

Page 1
HDMI Media Player Hard Disk
User Manual
PC/MAC
Page 2

2
CONTENTS
1. WARNINGS 4
2. INTRODUCTION 4
3. DEVICE PERFORMANCE 5
4. ACCESSORIES 7
5. USING THE DEVICE 10
6. INSTRUCTIONS FOR THE SOFTWARE SYSTEM 13
7. PLAY FUNCTION 18
8. DIGITAL COMPANION FUNCTION 22
9. HOST OUTPUT 23
10. FAQs 24
Page 3

3
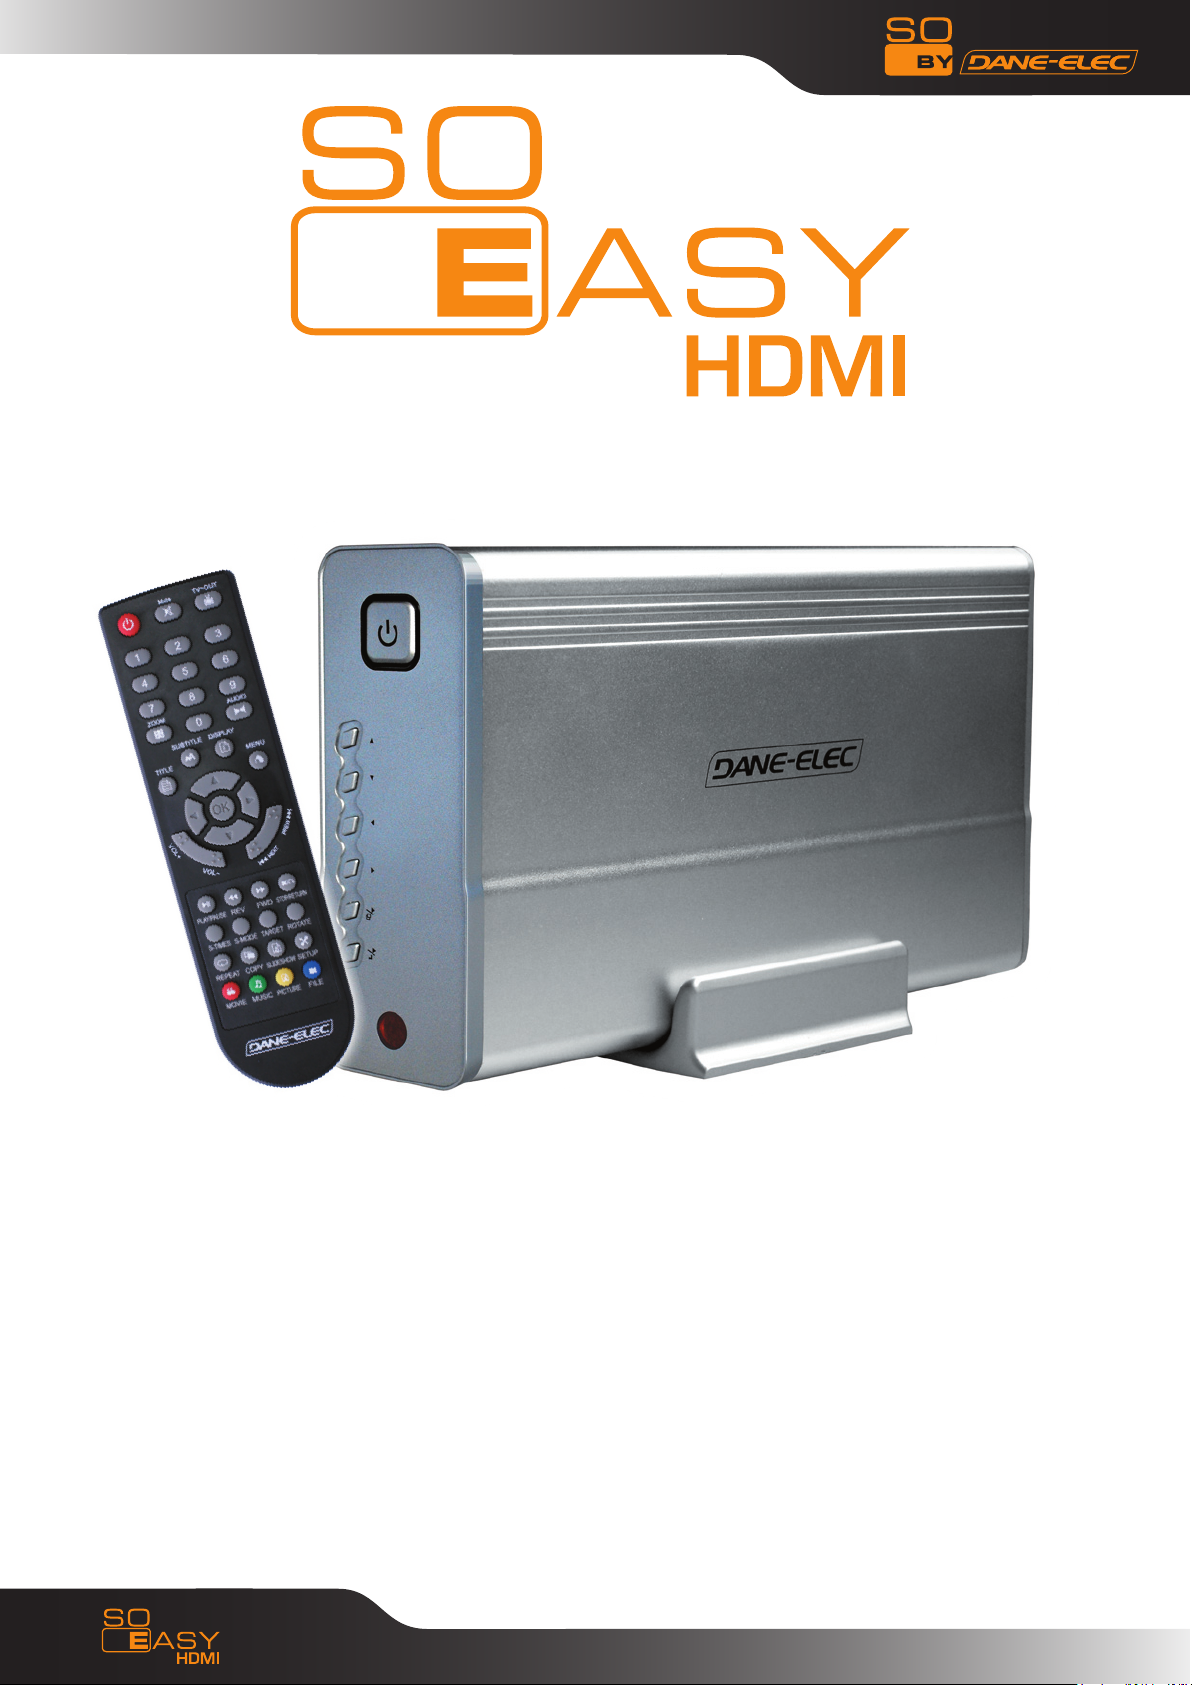
Thank you for choosing the So Easy HDMI multimedia player. For better use of this product, please
carefully read this user’s manual.
A national patent has been filed for the So Easy HDMI. Any imitation will be considered as counterfeit,
and the person responsible will have to assume the legal consequences.
The So Easy HDMI complies with the security standards pertaining to low voltage electronic devices, as
described in the Standard Part 15 Class B FCC American certification, and the certificate of the European
Union CE Standard EN55022 Class B, EN61000-6-3, EN61000-6-1.
The labels with the serial number on the product and its packaging are important guarantee information
and should be presented in the event of any repairs. The company will not perform any repairs if these
labels are damaged or illegible. Regarding the after-sales service, the guarantee covers a standard
exchange for up to seven days and repairs for 2 years.
The device cannot be used in all types of envrionment. After-sales service is applicable only if the
instructions have been respected and under the terms of the guarantee. The company cannot be held
liable for loss of data caused by the product.
For technical reasons, the company reserves the right to modify the product’s characteristics and
presentation without prior notice to the users.
Page 4

4
1. WARNINGS
1. Thanks for using So Easy HDMI ! Please read this manual carefully before you start to use it. In addition,
please keep this manual well.
2. The actual operations, controls and menu items might be different from this manual. The manufacturer
is not responsible for updating this manual immediately after a product change. Please consider the
product as standard.
3. Please do not personally repair or uninstall the unit. In the event of any damage caused to the unit
during repair or uninstallation, the free after-sales service warranty will be void.
4. Please use the unit under normal conditions. Keep it away from heat sources, high-pressure environments,
magnetic fields, loudspeakers, humid environments. Prevent water or chemical fluids from entering the
unit, as these will cause serious damage. While the unit is in operation, please do not lay heavy objects
upon it.
5. Please lay the unit flat when it is in operation. It is normal for the device to become hot during
operation.
6. Please use a power supply adaptor when you connect the unit to the TV, computer screen or other
multimedia output devices.
7. Please remove the battery from the remote control when no in use for a long period of time. When
the battery is flat, please replace with a new one of the same model. Please dispose of the used battery
carefully.
8. Please follow these steps to switch off the unit: press the stop button--press the power off button
(Blue led is on)--cut off the power supply. Please do not cut off the power supply while the unit is still in
operation, as this may damage the unit.
9. We cannot be held liable for any data missing while in use. Please make sure you back-up your work
or important data.
10. This manual describes the 3.5 inch HDD player’s standard functions. We are not responsible for updating
this manual immediately upon product change. Please consider the product as a standard. We apologise
in advance for any inconvenience this may cause.
11. Please connect your video outputs to your TV before switching on your device.
Warning: Do not format. Formatting will cancel your warranty. (Format original FAT 32)!
2. INTRODUCTION
So Easy HDMI is a light, multi-function product with a stylish design that can display files and stored
pictures, and play music and movies by connecting it to TV, projector, or monitor. It can be used for family
entertainment, office use, studying and travelling.
2.1 Multimedia Playback function: Can play your favourite movies and music in a more pleasant way by
connecting to your TV, projector or monitor. It is a new kind of living room entertainment.
2.2 Review family albums or picture collections with your TV. Enjoy your favourite picture slide-shows with
background music.
2.3 Mobile HDD function: can copy/rename/delete/create files or folders. Can make quick copies between
flash drives, card readers and hard disks.
Page 5
5
3. DEVICE PERFORMANCE
3.1 Characteristics :
1. The So Easy HDMI can store large quantities of video, music and photo data.
2. The So Easy HDMI can be connected to a Home Theatre. The So Easy HDMI can be used as a peripheral
storage device.
3. The So Easy HDMI is equipped with multiple ports for connection to a television or an amplifier.
4. The So Easy HDMI supports DVD navigation functions (it can read IFO format files)
5. The So Easy HDMI supports wide-screen display on a compatible television, as well as the multi-angle
and multi-language functions.
6. The So Easy HDMI can simultaneously display song lyrics and play audio files in MP3 and WMA format
(it supports LRC format files).
7. The So Easy HDMI’s casing is made of aluminium.
Page 6
6
3.2 Technical Specifications :
Hard disk
Storage devices
Host
Power adaptor AC power adapter
Specification
3.5" hard disk
FAT32
Read-write FAT32
Compatible with U-disk/MP3/HDD enclosure/card
reader.
Interface
Input interface
Power adaptor
Others
Formats supported
USB interface USB 2.0 high speed. Compatible for USB1.1
Audio output Analogue Stereo output, Digital Optical Coaxial output
Video output HDMI,Composite, Component-YpbPr
Optical
Indicator led Power led
Panel buttons Power,Up,Down,Left,Right and etc.
Input/output voltage
Power consumption USB Bus Power (max.500mA) ≤1000mA
Unit size 200 x 111 x 40mm
Working temeprature 5-45°C
Video format
Buttons on remote control: power on/off, play/pause,
setup, etc.
Input :AC 100-240V, 1.2A, 50-60Hz
Output :DC +12V/ 3A
Main Features
MPEG-1 : MPG.DAT
MPEG-2 : VOB
MPEG-4 : DivX 3,11 / 4.X / 5.X, XviD, MP4, AVI, DVD 5 &
DVD 9 (emulation), 720 x 576 p, PAL HDMI - 720 x 480 p
NTSC HDMI, 1080i
Audio format MP3, WMA, WAV, OGG, AC3
Picture format JPEG
E-book format TXT file
Subtitles Subtitles SRT, SUB, SMI format subtitles
Languages
Audio/Video
output
File management File management
French, English, Spanish, Italian, German, Dutch, Danish, Portuguese, Polish,
Greek, Turkish, Russian
Video output
Audio output
HDMI : Up to 1080i
CVBS : TV output (support NTSC/PAL/Multi.System)
YPbPr: Up to 1080i
Stereo audio output
Digital Optical:Coaxial
File copy, paste, delete, rename, new folder, properties,
cancel
Page 7

7
4. ACCESSORIES
#: Name Quantity
1 So Easy HDMI 1
2 AC Power Adaptor 1
3 Remote Control 1
4 AV Cable 1
5 Progressive scan video component cable (YPbPr) 1
6 USB Cable 1
7 Quick Startup Guide 1
8 Batteries 2
9 Holder 1
Remote control’s functions :
Button Function
Power
Mute
Tv Out
Turns the device On / Off
Plays / Mutes the sound
Selects TV Video output
480i, 480p, 720p, 1080i by NTSC TV Type
576i, 576p, 720p,1080i by PAL TV Type
Keypad
Choose a media file
Zoom
Zoom in/out (for photos)
Page 8
8
Audio
Change R / L audio Channels
Title
Subtitle
Menu
Navigation
button
Show Playlist for ISO files or video_TS files
a. When playing music and movie files, press
“Display” to show “Previous chapter”, “Next
chapter”. Press once more for “Off”
b. Press “Display” to show copy, paste,
delete, rename, new folder, properties, cancel
functions.
Go to Menu
Select item up, down, left or right
Press “OK”to confirm
Play/pause
REV
FWD
STOP/RETURN
S-Time
S-Mode
Target
Rotate
Increase or decrease the volume
Page up / down
Begin playback / confirm selection / pause
playback
Rewind
Fast forward
Stop playing, Return to previous step
Select Slideshow interval time (1, 3, 5, 10
seconds)
Select Slideshow transition mode between the
photos (14 Modes)
Destination of copy
Rotate selected photo
Repeat
Repeat mode
Page 9

9
COPY
Slideshow
One-key copy the external memory files to the
first FAT32 format partition
1. Press the button to directly play the pictures
and music in the hard disk’s music and picture
root directory menu.
2. a) Press the “slideshow” and “OK” or “Play/
Pause” button to play pictures and background
music in the root directory file menu
b) Press the “slideshow” button to select the
background music, then press “OK” to play the
pictures from the File menu.
Set up
Movie
Music
Picture
File
Remote Control Operation:
- Please insert the battery into the remote control before use. Please
change the battery when the remote control no longer functions.
- Please operate the remote control within 7 meters of the unit and
at a 60 degree angle. The surrounding brightness can affect the
remote control’s operating range.
Enter the OSD Setup menu
Press the button to enter the Movie menu.
All movie files are shown in the directory
structure
Press the button to enter the Music menu. All
music files are shown in the directory structure
Press the button to enter the Picture menu.
All picture files are shown in the directory
structure
Press the button to enter File menu. All the Files
are shown in the directory structure
Power supply
- Please use the AC power supply and make sure the socket is
compatible with the unit’s power requirements
- Do not use a different voltage, as this may damage the unit.
- Do not cut off the power while the unit is still in operation, as this
may cause serious damage to the hard disk. Please make sure that
the unit is in standby mode before cutting off the power.
- Please be aware that the unit still consumes power when in
standby mode.
Page 10

10
5. USING THE DEVICE
The default language setting on your So Easy HDMI is English. To change the language,
please follow the instructions below:
1) Turn on the So Easy HDMI
2) Access the Main menu
3) Press the SETUP button on the remote control
4) Go to “OSD language”.
5) Select your language.
6) Press SETUP to finish and exit the menu.
Page 11
11
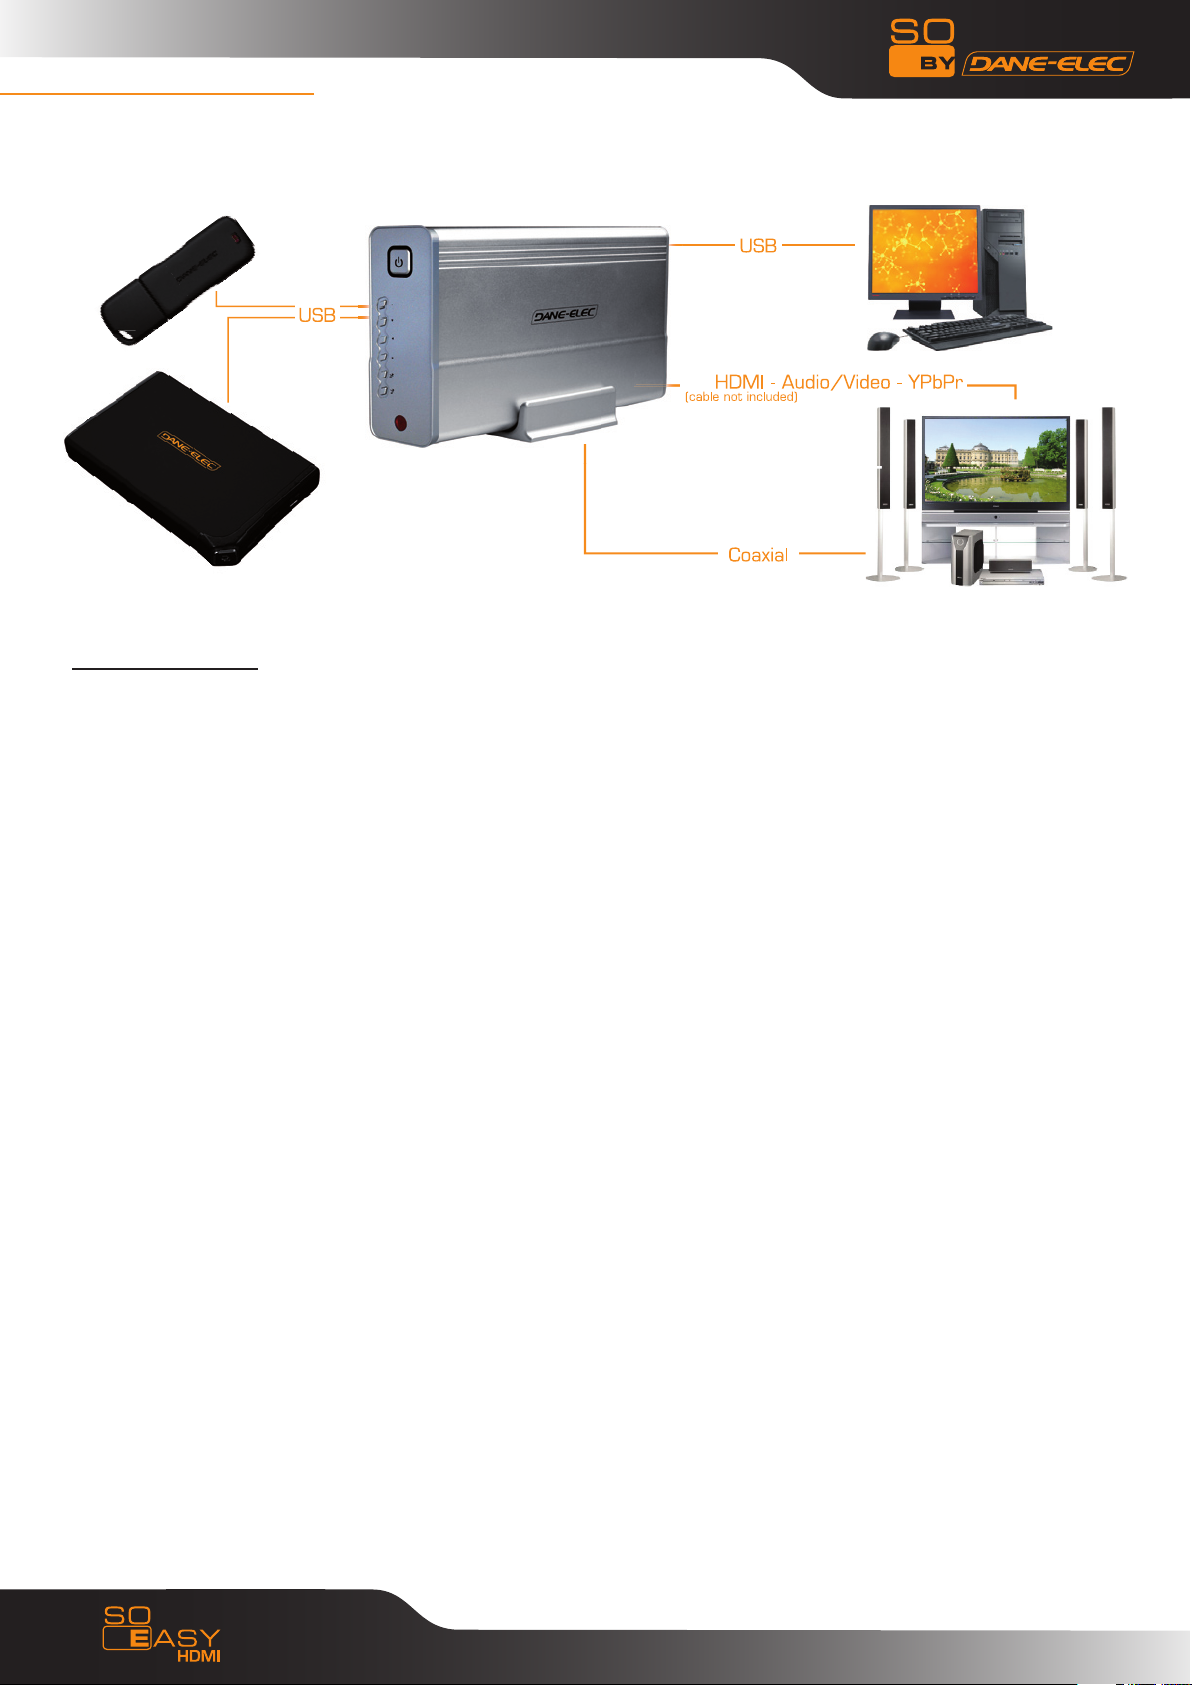
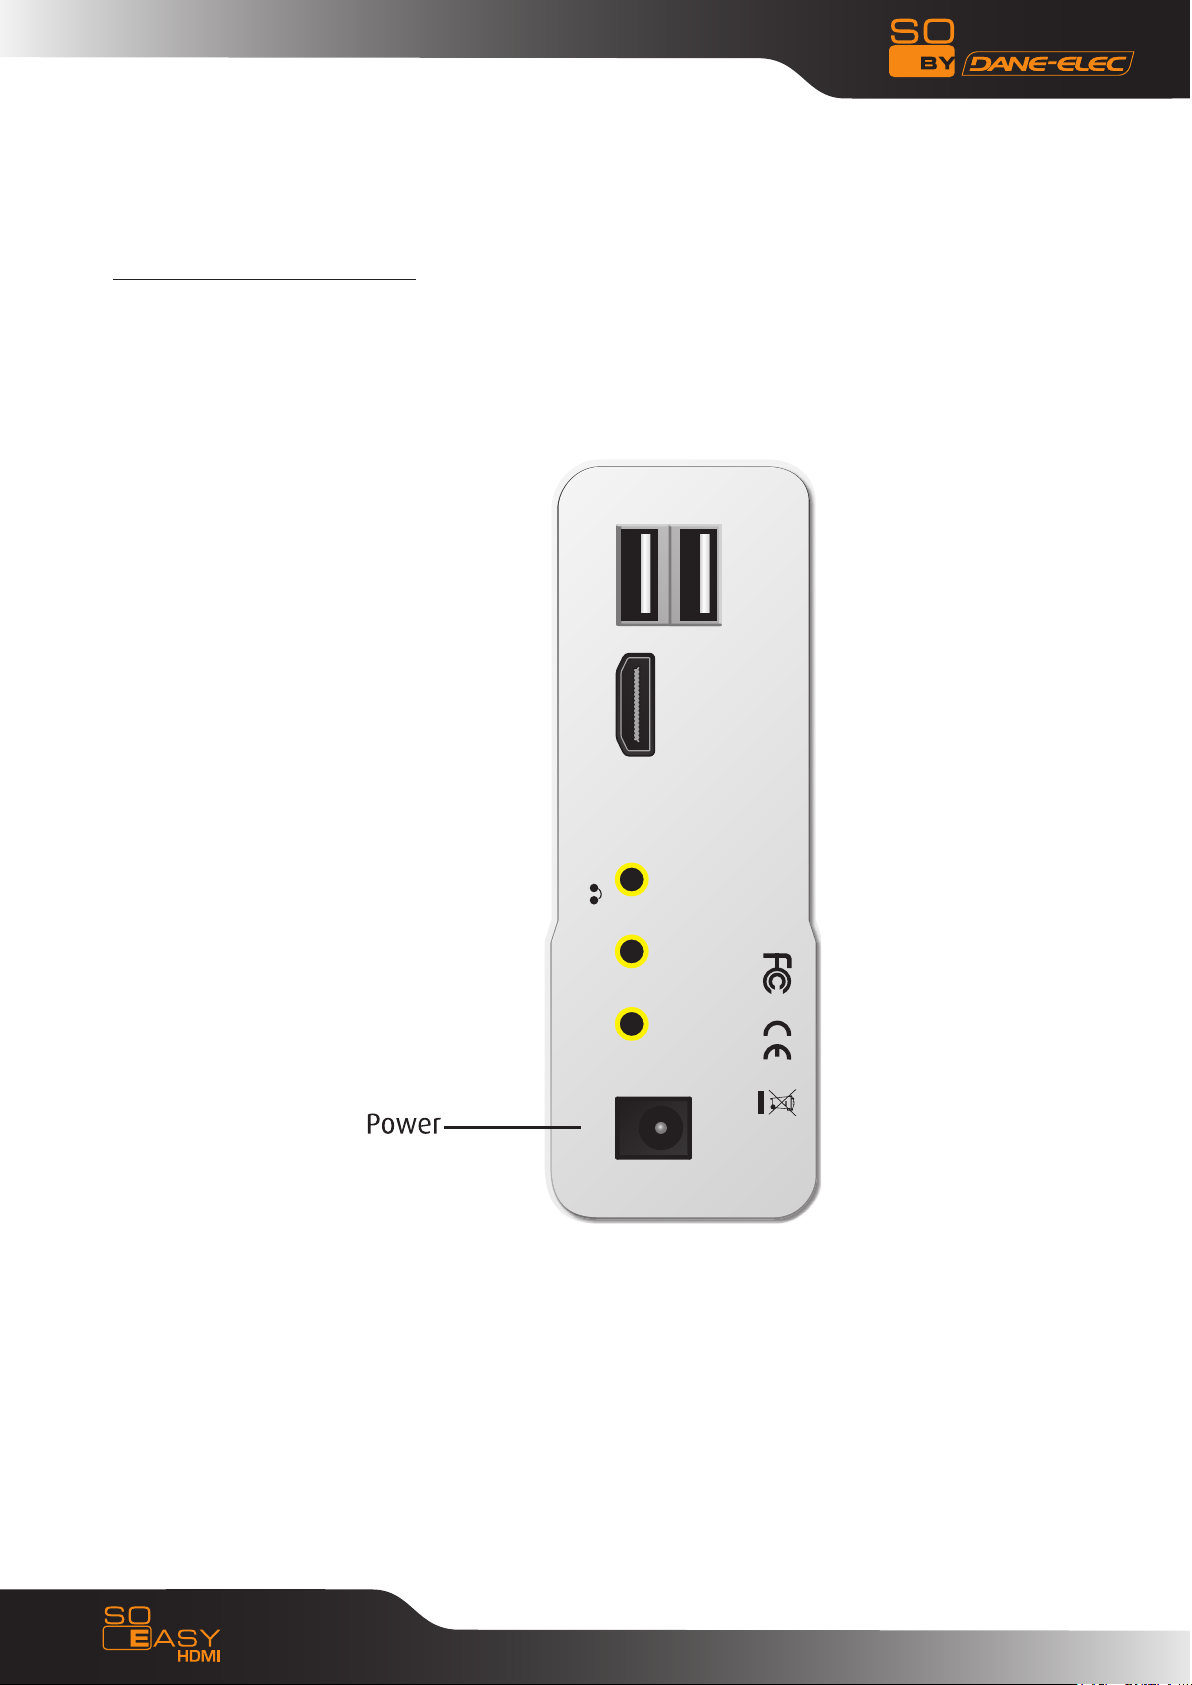
5.1 Connecting the device
Connect the unit to an AC power supply using the power adaptor. When the blue
led turns on, the device is ready to operate.
(PC) USB 2.0
HDMI
AV /
YPbPr
Coaxial
POW
USB-HOST
ER
Page 12

12
(PC) USB 2.0
HDMI
AV /
YPbPr
Coaxial
POW
ER
USB-HOST
AV Output mode
To use the AV output mode: select AV as the output mode for the television. Press the VIDEO key on the
So Easy HDMI remote to select AV (CVBS) OUT mode. The menu will appear on the television screen.
(PC) USB 2.0
HDMI
AV /
YPbPr
Coaxial
POW
ER
USB-HOST
YPbPr OUTPUT MODE (Progressive scan video component)
To use the YPbPr output mode: select YPbPr as the output mode for the television. Press the VIDEO key
on the So Easy HDMI remote to select YPbPr OUT mode. The menu will appear on the television screen.
You must also connect the AV cable (white and red) for sound since the YPbPr cable only transmits the
image.
Page 13
13
(PC) USB 2.0
HDMI
AV /
YPbPr
Coaxial
POW
ER
USB-HOST
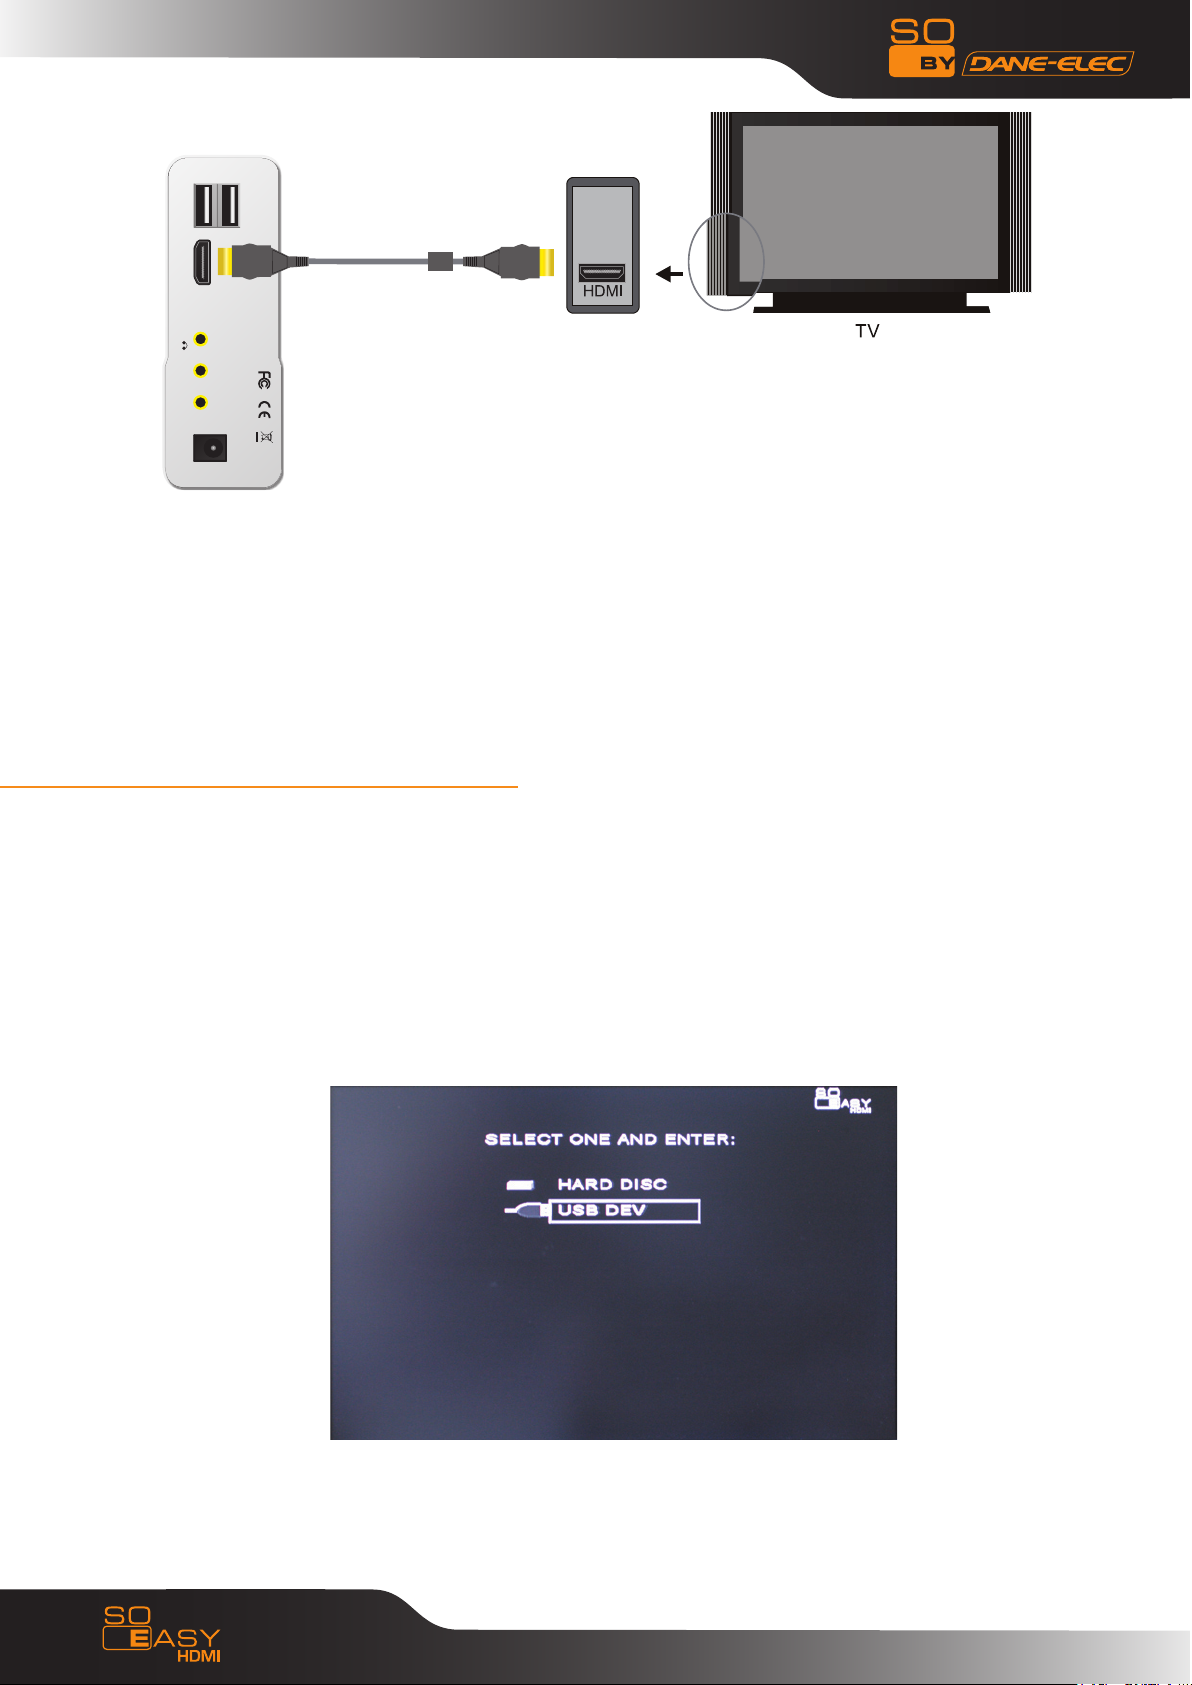
HDMI Output mode
To connect to a television and use the HDMI output: select HDMI mode, then press the VIDEO key on the
remote to switch to HDMI mode.
The menu will appear on the television screen. You must also connect the AV cable (white and red) for
sound since the YPbPr cable only transmits the image.
To connect to a HDMI monitor and use the HDMI output: press the VIDEO key on the remote to switch to
HDMI mode. The menu will appear on the television screen.
6. INSTRUCTION FOR YOUR SOFTWARE SYSTEM
Before beginning basic operation, please set up HDD player to your liking. The Setup menu enables you
to adjust the TV select the format, language etc. Once a setup is defined, the unit will operate with this
setup as default. Unless you reset the device, this setup will operate as default even in the event of a
power cut.
6. 1. Once he power and AV cables have been connected, press the Power On/Off button. The unit will
automatically begin data-reading, which is indicated by the blue led. Once reading is complete, the
screen displays a menu (see picture below). Use the directional keys to select the item of your choice,
then press the “Enter” button to confirm.
6. 2. Press the SETUP button on the remote control. The Setup menu appears on screen (see picture
below). Use the directional keys (up, down, left, right) to select the item of your choice, then press the
“Enter” button to confirm your highlighted selection. Press the “Exit” or “Setup” button to exit the Setup
menu.
Page 14

14
6. 3. TV type: the TV mode is originally set to “Multi system”. In the event that video images are fuzzy or
skip intermittently, please change the TV mode setup. For European countries, please select PAL.
6. 4. TV display: «4:3 P/S», «4:3 L/B» or «16:9 LARGE» are available.
6. 5. Video output: when your video output is connected to the TV by AV or Y.U.V. cable, change the setup
to CVBS or Ypbpr output.
Page 15

15
6. 6. Resolution: NTSC (480i, 480p), PAL (576i, 576p), 720p,1080i are available for your video outputs.
6. 7. Subtitle: select your preferred subtitle language.
6. 8. SPDIF Output: select SPDIF OFF, SPDIF/RAW or SPDIF/PCM to work 16
Page 16
16
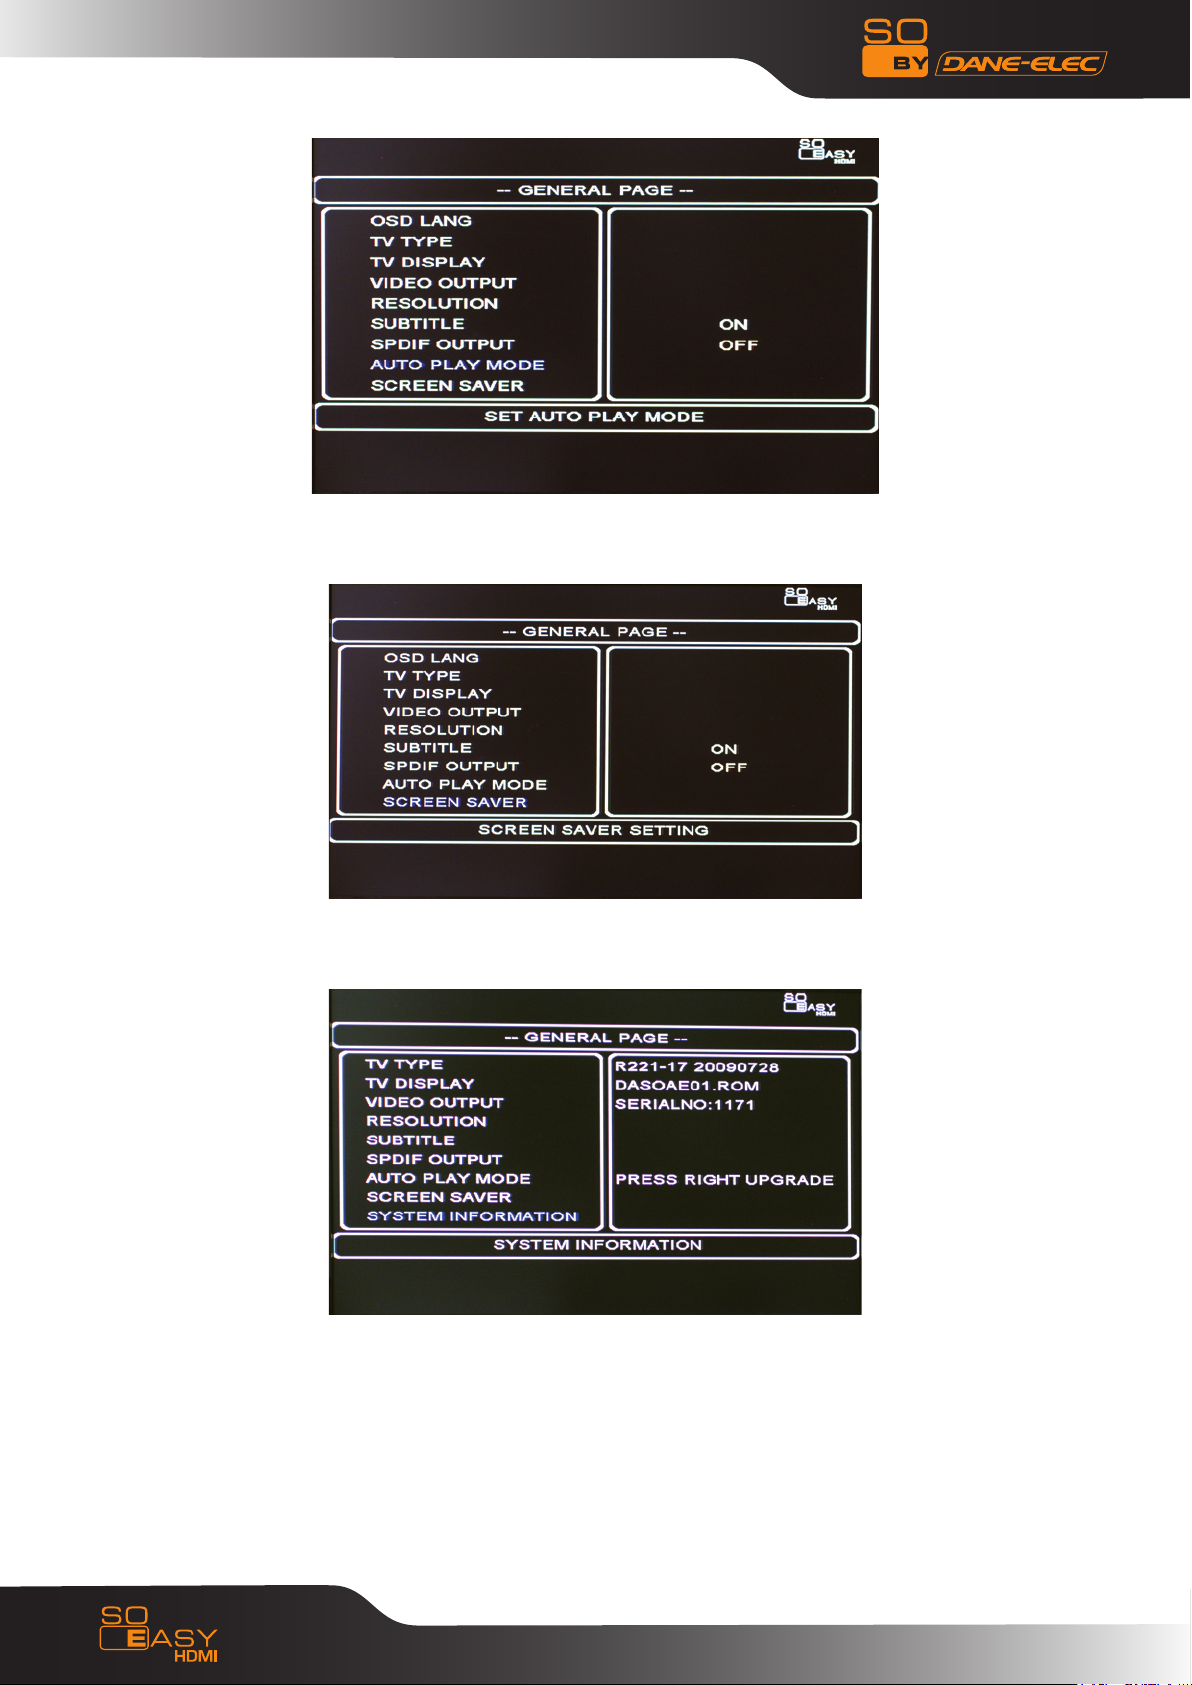
6. 9. Auto Play Mode: Auto Play ON and OFF to play files in the File menu directly when the unit is
powered up.
6. 10. Screen Saver: Screen Saver ON and OFF options.
6. 11.1 System Information: to view firmware version.
6. 11. 2. Software upgrade
The unit’s software can be upgraded. We will provide you with the newest software on our website or
through other channels. To obtain the most up-to-date software, please follow these steps:
a. Copy the software rom. file to the root directory of your USB Flash Drive or other external memory
device.
Page 17

17
b. Connect the USB Flash Drive to the unit via USB HOST. Enter the Setup menu. Select “System Information”,
press the “right” directional button on the remote control, and Press “OK” to start upgrading.
c. Once the upgrade is complete, the unit will restart automatically.
Please note: when upgrading, please do not cut off the power supply, as this could damage the unit.
Warnings:when updating, please don’t cut off power,otherwise the unit would both be damaged.
6. 12. Default setup: reset all settings to default.
6. 13. Exit setup: press the Setup button to exit the setup function.
Page 18
18
7. PLAY FUNCTION
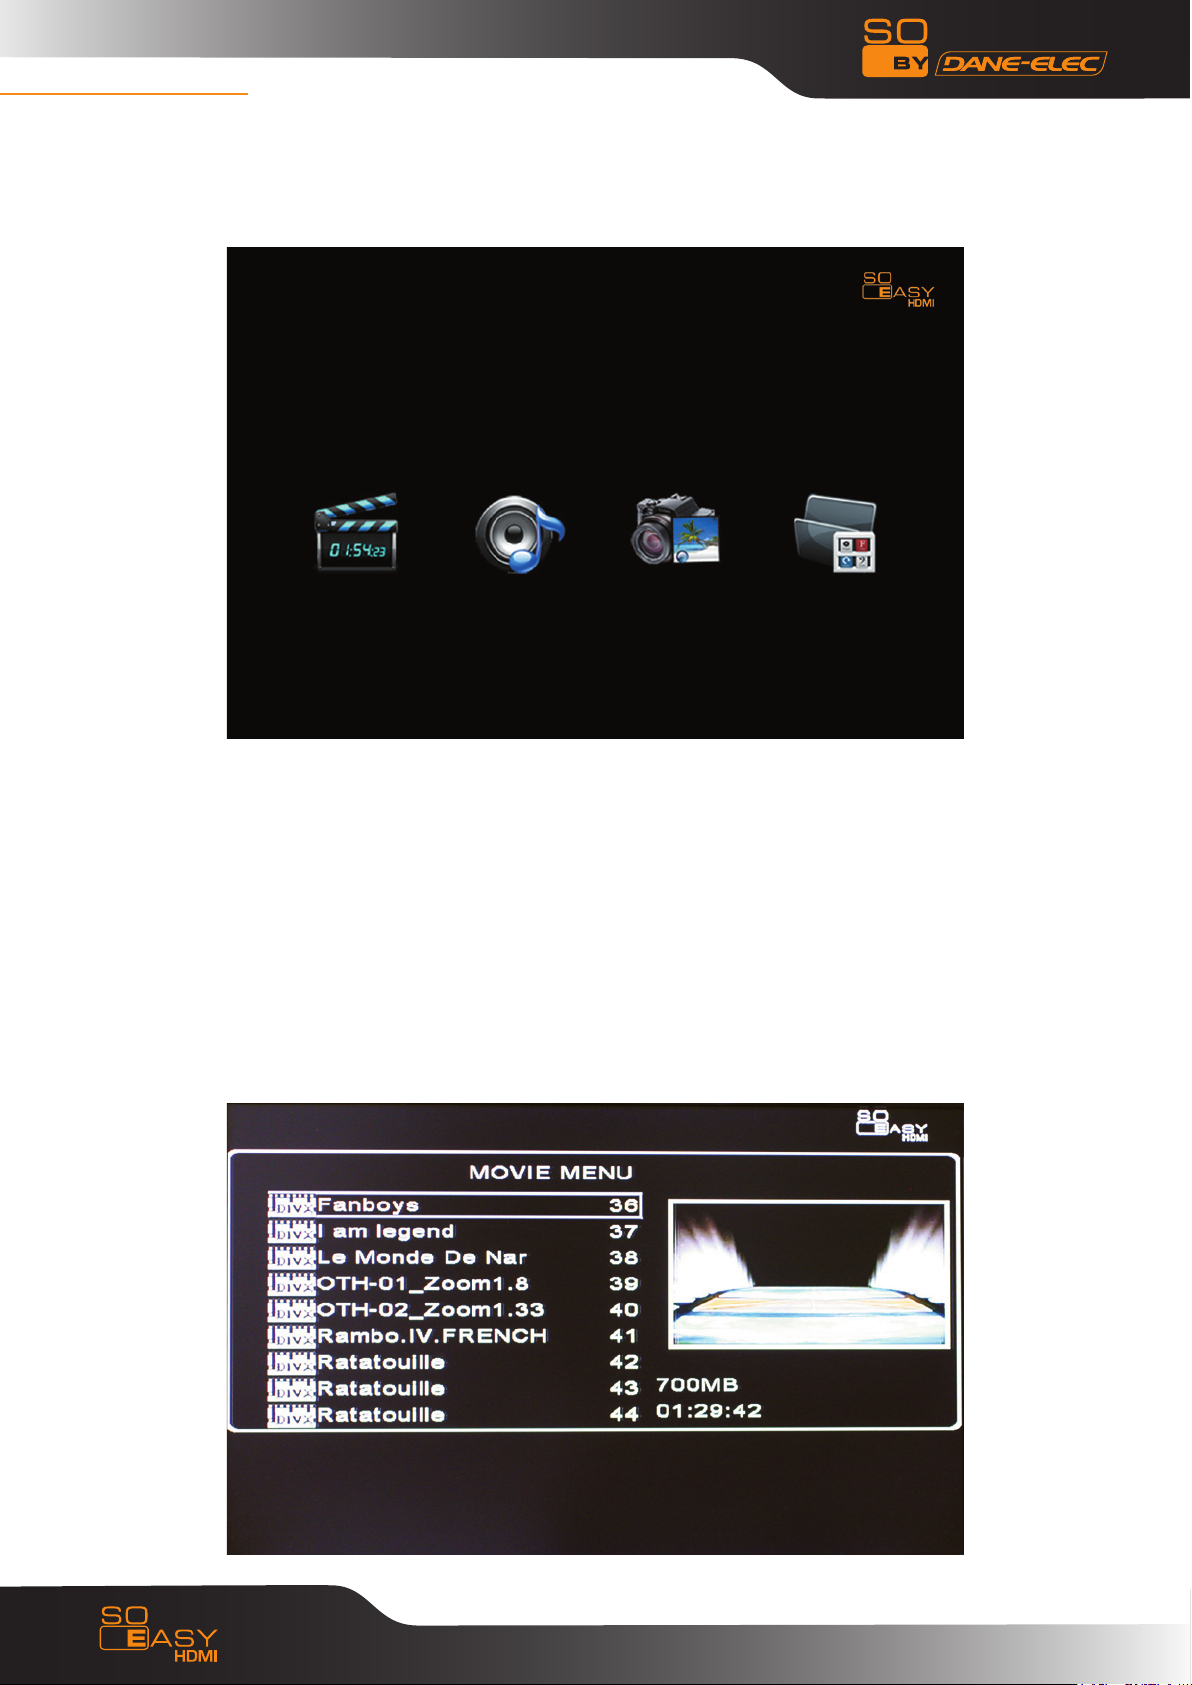
Select the hard disk or external memory in the first screen menu to enter a second screen menu as in the
picture below. Select the movie, music, photo or file you wish to start playing.
7. 1. Movie menu
By selecting Movie, the movie list appears with a preview of the selected film in the right-hand window.
When the film is playing, you can choose the previous and next film by pressing “PREW” and “NEXT” keys
on the remote control. Press the Fast Forward or Rewind buttons to fast review the movie backwards or
forwards at speeds of 2X, 4X, 6X, 8X or 16X. When playing the Movie, press the “Zoom” key with the
“FWD” or “REV” key to zoom in or out. Press the “Display” key of the remote control to choose “Previous
Chapter”, “Next Chapter” and “OFF”. Then press “OK”. By pressing the “S-mode” button on the remote
control, you can choose “Equalizer on”, “Equalizer off” and “OFF”. The Music mode can be set to Personal,
Standard, Classical, Jazz, Rock, Pop, Ballad and Dance. The default setting is Standard. When playing DVDs,
it is possible to switch between R & L audio channels or stereo sound.
Page 19

19
7. 2. Music menu
By choosing Music, the music list appears and starts to play. If you select one song and press the “S-mode” key on the remote control, the Equalizer menu will appear. The subtitle file with the same name
as the song will play automatically. When the Music is playing, press the “Display” button to choose
“Previous Chapter”, “Next Chapter” and “OFF”. By pressing the “S-mode” button on the remote control,
you can choose “Equalizer on”, “Equalizer off” and “OFF”. The Music mode can be set to Personal, Standard, Classical, Jazz, Rock, Pop, Ballad and Dance. The default setting is Standard. If the Slide Show option
is selected, the music will be played in the background automatically.
7. 3. Photo menu
By selecting Picture, the picture list will appear with the preview of the selected picture on the right. If
you wish to zoom into a picture while browsing, press the “zoom” and “FWD” or “REV” keys. Press the
“Rotate” key to rotate the picture. When playing a picture, press the “S-TIME” key to Select Slideshow
interval time (1, 3, 5, 10 Seconds). Press the “S-MODE” key to select the slideshow transition mode
between the photos (14 Modes). If the Photo slideshow is selected , the picture and background music
will play automatically.
WARNING: when 1080i output is selected, the Zoom, Rotate and S-mode functions are not available.
Page 20

20
7. 4. File menu
Select FILE in the menu. Enter the target hard disk’s file list and select the file you wish to play. You
can press Display on the remote control to complete “copy”, “paste”, “delete”, “rename”, “create new
folder”, “show properties”, and “cancel” operations, by pressing the “up” and “down” directional keys on
the remote control. In the File menu, you can select the Movie, Music, Picture and Slideshow functions.
Display function
7 .4. 1.Copy: copy files to destination.
7. 4. 2. Paste: paste to move files
Page 21

21
7. 4.3.Delete :delete files
7. 4. 4.Rename: rename file’s name.
7. 4. 5.New Folder: create new folder
Page 22

22
7. 4. 6.Properties : show properties
7. 4. 7.Cancel : cancel the operation or push the Display button to exit
Page 23

23
8. DIGITAL COMPANION FUNCTION
Copy Function
8. 1. One Button Copy Function
The unit can copy files from an external memory device (such as a card reader, USB Flash Drive and more)
to the FAT32 partition of the internal Hard disk. It will automatically create a folder (such as “USB 001”)
for the external file copied.
8. 2. Copy function under the Display menu
Press the “Target” button to select the copy destination. Select the file to be copied and press the
“Display” button. Choose “copy” in the Display menu and press “OK”.
9. HOST OUTPUT
The device is capable of connecting external USB storage devices such as U-DISK, card reader, MP3&4,
hard disk, etc.
It can also read and play whatever is stored in those external devices.
Page 24

24
10. FAQS
Q1: The unit gets hot when in operation. Is this normal?
A: It is quite normal for the unit to release heat. Please make sure nothing is covering the unit, preventing
it from releasing heat normally.
Q2: I have connected my device to a power supply but the indicator light remains off and the unit is not
working.
A: Check the power cable to see if it is damaged. Also check whether you have connected the unit
properly to the power supply. Finally, check that the power supply is switched on or is live, and that there
isn’t a power cut.
Q3: The power indicator light is on but the unit isn’t working.
A: Your operating procedure might be incorrect. Please reconnect to the power supply or switch the power
key on the device’s panel off and on again.
Q4: When I switch the unit on, no image is displayed, there is no colour strip or it is fuzzy.
A i. Please check whether the AV cable is properly connected.
ii. The unit’s video output mode doesn’t match the display mode. Please press the “TV Out” key and select
the correct mode.
ii. The display’s video input mode is incorrect. Please select the right mode (Video or AV).
iv. The AV cable is not connected properly. Please reconnect it.
Q5: I have connected the device but there is no sound.
A: The audio cable is not connected properly. Please reconnect it. There might also be a problem with the
original audio file.
Q6: The picture quality is poor.
A: Switch the unit off and reset the TV or display format to NTSC or PAL. The poor picture quality might
also originate from the original video file.
Q7. The remote control doesn’t work.
A: i. The remote control’s battery is flat. Change the battery while making sure you are using the correct
battery type.
ii. The battery is fitted properly. Please re-insert it.
iii. The remote control is being operated too far from the unit or from to open an angle. Please move
closer to the unit and operate the remote control within a 7m radius and at a ±30degree angle [NOTE – 60
degrees in the Remote Control section].
Page 25

25
iv. The remote control will not operate correctly unless it is being pointed at the unit.
v. There is an obstacle between the controller and unit. Please remove the obstacle and operate again.
Q8. My computer can’t read the hard disk
A: i. If this is the first time you are using the unit, please format it first. [NOTE – the WARNINGS section
specifically say NOT to format the unit].
ii. If this is the first time you are using the unit, the Master & Slave cable may not be selected correctly.
Please select Master Hard disk.
iii. If the computer USB can’t provide enough power supply, the hard disk will be noisy. If so, please check
whether the Computer’s hardware is upgraded or not. You may also purchase USB2.0 HUB to solve this
problem.
Q9: Films downloaded from the Internet are mostly in .rm/.rmvb format, which are not supported by the
unit
A: So far, only PCs, PDAs, and mobile phone PDAs with Windows/WinCE/Linux operating systems are
capable of playing real media files. Using the winAV17/Wismencoder super transfer 2.7 software can
solve this problem.
Q10: I have downloaded a DivX movie and its corresponding subtitles. How do I open the subtitle file
when I watch the movie?
A: Please ensure the subtitle and movie files have the same file name and are stored in the same folder.
Once this is done, the movie will play with its corresponding subtitles. This unit only supports subtitles in
SRT, SUB format. Other formats must be transferred [to what?].
Q11: I can not change the video output in the Setup menu.
A: When you connect the HDMI cable to the TV (whether you use HDMI output or not), you cannot change
the video output mode in the Setup menu. Video output can only be changed in the Setup menu when
no HDMI cable is connected to the TV.
Page 26

www.danedigital.com
www.dane-elec.com
 Loading...