

Page 1
0
Page 2
Note: Please recharge the MP4 player before using it!
Please use your MP4 player properly in case of explosion, fire, electric shock, etc.
1.Do not repair the player by yourself, or it will cause damage.
2.Do avoid getting the MP4 player wet or drop it in water.
3.As U-disk, it will be write-protected if you switch the【HOLD 】button to “Lock”
position.
4.Please backup important data onto your personal computer as repair or other
causes may result in data loss.
When using your MP4 player, pay attention to your health, especially the power of
hearing.
1.Do not use the earphones while driving or riding a bicycle.
2.It may cause traffic accident if you turn up the volume of the earphones while
walking down the street.
3.Do not turn up the volume too high, doctors warn against prolonged exposure t o
high volume.
4.Stop using the device or turn down the volume if you have ringing in your ears.
5.Always use the accessories provided by or approved b y our company, also do
not spray water on the player.
1
Page 3

Function features
The player supports MP3/WMA/WAV/OGG/APE/ACT/ASF format music files.
Including WMA files with DRM (Digital Rights Management) function.
Support USB 2.0 capability, much faster than USB 1.1, to enable faster
communication with your PC.
The player can record outside voice and FM radio.
The player has repeat functions.
The player has Video Playback, Photo Viewer, FM transmitter, E-book functions,
etc.
The player can power off automatically after a preset time.
2
Page 4
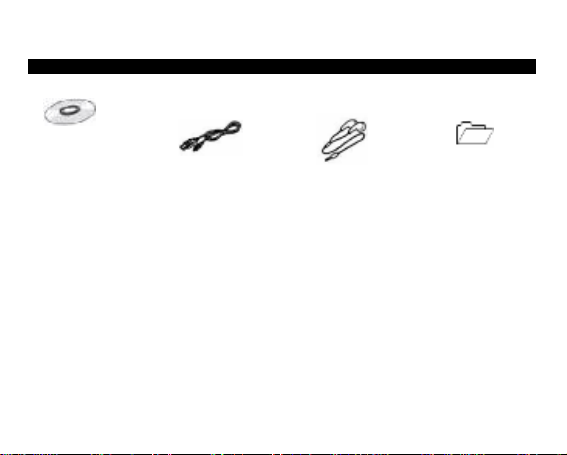
Accessories
Installation CD USB Cable Earphones User Guide
3
Page 5
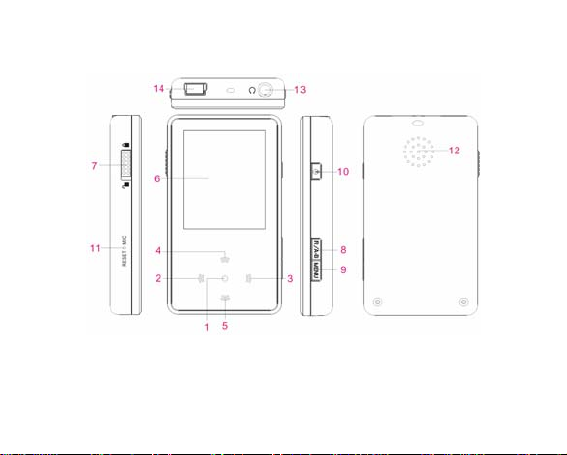
Components and button functions
1. Play/Pause/Confirm 8. Record/A-B repeat
2. Backward/Previous one 9. MENU button
3. Forward/Next one 10. Power on/off
4. Volume up 11. RESET/Microphone
5. Volume down 12. Speaker
4
Page 6

6. LCD display 13. Earphone jack
7. LOCK button 14. USB port
HOLD button All buttons are disabled if you switch HOLD button to “LOCK”
position.
This is helpful when you are doing sports, like walking, jogging, etc.
RESET hole & Microphone
You can reset the system setup of your MP4 player by pressing the RESET hole for 2
seconds.
It is used for recording the outside voice or FM radio while the player is playing record
function.
Charging Li –polymer battery safely
1. Connect the PC USB port and the player USB port with the provided USB cable.
2. The power sign is shown dynamic when charging, once f ull charged, the power
sign will stop moving, power is full, please shut off the power. The charging time is
approximately 2.5 hours.
3. To stop recharging, disconnect the USB cable.
Notes
z Before your first time use, please recharge your MP4 player.
z Your computer must be turned on while connected to your player for charging.
z Do not overcharge your player, or it may shorten the battery’s life.
z The times of charge/discharge are no less than 300 cycles.
CAUTION
1. Danger of explosion if battery is inc orrectly replaced. Replace only with the same
5
Page 7

or equivalent type.
2. Do not disassembl e, crush, short-circui t or incinerate your batte ry as it may cause
fire, injury, burns, or other hazards.
3. The li-polymer battery is consumptive material, so recharge it semiannually is
needed even if the player is not be used.
Basic operations
Turn power on and play music
To Start:
1. Connect earphone to earphone jack.
2. Switch HOLD
3. Press and hold
4. Touch
5. To return main menu: press and hold MENU button.
To pause/play: Touch
To change tracks: Touch【
To turn unit off: Press and hold
Volume Adjustment:
In music playing, Voice, FM tuner or Movie mode,touch【
turn down volume.
Menu Navigation
button to unlock position.
button to turn power on.
switch to play music.
switch.
】switch.
button.
】switch to turn up or
6
Page 8

MENU button: Enter main menu, submenu or return.
Skip button (【
Play/Pause button
1. Press and hold MENU button to enter main menu.
2. Touch【
Play, Radio, Picture, Text, Browser, Setting).
MUSIC
】/【 】): Shift menus.
: Play, Pause, or confirm.
】switch to select your desired option (e.g. Music, Movie, Record,
Press and hold button to turn unit on and touch【 】/【 】 to select “MUSIC”
mode, then touch
Music Playback Submenu
Touch
touch【
Tempo rate, Replay mode, Change mode, List mode, Favourite, DIR navigation,
Bookmark, FFREV speed setting, FFREV sound setting, Exit.
Repeat
1. Select Repeat and short press
2. Short press【
switch to enter.
to play music file, short press MENU button to enter into submenu and
】switch to select your desired Mode (Repeat, Equalizer, SRS WOW(﹡)HD,
button to enter.
】buttons to select your desired option (e.g. Normal, Repeat one,
Folder, Repeat folder, Repeat All, Random, Intro).
3. Short press
Equalizer
1. Select Equalizer and short press
button to confirm.
button to enter.
7
Page 9

2. Short press【 】buttons to select your desired option (e.g. Natural, Rock, PoP,
Classic, Soft, Jazz, DBB).
3. Short press
SRS WOW(﹡)HD
1. Select SRS WOW(﹡)HD and short press
2. Short press 【
WOW(﹡)HD,SRS WOW, User setting, Disable SRS WOW(﹡)HD).
User setting: Short press【
DEFINITION, Speakersize, Limiter, Exit. Press
as your opinion.
SRS 3D:Adjust the effect of horizontal surround, press【
TruBass: Adjust DBB effect, press【
FOCUS: Adjust the effect of vertical surround, press【
3. Short press
WOW, SRS and
WOW technology is incorporated under license from SRS Labs, Inc.
Tempo rate
1. Select Tempo rate and short press
2. Short press【
3. Short press
Replay mode
button to confirm.
button to enter.
】 buttons to select your desired option (e.g.SRS
】to select: SRS 3D, TruBass, FOCUS, CENTER,
to enter and press【 】 to setup it
】button to adjust it.
】button to adjust it.
】button to adjust it.
button to confirm.
are trademarks of SRS Labs, Inc.
button.
】buttons to select your desired option.
button to confirm.
8
Page 10

1. Select Replay mode and short press button to enter.
2. Short press【
Change mode
1. Select Change mode and short press
2. Short press【
3. Short press
List mode
1. Select List mode and short press
2. Short press【
Exit. Short press
3. Short press【
Favourite
1. Select Favourite and short press
2. Short press【
favourite, Exit. Short press
DIR navigation
1. Select DIR navigation and short press
2. Short press【
3. Short press
Bookmark
1. Select Bookmark and short press
2. Short press【
】buttons to select: Replay, Replay times, Replay gap.
button.
】buttons to select: File mode, Folder mode.
button to confirm.
button to enter.
】buttons to select: Title list, Artist list, Album list, Filename list,
button to enter.
】 buttons to select music file and press button to play.
button to enter.
】buttons to select: View favourite, Add favourite, Delete
button to enter.
button to enter.
】buttons to select your desired file.
button to play.
button to enter.
】buttons to select: Bookmark select, Bookmark delete,
9
Page 11

Bookmark add, Exit. Short press button to enter.
FFREV speed setting
1. Select FFREV speed setting and short press
2. Short press【
16X speed.
3. Short press
FFREV sound setting
1. Select FFREV sound setting and short press
2. Short press【
3. Short press
Note: The player supports lyric synchronization, in music playback mode,
press and hold【MENU】button until the lyric is displayed on the screen.
Music Pause Submenu
In music pause mode, short press【MENU】button to enter submenu and short press
【
】buttons to select your desired mode (e.g. Playlist, Artists, Album, Genre,
Composers, License inf. Local folder, Delete file, Delete all, Fade in/fade out time, Exit.)
PLAYLIST, ARTISTS, ALBUM, GENRE, COMPOSERS, LICENSE INFO AND L OCAL
FOLDER: You can select your favorite music by these divisions.
1. Select the submenu and enter by pressing
2. Press the【
Note: Synchronize music file into your MP3 player in MTP mode first, then you can enter
】buttons to select:.1X speed, 2X speed,4X speed, 8X speed,
button to confirm.
】buttons to select: No sound, Have sound.
button to confirm.
】button to select and button to play.
button to enter.
button to enter.
button.
10
Page 12

the folder: ”Play List”, “Artists”, “Album”, “Genre”, “Composers”, ”License info”.
DELETE FILE AND DELETE ALL: You can delete file or all files by the operation of
this unit.
1. During your music playback in pause mode, you can get in this option to delete
unwanted file.
2. Press the【
Fade in/fade out time: press【
Movie
In order to play video files in this digital player, you must change the video files into
AMV format.
Play AMV Video files
1. In main menu, short press【
pressing
2. Short press【
press【
3. Short press
Delete file, Delete all, Repeat, Exit. press【
to enter.
Local folder: press【
Delete file: Short press【
No or Yes.
Delete all: Short press
】button and button to confirm YES or NO.
】to select: Fast, Normal, Slow. Press to confirm.
】button to select “Movie“ mode and enter by
button.
】button to select your desired file, short press to play, short
】button to turn to previous/next one.
button to pause, press【MENU】to enter submenu: Local folder,
】button to select and then press
】button to select video file and then press to play.
】to select your desired video file and press to select:
to select: No or Yes.
11
Page 13

4. Press and hold【MENU】to return to main menu.
Note: 1. In movie play mode, hold and press【
volume.
2. Movie mode do not support fast forward/fast backward function.
RECORD
1 In main menu, short press【
pressing
2 Short press【MENU】button to enter submenu: Local folder, REC type, Record gain
set, Exit. Short press
REC type: Short press【
Record gain set: Short press【
3 Short press【
button to pause.
4 Short press【MENU】button to save the recorded file.
5 Long press【MENU】to return to main menu.
NOTE: You can also long press【R/A-B】button to start recording in any mode, and long
press【MENU】to save the recorded file and exit.
Play
1 In main menu, short press【
pressing
2 Press【
button.
】/【R/A-B】button to start to record, short press【 】/【R/A-B】
button.
】button to select the recorded file and short press【 】button to play,
】button to select “Record“ mode and enter by
button to enter.
】button to select: Fine REC, Long REC.
】to adjust it and then press 【 】button to confirm.
】button to select “Play “ mode and enter by
】to turn up/turn down the
12
Page 14

short press【 】button to pause.
3 In playback mode, short press【MENU】button to enter submenu: Repeat, Tempo
rate, Replay, Exit.
4 In pause mode, short press 【MENU】button to enter submenu: Local folder, Delete
file, Delete all. Exit.(this part please refer to <music playback/pause submenu>)
5 Long press【MENU】to return to main menu.
Radio(Optional function)
1. In main menu, short press【
button to enter.
2. Short press【
of 0.1MHz),short press【MENU】button to enter the submenu: Save, Delete, Delete
all, Auto search, Exit.
Save: Press
Delete: Select the preset band, then short press MENU to enter the submenu, select
Delete and then short press
Delete all: Select Delete all and press
Auto search: Short press【MENU】button to enter submenu. Short press【
button to start “Auto Search”. You may need to wait several minutes to let all
detectable stations be found and saved.
3. In normal mode, short press
4. Long press【MENU】to return to main menu.
】button to tune FM frequency from 87.5 to 108MHz(At intervals
to save the station.
】buttons to select “Radio“ mode, and short press
to delete the preset band.
button to delete all saved band.
】and
button to switch to preset mode.
13
Page 15

Picture
1 In main menu, short press【
pressing
2 Short press【MENU】to enter submenu: Local folder, Playback set, Delete file,
Delete all, Exit. Short press【
Local folder: Short press【
to browse.
Playback set: Short press【
to enter.
Delete file: Short press【
No or Yes.
Delete all: Short press
3 Short press and hold【MENU】to return to main menu.
TEXT
1. In main menu, short press【
pressing
2. Short press【
enter submenu, press【
Exit. short press
Local folder: Short press 【
browse. In manual play mode, short press【
button.
to select: No or Yes.
button.
】to select your desired file and short press【MENU】button to
to enter.
】buttons to select “Picture” mode and enter by
】to select and short press to enter
】button to select your desired photo file and press
】button to select: Manual play, Auto play. Short press
】to select your desired photo file and press to select:
】buttons to select TEXT mode and enter by
】to select: Local folder, Playback set, Delete file, Delete all,
】button to select your desired text file and press to
】to turn to previous or next page. short
14
Page 16

press【MENU】button to enter the submenu: Bookmark select, Bookmark delete,
Bookmark add, Exit.
Playback set: Short press【
to enter.
Delete file: Short press【
or Yes.
Delete all: Short press【
3. Short press【MENU】button to return to previous menu, press and hold【MENU】
to return to main menu.
Note: the E-BOOK function only can browse .TXT files.
Browser
1. In main menu, short press【
button.
2. Short press【
3. Short press【
photo files, recorded files and TXT files, etc)
4. Short press
5. Press and hold【MENU】button to return to main menu.
Setting
1. In main menu, short press【
pressing
button to confirm and play the selected file.
button.
】button to select: Manual play, Auto play. Short press
】to select your desired text file and press to select: No
】to select: No or Yes.
】buttons to select browser and enter by pressing
】buttons to select Local folder and then press to enter.
】to choose your desired file(including Video files, music files,
】buttons to select “Setting“ mode and enter by
15
Page 17

2. Short press【 】buttons to select the submenu: System time, LCD set,
Language, Power off, Replay mode, Online device, Memory info, Firmware
version, DRM time, Ear friendly set, Key tone, Remove MTP info. FM TX. Speaker,
Exit.
3. Short press
System time:
Short press【R/A-B】and【
to save your setup.
LCD set:
Short press【
button to enter the next submenu.
】button to adjust the time. then press button
】button to select: Dark mode, Exit. Select Dark mode and press
button to enter, so press【 】to adjust it.
Language:
1. Select language mode and short press
2. Short press【
3. Short press
Power off:
Short press【
button to confirm.
Replay mode:
Short press【
Online Device:
Short press【
】to select your desired option.
button to confirm.
】button to enter to adjust Off time or Sleep time, short press
】to select Manual replay or Auto replay.
】button to select “Media Device” or “USB Disk”.
button to confirm.
16
Page 18

Other settings menu options:
Memory info.– It shows the internal memory information.
Firmware version -- You can scan the firmware version.
DRM Time –It displays DRM Time.
Ear friendly set– Select it and press
button to select: Ear friendly, Ear friendly level.
Key Tone:
Select it and press
Remove MTPinfo:
Select it and press
Notice
1. Please setup the HOLD
2. Attention should be drawn to the environmental aspects of battery disposal.
3. Our packages use cardboard, polyethylene, and do not use any unnecessary
materials
4. Can’t identify the sixth and above sixth level of directory.
5. As U-disk, the disk will be write-protected if you switch the hold to lock position.
6. The user guide is only for reference. It is standard by the sample.
7. The contents of our Installation CD had been detected by the following
anti-virus software:
Norton Antivirus VER:15.0.0.58
Kaspersky VER:7.0.0.125
PC-Cillin VER:16.00.1671
McAfee VirusScan Plus VER:12.0
Symantec Antivirus VER:10.0.1.1000
button to enter, then you can adjust it.
button to confirm.
button to enter, then you can short press【 】
button in “unlock” mode before using the player.
17
Page 19

Technical Specification
No. Name Description
Capacity of Flash
1
Memory
2 USB Interface USB2.0 (High Speed)
3 LCD Display 1.8’ TFT (128X160)
4 Power supply Li-Polymer
5 S/N ratio
6 Audio Frequency Range 20Hz – 20kHz
7 EQ
8 Decoding Format
9 FM
10 File System FAT16, FAT32
11 Operating Moisture 10%—75%
Operating Temperature 5OC ----35 OC (41 OF---95 OF)
12
Build-in Flash Memory, up to 16G.
≥85dB
Nature, Rock, Pop, Classic, Soft, Jazz, DBB,
SRS WOW(﹡))HD
Audio:MP3/WMA/WAV/OGG/APE/ACT/ASF
Video: AMV
Picture: BMP/JPG/GIF
87.50 ---- 108.00MHz(Normal)
30 Station preset support
18
Page 20

Be care full : exposure to excessive sound level can be have the adverse effects
(Product Warranty 1 year, accessories 7 days)
MADE IN CHINA
 Loading...