

Page 1
SL Version
Portable Media Player
Portable Media Player
Dane-Elec_MiniPlayer SL_manual
donderdag 29 november 2007 12:13:04
Page 2
Welcome
Thank you for purchasing the product.
Please read the manual carefully before use.
We recommend you to keep it for future reference.
Getting Started
1
3
Welcome to DaneDigital website!
The DaneDigital home page provides the overview of company and products,
other related information, and answers to common questions.
Firmware and software updates are also available as well as the most recent
information about your Meizu by Dane-Elec product.
www.danedigital.com
Dane-Elec_MiniPlayer SL_manual
donderdag 29 november 2007 12:13:06
Page 3
5
Table of Contents
Table of Contents
7
8
9
10-11
12
13
14-16
17-19
20
21
22-23
24
Important Cautions
Copyright Notice
Product Features
Package Contents / Parts and Names
Protection Film on the Player
Touch Keypad
LCD Display
1. Getting Started
2. Basic Operation
Connecting Mini Player
Using for the First Time
Installation CD
Downloading from the PC
Saving Files & Disconnecting to Your PC
25-27
28-29
30-31
32-33
34-35
36-37
38-39
40-43
44-45
Using Buttons / Menu Controls
Using Browser / Listening to Music
Update the Music Library / Sorting the Music Library
Playback Mode / Sound Effect
Spatializer Sound Effect / Equalizer
Volume Restriction/ Displaying Lyrics
Photo Library / Slideshow Settings
Converting Video Files
Play Video / Video Settings
3. Quick Start
Getting Started
1
4
Dane-Elec_MiniPlayer SL_manual
donderdag 29 november 2007 12:13:06
Page 4
7
6
Important Cautions
Table of Contents
52-53
54
55
56-57
58-66
67-69
70-72
73
74
75
76
Voice Recorder
Play Recorded Files
E-book
Games & Tools
4. Menu
5. Guide to Firmware Upgrade
6. Additional Information
Detailed Features by Menu
Upgrade Firmware
Format
Handling Instructions
Precautions for Using the Product
Trouble Shooting
Product Specifications
Getting Started
1
Initialize OS to the Original Factory Settings
When it is not able to turn on and disable connecting the player to your PC after resets,
please click and hold the Next key ( ) and Power On/OFF button for about 8 seconds to
initialize the OS to the original factory settings. All data will be deleted in the player.
Turn On / Auto Power Off
To power on the player, make sure it has enough power, press the Power
On/Off button for over 3 seconds. Click it again to start play.
When there is no button operation for about 3 minutes while the player is
stopped, it is automatically turned of.To power off the player, press and
hold the Power On/OFF button until it finishes with shutting down procedure.
Reset Mini Player
When it is dead caused by improper operation, you have to reset your
mini player. Disconnect it to a USB cable or AC Adapter, press and hold
on the Enter key for over 12 seconds to reboot.
Update Music Library
After finish copying the music, using Main Menu-Music-Update Music Library on the player
before your listening music so that you can organize and assort them by artist, album or
genre. Otherwise, you can only browse the new copied songs from All Songs on the player.
Long Click
Dane-Elec_MiniPlayer SL_manual
donderdag 29 november 2007 12:13:06
Page 5
9
8
Product Features
Copyright Notice
This product is the registered trademark of Meizu Technology Co., Ltd.
Meizu Technology Co., Ltd, has the exclusive copyright for this User Manual.
It is prohibited to distribute this User Manual in part or in whole without permission.
The various examples, drawings and pictures and included in this User Manual
are subject to change without prior notice when new product enhancements
become available.
Do not change or modify the product without permission or authority of manufacturer.
It may cause undesirable operations, permanent damages or harmful interferences.
Windows 2000, Windows XP and Windows Media Player are the registered
trademarks of Microsoft Corp.
CE, FCC, CCC
Meizu Limited, Has the copyright for the product software.
It is prohibited to distribute or commercially use them without written
permission from Meizu Limited.
Stylish and Luxurious Design with High Portability
Mini Player has a Super mini size with High Portability, and Boasts a Stylish and
Luxurious Design with Stainless Steel Surface.
L
ble Disk
Built-in Microphone Supports High Quality Recording
Synchronized Song Lyrics Display and ID3 Supported
Text Reader (TXT)
Multiple Language Supported
Resume Function
Power Saving Function: Auto Power OFF and Sleep Timer
Hold key Function
Firmware Upgradable
arge & Vibrant LCD with Dynamic GUI; Human User Sliding-touch Keypads
2.41 Inch 260,000 Color QVGA 320*240 TFT-LCD
Professional Spatializer Sound Effects, Various and Adjustable EQ Modes
Including: User adjustable POP, Classical, Rock, Jazz, Live, Bass Booster, User.
Supports WMA, WMA VBR, WMA Lossless, WAV, OGG, Flac, APE Playback
Movie Player(AVI video files), Game, Calculator, Calendar and Stopwatch
Real-time Clock Setting
Photo Album + Slide Show: JPG, BMP, GIF Formats
Music library, Playlist Setting, MTP and MSC mode, Easier and Faster to search music
Support DRM10
Plays Up to 26 Hours for Music Playback (Based on our company's test)
High Speed USB2.0 Ultra Fast Data Transfer
High Capacity USB Flash Storage for Remova
Getting Started
1
General
Copyrights/Trademarks
Certifications
Dane-Elec_MiniPlayer SL_manual
donderdag 29 november 2007 12:13:06
Page 6
11
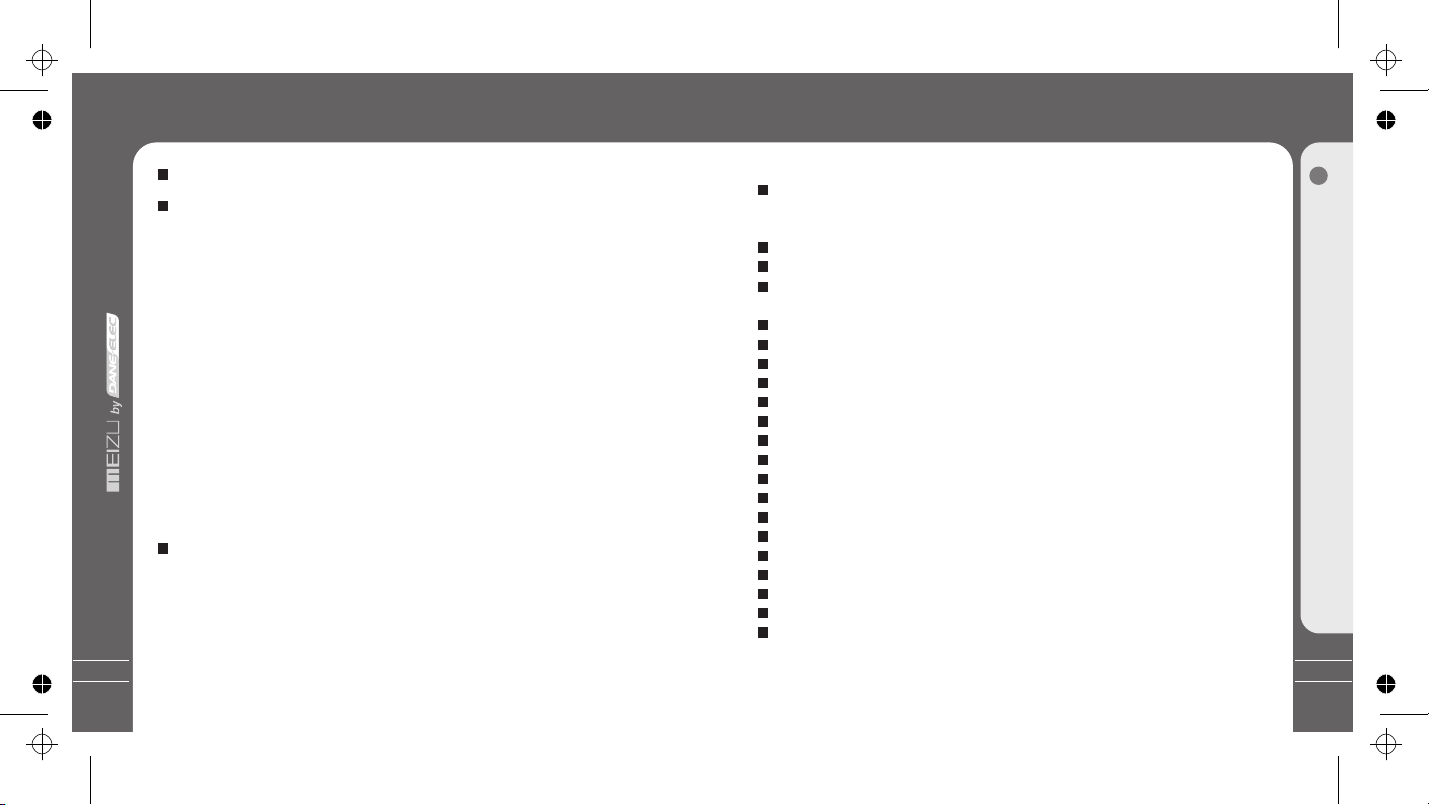
Package Contents
Earphones
Mini Player Main Body
USB Cable
Installation CD
Parts and Names
2. Front Side
LCD Window
Earphone
NEXT
PREVIOUS
POWER/PLAY/STOP
USB Port
HOLD
3. Right Side
1. Top
MENU
Strap
Note: Design and specifications are subject to change without notice.
Sliding-touch
Keypad
ENTER
MIC
Getting Started
1
10
Q C
K
S R
T
UI
TA
Quick start
Dane-Elec_MiniPlayer SL_manual
donderdag 29 november 2007 12:13:06
Page 7
13
1. While HOLD is locked, any operation will be invalid.
2. Too fast operation will be easy to cause error.
3. Slide your finger on the touch keypad up and down to reach the desired operation.
4. Click Enter key or the center keypad to enter the sub menu interface or excute an operation.
5. Clicking Menu key to go back to the previous menu interface or cancel an operation.
6. Click Next key to enter the sub menu interface.
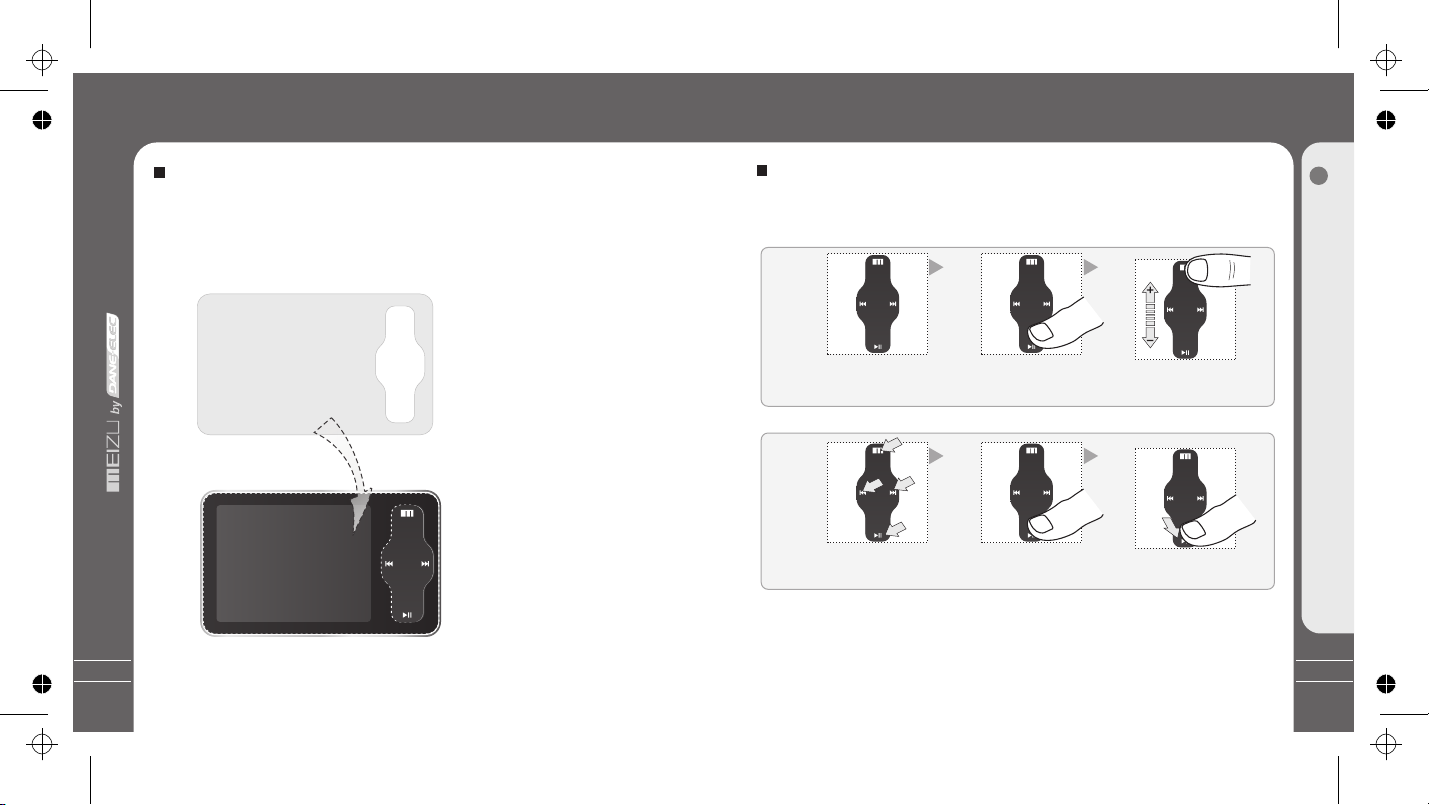
Touch Keypad
Touch keypad is an important part of the player, including sliding touch control and key
operations, which used for controlling operations of all kinds of functions of the player.
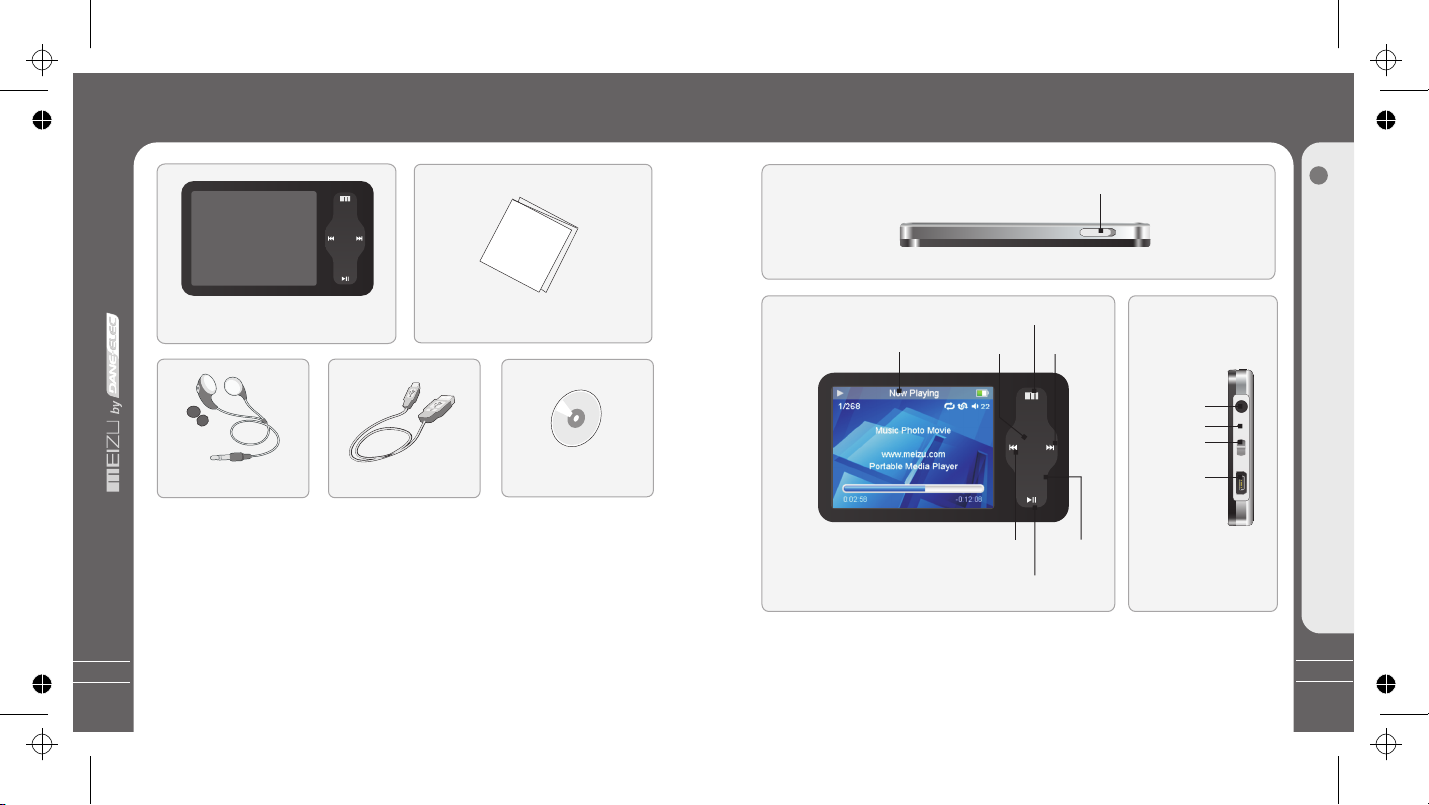
Protection Film on the Front Panel
Protection Film on the Player
Touch Keypad
Getting Started
1
Sliding touch keypad:
Touch keypad Lay your finger on one Sliding lightly on keypad
end of keypad
Clicking Key:
Key positions Lay your finger on key Press lightly
positions of keypad
The surface of player is easy to be contacted with other objects during use. To protect
the player from scratches, the front and rear plate surfaces of the player are attached
the transparent protection films. The films are featuring high light transmittance, antireflection and abrasion-resistance. Please keep the film on the front panel of the player.
The surfaces of the player are
attached with the protection films
before leaving factory.
12
Please do not peel off the Mask!
Dane-Elec_MiniPlayer SL_manual
donderdag 29 november 2007 12:13:06
Page 8
15
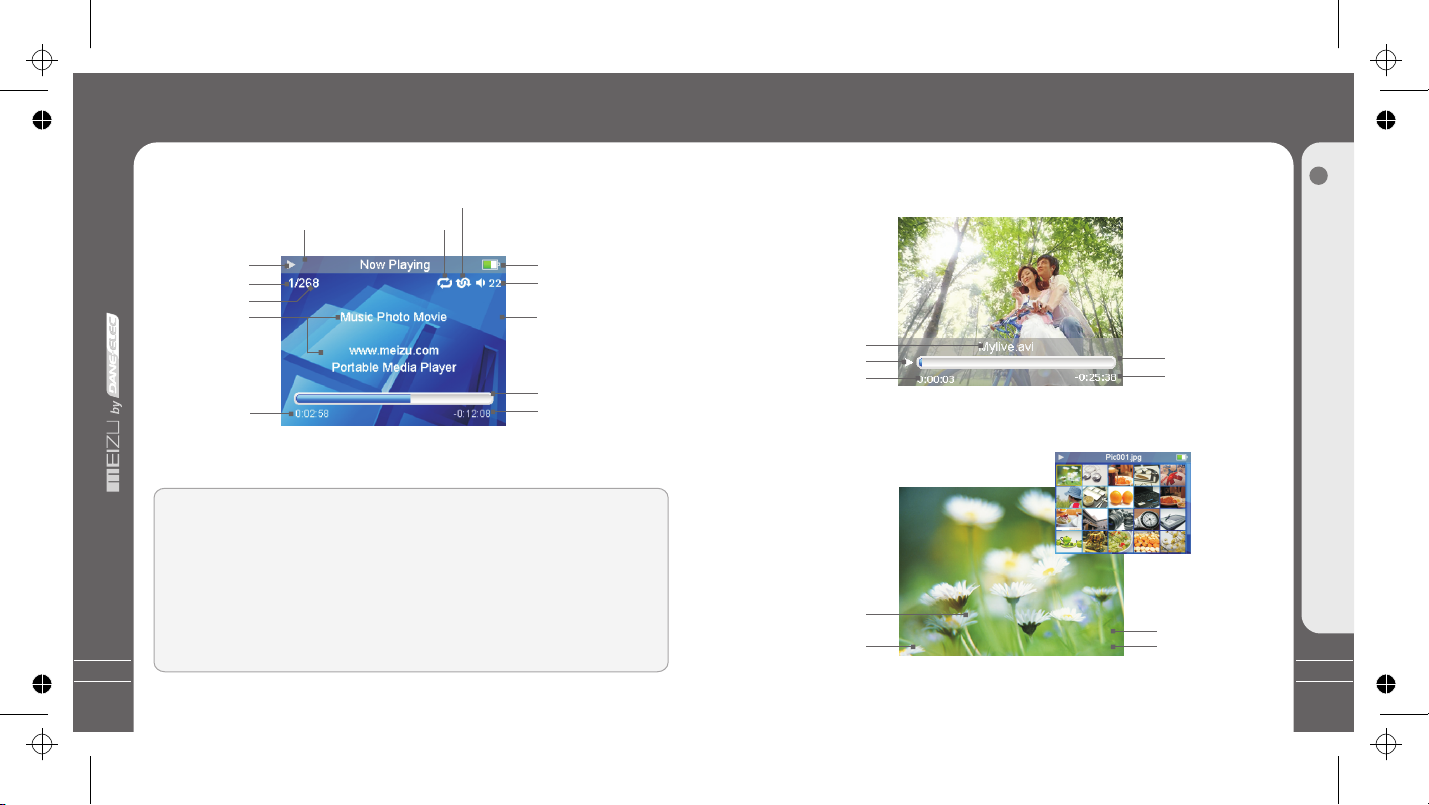
LCD Display
1. Play Music
Video Name
Play Status
Elapsed Time
2. Video Playback
5 6
4
5
LCD Display
Play Status
Track Number
Song Total
Song Info
Elapsed Time
Remaining Battery
Power
Volume
Playback Progress
/Status Bar
Remaining Playing
Time
HOLD
Repeat Playback
Radom Playback
Playback Progress
/Status Bar
Remaining
Playing Time
3. Photo View
Photo File Info
Current Number
Browsing Progress/
Status Bar
Total Numbers
LCD Display
Getting Started
1
In the playback mode, the playback progress bar shows the elapsed and
remaining time of current song. Slide your finger on touch keypad up and down
to adjust the volume.Click Enter key, the sliding bar will display a diamond
object in the bar. It shows the current playback position. Slide your finger on
touch keypad up and down to move playback position forward or backward.
Click Enter key again, it shows the song's detailed information. Click the key
once again, it displays dynamic frequency spectru
to normal playback mode.
m (it does not support for
FLAC/WMA lossless/APE file). Click Enter, return
14
Song info or lyrics
Dane-Elec_MiniPlayer SL_manual
donderdag 29 november 2007 12:13:07
Page 9
17
Click
Long Click
+
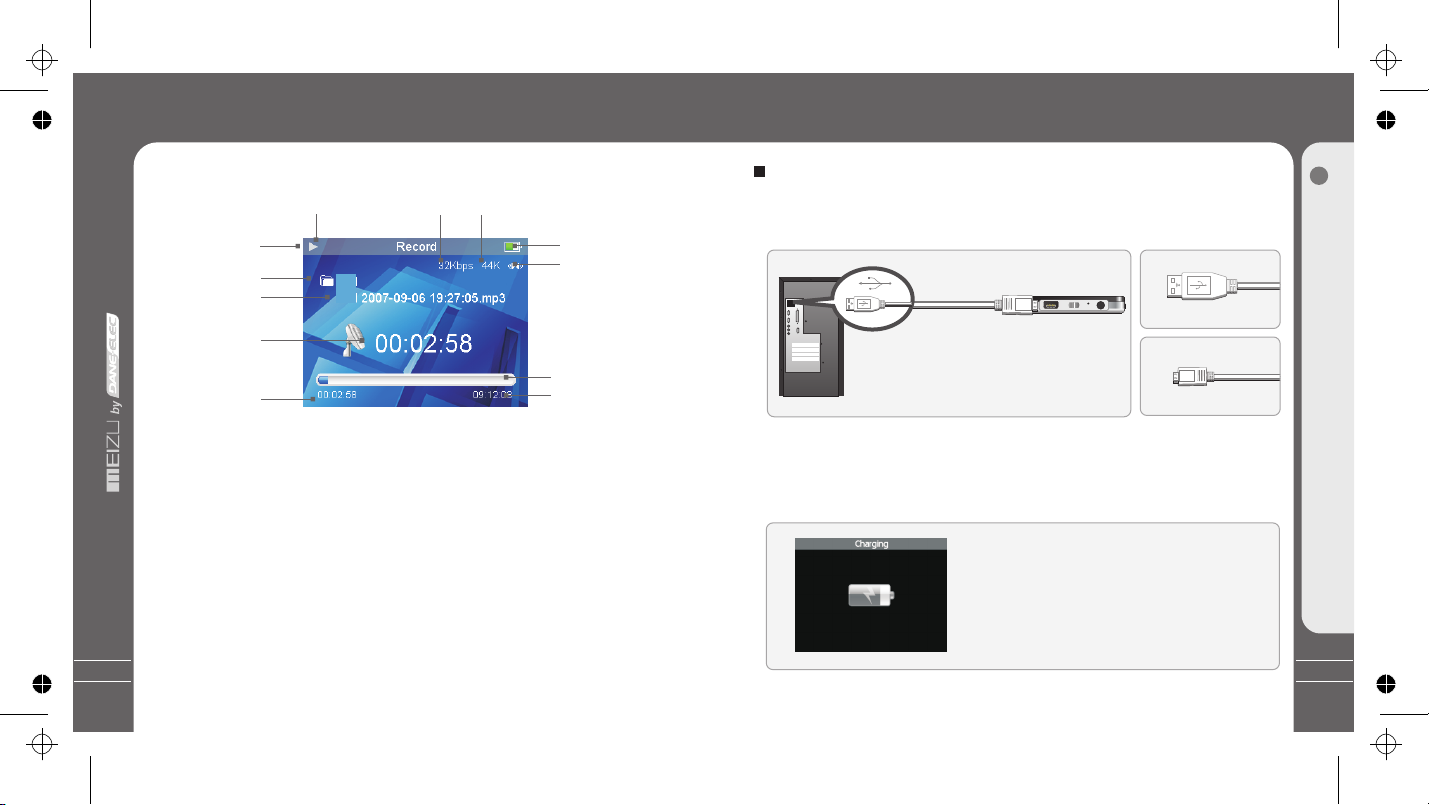
5. MIC Record
Remain Battery
Power
RecordTime
Record Status
File Content
Record File
Total Available Time
Record Progress
/Status Bar
HOLD
Bit Rate
Sampling Rate
Connecting Mini Player
USB Cable
USB port on the PC
USB port on the player
* Large End
* Small End
Connecting to a Computer
Connect the small end to player, large end to PC.
1. During Power Off
Connect it to the computer using the USB cable supplied in the package during the player
powered off. It will be charged using the power supply from the PC.
Installation CD
Connecting to a computer during it power off,
it will charge its built-in battery and appears as
the left figure.
LCD Display
Connecting Mini Player
Elapsed Time
Channel
16
Basic Operation
2
Dane-Elec_MiniPlayer SL_manual
donderdag 29 november 2007 12:13:07
Page 10

19
Using for the First Time
Charging the Battery
* Charging the Battery before using your player.
* While the player is connected to the computer via USB cable, it will charge its built-in
battery. The battery is fully charged in about 3 hours.
* Check if the player is connected to a high-power USB2.0 port. Some low-power USB
ports available in keyboards and other USB hubs may not provide enough power to
charge or sync the player.
* If the computer is in sleep mode, the player may not be charged.
The Remaining Battery Charge icon indicates the remaining time the battery can be
used. The more the battery is used, the fewer the number of segments in the icon.
2. During Power On
Connect it to the computer using the USB cable supplied in the package during
the player powered on. It will charge its built-in battery and appears as the figure.
In the normal Windows environment, as soon as the
cable or simple USB jack is connected, the message
"Searching for new device" appears and USB driver is
installed automatically. For Windows 98SE, put the
included CD-ROM in your disk drive, then follow the
instructions on your PC screen to install the USB drive.
Connecting Mini Player
Note: While connecting to PC, tracks and operations cannot be applied. Pulling out the
PC connection cable from the player before your listening to music / viewing a picture
and so on.
18
This page was intentionnaly left blank
Dane-Elec_MiniPlayer SL_manual
donderdag 29 november 2007 12:13:07
Page 11
21
Using for the First Time
3S
+
Loading the Battery
Using for the First Time
1. Insert the installation CD in your computer and install applicable softwares.
(Detail see to 21 Install CD.)
2. Click and turn on your player.
3. Connect the player to the computer using the USB cable supplied.
4. Open up the [Removable Disk](which represents the memory of this player)
on My Computer.
5. Transfer the desired files from PC into your player under their specified directories.
You can also create folder for your need, such as Ebook.
6. Safely disconnect the USB cable to the player.
(All keys of the player can not be operated during connecting to PC.)
7. Plug the earphone to the player.
8. You can now use the player to play music, video, view your favorite photographs
and a lot of other features.
The procedures of using for the first time
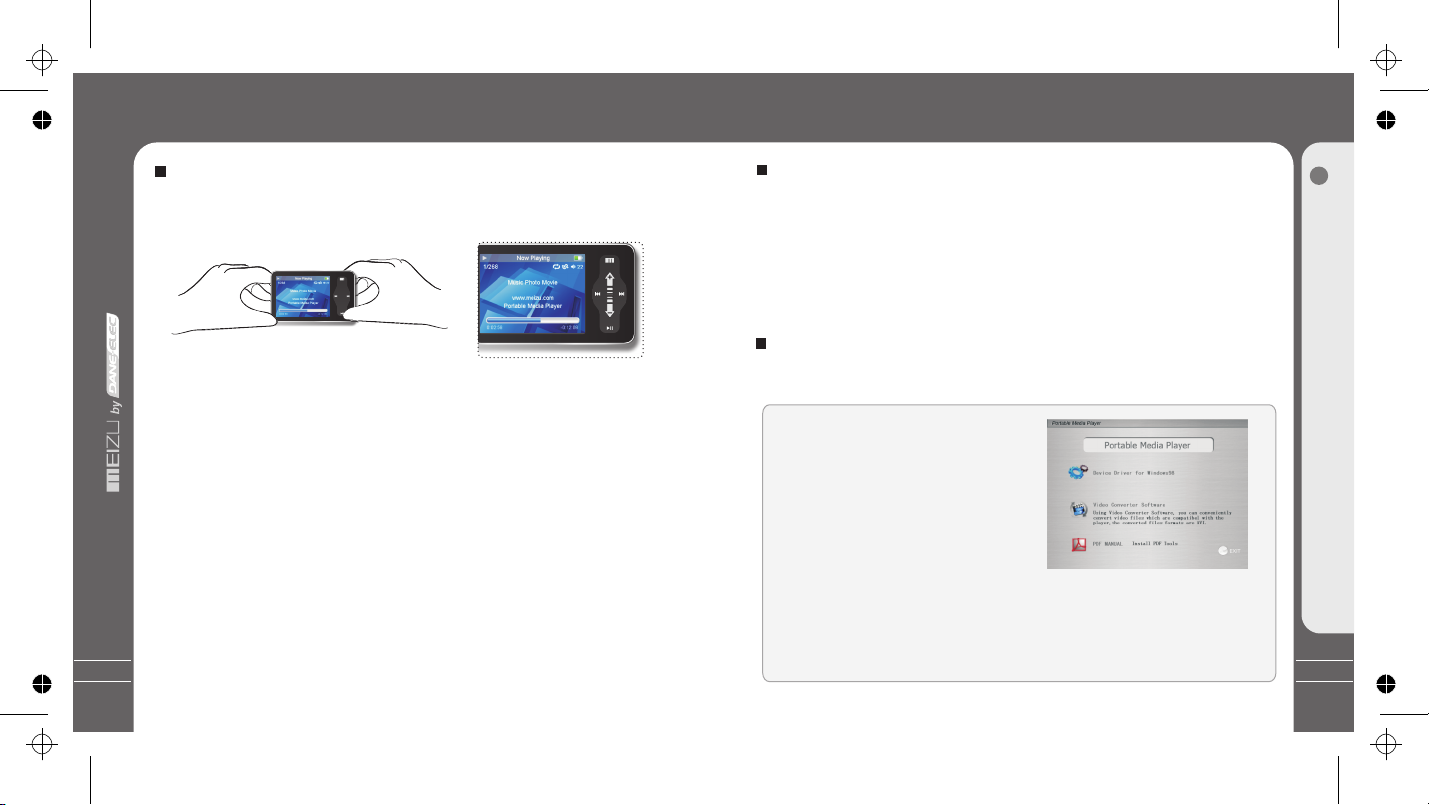
Handling
If you grab the player as picture, it is
easier to handle them.
System Requirement
Pentium 133MHz or Higher
32MB Main Memory or Higher
40MB Hard Disk Space or More
CD-ROM Drive
USB Port (2.0)
Windows 98SE/ ME / 2000 / XP
Insert the installation CD into the CD-ROM drive. The following screen appears
after inserting the CD.
The installation CD contains the
following contents:
- Device Driver for Windows98
- Video Converter for MEIZU MiniPlayer
Video Converting Tools
(Note: Window 98 driver is only required
for OS with win 98 or lower version.
If you are using Win2000 or above, you will not need to install driver. The PC
will automatically recognise the player when it is connected. The video
convert tool installation is required for video conversion. When installation is
automatically not started, execute the setup.exe in the installation CD, and
then the Manager program is automatically setup.
Install Software
Using for the First Time
Installation CD
20
Basic Operation
2
Dane-Elec_MiniPlayer SL_manual
donderdag 29 november 2007 12:13:09
Page 12

23
It appears on your PC as shown in the
figure as follows(while finish formatting).
Select [Edit] - [Paste].
After finishing copying, it appears the music files on the Removable Disk. Disconnect
the player to your PC, then you can start listening to the music.
Downloading from the PC
Basic Operation
2
When copy files, you should save the video and photo files to specified
directories of the player, video files into Video directory, photo files into
Pictures directory. Otherwise, they won't be identified by Mini Player.
Downloading from the PC
Music files can be transferred to the player using the
following steps, set MSC as USB mode.
Select the desired music to download
to the player from the computer.
Click the [Edit] - [Copy] Menu.
Double click [My Computer], then [Removable Disk] again.
The player is shown as the
Removable Disk on your PC.
Downloading from the PC
Note: you can also drag and drop the selected files
from your PC into the [Removable Disk] window.
Access from a CD or download music, video or picture files from internet and transfer to
your PC hard disk, then transfer them to your player's Removable Disk. Take example for
copying songs as below,
22
Dane-Elec_MiniPlayer SL_manual
donderdag 29 november 2007 12:13:10
Page 13

25
1. Power On
Click the Power ON/OFF
button, the power comes on and
MEIZU logo appears.
Using Buttons
Click
Press the Power ON/OFF button again,
start to play. If it displays no file, pls run
Update Music Library (Detail see to 30
Update the Music Library.)
2. Power Off
When you press and hold the power
ON/OFF button for about 3 seconds,
the power turns off. If the PC and the
player are connected via a USB cable,
you cannot turn the power off.
3. Playback & Stop
Press ON/OFF briefly, start to play.
Press it again while in Play status,
the play stops.
Quick Start
3
24
Saving Files and Disconnecting to your PC
Copy the Files in the Player into your PC
1. With the USB cable, connect the USB ports of the player and your PC.
(It should not use a USB hub. It is assumed that you connect to the USB port on
the main board.)
2. Save the music files under the hard disk on your PC.
3. After saved the files, click the icon on the screen of your PC.
4. It pops the message as above, then click it.
5. It runs 'Safely Remove Hardware'.
6. Then draw out and disconnect the USB cable.
To make sure to save the data on your player safely and fully, please follow
the above steps accordingly when you disconnect the player to the PC.
While disconnecting,,it appears the warning, click OK and finish it.
Saving Files & Disconnecting to Your PC
Click
Long Click
Dane-Elec_MiniPlayer SL_manual
donderdag 29 november 2007 12:13:10
Page 14

27
Select the Menu Options
Click the Menu key to go back to main menu, sliding the keypad up and down to select
the menu options. Click the Enter key or Next key, then enter the submenu (submenu is
available when there is ">" symbol on the right of menu item). Click the Menu key to the
upper menu (it will return to current playback interface, when you operate on top menu).
Adjust the Values
Enter the Settings from main menu. Sliding on the keypad up and down
to adjust the values. Press the Enter key and the options applied. During the selection,
click the Menu key and exit.
Menu Controls
Menu Controls
Click
Click
Click
Quick Start
3
Click the Menu key briefly
Click the Enter key briefly
Sliding up and down on
the touch keypad
Click the Menu key to exit
26
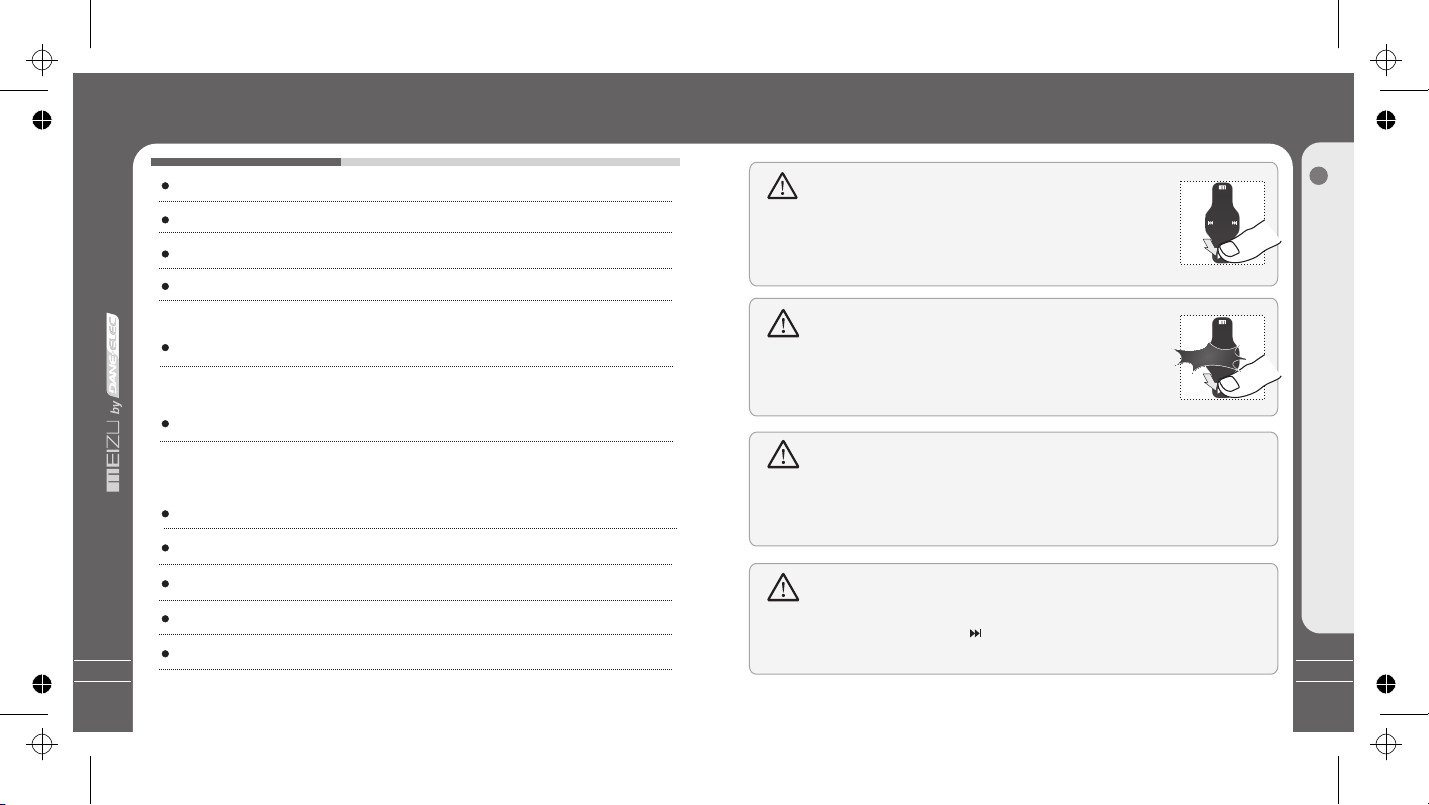
9. To select music
To select previous music To select next music
10. Initializing the operating system in the player
A. Click and hold the Next key and then hold the power ON/OFF button, do
not remove your finger until it appears the yellow screen. Then it initializes
the OS to the original factory settings. All data will be deleted.
5. To adjust the volume
in the music operation menu,
sliding your finger on the
touch keypad.
To increase volume
To decrease volume
in the video operation menu,
click the Menu key to increase
By turning Hold ON, all the keys on the player will not function.
It is irrelevant while listening to music.
Using Buttons
Unlock
Locked
Long Click
Click
Click
7. Menu
Press the Menu briefly
to Main Menu or move
to the upper folder
8. Display off on LCD
Long click Menu key for
6. Reset
If the player stops responding,
please reboot it: Long click
the Enter key for over 10-sec
to force shutdown, then press
ON/OFF to turn on the player.
4. Hold
B. Click and hold the Previous key and then hold the power ON/OFF button, do not remove
your finger until it appears the purple screen. After 2 seconds, it appears the green screen, then
it initializes the OS to the original factory settings. All data will be deleted. After finish this, you
may need to download the firmware package from internet and operate the upgrading.
(Detail see to Page68 Upgrading Product Firmware)
this effect, click Menu key again to resume the display.
volume click the Enter key to decrease volume.
Dane-Elec_MiniPlayer SL_manual
donderdag 29 november 2007 12:13:11
Page 15

29
Listening to Music
You can conveniently navigate through your music files and listen to them. Select Music
in the main menu. Slide up/down to browse for a song by Artist, Album, Genre, Rate and
Playlist. Select the desired song/playlist and click the Enter key to play. Click the
Previous/Next key to previous/next music, slide up and down on the keypad to adjust
the volume. You can conveniently transfer your favorite music to the player. It supports
following audio format: WMA (VBR): 8 Kbps ~ 355 Kbps
WAV: PCM, MS-ADPCM, IMA-ADPCM OGG: Q1 ~ Q10, and etc.
Note: 1. If the keys cannot function, please check if the HOLD is on.
2. Continuous playback time: About 26hrs (128kbps/volume 20/EQ normal/LCD off)
Sliding
Press
Press
Listening to Music
Quick Start
3
28
Open Browser
Click the Menu key, sliding the keypad up and down to select Browser option.
Click the Enter key to apply it.
Sliding on the keypad up and down to select the submenu options.
Click the Menu key and return to the upper menu or playback mode.
Play Music
There pops up the following functions after you select Music folder or a song,
1. Play 2. Add to Current Playlist 3. Add to My Playlist.
Using Browser
Click
Click
Using Browser
Click the Menu key briefly
Sliding up and down on
the touch keypad
Click the Enter key briefly
Click the Menu key briefly
Press
Click
Dane-Elec_MiniPlayer SL_manual
donderdag 29 november 2007 12:13:11
Page 16

31
Sorting the Music Library
Sorting the Music Library
All Songs To list all the songs on the player.
Playlist
a. Add to My Playlist. You can add the songs, Artists, Albums. When a song is selected,
press and hold the Enter key until the highlight bar starts to flicker, the song is added to My
Playlist. Select an artist or a album, press and hold the Enter key until the highlight bar
starts to flicker, the related songs are added to My Playlist. When the highlight bar stops
flickering, the selected song is added.
b. Save Playlist. After finishing adding the songs, select My Playlist - Save Playlist and
click the Enter key to apply it. Folder names are created automatically as PLAYLIST1,
PLAYLIST2...
c. Clear ( Delete ) Playlist. Select the memoried playlists (for example, PLAYLIST1), then
select Delete Playlist, click the Enter key and delete it.
Artists Assorting by all artists and unknown artists.
Albums Assorting by all albums and unknown albums.
Song Order ( assort All Songs only). You can assort the songs by Title, File name, Artist
and Album.
During Main Menu - Music - All Songs/Playlists/Artists/Albums, press the Power ON/OFF
button, it will start to play the songs on the current item.
Click
Quick Start
3
Click the Enter key briefly
Sliding up and down on
the touch keypad
30
Selecting Modes
Update the Music Library
After finishing copying the music files, you can also organize them by artist, album or
genre using Update the Music Library function on the player.
1. Click the main Menu key and select Music mode.
2. Click Enter key - Update the Music Library, then the option is applied. During the
updating, it will take you a few seconds.
3. When finishes, it returns back the menu options automatically.
Click
Click
Click
Update the Music Library
Click the Enter key briefly
Click the Enter key briefly
Click the Enter key briefly
Dane-Elec_MiniPlayer SL_manual
donderdag 29 november 2007 12:13:12
Page 17

33
This is the feature to set the Sound Effect. There are the following sound field effects:
A. EQ: Pop, Classical, Rock, Jazz, Live, Bass Booster, User-defined and Load Default.
It provides you to adjust the values of EQ by yourself.
B. Bass Boost You can choose the value from 0~15 to set the bass effect.
C. Treble Boost You can choose the value from 0~3 to set the treble effect.
D. Spatializer You can shoose: Spatializer, Spatializer Mode, Virtual3D, Phase
Corrected Equalizer, Virual Bass Enhancement, Speaker Type.
E. Volume restriction There are level 5~ 40 optional.
Sound Effect
Click
Click
Sound Effect
Quick Start
3
Click the Enter key briefly
Click the Enter key briefly
Sliding up and down on
the touch keypad
32
Random playback
This sets whether or not to play randomly. Click the Enter key and select On, the next
playlist is played randomly.
Repeat playback
Click the Repeat option in the controls window, then click the Enter key and select On,
the next playlist is played repeatedly.
Playback Mode
Playback Mode
Click
Click
Click the Enter key briefly
Sliding up and down on
the touch keypad
Click the Enter key briefly
Dane-Elec_MiniPlayer SL_manual
donderdag 29 november 2007 12:13:12
Page 18

35
Quick Start
3
34
To select Spatializer sound effect
1. During Main Menu mode, Select Sound Effect and click the Enter key.
2. Using your figure and sliding on the keypad up and down, select Spatializer effect.
Click the Enter key and apply it. You can choose the following options,
A. Spatializer To set Close or Open Spatializer sound effect
B. Spatializer Mode To set Spatializer mode: Normal, Virtual 3D, Natural Head Phone.
C. Virtual 3D To set values of Virtual 3D, you can adjust it from 0~9.
D. Phase Corrected Equalizer To adjust sound effect from value 0~9.
E. Virual Bass Enhancement To adjust sound effect from value 0~9.
F. Speaker Type To provide Hearphone and Speaker options.
(The player does not have a built-in speaker)
Spatializer Sound Effect
Click
Click
Spatializer Sound Effect
Click the Enter key briefly
Sliding up and down on
the touch keypad
Click the Enter key briefly
Select EQ
The player offers various EQ:
Pop, Classical, Rock, Jazz, Live, Bass Booster, User
User EQ
You can adjust the User EQ.
Function up and down on the keypad to select the value and apply it. Click the Previous
or Next key and move to different items.
Equalizer
Click
Press
Equalizer
Click the Enter key briefly
Sliding up and down on
the touch keypad
Click the NEXT key briefly
Sliding up and down on
the touch keypad
Dane-Elec_MiniPlayer SL_manual
donderdag 29 november 2007 12:13:13
Page 19

37
Quick Start
3
36
Displaying Lyric
1. Download the lyrics from the internet to your PC. The lyrics file is the format
of .Irc.
2. Connect the player and your PC via USB cable.
3. Copy and drag the music audio lyric files on your player. (The lyrics file and music file
must be stored in the same folder, their filenames must also be the same.)
For example, for song named my angel.wma, the matching lyrics file will be my angel.lrc.
4. Disconnect the player and your PC.
5. Turn on the player, click left/right key to select the favorite song and play it.
Synchronized song Lyrics
Copy the lyric files from your PC to the Player.
Insatiable.lrc
Song Title
Song Info
It will display three lines of lyrics on
the screen during playing, the current line
will be highlighted in different colour.
Displaying Lyric
insatiable.lrc
To Set the Volume restriction
1. During the Main Menu mode, select Sound Effect and click Enter key.
2. Using your figure and sliding on the keypad up and down, select Volume Restriction.
3. Click the Enter key, slide it up and down to adjust and apply the setting.
You can choose it from 5 ~ 35 level.
Volume Restriction
Volume Restriction
Click the Enter key briefly
Sliding up and down on
the touch keypad
Click the Enter key briefly
Click
Click
35
Dane-Elec_MiniPlayer SL_manual
donderdag 29 november 2007 12:13:14
Page 20

39
Quick Start
3
38
Slideshow Settings
Click
Click
Click
Click Slide Show Settings to open following sub menu:
A. Time per Slide (Image Delay)
Selects the time each picture is displayed on the screen during a slide show.
B. Repeat: Displays each picture repeatedly.
C. Shuffle Photos: Displays each picture randomly.
D. Auto Rotate: Rotate it automatically to fit for screen display according to the size of
a picture in the player.
E. Transitions (Slide Effect)
Enables/disables overlap effects between each image during a slide show. You can
choose: Random, Push Across, Push Down, Wipe Across, Wipe Down, Wipe from Center.
Click the Enter key briefly
Click the Enter key briefly
Click the Enter key briefly
Slideshow Settings
Photo Library
Searching for a picture
Function up/down to select previous/next image. Click the Enter key to display the
selected image in full screen.
Viewing a picture
Click left/right key to view previous/next image. Click the Enter key, you can select
and set the selected picture as Music background, Radio background or Record
background. Click the Menu key to exit, click the power ON/OFF button to display the
browsing information and progress/status bar. It supports JPEG, BMP, GIF formats.
Photo Library
Click
Click
Click
Click the Enter key briefly
Click the Menu to review
Sliding up and down on
the touch keypad
Click the Enter key briefly
Photo Library
Dane-Elec_MiniPlayer SL_manual
donderdag 29 november 2007 12:13:15
Page 21

41
Quick Start
3
40
Click [Start]--[Programs]--[Video
Converter]--[Video Converter].
2. Using Video Converter
When the installation finishes, Start -> Programs -> Video Converter -> Video Converter
is registered.
Converting Video Files
When the program starts, click Input
[Add] button and choose the
file to convert.
Select the converting video file from
the pop-up window, click [Open].
It appears the file name and informations on the File List.
Converting Video Files
The player supports .avi format.
However, as the resolution and code vary, some .avi will not be properly displayed on the
player. Therefore it is strongly recommened that user convert every video files before
saving to the player.
Install the converter tool enclosed in the CD disk.
Use the program to convert your .avi and other formats of video files.
After the conversion, you can save the file into the video diretory in your player disk.
1. Installing Video Converter
Insert the Installation CD in the CD-ROM
driver. Click [Video Converter Software]
to start the installation on the displayed
window.
Converting Video Files
The Installation program starts automatically. When it finishes, click
Finish and exit.
It will take you some time to finish the installation. It may pop up the warning window of
installing related plugin, it possibly indicates file is existing depending on the status of
the Windows. Then select "Retry" or "Ignore" to continue installation.
Dane-Elec_MiniPlayer SL_manual
donderdag 29 november 2007 12:13:15
Page 22

43
Quick Start
3
42
10
11
After finishing converting, click the
[Close] button and finish it.
6
Converting Video Files
Click [Styles[, you can set the styles,
click [OK] and apply it.
It will take you some time to convert
the file. During this process, only the
[Stop] button is valid for you.
Note:
1. The converted size is 320*240, the
converting time is depended on the size of
the original file. The quality is related to
your setting values.
2. The BitRate of Video is 200~500, Frame
is 15~20.
3. The subtitle file and video file should
be saved under the same content.
I.e. If a video file named Video.avi, then
the subtitle should be Video.srt.
4. They can be converted that the files are in
.srt, .smi, .sub, .ssa formats without subtitles.
Converting Video Files
5
6
7
8
Click Output [Browse] and specify the
path and file name.
It appears a Pop-up window, click OK
and save it.
Click [Setting] and specify the
preferences.
After click it, it appears the settings.
Then click [OK] button and apply it.
The caption file is the format of .srt as suffix. You may ignore Step 6 to Step 9 during
your converting files without caption.
Dane-Elec_MiniPlayer SL_manual
donderdag 29 november 2007 12:13:16
Page 23

45
Quick Start
3
44
Video Settings
Video Settings
1. Select Video in the main menu.
2. Function and select Video Settings, click the Enter key.
There are the following options,
Bass Boost To set bass boost for video playback from value 0~15.
Treble Boost To set treble boost for video playback from value 0~3.
Consecutive Use this item, you may set and play video consecutively.
Click
Click
Click the Enter key briefly
Click the Enter key briefly
Sliding up and down on
the touch keypad
Play Video
Play Video
1. Function up and down to select the video to play.
2. Click the Enter key to start playback.
3. During playback, click the Menu key to increase the volume, click the Enter key to
decrease the volume.
4. Click the Power ON/OFF button to pause the playback.
5. Long click the Power ON/OFF button to exit.
6. Click the Previous or Next key and move to fast forward or fast rewind.
Note:
Continuous playback time:
About 5 hours (320*240@15fps, Video: 384kbps, Audio: 128kbps / 44kHz)
Click
Click
Click the Enter key briefly
Click the Enter key briefly
Click the Enter key briefly
Click
Dane-Elec_MiniPlayer SL_manual
donderdag 29 november 2007 12:13:16
Page 24

47
46
This page was intentionnaly left blank This page was intentionnaly left blank
Dane-Elec_MiniPlayer SL_manual
donderdag 29 november 2007 12:13:17
Page 25

49
48
This page was intentionnaly left blank This page was intentionnaly left blank
Dane-Elec_MiniPlayer SL_manual
donderdag 29 november 2007 12:13:17
Page 26

51
50
This page was intentionnaly left blank This page was intentionnaly left blank
Dane-Elec_MiniPlayer SL_manual
donderdag 29 november 2007 12:13:17
Page 27

53
52
Quick Start
3
Click
Click
Voice Recorder
MIC Recording
1. Select Record in the main menu. Click the Enter key.
2. Select Start Voice Record option and click the Enter key to apply it.
3. Click the Enter key, then start voice recording.
4. Click the Enter key again, you can pause it. Long press it to stop.
Note: 1) Please make sure the battery volume is enough during Voice Recording.
2) If it displays "The Memory is Full!" on the LCD, to record, delete files and/or folders
on the player in order to make some space available. 3) The recording file will be
memorized and saved to RECORD\ directory, filenames are created automatically
beginning with "VOC" according to recording time.
Click the Enter key
for Record option.
Slide on the touch
keypad up and down.
Click the Enter key, start recording.
This page was intentionnaly left blank
Dane-Elec_MiniPlayer SL_manual
donderdag 29 november 2007 12:13:17
Page 28

55
Play Recorded Files
Play Recorded Files
1. When finishes recording, select Record Filelists, and click the Enter key.
2. Slide up and down on the keypad, you can find and play the recorded files.
3. Click the Enter key to start playback.
Click
Click
Click
Click the Enter key briefly
Click the Enter key briefly
Sliding up and down on
the touch keypad
Click the Enter key briefly
54
Quick Start
3
Click
Click
E-book
View E-book (Text file: .txt)
1. Save the .txt file in your PC. You can either download fom internet or create your own
using the Notepad program (standar program come with windows). Simply cut and paste your
favourite part of text onto a blank notepad document and save it as .txt file.
2. Connect the player and your PC with the provided USB cable.
2. Save the selected text file into your player from PC. You might also create a new
directory in your player disk, namely EBOOK. Then save the text file into that folder.
3. Disconnect the player and your PC. Turn on the player, select Browser option.
4. Press the Enter key, you can view the selected text file on your player. (If you save it under
a new directory, go into that folder)
5. Touch the keypad slightly on the Previous/Next key position, you can move the text file
page by page.
6. Click the Enter key, it pops up the window, you can select:
A. BookMark ( Bookmark 1, Bookmark 2, Bookmark 3, Jump to Bookmark 1, Jump to
Bookmark 2, Jump to Bookmark 3 ) B. Font Size (16*16, 20*20 )
C. Automatic (Close, 5 Second, 10 Second, 15 Second, 20 Second, 25 Second )
7. Click the Menu key to exit.
Click the Enter key
Slide on the touch
keypad up and down.
Click the Enter key.
Dane-Elec_MiniPlayer SL_manual
donderdag 29 november 2007 12:13:17
Page 29

57
Games and Tools
Hua Rong Dao, is an ancient Chinese board game, Caocao is the emperor of one of the three
kingdoms in ancient China. He was defeated by other two kingdoms in a war and now trying to
escape from them. Your mission is to help Caocao to escape from hunting of the rest guys on the
board by shuffling them around. When Caocao is at the center bottom of the board, nobody can
be on his way to life, so you will be promoted to be Caocao's next lieutanant. A real winner is the
one who find the best path with minimum steps.
·Click the Enter key to start the game.
·Sliding up and down on the keypad to select the object.
·Click the Menu to move it up, Enter key to move it down, Previous key to left and Next to right.
·Long click the power ON/OFF button to exit.
In planar labyrinth, the man can push only one box at a time.
When he finishes pushing all boxes into the destination position,
you win the game.
·Click the Enter key to start the game.
·Click the Menu to move it up, Enter key to move it down,
Previous key to left and Next to right.
·Long click the power ON/OFF button to exit.
Detailed Features by Menu
Games and Tools
1. Hua Rong Dao
2. Box Man
56
5. Calculator
·This is the menu to provide the calculator.
·Select Calculator and click the Enter key to apply it.
·Sliding up and down on the keypad to select the option key.
·Click the Enter key to apply it.
·Click the Menu key to exit.
Detailed Features by Menu
·Select Calendar and click the Enter key to apply it.
·Sliding up and down on the keypad to select the day.
·Click the Previous/Next key to select the month.
·Click the Menu key to exit.
Games and Tools
3. Calendar
4. Stopwatch
·Select Stopwatch and click the Enter key to apply it.
·Click the Enter key and start.
·Click the Previous/Next key to select the options.
·Click the Enter key to apply it.
·Click the Menu key to exit.
Quick Start
3
Dane-Elec_MiniPlayer SL_manual
donderdag 29 november 2007 12:13:18
Page 30

59
58
1. About
This is feature to display the information:
Memory
·Information on the flash memory in the Player is displayed.
·You can check usage and remaining memory size.
·Some of the flash memory in the Player is used for system area. Therefore, when we
exclude the system area essential for normal operation of the Player, the actual capacity
of the flash memory is somewhat reduced.
·For example, with a 256MB product, about 243MB of memory capacity is normal.
Free Space
Model Number
Operating System version
Settings
Detailed Features by Menu
Menu
4
2. Important Tips
This is to provide the reminding information and operating
procedures on the player.
· Select Settings, click the Enter key and apply it.
· Slide up and down on the kaybad, select Important Tips
and click the Enter key, then you will find the tips.
3. Main Menu
Detailed Features by Menu
Music
All Songs, Playlists, Artists, Albums, Song Order, Random,
Repeat, SoundEffects, BassBoost, TrebleBoost, EQ
Photos
Videos
Record
Record Files Lists, Start Voice Record
Now Playing
Game & Tools
HuaRongDao, Boxman, Calendar, Stop Watch, Calculator
Backlight Timer
This function is to list the related items in Main Menu when
they're set as Open status.
·Select Settings, Click the Enter key.
·Slide up and down on the keypad and select Main Menu,
click the Enter key.
·Slide up and down on the keypad, you can find the options,
click the Enter key to apply On/Off option.
Settings - Main Menu:
Dane-Elec_MiniPlayer SL_manual
donderdag 29 november 2007 12:13:18
Page 31

61
60
Detailed Features by Menu
Detailed Features by Menu
1.播放范围
A. Backlight Timer
B. Backlight Brightness
1.播放范围
4.Display
·This is the feature to adjust the brightness of the LCD
display.
·Select Backlight Brightness and click the Enter key.
·Using your finger by sliding on the keypad, select from
0 to 100 and apply the value.
·Click the Enter key and move to another option.
·Click the Menu key to exit.
·This menu is for setting the time for which the backlight is turned on.
·Select Backlight Timer and click the Enter key.
·Using your finger by sliding on the keypad, select from: 2sec.,
5sec., 10sec., 15sec., 20 sec., ' Always On'
Note: the player backlight goes off automatically in a few seonds when the player is not in
operating mode. Click Power on/off Key to resume the backlight.
C. Background Blend
·This is the feature to adjust the blend of background photo.
·Select Background Blend and click the Enter key.
·Using your finger by sliding on the keypad, select from
0 to 20 and apply the value.
·Click the Enter key to exit.
D. Fonts Color
·This is the feature to select a color for menu fonts.
·Select Fonts Color and click the Enter key.
·Using your finger by sliding on the keypad to select
different colors.
·Click the Enter key and apply the selection.
·Click the Menu key to exit.
·This is to set the colors of selecting bar.
·You can choose: white, red, dark red, green, dark green,
blue, dark blue, teal, dark teal, purple, dark purple, yellow,
dark yellow, light gray, black.
·Slide and select your desired color.
·Click the Enter key to apply it.
E. Menu Bar Color
Menu
4
Dane-Elec_MiniPlayer SL_manual
donderdag 29 november 2007 12:13:20
Page 32

63
6. Date and Time
A. Set Date and Time
·This is the feature to set the date and time.
·Select Set Date and Time option, and click the Enter key.
·Using your finger by sliding on the keypad, select to set the related value.
·Click the Previous/Next keys to select the options.
·Click the Enter key to apply and move to the upper menu.
·Click the Menu key to ignore it, then return back.
Menu
4
Detailed Features by Menu
This function is to set button sound as open or close
during operation.
·Select Button Sound Check.
·Click the Enter key to select On/Off option and apply it.
5. Button Sound Check
62
B. Time Format
Detailed Features by Menu
The player provides two formats to display the time.
·Select Time Format option.
·Click the Enter key to select 12 Hours or 24 Hours and
apply it.
·Click the Menu key to exit.
C. Title Time
·This is the feature to display the time on the menu title.
·Select Title Time.
·Click the Enter key to On or Off option and apply it.
·Initialize the background to the original factory settings.
·Select Use Default Background and click the Enter key,
it pops up the window.
·Slide and select 'Yes' or 'Cancel'.
·Click the Enter key to apply it.
F. Use Default Background
Dane-Elec_MiniPlayer SL_manual
donderdag 29 november 2007 12:13:20
Page 33

65
64
9. USB Mode
·The player can be set to automatically turn off after a
preset time while it is playing.
·You can choose: Off, 30 Minutes, 1 Hour, 1.5 Hours, 2
Hours, 3 Hours.
·Select Sleep Timer and press the Enter key. Then choose
a value by sliding your figure on the keypad.
8. Sleep Timer
Detailed Features by Menu
·This is the feature to set the MSC/ MTP mode.
·Select Settings and click the Enter key.
·Slide and select USB Mode, MSC and MTP optional.
·This is the feature to change the menu language.
·You can choose: English, French, German, Dutch,
Spanish, Portuguese, Italian and Danish.
·When you select and click the Enter key, the selection is
applied, it returns back the upper menu.
7. Language (Menu Language)
Detailed Features by Menu
◆ MSC Mode
Menu
4
Select the MSC mode, connect Mini Player to your PC. It will appear "Removable Disk"
on your PC. Double click it, you may use the player to copy, delete and etc. After
operation, click and run "Savely Remove Hardware", then disconnect it.
◆ MTP Mode
Media Transfer Protocol (MTP) is a protocol designed for portable media devices and
it has been developed by Microsoft based on Windows Media Player 10 (WMP10).
It facilitates communication between devices that support WMP 10.
With this protocol, it accesses the complete connecting for your Mini Player to
Windows XP. Also, you may manage and transfer all datas through WMP 10.
·Use Windows Media Player 10 to manage media datas
Windows Media Player 10 Interface
①
②
⑥
④
⑤
③
① Search Frame
② Library
③ Playing List
④ Detail Information
⑤ Content
⑥ Sync
Dane-Elec_MiniPlayer SL_manual
donderdag 29 november 2007 12:13:21
Page 34

67
66
10. Reset All Settings
Detailed Features by Menu
·Initialize all the settings to the original factory settings.
·Select Reset All Settings and click the Enter key, it pops
up the window.
·Slide and select 'Yes' or 'Cancel', when you select 'Yes',
all the settings will be initialized to the original factory ones.
Upgrading Product Firmware
Software.zip
The latest software
What is Firmware of the Player?
Firmware of the player is a program embedded in the hardware, which activates various features.
By upgrading, you can enhance the features and eliminate the bugs.
Notice for Legal Limitations and Responsibilities Regarding Firmware
1/ The performance and menu of Player may change without prior notice through upgrading
firmware of regular or beta versions supported by the manufacturer.
2/ We recommend that users should personally back up important files and data saved in the
player to their PC before upgrading firmware.
3/ All upgrades are intended for overall enhancement of performance. The upgrades will be
provided when available based on our company's judgment.
4/ Some beta versions of the firmware may have minor bugs that will be corrected in the official
versions of the firmware. This should be noted by the users before an action.
Conditions for Upgrading Firmware
1/ Upgrading the firmware requires the basic environment where the UMS feature of the
Windows OS works properly.
2/ You can check the player in 'My Computer' on Windows 98/ME/XP/2000/2003.
3/ 'Removable Disk' (which represented your player memory) must be displayed for an upgrade
purpose. If it is not displayed, we recommend that you check the menu that asks whether or not
to use a USB Device from the main board CMOS, or reinstall Windows, or have the USB port on
the main board examined.
Guide to Firmware Upgrade
●
●
●
Use WMP to play songs, it will add the songs to Library automatically.
You may also drag the media files on your PC to Library. It will automatically classify the
songs according to the Artists, Albums after adding.
1. Add to Library: Click 'Add to Library' on the bottom left corner of the windows, you also
can click the file to add it. 2. Classify files (Detail see to instruction of Media Player.)
a. On the Content section, click the desired folder.
b. On the Detail Information section, click the options (Title, Artist, Album, Rating, Genre
or Leighth, etc.), It will be sorted ascendingly and in alphabetically.
c. Click the options again, it will be sorted descendingly.
Guide to Firmware Upgrade
5
·Transfer songs to Mini Player with WMP 10
Set MTP to USB mode, connect Mini Player to your PC. It appears "MTP Media Player"
on the Taskbar, select 'Using Windows Media Player' on the pop-up window. Then select
'Automatic' and follow the steps to start Sync. It appears 'Synchronization is complete'
after finishing it.
Note: There are two methods for you to transfer songs to Miniplayer: Automatic and Manual.
During MTP mode, you also can transfer the songs and files directly. Click My Computer,
then double click Mini Player, you will find Data and Media folders. Put the desired songs to
Media folder, and other files to Data. ( Pictures should be put to the foler Data - PICTURES,
Video files to Data-VIDEO)
Dane-Elec_MiniPlayer SL_manual
donderdag 29 november 2007 12:13:21
Page 35

69
Upgrading Product Firmware
When there is a new firmware released, you can download the latest firmware from MEIZU
website free of charge to enhance the features and eliminate the bugs. Please refer to the
following procedure.
Downloading and Installing Firmware
Connecting the player and your PC
with the provided USB cable.
Turn on the player.
Click the Power ON/OFF button to turn
the player on.
Firmware Package
Please take attention to the model
number and software version.
Download the firmware package from
MEIZU' website.
Guide to Firmware Upgrade
5
The player is shown as the Removable
Disk on your PC.
In the normal Windows environment, as soon
as the cable is connected, the message
"Searching for new device" appears.
Upgrading Product Firmware
Then it displays M6SL.EBN,
resource.bin in the Removable Disk.
After finish upgrading, restart the
player, then it pops up and starts
running the 'Upgrading Software,
Please Wait...' and shut down automatically. Turn it on again, it pops up
'Upgrading Resource, Please Wait...',
then the program will be renovated
automatically on the player. It will take
you some time to finish the upgrading.
Decompress the downloaded files,
drag and drop them onto the
"RemovableDisk" window.
Then run 'Safely Remove Hardware'
and disconnect the player to your PC.
The upgrading is applied, then disconnect the USB cable on the player.
Draw out the USB cable on the player.
68
Software.zip
USB电源适配器连接线
USB电源适配器连接线
Long Click
Dane-Elec_MiniPlayer SL_manual
donderdag 29 november 2007 12:13:22
Page 36

71
Formatting the Flash Memory
The flash Memory of the player can be formatted. Please use Windows format tools
to format the player, and restore read & write operations of file systems.
If the flash Memory is formatted, all data stored within is lost.
Take notice of this fact, examine the following procedures.
Before formatting
Finished installation of the player manager program
Connecting the player to your PC
Backup all data stored in the player
Operating procedures
Press the Power ON/OFF button
to start the player.
Connect the player and your PC via
USB connection cable.
* Small end to player, large end to PC
Format
70
Additional Information
6
Double click [My Computer] and select the [Removable Disk].
Click the [Start] key.
Select the [Removable Disk] and right
click on it, then click [Format].
Format
The player is shown as the Removable
Disk on your computer.
Long Click
Dane-Elec_MiniPlayer SL_manual
donderdag 29 november 2007 12:13:22
Page 37

73
Exit the formatting, click [Close] to exit.
While finishing, click [OK] to finish.
You should take special care when you format it since all the data in the memory will be
deleted. The folders named Music, Pictures, Playlists, Record, Video in the player are
system directories, they will be deleted after format. Reboot and operate the player, then
the directories will be recreated automatically.
It pops up the warning window, select
[OK] to continue.
The formatting is start running.
Format
72
6
Additional Information
6
71
Do not subject the player to severe impact or jarring.
Vibration experienced during walking or exercising will not affect the player. However,
dropping a heavy object on the player may result in damage or sound distortion.
Be careful when storing the set and do not use or place it at the following places:
Places with high humidity;
Places with strong magnetic fields;
Places with extreme temperatures;
Directly under the sunshine or near the equipment that generates heat;
Inside a car with closed windows especially in summer.
It is necessary to prevent strong shock when reading files or operating, otherwise
files may be damaged or deleted.
Please do not repair or disassemble this product by yourself.
Please do not use this product in the place where forbid to use for electronics
products.
Please do not operate this product while driving.
Please backup the important information on your note book, any repair result from
electricity shock, static electricity, change of battery or incorrect using may cause
change, damage or delete the files stored in the product.
Handling Instructions
●
●
●
●
Dane-Elec_MiniPlayer SL_manual
donderdag 29 november 2007 12:13:23
Page 38

75
Precautions for Using the Product
74
Additional Information
6
Do not keep it in high
temperatures or in a damp
place for a long time or
dispose in direct sunlight.
Keep away from places of
dust and cigarette ash.
Keep away from impact, do
not contact with the static
objects.
Please keep the highperformance transparent
protection film on the player
and do not remove it.
Do not drop player or apply
impact. Shock is the major
cause of breakdown.
Make sure that the player does
not get in contact with
chemicals such as benzene
or thinner.
If you disassemble or modify
the product arbitrarily, you
cannot receive free services,
and may be excluded from the
scope of service.
Frequently back up important
files. All the data stored in the
product may be deleted during
AS.
Please keep the SN of your
player for your future's
reference.
Trouble Shooting
Trouble Shooting
There is no sound.
The player does not
power on.
Characters in LCD are
broken.
Failed download of music
audio file
Check whether the HOLD switch on the player is ON
(Switch to OFF position)
Check whether it failed upgrading the software, upgrade it
again.
Check that there are audio files in the memory.
Check whether VOLUME is set to "0".
Connect the earphones/remote plug firmly.
Corrupted WMA audio files may make a static noise & the sound
may cut off.
Check your files on the PC to see if they are corrupted.
Check out Menu - Display - Language and confirm whether
the right language has been selected.
Check the connection between your computer and the player
to ensure that the cable is secure.
Check the Manager program to make sure it is operating.
Check whether the player 's Memory is full.
Note: Should any problem persist after you have checked these symptoms, consult the
distributors.
●
●
●
●
●
●
●
●
●
●
●
SN
Dane-Elec_MiniPlayer SL_manual
donderdag 29 november 2007 12:13:28
Page 39

77
Additional Information
6
Product Specifications
73
Product Specifications
Dimensions
Weight
LCD
PC Interface
Flash Memory
Power Supply
Audio Playback
Picture Format
Video Playback
Record
Fast, Normal, High mode
VBR
8~355kbps
Quality0 ~ Quality10
PCM, MS-ADPCM, IMA-ADPCM
>90dB
<0.3%
690mV@32Ω
1024×1024
Video: 20 fps, ≤ 512kbps
Audio: 56~256kbps, stereo
Bit Rate: 32kbps ~ 128kbps
Micr
76
Memo
78mm×46.5mm×7.3mm (H×W×T)
48g (Including Battery)
TFT LCD QVGA 2.41" 320x240 260000 color
High speed USB2.0
Built-in basic Flash Memory (2GB/4GB/8GB)
Up to 26 hrs of music playback, 4.5 hrs for video playback
APE
FLAC, WMA Lossless
WMA
OGG
WAV
S/N Ratio
Distortion Rate
Earphone's Output
BMP, JPG, GIF
AVI
Recording Format
Recording Source
Note: Design and specifications are subject to change without notice.
Dane-Elec_MiniPlayer SL_manual
donderdag 29 november 2007 12:13:28
Page 40

Memo
80
Dane-Elec_MiniPlayer SL_manual
donderdag 29 november 2007 12:13:28
 Loading...