

Page 1

User’s Guide
H950V(B19AC)
TFT-LCD Monitor
Table of Contents
Regulatory Information
...............................................................................................................................2
Introduction
Controls
Caution
Power Management Feature
Standard Signal Table
Specifications
Pin assignment table D-Sub Mini 15pin connector
Troubleshooting
Package ........................................................................................................................................................ 3
The range of control Angle ............................................................................................................................3
Connection to Signal Source .........................................................................................................................4
Front panel ................................................................................................................................................... 5
Functions .......................................................................................................................................................5
Adjusting OSD(PC MODE) ............................................................................................................................6
Adjusting OSD(CVBS, S-VIDEO MODE) ....................................................................................................11
.........................................................................................................................................................16
....................................................................................................................17
...............................................................................................................................18
.............................................................................................................................................19
...........................................................................20
.........................................................................................................................................21
Page 2

TFT-LCD Monitor
Regulatory
Information
- FCC Information
This equipment has been tested and found to comply with limits for a class B digital device,
pursuant to Part 15 of the FCC Rules. These limits are designed to provide reasonable
protection against harmful interference in a residential installation.
This equipment can generates, uses, and radiate radio frequency energy and, if not installed and used in
accordance with the instructions, may cause harmful interference to radio communications. However, there is no
guarantee that interference will not occur in a particular installation.
If this equipment does cause unacceptable interference to radio and television reception, which can be determined
by turning the equipment off and on, the user is encouraged to try to correct the interference by one or more of the
following measures.
Reorient or relocate the receiving antenna.
Increase the separation between the equipment and receiver.
Connect the equipment into an outlet on a circuit different from that to which the receiver is connected.
Consult the dealer or an experienced Radio/TV technician for help.
Caution
Changes or modifications not expressly approved by the party responsible for compliance could void the user’s
authority to operate the equipment.
- Canadian Notice This Class B digital apparatus meets all requirements of the Canadian Interference Causing Equipment Regulations.
- Avis Canadien Cet appareil numérique de la classe B respecte toutes les exigences du Règlement sur le matériel brouilleur du
Canada.
- Energy Star As an ENERGY STAR partner, Hansol LCD Inc. has determined that this product meets energy Star
guidelines for energy efficiency.
Notice
The information contained in this document is subject to change without notice.
2
Page 3
TFT-LCD Monitor
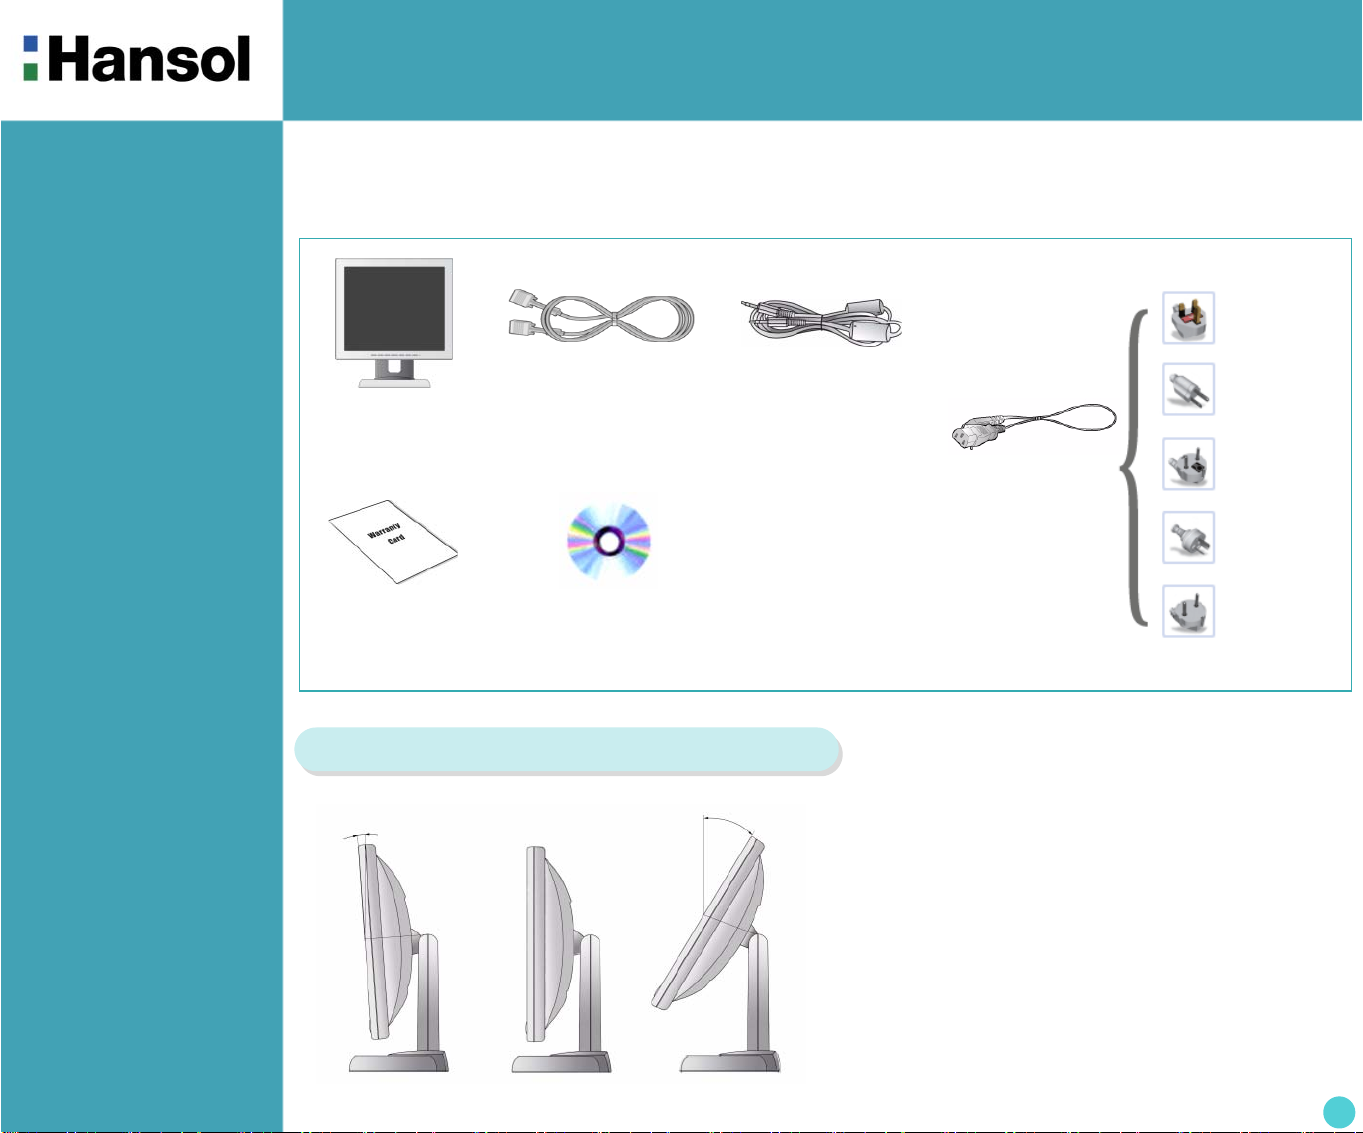
Introduction
- Package
Congratulations on your purchase of this top quality color monitor!
The items illustrated below are contained in the carton.
First, be sure that your carton includes all of them.
If any items are missing or damaged, please contact your local dealer or supplier.
LCD Monitor
Warranty
Card
Signal Cable
C D
(User’s Guide & etc)
Stereo Cable
(Option)
AC Power
Cable
UK
U.S.A/
Canada
Europe
Australia
Korea
- The range of
c on tr ol An gl e
How to Adjust the Stand
▲ Forward 5° ▲ Default ▲ Backward 33°
3
Page 4

TFT-LCD Monitor
Introduction
- Connection to
Signal Source
Basic Connection
① Port for AC power cable.
② Port for BNC output.
③ Port for BNC input.
④ Port for S-VHS input.
⑤ Port for Audio input.
⑥ Kensington Lock.
⑦ Port for signal cable from signal source.
①
<Power Source Connection> <Signal Cable Connection>
② ③ ④ ⑤ ⑥ ⑦
General
1. Use 220V or 110 V. (Free Voltage)
2. Connect monitor and Signal Source via Signal cable.
3. Power on the monitor and computer.
4. Connection is finished.
For Macintosh
Adapter for Macintosh(Optional)
Refer to the table on the rear side of
the optional Macintosh adapter and
adjust DIP switch by the resolution.
4
Page 5

Controls
- Front panel
TFT-LCD Monitor
SOURCE BUTTON
MENU/EXIT BUTTON
SELECT/AUTO BUTTON
- Functions Power button
Power button is located in the lower center of the Front Bezel.
You can push the button to trun on/off the power.
Power Indicating LED
Dark : Power off
Green : Normal mode
Green blinking : DPMS mode or Check Signal Cable mode.
On Screen Display(OSD) Function Button
OSD buttons on the front of bezel perform the following functions.
SOURCE : Monitor displays source of the signal in order (PC → CVBS → S-VHS)
MENU/EXIT : Press this button to display menus.If you press this button when OSD is displayed, you can switch
display to the previous menu and exit menu.
SELECT/AUTO : Press this button, when OSD is not displayed, to perform automatic setting.(only PC Mode.)
When OSD is displayed, you can select icons.
POWER : Power button.
+ / , – / : By pressing these button when OSD is displayed, you can move cursor into the menus which
you want. After press the SELECT button, you can change gauge level or select submenus.
When OSD is not displayed, you can adjust brightness or contrast.
VOLUME/MUTE : Press this button for volume control. When Control is displayed, you can control mute
by pressing this button.
POWER BUTTON
(Power indicating LED)
VOL/MUTE BUTTON
/ + BUTTON
/
– BUTTON
5
Page 6

TFT-LCD Monitor
Controls
- Adjusting OSD
(PC MODE)
Brightness / Contrast
Brightness
Contrast
MENU – + SELECT
1. Press the MENU button to access main menu.
2. Use – , + to move Brightness / Contrast ICON.
3. Press SELECT button into the submenu.
– + SELECT – +
1. Use – , + to move Brightness ICON.
2. Press SELECT button to select it.
3. Use – , + to adjust the brightness of the screen.
– + SELECT – +
Clock Phase
1. Use – , + to move Contrast ICON.
2. Press SELECT button to select it.
3. Use – , + to adjust the contrast of the screen.
MENU – + SELECT
1. Press the MENU button to access main menu.
2. Use – , + to move CLOCK PHASE ICON.
3. Press SELECT button into the submenu.
6
Page 7

TFT-LCD Monitor
Horizontal Position
– + SELECT – +
1. Use – , + to move H-Position ICON.
2. Press SELECT button to select it.
3. Use – , + to adjust display left or right.
According to the characteristic of video card, control range
can be changed.
Vertical Position
– +
1. Use – , + to move V-Position ICON.
2. Press SELECT button to select it.
3. Use – , + to adjust display upward or downward.
According to the characteristic of video card, control range
can be changed.
Phase
SELECT – +
Clock
– + SELECT – +
1. Press – , + to move Phase ICON.
2. Use SELECT button to select it.
3. Use – , + to correct fine trembling or Video noise.
– + SELECT – +
1. Use – , + to move Clock ICON.
2. Press SELECT button to select it.
3. Press – or + to remove vertical noise.
(Adjusting clock phase is required after the adjustment of clock.)
7
Page 8

TFT-LCD Monitor
Color
MENU – + SELECT
1. Press MENU button to access main menu.
2. Use – , + to move Color ICON.
3. Press SELECT button into the submenu.
Preset Color
– + MENU
1. Use – , + to select the Mode 1, and Mode 2.
2. Press the Menu button to return previous state.
9300K : Slighty Bluish white. 6500K : Slighty Reddish white.
User Color
OSD
– + SELECT – + MENU
1. Use – , + to move Color ICON.
2. Press SELECT button to select it.
3. Use – , + to increase or decrease each color.
MENU – + SELECT
1. Press MENU button to access main menu.
2. Use – , + to move OSD ICON
3. Press SELECT button into the submenu.
8
Page 9

TFT-LCD Monitor
OSD H-Position
– + SELECT – +
1. Use – , + to move OSD H-position ICON.
2. Press SELECT button to select it.
3. Use – , + to adjust OSD Left or right.
OSD V-Position
– + SELECT – +
1. Use – , + to move OSD V-position ICON.
2. Press SELECT button to select it.
3. Use – , + to adjust OSD upward or downward.
OSD Time
Special
– + SELECT – +
1. Use – , + to move OSD Time ICON.
2. Press SELECT button to select it.
3. Use – , + to adjust OSD display time.
4. Press menu button to return main menu.
MENU – + SELECT
1. Press the MENU button to access main menu.
2. Use – , + to move Special ICON.
3. Press SELECT button into the submenu.
9
Page 10

TFT-LCD Monitor
Language
MENU – + SELECT – +
1. Use – , + to move Language ICON.
2. Press SELECT button to select it.
3. Use – , + to select language.
Factory Reset
– + SELECT
1. Use – , + to move the Factory Reset ICON.
2. Press SELECT button to return to default setting.
Information
Sound
MENU – + SELECT
1. Use – , + to move the information ICON.
2. Press SELECT button to select it.
According to the characteristic of video card, display information
can be incorrect.
※ You can know display information.
MENU – + SELECT
1. Use – , + to decrease or increase volume level.
2. Press SELECT button to select it.
3. Use – , + to control volume.
10
 Loading...