

Page 1
MICROWAVE
Owner’s Manual.............................1 - 16
MICRO ONDE
Manuel du propriétaire.................17 - 32
MICROONDA
Manual del propietario.................33 - 48
MODEL • MODÈLE • MODELO
DBMW1121BBB
DBMW1121BWW
DBMW1126BBS
Danby Products Limited, Guelph, Ontario, Canada N1H 6Z9
Danby Products Inc. Findlay, Ohio, U.S.A. 45840
www.danby.com
Printed in China | Imprimé en Chine | Impreso en China
2024.04.29
Page 2

Welcome to the Danby family.
We are proud of our quality products and we believe in dependable service. We suggest
that you read this owner’s manual before plugging in your new appliance as it contains
important operation information, safety information, troubleshooting, and maintenance tips
to ensure the reliability and longevity of your appliance.
You are entitled to the warranty coverage as described in the owner’s manual provided with
your new appliance.
1. Please write down your appliance information below. You must keep the original proof
of purchase receipt to validate and receive warranty services.
2. Register your product online and receive a FREE 2 MONTH WARRANTY EXTENSION
after filling out a product survey, at www.danby.com/support/product-registration/
Model Number: ____________________________________________________
Serial Number: ____________________________________________________
Date of Purchase: __________________________________________________
Need Help?
1. Read your Owner’s Manual for installation help, troubleshooting, and maintenance
assistance.
2. Visit www.Danby.com to access self-service tools, FAQs and much more by searching
your model number in the search bar.
3. For the Quickest Customer Service, please fill out the web form at www.danby.com/
support. Your submission will go directly to an expert on your particular appliance.
Our average response times are between 20 minutes and 2 hours, during EST business
hours.
4. Call 1-800-263-2629 - please note that during peak hours, hold times can exceed one
hour.
1
Page 3
IMPORTANT SAFETY INSTRUCTIONS
READ AND FOLLOW ALL SAFETY INSTRUCTIONS
Basic safety precautions should be followed when using electrical appliances, including the
following:
WARNING - To reduce the risk of burns, electric shock, fire, injury to persons or exposure
to excessive microwave energy:
1. Read all instructions before using the microwave.
2. Read and follow the specific “PRECAUTIONS TO AVOID POSSIBLE EXPOSURE TO
EXCESSIVE MICROWAVE ENERGY” found on page 4.
3. This microwave must be grounded. Connect only to a properly grounded outlet. See
“GROUNDING INSTRUCTIONS” found on page 5.
4. Install or locate this microwave only in accordance with the provided installation
instructions.
5. Some products such as whole eggs and sealed containers, for example, closed glass
jars, are able to explode and should not be heated in this oven.
6. Use this microwave only for its intended use as described in this manual. Do not
use corrosive chemicals or vapors in this microwave. This type of oven is specifically
designed to heat, cook or dry food. It is not designed for industrial or laboratory use.
7. HOT CONTENTS CAN CAUSE SEVERE BURNS. DO NOT ALLOW CHILDREN TO USE
THE MICROWAVE. Use caution when removing hot items.
8. Do not operate this microwave if it has a damaged cord or plug, it if is not working
properly or if it has been damaged or dropped.
9. This microwave should be serviced only by qualified service personnel. Contact the
nearest authorized service facility for examination, repair, or adjustment.
10. Do not cover or block any openings on the microwave.
SAVE THESE INSTRUCTIONS!
2
Page 4
IMPORTANT SAFETY INSTRUCTIONS
READ AND FOLLOW ALL SAFETY INSTRUCTIONS
11. Do not store this microwave outdoors. Do not use this microwave near water, for
example, near a kitchen sink, in a wet basement, near a swimming pool or similar
location.
12. Do not immerse the power cord or plug in water.
13. Keep the power cord away from heated surfaces.
14. Do not let the power cord hang over edge of a table or counter.
15. When cleaning the surfaces of the door and oven that make contact when the door
is closed, use only mild, nonabrasive soaps, or detergent applied with a sponge or soft
cloth.
16. To reduce the risk of fire in the oven cavity:
• Do not overcook food. Carefully attend the microwave when paper, plastic, or other
combustible materials are placed inside the oven to facilitate cooking.
• Remove wire twist -ties from paper or plastic bags before placing the bag in oven.
• If material inside of the oven ignites, keep the oven door closed, turn the oven off,
and disconnect the power cord, or shut off the power at the fuse or circuit breaker
panel.
• Do not use the oven for storage purposes. Do not leave paper products, cooking
utensils, or food inside the oven when not in use.
17. Liquids, such as water, coffee, or tea are able to be overheated beyond the boiling
point without appearing to be boiling. When the container is removed from the
microwave, visible bubbling or boiling is not always present. THIS COULD RESULT
IN VERY HOT LIQUIDS SUDDENLY BOILING OVER WHEN THE CONTAINER IS
DISTURBED OR A UTENSIL IS INSERTED INTO THE LIQUID.
• Do not overheat liquids.
• Stir liquids both before and halfway through heating.
• Do not use straight sided containers with narrow necks.
• After heating, allow the container to stand in the microwave for a short period of time
before removing it.
• Use extreme care when inserting a spoon or other utensil into the container.
SAVE THESE INSTRUCTIONS!
3
Page 5
IMPORTANT SAFETY INSTRUCTIONS
READ AND FOLLOW ALL SAFETY INSTRUCTIONS
PRECAUTIONS TO AVOID POSSIBLE EXPOSURE TO EXCESSIVE
MICROWAVE ENERGY
(1) Do not attempt to operate this oven with the door open. Open-door
operation can result in harmful exposure to microwave energy. It is
important not to defeat or tamper with the safety interlocks.
(2) Do not place any object between the oven cabinet and the door or allow
soil or cleaner residue to accumulate on surfaces that make contact when the
door is closed.
(3) Do not operate the oven if it is damaged. It is particularly important that
the oven door close properly and that there is no damage to the:
(a) door (bent),
(b) hinges and latches (broken or loosened),
(c) door seals and sealing surfaces.
(4) The oven should not be adjusted or repaired by anyone except properly
qualified service personnel.
SAVE THESE INSTRUCTIONS!
4
Page 6
IMPORTANT SAFETY INSTRUCTIONS
READ AND FOLLOW ALL SAFETY INSTRUCTIONS
GROUNDING INSTRUCTIONS
This microwave must be grounded. In the event of an electrical short circuit, grounding
reduces the risk of electrical shock by providing an escape wire for the electrical current.
This microwave is equipped with a cord that has a grounding wire with a grounding plug.
The power cord must be plugged into an outlet that is properly grounded. If the outlet is a
2 prong wall outlet, it is your responsibility to have it replaced with a properly grounded 3
prong wall outlet. The serial rating plate indicates the voltage and frequency the microwave
is designed for.
WARNING - Improper use of the grounding plug can result in a risk of electric shock.
Consult a qualified electrician or service agent if the grounding instructions are not
completely understood, or if doubt exists as to whether the microwave is properly
grounded.
If it is necessary to use an extension cord, use only a 3 wire extension cord that has a 3
blade grounded plug and a 3 slot receptacle that will accept the plug on the microwave.
The marked electrical rating of the extension cord must be at least as great as the electrical
rating of the microwave. The longer cord must be arranged so that it will not drape over the
counter top or tabletop where it can be pulled by children or tripped over.
DANGER - Electric Shock Hazard: Touching some of the internal components can cause
serious personal injury or death. Do not disassemble this microwave.
WARNING - Electric Shock Hazard: Improper use of the grounded plug can result in electric
shock. Do not plug the microwave in if the grounded plug is damaged.
A short power supply cord is provided to reduce the risks resulting from becoming
entangled in or tripping over a longer cord.
If the power supply cord is damaged, it must be replaced by the manufacturer, its service
agent or similar qualified person to avoid hazard.
Have a qualified electrician install a grounded outlet near the microwave if the power cord
is too short.
SAVE THESE INSTRUCTIONS!
5
Page 7
IMPORTANT SAFETY INSTRUCTIONS
READ AND FOLLOW ALL SAFETY INSTRUCTIONS
SAFETY - SUPERHEATED LIQUID
Liquids are able to be overheated beyond the
boiling point without appearing to be boiling
due to the surface tension of the liquid. Visible
bubbling will not always be present when the liquid
is removed from the microwave. This could result
in very hot liquids suddenly boiling over when a
utensil or other item such as a tea bag is inserted
into the liquid.
To reduce the risk of injury:
• Do not overheat liquids. Do not heat any liquid
for more than 2 minutes per cup.
• Stir liquids before and halfway through heating.
• Do not use straight-sided containers with narrow
necks as this can cause a build up of steam.
• Superheated liquid can begin to spontaneously
boil when removed from the microwave.
After heating, allow the liquid to stand in the
microwave for 30 seconds before removing.
• Use extreme care when inserting a utensil or
other item into hot liquids.
The contents of milk bottles and baby food jars
should be stirred or shaken and the temperature
checked before serving in order to avoid burns.
Do not defrost frozen beverages, especially
carbonated beverages, in this microwave as they
could explode.
Hot foods and steam can cause burns. Be careful
when opening any container that has been heated
in the microwave. Direct the opening away from the
hands and face to avoid burns.
SAFETY - ARCING
Arcing refers to sparks inside the microwave while it
is in operation. Arcing is caused by:
• Metal or foil inside the microwave.
• Recycled paper towels being used inside the
microwave, as these can contain small pieces of
metal.
If arcing is present, stop operation and remove any
metal or paper towels from the microwave.
RADIO INTERFERENCE
This microwave generates and uses ISM frequencies
and if not installed and used properly in strict
accordance with the manufacturer’s instructions,
it may cause interference to radio and television
reception. It has been type-tested and found to
comply with limits for ISM Equipment pursuant
to Part 18 of the FCC Rules, which are designed
to provide reasonable protection against such
interference in a residential installation.
However, there is no guarantee that interference
will not occur in particular installations. If this
microwave does cause interference to radio or
television reception, which can be determined by
turning the equipment off and on, the interference
can be corrected by one or more of the following
methods:
• Reorient the receiving antenna of radio or
television.
• Move the microwave away from the receiver.
• Plug the microwave into a different outlet so that
the microwave and receiver are on different
branch circuits.
The manufacturer is not responsible for any
radio or TV interference caused by unauthorized
modification of this microwave. It is the
responsibility of the user to correct such interference.
SAVE THESE INSTRUCTIONS!
Page 8

INSTALLATION INSTRUCTIONS
OPERATING INSTRUCTIONS
INSTALLATION
• Remove all packing materials from the inside
and outside of the microwave. Do not remove
the cardboard mica sheet covering the
magnetron.
• Check the microwave for damage before using,
such as a misaligned or bent door, damaged
door seals, broken or loose door hinges or
latches, or dents inside the cavity or on the
door. If there is any damage, do not use the
microwave, return it to its point of purchase or
contact consumer care.
• The microwave must be placed on a flat, stable
surface that is able to hold its weight and the
heaviest food likely to be cooked in it.
• Do not use this microwave where heat, moisture
or high humidity are generated.
COOKING TECHNIQUES
To achieve the best results, follow the suggestions
below.
STIRRING
Stir foods while cooking to distribute heat evenly.
Food at the outside of the dish absorbs more energy
and will heat more quickly so stir from the outside of
the dish toward the center.
ARRANGEMENT
Arrange unevenly shaped foods with thicker,
meatier parts toward the outside of the turntable
so they receive more heat. To prevent overcooking,
place delicate items toward the center of the
turntable.
TURNING
• Do not clean this microwave with or use near
combustible materials.
• Allow 7.5 cm (3 inches) of space above the
microwave, 2.5 cm (1 inches) at the back of the
microwave and 7.5 cm (3 inches) on both sides
for proper air flow. Do not block any ventilation
openings.
• Do not operate the microwave without the glass
tray, roller support and shaft in their correct
positions.
• WARNING: Do not install the microwave over
a range cooktop or other heat producing
appliance. If installed near or above a heat
source the microwave could be damaged and
the warranty would be void.
Turn food over midway through cooking to expose
all parts to the microwave energy. This is important
with large items and meat.
STANDING
Foods cooked in a microwave build up internal
heat and continue to cook for a few minutes after
heating stops. Let foods stand to complete cooking,
especially meats and liquids. All liquids should be
allowed to stand for a few minutes after cooking
and should be shaken or stirred before consuming.
ADDING MOISTURE
Microwave energy is attracted to water molecules.
Food that is uneven in moisture content should be
covered and allowed to stand after cooking to allow
the heat to disperse evenly. Add a small amount of
water to dry food to help it cook.
7
Page 9

OPERATING INSTRUCTIONS
COOKING UTENSILS GUIDE
Certain utensils are inappropriate for use in a microwave. See below for more information on which
utensils are recommended, which should only have limited use and which are not recommended.
RECOMMENDED
Microwave Browning Dish: Used to brown the
exterior of small food items. Follow the directions
provided with the browning dish.
Microwavable Plastic Wrap: Used to retain steam.
Leave a small opening to avoid a build up of steam.
Do not place directly on food.
Glass and Ceramic Bowls and Dishes: Use for
heating or cooking.
Paper Plates and Cups: Use for short term heating
at low temperatures. Do not use recycled paper as
they can contain metal and could ignite.
Paper Towels and Napkins: Use for short term
heating and covering. They can absorb excess
moisture and prevent splattering. Do not use
recycled paper towels as they can contain metal
and could ignite.
NOT RECOMMENDED
Glass Jars and Bottles: Regular glass is too thin to
be used in a microwave. It can shatter and cause
damage or injury.
Paper Bags: These are a fire hazard and could
ignite. The only exception is popcorn bags, which
are designed for microwave use.
Styrofoam Plates and Cups: These can melt and
leave an unhealthy residue on food.
Plastic Storage and Food Containers: These can
melt and ignite.
Metal Utensils: These can cause arcing and
damage to the microwave. Remove all metal before
operation.
Aluminum Foil: Using foil can cause arcing and
damage the microwave.
Wax Paper: Use as a cover to prevent splattering.
Thermometers: Only use those that are labeled
“microwave safe” and follow all directions.
Check the food in several places. Conventional
thermometers can be used once the food has been
removed from the microwave.
LIMITED USE
Ceramic, Porcelain and Stoneware: Only use if
they are labeled “microwave safe”.
Plastic: Only use if labeled “microwave safe”.
Note: To check if a dish is safe for use in the
microwave, place the empty dish in the microwave
and press the Start/+30SEC button to run a cooking
program at 100% power for 30 seconds. If the dish
becomes very hot, it should not be used.
8
Page 10
OPERATING INSTRUCTIONS
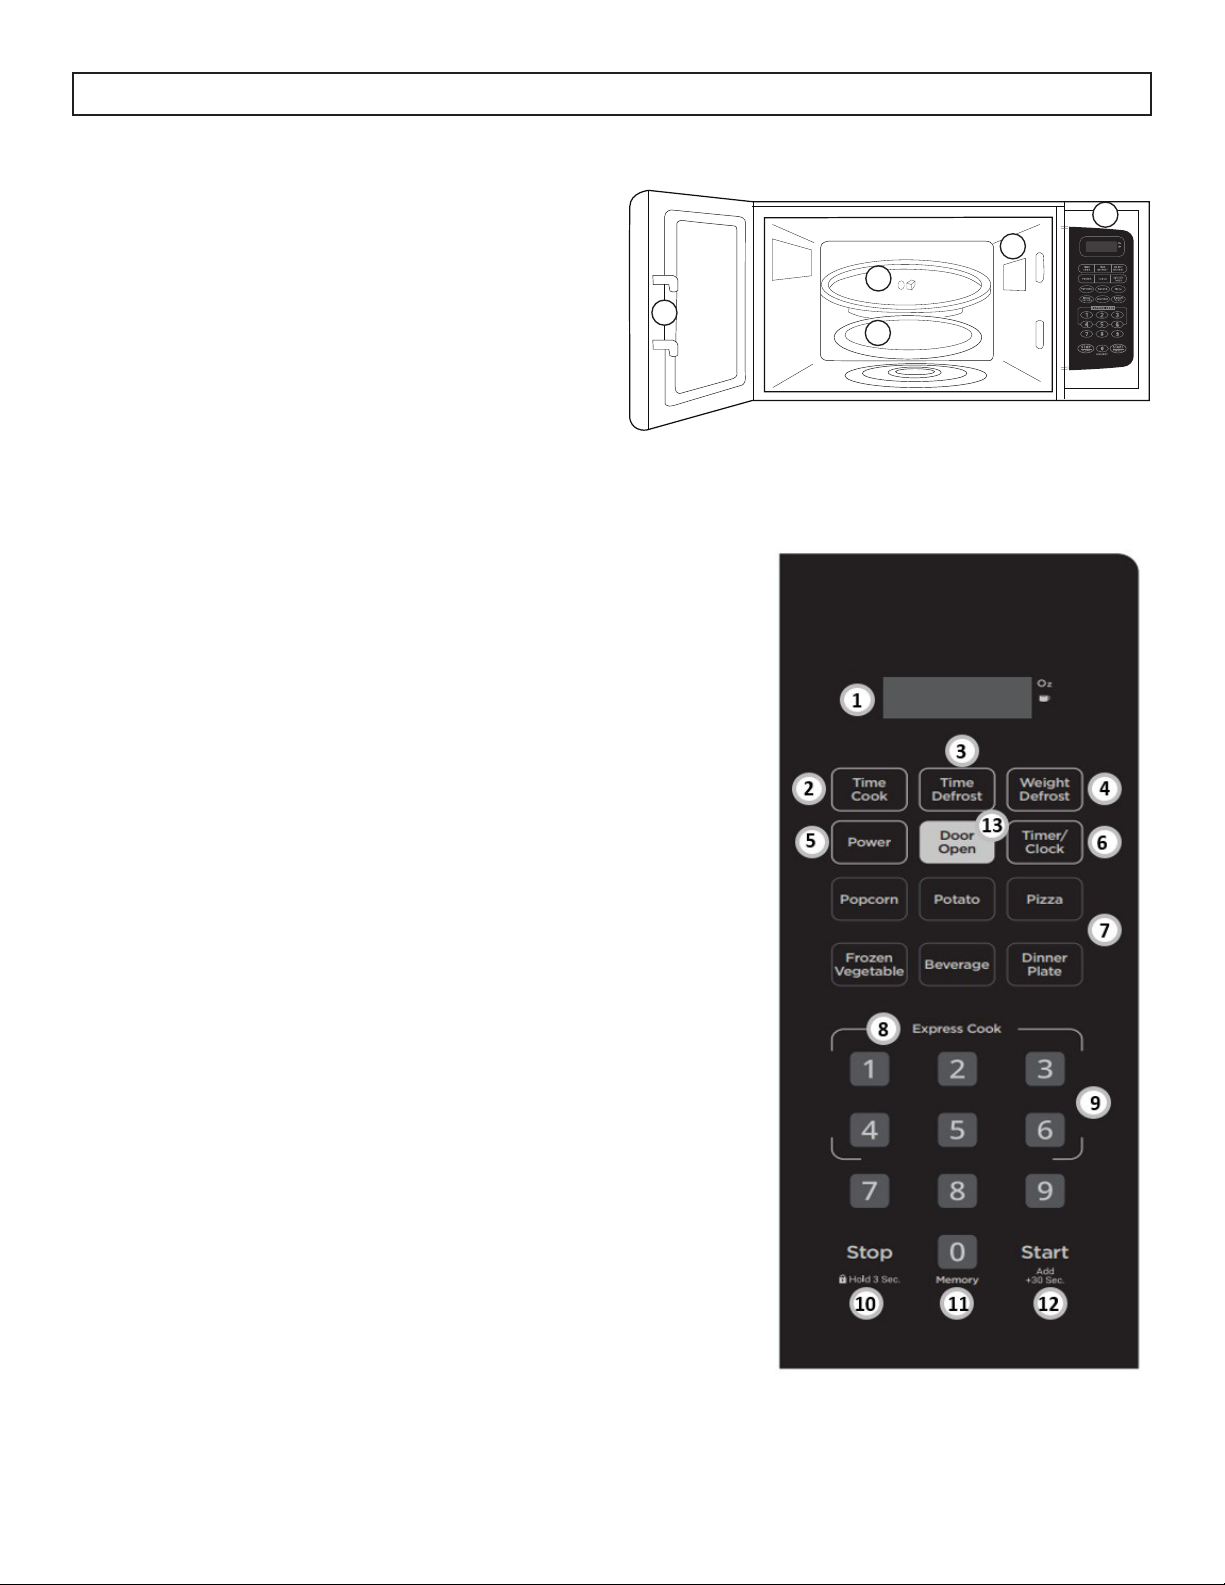
FEATURES
1. Door Lock System
2. Glass Tray
3. Roller Ring
4. Mica Sheet (Do Not Remove)
5. Control Panel
1
CONTROL PANEL
1. Display: Shows cooking time, power level and clock time.
2. Time Cook: Used to set the desired cook time.
3. Time Defrost: Used to set the defrost function based on time.
4. Weight Defrost: Used to set the defrost function based on
weight.
5
4
2
3
5. Power Button: Used to select the power level.
6. Timer/Clock Button: Used to set the timer and to set the
current time.
7. Auto Cook Menus: Instant settings to cook popular foods.
8. Express Cook Buttons: Used to set express cook options.
9. Number Pad: Used to set time or amounts.
10. Stop/Hold 3 SEC:
• Used to pause or clear a cooking program.
• Press and hold for 3 seconds to engage the control panel
lock.
11. 0/Memory Button: Used to set the memory.
12. Start/+30SEC Button: Used to start a cooking program or
add 30 seconds to a cooking program.
13. Door Open: Used for activating/deactivating Safety Lock
feature
9
Page 11
OPERATING INSTRUCTIONS
FIRST TIME USE
When the microwave is plugged in for the first time,
the display will show “0:00”. Use the number pad
to enter the current time and then press the clock
button to confirm.
The microwave will return to standby mode if there
is no input within 60 seconds.
During operation:
• Press the Start/+30SEC button to begin
operation.
• Press the Stop/Hold 3 SEC button to cancel the
cooking program.
• The microwave will beep five times at the end of
a cooking program.
MICROWAVE COOKING
SETTING THE TIMER/CLOCK
The clock can only be set as a 12 hour clock.
To set the current time:
1. Press the Timer/Clock button twice, the screen
will display “00:00”.
2. Use the number pad to enter the current time.
3. Press the Timer/Clock button to confirm.
During operation, press the Clock button to see the
current time.
To set a timer:
1. Press the Timer/Clock button once, the screen
will display “00:00”
2. Use the number pad to enter the desired time to
run the timer. The maximum time is 99 minutes
and 99 seconds.
3. Press the Start/+30SEC button to begin timer
operation.
1. Press the Time Cook button. The display will
show “00:00”.
2. Use the number pad to enter the desired cooking
time. The maximum time is 99 minutes and 99
seconds.
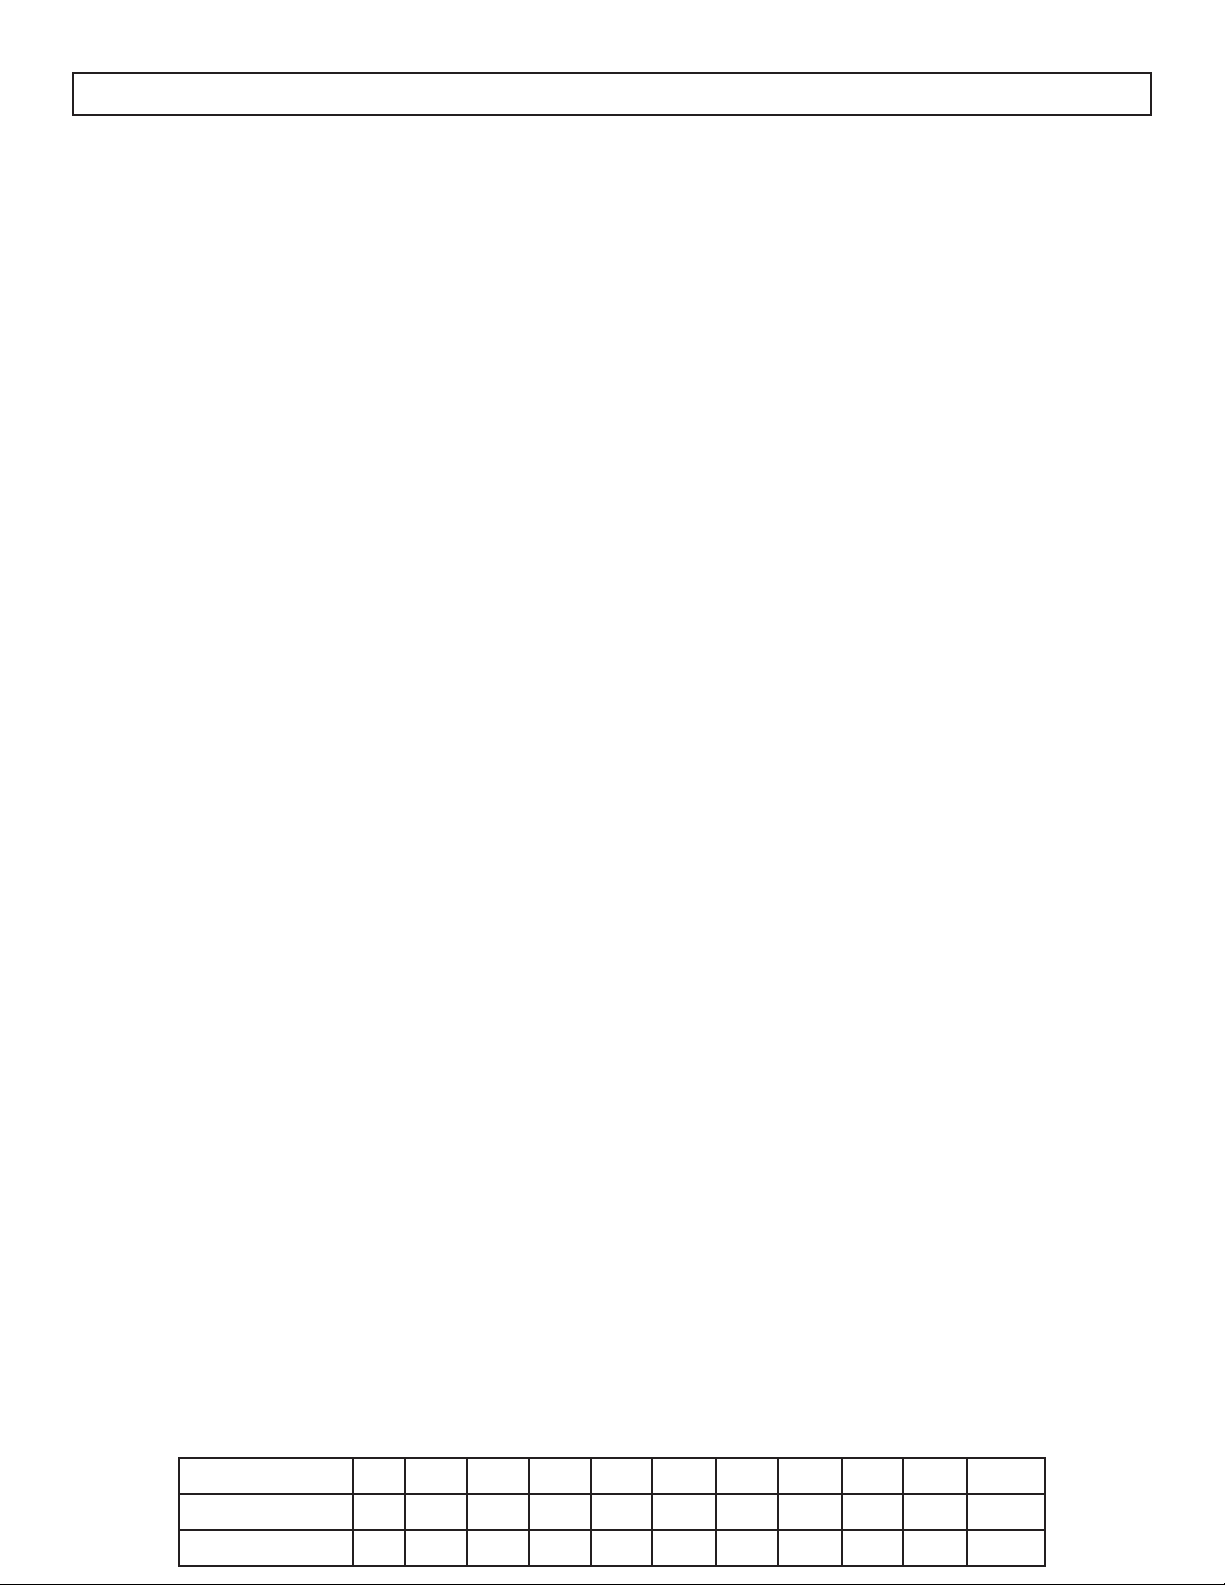
3. Press the Power button to choose a power level.
The default power level is 100%. The display
will show “PL10”. Use the number pad to enter
the desired power level if 100% is not required.
Consult the chart at the bottom of the page for
information on power levels.
4. Press the Start/+30SEC button to begin
operation.
Note: If “PL0” is selected, the microwave fan will
run with no cooking function. This power level can
be used to remove odors from the oven.
Note: During cooking, if the chosen power level is
not sufficient, press the power button. The current
power level will flash for three seconds. Use the
number pad to choose a new power level and
operation will continue in the new power level.
Note: The kitchen timer is a timer.
TWO STAGE COOKING
Some recipes require different stages of cooking
at different temperatures. To set a two stage cook
program:
1. Press the Time Cook button and use the number
pad to enter the desired cooking time for the first
stage.
2. Press the Power button and use the number
pad to enter the desired power level for the first
stage.
3. Press the Time Cook button and use the number
pad to enter the desired cooking time for the
second stage.
4. Press the Power button and use the number pad
to enter the desired power level for the second
stage.
5. Press the Start/+30sec button to begin
operation.
Number Pad 0 1 2 3 4 5 6 7 8 9 10
Cooking Power 0% 10% 20% 30% 40% 50% 60% 70% 80% 90% 100%
Display PL0 PL1 PL2 PL3 PL4 PL5 PL6 PL7 PL8 PL9 PL10
Page 12

OPERATING INSTRUCTIONS
AUTO COOK
The auto cook buttons can be used to set automatic cooking functions for the below food types.
POPCORN
1. Press the Popcorn button repeatedly to cycle through the options of “3.2” and “3.5”. These numbers
refer to the size of the popcorn bag in ounces.
2. Press the Start/+30SEC button to begin operation.
POTATO
1. Press the Potato button repeatedly to cycle through the options of “1”, “2” and “3”. These numbers
refer to the size of the portion in ounces. 1 is 8 ounces, 2 is 16 ounces and 3 is 24 ounces.
2. Press the Start/+30SEC button to begin operation.
PIZZA
1. Press the Pizza button repeatedly to cycle through the options of “4.0”, “8.0” and “14.0”. These
numbers refer to the size of the portion in ounces.
2. Press the Start/+30SEC button to begin operation.
FROZEN VEGETABLE
1. Press the Frozen Vegetable button repeatedly to cycle through the options of “4.0”, “8.0” and “16.0”.
These numbers refer to the size of the portion in ounces.
2. Press the Start/+30SEC button to begin operation.
BEVERAGE
1. Press the Beverage button repeatedly to cycle through the options of “1”, “2” and “3”. These numbers
refer to the number of cups.
2. Press the Start/+30SEC button to begin operation.
DINNER PLATE
1. Press the Dinner Plate button repeatedly to cycle through the options of “9.0”, “12.0” and “18.0”.
These numbers refer to the size of the portion in ounces.
2. Press the Start/+30SEC button to begin operation.
EXPRESS COOK
When the microwave is not in operation, press the
number pad from 1 to 6 to set a cooking program
that will run between 1 and 6 minutes at 100%
cooking power.
ADD 30 SECONDS
When the microwave is not in operation, press
the +30SEC button to set a cooking program that
will run for 30 seconds at 100% power level. This
button can be pressed multiple times, each press
will add a further 30 seconds to the cooking time.
The maximum cooking time is 99 minutes and 99
seconds.
11
Page 13
OPERATING INSTRUCTIONS
SAFETY LOCK
The Safety Lock is a system that safeguards against unintended activation of the microwave, providing a
protective measure to ensure child safety.
Initiating a cooking process triggers the door lock, and it also engages if the door remains unlocked for an
additional 30 minutes following the completion of cooking.
The Safety Lock is active by default. It will only be dactivated if the user chooses to do so manually. Even
in the event of loss of power, the oven will preserve the state of the safety lock, whether it is activated or
deactivated.
Unlock the door:
Press Door Open during operation and open the door within 10 seconds or the safety lock will re-engage.
The door will stay unlocked until cooking is initiated.
OR
Press Door Open within 30 minutes after cooking is complete to manually disable the door lock and switch
to standby mode. If no key is pressed, the safety lock will automatically disengage after 30 minutes.
Deactivate the safety lock:
If there are no children in the residence, you can shoose to permanently deactivate the safety lock function.
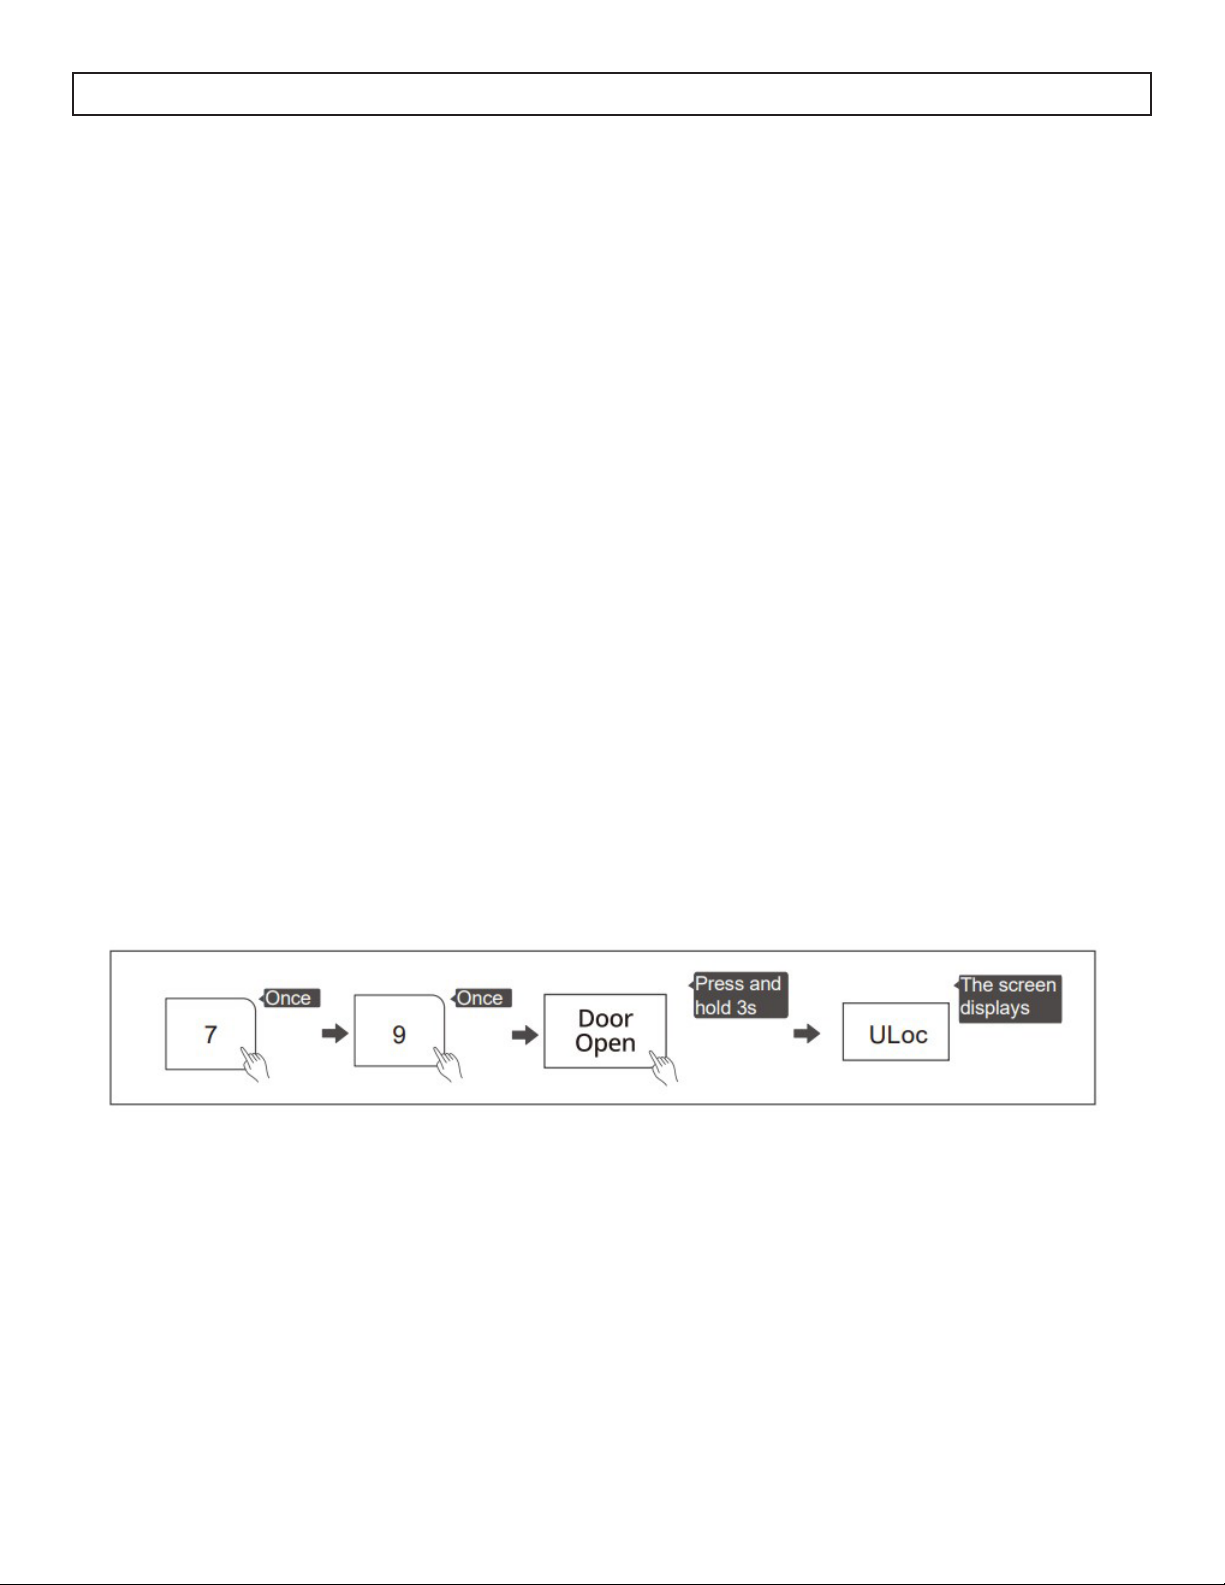
Press “7”, “9” in consecutive order and then press and hold Door Open for three seconds. Within 30
seconds, the screen will display “ULoc”, indicating the sucessful deactivation of the safety lock.
Re-activate the safety lock:
Press “7”, “9” in consecutive order and then press and hold Door Open for three seconds. Within 30
seconds, the screen will display “Loc”, indicating the successful re-activation of the safety lock.
SETTING THE CONTROL PANEL LOCK
To set the control panel lock press and hold the Stop/Hold 3Sec button for 3 seconds. The microwave will
beep to indicate that the lock is activated. While locked, the microwave cannot be used.
To cancel the control panel lock, press and hold the Stop/Hold 3Sec button for 3 seconds. The microwave
will beep to indicate that the lock has been deactivated.
12
Page 14

OPERATING INSTRUCTIONS
WEIGHT DEFROST
The defrosting time and power level are adjusted
automatically once the weight is entered.
1. Press the Weight Defrost button. The display will
show “dEF1”.
2. Use the number pad to enter the weight of the
food that will be defrosted between 4 ~ 100 oz.
3. Press the Start/+30SEC button to confirm.
TIME DEFROST
1. Press the Time Defrost button. The display will
show “dEF2”.
2. Use the number pad to enter the desired
defrosting time. The maximum time is 99 minutes
and 99 seconds.
3. The default power level is 3, 30%. The display
will show “PL3”.
4. To change the power level, press the Power
button and then press the number pad for the
desired power level.
5. Press the Start/+30SEC button to confirm.
MEMORY
The memory feature allows you to program cooking
times and powers that can be recalled and used
with minimal input. Three memory programs can be
set at one time, they are labeled 1, 2 and 3.
To set Memory 1:
1. Press the 0/Memory button once. The number 1
will display.
2. Press the Time Cook button and then use the
number pad to enter the desired cook time.
3. Press the Power button once. The power level
will default to 100%. “PL10” will display. To
change the power level, use the number pad to
enter the desired power level.
4. Press the Start/+30SEC button to save the
setting.
5. To use the setting in future, press the 0/
Memory button once and when the number 1
is displayed, press the Start/+30SEC button to
begin operation.
To set Memory 2 or 3, press the Memory button two
or three times until the number 2 or 3 are displayed
and then follow the steps above.
Note: If the power is lost or the microwave is
unplugged, the memory settings will need to be
reprogrammed.
13
Page 15

CARE AND MAINTENANCE
CLEANING
Turn off and unplug the microwave before
performing any cleaning.
The inside of the microwave should be cleaned with
a warm, damp cloth and mild detergents. Do not
allow food splatters to build up on the inside of the
microwave as this can affect the efficiency and if
sufficiently dirty, can ignite and cause fire.
The outside of the microwave should be cleaned
with a warm, damp cloth. To avoid damage to
internal components, do not allow any water to drip
into the ventilation openings.
Clean the door and window on both sides, the door
seals and the adjacent parts frequently with a damp
cloth to remove any spills or splatters. Do not use
abrasive cleaners.
MAINTENANCE
To remove odors from the microwave:
1. Combine a cup of water with the juice and skin
of one lemon in a microwavable bowl.
2. Microwave on full power for 5 minutes.
3. Wipe the inside of the microwave and glass tray
and roller ring thoroughly with a warm, damp
cloth.
MICA SHEET
Inside the microwave there is a cardboard mica
sheet protecting the magnetron. Do not remove this
sheet. Exposing the magnetron to food splatters can
cause arcing or fire. If it becomes dirty, the mica
sheet can be cleaned with a warm cloth.
Do not allow the control panel to become wet. If
necessary, clean the control panel with a damp
cloth and then wipe dry.
The glass tray can be removed and cleaned in
warm water and mild detergent or can be placed in
a dishwasher.
The roller ring and oven floor should be cleaned
regularly to avoid excessive noise or spilling. The
roller ring can be cleaned in warm water and mild
detergent or can be placed in a dishwasher. Ensure
that the roller ring and glass tray are replaced in the
proper position to avoid noise or spilling.
DISPOSAL
This microwave should not be treated as ordinary
household waste, it should be transported to the
appropriate collection point for the recycling of
electrical components. For information on local
waste collection points, contact your local waste
disposal agency or government office.
14
Page 16
LIMITED IN-HOME APPLIANCE WARRANTY
This quality product is warranted to be free from manufacturer’s defects in material and workmanship, provided that the unit is used under the normal operating
conditions intended by the manufacturer.
This warranty is available only to the person to whom the unit was originally sold by Danby Products Limited (Canada) or Danby Products Inc. (U.S.A.) (hereafter
“Danby”) or by an authorized distributor of Danby, and is non-transferable.
TERMS OF WARRANTY
Plastic parts, are warranted for thirty (30) days only from purchase date, with no extensions provided.
First Year
During the rst twelve (12) months, any functional parts of this product found to be defective, will be repaired or replaced, at warrantor’s
option, at no charge to the ORIGINAL purchaser.
To obtain
Danby reserves the right to limit the boundaries of “In Home Service” to the proximity of an Authorized Service Depot. Any app liance
Service
requiring service outside the limited boundaries of “In Home Service” , it will be the consumer’s responsibility to transport the appliance (at
their own expense) to the original retailer (point of purchase) or a service depot for repair. See “Boundaries of In Home Serv ice”below.
Contact your dealer from whom your unit was purchased, or contact your nearest authorized Danby service depot, where service
must be performed by a qualied service technician.
If service is performed on the units by anyone other than an authorized service depot, or the unit is used for commercial appli cation, all
obligations of Danby under this warranty shall be void.
Boundaries of
If the appliance is installed in a location that is 100 kilometers (62 miles) or more from the nearest service center your unit must be
In Home Service
delivered to the nearest authorized Danby Service Depot, as service must only be performed by a technician qualied and certif ied for
warranty service by Danby. Transportation charges to and from the service location are not protected by this warranty and are t he
responsibility of the purchaser.
Nothing within this warranty shall imply that Danby will be responsible or liable for any spoilage or damage to food or other c ontents of this appliance, whether due
to any defect of the appliance, or its use, whether proper or improper.
EXCLUSIONS
Save as herein provided, Danby, there are no other warranties, conditions, representations or guarantees, express or implied, m ade or intended by Danby or its
authorized distributors and all other warranties, conditions, representations or guarantees, including any warranties, conditio ns, representations or guarantees
under any Sale of Goods Act or like legislation or statue is hereby expressly excluded. Save as herein provided, Danby shall no t be responsible for any damages
to persons or property, including the unit itself, howsoever caused or any consequential damages arising from the malfunction o f the unit and by the purchase of
the unit, the purchaser does hereby agree to indemnify and hold harmless Danby from any claim for damages to persons or propert y caused by the unit.
GENERAL PROVISIONS
No warranty or insurance herein contained or set out shall apply when damage or repair is caused by any of the following:
1) Power failure.
2) Damage in transit or when moving the appliance.
3) Improper power supply such as low voltage, defective house wiring or inadequate fuses.
4) Accident, alteration, abuse or misuse of the appliance such as inadequate air circulation in the room or abnormal operating con ditions
(extremely high or low room temperature).
5) Use for commercial or industrial purposes (ie. If the appliance is not installed in a domestic residence).
6) Fire, water damage, theft, war, riot, hostility, acts of God such as hurricanes, oods etc.
7) Service calls resulting in customer education.
8) Improper Installation (ie. Building-in of a free standing appliance or using an appliance outdoors that is not approved for out door application).
Proof of purchase date will be required for warranty claims; so, please retain bills of sale. In the event warranty service is required, present this document to our
AUTHORIZED SERVICE DEPOT.
Danby Products Limited
PO Box 1778, Guelph, Ontario, Canada N1H 6Z9
Telephone: (519) 837-0920 FAX: (519) 837-0449
Danby Products Inc.
PO Box 669, Findlay, Ohio, U.S.A. 45840
Telephone: (419) 425-8627 FAX: (419) 425-8629
04/09
1-800-263-2629
Warranty Service
In-home
Transportation charges to and from the service location are not protected by this warranty and are the responsibility of the purchaser.
During the first twelve (12) months, any functional parts of this product found to be defective, will be repaired or
replaced, at warrantor’s option, at no charge to the original purchaser.
Contact the dealer where the unit was purchased, or contact the nearest authorized Danby service depot, where
service must be performed by a qualified service technician. If service is performed on the unit by anyone other
than an authorized service depot, all obligations of Danby under this warranty shall be void.
It is the responsibility of the purchaser to transport the appliance to the nearest authorized service depot.
First 12 months
To obtain service
LIMITED “CARRY IN” WARRANTY
This quality product is warranted to be free from manufacturer’s defects in material and workmanship, provided that the unit is used
under the normal operating conditions intended by the manufacturer.
This warranty is available only to the person to whom the unit was originally sold by Danby Products Limited (Canada) or Danby
Products Inc. (U.S.A.) (hereafter “Danby”) or by an authorized distributor of Danby, and is non-transferable.
TERMS OF WARRANTY
Plastic parts are warranted for thirty (30) days from the date of purchase, with no extensions provided.
Nothing within this warranty shall imply that Danby will be responsible or liable for any spoilage or damage to food or other
contents of this appliance, whether due to any defect of the appliance, or its use, whether proper or improper.
EXCLUSIONS
Save as herein provided, by Danby, there are no other warranties, conditions, representations or guarantees, express or implied, made
or intended by Danby or its authorized distributors and all other warranties, conditions, representations or guarantees, including any
warranties, conditions, representations or guarantees under any Sale of Goods Act or like legislation or statute is hereby expressly
excluded. Save as herein provided, Danby shall not be responsible for any damages to persons or property, including the unit itself,
howsoever caused or any consequential damages arising from the malfunction of the unit and by the purchase of the unit, the
purchaser does hereby agree to indemnify and hold harmless Danby from any claim for damages to persons or property caused by
the unit.
GENERAL PROVISIONS
No warranty or insurance herein contained or set out shall apply when damage or repair is caused by any of the following:
1) Power failure.
2) Damage in transit or when moving the appliance.
3) Improper power supply such as low voltage, defective house wiring or inadequate fuses.
4) Accident, alteration, abuse or misuse of the appliance such as inadequate air circulation in the room or abnormal operating
conditions (ie. extremely high or low room temperature).
5) Use for commercial or industrial purposes (ie. If the appliance is not installed in a domestic residence).
6) Fire, water damage, theft, war, riot, hostility, acts of God such as hurricanes, floods etc.
7) Service calls resulting in customer education.
8) Improper Installation (ie. Building-in of a free standing appliance or using an appliance outdoors that is not approved for outdoor
application, including but not limited to: garages, patios, porches or anywhere that is not properly insulated or climate controlled).
Proof of purchase date will be required for warranty claims; retain bills of sale. In the event that warranty service is required, present
the proof of purchase to our authorized service depot.
Warranty Service
Carry In
Danby Products Limited
PO Box 1778, Guelph, Ontario, Canada N1H 6Z9
Telephone: (519) 837-0920 FAX: (519) 837-0449
Danby Products Inc.
PO Box 669, Findlay, Ohio, U.S.A. 45840
Telephone: (419) 425-8627 FAX: (419) 425-8629
1-800-263-2629
04/17
TROUBLESHOOTING
PROBLEM POSSIBLE CAUSE
No power • A fuse may be blown or the circuit breaker tripped
• Plug not fully inserted into the wall outlet
Arcing or sparking during
operation
Unevenly cooked food • Food was not completely defrosted before cooking
Overcooked food • The power level or cooking time were too high
Undercooked food • Food was not completely defrosted before cooking
Poor Defrosting • Defrosting time or power level were insufficient
• Metallic items were left in the microwave during operation
• The microwave is being operated while empty
• Spilled food has built up inside the microwave or on the mica sheet
• Cooking time or power level were insufficient
• Food was not turned or stirred during cooking
• Cooking time or power level were insufficient
• Food was not turned or stirred during cooking
• Ventilation openings are blocked
• Food was not turned or stirred during defrosting
15
Page 17
LIMITED IN-HOME APPLIANCE WARRANTY
LIMITED “CARRY IN” WARRANTY
This quality product is warranted to be free from manufacturer’s defects in material and workmanship, provided that the unit is used under the normal operating
conditions intended by the manufacturer.
This quality product is warranted to be free from manufacturer’s defects in material and workmanship, provided that the unit is used
under the normal operating conditions intended by the manufacturer.
This warranty is available only to the person to whom the unit was originally sold by Danby Products Limited (Canada) or Danby Products Inc. (U.S.A.) (hereafter
This warranty is available only to the person to whom the unit was originally sold by Danby Products Limited (Canada) or Danby
“Danby”) or by an authorized distributor of Danby, and is non-transferable.
Products Inc. (U.S.A.) (hereafter “Danby”) or by an authorized distributor of Danby, and is non-transferable.
TERMS OF WARRANTY
TERMS OF WARRANTY
Plastic parts are warranted for thirty (30) days from the date of purchase, with no extensions provided.
Plastic parts, are warranted for thirty (30) days only from purchase date, with no extensions provided.
First 12 months
First Year
During the first twelve (12) months, any functional parts of this product found to be defective, will be repaired or
During the rst twelve (12) months, any functional parts of this product found to be defective, will be repaired or replaced, at warrantor’s
replaced, at warrantor’s option, at no charge to the original purchaser.
option, at no charge to the ORIGINAL purchaser.
To obtain service
To obtain
Service
Contact the dealer where the unit was purchased, or contact the nearest authorized Danby service depot, where
service must be performed by a qualified service technician. If service is performed on the unit by anyone other
Danby reserves the right to limit the boundaries of “In Home Service” to the proximity of an Authorized Service Depot. Any app liance
than an authorized service depot, all obligations of Danby under this warranty shall be void.
requiring service outside the limited boundaries of “In Home Service” , it will be the consumer’s responsibility to transport the appliance (at
their own expense) to the original retailer (point of purchase) or a service depot for repair. See “Boundaries of In Home Serv ice”below.
It is the responsibility of the purchaser to transport the appliance to the nearest authorized service depot.
Contact your dealer from whom your unit was purchased, or contact your nearest authorized Danby service depot, where service
must be performed by a qualied service technician.
Transportation charges to and from the service location are not protected by this warranty and are the responsibility of the purchaser.
If service is performed on the units by anyone other than an authorized service depot, or the unit is used for commercial appli cation, all
obligations of Danby under this warranty shall be void.
Nothing within this warranty shall imply that Danby will be responsible or liable for any spoilage or damage to food or other
Boundaries of
contents of this appliance, whether due to any defect of the appliance, or its use, whether proper or improper.
In Home Service
Save as herein provided, by Danby, there are no other warranties, conditions, representations or guarantees, express or implied, made
or intended by Danby or its authorized distributors and all other warranties, conditions, representations or guarantees, including any
warranties, conditions, representations or guarantees under any Sale of Goods Act or like legislation or statute is hereby expressly
Nothing within this warranty shall imply that Danby will be responsible or liable for any spoilage or damage to food or other c ontents of this appliance, whether due
excluded. Save as herein provided, Danby shall not be responsible for any damages to persons or property, including the unit itself,
to any defect of the appliance, or its use, whether proper or improper.
howsoever caused or any consequential damages arising from the malfunction of the unit and by the purchase of the unit, the
purchaser does hereby agree to indemnify and hold harmless Danby from any claim for damages to persons or property caused by
the unit.
Save as herein provided, Danby, there are no other warranties, conditions, representations or guarantees, express or implied, m ade or intended by Danby or its
authorized distributors and all other warranties, conditions, representations or guarantees, including any warranties, conditio ns, representations or guarantees
under any Sale of Goods Act or like legislation or statue is hereby expressly excluded. Save as herein provided, Danby shall no t be responsible for any damages
No warranty or insurance herein contained or set out shall apply when damage or repair is caused by any of the following:
to persons or property, including the unit itself, howsoever caused or any consequential damages arising from the malfunction o f the unit and by the purchase of
1) Power failure.
the unit, the purchaser does hereby agree to indemnify and hold harmless Danby from any claim for damages to persons or propert y caused by the unit.
2) Damage in transit or when moving the appliance.
3) Improper power supply such as low voltage, defective house wiring or inadequate fuses.
4) Accident, alteration, abuse or misuse of the appliance such as inadequate air circulation in the room or abnormal operating
conditions (ie. extremely high or low room temperature).
No warranty or insurance herein contained or set out shall apply when damage or repair is caused by any of the following:
5) Use for commercial or industrial purposes (ie. If the appliance is not installed in a domestic residence).
1) Power failure.
6) Fire, water damage, theft, war, riot, hostility, acts of God such as hurricanes, floods etc.
2) Damage in transit or when moving the appliance.
7) Service calls resulting in customer education.
3) Improper power supply such as low voltage, defective house wiring or inadequate fuses.
8) Improper Installation (ie. Building-in of a free standing appliance or using an appliance outdoors that is not approved for outdoor
4) Accident, alteration, abuse or misuse of the appliance such as inadequate air circulation in the room or abnormal operating con ditions
application, including but not limited to: garages, patios, porches or anywhere that is not properly insulated or climate controlled).
If the appliance is installed in a location that is 100 kilometers (62 miles) or more from the nearest service center your unit must be
delivered to the nearest authorized Danby Service Depot, as service must only be performed by a technician qualied and certif ied for
warranty service by Danby. Transportation charges to and from the service location are not protected by this warranty and are t he
EXCLUSIONS
responsibility of the purchaser.
EXCLUSIONS
GENERAL PROVISIONS
GENERAL PROVISIONS
(extremely high or low room temperature).
Proof of purchase date will be required for warranty claims; retain bills of sale. In the event that warranty service is required, present
5) Use for commercial or industrial purposes (ie. If the appliance is not installed in a domestic residence).
the proof of purchase to our authorized service depot.
6) Fire, water damage, theft, war, riot, hostility, acts of God such as hurricanes, oods etc.
7) Service calls resulting in customer education.
8) Improper Installation (ie. Building-in of a free standing appliance or using an appliance outdoors that is not approved for out door application).
Proof of purchase date will be required for warranty claims; so, please retain bills of sale. In the event warranty service is required, present this document to our
AUTHORIZED SERVICE DEPOT.
Danby Products Limited
Danby Products Limited
PO Box 1778, Guelph, Ontario, Canada N1H 6Z9
PO Box 1778, Guelph, Ontario, Canada N1H 6Z9
Telephone: (519) 837-0920 FAX: (519) 837-0449
Telephone: (519) 837-0920 FAX: (519) 837-0449
Warranty Service
Warranty Service
In-home
Carry In
1-800-263-2629
1-800-263-2629
04/17
04/09
Danby Products Inc.
PO Box 669, Findlay, Ohio, U.S.A. 45840
Telephone: (419) 425-8627 FAX: (419) 425-8629
PO Box 669, Findlay, Ohio, U.S.A. 45840
Telephone: (419) 425-8627 FAX: (419) 425-8629
Danby Products Inc.
Page 18

Bienvenue dans la famille Danby.
Nous sommes fiers de nos produits de qualité et nous croyons en un service fiable. Nous
vous suggérons de lire ce manuel du propriétaire avant de brancher votre nouvel appareil
car il contient des informations de fonctionnement importantes, des informations de
sécurité, des conseils de dépannage et d’entretien pour assurer la fiabilité et la longévité de
votre appareil.
Vous avez droit à la couverture de la garantie décrite dans le manuel du propriétaire fourni
avec votre nouvel appareil.
1. Veuillez noter ci-dessous les informations relatives à votre appareil. Vous devez
conserver la preuve d’achat originale pour valider et bénéficier des services de
garantie.
2. Enregistrez votre produit en ligne et recevez une PROLONGATION DE GARANTIE
GRATUITE DE 2 MOIS après avoir rempli une enquête sur les produits, à l’adresse
www.danby.com/support/product-registration/
Numéro de modèle : _______________________________________________
Numéro de serie : _________________________________________________
Date d’achat : _____________________________________________________
Besoin d’assistance?
1. Lisez votre manuel du propriétaire pour obtenir de l’aide à l’installation, au dépannage
et à la maintenance.
2. Visitez www.Danby.com pour accéder aux outils en libre-service, aux FAQ et bien plus
encore en recherchant votre numéro de modèle dans la barre de recherche.
3. Pour bénéficier du service client le plus rapide, veuillez remplir le formulaire Web à
l’adresse www.danby.com/support. Votre soumission ira directement à un expert de
votre appareil particulier. Nos temps de réponse moyens sont compris entre 20 minutes
et 2 heures, pendant les heures ouvrables EST.
4. Composez le 1-800-263-2629 - veuillez noter que pendant les heures de pointe, les
temps d’attente peuvent dépasser une heure.
17
Page 19
CONSIGNES DE SÉCURITÉ IMPORTANTES
LIRE ET SUIVRE TOUTES LES CONSIGNES DE SÉCURITÉ
Des précautions de sécurité de base doivent être suivies lors de l’utilisation d’appareils
électriques, notamment les suivantes:
ATTENTION - Pour réduire le risque de brûlures, d’électrocution, d’incendie, de blessures
corporelles ou d’exposition à une énergie micro-ondes excessive :
1. Lisez toutes les instructions avant d’utiliser le micro-ondes.
2. Lisez et suivez les «PRÉCAUTIONS POUR ÉVITER UNE POSSIBLE EXPOSITION À UNE
ÉNERGIE EXCESSIVE DES MICRO-ONDES» qui se trouvent à la page 4.
3. Ce micro-ondes doit être mis à la terre. Connectez uniquement à une prise correctement
mise à la terre. Voir « INSTRUCTIONS DE MISE À LA TERRE » à la page 5.
4. Installez ou localisez ce four à micro-ondes uniquement conformément aux instructions
d’installation fournies.
5. Certains produits tels que les œufs entiers et les récipients scellés, par exemple les
bocaux en verre fermés, peuvent exploser et ne doivent pas être chauffés dans ce four.
6. Utilisez ce micro-ondes uniquement pour l’usage auquel il est destiné, tel que décrit
dans ce manuel. N’utilisez pas de produits chimiques ou de vapeurs corrosifs dans ce
micro-ondes. Ce type de four est spécialement conçu pour chauffer, cuire ou sécher des
aliments. Il n’est pas conçu pour une utilisation industrielle ou en laboratoire.
7. LE CONTENU CHAUD PEUT PROVOQUER DE GRAVES BRÛLURES. NE LAISSEZ PAS
LES ENFANTS UTILISER LE MICRO-ONDES. Soyez prudent lorsque vous retirez des
objets chauds.
8. N’utilisez pas ce four à micro-ondes s’il a un cordon ou une fiche endommagé, s’il ne
fonctionne pas correctement ou s’il a été endommagé ou s’il est tombé.
9. Ce four à micro-ondes ne doit être réparé que par du personnel de service qualifié.
Contactez le centre de service agréé le plus proche pour un examen, une réparation ou
un réglage.
10. Ne couvrez ni ne bloquez les ouvertures du micro-ondes.
CONSERVEZ CES INSTRUCTIONS !
18
Page 20
CONSIGNES DE SÉCURITÉ IMPORTANTES
LIRE ET SUIVRE TOUTES LES CONSIGNES DE SÉCURITÉ
11. Ne rangez pas ce micro-ondes à l’extérieur. N’utilisez pas ce micro-ondes près de l’eau,
par exemple près d’un évier de cuisine, dans un sous-sol humide, près d’une piscine ou
d’un endroit similaire.
12. Ne plongez pas le cordon d’alimentation ou la fiche dans l’eau.
13. Éloignez le cordon d’alimentation des surfaces chauffées.
14. Ne laissez pas le cordon d’alimentation pendre du bord d’une table ou d’un comptoir.
15. Lors du nettoyage des surfaces de la porte et du four qui entrent en contact lorsque
la porte est fermée, utilisez uniquement des savons doux et non abrasifs ou un détergent
appliqué avec une éponge ou un chiffon doux.
16. Pour réduire le risque d’incendie dans la cavité du four:
• Ne pas trop cuire les aliments. Soyez attentif au micro-ondes lorsque du papier, du
plastique ou d’autres matériaux combustibles sont placés à l’intérieur du four pour
faciliter la cuisson.
• Retirez les attaches torsadées des sacs en papier ou en plastique avant de placer le sac
dans le four.
• Si un matériau à l’intérieur du four s’enflamme, gardez la porte du four fermée, éteignez
le four et débranchez le cordon d’alimentation, ou coupez l’alimentation au niveau du
panneau de fusibles ou de disjoncteurs.
• N’utilisez pas le four à des fins de stockage. Ne laissez pas de produits en papier,
d’ustensiles de cuisine ou d’aliments à l’intérieur du four lorsqu’il n’est pas utilisé.
17. Les liquides tels que l’eau, le café ou le thé peuvent être surchauffés au-delà du point
d’ébullition sans avoir l’air de bouillir. Lorsque le récipient est retiré du micro-ondes, il
n’y a pas toujours de bulles ou d’ébullition visibles. CECI POURRAIT FAIRE BOUILLIR
SOUDAINEMENT DES LIQUIDES TRÈS CHAUDS LORSQUE LE RÉCIPIENT EST DERANGER
OU QU’UN USTENSIILE EST INSÉRÉ DANS LE LIQUIDE.
• Ne pas surchauffer les liquides.
• Remuez les liquides avant et à mi-cuisson.
• N’utilisez pas de récipients à parois droites avec des cols étroits.
• Après avoir chauffé, laissez le récipient reposer au micro-ondes pendant une courte
période avant de le retirer.
• Soyez extrêmement prudent lorsque vous insérez une cuillère ou un autre ustensile dans
le récipient.
CONSERVEZ CES INSTRUCTIONS !
Page 21
CONSIGNES DE SÉCURITÉ IMPORTANTES
LIRE ET SUIVRE TOUTES LES CONSIGNES DE SÉCURITÉ
PRÉCAUTIONS POUR ÉVITER UNE POSSIBLE EXPOSITION À UNE
ÉNERGIE MICRO-ONDES EXCESSIVE
(1) N’essayez pas de faire fonctionner ce four avec la porte ouverte. Le
fonctionnement à porte ouverte peut entraîner une exposition nocive à
l’énergie des micro-ondes. Il est important de ne pas forcer ou altérer les
verrouillages de sécurité.
(2) Ne placez aucun objet entre l’armoire du four et la porte et ne laissez
pas de saletés ou de résidus de nettoyant s’accumuler sur les surfaces qui
entrent en contact lorsque la porte est fermée.
(3) N’utilisez pas le four s’il est endommagé. Il est particulièrement
important que la porte du four se ferme correctement et que les:
(a) porte (pliée),
(b) charnières et loquets (cassés ou desserrés),
(c) joints de porte et surfaces d’étanchéité.
(4) Le four ne doit pas être réglé ou réparé par qui que ce soit, à l’exception
du personnel de service dûment qualifié.
CONSERVEZ CES INSTRUCTIONS !
20
Page 22
CONSIGNES DE SÉCURITÉ IMPORTANTES
LIRE ET SUIVRE TOUTES LES CONSIGNES DE SÉCURITÉ
INSTRUCTIONS DE MISE À LA TERRE
Ce micro-ondes doit être mis à la terre. En cas de court-circuit électrique, la mise à la terre
réduit le risque de choc électrique en fournissant un fil d’évacuation pour le courant électrique.
Ce four à micro-ondes est équipé d’un cordon doté d’un fil de mise à la terre avec une fiche
de mise à la terre. Le cordon d’alimentation doit être branché dans une prise correctement
mise à la terre. Si la prise est une prise murale à 2 broches, il est de votre responsabilité de
la faire remplacer par une prise murale à 3 broches correctement mise à la terre. La plaque
signalétique de série indique la tension et la fréquence pour lesquelles le micro-ondes est
conçu.
ATTENTION - Une mauvaise utilisation de la prise de terre peut entraîner un risque de choc
électrique. Consultez un électricien qualifié ou un agent de service si les instructions de mise à
la terre ne sont pas complètement comprises, ou s’il existe un doute quant à savoir si le four à
micro-ondes est correctement mis à la terre.
S’il est nécessaire d’utiliser une rallonge, utilisez uniquement une rallonge à 3 fils dotée d’une
fiche à 3 broches mise à la terre et d’une prise à 3 fentes qui accepte la fiche du four à microondes. La puissance électrique indiquée sur la rallonge doit être au moins aussi élevée que
la puissance électrique du four à micro-ondes. Le cordon le plus long doit être disposé de
manière à ce qu’il ne tombe pas sur le plan de travail ou la table où il pourrait être tiré par
des enfants ou trébucher.
DANGER - Risque de choc électrique : toucher certains des composants internes peut causer
des blessures graves ou mortelles. Ne démontez pas ce micro-ondes.
ATTENTION - Risque de choc électrique : Une mauvaise utilisation de la fiche mise à la terre
peut entraîner un choc électrique. Ne branchez pas le micro-ondes si la prise de terre est
endommagée.
Un cordon d’alimentation court est fourni pour réduire les risques de s’emmêler ou de
trébucher sur un cordon plus long.
Si le cordon d’alimentation est endommagé, il doit être remplacé par le fabricant, son agent
de service ou une personne qualifiée similaire pour éviter tout danger.
Demandez à un électricien qualifié d’installer une prise de terre près du four à micro-ondes si
le cordon d’alimentation est trop court.
CONSERVEZ CES INSTRUCTIONS !
Page 23
CONSIGNES DE SÉCURITÉ IMPORTANTES
LIRE ET SUIVRE TOUTES LES CONSIGNES DE SÉCURITÉ
SÉCURITÉ - LIQUIDE SURCHAUFFÉ
Les liquides peuvent être surchauffés au-delà du
point d’ébullition sans sembler bouillir en raison de
la tension superficielle du liquide. Des bulles visibles
ne seront pas toujours présentes lorsque le liquide
est retiré du micro-ondes. Cela pourrait entraîner
une ébullition soudaine de liquides très chauds
lorsqu’un ustensile ou un autre article tel qu’un
sachet de thé est inséré dans le liquide.
Pour réduire le risque de blessure :
• Ne pas surchauffer les liquides. Ne chauffez
aucun liquide plus de 2 minutes par tasse.
• Remuez les liquides avant et à mi-cuisson.
• N’utilisez pas de récipients à parois droites avec
des cols étroits car cela peut provoquer une
accumulation de vapeur.
• Le liquide surchauffé peut commencer à bouillir
spontanément lorsqu’il est retiré du micro-ondes.
Après avoir chauffé, laissez le liquide reposer
au micro-ondes pendant 30 secondes avant de
le retirer.
• Soyez extrêmement prudent lorsque vous insérez
un ustensile ou un autre objet dans des liquides
chauds.
Le contenu des biberons et des petits pots pour
bébés doit être agité ou secoué et la température
vérifiée avant de servir afin d’éviter les brûlures.
Ne décongelez pas les boissons surgelées, en
particulier les boissons gazeuses, dans ce microondes car elles pourraient exploser.
Les aliments chauds et la vapeur peuvent provoquer
des brûlures. Soyez prudent lorsque vous ouvrez un
récipient qui a été chauffé au micro-ondes. Dirigez
l’ouverture loin des mains et du visage pour éviter
les brûlures.
SÉCURITÉ - ARC
Les arcs électriques font référence aux étincelles à
l’intérieur du micro-ondes pendant son fonctionnement.
L’arc est causé par :
• Métal ou papier d’aluminium à l’intérieur du microondes.
• Des serviettes en papier recyclé sont utilisées à
l’intérieur du micro-ondes, car elles peuvent contenir
de petits morceaux de métal.
Si un arc électrique est présent, arrêtez le
fonctionnement et retirez tout essuie-tout en métal ou en
papier du micro-ondes.
INTERFÉRENCES RADIO
Ce micro-ondes génère et utilise des fréquences ISM
et s’il n’est pas installé et utilisé correctement en stricte
conformité avec les instructions du fabricant, il peut
provoquer des interférences avec la réception radio
et télévision. Il a fait l’objet d’un essai de type et s’est
avéré conforme aux limites de l’équipement ISM
conformément à la partie 18 des règles de la FCC, qui
sont conçues pour fournir une protection raisonnable
contre de telles interférences dans une installation
résidentielle.
Cependant, rien ne garantit que des interférences ne
se produiront pas dans des installations particulières.
Si ce micro-ondes provoque des interférences avec
la réception radio ou télévisée, ce qui peut être
déterminé en éteignant et en rallumant l’équipement,
les interférences peuvent être corrigées par une ou
plusieurs des méthodes suivantes:
• Réorientez l’antenne de réception de la radio ou de
la télévision.
• Éloignez le micro-ondes du récepteur.
• Branchez le micro-ondes dans une autre prise de
sorte que le micro-ondes et le récepteur soient sur
des circuits de dérivation différents.
Le fabricant n’est pas responsable des interférences
radio ou TV causées par une modification non
autorisée de ce micro-ondes. Il est de la responsabilité
de l’utilisateur de corriger de telles interférences.
CONSERVEZ CES INSTRUCTIONS !
Page 24

INSTRUCTIONS D’INSTALLATION CONSIGNES D’UTILISATION
INSTALLATION
• Retirez tous les matériaux d’emballage de
l’intérieur et de l’extérieur de l’appareil. Ne
retirez pas la feuille de mica en carton couvrant
le magnétron.
• Vérifiez si l’appareil est endommagé avant
de l’utiliser, comme une porte mal alignée ou
pliée, des joints d’étanchéité endommagés, des
charnières ou des verrous ou des verrous de la
porte défectueux ou défectueux, ou des bosses
à l’intérieur de la cavité ou sur la porte. En cas
de dommages à l’appareil, ne l’utilisez pas, le
retourner à son point de vente ou contactez le
service consommateur.
• L’appareil doit être placé sur une surface
plane et stable qui peut contenir son poids et
la nourriture la plus lourde susceptible d’être
placée dans l’appareil.
TECHNIQUES DE CUISSON
Pour obtenir les meilleurs résultats lors de la cuisson
dans cet appareil, suivez les suggestions ci-dessous.
MÉLANGER
Mélanger les aliments pendant la cuisson pour
répartir uniformément la chaleur. La nourriture à
l’extérieur du plat absorbe plus d’énergie et chauffe
plus rapidement, puis remuez de l’extérieur du plat
vers le centre.
ARRANGEMENT
Disposez des aliments de forme inégale plus épais,
des pièces plus légères vers l’extérieur du plateau
tournant afin qu’ils reçoivent plus de chaleur. Pour
éviter de trop cuire, placez des objets délicats vers
le centre du plateau tournant.
TOURNANT
• N’utilisez pas cet appareil lorsque de la chaleur,
de l’humidité ou de l’humidité élevée sont
générés.
• Ne pas nettoyer cet appareil avec ou à
proximité de matériaux combustibles.
• Prévoyez un espace de 7,5 cm (3 pouces)
au-dessus de l’appareil, 2,5 cm (1 pouces) à
l’arrière de l’appareil et 7,5 cm (3 pouces) des
deux côtés pour permettre à l’air de circuler
correctement autour de l’appareil. Ne bloquez
pas les orifices de ventilation de l’appareil.
• N’utilisez pas l’appareil sans le plateau en
verre, le support de rouleau et l’arbre dans la
position correcte.
• AVERTISSEMENT: N’installez pas le micro-ondes
sur une table de cuisson ou un autre appareil
produisant de la chaleur. S’il est installé à
proximité ou au-dessus d’une source de chaleur,
le micro-ondes pourrait être endommagé et la
garantie annulée.
Faire passer les aliments au milieu de la cuisson
pour exposer toutes les pièces à l’énergie des microondes. Ceci est important pour les gros objets et la
viande.
REPOS
Les aliments cuits dans un micro-ondes augmentent
la chaleur interne et continuent à cuire quelques
minutes après le chauffage. Laissez reposer les
aliments pour terminer la cuisson, en particulier les
viandes et les liquides. Tous les liquides doivent être
laissés au repos pendant quelques minutes après la
cuisson et doivent être secoués ou agités avant de
consommer.
AJOUTER L’HUMIDITÉ
L’énergie des micro-ondes est attirée par les
molécules d’eau. Les aliments qui sont inégaux dans
la teneur en humidité doivent être couverts et laisser
reposer après la cuisson pour permettre à la chaleur
de se disperser uniformément. Ajoutez une petite
quantité d’eau à la nourriture sèche pour l’aider à
cuire.
23
Page 25

CONSIGNES D’UTILISATION
GUIDE DES USTENSILES DE CUISINE
Certains ustensiles sont inappropriés pour une utilisation dans un micro-ondes. Voir ci-dessous pour plus
d’informations sur les ustensiles recommandés, qui ne devraient avoir qu’une utilisation limitée et qui ne
sont pas recommandés.
RECOMMANDÉ
Plat de brunissement à micro-ondes: Utilisé pour
brunir l’extérieur des petits produits alimentaires.
Suivez les instructions fournies avec le plat
brunissant.
Enveloppement en plastique à micro-ondes: Utilisé
pour retenir la vapeur. Laissez une petite ouverture
pour éviter une accumulation de vapeur. Ne placez
pas directement sur les aliments.
Bols et plats en verre et en céramique: Utiliser pour
le chauffage ou la cuisson.
Plaques et tasses en papier: Utilisé pour un
chauffage à court terme à basse température.
Ne pas utiliser de papier recyclé car ils peuvent
contenir du métal et pourraient s’enflammer.
Serviettes en papier et serviettes de table: Utilisé
pour un chauffage et un revêtement à court terme.
Ils peuvent absorber l’excès d’humidité et éviter
les éclaboussures. N’utilisez pas de papier recyclé
car ils peuvent contenir du métal et pourraient
s’enflammer.
USAGE LIMITÉ
Céramique, porcelaine et les pots de grès: Utilisez
uniquement si elles sont étiquetées «Va au four à
micro-ondes».
Plastic: Utilisez uniquement si elles sont étiquetées
«Va au four à micro-ondes».
NON RECOMMANDÉ
Bocaux et bouteilles en verre: Le verre régulier est
trop fin pour être utilisé dans un micro-ondes. Il peut
se briser et causer des dommages ou des blessures.
Sacs en papier: Ce sont des risques d’incendie et
peuvent s’enflammer. La seule exception concerne
les sacs à popcorn, conçus pour l’utilisation des
micro-ondes.
Plaques et tasses en styromousse: Ceux-ci peuvent
fondre et laisser un résidu malsain sur les aliments.
Papier ciré: Utiliser comme couverture pour éviter
les éclaboussures.
Thermomètres: Utilisez uniquement ceux qui sont
étiquetés «Va au four à micro-ondes» et suivez
toutes les instructions. Vérifiez la nourriture à
plusieurs endroits. Les thermomètres conventionnels
peuvent être utilisés une fois que les aliments ont été
retirés du micro-ondes.
USAGE LIMITÉ
Céramique, porcelaine et les pots de grès: Utilisez
uniquement si elles sont étiquetées «Va au four à
micro-ondes».
Plastic: Utilisez uniquement si elles sont étiquetées
«Va au four à micro-ondes».
Récipients en plastique et pots de nourriture: Ils
peuvent fondre et s’enflammer.
Ustensiles en métal: Cela peut provoquer des arcs
et des dommages à l’appareil. Retirez tout le métal
avant l’opération.
Remarque: Pour vérifier si un plat peut être utilisé
sans danger au micro-ondes, placez le plat vide
dans le micro-ondes et appuyez sur le bouton
depart/+30SEC pour lancer un programme
de cuisson à 100 % de puissance pendant 30
secondes. Si le plat devient très chaud, il ne doit pas
être utilisé.
24
Page 26
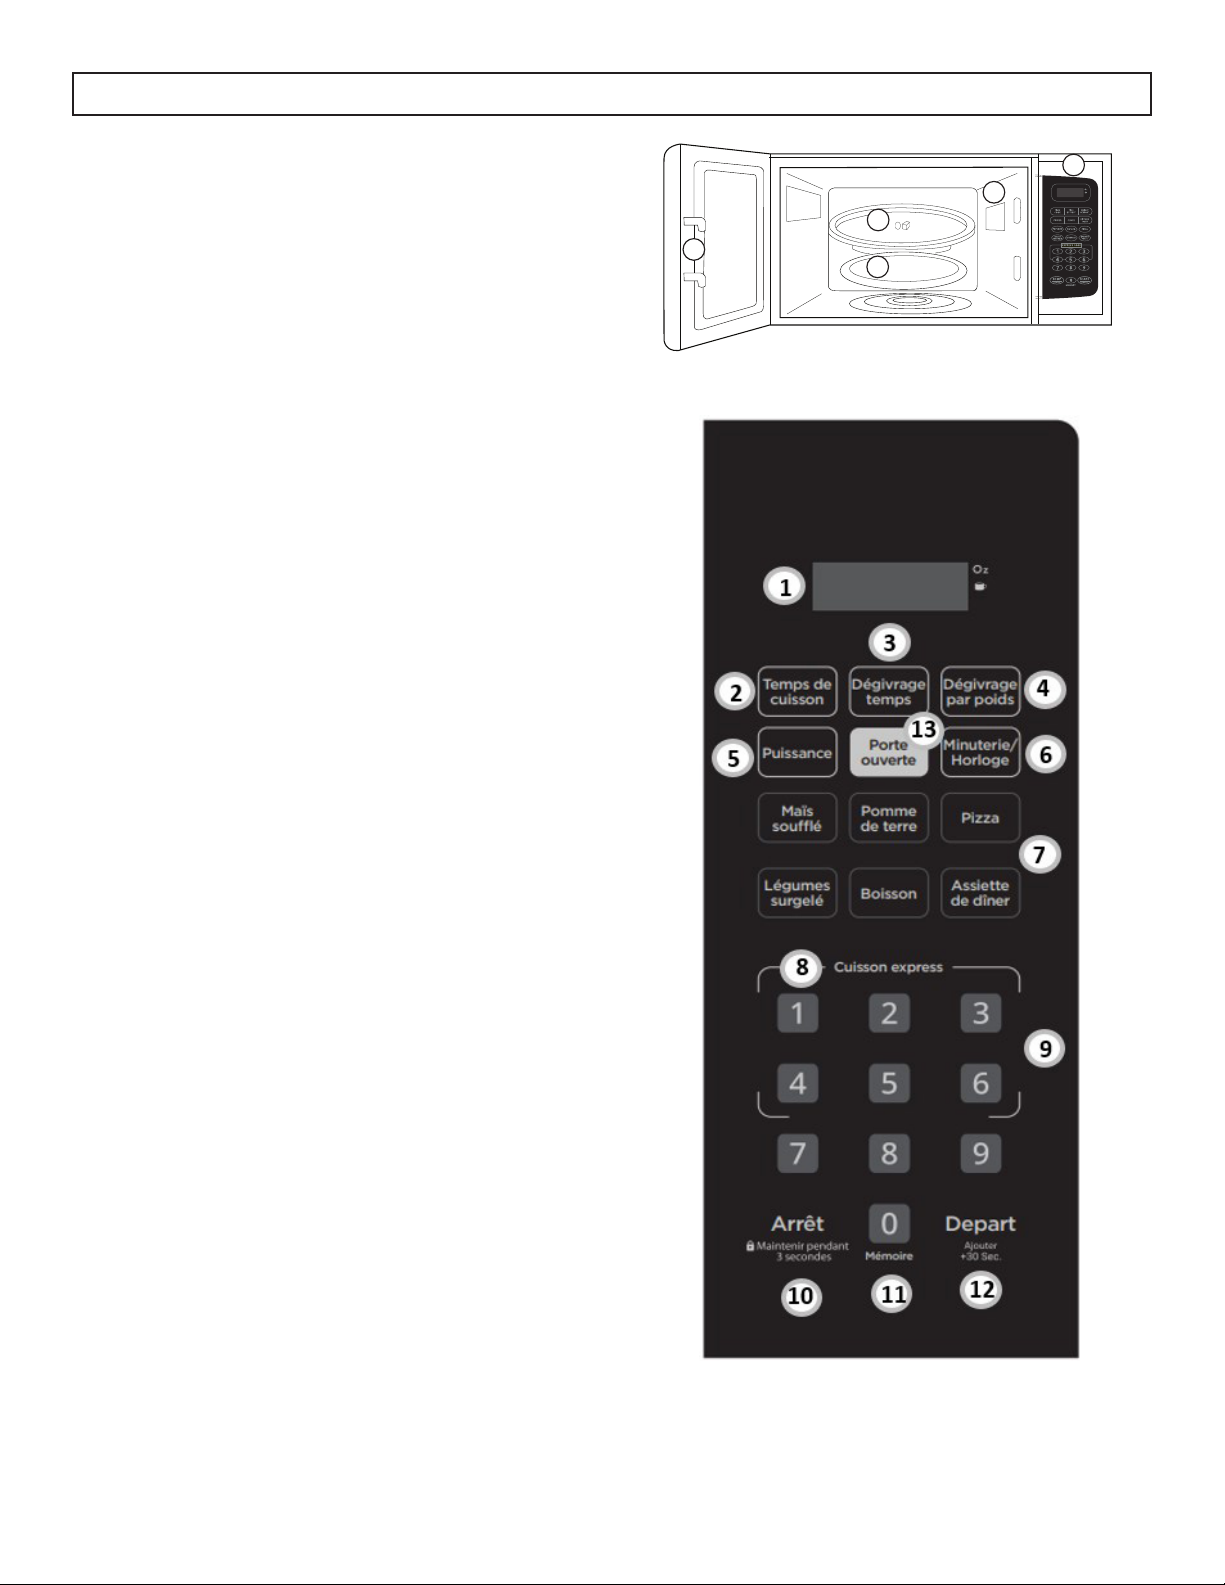
CONSIGNES D’UTILISATION
CARACTÉRISTIQUES
1. Système de verrouillage de porte
2. Plateau en verre
3. Anneau de rouleau
4. Feuille de mica (Ne pas enlever)
5. Panneau de contrôle
PANNEAU DE CONTRÔLE
1. Affichage: montre le temps de cuisson, le niveau de
puissance et l’heure de l’horloge.
2. Temps de cuisson: utilisé pour régler le temps de cuisson
désiré.
3. Dégivrage temps: utilisé pour définir la fonction de
dégivrage en fonction de l’heure.
4. Dégivrage par poids: utilisé pour régler la fonction de
dégivrage en fonction du poids.
5. Bouton de puissance: utilisé pour sélectionner le niveau
de puissance.
5
4
2
1
3
6. Bouton minuterie/horloge : utilisé pour régler la minuterie
et pour régler l’heure actuelle.
7. Menus de cuisson automatique: réglages instantanés
pour cuisiner des aliments populaires.
8. Boutons cuisson expresse: utilisé pour définir les options
de cuisson express.
9. Pavé numérique: utilisé pour régler l’heure ou les
montants.
10. Bouton arrêt/maintien 3SEC:
• Utilisé pour suspendre ou annuler un programme de
cuisson.
• Appuyez et maintenez enfoncé pendant 3 secondes
pour engager le verrouillage du panneau de
commande / enfant.
11. Bouton de 0/mémoire: utilisé pour régler la fonction de
mémoire.
12. Bouton depart/+30SEC: utilisé pour démarrer un
programme de cuisson ou ajouter 30 secondes à un
programme de cuisson.
13. Porte ouverte : Utilisé pour activer/désactiver
l’interverrouillage de sécurité.
25
Page 27
CONSIGNES D’UTILISATION
PREMIÈRE UTILISATION
Lorsque l’appareil est branché pour la première
fois, l’affichage indique “0:00”. Utilisez le pavé
numérique pour entrer l’heure actuelle, puis
appuyez sur le bouton d’horloge pour confirmer
Lorsque vous réglez la minuterie de cuisson,
l’appareil revient en mode veille s’il n’y a pas
d’entrée dans les 60 secondes.
Pendant l’opération:
• Appuyez sur le bouton depart/+ 30SEC pour
commencer l’opération.
• Appuyez sur le bouton arrêt/maintien 3SEC
pour annuler le programme de cuisson.
• L’appareil émet un bip cinq fois à la fin d’un
programme de cuisson.
CUISSON À MICRO-ONDES
1. Appuyez sur le bouton temps de cuisson.
L’affichage indique “00:00”.
2. Utilisez le pavé numérique pour entrer le temps
de cuisson désiré. Le temps maximum est de 99
minutes et 99 secondes.
3. Appuyez sur le bouton de puissance pour
choisir un niveau de puissance. Le niveau de
puissance par défaut est 100%. L’affichage
affichera “PL10”. Utilisez le pavé numérique
pour entrer le niveau de puissance souhaité si
100% n’est pas nécessaire.
4. Appuyez sur le bouton depart/+ 30SEC pour
commencer l’opération.
Remarque: Si “PL0” est sélectionné, le ventilateur de
l’appareil fonctionnera sans fonction de cuisson. Ce
niveau de puissance peut être utilisé pour éliminer
les odeurs du four.
Remarque: Pendant la cuisson, si le niveau de
puissance choisi n’est pas suffisant, appuyez sur
le bouton d’alimentation. Le niveau de puissance
actuel clignotera pendant trois secondes. Utilisez
le pavé numérique pour choisir un nouveau niveau
de puissance et l’opération se poursuivra dans le
nouveau niveau de puissance.
RÉGLAGE DE LA MINUTERIE/HORLOGE
L’horloge ne peut être réglée que sur 12 heures.
Pour régler l’heure actuelle:
1. Appuyez deux fois sur la touche minuterie/
horloge, l’écran affiche “00:00”.
2. Utilisez le pavé numérique pour entrer l’heure
actuelle.
3. Appuyez sur la touche minuterie/horloge pour
confirmer.
En cours de fonctionnement, appuyez sur la touche
Horloge pour afficher l’heure actuelle.
Pour régler une minuterie:
1. Appuyez une fois sur la touche minuterie/horloge,
l’écran affiche “00:00”.
2. Utilisez le pavé numérique pour entrer la durée
souhaitée pour faire fonctionner la minuterie. La
durée maximale est de 99 minutes et 99 secondes.
3. Appuyez sur la touche depart/+30SEC pour lancer
la minuterie.
Remarque: Le minuteur de cuisine est un minuteur.
CUISINE À DEUX ÉTAGES
Certaines recettes nécessitent différentes étapes de
cuisson à différentes températures. Pour définir un
programme de cuisson en deux étapes:
1. Appuyez sur le bouton temps de cuisson et utilisez
le pavé numérique pour entrer le temps de cuisson
souhaité pour la première étape.
2. Appuyez sur le bouton de puissance et utilisez le
pavé numérique pour entrer le niveau de puissance
souhaité pour la première étape.
3. Appuyez sur le bouton temps de cuisson et utilisez
le pavé numérique pour entrer le temps de cuisson
désiré pour la deuxième étape.
4. Appuyez sur le bouton de puissance et utilisez le
pavé numérique pour entrer le niveau de puissance
souhaité pour la deuxième étape.
5. Appuyez sur le bouton depart/+ 30SEC pour
commencer l’opération.
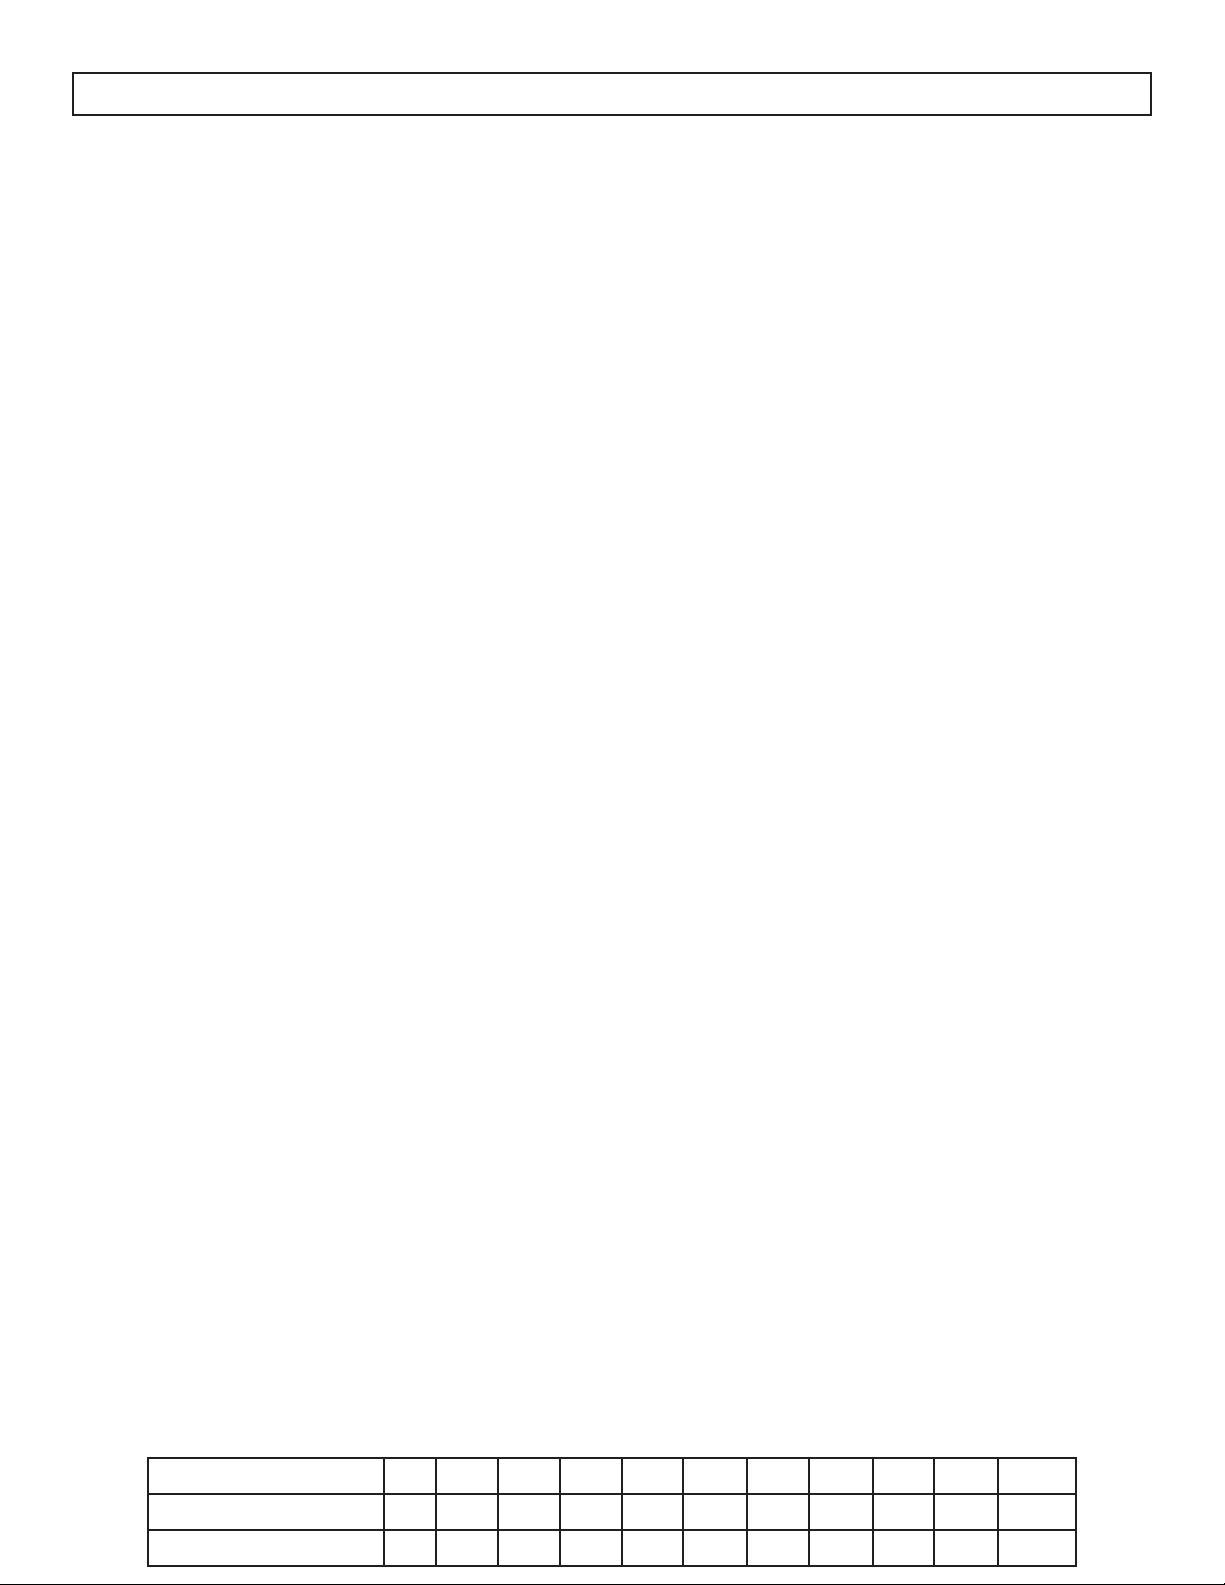
Pavé numérique 0 1 2 3 4 5 6 7 8 9 10
Puissance de cuisson 0% 10% 20% 30% 40% 50% 60% 70% 80% 90% 100%
Afficher PL0 PL1 PL2 PL3 PL4 PL5 PL6 PL7 PL8 PL9 PL10
Page 28

CONSIGNES D’UTILISATION
CUISSON AUTOMATIQUE
Les boutons de cuisson automatique peuvent être utilisés pour régler les fonctions de cuisson automatiques
pour les types d’aliments ci-dessous.
MAÏS SOUFFLÉ
1. Appuyez plusieurs fois sur le bouton maîs soufflé pour parcourir les options “3.2” et “3.5”. Ces
nombres se rapportent à la taille du sac de maîs soufflé en onces.
2. Appuyez sur le bouton depart/+30SEC pour commencer l’opération.
POMME DE TERRE
1. Appuyez plusieurs fois sur le bouton pomme de terre pour parcourir les options de “1”, “2” et “3”.
Ces chiffres se rapportent à la taille de la portion en onces. 1 est de 8 onces, 2 est de 16 onces et 3 est
de 24 onces.
2. Appuyez sur le bouton depart/+30SEC pour commencer l’opération.
PIZZA
1. Appuyez plusieurs fois sur le bouton pizza pour parcourir les options “4.0”, “8.0” et “14.0”. Ces
chiffres se rapportent à la taille de la portion en onces.
2. Appuyez sur le bouton depart/+30SEC pour commencer l’opération.
LÉGUME CONGELÉS
1. Appuyez plusieurs fois sur le bouton légume congelés pour parcourir les options “4.0”, “8.0” et
“16.0”. Ces chiffres se rapportent à la taille de la portion en onces.
2. Appuyez sur le bouton depart/+30SEC pour commencer l’opération.
BREUVAGE
1. Appuyez plusieurs fois sur le bouton breuvage pour parcourir les options de “1”, “2” et “3”. Ces
chiffres se rapportent au nombre de tasses.
2. Appuyez sur le bouton depart/+30SEC pour commencer l’opération.
REPAS
1. Appuyez plusieurs fois sur le bouton repas pour parcourir les options de “9.0”, “12.0” et “18.0”. Ces
chiffres se rapportent à la taille de la portion en onces.
2. Appuyez sur le bouton depart/+30SEC pour commencer l’opération.
CUISSON EXPRESSE
Lorsque l’appareil n’est pas en service, appuyez
sur le pavé numérique de 1 à 6 et l’appareil
fonctionnera entre 1 et 6 minutes à 100% de la
puissance de cuisson.
AJOUTER 30 SECONDES
Lorsque l’appareil ne fonctionne pas, appuyez sur
la touche depart/+30SEC pour faire fonctionner
l’appareil pendant 30 secondes à 100% du niveau
de puissance. Ce bouton peut être pressé à plusieurs
reprises, chaque pression ajoutera encore 30
secondes au temps de cuisson. Le temps de cuisson
maximum est de 99 minutes et 99 secondes.
27
Page 29
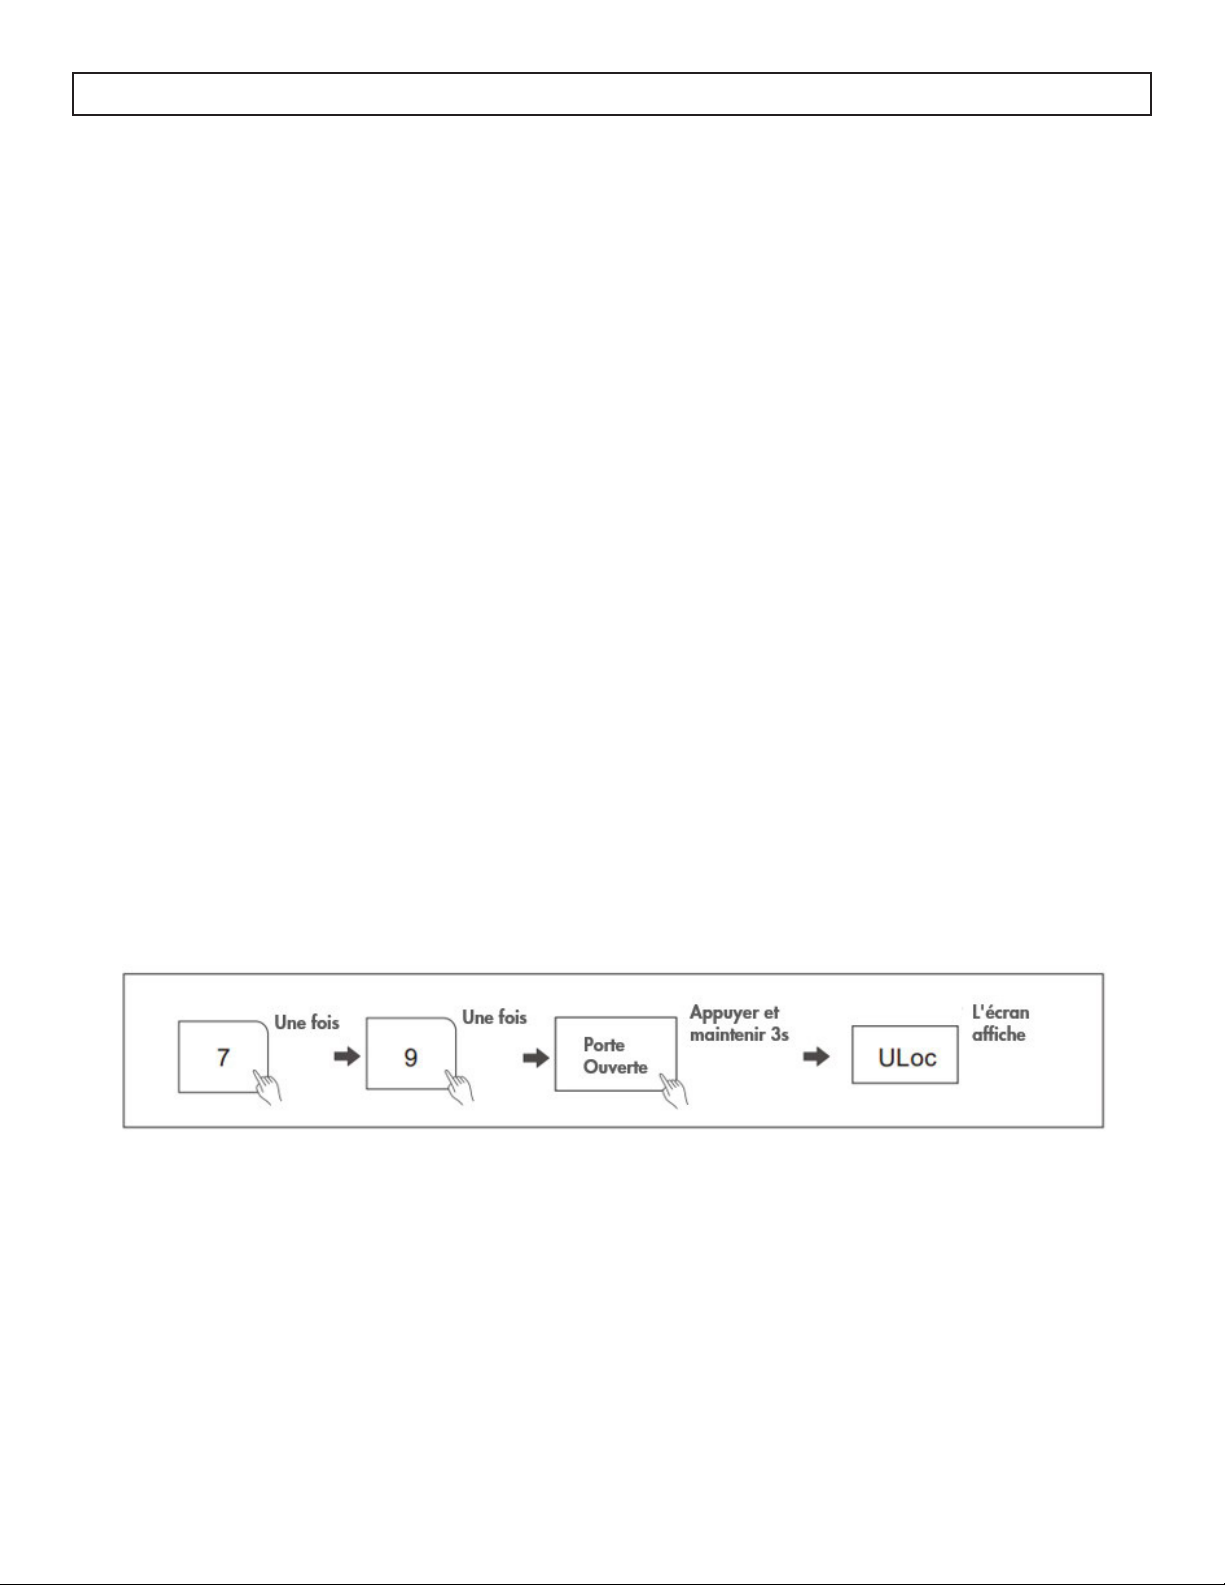
CONSIGNES D’UTILISATION
VERROUILLAGE DE SÉCURITÉ
Le verrouillage de sécurité est un système qui empêche l’activation involontaire du four à micro-ondes et
constitue une mesure de protection pour assurer la sécurité des enfants.
La mise en route d’un processus de cuisson déclenche le verrouillage de la porte, qui s’enclenche
également si la porte reste déverrouillée pendant 30 minutes supplémentaires après la fin de la cuisson.
L’interverrouillage de sécurité est actif par défaut. Il ne sera désactivé que si l’utilisateur choisit de le faire
manuellement. Même en cas de coupure de courant, le four conserve l’état du verrouillage de sécurité,
qu’il soit activé ou désactivé.
Déverrouiller la porte :
Appuyez sur Porte Ouverte pendant le fonctionnement et ouvrez la porte dans les 10 secondes, sinon le
verrou de sécurité se réenclenchera. La porte reste déverrouillée jusqu’à ce que la cuisson soit lancée.
OU
Appuyez sur Porte Ouverte dans les 30 minutes suivant la fin de la cuisson pour désactiver manuellement
le verrouillage de la porte et passer en mode veille. Si aucune touche n’est activée, le verrouillage de
sécurité se désactive automatiquement au bout de 30 minutes.
Désactiver le verrouillage de sécurité :
S’il n’y a pas d’enfants dans la résidence, vous pouvez choisir de désactiver définitivement la fonction de
verrouillage de sécurité.
Appuyez sur “7”, “9” dans l’ordre consécutif, puis appuyez sur Porte Ouverte pendant trois secondes.
Dans les 30 secondes qui suivent, l’écran affiche “ULoc”, indiquant que la désactivation du verrouillage de
sécurité a réussi.
Réactiver le verrouillage de sécurité :
Appuyez sur “7”, “9” dans l’ordre consécutif, puis appuyez sur Porte Ouverte pendant trois secondes.
Dans les 30 secondes qui suivent, l’écran affiche “Loc”, indiquant que la réactivation du verrouillage de
sécurité a réussi.
RÉGLAGE DU VERROUILLAGE DU PANNEAU DE COMMANDE
Pour régler le verrouillage du panneau de commande, maintenez enfoncé le bouton arrêt/maintien 3SEC
pendant 3 secondes. Le four à micro-ondes émettra un bip pour indiquer que le verrouillage est activé.
Lorsqu’il est verrouillé, le micro-ondes ne peut pas être utilisé.
Pour annuler le verrouillage du panneau de commande, maintenez enfoncé le bouton arrêt/maintien
3SECpendant 3 secondes. Le four à micro-ondes émettra un bip pour indiquer que le verrouillage a été
désactivé.
28
Page 30

CONSIGNES D’UTILISATION
DÉGIVRAGE PAR POIDS
Le temps de dégivrage et le niveau de puissance sont
réglés automatiquement lorsque le poids est entré.
1. Appuyez sur le bouton dégivrage poids. L’affichage
indique “dEF1”.
2. Utilisez le pavé numérique pour entrer le poids de
l’aliment à décongeler entre 4 et 100 oz.
3. Appuyez sur la bouton depart/+30SEC pour
confirmer.
DÉGIVRAGE PAR TEMPS
1. Appuyez sur le bouton dégivrage par temps.
L’affichage indique “dEF2”.
2. Utilisez le pavé numérique pour entrer le temps de
dégivrage souhaité. Le temps maximum est de 99
minutes et 99 secondes.
3. Le niveau de puissance par défaut est 3, 30%.
L’affichage indique “PL3”.
4. Pour changer le niveau de puissance, appuyez
sur le bouton puissance, puis appuyez sur le pavé
numérique pour connaître le niveau de puissance
désiré.
5. Appuyez sur la bouton depart/+30SEC pour
confirmer.
FONCTION MÉMOIRE
La fonction mémoire permet de programmer les temps
de cuisson et les pouvoirs qui peuvent être rappelés et
utilisés encore et encore avec une entrée minimale. Trois
programmes de mémoire peuvent être définis à la fois,
ils sont étiquetés 1, 2 et 3.
Pour configurer la mémoire 1:
1. Appuyez une fois sur le bouton 0/mémoire. Le
numéro 1 s’affiche.
2. Appuyez sur le bouton temps de cuisson, puis
utilisez le pavé numérique pour entrer le temps de
cuisson désiré.
3. Appuyez une fois sur le bouton puissance. Le
niveau de puissance sera par défaut à 100%. “PL10”
s’affiche. Pour changer le niveau de puissance,
utilisez le pavé numérique pour entrer le niveau de
puissance désiré.
4. Appuyez sur le bouton depart/+30SEC pour
enregistrer le réglage.
5. Pour utiliser le réglage à l’avenir, appuyez une fois
sur le bouton 0/mémoire et lorsque le numéro 1
s’affiche, appuyez sur le bouton depart/+30SEC
pour commencer l’opération.
Pour régler la mémoire 2 ou 3, appuyez deux fois sur
trois sur le bouton 0/mémoire jusqu’à ce que le numéro
2 ou 3 s’affiche, puis suivez les étapes ci-dessus.
Remarque: Si l’alimentation est perdue ou que l’appareil
est débranché, les réglages de la mémoire devront être
reprogrammés.
29
Page 31

SOINS ET ENTRETIEN
NETTOYAGE
Éteignez et débranchez l’appareil avant de
procéder à un nettoyage.
L’intérieur de l’appareil doit être nettoyé avec un
chiffon chaud et humide et des détergents doux.
Ne laissez pas les éclaboussures de nourriture
s’accumuler à l’intérieur de l’appareil, car cela
peut affecter l’efficacité du micro-ondes et, si
suffisamment sale, peut s’allumer et provoquer un
incendie.
L’extérieur de l’appareil doit être nettoyé avec un
chiffon chaud et humide. Pour éviter d’endommager
les composants internes, ne laissez aucune eau
s’écouler dans les ouvertures de ventilation.
Nettoyez la porte et la fenêtre des deux côtés,
les joints de la porte et les parties adjacentes
souvent avec un chiffon humide pour éliminer les
déversements ou les éclaboussures. Ne pas utiliser
de nettoyants abrasifs.
ENTRETIEN
Pour éliminer les odeurs du micro-ondes:
1. Mélangez une tasse d’eau avec le jus et la peau
d’un citron dans un bol à micro-ondes.
2. Micro-ondes à pleine puissance pendant 5
minutes.
3. Essuyez complètement l’intérieur de l’appareil,
le plateau en verre et l’anneau à rouleaux avec
un chiffon chaud et humide.
FEUILLE DE MICA
À l’intérieur de l’appareil, il y a une feuille de
carton en mica protégeant le magnétron. Ne retirez
pas cela de l’appareil car l’exposition du magnétron
aux éclaboussures de nourriture peut provoquer un
arc ou un incendie. Si elle devient sale, la feuille de
mica peut être nettoyée avec un chiffon chaud.
Ne laissez pas le panneau de commande se
mouiller. Si nécessaire, nettoyer le panneau de
commande avec un chiffon humide, puis essuyer.
Le bac en verre peut être enlevé et nettoyé dans de
l’eau tiède et un détergent doux ou peut être placé
dans un lave-vaisselle.
La bague de roulement et le plancher du four
doivent être nettoyés régulièrement afin d’éviter
un bruit ou un renversement excessif. L’anneau à
rouleaux peut être nettoyé dans de l’eau tiède et un
détergent doux ou peut être placé dans un lavevaisselle. Assurez-vous que la bague de roulement
et le plateau en verre sont remplacés dans la bonne
position pour éviter le bruit ou le renversement
DISPOSITION
Ce produit ne doit pas être considéré comme un
ordures ménagères, il doit être transporté vers le
point de collecte approprié pour le recyclage des
composants électriques. Pour plus d’informations sur
les points locaux de collecte des déchets, contactez
votre agence locale d’élimination des déchets ou
votre bureau gouvernemental.
30
Page 32
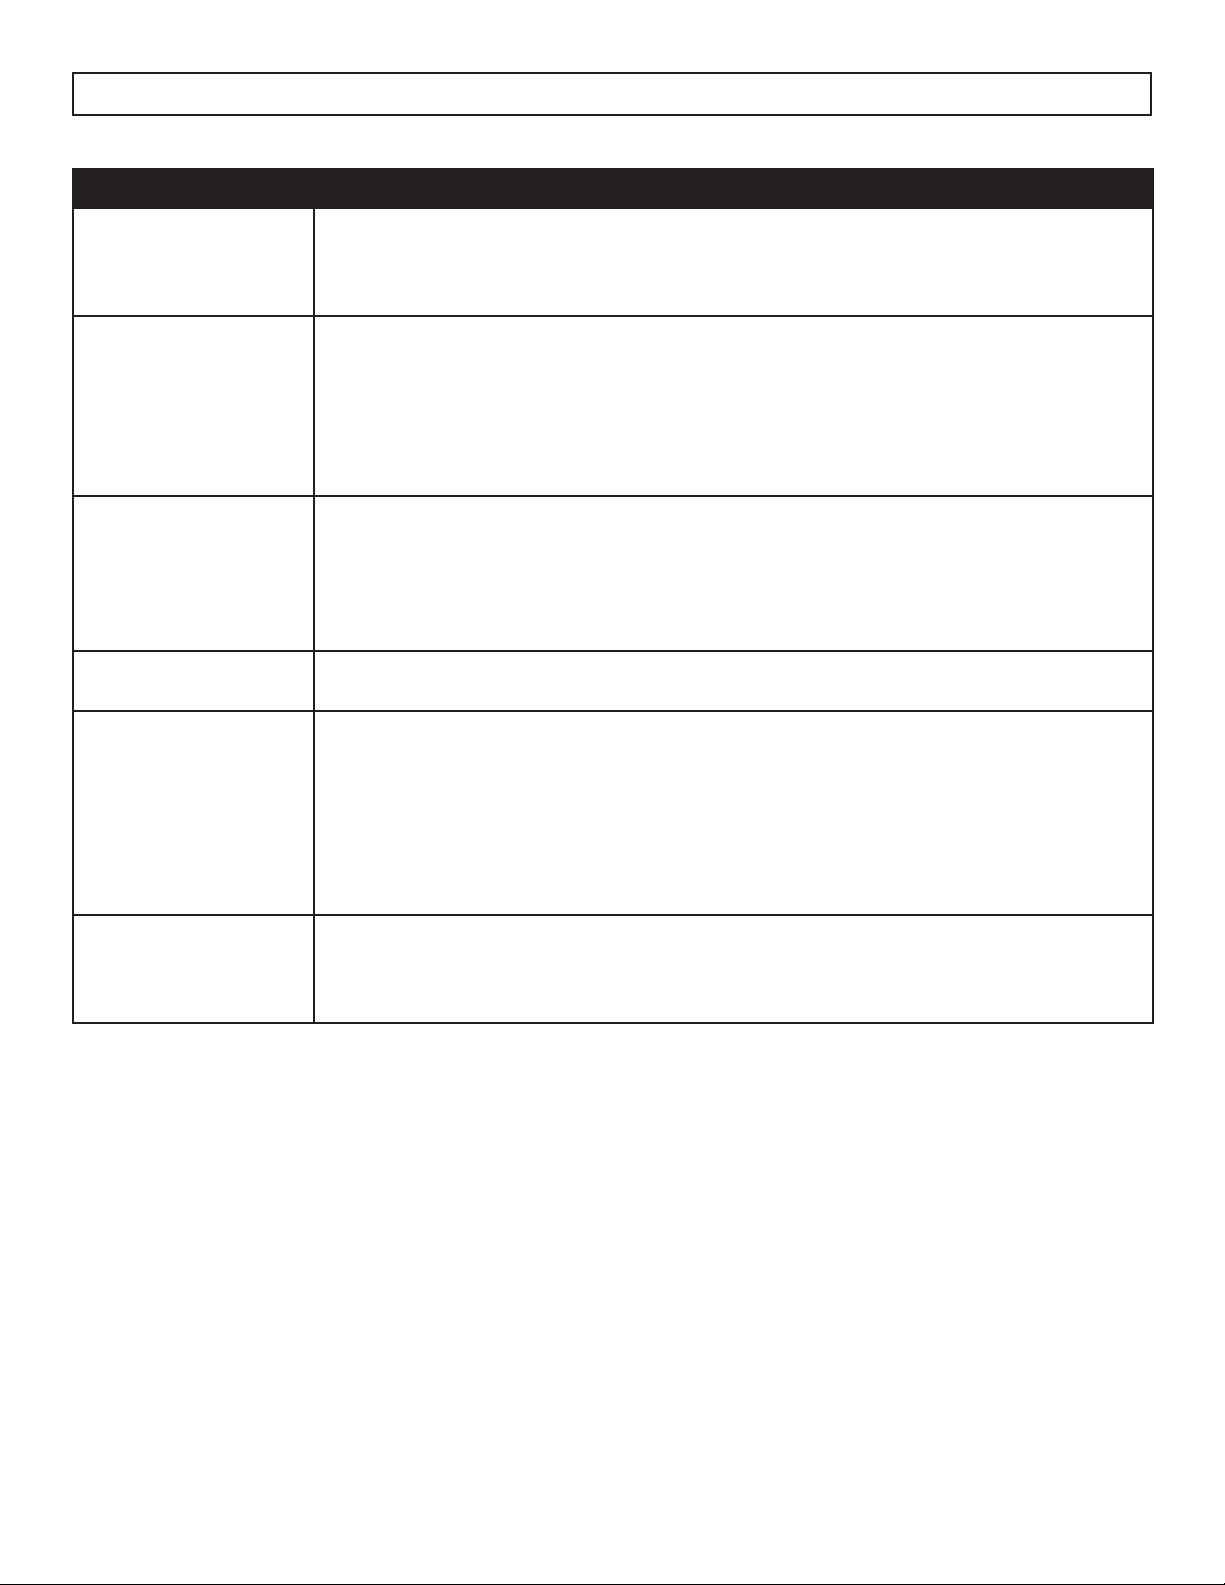
DÉPANNAGE
PROBLEM POSSIBLE CAUSE
Aucune puissance • Un fusible peut être soufflé ou le disjoncteur a déclenché
• Branchement pas complètement inséré dans la prise murale
Arracher ou étinceler
pendant l’opération
Aliments cuits de
façon inégale
Aliments trop cuit • Le niveau de puissance ou le temps de cuisson étaient trop élevés
Aliments non cuits • La nourriture n’a pas été complètement décongelée avant de cuisiner
• Les articles métalliques ont été laissés dans l’appareil pendant l’opération
• L’appareil fonctionne alors qu’il est vide
• Les aliments renversés ont été construits à l’intérieur de l’appareil ou sur la
feuille de mica
• La nourriture n’a pas été complètement décongelée avant de cuisiner
• Le temps de cuisson ou le niveau de puissance étaient insuffisants
• La nourriture n’a pas été tournée ou agitée pendant la cuisson
• Le temps de cuisson ou le niveau de puissance étaient insuffisants
• La nourriture n’a pas été tournée ou agitée pendant la cuisson
• Les ouvertures de ventilation sont bloquées
Mauvaise
décongélation
• Le temps de dégivrage ou le niveau de puissance étaient insuffisants
• La nourriture n’a pas été tournée ou agitée pendant le dégivrage
31
Page 33
LIMITED IN-HOME APPLIANCE WARRANTY
GARANTIE LIMITÉE « EN ATELIER »
This quality product is warranted to be free from manufacturer’s defects in material and workmanship, provided that the unit is used under the normal operating
Cet appareil de qualité est garanti exempt de tout vice de matière première et de fabrication, s’il est utilisé dans les conditions normales
conditions intended by the manufacturer.
recommandées par le fabricant.
This warranty is available only to the person to whom the unit was originally sold by Danby Products Limited (Canada) or Danby Products Inc. (U.S.A.) (hereafter
Cette garantie n’est offerte qu’à l’acheteur initial de l’appareil vendu par Danby Products Limited (Canada) ou Danby Products Inc.
“Danby”) or by an authorized distributor of Danby, and is non-transferable.
(É.-U.) (ci-après « Danby ») ou par l’un des ses distributeurs agréés et elle ne peut être transférée.
CONDITIONS
Les pièces en plastique sont garanties pendant trente (30) jours seulement à partir de la date de l’achat, sans aucune prolongation
Plastic parts, are warranted for thirty (30) days only from purchase date, with no extensions provided.
prévue.
TERMS OF WARRANTY
Premiers 12 mois
First Year
Pour obtenir un
To obtain
service
Service
Pendant les premiers douze (12) mois, toutes les pièces fonctionnelles de ce produit qui s’avèrent défectueuses
During the rst twelve (12) months, any functional parts of this product found to be defective, will be repaired or replaced, at warrantor’s
seront réparées ou remplacées, selon le choix du garant, sans frais à l’acheteur initial.
option, at no charge to the ORIGINAL purchaser.
Contactez le revendeur où l'appareil a été acheté ou contactez le dépôt de service Danby autorisé le plus
Danby reserves the right to limit the boundaries of “In Home Service” to the proximity of an Authorized Service Depot. Any app liance
proche, où le service doit être effectué par un technicien de service qualifié. Si le service est effectué sur
requiring service outside the limited boundaries of “In Home Service” , it will be the consumer’s responsibility to transport the appliance (at
l'appareil par une personne autre qu'un dépôt de service autorisé, toutes les obligations de Danby en vertu de
their own expense) to the original retailer (point of purchase) or a service depot for repair. See “Boundaries of In Home Serv ice”below.
cette garantie seront annulées.
Contact your dealer from whom your unit was purchased, or contact your nearest authorized Danby service depot, where service
must be performed by a qualied service technician.
Il est de la responsabilité de l'acheteur de transporter l'appareil vers le dépôt de service agréé le plus proche.
If service is performed on the units by anyone other than an authorized service depot, or the unit is used for commercial appli cation, all
Les frais de transport entre votre domicile et le lieu de l'entretien ne sont pas couverts par la présente garantie et doivent être
acquittés par l'acheteur.
Boundaries of
In Home Service
Aucune partie de la garantie ne prévoit implicitement que le fabricant sera tenu responsable des dommages subis par les aliments ou
d’autres types de contenu, qu’ils soient causés par la défectuosité de l’appareil ou par son usage adéquat ou inadéquat.
obligations of Danby under this warranty shall be void.
If the appliance is installed in a location that is 100 kilometers (62 miles) or more from the nearest service center your unit must be
delivered to the nearest authorized Danby Service Depot, as service must only be performed by a technician qualied and certif ied for
warranty service by Danby. Transportation charges to and from the service location are not protected by this warranty and are t he
responsibility of the purchaser.
EXCLUSIONS
En vertu de la présente, il n’existe aucune autre garantie, condition ou représentation, qu’elle soit exprimée ou tacite, de façon
Nothing within this warranty shall imply that Danby will be responsible or liable for any spoilage or damage to food or other c ontents of this appliance, whether due
manifeste ou intentionnelle, par Danby ou ses distributeurs agréés. De même, sont exclues toutes les autres garanties, conditions ou
to any defect of the appliance, or its use, whether proper or improper.
représentations, y compris les garanties, conditions ou représentations en vertu de toute loi régissant la vente de produits ou de toute
autre législation ou règlement semblable. En vertu de la présente, Danby ne peut être tenue responsable en cas de blessures
corporelles ou de dégâts matériels, y compris à l’appareil, quelle qu’en soit les causes. Danby ne peut pas être tenue responsable
Save as herein provided, Danby, there are no other warranties, conditions, representations or guarantees, express or implied, m ade or intended by Danby or its
des dommages indirects dus au fonctionnement défectueux de l’appareil. En achetant l’appareil, l’acheteur accepte de tenir sans
authorized distributors and all other warranties, conditions, representations or guarantees, including any warranties, conditio ns, representations or guarantees
reproche et de dégager Danby de toute responsabilité en cas de réclamation pour toute blessure corporelle ou tout dégât matériel
under any Sale of Goods Act or like legislation or statue is hereby expressly excluded. Save as herein provided, Danby shall no t be responsible for any damages
causé par cet appareil.
to persons or property, including the unit itself, howsoever caused or any consequential damages arising from the malfunction o f the unit and by the purchase of
the unit, the purchaser does hereby agree to indemnify and hold harmless Danby from any claim for damages to persons or propert y caused by the unit.
La garantie ou assurance ci-dessus ne s’applique pas si les dégâts ou réparations sont dus aux cas suivants :
1) Panne de courant.
2) Dommages subis pendant le transport ou le déplacement de l’appareil.
No warranty or insurance herein contained or set out shall apply when damage or repair is caused by any of the following:
3) Alimentation électrique incorrecte (tension faible, câblage défectueux, fusibles incorrects).
4) Accident, modification, emploi abusif ou incorrect de l’appareil tel qu'une circulation d'air inadéquate dans la pièce ou des
1) Power failure.
conditions de fonctionnement anormales (température extrêmement élevée ou basse).
2) Damage in transit or when moving the appliance.
5) Utilisation dans un but commercial ou industriel (à savoir, si l'appareil n'est pas installé dans un domicile résidentiel).
3) Improper power supply such as low voltage, defective house wiring or inadequate fuses.
6) Incendie, dommages causés par l’eau, le vol, la guerre, une émeute, des hostilités, ou en cas de force majeure (ouragan,
4) Accident, alteration, abuse or misuse of the appliance such as inadequate air circulation in the room or abnormal operating con ditions
inondation, etc.).
7) Visites d’un technicien pour expliquer le fonctionnement de l’appareil au propriétaire.
8) Installation inappropriée (par exemple, encastrement d'un appareil autoportant, ou utilisation extérieure d'un appareil non conçu à
cet effet, y compris, mais sans s'y limiter : les garages, les patios, les porches ou ailleurs, qui ne sont pas correctement isolés ou
climatisés).
La preuve de la date d'achat sera requise pour les réclamations de garantie; conserver la facture de vente. Dans le cas où un service
Proof of purchase date will be required for warranty claims; so, please retain bills of sale. In the event warranty service is required, present this document to our
de garantie est requis, présentez la preuve d'achat à notre dépôt de service agréé.
AUTHORIZED SERVICE DEPOT.
(extremely high or low room temperature).
5) Use for commercial or industrial purposes (ie. If the appliance is not installed in a domestic residence).
6) Fire, water damage, theft, war, riot, hostility, acts of God such as hurricanes, oods etc.
7) Service calls resulting in customer education.
8) Improper Installation (ie. Building-in of a free standing appliance or using an appliance outdoors that is not approved for out door application).
EXCLUSIONS
CONDITIONS GÉNÉRALES
GENERAL PROVISIONS
Danby Products Limited
Danby Products Limited
PO Box 1778, Guelph, Ontario, Canada N1H 6Z9
PO Box 1778, Guelph, Ontario, Canada N1H 6Z9
Téléphone : (519) 837-0920 Télécopieur : (519) 837-0449
Telephone: (519) 837-0920 FAX: (519) 837-0449
Warranty Service
Service sous garantie
In-home
En Atelier
1-800-263-2629
1-800-263-2629
02/18
04/09
Danby Products Inc.
PO Box 669, Findlay, Ohio, U.S.A. 45840
Téléphone : (419) 425-8627 Télécopieur : (419) 425-8629
PO Box 669, Findlay, Ohio, U.S.A. 45840
Telephone: (419) 425-8627 FAX: (419) 425-8629
Danby Products Inc.
Page 34

Bienvenido a la familia Danby.
Estamos orgullosos de nuestros productos de calidad y creemos en un servicio
confiable. Le sugerimos que lea este manual del propietario antes de enchufar su nuevo
electrodoméstico, ya que contiene información importante de funcionamiento, información
de seguridad, solución de problemas y consejos de mantenimiento para garantizar la
confiabilidad y longevidad de su electrodoméstico.
Tiene derecho a la cobertura de la garantía como se describe en el manual del propietario
que se proporciona con su nuevo electrodoméstico.
1. Escriba la información de su aparato a continuación. Debe conservar el comprobante
de compra original para validar y recibir los servicios de garantía.
2. Registre su producto en línea y reciba una EXTENSIÓN DE GARANTÍA GRATUITA DE 2
MESES después de completar una encuesta sobre el producto, en
www.danby.com/support/product-registration/
Número de modelo: _______________________________________________
Número de serie: _________________________________________________
Fecha de compra: _________________________________________________
Necesitas ayuda?
1. Lea el manual del propietario para obtener ayuda con la instalación, resolución de
problemas y asistencia de mantenimiento.
2. Visite www.Danby.com para acceder a herramientas de autoservicio, preguntas
frecuentes y mucho más buscando su número de modelo en la barra de búsqueda.
3. Para obtener el servicio al cliente más rápido, complete el formulario web en www.
danby.com/support. Su envío irá directamente a un experto en su dispositivo en
particular. Nuestros tiempos de respuesta promedio son entre 20 minutos y 2 horas,
durante el horario comercial EST.
4. Llame al 1-800-263-2629; tenga en cuenta que durante las horas pico, los tiempos de
espera pueden exceder una hora.
33
Page 35
INSTRUCCIONES DE SEGURIDAD IMPORTANTES
LEA Y SIGA TODAS LAS INSTRUCCIONES DE SEGURIDAD
Se deben seguir las precauciones básicas de seguridad al usar aparatos eléctricos,
incluidas las siguientes:
ADVERTENCIA - Para reducir el riesgo de quemaduras, descargas eléctricas, incendios,
lesiones a personas o exposición a energía de microondas excesiva:
1. Lea todas las instrucciones antes de usar el microondas.
2. Lea y siga las “PRECAUCIONES PARA EVITAR POSIBLE EXPOSICIÓN A ENERGÍA
EXCESIVA DE MICROONDAS” específicas que se encuentran en la página 4.
3. Este microondas debe estar conectado a tierra. Conéctelo solo a un tomacorriente
debidamente conectado a tierra. Consulte las “INSTRUCCIONES DE CONEXIÓN A
TIERRA” que se encuentran en la página 5.
4. Instale o ubique este microondas únicamente de acuerdo con las instrucciones de
instalación provistas.
5. Algunos productos, como huevos enteros y recipientes sellados, por ejemplo, frascos de
vidrio cerrados, pueden explotar y no deben calentarse en este horno.
6. Utilice este microondas solo para el uso previsto como se describe en este manual.
No utilice productos químicos o vapores corrosivos en este microondas. Este tipo de
horno está diseñado específicamente para calentar, cocinar o secar alimentos. No está
diseñado para uso industrial o de laboratorio.
7. EL CONTENIDO CALIENTE PUEDE CAUSAR QUEMADURAS GRAVES. NO PERMITA
QUE LOS NIÑOS UTILICEN EL MICROONDAS. Tenga cuidado al retirar objetos
calientess.
8. No utilice este microondas si tiene un cable o enchufe dañado, si no funciona
correctamente o si se ha dañado o caído.
9. Este microondas debe ser reparado únicamente por personal de servicio calificado.
Comuníquese con el centro de servicio autorizado más cercano para que lo examinen,
reparen o ajusten.
10. No cubra ni bloquee las aberturas del microondas.
¡GUARDA ESTAS INSTRUCCIONES!
Page 36
INSTRUCCIONES DE SEGURIDAD IMPORTANTES
LEA Y SIGA TODAS LAS INSTRUCCIONES DE SEGURIDAD
11. No guarde este microondas al aire libre. No use este microondas cerca del agua,
por ejemplo, cerca de un fregadero de la cocina, en un sótano húmedo, cerca de una
piscina o en un lugar similar.
12. No sumerja el cable de alimentación ni el enchufe en agua.
13. Mantenga el cable de alimentación alejado de superficies calientes.
14. No deje que el cable de alimentación cuelgue del borde de una mesa o mostrador.
15. Cuando limpie las superficies de la puerta y el horno que hacen contacto cuando la
puerta está cerrada, use solo jabones suaves no abrasivos o detergente aplicado con
una esponja o paño suave.
16. Para reducir el riesgo de incendio en la cavidad del horno:
• No cocine demasiado los alimentos. Preste atención al microondas cuando se
coloquen papel, plástico u otros materiales combustibles dentro del horno para
facilitar la cocción.
• Retire los alambres retorcidos de las bolsas de papel o plástico antes de colocar la
bolsa en el horno.
• Si el material dentro del horno se enciende, mantenga la puerta del horno cerrada,
apague el horno y desconecte el cable de alimentación, o apague la energía en el
panel de fusibles o disyuntores.
• No utilice el horno con fines de almacenamiento. No deje productos de papel,
utensilios de cocina o alimentos dentro del horno cuando no esté en uso.
17. Los líquidos, como el agua, el café o el té, pueden sobrecalentarse más allá del punto
de ebullición sin que parezca que están hirviendo. Cuando se retira el recipiente del
microondas, no siempre hay burbujas o ebullición visibles. ESTO PODRÍA RESULTAR EN
QUE LOS LÍQUIDOS MUY CALIENTES SE HIERVAN REPENTINAMENTE CUANDO EL
RECIPIENTE ESTÁ MOLESTADO O SE INSERTA UN UTENSILIO EN EL LÍQUIDO.
• No sobrecaliente los líquidos.
• Revuelva los líquidos antes y a la mitad del calentamiento.
• No utilice recipientes de lados rectos con cuellos estrechos.
• Después de calentar, deje reposar el recipiente en el microondas por un período
corto de tiempo antes de sacarlo.
• Tenga mucho cuidado al insertar una cuchara u otro utensilio en el recipiente.
¡GUARDA ESTAS INSTRUCCIONES!
Page 37
INSTRUCCIONES DE SEGURIDAD IMPORTANTES
LEA Y SIGA TODAS LAS INSTRUCCIONES DE SEGURIDAD
PRECAUCIONES PARA EVITAR UNA POSIBLE EXPOSICIÓN A
EXCESIVA ENERGÍA DE MICROONDAS
(1) No intente operar este horno con la puerta abierta. La operación con
la puerta abierta puede resultar en una exposición dañina a la energía
de microondas. Es importante no anular ni alterar los enclavamientos de
seguridad.
(2) No coloque ningún objeto entre el gabinete del horno y la puerta
ni permita que se acumule suciedad o residuos de limpiadores en las
superficies que hacen contacto cuando la puerta está cerrada.
(3) No opere el horno si está dañado. Es particularmente importante que la
puerta del horno se cierre correctamente y que no haya daños en:
(a) puerta (doblada),
(b) bisagras y pestillos (rotos o sueltos),
(c) sellos de puertas y superficies de sellado.
(4) El horno no debe ser ajustado ni reparado por nadie que no sea
personal de servicio debidamente calificado.
¡GUARDA ESTAS INSTRUCCIONES!
36
Page 38
INSTRUCCIONES DE SEGURIDAD IMPORTANTES
LEA Y SIGA TODAS LAS INSTRUCCIONES DE SEGURIDAD
INSTRUCCIONES DE PUESTA A TIERRA
Este microondas debe estar conectado a tierra. En caso de un cortocircuito eléctrico, la
conexión a tierra reduce el riesgo de descarga eléctrica al proporcionar un cable de
escape para la corriente eléctrica.
Este microondas está equipado con un cable que tiene un cable de conexión a tierra
con un enchufe de conexión a tierra. El cable de alimentación debe estar enchufado
a un tomacorriente que esté debidamente conectado a tierra. Si el tomacorriente es
un tomacorriente de pared de 2 clavijas, es su responsabilidad reemplazarlo por un
tomacorriente de pared de 3 clavijas debidamente conectado a tierra. La placa de
clasificación de serie indica el voltaje y la frecuencia para los que está diseñado el
microondas.
ADVERTENCIA - El uso inadecuado del enchufe con conexión a tierra puede resultar en un
riesgo de descarga eléctrica. Consulte a un electricista calificado o agente de servicio si
las instrucciones de conexión a tierra no se comprenden completamente, o si existen dudas
sobre si el microondas está conectado a tierra correctamente.
Si es necesario usar un cable de extensión, use solo un cable de extensión de 3 hilos que
tenga un enchufe de 3 clavijas con conexión a tierra y un receptáculo de 3 ranuras que
acepte el enchufe del microondas. La clasificación eléctrica marcada del cable de extensión
debe ser al menos tan grande como la clasificación eléctrica del microondas. El cable más
largo debe colocarse de manera que no caiga sobre la encimera o la mesa donde los
niños puedan tirar de él o tropezar con él.
PELIGRO - Peligro de descarga eléctrica: tocar algunos de los componentes internos puede
causar lesiones personales graves o la muerte. No desmonte este microondas.
ADVERTENCIA - Peligro de descarga eléctrica: el uso inadecuado del enchufe con conexión
a tierra puede provocar una descarga eléctrica. No enchufe el microondas si el enchufe
con conexión a tierra está dañado.
Se proporciona un cable de alimentación corto para reducir los riesgos de enredarse o
tropezarse con un cable más largo.
Si el cable de alimentación está dañado, debe ser reemplazado por el fabricante, su
agente de servicio o una persona calificada similar para evitar peligros.
Solicite a un electricista calificado que instale un tomacorriente con conexión a tierra cerca
del microondas si el cable de alimentación es demasiado corto.
¡GUARDA ESTAS INSTRUCCIONES!
Page 39
INSTRUCCIONES DE SEGURIDAD IMPORTANTES
LEA Y SIGA TODAS LAS INSTRUCCIONES DE SEGURIDAD
SEGURIDAD - LÍQUIDO
SOBRECALENTADO
Los líquidos pueden sobrecalentarse más allá del
punto de ebullición sin que parezca que están
hirviendo debido a la tensión superficial del
líquido. No siempre habrá burbujas visibles cuando
se saque el líquido del microondas. Esto puede
provocar que los líquidos muy calientes hiervan
repentinamente cuando se inserta un utensilio u otro
elemento, como una bolsita de té, en el líquido.
Para reducir el riesgo de lesiones:
• No sobrecaliente los líquidos. No caliente
ningún líquido durante más de 2 minutos por
taza.
• Revuelva los líquidos antes y a la mitad del
calentamiento.
• No utilice recipientes de lados rectos con cuellos
estrechos, ya que esto puede provocar la
acumulación de vapor.
• El líquido sobrecalentado puede comenzar
a hervir espontáneamente cuando se retira
del microondas. Después de calentar, deje
reposar el líquido en el microondas durante 30
segundos antes de retirarlo.
• Tenga mucho cuidado al insertar un utensilio u
otro artículo en líquidos calientes.
Se debe remover o agitar el contenido de los
biberones de leche y de los frascos de comida para
bebés y controlar la temperatura antes de servir
para evitar quemaduras.
No descongele bebidas congeladas, especialmente
bebidas carbonatadas, en este microondas, ya que
podrían explotar.
Los alimentos calientes y el vapor pueden provocar
quemaduras. Tenga cuidado al abrir cualquier
recipiente que se haya calentado en el microondas.
Dirija la abertura lejos de las manos y la cara para
evitar quemaduras.
SEGURIDAD - ARCO
La formación de arco se refiere a las chispas dentro del
microondas mientras está en funcionamiento. El arco
eléctrico es causado por:
• Metal o papel de aluminio dentro del microondas.
• Se utilizan toallas de papel recicladas dentro del
microondas, ya que pueden contener pequeños
trozos de metal.
Si se forman arcos eléctricos, detenga el funcionamiento
y retire las toallas de papel o de metal del microondas.
INTERFERENCIA DE RADIO
Este microondas genera y utiliza frecuencias ISM
y, si no se instala y utiliza correctamente siguiendo
estrictamente las instrucciones del fabricante, puede
provocar interferencias en la recepción de radio y
televisión. Ha sido sometido a pruebas de tipo y se ha
determinado que cumple con los límites para equipos
ISM de conformidad con la Parte 18 de las normas de
la FCC, que están diseñadas para proporcionar una
protección razonable contra dicha interferencia en una
instalación residencial.
Sin embargo, no hay garantía de que no se produzcan
interferencias en determinadas instalaciones. Si
este microondas causa interferencia en la recepción
de radio o televisión, lo cual se puede determinar
encendiendo y apagando el equipo, la interferencia se
puede corregir mediante uno o más de los siguientes
métodos:
• Reoriente la antena receptora de radio o televisión.
• Aleje el microondas del receptor.
• Enchufe el microondas en un tomacorriente diferente
para que el microondas y el receptor estén en
circuitos derivados diferentes.
El fabricante no es responsable de ninguna interferencia
de radio o televisión causada por modificaciones no
autorizadas de este microondas. Es responsabilidad del
usuario corregir dicha interferencia.
¡GUARDA ESTAS INSTRUCCIONES!
Page 40

INSTRUCCIONES DE INSTALACIÓN
INSTRUCCIONES DE OPERACIÓN
INSTALACIÓN
• Retire todos los materiales de embalaje del
interior y del exterior del aparato. No retire la
hoja de mica de cartón que cubre el magnetrón.
• Compruebe si el aparato está dañado antes
de usarlo, como una puerta desalineada
o doblada, sellos dañados de la puerta,
bisagras o pestillos de la puerta rotos o sueltos
o abolladuras dentro de la cavidad o en la
puerta. Si hay algún daño en el aparato, no
lo utilice, devuélvalo a su punto de compra o
póngase en contacto con el consumidor.
• El aparato debe colocarse sobre una superficie
plana y estable que sea capaz de sostener su
peso y el alimento más pesado que pueda ser
colocado en el aparato.
• No utilice este aparato donde se genere calor,
humedad o humedad elevada.
• No limpie este aparato con o cerca de
materiales combustibles.
TÉCNICAS DE COCCIÓN
Para obtener los mejores resultados al cocinar en
este aparato, siga las siguientes sugerencias.
REVOLVIENDO
Revuelva los alimentos mientras cocina para
distribuir el calor uniformemente. Alimentos en el
exterior de la antena absorbe más energía y se
calienta más rápidamente para agitar desde el
exterior del plato hacia el centro.
ARREGLO
Organizar los alimentos de forma irregular, más
gruesos, partes más caras hacia el exterior de la
plataforma giratoria para que reciban más calor.
Para evitar que se queme demasiado, coloque
los artículos delicados hacia el centro de la mesa
giratoria.
TORNEADO
Convierte los alimentos a la mitad de la cocción
para exponer todas las partes a la energía de
microondas. Esto es importante con los artículos
grandes y la carne.
• Deje 7.5 cm (3 pulgadas) de espacio sobre
el aparato, 2,5 cm (1 pulgadas) en la parte
posterior del aparato y 7,5 cm (3 pulgadas)
en ambos lados para que el aire fluya
correctamente alrededor del aparato. No
bloquee las aberturas de ventilación del
aparato.
• No opere el aparato sin la bandeja de vidrio,
el soporte del rodillo y el eje en sus posiciones
correctas.
• ADVERTENCIA: No instale el microondas sobre
una estufa u otro electrodoméstico que produzca
calor. Si se instala cerca o encima de una fuente
de calor, el microondas podría dañarse y la
garantía quedaría anulada.
REPOSEN
Los alimentos cocinados en un microondas
acumulan calor interno y continúan cocinando
durante unos minutos después de que se detenga
la calefacción. Deje que los alimentos reposen
para completar la cocción, especialmente carnes
y líquidos. Todos los líquidos deben dejarse
reposar durante unos minutos después de la
cocción y deben ser sacudidos o revueltos antes de
consumirlos.
AÑADIR HUMEDAD
La energía de la microonda se atrae a las moléculas
de agua. Los alimentos que son desiguales en el
contenido de humedad deben ser cubiertos y dejar
reposar después de cocinar para permitir que el
calor se dispersen uniformemente. Añadir una
pequeña cantidad de agua para secar los alimentos
para ayudar a cocinar.
39
Page 41

INSTRUCCIONES DE OPERACIÓN
GUÍA DE UTENSILIOS DE COCINA
Ciertos utensilios son inadecuados para su uso en un microondas. Vea a continuación para más
información sobre qué utensilios se recomiendan, que sólo deben tener un uso limitado y que no se
recomiendan.
RECOMENDADO
Plato para dorar en el microondas: Se utiliza para
dorar el exterior de los alimentos pequeños. Siga
las instrucciones proporcionadas con el plato de
dorado.
Envoltura de plástico para microondas: Se utiliza
para retener el vapor. Deje una pequeña abertura
para evitar una acumulación de vapor. No coloque
directamente sobre los alimentos.
Tazones y platos de vidrio y cerámica: Uso para
calentar o cocinar.
Platos y tazas de papel: Utilice para calentar a
corto plazo a bajas temperaturas. No utilice papel
reciclado ya que pueden contener metal y podrían
encenderse.
Toallas de papel y servilletas: Utilizar para
calefacción y cubrimiento a corto plazo.
Pueden absorber el exceso de humedad y
evitar salpicaduras. No utilice toallas de papel
recicladas ya que pueden contener metal y podrían
encenderse.
USO LIMITADO
Cerámica, porcelana y gres: Úselo sólo si están
etiquetados como “seguros para microondas”.
El plastico: Utilice solamente si está marcado como
“seguro para microondas”.
NO RECOMENDADO
Tarros y botellas de vidrio: El vidrio regular es
demasiado delgado para ser utilizado en un
microondas. Puede romperse y causar daños o
lesiones.
Bolsas de papel: Estos son un peligro de incendio
y podrían encenderse. La única excepción son las
bolsas de palomitas de maíz, que están diseñados
para uso de microondas.
Placas y tazas de espuma de poliestireno: Estos
pueden derretirse y dejar un residuo poco saludable
en los alimentos.
Papel encerado: Utilizar como tapa para evitar
salpicaduras.
Termómetros: Utilice solamente aquellos que están
etiquetados como “seguros para microondas” y
siga todas las instrucciones. Compruebe la comida
en varios lugares. Los termómetros convencionales
se pueden utilizar una vez que los alimentos se han
retirado del microondas.
USO LIMITADO
Cerámica, porcelana y gres: Úselo sólo si están
etiquetados como “seguros para microondas”.
El plastico: Utilice solamente si está marcado como
“seguro para microondas”.
Almacenamiento de plástico y contenedores de
alimentos: Estos pueden fundir y encender.
Utensilios de metal: Pueden producirse arcos y
daños en el aparato. Retire todo el metal antes de
la operación.
Nota: Para verificar si un plato es seguro para
usar en el microondas, coloque el plato vacío en
el microondas y presione el botón inicio/+30SEC
para ejecutar un programa de cocción al 100%
de potencia durante 30 segundos. Si el plato se
calienta mucho, no debe usarse.
40
Page 42
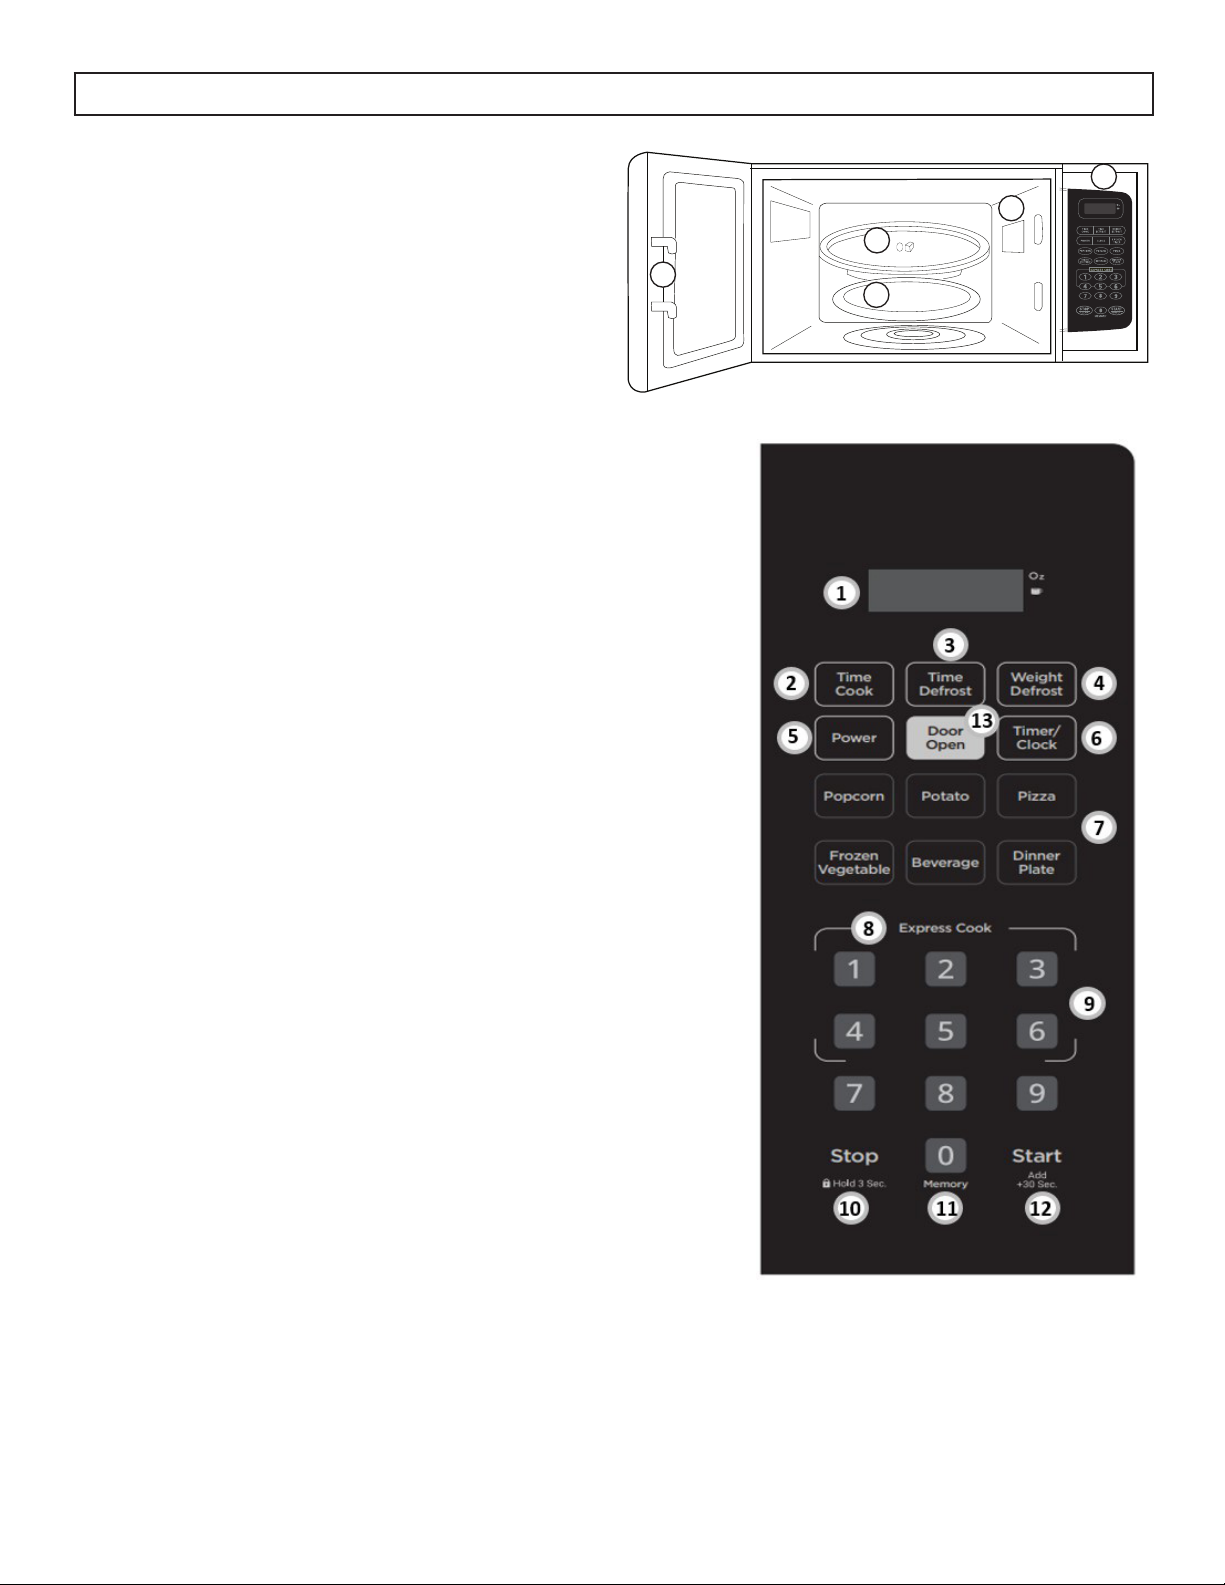
INSTRUCCIONES DE OPERACIÓN
CARACTERISTICAS
1. Sistema de cierre de puerta
2. Bandeja de vidrio
1
3. Anillo de rodillos
4. Hoja de mica (No quitar)
5. Panel de control
PANEL DE CONTROL
1. Pantalla de visualización: Muestra el tiempo de cocción, el
nivel de potencia y la hora del reloj.
2. Botón de cocción programada: Se utiliza para ajustar el
tiempo de cocción deseado.
3. Tiempo de descongelación: Se utiliza para ajustar la función
de descongelación en función del tiempoe.
4. Descongelar por peso: Se utiliza para ajustar la función de
descongelación en función del peso.
5. Botón de encendido: Se utiliza para seleccionar el nivel de
potencia.
6. Botón de temporizador/reloj: Permite ajustar el temporizador
y la hora actuall..
7. Menús de cocción automática: Configuración instantánea
para cocinar alimentos populares.
8. Botones cocción express: Se utiliza para configurar las
opciones de cocción express.
9. Botones del teclado numérico: Se utilizan para ajustar el
tiempo o las cantidades.
10. Parada/Retención 3SEC:
• Se utiliza para pausar o borrar un programa de cocción.
• Mantenga pulsado durante 3 segundos para activar el
bloqueo del panel de control.
11. Botón de memoria: Se utiliza para configurar la función de
memoria.
12. Botón Inicio/+30SEC : Se utiliza para iniciar un programa de
cocción o añadir 30 segundos a un programa de cocción.
13. Puerta abierta: Permite activar/desactivar el bloqueo de
seguridad.
5
4
2
3
41
Page 43
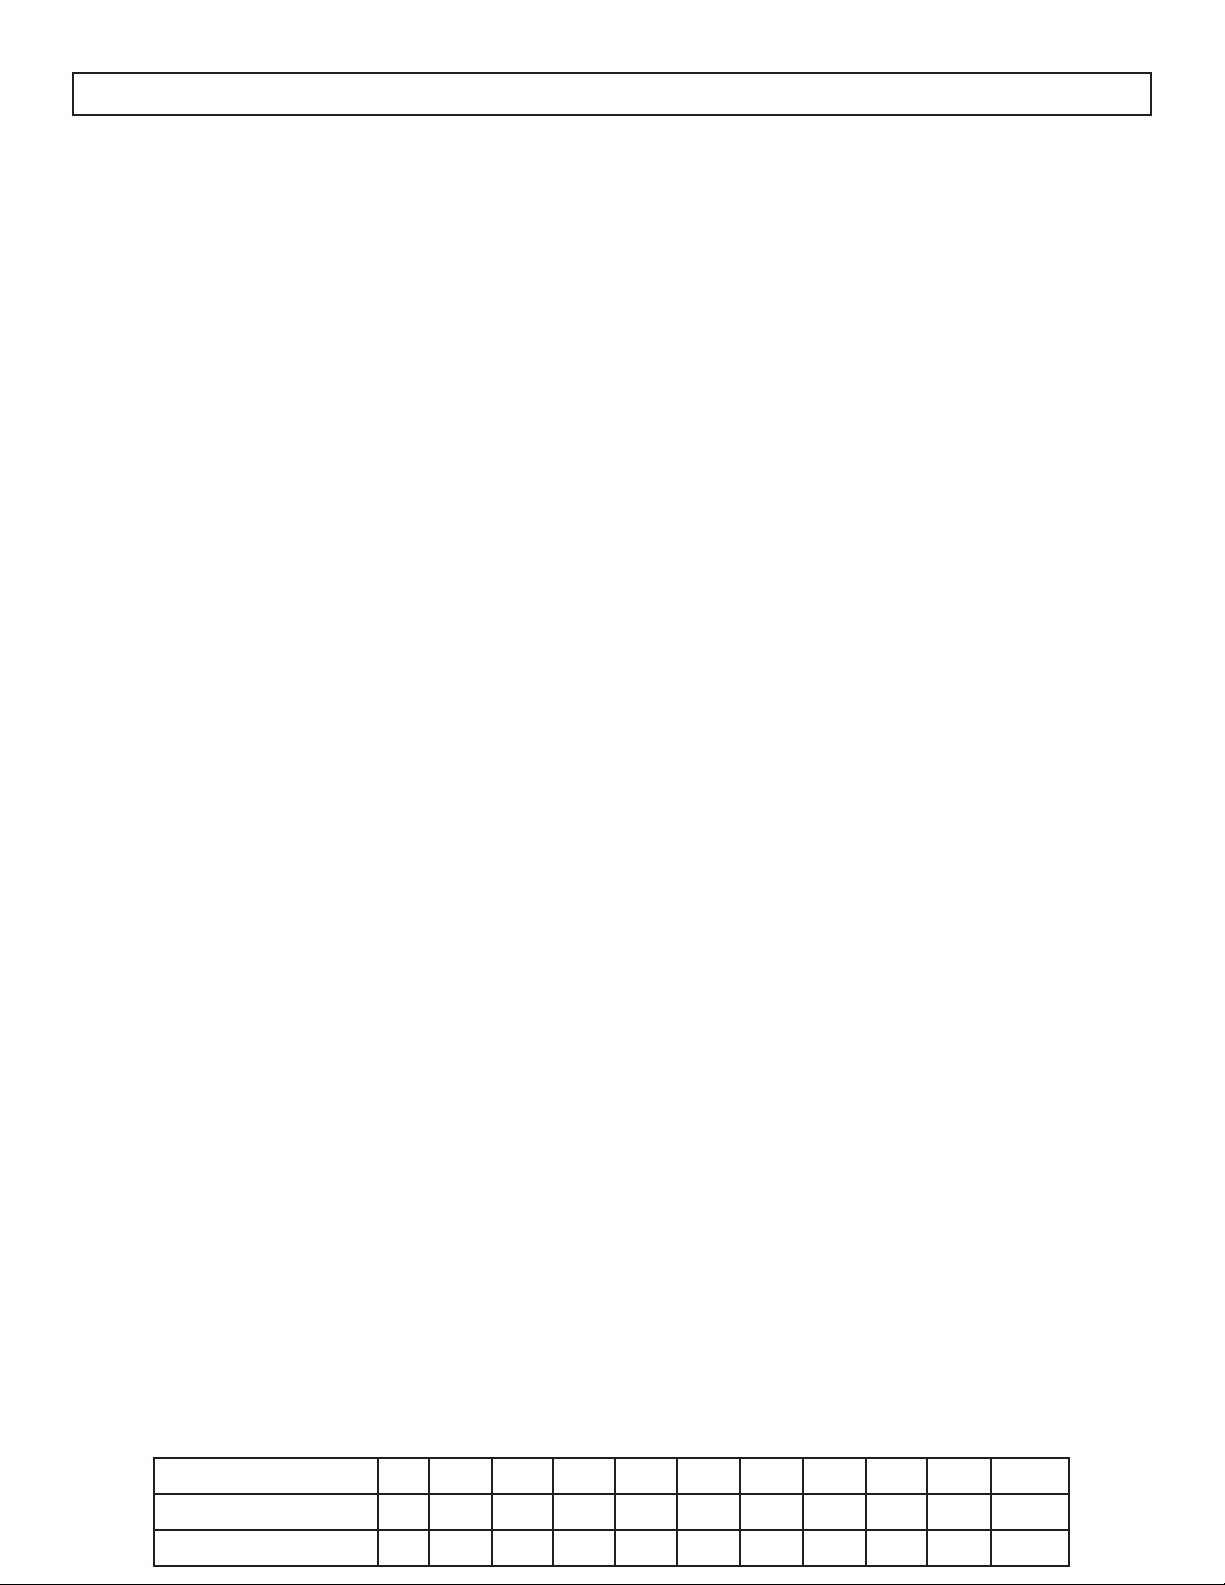
INSTRUCCIONES DE OPERACIÓN
USO PRIMERO
Cuando el aparato esté enchufado por primera
vez, la pantalla mostrará “0:00”. Utilice el teclado
numérico para introducir la hora actual y luego
pulse el botón de reloj para confirmar
Al configurar el temporizador de cocción, el
aparato volverá al modo de espera si no hay
entrada en 60 segundos.
Durante la operación:
• Pulse el botón inicio/+30SEC para iniciar la
operación.
• Pulse el botón parada para cancelar el
programa de cocción.
• Al final de un programa de cocción, el aparato
emitirá un pitido cinco veces.
COCCIÓN DE MICROONDAS
1. Presione el botón cocción programada. La
pantalla mostrará “00:00”.
2. Utilice el teclado numérico para introducir el
tiempo de cocción deseado. El tiempo máximo
es de 99 minutos y 99 segundos.
3. Pulse el botón de encendido para seleccionar
un nivel de potencia. El nivel de potencia
predeterminado es 100%. La pantalla mostrará
“PL10”. Use el teclado numérico para ingresar
el nivel de potencia deseado si no se requiere
100%.
4. Pulse el botón inicio/+30SEC para iniciar la
operación.
Nota: Si se selecciona “PL0”, el ventilador del
aparato funcionará sin función de cocción. Este
nivel de potencia se puede utilizar para eliminar
olores del horno.
Nota: Durante la cocción, si el nivel de potencia
elegido no es suficiente, presione el botón de
encendido. El nivel de potencia actual parpadeará
durante tres segundos. Use el teclado numérico
para elegir un nuevo nivel de potencia y la
operación continuará en el nuevo nivel de potencia.
AJUSTE DEL TEMPORIZADOR/RELOJ
El reloj sólo puede ajustarse como reloj de 12 horas.
Para ajustar la hora actual:
1. Pulse dos veces el botón temporizador/reloj, la
pantalla mostrará “00:00”.
2. Utilice el teclado numérico para introducir la hora
actual
3. Pulse el botón temporizador/reloj para confirmar.
Durante el funcionamiento, pulse el botón
temporizador/reloj para ver la hora actual.
Para programar un temporizador:
1. Pulse el botón temporizador/reloj una vez, la
pantalla mostrará “00:00”.
2. Utilice el teclado numérico para introducir el tiempo
deseado para que funcione el temporizador. El
tiempo máximo es de 99 minutos y 99 segundos.
3. Pulse el botón Inicio/+30SEC para iniciar el
funcionamiento del temporizador.
Nota: El temporizador de cocina es un temporizador.
COCINA DE DOS ETAPAS
Algunas recetas requieren diferentes etapas de
cocción a diferentes temperaturas. Para establecer
un programa de cocción en dos etapas:
1. Pulse el botón cocción programada y utilice el
teclado numérico para introducir el tiempo de
cocción deseado para la primera etapa.
2. Pulse el botón de encendido y utilice el teclado
numérico para introducir el nivel de potencia
deseado para la primera etapa.
3. Pulse el botón cocción programada y utilice el
teclado numérico para introducir el tiempo de
cocción deseado para la segunda etapa.
4. Pulse el botón de encendido y utilice el teclado
numérico para introducir el nivel de potencia
deseado para la segunda etapa.
5. Pulse el botón inicio/+30SEC para iniciar la
operación.
Teclado numérico 0 1 2 3 4 5 6 7 8 9 10
Potencia de cocinar 0% 10% 20% 30% 40% 50% 60% 70% 80% 90% 100%
Pantalla PL0 PL1 PL2 PL3 PL4 PL5 PL6 PL7 PL8 PL9 PL10
Page 44

INSTRUCCIONES DE OPERACIÓN
COCCIÓN AUTOMÁTICA
Los botones de cocción automática se pueden utilizar para configurar las funciones de cocción automática
para los tipos de alimentos siguientes.
PALOMITAS DE MAIZ
1. Pulse repetidamente el botón palomitas de maiz para recorrer las opciones de “3.2” y “3.5”. Estos
números se refieren al tamaño de la bolsa de palomitas de maíz en onzas.
2. Pulse el botón inicio/+30SEC para iniciar la operación.
PATATA
1. Presione el botón de patata varias veces para recorrer las opciones de “1”, “2” y “3”. Estos números
se refieren al tamaño de la porción en onzas. 1 es 8 onzas, 2 es 16 onzas y 3 es 24 onzas.
2. Pulse el botón inicio/+30SEC para iniciar la operación.
PIZZA
1. Presione repetidamente el botón pizza para recorrer las opciones de “4.0”, “8.0” y “14.0”. Estos
números se refieren al tamaño de la porción en onzas.
2. Pulse el botón inicio/+30SEC para iniciar la operación.
VEGETAL CONGELADO
1. Pulse repetidamente el botón vegetal congelado para recorrer las opciones de “4.0”, “8.0” y “16.0”.
Estos números se refieren al tamaño de la porción en onzas.
2. Pulse el botón inicio/+30SEC para iniciar la operación.
BEBIDA
1. Presione repetidamente el botón bebida para recorrer las opciones de “1”, “2” y “3”. Estos números
se refieren al número de copas.
2. Pulse el botón inicio/+30SEC para iniciar la operación.
PLATO DE CENA
1. Presione repetidamente el botón plato de cena para recorrer las opciones de “9.0”, “12.0” y “18.0”.
Estos números se refieren al tamaño de la porción en onzas.
2. Pulse el botón inicio/+30SEC para iniciar la operación.
COCCIÓN EXPRESA
Cuando el aparato no esté en funcionamiento,
presione el botón numérico de 1 a 6 y el aparato
funcionará entre 1 y 6 minutos con una potencia de
cocción del 100%.
AÑADIR 30 SEGUNDOS
Cuando el aparato no esté en funcionamiento,
al presionar el botón inicio/+30SEC, el aparato
funcionará durante 30 segundos a un nivel de
potencia del 100%. Este botón se puede pulsar
varias veces, cada vez que se presione, se añadirán
otros 30 segundos al tiempo de cocción. El
tiempo máximo de cocción es de 99 minutos y 99
segundos.
43
Page 45
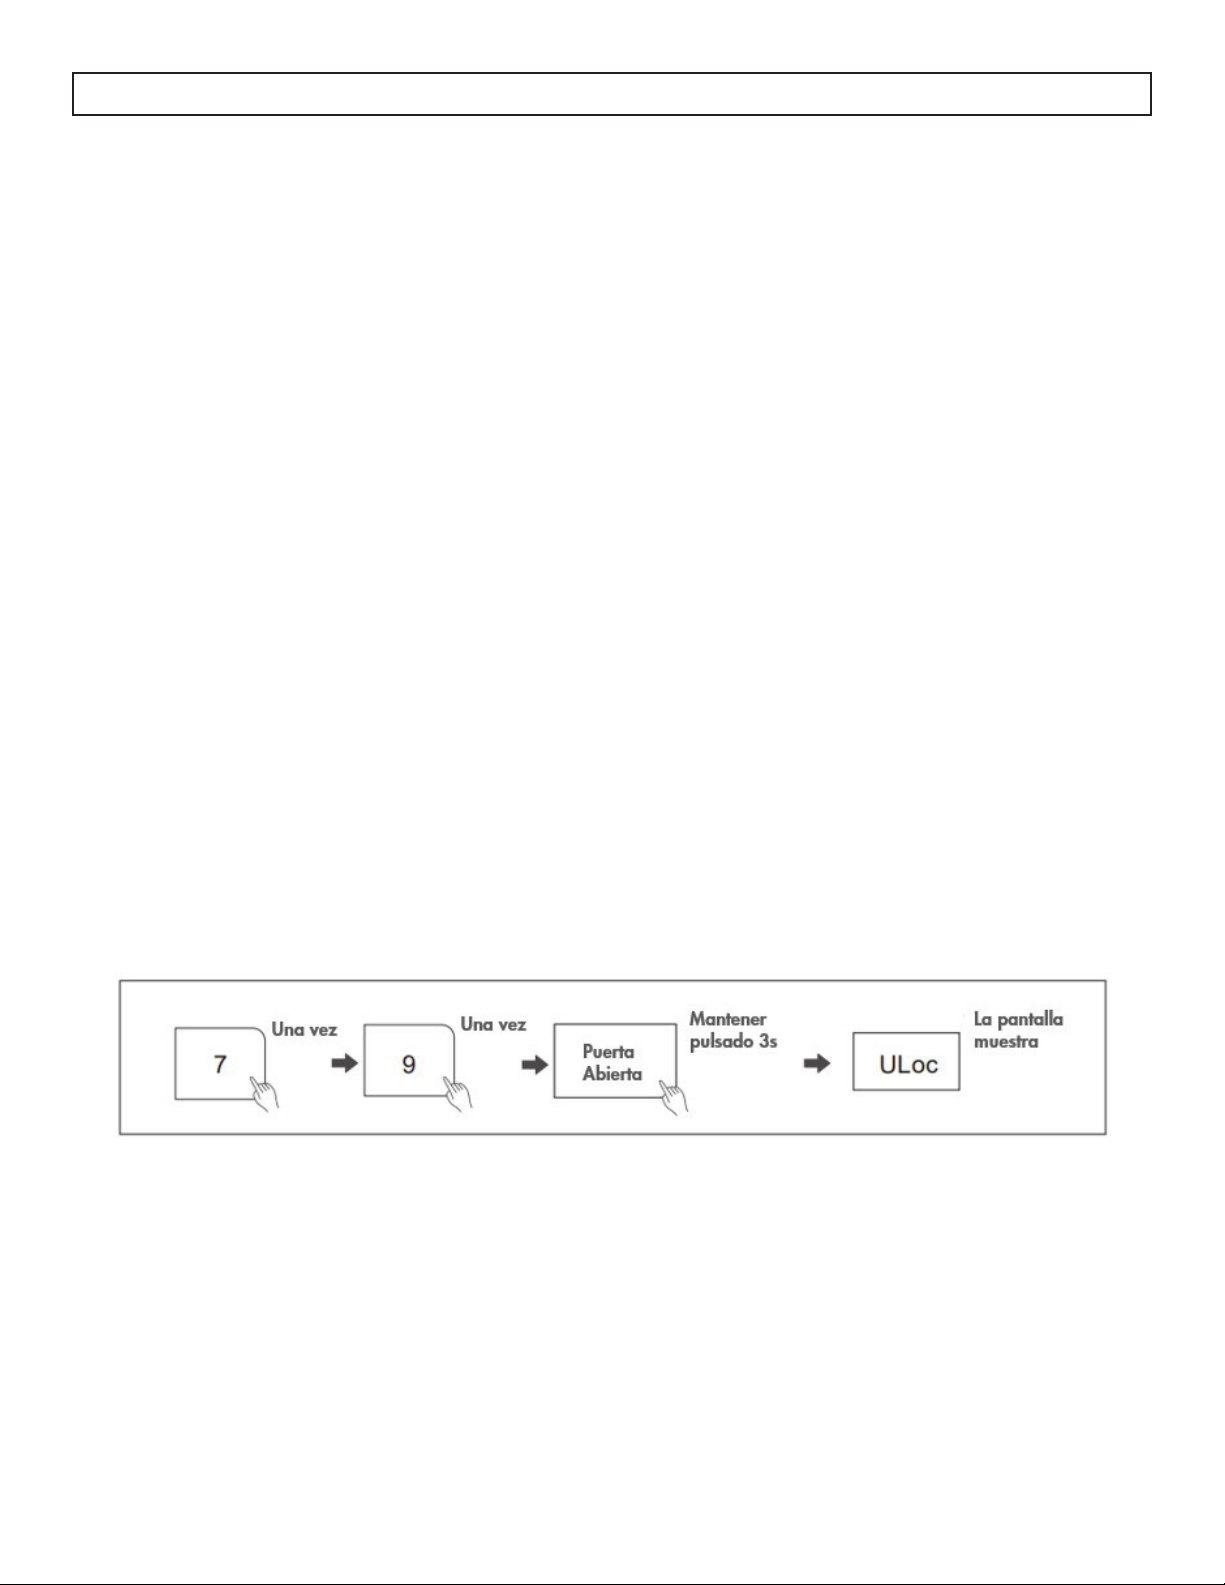
INSTRUCCIONES DE OPERACIÓN
BLOQUEO DE SEGURIDAD
El Bloqueo de Seguridad es un sistema que protege contra la activación involuntaria del microondas,
proporcionando una medida de protección para garantizar la seguridad de los niños.
Al iniciar un proceso de cocción se activa el bloqueo de la puerta, y también se activa si la puerta
permanece desbloqueada durante 30 minutos adicionales tras la finalización de la cocción.
El bloqueo de seguridad está activo por defecto. Sólo se desactivará si el usuario decide hacerlo
manualmente. Incluso en caso de pérdida de alimentación, el horno conservará el estado del bloqueo de
seguridad, tanto si está activado como desactivado.
Desbloquear la puerta:
Pulse Puerta Abierta durante el funcionamiento y abra la puerta antes de 10 segundos o el bloqueo de
seguridad volverá a activarse. La puerta permanecerá desbloqueada hasta que se inicie la cocción.
O
Pulse Puerta Abierta en los 30 minutos siguientes a la finalización de la cocción para desactivar
manualmente el bloqueo de la puerta y pasar al modo de espera. Si no se pulsa ninguna tecla, el bloqueo
de seguridad se desactivará automáticamente transcurridos 30 minutos.
Desactive el bloqueo de seguridad:
Si no hay niños en el domicilio, puede optar por desactivar permanentemente la función de bloqueo de
seguridad.
Pulse “7”, “9” en orden consecutivo y, a continuación, mantenga pulsado Puerta Abierta durante tres
segundos. En 30 segundos, la pantalla mostrará “ULoc”, indicando que el bloqueo de seguridad se ha
desactivado correctamente.
Vuelva a activar el bloqueo de seguridad:
Pulse “7”, “9” en orden consecutivo y, a continuación, mantenga pulsado Puerta Abierta durante tres
segundos. En 30 segundos, la pantalla mostrará “Loc”, lo que indica que el bloqueo de seguridad se ha
reactivado correctamente.
AJUSTE DEL BLOQUEO DEL PANEL DE CONTROL
Para configurar el bloqueo del panel de control, presione y mantenga presionado el botón detener/
mantener 3SEC durante 3 segundos. El microondas emitirá un pitido para indicar que el bloqueo está
activado. Mientras está bloqueado, el microondas no se puede utilizar.
Para cancelar el bloqueo del panel de control, mantenga presionado el botón detener/mantener 3SEC
durante 3 segundos. El microondas emitirá un pitido para indicar que el bloqueo se ha desactivado.
44
Page 46

INSTRUCCIONES DE OPERACIÓN
DESCONGELAMIENTO POR PESO
El tiempo de descongelación y el nivel de potencia
se ajustan automáticamente una vez que se
introduce el peso.
1. Pulse el botón descongelar por peso. La
pantalla mostrará “dEF1”.
2. Use el teclado numérico para ingresar el peso
de los alimentos que se descongelarán entre 4 ~
100 oz.
3. Pulse el botón inicio/+30SEC para confirmar.
TIEMPO DE DESCONGELACIÓN
1. Presione el botón tiempo de descongelación. La
pantalla mostrará “dEF2”.
2. Utilice el teclado numérico para introducir el
tiempo de descongelación deseado. El tiempo
máximo es de 99 minutos y 99 segundos.
3. El nivel de potencia predeterminado es 3, 30%.
La pantalla mostrará “PL3”.
4. Para cambiar el nivel de potencia, presione el
botón de encendido y luego presione el teclado
numérico para el nivel de potencia deseado.
5. Pulse el botón inicio/+30SEC para confirmar.
MEMORIA
La función de memoria le permite programar
tiempos de cocción y potencias que se pueden
recuperar y utilizar con una entrada mínima. Se
pueden configurar tres programas de memoria a la
vez, están etiquetados como 1, 2 y 3.
Para configurar la Memoria 1:
1. Presione el botón 0/memoria una vez.
Aparecerá el número 1.
2. Presione el botón de cocción programada y
luego use el teclado numérico para ingresar el
tiempo de cocción deseado.
3. Presione el botón de encendido una vez. El nivel
de potencia estará predeterminado al 100%.
Aparecerá “PL10”. Para cambiar el nivel de
potencia, use el teclado numérico para ingresar
el nivel de potencia deseado.
4. Presione el botón inicio/+30SEC para guardar
la configuración.
5. Para usar la configuración en el futuro,
presione el botón 0/memoria una vez y cuando
se muestre el número 1, presione el botón
inicio/+30SEC para comenzar la operación.
Para configurar la memoria 2 o 3, presione el
botón Memoria dos o tres veces hasta que se
muestre el número 2 o 3 y luego siga los pasos
anteriores.
Nota: Si se corta la energía o se desconecta
el microondas, será necesario reprogramar la
configuración de la memoria.
45
Page 47

CUIDADO Y MANTENIMIENTO
LIMPIEZA
Apague y desenchufe el microondas antes de
realizar cualquier limpieza.
El interior del microondas debe limpiarse con un
paño húmedo y tibio y detergentes suaves. No
permita que se acumulen salpicaduras de alimentos
en el interior del microondas, ya que esto puede
afectar la eficiencia y, si está lo suficientemente
sucio, puede encenderse y provocar un incendio.
El exterior del microondas debe limpiarse con
un paño húmedo y tibio. Para evitar daños a los
componentes internos, no permita que gotee agua
por las aberturas de ventilación.
Limpie la puerta y la ventana en ambos lados, los
sellos de la puerta y las partes adyacentes con
frecuencia con un paño húmedo para eliminar
cualquier derrame o salpicadura. No utilice
limpiadores abrasivos.
MANTENIMIENTO
Para eliminar los olores del microondas:
1. Combine una taza de agua con el jugo y la piel
de un limón en un tazón microwavable.
2. Cocinar a plena potencia durante 5 minutos.
3. Limpie completamente el interior del aparato y
la bandeja de vidrio y el anillo de rodillos con
un paño húmedo y caliente.
HOJA DE MICA
Dentro del aparato hay una hoja de mica de cartón
que protege el magnetrón. No lo quite del aparato,
ya que exponer el magnetrón a las salpicaduras
de alimentos puede causar arcos o incendios. Si se
ensucia, la hoja de mica se puede limpiar con un
paño caliente.
No permita que el panel de control se moje. Si es
necesario, limpie el panel de control con un paño
húmedo y luego séquelo.
La bandeja de vidrio se puede quitar y limpiar
con agua tibia y un detergente suave o se puede
colocar en un lavavajillas.
El aro giratorio y el piso del horno deben limpiarse
con regularidad para evitar derrames o ruidos
excesivos. El anillo giratorio se puede limpiar
con agua tibia y un detergente suave o se puede
colocar en un lavavajillas. Asegúrese de que el
anillo giratorio y la bandeja de vidrio se vuelvan a
colocar en la posición adecuada para evitar ruidos
o derrames.
DISPOSICIÓN
Este producto no debe ser tratado como un desecho
doméstico ordinario, debe ser transportado al
punto de recogida apropiado para el reciclaje de
componentes eléctricos. Para obtener información
sobre los puntos de recogida de residuos
locales, póngase en contacto con la agencia
local de eliminación de residuos o con la oficina
gubernamental.
46
Page 48
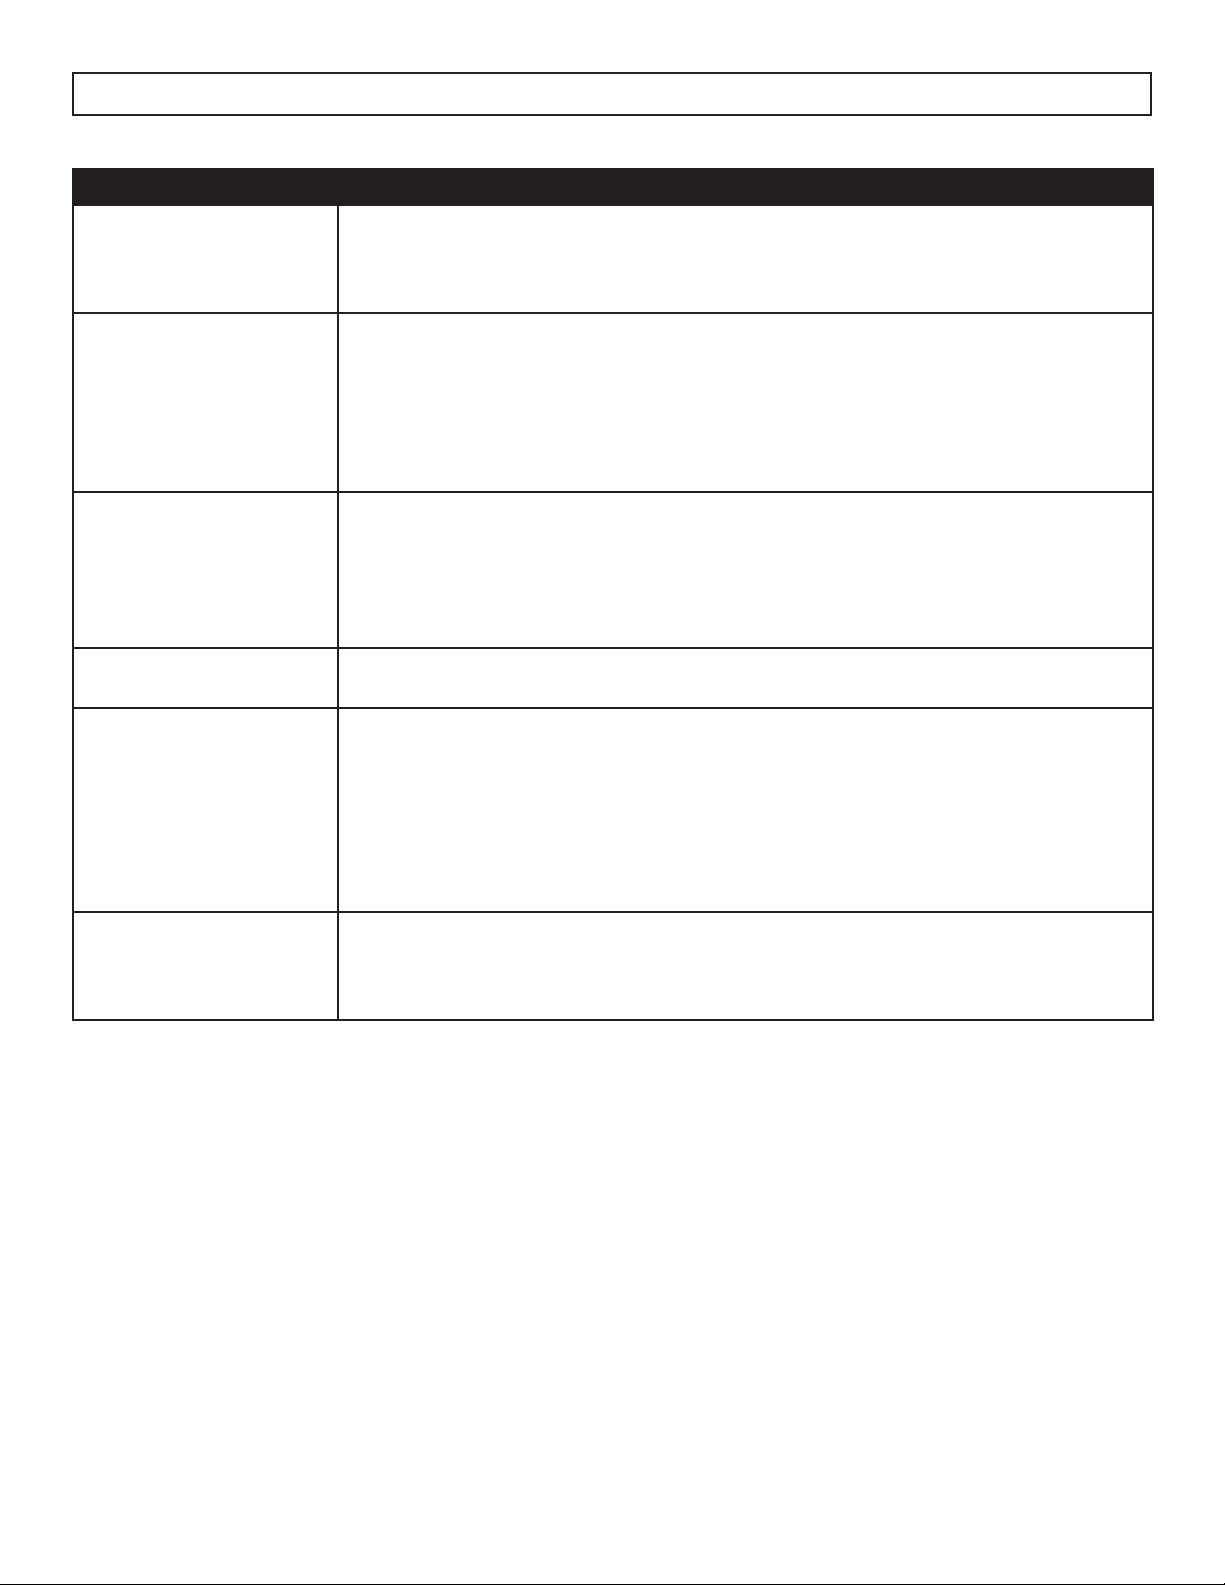
LIMITED IN-HOME APPLIANCE WARRANTY
This quality product is warranted to be free from manufacturer’s defects in material and workmanship, provided that the unit is used under the normal operating
conditions intended by the manufacturer.
This warranty is available only to the person to whom the unit was originally sold by Danby Products Limited (Canada) or Danby Products Inc. (U.S.A.) (hereafter
“Danby”) or by an authorized distributor of Danby, and is non-transferable.
TERMS OF WARRANTY
Plastic parts, are warranted for thirty (30) days only from purchase date, with no extensions provided.
First Year
During the rst twelve (12) months, any functional parts of this product found to be defective, will be repaired or replaced, at warrantor’s
option, at no charge to the ORIGINAL purchaser.
To obtain
Danby reserves the right to limit the boundaries of “In Home Service” to the proximity of an Authorized Service Depot. Any app liance
Service
requiring service outside the limited boundaries of “In Home Service” , it will be the consumer’s responsibility to transport the appliance (at
their own expense) to the original retailer (point of purchase) or a service depot for repair. See “Boundaries of In Home Serv ice”below.
Contact your dealer from whom your unit was purchased, or contact your nearest authorized Danby service depot, where service
must be performed by a qualied service technician.
If service is performed on the units by anyone other than an authorized service depot, or the unit is used for commercial appli cation, all
obligations of Danby under this warranty shall be void.
Boundaries of
If the appliance is installed in a location that is 100 kilometers (62 miles) or more from the nearest service center your unit must be
In Home Service
delivered to the nearest authorized Danby Service Depot, as service must only be performed by a technician qualied and certif ied for
warranty service by Danby. Transportation charges to and from the service location are not protected by this warranty and are t he
responsibility of the purchaser.
Nothing within this warranty shall imply that Danby will be responsible or liable for any spoilage or damage to food or other c ontents of this appliance, whether due
to any defect of the appliance, or its use, whether proper or improper.
EXCLUSIONS
Save as herein provided, Danby, there are no other warranties, conditions, representations or guarantees, express or implied, m ade or intended by Danby or its
authorized distributors and all other warranties, conditions, representations or guarantees, including any warranties, conditio ns, representations or guarantees
under any Sale of Goods Act or like legislation or statue is hereby expressly excluded. Save as herein provided, Danby shall no t be responsible for any damages
to persons or property, including the unit itself, howsoever caused or any consequential damages arising from the malfunction o f the unit and by the purchase of
the unit, the purchaser does hereby agree to indemnify and hold harmless Danby from any claim for damages to persons or propert y caused by the unit.
GENERAL PROVISIONS
No warranty or insurance herein contained or set out shall apply when damage or repair is caused by any of the following:
1) Power failure.
2) Damage in transit or when moving the appliance.
3) Improper power supply such as low voltage, defective house wiring or inadequate fuses.
4) Accident, alteration, abuse or misuse of the appliance such as inadequate air circulation in the room or abnormal operating con ditions
(extremely high or low room temperature).
5) Use for commercial or industrial purposes (ie. If the appliance is not installed in a domestic residence).
6) Fire, water damage, theft, war, riot, hostility, acts of God such as hurricanes, oods etc.
7) Service calls resulting in customer education.
8) Improper Installation (ie. Building-in of a free standing appliance or using an appliance outdoors that is not approved for out door application).
Proof of purchase date will be required for warranty claims; so, please retain bills of sale. In the event warranty service is required, present this document to our
AUTHORIZED SERVICE DEPOT.
Danby Products Limited
PO Box 1778, Guelph, Ontario, Canada N1H 6Z9
Telephone: (519) 837-0920 FAX: (519) 837-0449
Danby Products Inc.
PO Box 669, Findlay, Ohio, U.S.A. 45840
Telephone: (419) 425-8627 FAX: (419) 425-8629
04/09
1-800-263-2629
Warranty Service
In-home
Durante los primeros doce (12) meses, cualquier parte en buen estado de este producto que resulte defectuosa,
incluyendo cualquier sistema sellado, será reparado o reemplazado, a opción del fabricante, sin cargo para
el comprador original.
Póngase en contacto con el distribuidor donde adquirió el electrodoméstico o póngase en contacto con el
centro de servicio autorizado más cercano de Danby, donde el servicio debe ser realizado por un técnico
cualificado. Si el servicio es realizado por cualquier persona que no sea un depósito de servicio autorizado,
todas las obligaciones de Danby bajo esta garantía serán nulas.
Es responsabilidad del comprador transportar el aparato al centro de servicio autorizado más cercano.
Primeros 12 meses
Para obtener servicio
GARANTÍA LIMITADA “ACARREADO SOLAMENTE”
Este producto de calidad está garantizado contra defectos de fabricación, incluyendo partes y mano de obra, siempre y cuando la
unidad se utilice bajo las condiciones normales de funcionamiento para las que fue diseñado.
Esta garantía está solamente disponible para la persona que haya comprado originalmente esta unidad directamente de Danby
Products Limited (Canada) o Danby Products Inc. (U.S.A.) (en adelante “Danby”) o uno de sus distribuidores autorizados, y no es
transferible.
CONDICIONES DE LA GARANTÍA
Las piezas plásticas, se autorizan por treinta (30) días solamente a partir de la fecha de la compra, sin las extensiones
proporcionadas.
Nada dentro de esta garantía implica que Danby será responsable por cualquier daño que hayan sufrido los alimentos u otros
contenidos de este aparato, ya sea debido a un defecto del aparato, o su uso, adecuado o inadecuado.
EXCLUSIONES
Salvo lo aquí indicado por Danby, no existen otras garantías, condiciones o representaciones, explícitas o implícitas, concretas o
intencionales por parte de Danby o sus distribuidores autorizados y todas las demás garantías, condiciones o representaciones,
incluyendo cualquier garantía, condiciones o representaciones bajo cualquier Acta de Venta de Productos o legislación o estatuto
similar, quedan de esta forma expresamente excluidas. Salvo lo aquí indicado, Danby no serán responsables por ningún daño a
personas o bienes, incluyendo la propia unidad, sin importar su causa, o de ningún daño indirecto causado por el desperfecto de la
unidad, y al comprar esta unidad, el comprador acepta por la presente, indemnizar y proteger a Danby contra cualquier reclamo
por daños a personas o bienes causados por la unidad.
CONDICIONES GENERALES
No se considerará ninguna de estas garantías o seguros cuando el daño o la necesidad de reparación sea el producto de los
siguientes casos:
1) Falla del suministro eléctrico.
2) Daños en tránsito o durante el transporte de la unidad.
3) Alimentación incorrecta, como bajo voltaje, instalación eléctrica defectuosa o fusibles inadecuados.
4) Accidente, modificación, abuso o uso incorrecto del artefacto, tal como insuficiente ventilación del ambiente o condiciones de
operación anormales (temperatura ambiente extremadamente alta o baja).
5) Utilización comercial o industrial (v.g., si el electrodoméstico no está instalado en una vivienda particular).
6) Incendio, daños por agua, robo, guerra, disturbios, hostilidades, actos de fuerza mayor como huracanes, inundaciones, etc.
7) Pedidos de servicio debido a desinformación del usuario.
8) Instalación inadecuada (v.g., instalación de un electrodoméstico independiente o uso de un aparato al aire libre que no esté
aprobado para aplicaciones en exteriores, incluyendo pero no limitado a: garajes, patios, porches o cualquier lugar que no esté bien
aislado o controlado por el clima).
Se requerirá una prueba de la fecha de compra para reclamaciones de garantía; conservar las facturas de venta. En el caso de que
se requiera servicio de garantía, presente el comprobante de compra a nuestro depósito de servicio autorizado.
Servicio de Garantía
Acarreado Solamente
Danby Products Limited
PO Box 1778, Guelph, Ontario, Canada N1H 6Z9
Telephone: (519) 837-0920 FAX: (519) 837-0449
Danby Products Inc.
PO Box 669, Findlay, Ohio, U.S.A. 45840
Telephone: (419) 425-8627 FAX: (419) 425-8629
1-800-263-2629
04/17
Los cargos de transporte desde y hacia el lugar de servicio no están protegidos por esta garantía y son responsabilidad del
comprador.
SOLUCIÓN SUGERIDA
PROBLEM POSSIBLE CAUSE
Ninguna energía • Se puede quemar un fusible o disparar el disyuntor
Arco o chispas durante
la operación
Alimentos cocinados de
forma pareja
Alimentos sobrecocidos • El nivel de potencia o el tiempo de cocción fueron demasiado altos
• El enchufe no está completamente insertado en la toma de corriente
• Se dejaron artículos metálicos en el aparato durante el funcionamiento
• El aparato está funcionando mientras está vacío
• Los alimentos derramados se han acumulado dentro del aparato o en la
hoja de mica
• La comida no estaba completamente descongelada antes de cocinar
• El tiempo de cocción o el nivel de potencia eran insuficientes
• La comida no se dio vuelta o se removió durante la cocción
Alimentos poco cocidos • La comida no estaba completamente descongelada antes de cocinar
Encasa descongelación • El tiempo de descongelación o el nivel de potencia eran insuficientes
• El tiempo de cocción o el nivel de potencia eran insuficientes
• La comida no se dio vuelta o se removió durante la cocción
• Las aberturas de ventilación están bloqueadas
• Los alimentos no se revolvieron o revolvieron durante la descongelación
47
Page 49
GARANTÍA LIMITADA “ACARREADO SOLAMENTE”
Este producto de calidad está garantizado contra defectos de fabricación, incluyendo partes y mano de obra, siempre y cuando la
This quality product is warranted to be free from manufacturer’s defects in material and workmanship, provided that the unit is used under the normal operating
unidad se utilice bajo las condiciones normales de funcionamiento para las que fue diseñado.
conditions intended by the manufacturer.
Esta garantía está solamente disponible para la persona que haya comprado originalmente esta unidad directamente de Danby
This warranty is available only to the person to whom the unit was originally sold by Danby Products Limited (Canada) or Danby Products Inc. (U.S.A.) (hereafter
Products Limited (Canada) o Danby Products Inc. (U.S.A.) (en adelante “Danby”) o uno de sus distribuidores autorizados, y no es
“Danby”) or by an authorized distributor of Danby, and is non-transferable.
transferible.
Las piezas plásticas, se autorizan por treinta (30) días solamente a partir de la fecha de la compra, sin las extensiones
Plastic parts, are warranted for thirty (30) days only from purchase date, with no extensions provided.
proporcionadas.
LIMITED IN-HOME APPLIANCE WARRANTY
CONDICIONES DE LA GARANTÍA
TERMS OF WARRANTY
Primeros 12 meses
First Year
To obtain
Para obtener servicio
Service
Durante los primeros doce (12) meses, cualquier parte en buen estado de este producto que resulte defectuosa,
During the rst twelve (12) months, any functional parts of this product found to be defective, will be repaired or replaced, at warrantor’s
incluyendo cualquier sistema sellado, será reparado o reemplazado, a opción del fabricante, sin cargo para
option, at no charge to the ORIGINAL purchaser.
el comprador original.
Danby reserves the right to limit the boundaries of “In Home Service” to the proximity of an Authorized Service Depot. Any app liance
Póngase en contacto con el distribuidor donde adquirió el electrodoméstico o póngase en contacto con el
requiring service outside the limited boundaries of “In Home Service” , it will be the consumer’s responsibility to transport the appliance (at
centro de servicio autorizado más cercano de Danby, donde el servicio debe ser realizado por un técnico
their own expense) to the original retailer (point of purchase) or a service depot for repair. See “Boundaries of In Home Serv ice”below.
cualificado. Si el servicio es realizado por cualquier persona que no sea un depósito de servicio autorizado,
Contact your dealer from whom your unit was purchased, or contact your nearest authorized Danby service depot, where service
todas las obligaciones de Danby bajo esta garantía serán nulas.
must be performed by a qualied service technician.
Es responsabilidad del comprador transportar el aparato al centro de servicio autorizado más cercano.
If service is performed on the units by anyone other than an authorized service depot, or the unit is used for commercial appli cation, all
obligations of Danby under this warranty shall be void.
Los cargos de transporte desde y hacia el lugar de servicio no están protegidos por esta garantía y son responsabilidad del
comprador.
Boundaries of
In Home Service
Nada dentro de esta garantía implica que Danby será responsable por cualquier daño que hayan sufrido los alimentos u otros
contenidos de este aparato, ya sea debido a un defecto del aparato, o su uso, adecuado o inadecuado.
Nothing within this warranty shall imply that Danby will be responsible or liable for any spoilage or damage to food or other c ontents of this appliance, whether due
Salvo lo aquí indicado por Danby, no existen otras garantías, condiciones o representaciones, explícitas o implícitas, concretas o
to any defect of the appliance, or its use, whether proper or improper.
intencionales por parte de Danby o sus distribuidores autorizados y todas las demás garantías, condiciones o representaciones,
incluyendo cualquier garantía, condiciones o representaciones bajo cualquier Acta de Venta de Productos o legislación o estatuto
similar, quedan de esta forma expresamente excluidas. Salvo lo aquí indicado, Danby no serán responsables por ningún daño a
Save as herein provided, Danby, there are no other warranties, conditions, representations or guarantees, express or implied, m ade or intended by Danby or its
personas o bienes, incluyendo la propia unidad, sin importar su causa, o de ningún daño indirecto causado por el desperfecto de la
authorized distributors and all other warranties, conditions, representations or guarantees, including any warranties, conditio ns, representations or guarantees
unidad, y al comprar esta unidad, el comprador acepta por la presente, indemnizar y proteger a Danby contra cualquier reclamo
under any Sale of Goods Act or like legislation or statue is hereby expressly excluded. Save as herein provided, Danby shall no t be responsible for any damages
por daños a personas o bienes causados por la unidad.
to persons or property, including the unit itself, howsoever caused or any consequential damages arising from the malfunction o f the unit and by the purchase of
the unit, the purchaser does hereby agree to indemnify and hold harmless Danby from any claim for damages to persons or propert y caused by the unit.
No se considerará ninguna de estas garantías o seguros cuando el daño o la necesidad de reparación sea el producto de los
siguientes casos:
1) Falla del suministro eléctrico.
No warranty or insurance herein contained or set out shall apply when damage or repair is caused by any of the following:
2) Daños en tránsito o durante el transporte de la unidad.
1) Power failure.
3) Alimentación incorrecta, como bajo voltaje, instalación eléctrica defectuosa o fusibles inadecuados.
4) Accidente, modificación, abuso o uso incorrecto del artefacto, tal como insuficiente ventilación del ambiente o condiciones de
2) Damage in transit or when moving the appliance.
operación anormales (temperatura ambiente extremadamente alta o baja).
3) Improper power supply such as low voltage, defective house wiring or inadequate fuses.
5) Utilización comercial o industrial (v.g., si el electrodoméstico no está instalado en una vivienda particular).
4) Accident, alteration, abuse or misuse of the appliance such as inadequate air circulation in the room or abnormal operating con ditions
6) Incendio, daños por agua, robo, guerra, disturbios, hostilidades, actos de fuerza mayor como huracanes, inundaciones, etc.
7) Pedidos de servicio debido a desinformación del usuario.
8) Instalación inadecuada (v.g., instalación de un electrodoméstico independiente o uso de un aparato al aire libre que no esté
aprobado para aplicaciones en exteriores, incluyendo pero no limitado a: garajes, patios, porches o cualquier lugar que no esté bien
aislado o controlado por el clima).
Se requerirá una prueba de la fecha de compra para reclamaciones de garantía; conservar las facturas de venta. En el caso de que
se requiera servicio de garantía, presente el comprobante de compra a nuestro depósito de servicio autorizado.
Proof of purchase date will be required for warranty claims; so, please retain bills of sale. In the event warranty service is required, present this document to our
(extremely high or low room temperature).
5) Use for commercial or industrial purposes (ie. If the appliance is not installed in a domestic residence).
6) Fire, water damage, theft, war, riot, hostility, acts of God such as hurricanes, oods etc.
7) Service calls resulting in customer education.
8) Improper Installation (ie. Building-in of a free standing appliance or using an appliance outdoors that is not approved for out door application).
If the appliance is installed in a location that is 100 kilometers (62 miles) or more from the nearest service center your unit must be
delivered to the nearest authorized Danby Service Depot, as service must only be performed by a technician qualied and certif ied for
warranty service by Danby. Transportation charges to and from the service location are not protected by this warranty and are t he
responsibility of the purchaser.
EXCLUSIONES
EXCLUSIONS
CONDICIONES GENERALES
GENERAL PROVISIONS
AUTHORIZED SERVICE DEPOT.
Danby Products Limited
PO Box 1778, Guelph, Ontario, Canada N1H 6Z9
Danby Products Limited
Telephone: (519) 837-0920 FAX: (519) 837-0449
PO Box 1778, Guelph, Ontario, Canada N1H 6Z9
Telephone: (519) 837-0920 FAX: (519) 837-0449
Warranty Service
In-home
Servicio de Garantía
Acarreado Solamente
1-800-263-2629
1-800-263-2629
04/17
04/09
PO Box 669, Findlay, Ohio, U.S.A. 45840
Telephone: (419) 425-8627 FAX: (419) 425-8629
Telephone: (419) 425-8627 FAX: (419) 425-8629
PO Box 669, Findlay, Ohio, U.S.A. 45840
Danby Products Inc.
Danby Products Inc.
Page 50

NOTES / REMARQUES / NOTAS :
__________________________________________________________________________________________
__________________________________________________________________________________________
__________________________________________________________________________________________
__________________________________________________________________________________________
__________________________________________________________________________________________
__________________________________________________________________________________________
__________________________________________________________________________________________
__________________________________________________________________________________________
__________________________________________________________________________________________
__________________________________________________________________________________________
__________________________________________________________________________________________
__________________________________________________________________________________________
__________________________________________________________________________________________
__________________________________________________________________________________________
__________________________________________________________________________________________
__________________________________________________________________________________________
__________________________________________________________________________________________
__________________________________________________________________________________________
__________________________________________________________________________________________
__________________________________________________________________________________________
__________________________________________________________________________________________
__________________________________________________________________________________________
Page 51

NOTES / REMARQUES / NOTAS :
__________________________________________________________________________________________
__________________________________________________________________________________________
__________________________________________________________________________________________
__________________________________________________________________________________________
__________________________________________________________________________________________
__________________________________________________________________________________________
__________________________________________________________________________________________
__________________________________________________________________________________________
__________________________________________________________________________________________
__________________________________________________________________________________________
__________________________________________________________________________________________
__________________________________________________________________________________________
__________________________________________________________________________________________
__________________________________________________________________________________________
__________________________________________________________________________________________
__________________________________________________________________________________________
__________________________________________________________________________________________
__________________________________________________________________________________________
__________________________________________________________________________________________
__________________________________________________________________________________________
__________________________________________________________________________________________
__________________________________________________________________________________________
Page 52

Danby Products Limited, Guelph, Ontario, Canada N1H 6Z9
Danby Products Inc. Findlay, Ohio, U.S.A. 45840
www.danby.com
Printed in China | Imprimé en Chine | Impreso en China
 Loading...