


Installation and Configuration
Day/Night Color IP Camera
DF3000IP(-DN)
DF3000IP(-DN) CasinoCam
Rev . 5.1.0 / 070807
English

2
DF3000IP(-DN) / DF3000IP(-DN) CasinoCam
Dallmeier electronic GmbH & Co.KG
Copyright © Dallmeier electronic GmbH & Co.KG
All rights reserved. This document may not be copied,
photocopied, reproduced, translated, transferred to an electronic
medium or converted to a machine-readable form either whole
or in part without first receiving written permission from
Dallmeier electronic GmbH & Co.KG.
We reserve the right to make technical modifications.
The manufacturer accepts no liability for damage to property
or pecuniary damages arising due to minor defects of the
product or documentation, e.g. print or spelling errors, and for
those not caused by intention or gross negligence of the
manufacturer.
Dallmeier electronic GmbH & Co.KG
Cranachweg 1
D 93051 Regensburg
www.dallmeier-electronic.com
info@dallmeier-electronic.com

3
Dallmeier electronic GmbH & Co.KG
T able of content s
1 About this document .......................................................................... 5
1.1 V alidity................................................................................................... 5
1.2 Documentation on the DF3000IP(-DN).................................................. 5
1.3 Convention ............................................................................................ 5
2 For your safety.................................................................................... 7
3 General instructions ......................................................................... 11
3.1 Scope of supply................................................................................... 1 1
3.2 Transportation and packaging.............................................................. 11
3.3 Appropriate use ................................................................................... 11
3.4 Performance Features......................................................................... 11
3.5 Certificates.......................................................................................... 12
3.6 Warranty ............................................................................................. 12
4 Notes on operating the camera........................................................ 13
5 Views and connection assignment.................................................. 15
5.1 Views .................................................................................................. 15
5.2 Connection assignment ....................................................................... 15
6 Installation and Commissioning ...................................................... 17
6.1 Requirements at the installation site .................................................... 17
6.2 Installation ........................................................................................... 17
6.3 C ommissioning ................................................................................... 18
7 Establishing a connection................................................................ 19
7.1 System requirements........................................................................... 19
7.2 Establishing a connection.................................................................... 20
8 Displaying the live video / live image .............................................. 23
8.1 Displaying the live video....................................................................... 23
8.2 Displaying the live image ..................................................................... 24
9 Configuration .................................................................................... 27
9.1 Common settings ................................................................................ 29
9.1.1 Language ............................................................................................ 30
9.1.2 Changing the camera name................................................................. 30
9.1.3 COM Port ............................................................................................ 30
9.1.4 Relays ................................................................................................. 31
9.1.5 System time ........................................................................................ 32
9.1.5.1 Date/Time............................................................................................ 32
9.1.5.2 Timezone ............................................................................................ 33
9.1.5.3 Timeserver .......................................................................................... 33
9.1.6 Video standard .................................................................................... 33
9.1.7 Camera access ................................................................................... 33
9.1.7.1 Video................................................................................................... 34
9.1.7.2 Camera protocol .................................................................................. 34

4
DF3000IP(-DN) / DF3000IP(-DN) CasinoCam
Dallmeier electronic GmbH & Co.KG
9.1.8 Extensions .......................................................................................... 34
9.1.9 Password ............................................................................................ 35
9.2 Network settings .................................................................................. 35
9.2.1 Common settings ................................................................................ 35
9.2.2 Alarm hosts ......................................................................................... 36
9.2.2.1 Setting up an alarm host...................................................................... 37
9.2.2.1.1 Settings ............................................................................................... 37
9.2.2.1.2 Messages ........................................................................................... 38
9.2.2.1.3 Scheduler ............................................................................................ 38
9.2.2.1.4 Copying settings to other alarm hosts .................................................. 42
9.2.3 Video S treaming .................................................................................. 43
9.2.3.1 Protocol and encryption ....................................................................... 43
9.2.3.2 Multicast/Unicast................................................................................. 44
9.2.3.3 Range restriction ................................................................................. 45
9.2.3.4 Packet size.......................................................................................... 45
9.3 Enco der settings ................................................................................. 46
9.4 Sensor configuration ........................................................................... 49
9.4.1 Global.................................................................................................. 49
9.4.2 Image Optimization.............................................................................. 52
9.5 Backing up and sending the configuration ........................................... 56
9.5.1 Saving the configuration file................................................................. 56
9.5.2 Sending the configuration file .............................................................. 57
9.5.2.1 Individual camera ................................................................................ 57
9.5.2.2 Several cameras.................................................................................. 58
10 Info and Log ...................................................................................... 59
10.1 Information dialog ................................................................................ 59
10.2 MAC address ...................................................................................... 59
10.3 Event log ............................................................................................. 60
1 1 Breaking the connection .................................................................. 61
12 Appendix ........................................................................................... 63
12.1 Technical data ..................................................................................... 63

5
Dallmeier electronic GmbH & Co.KG
1 About this document
1.1 Validity
This document applies to the Day/Night color IP camera DF3000IP
(-DN) and DF3000IP(-DN) CasinoCam.
It has been produced on the basis of Version 2.1.0.23 (software).
The descriptions in this document apply to both cameras.
Distinctions are only made if necessary. For simplification reasons,
the term „DF3000IP(-DN)“ is thus used for all cameras.
1.2 Documentation on the DF3000IP(-DN)
Commissioning
The Quick Guide headed "Commissioning“ lists the most important
steps for the connection and commissioning of the camera.
Installation and Configuration (this document)
The document entitled "Installation and Configuration“ contains
detailed descriptions of the mounting, connection, commissioning
and configuration of the camera. General notes on the product and
technical data are additionally provided.
Storage of documentation
Store the documents in an accessible location near the product.
Keep the documents in readable condition. Pass on all documents
to each successive owner or user of the product.
1.3 Convention
This document contains various warning words and symbols that
indicate potential sources of danger. Various symbols and formats
are used to maintain the clarity of the document.

6
DF3000IP(-DN) / DF3000IP(-DN) CasinoCam
Dallmeier electronic GmbH & Co.KG
DANGER
The warning word DANGER denotes an immedi-
ate danger that may cause death or serious
injury if it is not averted.
WARNING
The warning word WARNING denotes a possible
danger that may cause death or serious injury
if it is not averted.
CAUTION
The warning word CAUTION denotes a possible
danger that may cause minor injury if it is not
averted.
IMPORTANT
The word IMPORTANT denotes information for
preventing damage, incorrect configurations or
incorrect actions.
NOTE
A NOTE offers information on principles, special
features and efficient procedure as well as general
recommendations.
Expression Expressions in bold and italics generally indicate
a control element on the device (switches or labels)
or on its user interface (buttons, menu entries).

7
Dallmeier electronic GmbH & Co.KG
2 For your safety
Only use this unit if it is technically in proper working order, to the
intended purpose and while keeping safety and potential dangers
in mind. Have malfunctions or damages eliminated immediately!
Appoint a professional
Installation, mounting, connection, start-up and configuration of
the unit may only be carried out by trained and authorized
professionals (installers).
Unless otherwise expressly specified, this also applies to the
maintenance, testing and repair.
Read and pay attention to the documents
Carefully and completely read the documents included in delivery.
Always pay attention to the provided instructions, notes and
warnings.
Regulations surveillance systems
The use of video and audio surveillance systems is strictly regulated
in most countries. Therefore, inform yourself on laws and regulations
that govern individual applications before using the unit. Ensure
compliance with these laws and regulations and also observe
regulations regarding data, working and environmental protection.
Do not make modifications
Do not make any modifications to the unit (neither to the software
nor the hardware) without consulting Dallmeier electronic. Improper
modifications can cause malfunctions or damages. Dallmeier
electronic accepts no liability for damages resulting from
unauthorized or improper modifications to the unit.
Protection against condensation water
If the unit is brought from a cold to a warm environment,
condensation water can form inside the unit. Short-circuits may
then lead to damage to the system. Wait up to 8 hours for the unit
to reach room temperature before starting it up.

8
DF3000IP(-DN) / DF3000IP(-DN) CasinoCam
Dallmeier electronic GmbH & Co.KG
Observe the rated voltage
The unit can be damaged or destroyed by the application of an
incorrect voltage.
The mains voltage must always match the rated voltage of the
unit. The rated voltage is specified on the rating plate of the unit.
Observe ratings
Unsuitable ambient conditions and improper installation (mainly
too high ambient temperature and insufficient ventilation) may
reduce the unit’s life cycle. Ensure compliance with the stated
operating conditions (see technical data), requirements at the
installation site and, if applicable, maintenance regulations.
Expansion components/peripheral devices
Use only expansion components conforming with the technical data
of the unit. Inappropriate peripheral devices may result in the
violation of local laws and regulations and damages to the unit.
Furthermore, the use of peripheral devices that are not tested and
approved by Dallmeier electronic results in loss of warranty . In case
of doubt, contact the sales partner responsible for your area.
Do not open the unit
Do not open the housing of the unit. There are no components
inside the unit that require maintenance by the user. The inspection,
maintenance and repair with an open housing must only be carried
out by trained and authorized professionals (installer).
Penetration of foreign bodies and liquids
No objects or liquids may be allowed to get into the device. In this
case, immediately disconnect the unit from the power supply (pull
out the power plug). Please contact the sales partner responsible
for your area.
Measures to be taken in the event of damage and burnt
smell
If you notice burnt smell or formation of smoke from a unit,
immediately disconnect it from the power supply (pull out the power plug). Please contact the sales partner responsible for your
area.

9
Dallmeier electronic GmbH & Co.KG
Disposal
Disconnect the unit from the power supply. Remove all connected
units and system components. Return the unit to your respective
sales partner.

10
DF3000IP(-DN) / DF3000IP(-DN) CasinoCam
Dallmeier electronic GmbH & Co.KG

11
Dallmeier electronic GmbH & Co.KG
3 General instructions
3.1 Scope of supply
Included in the scope of supply:
1 x DF3000IP(-DN)
1 x Power pack
1 x Adapter cable (Preview cable)
1 x LAN cable
1 x CD with documentation
1 x Quick Guide "Commissioning“
3.2 Transportation and packaging
Store the original packaging for transportation at a later date.
Dallmeier electronic is not responsible for damage resulting from
unprofessional/improper transportation. The goods should only be
shipped in their original packaging. If the original packaging is no
longer available, ensure that the packaging used sufficiently protects
the unit against damage, moisture, heat and cold.
3.3 Appropriate use
The DF3000IP(-DN) is a high-resolution color IP camera for color
or b/w imaging. It is designed for indoor use.
3.4 Performance Features
Equipped with an aspheric variofocal CS lens, the DF3000IP(-DN)
offers a resolution of 540 TV lines and a dynamic range up to 120
dB. Its light sensitivity and individual exposure strategy on pixel
level allow images with greater color neutrality and clarity of detail,
even at low light levels. Designed to be free from glare, the camera
permits detailed recognition even against extreme back lighting.

12
DF3000IP(-DN) / DF3000IP(-DN) CasinoCam
Dallmeier electronic GmbH & Co.KG
NOTE
For detailed information, please refer to the
Technical Data sheet in the appendix.
3.5 Certificates
The following certifications were in effect for the DF3000IP(-DN) at
the time this document was produced:
z CE
z FCC
z C-Tick
3.6 Warranty
The warranty period is 36 months.
The terms and conditions valid at the signing of the contract apply.

13
Dallmeier electronic GmbH & Co.KG
4 Notes on operating the camera
The camera can be operated at 12V DC or 24V AC.
If the camera or the cables connected to the camera are located
near sources of strong radiation, the video picture may be
distorted.
The camera is equipped with automatic gain control (AGC). In
low light the picture may be altered (e.g. noise). This is not a
camera malfunction.
The quality of the video picture depends on the lighting and the
monitor used to display the video picture.
Automatic white balance depends on the lighting used and can
cause color distortions in artificial light.
Poor lighting can lead to faulty white balance.

14
DF3000IP(-DN) / DF3000IP(-DN) CasinoCam
Dallmeier electronic GmbH & Co.KG

15
Dallmeier electronic GmbH & Co.KG
5 Views and connection assignment
5.1 Views
A Lens mount and back focus adjustment
B Aspheric variofocal CS lens
C Setting screw (2 mm Allen screw) for loosening/locking the
threaded ring
D 1/4" thread insert (top and bottom side) for camera mounting
5.2 Connection assignment
1 Power supply 12V DC / 24V AC
(integrated inverse polarity
protection)
2 Power LED
3 Analogue Video Preview output
(2.5 mm 2–conductor phone jack)
Fig. 5-2
4
3
2
1
7
5
6
Fig. 5-1
A
B
C
D
1 – Video signal; 2 – not used;
3 – Video Ground
123

16
DF3000IP(-DN) / DF3000IP(-DN) CasinoCam
Dallmeier electronic GmbH & Co.KG
4 Audio IN (3,5 mm jack)
5 LAN port (RJ45)
6 COM interface (RS485)
7 Connection for iris control
1 – Video signal; 2 – not used;
3 – Video Ground
123
13
24
Iris
2 - RS485_B / TR-
1 - RS485_A / TR+
Pin No. DC Iris
1 Damping 2 Damping +
3 Drive +
4 Drive -

17
Dallmeier electronic GmbH & Co.KG
6 Installation and Commissioning
6.1 Requirements at the installation site
The DF3000IP(-DN) is designed for indoor use.
Unfavorable local conditions may shorten the life of the product or
lead to malfunctions.
Do not install/operate the camera in places:
z with large scale dust and dirt
z with steam or oil vapors (e.g. kitchen)
z with direct sunlight
z with an ambient temperature below 0 °C or above 50 °C
z· near sources of strong radiation, i.e. X-rays, radio transmitters
or magnetic fields
z with corrosive surroundings (e.g. gases or salt water).
6.2 Installation
The camera has a 1/4" thread insert on its top and bottom side for
mounting the camera to a tripod or the wall or ceiling (with a
corresponding mount).
IMPORTANT
Possible damage to the camera caused by too
long screws.
Only use screws with a max. length of 7 mm for
mounting.
Fig. 6-1

18
DF3000IP(-DN) / DF3000IP(-DN) CasinoCam
Dallmeier electronic GmbH & Co.KG
CAUTION
Danger of injury from the camera falling down.
Before initial startup, make sure that the camera
is securely mounted.
6.3 Commissioning
WARNING
Danger of death from lightening strike! Do not
connect the power supply cable during a
thunderstorm.
¾ Connect the camera to the LAN using a network cable.
¾ If applicable, connect the camera to a monitor for alignment
purposes using the Video Preview output. For this purpose, use
the adaptor cable included in delivery.
¾ Connect the camera to the power supply. The Power LED will
be lit.
NOTE
The camera is provided with polarity protection.
The camera begins to boot.
The camera can be configured via the network after approx. 45
seconds.

19
Dallmeier electronic GmbH & Co.KG
7 Establishing a connection
Before you establish a connection, first ensure that the PC and the
camera are in the same network. Alternatively the camera can also
be connected directly to the PC using a cross cable.
Please also pay attention to the system requirements that your PC
must meet in order to establish a connection to the camera.
NOTE
The display of the live video requires Microsoft’s
Internet Explorer to be used and ActiveX to be
installed.
7.1 System requirements
Detai l Requirement
Desktop PC (IBM-compatible)
CPU Intel Pentium 1,3 GHz
or
AMD Athlon (or equivalent) 1,3 GHz
RAM Min. 128 MB
recommended 256 MB
Operating system Microsoft Windows 2000/XP
OS Service Packs Recommended, latest version
Graphics card VGA compatible
min. 64 MB
DirectX-capable
Monitor Resolution min. 1024 x 768
colors min. 16 Bit
Ethernet 100 MBit/s
Browser Microsoft Internet Explorer
or
Mozilla Firefox
Miscellaneous Macromedia Flash Player 6 (Windows)
or 7 (Linux)

20
DF3000IP(-DN) / DF3000IP(-DN) CasinoCam
Dallmeier electronic GmbH & Co.KG
7.2 Establishing a connection
NOTE
If applicable, the network card and browser have
to be reconfigured to interact with the camera for
the first time. Contact your network administrator,
if necessary.
¾ Start the Microsoft Internet Explorer.
¾ Enter the IP address of the camera in the browser’s address line.
NOTE
If the DF3000IP(-DN) has not yet been configured,
use the default address set at the factory (10.2.6.98).
¾ Confirm the address using the Enter key on your keyboard.
As soon as a connection to the camera is established, ActiveX can
be downloaded and installed.
Fig. 7-1
Fig. 7-2

21
Dallmeier electronic GmbH & Co.KG
NOTE
An internet connection must be present in order
to download ActiveX.
ActiveX must be installed only once. When
accessing the camera again, only the IP address
has to be entered to display the live video or to
configure the camera.
Depending on whether ActiveX has been inst alled, the main screen
will be displayed with or without the live video.
Fig. 7-4: Main page without live video
Fig. 7-3: Main page with live video

22
DF3000IP(-DN) / DF3000IP(-DN) CasinoCam
Dallmeier electronic GmbH & Co.KG

23
Dallmeier electronic GmbH & Co.KG
8 Displaying the live video / live image
The DF3000IP(-DN) allows the live video as well as the current live
image to be displayed in a web browser.
8.1 Displaying the live video
NOTE
The display of the live video requires Microsoft’s
Internet Explorer to be used and ActiveX to be
installed (see section 7).
¾ Establish a connection to the camera (see chapter 7).
¾ The live video of the camera will be displayed in the browser.
NOTE
The display of the live video can be password
protected (see chapter 9.1.7.1 ).
Fig. 8-1

24
DF3000IP(-DN) / DF3000IP(-DN) CasinoCam
Dallmeier electronic GmbH & Co.KG
8.2 Displaying the live image
NOTE
In oder to display the current live image in a
browser, the encoder mode must be set to MJPEG
in the Encoder settings dialog.
¾ Start the web browser.
¾ Enter the IP address of the camera in the browser’s address
line.
¾ Enter /live/image0.jpg directly behind the IP address.
Example:
http://10.2.6.98/live/image0.jpg
¾ Confirm the address using the Enter key on your keyboard.
The current live image of the camera will be displayed in the web
browser. Click the Refresh button in the browser’s toolbar to refresh
the image.
Fig. 8-2

25
Dallmeier electronic GmbH & Co.KG
NOTE
The display of the live image can be password
protected (see chapter 9.1.7.1 ).

26
DF3000IP(-DN) / DF3000IP(-DN) CasinoCam
Dallmeier electronic GmbH & Co.KG

27
Dallmeier electronic GmbH & Co.KG
9 Configuration
The DF3000IP(-DN) is configured via a PC using a web browser.
A condition for this is that the camera and the PC are in the same
network or that the camera is connected directly to the PC via a
cross cable.
¾ Establish a connection to the camera (see section 7).
Depending on whether ActiveX has been inst alled, the main screen
will be displayed with or without the live video.
Fig. 9-1: Main page with live video
Fig. 9-2: Main page without live video

28
DF3000IP(-DN) / DF3000IP(-DN) CasinoCam
Dallmeier electronic GmbH & Co.KG
¾ Click on the CONFIG button.
The login dialog will be displayed.
¾ Enter the password (default password = 3).
¾ Confirm with OK.
NOTE
To protect the camera from unauthorized access,
you must change the default password after the
first login (chapter 9.1.9).
Fig. 9-3
Fig. 9-4

29
Dallmeier electronic GmbH & Co.KG
After you have logged in successfully, the configuration menu and
the reduced live video will be displayed.
9.1 Common settings
The menu item Common settings
provides you with some basic
configuration possibilities.
Fig. 9-6
Fig. 9-5

30
DF3000IP(-DN) / DF3000IP(-DN) CasinoCam
Dallmeier electronic GmbH & Co.KG
9.1.1 Language
¾ Open the User interface dialog via Common settings > User
interface.
¾ Select the desired language.
¾ Click OK to apply your settings.
9.1.2 Changing the camera name
¾ Open the Camera name dialog via Common settings > Camera
name.
¾ Enter a name for the camera.
¾ Activate the Insert name in
video checkbox, if necessary.
¾ Click OK to apply your settings.
The camera name will be displayed in the top left corner of the
video image.
9.1.3 COM Port
External devices, such as a PT head or the RS485 contact interface,
can be connected to the camera’s COM port.
¾ Open the Interfaces dialog via Common settings > Interfaces.
Fig. 9-7
Fig. 9-8
Fig. 9-9

31
Dallmeier electronic GmbH & Co.KG
¾ In the Function field, select between Crosslink (e.g. for a PT
head), Contact Interface (for the RS485 contact interface) or
none.
The fields for Mode, Baud, Bits etc. are set to default values.
However, the required settings depend on the external device you
wish to use. See the manual supplied with the external device for
details of the required values.
¾ Click OK to apply your settings.
9.1.4 Relays
NOTE
This function can be used with a RS485 contact
interface only.
The DF3000IP(-DN) allows the Contact OUT relays to be configured
via the user interface.
¾ Open the Relay X dialog via Common settings > Relays >
Relays X.
Function
¾ Set Function to Error.
¾ Check the Camera Failure checkbox.
The relay will be switched in case of a camera failure.
Fig. 9-10

32
DF3000IP(-DN) / DF3000IP(-DN) CasinoCam
Dallmeier electronic GmbH & Co.KG
Holding time
¾ Set the Timer to On to activate the holding time.
¾ In the Time (sec.) field, enter the time in seconds for which the
relay is to be switched.
T ype
¾ The Type field allows you to decide whether the relay should act
as an opener (break contact) or a closer (make contact).
¾ Click OK to apply your settings.
9.1.5 System time
¾ Open the Set time dialog via Common settings > Time.
NOTE
If a time server was set (see chapter 9.1.5.3),
neither the date nor the time can be set manually.
9.1.5.1 Date/Time
¾ Set the date and time.
¾ Go to the Timezone and/or
Timeserver tab or click OK to
apply your settings.
Fig. 9-11

33
Dallmeier electronic GmbH & Co.KG
9.1.5.2 Timezone
¾ Select the Timezone tab.
¾ Select the desired timezone.
¾ Go to the Timeserver tab or click
OK to apply your settings.
9.1.5.3 Timeserver
¾ Select the Timeserver tab.
¾ Enter the IP address of the server
from which you wish to
automatically obtain the current
time via network.
¾ Activate the use timeserver
checkbox.
¾ Click OK to apply your settings.
9.1.6 Video standard
¾ Open the Video standard dialog via Common settings >
Video standard.
¾ Select PAL or NTSC.
¾ Click OK to apply your settings.
9.1.7 Camera access
¾ Open the Camera access dialog via Common settings >
Camera access.
Fig. 9-12
Fig. 9-13
Fig. 9-14

34
DF3000IP(-DN) / DF3000IP(-DN) CasinoCam
Dallmeier electronic GmbH & Co.KG
9.1.7.1 Video
The Video tab allows you to password protect live images and the
live video from being viewed via a web browser.
NOTE
The password corresponds to the password entered in the password dialog Common Settings >
Password.
9.1.7.2 Camera protocol
The vendor (manufacturer) and type of the camera protocol have
to be entered in the Camera protocol tab. Dallmeier and DF3000IP-
DN are set by default. If necessary, the manufacturer and type can
be entered manually.
9.1.8 Extensions
The Extensions dialog allows you to activate 4 additional casino
presets.
If necessary, please contact the Dallmeier electronic Sales
Department to purchase the extension code.
Fig. 9-15
Fig. 9-16

35
Dallmeier electronic GmbH & Co.KG
¾ Open the Extensions dialog
via Common settings >
Extensions.
¾ Enter the extension code.
¾ Click on OK.
9.1.9 Password
¾ Open the Change password dialog via Common settings >
Password.
¾ Enter the current password.
¾ Enter the new password and
confirm it by entering it a second
time.
¾ Click OK to apply your settings.
NOTE
For security reasons the new password should
consist of at least 8 characters. Do not use any
conventional expressions or names, but instead
use a combination of numbers and letters.
9.2 Network settings
To avoid network conflicts, you should clarify whether the intended
changes are permitted before you change the network settings. In
particular, the allocation of an IP address that has already been
used may result in malfunctions.
9.2.1 Common settings
¾ Open the Network settings dialog via Common settings >
Network.
Fig. 9-17
Fig. 9-18

36
DF3000IP(-DN) / DF3000IP(-DN) CasinoCam
Dallmeier electronic GmbH & Co.KG
¾ First select the appropriate Link
speed for the current LAN. In
most cases the default setting
automatic will suffice.
If you check the DHCP option, you
will connect to the existing network
without any further configuration.
In this case the camera obtains its network settings from a central
DHCP server.
However, it must be taken into account that an active DHCP server
must be available in the network.
Otherwise no IP address will be assigned to the camera. In this
case, the camera cannot be configured anymore via a browser
(changing the IP address manually).
IMPORTANT
Ensure that an active DHCP server is available in
the network before activating DHCP. Contact your
network administrator if necessary.
¾ If DHCP is not selected, enter the IP-Address, Netmask and
Gateway for the camera.
¾ Click OK to apply your settings.
NOTE
After changing the network settings, the
connection to the DF3000IP(-DN) will be broken.
You have to log in again.
9.2.2 Alarm hosts
If you configure an alarm host, the camera can send alarm
messages via the LAN. A software package (for example PGuard)
to evaluate the messages must be running on the receiving
computer.
Fig. 9-19
37
Dallmeier electronic GmbH & Co.KG
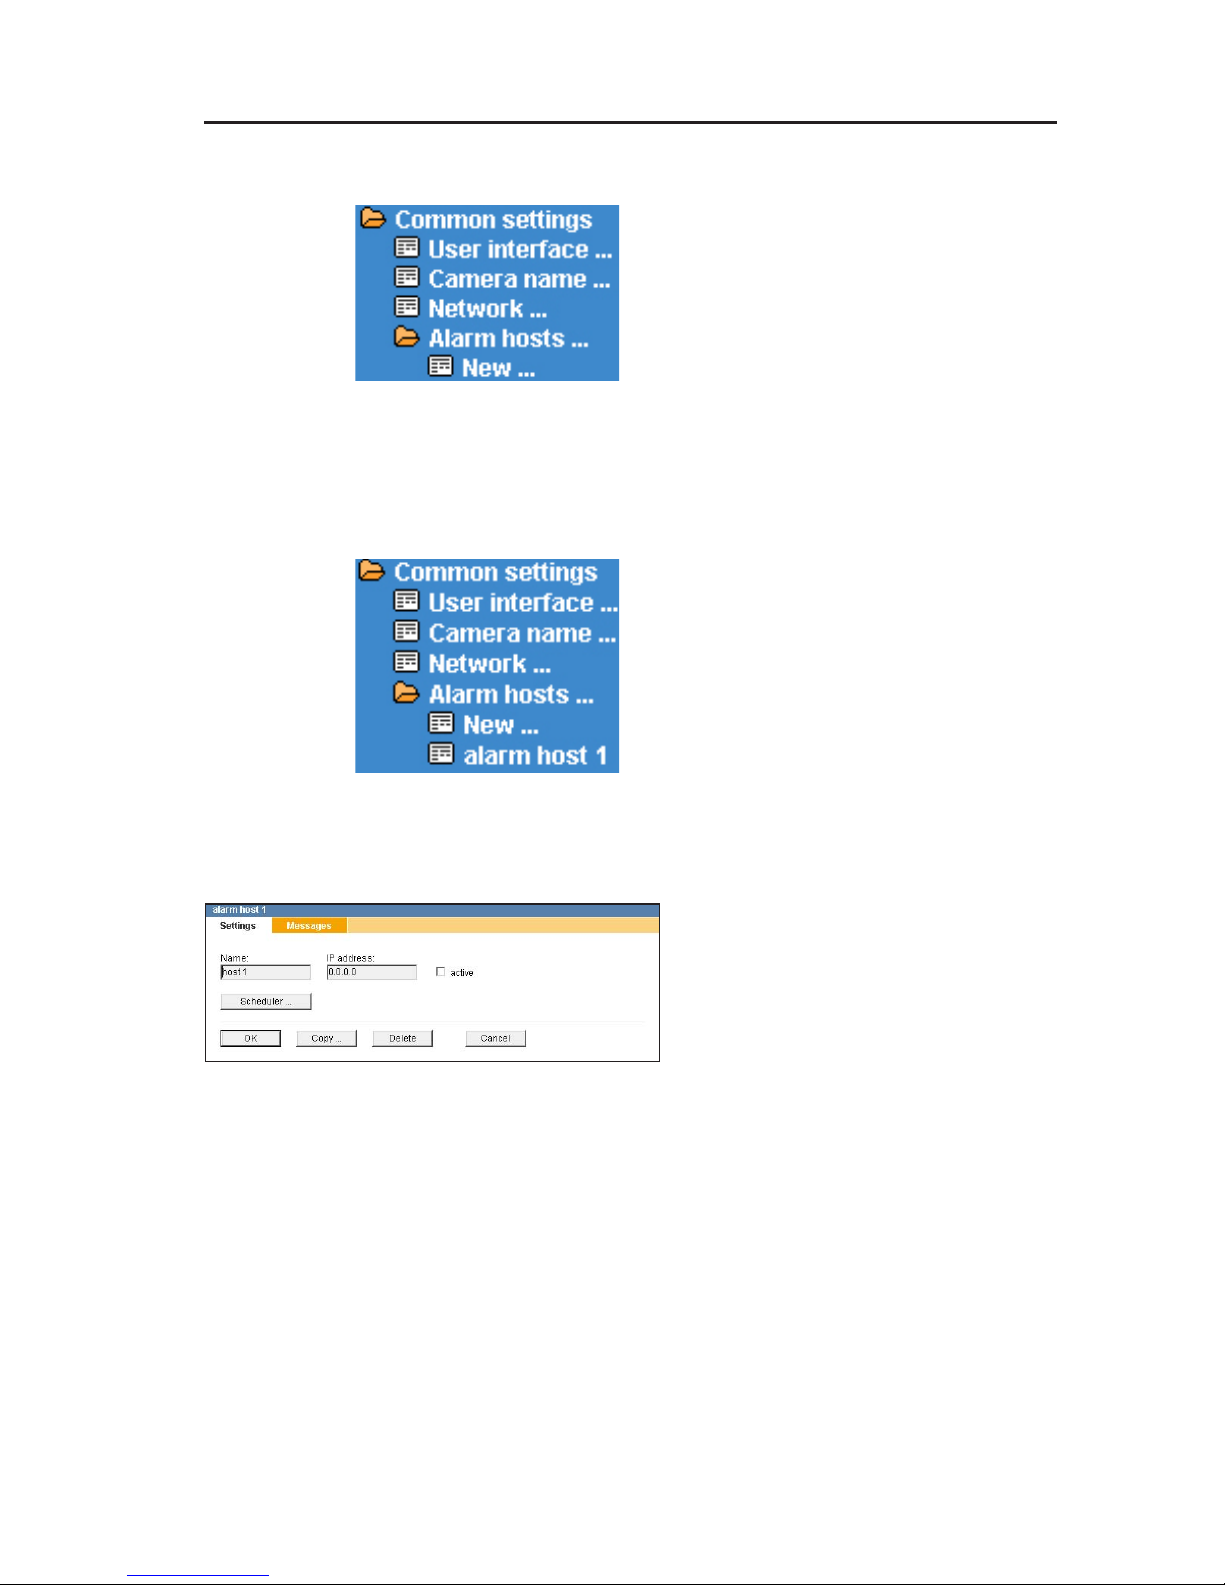
¾ Select Common settings > Alarm hosts.
If you have not previously configured
an alarm host, only the New option will
be displayed.
9.2.2.1 Setting up an alarm host
¾ Click on New.
The selection is expanded by the alarm
host 1 entry.
¾ Click on alarm host 1.
9.2.2.1.1 Settings
¾ In the Name box enter the name
of the computer which is to
receive the alarm message from
your DF3000IP-DN.
¾ In the IP address box enter the
IP address of the computer
which is to receive the alarm
message from your DF3000IP(DN).
¾ Check the active checkbox.
¾ Go to the Messages tab or click OK to apply your settings.
Fig. 9-20
Fig. 9-21
Fig. 9-22

38
DF3000IP(-DN) / DF3000IP(-DN) CasinoCam
Dallmeier electronic GmbH & Co.KG
9.2.2.1.2 Messages
The following two messages can be transmitted to the alarm host:
Motion detection
Message in case of motion detection
Sedor status
Messages from an external SEDOR device
¾ Select the desired message(s)
by checking the corresponding
checkbox.
Click on OK if you do not want to make any additional settings
(Scheduler and/or Copy).
After clicking on OK, the designation „alarm host 1“ is replaced by
the name you entered.
9.2.2.1.3 Scheduler
The scheduler function for the alarm host allows to limit message
transmission to certain time periods.
NOTE
Please note that this scheduler only applies to the
selected alarm host.
Fig. 9-23
Fig. 9-24

39
Dallmeier electronic GmbH & Co.KG
¾ Select the host from the selection list
for which you would like to configure
the scheduler.
¾ Click on Scheduler.
All areas in the weekly plan which
are shown as light colored are
active areas (pre-set).
Within this time period all selected
messages will be sent to the
corresponding alarm host..
¾ Click on the not active button.
¾ Move the mouse pointer over the
top left corner of the desired time
area.
¾ If you move the position of the
crosshairs whilst holding the
mouse button, a dark rectangle
will be opened.
Dark areas are inactive time areas.
The smallest time unit you can set is 15 minutes.
In the example shown here the time from 02:00 to 07:15 has been
marked as not active. Within this time period no messages will be
sent to the alarm host.
Fig. 9-25
Fig. 9-26
Fig. 9-27
Fig. 9-28
40
DF3000IP(-DN) / DF3000IP(-DN) CasinoCam
Dallmeier electronic GmbH & Co.KG
Undoing the selection
T o undo the marking, click on the active button and trace a rect angle
over the inactive area.
You also can remark certain sections within the inactive area as
active by tracing the particular section.
Active and inactive time areas defined using the above-mentioned
method are valid for the entire year.
If no exceptions are to be made (see the following paragraph)
click on OK.
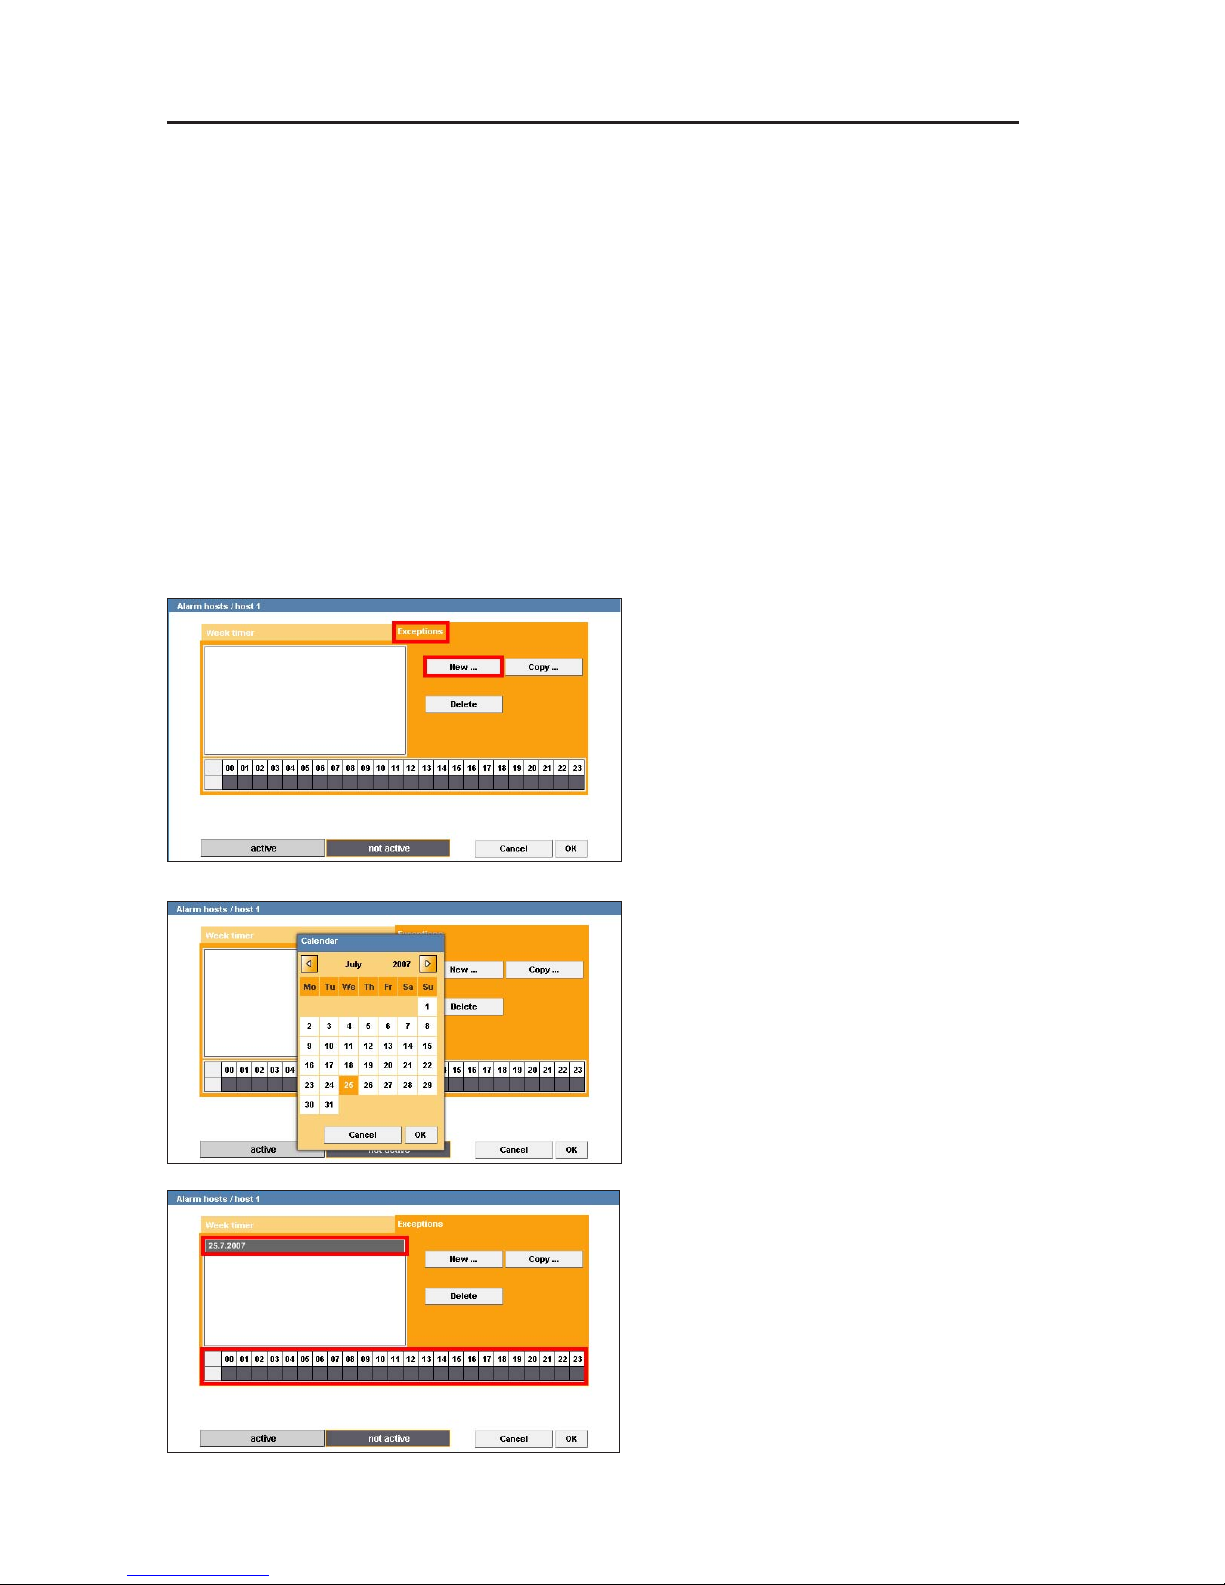
Exceptions to the weekly plan
To account for public holidays and company-specific deviations
you can stipulate exceptions to the weekly plan.
¾ Click on the Exceptions tab.
¾ Click on New.
¾ Mark the day for which you
would like to apply the deviation
setting in the displayed calendar.
¾ Click OK to apply your settings.
The date you have selected will be
entered in the list.
All 24 hours are initially marked as
not active for this date.
Fig. 9-29
Fig. 9-30
Fig. 9-31

41
Dallmeier electronic GmbH & Co.KG
¾ Click on the active button.
¾ Mark the time during which the
system is to be active (i.e. deviate
from the standard setting).
¾ Click OK to apply your settings
or transfer them to other days.
Copying exceptions for other dates
If you want the set exception to apply to other days as well you can
copy these settings for a new date.
¾ Click on Copy.
¾ Select the new date in the
displayed calendar.
¾ Click OK to apply your settings.
The new date now appears in the list with the setting of the previous
date.
Deleting exceptions
¾ Mark the respective date in the
list.
¾ Click on Delete.
¾ Click on OK to apply these
exceptions to the week timer.
Fig. 9-32
Fig. 9-33
Fig. 9-34

42
DF3000IP(-DN) / DF3000IP(-DN) CasinoCam
Dallmeier electronic GmbH & Co.KG
9.2.2.1.4 Copying settings to other alarm hosts
The Copy function allows you to make a copy of all settings for
another alarm host.
¾ To copy the settings of an alarm
host, click on the relevant alarm host
in the selection list.
¾ Open the Settings tab and click
on Copy.
The name of the copied alarm host now
appears in the alarm hosts selection list
with the attribute (1) for „first copy“.
¾ Select the copied alarm host and
change its Name and IP
address.
¾ Click OK to apply your settings.
All of the settings that were made for the original alarm host under
Messages and Scheduler apply to this new alarm host.
Fig. 9-38
Fig. 9-35
Fig. 9-36
Fig. 9-37

43
Dallmeier electronic GmbH & Co.KG
9.2.3 Video Streaming
The Video streaming dialog allows the camera to be configured
for transferring video and audio data via the network.
¾ Open the Video streaming dialog via Common settings >
Video streaming.
In the Mode box you select the
protocol and the encryption you
wish to use to send the data packets
(MPEG, RTP/MPV, RTP/MP4V-ES
or RTP/MJPEG).
At the same time decide whether
the data should be sent to an
arbitrary number (multicast) or only
to one specific (unicast) receiver.
NOTE
The settings for Mode in the Video streaming
dialog must be the same as for the Encoder mode
in the Encoder settings dialog.
NOTE
If Mode = off, the camera will not send any video
or audio data via the network.
9.2.3.1 Protocol and encryption
MPEG
While recording, the camera sends the recorded video and audio
data to the network.
The data are sent in the form of a pure stream (without protocol)
and with encryption under the MPEG 2 program stream standard.
RTP/MPV, RTP/MP4V-ES, RTP/MJPEG
While recording, the camera sends the recorded video data to the
network. In contrast to MPEG, however, the audio data cannot be
sent.
Fig. 9-39

44
DF3000IP(-DN) / DF3000IP(-DN) CasinoCam
Dallmeier electronic GmbH & Co.KG
NOTE
Even if the camera records the data with sound,
the audio signal will not be sent if RPT/MPV is set.
The data will be sent using the RTP protocol, which optimizes the
synchronization of the data packets at the receiver.
The data will be encrypted using the MPEG2 standard (MPEG Vi-
deo) , MPEG4 standard or MJPEG standard.
RTP implementation is based on the following standards:
RFC3550 (RTP Transport Protocol for Real-Time Applications)
RFC3551 (RTP Profile for Audio and Video Conferences with Mini-
mal Control)
RFC2250 (RTP Payload Format for MPEG1/MPEG2 Video)
RFC3016 (RTP Payload Format for MPEG-4 Audio/Visual S treams)
RFC2435 (RTP Payload Format for JPEG-compressed Video)
9.2.3.2 Multicast/Unicast
If a Mode with Multicast is selected, the undirected video and audio
stream will be fed into the network.
In this case the data packets will have the multicast IP address and
the port of the sender (server). The potential receiver (client) will
only accept these packages if the same port is configured to receive
and it knows the IP address of the server.
In this case, first enter a Multicast IP Address.
The address range for multicast is between 224.0.0.0 and
239.255.255.255.
NOTE
Certain addresses in the multicast address range
are reserved for special purposes. If you have any
doubt, contact your network administrator.
Set a suitable Port through which you wish to send
the data packets.

45
Dallmeier electronic GmbH & Co.KG
If, on the other hand, you select a Mode with Unicast, the video
and audio stream will only be sent to a specific receiver (client).
In this case, therefore, you must enter the client’s IP address and
port as Unicast IP Address and Port.
9.2.3.3 Range restriction
The so-called "Time to Live“ value can be fixed in the TTL box.
This value specifies how far a data packet can spread in the network.
The TTL is reduced by one by each router through which a packet
is routed. If the TTL is zero, the packet is discarded.
This method means that packets that move to and from between
two computers due to routing errors are removed from the network.
9.2.3.4 Packet size
The size of the data packets to be sent is set in Packet size. To
optimize the transmission times (delay) of the data packets, the
packet size should be set to 2048 bytes.
The larger a packet’s size, the more time it can take until the
packet is "complete“ and ready for transmission. This can lead to a
delay that results in a "jumpy“ video stream.
The smaller the data packet s are, the greater the network overhead.

46
DF3000IP(-DN) / DF3000IP(-DN) CasinoCam
Dallmeier electronic GmbH & Co.KG
9.3 Encoder settings
¾ Select Encoder settings in the selection list.
NOTE
The settings cannot be changed any more after
establishing a connection between the recorder
and DF3000IP(-DN).
Meaning of the individual setting options
Input
Encoder 1 is the default setting for the DF3000IP(-DN).
Encoder mode
In Encoder mode you can select the standard with which the audio
and video data are to be compressed.
NOTE
The settings for Encoder mode in the Encoder
settings dialog must be the same as for the Mode
in the Video streaming dialog.
NOTE
MPEG4 and MJPEG do not allow audio data to
be recorded.
Fig. 9-40

47
Dallmeier electronic GmbH & Co.KG
Frames/Second
Set here the number of pictures to be recorded per second.
Please note that an audio recording is only possible at a video rate
of 25 images per second (or 30 per seconds for NTSC).
Resolution
The resolution enables you to influence the size of the images for
the video signal. The entries define length x width in pixels.
Bit rate
The bit rate is a measure of the degree of compression of video
data; it thus has a direct impact on the image quality of the recording.
A low bit rate stands for a high degree of compression with a
relatively small volume of data but poor image quality.
A high bit rate stands for a low degree of compression with a
relatively large volume of data and very good image quality.
A bit rate of between 4 and 6 Mbp s (megabit per second) is a good
compromise between data volume and image quality. Most
requirements in surveillance systems are met with the quality of
image thus obtained.
Bitrate mode
The bit rate mode allows you to configure video recording to occur
at a constant or a variable bit rate. A variable bit rate makes better
use of the available hard disk space.
The variable setting changes the bit rate in accordance with the
activity (changes) in the image. You can limit the fluctuation of the
bit rate by making the appropriate setting, which is done as a
percent.
Example to bit rate mode
With a set bit rate of 4 Mbits and a bit rate mode „variable by 50
%“, the bit rate can vary from 6 Mbits to 2 Mbits during recording.
In variable bit rate mode, settings are made in 10 % increments,
from 10 % to 400 %.
Audiobitrate
The audio bit rate setting allows you not only to control the audio
quality , but also the amount of required hard disk sp ace to a certain
extent. The higher the audio bit rate, the better the audio quality. A
higher bit rate, however, requires more hard disk space than a
lower bit rate.

48
DF3000IP(-DN) / DF3000IP(-DN) CasinoCam
Dallmeier electronic GmbH & Co.KG
GOP-size
GOP (Group Of Pictures) is a variable for specifying how images
are used to generate the MPEG-2 data flow. A GOP value of 6 and
15 enables good image quality with high compression. A GOP value
of 1 denotes a low compression factor and should only be used for
special applications (e.g. multiplex mode).
GOP sizes greater than 15 belong to the Extended GOPs.
Please note that reverse playback is only possible in reduced quality
(by frame drops) when these GOP sizes are used.
Deinterlacing
The aim of this function is to increase the image quality. In this
case the so-called interlace effect, which may occur after merging
two fields into a frame, is calculated from the frame.
However, whether this aim is achieved depends on a large number
of influences.
It is therefore not possible to provide a general recommendation to
activate or deactivate this function. We recommend that you test
the output on the monitor after the camera has been configured.
For this purpose, select a typical scene for playback for the camera
concerned. If the comb effect can be detected when objects move,
in other words if a lack of focus occurs, the effect can be reduced
by activating Deinterlacing.
On the other hand the playback may be very focused but jumpy. In
this case the deactivation of this function may, in certain
circumstances, result in more flowing playback.
NOTE
All encoder settings are only applied or activated
after clicking OK.

49
Dallmeier electronic GmbH & Co.KG
9.4 Sensor configuration
In the Sensor dialog you can influence how the incoming video
signal should be processed. This allows the image to be adjusted
to the local situation.
NOTE
These settings have a direct effect on the recording,
not just on the image display on the evaluation
station’s monitor.
¾ Select Sensor configuration in the selection list.
9.4.1 Global
The Global tab allows the following settings to be made:
z Synchronization
Choose between Internal 1, Internal 2, AC-Linelock, Flickerfree
Linelock and None for Synchronization.
NOTE
The Synchronization = AC-Linelock function is
not supported by the camera when used with 12V
DC.
Fig. 9-41

50
DF3000IP(-DN) / DF3000IP(-DN) CasinoCam
Dallmeier electronic GmbH & Co.KG
NOTE
Flicker Free Linelock is recommended if cameras
without Linelock that are operated with a mains
frequency of 50 Hz must be enhanced for
scenarios with neon tubes.
z V-Phase
After selecting the synchronization you can adjust the V-Phase, if
necessary.
NOTE
The V-Phase function is not supported by the
camera when used with 12V DC.
z Lens
Choose Manual for lenses with manual iris control or DC Control
for DC auto iris lenses.
z Horizontal Flip
Set Horizontal Flip = On to horizontally flip the image.
This setting is necessary to obtain an accurate-to-side presentation
of the image if recording occurs via a mirror.
z Color
The Color menu item allows you to deactivate color playback and
to go to the black-and-white mode.
z Color Night
With Color Night, you can select whether the camera will take
color (On) or black-and-white (Off) images in the night mode.
z Progressive Scan
Progressive Scan = Off
Two fields are recorded and sent in sequence at different times.
If there are fast-moving objects, the so-called interlace effect may
occur. In contrast to this, this setting sets a high picture rate.

51
Dallmeier electronic GmbH & Co.KG
Progressive Scan = On
Two fields are recorded and sent in sequence at the same time.
The so-called interlace effect is prevented, which means that the
image rate can be halved compared to that for the Off setting.
NOTE
To record camera images with maximum
resolution the Dallmeier recorder should be
operated in full picture mode and the camera
should be set to Progressive Scan = On.
z Backlight
When recording against backlighting, e.g. from windows, glass
doors or other sources of light, the backlight function prevents
blanking of the object to a great degree.
The camera analyzes the light conditions within the field of view
and controls the lighting parameters accordingly.
Choose between None, Up, Lower and Down to define the position
of the field of view.
z Day/Night Mode
The camera has a special setting that allows for detailed shots at
night.
Here, the camera can be manually or automatically set to day/
night mode.
Day/Night Mode = Day
The camera is set to day mode. Night mode is deactivated.
Day/Night Mode = Auto
This setting automatically switches the camera to night mode at a
certain point in time.
Day/Night Mode = Night
This setting immediately changes the camera to night mode,
regardless of the prevailing light conditions.
NOTE
The settings are only applied or activated after
clicking OK.

52
DF3000IP(-DN) / DF3000IP(-DN) CasinoCam
Dallmeier electronic GmbH & Co.KG
9.4.2 Image Optimization
The Image Optimization tab allows the following settings to be
made:
z Presets
The following presets are available:
Universal
Scenes full of contrast with strong backlights. The relevant details
are in the highlights. The maximum dynamic scope of the camera
is used. Large differences in brightness are adjusted.
Details 1/2
Scenes full of contrast with strong backlights. Details are displayed
in high resolution. The maximum dynamic scope of the camera is
used.
Indoor/Shadow
Preset for indoor scenes full of contrast. The relevant details are in
the shadow. Detail resolution in the shadowy area is optimized.
Bright areas of the picture are displayed brighter than normal.
Fig. 9-42

53
Dallmeier electronic GmbH & Co.KG
Indoor
Preset for indoor scenes with medium contrast. Details are displayed
in high resolution. Detail resolution in bright areas is optimized.
Fluorescent
Use for indoor scenes with fluorescent light and low contrasts. Detail
resolution in bright areas is optimized. Typical flickering with neon
lights is compensated.
Low Light
Preset for low light scenes with slowly moving objects.
NOTE
The following 4 presets are only available in the
DF3000IP(-DN) CasinoCam. If necessary, please
contact the Dallmeier electronic Sales Department
to purchase the activation code.
Poker table
This Preset has been developed to meet the special requirements
at the poker table
ensuring optimal identification of red and black cards.
Gambling
A preset for games that require chips. This preset allows the chip
colors to be optimally displayed.
Wheel
This Preset has been developed to meet the special requirements
at the roulette wheel ensuring optimal identification of the numbers
and colors of the wheel.
Slot machine
This Preset has been developed to meet the special requirements
for slot machines ensuring optimal identification of the symbols.

54
DF3000IP(-DN) / DF3000IP(-DN) CasinoCam
Dallmeier electronic GmbH & Co.KG
z White balance
The White Balance Mode allows you to influence the white balance
of the camera.
ATW
With ATW (Auto Tracking White Balance) the white balance is
continually recalculated.
The white balance is readjusted accordingly in different recording
conditions.
AWB..
With AWB.. automatic white balance is carried out for the situation
current at the time of measurement. Choose AWB.. and hold a
white sheet of paper in front of the camera. Then click the Apply
White Balance button. The camera is then calibrated for the most
realistic color reproduction possible, regardless of the actual
scenario.
NOTE
With light and therefore color temperature
modifications, no new measurement for white
balance is carried out.
Manual
Choose Manual to manually adjust the white balance in the White
Balance Manual field.
White Balance Offset
The White Balance Offset function can be used when the automatic
white balance produces an unsatisfactory color display with „monochrome“ scenarios. This function modifies the metered color
temperature.
z Gamma
Gamma defines the brightness range within the color space and
thus the differentiation between lights and shadows.
Choose Gamma = Auto for scenarios with strongly varying light
conditions.
Choose Gamma = Manual to manually adjust Gamma.

55
Dallmeier electronic GmbH & Co.KG
z Range Bias (for CasinoCam only)
Range Bias allows you to shade or brighten the different brightness
areas.
z Brightness
The Brightness field allows you to adjust the image brightness.
z Sharpness
The Sharpness field allows you to adjust the image sharpness.
z Gain Limit (for CasinoCam only)
Gain Limit allows you to set the max. gain with which the amplitude
of the video signal is raised in poor light conditions.
z Saturation
The Saturation field allows you to adjust the image saturation.
NOTE
The settings are only applied or activated after
clicking OK.

56
DF3000IP(-DN) / DF3000IP(-DN) CasinoCam
Dallmeier electronic GmbH & Co.KG
9.5 Backing up and sending the configuration
The configuration of the DF3000IP(-DN) can be exported as a file
and thus backed up.
In addition to re-establishing the configuration, the configuration
can also be transferred to several cameras simultaneously.
9.5.1 Saving the configuration file
NOTE
If you wish to transfer the configuration at a later
date to several cameras, you must not save the
Network settings configuration group.
¾ Open the Config File Management dialog via Config File >
Download.
¾ Select the configurations you wish
to save to the configuration PC by
checking the corresponding
checkbox.
¾ Confirm with OK.
¾ Follow the instructions in the
download dialog and save the
configuration file.
The file name contains the IP address of the relevant camera.
Fig. 9-43

57
Dallmeier electronic GmbH & Co.KG
9.5.2 Sending the configuration file
The configuration file saved on the configuration PC can be sent to
an individual camera. This allows the configuration to be restored
on the camera that is currently connected.
In addition the configuration file can also be sent to several cameras
at the same time. This is a very effective method of configuring
several cameras identically in terms of certain configuration groups.
9.5.2.1 Individual camera
To restore the configuration of an individual camera, first establish
a connection to this camera.
¾ Open the Config File Manage-
ment dialog via Config File >
Upload.
¾ Click on Durchsuchen (Search).
¾ Select the relevant configuration
file.
¾ Confirm with OK.
At the end of the transfer the system
will display a list of transferred (or
skipped) configuration groups.
Fig. 9-44
Fig. 9-45

58
DF3000IP(-DN) / DF3000IP(-DN) CasinoCam
Dallmeier electronic GmbH & Co.KG
9.5.2.2 Several cameras
The prerequisite for this method is that all the relevant cameras
are integrated in a LAN (with suitable cabling and a separate IP
address for each camera). In addition the password must be
identical for all the cameras.
Before the configuration file is sent, it must be saved as described
above. However, the Network settings configuration group must
not be included in the file that you save.
If these settings were included, the same IP address would be sent
to all the cameras. Since, however, every IP address in the LAN
must be unique, this would cause massive problems in the LAN.
NOTE
Ensure that the Network settings configuration
group is not sent to the cameras.
To send the configuration file, first establish a connection to one of
the receiving cameras.
¾ Open the Config File Management dialog via Config File >
Upload.
¾ Click on Durchsuchen (Search).
¾ Select the relevant configuration
file.
¾ Check the Broadcast checkbox.
¾ Enter the first and last IP address
of the relevant camera group.
¾ Enter the password.
NOTE
The password must be identical for all the cameras.
This is the case with the default setting (password
= 3).
At the end of the transfer the system will display a list of transferred (or skipped) configuration groups.
Fig. 9-46

59
Dallmeier electronic GmbH & Co.KG
10 Info and Log
10.1 Information dialog
General information about the camera that is currently connected
will be displayed in the DF3000IP-DN dialog.
¾ Select About in the selection list.
The following will be displayed:
z Camera type
z Version number of the camera software
z Version number of the encoder
z Version number of the Linux kernel
z Serial number
10.2 MAC address
The MAC address of the network interface is displayed in the
Network settings dialog.
¾ Open the Network settings
dialog via Common settings >
Network.
Fig. 10-1
Fig. 10-2
60
DF3000IP(-DN) / DF3000IP(-DN) CasinoCam
Dallmeier electronic GmbH & Co.KG
10.3 Event log
The camera logs IP addresses of units that temporarily blocked
certain resources of the camera in a log file.
The list of IP addresses is output in the Event log dialog.
¾ Open the Event log dialog via Common settings > Event log.
Fig. 10-3

61
Dallmeier electronic GmbH & Co.KG
1 1 Breaking the connection
After completing the configuration you should break the connection
in controlled conditions.
¾ First log off the system by clicking on Exit.
The login page will be displayed.
¾ Now close your browser.
NOTE
If the connection is broken by closing the browser
without clicking on LOGOUT, you must wait for
five minutes before logging on again.
Fig. 11-1

62
DF3000IP(-DN) / DF3000IP(-DN) CasinoCam
Dallmeier electronic GmbH & Co.KG

63
Dallmeier electronic GmbH & Co.KG
12 Appendix
12.1 Technical data
Specifications
Sensor 1/3" sensor CMOS
Dynamic range (max.) 120 dB max.
Horizontal resolution (TV lines) 540 TV lines
Picture size (horizontal x vertical) 720 x 540 pixel
Transfer rate Analogue 50 fps (P AL); 60 f ps (NTSC) //
Digital stream 25 fps (P AL); 30 f ps (NTSC)
Light sensitivity 0.5 lux (0,1 lux in Slow Shutter mode)
with F0. 95; 50 IRE
(-DN): 0.2 lux (0,04 lux in Slow Shutter mode)
with F0.95; 50 IRE
Slow shutter Up to 8x
Signal to noise ratio >48dB
Video standard P AL/NTSC
Signal formats (video) MPEG-2/-4, MJPEG , H.263
Resolution D1, 4 CIF, 2 CIF , CIF, QCIF
Signal formats (audio) MP3, PCM/LPCM, MPEG-1 Layer 2
Synchronisation Internal (P AL/NTSC)
Adjustable white balance ATW , AWB, manual (2000K - 11000K)
Backlighting compensation Y es, with backlight zone
AGC Yes
Gamma correction Y es
Progressive Scan Y es
Presets Universal, Details 1, Details 2, Indoor/Shadow , Indoor,
Fluorescent, Low Light, Poker Table (optional),
Gambling (optional), Wheel (optional), Slot Machine
(optional)
B/W and color mode Y e s
Day/Night funcionality Yes, infrared sensitivity in night mode
Configuration Web-Browser
IP-Board Dual MIPS risk processor, 64 MB DRAM

64
DF3000IP(-DN) / DF3000IP(-DN) CasinoCam
Dallmeier electronic GmbH & Co.KG
Web server Y e s
Languages German, English, French, Sp anish, Hungarian
Lenses
Mou nt CS mount; C mount with 5mm adapter
Lenses Variofocal lens F0.95; 2.8 - 8 mm
Options
Image & Clip Storage Optional
Interfaces
API/SDK Yes
Application Program Interface Y es
LAN Yes
Serial RS485 in/out
Video output 2,5 mm phone jack, FBAS (75 ohm): P AL, NTSC
Audio input Impedance: 9.8 kOhm;
Sensitivity (6 dB): 1 Vrms / 2.83 Vpp
Other hardware details
Power supply 12V DC, 24V AC ( 50/60 Hz) or PoE
(incl. permitted tolerance)
Power consumption 5.4 W
Dimensions B 45 x H 45 x L 112 mm (without lens)
Temperature 0 °C - 50 °C
Relative humidity 0 - 90 % not condensing
Weight Appr . 9.2 oz / 260g
Warranty 36 months

65
Dallmeier electronic GmbH & Co.KG
Declaration of Conformity
This declaration is valid for following product:
Equipment: IP Camera
Type: DF3000IP(-DN)
Hereby the equipment is confirmed to comply with the requirements set
out in the Council Directive on the Approximation of the Laws of the
Member States relating to Electromagnetic Compatibility (89/336/EEC)
and the Council Directive relating to Low Voltage 73/23/EEC and 2006/
95/EEC.
The following company is responsible for this declaration
:
Dallmeier electronic GmbH & Co.KG
Cranachweg 1
D - 93051 Regensburg
The measurements were carried out in accredited laboratories.
For the evaluation of above mentioned Council Directives for
Electromagnetic Compatibility and for Low Voltage following standards
were consulted:
DIN EN 55022: 1998-04 class B
DIN EN 50130-4: 2003-09
(DIN EN 61000-4-2: 2001-12, DIN EN 61000-4-3: 2003-11,
DIN EN 61000-4-4: 2002-07, DIN EN 61000-4-5: 2001-12,
DIN EN 61000-4-6: 2001-12
DIN EN 61000-4-11: 2001-12)
DIN EN 60065: 2003-01
Regensburg, March 30, 2007 Dieter Dallmeier
General Manager
 Loading...