

Page 1
INSTRUCTION BOOK FOR
Theater-Lite
DL-0291_Rev2_Theater Lite Instructions.indd 1 11/5/2014 3:15:37 PM
Page 2

Introduction Care Of Screen
Thank you for purchasing this product. Before operating your
screen, please read all instructions. Store this instruction book for
future reference.
For Your Safety
This product has been designed with safety in mind. However
inappropriate use of this product is dangerous and may cause
personal injury. In order to prevent accidents, please follow the
instructions below.
INSPECT THE PRODUCT REGULARLY.
Before you use the projection screen, make certain that all the
parts such as the screen case, hook, upright bar, feet and lifting
handle are not warped, loose, or damaged. Do not use if screen
is out of order.
To maintain the rel ectivity of the screen:
• Do not touch the screen surface directly.
• Do not bend or lean on or hand tings from the screen.
• Do not write on the screen, Regardless of the type of writing
instrument used, it cannot be erased.
• When carring for the screen as regular maintenance, wipe it with
a soft, dry cloth or dust it with a soft brush. If the screen is stained
or dirty, clean it using s damp cloth with water and mild
detergent. Then wipe with water only and dry it thoroughly.
• Do not wipe with benzene or paint thinner. The surface of the
screen will degrade and this will negatively afect the quality of
the projected image.
WARNINGS PRECAUTIONS
Failure to observe the following warning can result in ire and
serious Injury.
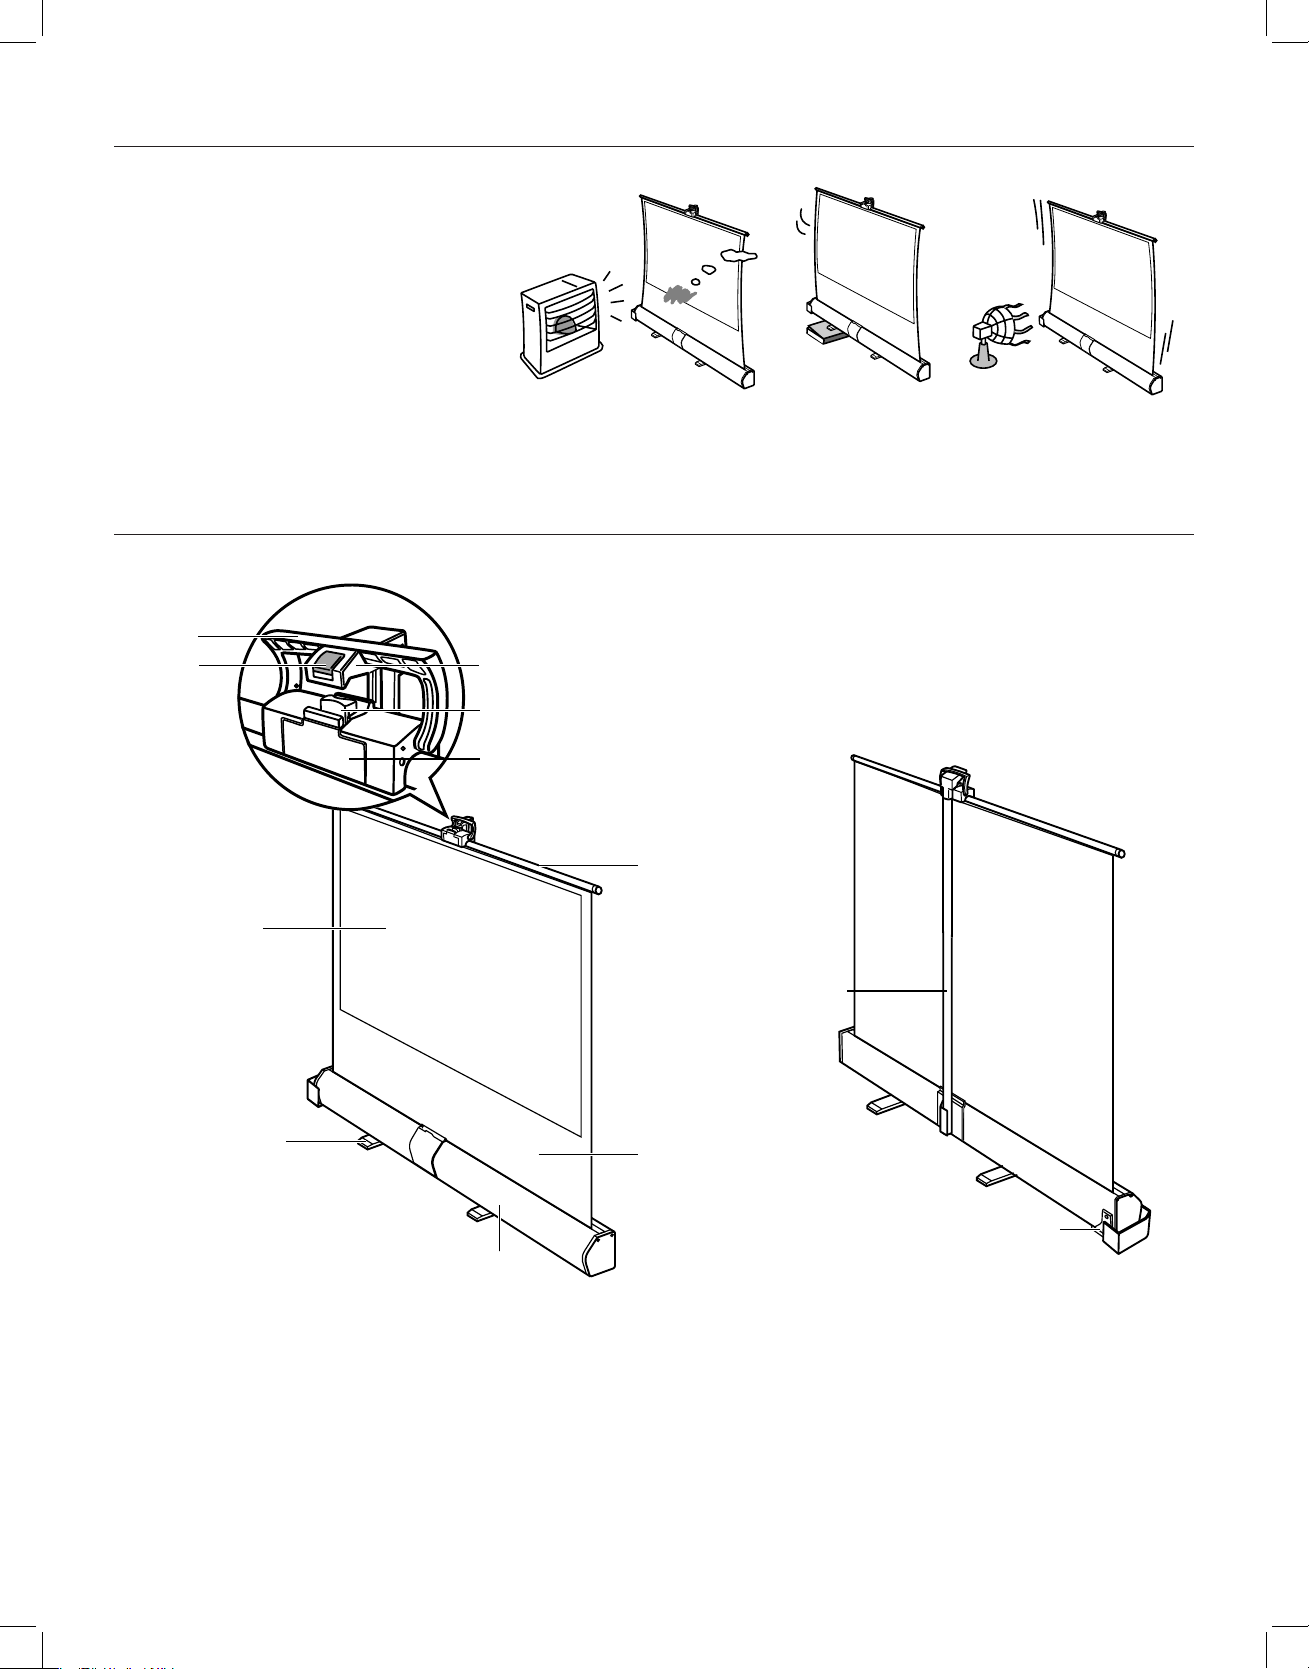
Do not place the screen near any heating sources. Since the
screen is made of plastic material, it may cause ire and can be
damaged.
Place in a lat, stable place. If the screen is set up on a slanting
surface or with something under one foot, it is likely to fall over,
resulting in personal injury to people nearby.
Keep out of direct wind. If the screen is set up in strong air
currents, outside, near a window, or in front of a fan, it can blow
over resulting in personal injury to people nearby.
To prevent the screen from tipping over falling. Rotate the
feet at the bottom of the case until they are perpendicular to the
case, and make sure they are securely in place. Firmly set the
upright, grasp the lifting handle tightly, pull the screen up and set
it securely on the hook at the top end of the upright bar. Do not
push or lean on the screen or upright bar once they are set. Do
not hang anything on the screen or the upright bar.
Do not take apart or modify. Any disassembly or modiication
can result, not only in the screen failing to function normally, but
it can also cause parts to spring of, resulting in personal injury to
people nearby.
Failure to observe the following precautions can result in injury
or damage.
When handling the screen:
• When storing the screen, lock the release lever by rotating the
green knob. If the case is carried when the release lever is not
securely locked, it may spring open unexpectedly, causing the
screen to get dirty or damaged.
• When raising or lowering the screen, make sure to keep pressing
on the screeen release button. Lowering by force may damage
screen.
• When cleaning the screen, be careful the screen and the upright
bar do not tip over.
Do not let children touch. Do not let children operate or play with
the screen. The screen can tip over and cause personal injury.
Store horizontally. If the screen is stored vertically, take measure
to prevent if from tipping over. If the screen is leaned up against
a wall or other object, it can tip over and cause personal injury.
2
DL-0291_Rev2_Theater Lite Instructions.indd 2 11/5/2014 3:15:37 PM
Page 3
Installation Location
THEATER-LITE
THEATER-LITE
Avoid locations that are :
• Humid and in direct sunlight
• Not l at and level
• Very dusty
• Near heating sources
• Directly in the path of strong air currents
• Frequently traversed by people
Parts Identiication
handle
screen
release
button
hook
green knob
latch
screen
foot
slat
upright bar
skirt film
hook holder
case
3
DL-0291_Rev2_Theater Lite Instructions.indd 3 11/5/2014 3:15:37 PM
Page 4

THEATER-LITE
7. Raise the screen to position at desired
height.
Press the screen release button and pull up
the hook to desired height. You can place in
position at any height.
handle and simultaneously squeezing
the release latch.
handle
latch
hook.
Make sure that the notch of the handle is rmly
on the hook until it clicks.
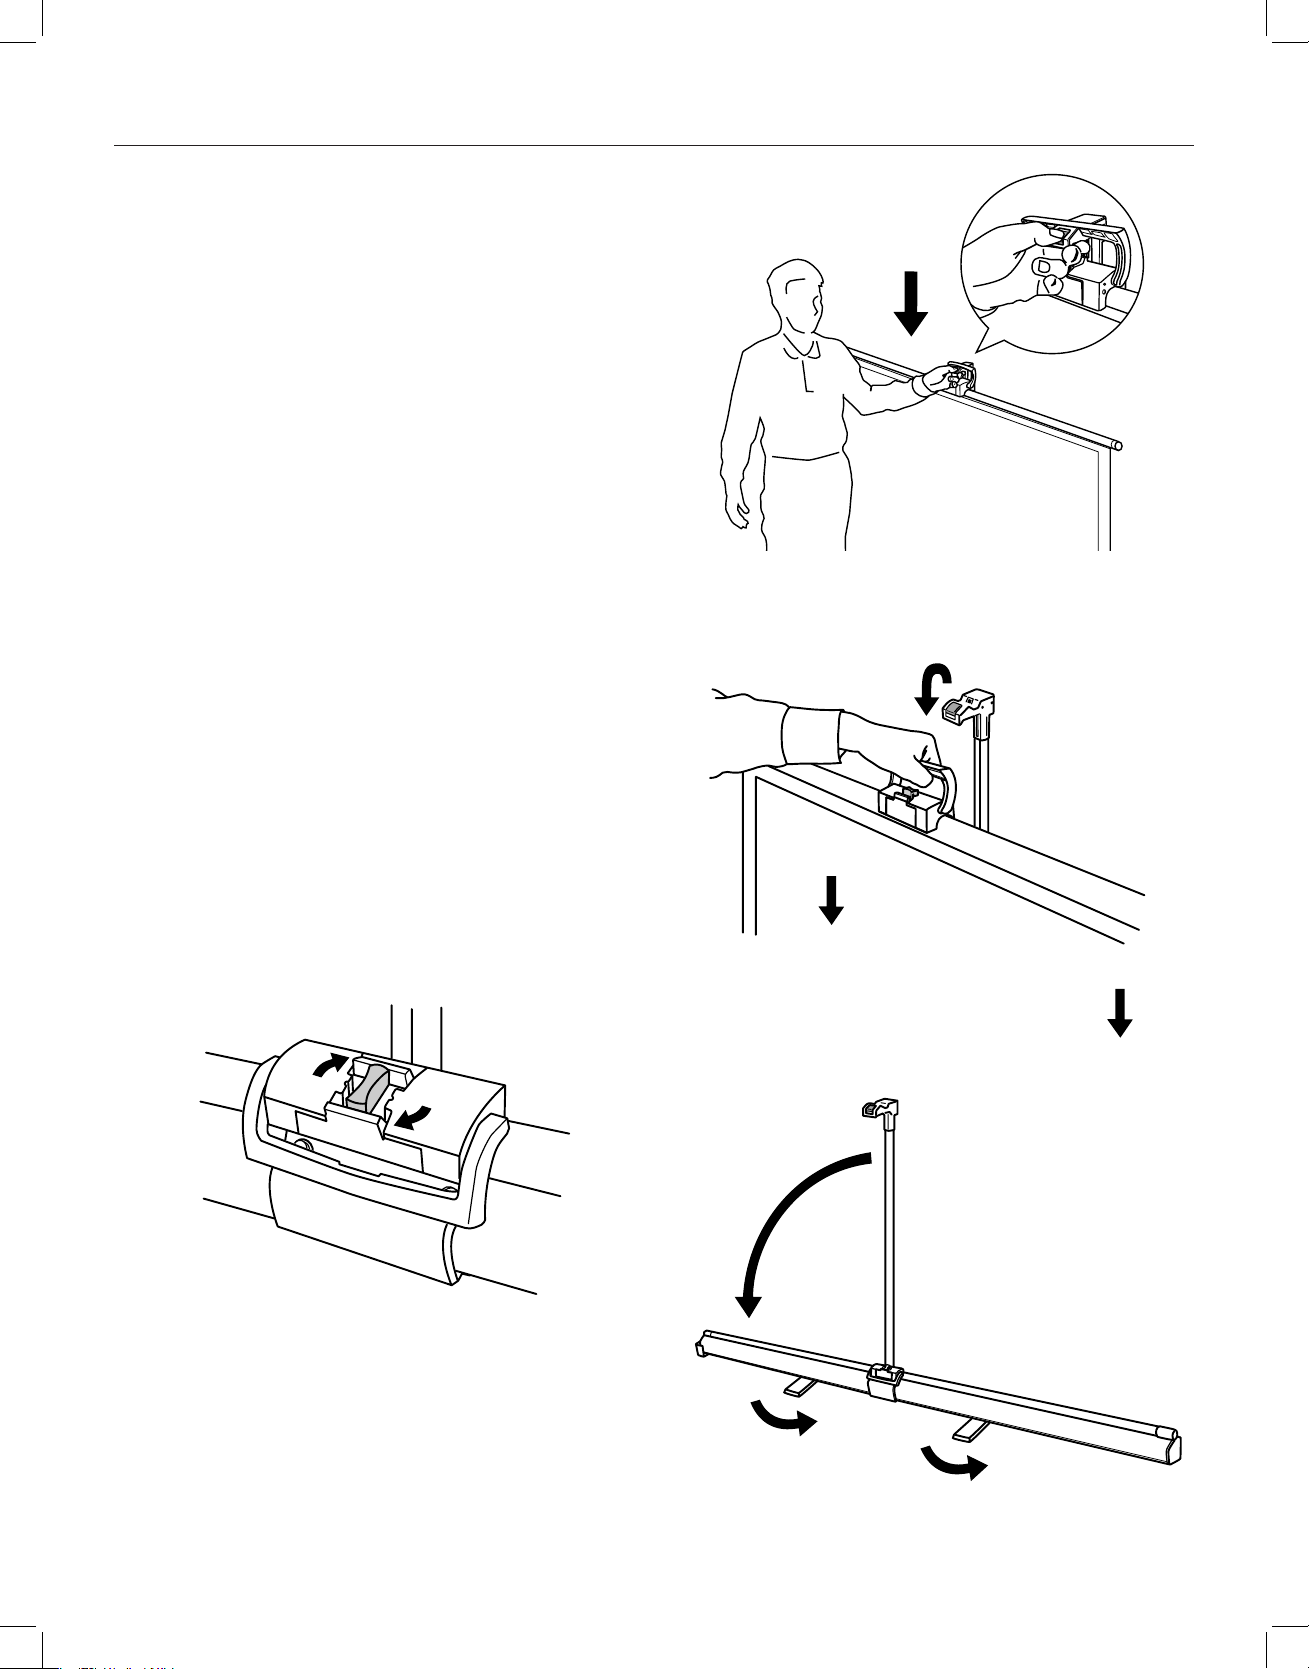
Setting Up the Screen
1. Determine where to set up the screen.
2. Rotate feet at the bottom so they are perpendicular to the case.
3. Rotate the upright bar 90 degrees into vertical position. Rotate
the upright bar until it clicks (Figure 1).
4. Rotate the green knob 90 degrees to unlock the release latch
(Figure 2).
5. Raise the screen by grasping the lifting handle and
simultaneously squeezing the release latch (Figure 3).
6. Anchor the lifting handle on the upright hook. Make sure that
the notch of the handle is irmly on the hook until it clicks
(Figure 4).
CAUTION There may be some space in between the slat and
screen fabric that is for keeping the l atness of screen surface
and not defect in quality.
7. Raise the screen to position at desired height. Press the screen
release button and pull up the hook to desired height. You can
place in position at any height (Figure 5).
Green Knob
Upright Bar
Case Feet
Figure 1
Figure 2
Figure 4 Figure 5
4
hook
Figure 3
screen release button
DL-0291_Rev2_Theater Lite Instructions.indd 4 11/5/2014 3:15:37 PM
Page 5
Press the screen release button and lower the
screen slowly. Make sure to support the hook
with your hand to lower the screen.
hook and store the the screen in the
case.
Lower the screen, as straight as possible until
it clicks and the screen is completely stored
and locked in the case.
3. Rote the green knob 90 degrees to lock
the release latch.
CAUTION
· Do not carry the screen while the green knob
is not completely rotated 90 degrees. Doing so
may cause the case to accidentally slip off and
discolor or damage the product.
4. Rotate the upright bar 90 degrees into a
horizontal position.
Make sure that the upright bar is telescoped
completely and then pull it down gently until
it is locked in its holder. If the upright bar is
not locked properly in the holder, telescope it
completely by pressing on the screen release
button and place it back into the holder.
5. Rotate the feet horizontally until they
are aligned with the screen case.
the release latch.
is not completely rotated 90 degrees. Doing so
may cause the case to accidentally slip off and
discolor or damage the product.
horizontal position.
Make sure that the upright bar is telescoped
completely and then pull it down gently until
it is locked in its holder. If the upright bar is
not locked properly in the holder, telescope it
completely by pressing on the screen release
button and place it back into the holder.
are aligned with the screen case.
Press the screen release button and lower the
screen slowly. Make sure to support the hook
with your hand to lower the screen.
3. Rote the green knob 90 degrees to lock
the release latch.
CAUTION
· Do not carry the screen while the green knob
is not completely rotated 90 degrees. Doing so
may cause the case to accidentally slip off and
discolor or damage the product.
4. Rotate the upright bar 90 degrees into a
horizontal position.
Storing the Screen
the release latch.
1. Lowering the screen. Press the screen release button and lower
the screen slowly. Make sure to support the hook with your
hand to lower the screen (Figure 6).
2. Remove the lifting handle from the hook and store the the
screen in the case. Lower the screen, as straight as possible until
it clicks and the screen is completely stored and locked in the
case (Figure 7).
CAUTION: Adjust the lock position of the latch left or right if it
doesn’t match with lock position of the case.
CAUTION: Do not carry the screen while it is not completely
stored and locked. Doing so may cause the case to accidentally
slip of and discolor or damage the product.
3. Rote the green knob 90 degrees to lock the release latch
(Figure 8).
CAUTION: Do not carry the screen while the green knob is not
completely rotated 90 degrees. Doing so may cause the case to
accidentally slip of and discolor or damage the product.
4. Rotate the upright bar 90 degrees into a horizontal position.
Make sure that the upright bar is telescoped completely and
then pull it down gently until it is locked in its holder. If the
upright bar is not locked properly in the holder, telescope it
completely by pressing on the screen release button and place
it back into the holder.
5. Rotate the feet horizontally until they are aligned with the
screen case (Figure 9).
Figure 6
Figure 8
Figure 7
Figure 9
5
DL-0291_Rev2_Theater Lite Instructions.indd 5 11/5/2014 3:15:38 PM
Page 6

Speciications for 80" HDTV Format
Weight: 11 Lbs.
Right Side
4½"
Left Side
4½"
2¼"
86"
3½"
13½"
76"
6
DL-0291_Rev2_Theater Lite Instructions.indd 6 11/5/2014 3:15:38 PM
Page 7

7
DL-0291_Rev2_Theater Lite Instructions.indd 7 11/5/2014 3:15:38 PM
Page 8

LIMITED ONE YEAR WARRANTY ON DALITE PRESENTATION PRODUCTS
Milestone AV Technologies LLC warrants certain Da-Lite branded products to the original purchaser only, to be free from defects in
materials and workmanship for a period of one (1) year from the date of purchase by the original purchaser; provided they are properly
operated according to Da-Lite's instructions and are not damaged due to improper handling or treatment after shipment from the
factory.
This warranty does not apply to equipment showing evidence of misuse, abuse or accidental damage, or which has been tampered
with or repaired by a person other than authorized Da-Lite personnel.
Da-Lite’s sole obligation under this warranty shall be to repair or to replace (at Da-Lite’s option) the defective part of the merchandise.
Returns for service should be made to your Da-Lite dealer. If it is necessary for the dealer to return the screen or part to Da-Lite,
transportation expenses to and from Da-Lite are payable by the purchaser and Da-Lite is not responsible for damage in shipment.
To protect yourself against damage or loss in transit, insure the product and prepay all transportation expenses.
TO THE MAXIMUM EXTENT PERMITTED BY APPLICABLE LAW, THIS WARRANTY IS IN LIEU OF ALL OTHER WARRANTIES, EXPRESS
OR IMPLIED, INCLUDING WARRANTIES AS TO FITNESS FOR USE AND MERCHANTABILITY. Any implied warranties of itness for use,
or merchantability, that may be mandated by statute or rule of law are limited to the one (1) year warranty period. This warranty gives
you speciic legal rights, and you may also have other rights, which vary from state-to-state. TO THE MAXIMUM EXTENT PERMITTED
BY APPLICABLE LAW, NO LIABILITY IS ASSUMED FOR EXPENSES OR DAMAGES RESULTING FROM INTERRUPTION IN OPERATION
OF EQUIPMENT, OR FOR INCIDENTAL, DIRECT, OR CONSEQUENTIAL DAMAGES OF ANY NATURE.
In the event that there is a defect in materials or workmanship of a Da-Lite product, you may contact our Sales Partners at PO Box 137,
Warsaw, IN 465810137, (574) 2678101, (800) 6223737.
IMPORTANT: THIS WARRANTY SHALL NOT BE VALID AND DALITE BRANDED PRODUCTS SHALL NOT BE BOUND BY THIS
WARRANTY IF THE PRODUCT IS NOT OPERATED IN ACCORDANCE WITH THE DALITE WRITTEN INSTRUCTIONS.
Keep your sales receipt to prove the date of purchase and your original ownership.
A Milestone AV Technologies Brand
3100 North Detroit Street
Warsaw, Indiana 46582
P: 574.267.8101 or 800.622.3737
F: 574.267.7804 or 877.325.4832
E: info@da-lite.com
www.da-lite.com
DL–0291 (Rev. 2) 11.14
© 2014 Milestone AV Technologies LLC. Printed in U.S.A.
DL-0291_Rev2_Theater Lite Instructions.indd 8 11/5/2014 3:15:38 PM
xxxxx
 Loading...