

Page 1
Da-Lite: Selecting The Right Screen
Da-Lite > Educational Materials > Selecting The Right Screen
Da-Lite offers a wide array of screens each with a choice of projection surfaces. Selecting
the right combination to meet your needs is important for optimum results. The following
pages offer guidelines for selecting a screen that suits your application. Although these
recommendations will work in most situations, each must be looked at not as a strict rule,
but rather as a guideline for determining your actual needs based on your own situation.
For additional help in selecting screens, contact Da-Lite for the free publications
"Selecting Front Projection Screens for Today's Presentation Media Applications" or
"Selecting Rear Projection Screens for Today's Presentation Applications". Of course, your
Da-Lite Sales Partner is also happy to assist you.
Four Steps to the Right Screen
1. Pick the type screen that best suits your particular needs. For example, choose from
front projection or rear projection screens in either portable, wall or ceiling mounted
models in either manual or electric versions or rear projection. Generally, if your
projection application is permanent, then wall and ceiling screens are your best choice. If,
however, you find your needs require moving the screen to different locations, then a
portable screen is a better alternative.
2. Determine the optimum screen size based on room dimensions, planned audience
seating size and arrangement. The rule of thumb is to fit the screen to the audience - not
to the projector. Da-Lite recommends the following formula for determining screen size:
● Screen height should be approximately equal to 1/6 the distance from the screen
to the last row of seats, allowing text to be read and detail to be seen in the
projected image.
● The bottom of the screen should be a minimum of 4 feet above the audience floor,
allowing those seated toward the rear of the audience to see the screen. This may
require additional screen "drop" for ceiling hung screens.
3. Select the appropriate format for your projection application. Common formats are as
follows:
Common
Applications
Aspect Ratio
Width/Height
NTSC Video
1.33
PAL Video
1.33
HDTV Video
1.78
Letterbox Video
1.85
Cinemascope
2.35
35 MM Filmstrip
1.32
2x2 Standard 35MM Double-Frame Slides
1.50
4. Choose the screen surface that best suits your projection and viewing requirements.
For your convenience, the front and rear projection pages provide descriptions and
performance characteristics for each front and rear screen surface. If the screen will be
used for multiple projection methods, choose the screen surface that meets the
requirements of the lesser performing projection method. For example, if using a slide
projector and a video projector, choose the screen surface for the video projector since its
light output is generally less than a slide projector.
● Front Projection Screen Surfaces
● Rear Projection Screen Surfaces
http://www.dalite.com/educational_materials/selecting1.php
Page 2
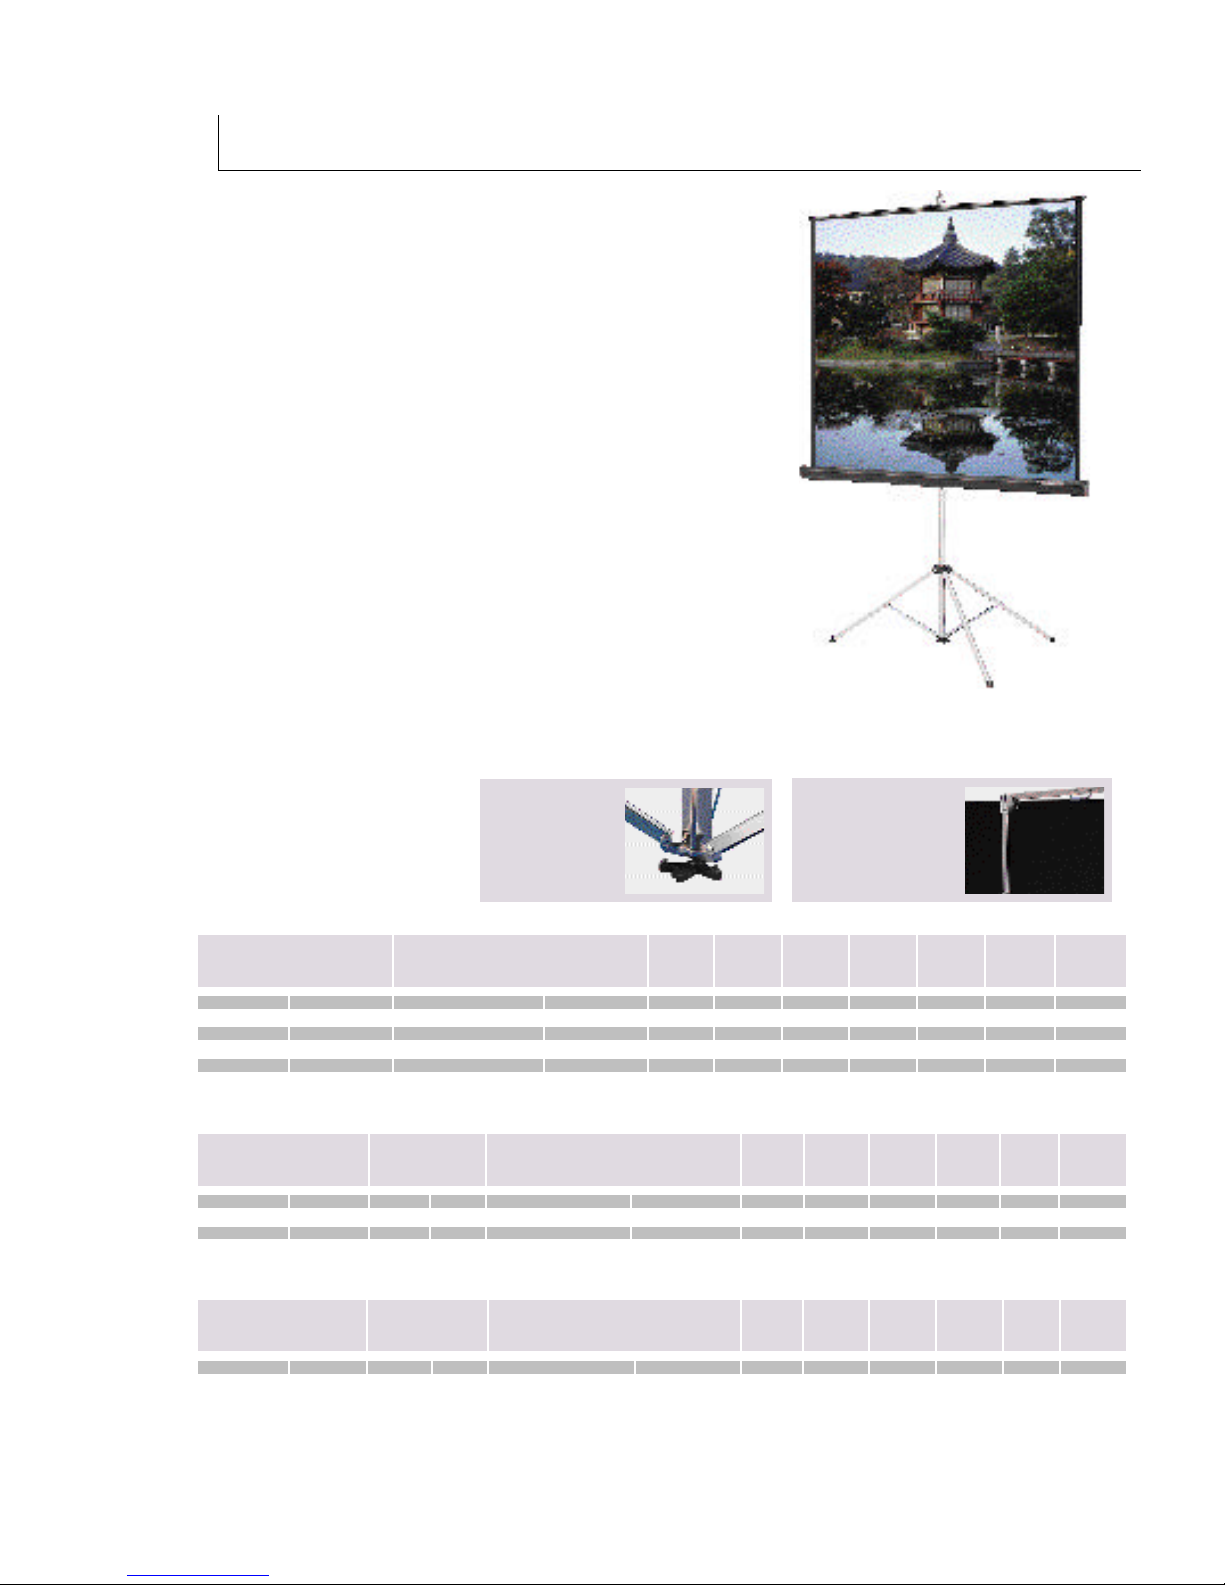
PICTURE KING
®
Rugged Tripod Screen
• High quality professional tripod screen able to
withstand daily usage.
• Heavy-duty aluminum extruded legs with toe release
mechanism offers a wide stance for maximum
stability.
• Screen height is adjustable to accommodate any
ceiling height with self-locking extension tube and
high-low case adjustment.
• Built-in fabric lock secures screen fabric during
transport and use to prevent shifting.
• Gray carpeted version for rental situations also
available.
Matte White, Glass Beaded, Video Spectra®1.5, and Super
Wonder-Lite
Power fabric will be seamless up to and including 6' high.
Patented toe
release
conveniently
unlocks the
Picture King’s legs.
SQUARE FORMAT
S i z e Dimensions C a r p e t e d Video S u p e r C a r p e t e d
H x W ( C l o s e d ) M a t t e M a t t e G l a s s Spectra® W o n d e r - H i g h H i g h
i n . c m . i n . c m . W h i t e W h i t e B e a d e d 1 . 5 L i t e ® P o w e r P o w e r
50" x 50" 127 x 127 4" x 7-1/2" x 57-1/2" 10 x 19 x 146 x x x x x x x
60" x 60" 152 x 152 4" x 7-1/2" x 65-3/4" 10 x 19 x 167 x x x x x x x
70" x 70" 178 x 178 4" x 7-1/2" x 75-3/8" 10 x 19 x 192 x x x x x x x
84" x 84" 213 x 213 4" x 7-1/2" x 94" 10 x 19 x 239 x x x x x
72" x 96" 183 x 244 4" x 7-1/2" x 105" 10 x 19 x 267 x x x x x
96" x 96" 244 x 244 4" x 7-1/2" x 105" 10 x 19 x 267 x x x x x
VIDEO FORMAT
Viewing Area N o m i n a l Dimensions C a r p e t e d V i d e o C a r p e t e d
H x W D i a g o n a l ( C l o s e d ) M a t t e M a t t e G l a s s S p e c t r a ® High H i g h
i n . c m . i n . . c m . i n . c m . W h i t e W h i t e B e a d e d 1 . 5 P o w e r P o w e r
43" x 57" 109 x 145 72" 183 4" x 7-1/2" x 65-3/4" 10 x 19 x 167 x x x x x x
50" x 67" 127 x 170 84" 213 4" x 7-1/2" x 75-3/8" 10 x 19 x 192 x x x x x x
60" x 80" 152 x 203 100" 254 4" x 7-1/2" x 94" 10 x 19 x 239 x x x x x x
69" x 92" 175 x 234 120" 305 4" x 7-1/2" x 105" 10 x 19 x 267 x x x x x x
HDTV FORMAT
Viewing Area N o m i n a l Dimensions C a r p e t e d V i d e o C a r p e t e d
H x W D i a g o n a l ( C l o s e d ) M a t t e M a t t e G l a s s S p e c t r a ® High H i g h
i n . c m . i n . c m . i n . c m . W h i t e W h i t e B e a d e d 1 . 5 P o w e r P o w e r
45" x 80" 114 x 203 92" 234 4" x 7-1/2" x 105" 10 x 19 x 239 x x x x x x
50" x 92" 132 x 234 106" 269 4" x 7-1/2" x 105" 10 x 19 x 267 x x x x x x
®
fabrics will be seamless in all sizes. High
Built-in keystone
eliminator tilts the screen
forward to compensate
for distortion found with
overhead projectors.
Page 3
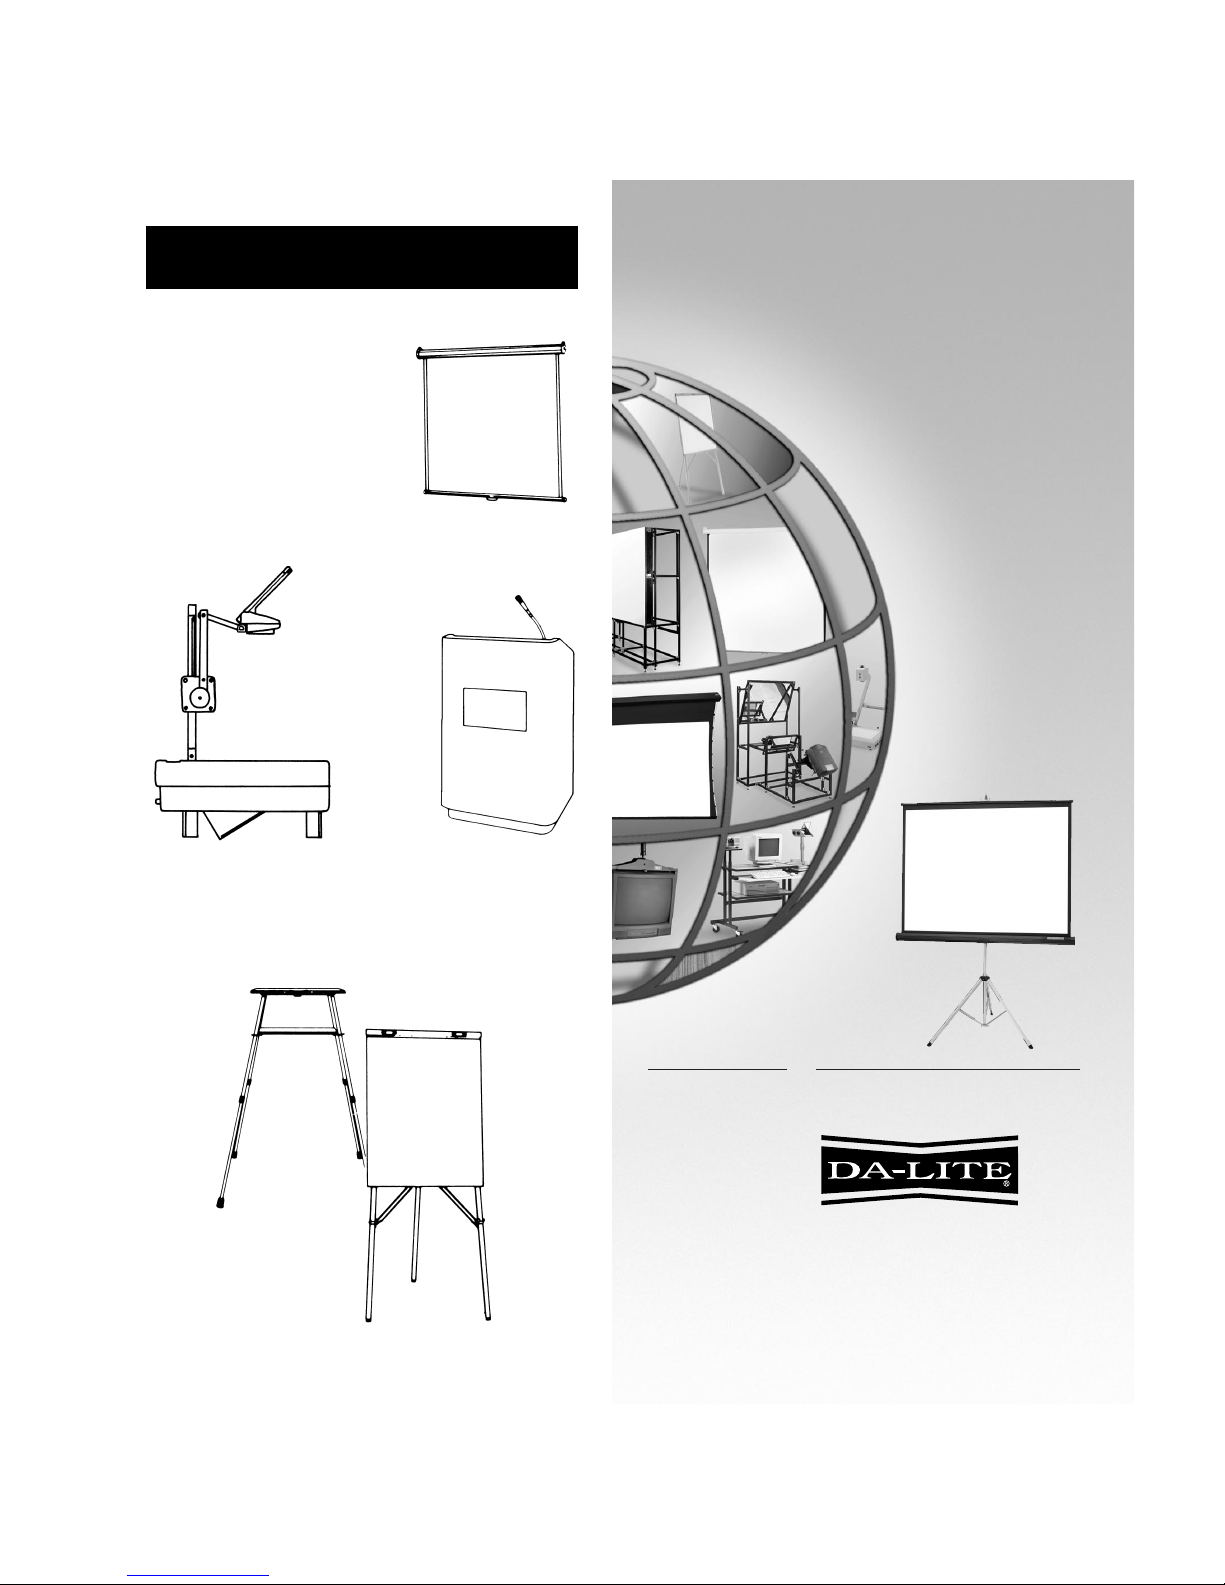
DA-LITE IS MORE
THAN PROJECTION SCREENS
Da-Lite Tripod, Wall &
Ceiling and Electric Screens
Da-Lite Overhead
Projectors
Da-Lite Lecterns
Communications
Cabinets
Da-Lite
Project-O-Stands
and Easels
Da-Lite
Model 5000 Portable
46425 Rev. 1/01
POWER
PRESENTATION PRODUCTS
The
In
Assembly Instructions
For
Picture King
DA-LITE SCREEN COMPANY, INC.
3100 North Detroit Street
Post Office Box 137
Warsaw, Indiana 46581-0137
Phone: 219/267-8101
800-622-3737
Fax: 219/267-7804
http:// www.da-lite.com
e-mail: info@da-lite.com
Page 4
SILVER LENTICULAR PICTURE SURFACES
Silver Lenticular surfaces are
sensitive to temperature
changes which may
temporarily cause slight
unevenness after a screen
has been rolled up for a
time. If uneven when first
opened for use, put on normal tension with the
tensioning device and allow it to stand at room
temperature of 70 to 75 degrees for five or ten
minutes. The surface will equalize itself and be
normally flat for projection in a very short time.
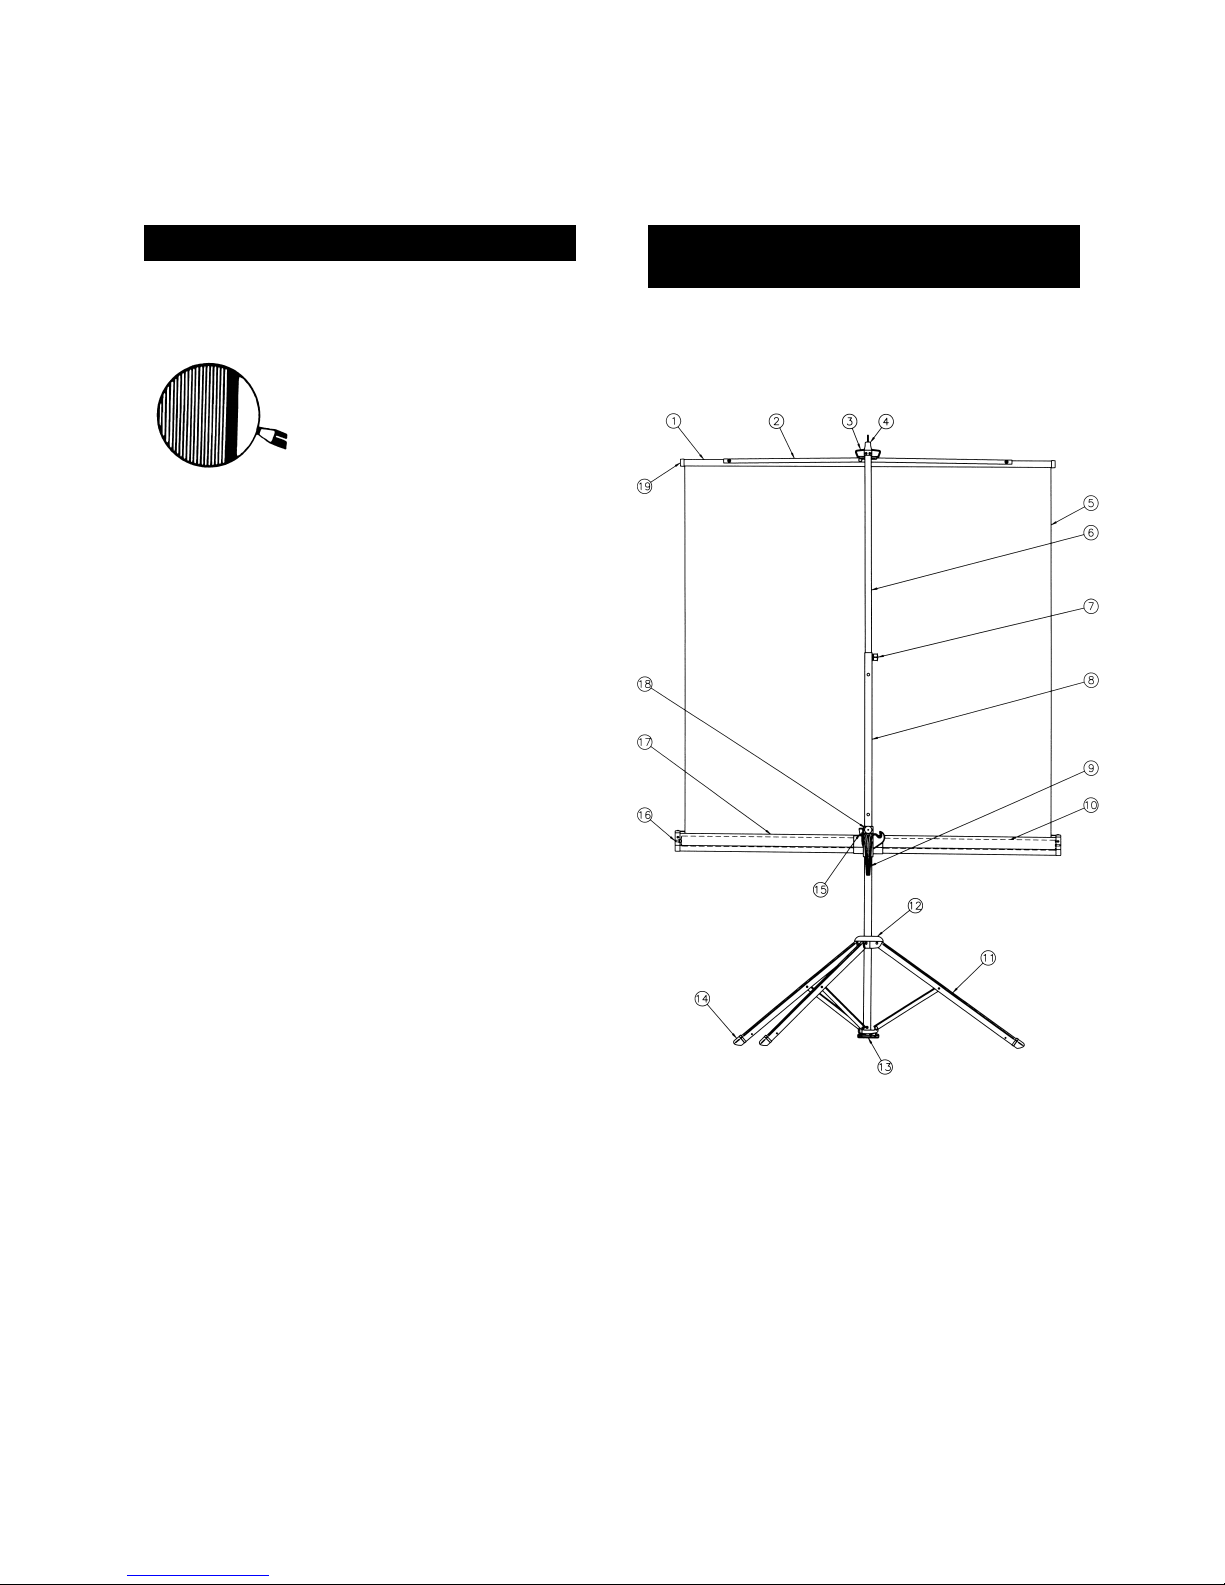
IMPORTANT PARTS
OF YOUR DA-LITE SCREEN
OPTIONS
1) Slat
2) Saddle
3) Pull Bail
4) Hanger Hook
5) Picture Surface
6) Extension Tube
7) Red Locking Knob
8) Bottom Tube
9) Handle
10) Roller
11) Tripod
12) Leg Bracket
13) Toe Release &
Leg Lock
14) Leg Shoes
15) Fabric Tension
Lock Lever
16) End Cap
17) Screen Case
18) Red Locking Knob
19) Slat Caps
(When ordering parts, please specify screen
model and size.)
Page 5

SETTING UP YOUR SCREEN
1. Hold screen vertically with tripod just above
floor. With toe, press straight down on toe
release plate. Tripod legs will glide open.
2. Pull out Red Locking Knob at top of bottom
tube.
3. Raise extension tube to first position, and
then swing case to horizontal position.
4. Raise screen surface and pull bail over
hanger. If Keystone Eliminator is to be used,
(1) simply grasp the knurled tip which
protrudes slightly above the hanger; (2) pull
straight up; (3) then lay in a horizontal
position over the hanger, and place the pull
bail on it.
5. Release Red Locking Knob and fabric
tension lock lever on handle.
6. Holding extension tube with one hand and
releasing Red Locking Knob with other, raise
extension tube to desired position.
7. The case position may be changed by
pulling out the Red Locking Knob located
on the handle.
8. For rectangular picture area on screens with
square surfaces, move case to desired
position and lock by pressing down on the
fabric tension lock lever.
9. On models with Super Wonder-Lite surface,
press down on handle until surface is taut.
Lock by pressing down on fabric tension
locking lever.
CLOSING THE SCREEN
1. Return screen case to original central
position on center tube. On models with
Super Wonder-Lite surface, first release
fabric tension lock lever on handle.
2. Hold extension tube firmly. Pull out top Red
Locking Knob and lower extension tube to
bottom position.
3. Unhook screen pull bail and complete rerolling fabric into case.
4. If Keystone Eliminator has been used,
simply raise it to a perpendicular position
and push it back into the extension tube.
5. Swing case to vertical position. Note that
fabric locks in.
6. Set tab on hanger in opening of case end
cap. As extension tube locks, the case
also is locked.
7. Place tip of middle finger of right hand in
depression beneath leg bracket. Lift leg
bracket sharply, at the same time applying a
slight lift to entire unit with left hand. Note
that legs are closed and locked, hanger, and
extension tube and case are locked and
surface is locked to provide for safe and
comfortable carrying and storing.
USING SCREEN IN LOWEST POSITION
Follow steps 1 through 3 above.
a. Raise locking lever on left side of handle.
b. Release red knob and lower case.
c. Holding bottom tube, raise extension tube
until it locks into desired position.
Before re-rolling surface into case, examine both
front and back of surface to be sure they are
free of foreign matter. A Da-Lite Screen case
cover is a wise and economical investment.
PROTECT YOUR SCREEN
Page 6

• Available with Glass Beaded, Matte White,
Video Spectra 1.5, High Power or Super
Wonder-Lite Surface.
• Steel Saddle for Wrinkle-Free Picture
Surface
• Camlok Metal Roller System
• Automatic Fabric Lock
• Self-Locking Extension Tube
• Extra Heavy Duty Tripod Assembly
• Heavy Gauge Aluminum Legs Support Extra
Strong Center and Extension Tubes
• Exclusive Custom Recessed Keystone
Eliminator
• Flat Back No-Rub Octagon Case
• High Impact Plastic End Caps
• Wide Range Height Adjustment
• Tension Lever Lock for Position Adjustment
QUALITY FEATURES FOR BETTER PICTURES,
EASIER OPERATION, LONGER LIFE
HEAVY DUTY CARRYING CASE
Will protect the screen’s finish. Screen handle
protrudes for easy carrying. Sizes available for all
tripod screen models.
YOU HAVE MADE A WISE
SELECTION…
in choosing a Da-Lite projection
screen, designed and engineered
to produce the sharpest, most
pleasing pictures with maximum
convenience.
Page 7

STANDARD FAST-FOLD
®
SCREEN SYSTEM
Large Sturdy Portable Screens up to 14' Wide
• Lightweight yet exceptionally stable folding
aluminum frames fit into a case for convenient
transport and storage.
• Frames fold without coming apart while “speedy
cranks” allow “set up” and “tear down” without tools.
• Front and rear projection screen surfaces can be
interchanged at any time.
• Screen can be adjusted up or down in 6"
increments.
• Standard screen sizes from 54" H x 54" W to
10'6" H x 14' W. Custom sizes available.
• Includes durable polyethylene storage carrying case.
• Optional Drapery Presentation Kit gives professional
stage front appearance.
* All surfaces up to and including 12' high will be seamless.
SQUARE FORMAT
Overall Size Net Picture Area D a - M a t Da-Tex (Rear) P e a r l e s c e n t Cinema Vision Dual Vision
H x W H x W
i n . / f t . c m . i n . c m . S c r e e n S u r f a c e S c r e e n S u r f a c e S c r e e n S u r f a c e S c r e e n S u r f a c e S c r e e n S u r f a c e
54" x 54" 137 x 137 50" x 50" 127 x 127 x x x x x x x x x x
72" x 72" 183 x 183 68" x 68" 173 x 173 x x x x x x x x x x
5' x 7'6" 152 x 229 56" x 86" 142 x 218 x x x x x x x x x x
7' x 7' 213 x 213 80" x 80" 203 x 203 x x x x x x x x x x
*7' x 10'6" 213 x 320 80" x 122" 203 x 310 x x x x x x x x x x
6' x 9' 183 x 274 68" x 104" 173 x 264 x x x x x x x x x x
8' x 8' 244 x 244 92" x 92" 234 x 234 x x x x x x x x x x
*8' x 12' 244 x 366 92" x 140" 234 x 356 x x x x x x x x x x
9' x 9' 274 x 274 104" x 104" 264 x 264 x x x x x x x x x x
*10' x 10' 305 x 305 116" x 116" 295 x 295 x x x x x x x x x x
*12' x 12' 366 x 366 140" x 140" 356 x 356 x x x x x x x x x x
VIDEO FORMAT
Overall Size Net Picture Area D a - M a t Da-Tex (Rear) P e a r l e s c e n t Cinema Vision Dual Vision
H x W H x W
i n . / f t . c m . i n . c m . S c r e e n S u r f a c e S c r e e n S u r f a c e S c r e e n S u r f a c e S c r e e n S u r f a c e S c r e e n S u r f a c e
54" x 74" 137 x 188 50" x 70" 127 x 178 x x x x x x x x x x
63" x 84" 160 x 213 59" x 80" 150 x 203 x x x x x x x x x x
6' x 8' 183 x 244 68" x 92" 173 x 234 x x x x x x x x x x
*7'6" x 10' 229 x 305 86" x 116" 218 x 295 x x x x x x x x x x
*9' x 12' 274 x 366 104" x 140" 264 x 356 x x x x x x x x x x
*10'6" x 14' 320 x 427 122" x 164" 310 x 417 x x x x x x x x x x
HDTV FORMAT
Overall Size Net Picture Area D a - M a t Da-Tex (Rear) P e a r l e s c e n t Cinema Vision Dual Vision
H x W H x W
i n . c m . i n . c m . S c r e e n S u r f a c e S c r e e n S u r f a c e S c r e e n S u r f a c e S c r e e n S u r f a c e S c r e e n S u r f a c e
56" x 96" 142 x 244 52" x 92" 132 x 234 x x x x x x x x x x
62" x 108" 157 x 274 58" x 104" 147 x 264 x x x x x x x x x x
*69" x 120" 175 x 305 65" x 116" 165 x 295 x x x x x x x x x x
*83" x 144" 211 x 366 79" x 140" 201 x 356 x x x x x x x x x x
* Heavy duty AT-Legs recommended for added stability. Substituted for T-Legs additional charge.
C o m p l e t e R e p l a c e m e n t C o m p l e t e R e p l a c e m e n t C o m p l e t e R e p l a c e m e n t C o m p l e t e R e p l a c e m e n t C o m p l e t e R e p l a c e m e n t
C o m p l e t e R e p l a c e m e n t C o m p l e t e R e p l a c e m e n t C o m p l e t e R e p l a c e m e n t C o m p l e t e R e p l a c e m e n t C o m p l e t e R e p l a c e m e n t
C o m p l e t e R e p l a c e m e n t C o m p l e t e R e p l a c e m e n t C o m p l e t e R e p l a c e m e n t C o m p l e t e R e p l a c e m e n t C o m p l e t e R e p l a c e m e n t
Sturdy 1" square lightweight aluminum frame construction.
Page 8

Instruction Book For
Fast-Fold®Screen Frames
Standard T-Leg
The
POWER
In
PRESENTATION PRODUCTS
DA-LITE SCREEN COMPANY, INC.
3100 North Detroit Street
Post Office Box 137
Warsaw, Indiana 46581-0137
Phone: 219/267-8101
800-622-3737
Fax: 219/267-7804
http:// www.da-lite.com
e-mail: info@da-lite.com
Page 9

PROCEDURE
Da-Lite Fast-Fold frames are made of 1” square hard aluminum tubing with an anodized finish. With proper care they will
provide many years of use. Please follow the set up instructions below (steps 1-5).
1. Remove the frame from its case and wrapping. Position it as shown (front view).
Two Section Frame Three Section Frame
2. Unfold the frame following the directions given below so that it is lying flat and latches are facing up (top view).
LOOKING FROM THE TOP
TOP
ROTATE 90
o
1
Page 10

PROCEDURE
3. Rotate the frame 90 degrees as shown below (front view).
LATCH
TOP
LATCH
LOOKING FROM THE FRONT
4. Rotate the latches on both sides until they lock with the rivets as shown below.
LATCH
LATCH
ROTATE LATCH UNTIL IT LOCKS
WITH RIVET ON BOTH SIDES
RIVET
5. While holding the bottom of the frame in place, lift the top of the frame to unfold the sides. Lock down all four
corners and all remaining latches.
TOP
LATCH
LOCK
DOWN THE
CORNERS
LATCH
2
Page 11
FOLDING THE PICTURE SURFACE FOR PACKING
When folding the screen material for packing, observe the
following precautions before proceeding:
1. The surface should not be allowed to contact
painted, varnished or plastic finished objects for a
prolonged period of time.
2. Make certain the picture surface is on a clean,
flat surface.
Then proceed in the following manner:
Place clean white tissue paper – with no printing – on top
of the picture surface. If tissue is not available, a soft white
cloth or something similar will serve the same purpose.
Under no conditions should newspaper or anything similar
be used since these may damage the screen material.
1. With the viewing side facing up, fold the fabric in
half from top to bottom. Make certain when folding,
the surface does not come in contact with either the
black binding, grommets or snap buttons.
2. If the material on the first fold is more than 3 feet
high, then fold once again, but always place clean
tissue paper between the folds.
3. For large size screens, fold in half again if necessary.
Make certain when folding, the surface does not
come in contact with either the black binding,
grommets or snap buttons.
4. After the top to bottom folding procedure is
completed, then fold from left to right and continue
folding until the fabric is of sufficient size to fit into
the leatherette case.
NOTE: Keep the screen surface in the envelope provided
when it is not in use. Failure to observe these normal
precautions may cause discoloration of the material.
CLEANING
Da-Tex, Dual Vision, and Da-Mat surfaces can be cleaned as
follows:
Using a white clean cloth (100% cotton preferred) that is
dampened with clear water, gently wipe the area in one
direction. Do not use a circular motion. Using a dry 100%
cotton cloth, wipe dry after each cleaning session. To
clean a stubborn stain or a sticky surface, use denatured
alcohol (methanol or methyl alcohol) following the same
procedure as for water. For extremely stubborn stains, use
V M & P, Naphtha or Super Naphtha and follow the same
procedure as for water.
Cinema Vision and Pearlescent surfaces are not cleanable.
NOTE: Fast-Fold screens are shipped with tissue paper
packed between the folds. This keeps the material from
sticking to itself and makes it easier to unfold.
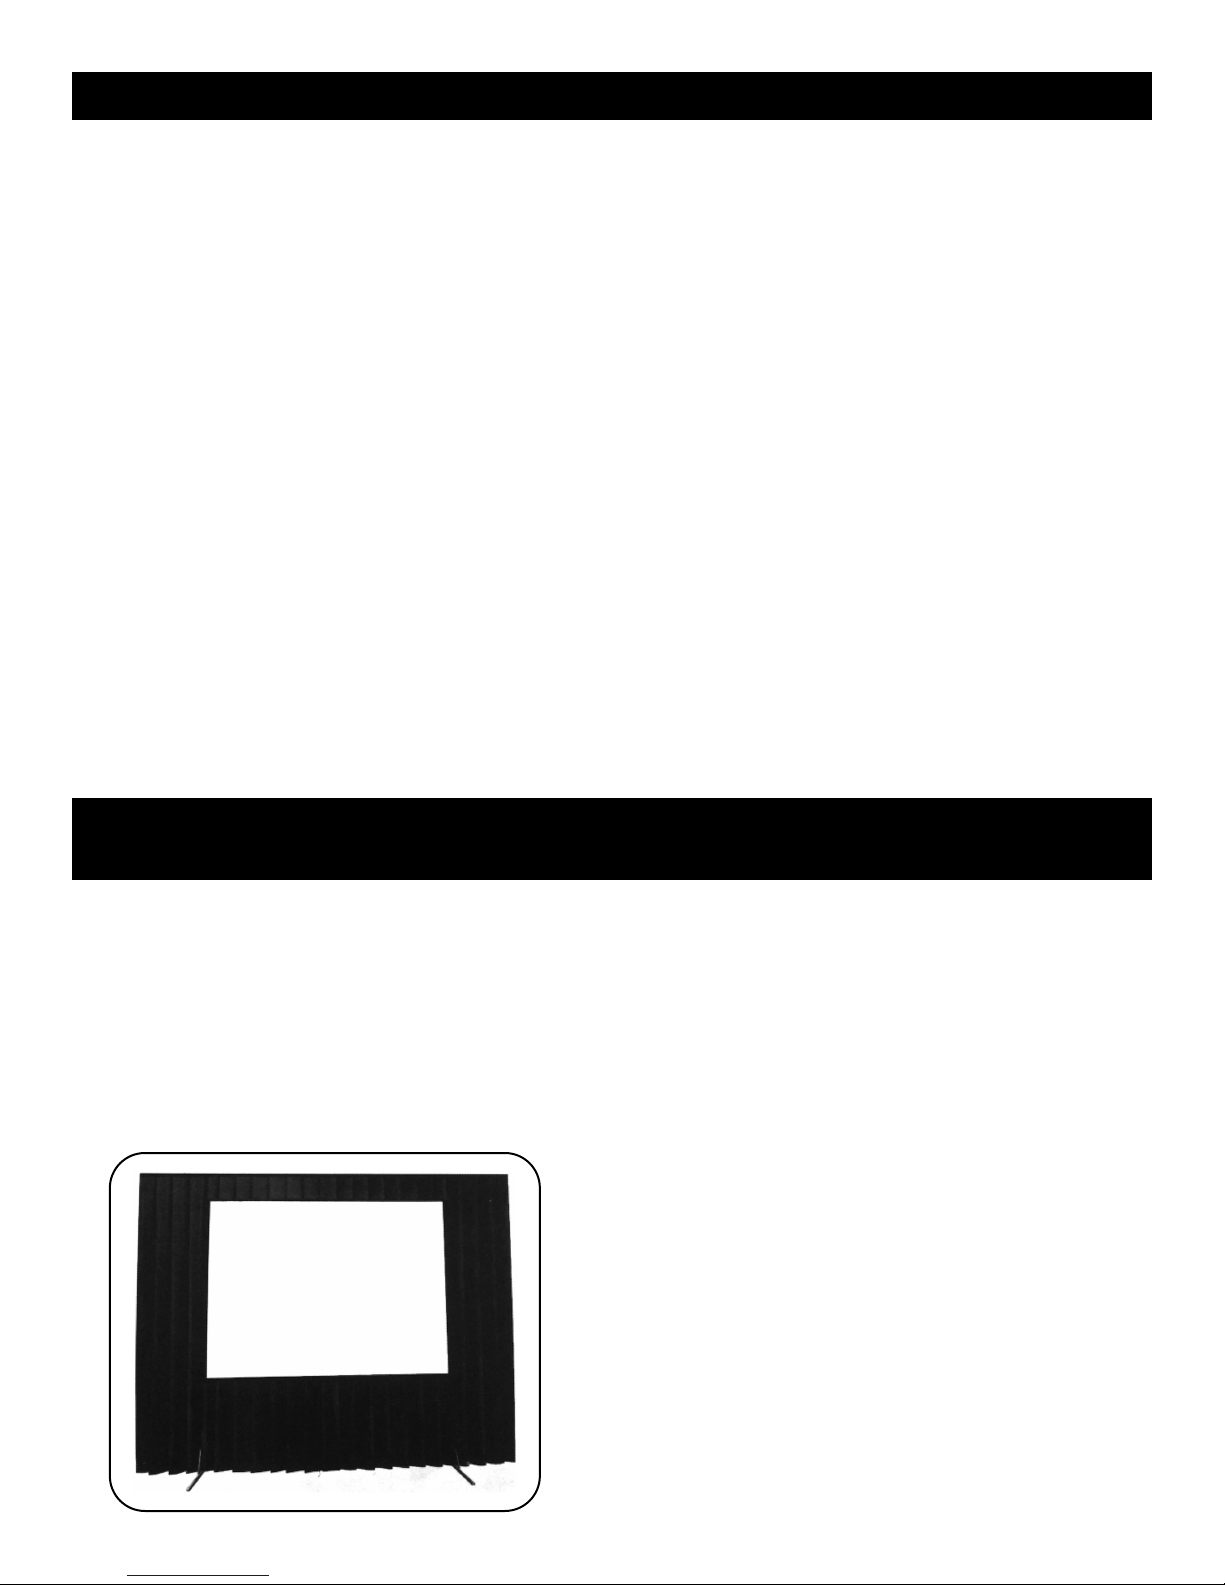
HANDSOME THEATRE-LIKE SET CREATED
WITH FAST-FOLD® PRESENTATION DRAPERY ACCESSORIES
For a finished, professional appearance, Fast-Fold screens
can be dramatically enhanced with the Drapery
Presentation Accessory Kit. Handsome velour drapes in a
choice of two eye-catching colors surround the screen on
four sides, providing an attractive stage front to the
audience.
The Presentation Drapery Accessory Kit serves a second
function when used with a rear projection surface. It
shields extraneous light from the projector as well as
hiding projection and other equipment from the audience.
An optional Adjustable Skirt Bar provides a versatile
method of changing the picture ratio.
The hardware in the kit is made of lightweight aluminum
and, along with the folded velour drapes, is packed into a
convenient easy to carry poly case. The entire kit can be
set up in minutes. Case optional at additional cost.
Presentation Drapery Accessory Kit
Consists of a set of velour drapes in choice of Blue or
Black, Valance, two Wings, Skirt, Valance Bar, and two
Wing Bars.
• All bars attach to screen frame with slip on clamps.
No tools needed.
• Valance Bar attaches to frame first. Wing Bars then
attach to Valance Bar.
• Valance Bar extends 12" above frame. Wing Bars
extend 32" on each side.
(ILLUSTRATED)
• Wing Bars attach to frame when ceiling height
prevents use of Valance.
• 45" High Skirt snaps to bottom of screen or to optional
Adjustable Skirt Bar.
3
Form 47400 Rev. 4/01
Page 12

FAST-FOLD
Large Heavy-Duty Portable Screens
• Extra heavy-duty, folding 6" truss frame and legs
accommodate virtually any screen size.
• Welded 1" aluminum tubing forms a sturdy yet
lightweight 6" x 1" truss member for frame and legs.
• Frames bolt together with “speedy cranks” to allow
easy “set up” and “tear down” without tools. All
components fit into durable carrying cases for
convenient transport and storage.
• Front and rear projection screen surfaces can be
interchanged at any time.
• Screen can be adjusted up or down in 6"
increments.
• Custom sizes available.
®
TRUSS FRAME SCREENS
All surfaces up to and including 12' high will be seamless.
• Includes rugged polyethylene carrying case.
• Optional Drapery Presentation Kit gives professional
stage front appearance.
Extra sturdy truss frame construction handles the largest screens.
SQUARE FORMAT
Overall Size Net Picture Area D a - M a t Da-Tex (Rear) P e a r l e s c e n t Cinema Vision Dual Vision
H x W H x W
f t . c m . f t . c m . S c r e e n S u r f a c e S c r e e n S u r f a c e S c r e e n S u r f a c e S c r e e n S u r f a c e S c r e e n S u r f a c e
9' x 25' 213 x 762 8' x 24' 244 x 732 x x x x x x x x x x
11' x 11' 335 x 335 10' x 10' 305 x 305 x x x x x x x x x x
13' x 13' 396 x 396 12' x 12' 366 x 366 x x x x x x x x x x
VIDEO FORMAT
Overall Size Net Picture Area D a - M a t Da-Tex (Rear) P e a r l e s c e n t Cinema Vision Dual Vision
H x W H x W
i n . / f t . c m . f t . c m . S c r e e n S u r f a c e S c r e e n S u r f a c e S c r e e n S u r f a c e S c r e e n S u r f a c e S c r e e n S u r f a c e
7' x 9' 213 x 274 6' x 8' 183 x 244 x x x x x x x x x x
8'6" x 11' 259 x 335 7'6" x 10' 229 x 305 x x x x x x x x x x
10' x 13' 305 x 396 9' x 12' 274 x 366 x x x x x x x x x x
11'6" x 15' 351 x 457 10'6" x 14' 320 x 427 x x x x x x x x x x
13' x 17' 396 x 518 12' x 16' 366 x 488 x x x x x x x x x x
16' x 21' 488 x 640 15' x 20' 351 x 610 x x x x x x x x x x
19' x 25' 579 x 762 18' x 24' 549 x 732 x x x x x x x x x x
HDTV FORMAT
Overall Size Net Picture Area D a - M a t Da-Tex (Rear) P e a r l e s c e n t Cinema Vision Dual Vision
H x W H x W
i n . / f t . c m . f t . c m . S c r e e n S u r f a c e S c r e e n S u r f a c e S c r e e n S u r f a c e S c r e e n S u r f a c e S c r e e n S u r f a c e
10' x 17' 305 x 518 9' x 16' 213 x 488 x x x x x x x x x x
11' x 19' 335 x 579 10' x 18' 305 x 549 x x x x x x x x x x
12'3" x 21' 373 x 641 11'3" x 20' 343 x 610 x x x x x x x x x x
14'6" x 25" 442 x 762 13'6" x 24' 411 x 732 x x x x x x x x x x
C o m p l e t e R e p l a c e m e n t C o m p l e t e R e p l a c e m e n t C o m p l e t e R e p l a c e m e n t C o m p l e t e R e p l a c e m e n t C o m p l e t e R e p l a c e m e n t
C o m p l e t e R e p l a c e m e n t C o m p l e t e R e p l a c e m e n t C o m p l e t e R e p l a c e m e n t C o m p l e t e R e p l a c e m e n t C o m p l e t e R e p l a c e m e n t
C o m p l e t e R e p l a c e m e n t C o m p l e t e R e p l a c e m e n t C o m p l e t e R e p l a c e m e n t C o m p l e t e R e p l a c e m e n t C o m p l e t e R e p l a c e m e n t
Page 13

Packing Instructions For
Fast Fold Screen
Surfaces
Da-Tex, Da-Mat, Pearlescent,
Cinema Vision, and Dual Vision
In
POWER
The
PRESENTATION PRODUCTS
DA-LITE SCREEN COMPANY, INC.
3100 North Detroit Street
Post Office Box 137
Warsaw, Indiana 46581-0137
Phone: 219/267-8101
800-622-3737
Fax: 219/267-7804
http:// www.da-lite.com
e-mail: info@da-lite.com
Printed in U.S.A. 47402 Rev. 2/01
Page 14

and continue folding until the folded area is small enough to fit into
the vinyl pouch. Please note that the final fold must stop short of the
black binding material to keep the viewing area away from it and the snap
buttons as illustrated.
5. Once the top to bottom folding is completed, fold from left to right
STORAGE AND CLEANING
STORAGE
prevent damage and discoloration.
becomes sticky, see cleaning instructions below.
screen to warm up to room temperature before unfolding. This will
ensure the film is being handled in its most flexible state and will
prevent surface cracks.
1. The screen surface must be stored in its pouch when not in use to
2. While in storage, avoid extreme temperature conditions. If surface
3. If stored at temperatures far below room temperature, allow the
Da-Tex, Dual Vision, and Da-Mat surfaces can be cleaned as follows:
Using a white clean cloth (100% cotton preferred) that is dampened
CLEANING
with clear water, gently wipe the area in one direction. Do not use a
circular motion. Using a dry 100% cotton cloth, wipe dry after each
cleaning session. To clean a stubborn stain or a sticky surface, use
denatured alcohol (methanol or methyl alcohol) following the same
procedure as for water. For extremely stubborn stains, use V M & P,
Naphtha or Super Naphtha and follow the same procedure as for water.
varnished, plastic, or dyed surface or object. Prolonged contact with
any one of these materials could cause a chemical reaction and
compromise the screen’s physical or optical quality. This can be
accomplished by laying a white clean cotton fabric or paper (slightly
larger than the screen size) on a flat surface prior to folding the
1. Make sure the surface does not come in contact with a painted,
FOLDING INSTRUCTIONS
Please follow the steps as outlined below when folding the screen material
for packing:
screen.
pearlescent side up on Pearlescent and Cinema Vision fold the
fabric in half from top to bottom. (A 7.5' x 10' screen is now
3.75' x 10'.) Make sure that the screen never comes in contact with the
black binding, grommets or snap buttons. Please note that for this to
happen, one must make sure all folds subsequent to the first fold stop short
of black binding material as illustrated below.
2. With the dull side up on Da-Tex, Dual Vision, and Da-Mat and the
STEP ONE
STEP FOUR
STEP THREE
STEP TWO
STEP FIVE
DO NOT FOLD
FABRIC ONTO
BLACK BINDING,
DO NOT FOLD
FABRIC ONTO
BLACK BINDING,
GROMMETS OR
GROMMETS OR
SNAP BUTTONS
SNAP BUTTONS
the folds.
above example), then continue to fold until the folded area is equal
to or smaller than 3 feet wide. Please remember that all folds
subsequent to the first fold must stop short of the black binding material to
keep the viewing area away from it and the snap buttons as illustrated
above.
3. Place clean tissue paper or white 100% cotton material between
4. If the folded area is more than 3 feet wide (which is the case in the
Page 15

DRAPERY PRESENTATION KIT
Professional Stage Front Appearance
• 16 oz., fire retardant cotton velour drapery attaches
with snaps to Fast-Fold screens to enhance image
and project a professional appearance.
• Drapery is fully pleated for finished professional look.
• Complete kit contains a valance bar, 14" high
valance drape, wing bars, 32" wide wing drapes and
a 45" long skirt. An optional adjustable skirt bar is
available to change picture aspect ratio.
• Standard colors include blue or black.
SQUARE FORMAT
For Screen O v e r a l l Kits for Standard Frames Kits for Truss Frames Drapery Presentation Accessories
H x W Ht. w/45" Skirt
i n . / f t . c m . f t . c m . Skirt Bar Skirt Bar Skirt Bar Skirt Bar W i n g s ( p a i r ) V a l a n c e S k i r t
54" x 54" 137 x 137 9'3" 282 x x x x x
72" x 72" 183 x 183 10'9" 328 x x x x x
5' x 7'6" 152 x 229 9'9" 297 x x x x x
7' x 7' 213 x 213 11'9" 358 x x x x x
7' x 10'6" 213 x 320 11'9" 358 x x x x x
6' x 9' 183 x 274 10'9" 328 x x x x x
8' x 8' 244 x 244 12'9" 389 x x x x x
8' x 12' 244 x 366 12'9" 389 x x x x x
9' x 9' 274 x 274 13'9" 419 x x x x x
10' x 10' 305 x 305 14'9" 450 x x x x x
11' x 11' 335 x 335 15'9" 480 x x
12' x 12' 366 x 366 16'9" 511 x x x x x
13' x 13' 386 x 396 17'9" 541 x x
9' x 25' 213 x 762 13'9" 419 x x
VIDEO FORMAT
For Screen O v e r a l l Kits for Standard Frames Kits for Truss Frames Drapery Presentation Accessories
H x W Ht. w/45" Skirt
i n . / f t . c m . f t . c m . Skirt Bar Skirt Bar Skirt Bar Skirt Bar W i n g s ( p a i r ) V a l a n c e S k i r t
54" x 74" 137 x 188 9'3" 282 x x x x x
63" x 84" 160 x 213 10' 305 x x x x x
7' x 9' 213 x 274 11'9" 358 x x
6' x 8' 183 x 244 10'9" 328 x x x x x
8'6" x 11' 259 x 335 13'3" 404 x x
7'6" x 10' 229 x 305 12'3" 373 x x x x x
9' x 12' 274 x 366 13'9" 419 x x x x x
10' x 13' 305 x 396 14'9" 450 x x
10'6" x 14' 320 x 427 15'3" 465 x x x x x
11'6" x 15' 351 x 457 16'3" 495 x x
13' x 17' 396 x 518 17'9" 541 x x
16' x 21' 488 x 640 20'9" 632 x x
HDTV FORMAT
For Screen O v e r a l l Kits for Standard Frames Kits for Truss Frames Drapery Presentation Accessories
H x W Ht. w/45" Skirt
i n . / f t . c m . f t . c m . Skirt Bar Skirt Bar Skirt Bar Skirt Bar W i n g s ( p a i r ) V a l a n c e S k i r t
56" x 96" 142 x 244 9'5" 287 x x x x x
62" x 108" 157 x 274 9'11" 302 x x x x x
69" x 120" 175 x 305 10'6" 320 x x x x x
83" x 144" 211 x 366 11'8" 356 x x x x x
10' x 17' 305 x 518 14'9" 450 x x
11' x 19' 335 x 579 15'9" 480 x x
12'3" x 21' 373 x 641 17' 518 x x
14'6" x 25' 442 x 762 19'3" 587 x x
W i t h o u t W i t h Without Adj. With Adj. Without Hardware
W i t h o u t W i t h Without Adj. With Adj. Without Hardware
W i t h o u t W i t h Without Adj. With Adj. Without Hardware
Page 16
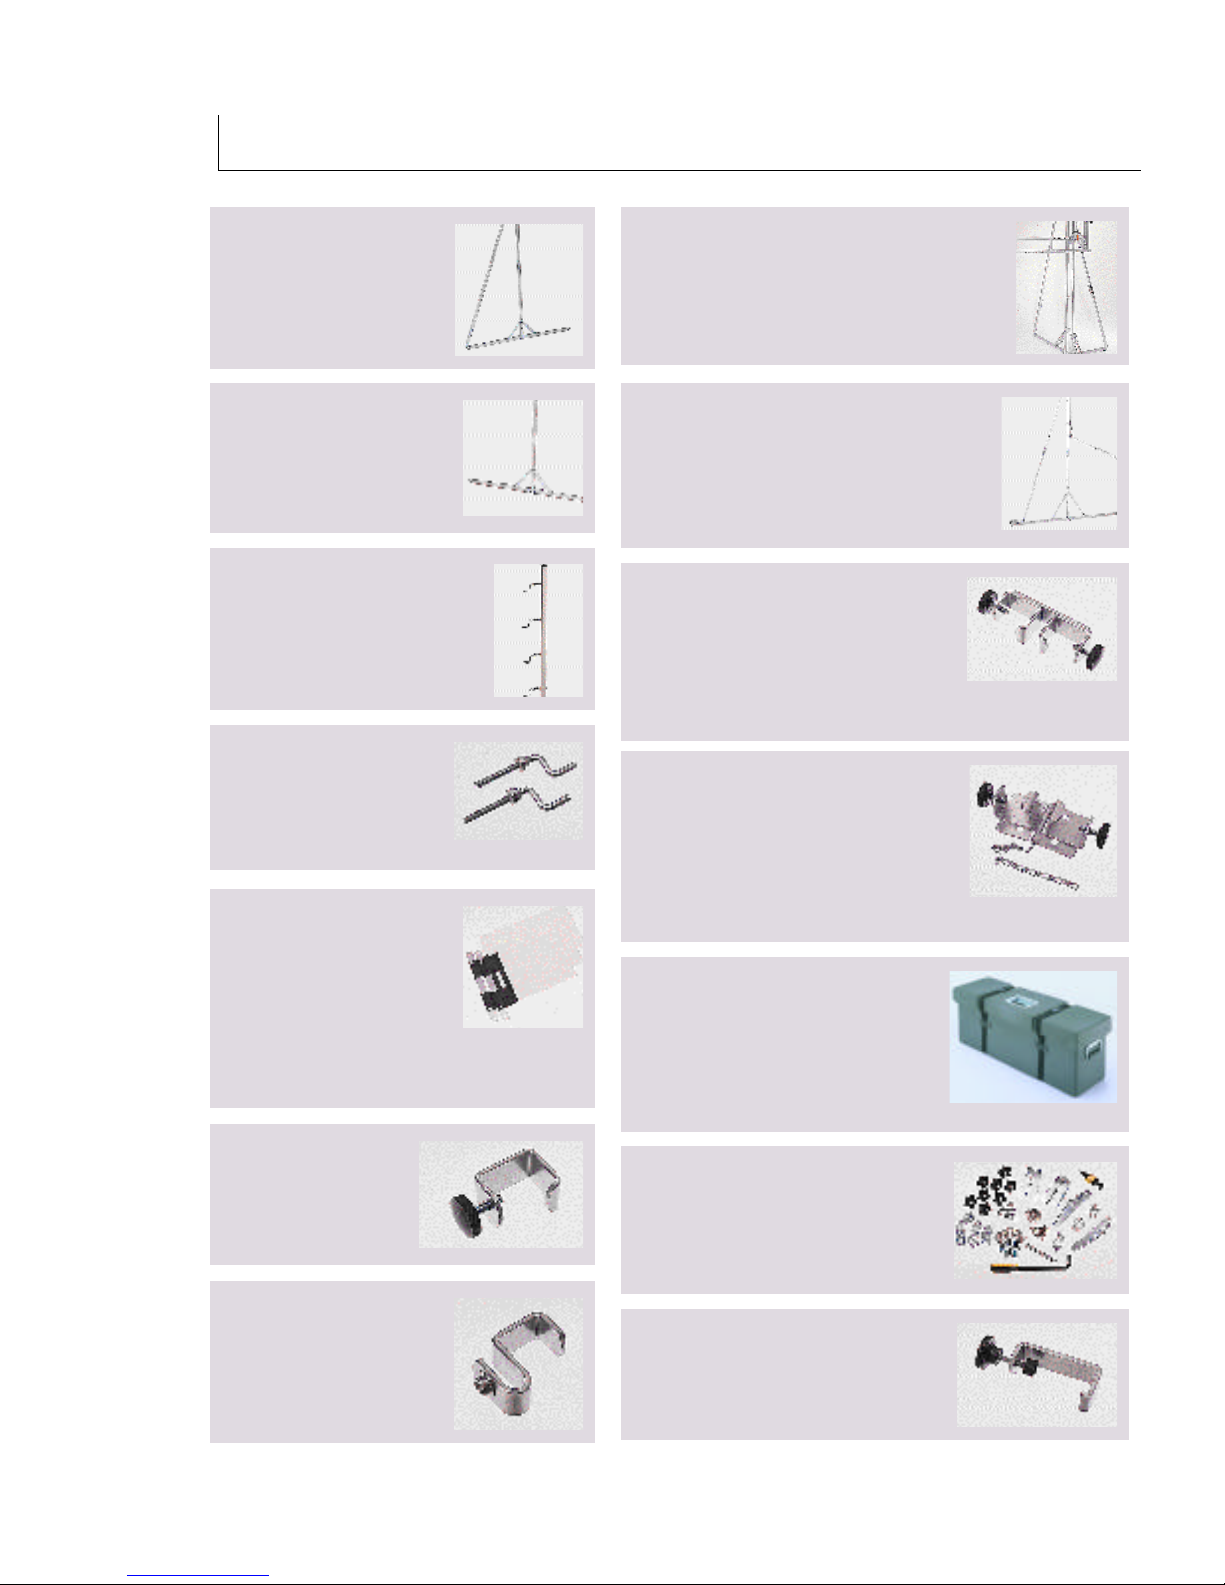
FAST-FOLD SCREEN ACCESSORIES
A-T Legs
Front and back reinforced
legs for additional stability on
all Fast-Fold Screens.
T Legs
Replacement legs for all
standard Fast-Fold screens.
Leg Saver Back Brace
Provides added reinforcement to
bottom hinge and joint of leg when
screen is raised higher on legs
Speedy Cranks
Replacement cranks for all
Fast-Fold frames
Fill Strips
Choose from either Da-Mat,
Cinema Vision, or Pearlescent
to conceal vertical center
frames when joining two
Fast-Fold screens together. A t t a c h m e n t s require
four Fill Strip Clamps.
Anti-Sway Brace
Attaches to either side of leg for added horizontal
stability on screens larger than 14' wide. Uses hook
clamps which are sold separately.
Add-on “A” Braces
Converts “T-legs” to “A-T” style legs for added
stability when using screens over 7'6" H x 10' W.
Requires 1 pair per screen. Includes four hook
clamps.
Straight Screen Joining Clamp
Used to lock screens together to form a wider
image. Two clamps required for screens up
to 9' high and three clamps required for
screens over 9' high.
Hinged Screen Joining Clamp
Used to lock screens together to form a
wider image and allows screen to be
angled. two clamps required for screens up
to 9' high and three clamps required for
screens over 9' high.
Polyethylene Case
Extra durable carrying case sized for
Fast-Fold drapery kits and standard FastFold screens.
Fill Strip Clamp
Use to attach Fill Strips
to Fast-Fold frames.
Skirt Adapter Brackets
Brackets to allow use of
larger skirt on smaller width
screen.
Fast-Fold Repair Kit
Includes everything needed to repair
Fast-Fold screens in the field.
“Hook” Clamps
Use for attaching “A” Braces to “T” style
legs.
 Loading...