

Page 1
MEGALINE
EUPHONIA
HELICON MK2
MENTOR
IKON
®
LEKTOR
®
CONCEPT
SUBWOOFER
DALI ZENSOR
MA NUA L
ENGLISH - DEUTSCH - DANSK
MK2
ZENSOR
N
Item No. 951042-0-0F
ENGLISH - DEUTSCH - DANSK - JAPANESE
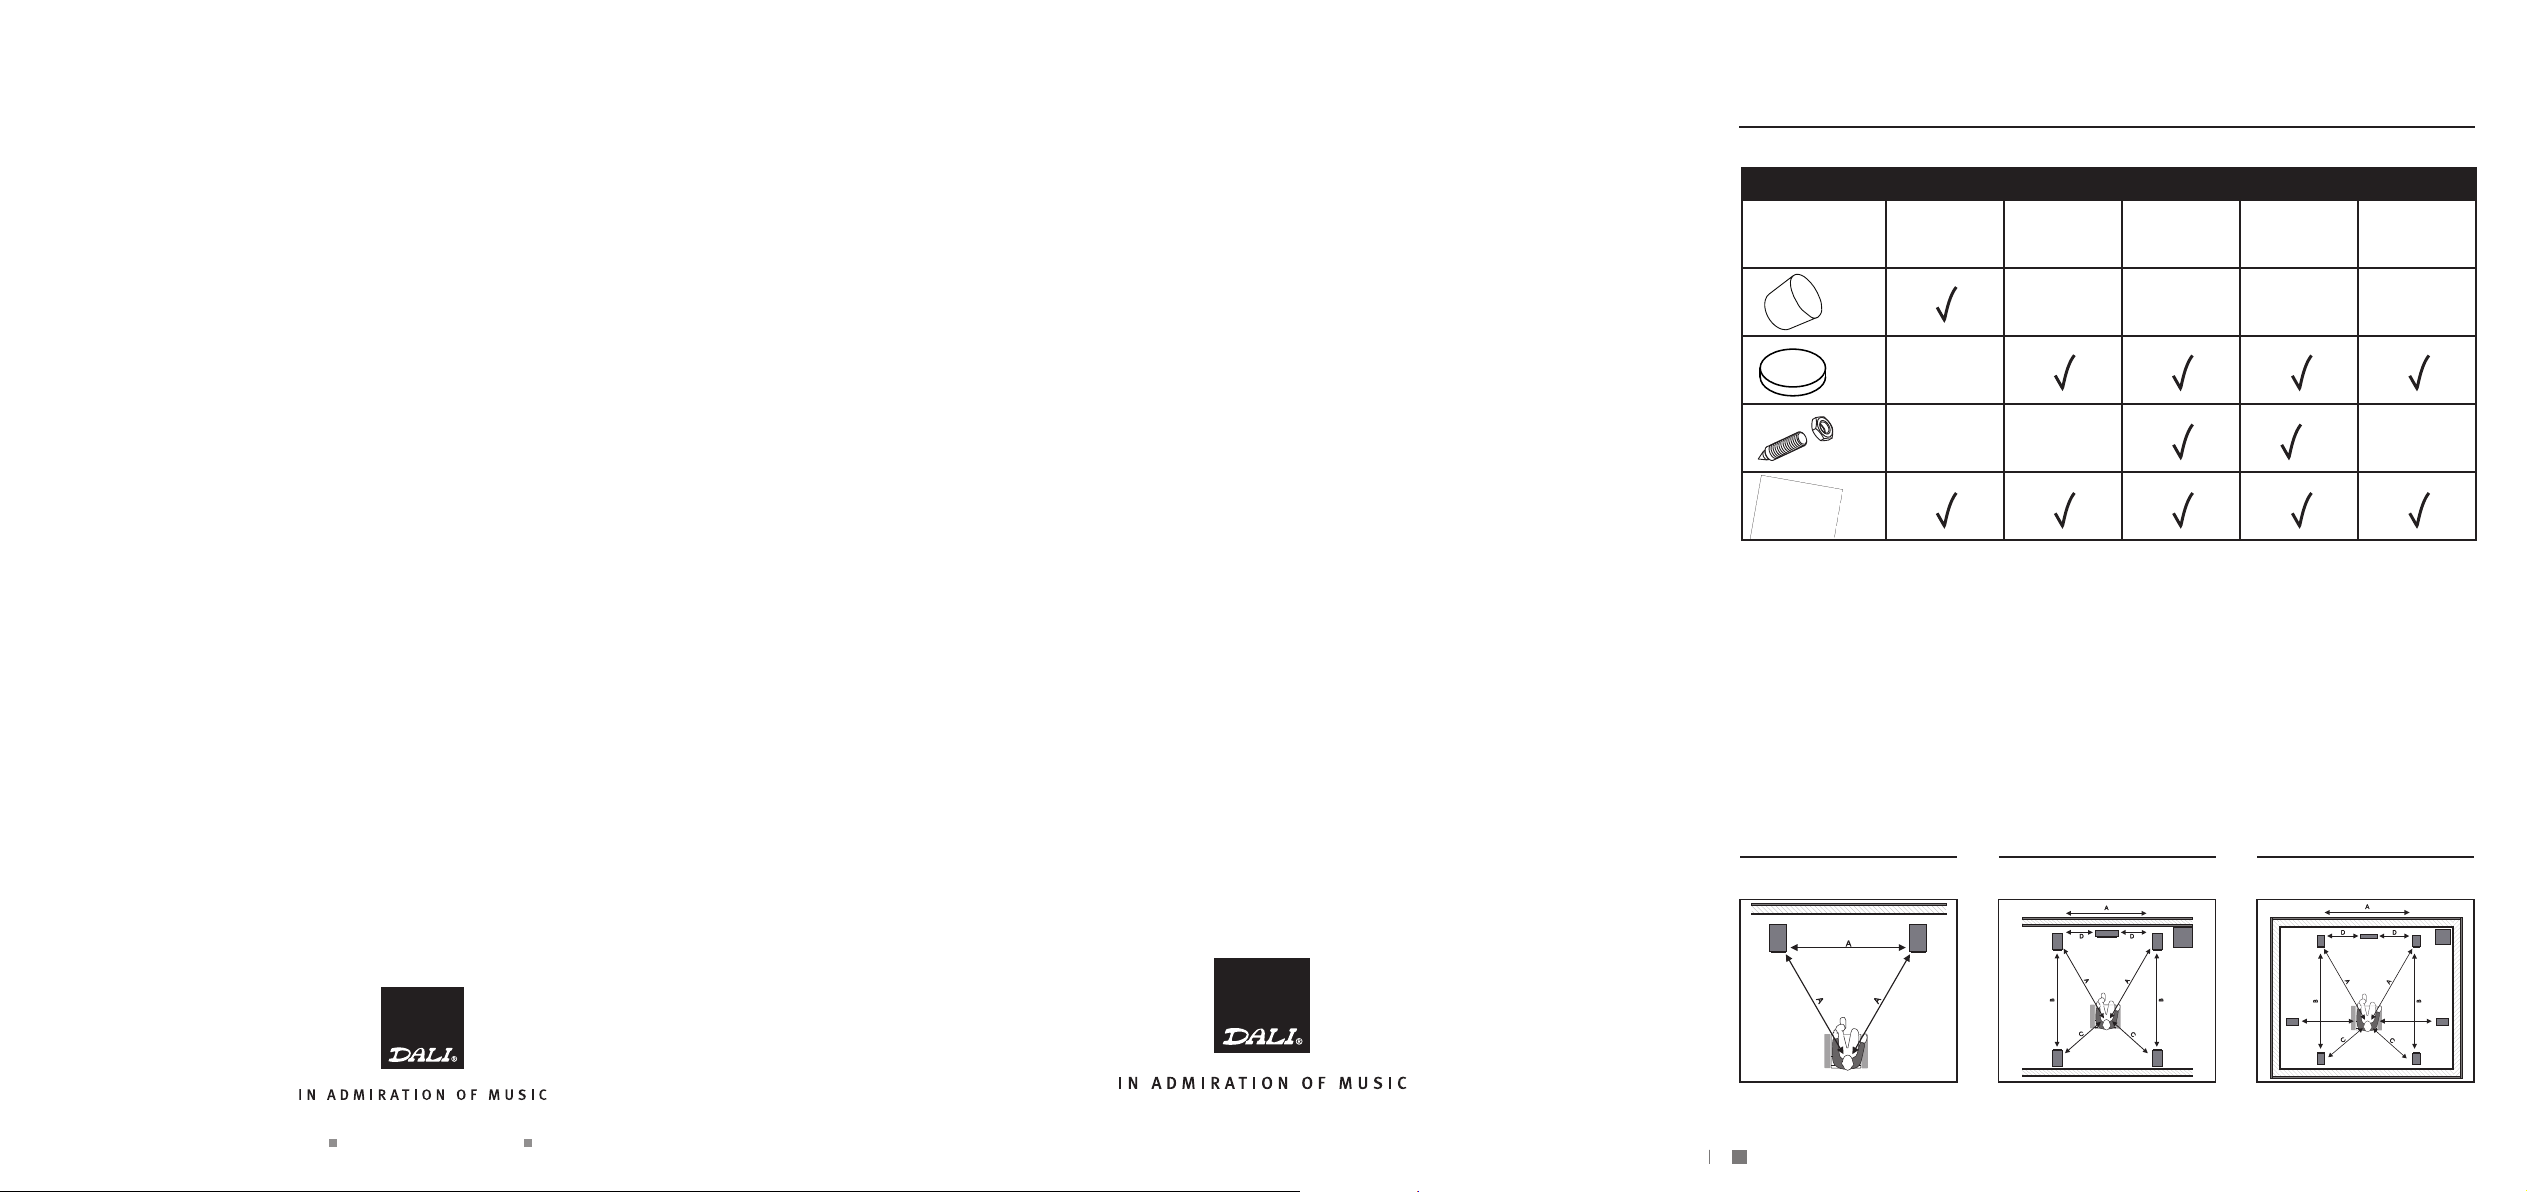
TABLE 1
ZENSOR 1 3 5 7 VOKAL
DALI ZENSOR
MANUAL
Speaker(s)
pr. carton
x8
2
x8
x8
x8
x8
1122
x4x8
DALI Denmark +45 9672 1155
www.dali-speakers.com
FIGURE 1A FIGURE 1B FIGURE 1C
X X
2
Page 2
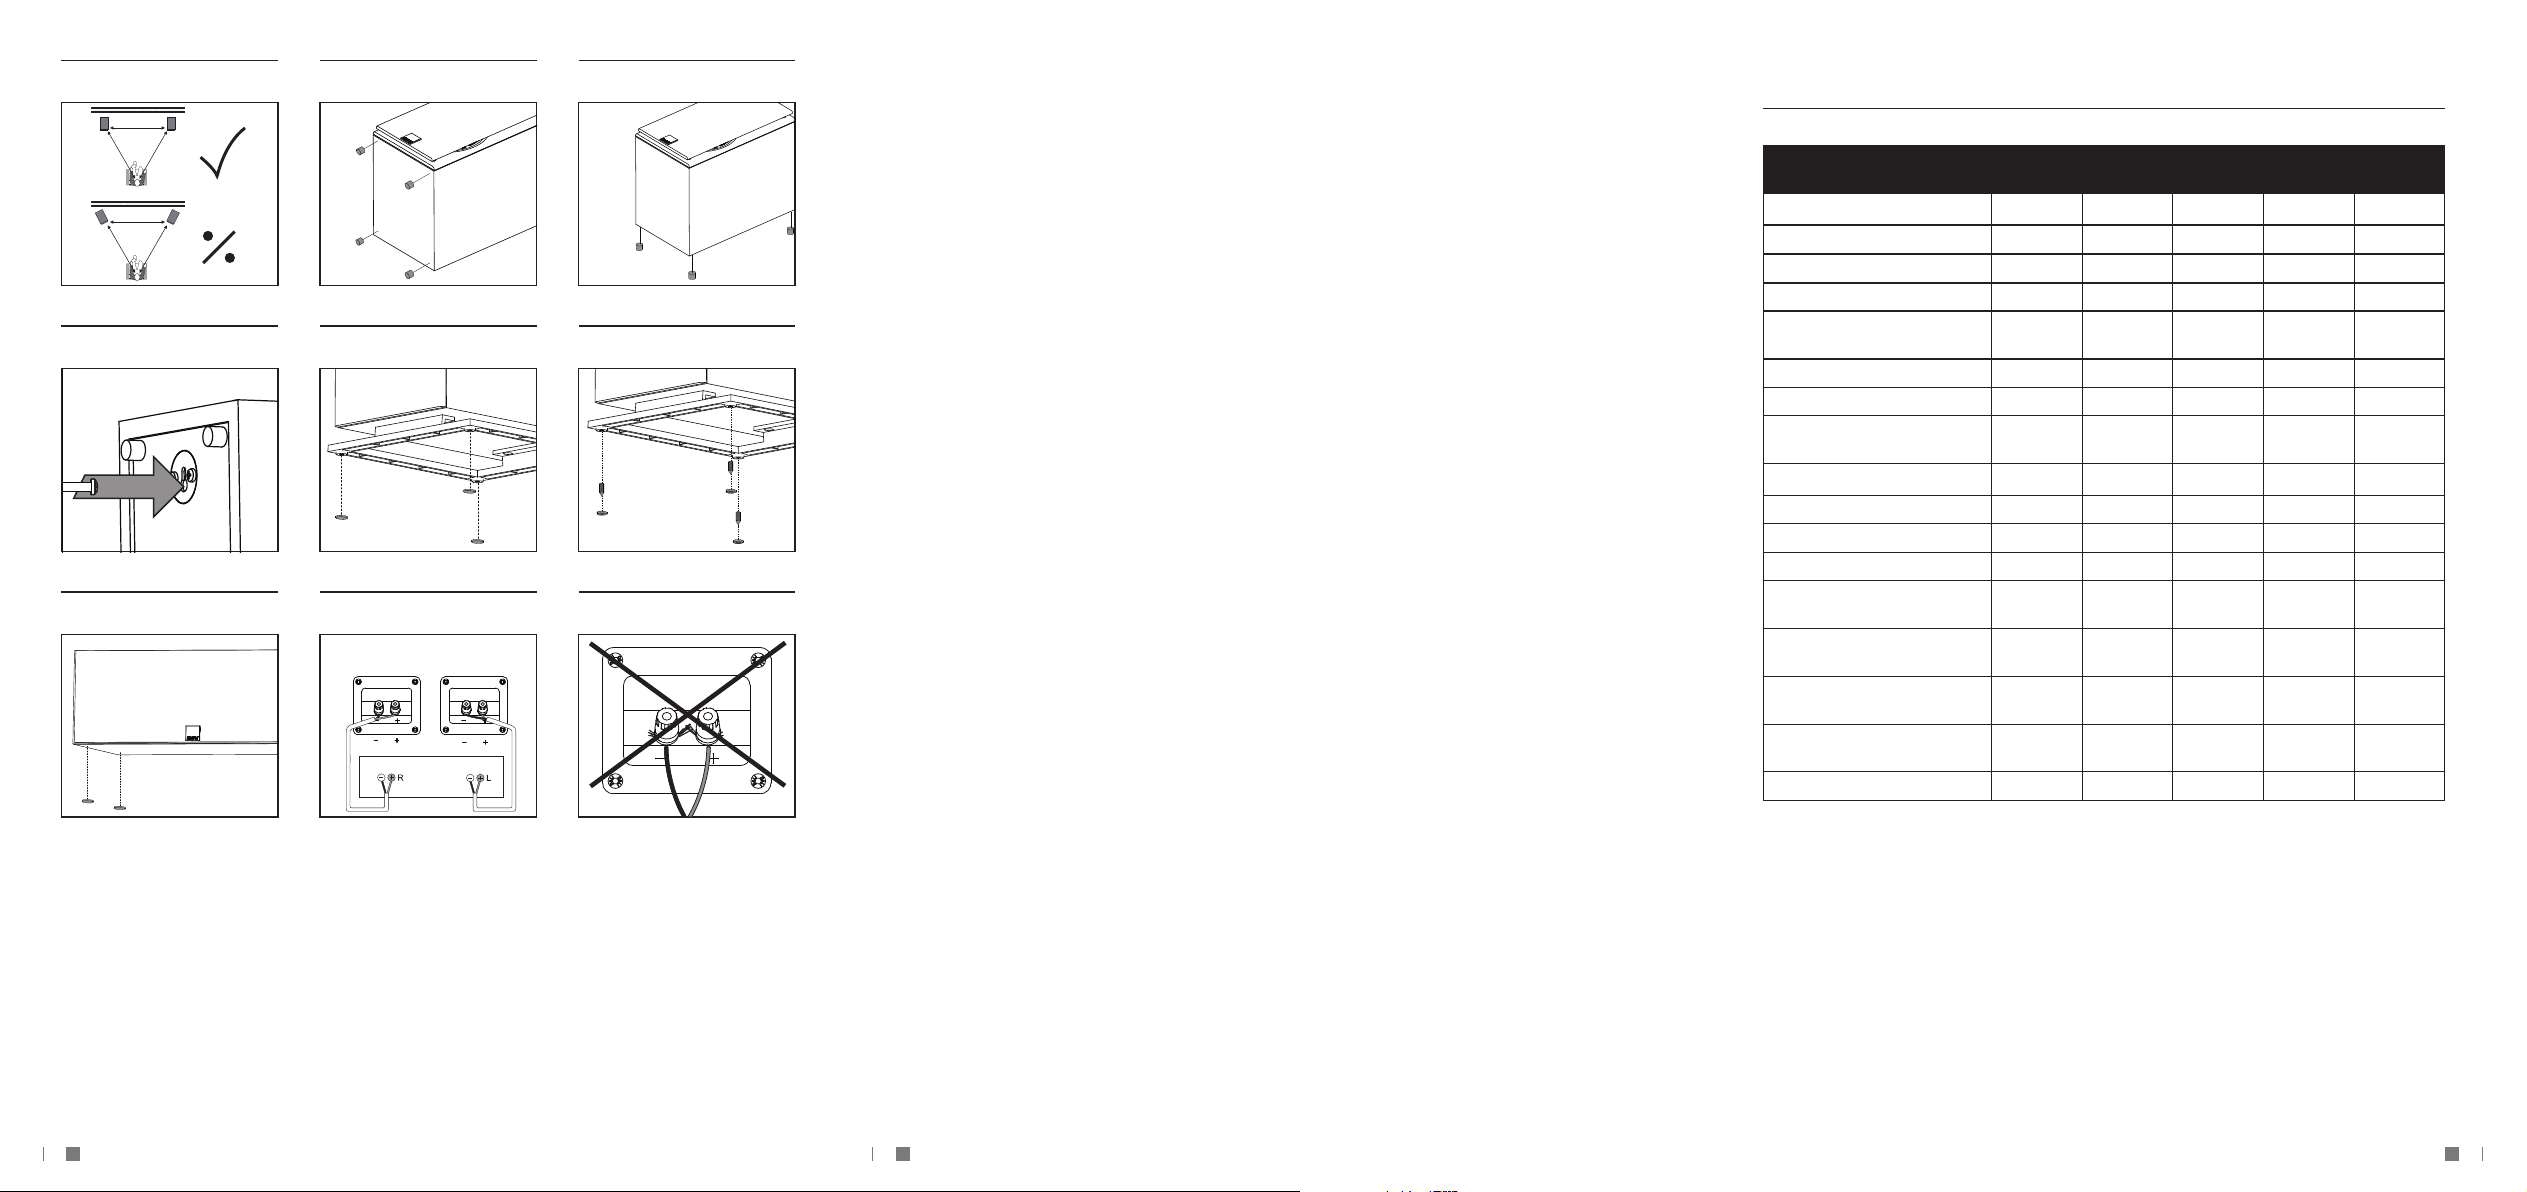
FIGURE 2 FIGURE 3A FIGURE 3B
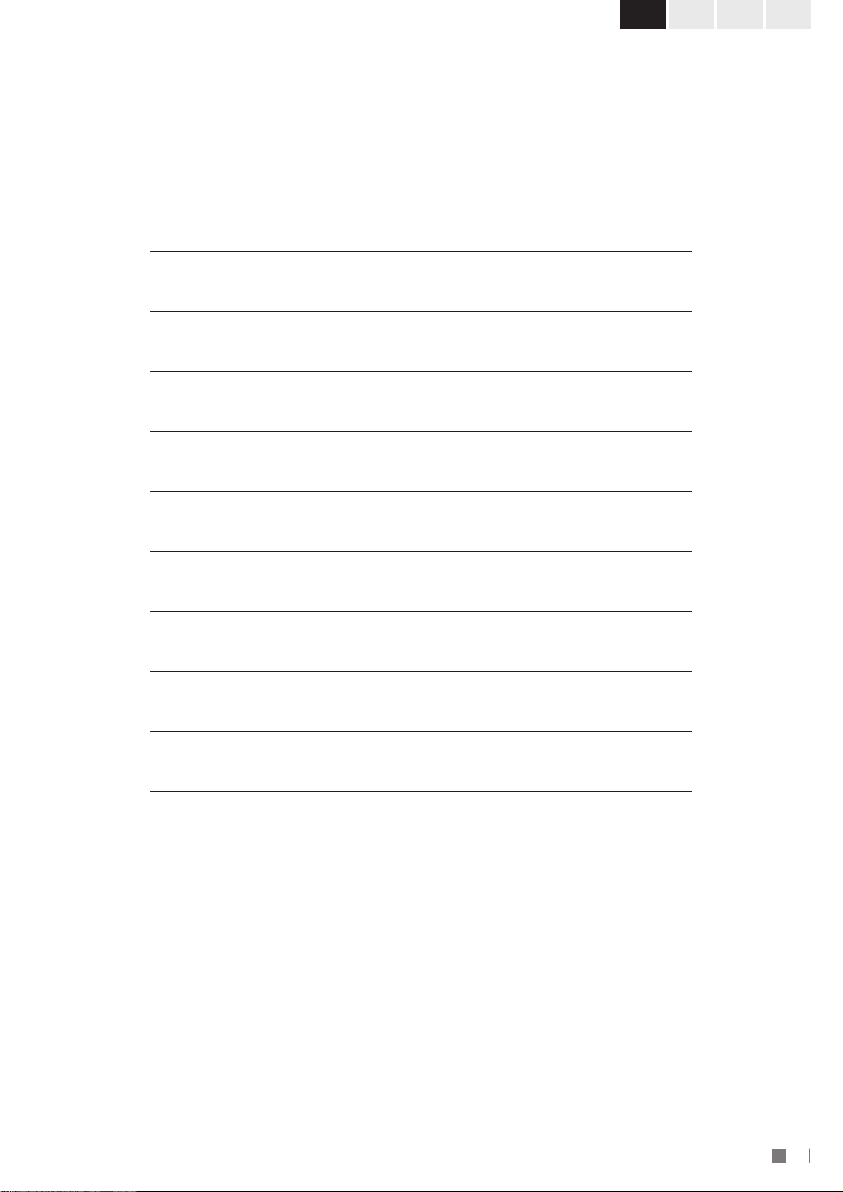
TABLE 2 - ZENSOR TECHNICAL SPECIFICATIONS
FIGURE 3C FIGURE 3D FIGURE 3E
FIGURE 3F FIGURE 4 FIGURE 5
Right
loudspeaker
loudspeaker
Amplifier
Left
ZENSOR 1 ZENSOR 3 ZENSOR 5 ZENSOR 7 ZENSOR
Frequency Range [+/- 3] dB [Hz] 53 - 26.500 50 - 26.500 43 - 26.500 40 - 26.500 47 - 26.500
Sensitivity [2.83V/1m] [dB] 86,5 88,0 88,0 90,0 88,5
Nominal Impedance [ohms] 6 6 6 6 6
Maximum SPL [dB] 106 108 108 110 109
Recommended Amp. Power
[Watts]
Crossover Frequencies [Hz] 2.900 2.600 2.400 2.400 2.400
Crossover Principle 2-way 2-way 2-way 2-way 2-way
High Frequency Driver 25 mm soft
Low Frequency/midrange Driver(s) 1 x 5¼” 1 x 7” 2 x 5¼” 2 x 7” 2 x 5¼”
Enclosure Type Bass reflex Bass reflex Bass reflex Bass reflex Bass reflex
Bass Reflex Tuning Frequency [Hz] 51,5 46,0 44,0 40,0 45,0
Connection Input(s) Single wire Single wire Single wire Single wire Single wire
Recommended Placement Wall/shelf/
Magnetic Shielding Semi
Dimensions (H x W x D) [mm] 274 x 162 x
Dimensions (H x W x D) [inches] 10.8 x 6.4
Weight [kg/lb] 4,2/9.3 6,3/13,9 10,3/22.7 14,9/32.8 6,8/15.0
25 - 100 25 - 125 30 - 150 30 - 150 30 - 120
dome
(Stand)
shielding
220
x 8.7
25 mm soft
dome
shelf/
Stand
No No No Semi
351 x 205 x
293
13.8 x 8.1 x
11.5
25 mm soft
dome
Floor Floor Shelf below
825 x 162 x
267
32.5 x 6.4 x
10.5
25 mm soft
dome
978 x 205 x
312
38.5 x 8.1 x
12.3
VOKAL
25 mm soft
dome
TV screen
shielding
161 x 441 x
281
6.3 x 17.4 x
11.1
All technical specifications are subject to change without notice.
43
29
Page 3

UK DE DK5JP
CONTENTS / INHALT / INDHOLD / 内容
ENGLISH 6
DEUTSCH 12
DANSK 18
日本 24
Page 4
CAUTION
RISK OF ELECTRIC SHOCK DO NOT OPEN.
TO REDUCE THE RISK OF ELECTRIC SHOCK,
DO NOT REMOVE THE BACK PANEL.
NO USER-SERVICEABLE PARTS INSIDE.
REFER SERVICING TO QUALIFIED PERSONNEL.
The lightning flash within an equilateral triangle is
intended to alert you to the presence of non insulated
“dangerous voltage” within the product’s enclosure that
may be of sufficient magnitude to constitute an electric
shock to persons.
The exclamation point within an equilateral triangle
is intended to alert you to the presence of important
operating and maintenance (servicing) instructions in
the literature accompanying the appliance.
1 Read instructions - all the safety and operating instructions
should be read before the appliance is operated.
2 Retain instructions - the safety and operating instructions
should be retained for future reference.
3 Heed warnings - all warnings on the appliance and in the
operating instructions should be adhered to.
4 Follow instructions - all operating and use instructions should
be followed.
5 Water and moisture - the appliance should not be used near
water - for example, near a bathtub, washbowl, kitchen sink,
laundry tub, in a wet basement, or near a swimming pool and
the like.
6 Carts and stands - the appliance should be used only with a
cart or stand if recommended by the manufacturer.
7 Wall or ceiling mounting - the appliance should be mounted to
a wall or ceiling only as recommended by the manufacturer.
8 Ventilation - the appliance should be situated so that its
location or position does not interfere with proper ventilation.
For example, the appliance should not be situated on a bed,
sofa, rug, or similar surface that may block the ventilation
openings; or placed in a built-in installation, such as a
bookcase or cabinet, that may impede the flow of air through
the ventilation openings.
9 Heat - the appliance should be situated away from heat
sources such as radiators, heat registers, stoves, or other
appliances that produce heat.
11 Power cord protection - power-supply cords should be
routed so that they are not likely to be walked on or pinched
by items placed on or against them, paying particular
attention to cords at plugs, convenience receptacles and the
point where they exit from appliance.
12 Cleaning - do not use any liquid cleaners. Use only a dry
cloth to wipe off dust and grease.
13 Non-use periods - the power cord of the appliance should
be unplugged from the outlet when left unused for a long
period of time.
14 Object and liquid entry - care should be taken so that
objects do not fall and liquids are not spilled into the
enclosure through openings.
15 Damage requiring service - the appliance should be
serviced by qualified personnel when:
a) The power-supply cord or the plug has been
damaged; or
b) Objects have fallen, or liquid has been spilled into
the appliance; or
c) The appliance has been exposed to rain; or
d) The appliance does not appear to operate normally,
or exhibits a marked change in performance; or
e) The appliance has been dropped, or the enclosure
damaged.
16 Servicing - the user should not attempt to service
the appliance beyond that described in the opera ting
instructions. All other servicing should be referred to
qualified service personnel.
10 Power sources - the appliance should be connected to a
power supply only of the type described in the operating
instructions or as marked on the appliance.
6
Page 5
UK DE DK7JP
CONTENTS
1.0 INTRODUCTION 8
2.0 UNPACKING 8
3.0 POSITIONING 8
4.0 CONNECTION 9
5.0 RUNNING-IN 10
6.0 CLEANING AND MAINTENANCE 10
7.0 DISPOSAL 10
8.0 POWER AND ACOUSTIC PRESSURE 10
9.0 THE LISTENING ROOM 11
10.0 TECHNICAL SPECIFICATIONS 11
Page 6

1.0 INTRODUCTION
Congratulations with your new DALI ZENSOR loudspeaker. It is important to us that your new
DALI loudspeakers are set up and connected optimally. For this reason, we recommend that you
read this manual and follow its recommendations. The manual contains instructions for setup
and connection, as well as tips and advice on how to get the most out of your new loudspeakers.
DALI is acclaimed around the world for unique loudspeakers built to our uncompromising
standards for design and performance. The goal for every single DALI loudspeaker is always
our foremost commitment: To create a listening experience in your home that will make you
forget time and place.
Remember to sign up for the DALI newsletter at www.dali-speakers.com.
Enjoy!
2.0 UNPACKING
Be careful not to damage the contents when you unpack the parts. Depending on which DALI
ZENSOR model you have bought, different accessories come with the loudspeaker. Check that
all parts are contained in the cardboard box (see Table 1). Keep the packaging materials should
your speaker need to be relocated or serviced.
3.0 POSITIONING
To achieve the best results, the loudspeaker setup should be symmetrical round your favorite
listening position, see Figure 1A - C. We recommend that you experiment with the position of
your loudspeakers – the sound quality will change depending on the loudspeaker position. For
ZENSOR 1, ZENSOR 3 and VOKAL, the speakers should ideally be positioned, so that the height
of the tweeter is approximately at ear height when seated in your favorite listening position.
ZENSOR 5 and 7 are designed as floor standing speakers. They should be positioned minimum
10 – 20 cm (4 – 8”) from the rear wall. ZENSOR 1, ZENSOR 3 and VOKAL are designed to be
positioned flat up against the wall.
Objects positioned between the speaker and the listening position might negatively affect sound
quality. The speakers are designed to meet our wide dispersion principle, so they should NOT be
angled towards the listening position, but be positioned parallel with the rear wall, see Figure 2.
By parallel positioning, the distortion in the main listening area will be lowered and the room
integration will be improved. The wide dispersion principle will ensure that sound is spread
evenly within a large area in the listening room.
3.1 DALI ZENSOR 1
The speaker can be positioned on a stand/shelf or hung on a wall using the integrated wall
bracket. If positioned on a stand or shelf, the enclosed rubber bumpers can be mounted under
the speaker for stable and vibration free positioning, see Figure 3A. If hung on a wall, mount the
bumpers on the rear edges of the speakers, see Figure 3B. The speakers are hung on a wall
using one screw mounted in the wall. The screw must fit the wall bracket on the rear side of
the speaker, see Figure 3C.
8
Page 7

UK DE DK9JP
3.2 DALI ZENSOR 3
The speaker can be positioned on a stand/shelf. If positioned on a stand or shelf, the enclosed
rubber bumpers can be mounted under the speaker for stable and vibration free positioning,
see Figure 3A.
3.3 DALI ZENSOR 5 and 7
The speakers are designed to stand on the floor. ZENSOR 5 and 7 can be used with spikes or
rubber bumpers under the speakers, see Figure 3D/E. Be careful not to over tighten the locking
nuts. Spikes or rubber bumpers can improve the sound quality. You can try both to hear what
gives the best sound quality in your setup. Please be aware, that spikes may damage the floor,
if it is not protected by e.g. coins under the spikes.
3.4 DALI ZENSOR VOKAL
ZENSOR VOKAL is the dedicated centre channel and has been specially designed to be
positioned close to the large surface of the TV screen. You can place it above or below the
screen, on a stand or on a shelf. We recommend fitting the enclosed bumpers to ensure a
stable, vibration-free setup (see Figure 3F).
4.0 CONNECTION
Correct, tight connections to your amplifier are extremely important for your listening experience.
Always use cables of the same type and length for left and right channels. We recommend using
special speaker cables from DALI, available from your dealer.
Connection in correct phase is a detail that is often ignored. The red (+) terminal of the amplifier
must be connected to the red (+) terminal of the loudspeaker. The black (-) terminal of the
amplifier must be connected to the black (-) terminal of the loudspeaker (see figure 4). Even a
single loudspeaker connected out-of-phase in a stereo or surround installation will make the
bass weaker and the stereo image unfocused.
For the optimal listening experience, the right loudspeaker (as seen from the listening position)
must be connected to the amplifier output terminals marked “R” or “Right”. The left loudspeaker
must be connected to the amplifier output terminals marked “L” or “Left”.
NOTE: Before connecting cables or changing any connections, ALWAYS turn off your amplifier.
NOTE: Make sure that the bare conductors are tightly gripped by the terminals with no loose
wires which could cause a short circuit and damage the amplifier (see Figure 5).
NOTE: If you are using DALI ZENSOR in a surround system, follow the instructions included with
your surround amplifier.
Page 8

5.0 RUNNING-IN
Like any mechanical system, a loudspeaker requires a “running-in” period to perform at its
best. You will experience a gradual increase in sound quality during the first period of use. The
break-in period will vary depending on use and playback volume. You should expect up to 100
hours of playback until maximum performance is reached. Unlike other mechanical systems,
the life-span of a loudspeaker is increased by normal, regular playback of music.
6.0 CLEANING AND MAINTENANCE
Clean the cabinets with a soft, dry cloth. If the cabinets are dirty, wipe with a soft cloth dipped in
all-purpose cleaner and then well wrung out. Be very careful when wiping the speaker cones,
as they are very fragile. Front grilles can be cleaned with a clothes brush and wiped with a
wellwrung, lint-free cloth and mild all-purpose cleaner.
6.1 AVOID DIRECT SUNLIGHT:
The surfaces of the speakers may fade or become discoloured over time when exposed to
direct sunlight. Therefore avoid positioning the speakers in direct sunlight.
7.0 DISPOSAL
If you want to dispose of this product, do not mix it with general household waste. There is
a separate collection system for used electronic products in accordance with legislation that
requires proper treatment, recovery and recycling. Private households in the EU member states,
Switzerland, Liechtenstein and Norway may return their used electronic products free of charge
to designated collection facilities or to a retailer (if you purchase a similar new one). If you reside
in countries not mentioned above, please contact your local authorities for the correct method
of disposal. By following this process, you will ensure that your disposed product undergoes
the necessary treatment, recovery and recycling and thus prevent potential negative effects on
the environment and human health.
10
8.0 POWER AND ACOUSTIC PRESSURE
How loud a speaker is able to play and still sound good is completely dependent on the signal
it has to reproduce. So, in practice, it is not possible to define an unequivocal level for use in
comparing different speakers.
Lots of pure, undistorted output from a large amplifier is better than a distorted signal from a
small amplifier stretched beyond its capacity. The signal from a distorting (clipping) amplifier
contains much more high-frequency information than an undistorted signal, and therefore puts
a heavy strain on the tweeter. Consequently, speakers are often damaged by small amplifiers,
having to work too hard - and very rarely by large amplifiers, which are practically running idle.
Page 9

UK DE DK11JP
It is worth noting that turning tone controls above the neutral setting significantly burdens
both speakers and amplifier. On a good sound system, tone controls should only be used to
compensate for poor recordings and not to permanently compensate for weaknesses elsewhere
in the system. DALI recommends the tone controls generally be set to the neutral position, and
to achieve your desired sound image through correct positioning of the speakers. Ensuring that
you keep the volume low enough for the sound to remain clear and undistorted will minimize
the strain on both speakers and amplifier.
All DALI loudspeakers are designed with linear impedance for an optimal amplifier load. The
result is a significantly more open and detailed sonic image.
9.0 THE LISTENING ROOM
Every room has its own distinctive acoustics, which influence the way we experience sound
from a speaker. The sound you hear consists of direct sound from the speakers and reflected
sound from the floor, ceiling and walls. The latter will affect how you experience the sound.
As a basic rule, try to avoid large, hard and reflective areas in the immediate vicinity of your
loudspeakers as it will typically cause strong reflections, which might disturb the precision and
spatial effect of the sound reproduction. Reflection might be suppressed by positioning e.g. a
plant between the speaker and the reflecting surface. Soft items such as carpets, curtains etc.
might help if the sound is too bright. Both the amount and quality of the deep bass depend on
the size and shape of the room, and the position of the speakers. Positioning the speakers near
a side or back wall will accentuate the bass.
A corner location will accentuate it even more, but will also increase the reflections.
10.0 TECHNICAL SPECIFICATIONS
In Table 2 you will find the most common specifications for our speakers. Please have in mind
that there are countless methods for measuring speakers. However, none of them tell you
anything useful about how a speaker really sounds. Only your ears can decide whether one
speaker sounds better than another. Like all our speakers, DALI ZENSOR series is designed to
reproduce music as honestly as possible.
Enjoy your new DALI ZENSOR!
Page 10

VORSICHT
ELEKTROSCHOCKGEFAHR – NICHT ÖFFNEN.
ZUR REDUZIERUNG DER ELEKTROSCHOCKGEFAHR
DIE RÜCKWAND NICHT ABNEHMEN. DAS GERÄT
ENTHÄLT KEINE VOM BENUTZER WARTBAREN TEILE.
WARTUNGSARBEITEN NUR VON QUALIFIZIERTEM
PERSONAL AUSFÜHREN LASSEN.
Das Blitzsymbol in einem gleichseitigen Dreieck soll
Sie darauf aufmerksam machen, dass innerhalb
des Gerätes unisolierte „gefährliche Spannungen“
vorliegen, deren Größenordnung ausreichen kann, um
einen elektrischen Schlag zu verursachen.
Das Ausrufezeichen in einem gleichseitigen Dreieck soll
Sie darauf aufmerksam machen, dass wichtige
Bedienungs- und Wartungsanweisungen in der
beigelegten Bedienungsanleitung zu finden sind.
1 Lesen Sie die Instruktionen: Sämtliche Sicherheitsund
Bedienungsanweisungen sollten vor Inbetriebnahme des
Geräts gelesen werden.
2 Heben Sie sich die Instruktionen auf: Die Sicherheitsund
Bedienungsanweisungen sollten so abgelegt werden, dass
Sie auch künftig darin nachsehen können.
3 Beachten Sie Warnungen: Alle Warnungen am Gerät und in
den Bedienungsanweisungen sind zu befolgen.
4 Halten Sie sich an die Instruktionen: Alle Anweisungen für
Bedienung und Benutzung sind zu befolgen.
5 Kein Wasser, keine Feuchtigkeit: Das Gerät nicht in Wassernähe
benutzen! Also z.B. nicht in der Nähe von Badewanne,
Waschbecken, Küchenspüle oder Wäschewanne, in keinem
feuchten Keller und auch nicht am Swimmingpool o.Ä.
6 Rollwagen oder Podeste: Das Gerät sollte nur dann mit
einem Rollwagen oder Podest verwendet werden, wenn der
Hersteller dies empfiehlt.
7 Wand- oder Deckenmontage: Das Gerät sollte nur gemäß
Empfehlungen des Herstellers an einer Wand oder Decke
montiert werden.
8 Belüftung: Das Gerät sollte an einem geeigneten Standort
so aufgestellt werden, dass die ordnungsgemäße Belüftung
des Geräts nicht beeinträchtigt wird. Das Gerät sollte z.B.
nie auf einem Bett, Sofa, Teppich oder einerähnlichen
Oberfläche aufgestellt werden, die zu einem Verschluss
der Belüftungsöffnungen führen könnte. Das Gerät sollte
auch nicht in Einbaumöbeln wie Bücherregalen oder
Schränken aufgestellt werden, wo der Luftfluss durch die
Belüftungsöffnungen beeinträchtigt werden könnte.
9 Wärme: Das Gerät sollte in sicherer Entfernung von
Wärmequellen wie Heizkörpern, Heizregistern, Öfen
oder sonstigen Wärme erzeugenden bzw. abgebenden
Vorrichtungen aufgestellt werden.
10 Stromquellen: Das Gerät sollte ausschließlich an
Stromquellen des in der Betriebsanleitung bzw. am Gerät
angegebenen Typs angeschlossen werden.
11 Schutz der Stromkabel: Verlegen Sie die Kabel für die
Netzverbindung so, dass möglichst niemand darauf treten
wird und sie auch nicht eingequetscht werden. Dabei ist
besonders auf die Kabelabschnitte nahe der Steckdose und
in unmittelbarer Nähe des Geräts zu achten.
12 Reinigung: Verwenden Sie keine flüssigen Reinigungsmittel.
Benutzen Sie nur einen trockenen Lappen zum Abwischen
von Staub und Fett.
13 Nichtgebrauch: Bei längerem Nichtgebrauch sollte der
Netzstecker gezogen werden.
14 Eindringen von Objekten oder Flüssigkeiten: Achten Sie
darauf, dass durch die Öffnungen keine Gegenstände
ins Gehäuse fallen und keine Flüssigkeiten dort hinein
verschüttet werden.
15 Schäden, die eine qualifizierte Wartung bzw. Reparatur
erfordern: Bringen Sie das Gerät in folgenden Fällen zum
Fachmann:
a) wenn das Stromkabel oder der Stecker beschädigt
wurde; oder
b) wenn Objekte ins Gerät gefallen sind oder
Flüssigkeit eingedrungen ist; oder
c) wenn das Gerät im Regen gestanden hat; oder
d) wenn das Gerät nicht normal zu funktionieren
scheint oder wenn im Betrieb des Geräts eine
ausgeprägte Änderung eingetreten ist; oder
e) wenn das Gerät fallen gelassen wurde oder
Schäden am Gehäuse vorliegen.
16 Wartung: Der Benutzer sollte keinerlei Wartung des Geräts
versuchen, die über die diesbezüglichen Angaben in den
Betriebsanweisungen hinausgeht. Alle andere Wartung
sollte qualifiziertem Wartungspersonal überlassen werden.
12
Page 11

UK DE DK JP
INHALT
1.0 EINLEITUNG 14
2.0 AUSPACKEN 14
3.0 POSITIONIERUNG 14
4.0 ANSCHLUSS 15
5.0 EINLAUFZEIT 16
6.0 PFLEGE 16
7.0 ENTSORGUNG 16
8.0 LEISTUNG UND SCHALLDRUCK 16
9.0 DER HÖRRAUM 17
10.0 TECHNISCHE DATEN 17
13
Page 12

1.0 EINLEITUNG
Herzlichen Glückwunsch zu Ihrem neuen ZENSOR Lautsprecher. Es ist uns wichtig, dass Ihre
neuen DALI Lautsprecher optimal aufgestellt und angeschlossen werden. Deshalb empfehlen
wir Ihnen, dass Sie das vorliegende Benutzerhandbuch lesen und den darin enthaltenen
Anleitungen folgen. Dieses Benutzerhandbuch enthält Anleitungen für die Aufstellung und den
Anschluss sowie Tipps und Ratschläge, wie Sie Ihre neuen Lautsprecher optimal nutzen.
DALI genießt auf der ganzen Welt den Ruf, einzigartige Lautsprecher zu bauen und dabei
kompromisslosen Standards in Bezug auf Design und Leistung zu folgen. Jeder einzelne DALI
Lautsprecher wird von uns in dem Bestreben gefertigt, dem folgenden Anspruch gerecht zu
werden: Ihnen in Ihrem Zuhause ein Hörerlebnis zu bieten, das Sie Raum und Zeit vergessen lässt.
Denken Sie daran, sich für den DALI Newsletter anzumelden auf www.dali-speakers.com.
Viel Vergnügen!
2.0 AUSPACKEN
Achten Sie darauf, die Teile beim Auspacken nicht zu beschädigen. Abhängig von dem DALI
ZENSOR Modell, für welches Sie sich entschieden haben, befinden sich unterschiedliche
Zubehörteile in der Verpackung. Prüfen Sie, ob alle Teile in dem Pappkarton enthalten sind
(siehe Tabelle 1). Heben Sie das Verpackungsmaterial auf für den Fall, dass Sie umziehen oder
den Lautsprecher zur Reparatur schicken müssen.
3.0 POSITIONIERUNG
Das beste Ergebnis erzielen Sie, wenn Sie die Lautsprecher symmetrisch um Ihre bevorzugte
Hörposition herum aufstellen, siehe Abb. 1A – C. Wir empfehlen Ihnen mit verschiedenen
Lautsprecherpositionen zu experimentieren – die Klangqualität ändert sich je nach
Lautsprecherposition. Beim ZENSOR 1, ZENSOR 3 und VOKAL sollten die Lautsprecher
idealerweise so positioniert werden, dass die Höhe des Hochtöners in etwa auf „Ohrenhöhe“
ist, wenn Sie in Ihrer bevorzugten Hörposition sitzen.
14
ZENSOR 5 und 7 sind als Standlautsprecher vorgesehen. Der Abstand von der Rückseite des
Lautsprechers zur Raumwand sollte mindestens 10 – 20 cm betragen. Der ZENSOR 1, ZENSOR
3 und VOKAL ist für die Aufstellung direkt an der Wand konstruiert.
Gegenstände zwischen Lautsprecher und Hörposition können die Klangqualität beeinträchtigen.
Die Lautsprecher sind für eine breite Streuung gebaut, deshalb sollten sie NICHT in einem
Winkel zur Hörposition aufgestellt werden, sondern parallel zu der Rückwand, siehe Abb. 2. Bei
paralleler Aufstellung verringert sich die Verzerrung in der Hörposition und die Raumintegration
wird verbessert. Das „Wide Dispersion“-Prinzip sorgt für eine gleichmäßige Abstrahlung des
Klangs innerhalb eines großen Bereichs im Hörraum.
3.1 DALI ZENSOR 1
Die Lautsprecher können auf einem Stativ/in einem Regal aufgestellt oder mit Hilfe der
integrierten Wandhalterung an der Wand befestigt werden. Wenn der Lautsprecher auf einem
Stativ oder in einem Regal aufgestellt wird, können die beiliegenden Gummistopper angebracht
werden, sodass der Lautsprecher stabil und erschütterungsfrei steht, siehe Abb. 3A. Wenn
der Lautsprecher an der Wand hängen soll, müssen die Stopper an der Hinterkante des
Lautsprechers angebracht werden, siehe Abb. 3B. Die Lautsprecher werden mit einer Schraube
(und Dübel) an der Wand festgeschraubt. Die Schraube muss zur/zu den Wandhalterung/en an
der Lautsprecherrückseite passen, siehe Abb. 3C.
Page 13

UK DE DK JP
3.2 DALI ZENSOR 3
Die Lautsprecher können auf einem Stativ/in einem Regal aufgestellt. Wenn der Lautsprecher
auf einem Stativ oder in einem Regal aufgestellt wird, können die beiliegenden Gummistopper
angebracht werden, sodass der Lautsprecher stabil und erschütterungsfrei steht, siehe Abb. 3A.
3.3 DALI ZENSOR 5 und 7
Die Lautsprecher sind als Standlautsprecher für das Aufstellen auf dem Boden vorgesehen.
ZENSOR 5 und 7 können mit Standdornen oder mit Gummistoppern aufgestellt werden, siehe
Abb. 3D/E. Standdornen oder Gummistopper können die Klangqualität verbessern. Testen Sie
beides, und finden Sie die optimale Klangqualität für Ihre Aufstellung. Bitte beachten Sie, dass
Standdornen den Fußboden beschädigen können. Legen Sie zum Schutz des Bodens eine
Münze o. Ä. unter die Dornen.
3.4 DALI ZENSOR VOKAL
ZENSOR VOKAL ist der spezielle center-Kanal und wurde so konstruiert, dass er nahe der
großen Oberfläche eines Fernsehbildschirms aufgestellt werden kann. Sie können ihn über
oder unter dem Bildschirm aufstellen, auf einem Ständer oder einem Regal. Wir empfehlen,
die mitgelieferten Gummifüße anzubringen, um einen stabilen, vibrationsfreien Stand zu
gewährleisten (siehe Abb 3F).
4.0 ANSCHLUSS
Ein korrekter und fester Anschluss der Lautsprecher an Ihren Verstärker ist von entscheidender
Bedeutung für Ihr Hörerlebnis.
Verwenden Sie für den rechten und linken Kanal stets Kabel desselben typs und derselben
Länge. Wir empfehlen die Verwendung spezieller Lautsprecherkabel von DALI. Diese sind bei
Ihrem DALI Händler erhältlich.
Die korrekte Polung der Anschlüsse ist ein sehr häufig außer Acht gelassenes Detail. Der rote
Plus-Anschluss (+) des Verstärkers muss mit dem roten Plus-Anschluss (+) des Lautsprechers
verbunden werden. Der schwarze Minus-Anschluss (-) des Verstärkers muss mit dem schwarzen
Minus-Anschluss (-) des Lautsprechers verbunden werden (siehe Abb 4). Ein einziger falsch
gepolter Lautsprecher führt in einem Stereo- oder Surround-System zu schwächeren Bässen
und einem unklaren Stereobild.
Für ein optimales Hörerlebnis muss der rechte Lautsprecher (von der Hörposition aus betrachtet)
an die mit „R“, „Right“ oder „Rechts“ bezeichneten Verstärkerausgänge angeschlossen
werden. Der linke Lautsprecher muss an die mit „L“, „Left“ oder „Links“ bezeichneten
Verstärkerausgänge angeschlossen werden.
BITTE BEACHTEN: Schalten Sie IMMER Ihren Verstärker aus, bevor Sie Kabel verbinden oder
Anschlüsse ändern!
BITTE BEACHTEN: Vergewissern Sie sich, dass die Aderleitungen fest mit den Anschlüssen
verbunden sind und keine losen Drähte einen Kurzschluss verursachen können, durch den Ihr
Verstärker beschädigt werden könnte (siehe Abb 5).
BITTE BEACHTEN: Falls Sie DALI ZENSOR in einer Surround-Anlage einsetzen, befolgen Sie die
Anleitung zu Ihrem Surround-Verstärker.
15
Page 14

5.0 EINLAUFZEIT
Wie jedes mechanische System erfordert auch ein Lautsprecher eine gewisse Zeit, bevor
er seine optimale Leistung erbringt. In der ersten Zeit werden Sie erleben, wie sich die
Klangqualität allmählich immer weiter verbessert. Die Dauer dieser Einspielzeit hängt
von der Häufigkeit der Benutzung und der gewählten Lautstärke ab. Um die maximale
Leistungsfähigkeit der Lautsprecher zu erreichen, sollten Sie von bis zu 100 Stunden einspielen
ausgehen. Im Gegensatz zu anderen mechanischen Systemen erhöht sich die Lebensdauer
eines Lautsprechers durch regelmäßigen, normalen Gebrauch.
6.0 PFLEGE
Reinigen Sie das Gehäuse mit einem weichen, trockenen Tuch. Sollte das Gehäuse verschmutzt
werden, verwenden Sie für die Reinigung ein weiches Tuch, das Sie zuvor in Allzweckreiniger
getaucht und anschließend gründlich ausgewrungen haben. Lassen Sie äußerste Vorsicht
walten, wenn Sie die Lautsprechermembran säubern, da diese sehr empfindlich ist.
Frontabdeckungen kann mit einer normalen Kleiderbürste gesäubert werden oder mit einem
gründlich ausgewrungenen, fusselfreien tuch und Allzweckreiniger säubern.
6.1 Direktes Sonnenlicht vermeiden
Wenn die Lautsprecher direktem Sonnenlicht ausgesetzt werden, können im Laufe der Zeit ihre
Oberflächen ausbleichen oder sich verfärben. Vermeiden Sie es deshalb, die Geräte in direktem
Sonnenlicht aufzustellen.
7.0 ENTSORGUNG
Entsorgen Sie dieses Produkt nicht gemeinsam mit dem Haushaltsmüll. Es gibt ein getrenntes
Sammelsystem für gebrauchte elektronische Produkte gemäß der gesetzlichen Regelung, die
eine richtige Behandlung, Rückgewinnung und Wiederverwertung verlangt. Privathaushalte
in den Mitgliedstaaten der EU, der Schweiz, Liechtenstein und in Norwegen können ihre
gebrauchten elektronischen Produkte kostenlos an dafür eingerichteten Sammelstellen abgeben.
Sie können es auch bei einem Händler abgeben, wenn Sie ein ähnliches neues Produkt kaufen.
Wenn Sie in einem Land wohnen, das nicht oben aufgeführt wurde, wenden Sie sich bitte an
Ihre örtlichen Behörden, um sich nach der korrekten Art der Entsorgung zu erkundigen. Auf
diese Weise stellen Sie sicher, dass das zu entsorgende Produkt der notwendigen Behandlung,
Rückgewinnung und Wiederverwertung unterzogen wird, wodurch mögliche negative Einflüsse
auf die Umwelt und die menschliche Gesundheit verhindert werden.
16
8.0 LEISTUNG UND SCHALLDRUCK
Mit wieviel Volumen ein Schallwandler Musik wiedergeben kann und dabei noch gut klingt,
hängt ausschließlich von dem von ihm zu reproduzierenden Signal ab. Deswegen ist es in der
Praxis unmöglich, eindeutige Standards für den Vergleich von Schallwandlern zu definieren.
Ein überwiegend reiner, unverzerrter Output einer leistungsstarken Endstufe ist ohne Frage
besser als das verzerrte Signal eines überlasteten Verstärkers. Das von einem verzerrten
(übersteuerten) Verstärker stammende Signal enthält weitaus mehr Hochtonfrequenz
Informationen als ein unverzerrtes Signal. Darum erhöht sich die Belastung für den Hochtöner
stark. Folglich werden Lautsprecher häufig durch kleine und zu leistungsschwache Endstufen
beschädigt, da diese dann zu viel Arbeit verrichten müssen. Nur sehr selten werden Schäden
durch große Verstärker hervorgerufen, da diese praktisch völlig untätig bleiben.
Page 15

UK DE DK JP
Wichtig ist in diesem Zusammenhang auch, dass sich durch eine Aussteuerung der Tonregler
über die neutralen Werte hinaus die auf Lautsprechern und Verstärker liegende Last erheblich
erhöht. In einem guten Sound-System sollten die Tonregler zur Einstellung der Klangfarbe
lediglich eingesetzt werden, um schlechte Aufnahmen auszugleichen, aber nicht, um
andere Schwächen des Systems dauerhaft zu kompensieren. So empfiehlt DALI generell,
die Klangfarbeneinstellung in der neutralen Position zu belassen. Ihr gewünschtes Klangbild
erreichen Sie vielmehr durch eine korrekte Positionierung der Lautsprecher. Achten Sie darauf,
dass Sie die Lautstärke so niedrig halten, dass der Klang klar und unverzerrt bleibt. Dadurch
minimieren Sie die Belastung für Lautsprecher und Verstärker.
Allen DALI Lautsprechern liegt das Konzept der linearen Impedanz zu Grunde, um für eine
optimale auf dem Verstärker liegende Last zu sorgen. Das Ergebnis ist ein erheblich offeneres
und detailreicheres Klangbild.
9.0 DER HÖRRAUM
Jeder Raum hat seine eigenen charakteristischen akustischen Eigenschaften, die unsere
Klangwahrnehmung in Bezug auf einen bestimmten Lautsprecher beeinflussen. Sie können die
Akustik Ihres Hörraums auf verschiedene Weise beeinflussen.
Ein Teil des von Ihnen wahrgenommenen Klangs kommt nicht von den Lautsprechern, sondern
von Reflektionen an Boden, Decke und Wänden. Diese Reflektionen werden durch Objekte wie
Mobiliar, Pflanzen und Teppiche abgeschwächt. Ist der Klang zu hell, können weiche Gegenstände
wie Vorhänge und Teppiche Abhilfe schaffen. Befinden sich großflächige Fensterscheiben im Raum,
verhindern Vorhänge vor den Fenstern Reflektionen von der Glasoberfläche.
Sowohl die Stärke als auch die Qualität tiefer Bässe hängen von Größe und Form des Raums sowie
vom Aufstellungsort der Lautsprecher ab. Sind die Lautsprecher nahe der Seitenwände oder der
hinteren Wand platziert, so kommt der Bass mehr zur Geltung. Eine Platzierung in Eckbereichen hebt
den Bass noch stärker hervor; es erhöhen sich dadurch aber auch die Reflektionen. Die Entscheidung
liegt ganz bei Ihnen. Experimentieren Sie also mit verschiedenen Positionen, um herauszufinden,
welche Ihnen das ideale Klangerlebnis liefert.
Generell sollten Sie große, harte und stark reflektierende Flächen in der unmittelbaren Nähe der
Lautsprecher vermeiden. Solche Flächen reflektieren die Klänge von Lautsprechern in der gleichen
Weise, wie z.B. Spiegel auch das Licht reflektieren, nämlich mit nahezu voller Stärke. Aufgrund der
relativ langsamen Geschwindigkeit des Schalls entsteht dabei allerdings eine leichte Verzögerung,
die die Präzision und den räumlichen Effekt der Klangwiedergabe stört. Durch eine weiche
Oberfläche, z. B. eine hinter dem Lautsprecher aufgehängte textiloberfläche, einen kleinen Teppich
vor dem Lautsprecher oder eine große, seitlich platzierte Pflanze kann eine verblüffend große
Wirkung in Bezug auf Klangqualität und Klangpräzision erzielt werden. Sind Sie mit der Platzierung
Ihrer Lautsprecher zufrieden, ist es wichtig, dass diese einen absolut stabilen Halt haben. Bei
Standlautsprechern ist die Verwendung der mitgelieferten Spikes ausgesprochen wichtig.
10.0 TECHNISCHE DATEN
In Tabelle 2 finden Sie eine Aufstellung der wichtigsten technischen Daten Ihrer Lautsprecher.
Bedenken Sie, dass es unzählige Methoden zur technischen Messung von Lautsprechern gibt.
Keine von ihnen wird Ihnen jedoch etwas Nützliches darüber verraten, wie ein Lautsprecher
wirklich klingt. Allein Ihre Ohren können entscheiden, ob ein Lautsprecher besser klingt als ein
anderer. Wie alle unserer Lautsprecher wurde auch der DALI ZENSOR so konstruiert, dass er die
Musik so originalgetreu wie nur irgend möglich wiedergibt.
Viel Vergnügen mit Ihrem neuen DALI ZENSOR!
17
Page 16

ADVARSEL
UNDGÅ STØDRISIKO. APPARATET MÅ IKKE ÅBNES.
FOR AT MINDSKE RISIKO FOR ELEKTRISK STØD,
MÅ BAGPANEL IKKE FJERNES.DER ER INTET INDENI
SOM KAN SERVICERES AF BRUGEREN. AL SERVICE
HENVISES TIL AUTORISERET VÆRKSTED.
Lynsymbolet i en trekant skal advare brugeren mod
uisoleret farlig spænding inde i apparatet som kan være
stor nok til at udgøre risiko for elektrisk stød.
Symbolet med udråbstegn i en trekant skal advare
brugeren om vigtige forholdsregler vedr. brug,
vedligeholdelse (service) af apparatet i den medfølgende
literatur.
1 Læs informationerne - Alt vedr. sikkerhed og betjening bør
læses inden produktet tages i brug.
2 Gem informationerne - Informationer om sikkerhed og
betjening bør også opbevares til senere brug.
3 Overhold advarsler - Overhold nøje alle advarsler som findes
på produktet eller i brugsvejledningen.
4 Følg instruktionerne - Alle sikkerheds- og betjeningsinstrukser
bør overholdes nøje.
5 Vand og fugt - Produktet bør ikke benyttes tæt på vand, f.eks.
badekar, håndvask, køkkenvask, vaskebalje, fugtig kælder,
swimming pool, o.s.v.
6 Vogn og stander - Brug kun vogn eller stander i henhold til
producentens anvisninger.
7 Montering på loft eller væg - Apparatet bør kun lofts- eller
vægmonteres i henhold til producentens anvisninger.
8 Udluftning - Produktets placering skal tillade fri udluftning.
Apparatet må f.eks. ikke placeres på seng, sofa, tæppe
eller andet blødt underlag som kan blokere for udluftning.
Produktet må ikke placeres i lukket reol eller racksystem som
kan hæmme fri luft bevægelse til afkøling.
9 Varme - Produktet bør placeres bort fra varmekilder som
radiatorer, direkte sollys, ovn/komfur eller andre produkter
(også effektforstærkere) der udstråler varme.
10 Strømkilder - Produktet må kun strømfødes som beskrevet i
brugsvejldning eller som angivet på selve produktet.
11 Lysnetledning - Lysnetledninger bør placeres, så de ikke
klemmes af gående eller af genstande placeret på eller
ved dem. Pas især godt på ved stik, stikdåse og dér hvor
ledningen kommer ud af produktet.
12 Rengøring - Brug aldrig rengøringsvæsker. Brug kun en tør
klud til at fjerne støv og snavs.
13 Ved længere tid uden brug - Stikket bør tages ud af
kontakten, hvis apparatet ikke skal bruges gennem
længere tid.
14 Fremmede genstande og væsker - Fremmede genstande
eller væsker må aldrig trænge ind i apparatet gennem
åbningerne.
15 Skade der kræver service - Apparatet bør afleveres til
service på autoriseret værksted i følgende tilfælde:
a) Når lysnetledning eller stik er beskadiget.
b) Når væske eller fremmed genstand er trængt ind
i produktet.
c) Hvis produktet har været udsat for regn.
d) Hvis produktet ikke fungerer korrekt eller hvis
produktets ydelse ændres markant.
e) Hvis produktet udsættes for slag, fald eller anden
skade.
16 Service - Brugeren bør ikke forsøge service udover det som
beskrives i brugsvejledningen. Al anden service henvises til
autoriseret værksted.
18
Page 17

UK DE DK JP
INDHOLDSFORTEGNELSE
1.0 INTRODUKTION 20
2.0 UDPAKNING 20
3.0 PLACERING 20
4.0 TILSLUTNING 21
5.0 TILSPILNING 21
6.0 RENGØRING OG VEDLIGEHOLDELSE 22
7.0 BORTSKAFFELSE 22
8.0 EFFEKT OG LYD 22
9.0 LYTTERUMMET 23
10.0 TEKNISKE SPECIFIKATIONER 23
19
Page 18

1.0 INTRODUKTION
Tillykke med valget af DALI ZENSOR højttalere. For os er det vigtigt, at dine nye DALI højttalere
opstilles og tilsluttes bedst muligt. Vi anbefaler derfor, at du læser manualen og følger
anvisningerne. Du kan læse om opstilling og tilslutning af højttalerne - samt nogle gode råd
om, hvordan du får mest ud af dine nye højttalere. DALI er anerkendt blandt musikelskere over
hele verden for sine unikke højttalere, der alle er konstrueret og designet ud fra kompromisløse
krav til design og lyd. Vores mål for hver eneste DALI højttaler er os altid for øje: At skabe
lydoplevelser i dit hjem, som får dig til at glemme tid og sted.
Husk at tilmelde dig DALIs nyhedsbrev på www.dali-speakers.com.
God fornøjelse!
2.0 UDPAKNING
Udvis forsigtighed ved udpakning, for at undgå skader på indholdet. Afhængigt af hvilken DALI
ZENSOR model du har købt, medfølger der forskelligt tilbehør til højttalerne. Kontroller at alle
dele, angivet i Tabel 1, er medleveret. Gem emballagen til senere brug, hvis højttalerne f. eks.
skal byttes eller serviceres.
3.0 PLACERING
For det optimale resultat, bør højttaleropstillingen være symmetrisk omkring din foretrukne
lytteposition (se Figur 1A - C). Vi anbefaler at du eksperimenterer med forskellige placeringer
– lydkvaliteten varierer, afhængig af højttalernes placering. ZENSOR 1, ZENSOR 3 og
VOKAL højttalerne bør ideelt placeres med diskanten omtrent i ørehøjde, når du sidder i din
foretrukne lytteposition.
ZENSOR 5 og 7 er gulvhøjttalere. De bør placeres mindst 10 – 20 cm fra bagvæg. Ideelt bør
ZENSOR 1, ZENSOR 3 og VOKAL placeres direkte opad væggen.
20
Genstande opstillet mellem højttaler og lyttepositionen kan forringe lydgengivelsen. Højttalerne
er udviklet til at opfylde vores krav om stor spredning af lyden. De bør derfor IKKE vinkles
indad mod lyttepositionen, men positioneres så bagpladen er parallel med bagvæggen (se Figur
2). Ved at sigte højttalerne ret fremad, reduceres forvrængning ved hovedlyttepositionen og
rumintegrationen forbedres. Kravet om stor spredning af lyden sikrer, at lyden fordeles jævnt
over et stort areal i lytterummet.
3.1 DALI ZENSOR 1
Højttalerne kan placeres på stander/hylde eller vægmonteres via det integrerede vægbeslag.
Ved placering på stander eller hylde, kan de medfølgende gummidupper monteres under
højttaleren for en stabil og vibrationsfri opstilling (se Figur 3A). Ved vægmontering, monteres
gummidupperne på højttalerens bagkant (se Figur 3B). Højttalerne vægmonteres ved at fæstne
en skrue i væggen. Skruen skal passe til vægbeslaget på højttalerens bagside (se Figur 3C).
3.2 DALI ZENSOR 3
Højttalerne kan placeres på stander eller hylde. Ved placering på stander eller hylde, kan de
medfølgende gummidupper monteres under højttaleren for en stabil og vibrationsfri opstilling
(se Figur 3A).
Page 19

UK DE DK JP
3.3 DALI ZENSOR 5 og 7
Højttalerne er beregnet til gulvplacering. ZENSOR 5 og 7 kan monteres med de medfølgende
spikes eller gummidupper under højttalerne (se Figur 3D/E). Spikes eller gummidupper kan
forbedre lydgengivelsen. Prøv begge løsninger og vælg den som giver det bedste resultat i din
opstilling. Udvis forsigtighed med spikes, da de kan skade gulvet. Gulvoverfladen kan beskyttes
ved at stille spikes’ene på skiver/mønter eller lignende.
3.4 DALI ZENSOR VOKAL
ZENSOR VOKAL er den dedikerede centerhøjttaler, som er specielt designet til at være placeret
tæt på tv-skærmens store overflade. Du kan placere den over eller under skærmen, på et stativ
eller på en hylde. Vi anbefaler, at du monterer de medfølgende gummikanter for at opnå en
stabil og vibrationsfri opsætning (se Figur 3F).
4.0 TILSLUTNING
Forbindelsen til din forstærker er uhyre vigtig for lydoplevelsen. Brug altid kabler af samme
type til alle dine DALI ZENSOR højttalere. Kablerne i højre og venstre side skal helst have
samme længde. En ofte overset detalje er tilslutning i korrekt fase, dvs. at rød terminal (+) på
forstærker skal forbindes med rød terminal (+) på højttaleren, og sort terminal (-) på forstærker
skal forbindes med sort terminal (-) på højttaleren (Se Figur 4).
Den perfekte lydoplevelse kræver, at højre højttalere forbindes til udgangsterminalen mærket
“R” eller “Right” på din forstærker og venstre højttalere til udgangsterminalen mærket “L”
eller “Left” på din forstærker. Er blot en enkelt højttaler i et stereo- eller surroundsystem ikke
tilsluttet i fase, vil bassen opleves som svagere og lydbilledet virke diffust.
BEMÆRK: Inden du tilslutter kabler eller foretager ændringer i tilslutninger, skal du altid slukke
for din forstærker.
BEMÆRK: Sørg for, at ledningerne sidder på plads i terminalerne, og at der ikke er nogle løse
ender, som kan forårsage kortslutning og beskadige forstærkeren (Se Figur 5).
BEMÆRK: Hvis DALI ZENSOR anvendes i et surround system, skal du følge instruktionerne for
din surround forstærker/receiver.
5.0 TILSPILNING
Ligesom ethvert andet mekanisk system skal en højttaler ”spilles til” for at kunne yde sit
bedste. Derfor vil du i den første periode opleve en gradvis forbedring af højttalernes lydkvalitet.
Tilspilningsperioden varierer i forhold til brug og lydniveau. Du skal regne med op til 100 timers
playback førend dine højttalere opnår maximum ydelse. I modsætning til andre mekaniske
systemer forlænges en højttalers levetid ved normal, regelmæssig brug.
21
Page 20

6.0 RENGØRING OG VEDLIGEHOLDELSE
Rengøring af kabinetterne foretages bedst med en blød og tør klud. Er kabinetterne tilsmudsede,
kan en blød klud, der er hårdt opvredet i et mildt universalrengøringsmiddel, benyttes. Vær
meget forsigtig ved evt. aftørring af højttalermembranerne, da disse er meget følsomme.
Stoframmerne rengøres med en almindelig klædebørste eller aftørres med en hårdt opvredet
og fnugfri klud med mildt universalrengøringsmiddel.
6.1 Undgå direkte sollys:
Højttalernes overflade kan falme eller blive misfarvet med tiden, hvis den udsættes for direkte
sollys. Undgå derfor at placere højttalerne i direkte sollys.
7.0 BORTSKAFFELSE
Produktet må ikke blandes med almindeligt husholdningsaffald ved bortskaffelse. Lovgivningen
kræver, at elektroniske apparater indsamles for korrekt bortskaffelse, genindvinding og genbrug.
Private husstande i EU-medlemslandene, Schweiz, Liechtenstein og Norge kan gratis aflevere
deres brugte elektroniske apparater på kommunale genbrugspladser eller til forhandlere (ved
køb af et nyt lignende produkt). Hvis du er bosiddende i andre lande end ovennævnte, bedes du
kontakte dine lokale myndigheder for oplysninger om korrekt bortskaffelse. Ved at følge disse
retningslinjer sikrer du, at dit produkt bortskaffes, genindvindes og genbruges på korrekt vis for
at forhindre potentielle negative konsekvenser for miljøet og folkesundheden.
8.0 EFFEKT OG LYD
Hvor højt en højttaler kan spille og stadig lyde godt, afhænger fuldstændigt af det signal, den
skal gengive. Derfor kan man ikke i praksis definere et entydigt niveau, der kan bruges til at
sammenligne forskellige højttalere.
Det ligger fast, at masser af ren og uforvrænget effekt fra en stor forstærker er bedre end
et forvrænget signal fra en lille forstærker, der er presset ud over sin ydeevne. Signalet fra
en forstærker, der forvrænger (klipper), indeholder langt mere højfrekvensinformation end et
uforvrænget signal, og belaster derfor diskantenheden meget hårdt. Det er derfor, højttalere
som oftest ødelægges af små forstærkere, der arbejder for hårdt - og kun sjældent af store
forstærkere, der nærmest kører i tomgang.
22
Det er værd at notere sig, at når tonekontrollerne er skruet over neutral indstilling, belastes
både højttalere og forstærker væsentligt. På et godt lydanlæg bør tonekontroller kun bruges
til at kompensere for en dårlig optagelse og ikke til permanent at kompensere for svagheder
andre steder i anlægget. DALI anbefaler derfor, at tonekontrollerne generelt er justeret til neutral
position, og at det ønskede lydbillede opnås ved korrekt placering af højttalerne. Hvis du sørger
for ikke at spille højere, end at lyden fortsat er klar og uforvrænget, minimerer du belastningen
på både højttalere og forstærker.
Alle DALI højttalere er konstrueret , så de altid giver en optimal belastning af forstærkeren - det
kaldes også for lineær impedans - og resultatet er et tydeligt mere åbent og detaljeret lydbillede.
Page 21

UK DE DK JP
9.0 LYTTERUMMET
Ethvert rum har sin egen og særegne akustik, der præger den måde, vi oplever lyden fra
højttalerne. Reelt handler det om, hvordan rummet modtager lydenergien og skaffer sig af med
den igen. Du kan påvirke dit lytterums akustik på forskellige måder.
En del af den lyd, du hører, kommer ikke direkte fra selve højttaleren men fra refleksioner fra
gulv, loft og vægge. Disse refleksioner dæmpes af bl.a. møbler, planter og tæpper. Er lydbilledet
for lyst, kan bløde ting som gardiner og tæpper hjælpe. For eksempel har det en vis indflydelse
at trække gardinerne for, når du vil undgå refleksioner fra store glasflader.
Både mængden og kvaliteten af den dybe bas afhænger af rummets størrelse, form og
højttalernes placering. F.eks. fremhæves bassen ved en placering nær side- eller bagvæg og
endnu mere ved placering i et hjørne. Her øges refleksionerne fra væggene dog ganske meget.
Da det i sidste ende er dine ører, der bestemmer, anbefaler vi, at du eksperimenterer dig frem
til den placering, der giver det lydbillede, du ønsker.
Som grundregel skal du undgå store, hårde reflekterende flader umiddelbart omkring
højttalerne, da disse vil virke som såkaldte spejlkilder og ødelægge det rumlige perspektiv i
lydbilledet. Prøv f.eks. at hænge et vægtæppe bag højttaleren, lægge et tæppe foran eller stille
en større plante ved siden af højttaleren og oplev, hvor overraskende stor indflydelse det har på
præcisionen i lydbilledet.
10.0 TEKNISKE SPECIFIKATIONER
I Tabel 2 finder du de mest almindelige specifikationer for vores højttalere. Husk, at der findes
utallige måder til bedømmelse af højttalere, men ingen af dem fortæller noget om, hvordan
en højttaler egentlig lyder. Det er kun dine ører, der afgør, om én højttaler lyder bedre end en
anden. Ligesom alle vores andre højttalere er DALI ZENSOR designet til at gengive musik så
ærligt som muligt.
God fornøjelse med din nye DALI ZENSOR højttaler!
23
Page 22

注意
感電防止のため、本体を開けないでください。
感電の危険を軽減するため、バックパネルは取り外
さないでください。
内部にお客様が点検整備できる部品はありません。
点検整備は販売店にご依頼ください
この表示は、本機の筐体内部に感電の危険
がある高電圧部があることを示していま
す。
この表示は、使用中もしくは保守(または
修理)する上で重要な説明が書かれている
ことを示しています。
1 説明書をお読みください ― 本機をご使用になる
前に、この取扱説明書に書かれている安全上の注
意をよくお読みください。
2 取扱説明書は保管してください ― 本書を必要な
時に読めるよう保管しておいてください
3 注意事項を守ってください ― 本体および操作説
明書に記載された注意は必ず守ってください。
4 説明書に従ってください ― 取扱説明書の説明に
従い正しくお使いください。
5 水と湿気 ― 本機は、浴槽、洗面台、台所のシン
ク、洗濯用シンク、湿った地下室、プールの近く
など、水回りで使用しないでください。
6 壁付け ― 本機の壁付けは必ずメーカーの推奨事
項に従って行ってください。
7 通気 ― 本機は、適切な通気が妨げられないよう
な場所や位置に設置してください。
例えば、ベッド、ソファ、敷物など、通気孔の妨
げになるものの上、通気孔を通る空気の流れが妨
げられる作り付けの家具等の中には設置しないで
ください。
8 熱 ― 本機は、ラジエーター、ヒートレジスタ、
ストーブ、あるいは熱を発するその他の機器など
の熱源の近くに設置しないでください。
9 お手入れ ― 液体洗浄剤は使用しないでくださ
い。ほこりや油脂は乾いた布で拭き取ってくだ
さい。乾いた布以外のものは使わないでくださ
い。
10異物や液体の浸入 ― 開口部から内部に異物が
入ったり液体をこぼさないように注意してくだ
さい。
11点検整備を必要とする損傷―以下の場合には、
販売店もしくは輸入代理店に本機の点検整備を
依頼してください。
a)本機に異物が中に入ったり、液体をこぼ
れたりした場合
b)雨に濡れた場合
c)正しく動作しない場合、または性能に著
しい変化が見られた場合
d)本機を落下させた場合、または筐体が損
傷した場合
12点検整備 - 本機の点検整備は操作方法で説明さ
れている以外は行わないでください。説明され
ていない点検整備は販売店もしくは輸入代理店
に依頼してください。
24
Page 23

UK DE DK JP
内容
1.0はじめに 26
2.0開梱 26
3.0設置位置 26
4.0接続 27
5.0慣らし運転 27
6.0掃除と保守 27
7.0パワーと音圧 28
8.0リスニングルーム 28
9.0技術仕様 28
25
Page 24

1.0はじめに
DALI ZENSORをお買い上げいただき、ありがとうございます。本取扱説明書をよく読
み、推奨事項を守って適切に設置と接続を行ってください。本書では、設置と接続の説
明、そして新しいスピーカーを最大限に活かすためのヒントとアドバイスをご紹介して
います。妥協を許さない設計基準と性能基準によって作られるDALI独自のスピーカー
は、世界中で称賛を集めています。DALIの一台一台のスピーカーは、当社の最大のコミ
ットメントである「時間や場所を忘れさせてくれるリスニング体験を自宅で作り出すこ
と」というゴールを常に目指しています。
2.0開梱
部品の開梱をする時は傷を付けないようご注意ください。DALI ZENSORの付属品は、お
買い上げいただいたモデルによって異なります。箱に部品がすべて同梱されてことを確
認してください(表1を参照)。スピーカーの移送や点検整備が必要になった場合に備
えて、包装は保管しておいてください。
3.0設置位置
スピーカーはお気に入りのリスニングポジションの周りに対称に設置してください(図
1A– Cを参照)。音質はスピーカーの位置に左右されますので、様々なスピーカーの位
置をお試しになることをお薦めします。ZENSOR 1と3とVOKALは、お気に入りのリスニン
グポジションに座った状態でトゥイーターがほぼ耳の高さにくる位置が理想です。
ZENSOR5と7はフロアスタンディング型スピーカーです。後ろを壁から10~20cm以上離
して設置してください。ZENSOR 3は後ろを壁から5~30cm以上離して設置してくださ
い。ZENSOR1は、壁を背に壁と平行に並べて設置してください。
スピーカーとリスニングポジションの間に障害物があると音質に悪影響が出る可能性が
あります。スピーカーは、「ワイドディスパージョン」という当社の基本的考え方に沿
って設計されていますので、本体はリスニングポジションの方に傾けず後ろの壁に平行
に設置してください(図2を参照)。平行に設置すると、スゥイートスポットが広くと
れ、リスニングルーム内においてサウンドが均等に広がります。
26
3.1DALIZENSOR1
スタンドや棚の上に設置するか、または背面のブラケットで壁に掛けることができるス
ピーカーです。スタンドや棚に設置する場合には、同封のゴムバンパーをスピーカーの
下に取り付けると振動せずに安定します(図3Aを参照)。壁に掛ける場合、バンパーは
背面のエッジに取り付けてください(図3Bを参照)。壁にはねじを1本取り付ければ掛
けられます。このねじは本体背面にある壁ブラケットにフィットしなければなりません
(図3Cを参照)。
3.2DALIZENSOR3
スタンドもしくは棚の上に設置いただくスピーカーです。同封のゴムバンパーをスピー
カーの下に取り付けると振動せずに安定します(図3Aを参照)。
Page 25

UK DE DK JP
3.3DALIZENSOR5と7
ZENSOR5と7はフロアスタンド型スピーカーで、スパイクかゴムバンパーを本体の下に付
けて使用します(図3D/Eを参照)。緩み止めナットは、締めすぎないようにご注意くだ
さい。スパイクやゴムバンパーを使うと音質が向上します。ご自分のリスニングルーム
において最高の音質が得られるよう、両方を聞き比べてください。スパイクは下にコイ
ンなどを入れて保護しないと床に傷が付く場合があるのでご注意ください。
3.4DALIZENSORVOKAL
ZENSOR VOKALはセンターチャンネル専用で、大型のテレビモニターの近くに設置するよ
うに設計されています。 設置場所に関してはテレビモニターの上下の棚の上に置いて
ください。同封のゴムバンパーをスピーカーの下に取り付けると振動せずに安定します
(図3Fを参照)。
4.0接続
実際のリスニングには、アンプにしっかりと正しく接続することが大変重要です。左右
のチャンネルには必ず同じ型と長さのケーブルをお使いください。
接続を正しい相で行うという細かいことは無視されがちです。アンプの赤い端子(+)
はスピーカーの赤い端子(+)に、アンプの黒い端子(-)はスピーカーの黒い端子(
-)に接続してください(図4を参照)。ステレオやサラウンド設定では、一つのスピ
ーカーで接続相が一致しなくても、低域が弱くなり、ステレオイメージの焦点が定まり
ません。
最適なリスニング体験をお求めの場合、(リスニングポジションから見て)右のスピー
カーは、アンプの「R」または「Right」と書かれた出力端子、左のスピーカーは、アン
プの「L」または「Left」と書かれた出力端子に接続してください。
注意: ケーブルの接続または接続の変更は、必ずアンプの電源を切ってから行ってくだ
さい。
注意: 露出した導体は、ターミナルでしっかりと固定し、ワイヤーが弛まないようにし
てください。ワイヤーが弛んでいるとショートによりアンプが破損する場合があります
(図5を参照)。
注意: サラウンドシステムでDALI ZENSORをお使いになる場合は、サラウンドアンプに
付属している取扱説明書に従ってください。
5.0慣らし運転
あらゆる機械と同様に、スピーカーも最高の状態で動作するには「慣らし運転」期間が
必要です。慣らし運転期間は使用方法と再生音量によって異なります。最大性能に達す
るまでの再生は最長100時間を見込んでください。また、他の機械とは異なり、スピー
カーは音楽を定期的に正常に再生すると寿命が延びます。
6.0掃除と保守
本体の掃除には乾いた柔らかい布を使ってください。汚れは、万能洗剤を染み込ませて
固く絞った柔らかい布で拭いてください。スピーカーコーンはこわれやすいので、拭く
時には特に注意してください。フロントグリルは、洋服ブラシで汚れを払い落し、弱い
万能洗剤を染み込ませて固く絞った糸くずの出ない布を使って拭いてください。
27
Page 26

6.1直射日光を避ける
スピーカーの表面は、直射日光に当たると時間がたつにつれて色があせたり変色したり
する場合があります。直射日光の当たる所には設置しないようにしてください。
7.0パワーと音圧
スピーカーがどの程度の大音量まで良質なサウンドを保てるかは、再生する信号に完全
に左右されますので、スピーカーの比較の基準とする明確なレベルを定義することは実
際のところ不可能です。
小さいアンプから能力を超えた歪みのある信号が出るよりも、大きいアンプから純粋で
歪みのない信号が十分に出るに越したことはありません。歪んだ(クリッピング)アン
プからの信号は、歪みのない信号よりもはるかに多くの高周波数情報が含まれているた
め、トゥイーターに重い負担がかかります。そのため、スピーカーは、小さいアンプが
無理をしすぎて破損する場合が多く、大きなアンプ(事実上空回りしている)によって
破損する場合はまれです。
音質調節をニュートラル設定以上にすると、スピーカーとアンプの両方に大きな負担が
かかりますのでご注意ください。優れたサウンドシステムの場合、音質調節を使用する
のは劣悪な録音物を補う場合のみとし、システム内の弱点を恒久的に補うために使用す
るのは避けてください。DALIは、音質調節は原則的にニュートラルに設定し、求めるサ
ウンドイメージはスピーカーのポジショニングを適切に行って実現することをお薦めし
ます。クリアで歪みないサウンドを実現する低音量を維持するようにすれば、スピーカ
ーとアンプにかかる負担は最小限になります。
DALIのスピーカーはすべて、アンプの負担が最適になるよう各帯域のインピーダンスが
フラットで設計されているため、はるかに開放的できめ細かい音のイメージが得られま
す。
28
8.0リスニングルーム
部屋の構造によって、スピーカーから出るサウンドの聞こえ方が変わります。耳に届く
サウンドは、スピーカーから直接出るサウンドと床や天井、壁に反射した音です。反射
音はサウンド体験に影響します。一般的に強い反射が生じた場合、音響再生の精度と空
間効果が妨げられる可能性がありますので、基本原則として大きく、硬く、且つ音を反
射するもののすぐそばにスピーカーを設置することは避けてください。スピーカーと反
射面の間に植物などを置くと反射が抑えられる場合があります。サウンドが鮮やかすぎ
る場合には、カーペットやカーテンなどの柔らかいものを使うと良いでしょう。重低音
の音量と音質はいずれも、部屋の大きさと形状、スピーカーの位置で決まります。スピ
ーカーの側面または背面を壁に近づけて設置すると低域が強調されます。
部屋の角に設置すると低域はさらに強調されますが、反射も増えます。
9.0技術仕様
当社スピーカーの最も代表的な仕様を表2にまとめました。スピーカーには数えきれな
いほどの評価方法がありますが、「スピーカーが実際にどのようなサウンドを出すか」
がわかるものは一つもありません。他と比較したスピーカーの優劣を決めるのはご自分
の耳しかありません。当社のスピーカーの例に漏れず、DALI ZENSORシリーズも音楽を
最大限忠実に再現できるよう設計されています。
新しいDALIZENSORをお楽しみください。
 Loading...