

OWNER’S MANUAL
Dali Suite
Dali Suite
BRUGSANVISNING

2
THANK YOU FOR
CHOOSING DALI
We know you can’t wait to hear your new DALI loudspeakers, so we’ll save the more
technical stuff until later. That way, you’ll have something to read once your system is up
and running.
But rst, unless you are experienced and condent in hi- matters, please take the time to
read at least the sections on CONNECTIONS and PLACEMENT, before wiring your new
DALI loudspeakers to your system.
It is the goal of this manual to assist you in obtaining the nest possible performance from
your new DALI loudspeakers. If additional assistance is required, always feel free to contact
your authorised DALI dealer.
STEREO AND SURROUND
CONNECTION
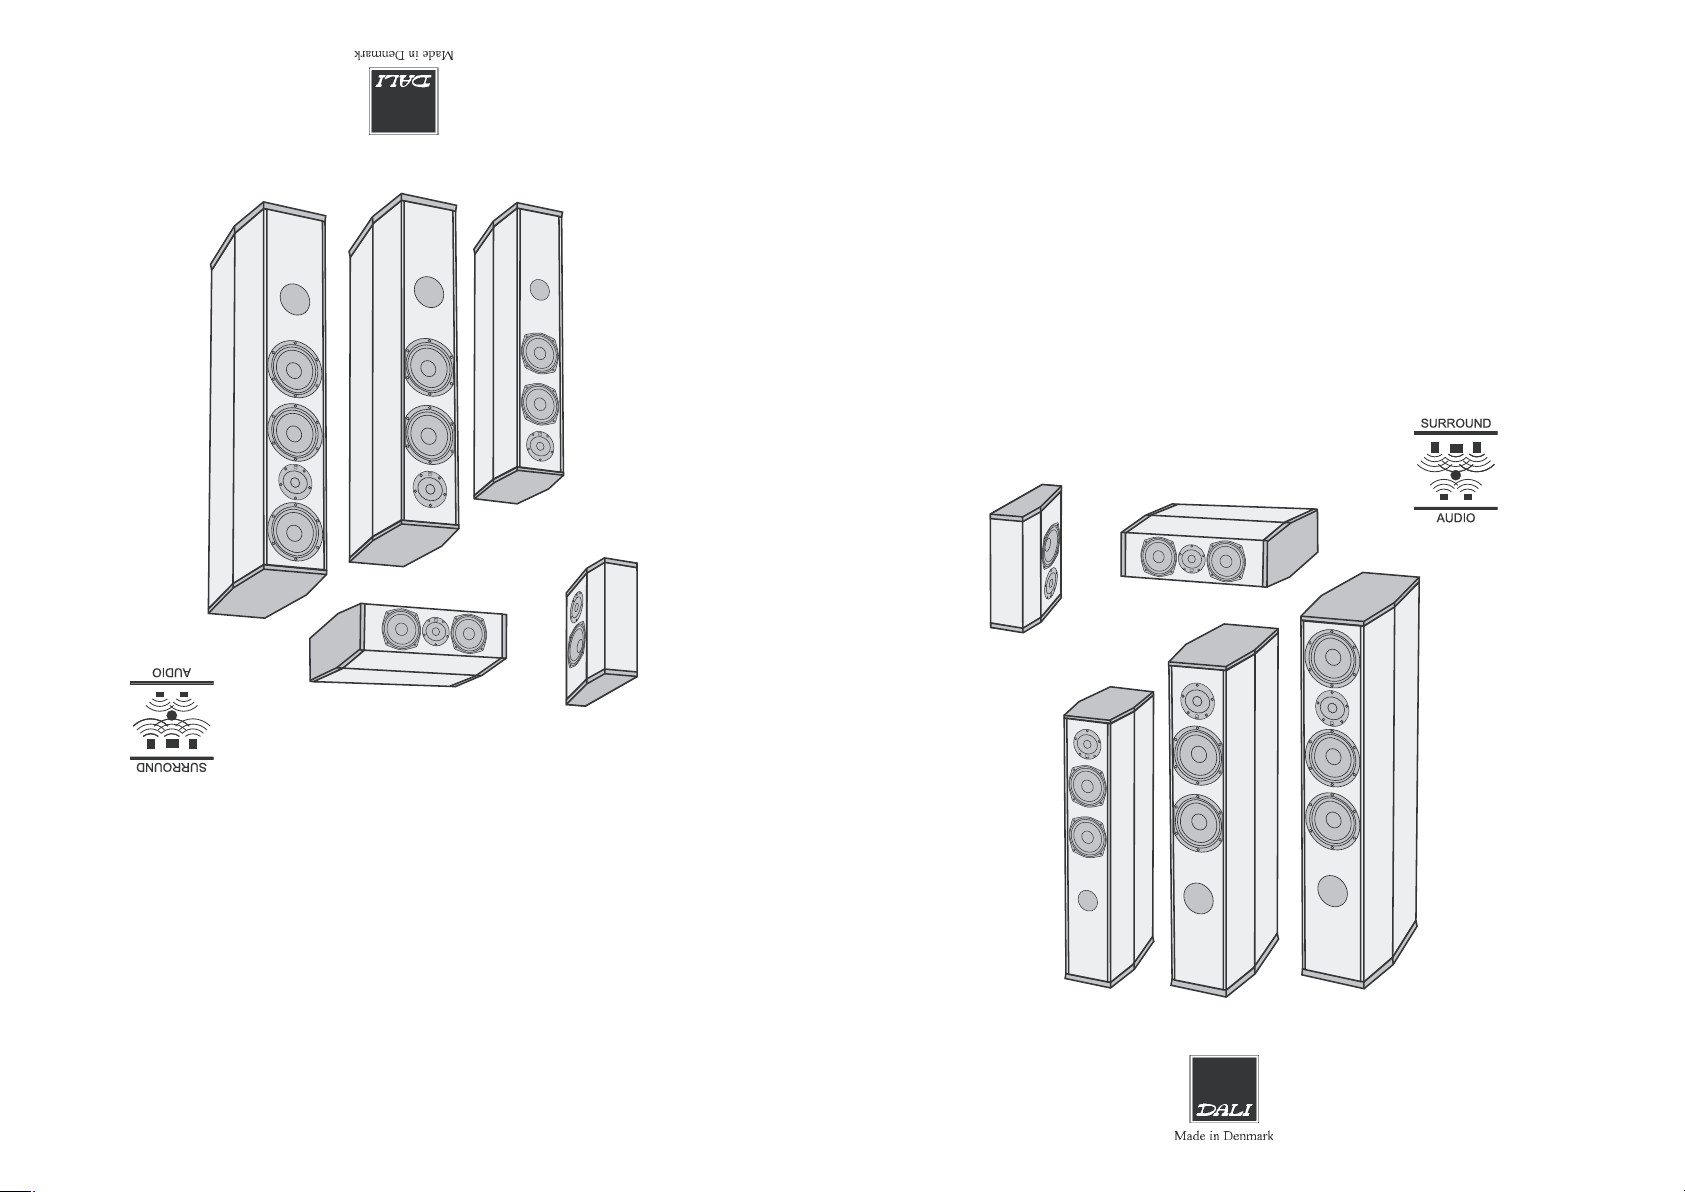
The loudspeaker carton indicates whether the
speaker inside is Left or Right or Centre. Position
them correctly.
Always turn your amplier off before connecting
or disconnecting any cables. Always use equal
lengths of cable for the left and right speakers.
tes et terminalpar
talere til surroundforstærkeren som vist i (g. 2).
I et surroundanlæg, tilsluttes center- og baghøjt-
til forstærkeren som vist i (g. 1).
minaler. Ved normal brug, tilslut
terminaler og een mellem højttalerens to sorte terhåndstrammet, een mellem højttalerens to røde
de medfølgende metalbøjler være på plads og
ønsker at bruge bi-wiring eller bi-amping, skal
DALI Suite har to sæt terminaler. Hvis du ikke
reoperspektiv og svag bas.
fase.“ Tilslutning ude af fase giver et diffust ste(-) terminal. Derved er alle højttalertilslutninger „i
(+) terminal og sort minus (-) terminal til sort minus
forstærker med rød plus (+) terminal til rød plus
Højttalerkabel skal tilsluttes mellem højttaler og
stre og højre højttaler.
på tilslutninger. Brug altid lige lange kabler til venSluk altid for din forstærker/receiver før du ændrer
lyttepositionen.
højttaler placeres til venstre og til højre set fra
stre, højre eller centerhøjttaler. Venstre og højre
Emballagen angiver om der er tale om en ven-
Fig. 2. Surroundtilslutning
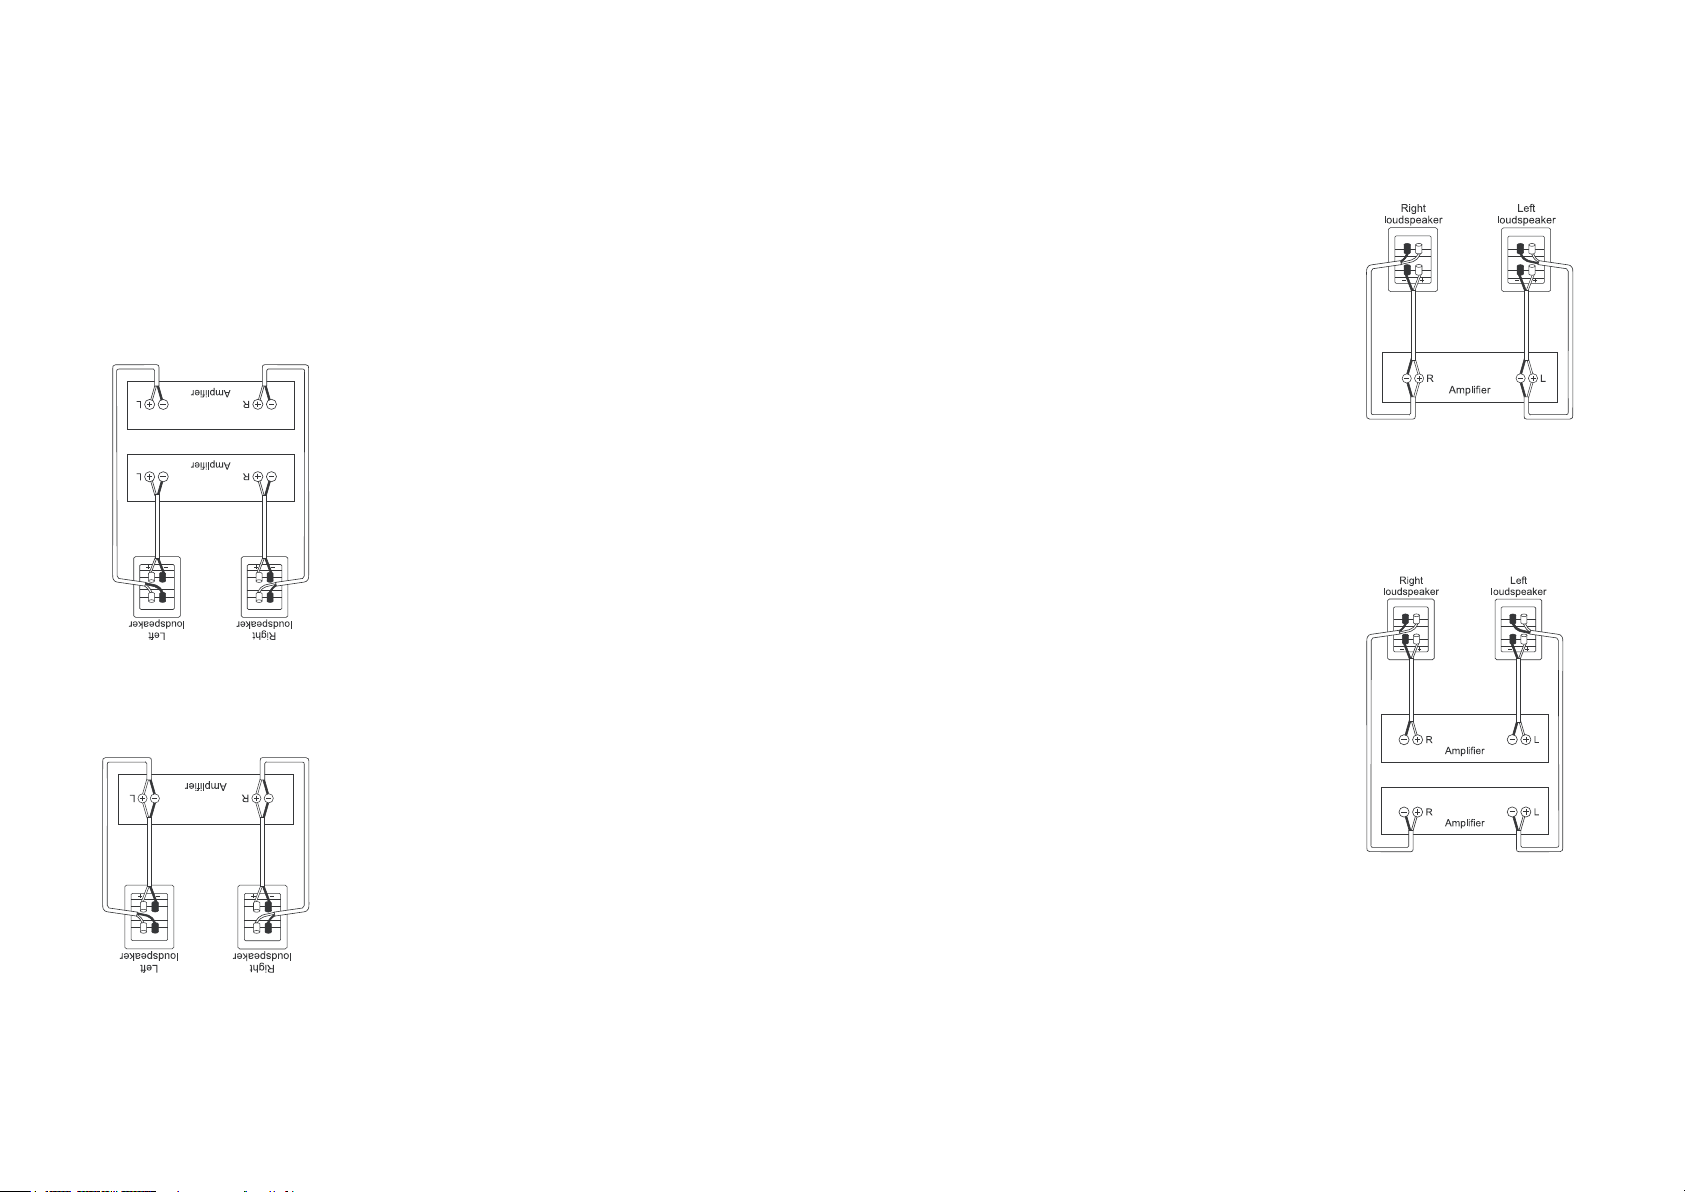
Fig. 1. Normal stereotilslutning
Fig. 1. Normal Stereo Connection
Fig. 2. Surround Connection
Cable should be connected between loudspeaker
and amplier, red plus (+) terminal to red plus (+)
terminal and black minus (-) terminal to black minus (-) terminal. It is important that the connections
are made correctly and „in phase.“ Incorrect, outof-phase connection will result in a diffuse stereo
image and weak bass.
Your DALI Suite loudspeakers have two pairs of
terminals. If you do not choose to use bi-wiring
or bi-amping, make sure that the enclosed metal
straps are in place and tightened by hand, one
connecting red terminal to red terminal, the other
connecting black terminal to black terminal. For
normal use, connect only one terminal pair to the
amp as shown in (Fig. 1).
In a surround system, connect centre, front and
rear surround loudspeakers to the surround amp
as shown in (Fig. 2).
2
TILSLUTNING
der er lagt i dine DALI højttalere.
Målet med denne manual er at sikre dig størst mulig fornøjelse af den ekspertise og kvalitet
og PLACERING, inden højttalerne tilsluttes.
Med mindre du har en vis teknisk indsigt, bør du mindst læse afsnittene om TILSLUTNING
lægget til at spille.
højttalere. Det tekniske stof gemmes til sidst, så du har noget at læse, når du har fået anDenne manual er opbygget, så du hurtigt kan komme i gang med at lytte til dine nye DALI
DALI HØJTTALERE
TILLYKKE MED VALGET AF
3
Fig. 4. Bi-Amping
Fig. 3. Bi-Wiring
BI-WIRING AND BI-AMPING
dig en bedre lydkvalitet.
Kabelkvalitet og konstruktion gør en forskel. Køb derfor kabel af god kvalitet, så du sikrer
med jævne mellemrum, da forbindelserne kan løsne sig med tiden.
dette kan forårsage kortslutning og ødelægge forstærkeren. Efterspænd forbindelserne
Spænd alle tilslutninger, så kablerne ikke kan løsne sig. Løse tråde må ikke stritte ud, da
punkter samt udvidet dynamik.
amping giver endnu større forbedring på disse
og mindre intermodulationsforvrængning. BiBi-wiring giver større sammenhæng og åbenhed
samme forstærker.
lers højfrekvensterminaler til højre kanal på den
forstærker. Tilslut højttalerkabel fra højre højttakvensterminaler til venstre kanal på den anden
Tilslut højttalerkabel fra venstre højttalers højfreforstærker
højttalers basterminaler til højre kanal på samme
af forstærkerne. Tilslut højttalerkabel fra højre
højttalers basterminaler til venstre kanal på en
reoforstærkere. Tilslut højttalerkabel fra venstre
Til bi-amping, (g. 4) anbefales to identiske ste-
samme udgangsterminaler på forstærkeren.
sluttes kabel fra højttalerens andet terminalpar til
udgangsterminaler på forstærkeren. Dernæst tillem eet terminalpar på hver højttaler til tilsvarende
Til bi-wiring (g. 3), tilsluttes højttalerkabel mel-
forbundet til deleltrets bassektion.
højfrekvenssektion, mens det nederste par er
på højttalerene er forbundet direkte til deleltrets
metalbøjlerne fjernes. Det øverste terminalpar
Før du bruger bi-wiring eller bi-amping, skal
lydkvalitet.
DALI anbefaler bi-wiring eller bi-amping for bedre
We recommend bi-wiring or bi-amping for improved sound quality.
To bi-wire or bi-amp, remove the metal straps
before going on to the next steps. The top terminal pair on each speaker connects to the high
frequency crossover section and the bottom terminal pair connects directly to the low frequency
crossover section.
To bi-wire (g. 3), connect cable from one pair
of terminals on each speaker to the amplier’s
output terminals. Then, connect another cable
from the second pair of speaker terminals to the
SAME terminals on the amplier.
To bi-amp (g. 4), two identical stereo ampliers
should be used. Connect cable from the bass
terminals of the left speaker to the left channel
of one of the ampliers. Connect cable from the
bass terminals of the right speaker to the right
channel of the same amplier.
Connect cable from the high frequency terminals
of the left speaker to the left channel of the second
amplier. Then, connect cable from the high frequency terminals of the right speaker to the right
channel of the second amplier.
Bi-wiring offers improvements in the areas of
coherence and openness and reduces intermodulation distortion. Bi-amping offers further
improvements in these areas with the added
benet of increased dynamics.
Tighten all connections securely so that the cable cannot slip out. Make certain that no loose
strands of wire are sticking out. Wire connected
to a terminal must never touch wire connected to
any other terminal.
Cable quality and design do make a difference. Buy the best cable you can reasonably afford. In this simple way, you can raise the performance of your system to a higher level.
Fig. 3. Bi-Wiring
Fig. 4. Bi-Amping
BI-WIRING OG BI-AMPING
3

PLACEMENT
Fig. 5. Ideal height for listening
Fig. 6. Centre speaker placement
Fig. 7. Placement of stereo/surround
front speakers
Even small differences in the positioning of loudspeakers in a room can have signicant impact
on performance, especially on soundstage focus
and bass quality.
DALI loudspeakers are capable of exceptional
performance in these and other crucial areas,
but you must experiment with placement in order
to nd the optimum position.
Unfortunately, there are no hard and fast rules to
follow, but here are a few guidelines.
There should be no objects between the speakers
and the listening position. Obstructions to the free
passage of sound cause uneven frequency response and poor stereo imaging.
The distance between the Left and Right speaker and between each speaker and the central
listening position should be identical. While DALI
loudspeakers provide excellent performance at
positions off to the side, for serious, critical listening we strongly recommend a central listening
position.
DALI loudspeakers should face directly ahead,
with no toe-in (Fig. 7), this does not apply for
centre and rear cannel speakers.
The DALI Suite centre speaker is specically
tuned for placement near the large, at surface
of a TV screen. The DALI centre speaker should
be placed on the supplied support mat directly
upon or on a shelf just below the television with
the speaker’s front edge along the same line as
the TV screen (Fig. 6).
The support mat is designed so the centre channel
speaker can be angled up or down towards the
listening position. The three ns of the support mat
should be oriented towards the rear of the centre
channel speaker.
4
Soklen vendes med de tre “nner“ bagud.
op eller ned mod lytterpositionen.
Soklen er designet så centerhøjttaleren kan vippes
samme plan som TV-skærmen (Fig. 6).
på en hylde under TV-apperatet med forpladen i
på den medfølgende sokkel, enten ovenpå eller
aleren
plane overade. Man bør placere centerhøjttstrueret til placering tæt på TV-skærmens store
DALI Suite centerhøjttaleren er specielt kon-
og baghøjttalere.
itionen (Fig. 7), dette gælder dog ikke for centerDALI højttalere bør ikke vinkles ind mod lyttepos-
til kritisk lytning.
siderne, anbefaler vi at man placerer sig centralt
højttalere har glimrende spredning af lyden ud til
central lytteposition bør være ens. Selv om DALI
fronthøjttaler og mellem hver af højttalerne og en
Afstanden mellem højre („R“) og venstre („L“)
frekvensgang og forringet stereoperspektiv.
og lyttepositionen. Forhindringer forårsager uens
Der må ikke være genstande mellem højttalerne
men her er nogle nyttige råd:
Uheldigvis ndes der ingen klare og faste regler,
for at nde den optimale placering.
afgørende punkter, men man må eksperimentere
DALI højttalere er fremragende på disse og andre
stereopræcision og basgengivelse.
rum kan få stor indydelse på lyden, specielt på
Selv små ændringer af højttalernes placering i et
fronthøjttalere
Fig. 7. Placering af stereo/surround
Fig. 6. Placering af centerhøjttaler
Fig. 5. Ideal lyttehøjde
PLACERING
4

5
THE LISTENING ROOM
Your DALI loudspeakers have been designed to
convert the incoming electrical signal to acoustic
energy as accurately as possible. But speakers
are only one link in the audio chain which be-
mere præcist.
basgengivelsen op og gøre stereoperspektivet
gulvtæpper. Spikes vil i dette tilfælde stramme
leren bedre til gulvet, specielt hvis man har tykke
ikke vipper. Spikes kan bruges til at koble højttaman sørge for at højttaleren står godt fast og
Når man har fundet den bedste placering, bør
lance, som man synes bedst om.
forskellige placeringer, for at nde den klangbabashævning. Man bør derfor eksperimentere med
Hjørneplacering giver normalt en endnu kraftigere
ved en højttalerplacering nær side- eller bagvæg.
rummets størrelse og form. Bassen fremhæves
Kvaliteten og mængden af dybbas afhænger af
gins with the quality of the recorded material,
turntable/DVD etc., interconnects, the amplier,
speaker cables and nally ends with the listening
room itself.
Loudspeakers perform best in rooms with normal
furnishings such as bookshelves, owers, vases,
and soft furniture. Removing a vase, opening a
curtain slightly or moving a chair a few inches can
actually make a big difference. Try to avoid large,
hard, at surfaces near the speakers.
If the sound is on the bright side, closing curtains
may help. The heavier the curtain, the greater
the effect. Rugs or carpets will damp unwanted
reections from a hardwood oor.
dæmpe uønskede gulvreeksioner.
virkning.Væg-til-væg tæpper eller løse tæpper kan
trække gardiner for. Jo tungere gardiner, jo større
Hvis lyden er til den lyse side, kan det hjælpe at
højttalerne.
dramatisk. Prøv at undgå store, hårde ader nær
for eller blot ytter lidt rundt, kan det ændre lyden
o.s.v. Hvis man fjerner noget, trækker gardiner
stuemiljø med bogreoler, planter, tæpper, sofa,
Højttalerne spiller bedst i et normalt daglig-
og som ender til sidst med selve rummet.
nalkabler, forstærker, højttalerkabler, højttalerne
materiale, grammofon/CD-afspiller/DVD mm., sigeet led i en kæde, der starter med det optagede
så præcist som muligt. Men højttalerne er kun
indkommende elektriske signal til akustisk energi
Dine DALI højttalere er designet til at omdanne det
The quality and quantity of bass depend on the
size and shape of the room. Experiment with various positions. Bass will be reinforced by placement near side or rear walls, so, naturally, corner
placement offers substantial bass boost. Find the
position that offers the best balance of sound for
your room and musical tastes.
When you have found the best position, make
certain that the loudspeaker is perfectly level and
cannot rock back and forth. Spikes may be used
to couple the speaker more effectively to the oor.
Spikes are especially recommended on surfaces
with thick carpeting. Spikes will generally tighten
up bass response and sharpen up the focus of
the stereo image.
LYTTERUMMET
5

POWER HANDLING
6
The power handling of a loudspeaker is very much
dependent on the type of music it is called upon
to reproduce at any given time. Since a music
signal or lm soundtrack simultaneously consists
of a broad range of frequencies, it is not possible
to dene maximum power handling in meaningful
terms.
In the real world, large amounts of clean, undistorted power from a big amp is better than the
distorted output of a small amp pushed beyond
its limits. More speakers are damaged by small
amps working too hard, than by big amps coasting
along.
Turning tone controls up beyond their neutral
centre position greatly increases power demands.
Tone controls are intended for occasional use to
improve older recordings or bad recordings. We
strongly advise against using them to compensate permanently for weaknesses elsewhere in
the audio system. Experimenting with loudspeaker
placement may be all it takes to achieve a much
more musical result.
Under normal conditions, overloading is heard
as distortion (clipping) and a loss of clarity. If you
always keep the level below this point, there will
be nothing to worry about.
mere præcis.
lige kraftigt ved lyttepositionen. En præcisionslydtryksmåler gør indstillinger hurtigere og
Følg surroundforstærkerens brugsanvisning, og indstil alle kanaler, så højttalerne spiller
Justering af niveauer
SURROUND
får man sjældent problemer.
klarhed. Hvis man spiller på et passende niveau,
af forstærkeren forvrængning (klipning) og nedsat
Under normale forhold, medfører overbelastning
mere musikalsk resultat.
lerne kan være det der skal til for at opnå et meget
steder i anlægget. En anden placering af højttapermanent at kompensere for svagheder andre
fraråder på det kraftigste, at man bruger dem til
friske en gammel eller dårlig optagelse op. Vi
tering væsentligt. Tonekontroller er beregnet til at
lingen, øges kravene til højttalernes effekthåndVed at skrue tonekontrollerne op over midterstil-
i tomgang.
hårdt, end af store forstærkere der nærmest kører
ødelægges af små forstærkere, der arbejder for
der presses ud over sin ydeevne. Flere højttalere
end et forvrænget signal fra en lille forstærker,
uforvrænget effekt fra en stor forstærker er bedre
I praksis kan man dog sige, at masser af ren
SURROUND SOUND
Adjusting surround levels
Follow the instructions included with your surround amplier, match power levels so that all
speakers sound equally loud at the listening position. An accurate Sound Pressure Level
metre will make system calibration easier and more precise.
6
kunne bruges fornuftigt.
denere et entydigt maksimalt niveau, så tallet
af frekvenser og niveauer, vil det være umuligt at
musiksignal på een gang består af et bredt spekter
meget af den musik som den skal gengive. Da et
En højttalers evne til at „spille højt“ afhænger
EFFEKT OG LYDTRYK

7
DYNAMICS
Unfortunately, too much attention is focused on the ability to play LOUD. Much more important for your musical and cinematic enjoyment is the ability to convey a natural sense of
musical and home theatre dynamics. Dynamics is the capacity of the system to reproduce
a sudden change in level (up or down) rapidly, cleanly and accurately. A system with good
dynamics will present a realistic sense of the weight and scale of the musical event or lm
soundtrack even at low volume settings.
Try listening to your system with the volume turned down. This is a far tougher test than
playing at out at full power.
BREAK-IN PERIOD
A loudspeaker is a mechanical device and as such requires an extended initial period of
normal use during which you will notice a gradual improvement in sound quality.
ningsperiode.
Hvis højttalerne ikke har været brugt igennem længere tid, kan de kræve en kort til- spil-
længer faktisk højttalernes levetid.
Slitage ved normal brug er ikke et problem med DALI højttalere. Regelmæssig brug for-
Wear is not a problem with DALI loudspeakers, regular use will only extend their life.
After a long period without use, the speakers may need a short break-in period again.
opleve en gradvis forbedring af højttalernes lydkvalitet.
En højttaler er et mekanisk system, der skal „spilles til“. Derfor vil man i den første periode
TILSPILNING
absolut minimum for at kunne opleve anlæggets fulde dynamik.
formåen, end bare at spille for fuldt tryk. Baggrundsstøj fra omgivelser skal holdes på et
Prøv at lytte ved lavt niveau. Dette kan være en langt mere krævende test af anlæggets
størrelsen af den musikalske begivenhed, også ved lavt niveau.
rent og præcist. Et anlæg med god dynamik kan gengive et ægte billede af kvaliteten og
det vil sige, at de kan genskabe en pludselig ændring i niveau (op eller ned) lynhurtigt,
for musiknydelsen, at højttalerne er i stand til at genskabe musikkens naturlige dynamik,
Desværre bliver der ofte fokuseret ensidigt på det at kunne spille højt. Det er meget vigtigere
DYNAMIK
7

USEFUL NUMBERS
8
There are lots of measurements which can be carried out on loudspeakers, not to mention a confusing number of incompatible methods by which these measurements can be
executed. But, in terms of saying something meaningful about how a given loudspeaker
will actually sound, only a handful of data specications are of any real use. You should
pay special attention to specications for sensitivity and impedance.
Sensitivity is an indication of the sound pressure level which the speaker can generate for
a given input power. High sensitivity means that you can reproduce dynamic passages
without spending a fortune on a high-powered amplier.
The linear impedance of DALI loudspeakers offers ideal stress-free operating conditions
for ampliers.
Model
Suite
Center
Suite Rear
Suite 1.5
Suite 2.5
Suite 3.5
Frequency response +/- dB [Hz]
Impedance [ohm]
Bass Reex System Resonance [Hz]
61 - 24000
4
56
71 - 24000
4
-
41 - 24000
43.5
33 - 25000
4
4
37.5
33 - 25000
4
38.0
24,5
35,3
22,6
115,0
Gulv
113
91,5
3500
38,0
4
20 - 120
30 - 200
33 - 25000
Suite 3.5
19,5
31,8
20,5
103,5
20 - 120
Gulv
111
90,0
30 - 150
3500
37,5
4
33 - 25000
Suite 2.5
14,0
25,0
18,0
88,0
10 - 60
Gulv
109
89,0
3000
43,5
4
40 - 160
41 - 24000
Suite 1.5
3,8
12,0
20,4
37,0
-
Væg
105
88,0
2900
-
4
20 - 80
71 - 24000
Suite Rear
8,5
25,8
50,0
17,6
-
TV
112
91,0
2500
56
4
40 - 150
Center
Suite
Over/under
61 - 24000
Vægt [kg]
Dybde [cm]
Bredde [cm]
Højde [cm]
Anbefalet afstand fra bagvæg [cm]
Placering
Max. lydtryk [dB]
Følsomhed (@2,83V/1m) [dB]
Anbefalet forstærkereffekt (8 ohm) [W]
Delefrekvens [Hz]
Basreex systemresonans [Hz]
Impedans [ohm]
Frekvensområde +/- dB [Hz]
Model
Crossover frequency [Hz]
Recommended amplier power (8 ohm) [W]
Sensitivity (@2.83V/1m) [dB]
Max. SPL [dB]
Placement
Recommended distance from rear wall [cm]
Height [cm]
Width [cm]
Depth [cm]
Weight [kg/lbs]
2500
40 - 150
91.0
112
Above/below
television
-
17.6
50.0
25.8
8.5/18.8
8
2900
20 - 80
88.0
105
Wall
-
37.0
20.4
12.0
3.8/8.4
3000
40 - 160
89.0
109
Floor
10 - 60
88.0
18.0
25.0
14.0/31
3500
30 - 150
90.0
111
Floor
20 - 120
103.5
20.5
31.8
19.5/43
3500
30 - 200
91.5
113
Floor
20 - 120
115.0
22.6
35.3
24.5/54
arbejdsforhold, også ved komplekse musikpassager.
Lineær impedans, som er et kendetegn ved DALI højttalere, giver forstærkeren gunstige
ofre en formue på kraftige forstærkere.
effekt. Høj følsomhed betyder, at man kan gengive dynamiske passager uden at skulle
Følsomhed er udtryk for det lydtryk som højttaleren kan skabe ved en given forstærker-
til, når højttalerne skal kombineres med en forstærker.
Det er især specikationerne for følsomhed om impedans, som man bør lægge mærke
lig lyder. Der er dog nogle få interessante specikationer som man kan bruge til noget.
sjældent sammenlignelige, og siger endnu sjældnere noget om, hvordan højttaleren egentforskellige måder, disse målinger kan fortolkes. De specikationer der opgives er således
Der kan foretages mange „objektive“ målinger på højttalere, for ikke at tale om de mange
NYTTIGE SPECIFIKATIONER
 Loading...