

Page 1

ENGLISH - DEutScH - DANSK - 中国 - 日本語 - frANçAIS
DALI OPTICON
MANUAL
Page 2
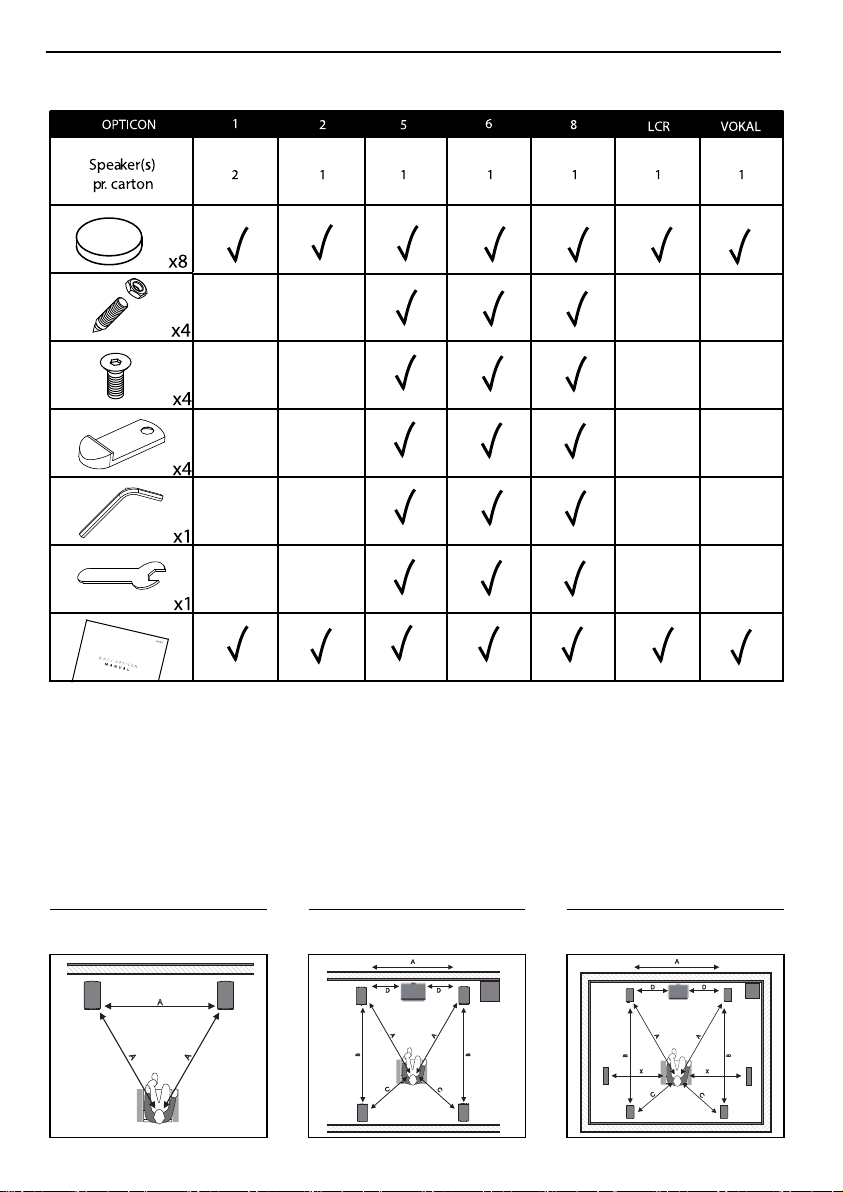
TABLE 1
FIGURE 1A FIGURE 1B FIGURE 1C
Page 3
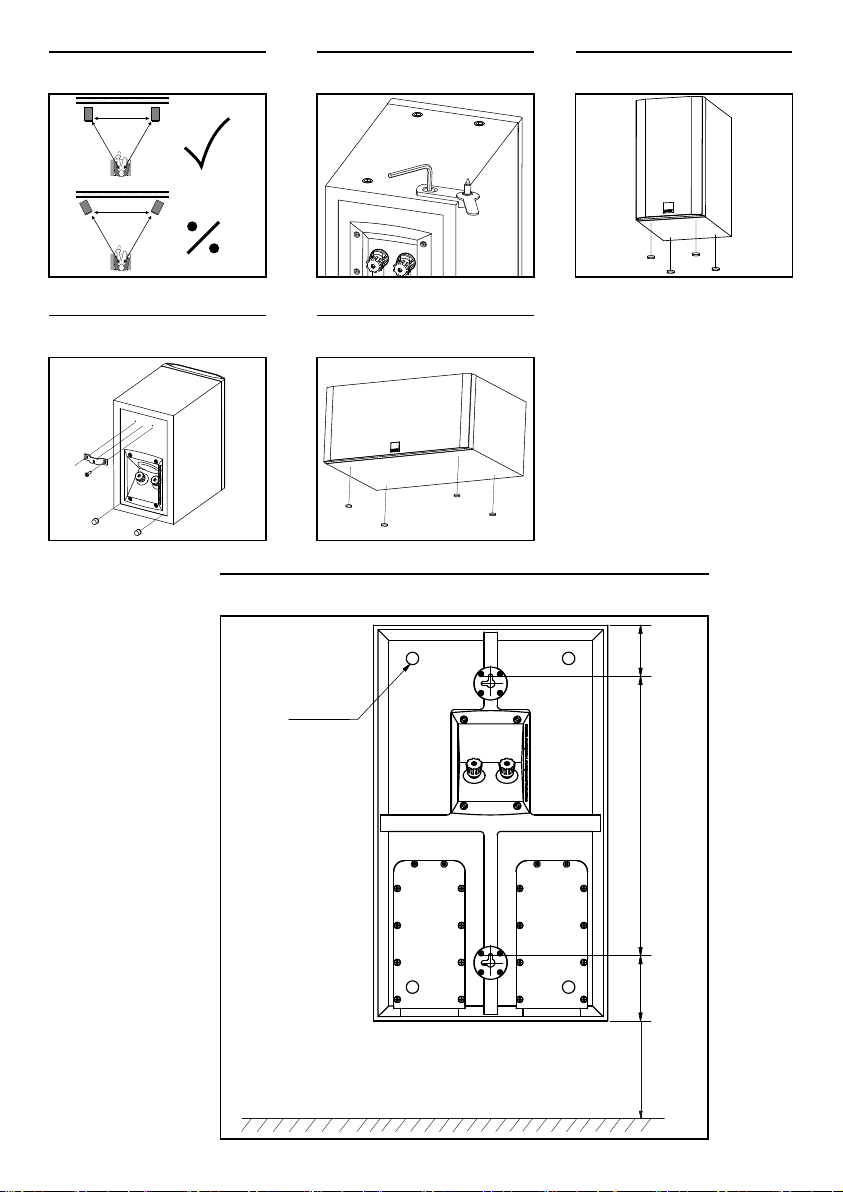
FIGURE 3 FIGURE 4FIGURE 2
FIGURE 6FIGURE 5
FIGURE 7
3
,
2
6
4 x pads
0
,
0
4
3
7
,
9
7
d
m
n
m
e
0
m
0
m
1
o
.
c
in
e
R
m
Page 4
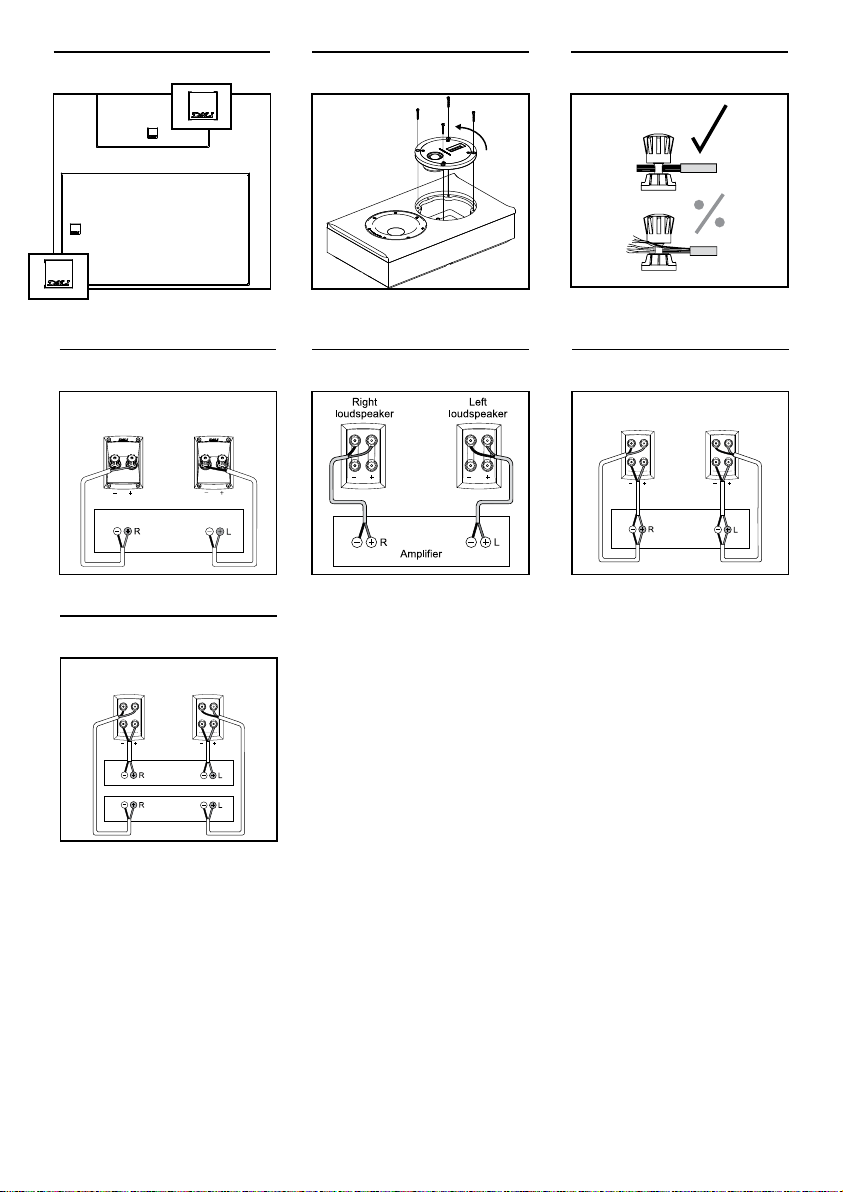
FIGURE 8 FIGURE 9 FIGURE 10
FIGURE 11A
Right
loudspeaker
loudspeaker
Amplifier
FIGURE 11D
Right
loudspeaker
loudspeaker
Amplifier
Amplifier
Left
Left
FIGURE 11B
FIGURE 11C
Right
loudspeaker
loudspeaker
Amplifier
Left
Page 5

UK DE DK CN JP FR
CONTENTS
1.0 INTRODUCTION 6
2.0 UNPACKING 6
3.0 POSITIONING 6
4.0 CONNECTION 8
5.0 RUNNING-IN 8
6.0 CLEANING & MAINTENANCE 9
7.0 DISPOSAL 9
8.0 POWER AND ACOUSTIC PRESSURE 9
9.0 THE LISTENING ROOM 10
10.0 TECHNICAL SPECIFICATIONS 10
5
Page 6

1.0 INTRODUCTION
Congratulations with your new DALI OPTICON loudspeaker. It is important to us that you’re new
DALI loudspeakers are set up and connected optimally. For this reason, we recommend that you
read this manual and follow its instructions.
The manual contains instructions for setup and connection, as well as tips and advice on how
to get the most out of your new loudspeakers. DALI is acclaimed around the world for unique
loudspeakers built to our uncompromising standards for design and performance. The goal
for every single DALI loudspeaker is always our foremost commitment: To create a listening
experience in your home that will make you forget time and place.
Remember to sign up for the DALI newsletter at www.dali-speakers.com.
Enjoy!
2.0 UNPACKING
Be careful not to damage the contents when you unpack the parts. Depending on which DALI
OPTICON model you have bought, different accessories come with the loudspeaker. Check that
all parts are contained in the cardboard box (see Table 1). Keep the packaging materials should
your speaker need to be relocated or serviced.
2.1 GRILLES
The speakers are delivered with the grille fronts already mounted when you unpack them. If
you wish to remove the grille front, loosen it by gradually tugging at the plungers that hold it in
place. It is important that all plunges are equally loosened before removing the front. Otherwise
the grille may be damaged.
3.0 POSITIONING
To achieve the best results, the loudspeaker setup should be symmetrical round your favourite
listening position, (see Figure 1A – 1C). We recommend that you experiment with the position
of your loudspeakers – the sound quality will change depending on the loudspeaker position.
For DALI OPTICON 1, OPTICON 2 and DALI OPTICON LCR the speakers should ideally be
positioned, so that the tweeter is approximately at ear height when seated in your favourite
listening position. DALI OPTICON 5, 6 and 8 are designed as floor standing speakers. They
should be positioned minimum 20 cm (8”) from the rear wall. DALI OPTICON 2 should likewise
be positioned minimum 20 cm (8”) from the rear wall. DALI OPTICON LCR is optimized for wallmounting, but will also work well on a shelf. If wall mounted there should be at least 10 cm (4”)
to any surface underneath the speaker and if placed on a shelf there should be at least 10 cm
(4”) distance to the wall.
Objects positioned between the speaker and listening position might negatively affect sound
quality. All DALI OPTICON speakers are designed to meet our wide dispersion principle, so they
should not be angled towards the listening position, but be positioned parallel with the rear wall
(see Figure 2). By parallel positioning, the distortion in the main listening area will be lowered
and the room integration will be better. The wide dispersion principle also ensures that sound is
spread evenly within a large area in the listening room.
3.1 DALI OPTICON 5, 6 and 8
The speakers are designed to stand on the floor, using spikes or rubber bumpers under the
speakers, (see Figure 3+4). Be careful not to over tighten the contra nuts. Spikes or rubber
bumpers can improve the sound quality. You can try both to hear what gives the best sound
quality in your setup. Please be aware that spikes may damage the floor if it is not protected.
6
Page 7

UK DE DK CN JP FR
NOTE: On some floor surfaces and in some rooms, the use of spikes is a crucial aspect in
obtaining the best result. The spikes (included) should be fastened loosely in the four aluminium
feet, leaving the spike’s nut only slightly tightened. Using the screws, mount the feet in the
threaded holes on the bottom of the speaker. Push the feet against the cabinet before tightening
the screws. Place the loudspeaker upright on its spikes on the floor, so that it stands steadily
without rocking. Tighten the nuts, so that the four spikes sit tightly in the aluminium feet.
These assembly and setup steps ensure stable mechanical coupling to the surface beneath
(see Figure 3).
3.2 DALI OPTICON 2
DALI OPTICON 2 is optimized for stand mounting, but will also work well on a shelf. If positioned
on a stand or shelf, the enclosed bumpers can be placed under the speaker for stable and
vibration-free positioning (see Figure 4).
3.3 DALI OPTICON 1
There are several placement options for DALI OPTICON 1; on a stand, on a shelf, on a table-top
or wall-mounting. For wall-mounting DALI OPTICON, you must use the included wall bracket.
Before mounting the speaker on the wall, position the special bumpers - enclosed in the wall
bracket packaging - on the bottom rear edge of the speaker (See figure 5). These bumpers
ensure the correct distance from the wall and ensure secure mounting. If positioned on a stand
or shelf, the enclosed bumpers can be placed under the speaker for stable and vibration-free
positioning (see figure 4).
3.4 DALI OPTICON VOKAL
DALI OPTICON VOKAL is the dedicated centre channel and has been specially designed to be
positioned close to the large surface of the TV screen. You can place it above or below the
screen, on a stand or on a shelf. We recommend fitting the enclosed bumpers to ensure a
stable, vibration free setup (see figure 6).
3.5 DALI OPTICON LCR
DALI OPTICON LCR is optimized for wall-mounting (see Figure 7), but can be used on a shelf
or TV furniture.
DALI OPTICON LCR can be used as a left, right or centre speaker. If used in the horizontal
position the hybrid tweeter module should be rotated so it stays vertical, which is important to
preserve the wide dispersion and fine detail of the high frequencies. If used in the horizontal
position, you can rotate the DALI logo on the front grille by lifting it up slightly and rotating it into
the desired position (see Figure 8).
The ribbon tweeters are pre-configured for vertical positioning in the factory and if the speaker
is used in the horizontal position, your authorized dealer or service facility can rotate the ribbon
tweeter for you. To remove the ribbon tweeter from the cabinet, use a 3 mm Allen key (not
included) to remove the four screws. When disassembled, rotate the ribbon tweeter 90 degrees.
Insert the rotated ribbon tweeter and install it, using the four screws (Figure 9). Be careful not
to over tighten the screws when assembling the speaker again.
If positioned on a shelf or TV furniture, the enclosed bumpers can be placed under the speaker
(in both the vertical or horizontal position) for stable and vibration-free positioning
(see Figure 4).
7
Page 8

4.0 CONNECTION
Correct, tight connections to your amplifier are extremely important for your listening experience.
Always use cables of the same type and length for left and right channels. We recommend using
DALI CONNECT speaker cable, available from your dealer.
Connection in correct phase is a detail that is often ignored. The red (+) terminal of the amplifier
must be connected to the red (+) terminal of the loudspeaker. The black (-) terminal of the
amplifier must be connected to the black (-) terminal of the loudspeaker (see Figure 11A). Even
a single loudspeaker connected out-of-phase in a stereo or surround installation will make the
bass weaker and the stereo image unfocused.
For the optimal listening experience, the right loudspeaker (as seen from the listening position)
must be connected to the amplifier output terminals marked “R” or “Right”. The left loudspeaker
must be connected to the amplifier output terminals marked “L” or “Left”.
NOTE: Before connecting cables or changing any connections, ALWAYS turn off your amplifier.
NOTE: Make sure that bare conductors are tightly gripped by the terminals with no loose wires
which, could cause a short circuit and damage the amplifier (see Figure 10).
NOTE: If you are using DALI OPTICON in a surround system, follow the instructions included
with your surround amplifier.
4.1 SINGLE-WIRING vs. BI-WIRING/BI-AMPING
All DALI OPTICON speakers can be connected by means of a single speaker cable (see Figure
11A + 11B). However, DALI OPTICON 5, 6 and 8 are fitted with two pairs of terminals, allowing
you the option of running two sets of cables to each speaker. The top terminal pair is internally
connected to the crossover network’s high frequency section. The bottom terminal pair is
internally connected to the crossover network’s bass section.
NOTE: When bi-wiring or bi-amping, ALWAYS remove the metal jumpers between the terminals
before connecting cables (see Figure 11C + 11D).
For bi-wiring, connect two sets of loudspeaker cables, one to the top terminals and one to the
bottom terminals of the speakers. At the amplifier end, connect both sets of loudspeaker cables
to the same pair of terminals on the amplifier (see Figure 11C).
For bi-amping, connect two sets of loudspeaker cables, one to the top terminals and one to the
bottom terminals. At the amplifier end, connect one set of loudspeaker cables to one amplifier,
and connect the other set of cables to the second amplifier (see Figure 11D).
5.0 RUNNING-IN
Like any mechanical system, a loudspeaker requires a “running-in” period to perform at its best.
You will experience a gradual increase in sound quality during the first period of use. The break-in
period will vary depending on use and playback volume. You should expect up to 100 hours of
playback until maximum performance is reached. Unlike other mechanical systems, the life-span
of a loudspeaker is increased by normal, regular playback of music.
8
Page 9

UK DE DK CN JP FR
6.0 CLEANING & MAINTENANCE
Clean the cabinets with a soft, dry cloth. If the cabinets are dirty, wipe with a soft cloth dipped in
all-purpose cleaner and then well wrung out. Be very careful when wiping the speaker cones,
as they are very fragile. Grille fronts can be cleaned with a clothes brush and wiped with a well
wrung, lint-free cloth and mild all-purpose cleaner.
6.1 AVOID DIRECT SUNLIGHT:
The surfaces of the speakers may fade or become discoloured over time when exposed to
direct sunlight. Therefore avoid positioning the speakers in direct sunlight.
7.0 DISPOSAL
If you want to dispose of this product, do not mix it with general household waste. There is
a separate collection system for used electronic products in accordance with legislation that
requires proper treatment, recovery and recycling. Private households in the EU member states,
Switzerland, Liechtenstein and Norway may return their used electronic products free of charge
to designated collection facilities or to a retailer (if you purchase a similar new one). If you reside
in countries not mentioned above, please contact your local authorities for the correct method
of disposal. By following this process, you will ensure that your disposed product undergoes the
necessary treatment, recovery and recycling and thus prevent potential negative effects on the
environment and human health.
8.0 POWER AND ACOUSTIC PRESSURE
How loud a speaker is able to play and still sound good is completely dependent on the signal
it has to reproduce. So, in practice, it is not possible to define an unequivocal level for use in
comparing different speakers.
Lots of pure, undistorted output from a large amplifier is better than a distorted signal from a
small amplifier stretched beyond its capacity. The signal from a distorting (clipping) amplifier
contains much more high-frequency information than an undistorted signal, and therefore puts
a heavy strain on the tweeter. Consequently, speakers are often damaged by small amplifiers,
having to work too hard - and very rarely by large amplifiers, which are practically running idle.
It is worth noting that turning tone controls above the neutral setting significantly burdens
both speakers and amplifier. On a good sound system tone controls should only be used to
compensate for poor recordings and not to permanently compensate for weaknesses elsewhere
in the system.
Therefore DALI recommends that the tone controls generally be set to the neutral position, and
you achieve your desired sound image through correct positioning of the speakers. Ensuring
that you keep the volume low enough for the sound to remain clear and undistorted will
minimize the strain on both speakers and amplifier.
All DALI loudspeakers are designed with linear impedance for an optimal amplifier load. The
result is a significantly more open and detailed sonic image.
9
Page 10

9.0 THE LISTENING ROOM
Every room has its own distinctive acoustics, which influence the way we experience sound
from a speaker. The sound you hear consists of direct sound from the speakers and reflected
sound from the floor, ceiling and walls. The latter will affect how you experience the sound.
As a basic rule, try to avoid large, hard and reflective areas in the immediate vicinity of your
loudspeakers as it will typically cause strong reflections, which might disturb the precision and
spatial effect of the sound reproduction. Reflection might be suppressed by positioning e.g. a
plant between the speaker and the reflecting surface. Soft items such as carpets, curtains etc.
might help if the sound is too bright. Both the amount and quality of the deep bass depend on
the size and shape of the room, and the position of the speakers. Positioning the speakers near
a side or back wall will accentuate the bass. A corner location will accentuate it even more, but
will also increase the reflections.
10.0 TECHNICAL SPECIFICATIONS
In Table 2 you will find the most common specifications for our speakers. Please have in mind
that there are countless methods for measuring speakers. However, none of them tell you
anything useful about how a speaker really sounds. Only your ears can decide whether one
speaker sounds better than another. Like all our speakers, DALI OPTICON series is designed to
reproduce music as honestly as possible.
Enjoy your new DALI OPTICON!
10
Page 11

UK DE DK CN JP FR
INHALT
1.0 EINLEITUNG 12
2.0 AUSPACKEN 12
3.0 AUFSTELLEN 12
4.0 ANSCHLIESSEN 14
5.0 EINSPIELZEIT 15
6.0 REINIGUNG & PFLEGE 15
7.0 ENTSORGUNG 15
8.0 LEISTUNG UND LAUTSTÄRKE 16
9.0 DER HÖRRAUM 16
10.0 TECHNISCHE DATEN 17
11
Page 12

1.0 EINLEITUNG
Herzlichen Glückwunsch zu Ihren neuen DALI OPTICON Lautsprechern! Bitte lesen Sie
diese Bedienungsanleitung aufmerksam durch, bevor Sie die Lautsprecher auspacken und
anschließen.
Die Anleitung enthält Beschreibungen für die Aufstellung und den Anschluss sowie zahlreiche
Tipps und Hinweise, damit Sie Ihre neuen Lautsprecher in der bestmöglichen Klangqualität
genießen können. Weltweit schätzen Musikfans DALI für seine einzigartigen Lautsprecher, die
nach unseren kompromisslosen Standards für Design und Leistung gebaut werden. Mit jedem
einzelnen DALI Lautsprecher verfolgen wir vorrangig ein Ziel: bei Ihnen Zuhause ein Hörerlebnis
zu ermöglichen, das Sie Zeit und Raum vergessen lässt.
Sie möchten weitere Informationen über DALI und unsere Produkte erhalten? Dann können
Sie sich auf www.dali-speakers.com für den DALI-Newsletter registrieren, in unserer Website
stöbern oder sich an einen autorisierten DALI-Händler wenden.
Viel Vergnügen!
2.0 AUSPACKEN
Bitte achten Sie beim Auspacken darauf, keine Teile zu beschädigen. Zu jedem DALI OPTICON
Modell befindet sich unterschiedliches Zubehör im Lieferumfang. Überprüfen Sie, ob sich alle
in Tabelle 1 aufgeführten Teile im Karton befinden. Bewahren Sie die Verpackung für einen
möglichen späteren Transport oder Servicefall auf.
2.1 ABDECKUNGEN
Die mit den Lautsprechern gelieferten Abdeckungen sind bereits vor den Schallwänden
fixiert. Wenn Sie die Abdeckungen entfernen möchten, ziehen Sie bitte vorsichtig rundum
an der Abdeckung, damit sich die Befestigungsstifte lösen. Es ist wichtig, zunächst alle
Befestigungsstifte gleichmäßig herauszuziehen, bevor Sie die Abdeckung abnehmen.
Andernfalls besteht Gefahr, die Abdeckung zu beschädigen.
12
3.0 AUFSTELLUNG
Für eine optimale Klangwiedergabe sollten die Lautsprecher symmetrisch vor Ihnen oder rund
um Ihre Hörposition stehen (siehe Skizzen 1A – 1C). Wir empfehlen Ihnen, ein wenig mit der
Position der Lautsprecher zu experimentieren – die Klangqualität wird sich in Abhängigkeit
von der Aufstellung verändern. Die DALI OPTICON 1, OPTICON 2 und OPTICON LCR sollten so
aufgestellt werden, dass sich die Hochtöner der Lautsprecher auf gleicher Höhe wie die Ohren
der sitzenden Zuhörer befinden. Die DALI OPTICON 5, 6 und 8 sind Standlautsprecher. Sie
sollten mindestens 20 cm vor der rückwärtigen Wand stehen. Auch für die DALI OPTICON 2
empfehlen wir einen Wandabstand von mindestens 20 cm. Der DALI OPTICON LCR ist für eine
Wandmontage optimiert, lässt sich aber auch in einem Regal aufstellen. Wird er an einer Wand
befestigt, sollte unterhalb des Lautsprechers ein freier Raum von mindestens 10 cm bleiben,
bei einer Aufstellung im Regal ein Wandabstand von mindestens 10 cm.
Zwischen dem Lautsprecher und der Hörposition sollten sich keinerlei Gegenstände befinden,
da sie die Klangwiedergabe verschlechtern. Da die DALI OPTICON Lautsprecher gemäß unserer
Klangprinzipien einen sehr breiten Abstrahlwinkel aufweisen, sollten sie nicht zur Hörposition
angewinkelt werden, sondern parallel zur Rückwand des Raums stehen (siehe Skizze 2). Durch
diese Aufstellung verringern sich die Verzerrungen im zentralen Hörbereich und die Integration
Page 13

UK DE DK CN JP FR
in den Raum gelingt besser. Das Prinzip des weiten Abstrahlwinkels gewährleistet zudem, dass
man den Klang in einem großen Bereich des Hörraums genießen kann.
3.1 DALI OPTICON 5, 6 und 8
Die Standboxen sind so konzipiert, dass sie – gedämpft durch die im Lieferumfang befindlichen
Spikes oder Gummifüße – direkt auf dem Fußboden stehen sollten (siehe Skizzen 3+4). Achten
Sie darauf, die Spikes in ihren Gewinden nicht zu überdrehen. Die Verwendung von Spikes oder
Gummidämpfern kann die Klangqualität verbessern. Wir empfehlen, die Lautsprecher einmal
sowohl mit Spikes als auch mit Gummifüßen Probe zu hören, um festzustellen, welche Variante
in Ihrem Hörraum die bessere ist. Bitte achten Sie darauf, den Fußboden nicht mit den Spikes
zu beschädigen. Schutz bieten untergelegte Metallplättchen oder Münzen.
HINWEIS: Auf manchen Fußböden und in manchen Räumen ist die Verwendung von Spikes
wichtig, um eine bestmögliche Klangqualität zu realisieren. Die mitgelieferten Spikes sollten
mit zunächst nur leicht angezogenen Muttern in den vier Aluminiumfüßen befestigt werden.
Mit den Schrauben werden die Füße in den vorgebohrten Löchern an der Unterseite der
Lautsprechergehäuse befestigt. Drücken Sie die Füße fest ans Gehäuse, bevor Sie die
Schrauben festziehen. Stellen Sie die Lautsprecher auf die Spikes und achten Sie auf einen
stabilen Stand. Ziehen Sie die Muttern fest, so dass die vier Spikes fest in den Aluminiumfüßen
sitzen. Auf diese Weise ist eine gute mechanische Entkopplung der Lautsprecher vom Boden
gewährleistet (siehe Skizze 3).
3.2 DALI OPTICON 2
Wir empfehlen, die DALI OPTICON 2 auf einem Standfuß oder auf einem Regalboden aufzustellen.
Die mitgelieferten Gummifüße lassen sich unter dem Lautsprecher fixieren und gewährleisten
eine stabile und vibrationsfreie Aufstellung (siehe Skizze 4).
3.3 DALI OPTICON 1
Die DALI OPTICON 1 lässt sich auf vielfältige Weise platzieren: auf einem Standfuß, im Regal
oder an der Wand. Verwenden Sie für eine Wandmontage den mitgelieferten Wandhalter. Vor der
Montage der Lautsprecher an der Wand, kleben Sie die in der Verpackung der Wandhalterung
befindlichen Gummifüße auf die untere Hinterkante der Lautsprecher (siehe Abbildung 5).
Diese Dämpfer sorgen für den richtigen Abstand zur Wand und einen sicheren Halt. Werden die
Lautsprecher auf einem Standfuß oder in einem Regal aufgestellt, kleben Sie die Gummifüße
auf die Unterseite des Gehäuses, damit die Lautsprecher stabil und vibrationsfrei stehen (siehe
Abbildung 4).
3.4 DALI OPTICON VOKAL
Der DALI OPTICON VOKAL ist der Centerlautsprecher der Serie. Er ist so konzipiert, dass er direkt
unter- oder oberhalb des TV-Bildschirms auf einem Standfuß oder Regal platziert werden kann.
Die mitgelieferten Gummifüße lassen sich unter dem Lautsprecher fixieren und gewährleisten
eine stabile und vibrationsfreie Aufstellung (siehe Skizze 6).
3.5 DALI OPTICON LCR
Der DALI OPTICON LCR wurde für eine Montage an der Wand entwickelt (siehe Skizze 7), lässt
sich aber auch in einem Regal oder auf einem TV-Schrank aufstellen.
13
Page 14

Der DALI OPTICON LCR kann für die Wiedergabe des linken oder rechten Kanals als auch
als Center-Speaker eingesetzt werden. Wird der Lautsprecher in einer horizontalen Position
betrieben, sollte die Hochtoneinheit – wie weiter unten beschrieben – um 90 Grad gedreht
werden, damit sie weiterhin vertikal abstrahlt. Auf diese Weise bleiben die breitwinklige
Abstrahlung und der Detailreichtum im Hochtonbereich erhalten. Damit das DALI-Logo an der
Frontabdeckung bei einem horizontalen Betrieb richtig sitzt, lässt es sich etwas nach vorn
ziehen und in die gewünschte Position drehen (siehe Skizze 8).
Die Bändchenhochtöner sind ab Werk für eine vertikale Aufstellung der Lautsprecher
vorkonfiguriert. Möchten Sie die Lautsprecher in horizontaler Position verwenden, übernimmt
auch gern Ihr autorisierter DALI-Händler das Drehen der Hochtoneinheit für Sie.
Um den Hochtöner vom Gehäuse abzunehmen, benötigen Sie einen 3 mm Inbus (nicht
im Lieferumfang) zum Lösen der vier Schrauben. Nach dem Abnehmen drehen Sie den
Bändchenhochtöner um 90 Grad, setzen ihn wieder ein und ziehen die vier Schrauben fest
(Skizze 9). Achten Sie darauf, die Gewinde nicht zu überdrehen.
Stellen Sie den DALI OPTICON LCR auf einem Regal oder TV-Schrank auf, kleben Sie die
mitgelieferten Gummifüße unter den Lautsprecher (sowohl bei vertikaler als auch bei
horizontaler Position), damit ein stabiler und vibrationsfreier Betrieb gewährleistet ist (siehe
Skizze 4).
4.0 ANSCHLIESSEN
Für einen perfekten Hörgenuss müssen die Lautsprecher fehlerfrei und zuverlässig mit Ihrem
Verstärker verbunden werden. Verwenden Sie stets Kabel des gleichen Typs und der gleichen
Länge für den linken und rechten Kanal. Wir empfehlen Ihnen die bei Ihrem Fachhändler
erhältlichen speziellen DALI-Lautsprecherkabel.
14
Der phasenrichtige Anschluss der Lautsprecher ist überaus wichtig, wird aber häufig
nicht beachtet. Die rote (+) Anschlussklemme des Verstärkers muss mit der roten (+)
Anschlussklemme des Lautsprechers verbunden werden. Die schwarze (-) Anschlussklemme
des Verstärkers muss mit der schwarzen (-) Anschlussklemme des Lautsprechers verbunden
werden (siehe Skizze 11A). Auch wenn nur einer der Lautsprecher in einer Stereo- oder
Mehrkanal-Anlage phasenverkehrt angeschlossen ist, klingt der Bass schwächer und die
Ortbarkeit im Stereopanorama ist eingeschränkt.
Verbinden Sie den von der Sitzposition aus rechts stehenden Lautsprecher mit dem “R” oder
“Right” markierten Verstärkerausgang und den links stehenden Lautsprecher mit dem “L” oder
“Left” bezeichneten Verstärkerausgang.
HINWEIS: Schalten Sie immer Ihren Verstärker aus, bevor Sie Kabel anschließen oder
Kabelverbindungen verändern wollen.
HINWEIS: Achten Sie darauf, die abisolierten Enden der Lautsprecherkabel sorgfältig zu
verdrillen und in die Klemmen einzuführen, damit keine abstehenden Adern einen Kurzschluss
verursachen und den Verstärker beschädigen können (siehe Skizze 10).
HINWEIS: Wenn Sie die DALI OPTICON Lautsprecher in einem Surroundsystem einsetzen,
folgen Sie bitte den Anweisungen in der Bedienungsanleitung Ihres Surround-Verstärkers.
Page 15

UK DE DK CN JP FR
4.1 SINGLE-WIRING vs. BI-WIRING/BI-AMPING
Alle DALI OPTICON Lautsprecher lassen sich wie eben beschrieben über ein einzelnes
Lautsprecherkabel mit dem Verstärker verbinden (siehe Skizzen 11A + 11B). Die
Anschlussterminals der DALI OPTICON 5, 6 und 8 bieten darüber hinaus die Möglichkeit, die
Verbindung zum Verstärker über zwei separate Lautsprecherkabel vorzunehmen. Die oberen
Anschlüsse stellen eine Verbindung zur Frequenzweiche der Hoch- und Mitteltöner des
Lautsprechers her, die unteren zur Frequenzweiche der Tieftöner.
HINWEIS: Entfernen Sie für einen Bi-Wiring oder Bi-Amping-Betrieb vor der Montage der Kabel
immer erst die Metallbrücken zwischen den Anschlussklemmen (siehe Skizzen 11C + 11D).
Für Bi-Wiring, also die Ansteuerung der Lautsprecher über jeweils zwei separate
Lautsprecherkabel, verbinden Sie das eine Kabel mit den beiden oberen Anschlussklemmen des
Lautsprechers und das zweite Kabel mit den unteren Anschlussklemmen des Lautsprechers.
Verstärkerseitig verbinden Sie die Adern beider Lautsprecherkabel jeweils mit derselben
Ausgangsklemme (siehe Skizze 11C).
Für Bi-Amping, also die Ansteuerung der Lautsprecher über jeweils zwei separate Verstärker,
benötigen Sie zwei Lautsprecherkabel je Lautsprecher, eins für die oberen Anschlussklemmen
und eins für die unteren Anschlussklemmen. Am anderen Ende schließen Sie ein Kabel an den
Ausgang des einen Verstärkers und das andere Kabel an den Ausgang des zweiten Verstärkers
an (siehe Skizze 11D).
5.0 EINSPIELZEIT
Wie jedes andere mechanische System muss auch ein Lautsprecher eingespielt werden, damit er
optimal funktionieren und klingen kann. Sie werden feststellen, dass sich die Klangqualität Ihrer
neuen Lautsprecher in der ersten Zeit kontinuierlich merklich verbessert. Die Dauer der Einspielzeit
hängt davon ab, wie häufig Sie Ihre HiFi-Anlage nutzen und wie laut Sie hören. Rechnen Sie mit
einer Einspielzeit von bis zu 100 Stunden, bis der Lautsprecher seine volle Leistung entfalten kann.
Übrigens: Im Gegensatz zu anderen mechanischen Systemen verlängert sich die Lebensdauer
eines Lautsprechers durch eine regelmäßige normallaute Musikwiedergabe.
6.0 REINIGUNG & PFLEGE
Reinigen Sie die Gehäuse mit einem weichen trockenen Tuch. Verschmutzte Stellen säubern
Sie am besten mit einem zuvor in Allzweckreiniger getauchten und dann gut ausgewrungenen
weichen Tuch. Seien Sie sehr vorsichtig beim Entstauben der Lautsprechermembrane, da diese
sehr empfindlich sind. Die Frontabdeckungen können mit einer Kleiderbürste und einem gut
ausgewrungenen faserfreien Tuch mit mildem Allzweckreiniger gereinigt werden.
6.1 DIREKTE SONNENEINSTRAHLUNG VERMEIDEN:
Die Oberflächen der Lautsprecherboxen können mit der Zeit ausbleichen oder ihre Farbe
verändern, wenn sie direktem Sonnenlicht ausgesetzt sind. Vermeiden Sie daher eine
Aufstellung der Lautsprecher direkt am Fenster im Sonnenlicht
7.0 ENTSORGUNG
Wenn Sie dieses Produkt entsorgen möchten, geben Sie es bitte nicht in den allgemeinen
Hausmüll. Es gibt ein separates Sammelsystem für gebrauchte elektronische Produkte, über
das die richtige Behandlung, Rückgewinnung und Wiederverwertung gemäß der bestehenden
Gesetzgebung gewährleistet wird. Private Haushalte in den EU-Staaten, der Schweiz, Liechtenstein
15
Page 16

und Norwegen können ihre ausrangierten Elektronik-Produkte kostenfrei bei den entsprechenden
Sammeleinrichtungen oder – beim Neukauf eines entsprechenden Produkts – über den Händler
zurückgeben. Bitte wenden Sie sich in den Ländern, die oben nicht aufgeführt sind, hinsichtlich
der korrekten Verfahrensweise der Entsorgung an die örtliche Kommunalverwaltung. Auf diese
Weise stellen Sie sicher, dass das zu entsorgende Produkt der notwendigen Behandlung,
Rückgewinnung und Wiederverwertung unterzogen wird, und so mögliche negative Einflüsse auf
die Umwelt und die menschliche Gesundheit vermieden werden.
8.0 LEISTUNG UND LAUTSTÄRKE
Wie laut ein Lautsprecher spielen kann und dabei immer noch gut klingt, hängt maßgeblich
vom Signal ab, das er wiedergeben soll. Also ist es praktisch unmöglich, eine exakte Lautstärke
für den Vergleich von verschiedenen Lautsprechern festzulegen.
Ein reines, unverzerrtes Ausgangssignal eines größeren Verstärkers ist immer besser als das
verzerrte Ausgangssignal eines kleinen Verstärkers, der schon an seine Leistungsgrenzen
stößt. Das Signal eines verzerrenden oder clippenden Verstärkers enthält weitaus mehr
hochfrequente Anteile als ein unverzerrtes Signal und belastet somit den Hochtöner über Gebühr.
Dementsprechend werden Lautsprecher meistens in Verbindung mit zu kleinen Verstärkern
überlastet und zerstört – und sehr selten durch große Verstärker, die nicht besonders gefordert
werden.
Wir möchten auch darauf hinweisen, dass das Aufdrehen der Klangregler über die neutrale
Mittelstellung hinaus sowohl die Lautsprecher als auch den Verstärker außerordentlich
belastet. Bei einer guten HiFi-Anlage sollten die Klangregler nur eingesetzt werden, um
zuweilen die mäßige Klangqualität einer schlechten Aufnahme zu kompensieren, aber nicht um
Schwachstellen des Systems dauerhaft auszugleichen.
DALI empfiehlt daher, die Klangregler in der neutralen Position zu belassen und das gewünschte
Klangbild durch eine korrekte Aufstellung der Lautsprecher zu erreichen. Wenn Sie darauf
achten, Ihren Verstärker nur in dem Lautstärkebereich zu nutzen, der frei von Verzerrungen ist,
schont dies sowohl den Verstärker als auch die Lautsprecher.
16
Alle DALI Lautsprecher weisen einen linearen Impedanzverlauf auf und stellen daher für
den Verstärker keine große Last dar. Das hörbare Ergebnis ist ein deutlich offeneres und
detailreicheres Klangbild.
9.0 DER HÖRRAUM
Jeder Raum hat seine eigene charakteristische Akustik, die den Klang eines Lautsprechers
maßgeblich beeinflusst. Der Klang, den Sie hören, setzt sich aus direktem, von den
Lautsprechern abgegebenem Schall sowie vom Boden, der Decke und den Wänden reflektierten
Schall zusammen. Diese Reflexionen haben einen großen Einfluss auf den Klang. Als
Grundregel gilt daher, in unmittelbarer Nähe der Lautsprecher große, harte und reflektierende
Flächen zu vermeiden. Sie verursachen in der Regel besonders starke Reflexionen, welche
die Präzision und Räumlichkeit maßgeblich beeinträchtigen. Solche Reflexionen lassen sich
reduzieren, indem man beispielsweise eine Pflanze im Bereich zwischen den Lautsprechern
und der reflektierenden Fläche platziert. Ist der Klang noch immer zu hell, wirken oft weiche
Materialien wie Vorhänge oder Teppiche Wunder. Sowohl der Pegel als auch die Präzision
der Tiefbasswiedergabe sind von der Größe und Form des Raums sowie der Position der
Lautsprecher abhängig. Eine Aufstellung der Lautsprecher in der Nähe einer seitlichen oder
Page 17

UK DE DK CN JP FR
rückwärtigen Wand verstärkt den Bass. Die Platzierung in einer Ecke hebt den Bass noch
deutlicher an, gleichzeitig verstärken sich aber auch die Reflexionen.
10.0 TECHNISCHE DATEN
In Tabelle 2 finden Sie die wichtigsten technischen Daten Ihrer Lautsprecher. Bitte bedenken Sie
dabei, dass es unzählige Methoden zur Messung von Lautsprechern gibt. Allerdings gibt keine
Aufschluss darüber, wie ein Lautsprecher wirklich klingt. Nur Ihre Ohren können entscheiden,
welcher Lautsprecher besser als ein anderer klingt. Wie alle Lautsprecher von DALI wurde auch die
OPTICON-Serie mit der Maßgabe entwickelt, Musik so originalgetreu wie möglich wiederzugeben.
Wir wünschen Ihnen viel Spaß mit Ihren neuen DALI OPTICON Lautsprechern!
17
Page 18

INDHOLD
1.0 INTRODUKTION 19
2.0 UDPAKNING 19
3.0 PLACERING 19
4.0 TILSLUTNING 21
5.0 TILSPILNING 21
6.0 RENGØRING OG VEDLIGEHOLDELSE 22
7.0 BORTSKAFFELSE 22
8.0 EFFEKT OG LYD 22
9.0 LYTTERUMMET 23
18
10.0 TEKNISKE SPECIFIKATIONER 23
Page 19

UK DE DK CN JP FR
1.0 INTRODUKTION
Tillykke med valget af DALI OPTICON højttalere. For os er det vigtigt, at dine nye DALI højttalere
opstilles og tilsluttes bedst muligt. Vi anbefaler derfor, at du læser manualen og følger den.
Du kan læse om opstilling og tilslutning af højttalerne - samt nogle gode råd om, hvordan du
får mest ud af dine nye højttalere. DALI er anerkendt blandt musikelskere over hele verden for
sine unikke højttalere, der alle er konstrueret og designet ud fra kompromisløse krav til design
og lyd. Vores mål for hver eneste DALI højttaler er os altid for øje: At genskabe lydoplevelser i dit
hjem, som får dig til at glemme tid og sted.
Husk at tilmelde dig DALIs nyhedsbrev på www.dali-speakers.com.
God fornøjelse!
2.0 UDPAKNING
Udvis forsigtighed ved udpakning, for at undgå skader på indholdet. Afhængigt af, hvilken DALI
OPTICON model du har købt, medfølger der forskelligt tilbehør til højttalerne. Kontroller at alle
dele, angivet i tabel 1, er medleveret. Gem emballagen til senere brug, hvis højttalerne f.eks.
skal byttes eller serviceres.
2.1 STOFRAMMER
Højttalerne leveres med stoframmerne monteret, når du pakker dem ud. Hvis du ønsker at
fjerne stoframmen foran, skal du løsne det ved gradvist at rykke i stifterne i stoframmen, der
holder det på plads. Det er vigtigt, at alle stifter bliver løsnet, før du fjerner fronten. Ellers kan
gitteret blive beskadiget.
3.0 PLACERING
For det optimale resultat, bør højttaleropstillingen være symmetrisk omkring din foretrukne
lytteposition (se Figur 1A - 1C). Vi anbefaler at du eksperimenterer med forskellige placeringer
– lydkvaliteten varierer, afhængig af højttalernes placering. DALI OPTICON1, OPTICON 2 and
DALI OPTICON LCR højttalerne bør ideelt placeres med diskanten omtrent i ørehøjde, når du
sidder i din foretrukne lytteposition. DALI OPTICON 5, 6 and 8 er gulvhøjttalere. De bør placeres
minimum 20 cm fra bagvæg. DALI OPTICON 2 bør ligeledes placeres minimum 10 cm fra
bagvæggen. DALI OPTICON LCR er optimeret til væg montering, men kan også bruges stående.
Væghænges OPTICON LCR bør der være minimum 10 cm til nærmeste flade under højttaleren
og placeres OPTICON LCR stående bør der være minimum 10 cm til væggen.
Genstande opstillet mellem højttaler og lyttepositionen kan forringe lydgengivelsen. Højttalerne
er udviklet til at opfylde vores krav om stor spredning af lyden. De bør derfor ikke vinkles indad
mod lyttepositionen, men positioneres så bagsiden er parallel med bagvæggen (se Figur 2). Ved
at sigte højttalerne paralellt ret fremad, reduceres forvrængning ved hovedlyttepositionen og
rumintegrationen forbedres. Kravet om stor spredning af lyden sikrer at lyden fordeles jævnt
over et stort areal i lytterummet.
3.1 DALI OPTICON 5, 6 og 8
Højttalerne er beregnet til gulvplacering. Monter de medfølgende spikes eller gummidupper
under højttalerne (se Figur 3 + 4). Spikes eller gummidupper kan forbedre lydgengivelsen. Prøv
begge løsninger og vælg den som giver det bedste resultat i din opstilling. Udvis forsigtighed
med spikes, da de kan skade gulvet.
19
Page 20

BEMÆRK: På nogle gulvoverflader og i nogle rum er det afgørende at bruge spikes for at
opnå det bedste resultat. Spikes (medfølger) skal monteres løst i de fire aluminiumsfødder, så
spikemøtrikkerne kun er spændt en smule. Monter fødderne i de gevindskårne huller i bunden
af højttaleren ved hjælp af skruerne. Skub fødderne mod kabinettet, før du spænder skruerne.
Anbring højttaleren oprejst på sine spikes på gulvet, så den står stabilt uden at vippe. Spænd
møtrikkerne, så de fire spikes sidder forsvarligt fast i aluminiumsfødderne. Denne procedure til
montering og opsætning sikrer stabil mekanisk kobling til underlaget (se figur 3).
3.2 DALI OPTICON 2
DALI anbefaler, at du placerer din DALI OPTICON 2 på en fod for den bedste lydoplevelse.
Alternativt kan DALI OPTICON 2 placeres på en hylde. De medfølgende gummifødder kan
monteres under højttaleren for stabil og vibrationsfri placering (se figur 4).
3.3 DALI OPTICON 1
DALI OPTICON 1 kan placeres på mange måder: på fod, hylde, bord eller væg. Til vægmontering
af DALI OPTICON 1 skal du bruge det inkluderede vægbeslag. Før du monterer højttaleren på
væggen, skal du montere de særlige gummikanter, der findes i emballagen til vægbeslaget,
på højttalerens nederste bagkant (se figur 5). Disse gummilister sikrer korrekt afstand fra
væggen og sørger for sikker montering. Hvis højttalerne placeres på en fod eller en hylde, kan
de medfølgende gummikanter placeres under højttalerne for stabil og vibrationsfri placering
(se figur 4).
3.4 DALI OPTICON VOKAL
DALI OPTICON VOKAL er den dedikerede centerhøjttaler, som er specielt designet til at være
placeret tæt på tv-skærmens store overflade. Du kan placere den over eller under skærmen, på
et stativ eller på en hylde. Vi anbefaler, at du monterer de medfølgende gummifødderfor at opnå
en stabil og vibrationsfri opsætning (se figur 6).
20
3.5 DALI OPTICON LCR
DALI OPTICON LCR er optimeret til vægmontering (se figur 7), men kan også bruges på en hylde
eller et TV møbel.
DALI OPTICON LCR kan bruges som venstre eller højre eller center højttaler. Bruges OPTICON
LCR i den horisontale position bør tweeter modulet drejes således det forbliver vertikalt. Dette
bør gøres for at sikre den optimale spredning af de høje frekvenser og dermed de fine detaljer
i lyden. Bruges OPTICON LCR horisontalt kan DALI logoet på stoframmen løftes op og roteres
således det matcher højttalerens position (se figur 8).
Tweeter modulet sidder fra fabrikkens side standard monteret til vertikalt brug. Skal OPTICON
LCR monteres horisontalt kan din DALI forhandler rotere tweeter modulet for dig. Afmonter
tweeter modulet fra kabinettet ved at løsne de fire skruer med en 3 mm unbrako-bit (ikke
inkluderet). Når modulet er løsnet og løftet ud af kabinettet, roters hele modulet 90 grader. Sæt
modulet tilbage i kabinettet og fastgør det igen med de samme fire skruer (se figur 9). Vær
forsigtig med ikke at overskrue skruerne under samlingen.
Stilles OPTICON LCR på en hylde eller et TV møbel, skal de medfølgende gummifødder monteres
under højttaleren for stabil og vibrationsfri placering (se figur 4).
Page 21

UK DE DK CN JP FR
4.0 TILSLUTNING
Forbindelsen til din forstærker er uhyre vigtig for lydoplevelsen. Brug altid kabler af samme type
til alle dine DALI OPTICON højttalere. Kablerne i højre og venstre side skal helst have samme
længde. Vi anbefaler at bruge DALI CONNECT højttalerkabler, der kan købes hos din lokale DALI
forhandler.
En ofte overset detalje er tilslutning i korrekt fase, dvs. at rød terminal (+) på forstærker skal
forbindes med rød terminal (+) på højttaleren, og sort terminal (-) på forstærker skal forbindes
med sort terminal (-) på højttaleren (Se figur 11A). Er blot en enkelt højttaler i et stereo- eller
surroundsystem ikke tilsluttet i fase, vil bassen opleves som svag og lydbilledet virke diffust.
Den perfekte lydoplevelse kræver, at højre højttalere forbindes til udgangsterminalen mærket
“R” eller “Right” på din forstærker og venstre højttalere til udgangsterminalen mærket “L” eller
“Left” på din forstærker.
BEMÆRK: Inden du tilslutter kabler eller foretager ændringer i tilslutninger, skal du slukke for
din forstærker.
BEMÆRK: Sørg for, at ledningerne sidder på plads i terminalerne, og at der ikke er nogle løse
ender, som kan forårsage kortslutning og beskadige forstærkeren (se figur 10).
BEMÆRK: Bruger du dine DALI OPTICON højttalere i et surround system bedes du følge
vejledningen der følger med din surround forstærker.
44.1 ENKELT vs. DOBBELT KABELFØRING/FORSTÆRKNING
Alle DALI OPTICON højttalere kan tilsluttes ved hjælp af et enkelt højttalerkabel (se figur 11A og
11B). DALI OPTICON 5, 6 og 8 er dog udstyret med to par terminaler, så du har mulighed for at
føre to sæt kabler til hver højttaler. Det øverste terminalpar er internt forbundet til delefilterets
højfrekvensdel. Det nederste terminalpar er internt forbundet til delefilterets basdel.
BEMÆRK: Ved dobbelt kabelføring eller dobbelt forstærkning skal du ALTID fjerne metaljumperne mellem de to terminaler, før du tilslutter kablerne (se figur 11C og 11D).
Ved dobbelt kabelføring skal du tilslutte to sæt højttalerkabler, et til højttalernes øverste
terminaler og et til deres nederste terminaler. På forstærkersiden skal begge sæt højttalerkabler
sluttes til det samme terminalpar på forstærkeren (se figur 11C).
Ved dobbelt forstærkning skal du tilslutte to sæt højttalerkabler, et til de øverste terminaler og
et til de nederste terminaler. På forstærkersiden skal det ene sæt højttalerkabler sluttes til den
ene forstærker, og det andet sæt kabler skal sluttes til den anden på forstærker (se figur 11D).
5.0 TILSPILNING
Ligesom ethvert andet mekanisk system skal en højttaler ”spilles til” for at kunne yde sit
bedste. Derfor vil du i den første periode opleve en gradvis forbedring af højttalernes lydkvalitet.
Tilspilningsperioden varierer i forhold til brug og lydniveau. Du skal regne med op til 100 timers
playback førend dine højttalere opnår maximum ydelse. I modsætning til andre mekaniske
systemer forlænges en højttalers levetid ved normal, regelmæssig brug.
21
Page 22

6.0 RENGØRING OG VEDLIGEHOLDELSE
Rengøring af kabinetterne foretages bedst med en blød og tør klud. Er kabinetterne tilsmudsede,
kan en blød klud, der er hårdt opvredet i et mildt universalrengøringsmiddel, benyttes. Vær
meget forsigtig ved evt. aftørring af højttalermembranerne, da disse er meget følsomme.
Stoframmerne rengøres med en almindelig klædebørste eller aftørres med en hårdt opvredet
og fnugfri klud med mildt universalrengøringsmiddel.
6.1 Undgå direkte sollys:
Højttalernes overflade kan falme eller blive misfarvet med tiden, hvis den udsættes for direkte
sollys. Undgå derfor at placere højttalerne i direkte sollys.
7.0 BORTSKAFFELSE
Produktet må ikke blandes med almindeligt husholdningsaffald ved bortskaffelse. Lovgivningen
kræver, at elektroniske apparater indsamles for korrekt bortskaffelse, genindvinding og genbrug.
Private husstande i EU-medlemslandene, Schweiz, Liechtenstein og Norge kan gratis aflevere
deres brugte elektroniske apparater på kommunale genbrugspladser eller til forhandlere (ved
køb af et nyt lignende produkt). Hvis du er bosiddende i andre lande end ovennævnte, bedes du
kontakte dine lokale myndigheder for oplysninger om korrekt bortskaffelse. Ved at følge disse
retningslinjer sikrer du, at dit produkt bortskaffes, genindvindes og genbruges på korrekt vis for
at forhindre potentielle negative konsekvenser for miljøet og folkesundheden.
8.0 EFFEKT OG LYD
Hvor højt en højttaler kan spille og stadig lyde godt, afhænger fuldstændigt af det signal, den
skal gengive. Derfor kan man ikke i praksis definere et entydigt niveau, der kan bruges til at
sammenligne forskellige højttalere.
Det ligger fast, at masser af ren og uforvrænget effekt fra en stor forstærker er bedre end
et forvrænget signal fra en lille forstærker, der er presset ud over sin ydeevne. Signalet fra
en forstærker, der forvrænger (klipper), indeholder langt mere højfrekvensinformation end et
uforvrænget signal, og belaster derfor diskantenheden meget hårdt. Det er derfor, højttalere
som oftest ødelægges af små forstærkere, der arbejder for hårdt - og kun sjældent af store
forstærkere, der nærmest kører i tomgang.
22
Det er værd at notere sig, at når tonekontrollerne er skruet over neutral indstilling, belastes
både højttalere og forstærker væsentligt. På et godt lydanlæg bør tonekontroller kun bruges
til at kompensere for en dårlig optagelse og ikke til permanent at kompensere for svagheder
andre steder i anlægget.
DALI anbefaler derfor, at tonekontrollerne generelt er justeret til neutral position, og at det
ønskede lydbillede opnås ved korrekt placering af højttalerne. Hvis du sørger for ikke at
spille højere, end at lyden fortsat er klar og uforvrænget, minimerer du belastningen på både
højttalere og forstærker.
Alle DALI højttalere er konstrueret på en måde, så de altid giver en optimal belastning af
forstærkeren - det kaldes også for lineær impedans - og resultatet er et tydeligt mere åben og
detaljeret lydbillede.
Page 23

UK DE DK CN JP FR
9.0 LYTTERUMMET
Ethvert rum har sin egen og særegne akustik, der præger den måde, vi oplever lyden fra
højttalerne. Reelt handler det om, hvordan rummet modtager lydenergien og skaffer sig af
med den igen. Du kan påvirke dit lytterums akustik på forskellige måder. En del af den lyd, du
hører, kommer ikke direkte fra selve højttaleren men fra refleksioner fra gulv, loft og vægge.
Disse refleksioner dæmpes af bl.a. møbler, planter og tæpper. Er lydbilledet lyst, kan bløde ting
som gardiner og tæpper hjælpe. For eksempel har det en vis indflydelse at trække gardinerne
for, når du vil undgå refleksioner fra store glasflader. Både mængden og kvaliteten af den dybe
bas afhænger af rummets størrelse, form og højttalernes placering. F.eks. fremhæves bassen
ved en placering nær side- eller bagvæg og endnu mere ved placering i et hjørne. Her øges
refleksionerne fra væggene dog ganske meget. Da det i sidste ende er dine ører, der bestemmer,
anbefaler vi, at du eksperimenterer dig frem til den placering, der giver det lydbillede, du ønsker.
Som grundregel skal du undgå store, hårde reflekterende flader umiddelbart omkring
højttalerne, da disse vil virke som såkaldte spejlkilder og ødelægge det rumlige perspektiv i
lydbilledet. Prøv f.eks. at hænge et vægtæppe bag højttaleren, lægge et tæppe foran eller stille
en større plante ved siden af højttaleren og oplev, hvor overraskende stor indflydelse det har på
præcisionen i lydbilledet.
10.0 TEKNISKE SPECIFIKATIONER
I tabel 2 finder du de mest almindelige specifikationer for højttalerserien. Husk, at der findes
utallige måder til bedømmelse af højttalere, men ingen af dem fortæller noget om, hvordan
en højttaler egentlig lyder. Det er kun dine ører, der afgør, om én højttaler lyder bedre end en
anden. Ligesom alle vores andre højttalere er DALI OPTICON designet til at gengive musik så
ærligt som muligt.
God fornøjelse med din nye DALI OPTICON højttaler!
23
Page 24

内容
1.0 引言 25
2.0 启封 25
3.0 摆位 25
4.0 连接 26
5.0 热机 27
6.0 清洁和保养 27
7.0 废弃处置 27
8.0 功率和声压 27
9.0 试听间 28
24
10.0 技术规格 28
Page 25

UK DE DK CN JP FR
1.0 引言
感谢您购买全新达尼 OPTICON 音箱!请确保对新购的达尼音箱进行最佳安装和连接。建
议您阅读本手册,并按照手册内容进行操作。
本手册不仅详细说明了音箱的安装和连接方式,更提供专业性建议,让音箱达到最佳播放
效果。达尼音箱以卓越的设计和绝佳的性能享誉世界,每一台达尼音箱产品都凝聚了我们
对音效的至高承诺:打造身临其境般的家庭听觉体验。
敬请登录www.dali-speaker.cn订阅达尼简报。
祝您使用愉快!
2.0 启封
在打开包装时应小心翼翼,避免零件损坏。达尼 OPTICON 系列将配有不同的附件。请检
查包装箱内零件是否齐全(参见表1)。请妥善保管包装材料,以备日后运输或维修时使
用。
2.1 网罩
启封后你会发现前置网罩已安装在音箱上。如想卸下网罩,应慢慢拉出固定网罩的插棒,
使网罩松动。在卸下网罩前,应均匀地松动插棒,否则网罩可能会受损。
3.0 摆位
为了达到最佳的音响效果,音箱应围绕您喜爱的聆听位置对称摆放(参见图1A–1C)。
由于摆位不同,音质会发生相应变化,因此建议您尝试不同的摆位。应对达尼OPTICON 1
、OPTICON 2 和达尼OPTICON LCR音箱进行细致的摆位:确保您坐着聆听音乐时,高音单
元能与双耳高度大致处于同一水平线。达尼 OPTICON 5, 6 和8均为落地式音箱,它们的
箱体背部与墙面的距离至少为20厘米(8英寸)。达尼 OPTICON 2 的箱体背部与墙面的距离
至少为20厘米(8英寸)。将达尼 OPTICON LCR 音箱安装在墙面上能达到最佳音质效果,作
为书架式音箱同样效果不俗。如采用墙面安装,则音箱与下方物体的距离应不小于10厘米
(4英寸);如果放置在柜架上,则音箱与墙面的距离至少为10厘米(4英寸)。
在音箱和聆听位置之间放置其他物体可能有损音质。OPTICON 系列的设计宗旨是实现音效
广域扩散,因此将音箱背部与墙面保持平行即可,不必与聆听位置构成角度(参见图2)。
平行摆放有助于降低主听音区域的音效失真,呈现更出色的整体音效。广域传播的声学理
念可使声音大范围地覆盖整个室内空间。
3.1 达尼 OPTICON 5、6和8
这三款音箱均采用落地式设计,箱体底部可安装脚钉或橡胶垫(参见图3+4)。注意不要
将埋头螺母拧得过紧。脚钉和橡胶垫都能提高音质,因此尝试调整脚钉和橡胶垫可获得最
佳音质。请注意,应对脚钉采取防护措施,以免划伤地板。
注意:如果房间的地板较特殊,那么脚钉将是最佳音质的重要保障。自带的脚钉应松弛地
固定在四个铝合金支撑脚上,脚钉上的螺母也处于松弛状态。首先将铝制支撑脚抵在箱体
底部相应位置,然后将螺丝拧入螺纹孔眼固定四个支撑脚。脚钉应与箱体底部保持垂直,
使箱体更稳固并消除震动。拧紧螺母,使四个脚钉紧紧固定在支撑脚上。上述安装步骤能
为音箱底板带来稳定的机械耦合(见图3)。
3.2 达尼 OPTICON 2
将达尼 OPTICON 2 放在落地架上可获最佳音效,作为书架式音箱同样音效不俗。如置于
落地架或者柜架上,可将随附的脚垫安装在箱体底部,以稳固箱体并降低共振影响(参见
图4)。
25
Page 26

3.3 达尼 OPTICON 1
达尼OPTICON 1可放置于落地架、柜架或桌面上,也安装于墙面。若采用墙面安装,必须
使用随附的挂墙架。在安装之前,首先取出挂墙架包装盒内的特制脚垫,并将其准确安装
在箱体背部的边缘位置(参见图5)。这些脚垫能使音箱与墙面保持合适距离,确保妥善
安装。如欲置于落地架或柜架上,则可将随附的脚垫安装于箱体底部,使箱体更稳定并降
低共振影响(参见图4)。
3.4 达尼 OPTICON VOKAL
OPTICON VOKAL 音箱专用于重现中央声道的声音信号,因此其摆位应靠近电视屏幕。您可
将它放置在屏幕下方的支架上或屏幕上方的柜架上。建议使用附带的脚垫,使箱体更稳定
并降低共振影响(参见图6)。
3.5 达尼 OPTICON LCR 音箱
将达尼 OPTICON LCR 音箱安装在墙面上(参见图7)可获最佳音效,但摆放在柜架或电视
柜上同样音效不俗。
达尼 OPTICON LCR 音箱可作为左声道、右声道或中置音箱。如将音箱水平放置,则应将
混合高音模组旋转至垂直位置,此举可有效保持广域扩散和高频输出的清晰度。在水平放
置情况下,还可小幅抬高网罩上的达尼标志并将其旋转至理想位置(参见图8)。
铝带高音单元在出厂时设为垂直位置,如将音箱水平放置,可要求授权经销商或服务机
构为您旋转铝带高音单元。如需将铝带高音单元从箱体中拆除,请使用3毫米内六角扳手
(用户自备)拆下四个螺钉。在拆卸时,请将铝带高音单元旋转90度。如需重新安装铝
带高音单元,请取出过去拆下的四个螺钉(参见图9)。在安装时,不要过度拧紧这四个
螺钉。
如需将音箱置于柜架或电视柜上,可将随附的脚垫安装在箱体底部(水平或垂直放置均
可),以稳固箱体并降低共振影响(参见图4)。
26
4.0 连接
以正确的方式将音箱与功放牢牢连接,这对优良的听觉体验至关重要。请始终使用同一型
号、相同长度的线缆连接左声道和右声道。建议向经销商购买达尼专用音箱线缆。
连接时请保证相位正确。功放上的红色(+极)接线端子必须与音箱上的红色(+极)接线
端子相连。同样,功放上的黑色端子(-极)也必须与音箱上的黑色端子(-极)相连(见
图11A)。安装环绕声或立体声系统时,一旦某个音箱的相位连接有误,便会减弱低音效
果并导致立体声像失准。
为达到最佳音效,右置音箱(从聆听位置看)必须与功放上标有“R”或“Right”的输出
端相连接,左置音箱必须与功放上标有“L” or “Left”的输出端相连接。
注意:必须先关闭功放,然后才能连接线缆或改变连接。
注意:确保接线端子紧紧咬合裸导线,以防电线松动造成短路和功放受损(参见图10)。
注意:如果您在环绕声系统中使用达尼 OPTICON 音箱,请参见环绕声功放的随附说明。
4.1 单线分音和双线分音/双路功放推动
所有达尼 OPTICON 系列音箱均能使用单线分音(见图11A+11B)。不过,达尼OPTICON 5
、6和8系列音箱配备两对接线端子,因此您也可以选择双线分音/双路功放推动的接线方
式。顶部的一对接线端子与内部分频结构的高频区域相连,底部的一对接线端子则与内部
分频结构的低音区域相连。
Page 27

UK DE DK CN JP FR
注意:设置双线分音或双线功放推动时,必须首先断开接线端之间的金属跳线,然后才能
连接线缆(见图11C + 11D)。
设置双线分音时,需使用两套线缆,一套与顶部接线端子连接,一套与底部接线端子连
接。在功放端,应将两套线缆与功放上相应的接线端子连接(参见图11C)。
设置双路功放推动时,需使用两套线缆,一套与顶部接线端子连接,一套与底部接线端子
连接。在功放端,应将两套音箱线缆分别与两个功放连接(参见图11D)
5.0 热机
就像机械系统需要试运行一样,音箱也需要一段热机时间。新购音箱在初期使用过程中,
音质会逐步提高。热机时间主要取决于使用次数和播放音量,但至少需播放100个小时后
方可达到最佳性能。与其他机械系统不同,规范而有规律地使用音箱甚至还能延长其使用
寿命。
6.0 清洁和保养
应使用柔软的干布清洁箱体。如需清洁音箱,请先将柔软的抹布在通用清洁剂中沾湿并完
全拧干,然后用其擦拭音箱。音盆十分脆弱,所以擦拭时应格外小心。网罩可先用衣刷清
洁,然后将无绒布在温和的通用清洁剂中沾湿并彻底拧干,再进行擦拭
6.1 避免阳光直射:
如果音箱长期处于阳光暴晒之下,则箱体表面可能出现褪色或变色。因此,不要将音箱置于
阳光直射之处。
7.0 废弃处置
对音箱作废弃处置时,请勿将其与一般生活垃圾一同丢弃。废弃的电子产品有一套独立的
分类回收系统,需按相关法规对其进行恰当的处置、回收和循环利用。欧盟成员国、瑞
士、列支敦士登和挪威境内的私人用户可免费将废弃的电子产品退到指定回收厂或零售商
处(如果打算购买类似的新音箱)。居住在上述国家以外的私人用户请联系当地政府,了
解正确的废弃处置方式。遵守此流程,才能确保您废弃的产品得到了合理的处置、回收和
循环利用,以避免它对环境和人体健康造成不良影响。
8.0 功率和声压
在保证音质的前提下,音箱的音量上限完全取决于声音信号的品质。因此,实际操作中无
法设定一个明确的标准来比较各种音箱的优劣。
使用大型功放正常输出多个纯净的高保真信号,要优于使用小型功放过载输出单个失真信
号。功放发生畸变(削波)后,其输出信号中的高频信息会大大高于正常信号,这会对高
音单元造成很大的负担。因此,由于小型功放过载运行,音箱往往容易受到损害。 相对
而言,大型功放的运载负荷非常小,因而不会损害音箱。
值得注意的是:将音调调节至中等(neutral)以上,会大幅加重音箱和功放的负担。在
一套高品质音箱系统中,音调控制只可弥补某些不清晰的唱片,却不能永久性弥补音响系
统中的缺陷。
建议您平时将音调控制调节至中等(neutral),并通过合理的音箱摆位获得理想的声
像。请调低音量以保证音质的清晰不失真,这同样能够最大程度地减少音箱和功放的运行
负担。
为了实现最佳功放负载,所有达尼音箱均配备线性阻抗,因此声像效果大幅提升,更加细
腻而无阻滞。
27
Page 28

9.0 听音空间
各个房间的声学环境差异,会让您对同一款音箱产生不同的感受。您听到的不仅有直接来
自音箱的声音,还有来自地面、天花板和墙壁反射声,而反射声会影响您的听觉体验。因
此,尽量让音箱远离大面积的硬面反射区,因为这些区域往往会产生明显的声波反射,干
扰音质的精确度和空间感。在音箱和反射面之间摆放盆栽等物体有助于减轻声波反射。倘
若声音过于尖锐,可使用地毯、窗帘等柔软的物品加以缓解。重低音的音量和音质都与房
间的大小、形状以及音箱摆位有关。将箱体一侧或背部靠近墙面放置,会加强低音效果。
若靠墙角摆放,低音增强效果会更显著,但反射也会随之加强。
10.0 技术规格
表2提供了达尼音箱最常见的技术参数。评测音箱的方法固然很多,但您无法从中确切感
受音箱的实际音质,亲耳聆听才是判断音箱优劣的最佳标准。达尼 OPTICON 系列以卓越
的设计真实再现原声,彰显达尼长久以来的质量理念。
尽情感受达尼 OPTICON 音箱带来的全新体验吧!
28
Page 29

UK DE DK CN JP FR
内容
1.0 はじめに 30
2.0 開梱 30
3.0 設置位置 30
4.0 接続 32
5.0 慣らし運転 33
6.0 掃除と保守 33
7.0 パワーと音圧 34
8.0 リスニングルーム 34
9.0 技術仕様 34
29
Page 30

1.0 はじめに
DALI OPTICONをお買い上げいただき、ありがとうございます。本取扱説明書をよく読
み、推奨事項を守って適切に設置と接続を行ってください。
本書では、設置と接続の説明、そして新しいスピーカーを最大限に活かすためのヒント
とアドバイスをご紹介しています。妥協を許さない設計基準と性能基準によって作られ
るDALI独自のスピーカーは、世界中で称賛を集めています。DALIの一台一台のスピーカ
ーは、当社の最大のコミットメントである「時間や場所を忘れさせてくれるリスニング
体験を自宅で作り出すこと」というゴールを常に目指しています
2.0 開梱
部品の開梱をする時は傷を付けないようご注意ください。DALI OPTICONの付属品は、お
買い上げいただいたモデルによって異なります。箱に部品がすべて同梱されてことを確
認してください(表1を参照)。スピーカーの移送や点検整備が必要になった場合に備
えて、梱包材は保管しておいてください。
2.1 グリル(サランネット)
開梱するとスピーカーの正面にグリルが取り付けられた状態であることが確認できま
す。グリルを取り外したい場合は、グリルの両側を持ってゆっくり手前に引いてくださ
い。また、その際は上下の片側一方に力をかけずに全体にかかるように取り外す事が重
要です。取扱い方によってはグリルが破損するおそれがあります。
3.0 設置位置
スピーカーはお気に入りのリスニングポジションの周りに対称に設置してください(
図1A – 1Cを参照)。音質はスピーカーの位置に左右されますので、様々なスピーカ
ーの位置をお試しになることをお薦めします。OPTICON1と2とLCRは、お気に入りのリ
スニングポジションに座った状態でトゥイーターがほぼ耳の高さにくる位置が理想で
す。OPTICON5と6及び8はフロアスタンディング型スピーカーで、後ろの壁から最低20cm
以上離して設置してください。OPTICON2も同様に後ろの壁から20cm以上離して設置して
ください。OPTICON LCRは壁掛けと棚置きの両方に最適化されています。壁掛けの場合
はスピーカー下部に少なくとも10cm、棚置きの場合は壁からの少なくとも10cmの距離を
保って設置ください。
30
スピーカーとリスニングポジションの間に障害物があると音質に悪影響が出る可能性が
あります。DALI OPTICONは、「ワイドディスパージョン」という当社の基本的考え方に
沿って設計されていますので、本体はリスニングポジションの方に傾けず後ろの壁に平
行に設置してください(図2を参照)。平行に設置すると、スゥイートスポットが広く
とれ、リスニングルーム内においてサウンドが均等に広がります。
3.1 DALI OPTICON 5, 6, 8
フロアスタンド型スピーカーで、スパイクかゴムバンパーを本
体の下に付けて使用します(図3、4を参照)。緩み止めナッ
トは、締めすぎないようにご注意ください。スパイクやゴムバ
ンパーを使うと音質が向上します。ご自分のリスニングルーム
において最高の音質が得られるよう、両方を聞き比べてくださ
Page 31

UK DE DK CN JP FR
い。スパイクは別途スパイク受け等を購入頂き保護をしないと
床に傷が付きますのでご注意ください。
注:一定環境下での床面、お部屋においてスパイクを使用する
事は最良の結果を得る上で重要なファクターになります。スパ
イク(付属品)は、スパイクのナットを完全に締めずに、4つの
アルミ製の脚に固定してください。付属のネジをスピーカーの
底面にあるネジ穴に脚をマウントします。脚をキャビネットに
押し付けてた上でネジを締めてください。床にそのスパイクを
装着したスピーカーを置いてください。振動せずに、しっかり
と立っていることも確認願います。確認が出来ましたらナット
を締めてください。この組立作業は安定した機械的結合を保証
します(図3を参照)。
3.2 DALI OPTICON 2
DALI OPTICON2は別売のスタンドに置く場合と棚の上に置く場合の両方に最適化されて
います。スタンドに置く場合、付属のゴムバンパーをスピーカーの下に取り付けると振
動せずに安定します(図4を参照)。
3.3 DALI OPTICON 1
DALI OPTICON 1はいくつかの設置方法がございます。スタンド上に、棚の上、テーブル
トップまたは壁掛けにも対応致します。但し、壁掛けの場合は、付属の壁用ブラケット
を使用する必要があります。
壁にスピーカーをマウントする前に、ウォールブラケットのパッケージ内に封入 され
ている特別なバンパーをスピーカーの背面に貼り付けてください(図5を参照してくだ
さい)。これらのバンパーは壁から適切な距離を確保し、安全な取り付けを保証致しま
す。スタンドや棚の上に設置する場合、付属のゴムバンパーをスピーカーの下に取り付
けると振動せずに安定します(図4を参照)。
注意:壁掛けの取り付けは安全性確保のため、専門施工業者へ依頼してください。スピ
ーカーケーブルを足や手に引っ掛けて本機を落下させることのないように、ケーブルは
必ず壁などに固定してください。取り付け後は必ず安全性を確認してください。また、
その後定期的に落下の可能性がないか安全点検を実施してください。取り付け場所、取
り付け方法の不備によるいかなる損害、事故についても弊社及び輸入代理店はいっさい
その責を負いません。
3.4 DALI OPTICON VOKAL
OPTICON VOKALはセンターチャンネル専用で、大型のテレビモニターの近くに設置する
ように設計されています。 設置場所に関してはテレビモニターの上下の棚の上に置い
てください。同封のゴムバンパーをスピーカーの下に取り付けると振動せずに安定しま
す(図6を参照)
31
Page 32

3.5 DALI OPTICON LCR
OPTICON LCRは壁掛け(図7を参照)やTVラックに置く場合に最適化されています。
OPTICON LCRは、左、右またはセンターチャンネルスピーカーとしてご使用頂けます。
横置き方向で使用される場合はハイブリッドツイーターモジュールを回転させて下さ
い。これは高域成分の拡散性と繊細なディティールを表現するために重要です。縦置
き方向で使用される場合はハイブリッドツイーターモジュールは動かさずご使用くださ
い。また、フロントグリルのDALIロゴ(図8を参照)は少し持ち上げて、希望の位置に
それを回転させることができます。
ハイブリッドツイーターモジュールは工場出荷時は縦置きでの使用設定で固定されてい
ます。ハイブリッドツイーターモジュールを回転させるには別売の3mmの六角レンチを
用い4本のネジを取り外します。取外後、ハイブリッドツイーターモジュールを90度回
転させマウントされていた場所に置いて、4本のネジを締めてください(図9を参照)。そ
の際、ネジは締めすぎないようご注意ください。
棚の上もしくはTV台に設置される場合(縦置き、横置きのいぜれの場合も)は付属のゴム
バンパーをスピーカーの下に取り付ける事により振動せずに安定します(図4を参照)。
注意:壁掛けの取り付けは安全性確保のため、専門施工業者へ依頼してください。スピ
ーカーケーブルを足や手に引っ掛けて本機を落下させることのないように、ケーブルは
必ず壁などに固定してください。取り付け後は必ず安全性を確認してください。また、
その後定期的に落下の可能性がないか安全点検を実施してください。取り付け場所、取
り付け方法の不備によるいかなる損害、事故についても弊社及び輸入代理店はいっさい
その責を負いません。
注意:壁掛けの取り付けは安全性確保のため、専門施工業者へ依頼してください。スピ
ーカーケーブルを足や手に引っ掛けて本機を落下させることのないように、ケーブルは
必ず壁などに固定してください。取り付け後は必ず安全性を確認してください。また、
その後定期的に落下の可能性がないか安全点検を実施してください。取り付け場所、取
り付け方法の不備によるいかなる損害、事故についても弊社及び輸入代理店はいっさい
その責を負いません。
32
4.0 接続
実際のリスニングには、アンプにしっかりと正しく接続することが大変重要です。左右
のチャンネルには必ず同じ型と長さのケーブルをお使いください。
接続を正しい相で行うという細かいことは無視されがちです。アンプの赤い端子(+)
はスピーカーの赤い端子(+)に、アンプの黒い端子(-)はスピーカーの黒い端子(
-)に接続してください(図11Aを参照)。ステレオやサラウンド設定では、一つのス
ピーカーで接続相が一致しなくても、低域が弱くなり、ステレオイメージの焦点が定ま
りません。
最適なリスニング体験をお求めの場合、(リスニングポジションから見て)右のスピー
カーは、アンプの「R」または「Right」と書かれた出力端子、左のスピーカーは、アン
プの「L」または「Left」と書かれた出力端子に接続してください。
注意: ケーブルの接続または接続の変更は、必ずアンプの電源を切ってから行ってくだ
さい。
Page 33

UK DE DK CN JP FR
注意: 露出した導体は、ターミナルでしっかりと固定し、ワイヤーが弛まないようにし
てください。ワイヤーが弛んでいるとショートによりアンプが破損する場合があります
(図10を参照)。
注意: サラウンドシステムでDALI OPTICONをお使いになる場合は、サラウンドアンプに
付属している取扱説明書に従ってください。
4.1シングルワイヤリングとバイワイヤリング/バイアン
プ
DALI OPTICONのすべてのモデルはシングルのケーブルで接続が可能です(図11A、11Bを
参照)。しかし、OPTICON5、6、8は2対のターミナルが用意されています。各々のスピー
カーへの2本のケーブルを繋ぐこともできます。 上部のターミナルは、内部のクロスオ
ーバーネットワークの高音域に接続され、下部のターミナルは、内部のクロスオーバー
ネットワークの低音域に接続されています。
注意: バイワイヤリングもしくはバイアンプでの接続の際は、ケーブルの接続をする前
に必ずジャンパー線は取り外して下さい。(図 11C、11Dを参照)
バイワイヤリングにおいては2セットのケーブルを使用します。スピーカー側で一点は
上部のターミナルに、もう一点は下部のターミナルに接続下さい。アンプ側は1セット
のケーブルをアンプのターミナルに、もう1セットのケーブルを別のターミナルに接続
下さい(図11Cを参照)。
バイアンプにおいても2セットのケーブルを使用します。スピーカー側で一点は上部の
ターミナルに、もう一点は下部のターミナルに接続下さい。アンプ側は1セットのケー
ブルを1台目のアンプのターミナルに、もう1セットのケーブルを2台目のアンプのター
ミナルに接続下さい(図11Dを参照)。
5.0慣らし運転
あらゆる機械と同様に、スピーカーも最高の状態で動作するには「慣らし運転」期間が
必要です。慣らし運転期間は使用方法と再生音量によって異なります。最大性能に達す
るまでの再生は最長100時間を見込んでください。また、他の機械とは異なり、スピー
カーは音楽を定期的に正常に再生すると寿命が延びます。
6.0掃除と保守
本体の掃除には乾いた柔らかい布を使ってください。汚れは、万能洗剤を染み込ませて
固く絞った柔らかい布で拭いてください。スピーカーコーンはこわれやすいので、拭く
時には特に注意してください。フロントグリルは、洋服ブラシで汚れを払い落し、弱い
万能洗剤を染み込ませて固く絞った糸くずの出ない布を使って拭いてください。
6.1 直射日光を避ける
スピーカーの表面は、直射日光に当たると時間がたつにつれて色があせたり変色したり
する場合があります。直射日光の当たる所には設置しないようにしてください。
33
Page 34

7.0 パワーと音圧
スピーカーがどの程度の大音量まで良質なサウンドを保てるかは、再生する信号に完全
に左右されますので、スピーカーの比較の基準とする明確なレベルを定義することは実
際のところ不可能です。
小さいアンプから能力を超えた歪みのある信号が出るよりも、大きいアンプから純粋で
歪みのない信号が十分に出るに越したことはありません。歪んだ(クリッピング)アン
プからの信号は、歪みのない信号よりもはるかに多くの高周波数情報が含まれているた
め、トゥイーターに重い負担がかかります。そのため、スピーカーは、小さいアンプが
無理をしすぎて破損する場合が多く、大きなアンプ(事実上空回りしている)によって
破損する場合はまれです。音質調節をニュートラル設定以上にすると、スピーカーとア
ンプの両方に大きな負担がかかりますのでご注意ください。優れたサウンドシステムの
場合、音質調節を使用するのは劣悪な録音物を補う場合のみとし、システム内の弱点を
恒久的に補うために使用するのは避けてください。DALIは、音質調節は原則的にニュー
トラルに設定し、求めるサウンドイメージはスピーカーのポジショニングを適切に行っ
て実現することをお薦めします。クリアで歪みないサウンドを実現する低音量を維持す
るようにすれば、スピーカーとアンプにかかる負担は最小限になります。
DALIのスピーカーはすべて、アンプの負担が最適になるよう各帯域のインピーダンスが
フラットで設計されているため、はるかに開放的できめ細かい音のイメージが得られま
す。
8.0 リスニングルーム
部屋の構造によって、スピーカーから出るサウンドの聞こえ方が変わります。耳に届く
サウンドは、スピーカーから直接出るサウンドと床や天井、壁に反射した音です。反射
音はサウンド体験に影響します。一般的に強い反射が生じた場合、音響再生の精度と空
間効果が妨げられる可能性がありますので、基本原則として大きく、硬く、且つ音を反
射するもののすぐそばにスピーカーを設置することは避けてください。スピーカーと反
射面の間に植物などを置くと反射が抑えられる場合があります。サウンドが鮮やかすぎ
る場合には、カーペットやカーテンなどの柔らかいものを使うと良いでしょう。重低音
の音量と音質はいずれも、部屋の大きさと形状、スピーカーの位置で決まります。スピ
ーカーの側面または背面を壁に近づけて設置すると低域が強調されます。
部屋の角に設置すると低域はさらに強調されますが、反射も増えます。
34
9.0 技術仕様
当社スピーカーの最も代表的な仕様を表2にまとめました。スピーカーには数えきれな
いほどの評価方法がありますが、「スピーカーが実際にどのようなサウンドを出すか」
がわかるものは一つもありません。他と比較したスピーカーの優劣を決めるのはご自分
の耳しかありません。当社のスピーカーの例に漏れず、DALI OPTICONシリーズも音楽を
最大限忠実に再現できるよう設計されています。
新しいDALI OPTICONをお楽しみください。
Page 35

UK DE DK CN JP FR
SOMMAIRE
1.0 INTRODUCTION 36
2.0 DÉBALLAGE 36
3.0 POSITIONNEMENT 36
4.0 CONNEXION 38
5.0 RODAGE 39
6.0 NETTOYAGE ET ENTRETIEN 39
7.0 MISE AU REBUT 39
8.0 PUISSANCE ET PRESSION ACOUSTIQUE 39
9.0 LA PIÈCE D'ÉCOUTE 40
10.0 CARACTÉRISTIQUES TECHNIQUES 40
35
Page 36

1.0 INTRODUCTION
Félicitations pour l’achat de vos nouvelles enceintes DALI OPTICON. Nous attachons une grande
importance à l’installation et la connexion optimales de vos nouvelles enceintes DALI. C’est
pourquoi nous vous recommandons de lire ce manuel et d’en suivre les instructions.
Ce manuel contient des instructions d’installation et de connexion, ainsi que des conseils et
des recommandations qui vous permettront de profiter pleinement de vos nouvelles enceintes.
DALI est réputé dans le monde entier pour ses enceintes uniques, dotées d’un design et de
performances répondant aux normes les plus strictes. L’objectif de chaque enceinte DALI
est toujours à l’image de notre engagement fondamental : vous proposer, chez vous, une
expérience d’écoute qui ne manquera jamais de vous transporter.
N’oubliez pas de vous inscrire sur www.dali-speakers.com pour recevoir la newsletter de DALI.
Nous vous souhaitons beaucoup de plaisir avec vos enceintes.
2.0 DÉBALLAGE
Prenez soin de ne pas endommager le contenu lors du déballage des différents composants.
Selon le modèle DALI OPTICON que vous avez acheté, différents accessoires sont fournis avec
les enceintes. Assurez-vous que l’emballage en carton contient toutes les pièces (voir Tableau
1). Conservez les matériaux d’emballage, dans l’éventualité où vous devriez transporter ou faire
réparer vos enceintes.
2.1 GRILLES
Les enceintes sont fournies avec la face avant des grilles déjà montée quand vous les déballez.
Si vous voulez retirer la face avant des grilles, détachez-la petit à petit en tirant sur les pistons
qui la maintiennent en place. Il est important que tous les pistons soient desserrés de façon
uniforme avant de détacher la face avant. Sans quoi, la grille peut être endommagée.
36
3.0 POSITIONNEMENT
Pour obtenir les meilleurs résultats, les enceintes doivent être disposées de façon symétrique
autour de votre position d’écoute préférée (voir Figure 1A – 1C). Nous vous recommandons
d’essayer de positionner vos enceintes de différentes façons ; la qualité sonore variera en
fonction de la position des enceintes. Pour les modèles DALI OPTICON 1, OPTICON 2 et DALI
OPTICON LCR, les enceintes doivent idéalement être positionnées de manière à ce que le
tweeter se trouve sensiblement à la hauteur de votre oreille lorsque vous êtes assis dans
votre position d’écoute préférée. Les enceintes DALI OPTICON 5, 6 et 8 sont conçues pour
être posées au sol. Elles doivent être positionnés à 20 cm (8”) minimum du mur situé derrière
l’enceinte. Le modèle DALI OPTICON 2 doit être positionné à 10 cm (4”) minimum du mur
situé derrière l’enceinte. DALI OPTICON LCR est optimisé pour une installation murale, mais
fonctionnera également bien sur une étagère. En cas de montage mural, il doit y avoir au moins
10 cm (4”) d’écart avec toute surface sous l’enceinte et en cas de montage sur une étagère, il
doit y avoir au moins 10 cm (4”) de distance avec le mur.
La présence d’objets situés entre l’enceinte et la position d’écoute peut avoir un effet négatif
sur la qualité sonore. Toutes les enceintes DALI OPTICON sont conçues pour satisfaire à notre
principe de « diffusion large » ; elles ne doivent donc pas être orientées vers la position d’écoute,
mais doivent être positionnées parallèlement au mur situé derrière l’enceinte (voir Figure 2). Le
positionnement parallèle permet de réduire la distorsion dans la position d’écoute principale
et d’assurer une meilleure intégration dans la pièce. Le principe de diffusion large garantit
également une répartition homogène du son à chaque endroit de la pièce d’écoute.
Page 37

UK DE DK CN JP FR
3.1 DALI OPTICON 5, 6 et 8
Les enceintes sont conçues pour être posées au sol, sur des pointes ou des pieds en caoutchouc
placés sous les enceintes (voir Figure 3 + 4). Veillez à ne pas trop serrer les contre-écrous.
L’utilisation de pointes ou de pieds en caoutchouc permet d’améliorer la qualité sonore. Vous
pouvez essayer l’une et l’autre de ces solutions afin d’identifier celle qui produit le meilleur son
dans votre installation. Gardez à l’esprit que des pointes peuvent endommager le sol, s’il n’est
pas protégé.
REMARQUE: Sur certaines surfaces de sol et dans certaines pièces, l’utilisation de pointes
est un élément crucial pour obtenir les meilleurs résultats. Les pointes (incluses) doivent être
fixées sans être serrées dans les quatre pieds en aluminium, en laissant l’écrou de la pointe
légèrement serré. À l’aide des vis, montez les pieds dans les trous filetés sur la partie inférieure
de l’enceinte. Appuyez les pieds contre l’enceinte avant de serrer les vis. Mettez l’enceinte en
position verticale en appui sur ses pointes sur le sol, de sorte qu’elle se tienne bien droite, sans
vaciller. Serrez les écrous, de sorte que les quatre pointes soient étroitement serrées contre
les pieds en aluminium. Ces étapes de montage et de mise en place garantissent un attelage
mécanique stable à la surface de dessous (voir Figure 3).
3.2 DALI OPTICON 2
DALI OPTICON 2 est optimisé pour une installation au sol, mais fonctionnera également bien sur
une étagère. En cas de positionnement sur un support ou une étagère, les pieds fournis peuvent
être placés sous l’enceinte pour obtenir un positionnement stable et exempt de vibrations (voir
Figure 4).
3.3 DALI OPTICON 1
Il existe plusieurs possibilités de positionnement pour DALI OPTICON 1 ; sur un support, sur un
étagère, sur une table ou en installation murale. Pour une installation murale de DALI OPTICON,
vous devez utiliser le support fourni. Avant de monter l’enceinte au mur, placez les pieds
spéciaux, fourni dans l’emballage du support mural, sur la partie inférieure arrière de l’enceinte
(voir figure 5). Ces pieds garantissent une distance correcte avec le mur et permettent un
montage sécurisé. En cas de positionnement sur un support ou une étagère, les pieds fournis
peuvent être placés sous l’enceinte pour obtenir un positionnement stable et exempt de
vibrations (voir figure 4).
3.4 DALI OPTICON VOKAL
L’enceinte DALI OPTICON VOKAL est le canal central dédié, et a été spécialement conçue
pour être positionnée aussi près que possible de la grande surface d’un écran de télévision.
Vous pouvez la placer au-dessus ou en dessous de l’écran, sur un pied ou sur une étagère.
Nous vous recommandons d’installer les pieds fournis sur l’enceinte, de manière à garantir un
positionnement stable et exempt de vibrations (voir Figure 6).
3.5 DALI OPTICON LCR
L’enceinte DALI OPTICON LCR est optimisée pour une installation murale (voir Figure 7), mais
peut aussi être placée sur une étagère ou un meuble TV.
L’enceinte DALI OPTICON LCR peut être utilisée comme enceinte de droite, de gauche ou
centrale. Si l’enceinte est utilisée en position horizontale, le module de tweeter hybride doit
être pivoté de façon à rester vertical. Cela est important pour préserver la diffusion large et
les détails précis des hautes fréquences. Si l’enceinte est utilisée en position horizontale, vous
37
Page 38

pouvez faire pivoter le logo DALI sur la grille frontale en le soulevant légèrement puis en le
faisant pivoter dans la position voulue (voir Figure 8).
Les tweeters à ruban sont préconfigurés pour un positionnement vertical à l’usine et si l’enceinte
est utilisée en position horizontale, votre revendeur ou centre de service agréé peut faire pivoter
le tweeter à ruban pour vous. Pour retirer le tweeter à ruban de l’enceinte, utilisez une clé Allen
de 3 mm (non incluse) afin de retirer les quatre vis. Une fois qu’il a été démonté, faites tourner le
tweeter à ruban de 90 degrés. Insérez le tweeter à ruban pivoté et installez-le, en vous servant
des quatre vis (Figure 9). Veillez à ne pas trop serrer les vis quand vous remontez l’enceinte.
En cas de positionnement sur une étagère ou un meuble TV, les pieds fournis peuvent être placés
sous l’enceinte (aussi bien en position horizontale que verticale) pour obtenir un positionnement
stable et exempt de vibrations (voir Figure 4).
4.0 CONNEXION
Une connexion correcte et solide à votre amplificateur est extrêmement importante pour votre
expérience d’écoute. Utilisez toujours des câbles de type et de longueur identiques pour les
canaux gauche et droit. Nous recommandons l’utilisation du câble d’enceinte DALI CONNECT,
disponible auprès de votre revendeur.
Le respect des phases lors de la connexion est un détail souvent ignoré. La borne rouge (+)
de l’amplificateur doit être connectée à la borne rouge (+) de l’enceinte. La borne noire (-)
de l’amplificateur doit être connectée à la borne noire (-) de l’enceinte (voir Figure 11A). La
connexion incorrecte (phases inversées) d’une seule enceinte dans une installation stéréo ou
surround suffira à affaiblir les graves et à altérer la netteté de l’image stéréo.
Pour une expérience d’écoute optimale, l’enceinte droite (vue depuis la position d’écoute) doit
être connectée aux bornes de sortie « R » ou « Right » (droite) de l’amplificateur. L’enceinte
gauche doit être connectée aux bornes de sortie « L » ou « Left » (gauche) de l’amplificateur.
38
REMARQUE: Avant de connecter des câbles ou de modifier des connexions, éteignez
TOUJOURS votre amplificateur.
REMARQUE: Assurez-vous que les conducteurs dénudés sont fermement saisis par les bornes
et qu’aucun brin de câble ne dépasse, au risque de provoquer un court-circuit et d’endommager
l’enceinte (voir Figure 10).
REMARQUE: Si vous utilisez des enceintes DALI OPTICON dans un système surround, suivez les
instructions fournies avec votre amplificateur surround.
4.1 CÂBLAGE SIMPLE OU BI-CÂBLAGE/BI-AMPLIFICATION
Toutes les enceintes DALI OPTICON peuvent être connectées au moyen d’un simple câble
d’enceinte (voir Figure 11A + 11B). Toutefois, les enceintes DALI OPTICON 5, 6 et 8 comportent
deux paires de bornes, qui vous offrent la possibilité de connecter chaque enceinte avec deux
jeux de câbles. La paire de bornes supérieure est connectée, au niveau interne, à la section
haute fréquence du filtre passif. La paire de bornes inférieure est connectée, au niveau interne,
à la section de basses fréquences du filtre passif.
Page 39

UK DE DK CN JP FR
REMARQUE: Si les enceintes sont connectées en bi-câblage ou bi-amplification, retirez
TOUJOURS les cavaliers de liaison métalliques entre les bornes avant de connecter les câbles
(voir Figure 11C + 11D).
Pour le bi-câblage, vous devez connecter deux jeux de câbles d’enceinte : un premier jeu aux
bornes supérieures et un deuxième jeu aux bornes inférieures des enceintes. Au niveau de
l’amplificateur, connectez les deux jeux de câbles d’enceinte à la même paire de bornes sur
l’amplificateur (voir Figure 11C).
Pour la bi-amplification, vous devez connecter deux jeux de câbles d’enceinte : un premier jeu
aux bornes supérieures et un deuxième jeu aux bornes inférieures des enceintes. Au niveau de
l’amplificateur, connectez un jeu de câbles d’enceinte à un amplificateur, puis connectez l’autre
jeu de câbles au deuxième amplificateur (voir Figure 11D).
5.0 RODAGE
À l’image de tout système mécanique, une enceinte nécessite une période de « rodage » pour
donner le meilleur d’elle-même. Vous constaterez une amélioration progressive de la qualité
sonore durant la première période d’utilisation. La période de rodage varie selon l’utilisation et
le volume de lecture. Vous devez prévoir jusqu’à 100 heures de diffusion avant d’atteindre des
performances optimales. Contrairement à d’autres systèmes mécaniques, la durée de vie d’une
enceinte est augmentée par la diffusion normale et régulière de musique.
6.0 NETTOYAGE ET ENTRETIEN
Nettoyez les enceintes avec un chiffon doux et sec. Si les enceintes sont sales, essuyez-les
avec un chiffon doux imprégné d’un produit nettoyant multi-usages, bien essoré. Essuyez
toujours délicatement les cônes des haut-parleurs ; ils sont très fragiles. La face avant des
grilles peut être nettoyée avec une brosse à vêtements, puis essuyée avec un chiffon non
pelucheux imprégné d’un nettoyant doux multi-usages, bien essoré.
6.1 ÉVITEZ LA LUMIÈRE DIRECTE DU SOLEIL:
Si elles sont exposées à la lumière directe du soleil, les surfaces des enceintes risquent de
ternir ou de se décolorer progressivement. Par conséquent, évitez de positionner les enceintes
dans un endroit exposé à la lumière directe du soleil.
7.0 MISE AU REBUT
Si vous souhaitez mettre ce produit au rebut, ne le jetez pas avec les déchets ménagers
ordinaires. Un système de collecte distinct existe pour les produits électroniques usagés,
conformément à la législation, qui impose un traitement, une récupération et un recyclage
adéquats. Les foyers de particuliers dans les états membres de l’UE, en Suisse, au Liechtenstein
et en Norvège peuvent déposer gratuitement leurs produits électroniques auprès d’un site
de collecte dédié ou d’un revendeur (en cas d’achat d’un produit neuf semblable). Si vous
n’habitez pas dans l’un des pays mentionnés ci-dessus, veuillez contacter les autorités locales
pour connaître la méthode de mise au rebut correcte. En suivant cette procédure, vous vous
assurerez que votre produit mis au rebut sera correctement traité, récupéré et recyclé, ce qui
évitera d’éventuels effets négatifs sur l’environnement et la santé.
8.0 PUISSANCE ET PRESSION ACOUSTIQUE
Le volume auquel une enceinte peut diffuser du son avec une qualité sonore optimale dépend
entièrement du signal qu’elle doit restituer. Ainsi, en pratique, il est impossible de définir un
niveau d’utilisation incontestable, utilisable pour comparer différentes enceintes.
39
Page 40

Un signal de sortie ample et pur, sans distorsion, provenant d’un amplificateur puissant est
meilleur qu’un signal distordu provenant d’un petit amplificateur poussé au-delà de ses
capacités. Le signal provenant d’un amplificateur présentant une distorsion (phénomène dit
« d’écrêtage ») contient beaucoup plus d’informations à haute fréquence qu’un signal sans
distorsion, et exerce donc une charge considérable sur le tweeter de l’enceinte. Par conséquent,
les enceintes sont souvent endommagées par les petits amplificateurs fonctionnant au-delà
de leurs capacités – et très rarement, en revanche, par des amplificateurs puissants, qui
fonctionnent pratiquement « au repos ».
Il est important de noter que l’utilisation des commandes de tonalité au-delà du réglage neutre
exerce une charge significative sur les enceintes et l’amplificateur. Sur un bon système audio,
les commandes de tonalité doivent uniquement être utilisées pour compenser une mauvaise
qualité d’enregistrement, et non pour pallier en permanence la faiblesse d’un autre composant
du système.
C’est pourquoi DALI vous recommande de régler les commandes de tonalité en position
neutre et d’obtenir l’image sonore souhaitée en positionnant correctement vos enceintes. En
maintenant toujours un volume sonore suffisamment bas pour garantir un son clair et sans
distorsion, vous minimiserez la charge exercée sur vos enceintes et votre amplificateur.
Toutes les enceintes DALI présentent une impédance linéaire, permettant d’optimiser la charge
de l’amplificateur. Le résultat est une image sonore significativement plus ouverte et détaillée.
9.0 LA PIÈCE D’ÉCOUTE
Chaque pièce possède des caractéristiques acoustiques uniques, qui influencent la manière
dont nous entendons le son provenant d’une enceinte. Le son que vous entendez est constitué
du son direct provenant des enceintes et du son réfléchi provenant du sol, du plafond et des
murs. Ce dernier affectera votre expérience du son. La règle fondamentale consiste à essayer
d’éviter d’avoir de grandes surfaces dures et réfléchissantes à proximité de vos enceintes, car
celles-ci provoqueront généralement de puissants effets de réflexion pouvant altérer la précision
et la spatialisation de la restitution sonore. La réflexion peut notamment être supprimée en
positionnant, par exemple, une plante entre l’enceinte et la surface réfléchissante. Les objets
souples, tels que les tapis, les rideaux, etc. peuvent également être utiles si le son semble trop
aigu. Le volume et la qualité des graves dépendent de la taille et de la forme de la pièce, ainsi
que de la position des enceintes. Les graves seront accentués si un mur se trouve sur le côté
ou à l’arrière de vos enceintes. Positionner vos enceintes dans un coin accentuera encore ce
phénomène et augmentera également le phénomène de réflexion.
40
10.0 CARACTÉRISTIQUES TECHNIQUES
Le Tableau 2 présente les caractéristiques essentielles de nos enceintes. Veuillez garder à
l’esprit qu’il existe d’innombrables façons de mesurer les performances d’enceintes ; toutefois,
aucune ne vous permettra d’en évaluer réellement la sonorité. Seules vos oreilles peuvent
décider quelle enceinte est meilleure que les autres. Comme tous nos modèles, la série DALI
OPTICON est conçue pour restituer la musique de manière aussi fidèle que possible.
Nous espérons que vos nouvelles enceintes DALI OPTICON vous procureront beaucoup de
plaisir.
Page 41

TABLE 2 - OPTICON TECHNICAL SPECIFICATIONS
OPTICON 1 OPTICON 2 OPTICON 5 OPTICON 6 OPTICON 8 OPTICON LCR OPTICON VOKAL
Frequency Range [+/- 3] dB [Hz] 62 -26,000 59 - 27,000 51 - 32,000 49 - 32,000 38 - 32,000 72 - 32,000 47 - 32,000
Sensitivity [2.83V/1m] [dB] 86 87 88 89 88 90.5 89.5
Nominal Impedance [ohms] 4 4 4 4 4 4 4
Maximum SPL [dB] 105 107 107 110 112 109 109
Recommended Amplifier Power
[Watt]
Crossover Frequency [Hz] 2,000 2,000 2,400 / 14,000 800 / 2,200 /
Crossover Principle 2-way 2-way 2+½-way 2½+½-way 3+½-way 2+½-way 2+½-way
High Frequency Driver 1 x 26 mm soft
Low Frequency / mid-range
Driver(s)
Enclosure Type Bass reflex Bass reflex Bass reflex Bass reflex Bass reflex
Bass Reflex Tuning Frequency
[Hz]
Connection Input(s) Single Single Bi-wire / Bi-amp Bi-wire / Bi-amp Bi-wire / Bi-amp Single Single
Recommended Placement Stand/Shelf/Wall Stand/Shelf Floor Floor Floor On-wall/Shelf Shelf
Recommended Distance from
rear wall to speaker’s rear
panel [cm]
Dimensions (H x W x D) [mm] 261 x 152 x 231 351 x 195 x 297 891 x 195 x 310 1001 x 195 x 330 1141 x 241 x 450 482 x 285 x 128 201 x 435 x 312
Dimensions (H x W x D) [inches] 10.4 x 6.1 x 9.2 14.0 x 7.8 x 11.9 35.6 x 7.8 x 12.4 40.0 x 7.8 x 13.2 45.6 x 9.6 x 18.0 19.3 x 11.4 x 5.1 8.0 x 17.4 x 12.5
Weight [kg/lb] 4.5 / 9.9 7.8 / 17.2 15.6 / 34.4 18.9 / 41.7 34.8 / 76.7 8.3 / 18.3 8.8 / 19.4
Accessories Rubber feet,
25 - 100 30 - 150 30 - 150 25-200 40 - 300 30 - 150 30 - 150
14,000
dome
1 x 4¾” 1 x 6½” 1 x 6½” 2 x 6½” 2 x 8” / 1 x 6½” 1 x 6½” 1 x 6½”
61.5 46.5 43.0 42.0 29.5 45.5 43.5
2 -80 10 - 80 20 - 80 20 - 100 30 - 150 0 - 10 0 - 30
manual
1 x 28 mm soft
dome
Rubber feet,
manual
1 x 28 mm soft
dome
1 x 17 x 45 mm
ribbon
Spike set,
rubber feet,
manual
1 x 28 mm soft
dome
1 x 17 x 45 mm
ribbon
Spike set, rubber
feet, manual
390 / 2,300 /
14,000
1 x 28 mm soft
dome
1 x 17 x 45 mm
ribbon
(mid-range
closed box)
Spike set,
rubber feet,
manual
2,200 / 14,000 2,300 / 14,000
1 x 28 mm soft
dome
1 x 17 x 45 mm
ribbon
Bass reflex Bass reflex
Rubber feet,
manual
1 x 28 mm soft
dome
1 x 17 x 45 mm
ribbon
Rubber feet,
manual
Page 42

Item No. 951057-0-0
DALI Denmark +45 9672 1155
www.dali-speakers.com
 Loading...