

Page 1

MANUAL
Page 2
CONTENTS
1.0 Unpacking .................. 3
2.0 Buttons, indication LED’s
and Connections ............. 5
2.1 Button and LED Overview.......... 4
2.2 Input/output overview ............ 5
2.3 Remote control .................6
2.4 Bluetooth button functions ......... 6
3.0 Power and Auto
Source Select................ 7
3.1 Power ON .....................7
3.2 Power OFF .....................7
3.3 Auto Power OFF .................7
3.4 Auto Source Select...............8
4.0 Volume..................... 9
4.1 Volume Down...................9
4.2 Volume Up ..................... 9
4.3 Volume Indications...............9
5.0 Bluetooth ...................10
5.1 Pairing .......................10
5.2 Bluetooth Release ..............11
5.3 Bluetooth Naming ..............11
6.0 Sound Mode.................12
7.0 Connections.................13
7.1 USB Power Out / Service .........13
7.2 Sub Out ......................13
7.3 AUX In .......................13
7.4 Optical In .....................13
7.5 Optical In (TV) .................13
7.6 HDMI In ......................14
8.0 Positioning..................15
9.0 Factory Reset &
Firmware Upgrade ............16
9.1 Factory Reset..................16
9.2 Firmware upgrade ..............16
9.3 Firmware - Readout
Current Version ................17
10.0 Cleaning....................18
11.0 Disposal....................19
2
Page 3
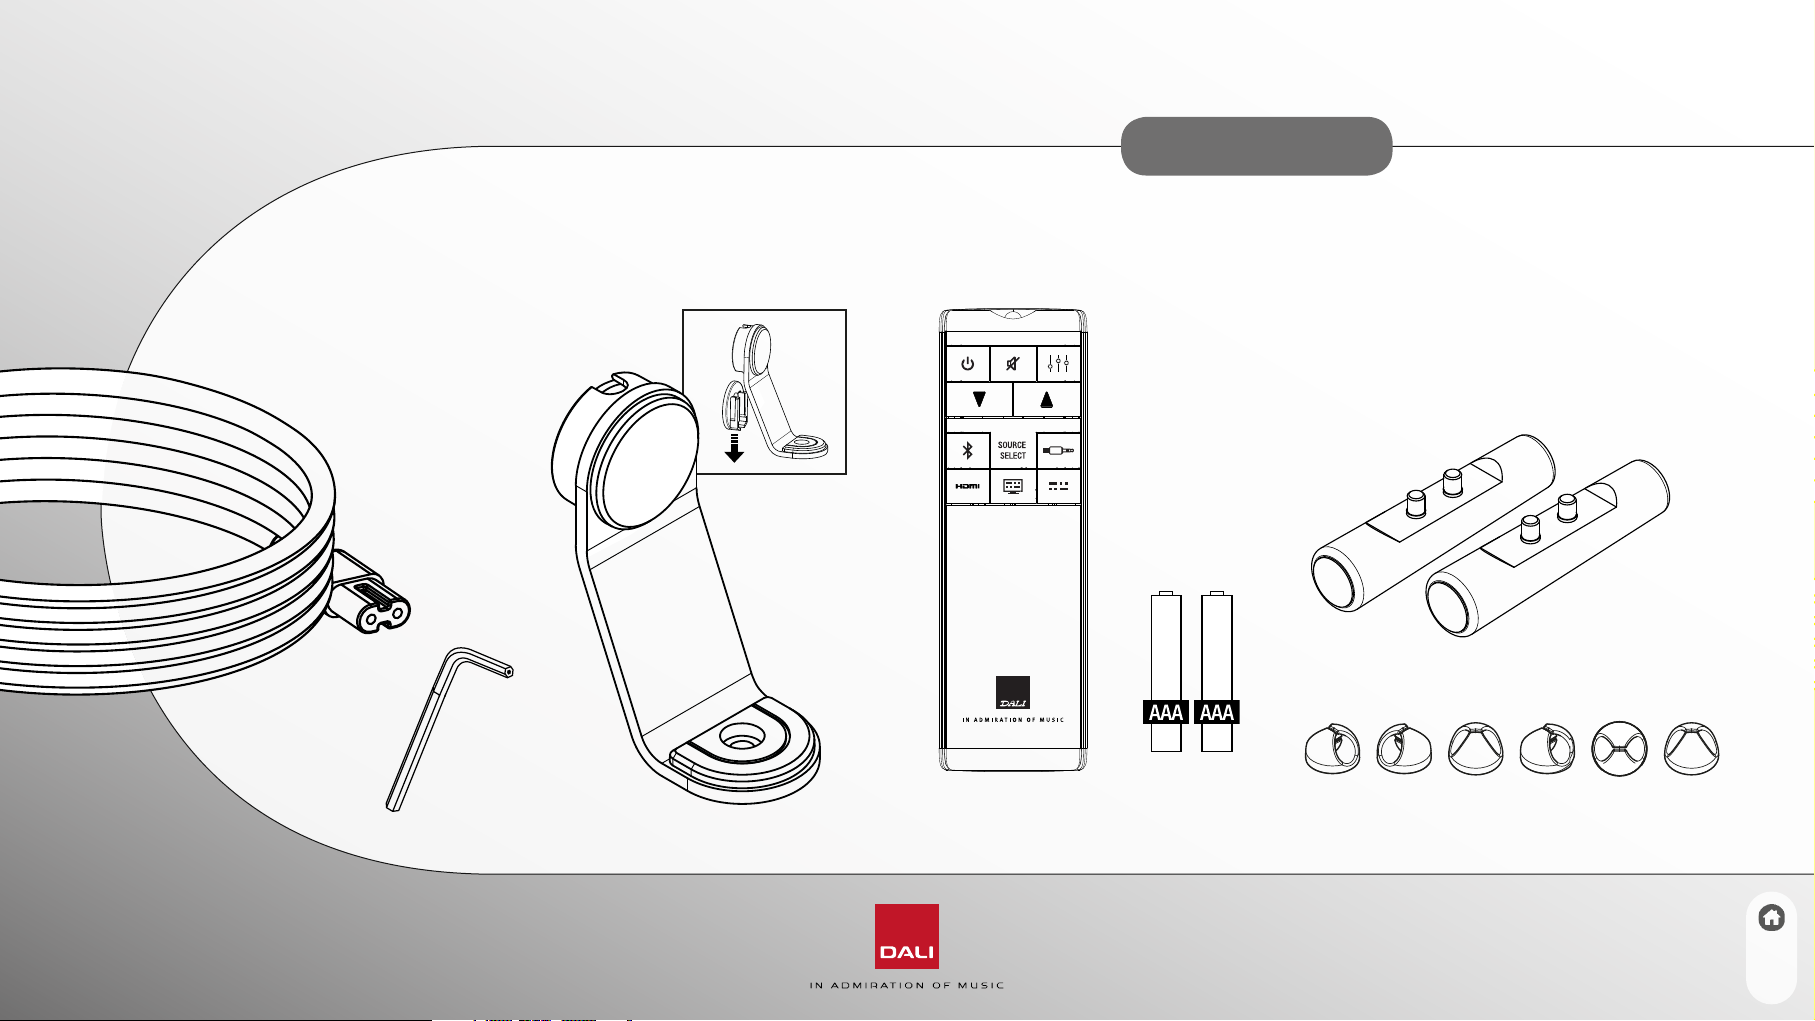
1.0 UNPACKING
Be careful not to damage the contents when unpacking
the parts. Check that all parts are included in the
cardboard box. Keep the packaging materials in case
your speaker needs to be relocated or serviced.
3
Page 4
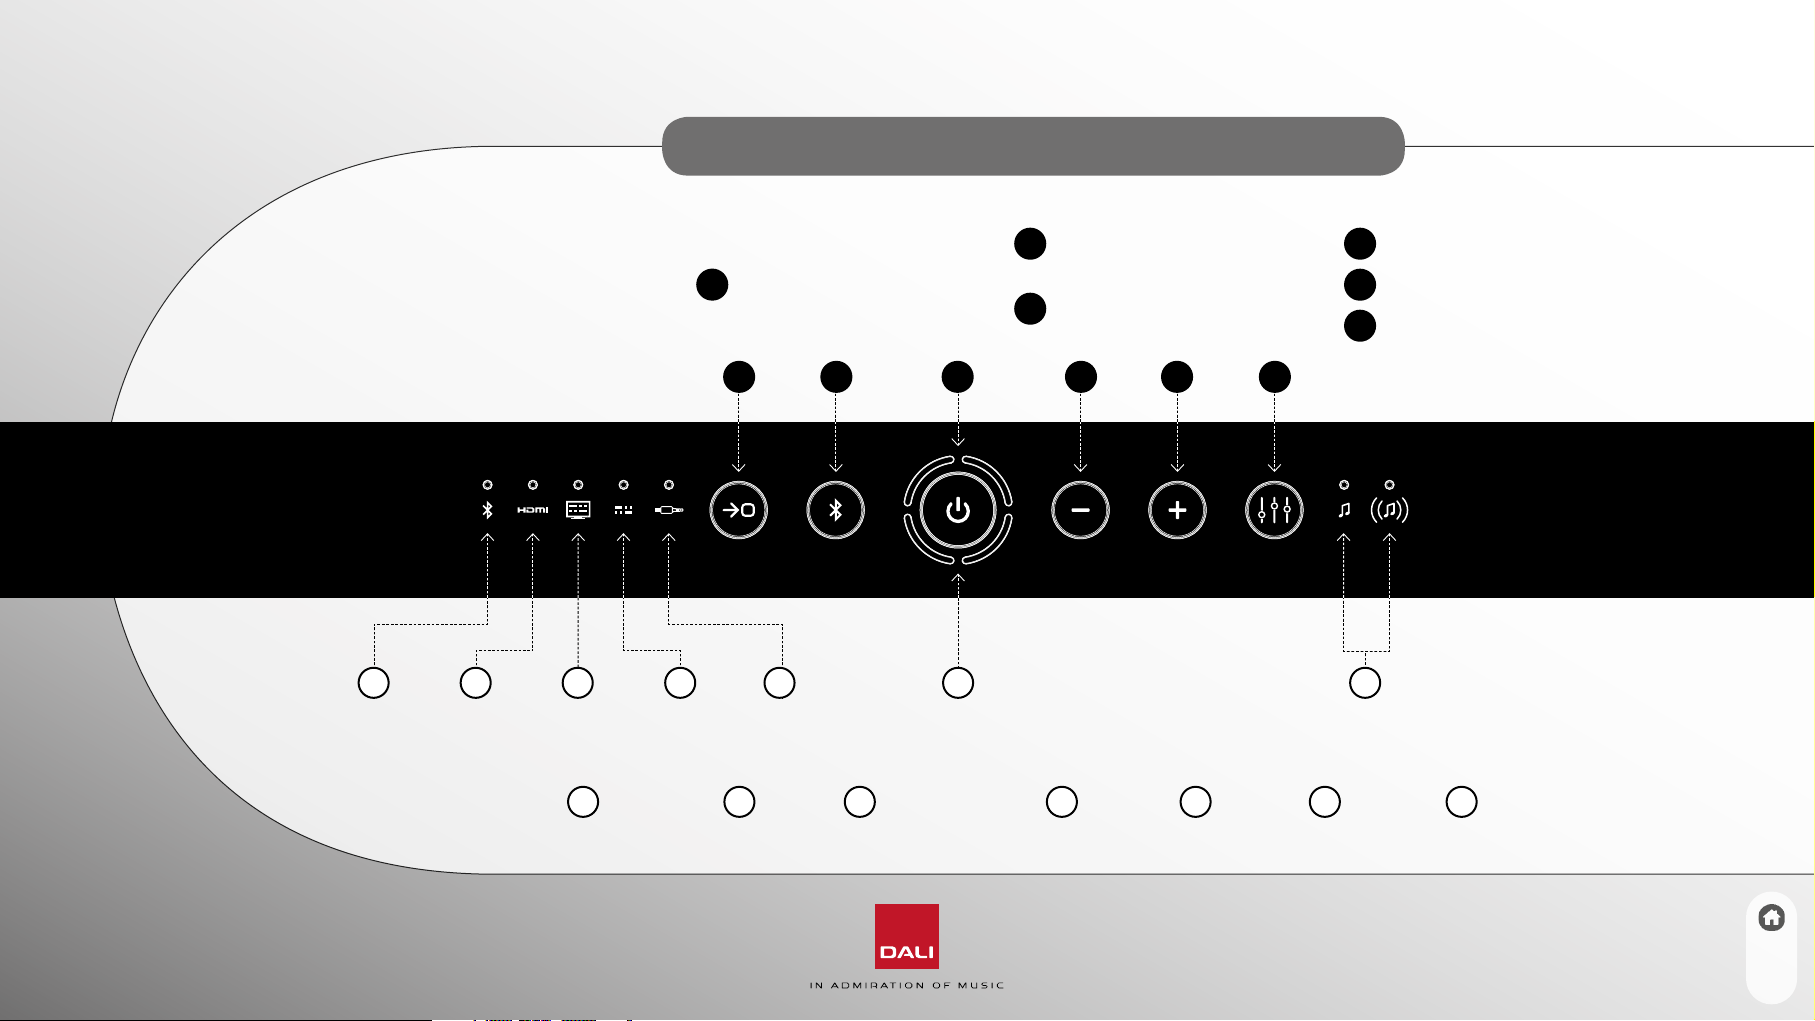
2.0 BUTTONS, INDICATION LED’S AND CONNECTIONS
2.1 BUTTON AND
LED OVERVIEW
1 2 3 4 5 6 7
LED INDICATION
Bluetooth
1
BUTTONS
1
Source select (Toggle)
1 2 3 4 5 6
HDMI
2
Optical (for TV)
3
2
Bluetooth select/release/
pause/play/skip (See 2.4)
3
Power On/Off/Mute
Optical
4
AUX in
5
6
4
Volume Down
5
Volume Up
6
Sound Mode (Toggle)
Volume
Sound mode
7
4
Page 5
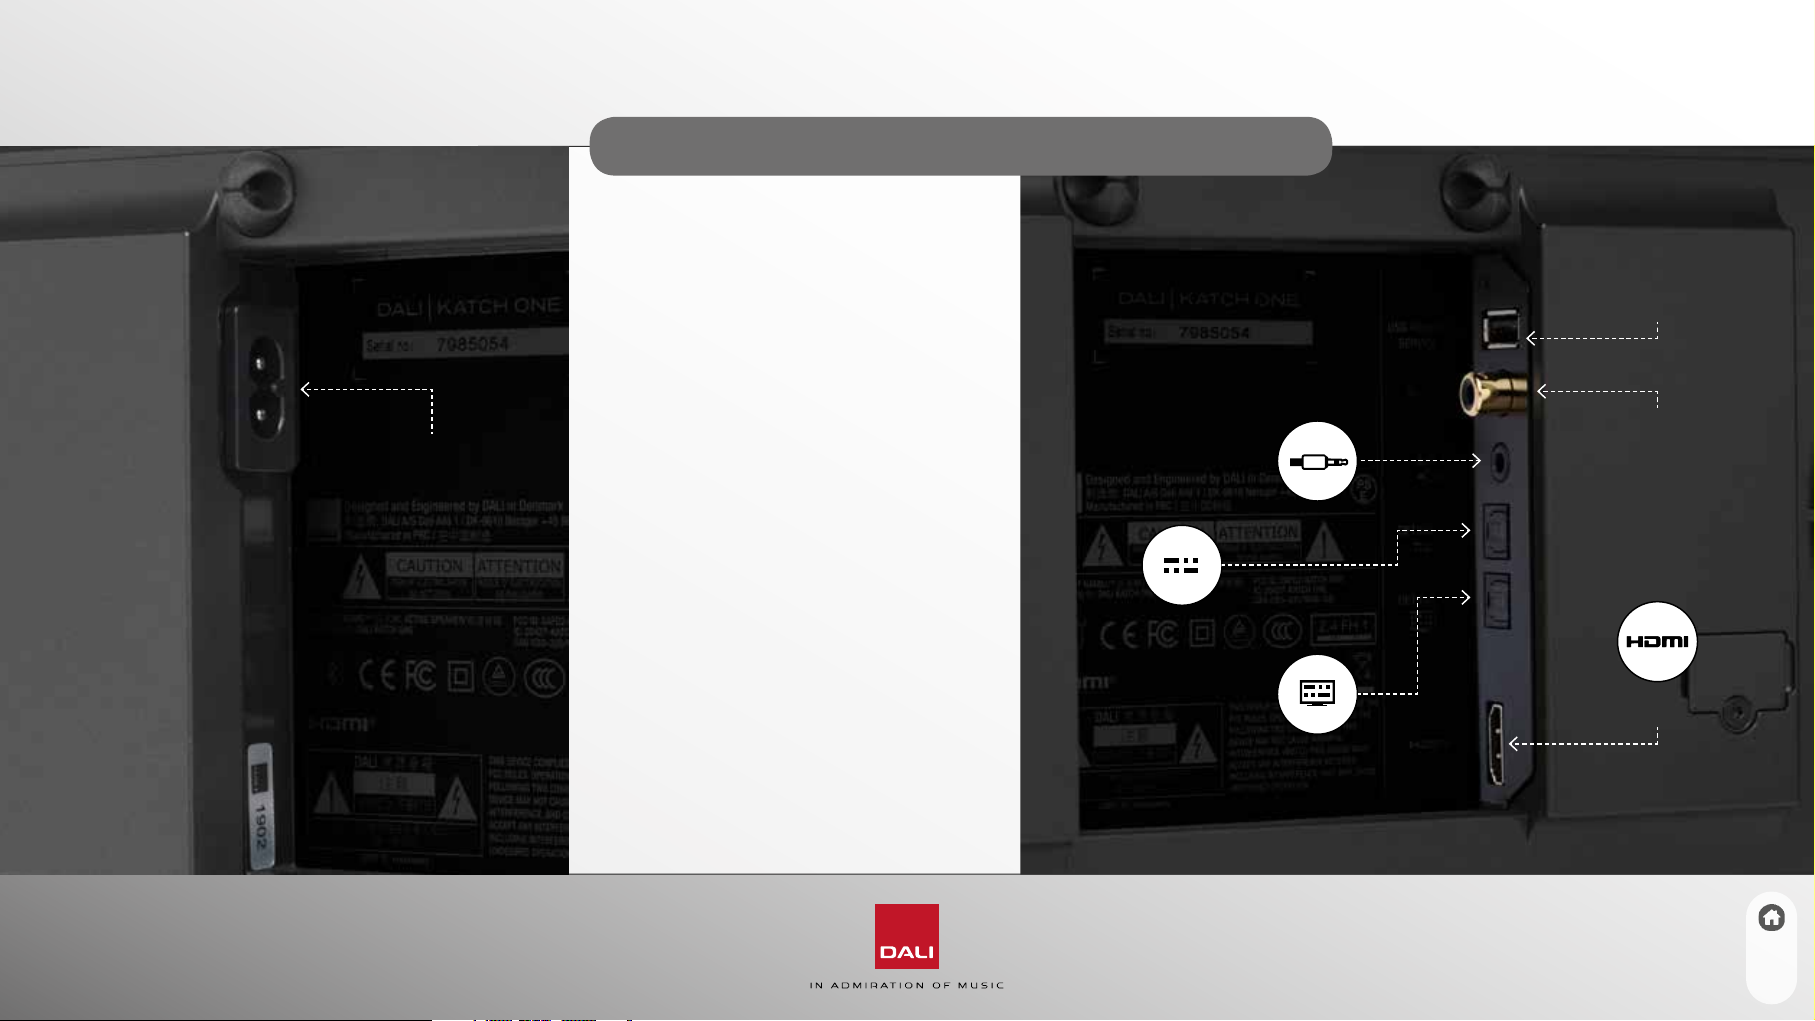
2.0 BUTTONS, INDICATION LED’S AND CONNECTIONS
2.2 INPUT/OUTPUT
OVERVIEW
USB Power
Out/Service
Mains power
5
See 7.0 for a detailed description
of all the connectors.
AUX In
Optical In
Optical In
(TV)
SUB Out
HDMI In
Page 6
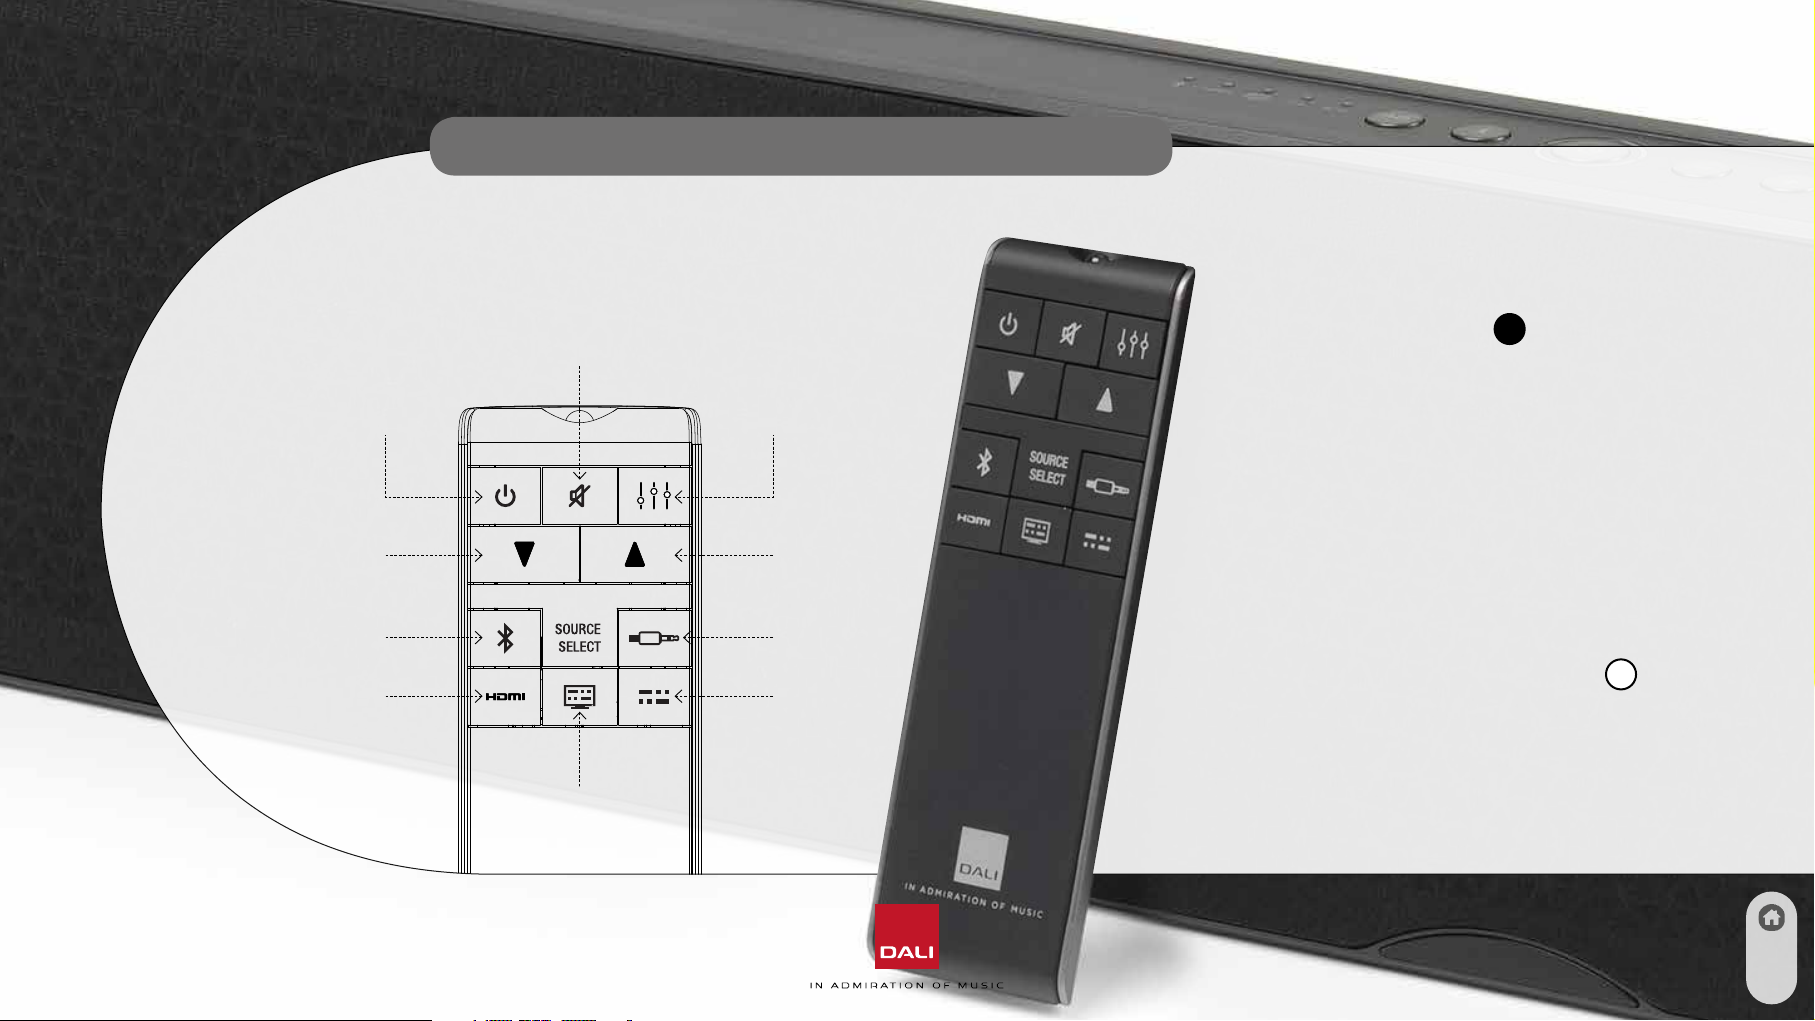
2.0 BUTTONS, INDICATION LED’S AND CONNECTIONS
2.3 REMOTE CONTROL
Mute
On/Off
Volume Down Volume Up
Bluetooth AUX In
HDMI
Optical In
(TV)
Sound Mode
Optical In
2.4 BLUETOOTH BUTTON FUNCTIONS
The Bluetooth button (Button
remote control Bluetooth button can be used to
select/release/pause/play/skip to next track.
Select Bluetooth Short press
Pause/Play music Short press
Skip track forward Two quick short presses
Skip track backwards Three quick short presses
Release Bluetooth
connection Press and hold till the
Bluetooth LED (LED
start blinking
) and the
2
1
)
6
Page 7

3.0 POWER AND AUTO SOURCE SELECT
3.1 POWER ON
To turn ON the DALI KATCH ONE;
1. Press the Power ON/OFF button (Button 3)
2. The indicator light (LED
indicating the current volume and the input /Sound
Mode indicator LED’s shows the last used settings
3. The KATCH ONE is ready for use
If your DALI KATCH ONE does not turn on, check if
the mains cable is connected correctly (See 2.2)
) is illuminated
6
3.2 POWER OFF
To turn OFF the DALI KATCH ONE;
1. Press and hold Power ON/OFF button (Button
2. The indicator LED’s are turned off
3.3 AUTO POWER OFF
The DALI KATCH ONE will automatically turn off if no audio has been
)
2
playing for 20 minutes. If the KATCH ONE is connected to a TV via HDMI
and CEC is enabled (See 7.6) a power off command from the TV will
also power off the KATCH ONE.
7
Page 8

3.0 POWER AND AUTO SOURCE SELECT
3.4 AUTO SOURCE SELECT
The DALI KATCH ONE will automatically turn on and start playing if audio is played to
any of the inputs, if a TV connected to the HDMI is turned on (See 7.6) or if a Bluetooth
connected device starts playback.
If the DALI KATCH ONE is turned on and no audio is playing, starting playback on a
different input will cause the KATCH ONE to automatically switch to the active input.
It is possible to disable Auto Power ON/OFF and Auto Source Select. Follow the steps
below to deactivate/activate this feature;
1. Press and hold Source Select (Button 1)
2. While holding down the Source Select (Button
to disable Auto Power ON/OFF and Auto Source Select
3. While holding down the Source Select (Button
to enableAuto Power ON/OFF and Auto Source Select (Default setting)
8
) pres Volume Down (Button 4)
1
) pres Volume Up (Button 5)
1
Page 9

4.0 VOLUME
4.1 VOLUME DOWN
To turn down the volume on the DALI KATCH ONE;
1. Press the Volume Down button on the KATCH
ONE (Button 4) or on the remote control
To quickly turn down the volume, press and hold
the Volume Down button.
4.2 VOLUME UP
To turn up the volume on the DALI KATCH ONE;
1. Press the Volume Up button on the KATCH ONE
(Button 5) or on the remote control
4.3 VOLUME INDICATIONS
The indicator lights (LED 6) will indicate the
volume setting.
To quickly turn up the volume, press and hold
the Volume Up button.
9
Mute state is indicated by the indicator
lights (LED 6) blinking.
Page 10

5.0 BLUETOOTH
5.1 PAIRING
To connect your device to the DALI KATCH ONE;
1. Turn on the DALI KATCH ONE (See 3.1)
10
2. Select Bluetooth (Button
3. The DALI KATCH ONE is now ready for Bluetooth pairing
a. If the Bluetooth LED (LED
b. If the Bluetooth LED (LED
To disconnect the connected device use the Bluetooth Release function (5.2)
c. It is only possible to have one device connected at any time
4. Initiate the Bluetooth pairing process from your device
5. When the pairing is complete, the Bluetooth pairing sound is played
The DALI KATCH ONE will automatically connect to a device when Bluetooth is selected, if a device has been paired to
the KATCH ONE earlier, and is within range. The KATCH ONE will not initiate auto playback. Playback has to be started
from the connected device or by pressing the Bluetooth button shortly on KATCH ONE or the remote control.
)
2
) is blinking no device is currently paired
1
) is not blinking a device is connected.
1
Page 11

5.0 BLUETOOTH
5.3 BLUETOOTH NAMING
If you have more than one DALI KATCH ONE, it is possible to change the
Bluetooth name of your DALI KATCH ONE.
11
5.2 BLUETOOTH RELEASE
If you are unable to pair your device to the DALI KATCH ONE;
1. Press and hold the Bluetooth release button (Button 2)
until the Bluetooth release sound plays and the Bluetooth
LED (LED 1) starts blinking
2. The connected devices are now released and you can
re-engage the pairing (See 5.1)
1. Turn on the DALI KATCH ONE (See 3.1)
2. Press and hold the Power ON/OFF button (Button
3. Then press either Volume Up (Button
circle through the possible names (DALI KATCH ONE, DALI KATCH ONE 1,
DALI KATCH ONE 2 and DALI KATCH ONE 3)
DALI KATCH ONE DALI KATCH ONE 1 DALI KATCH ONE 2 DALI KATCH ONE 3
) or Volume Down (Button 4) to
5
)
3
Page 12

6.0 SOUND MODE
The DALI KATCH ONE has two sound modes, Focus and Wide.
To toggle between the two sound modes press the Sound Mode button (Button 6).
The Sound Mode LED (LED 7) indicates the selected sound mode.
Wide (Default)
Expands the sound beyond the KATCH ONE physical dimensions.
Perfect for movies and concerts experiences.
Focus
Delivers a more focused stereo signal.
Perfect for news, documentaries and talk shows.
12
Page 13

7.0 CONNECTIONS
7.1 USB POWER OUT / SERVICE
The USB charge port delivers 5V/1A, which
makes it possible to charge most devices
directly from the DALI KATCH ONE.
It is also possible to power a Google Chromecast
Audio or similar devices, making it possible to
integrate the DALI KATCH ONE with your home
network.
Note: It is not possible to play music
via the USB port.
7.2 SUB OUT
Add a subwoofer to your DALI KATCH ONE
system for even better bass performance.
7.3 AUX IN
Connect any analogue output device to the
DALI KATCH ONE using a stereo mini-jack cable.
7.4 OPTICAL IN
Connect any optical S/PDIF audio device to the
DALI KATCH ONE.
7.5 OPTICAL IN (TV)
Connect a TV to the DALI KATCH ONE
using the optical output.
13
Page 14

7.0 CONNECTIONS
7.6 HDMI IN
Connect a TV to the DALI KATCH ONE using HDMI ARC.
✓
ARC
This connection requires that the DALI KATCH ONE is
connected to your TV’s HDMI ARC input, that CEC is turned
on (will be described later), and that you select alternative
audio output in the TV’s audio menu. Also the audio output
must be set to Stereo or PCM. The correct menu and
wording will differ between TV brands. Please refer to your
TV manual for the correct settings on your TV.
If your TV do not support HDMI ARC, DALI recommend using an Optical
connection to the DALI KATCH ONE (See 7.5). In this case it is still possible
to simultaneously use the HDMI connection to enable the TV remote
control for use with the KATCH ONE using the CEC function (See below).
To enable the use of your TV remote over HDMI to control basic functions
(volume, mute power on/off) your TV needs to have HDMI CEC enabled.
HDMI CEC has different names depending on the TV brand:
• Samsung: Anynet+
• LG: SimpLink
• Sony: Bravia Link
• Phillips: EasyLink
• Panasonic: Viera Link
• Hitachi: HDMI-CEC
14
Page 15

8.0 POSITIONING
The DALI KATCH ONE is designed to deliver the best possible
sound experience mounted on the wall, or standing on the
included feet right up against the wall. If placed away from the
wall the KATCH ONE’s bass performance will be lowered.
To get the best possible audio experience place the DALI KATCH
ONE so the front of the KATCH ONE is playing directly towards
the primary listening position.
15
Page 16

9.0 FACTORY RESET & FIRMWARE UPGRADE
9.1 FACTORY RESET
To reset the DALI KATCH ONE to the factory state;
1. Stop any playback to the DALI KATCH ONE
2. Turn off the DALI KATCH ONE (See 3.2)
3. Press and hold the Sound mode toggle button
(Button
button (Button 2) until an audio indication
is played
4. Release both buttons
5. All the indicator LED’s turn on and the
firmware version is shown (See 9.3)
6. Wait for about 10 seconds
7. Turn off the DALI KATCH ONE (See 3.2)
8. The unit is now reset
) and press the Power ON/OFF
6
9.2 FIRMWARE UPGRADE
Download the latest firmware from our website and unzip
the file to your Windows computer.
Use the DALI Tool included in the firmware download to place
the firmware file on a USB memory stick. Insert the USB
memory stick into the USB Power Out / Service connector.
1. Power off your DALI KATCH ONE (See 3.2)
2. Insert the USB stick into the USB Power Out / Service Port
3. Power on your DALI KATCH ONE (See 3.1)
4. Wait for the Power LED next to the USB Power Out /
Service Port to stop blinking
5, Remove the USB stick for the USB Power Out / Service Port
6. The DALI KATCH ONE is now updated
Look for new firmware here:
www.dali-speakers.com/katchone
16
Page 17

9.0 FACTORY RESET & FIRMWARE UPGRADE
“.”
First digit(s)
Last digit(s)
9.3 FIRMWARE - READOUT
CURRENT VERSION
Initiate factory reset (See 9.1) to read
out current firmware version.
The current firmware version is
automatically shown by an indicator
light sequence. It is interpreted by the
sum of the indicator lights using the
following format:
8
4
1
2
FLASH 1:
First digit(s)
FLASH 2:
“.”
FLASH 3:
Last digit(s)
EXAMPLE: VERSION 1.1
Flash 1: Flash 2: Flash 3:
SUM = 1 . SUM = 1
EXAMPLE: VERSION 2.5
Flash 1: Flash 2: Flash 3:
SUM = 2 . SUM = 1+4 = 5
17
Page 18

10.0 CLEANING
Clean the cabinet with a soft, dry cloth. If the cabinet are dirty, wipe with a soft
cloth dipped in all-purpose cleaner and then well wrung out. As this is product
contains electronics, be careful not to get it wet, and keep it clear of water.
18
Page 19

11.0 DISPOSAL
If you want to dispose of this product, do not mix it with general household waste.
There is a separate collection system for used electronic products in accordance
with legislation that requires proper treatment, recovery and recycling. Private
households in the EU member states, Switzerland, Liechtenstein and Norway
may return their used electronic products free of charge to designated collection
facilities or to a retailer (If you purchase a similar new one). If you reside in
countries not mentioned above, please contact your local authorities for the correct
method of disposal. By following this process, you will ensure that your disposed
product undergoes the necessary treatment, recovery and recycling and thus
prevent potential negative effects on the environment and human health.
19
 Loading...