

Page 1

ENGLISH - DEUTSCH - DANSK - FRANÇAIS - 简体中文
DALI CALLISTO C
MANUAL
Page 2
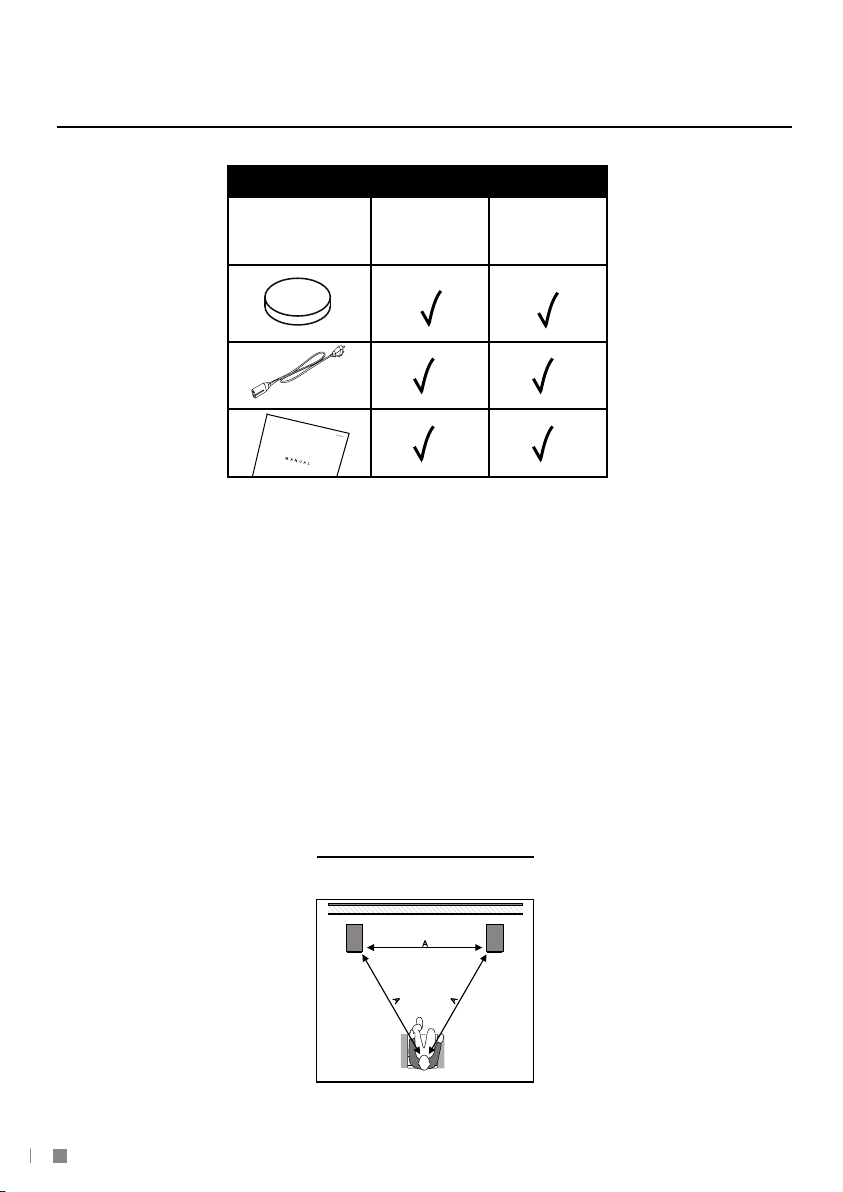
TABLE 1
TABLE 1 - 1 AX + 5 AX
CALLISTO 2 C 6 C
Speaker(s)
pr. carton
POWER CABLE
DALI CALLISTO
11
x4
x1
FIGURE 1
2
Page 3
UK DE DK3FR CN
FIGURE 2 FIGURE 3A
FIGURE 4FIGURE 3B
TOUCH AREA
Page 4
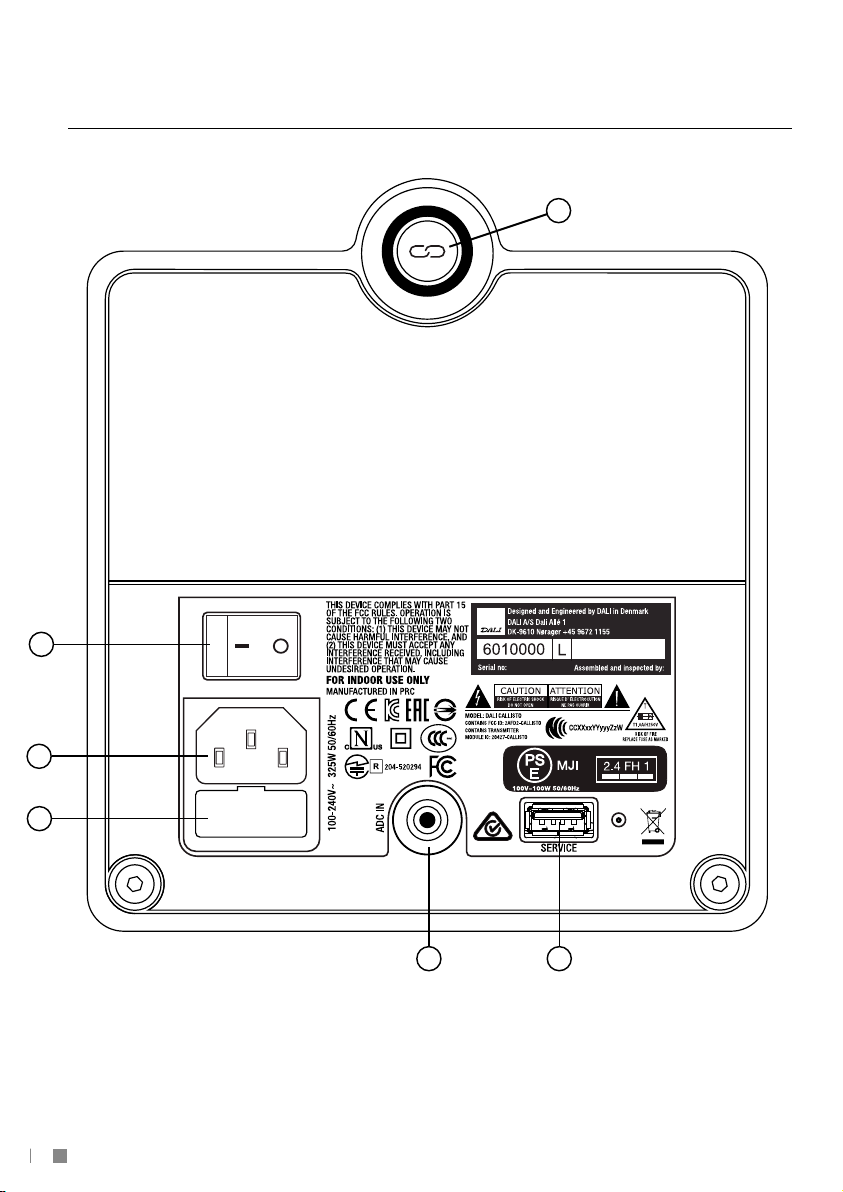
FIGURE 5
6
LINK
CONNECT
DALI | CALLISTO
Made in Denmark
2
1
3
4 5
4
Page 5

UK DE DK5FR CN
CONTENTS / INHALT / INDHOLD / CONTENU / 目录
ENGLISH 7
DEUTSCH 12
DANSK 18
FRANÇAIS 24
简体中文 32
FCC Statement
This device complies with part 15 of the FCC Rules. Operation is subject to the following two conditions: (1) This device may not cause harmful
interference, and (2) this device must accept any interference received, including interference that may cause undesired operation.
Any Changes or modifications not expressly approved by the party responsible for compliance could void the user’s authority to operate the equipment.
Note: This equipment has been tested and found to comply with the limits for a Class B digital device, pursuant to part 15 of the FCC Rules. These limits
are designed to provide reasonable protection against harmful interference in a residential installation. This equipment generates uses and can radiate
radio frequency energy and, if not installed and used in accordance with the instructions, may cause harmful interference to radio communications.
However, there is no guarantee that interference will not occur in a particular installation. If this equipment does cause harmful interference to radio
or television reception, which can be determined by turning the equipment off and on, the user is encouraged to try to correct the interference by one
or more of the following measures:
- Reorient or relocate the receiving antenna.
- Increase the separation between the equipment and receiver.
- Connect the equipment into an outlet on a circuit different from that to which the receiver is connected.
- Consult the dealer or an experienced radio/TV technician for help.
IC Caution
This device complies with Industry Canada license-exempt RSS standard(s).
Operation is subject to the following two conditions: (1) This device may not cause interference, and (2) This device must accept any interference,
including interference that may cause undesired operation of the device.
This equipment should be installed and operated with a minimum distance of 20 cm between the radiator and your body.
CAN ICES-3(B)/NMB-3(B)
CE
DALI A / S hereby declares that the DALI CALLISTO C radio equipment complies with Directive 2014/53/EU
The full text of the EU Declaration of Conformity is available at the following Internet address: www.dali-speakers.com/
Information required for compliance with article 10.8(a) and 10.8(b) of the Radio Equipment
Directive 2014/53/EU regarding intentionally emitted radio waves:
Frequency operating range: 5725-5875MHz
Max. transmit power: 10.88dBm
Page 6
UK DE DK
JP
The lightning fl ash within an equilateral triangle is
intended to alert you to the presence of non insulated
“dangerous voltage” within the product’s enclosure that
may be of suffi cient magnitude to constitute an electric
shock to persons.
The exclamation point within an equilateral triangle
is intended to alert you to the presence of important
operating and maintenance (servicing) instructions in
the literature accompanying the appliance.
12 Cleaning - do not use any liquid cleaners. Use only a dry
cloth to wipe off dust and grease.
13 Non-use periods - the power cord of the appliance should
be unplugged from the outlet when left unused for a long
period of time.
14 Object and liquid entry - care should be taken so that
objects do not fall and liquids are not spilled into the
enclosure through openings.
15 Damage requiring service - the appliance should be
serviced by qualifi ed personnel when:
a) The po wer-supply cord or the plug has been
damaged; or
b) Objects have fallen, or liquid has been spilled into
the appliance; or
c) The appliance has been exposed to rain; or
d) The appliance does not appear to operate normally,
or exhibits a marked change in performance; or
e) The appliance has been dropped, or the enclosure
CAUTION
RISK OF ELECTRIC SHOCK
DO NOT OPEN
ATTENTION
RISQUE D’ ÉLECTROCUTION
NE PAS OUVRIR
INSTRUCTIONS IMPORTANTES RELATIVES A LA SECURITE
1.
Lisez les instructions – vous devez prendre connaissance de
toutes les instructions de sécurité et d’utilisation avant d’utiliser
l’équipement.
2.
Conservez les instructions – les instructions de sécurité et
d’utilisation doivent être conservées pour pouvoir être consultées
ultérieurement.
3.
Tenez compte des avertissements – tous les avertissements
figurant sur l’équipement et les instructions d’utilisation doivent
être respectés.
4.
Suivez les instructions – toutes les instructions de fonctionnement
et d’utilisation doivent être suivies.
5.
Eau et humidité – l’équipement ne doit pas être utilisé à proximité
d’eau ; par exemple, près d’une baignoire, d’un lavabo, d’un évier,
d’un bac à lessive, dans un sous-sol humide ou près d’une piscine,
etc. Afin de réduire le risque d’incendie ou de décharge électrique,
Nettoyage – n’utilisez jamais de produit nettoyant liquide.
Chariots et supports – l’équipement doit uniquement être
6.
installé sur un chariot ou un support si ce type d’installation est
recommandé par le fabricant. Lorsqu’un chariot est utilisé, faites
preuve de prudence lorsque vous déplacez l’ensemble chariot/
appareil afin d’éviter de vous blesser s’il venait à basculer.
7.
Installation murale ou au plafond – si l’équipement peut être
monté au mur ou au plafond, il doit être installé uniquement selon
les recommandations du fabricant.
8.
Ventilation – l’équipement doit être installé de manière à ce que
son emplacement ou sa position ne perturbe pas la ventilation
correcte. Par exemple, l’équipement ne doit pas être installé
sur un canapé, un tapis ou une surface semblable, susceptible
d’obstruer les ouvertures de ventilation ; il ne doit pas être installé
dans un renfoncement (par exemple, dans une bibliothèque ou
une armoire) susceptible de gêner la circulation d’air à travers les
ouvertures de ventilation.
9.
Chaleur – l’équipement doit être éloigné de toute source de
chaleur telle qu’un radiateur, une grille de chauffage, un poêle ou
d’autres appareils (y compris des amplificateurs) produisant de
la chaleur.
10.
Sources d’alimentation électrique – l’équipement doit uniquement
être connecté à une source d’alimentation électrique conforme
à la description fournie dans les instructions d’utilisation ou aux
marquages présents sur l’équipement.
11.
Protection du cordon d’alimentation – les cordons d’alimentation
doivent être positionnés de manière à éviter tout risque de
piétinement ou de pincement par un objet posé sur ou placé
contre eux. Faites particulièrement attention aux cordons au
niveau des fiches d’alimentation électrique, des prises de courant
et à l’endroit auquel le cordon sort de l’équipement.
6
Utilisez uniquement un chiffon sec pour essuyer la poussière et
12.
la graisse.
13.
Périodes sans utilisation – le cordon d’alimentation de
l’équipement doit être débranché de la prise de courant lorsque
l’équipement n’est pas utilisé pendant une période prolongée et
en cas d’orage.
14.
Pénétration d’objets et de liquides – veillez à ce qu’aucun objet
ou liquide ne pénètre dans l’enceinte par les ouvertures de
l’équipement.
15.
Réparation – l’utilisateur ne doit pas tenter de réparer
l’équipement, hormis dans les situations décrites dans les
instructions d’utilisation. Toute autre réparation doit être confiée
à un réparateur qualifié. Afin de réduire le risque de décharge
électrique, n’enlevez pas le couvercle (ou le panneau arrière), car
l’équipement ne comporte aucune pièce réparable par l’utilisateur.
16.
Dommages nécessitant réparation – l’équipement doit être réparé
par du personnel qualifié dans les situations suivantes :
a)
Si le cordon d’alimentation ou la prise ont été endommagés ; ou
b)
Si des objets sont tombés ou du liquide s’est déversé à l’intérieur
de l’équipement ; ou
c)
Si l’équipement a été exposé à la pluie ; ou
d)
Si l’équipement ne semble pas fonctionner normalement, ou
présente une altération significative des performances ; ou
e)
Si l’équipement est tombé, ou l’enceinte a été endommagée.
17.
Isolation - cet équipement est un appareil électrique de classe
II ou à double isolation. Il a été conçu de telle manière qu’il ne
demande pas une mise à la terre de sécurité.
18.
Débranchement du secteur - La fiche secteur est un
dispositif de débranchement et doit rester facilement
accessible durant l’utilisation. Afin de débrancher
complètement l’appareil du secteur, la fiche secteur doit
être débranché de la prise de courant.
Ce produit contient des pièces électriques ou électroniques.
Si elles ne sont pas mises au rebut correctement, la
présence de ces pièces peut potentiellement avoir des
effets négatifs sur l’environnement et la santé humaine.
La présence de cette étiquette sur le produit signifie qu’il ne
doit pas être mis au rebut comme un déchet non trié, mais
doit être collecté séparément. En tant que consommateur,
vous avez la responsabilité de vous assurer de la mise au
rebut correcte de ce produit.
Page 7
UK DE DK7FR CN
CONTENTS
1.0 INTRODUCTION 8
2.0 UNPACKING 8
3.0 POSITIONING 8
4.0 CONNECTION 9
5.0 USAGE 9
6.0 THE LISTENING ROOM 10
7.0 RUNNING-IN 10
8.0 CLEANING AND MAINTENANCE 10
9.0 DISPOSAL 11
10.0 TECHNICAL SPECIFICATIONS 11
Page 8

1.0 INTRODUCTION
Congratulations with your new DALI CALLISTO C loudspeaker. It is important to us that your
new DALI loudspeakers are set up and connected optimally. For this reason, we recommend
that you read this manual and follow its recommendations. The manual contains instructions
for setup and connection, as well as tips and advice on how to get the most out of your new
loudspeakers.
DALI is acclaimed around the world for unique loudspeakers built to our uncompromising
standards for design and performance. The goal for every single DALI loudspeaker is always
our foremost commitment: To create a listening experience in your home that will make you
forget time and place.
Remember to sign up for the DALI newsletter at www.dali-speakers.com.
Enjoy!
2.0 UNPACKING
Be careful not to damage the contents when you unpack the parts. Depending on which DALI
CALLISTO C model you have bought, different accessories come with the loudspeaker. Check
that all parts are contained in the cardboard box (see Table 1). Keep the packaging materials
should your speaker need to be relocated or serviced.
3.0 POSITIONING
To achieve the best results, the loudspeaker setup should be symmetrical around your favourite
listening position (see Figure 1). We recommend that you experiment with the position of your
loudspeakers – the sound quality will change depending on the loudspeaker position.
For the DALI CALLISTO 2 C the speakers should ideally be positioned, so that the tweeter is
approximately at ear height when seated in your favourite listening position. DALI CALLISTO
2 C should be positioned minimum 20 cm (8”) from the rear wall.
DALI CALLISTO 6 C is designed as floor standing speakers. It should be positioned minimum 20
cm (8”) from the rear wall.
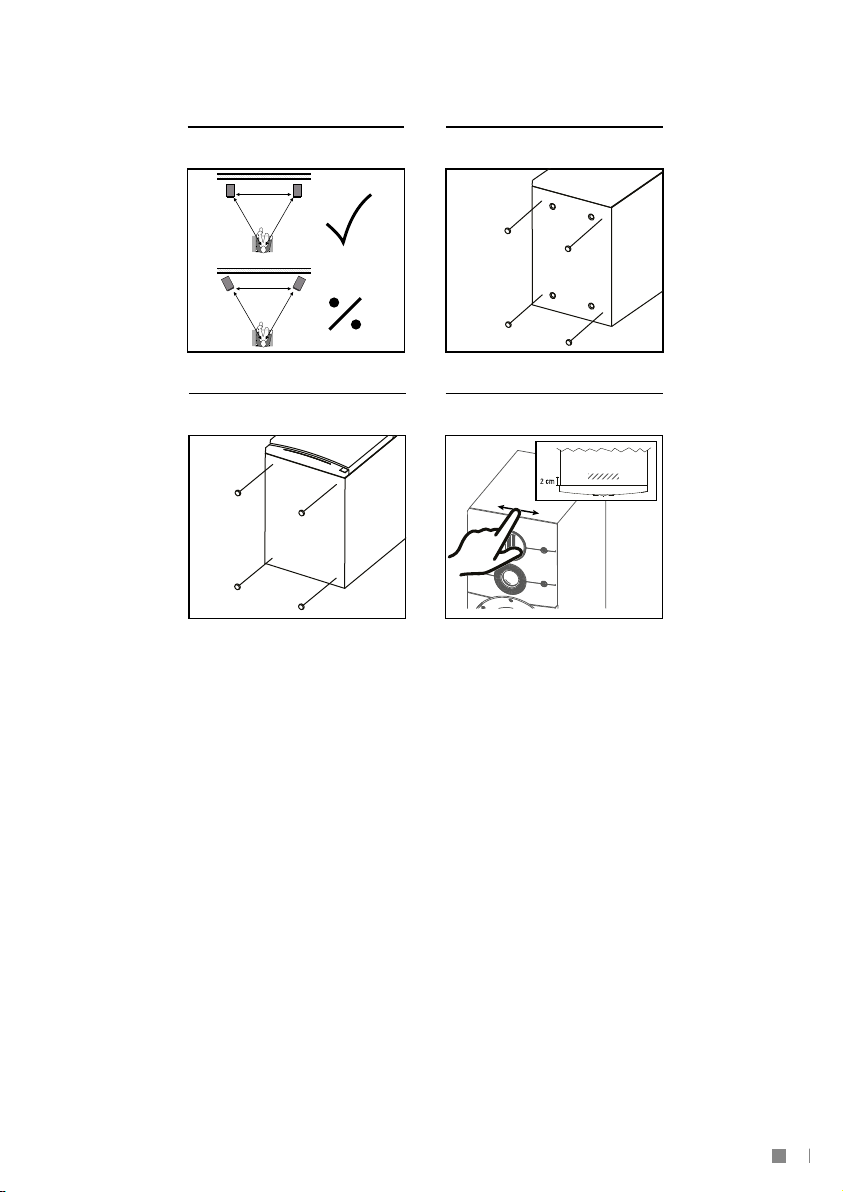
Objects positioned between the speaker and listening position might negatively affect sound
quality. All DALI speakers are designed to meet our wide dispersion principle, so they should not
be angled towards the listening position, but be positioned parallel with the rear wall (see Figure
2). By parallel positioning, the distortion in the main listening area will be lowered and the room
integration will be better. The wide dispersion principle also ensures that sound is spread evenly
within a large area in the listening room.
3.1 DALI CALLISTO 6 C
The speakers are designed to stand on the floor, using spikes or rubber bumpers under the
speakers (see Figure 3A). Spikes or rubber bumpers can improve the sound quality. You can try
both to hear what gives the best sound quality in your setup.
The spikes (included) should be fastened loosely in the four aluminium feet, leaving the spike’s
contra nut only slightly tightened. Mount the feet in the threaded holes on the bottom of the
speaker using the screws. Push the feet against the cabinet before tightening the screws. Place
the loudspeaker upright on its spikes on the floor, so that it stands steadily without rocking.
Tighten the nuts, so that the four spikes sit tightly in the aluminium feet. Be careful not to over
tighten the contra nuts.
8
Page 9

UK DE DK9FR CN
NOTE: Please be aware that spikes may damage the floor if it is not protected.
NOTE: On some floor surfaces and in some rooms, the use of spikes is a crucial aspect in
obtaining the best result.
3.2 DALI CALLISTO 2 C
DALI CALLISTO 2 C is optimized for stand mounting, but will also work well on a shelf. If
positioned on a stand or shelf, the enclosed bumpers can be placed under the speaker for
stable and vibration-free positioning (see Figure 3B).
4.0 CONNECTION
The main connections are located on the back of the CALLISTO C speaker (see Figure 5)
1) Mains connector
2) Mains power switch
3) Fuse compartment
4) ADC IN
5) USB Service port
6) LINK CONNECT button
5.0 USAGE
Connect the supplied power cord to the mains connector and your mains outlet. Use the mains
power switch to power on the CALLISTO C speaker.
NOTE: If the CALLISTO C fails to power up when connected to the mains and the power switch
is set to ON, the fuse may have blown or be faulty. Replace the fuse with the same type as
originally supplied – see fuse type on the rear of the amplifier. If the fuse blows repeatedly, have
the CALLISTO C speaker checked at an authorised service centre – contact your authorised
dealer.
5.1 CONNECTING THE SPEAKERS
The DALI SOUND HUB. If you have purchased a DALI SOUND HUB with your CALLISTO C
speakers follow the guidelines in the SOUND HUB Quick Start Guide to connect your
CALLISTO C speakers. ADC IN cabled connection. Connect the CALLISTO C speakers to a PRE
OUT. The speaker will in this case operate with fixed gain. DALI recommends using high quality
cables that preferably do not exceed 3 meters.
5.2 VOLUME CONTROL
When connected to the DALI SOUND HUB you can control the system volume on the front top
of each speaker (see figure 4). If using the ADC IN connection then you can only control the
volume on the playback device.
5.3 FRONT LED
The LED panel on the front of the speaker lights up and indicate the volume level whenever the
volume is changed. When the speaker is muted the outer most LEDs at both ends of the LED
panel will blink to indicates this state.
5.4 AUTO POWER OFF
The CALLISTO C will automatically power off if no signal has been detected for a period. The
CALLISTO C automatically powers on again the instance an audio signal is detected.
Page 10

5.5 FIRMWARE UPDATE
If a new firmware for the CALLISTO C speakers is released, use the USB Service port to update
the speaker. Follow the instructions in the firmware download file.
Check for the latest firmware at www.dali-speakers.com.
5.6 FACTORY RESET
Should it become necessary to perform a factory reset on the CALLISTO C speaker it can be
done following the following steps:
1) Turn off the CALLISTO C speaker and wait for about 15 seconds
2) Press and hold the LINK CONNECT button
3) While holding the LINK CONNECT button turn on the CALLISTO C speaker
4) Keep holding the LINK CONNECT button until the position display starts blinking
5) The CALLISTO C speaker is now restores to factory defaults
6.0 THE LISTENING ROOM
Every room has its own distinctive acoustics, which influence the way we experience sound
from a speaker. The sound you hear consists of direct sound from the speakers and reflected
sound from the floor, ceiling and walls. The latter will affect how you experience the sound.
As a basic rule, try to avoid large, hard and reflective areas in the immediate vicinity of your
loudspeakers as it will typically cause strong reflections, which might disturb the precision and
spatial effect of the sound reproduction. Reflection might be suppressed by positioning e.g. a
plant between the speaker and the reflecting surface. Soft items such as carpets, curtains etc.
might help if the sound is too bright. Both the amount and quality of the deep bass depend on
the size and shape of the room, and the position of the speakers. Positioning the speakers near
a side or back wall will accentuate the bass. A corner location will accentuate it even more, but
will also increase the reflections.
10
7.0 RUNNING-IN
Like any mechanical system, a loudspeaker requires a “running-in” period to perform at its
best. You will experience a gradual increase in sound quality during the first period of use. The
break-in period will vary depending on use and playback volume. You should expect up to 100
hours of playback until maximum performance is reached. Unlike other mechanical systems,
the life-span of a loudspeaker is increased by normal, regular playback of music.
8.0 CLEANING & MAINTENANCE
Clean the cabinets with a soft, dry cloth. If the cabinets are dirty, wipe with a soft cloth dipped in
all-purpose cleaner and then well wrung out. Be very careful when wiping the speaker cones,
as they are very fragile. Grille fronts can be cleaned with a clothes brush and wiped with a well
wrung, lint-free cloth and mild all-purpose cleaner.
8.1 AVOID DIRECT SUNLIGHT
The surfaces of the speakers may fade or become discoloured over time when exposed to
direct sunlight. Therefore avoid positioning the speakers in direct sunlight.
Page 11

UK DE DK11FR CN
9.0 DISPOSAL
If you want to dispose of this product, do not mix it with general household waste. There is
a separate collection system for used electronic products in accordance with legislation that
requires proper treatment, recovery and recycling. Private households in the EU member states,
Switzerland, Liechtenstein and Norway may return their used electronic products free of charge
to designated collection facilities or to a retailer (if you purchase a similar new one). If you reside
in countries not mentioned above, please contact your local authorities for the correct method
of disposal. By following this process, you will ensure that your disposed product undergoes the
necessary treatment, recovery and recycling and thus prevent potential negative effects on the
environment and human health.
10.0 TECHNICAL SPECIFICATIONS
In Table 2 you will find the most common specifications for your speakers. Please have in
mind that there are countless methods for measuring speakers. However, none of them tell
you anything useful about how a speaker really sounds. Only your ears can decide whether
one speaker sounds better than another. lLke all our speakers, the DALI CALLISTO C series is
designed to reproduce music as honestly as possible.
Enjoy your new DALI CALLISTO C!
Page 12
UK DE DK
JP
The lightning fl ash within an equilateral triangle is
intended to alert you to the presence of non insulated
“dangerous voltage” within the product’s enclosure that
may be of suffi cient magnitude to constitute an electric
shock to persons.
The exclamation point within an equilateral triangle
is intended to alert you to the presence of important
operating and maintenance (servicing) instructions in
the literature accompanying the appliance.
12 Cleaning - do not use any liquid cleaners. Use only a dry
cloth to wipe off dust and grease.
13 Non-use periods - the power cord of the appliance should
be unplugged from the outlet when left unused for a long
period of time.
14 Object and liquid entry - care should be taken so that
objects do not fall and liquids are not spilled into the
enclosure through openings.
15 Damage requiring service - the appliance should be
serviced by qualifi ed personnel when:
a) The power-supply cord or the plug has been
damaged; or
b) Objects have fallen, or liquid has been spilled into
the appliance; or
c) The appliance has been exposed to rain; or
d) The a ppliance does not appear to operate normally,
or exhibits a marked change in performance; or
e) The appliance has been dropped, or the enclosure
CAUTION
RISK OF ELECTRIC SHOCK
DO NOT OPEN
WICHTIGE SICHERHEITSHINWEISE
Die Hinweise lesen – Lesen Sie alle Sicherheitshinweise und die
1.
Bedienungsanleitung vor Betrieb des Geräts sorgfältig durch.
Die Anweisung aufbewahren – Bewahren Sie die
2.
Sicherheitshinweise und die Bedienungsanleitung an einem
sicheren Ort auf, damit Sie sie bei Bedarf sofort zur Hand haben.
Warnhinweise beachten – Beachten Sie unbedingt die
3.
Warnhinweise auf dem Gerät und die Bedienungsanleitung.
Anleitung befolgen – Befolgen Sie genau die Bedienungsanleitung.
4.
Wasser und Feuchtigkeit – Das Gerät muss vor direktem
5.
Kontakt mit Wasser geschützt werden und darf nicht in der Nähe
einer Badewanne, eines Waschbeckens, Spülbeckens, einer
Wäschewanne, in einem feuchten Keller oder in der Nähe eines
Schwimmbeckens o. Ä. verwendet werden. Um die Gefahr eines
Brands oder eines elektrischen Schlags zu verringern, dürfen
Sie das Gerät nie Regen oder Feuchtigkeit aussetzen. Das Gerät
Reinigung – Verwenden Sie keine Flüssigreiniger.
Wagen oder Ständer – Das Gerät sollte nur dann mit einem
6.
Wagen oder Ständer verwendet werden, wenn dies vom Hersteller
empfohlen wird. Bei Verwendung eines Wagens lassen Sie Vorsicht
walten, wenn Sie den Wagen mit dem Gerät bewegen, um ein
Umkippen zu vermeiden.
7.
Wand- oder Deckenmontage – Falls das Gerät für Wand- oder
Deckenmontage geeignet ist, sollte die Montage nur entsprechend
der Empfehlungen des Herstellers durchgeführt werden.
8.
Belüftung – Das Gerät sollte so platziert werden, dass der Standort
oder die Position nicht die Belüftung beeinträchtigt. Das Gerät
sollte z. B. nicht auf einem Bett, Sofa, Teppich oder einer ähnlichen
Unterlage verwendet werden, die die Lüftungsöffnungen
blockieren könnte, oder in eine abgeschlossene Umgebung
gestellt werden wie z. B. einen Bücherschrank oder Schrank, was
den Luftstrom durch die Lüftungsöffnungen behindern könnte.
9.
Wärme – Das Gerät sollte von Wärmequellen wie Heizkörpern,
12
Heizregistern, Öfen oder anderen Geräten (einschließlich
Leistungsverstärkern) ferngehalten werden, die Wärme erzeugen.
10.
Stromversorgung – Das Gerät darf nur an eine Stromversorgung
angeschlossen werden, die dem Typ entspricht, die in
der Bedienungsanleitung angegeben oder auf dem Gerät
gekennzeichnet ist.
11.
Netzkabel – Netzkabel müssen so verlegt werden, dass niemand
auf sie tritt oder Gegenstände darauf abgestellt werden. Achten
Sie besonders auf Kabel an Steckern, Mehrfachsteckdosen und
die Stelle, an der das Kabel das Gerät verlässt.
ATTENTION
RISQUE D’ ÉLECTROCUTION
NE PAS OUVRIR
12.
Reinigen Sie das Gerät nur mit einem trockenen Lappen, um Staub
und Fett abzuwischen.
13.
Stillstandszeiten – Das Netzkabel des Geräts sollte aus der
Steckdose gezogen werden, wenn das Gerät für einen längeren
Zeitraum unbenutzt bleibt oder während Gewittern.
14.
Gegenstände und Flüssigkeiten – Achten Sie darauf, dass keine
Gegenstände oder Flüssigkeiten durch die Öffnungen in das
Gehäuse gelangen.
15.
Wartung und Reparatur – Der Benutzer sollte nicht versuchen,
Wartungen und Reparaturen am Gerät über die in der
Bedienungsanleitung angegebenen Maßnahmen hinaus
durchzuführen. Alle Wartungs- und Reparaturarbeiten müssen
durch qualifizierte Servicetechniker durchgeführt werden. Um die
Gefahr von elektrischen Schlägen zu verringern, öffnen Sie nie
die Abdeckung (oder Rückabdeckung), da sich dort keine Teile
befinden, die vom Benutzer repariert werden dürfen.
Schäden, die einer Reparatur bedürfen – Das Gerät sollte von
16.
qualifizierten Servicetechnikern repariert und gewartet werden,
wenn:
das Netzkabel oder der Stecker beschädigt ist,
a)
Gegenstände oder Flüssigkeiten in das Gerät geraten sind,
b)
c)
d)
e)
das Gerät Regen ausgesetzt war,
der Betrieb des Geräts gestört oder dessen Leistung spürbar
verändert ist,
das Gerät heruntergefallen oder die Abdeckung beschädigt ist.
Isolierung – Dieses Gerät ist ein Gerät der Schutzklasse
17.
II oder ein doppelt isoliertes elektrisches Gerät. Es ist so
konstruiert, dass eine Sicherheitsverbindung zur Erde nicht
erforderlich.
Hauptstecker – Der Hauptstecker wird dazu verwendet, das
18.
Gerät auszustecken, und muss weiterhin funktionstüchtig
bleiben. Um das Gerät vollständig vom Netz zu trennen,
muss der Hauptstecker vollständig von der Steckdose
getrennt werden.
Dieses Produkt enthält elektrisches oder elektronisches
Material. Das Vorhandensein dieses Materials kann bei
unsachgemäßer Entsorgung schädliche Auswirkungen auf
die Umwelt und die Gesundheit haben.
Dieses Kennzeichen auf dem Produkt gibt an, dass dieses
Produkt nicht mit anderem Haushaltsabfall entsorgt
werden darf, sondern getrennt entsorgt werden muss.
Als Verbraucher haften Sie für die ordnungsgemäße
Entsorgung des Produkts.
Page 13

UK DE DK FR CN
INHALT
1.0 EINLEITUNG 14
2.0 AUSPACKEN 14
3.0 AUFSTELLUNG 14
4.0 ANSCHLUSS 15
5.0 GEBRAUCH 15
6.0 DER HÖRRAUM 16
7.0 EINSPIELZEIT 17
8.0 REINIGUNG UND INSTANDHALTUNG 17
9.0 ENTSORGUNG 17
10.0 TECHNISCHE DATEN 17
CE
Hiermit erklärt DALI A/S, dass der Funkanlagentyp DALI CALLISTO C der Richtlinie 2014/53/EU entspricht.
Der vollständige Text der EU-Konformitätserklärung ist unter der folgenden Internetadresse verfügbar:
www.dali-speakers.com/
13
Page 14

1.0 EINLEITUNG
Herzlichen Glückwunsch zu Ihren neuen DALI CALLISTO C Lautsprechern. Es ist uns wichtig,
dass Ihre neuen DALI Lautsprecher optimal eingestellt und angeschlossen werden. Aus diesem
Grund empfehlen wir Ihnen, diese Gebrauchsanweisung sorgfältig zu lesen und die enthaltenen
Empfehlungen zu befolgen. Diese Gebrauchsanweisung enthält Anleitungen für die Aufstellung
und das Anschließen sowie einige Tipps dazu, wie Sie mit Ihren Lautsprechern die besten
Klangergebnisse erzielen.
DALI ist in der ganzen Welt bekannt für seine einzigartigen Lautsprecher, die nach unseren
kompromisslosen Standards für Design und Leistung hergestellt werden. Jeder einzelne DALI
Lautsprecher soll immer unsere wichtigstes Ziel erfüllen: Ihnen zu Hause ein Hörerlebnis zu
bieten, das Sie Ort und Zeit vergessen lässt.
Denken Sie daran, sich für den DALI Newsletter auf www.dali-speakers.com anzumelden.
Viel Vergnügen!
2.0 AUSPACKEN
Achten Sie darauf, beim Auspacken keine Teile zu beschädigen. Je nachdem welches DALI
CALLISTO C Modell Sie gekauft haben, ist verschiedenes Zubehör für die Lautsprecher
enthalten. Kontrollieren Sie, dass der Karton alle Teile enthält (siehe Tabelle 1). Bewahren
Sie die Verpackung für den Fall auf, dass die Lautsprecher später einmal transportiert oder
gewartet werden müssen.
3.0 AUFSTELLEN
Um die besten Ergebnisse zu erzielen, müssen die Lautsprecher symmetrisch um Ihre
bevorzugte Hörposition angeordnet werden (siehe Abb. 1). Wir empfehlen Ihnen, verschiedene
Positionen für Ihre Lautsprecher auszuprobieren – je nach Position der Lautsprecher verändert
sich die Klangqualität.
14
Für die DALI CALLISTO 2 C sollten die Lautsprecher so aufgestellt werden, dass sich der
Hochtöner ungefähr auf Ohrhöhe befindet, wenn Sie in Ihrer bevorzugten Hörposition sitzen.
Die DALI CALLISTO 2 C Lautsprecher sollten mindestens 20 cm von der dahinter befindlichen
Wand aufgestellt werden.
Die DALI CALLISTO 6 C Lautsprecher sind als Standlautsprecher ausgelegt. Sie sollten
mindestens 20 cm von der dahinter befindlichen Wand aufgestellt werden.
Wenn sich zwischen den Lautsprechern und der Hörposition Gegenstände befinden, kann
dies die Klangqualität verschlechtern. Alle DALI Lautsprecher sind für eine breite Abstrahlung
konstruiert. Sie sollten daher nicht eingewinkelt zur Hörposition, sondern parallel zur hinteren
Wand aufgestellt werden (siehe Abb. 2). Durch die parallele Aufstellung wird die Verzerrung im
Haupthörbereich verringert und die räumliche Integration verbessert. Das Prinzip der breiten
Abstrahlung stellt auch sicher, dass der Klang in einem großen Bereich des jeweiligen Raumes
gleichmäßig verteilt wird.
3.1 DALI CALLISTO 6 C
Die Lautsprecher sind für die Aufstellung auf dem Boden ausgelegt, wobei Spikes oder
Gummifüße unter den Lautsprechern verwendet werden (siehe Abb. 3A-3B). Die Verwendung
von Spikes oder Gummifüßen verbessert die Klangqualität. Versuchen Sie beide Möglichkeiten,
um zu hören, welche davon in Ihrer Aufstellung die beste Klangqualität ergibt.
Page 15

UK DE DK FR CN
Die mitgelieferten Spikes sollten zunächst lose in die vier Aluminiumfüße eingeschraubt
werden, so dass die Gegenmuttern der Spikes nur leicht angezogen werden. Befestigen Sie die
Füße mit den Schrauben in den Gewindelöchern unten am Lautsprecher. Drücken Sie die Füße
gegen das Gehäuse, bevor die Schrauben angezogen werden. Stellen Sie den Lautsprecher
auf den Spikes aufrecht auf dem Fußboden auf, so dass er feststeht, ohne zu wackeln. Dann
ziehen Sie die Muttern an, so dass die vier Spikes fest in den Aluminiumfüßen sitzen. Achten
Sie darauf, die Gegenmuttern nicht zu überdrehen.
HINWEIS: Beachten Sie, dass die Spikes den Fußboden beschädigen können, wenn dieser nicht
geschützt ist.
HINWEIS: Auf manchen Fußböden und in manchen Räumen ist die Verwendung von Spikes
entscheidend für das optimale Ergebnis.
3.2 DALI CALLISTO 2 C
Die DALI CALLISTO 2 C Lautsprecher sind optimiert für die Montage auf einem Ständeroder
aber auch als Regallautsprecher einsetzbar. Bei Aufstellung auf einem Ständer oder einem
Regal können die mitgelieferten Gummifüße angebracht werden, um einen stabilen und
vibrationsfreien Stand zu gewährleisten (siehe Abb. 3C).
4.0 ANSCHLUSS
Die Hauptanschlüsse befinden sich auf der Rückseite der CALLISTO C Lautsprecher (siehe Abb.
5).
1) Netzanschluss
2) Hauptschalter
3) Sicherungsfach
4) PRE IN
5) USB-Service-Schnittstelle
6) LINK CONNECT-Taste
5.0 GEBRAUCH
Stecken Sie das mitgelieferte Stromkabel in den Netzanschluss des Lautsprechers und das
andere Ende in die Steckdose. Schalten Sie die CALLISTO C Lautsprecher mit dem Hauptschalter
ein.
HINWEIS: Wenn die CALLISTO C Lautsprecher nicht angehen, obwohl sie am Stromnetz
angeschlossen sind und der Schalter POWER auf ON steht, kann die Sicherung durchgebrannt
oder fehlerhaft sein. Dann ersetzen Sie die Sicherung durch eine neue des gleichen Typs – vgl.
die Angaben zum Sicherungstyp auf der Rückwand. Wenn die Sicherung öfter durchbrennt,
sollten Sie die CALLISTO C Lautsprecher bei einer autorisierten Werkstatt kontrollieren lassen
– wenden Sie sich dazu bitte an Ihren autorisierten Händler.
5.1 DIE LAUTSPRECHER ANSCHLIESSEN
Die DALI CALLISTO C Lautsprecher können auf zwei Arten an eine Singnalquelle angeschlossen
werden.
1) Verbindung mit DALI SOUND HUB. Wenn Sie einen DALI SOUND HUB mit Ihren CALLISTO C
Lautsprechern gekauft haben, befolgen Sie bitte die Anleitung in der Kurzanleitung für
den SOUND HUB, um Ihre CALLISTO C Lautsprecher anzuschließen.
15
Page 16

2) Anschluss über PRE IN Kabelanschluss. Schließen Sie Ihre CALLISTO C Lautsprecher an die
PRE OUT Anschlüsse an einem Vorverstärker oder Verstärker, PC, DAC oder an einem anderen
Audiogerät mit geregeltem Lautstärkeausgang an. Die Lautsprecher arbeiten in diesem Fall
mit einer fixierten Verstärkung. DALI empfiehlt die Verwendung von hochwertigen Kabeln, die
nicht über 3 Meter lang sein sollten.
5.2 REGELUNG DER LAUTSTÄRKE
Bei Anschluss an den DALI SOUND HUB können Sie die Systemlautstärke vorne, oben an jedem
Lautsprecher einstellen (siehe Abb. 4). Wenn Sie einen PRE IN-Anschluss verwenden, können
Sie die Lautstärke nur am Abspielgerät regeln.
5.3 VORDERES LED-PANEL
Immer wenn die Lautstärke geändert wird, leuchtet das LED-Panel an der Vorderseite der
Lautsprecher auf und zeigt die Lautstärke an. Wenn die Lautsprecher stummgeschaltet
sind, blinken die äußersten LEDs an beiden Enden des LED-Panels auf, um diesen Zustand
anzuzeigen.
Die LEDs erlöschen nach einer kurzen Zeit, wobei eine LED angeschaltet bleibt, um die aktuelle
Lautstärke anzuzeigen.
5.4 AUTOMATISCHE ABSCHALTUNG
Die CALLISTO C Lautsprecher werden automatisch abgeschaltet, wenn für eine bestimmte Zeit
kein Signal erfasst wird. Die CALLISTO C Lautsprecher schalten sich automatisch wieder ein,
wenn ein Audiosignal anliegt.
5.5 FIRMWARE-UPDATE
Wenn eine neue Firmware für die CALLISTO C Lautsprecher veröffentlicht wird, aktualisieren
Sie die Lautsprecher mit Hilfe der USB-Service-Schnittstelle. Befolgen Sie die Anleitung in der
heruntergeladenen Informationsdatei der Firmware.
Informationen über aktuelle Firmware finden Sie auf www.dali-speakers.com.
16
5.6 RESET AUF WERKSEINSTELLUNG
Sollte es nötig sein, die Einstellungen eines CALLISTO C Lautsprechers auf die Werkseinstellungen
zurückzusetzen, gehen Sie folgendermaßen vor:
1) Schalten Sie den CALLISTO C Lautsprecher aus und warten Sie etwa 15 Sekunden.
2) Halten Sie die LINK CONNECT-Taste gedrückt.
3) Schalten Sie gleichzeitig den CALLISTO C Lautsprecher an.
4) Halten Sie die LINK CONNECT-Taste weiter gedrückt, bis die Positionsanzeige blinkt.
5) Der CALLISTO C Lautsprecher ist jetzt auf die Werkseinstellungen zurückgesetzt.
6.0 DER HÖRRAUM
Jeder Raum besitzt seine eigene Akustik, die die Art und Weise beeinflusst, wie wir den Klang
eines Lautsprechers erleben. Der Klang, den Sie hören, besteht sowohl aus dem Schall, welchen
die Lautsprecher direkt abstrahlen, als auch aus dem von Wänden und Decke reflektierten
Schall. Letzteres beeinflusst wesentlich Ihr Klangerlebnis.
Als Grundregel sollte man in unmittelbarer Nähe der Lautsprecher größere, harte, stark
reflektierende Bereiche vermeiden. Diese bewirken typischerweise eine starke Reflexion, was
die Präzision sowie die Raumwirkung der Klangwiedergabe negativ beeinflusst. Die Reflexion
Page 17

UK DE DK FR CN
kann z. B. durch Aufstellen einer Pflanze zwischen Lautsprecher und reflektierender Fläche
unterdrückt werden. Weiche Gegenstände wie Teppiche, Vorhänge o. ä. schaffen eventuell
Abhilfe, wenn der Klang zu hell ist. Menge und Qualität der tiefen Bässe hängen von Größe und
Form des Raumes sowie der Aufstellung der Lautsprecher ab. Eine Aufstellung der Lautsprecher
nahe einer Seiten- oder Rückwand hebt die Bässe hervor. Eine Eckposition hebt sie noch mehr
hervor, erhöht zudem auch die Schallreflexion.
7.0 EINSPIELZEIT
Wie jedes mechanische System erfordert auch ein Lautsprecher eine gewisse „Einspielzeit“,
bevor er seine optimale Leistung erbringt. In der ersten Zeit werden Sie erleben, wie sich die
Klangqualität allmählich immer weiter verbessert. Die Dauer dieser Einspielzeit hängt von
der Häufigkeit der Benutzung und der gewählten Lautstärke ab. Rechnen Sie mit mindestens
100 Stunden Einspielzeit, bis die optimale Leistung erreicht ist. Im Gegensatz zu anderen
mechanischen Systemen verringert sich die Lebensdauer eines Lautsprechers nicht durch
regelmäßigen normalen Gebrauch.
8.0 REINIGUNG UND INSTANDHALTUNG
Säubern Sie das Gehäuse mit einem weichen, trockenen Tuch. Sollte das Gehäuse verschmutzt
sein, wischen Sie es mit einem weichen, leicht feuchten mit mildem Haushaltsreiniger
versehenem Tuch ab. Achten Sie beim Abwischen auf die Lautsprecherchassis, da diese
sehr fragil sind. Die Frontgitter können mit einer Kleiderbürste gesäubert und mit einem gut
ausgewrungenen, fusselfreien Tuch und mildem Reinigungsmittel abgewischt werden.
8.1 DIREKTES SONNENLICHT VERMEIDEN
Wenn die Lautsprecher direktem Sonnenlicht ausgesetzt werden, können im Laufe der Zeit ihre
Oberflächen ausbleichen oder sich verfärben. Vermeiden Sie es deshalb, die Geräte in direktem
Sonnenlicht aufzustellen.
9.0 ENTSORGUNG
Entsorgen Sie dieses Produkt nicht gemeinsam mit dem Haushaltsmüll. Es gibt ein getrenntes
Sammelsystem für gebrauchte elektronische Produkte gemäß den gesetzlichen Vorschriften, die eine
ordnungsgemäße Behandlung, Rückgewinnung und Wiederverwertung verlangen. Privathaushalte
in den Mitgliedstaaten der EU, der Schweiz, Liechtenstein und in Norwegen können ihre gebrauchten
elektronischen Produkte kostenlos an dafür eingerichteten Sammelstellen abgeben. Sie können
es auch bei einem Händler abgeben, wenn Sie ein ähnliches neues Produkt kaufen. Wenn Sie in
einem Land wohnen, das nicht oben aufgeführt wurde, wenden Sie sich bitte an Ihre örtlichen
Behörden, um sich nach der korrekten Art der Entsorgung zu erkundigen. Auf diese Weise stellen
Sie sicher, dass das zu entsorgende Produkt der notwendigen Behandlung, Rückgewinnung und
Wiederverwertung zugeführt wird, wodurch mögliche negative Einflüsse auf die Umwelt und die
menschliche Gesundheit verhindert werden.
10.0 TECHNISCHE DATEN
In Tabelle 2 finden Sie eine Aufstellung der wichtigsten technischen Daten Ihrer Lautsprecher.
Bedenken Sie, dass es unzählige Methoden zur technischen Messung von Lautsprechern
gibt. Keine davon wird Ihnen jedoch etwas Nützliches darüber verraten, wie ein Lautsprecher
wirklich klingt. Allein Ihre Ohren können entscheiden, ob ein Lautsprecher besser klingt als ein
anderer. Wie alle unsere Lautsprecher wurde auch die DALI CALLISTO C Serie so konstruiert,
dass sie die Musik so originalgetreu wie nur irgend möglich wiedergibt.
Viel Vergnügen mit Ihren neuen DALI CALLISTO C Lautsprechern!
17
Page 18

UK DE DK
JP
The lightning fl ash within an equilateral triangle is
intended to alert you to the presence of non insulated
“dangerous voltage” within the product’s enclosure that
may be of suffi cient magnitude to constitute an electric
shock to persons.
The exclamation point within an equilateral triangle
is intended to alert you to the presence of important
operating and maintenance (servicing) instructions in
the literature accompanying the appliance.
12 Cleaning - do not use any liquid cleaners. Use only a dry
cloth to wipe off dust and grease.
13 Non-use periods - the power cord of the appliance should
be unplugged from the outlet when left unused for a long
period of time.
14 Object and liquid entry - care should be taken so that
objects do not fall and liquids are not spilled into the
enclosure through openings.
15 Damage requiring service - the appliance should be
serviced by qualifi ed personnel when:
a) The power-supply cord or the plug has been
damaged; or
b) Objects have fallen, or liquid has been spilled into
the appliance; or
c) The appliance has been exposed to rain; or
d) The a ppliance does not appear to operate normally,
or exhibits a marked change in performance; or
e) The appliance has been dropped, or the enclosure
CAUTION
RISK OF ELECTRIC SHOCK
ATTENTION
RISQUE D’ ÉLECTROCUTION
DO NOT OPEN
VIGTIGE SIKKERHEDSFORANSTALTNINGER
1.
Læs brugsanvisningen - læs alle sikkerheds- og
betjeningsanvisninger, før produktet tages i brug.
2.
Gem brugsanvisningen - sørg for at gemme sikkerheds- og
betjeningsanvisningerne til fremtidigt brug.
3.
Tag hensyn til advarsler - alle advarsler på produktet og i
betjeningsanvisningerne skal overholdes.
4.
Følg anvisningerne - alle betjenings- og brugsanvisninger skal
følges.
5.
Vand og fugt - produktet må ikke bruges i nærheden af vand f.eks. badekar, håndvask, køkkenvask, vaskekar, i en fugtig kælder
eller i nærheden af en swimmingpool og lignende. For at reducere
risikoen for brand eller elektrisk stød må produktet ikke udsættes
for regn eller fugt. Produktet må ikke udsættes for vanddryp eller
-sprøjt. Genstande indeholdende flydende væske, såsom vaser, må
ikke stilles på produktet.
6.
Holder og fødder - produktet må kun bruges med holder eller fod ,
hvis det anbefales af producenten. Når der bruges en holder, skal
der udvises forsigtighed, når holder/produkt flyttes for at undgå
skade, såfremt det tipper.
7.
Væg- eller loftmontering - hvis produktet kan væg- eller
loftmonteres, skal det kun monteres efter producentens
anbefaling.
8.
Ventilation - produktet skal anbringes således, at dets placering
eller position ikke blokerer for fri ventilation. F.eks. må produktet
ikke placeres på en seng, sofa, gulvtæppe eller lignende overflader,
der kan blokere for ventilationsåbninger. Produktet må heller ikke
placeres i indbyggede installationer, såsom reoler eller skabe, der
kan hindre luftstrømmen gennem ventilationsåbninger.
9.
Varme - produktet må ikke opbevares i nærheden af varmekilder,
som f.eks. radiatorer, varmespjæld, komfurer eller andre apparater
(herunder forstærkere), som udvikler varme.
10.
Strømforsyning - produktet må kun tilsluttes til en strømforsyning
af den type, der er beskrevet i betjeningsanvisningerne, eller som
fremgår af mærket på produktet.
11.
Beskyttelse af netledning - ledninger skal trækkes, så de ikke
bliver trådt på eller kommer i klemme mellem genstande, der
placeres ovenpå eller omkring dem. Vær specielt opmærksom på
ledninger ved afbrydere, stikkontakter og dér, hvor de har udgang
fra produktet.
18
NE PAS OUVRIR
12.
Rengøring - der må ikke anvendes flydende rengøringsmidler.
Brug kun en tør klud til at fjerne støv og snavs.
13.
Når produktet ikke er i brug - sørg for at tage stikket ud af
stikkontakten, når produktet ikke har været i brug i længere tid,
samt hvis det lyner eller er voldsomt uvejr.
14.
Genstande og væske - sørg for at udvise forsigtighed, så
genstande ikke falder ned på og væske ikke spildes og løber ind i
åbningerne på produktet.
15.
Service - brugeren må ikke selv foretage anden service på
produktet end den, som fremgår af betjeningsanvisningerne.
Enhver anden service skal foretages af autoriserede fagfolk. For
at undgå risiko for elektrisk stød må front (eller bagside) ikke
fjernes, idet der ikke findes nogle dele indeni, som brugeren selv
må foretage service på.
16.
Skade, der kræver service - der skal foretages service på
produktet af autoriserede fagfolk, når:
a)
Netledningen eller stikket er beskadiget, eller
b)
Genstande er faldet ned eller væske er spildt på produktet, eller
c)
Produktet har været udsat for regn, eller
d)
Produktet ikke fungerer normalt eller viser mærkbare tegn på
forringelse af ydeevne, eller
e)
Produktet har været tabt eller kabinettet er beskadiget.
17.
18.
Isolering - dette produkt tilhører Klasse II og er dobbelt
isoleret. Produktet er designet på en sådan måde, at det
ikke kræver tilslutning af jordstik.
Sikkerhedsafbryder - Sikkerhedskontakt anvendes som
sikkerhedsafbryder og skal hele tiden være tilgængelig
under beregnet brug. For at afbryde strømmen helt til
produktet skal stikket tages helt ud af stikkontakten.
Dette produkt indeholder elektriske eller elektroniske dele.
Disse dele kan, hvis de ikke bortskaffes på korrekt vis,
være skadelige for miljøet og menneskers sundhed.
Når produktet er mærket hermed, betyder det, at det ikke
må bortskaffes sammen med usorteret affald og skal
bortskaffes separat. Som forbruger har du ansvaret for, at
dette produkt bortskaffes på korrekt vis.
Page 19
UK DE DK FR CN
INDHOLDSFORTEGNELSE
1.0 INTRODUKTION 20
2.0 UDPAKNING 20
3.0 PLACERING 20
4.0 TILSLUTNING 21
5.0 IBRUGTAGEN 21
6.0 LYTTERUMMET 22
7.0 TILSPILNING 22
8.0 RENGØRING OG VEDLIGEHOLDELSE 22
9.0 BORTSKAFFELSE 23
10.0 TEKNISKE SPECIFIKATIONER 23
CE
DALI A/S erklærer hermed at DALI CALLISTO C radioudstyrtypen overholder direktiv 2014/53/EU
Den komplette ordlyd af EU-overensstemmelseserklæringen findes på følgende internetadresse:
www.dali-speakers.com/
19
Page 20

1.0 INTRODUKTION
Tillykke med valget af DALI CALLISTO C højttalere. For os er det vigtigt, at dine nye DALI
højttalere opstilles og tilsluttes bedst muligt. Vi anbefaler derfor, at du læser manualen og følger
anvisningerne. Du kan læse om opstilling og tilslutning af højttalerne - samt nogle gode råd om,
hvordan du får mest ud af dine nye højttalere.
DALI er anerkendt blandt musikelskere over hele verden for sine unikke højttalere, der alle er
konstrueret og designet ud fra kompromisløse krav til design og lyd. Vores mål for hver eneste
DALI højttaler er os altid for øje: At skabe lydoplevelser i dit hjem, som får dig til at glemme tid
og sted.
Husk at tilmelde dig DALIs nyhedsbrev på www.dali-speakers.com.
God fornøjelse!
2.0 UDPAKNING
Udvis forsigtighed ved udpakning, for at undgå skader på indholdet. Afhængigt af hvilken DALI
CALLISTO C model du har købt, medfølger der forskelligt tilbehør til højttalerne. Kontroller at
alle dele, angivet i Tabel 1, er medleveret. Gem emballagen til senere brug, hvis højttalerne f.
eks. skal byttes eller serviceres.
3.0 PLACERING
For det optimale resultat, bør højttaleropstillingen være symmetrisk omkring din foretrukne
lytteposition (se Figur 1A - 1C). Vi anbefaler at du eksperimenterer med forskellige placeringer
– lydkvaliteten varierer, afhængig af højttalernes placering.
DALI CALLISTO 2 C højttalerne bør ideelt placeres med diskanten omtrent i ørehøjde, når du
sidder i din foretrukne lytteposition. DALI CALLISTO 2 C bør ligeledes placeres minimum 20
cm fra bagvæggen.
20
DALI CALLISTO 6 C er designet som en gulvhøjttaler. Den bør placeres minimum 20 cm fra
bagvæg.
Genstande opstillet mellem højttaler og lyttepositionen kan forringe lydgengivelsen.
Højttalerne er udviklet til at opfylde vores krav om stor spredning af lyden. De bør derfor
ikke vinkles indad mod lyttepositionen, men positioneres så bagsiden er parallel med
bagvæggen (se Figur 2). Ved at sigte højttalerne paralellt ret fremad, reduceres forvrængning
ved hovedlyttepositionen og rumintegrationen forbedres. Kravet om stor spredning af lyden
sikrer at lyden fordeles jævnt over et stort areal i lytterummet.
3.1 DALI CALLISTO 6 C
Højttalerne er beregnet til gulvplacering. Monter de medfølgende spikes eller gummidupper
under højttalerne (se Figur 3A). Spikes eller gummidupper kan forbedre lydgengivelsen. Prøv
begge løsninger og vælg den som giver det bedste resultat i din opstilling.
Spikes (medfølger) skal monteres løst i de fire aluminiumsfødder, så spikemøtrikkerne kun er
spændt en smule. Monter fødderne i de gevindskårne huller i bunden af højttaleren ved hjælp af
skruerne. Skub fødderne mod kabinettet, før du spænder skruerne. Anbring højttaleren oprejst
på sine spikes på gulvet, så den står stabilt uden at vippe. Spænd møtrikkerne, så de fire spikes
sidder forsvarligt fast i aluminiumsfødderne.
Page 21

UK DE DK FR CN
BEMÆRK: Udvis forsigtighed med spikes, da de kan skade gulvet.
BEMÆRK: På nogle gulvoverflader og i nogle rum er det afgørende at bruge spikes for at opnå
det bedste resultat.
3.2 DALI CALLISTO 2 C
DALI anbefaler, at du placerer din DALI CALLISTO 2 C på en fod for den bedste lydoplevelse.
Alternativt kan DALI CALLISTO 2 C placeres på en hylde. De medfølgende gummifødder kan
monteres under højttaleren for stabil og vibrationsfri placering (se figur 3B).
4.0 TILSLUTNING
Alle stik er placeret nederst bag på CALLISTO C højttaleren (se figur 5)
1) Strømstik
2) Hovedafbryder
3) Sikring
4) ADC In
5) USB Service port
6) LINK CONNECT knap
5.0 IBRUGTAGEN
Tilslut det medfølgende strømkabel til strømstikken i højtaleren og i væggen. Tænd for CALLISTO
C højttaleren på hovedafbryderen.
Bemærk: Hvis højttaleren ikke tændes, når den tilsluttes spænding, og hovedafbryderen står
på ’ON’, kan sikringen være sprunget eller være defekt. Udskift sikringen med en af samme
type som den oprindeligt leverede – se sikringstype på forstærkerens bagplade. Hvis sikringen
springer flere gange, skal du få subwooferen kontrolleret på et autoriseret serviceværksted kontakt din autoriserede forhandler.
5.1 FORBIND HØJTTALERNE
DALI Sound Hub. Hvis du har købt en DALI Sound Hub sammen med dine CALLISTO C højttalere
kan du følge vejledningen vedlagt Sound Hub’en for at forbinde højttalerne. ADC In kablet
forbindelse. Forbind CALLISTO C højttaleren til en PRE Out. Højttalerens forstærker arbejder
med fuldt gain når denne tilslutnings form bruges. DALI anbefaler at der bruges høj kvalitets
kabler og at kablet ikke overstiger 3 meters længde.
5.2 VOLUME KONTROL
Når CALLISTO C højttalere forbindes til DALI Sound Hub kan system volumen også justeres
på toppen af hver højttaler (se figur 4). Hvis ADC IN bruges kan volumen kun kontrolleres via
volumen kontrollen på den tilsluttede lydkilde.
5.3 VOLUMEN LED
LED displayet på forsiden af højttaleren lyser op og indikerer volumen niveauet når volumen
ændres. Hvis højttaleren sætte på mute vil de to yderste LED’er blinke.
LED displayet slukkes igen efter kort tid og efterlader en enkelt LED tændt for at indikere det
aktuelle volumen niveau.
21
Page 22

5.4 AUTOMATISK SLUK
CALLISTO C højtalerne slukker automatisk hvis de ikke har været brugt i noget tid. CALLISTO C
højttaleren tænder automatisk igen hvis der igen afspilles lyd.
5.5 FIRMWARE OPDATERING
Hvis der frigives en ny firmware til CALLISTO C højttalerne skal denne indlæses ved at bruge
USB Service porten. Følg instruktionen i firmware fil pakken.
5.6 FACTORY RESET
Skulle det blive nødvendigt at nulstille CALLISTO C højtalerne kan dette gøres ved at følge
nedenstående instruktion:
1) Sluk for CALLISTO C højttaleren og vent ca. 15 sekunder
2) Tryk på LINK CONNECT knappen og hold den trykket ind
3) Tænk for CALLISTO C højttaleren
4) Fortsæt med at holde LINK CONNECT knappen trykket ind, indtil displayet begynder at blinke
5) CALLISTO C højttaleren er nu bragt tilbage til dens originale indstillinger
6.0 LYTTERUMMET
Ethvert rum har sin egen og særegne akustik, der præger den måde, vi oplever lyden fra
højttalerne. Reelt handler det om, hvordan rummet modtager lydenergien og skaffer sig af
med den igen. Du kan påvirke dit lytterums akustik på forskellige måder. En del af den lyd, du
hører, kommer ikke direkte fra selve højttaleren men fra refleksioner fra gulv, loft og vægge.
Disse refleksioner dæmpes af bl.a. møbler, planter og tæpper. Er lydbilledet lyst, kan bløde ting
som gardiner og tæpper hjælpe. For eksempel har det en vis indflydelse at trække gardinerne
for, når du vil undgå refleksioner fra store glasflader. Både mængden og kvaliteten af den
dybe bas afhænger af rummets størrelse, form og højttalernes placering. F.eks. fremhæves
bassen ved en placering nær side- eller bagvæg og endnu mere ved placering i et hjørne.
Her øges refleksionerne fra væggene dog ganske meget. Da det i sidste ende er dine ører,
der bestemmer, anbefaler vi, at du eksperimenterer dig frem til den placering, der giver det
lydbillede, du ønsker.
22
Som grundregel skal du undgå store, hårde reflekterende flader umiddelbart omkring
højttalerne, da disse vil virke som såkaldte spejlkilder og ødelægge det rumlige perspektiv i
lydbilledet. Prøv f.eks. at hænge et vægtæppe bag højttaleren, lægge et tæppe foran eller stille
en større plante ved siden af højttaleren og oplev, hvor overraskende stor indflydelse det har på
præcisionen i lydbilledet.
7.0 TILSPILNING
Ligesom ethvert andet mekanisk system skal en højttaler ”spilles til” for at kunne yde sit
bedste. Derfor vil du i den første periode opleve en gradvis forbedring af højttalernes lydkvalitet.
Tilspilningsperioden varierer i forhold til brug og lydniveau. Du skal regne med op til 100 timers
playback førend dine højttalere opnår maximum ydelse. I modsætning til andre mekaniske
systemer forlænges en højttalers levetid ved normal, regelmæssig brug.
8.0 RENGØRING OG VEDLIGEHOLDELSE
Rengøring af kabinetterne foretages bedst med en blød og tør klud. Er kabinetterne tilsmudsede,
kan en blød klud, der er hårdt opvredet i et mildt universalrengøringsmiddel, benyttes. Vær meget
forsigtig ved evt. aftørring af højttalermembranerne, da disse er meget følsomme.
Stoframmerne rengøres med en almindelig klædebørste eller aftørres med en hårdt opvredet og
fnugfri klud med mildt universalrengøringsmiddel.
Page 23

UK DE DK FR CN
8.1 Undgå direkte sollys
Højttalernes overflade kan falme eller blive misfarvet med tiden, hvis den udsættes for direkte
sollys. Undgå derfor at placere højttalerne i direkte sollys.
9.0 BORTSKAFFELSE
Produktet må ikke blandes med almindeligt husholdningsaffald ved bortskaffelse. Lovgivningen
kræver, at elektroniske apparater indsamles for korrekt bortskaffelse, genindvinding og genbrug.
Private husstande i EU-medlemslandene, Schweiz, Liechtenstein og Norge kan gratis aflevere
deres brugte elektroniske apparater på kommunale genbrugspladser eller til forhandlere (ved
køb af et nyt lignende produkt). Hvis du er bosiddende i andre lande end ovennævnte, bedes du
kontakte dine lokale myndigheder for oplysninger om korrekt bortskaffelse. Ved at følge disse
retningslinjer sikrer du, at dit produkt bortskaffes, genindvindes og genbruges på korrekt vis for
at forhindre potentielle negative konsekvenser for miljøet og folkesundheden.
10.0 TEKNISKE SPECIFIKATIONER
I tabel 2 finder du de mest almindelige specifikationer for højttalerserien. Husk, at der findes
utallige måder til bedømmelse af højttalere, men ingen af dem fortæller noget om, hvordan
en højttaler egentlig lyder. Det er kun dine ører, der afgør, om én højttaler lyder bedre end en
anden. Ligesom alle vores andre højttalere er DALI RUBICON designet til at gengive musik så
ærligt som muligt.
God fornøjelse med din nye DALI CALLISTO C højttaler!
23
Page 24
UK DE DK
JP
The lightning fl ash within an equilateral triangle is
intended to alert you to the presence of non insulated
“dangerous voltage” within the product’s enclosure that
may be of suffi cient magnitude to constitute an electric
shock to persons.
The exclamation point within an equilateral triangle
is intended to alert you to the presence of important
operating and maintenance (servicing) instructions in
the literature accompanying the appliance.
12 Cleaning - do not use any liquid cleaners. Use only a dry
cloth to wipe off dust and grease.
13 Non-use periods - the power cord of the appliance should
be unplugged from the outlet when left unused for a long
period of time.
14 Object and liquid entry - care should be taken so that
objects do not fall and liquids are not spilled into the
enclosure through openings.
15 Damage requiring service - the appliance should be
serviced by qualifi ed personnel when:
a) The power-supply cord or the plug has been
damaged; or
b) Objects have fallen, or liquid has been spilled into
the appliance; or
c) The appliance has been exposed to rain; or
d) The a ppliance does not appear to operate normally,
or exhibits a marked change in performance; or
e) The appliance has been dropped, or the enclosure
CAUTION
RISK OF ELECTRIC SHOCK
DO NOT OPEN
IMPORTANT SAFETY INSTRUCTIONS
1.
Read instructions - all the safety and operating instructions
should be read before the appliance is operated.
2.
Retain instructions - the safety and operating instructions
should be retained for future reference.
3.
Heed warnings - all warnings on the appliance and in the
operating instructions should be adhered to.
4.
Follow instructions - all operating and use instructions should
be followed.
5.
Water and moisture - the appliance should not be used near
water - for example, near a bathtub, washbowl, kitchen sink,
laundry tub, in a wet basement, or near a swimming pool and
the like. To reduce the risk of fire or electric shock, do not expose
this apparatus to rain or moisture. The apparatus should not be
exposed to dripping or splashing. Objects filled with liquids, such
as vases should not be placed on the apparatus.
6.
Carts and stands - the appliance should be used only with a
cart or stand if recommended by the manufacturer. When a cart
is used, use caution when moving the cart/apparatus combination
to avoid injury from tip-over.
7.
Wall or ceiling mounting – if the appliance includes options for wall
or ceiling mounting, it should be mounted only as recommended
by the manufacturer.
8.
Ventilation - the appliance should be situated so that its location
or position does not interfere with proper ventilation. For example,
the appliance should not be situated on a bed, sofa, rug, or similar
surface that may block the ventilation openings; or placed in a
built-in installation, such as a bookcase or cabinet, that may
impede the flow of air through the ventilation openings.
9.
Heat - the appliance should be situated away from heat sources
such as radiators, heat registers, stoves, or other appliances
(including amplifiers) that produce heat.
Do not place exposed flame sources such as lighted candles on
the apparatus.
10.
Power sources - the appliance should be connected to a power
supply only of the type described in the operating instructions or
as marked on the appliance.
11.
Power cord protection - power-supply cords should be routed
so that they are not likely to be walked on or pinched by items
placed on or against them, paying particular attention to cords
at plugs, convenience receptacles and the point where they exit
from appliance.
24
ATTENTION
RISQUE D’ ÉLECTROCUTION
NE PAS OUVRIR
12.
Cleaning - do not use any liquid cleaners. Use only a dry cloth to
wipe off dust and grease.
13.
Non-use periods - the power cord of the appliance should be
unplugged from the outlet when left unused for a long period of
time and during lightning storms.
14.
Object and liquid entry - care should be taken so that objects
do not fall and liquids are not spilled into the enclosure through
openings.
15.
Servicing - the user should not attempt to service the appliance
beyond that described in the operating instructions. All other
servicing should be referred to qualified service personnel. To
reduce the risk of electric shock, do not remove cover (or back) as
there are no user-serviceable parts inside.
16.
Damage requiring service - the appliance should be serviced by
qualified personnel when:
a)
The power-supply cord or the plug has been damaged; or
b)
Objects have fallen, or liquid has been spilled into the appliance; or
c)
The appliance has been exposed to rain; or
d)
The appliance does not appear to operate normally, or exhibits a
marked change in performance; or
The appliance has been dropped, or the enclosure damaged.
e)
17.
Isolation - this equipment is a Class II or double insulated
electrical appliance. It has been designed in such a way
that it does not require a safety connection to electrical
earth.
18.
Mains disconnection - Mains plug is used as disconnect
device and it should remain readily operable during
intended use. In order to disconnect the apparatus from the
mains completely, the mains plug should be disconnected
from the mains socket outlet completely.
19.
Intended operational climate: moderate.
This product contains electrical or electronic materials.
The presence of these materials may, if not disposed of
properly, have potential adverse effects on the environment
and human health.
Presence of this label on the product means it should not
be disposed of as unsorted waste and must be collected
separately. As a consumer, you are responsible for ensuring
that this product is disposed of properly.
Page 25

UK DE DK FR CN
IC Précaution
Le present appareil est conforme aux CNR d’Industrie Canada applicables aux appareils radio exempts de licence.
L’exploitation est autorisée aux deux conditions suivantes: (1) l’appareil ne doit pas produire de brouillage, et (2) l’utilisateur
de l’appareil doit accepter tout brouillage radio électrique subi, meme si le brouillage est susceptible d’en compromettre
le fonctionnement.
Cet équipement doit être installé et utilisé à une distance minimale de 20 cm entre le radiateur et votre corps.
CAN ICES-3(B)/NMB-3(B)
CE
DALI A/ S déclare par la présente que le type d’équipement radioélectrique DALI CALLISTO C est conforme à la directive
2014/53 /UE.
Le texte complet de la déclaration UE de conformité est disponible à l’adresse internet suivante:
www.dali-speakers.com/
25
Page 26

CONTENTS
1.0 INTRODUCTION 27
2.0 DEBALLAGE 27
3.0 POSITIONNEMENT 27
4.0 CONNEXION 28
5.0 UTILISATION 28
6.0 LA PIÈCE D’ÉCOUTE 29
7.0 RODAGE 30
8.0 NETTOYAGE ET ENTRETIEN 30
9.0 MISE AU REBUT 30
26
10.0 CARACTERISTIQUES TECHNIQUES 30
Page 27

UK DE DK FR CN
1.0 INTRODUCTION
Félicitations pour l’achat de vos nouvelles enceintes DALI CALLISTO C. Nous attachons une
grande importance à l’installation et la connexion optimales de vos nouvelles enceintes DALI.
C’est pourquoi nous vous recommandons de lire ce manuel et d’en suivre les recommandations.
Ce manuel contient des instructions d’installation et de connexion, ainsi que des conseils et
des recommandations qui vous permettront de profiter pleinement de vos nouvelles enceintes.
DALI est réputé dans le monde entier pour ses enceintes uniques, dotées d’un design et de
performances répondant aux normes les plus strictes. L’objectif de chaque enceinte DALI
est toujours à l’image de notre engagement fondamental : vous proposer, chez vous, une
expérience d’écoute qui ne manquera jamais de vous transporter.
N’oubliez pas de vous inscrire sur www.dali-speakers.com pour recevoir la newsletter de DALI.
Nous vous souhaitons beaucoup de plaisir avec vos enceintes.
2.0 DEBALLAGE
Prenez soin de ne pas endommager le contenu lors du déballage des différents composants.
Selon le modèle DALI CALLISTO C que vous avez acheté, différents accessoires sont fournis
avec les enceintes. Assurez-vous que l’emballage en carton contient toutes les pièces (voir
Tableau 1). Conservez les matériaux d’emballage, dans l’éventualité où vous devriez transporter
ou faire réparer vos enceintes.
3.0 POSITIONNEMENT
Pour obtenir les meilleurs résultats; les enceintes doivent être disposées de façon symétrique
autour de votre position d’écoute préférée (voir Figure 1). Nous vous recommandons d’essayer
de positionner vos enceintes de différentes façons ; la qualité sonore variera en fonction de la
position des enceintes.
Pour les modèles DALI CALLISTO 2 C, les enceintes doivent idéalement être positionnées de
manière à ce que le tweeter se trouve à la hauteur de votre oreille lorsque vous êtes assis dans
votre position d’écoute préférée. Le modèle CALLISTO 2 C doit être positionné à au moins 20
cm (8”) du mur situé derrière.
Les enceintes CALLISTO 6 C sont conçues pour être posées au sol. Elles doivent être
positionnées à au moins 20 cm (8”) du mur situé derrière.
La présence d’objets situés entre l’enceinte et la position d’écoute peut avoir un effet négatif
sur la qualité sonore. Toutes les enceintes DALI sont conçues pour satisfaire à notre principe
de « diffusion large » ; elles ne doivent donc pas être orientées vers la position d’écoute, mais
doivent être positionnées parallèlement au mur situé derrière (voir Figure 2). Le positionnement
parallèle permet de réduire la distorsion dans la position d’écoute principale et d’assurer une
meilleure intégration dans la pièce. Le principe de diffusion large garantit également une
répartition homogène du son dans un vaste rayon de la pièce d’écoute.
3.1 DALI CALLISTO 6 C
Les enceintes sont conçues pour être posées au sol sur des pointes ou des pieds en caoutchouc
placés sous les enceintes (voir Figure 3A). L’utilisation de pointes ou de pieds en caoutchouc
permet d’améliorer la qualité sonore. Vous pouvez essayer l’une et l’autre de ces solutions afin
d’identifier celle qui produit le meilleur son dans votre installation.
27
Page 28

Les pointes (incluses) doivent être fixées sans être serrées dans les quatre pieds en aluminium,
en laissant le contre-écrou de la pointe légèrement serré. Montez les pieds dans les trous
filetés sur la partie inférieure de l’enceinte à l’aide des vis. Appuyez les pieds contre l’enceinte
avant de serrer les vis. Mettez l’enceinte en position verticale en appui sur ses pointes sur le
sol, de sorte qu’elle se tienne bien droite, sans vaciller. Serrez les écrous de manière à ce que
les quatre pointes soient bien tenues dans les pieds en aluminium. Veillez à ne pas trop serrer
les contre-écrous.
REMARQUE: Gardez à l’esprit que les pointes peuvent endommager le sol, s’il n’est pas protégé.
REMARQUE: Sur certaines surfaces et dans certaines pièces, l’utilisation de pointes est
essentielle pour obtenir les meilleurs résultats.
3.2 DALI CALLISTO 2 C
DALI CALLISTO 2 C est optimisé pour une installation au sol, mais fonctionne également bien
sur une étagère. En cas de positionnement sur un support ou une étagère, les pieds fournis
peuvent être placés sous l’enceinte pour assurer sa stabilité et l’absence de vibrations (voir
Figure 3B).
4.0 CONNEXION
Le branchement au secteur se situe à l’arrière de l’enceinte CALLISTO C (voir Figure 5).
1 ) Connecteur secteur
2 ) Interrupteur d’alimentation principale
3 ) Compartiment de fusible
4) ENTRÉE ADC
5) Port de service USB
6) Bouton LINK CONNECT
28
5.0 UTILISATION
Raccordez le cordon d’alimentation fourni au connecteur SECTEUR et à votre prise de courant.
Mettez l’enceinte CALLISTO C en marche à l’aide de l’interrupteur d’alimentation principale.
REMARQUE : si vous ne parvenez pas à allumer l’enceinte CALLISTO C alors qu’elle est branchée
et que l’interrupteur d’ALIMENTATION est en position de MARCHE, il est possible que le fusible
ait sauté ou soit endommagé. Remplacez-le par un fusible du même type que celui d’origine
(le type de fusible est indiqué à l’arrière de l’amplificateur). Si le fusible saute continuellement,
faites vérifier l’enceinte CALLISTO C dans un centre de service agréé (prenez contact avec votre
revendeur agréé).
5.1 CONNEXION DES ENCEINTES
Le DALI SOUND HUB. Si vous avez acheté un DALI SOUND HUB avec vos enceintes
CALLISTO C, veuillez suivre les instructions du guide de démarrage rapide du SOUND HUB
pour y connecter vos enceintes CALLISTO C. Connexion câblée pour entrée ADC. Branchez les
enceintes CALLISTO C à une sortie pré-ampli. Dans ce cas, l’enceinte fonctionnera à gain fixe.
DALI recommande l’utilisation de câbles de qualité supérieure, de préférence de moins de 3
mètres.
Page 29

UK DE DK FR CN
5.2 RÉGLAGE DU VOLUME
Lorsque les enceintes sont connectées aux DALI SOUND HUB, vous pouvez régler le volume
du système sur la partie supérieure avant de chaque enceinte (voir Figure 4). Si vous utilisez
la connexion ADC IN, vous pouvez uniquement régler le volume sur le dispositif de lecture.
5.3 LED AVANT
Le panneau LED à l’avant de l’enceinte s’allume et indique le volume chaque fois que vous
le changez. Lorsque l’enceinte est mise en sourdine, les LED situées aux deux extrémités du
panneau LED clignotent pour indiquer cet état.
La LED située à l’avant s’éteint après un court instant, et une LED reste allumée pour indiquer
le volume.
5.4 MODE ALIM. ÉTEINT
L’enceinte CALLISTO C se mettra automatiquement hors tension si aucun signal n’est détecté
pendant 15 minutes. Elle se remet automatiquement en marche lorsqu’un signal audio est
détecté.
5.5 MISE À JOUR DU MICROLOGICIEL
En cas de mise à jour du micrologiciel des enceintes CALLISTO C, veuillez utiliser le port de
service USB pour mettre à jour votre enceinte. Veuillez suivre les instructions du fichier de
téléchargement du micrologiciel.
Vous pouvez consulter la version du micrologiciel la plus récente sur www.dali-speakers.com.
5.6 RÉINITIALISATION
S’il est nécessaire de réinitialiser l’enceinte CALLISTO C, vous pouvez le faire en suivant les
étapes suivantes:
1) Mettez l’enceinte CALLISTO C hors tension et patientez environ 15 secondes.
2) Appuyez sur le bouton LINK CONNECT et maintenez-le enfoncé.
3) Mettez l’enceinte CALLISTO C en position de marche tout en maintenant le bouton LINK
CONNECT enfoncé.
4) Continuez de maintenir le bouton LINK CONNECT enfoncé jusqu’à ce que le témoin de
position commence à clignoter.
5) Les réglages d’usine sont alors restaurés sur l’enceinte CALLISTO C.
6.0 LA PIÈCE D’ÉCOUTE
Chaque pièce possède des caractéristiques acoustiques uniques, qui influencent la manière
dont nous entendons le son provenant d’une enceinte. Le son que vous entendez est constitué
du son direct provenant des enceintes et du son réfléchi provenant du sol, du plafond et des
murs. De ce dernier dépend votre expérience d’écoute.
La règle fondamentale consiste à essayer d’éviter d’avoir de grandes surfaces dures et
réfléchissantes à proximité de vos enceintes, car celles-ci provoqueront d’importantes
réflexions, qui peuvent affecter la précision et l’effet spatial de la reproduction sonore. La
réflexion peut notamment être supprimée en positionnant, par exemple, une plante entre
l’enceinte et la surface réfléchissante. Des objets mous tels que des tapis ou des rideaux
peuvent aider si le son est trop clair. Le volume et la qualité des graves dépendent de la taille et
de la forme de la pièce, ainsi que de la position des enceintes. Les graves seront accentués si
29
Page 30

un mur se trouve sur le côté ou à l’arrière de vos enceintes. Positionner vos enceintes dans un
coin de pièce les accentue encore plus, mais cela augmente également les réflexions.
7.0 RODAGE
À l’image de tout système mécanique, une enceinte nécessite une période de « rodage » pour
donner le meilleur d’elle-même. Vous constaterez une amélioration progressive de la qualité
sonore durant la première période d’utilisation. La période de rodage varie selon l’utilisation et
le volume de lecture. Vous devez prévoir jusqu’à 100 heures de diffusion avant d’atteindre des
performances optimales. Contrairement à d’autres systèmes mécaniques, la durée de vie d’une
enceinte est augmentée par la diffusion normale et régulière de musique.
8.0 NETTOYAGE ET ENTRETIEN
Nettoyez les enceintes avec un chiffon doux et sec. Si les enceintes sont sales, essuyez-les
avec un chiffon doux imprégné d’un produit nettoyant multi-usages, bien essoré. Essuyez
toujours délicatement les cônes des haut-parleurs ; ils sont très fragiles. La face avant des
grilles peut être nettoyée avec une brosse à vêtements, puis essuyée avec un chiffon non
pelucheux imprégné d’un nettoyant doux multi-usages, bien essoré.
8.1 ÉVITEZ LA LUMIÈRE DIRECTE DU SOLEIL
Si elles sont exposées à la lumière directe du soleil, les surfaces des enceintes risquent de
ternir ou de se décolorer progressivement. Par conséquent, évitez de positionner les enceintes
dans un endroit exposé à la lumière directe du soleil.
9.0 MISE AU REBUT
Si vous souhaitez mettre ce produit au rebut, ne le jetez pas avec les déchets ménagers
ordinaires. Un système de collecte distinct existe pour les produits électroniques usagés,
conformément à la législation, qui impose un traitement, une récupération et un recyclage
adéquats. Les foyers de particuliers dans les états membres de l’UE, en Suisse, au Liechtenstein
et en Norvège peuvent déposer gratuitement leurs produits électroniques auprès d’un site
de collecte dédié ou d’un revendeur (en cas d’achat d’un produit neuf semblable). Si vous
n’habitez pas dans l’un des pays mentionnés ci-dessus, veuillez contacter les autorités locales
pour connaître la méthode de mise au rebut correcte. En suivant cette procédure, vous vous
assurerez que votre produit mis au rebut sera correctement traité, récupéré et recyclé, ce qui
évitera d’éventuels effets négatifs sur l’environnement et la santé.
30
10.0 CARACTÉRISTIQUES TECHNIQUES
Le Tableau 2 présente les caractéristiques essentielles de vos enceintes. Veuillez garder à
l’esprit qu’il existe d’innombrables façons de mesurer les performances d’enceintes ; toutefois,
aucune ne vous permettra d’en évaluer réellement la sonorité. Seules vos oreilles peuvent
décider quelle enceinte est meilleure que les autres. Comme tous nos modèles, la série DALI
CALLISTO C est conçue pour restituer la musique de manière aussi fidèle que possible.
Nous espérons que vos nouvelles enceintes DALI CALLISTO C vous procureront beaucoup de
plaisir.
Page 31

小心触电,请勿擅自开启
为减少触电风险,请勿移去背板。
包装内不含用户可维修零件。
请让资深技术人员维修。
器具耦合器作为断开装置,
该断开装置应能保持方便的操作。
UK DE DK FR CN
三角形带闪电的标志警示用户:本电器箱体内
部的非绝缘体存在“危险电压”,也许会造成
触电事故。
三角形带惊叹号的标志提醒用户:本电器所附
的说明书中,写有重要的操作和维修(服务)
指南。
1 阅读用法说明 - 在打开本电器之前,请仔细阅
读安全和操作说明。
2 说明书保管 - 请妥善保管说明书,以便将来参
考。
3 留意警告-请遵守本电器上和操作说明中的所
有警告。
4 遵守说明-请遵守所有的操作和使用说明。
5 防水防潮-请勿在近水处-例如浴缸、洗脸池、
厨房水槽、洗衣池、游泳池或潮湿的地下室等
处使用本电器。
6 载物台或置物台 – 如果制造商建议仅能在推
车或置物台上使用本电器,则用户应当遵守。
7 墙壁或天花板固定-请遵从制造商的推荐方法
将本电器固定到墙壁或天花板上。
8 通风-请把本电器安置在合适的位置以保证通
风,例如本电器不能放在床、沙发、地毯等堵塞
设备通风口的表面上,也不能放置在嵌入式结
构上,如书架或壁橱,防止阻碍设备通风口处
的空气流通。
9 热源 - 请保持设备远离热源如暖气片、散
热格栅、火炉或其它产生热量的本电器。
10电源-仅允许使用操作说明指定的或本电器上
标注规格的电源。
11电源线保护 - 请把电源线缠绕起来,以防被踩
踏或被放在上面的物品夹住,尤其要当心插
头、插座或连接本电器的电源线。电器耦合器
可用作断电装置。
12清理 - 请勿使用液体清洁剂,应使用干布擦拭
灰尘或油污。
插座中拔出。
14防止固体或液体物进入 - 防止固体物或液体
从箱体缝隙进入设备。
15需要维修的情况-当本电器受到以下损坏,应
让专业维修人员进行维修:
a) 电源线或插头损坏;
b) 异物或液体进入本电器;
c) 本电器被暴露在雨中;
d) 本电器异常运行或性能有明显下降;
e) 本电器跌落或箱体损坏。
16服务 - 用户不能在操作说明规定的服务范围
之外取得电器维修服务。其它任何维修服务
请向专业维修人员咨询。
17不要将电池或者电池组暴露在高温环境下,
例如阳光直射的地方或者火焰旁等。
18如果更换了不匹配的电池,那么可能引发爆
炸。请根据要求,更换成相同或者同样类型的
电池。
19请将新的和旧的电池远离儿童。如果电池盒
没有安全地关闭,请停止使用产品,并将之远
离儿童。
20该设备是二级或者双重绝缘电子产品,所以
不需要安全地接。
21电源线作为断电设备,应该在使用过程中保
持操作的便捷性。为了能把电子设备彻底断
电,电源线必须从插座中完全拔离。
13搁置期 - 若长期不使用本电器,请将电源线从
31
Page 32

目录
1.0简介 33
2.0拆包 33
3.0放置 33
4.0连接 34
5.0用法 34
6.0收听房间 35
7.0磨合 35
8.0清洁和维护 35
9.0丢弃 35
32
10.0技术规格 35
Page 33

UK DE DK FR CN
1.0简介
恭喜您购买了新的 DALI CALLISTO C 音箱。以最佳方式安装和连接您的新 DALI
CALLISTOC 音箱对我们很重要。因此,我们建议您阅读本手册并按照建议进行操
作。本手册包含安装和连接说明,以及有关充分利用新音箱的窍门和建议。
DALI 因依据严格的设计和性能标准生产独一无二的音箱而享誉全球。每台 DALI
音箱的目标始终是我们的首要承诺:在家中营造一种让您忘记时间和地点的听觉
体验。
请记得在www.dali-speakers.com注册以获取DALI新闻简报。
尽情享受吧!
2.0拆包
拆开零部件包装时,请小心操作,以免造成损坏。根据您购买的 DALI CALLISTOC
型号,音箱会随附不同的配件。请检查硬纸箱中是否包含所有零部件(见表 1)。请
保留包装材料,以便在需要迁移或维修音箱时使用。
3.0放置
为实现最佳效果,应围绕您最喜欢的收听位置对称安装音箱(见图1)。我们建议您
试着调整音箱的位置-音质会因音箱位置而异。
对于DALICALLISTO2C,应将音箱放置在理想位置,以便当您坐在最喜欢的收听
位置时,高频扬声器大约处于耳朵的高度。DALI CALLISTO 2 C 应距离后墙至少
20厘米(8英寸)。
DALICALLISTO6C是一款落地式音箱。它应距离后墙至少20厘米(8英寸)
放置在音箱和收听位置之间的物体可能会对音质造成负面影响。所有 DALI 音箱
的设计均符合我们的宽分散原则,因此,不应将其与收听位置成角度放置,而应与
后墙平行放置(见图2)平行放置可以降低主收听区域的失真,同时改善房间集成。
宽分散原则还可确保声音在收听房间里的大面积区域内均匀传播
3.1DALICALLISTO6C
音箱为落地式,底部采用脚钉或橡胶缓冲块(见图3A)。脚钉或橡胶缓冲块可以改
善音质。您可以试用两者,听听哪种方案在您的设置中提供最佳音质。
应将脚钉(随附)松散地固定在四个铝制脚架上,只略微拧紧脚钉的反螺母。
使用螺钉将脚架安装在音箱底部的螺纹孔中。拧紧螺钉之前,让脚架抵住箱体。将
装好脚钉的音箱直立放在地板上,使其稳稳站立而不摇晃。拧紧螺母,将四个脚钉
固定到铝制脚架中。请小心操作,避免过度拧紧反螺母。
注意:请注意,如果没有适当保护,脚钉可能会损坏地板。
注意:在某些地板表面上和某些房间中,使用脚钉对获得最佳效果至关重要。
3.2DALICALLISTO2C
DALICALLISTO2C不仅针对支架安装进行了优化,而且也适合在架子
上使用。如果放置在支架或架子上,可将随附的缓冲块放在音箱下面,确
保音箱稳定无振动(见图3B)。
33
Page 34

4.0连接
主连接位于CALLISTOC音箱背面(见图5)
1)电源接口
2)电源开关
3)保险丝舱
4)ADCIN
5)USB服务端口
6)LINKCONNECT按钮
5.0用法
将提供的电源线连接到电源接口和电源插座。使用电源开关打开 CALLISTO C 音
箱 。
注意:如果在已接通电源并将电源开关调到ON时CALLISTOC无法通电,则保险
丝可能已烧断或出现故障。更换与原装保险丝相同类型的保险丝 - 请在功放背面
查看保险丝类型。如果保险丝反复烧断,请联系您的授权经销商,将 CALLISTO C
音箱送到经授权的服务中心进行检修
5.1连接音箱
DALI SOUND HUB。如果您在购买 CALLISTO C 音箱时也购买了 DALI SOUND
HUB,请按《SOUNDHUB快速入门指南》中的指引来连接CALLISTOC音箱。
ADCIN电缆连接。在此情况下,音箱将采用固定增益。DALI建议使用优质电缆,
长度最好不超过3米。
5.2音量控制
连接到DALISOUNDHUB时,您可以在每个音箱的正面顶部控制系统音量(见图
4)。如果使用ADCIN连接,则只能在播放设备上控制音量。
34
5.3正面LED
无论何时改变音量,音箱正面的 LED 面板都会亮起并指示音量。将音箱静音
时,LED面板两端最外侧的LED将闪烁以指示此状态。
正面LED将在一小段时间后熄灭,只剩下一个LED亮起,指示当前音量。
5.4自动关闭
如果在一段时间内检测不到任何信号,CALLISTOC 将自动关闭。检测到音频信号
时,CALLISTOC将自动再次打开。
5.5固件更新
如果CALLISTOC 音箱的新固件已发布,请使用 USB 服务端口更新音箱。请按照
固件下载文件中的说明进行操作。
请在www.dali-speakers.com上查找最新固件。
5.6恢复出厂设置
如有必要对CALLISTOC音箱恢复出厂设置,可以按照以下步骤进行:
1)关闭CALLISTOC音箱,等待大约15秒
Page 35

UK DE DK FR CN
2)按住LINKCONNECT按钮
3)按住LINKCONNECT按钮的同时打开CALLISTOC音箱
4)按住LINKCONNECT按钮,直到位置显示屏开始闪烁
5)CALLISTOC音箱现已恢复出厂默认设置
6.0收听房间
每个房间都有独特的音响效果,这会影响我们体验音箱声音的方式。您听到的声
音包括直接从音箱发出的声音以及从地板、天花板和墙壁反射的声音。后者将影
响您的听觉体验。
作为基本原则,请尽量避免音箱周围存在大型坚硬反射表面,因为这样通常会造
成强烈的反射,从而可能影响声音再现的精度和空间效应。通过在音箱和反射表
面之间放置盆栽等物体,可以抑制反射。如果声音太嘹亮,地毯、窗帘等软物体可
能会有帮助。重低音的数量和质量取决于房间的大小和形状以及音箱的位置。将
音箱放置在侧墙或后墙附近会加强重低音。角落位置不仅会进一步强化重低音,
也会增加反射
7.0磨合
和任何机械系统一样,音箱也需要一个“磨合”期才能达到最佳性能。在第一个使
用阶段,您将体验到音质逐渐提升。磨合期因使用方法和播放音量而异。您应播放
长达 100 小时才能达到最佳性能。与其他机械系统不同,可以通过定期正常播放
音乐来延长音箱的使用寿命
8.0清洁和维护
用柔软的干布清洁箱体。如果箱体变脏,请将一块软布浸泡在通用清洁剂中,然后
拧干,擦拭箱体。擦拭音箱纸盆时请务必小心,因为它们非常脆弱。正面格栅可以
用衣物刷清洁,然后用中性通用清洁剂浸泡后拧干的无绒布擦拭。
8.1避免阳光直射
长期接受阳光直射,音箱表面可能会褪色或变色。因此,请避免将音箱放在阳光直
射的位置。
9.0丢弃
如果您想丢弃此产品,请不要将其与普通生活垃圾混在一起。依据要求适当处理、
回收和再利用的法律,设有专门的废旧电子产品收集系统。在欧盟成员国、瑞士、
列支敦斯登和挪威,私人家庭可以将其废旧电子产品免费运回指定的收集设施或
零售商(如果您购买了类似的新产品)。如果您不居住在上述国家,请联系当地相
关部门,了解正确的处置方法。按照此流程,您可以确保您丢弃的产品接受必要的
处理、回收和再利用,防止对环境和人类健康造成负面影响。
10.0技术规格
在表 2 中,您可以找到最常见的音箱规格。请记住,测量音箱的方法不计其数。然
而,没有哪种方法可以告诉您关于音箱真正效果的任何有用信息。您只能通过耳
朵判断一个音箱是否好于另一个音箱。和我们的所有音箱一样,DALICALLISTOC
系列将尽可能真实地重现音乐。
尽情享用您的新DALICALLISTOC吧!
35
Page 36

UK DE DK5FR CN
TABLE 2 - TECHNICAL SPECIFICATIONS
CALLISTO 2 C CALLISTO 6 C
Frequency Range (+/-3 dB) [Hz] 47 - 30,000 37 - 30,000
Maximum SPL [dB] 108 110
Crossover Frequency [Hz] 2,700 2,600
Crossover Principle Hybrid Full Active
24 bit DSP and
Passive all analouge
High Frequency Driver 1 x 29 mm soft dome
1 x 17 x 45 mm ribbon
Low Frequency / mid-range Driver(s) 1 x 6½” 2 x 6½”
Enclosure Type Bass Reflex Bass Reflex
Bass Reflex Tuning Frequency [Hz] 46 40
Amplifier Output [watt] 250 250
Connection input ADC-In (RCA) ADC-In (RCA)
Input Impedance [Ω] 5K 5K
Input Sensitivity [mV] 1,700 1,850
Wireless input Full 24 Bit / 96 kHz
(No bit-loss attenuated)
Amplifier Type Discrete Class D (Closed
Loop, Self Oscillating)
Onboard DAC Burr Brown PCM1796
(Balanced output)
Maximum digital resolution [bits/KHz] 24 / 96 24 / 96
Recommended Placement Stand / Shelf Floor
Recommended Distance from Wall [cm] 10 - 80 25 - 100
Input mains Universal mains
100 - 240V
Maximum Power Consumption [W] 325 325
Standby Power Consumption [W] 1.2 1.2
Dimensions (HxWxD) [mm] 393 x 200 x 321 1,004 x 200 x 346
Weight [kg/lb] 10.1 / 22.3 22.6 / 49.8
Accessories Included Manual, Rubber Feet,
Front Grille
All technical specifications are subject to change without notice.
Hybrid Full Active
24 bit DSP and
Passive all analouge
1 x 29 mm soft dome
1 x 17 x 45 mm ribbon
Full 24 Bit / 96 kHz
(No bit-loss attenuated)
Discrete Class D (Closed
Loop, Self Oscillating)
Burr Brown PCM1796
(Balanced output)
Universal mains
100 - 240V
Manual, Rubber Feet,
Front Grille
Page 37

Item No. 951072-0-0 Rev. D
DALI Denmark +45 9672 1155
www.dali-speakers.com
 Loading...