


myhomefone.com.au
Quickstart guide
Everything you need to get set up and start calling.

2
Contents
What’s included .........................................
myhomefone™ handset ........................
Getting started ..........................................
Activate your pre-installed
SIM card and transfer landline ...........
Using your phone ......................................
Using the menu ...........................................
Adding and editing numbers
in the phone book ......................................
SOS calls ........................................................
Making SOS calls .......................................
Setting up SOS numbers .......................
Important safety instructions .......
Warrranty information ..........................
Welcome to your new
myhomefone
™
myhomefone™ is the alternative to nbn™ based phones.
This is the phone for people who don’t want nbn™ at
home or need a back-up phone that works regardless
of the availability of nbn™. myhomefone™ runs on the
3G network and comes with a pre-installed SIM card;
no landline is needed.
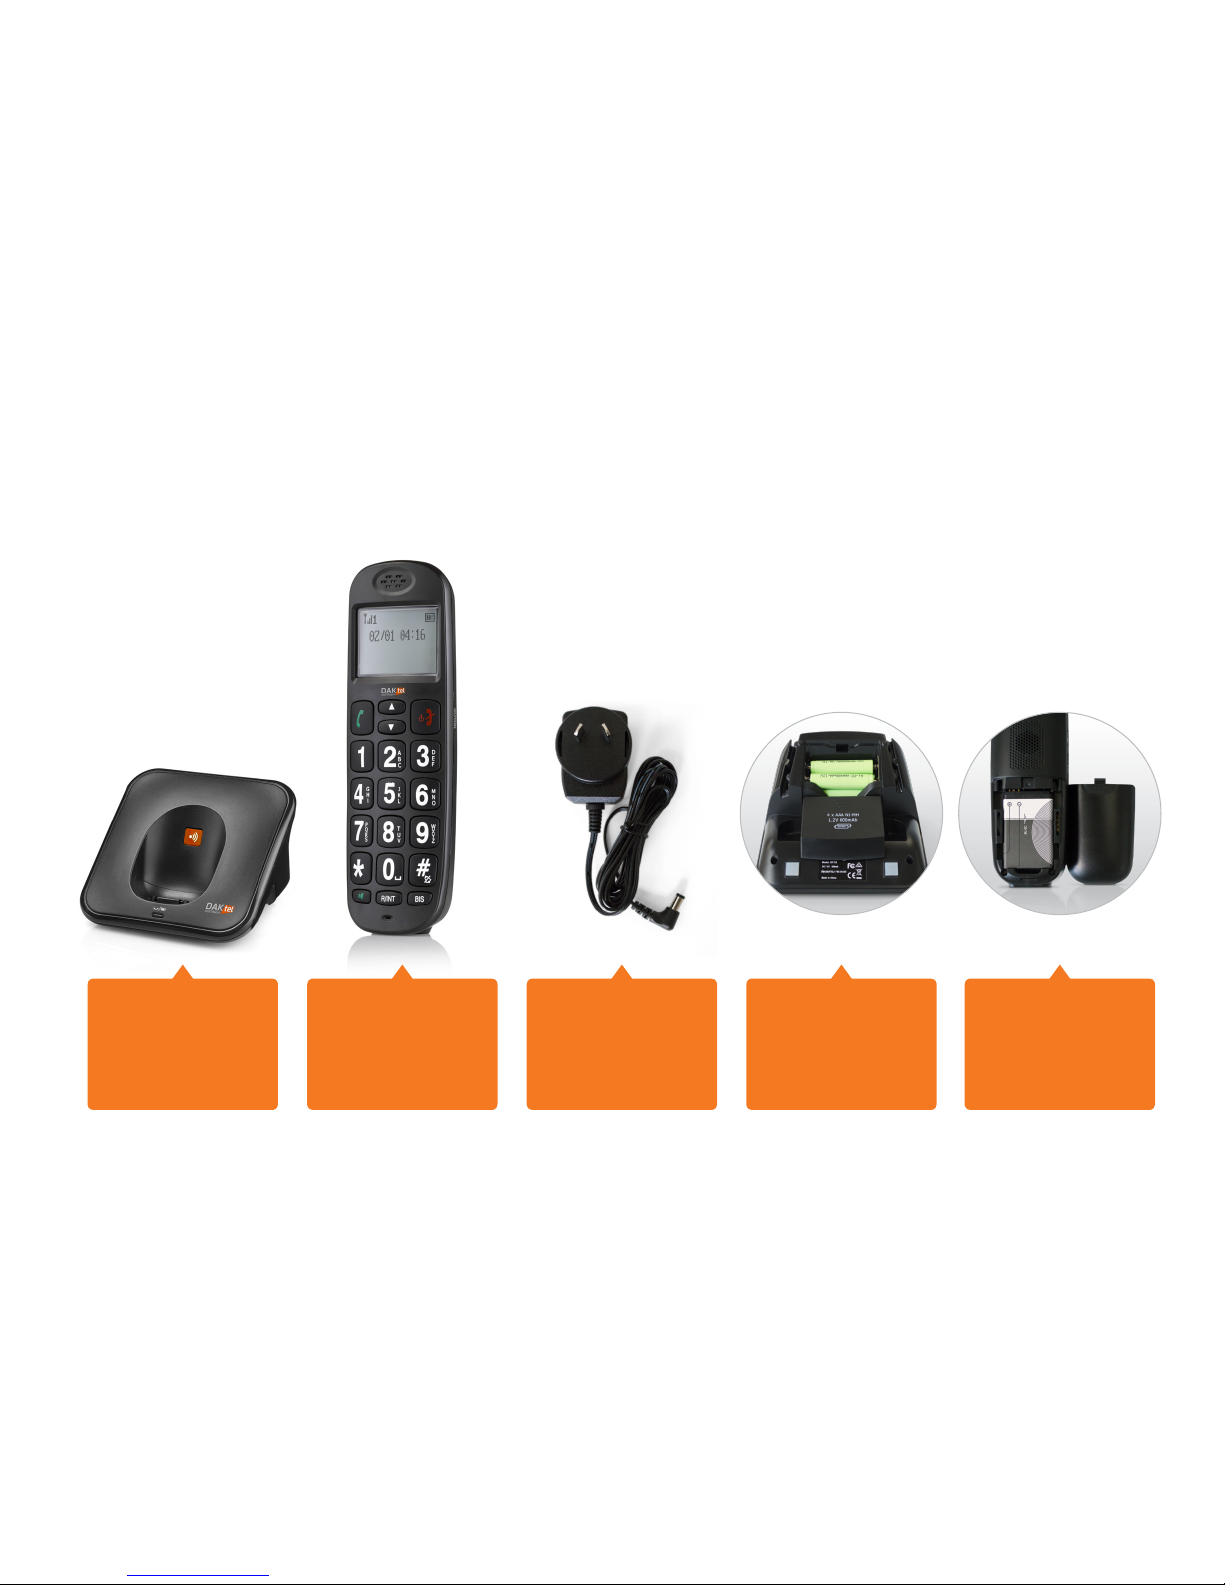
What’s included
Base station
myhomefone™
handset
Base charging
cable & charging
power adapter
4x Li-ion baeries
(installed in base)
1x Li-ion baery
(installed in handset)

Speaker
Volume + / -
Battery Cover
Redial
Delete/Intercom
Handsfree
Loudspeaker
12-Key Dial Pad
Up/Down Menu
Answer Call
Start Outgoing Call
LCD Screen
End Call
Power On/Off
SOS Emergency
Button
Handset Amplifer
Speaker
Microphone
Charging Contacts
MENU/OK
myhomefone™ handset

2. Connect the charging
cable into the base station,
plug it into the wall socket
and place the handset on
the base station.
3. Remove the plastic
battery tab from the
base station.
Getting started
1. Remove all plastic
packaging and make
sure everything is
accounted for.
1. Have your welcome
letter handy, you will
need the SIM number
at the top left of the
letter when you call our
service centre.
2. Call our service centre
on 1300 031 107 and
tell them that you wish
to activate your new
pre-installed SIM card.
They will connect you
while on the phone,
and you should see
the network appear on
the handset within 10
minutes (may take up to an hour).
3. Tell the operator that you wish to transfer your old
landline number across to your new phone.
Provide the landline number that you wish to transfer
and they will arrange this. Note: transferring your
old home phone number to myhomefone™ will
take up to days.
You’re now ready to use your
new myhomefoneTM.
4. The phone will be
ready to use, however
it will need to remain on
the base station until
fully charged.
This may take
several hours.
How to activate your pre-installed SIM card and transfer landline

Using the handset
Making your first call is easy, just dial then press the green phone
button, when you’re done press the red phone button to finish the call.
Up/Down arrows
While on standby use
these to scroll through the
contact list.
While in menu use to scroll
up and down options.
Answer call buon
Answer incoming calls.
Start outgoing calls.
Call end buon
Hang up current call.
Hold down for power on/off.
While in menu: return/back.
Menu/Ok buon
On standby: access menu
While in menu: select option
MENU/OK

Adding and editing numbers in the phone book
Press the button on the right side of the handset
Scroll down using the arrow keys to Phone Book
and press
Scroll to New Entry and press
Enter the contact’s name using the dial pad and press
to confirm
Enter the phone number using the dial pad and press
to confirm. The phone will automatically start ringing and give
you the option to choose a Ring Tone.
Choose the Ring Tone using the arrows and press
to confirm.
Using the menu
Press the button on the right side
of the handset
Scroll up/down on the screen using the arrow keys
To select an option, press the button
To return or cancel, press the ‘End Call’ button
MENU/OK MENU/OK
MENU/OK
MENU/OK
MENU/OK
MENU/OK
MENU/OK
MENU/OK

Making SOS Calls
Press the red button at the back of the handset
Your phone will immediately start calling to up to nominated contacts
Your phone begins with your first contact, calling times until the call
is answered
If after calls there is no answer, a text message will be sent to the
contact (only to mobiles) to prompt action. Your phone will then start
calling the next contact, repeating this process for up to 6 contacts.
The SOS setting can also be used with professional monitoring,
offering a hour service to those that need help around the clock.
For more information, please contact us on 1300 031 107
SOS calls
Set up to contacts for your phone to
automatically call in case of an emergency.
SOS
Text
message
Contact 1 Contact Contact Contact Contact Contact

Seing up SOS Numbers
Adding SOS contacts
Press the butt on
Scroll down using the arrow keys to SOS Setting
and press
You will be asked for a PIN Code, enter 0000 using the
dial pad (this is the default PIN) and press
Press to select SOS Number
The words ‘Number 1 Empty’ will be displayed, press
enter the phone number using the dial pad, press
to confirm
Scroll down using the arrow keys for the next contact entry,
press enter the phone number using the dial pad,
press to confirm
Repeat this process for up to 6 contacts
Editing SOS contacts
Press the butt on
Scroll down using the arrow keys to SOS Setting
and press
You will be asked for a PIN Code, enter 0000 using the dial
pad (this is the default PIN) and press
Press to select SOS Number
Scroll to the contact you want to edit using the arrow keys
pre ss
Press the butt on (below ‘O’ dial bu tton) to
delete numbers
Enter the new phone number using the dial pad and
press to confirm
MENU/OK MENU/OK
MENU/OK MENU/OK
MENU/OK
MENU/OK
R/INT
MENU/OK
MENU/OK
MENU/OK
MENU/OK
MENU/OK MENU/OK
MENU/OK MENU/OK

Important Safety Instructions
Basic Safety Precautions
When using your telephone equipment, basic safety precautions should always be followed to
reduce the risk of fire, electric shock and injury to persons, including the following:
>
This unit is NOT waterproof. DO NOT expose this unit to moisture
>
DO NOT expose this unit to rain
>
Do not use this product near water, for example, near a bath tub, wash bowl, kitchen sink
or laundry tub, in a wet basement or near a swimming pool
>
Do not use the telephone to report a gas leak in the vicinity of the leak
>
Keep the unit away from any flammable sources, and do not expose the Li-ion batteries
to open flame
>
Do not place the unit in direct sunlight or subject it to high temperatures
This device operates on the G cellular network, using a supplied G SIM card. DAKtel Australia
makes no guarantees of network coverage in your area, it is your responsibility to ensure that
there is sufficient G reception in the intended area of use.
The base unit communicates with the handset over DECT connection. This has an operating
range of up to m, in an open environment. Building structures can greatly impact the working
range, and DAKtel makes no guarantee that the handset will maintain connection when the handset
is more than m from the base unit.

One-Year Limited Warranty
Satisfactory evidence of the original purchase is required for warranty service.
Please refer to the DAKtel website for the terms and conditions.
Warrantor: The warrantor for this warranty is DAKtel Australia Pty Ltd
ABN
Warranty Terms: DAKtel Australia warrants to the original retail purchaser only
that the myhomefone™ (“the product”), will be free from defects in materials and
craftsmanship for the duration of the warranty period, subject to the limitations
and exclusions set out below.
Warranty Period: This warranty to the original retail purchaser is only valid
in the country of purchase for a Product first purchased either in Australia or
New Zealand and will expire exactly one year from the date of original retail sale.
If a warranty claim is made, this warranty will not apply if the Product is found
by DAKtel to be:
>
Damaged or not maintained in a reasonable manner or as recommended
in the relevant DAKtel Owner’s Manual
>
Modified, altered or used as part of any conversion kits, subassemblies
or any configurations not sold by DAKtel Australia
>
Improperly installed contrary to instructions contained in the relevant
Owner’s Manual
>
Repaired by someone other than an authorised DAKtel Australia agent
in relation to a defect or malfunction covered by this warranty
>
Used in conjunction with any other equipment, parts or a system not
manufactured by DAKtel.
Parts Covered: This warranty covers the Product and included accessories.
User-Generated Data: This warranty does not cover any claimed loss of or
damage to user-generated data (including but not without limitation phone
numbers, addresses and images) that may be stored on your Product.
Statement of Remedy: If the Product is found not to conform to this warranty
as stated above, the Warrantor, at its discretion, will either repair the defect
or replace the Product without any charge for parts or service. This warranty
does not include any reimbursement or payment of any consequential damages
claimed to arise from a Product’s failure to comply with the warranty.
Our goods come with guarantees that cannot be excluded under the Australian
Consumer Law. You are entitled to a replacement of refund for a major failure
and for compensation for any other reasonably foreseeable loss or damage.
You are also entitled to have the goods repaired or replaced if the goods fail
to be of acceptable quality and the failure does not amount to a major failure.
This warranty is in addition to and sits alongside your rights under either the
COMPETITION AND CONSUMER ACT (Australia) or the CONSUMER
GUARANTEES ACT (New Zealand) as the case may be, none of which can
be excluded.
Procedure for obtaining Warranty Service: Depending on the country in which the
Product was first purchased, if you believe that your Product does not conform
with this warranty, you should deliver the Product, together with satisfactory
evidence of your original purchase (such as a legible copy of the sales docket), to
DAKtel. Please refer to the DAKtel website for address details. You should contact
DAKtel regarding any compensation that may be payable for your expenses
incurred in making a warranty claim. Prior to delivery, we recommend that you
make a backup copy of any phone numbers, names or other data stored
on your Product, in case it is lost or damaged during warranty service.
Daktel Australia Pty Ltd

For more information
Call: 1300 031 107
or go to our website: myhomefone.com.au
Level , Alfred Street, North Sydney, NSW , Aus tralia
 Loading...