

Dakota Alert UT-4000-ANZ User Manual

Magnetic
cover
2. Use your fingernail or a flathead screwdriver to pry open the magnetic contact’s cover.
3. Mount the magnetic contact with a drill and two screws (included), then snap the cover back on.
4. Mount the transmitter bracket with a drill and two screws (included). Make sure that the arrow on the bracket is
facing up.
5. If you’re mounting your transmitter outdoors, push the silicone plugs into the push button’s screw holes to
waterproof the casing.
6. Slide the transmitter down onto the bracket.
Transmitter
Bracket
SPECIFICATIONS
• Power source: CR2 battery • Transmitter range: up to 1.6 km*
• Frequency: 433 MHz • Dimensions: (W × H × D) 50 × 95 × 22mm)
*Actual range will vary depending on local terrain and obstructions.
TECHNICAL SUPPORT:
If you encounter any difficulty in the operation of this product after reading the manual, please contact us.
We will be happy to answer your questions and help you in any way we can.
WARRANTY:
Dakota Alert warrants this product to be free of defects in material and workmanship for a period of one year from
the date of purchase. This warranty does not cover damage resulting from accident, abuse, act of God or improper
operation. If this product does become defective, simply return it to Target Technology Ltd. Please include a note
describing the troubles along with your name and return address as well as the original sales receipt. If the product is
covered under warranty it will be repaired or replaced at no charge. If it is not covered by warranty, you will be notified
of any charges before work is done.
Universal
Transmitter
UT-4000-ANZ
USER GUIDE
Freephone New Zealand: 0508 242 333
Phone (64) 6 751 2969
Fax (64) 751 2717
PO Box 730, New Plymouth 4342
NEW ZEALAND
Freephone Australia: 1300 588 195
Fax (64) 751 2717
AUSTRALIA
This UT-4000 Dakota Alert Universal Transmitter sends a signal to your DCR-4000 receiver
when its button is pressed or it detects a door/window opening. Connect multiple Dakota Alert
transmitters to your receiver to create a complete security system.
NEW ZEALAND AUSTRALIA
www.bealert.co.nz www.bealert.com.au
CONTENTS
• Universal Transmitter • Screws (4)
• Transmitter bracket • CR2 battery
• Magnetic contact • User Guide
• Silicone plugs (4)
SETTING UP YOUR UNIVERSAL TRANSMITTER
1. To install the battery, see “Installing the battery.”
2. To select a tune and connect your transmitter to your receiver, see “Connecting to your receiver.”
3. To mount your transmitter, see “Mounting your universal transmitter.”
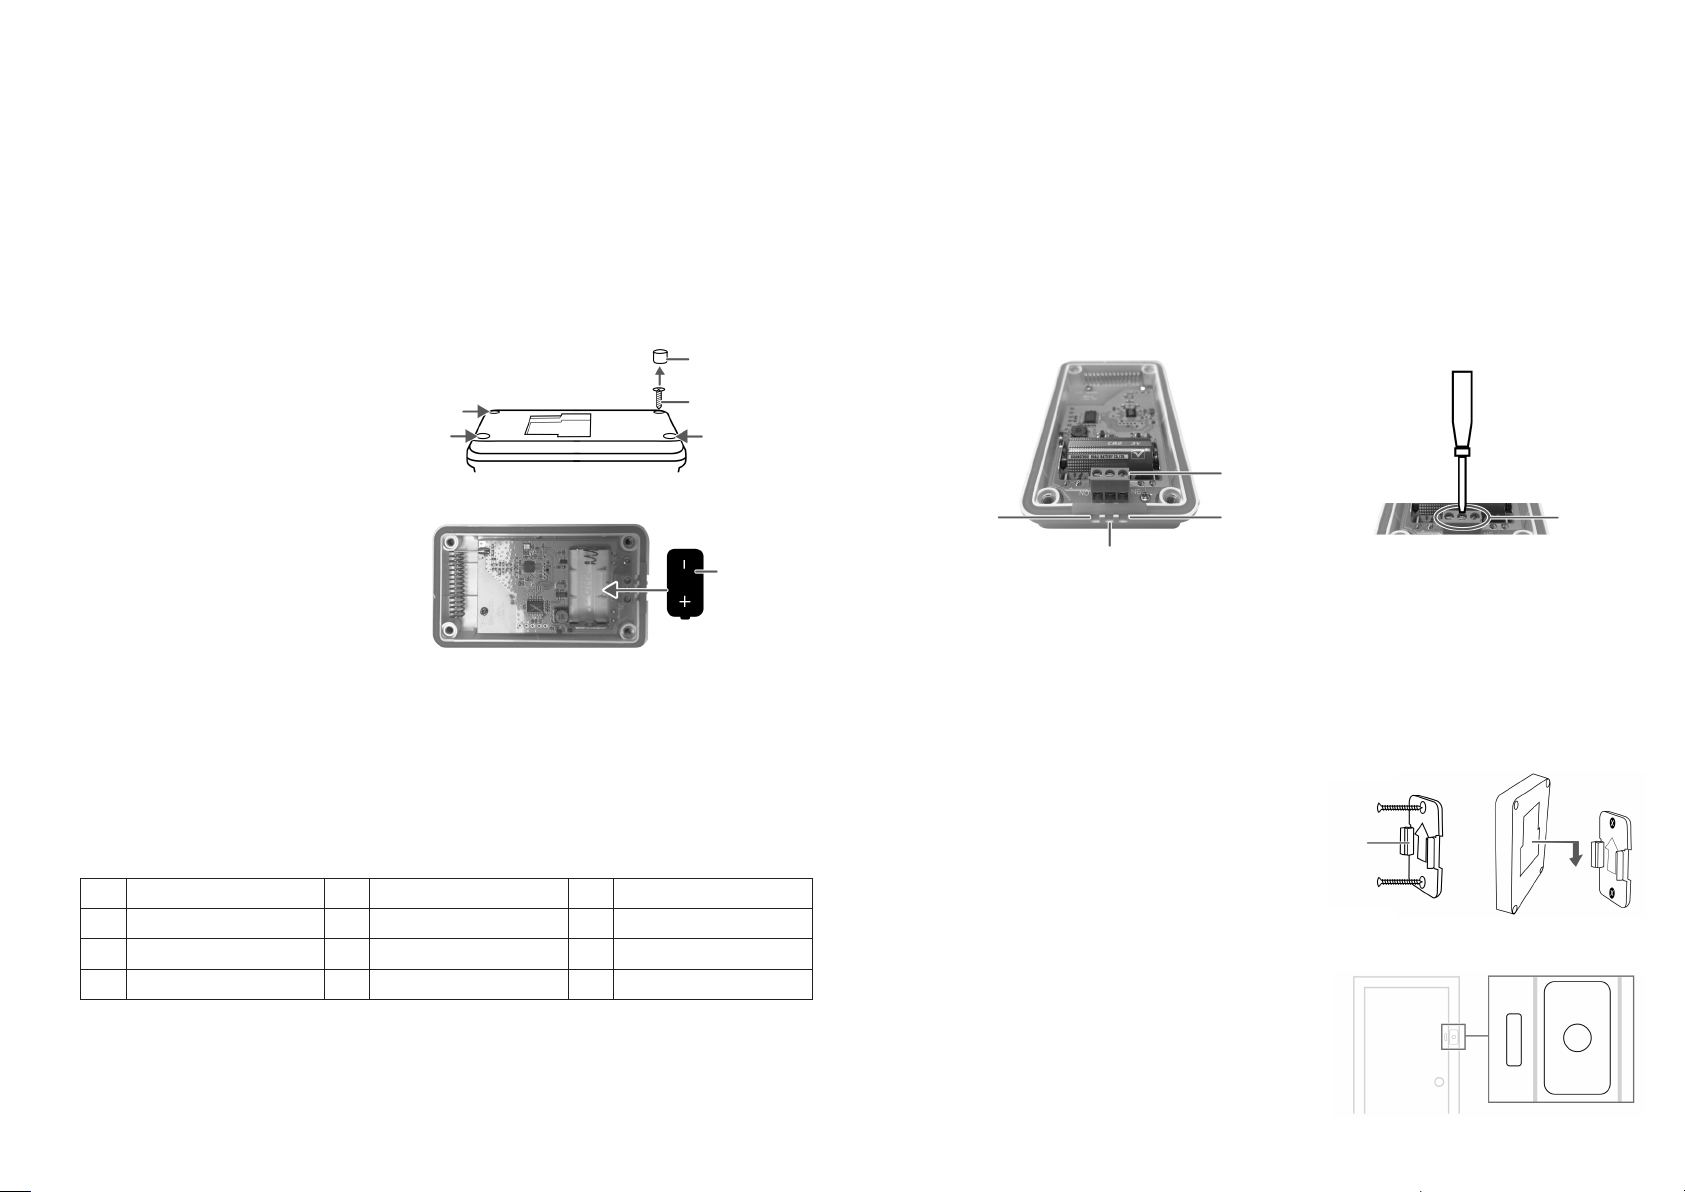
INSTALLING THE BATTERY
1. Remove the four silicone plugs (if inserted) and
screws on the back of the transmitter to take off
the cover.
2. Insert the CR2 battery in the transmitter. Make
sure that the + and – symbols on the battery
match the symbols in the compartment.
3. Replace the cover and secure it with the screws.
Note: If you are mounting your transmitter
outdoors, push the silicone plugs into the screw
holes to waterproof the casing.
Silicone plug
Screw
CR2 battery
CONNECTING TO YOUR RECEIVER
Note: You can connect up to 16 transmitters to your receiver.
1. Place your receiver and transmitter near each other.
Note: Be careful not to activate your transmitter until you find the tune you want. Keep the magnetic contact away
from the push button to avoid accidentally activating it.
2. Press and hold the
release the buttons.
1 Ding Dong (high) 5 Alarm/Siren 9 William Tell
2 Ding Dong (low) 6 Coo Coo Clock 10 Cannon in D
3 Westminster 7 Bird Chirping 11 Morning
4 Fur Elise 8 Twinkle Twinkle 12 Toreador March
3. Press
4. After you choose a tune, activate the transmitter (press its button or separate it from the magnetic door contact).
(volume) repeatedly until you find the tune you want.
The receiver beeps.
Note: If you accidentally activate the transmitter on a tune you don’t want, press the volume button on the receiver
to continue cycling through the tunes to select the tune you want, then reactivate the transmitter.
MODE and (volume) buttons on the receiver for three seconds. When all four lights flash,
5. If you are coding more than one transmitter, repeat steps 3 and 4.
6. After your transmitter(s) are coded, press and hold the
7. To test the tune, activate the transmitter. You’ll hear the selected tune through your receiver and the lights will flash.
MODE button until the LEDs stop flashing.
CONNECTING AN EXTERIOR DETECTOR (OPTIONAL)
Your universal transmitter can be activated by any type of detector that provides a normally open (N/O) or normally closed
(N/C) output. Both N/O and N/C contacts can be used simultaneously with the magnetic contact and push button.
1. Remove the four silicone plugs (if inserted) and screws on the back of the transmitter to take off the cover.
2. Insert wires through the silicone gaskets and into the terminals on the bottom of the transmitter:
• For a normally closed connection, insert the wires into the N/C and common terminals.
• For a normally open connection, insert the wires into the N/O and common terminals.
Terminals
Normally Open
(N/O)
Common
3. After inserting the wires, tighten the terminals with a small screwdriver.
Note: A 22 AWG solid wire can easily pierce the silicone gasket. If using a lighter gauge wire, you may need to
pierce the gasket with a paper clip or small needle.
4. Replace the cover and secure it with the screws.
Note: If mounting your transmitter outdoors, push the silicone plugs into the screw holes to waterproof the casing.
Normally Closed
(N/C)
Terminals
MOUNTING YOUR UNIVERSAL TRANSMITTER
You can use the transmitter as a doorbell that activates when
its button is pressed or as a warning that activates when the
magnetic contact is separated from the push button.
Doorbell
1. Use a drill and two screws (included) to mount the transmitter
bracket. Make sure that the arrow on the bracket is facing up.
2. If you’re mounting your transmitter outside, push the silicone
plugs into the screw holes to waterproof the casing.
3. Slide the transmitter down onto the bracket.
Door/Window mounting
1. Choose mounting locations where the magnetic contact can be
10mm or less from the push button.
Transmitter
Bracket
 Loading...