

Page 1
MAN#650207
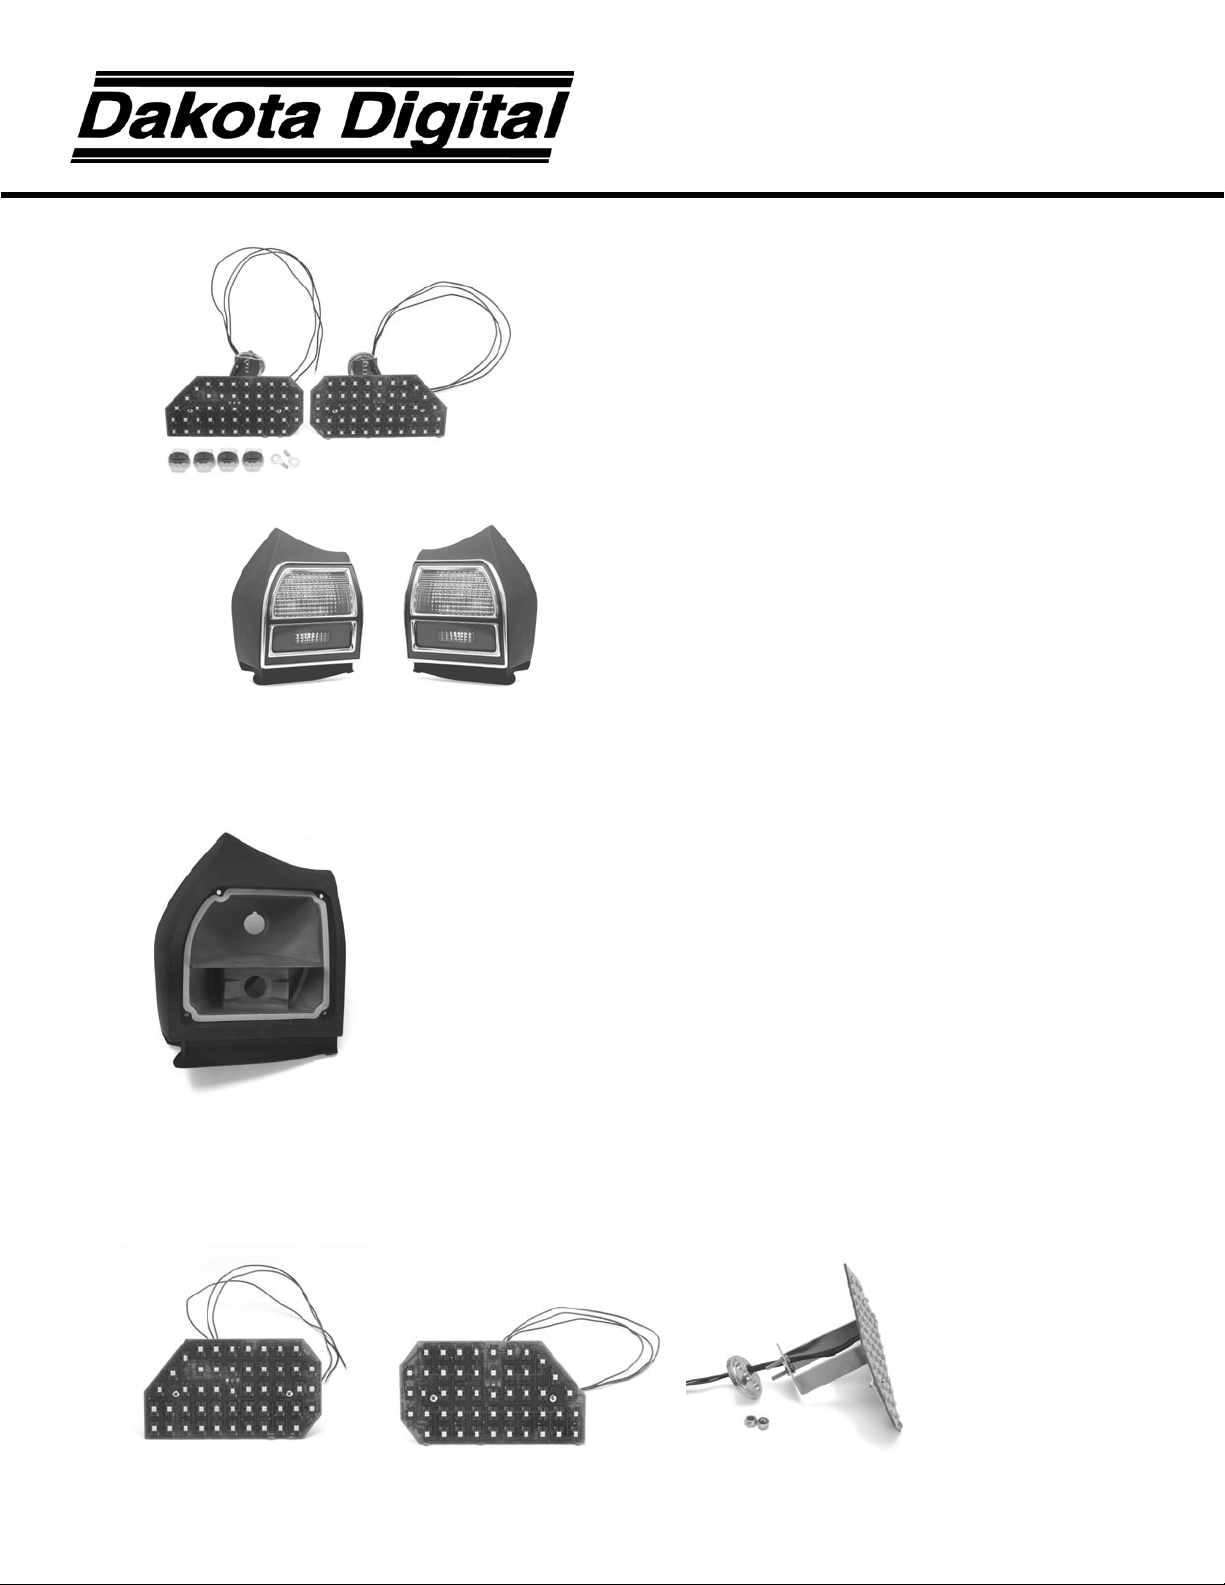
Left or driver’s
Right or passenger’s
Kit includes:
Installation:
INSTALLATION INSTRUCTIONS
LAT-NR310
LED Tail Lights for 1969 Chevelle
1. Remove the tail light housing from the vehicle.
2. Remove the bulb connector from the back of the housing.
3. Remove the 4 screws that hold the trim and lens. Remove the trim and tail light lens from the
tail light housing.
4. Now is a good time to clean or replace the lens and housing if necessary.
5. Note that there are two different LED assemblies. One for the driver side and one for the
passenger side. Select the correct assembly for the tail light housing. Remove the two locking
nuts and flat aluminum plate from the back of the new LED assembly.
side LED assembly.
side LED assembly.
Page 2
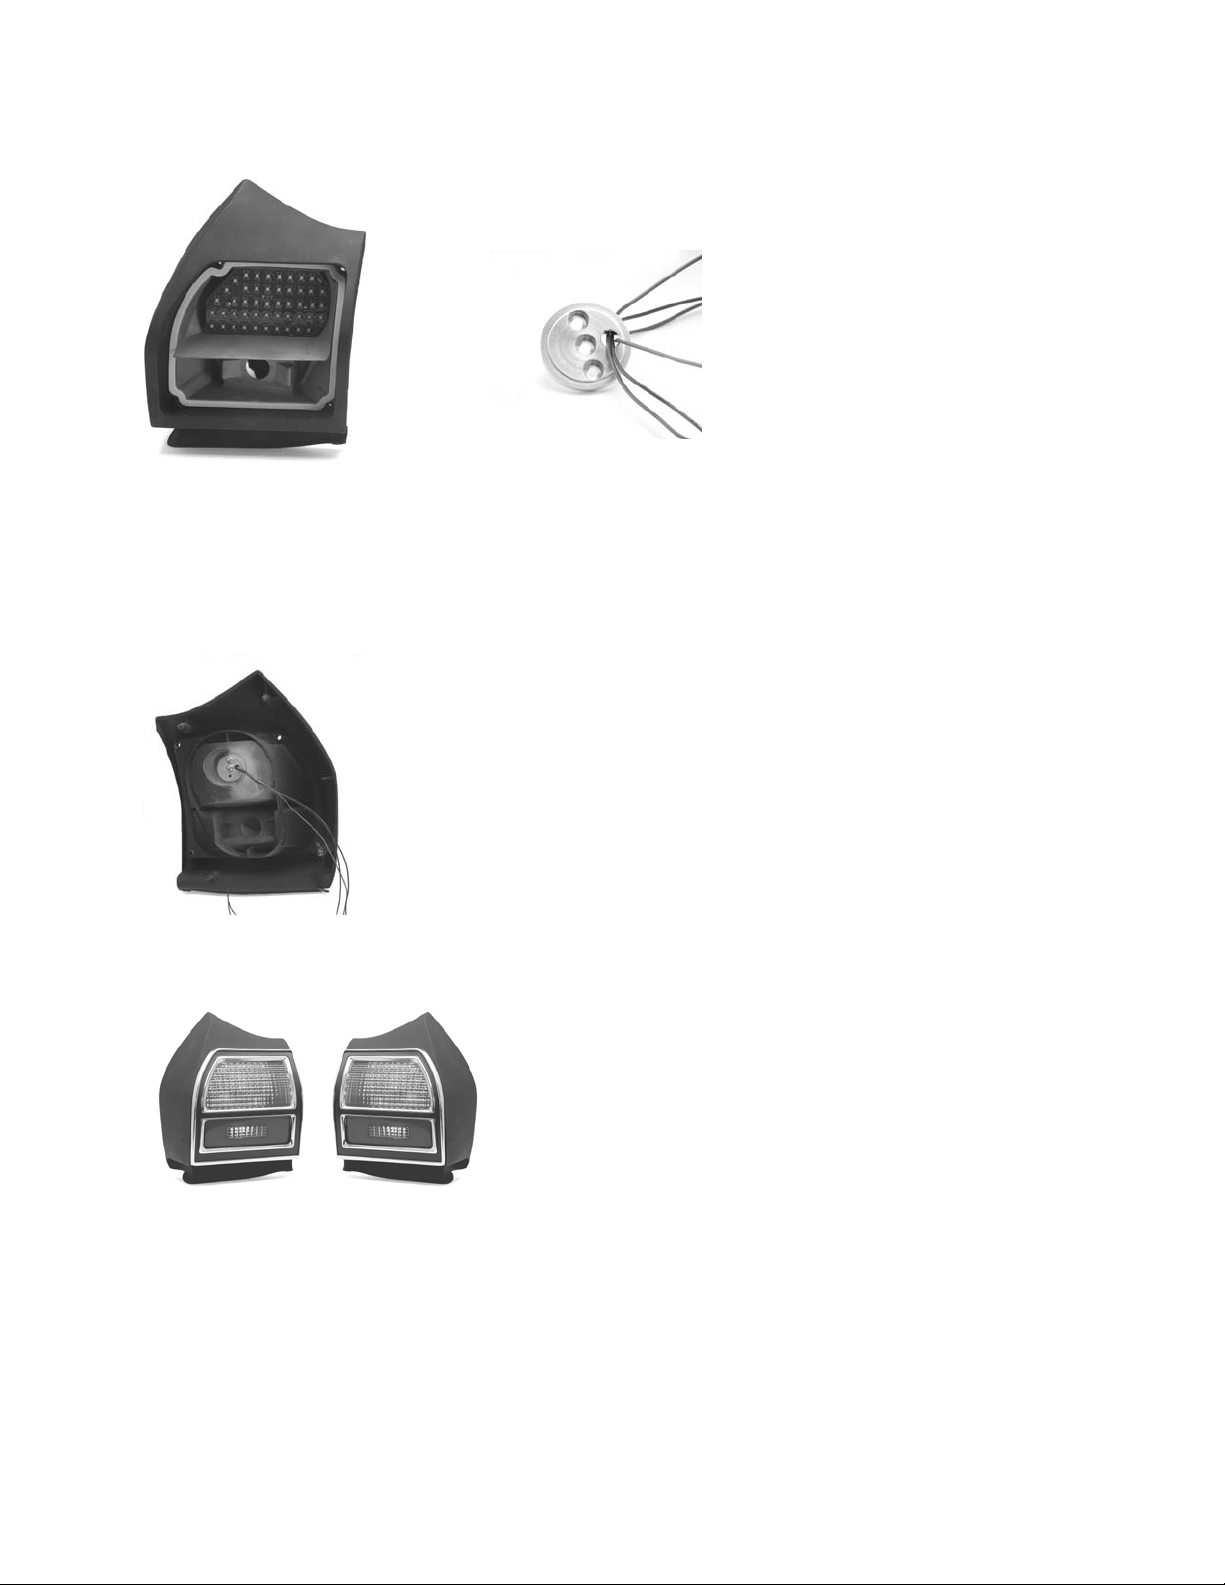
6. Insert each new LED assembly through the hole where the original bulb and connector were.
Use caution when feeding the wires through to avoid damaging the wire insulation.
7. Feed the wires through the large hole in the back plate and attach the back plate onto the back
side of the housing. The flat side of the mounting disk should be toward the outside and the
side with the slight raised center should go in toward the housing. This will index the mount in
the original housing.
8. Secure the LED assembly into the housing with the supplied plate and nuts.
9. Place the original lens gasket into place and replace the tail light lens.
10. Cut off the existing light socket as it will not be used. Trim the wires from LED assembly to
appropriate length, once mounted, making sure wires are routed cleanly and securely.
11. Use the supplied moisture resistant pigtail connectors*** to attach the wires from the new LED
assembly to the existing vehicle harness. Insert appropriate wire from vehicle harness and
mating LED assembly wire into a connector and crimp following instructions below.
***For the best connection, soldering is recommended. But to simplify installation the supplied connectors will
provide a fast weather resistant connection.
Page 3
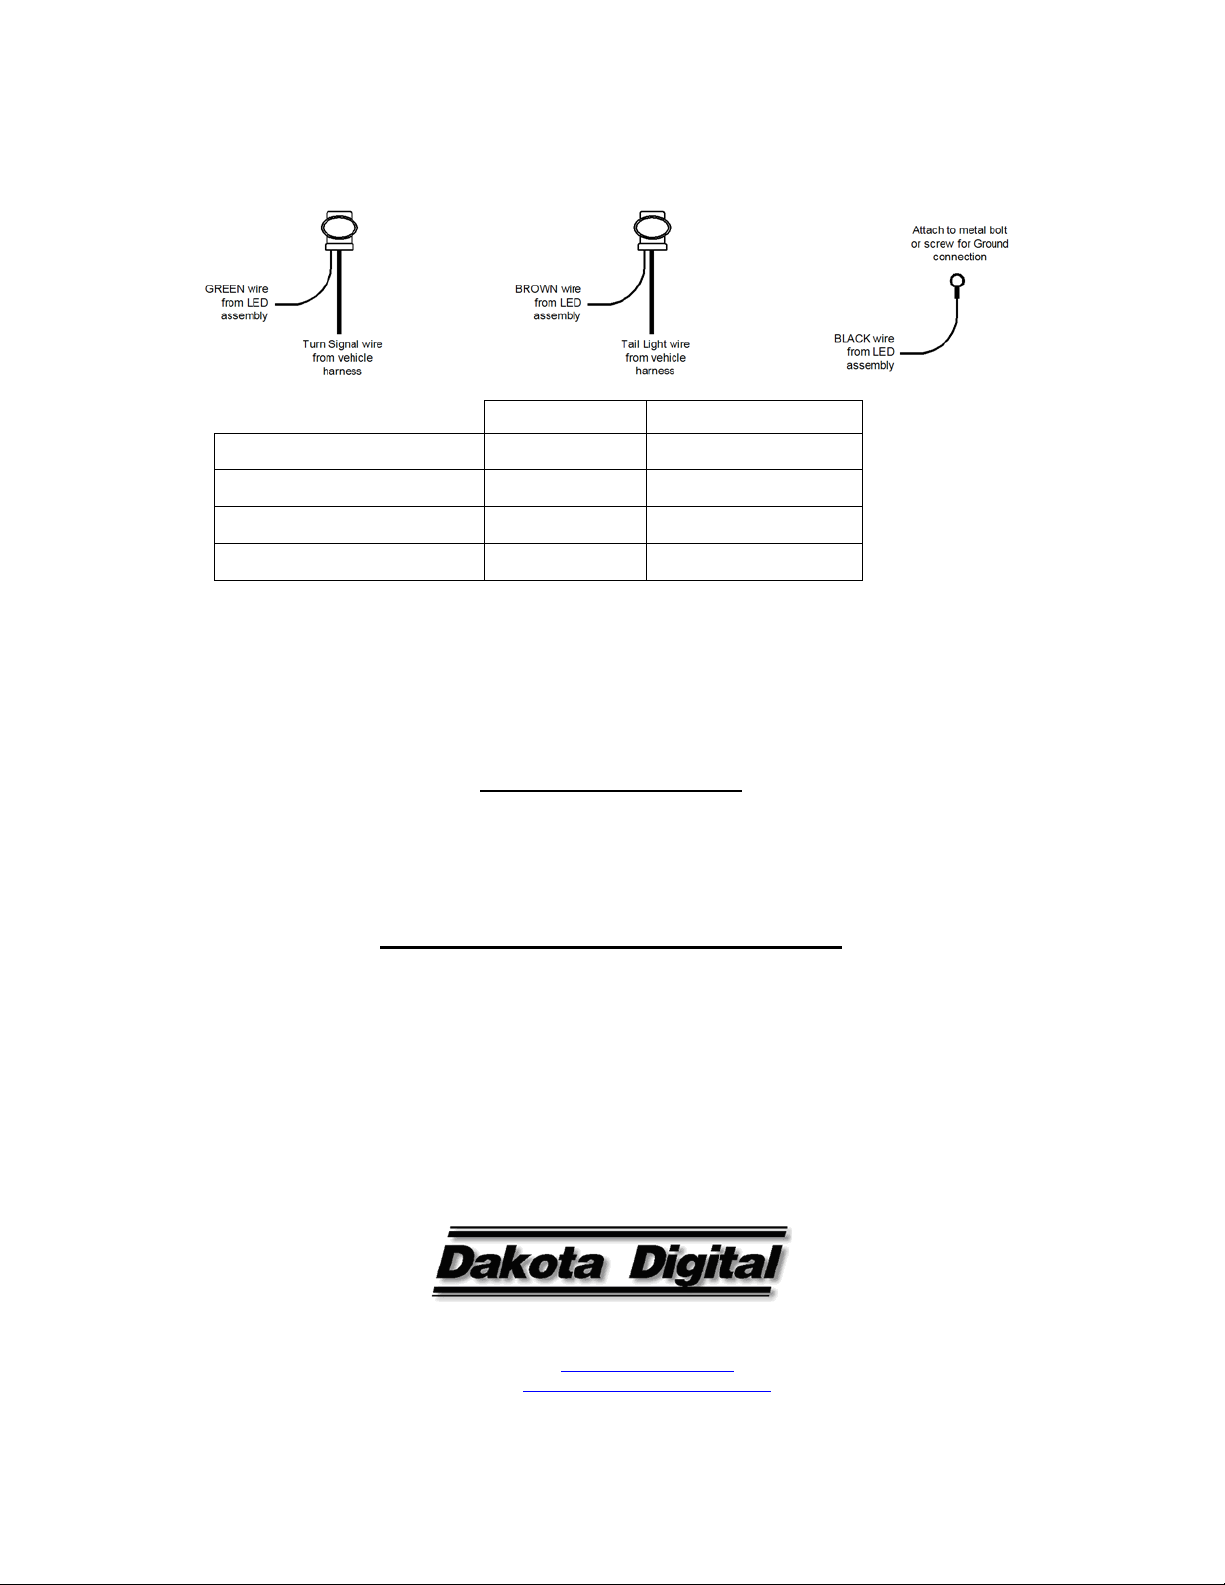
The correct crimp method for the supplied connectors is:
LED light
Vehicle harness
Tail light
Brown
Brown or Black
Driver’s Turn
Green
Green or Pink
Passenger’s Turn
Green
Yellow or Purple
Ground
Black
Chassis or Body
1.) Insert UNSTRIPPED wires into the connector and ensure they are all they way in by
observing the clear bottom of the connector to see the wires are touching the end.
2.) Use pliers to push the blue cap down flush with the edge of the clear body, completing the
connection. The connection will only be correct if pressed firmly down with pliers.
12. Repeat steps 1 through 11 for the other side.
13. Test the tail lights, brake lights, and turn signals.
SERVICE AND REPAIR
problems you may be having installing one of our products. Please read through the Troubleshooting Guide. There, you will find the solution to most problems.
Should you ever need to send the unit back for repairs, please call our technical support line, (605) 332-6513, to request a Return Merchandise Authorization
number. Pack ag e the pro duc t in a good quali t y box alon g with plenty of packing material. Ship the product by UPS or insured Parcel Post. Be sure to include the RMA
number on the package, and include a com pl et e description of the problem wit h RMA number, your full name and address (st re et add res s pref er red ), and a telephone number
where you can be reached during the day. Any returns for warranty work must include a copy of the dated sales receipt from your place of purcha se. Send no money. We will
bill you after repair.
DAKOTA DIGITAL offers complete service and repair of its product line. In addition, technical consultation is available to help you work through any questions or
Dakota Digital Limited Lifetime Warranty
workmanship for the lifetime of the original vehicle it was installed in, such defect(s) will be repaired or replaced at Dakota Digital’s option.
apply to any product or part thereof which in the opinion of the Company has been damaged through alteration, improper installation, mishandling, misuse, neglect, or
accident.
the duration of this written warranty. No person or representative is authorized to assume, for Dakota Digital, any liability other than expressed herein in connection with the
sale of this product.
DAKOTA DIGITAL warrants to the ORIGINAL PURCHASER of this product that should it, under normal use and condition, be proven defective in material or
This warranty does not cover nor extend to damage to the vehicle’s systems, and does not cover removal or reinstallation of the product. This Warranty does not
This Warranty is in lieu of all other expressed warranties or liabilities. Any implied warranties, including any implied warranty of merchantability, shall be limited to
4510 W. 61ST St. N., Sioux Falls, SD 57107
Phone: (605) 332-6513 FAX: (605) 339-4106
www.dakotadigital.com
©Copyright 2006 Dakota Digital Inc.
 Loading...