

Page 1
VERTICAL BAND SAWS
INSTRUCTION MANUAL AND PARTS LIST
MODEL TRADEMASTER – SECTION I
DAKE/PARMA
WHEN ORDERING PARTS
GIVE COMPLETE SERIAL NUMBER OF MACHINE
GIVE PART NUMBER AND NAME
GIVE AMOUNT REQUIRED
Unless the above data is included we cannot fill your
order.
MODEL: _____________________________________
SERIAL NUMBER: _____________________________
DATE PURCHASED: ___________________________
DAKE Division of JSJ
724 Robbins Road
Grand Haven, MI 49417
Phone: 616-842-7110 800-937-3253
Fax: 616-842-0859 800-846-3253
E-mail: technicalservice@dakecorp.com
Website: www.dakecorp.com
4/29/03
Model Trademaster Section I - 1
Page 2

Table of Contents
SECTION I
Specifications ……………………………………………………………………. Page 3
Features ………………………………………………………………………….. Page 3
Safety Instructions/Unpacking …………………………………………………. Page 4-5
Adjustments ……………………………………………………………………… Page 6
Blade Selection ………………………………………………………………….. Page 7
Standard Tooth Applications …………………………………………………… Page 7
Blade Speeds ……………………………………………………………………. Page 7
Blade Removal and Installation ……………………………………………….. Page 7
Important Note …………………………………………………………………… Page 7
Lubricating Instructions …………………………………………………………. Page 8
4/29/03
Parts Installation …………………………………………………………………. Page 8-9
Operating Instructions/Adjustments/Set-up ……………………………………Page 9-11
Blade Tracking …………………………………………………………………… Page 11
Blade Guide Adjustments ………………………………………………………. Page 11
SECTION II
Breakdown………………………………………………………………………. Page 1-9
Model Trademaster Section I - 2
Page 3

Specifications
Part Number 988070 / 988071
Blade Width 1/8 – 1 inch
Blade Length 150 inches
Blade Speed 50 to 500 infinitely variable
Band Wheels 2
Tire Type Crown type tires
Band Wheel Size 20 inches
Horsepower 1-1/2 h.p.
Throat Size (band to column) 19-1/2 inches
Roller Guides Heat treated roller blade guides
Maximum work height 12 inches
Worktable Dimensions 24 x 24 inches
4/29/03
Worktable Tilt 10º left / 45º right
Table Travel 11 inches front to back
Table Travel Action Foot control and lock
Worktable Height 41 inches
Machine Height 80 inches
Machine Floor Space 40 x 32 inches
Weight 1050 pounds
Blade Welder, Optional 1 inch
Features
● Power feed table with adjustable feed pressure up to 60 lbs. Simple design is maintenance
free.
● Heavy duty welded steel base and frame.
● Precision ground cast iron work table.
● Heat treated blade guides.
● Variable speed range from 50 to 500 fpm with clearly visible speed indicator.
● Tilting table combined with power feed makes compound angle possible.
● Safety shielded with over blade protection, right down to the work piece.
Model Trademaster Section I - 3
Page 4

4/29/03
IMPORTANT SAFETY INSTRUCTIONS
Warning: Failure to follow the following safety precautions may result in serious injury.
KEEP WORK AREAS CLEAN. Cluttered benches and workstations invite accidents
and create potential fire hazards. Floors must be kept clean and free from oil, wax,
sawdust or other debris. Promote cleanliness and reduce accidents and fire hazards.
CONSIDER WORK AREA ENVIRONMENT. Keep alert to potential hazards in the
work environment. Do not use electrical machinery in damp or wet locations. Keep
machinery clear of the presence of highly combustible materials, dust, flammable
liquids, fumes, vapors and gases.
WEAR PROPER APPAREL. Do not wear loose fitting clothing, gloves, neckties or
jewelry. They can be caught in moving parts. Non-skid footwear is recommended.
Wear eye, face, ear, respiratory and body protection equipment appropriate for
operating environment. Wear protective hair covering to contain long hair. Roll long
sleeves up above elbows when operating the saw.
USE SAFETY GLASSES. Eye protection is required at all times when using this
machine.
DON’T ABUSE POWER CORD. Keep cord from heat, oil and sharp edges.
DON’T FORCE TOOLS. Machinery performance will remain at higher and safer levels
if it is not pushed beyond the limits of its capability.
SECURE ALL WORK. Use clamps, vices, fixtures or jigs to hold work when it’s
practical. It’s safer than using your hands and it frees both of your hands to operate the
machine. Use a push block to hold or guide work when working close to the cutting
tool.
DON’T OVERREACH. Keep all hands well away from moving parts; saw blades and
other cutting tools. Keep proper footing and balance at all times.
MAINTAIN TOOLS WITH CARE. Keep tools sharp and clean for better and safe
performance. Follow instructions for maintenance and changing accessories. Keep
handles dry, clean and free from oil and grease. Damaged parts should be inspected
before further use of the tool. Check alignment of all moving parts. Look for binding of
moving parts, breakage, mounting and any other condition that may affect machine
operation. Any part or guard that is damaged should be properly repaired or replaced
prior to further use.
DISCONNECT MACHINE. Make sure machine is unplugged from it’s power source
before servicing and when changing accessories, such as blades.
NEVER LEAVE MACHINE RUNNING UNATTENDED. Before leaving machine, turn
the power off. Do not leave the machine until it comes to a complete stop.
Model Trademaster Section I - 4
Page 5

KEEP ALL SAFETY GUARDS IN PLACE. Be sure that all guards are in working order,
positioned properly and are aligned and adjusted correctly.
CHECK EXPOSURE. Adjust the machine for minimum exposure of cutting tool
necessary to perform each operation.
GROUND ALL TOOLS. Make sure wiring codes and recommended electrical
connections are followed and that the machine is properly grounded.
KEEP ALL CHILDERN AND VISITORS AWAY. All visitors should be kept a safe
distance from the work area. Don’t let visitors come into contact with machine or power
cord. Any person visiting the work area should wear appropriate protective devices for
eyes, face, ear, respiratory and body coverage as indicated for the operation or
environment.
STAY ALERT. WATCH WHAT YOU ARE DOING. USE COMMON SENSE AT ALL
TIMES. NEVER OPERATE ANY TOOL OR PIECE OF MACHINERY WHILE TIRED
OR UNDER THE INFLUENCE OF DRUGS, ALCOHOL OR MEDICATION.
4/29/03
UNPACKING AND CHECKING CONTENTS
Carefully unpack and discard crating material. Unbolt machine from pallet and lift off.
(You can lift your Trademaster saw by the upper portion of the saw using a lift truck.)
Only lift in this manner with the door OPEN or damage may result.
Un-tape all doors and remove the cardboard box from the bottom of the saw base.
Install 10-pound weight on the outside counterweight bar.
Install 40-pound weight using the bolt provided on the arm inside the lower cabinet.
Install the foot pedal and speed selector knob.
Remove the protective coating from the table using a water base grease remover.
CAUTION: Gasoline, naphtha, kerosene lacquer thinner, mineral spirits and other
related solvents are highly flammable. Wipe thoroughly with a clean, dry cloth.
The lock for the table travel is found under the table on the table rail. Be sure to unlock
it before attempting to move the table.
WARNING: For your own safety, do not connect your saw to the power source
until the machine is completely assembled.
WARNING: This machine has been shipped with the table locked. Before
operation the lock clamp on the right hand table rail must be loosened.
Model Trademaster Section I - 5
Page 6

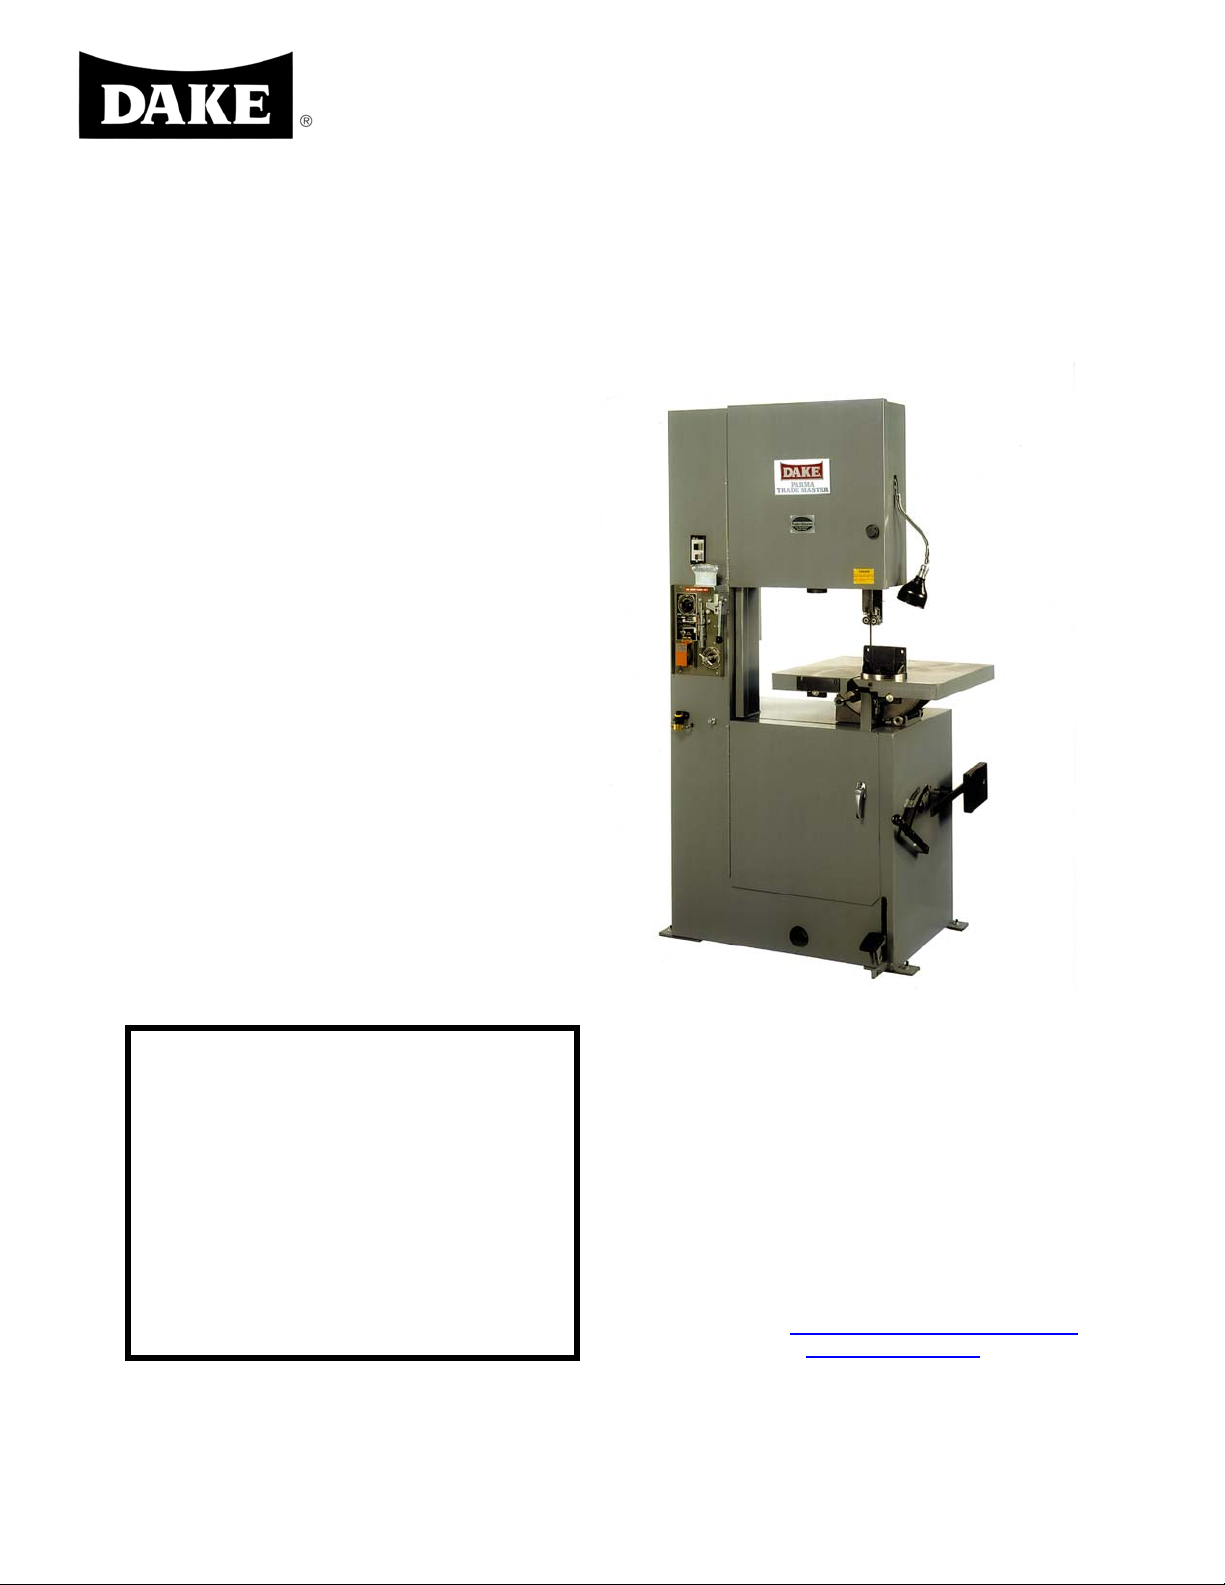
AE G
TRADEMASTER ADJUSTMENTS
A WHEEL CANT ADJUSTMENT– Used to position blade on wheel.
4/29/03
B GUIDE BAR LOCK – Used to lock roll guides into position.
C BLADE TENSION HANDLE – Used to remove and install saw blade. Also used
to set the correct blade tension – be sure blade is tight.
D ROCKER LOCK KNOB – Used to unlock & move table to desired degree angle
of cut then lock into position.
E TABLE LOCK KNOB – Used to lock table into a fixed position.
F VARIABLE SPEED LOCK – Unlock lock and move to the desired blade speed &
relock.
H HYDRAULIC FEED CYLINDER – Used to regulate the table feed.
Model Trademaster Section I - 6
Page 7

4/29/03
Blade Selection
For Operator convenience, a blade selector chart is located inside the saw cover. It
provides recommended blade speeds, required teeth per inch, and minimum cutting
radius for various blade widths. The following chart can be used to select the blade
needed:
Standard Tooth Applications
Thickness of Material Teeth per Inch
Up to 1/8” 18 Teeth
1/8” to 1/4" 14 Teeth
1/4" to 1/2" 10 Teeth
1/2" to 1” 8 Teeth
1” to 3” 6 –4 Teeth
3” to 6” 4-6 Teeth
6” and longer 3H
Note: 1) You must have at least 3 teeth into your work or blade damage will result.
2) For straight cuts, a 3/4" inch blade is best.
Blade Speed (feet per minute)
Refer to the blade selector chart inside the cover on your Trademaster for
the appropriate speed.
Blade Removal and Installation
To remove the blade, release the blade tension handle. (Item C on page
6). Remove the blade.
To install the blade, place the blade over the bottom wheel, then on the
top wheel. Teeth must point down toward the table. Tighten the blade
tension handle enough to hold the blade firmly in place, and the push the
blade into the guide inserts. Turn the machine on to allow the blade to
position itself and then finish tightening the blade. IMPORTANT: Blade
must be tight to insure straight cut.
Please Note:
The most common causes for your Trademaster not cutting straight are:
1) Blade tension is too low.
2) The blade is either dull or worn on one side.
3) The blade is upside down. The teeth must point down toward
the table.
Model Trademaster Section I - 7
Page 8

4/29/03
Lubricating
Gear Box: Your Trademaster gearbox is filled at the factory. Check the
fluid level on arrival, and then check every six months thereafter. Use 90
weight gear lube to maintain fluid level at the fill / check pipe plug.
Hydraulic Cylinder: Keep the cylinder reservoir ½ to ¾ full. Use light
hydraulic oil to refill.
Oil Cup on Variable Speed Axle: Keep full when saw is in use.
CAUTION: Fill only when machine is turned off.
Parts Installation
Some of the components of your Trademaster bandsaw have been packed separately
inside of the machine, to prevent shipping damage. Please take care when installing
these components to prevent machine damage or injury.
10 lb. Counter weight: This is used to increase or decrease cutting pressure.
1. This is to be installed on the counter weight arm. The arm is located on the right
hand side of the machine next to the speed control lever. Remove one of the cap
screws (two screws one on front and rear of this arm). Carefully slide this counter
weight onto the arm. Position it in the middle of the arm. (At the pivot point) Tighten
the lock knob on the weight. Replace the cap screw. WARNING: Never operate is
machine without these cap screws installed. The counter weight could slip off of the
arm and cause injury.
2. Speed select knob: Install on the end of the speed select lever.
Model Trademaster Section I - 8
Page 9

3. 40 lb. Weight: This gives table the gravity fed momentum.
This is hung on the inside of the cabinet (right hand side) on the weight lever
arm. Carefully and safely as not to injure yourself, lift this weight and hang it from the
weight lever using the pin provided.
4. Install the foot pedal pad.
Operating instructions
There are four key components that must be taken into consideration before cutting
your material.
1. Blade type / pitch required for the material.
2. Speed (fpm) to appropriately cut the material.
3. Feed pressure.
4. Table feed rate
Using the chart on the inside of the upper wheel door, select the proper blade and
cutting speeds. Always securely hold your material while cutting. Using either the miter
gauge supplied with the machine, or a clamping device.
unless the table is locked in the fixed position, and you are contour cutting.
Note: Never cut free hand
Lower the guide post to approx. 1/16” – 1/8” above the material to be cut.
Once the material is clamped for cutting you must set the counter weight to apply
cutting pressure. This is done by loosening the lock knob and sliding the weight to the
front or rear of the arm. Forward will reduce pressure but assist in the tables return.
Sliding this weight to the rear will increase the feeding pressure.
The blade speed must only be adjusted
with the machine running. This can be selected
by moving the speed selector lever forward or backward to increase or decrease blade
speed. The scale on the speed selector bracket will indicate the blade speed in feet per
minute.
4/29/03
Model Trademaster Section I - 9
Page 10

The feed rate of the table must be adjusted as the machine is put into motion. The
design of this machine will not allow cutting faster than the blade will remove the
material. If the table stalls out into the cut slow this feed rate down, or adjust the cutting
pressure counter weight.
To start the table in motion the foot pedal is depressed. Keeping your foot level on the
pedal (tilting the pedal toward the machine) depress the pedal and release it. This will
disengage the pedal from its locked position, and set the table in motion.
Once the table is moving adjust the flow control to increase or decrease the tables feed
rate. By turning the control clockwise will decrease the rate and counter clockwise will
increase the rate.
4/29/03
Always make this adjustment when machine is running.
After the cut is complete, depress the pedal downward keeping the pedal level. This will
then engage the pedal lock.
Note: The return of the table can be assisted while pushing the pedal and pushing the
counter weight arm downward.
To tilt the table, loosen the table lock, and carefully tilt the table to the degree needed as
marked on the scale and lock the table at this angle. ALWAYS secure the work to the
table to prevent it from falling off the machine. To make compound miters, set the table
Model Trademaster Section I - 10
Page 11

to the degree needed and the miter gauge to the angle needed. When cutting angles or
compound miters, always slow the table feed down.
Notes: When bundle cutting always secure pieces together to prevent parts moving
during the cutting process.
When contour cutting always lock table, and use the narrowest blade possible for the
application, to prevent undo stress to the blade.
Blade tracking and guide adjustments
When a new blade is installed blade tracking may be necessary. The blade should run
as close to center of the band wheel as possible, if the blade is not centered the blade
must be tracked in.
1. Tension blade to manufactures recommendations. (It is better to be over tight than
not tight enough).
2. On the rear of the machine behind the upper wheel loosen the cant knob.
3. Adjust the center-tracking knob in or out to track the blade. Note: Make only half
turns at a time, and jog the machine as you go to check tracking.
4. After tracking is completed tighten cant knob.
Blade guide adjustment should be done from time
To time to insure the blade is being properly supported.
The guides are adjustable in five different ways.
1. The roller adjustment to loosen from the blade.
2. The roller adjustment to tighten against the blade.
3. The roller adjustment in and out for blade widths.
4. The top roller in / out side to side for support of the blades back, for centering blade
groove.
The blade must run straight through the guides without any twist or misalignment from
the upper to the lower guides. The top roller has a shallow groove in it and the
back edge of the blade is to run through this groove. The roller can be moved left or
right by loosening the setscrew and shifting the roller. The top and bottom must be in
line with each other. The back of the blade should just touch this roller. If it does not or
is too close where it bows the blade outward it must be adjusted. By loosening the
setscrew, the knurled knob can be turned to make this adjustment.
The lower rollers can be adjusted to put pressure on the blade
sides. This is done by loosening the setscrews and rotating the
eccentric axle. There should be approx. .004 of gap between
these rollers and the blade.
If you change the blade width the lower rollers (both on upper
and lower guide sets) must be adjusted accordingly. By
loosening the setscrews move the rollers so they are just
behind the blades teeth gullets. The roller must not contact the
set of the teeth.
Note: Keep the guides clean and free from chips.
4/29/03
Model Trademaster Section I - 11
 Loading...