

DAITEM SH511AX, SH512AX, SH514AX, SH513AX Installation Manual
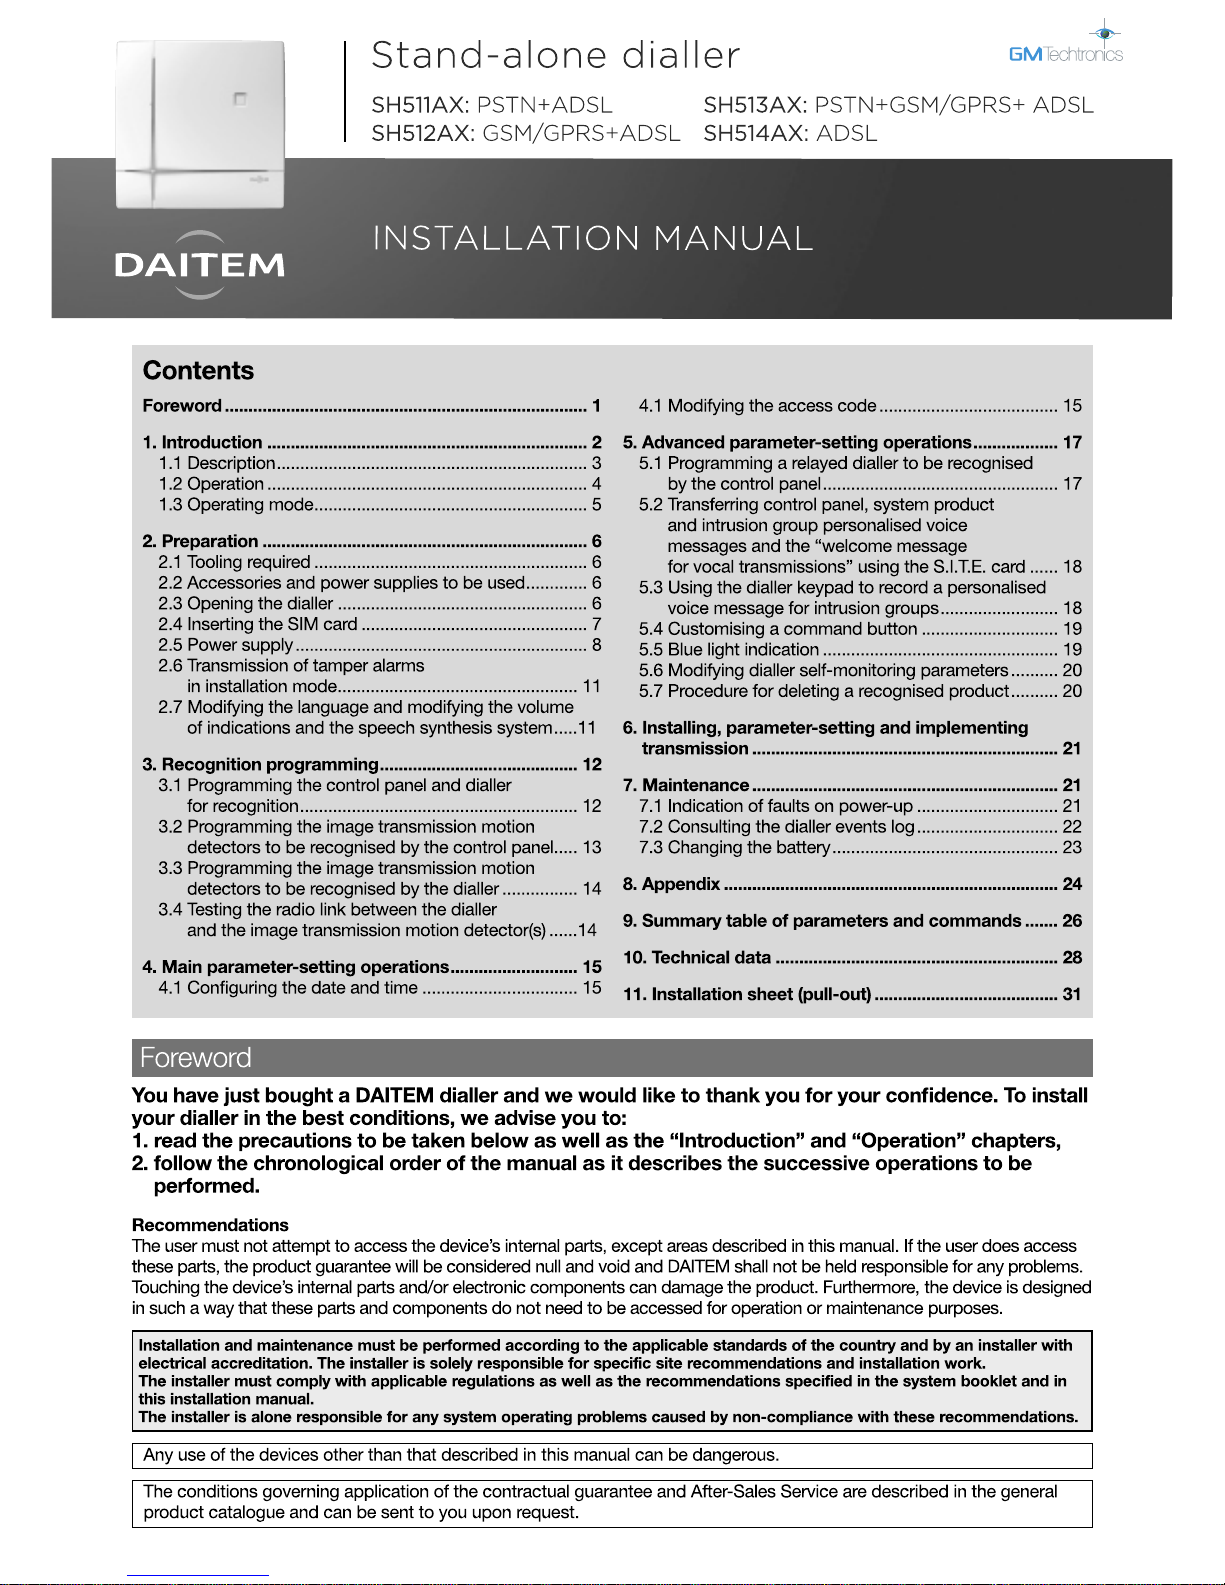
• Depending on the type of dialler, it is fitted with a
transmission module using different media (see table
opposite, unused media must be declared).
• When installing the product, it should be assumed that
the dialler has three transmission media:
PSTN, GSM/GPRS and ADSL.
2
The stand-alone dialler has two main functions. Via its different communication networks, it makes
the following possible:
1. Remote alerts in the event of intrusion or an event occurring on the protected site.
• The dialler warns individual correspondents and/or a remote monitoring centre in case of:
- intrusion,
- technical alarms,
- fire alarms,
- tamper alarms,
- system device faults.
Protection of individuals (e.g. Silent alarm), technical alarms and fire alarms are active 24 hours a day. The dialler has
anti-tamper protection against opening and removal.
• When an intrusion occurs, the dialler makes the following remote operations possible:
- listen in and talk-back/speak-out,
- visual confirmation of the alarm via the transmission of images or films from image transmission detectors and/or
compatible IP cameras installed on the protected site.
2. Remote access to the protected site:
• alarm system control,
• parameter-setting,
• verifications.
Transmission module and transmission media
1. Introduction
The different stand-alone diallers are:
Dialler
reference
Module
reference
Transmission media
SH511AX SH501AX PSTN -
Ethernet
(ADSL)
SH512AX SH502AX - GSM/GPRS
SH513AX SH503AX PSTN GSM/GPRS
SH514AX SH504AX - -
IMPORTANT
• Some functions are only available with control panel versions 2.0.0 or later (enter on the control
panel keypad to check the version).
• Operational differences in relation to former ranges are described in the compatibility booklet available in the Daitem
Installers section at www.daitem.co.uk.
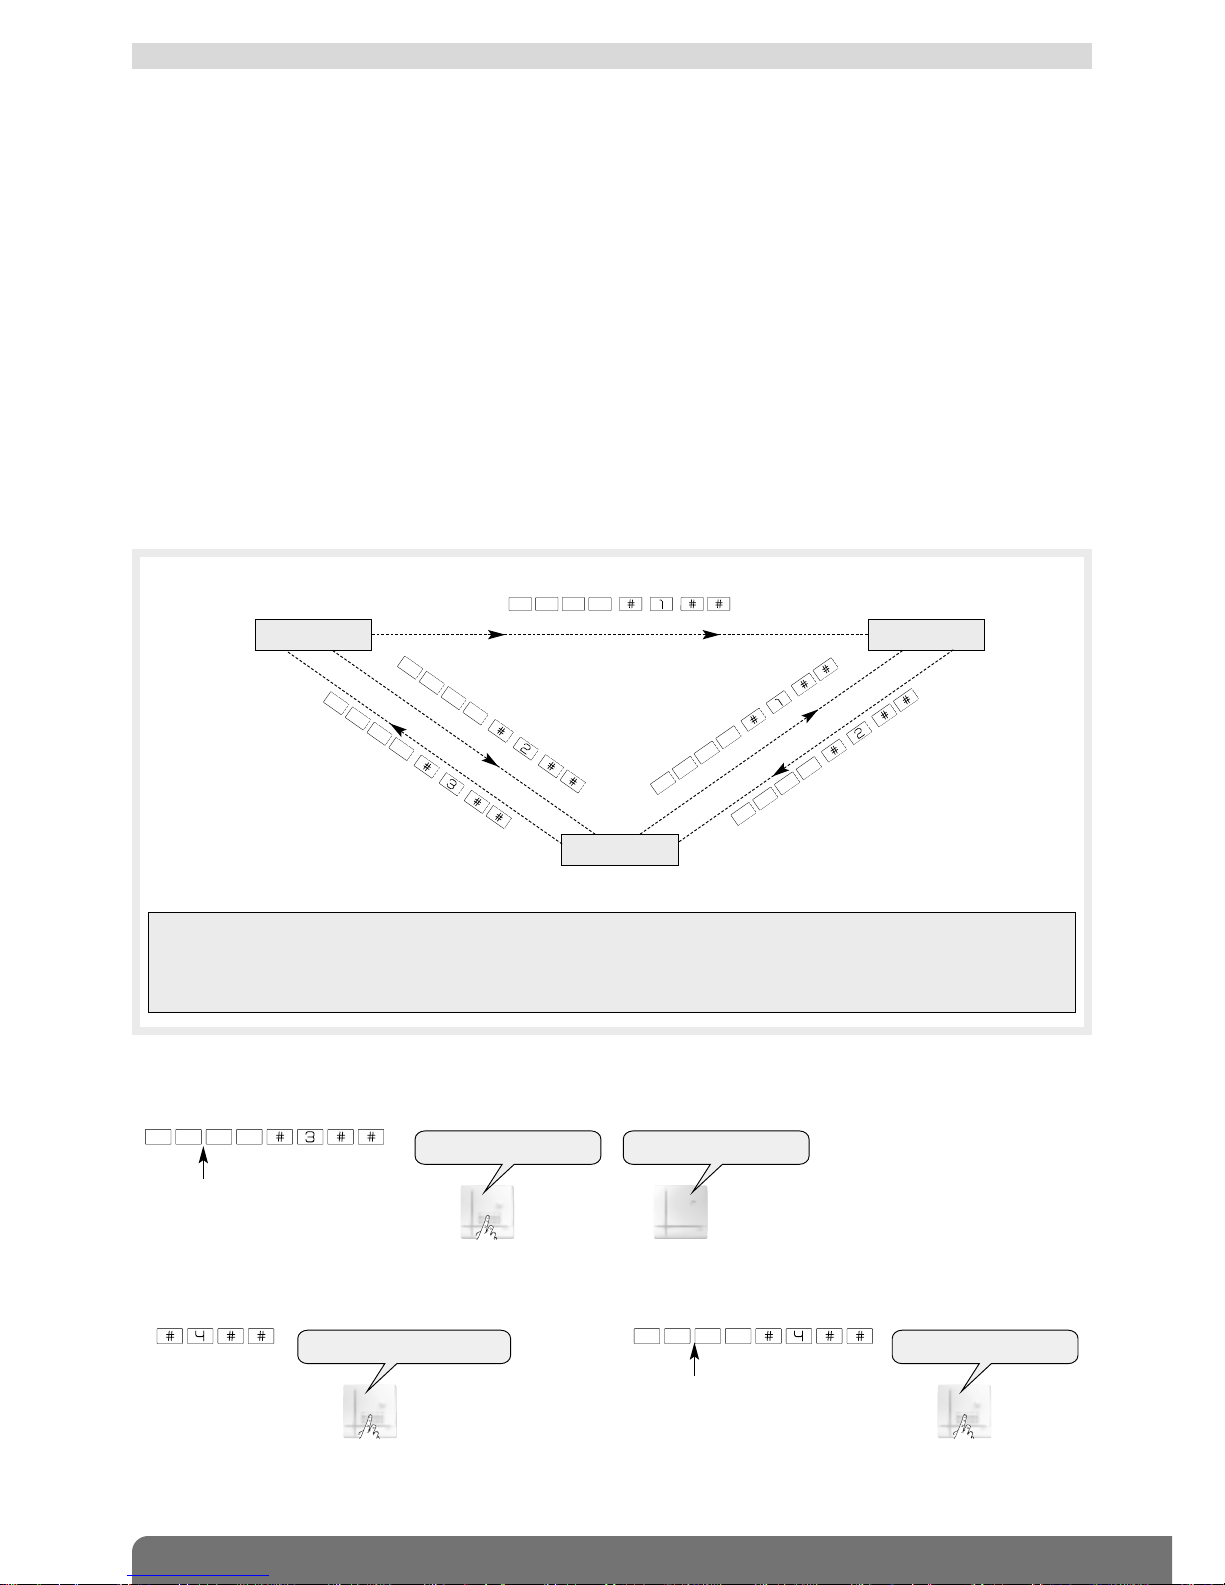
Local programming:
The dialler can be programmed locally:
• using the dialler keypad as described in this manual:
or
• more easily and in an intuitive manner, via a PC and user-friendly interface (protected by installer access code). The
computer must have TwinLoad®configuration and maintenance software and be linked to the radio configuration tool.
The dialler is configured by radio via the control panel.
The software and installation manual are available in the Daitem installer section at www.daitem.co.uk.
Computer with
TwinLoad®software
DIALLERCONTROL PANEL
)) )) )) )) ) )) )) )) )) )
USB cord
RADIO CONFIGURATION TOOL
GSM/
GPRS
ETHERNET
(ADSL)
fi Only concerns transmission modules using the media indicated
(example here: GSM/GPRS and/or Ethernet (ADSL)
MODULE APPLICATION KEY:
fi Only concerns alarm systems fitted with one or several image transmission detectors.
MUST BE USED IN ORDER TO REMOTELY TRANSMIT IMAGES FROM IMAGE DETECTORS
fi Only concerns alarm systems fitted with one or several compatible IP video cameras.
MUST BE USED IN ORDER TO REMOTELY TRANSMIT IMAGES FROM IP COMPATIBLE CAMERAS
3
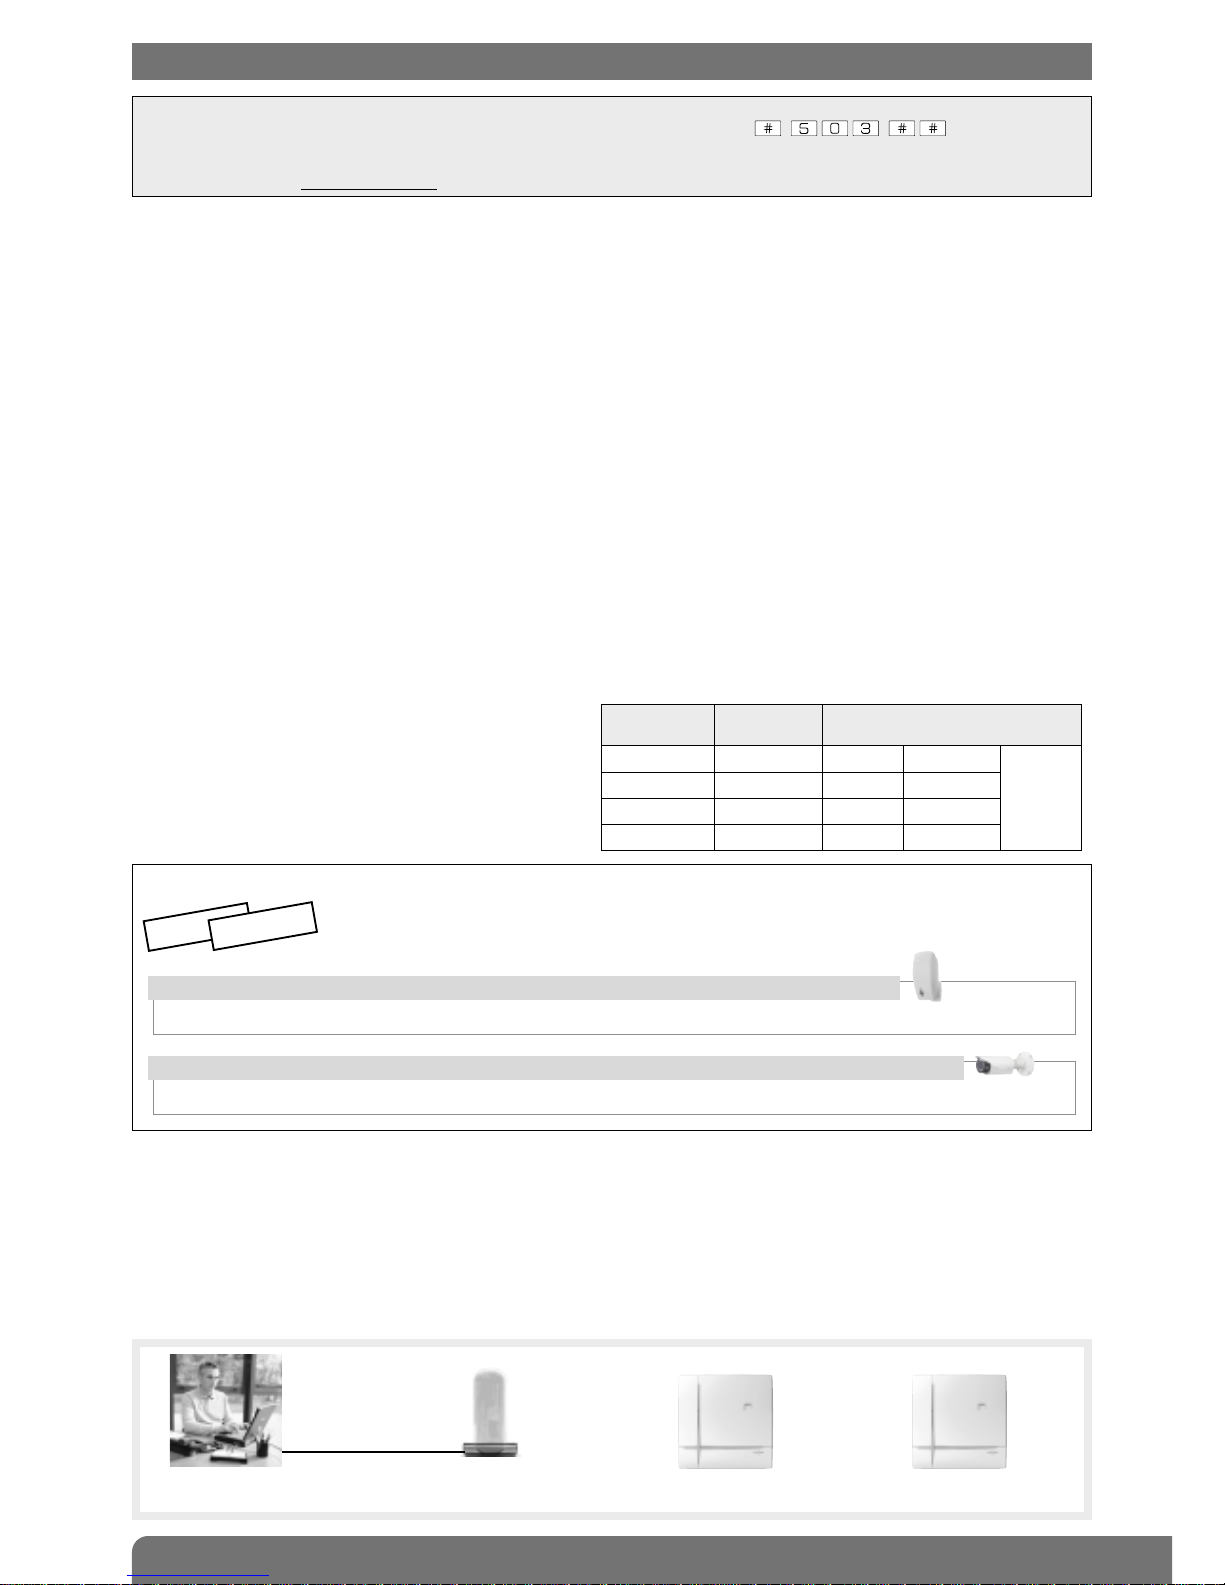
The dialler has a keypad on its front face with the following:
• 12 programming buttons (dial buttons from to and and buttons) for different operations:
- recognition programming of system devices,
- programming of the different parameters,
- checking these different parameters,
- performing a test call to individual correspondents or a remote monitoring centre.
• 4 command buttons that can be personalised according to the user’s needs, e.g. Silent alarm (= Panic alarm).
(1) The control panel S.I.T.E. module is optional. It allows the transfer of control panel
personalised voice messages to the dialler:
- transfer of system product personalised voice messages,
- transfer of intrusion group personalised voice messages,
- transfer of personalised “welcome message for vocal transmissions”.
(See chapter on Advanced parameter-setting operations/Transferring control panel,
system product and intrusion group personalised voice messages and the “welcome
message for vocal transmissions” using the S.I.T.E. module).
Detachable
washer for
base fixing
and tamper pin
Fixing
support
Slot for cable clamp
supplied in bag of accessories
Compartment:
- lithium power pack
or
- internal mains power module
Compartment
for rechargeable Li-Ion
back-up battery
Connector
for optional
control panel
S.I.T.E. module (1)
Transmission module
Hole
for fixing
support
opening
Hole for locking
screw (supplied in the
accessories packet)
Internal view Rear view
1 x 2-point connector
for rechargeable back-up
battery
SH513AX
A1142A047879
Coller sur certif
SH513AX
A1142A047879
Coller sur certif
SH503AX
A1143A047879
Coller sur certif
SH503AX
A1143A047879
Coller sur certif
The S.I.T.E module must be connected
and disconnected with all power off.
Dialler
Loudspeaker
Three-colour LED
Microphone
12 programming buttons
4 customisable command buttons:
• armed
• off
• armed partial 1
• armed partial 2
Blue light
LEDs
Colours
LED status Indication
Threecolour
LED
red
steady button pressed or line occupied (incoming/outgoing call)
continuous rapid flashing operation blocked when powered (power supply, radio, transmission module link or keypad)
12 s maximum rapid flashing connection test, date and reference
1 flash every 5 s permanent indication of test mode
2 flashes every 10 s permanent indication of installation mode
3 rapid flashes error
green
steady for 10 seconds valid access code
steady recording of voice message
orange
rapid flashing memory zone transfer
Blue light
modulated indication of renewed
control panel transmissions
mode change: installation, test and use
arming or disarming
system status command
one of the 4 customisable buttons pressed (arm, disarm, arm partial 1 and 2)
LED indications
1.1 Description
4
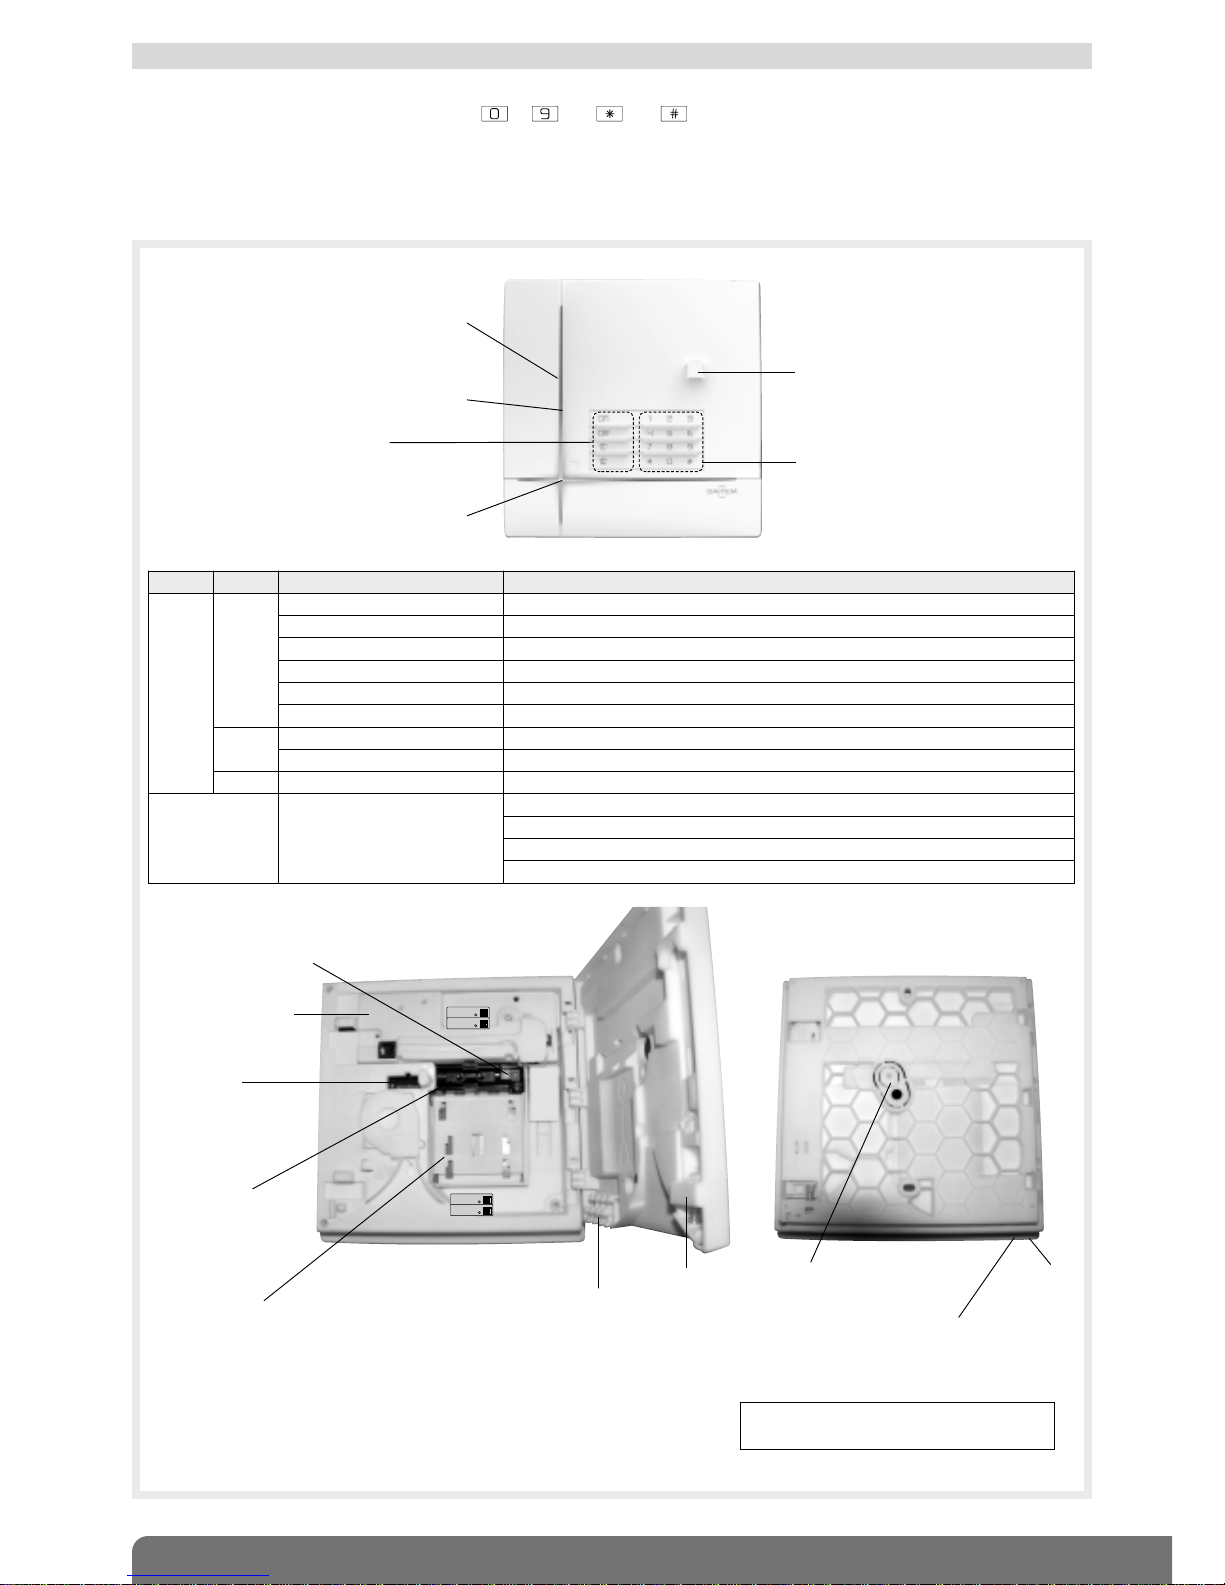
• The dialler only operates in a system with an alarm control panel.
Depending on the type of dialler, it communicates via different communication media: PSTN, GSM/GPRS and Ethernet
(ADSL) (see “Description” chapter).
1.2 Operation
Up to
20 compatible
IP cameras
Intrusion
detectors
Ethernet
(ADSL)
link
PSTN
link
The total
recognised
detector
capacity
depends
on the
type of
alarm
control
panel.
Up to
40 image
transmission
motion
detectors
STAND-ALONE
DIALLER
CONTROL
PANEL
)) )) )
)) )) )) )
)) )) )) )) )) )) )) )) )) )) )) ))
)) )) ) )) )) )) )
)) )) )) )
GSM/
GPRS relay
N.B.: each image transmission detector must be programmed for
recognition by the alarm control panel and the stand-alone dialler.
• voice message
and/or SMS (GSM)
• MMS (GSM)
protocol:
• Contact ID (GSM)
• ViewCom IP (GPRS)
)) )) ))
)) )) ))
Remote
monitoring
Individual
correspondents
• voice message (PSTN)
protocol:
• Contact ID (PSTN)
• FSK200 (PSTN)
Remote
monitoring
Individual
correspondents
ADSL
box/router
modem
PSTN
NETWORK
PSTN
GSM/GPRS
protocol:
• ViewCom IP Ethernet
(ADSL)
Remote
monitoring
Ethernet
(ADSL)
Internet
ETHERNET
(ADSL)
MUST BE USED IN ORDER TO REMOTELY TRANSMIT IMAGES FROM IMAGE DETECTORS
Image transmission detectors transmit:
• the intrusion event directly to the control panel,
• the images recorded directly to the dialler.
GSM/
GPRS
ETHERNET
(ADSL)
MUST BE USED IN ORDER TO REMOTELY TRANSMIT IMAGES FROM IP COMPATIBLE CAMERAS
• IP cameras are linked to the ADSL box/router modem
• The list of compatible IP cameras is available in the Daitem Installers section at
www.daitem.co.uk.
• The IP transmission module manages the IP cameras via the alarm system making it possible:
- to record alarm films following detection of intrusion or confirmed intrusion,
- for users to view their IP cameras via the customer-dedicated Internet Portal.
• The intrusion detectors are associated with the IP cameras: each detector can be associated with 2 cameras
maximum.
GSM/
GPRS
ETHERNET
(ADSL)
5
1.3.2 The dialler’s different functions and commands are protected by 3 separate access codes:
• 1 MASTER code, to be used by the main system user in USER mode for:
- activating all of the dialler’s commands locally via the dialler keypad (full dialler use),
- remotely accessing the dialler via a PC (and via Smartphone and touch-screen tablet applications: iPhone/iPad and
Androïd),
- operating the system remotely over the phone (for incoming calls via the GSM network, the product must be connected
to the mains).
• 1 INSTALLER code, to be used by the installer in INSTALLATION mode for:
- completely accessing the dialler during installation on site via the dialler keypad or a PC with TwinLoad®software and
which is linked to the radio configuration tool (in this case the dialler is configured by radio via the control panel),
- remotely accessing the dialler via a PC with TwinLoad®software. This is possible in all modes (factory: TEST), subject to
the user’s rights defined when parameter 611 is programmed.
• 1 VIDEO code, to be used mostly by the user and which provides secure access to video footage via the Internet.
1.3 Operating mode
1.3.1 The dialler has 3 separate operating modes:
• installation mode for dialler installation and maintenance,
• test mode for dialler functional testing,
• user mode for dialler daily use.
• The request to change system operating mode issued by the dialler is only taken into account when the control panel
issues a voice message about the new system status in order to validate the change.
Example: switching from test mode to installation mode:
• - To check the dialler’s operating mode at any time, use the keypad to enter:
installer code
“bip, installation mode”
“bip, installation mode”
Changing the operating mode:
CONTROL PANEL
DIALLER
master code
- in installation (or test) mode:
“bip, system status,
installation (or test) mode,...”
DIALLER
- in user mode when the system is disarmed (or armed):
“bip, systemc status,
off (or armed), ...”
DIALLER
The operating mode is changed using the factory master code “0000” then the factory installer code “1111” as shown
below:
Factory:
• installer code “1111”
• master code “0000”
• video code “4444”
IMPORTANT
• For security reasons, the keypad automatically switches back to user mode after 4 hours without a command being
issued.
• If 5 wrong codes are entered in less than 5 minutes the keypad will be blocked for 5 minutes and notification that a wrong
code has been entered will be issued.
INSTALLATION
MODE
TEST MODE
USER MODE
installer code
master code
master code
installer code
installer code
1 flash every 5 s
2 flashes
every 10 s
6
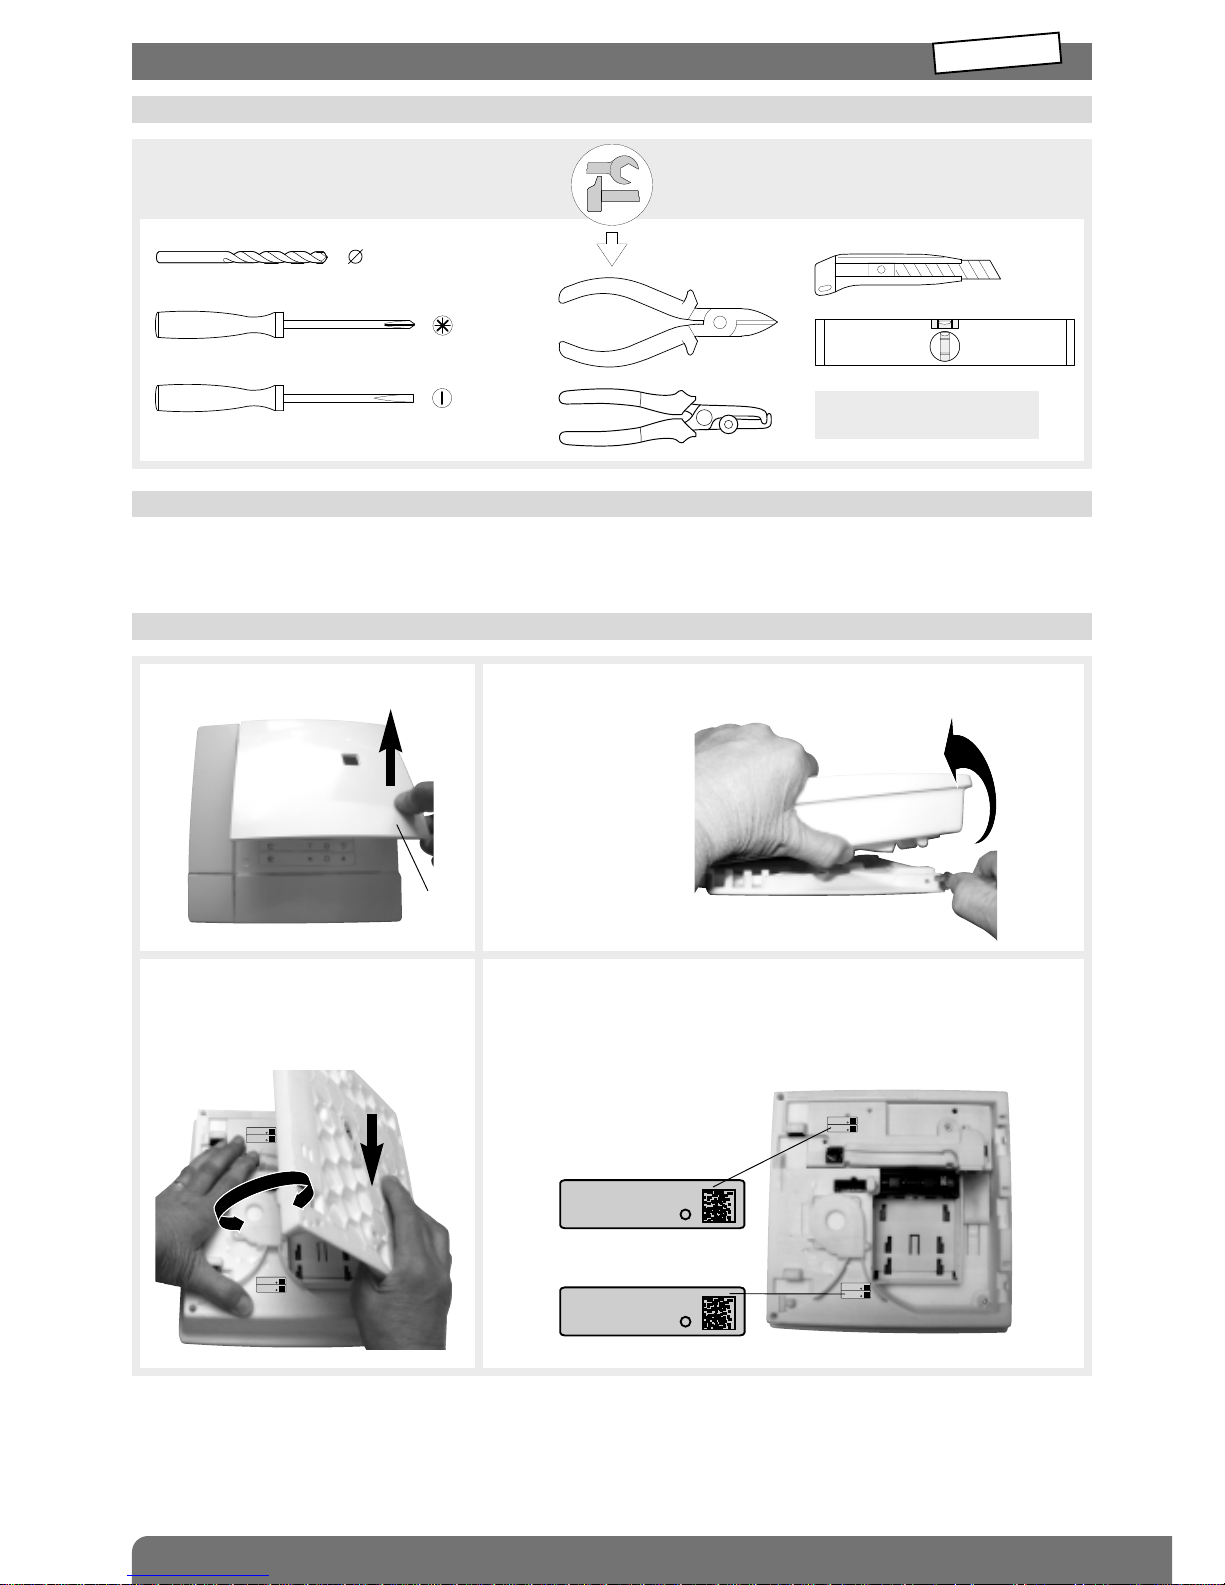
2. Preparation
2.3 Opening the dialler
1. Remove the front cover.
3. Place the dialler face down on a flat
surface and then remove the base by
inclining it an angle of 45° (A) and
pulling it downwards (B).
4. Guarantee stickers
Remove the pre-cut part of the guarantee sticker and stick it to the
guarantee certificate inside the user manual supplied with the control
panel. If you are adding to an existing system, use the guarantee
certificate supplied with this product.
2. Insert a screwdriver (Ø < 3.5 mm) in the bottom right-hand side of the
base (A) and push on it in order to open the dialler (B).
SH513AX
A1142A047879
Coller sur certif
INSTALLATION
MODE
SH503AX
A1143A047879
Coller sur certif
SH503AX
A1143A047879
Coller sur certif
SH503AX
A1143A047879
Coller sur certif
SH513AX
A1142A047879
Coller sur certif
SH513AX
A1142A047879
Coller sur certif
SH503AX
A1143A047879
Coller sur certif
SH503AX
A1143A047879
Coller sur certif
SH513AX
A1142A047879
Coller sur certif
SH513AX
A1142A047879
Coller sur certif
A
A
B
B
45°
2.1 Tooling required
6 mm
3.5 mm
The fixing screws
and plugs are not supplied.
PZ 2
3.5 mm
Cover
2.2 Accessories and power supplies to be used
The accessories and power supply(ies) needed to install the dialler depend on the type of dialler and media used. Before
going out to the site, installers must make sure they have the additional accessories and power supply(ies) listed in the
“Appendix” chapter (besides any accessories that are supplied with dialler).
7
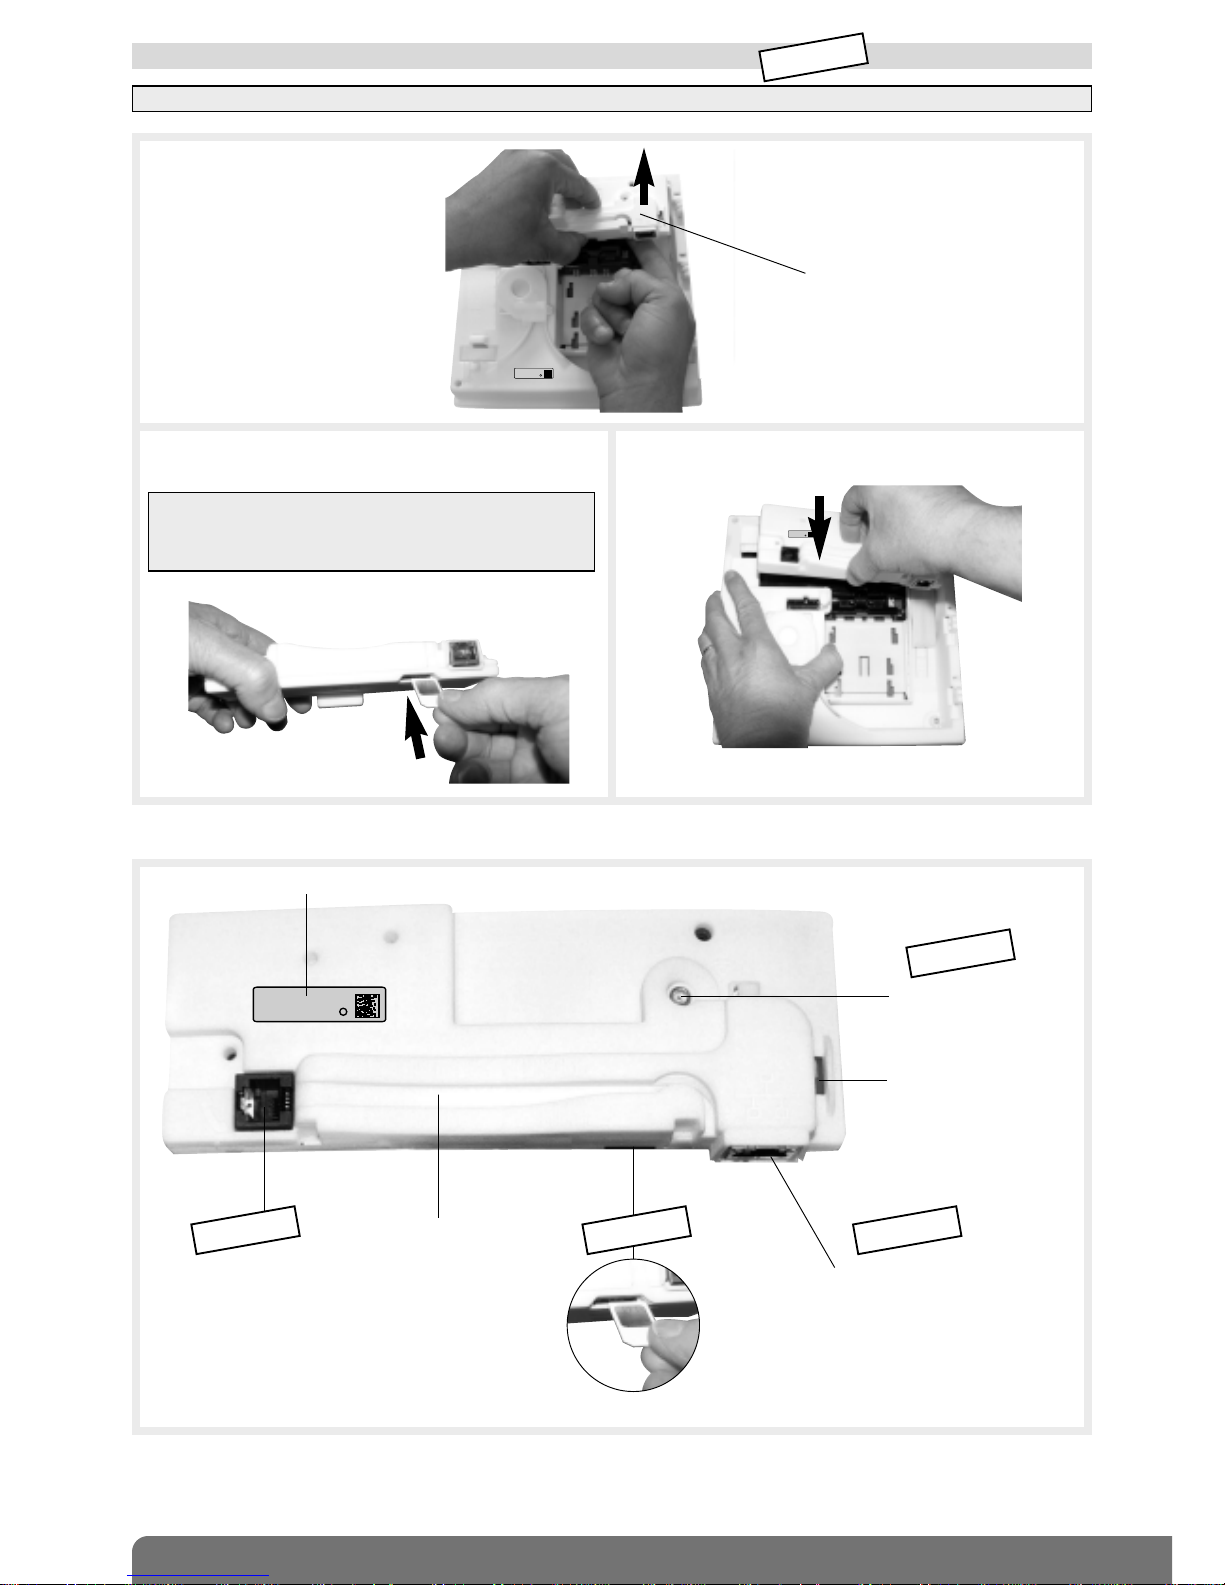
Transmission module
2.4 Inserting the SIM card
1. Unclip the transmission module.
2. Insert the SIM card into its slot making sure it is the
right way round in the module.
3. Clip the transmission module into its compartment.
Transmission module
SH503AX
A1143A047879
Coller sur certif
GSM/GPRS
IMPORTANT: the SIM card must be inserted into the dialler with the power off.
IMPORTANT
• Only mini SIM cards can be used in the module.
• Do not insert a Micro SIM card as it does not have the
right format and may damage the module.
SH513AX
A1142A047879
Coller sur certif
PSTN
GSM/GPRS
ETHERNET
(ADSL)
RJ11 connector for
conventional Public
Switched Telephone
Networks (optional RJ11
PSTN cable)
PSTN cable trough
SIM card slot
RJ45 Ethernet connector
for IP network (ADSL)
(RJ45/RJ45 Ethernet
network cable)
Connector for GSM
external antenna
Transmission module reference
GSM external antenna
cable trough
SH503AX
A1143A047879
Coller sur certif
GSM/GPRS
8
Declaring unused media
To prevent faults from occurring due to line cuts or the absence of transmission media in user mode, unused media must be
declared. This parameter-setting operation is explained in the installation manual common to the control panel-dialler and
the stand-alone dialler: “Parameter-setting and implementation of transmission with transmission module/chapter on
“Main parameter-setting operations for the transmission module/Declaring unused media”.
Indication of power faults on power-up:
N.B.:
• If the main power supply comes from the mains power module:
- a sufficiently charged Li-Ion back-up battery must be installed in case the dialler issues the voice message “Fault,
Accumulator Voltage, Transmitter”, and the red LED flashes until the battery has been properly connected.
- if there is a mains power supply problem, the dialler issues the voice message “Fault, Battery Voltage, Transmitter”.
• If the main power supply comes from the BatLi lithium power pack:
- the Ethernet (ADSL) media will not be operational,
- the GSM/GPRS media will be operational on condition that the Li-Ion back-up battery has been installed. In this case
(powered without mains), the GSM/GPRS media will be configured by default for outgoing calls only.
If an improper power supply is used with the transmission module connected this will lead to an error indication following
power-up.
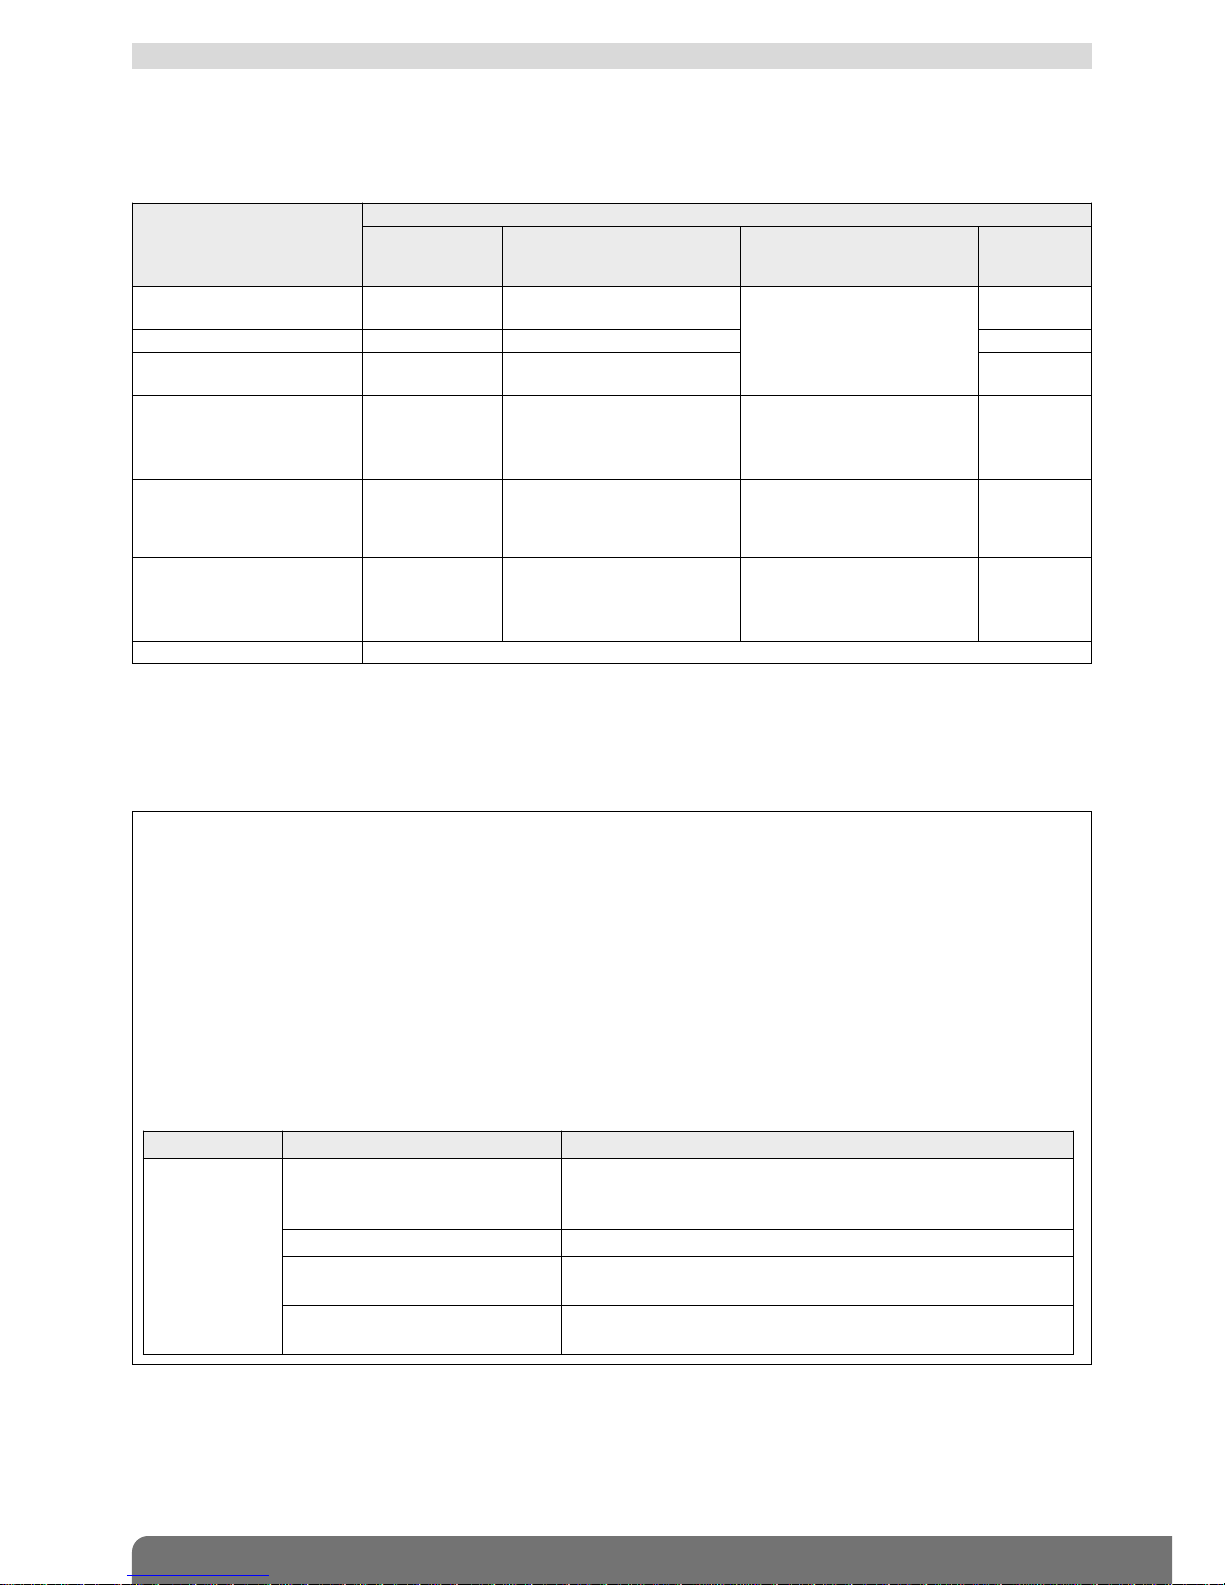
What to do if?
2.5 Power supply
Red LED Voice message Solutions
Constant rapid
flashing
“Fault, power supply, transmitter
plug”
use the tables in the “Appendix/Accessories and power supplies
to be used” chapter to check compatibility between the
transmission module media and the dialler power supply.
“Fault, transmitter plug” check the transmission module has been properly installed.
“Fault, battery voltage, transmitter” check the state of the main power supply: BatLi 22 lithium power
pack or mains power module depending on the case.
“Fault, accumulator voltage,
transmitter”
if the power supply is from the mains, check that the Li-Ion backup battery has been installed and is properly charged.
Media used
Type of dialler/media available
SH511AX
PSTN+ Ethernet
(ADSL)
SH512AX GSM/GPRS+
Ethernet (ADSL)
SH513AX PSTN+GSM/
GPRS+ Ethernet (ADSL)
SH514AX
Ethernet
(ADSL)
PSTN+Ethernet (ADSL)
mains power
module + Li-Ion
/
mains power module + Li-Ion
/
GSM/GPRS+Ethernet (ADSL) / mains power module + Li-Ion /
PSTN+GSM/GPRS+Ethernet
(ADSL)
/ / /
(PSTN+GSM/GPRS) only / /
• BatLi + compulsory Li-Ion
or
• mains power module + Li-Ion
for GSM incoming calls
/
PSTN only
• BatLi
or
• mains power
module + Li-Ion
/
• BatLi
or
• mains power module
+ Li-Ion
/
GSM/GPRS only /
• BatLi + compulsory Li-Ion
or
• mains power module + Li-Ion
for GSM incoming calls
• BatLi + compulsory Li-Ion
or
• mains power module + Li-Ion
for GSM incoming calls
/
Ethernet (ADSL) only mains power module + Li-Ion
Type of power supply to be installed depending on the media used
KEY:
• BatLi = 2 x (3.6 V, 13 Ah) lithium power pack, BatLi22
• Li-Ion = 3.7 V/1.2 Ah Li-Ion rechargeable back-up battery
• Mains power module = 200-240 VAC 50-60 Hz / 4.5 VDC 2.2 A internal mains power module

9
2.5.1 Use with the BatLi22 lithium power pack and Li-Ion rechargeable back-up battery
1. Connect the back-up battery to the “2-point” connector. 2. Clip the back-up battery into its compartment.
3.7 V/1.2 Ah
back-up battery
SH513AX
A1142A047879
Coller sur certif
SH503AX
A1143A047879
Coller sur certif
SH513AX
A1142A047879
Coller sur certif
SH503AX
A1143A047879
Coller sur certif
DIALLER
3. Position the lithium battery on the
guide rails.
4. Slide the lithium power pack
upwards until it locks into position.
5. Following power-up, the dialler will
issue the voice message:
To remove the lithium power pack,
press on the unlocking key and slide
it downwards.
IMPORTANT
• If the dialler does not respond as
it should:
- disconnect the lithium power
pack and then the back-up
battery,
- wait for 2 min,
- reconnect the back-up battery
and then the lithium power pack,
- check the correct voice message
is issued.
• On power-up, the dialler is
automatically in installation mode.
“bip, installation mode”
Unlocking key
IMPORTANT
Depending on the transmission media used:
• Installation of the back-up battery is often required for the dialler to operate (see Power supply/Type of power supply to be
installed depending on the media used” chapter).
• The back-up battery is charged on the dialler and is designed to act as a buffer or back-up power supply to the main power
supply. If the dialler is prepared for installation off the site and then moved without its main power supply being connected,
the back-up battery should also be removed so that it remains charged.
• Connect the back-up battery first and then the lithium power pack or internal mains power module.
• The back-up battery must be connected with the main power off.
If the dialler indicates a fault, refer
to the “Power supply/Indication of
power faults on power-up” chapter
and the “Maintenance” chapter.

10
2.5.2 Use with the mains power module and the Li-Ion rechargeable back-up battery
1. Connect the rechargeable back-up battery to the
“2-point” connector.
2. Clip the back-up battery into its compartment.
3.7 V/1.2 Ah Li-Ion rechargeable
back-up battery
SH513AX
A1142A047879
Coller sur certif
SH503AX
A1143A047879
Coller sur certif
SH513AX
A1142A047879
Coller sur certif
SH503AX
A1143A047879
Coller sur certif
5. Position the mains power module
on to the guide rails.
6. Slide the module upwards until it
locks into position.
Unlocking key
3. Loosen the internal mains power
module closing screw.
4. • Connect the mains power cable (2 x 0.75 mm2H05WF type with a
diameter ranging from 5 mm min to 7.5 mm max) to the terminal block.
• Install a cable clamp.
• Put the cover back and tighten the closing screw.
Cover
Closing screw
230 V
mains cable
clamp (not
supplied)
Electrical
shock hazard
IMPORTANT: only use the
4.5 V DC module supplied
with the dialler or available
in the catalogue.
RXU01X internal mains power
supply module:
200-240 VAC 50-60 Hz
4.5 VDC 2.2 A
(double insulation symbol,
220 V power supply
without earth connection).
Connection to terminal
block N terminal (blue cable)
Connection to terminal
block L terminal
7 mm +/-1
28 mm +/-2
Strip the mains power cable over a length of 28 mm and the conductor over 7 mm.
Terminal L
Terminal N
 Loading...