

Service Instructions
DP 13 and 14 SEER PACKAGE HEA T PUMPS
DP 13 and 14 PACKAGE COOLING
HORIZONTAL MODELS
WITH R-410A
This manual is to be used by qualified, professionally trained HVAC technicians only. Daikin does
not assume any responsibility for property damage or personal injury due to improper service
procedures or services performed by an unqualified person.
Copyright © 2013 - 2016
RSD6300011r3
April 2016
1

INDEX
IMPORT ANT INFORMA TION ......................................................................................................... 4 - 5
PRODUCT IDENTIFICATION - DP[13-14]C/HH**41** ................................................................. 6 - 7
ACCESSORIES................................................................................................................................... 8
PCCP101-103 ROOF CURB .......................................................................................................................................... 9
PCP101-103 DOWNFLOW PLENUM ............................................................................................................................ 9
PCEF101-103 ELBOW AND FLASHING KIT ............................................................................................................... 10
DDNECNJPCHHA ECONOMIZER ................................................................................................................................10
PCMD101-103 DOWNFLOW MANUAL DAMPER ........................................................................................................11
GPHMD101-103 HORIZONTAL MOTORIZED DAMPER WITH DUCT FLANGE ............................................................11
SQRPC SQUARE TO ROUND CONVERTER............................................................................................................... 12
SQRPCH SQUARE TO ROUND CONVERTER ............................................................................................................ 12
DPHRFA EXTERNAL FIL TER KIT ............................................................................................................................... 13
PRODUCT DESIGN .......................................................................................................................... 14
ELECTRICAL WIRING ................................................................................................................................................. 15
LINE VOL T AGE WIRING.............................................................................................................................................. 16
SYSTEM OPERATION ...................................................................................................................... 17
DP[13-14]C/HH**41**
COOLING.................................................................................................................................................................... 17
COOLING CYCLE........................................................................................................................................................ 17
HEA TING CYCLE......................................................................................................................................................... 17
DEFROST CYCLE ....................................................................................................................................................... 18
FAN OPERA TION ........................................................................................................................................................ 18
SCHEDULED MAINTENANCE ......................................................................................................... 21
ONCE A MONTH ......................................................................................................................................................... 21
ONCE A YEAR............................................................................................................................................................. 21
TEST EQUIPMENT...................................................................................................................................................... 21
SERVICING ....................................................................................................................................... 22
COOLING/HEA T PUMP- SERVICE ANALYSIS GUIDE ................................................................................................ 22
S-1 CHECKING VOL TAGE ........................................................................................................................................... 23
S-2 CHECKING WIRING .............................................................................................................................................. 23
S-3 CHECKING THERMOSTAT , WIRING , AND ANTICIP A TOR.................................................................................... 23
S-3A Thermostat and Wiring ..................................................................................................................................... 23
S-3B Cooling Anticipator ........................................................................................................................................... 24
S-3C Heating Anticipator ........................................................................................................................................... 24
S-4 CHECKING TRANSFORMER AND CONTROL CIRCUIT ....................................................................................... 24
S-7 CHECKING CONT ACTOR AND/OR RELA YS........................................................................................................ 24
S-8 CHECKING CONT ACTOR CONTACTS.................................................................................................................. 25
S-9 CHECKING FAN RELA Y CONT ACTS..................................................................................................................... 25
S-11 CHECKING LOSS OF CHARGE PROTECT OR ................................................................................................... 26
S-15 CHECKING CAP ACITOR ..................................................................................................................................... 26
S-15A RESIST ANCE CHECK ....................................................................................................................................... 27
S-15B CAP ACITANCE CHECK ..................................................................................................................................... 27
S-16 CHECKING MOTORS .......................................................................................................................................... 28
S-16A CHECKING F AN AND BLOWER MOTOR WINDINGS (PSC MOT ORS) ............................................................ 28
S-16D CHECKING EEM MOTORS ............................................................................................................................... 28
S-17 CHECKING COMPRESSOR WINDINGS ............................................................................................................. 29
S-17A RESIST ANCE TEST .......................................................................................................................................... 29
S-17B GROUND TEST ................................................................................................................................................. 29
S-17D Operation T est ................................................................................................................................................. 30
S-18 TESTING CRANKCASE HEA TER ........................................................................................................................ 30
S-18A CHECKING CRANKCASE HEA TER THERMOST AT........................................................................................... 30
2

INDEX
S-21 CHECKING REVERSING V AL VE AND SOLENOID .............................................................................................. 30
S-24 TESTING DEFROST CONTROL .......................................................................................................................... 31
S-25 TESTING DEFROST THERMOSTA T.................................................................................................................... 31
S-50 CHECKING HEA TER LIMIT CONTROL(S) ........................................................................................................... 31
S-52 CHECKING HEA TER ELEMENTS ........................................................................................................................ 31
S-100 REFRIGERA TION REPAIR PRACTICE............................................................................................................... 32
S-101 LEAK TESTING ................................................................................................................................................. 32
S-102 EV ACUATION..................................................................................................................................................... 32
S-103 CHARGING ........................................................................................................................................................ 33
S-104 CHECKING COMPRESSOR EFFICIENCY ......................................................................................................... 34
S-108 SUPERHEA T ...................................................................................................................................................... 34
S-109 CHECKING SUBCOOLING ................................................................................................................................35
S-11 1 FIXED ORIFICE RESTRICTION DEVICES ......................................................................................................... 35
S-112 CHECKING RESTRICTED LIQUID LINE ............................................................................................................ 36
S-113 REFRIGERANT OVERCHARGE ......................................................................................................................... 36
S-114 NON-CONDENSABLES...................................................................................................................................... 36
S-115 COMPRESSOR BURNOUT................................................................................................................................39
S-122 REVERSING V ALVE REPLACEMENT................................................................................................................ 39
S-200 CHECKING EXTERNAL ST ATIC PRESSURE .................................................................................................... 40
S-201 CHECKING TEMPERA TURE RISE ..................................................................................................................... 40
WIRING DIAGRAMS.......................................................................................................................... 41
OT18-60A OUTDOOR THERMOST A T ......................................................................................................................... 41
OT18-60A OUTDOOR THERMOST A T ......................................................................................................................... 42
SINGLE PHASE HKR** HEAT KITS ............................................................................................................................ 43
PCE* ECONOMIZER .................................................................................................................................................... 44
SPK* - SINGLE POINT WIRING KIT ........................................................................................... ................................ 45
UNIT WIRING DIAGRAMS .......................................................................................................................................... 46
3
IMPORT ANT INFORMA TION
Pride and workmanship go into every product to provide our customers with quality products. It is possible, however, that
during its lifetime a product may require service. Products should be serviced only by a qualified service technician who
is familiar with the safety procedures required in the repair and who is equipped with the proper tools, parts, testing
instruments and the appropriate service manual. REVIEW ALL SERVICE INFORMATION IN THE APPROPRIATE
SERVICE MANUAL BEFORE BEGINNING REPAIRS.
IMPORT ANT NOTICES FOR CONSUMERS AND SERVICERS
RECOGNIZE SAFETY SYMBOLS, WORDS AND LABELS
This unit should not be connected to, or used in conjunction with, any devices that are not design certified for use with this
unit or have not been tested and approved by Daikin. Serious property damage or personal injury, reduced unit performance
and/or hazardous conditions may result from use of devices that have not been approved or certified by Daikin.
WARNING
O
NLY PERSONNEL THAT HAVE BEEN TRAINED TO INSTALL, ADJUST, SERVICE OR
REPAIR (HEREINAFTER
MANUAL SHOULD SERVICE THE EQUIPMENT
BE RESPONSIBLE FOR ANY INJURY OR PROPERTY DAMAGE ARISING FROM
IMPROPER SERVICE OR SERVICE PROCEDURES
ASSUME RESPONSIBILITY FOR ANY INJURY OR PROPERTY DAMAGE WHICH MAY
RESULT
. IN
LICENSES TO SERVICE THE EQUIPMENT SPECIFIED IN THIS MANUAL, ONLY
LICENSED PERSONNEL SHOULD SERVICE THE EQUIPMENT
INSTALLATION, ADJUSTMENT, SERVICING OR REPAIR OF THE EQUIPMENT
SPECIFIED IN THIS MANUAL, OR ATTEMPTING TO INSTALL, ADJUST, SERVICE OR
REPAIR THE EQUIPMENT SPECIFIED IN THIS MANUAL WITHOUT PROPER
TRAINING MAY RESULT IN PRODUCT DAMAGE, PROPERTY DAMAGE, PERSONAL
INJURY OR DEATH
, “
SERVICE
”)
THE EQUIPMENT SPECIFIED IN THIS
. THE
MANUFACTURER WILL NOT
. IF
YOU SERVICE THIS UNIT, YOU
ADDITION, IN JURISDICTIONS THAT REQUIRE ONE OR MORE
. I
MPROPER
.
O PREVENT THE RISK OF PROPERTY DAMAGE, PERSONAL INJURY, OR DEATH,
T
DO NOT STORE COMBUSTIBLE MATERIALS OR USE GASOLINE OR OTHER
FLAMMABLE LIQUIDS OR VAPORS IN THE VICINITY OF THIS A PPLIANCE.
To locate an authorized servicer, please consult your telephone book or the dealer from whom you purchased this
product. For further assistance, please contact:
CONSUMER INFORMA TION LINE - DAIKIN BRAND PRODUCTS
TOLL FREE 1-855-770-5648 (U.S. only)
email us at: customerservice@daikincomfort.com
fax us at: (713) 856-1821
(Not a technical assistance line for dealers.)
Outside the U.S., call 1-713-861-2500
(Not a technical assistance line for dealers.)
Y our telephone company will bill you for the call.
4
IMPORTANT INFORMATION
SAFE REFRIGERANT HANDLING
While these items will not cover every conceivable situation, they should serve as a useful guide.
WARNING
EFRIGERANTS ARE HEAVIER THAN AIR. THEY CAN "P USH OUT" THE
R
OXYGEN IN YOUR LUNGS OR IN ANY ENCLOSED SPAC E.
POSSIBL E DI FFI CULTY IN BR EAT HING O R DEA TH:
EVER PU RGE RE FRIG ERA NT INT O AN E NCLOS ED R OOM OR SPACE . BY
•
N
LAW, ALL REF RIGERANTS MUST BE RECLAIMED.
F AN INDOOR LEAK IS SUSPECTED, THOROUGHLY VENTILATE THE AREA
•
I
BEFORE BEGINNING WORK.
•
IQUI D REFRIGE RANT CAN BE VERY COLD . TO AVOID POSSIBLE FROST-
L
BITE OR BLINDNESS, AVOID CONTACT WITH REFRIGERANT AND WEAR
GLOVES AND GOGGLES.
SKI N OR E YES, S EEK M EDI CA L HELP IMME DI AT ELY .
•
ALWAYS FOLLOW EPA REGULATI ONS. NEVER BUR N REFRIGERANT,
AS POISON OUS GAS WI LL BE PRODUC ED.
F LIQUID REFRIGERANT DOES CONTACT YOUR
I
O AVO ID
T
WARNING
TO AVOID POSSIBLE EXPLOSION:
• NEVER APPLY FLAME OR S TEAM TO A REFRIGERANT CYL INDER. IF YOU
MUST HEAT A CYLINDE R FOR FASTER CHARGING , PARTIALLY IMMERSE
IT IN WARM WATER.
• NE VER FILL A CYLINDER MO RE THAN 80% FULL OF LIQUID R EFRIGERANT.
• NE VER ADD ANYTHING O THER THAN R-22 TO AN R-22 CYLINDER OR
R-410A TO AN R-410A CYLINDER. THE SERVICE EQUIPMENT USED MUST
BE LISTED OR CERTIF IED FOR THE TYPE OF REFRIGE RANT USED.
• STORE CYLINDERS IN A CO OL, DRY PLACE. NEVER USE A CYLIND ER
AS A PLATFORM OR A ROLLER.
WARNING
O AVOI D P O SSIBL E E XP LOSI ON, US E ONLY R ETURN AB LE ( NOT DISPO SABL E)
T
SERVICE CYLINDERS WHEN REMOVING REFRIGERANT FROM A SYSTEM.
•
NSURE T HE CYL INDER I S FREE O F DAMA GE WHIC H COULD LEAD TO A
E
LEAK OR EXPLOSION.
•
NSURE T HE HYDR OSTATI C TEST DATE DO ES NOT E XCEE D 5 YEARS .
E
•
NSURE THE PRESSURE RATING MEETS OR EXCEEDS 400 LBS.
E
HEN I N DOUB T, DO NOT U SE CYLI ND ER.
W
WARNING
WARNING
SYSTEM CONTAMINANT S, IMPROPER SERVICE PROCEDU RE AND/OR PHYSICAL
ABUSE AFFECTING HE RMETIC COMPRESSOR ELECTRI CAL TERMINALS MAY
CAUSE DANGEROUS SYSTEM VENTING.
The successful development of hermetically sealed refrigeration compressors has completely sealed the compressor's
moving parts and electric motor inside a common housing,
minimizing refrigerant leaks and the hazards sometimes associated with moving belts, pulleys or couplings.
Fundamental to the design of hermetic compressors is a
method whereby electrical current is transmitted to the compressor motor through terminal conductors which pass
through the compressor housing wall. These terminals are
sealed in a dielectric material which insulates them from the
housing and maintains the pressure tight integrity of the hermetic compressor. The terminals and their dielectric embedment are strongly constructed, but are vulnerable to careless compressor installation or maintenance procedures and
equally vulnerable to internal electrical short circuits caused
by excessive system contaminants.
T
O AVOID POSSIBLE INJURY, EXPLOSION OR DEATH, PRACTICE SAFE
HANDLING OF REFRIGERANTS.
In either of these instances, an electrical short between the
terminal and the compressor housing may result in the loss
of integrity between the terminal and its dielectric embedment. This loss may cause the terminals to be expelled,
thereby venting the vaporous and liquid contents of the compressor housing and system.
A venting compressor terminal normally presents no danger
to anyone, providing the terminal protective cover is properly
in place.
If, however, the terminal protective cover is not properly in
place, a venting terminal may discharge a combination of
(a ) hot lubricating oil and refrigerant
(b ) flammable mixture (if system is contaminated
with air)
in a stream of spray which may be dangerous to anyone in
the vicinity. Death or serious bodily injury could occur.
Under no circumstances is a hermetic compressor to be electrically energized and/or operated without having the terminal
protective cover properly in place.
See Service Section S-17 for proper servicing.
5

PRODUCT IDENTIFICATION
yp
g
g
g
The model number is used for positive identification of component parts used in manufacturing. Please use this number when
requesting service or parts information.
D P13CH244 1AA
Brand Engineer ing
D - Daik in Minor revision
Product T
P - Packa
SEER 1 - 208/ 230 V single phase 60 Hz
13 - 13 SEER 2 - 220/240 V single phase 50 Hz
14 - Up to 1 4 SEER 3 - 208/230 V three phase 60 Hz
15 - Up to 1 5 SEER 4 - 460 V three phas e 60 Hz
Unit Type
H - Heat Pump Ref rigerant
C - Air Conditioner 4 - R-410A
Confi
M - Multi-position 24 - 2 to n 42 - 3.5 ton
H - Horizontal 30 - 2.5 ton 48 - 4.0 ton
eEn
ed Major revision
uration Tonnage Nominal
ineering
Voltage
5 - 380/415 V three phase 50 Hz
3 6 - 3 to n 6 0 - 5 t o n
6
PRODUCT IDENTIFICATION
Model # Pa cka ge Cooling Description
aikin Package Cooling up to 13 Seer R410A Horizontal elec tric cooling unit.
DP13CH[24-60]41**
DP14CH[24-60]41**
DP14CH24-3041BB
DP14CH3641AC
DP14CH42-6041BB
DP14CH24-3041BC
DP14CH3641AD
DP14CH42-6041BC
Model # Package Heat Pump Description
DP13HH[24-60]41**
DP14HH[24-60]41**
DP14HH24-3641AC
DP14HH42-6041BB
D
Initial release of 208-230/1/60 s ingle phase m odel s.
aikin Package Cooling up to 14 Seer R410A Horizontal elec tric cooling unit.
D
Initial release of 208-230/1/60 s ingle phase m odel s.
aikin Package Cooling up to 14 Seer R410A Horizontal elec tric cooling unit,
D
208-230/1/60 single phase models. Converted Aluminum coils with 3/8" return
bends/ c ros s overs to Alum i num c oi ls us ing 9m m return bends / c ros s overs.
aikin Package Cooling up to 14 Seer R410A Horizontal elec tric cooling unit,
D
208-230/1/60 single phase models. Release of m odels with access box removed.
aikin Package Heat Pump up to 13 Seer R410A Horizontal heat pum p unit. Initial
D
releas e of 208-230/1/ 60 si ngl e phase models.
aikin Package Heat Pump up to 14 Seer R410A Horizontal heat pum p unit. Initial
D
releas e of 208-230/1/ 60 si ngl e phase models.
aikin Package Heat Pump up to 14 Seer R410A Horizontal heat pum p unit,
D
208-230/1/60 single phase models. Converted Aluminum coils with 3/8" return
bends/ c ros s overs to Alum i num c oi ls us ing 9m m return bends / c ros s overs.
DP14HH24-3641AD
DP14HH42-6041BC
DP14HH6041CA
aikin Package Heat Pump up to 14 Seer R410A Horizontal heat pum p unit,
D
208-230/1/60 single phase models. Release of m odels with access box removed.
D
aikin Package Heat Pump up to 14 Seer R410A Horizontal heat pum p unit,
208-230/1/60 single phase models. - Devel op and rel ease 14 SEER 5 Ton H model
heat pum p wi th new 7 mm condenser c oi l.
7
ACCESSORIES
DP[13-14]CH/HH**41**
ACCESSORIES - DP**C/DP**H**** MODELS
Part Number Descriptio n
PCCP 101-103 14" Ro of Curb for Daik i n H - Series Package Un it A ll Chasis Requires PCP101 -103
PCP 101 -103 Downf lo w P lenu m Kit for Daik i n H - Ser i es Pac kage Units All Chassis. Requir es P CCP 1 01-103
PCP101-103R8
PCMD101-103 Manual Damper fo r D aikin H-Seri es Pac kage Units. Requi res PCP101-103
PCMDM101-103 Motorized Damper f or Daikin H- Ser ies Pac kage Units. Requires PCP 1 01- 103
GPHMD10 1- 103 Horizont al Manual Damper for Daik in H - Serie s Pac k a ge U ni t Horizontal Applications All Chassis
SQRPCH101 Horizont al Squar e to Round Adapters f or H- Series Pa c kage Unit 16"&14" Round .
SQRPCH102-103 Hor izontal Sq uar e t o Rou nd Adapter s f or H- Seri es Pac kage Unit 18"&14"
SQRPC101
SQRPC102-103
DPHFRA Exter na l H or izontal Filter Rack for Daikin M- and H- Series Pac k ag e Units
PCE F101-103 Elbow & Flashing w / R-8 Liner for Daiki n H- Ser i es Pa c kage Unit All Chassis
CDK36 3 T on Co nc e ntric Duc t Kit
CDK3651 5 3 T on Flush Mount Conc entric Duc t Kit w / Filt e r
CDK3653 0 3 T on Step Down Co nc e ntric Duc t Kit
CDK3653 5 3 T on St ep Do wn C oncentric D uct Kit w/ F ilter
CDK4872 4 - 6 Ton Concentric Duct Kit
CDK4872 515 4 - 6 To n Flush Mount Co nc e ntric Duc t Kit w / Filt er
CDK4872 530 4 - 6 To n Step Down Con c en tric Duct Kit
CDK4872 535 4 - 6 To n Step Down Con c en tric Duct Kit w/ Filter
DDNECNJPCHHA Downflow Economizer H-S eries Package Unit. Requires PCP 10 1-103.
DHZ E C NJPGCHM Economiz er H-Series Daikin Pa c kage Unit
Downf lo w P lenu m Kit for Daik i n H - Ser i es Pac kage Units w/ R-8 Insulation Lin er All C hassis.
Requires PCC P 101 -103
Downf lo w S quare to Round Adapt er for H- S eries Pa c kage Unit 16" Rounds.
Requires PCCP 101- 103 and P CP1 01-10 3
Downf lo w S quare to Round Adapt er for H- S eries Pa c kage Unit 18" Rounds.
Requires PCCP 101- 103 and P CP1 01-10 3
THERMOSTATS
CH70T G Manual Change over
CHSATG Manual Change over
CHT18-60 M anual Changeov er
CHT90-120 M anual Changeov er
CHT P 18 -6 0HD M anu al Chan ge over
CT18-60 Manual Changeover Mechanical, Nonprogrammable Cool Only
THERMOSTATS
1213401 White Manual Changeov e r
1213402 White Manual Changeov e r
1213403 White Manual Changeov e r
1213404 White Manual Changeov e r
1213406
1213407
1213408
1213410
1213411
1213412
1213431
Beige
White
White
White
White
White
White
Manual/Auto Changeover
Manual Changeov e r 5 + 2 Pr o gr amming Digital 2 Heat - 2 Cool
Manual/Auto Changeover
Manual Changeov e r
Manual Changeov e r
Manual/Auto Changeover
Manual/Auto Changeover 7 Day Programming Digital 3 Heat - 2 Cool
8
Digital, Nonprogrammable 1 Heat - 1 Cool
Mechanical, Nonprogrammable 1 Heat - 1 Cool
Mechanical, Nonprogrammable 1 Heat - 1 Cool
Mechanical, Nonprogrammable 2 Heat - 2 Cool
Digital, Nonprogrammable 2 Heat - 1 Cool
5 + 2 Pr o gr amming Digital 1 Heat - 1 Cool
Nonprogr a mmable Digital 1 Hea t - 1 Cool
7 Day Programming Digital 2 Heat - 1 Cool
Nonprogr a mmable Digital 2 Hea t - 1 Cool
5 + 2 Pr o gr amming Digital 3 Heat - 2 Cool
7 Day Programming Digital 1 Heat - 1 Cool
5 + 2 Pr o gr amming Digital 2 Heat - 1 Cool
Nonprogr a mmable Digital 2 Hea t - 2 Cool
7 Day Programming Digital 3 Heat - 2 Cool
ACCESSORIES
33"
DP[13-14]CH/HH**41A*
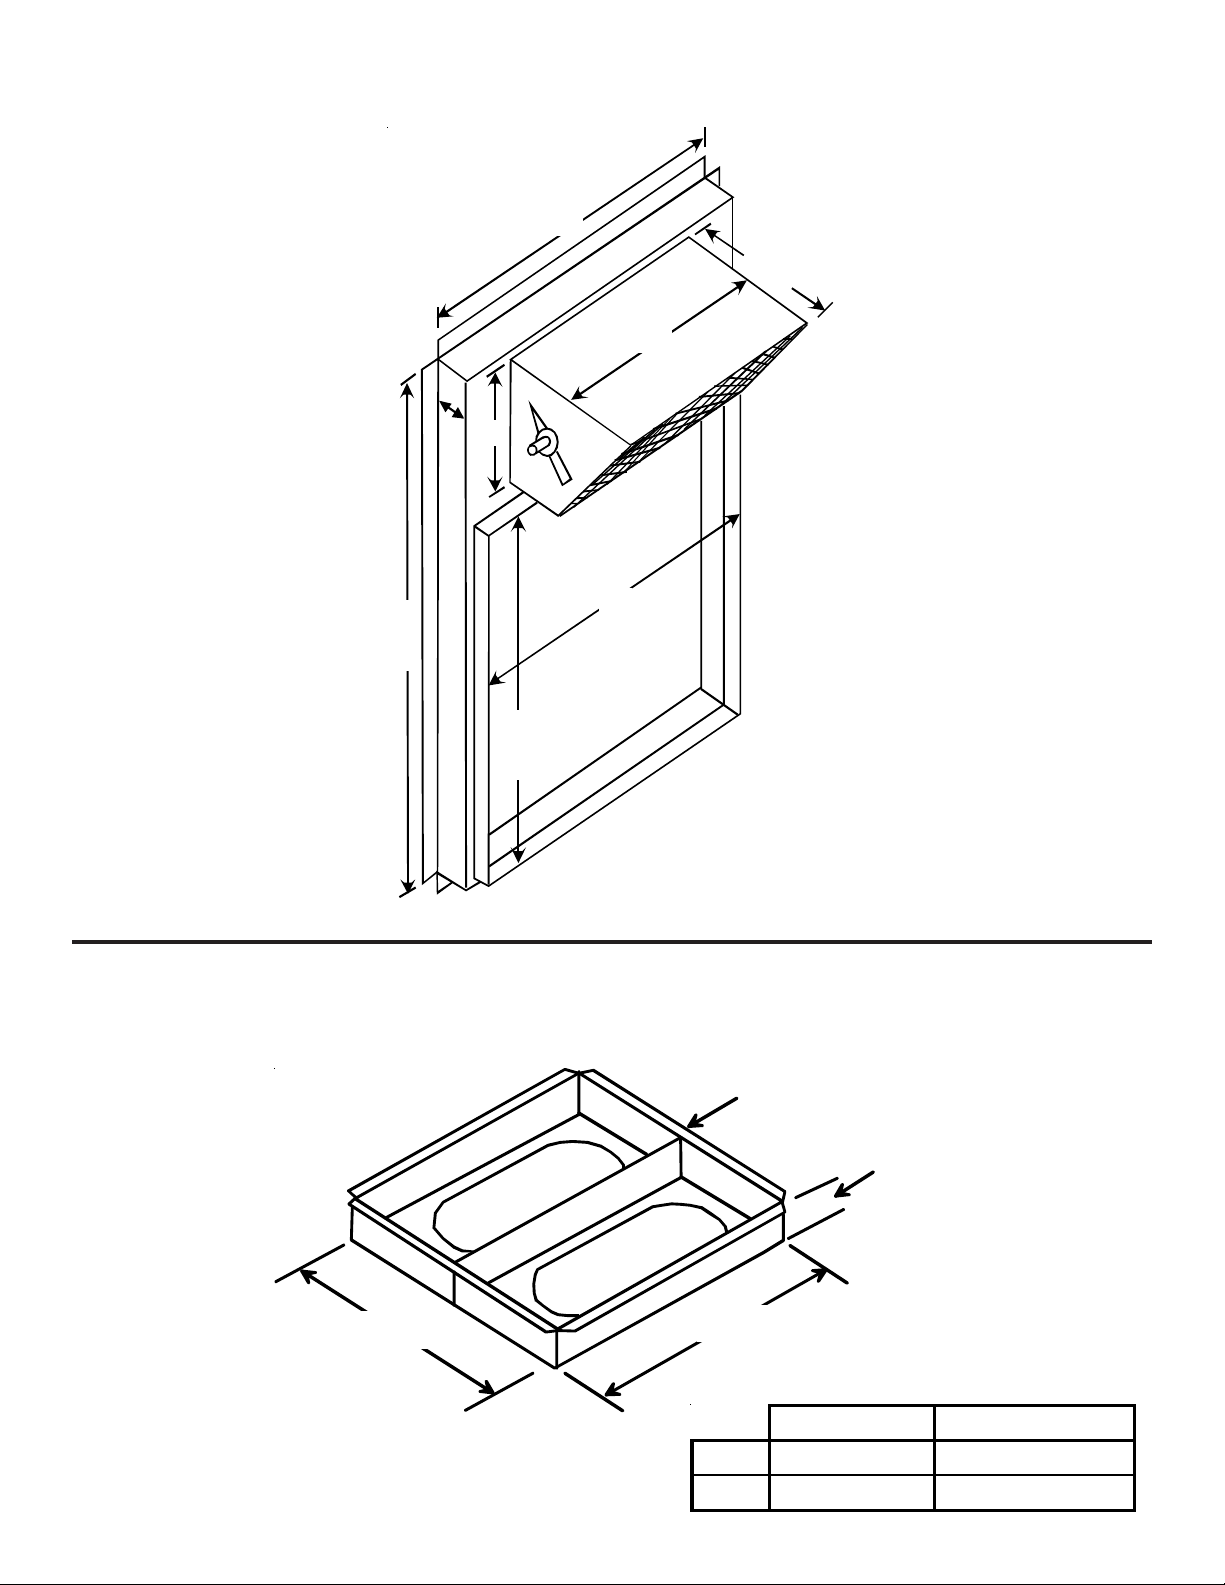
PCCP101-103 ROOF CURB
64"
59"
29 3/8"
29 3/4"
33"
28 3/4"
31"
26"
PCP101-103 DOWNFLOW PLENUM
(Use with PCCP Roof Curb)
14"
1" Flange
Roof
Curb
37"
13"
25 1/2"
33"
13"
9
ACCESSORIES
DP[13-14]CH/HH**41A*
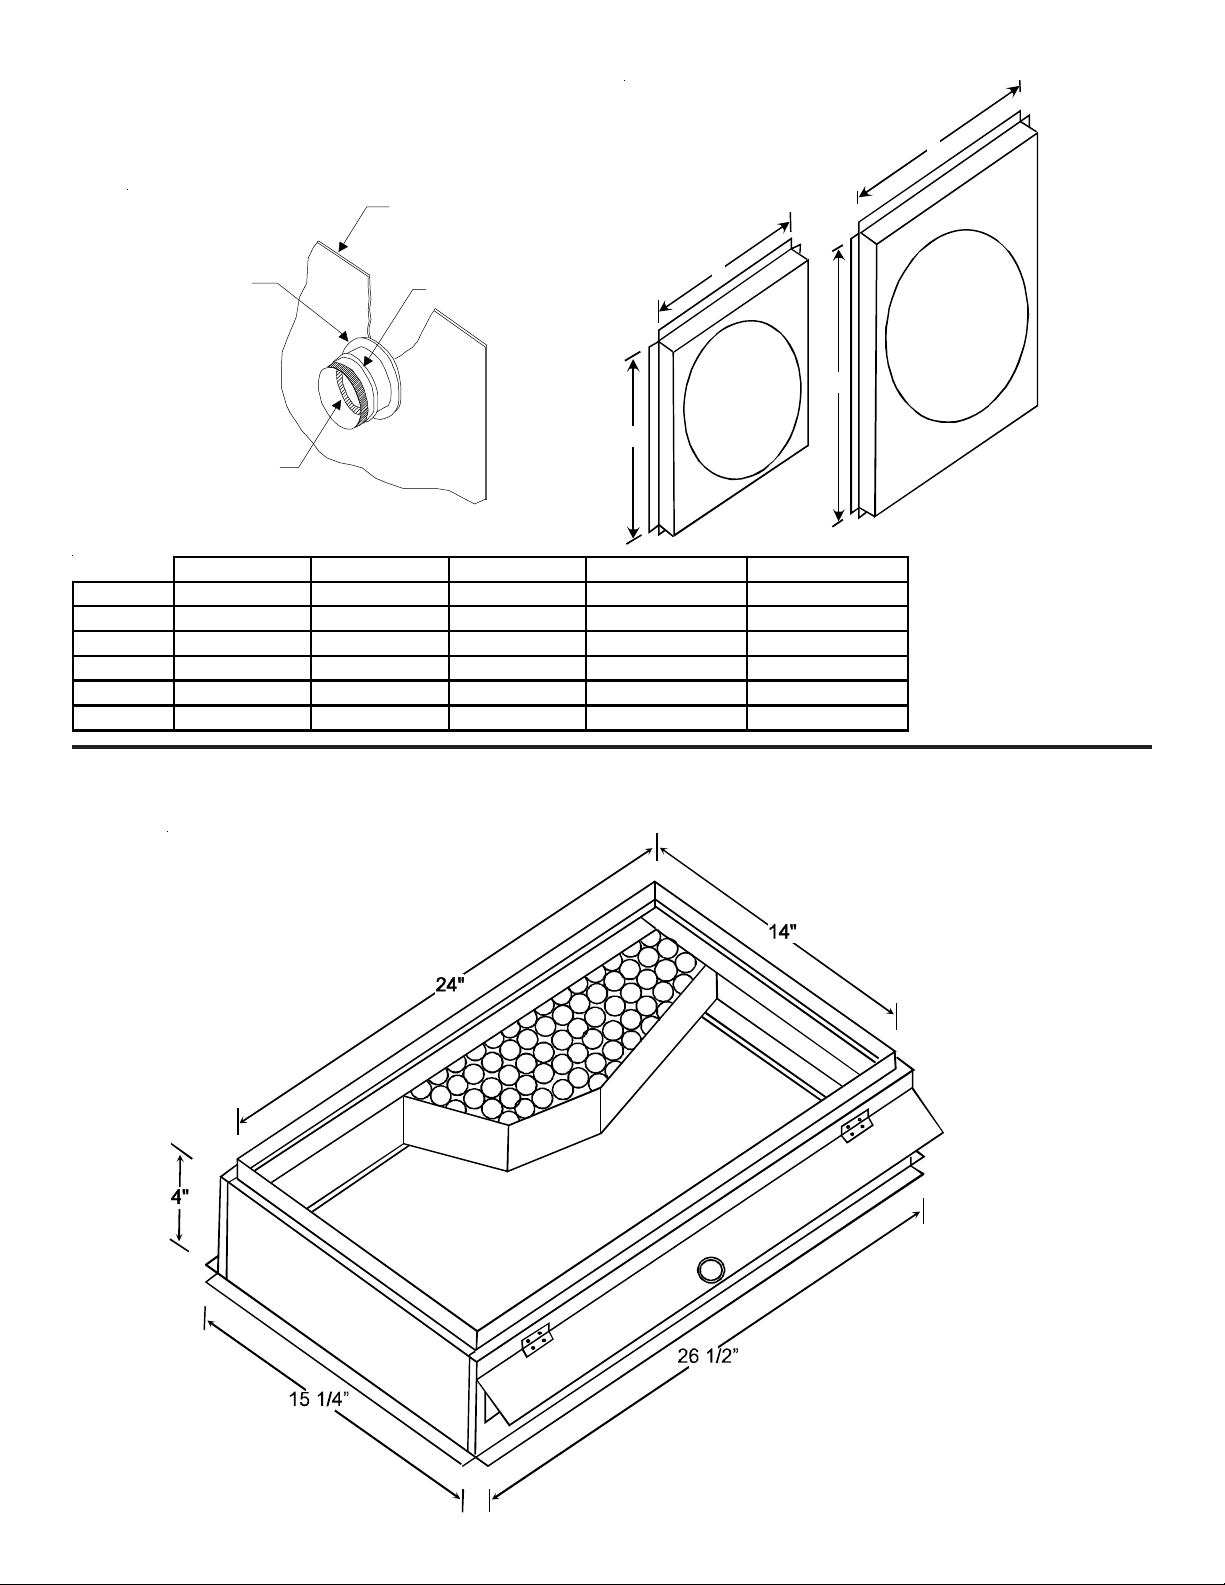
PCEF101-103 ELBOW AND FLASHING KIT
28"
35"
25"
33"
3"
4"
4"
25"
8"
DDNECNJPCHHA ECONOMIZER*
(DOWNFLOW APPLICATIONS)
C
E
D
Model Used With
DDNECNJPCHHA
10
B
H-SERIES DAI KI N
PACKAGE UNIT.
REQUIRES
PCP10 1- 103
F
A
A
20 16.25 16 23.5 12.5 45.75
B
C
D
E
F
ACCESSORIES
DP[13-14]CH/HH**41A*
DHZECNJPGCHM ECONOMIZER*
(HORIZONTAL APPLICATIONS)
D C
B
E
A
F
SHIPPED WITH 16 X 25 X 1" FILTER AND
14.5 X 15.5 MIST ELIMINATOR INSTALLED
A B C D E F G
Shipped with 16 x 25 x 1" Filter and 14.5 x 15.5 Mist Eliminator Installed
PGEH101/102 25.25 18.125 18 16 10.375 13.75 16.125
PGEH103 35.25 18.125 18 16 15.875 18.25 16.125
ECONOMIZER ABCDEFG
DHZECNJPGCHM 25.25 18.125 18 16 10.375 13.75 16.125
G
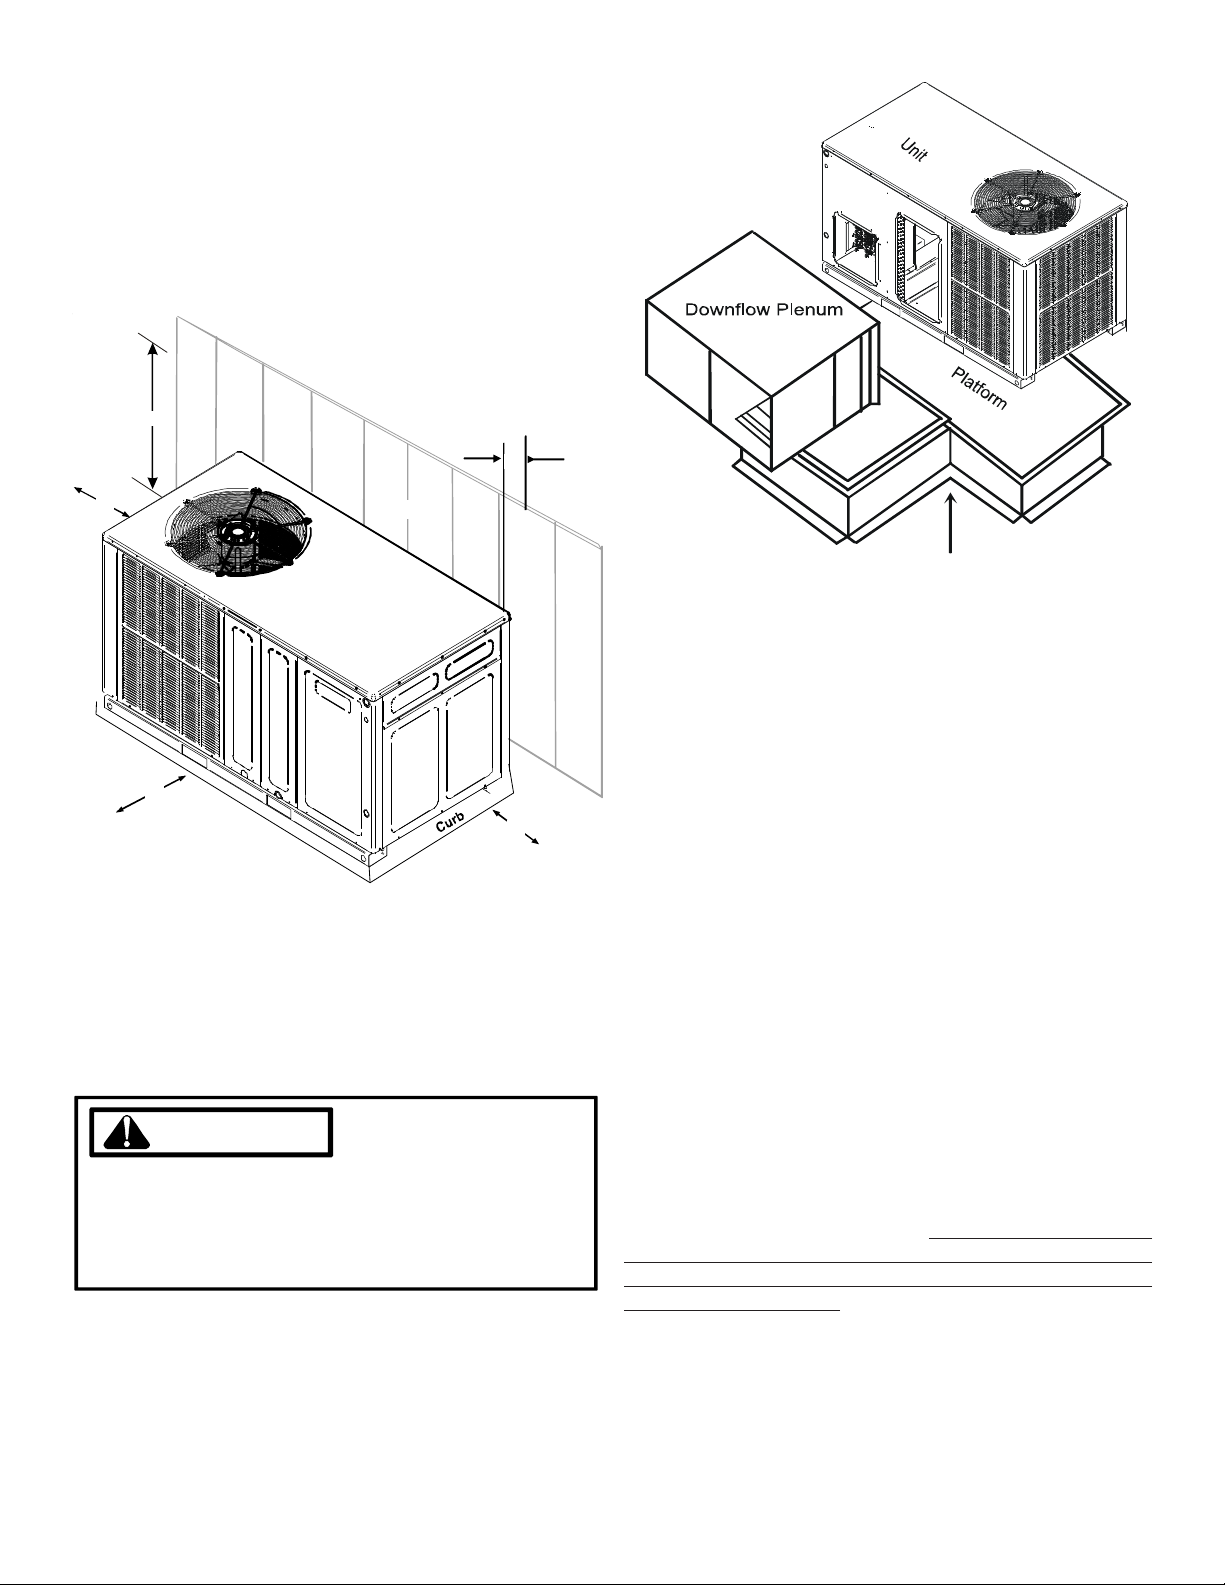
PCMD101-103 DOWNFLOW MANUAL DAMPER*
PCMDM101-103 DOWNFLOW MOTORIZED DAMPER*
*USED WITH PCP101-103 DOWNFLOW PLENUM
"
8
/
1
2
1
FILTER ACCESS
PANEL
6"
10"
18"
29 3/4"
MODEL DESCRIPTION
PCMDH101-103 Manual Da mper
PCMDM101-1 03 M o torzie d Damper
11
ACCESSORIES
"
A
A
GPHMD101-103 HORIZONTAL MANUAL DAMPER WITH DUCT FLANGE
2"
6"
18"
17"
12"
DP[13-14]CH/HH**41A*
8
1
/
4
"
25 1/4"
17 1/4"
SQRPC SQUARE TO ROUND CONVERTER
(DOWNFLOW APPLICATIONS)
1" FLANGES
SA
1 1/2
12
29 1/2"
RA
29 1/4"
SQRPC101 SQRP102-103
S
R
16" 18"
16" 18"
ACCESSORIES
A
DP[13-14]CH/HH**41A*
SQRPCH SQUARE TO ROUND CONVERTER
(HORIZONTAL APPLICATIONS)
SQUARE TO ROUND
DUCT CONVERTER PANEL
2"
SUPPLY
A
OUTER FLANGE
STARTER FLANGE
SQRPCH-101 SQRPCH-102 SQRPCH-103 SQRPCH102-14 SQRPCH103-14
15" 17" 17" 15" 15"
B
C 17" 17" 19" 15" 15"
D 22 1/2" 24 1/2" 24 1/2" 24 1/2" 24 1/2"
SUPPLY
RETURN 16" 16" 18" 14" 14"
15" 17" 17" 15" 15"
14" 16" 16" 14" 14"
BEAD
B
C
2"
RETURN
D
DPHFRA EXTERNAL FILTER KIT
(HORIZONTAL APPLICATIONS)
14" x 25" x 2" FILTER
13
PRODUCT DESIGN
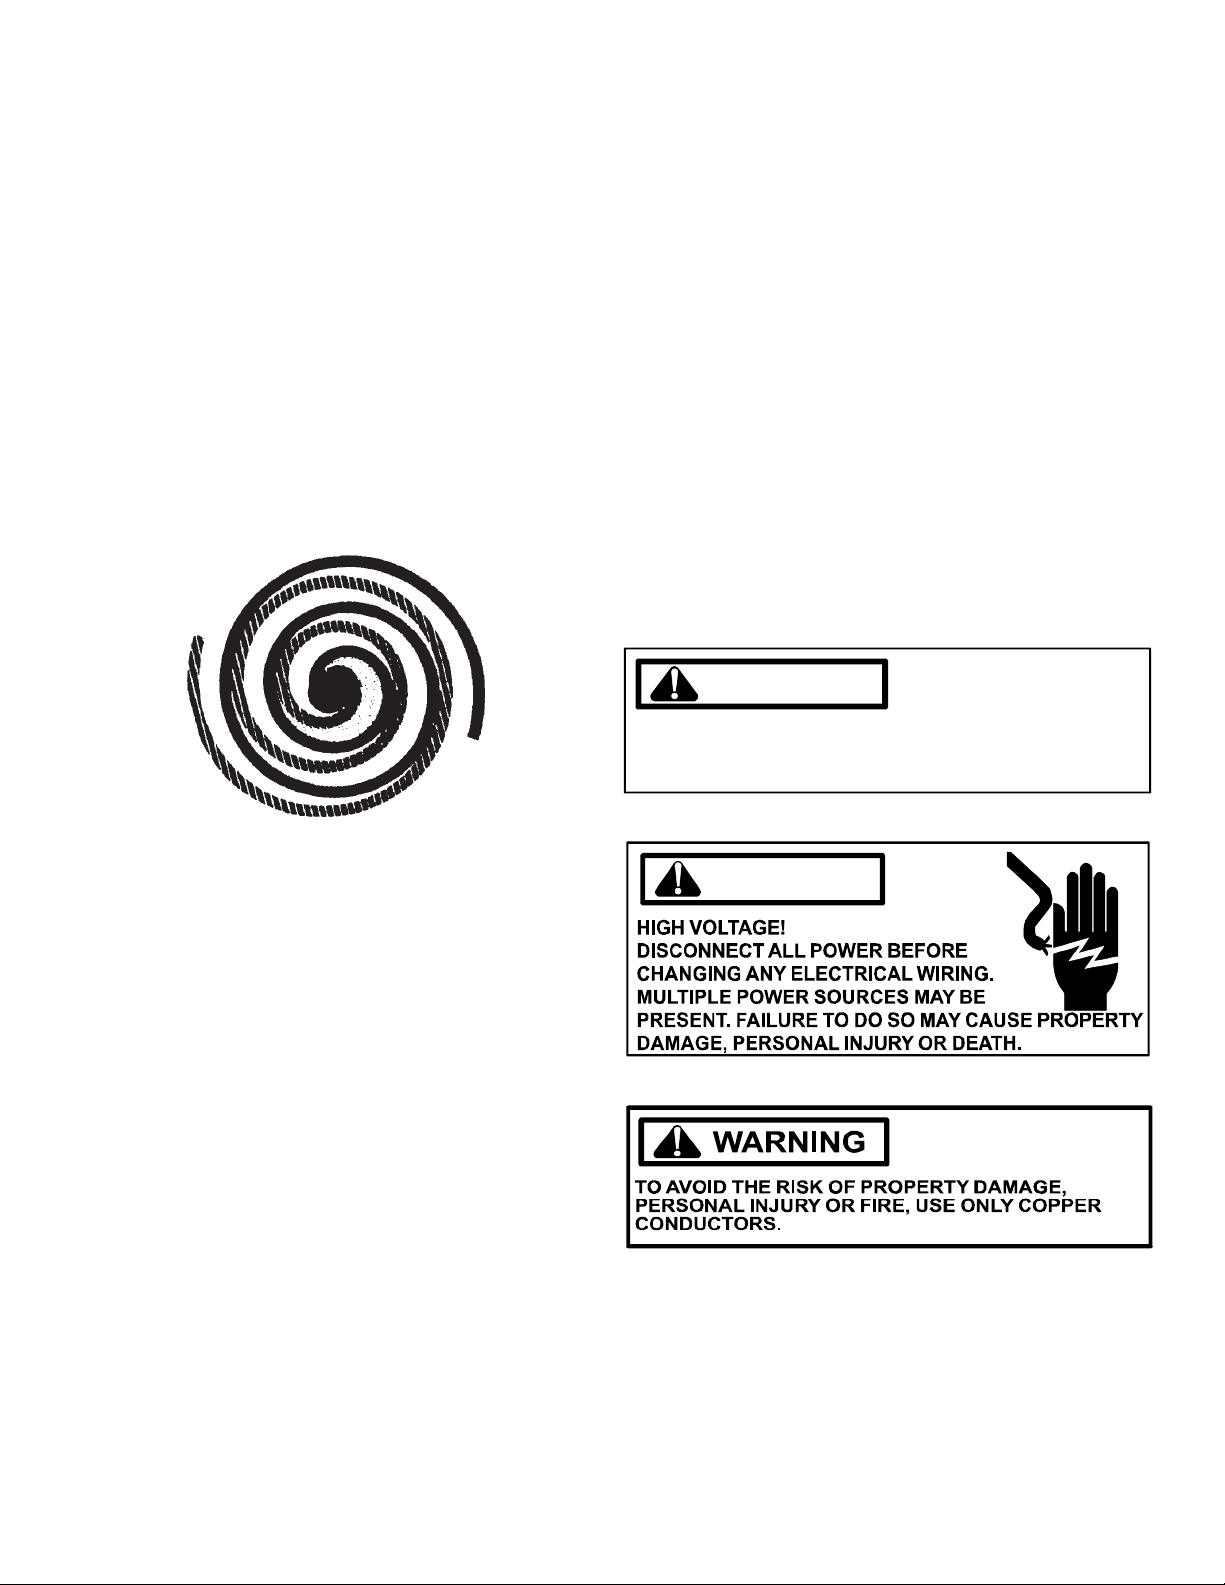
LOCATION & CLEARANCES
NOTE: To ensure proper condensate drainage, unit must be installed in a level position.
In installations where the unit is installed above ground level
and not serviceable from the ground (Example: Roof Top
installations) the installer must provide a service platform for
the service person with rails or guards in accordance with local
codes or ordinances.
48” MIN.
10"
36"
36"
DP[13-14]CH/DP[13-14]HH**41*
WALL
UNIT
36"
NOTE: Roof overhang should be no more than 36" and
provisions made to deflect the warm discharge air out from the
overhang.
Minimum clearances are required to avoid air recirculation and
keep the unit operating at peak efficiency.
WARNING
TO PREVENT PO SSIBLE DAMAG E, THE UNIT SHOUL D
REMAIN IN AN UPRIGHT POSITION DURING ALL
RIGGING AND MOVING OPERA TIONS. TO FACILIT A TE
LIFTING AND M OVING IF A CRANE IS USED, PLACE
THE UNIT IN AN ADEQUATE CABLE SLIDE.
Refer to Roof Curb Installation Instructions for proper curb
installation. Curbing must be installed in compliance with the
National Roofing Contractors Association Manual.
Lower unit carefully onto roof mounting curb. While rigging
unit, center of gravity will cause condenser end to be lower
than supply air end.
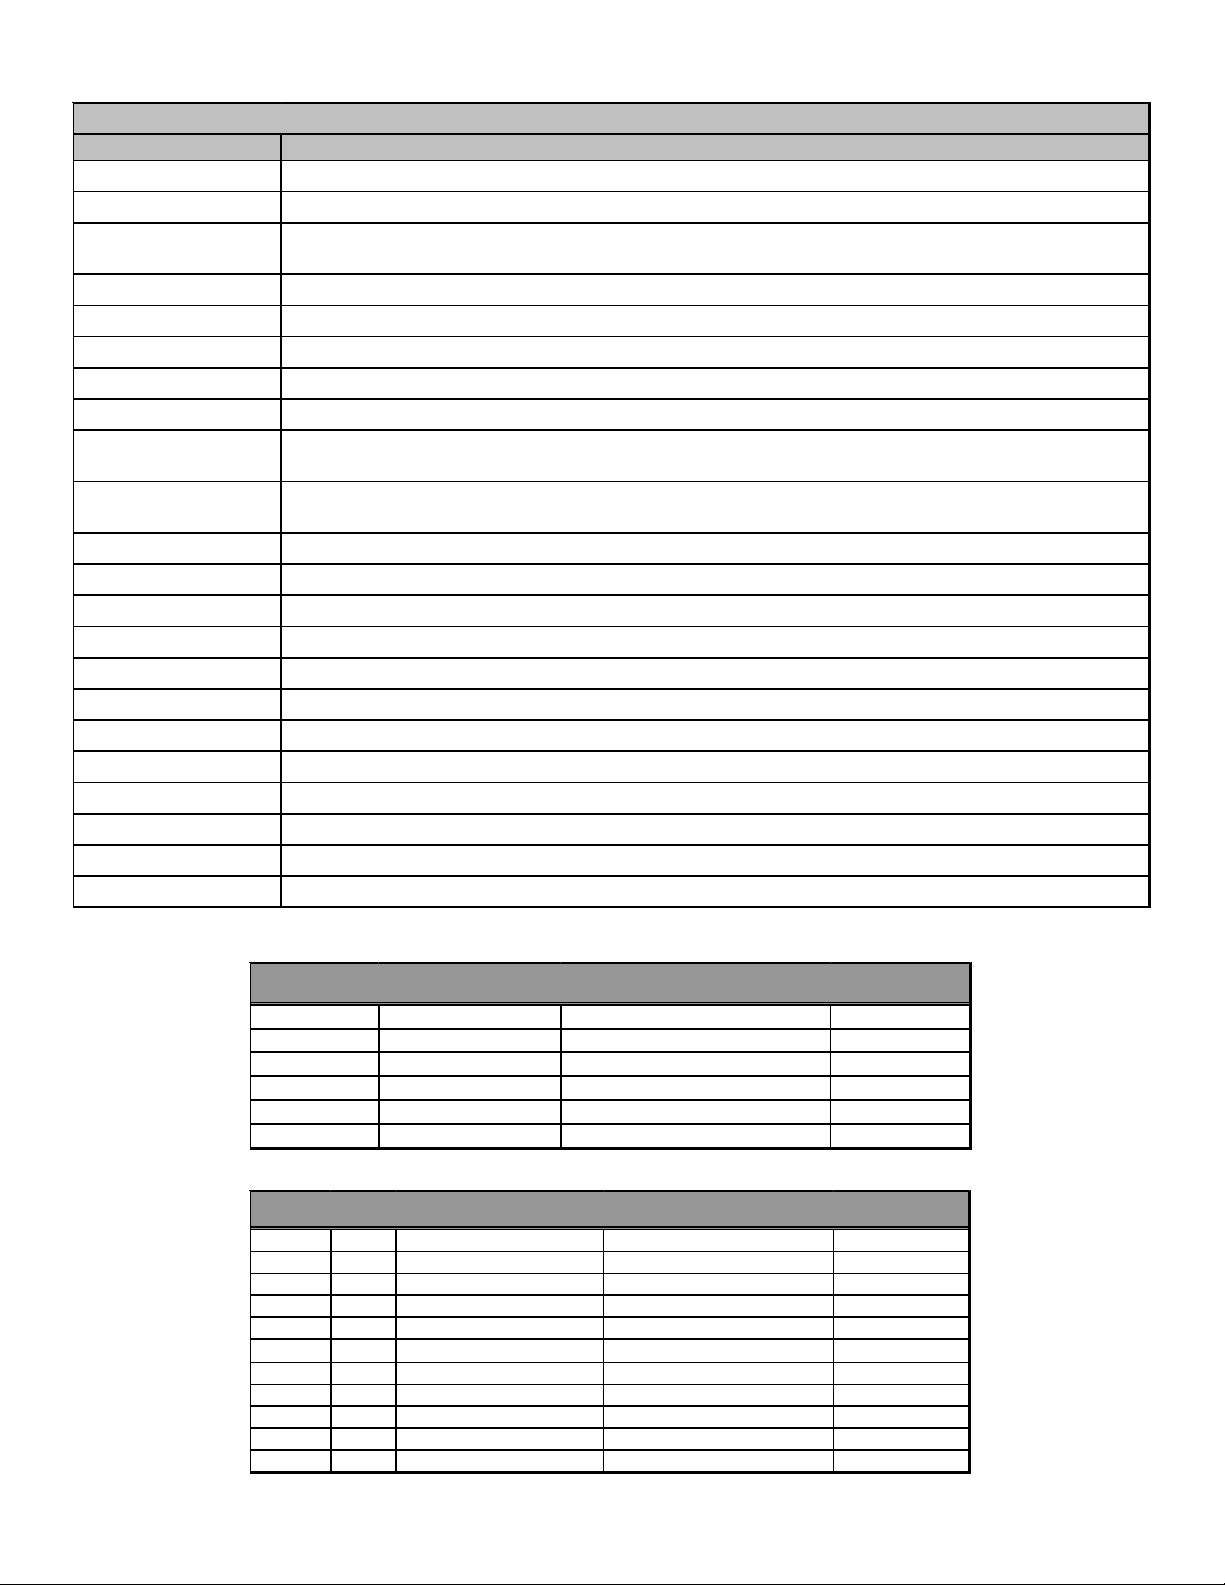
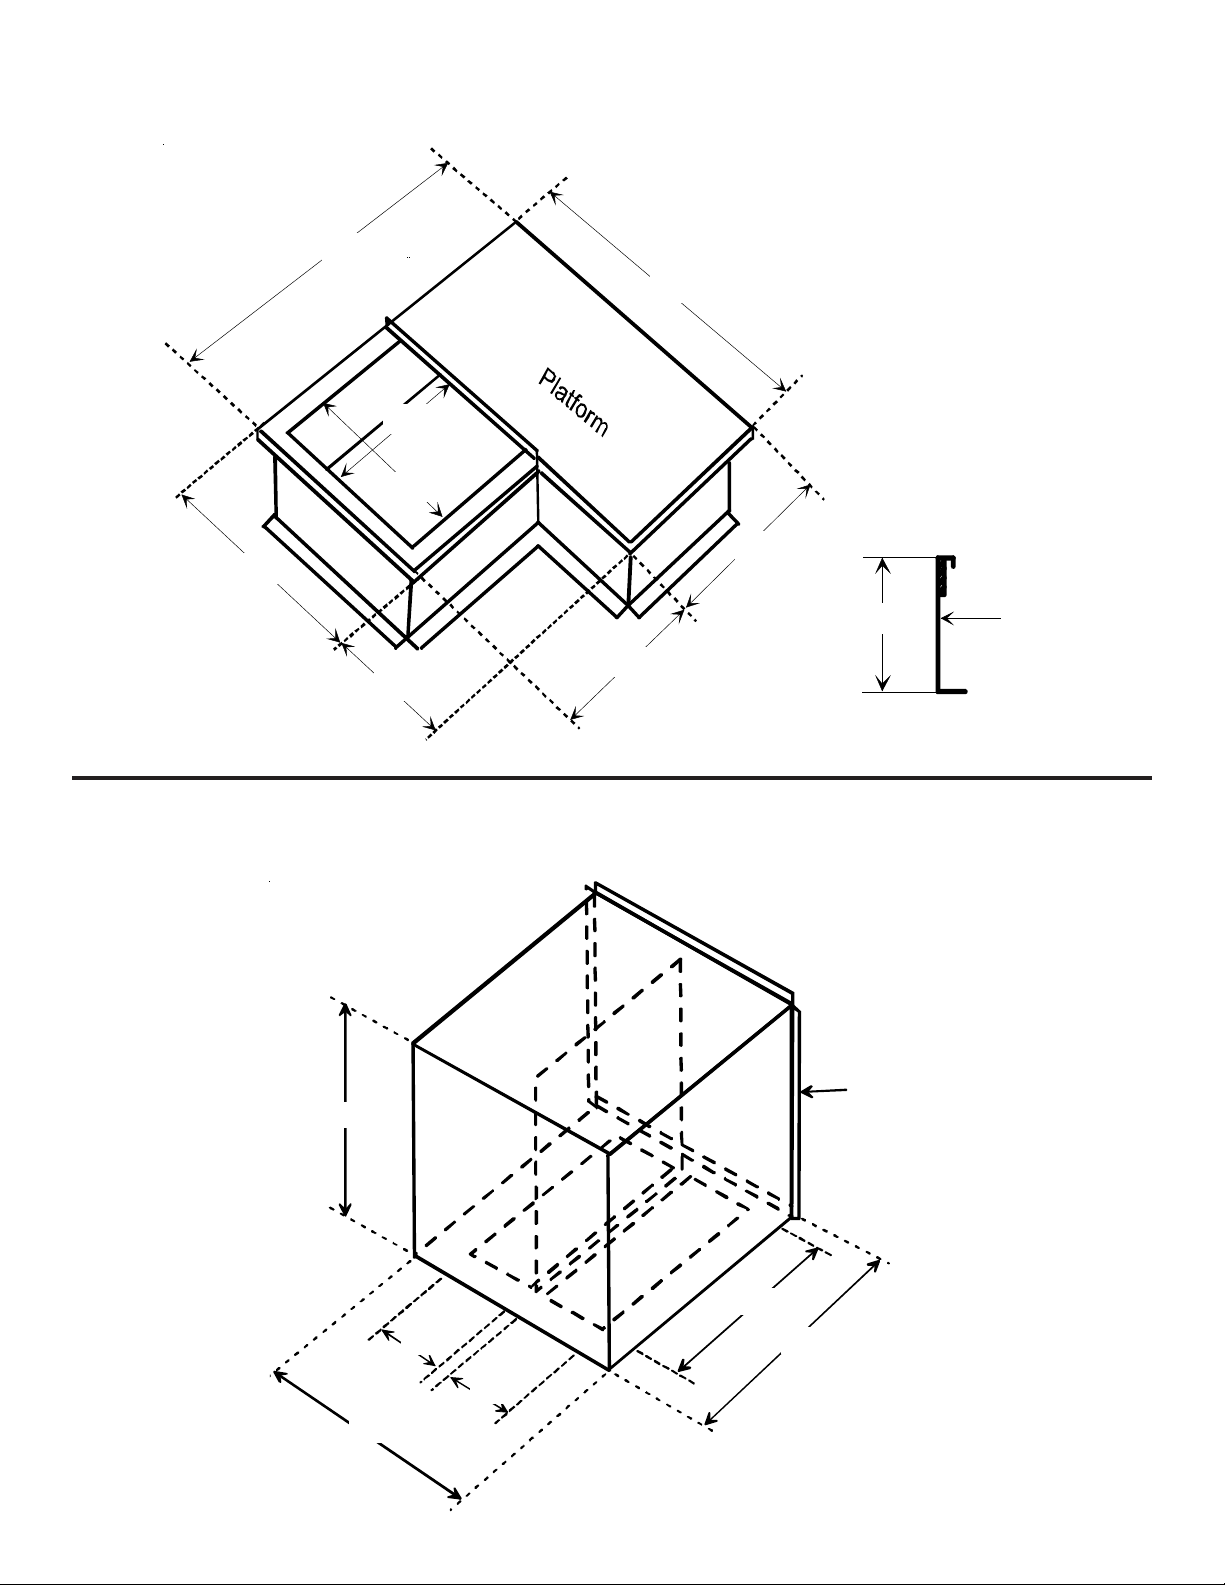
Roof Curb and Platform
DP[13-14]CH/DP[13-14]HH**41*
DPCH/DPHH Package Units are designed for outdoor installations only in either residential or light commercial applications.
NOTE: To ensure proper condensate drainage, unit must be
installed in a level position.
The connecting ductwork (Supply and Return) can be connected
for horizontal discharge airflow. In the down discharge applications, a matching Platform/Roof Curb (PCCP) and Downflow
Plenum (PCP101-103) is recommended for horizontal models
only.
A return air filter must be installed behind the return air grille(s)
or provision must be made for a filter in an accessible location
within the return air duct. The minimum filter area should not
be less than those sizes listed in the Specification Section.
Under no circumstances should the unit be operated without
return air filters.
A 3/4" - 14 NPT drain connector is provided for removal of condensate water from the indoor coil. In order to provide proper
condensate flow, do not reduce the drain line size.
Refrigerant flow control is achieved by use of restrictor orifices.
These models use the FasTest Access Fitting System, with a
saddle that is either soldered to the suction and liquid lines or
is fastened with a locking nut to the access fitting box (core)
and then screwed into the saddle. Do not remove the core
from the saddle until the refrigerant charge has been
removed. Failure to do so could result in property damage or personal injury.
The single phase units use permanent split capacitors (PSC)
design compressors. Starting components are therefore not
required. A low MFD run capacitor assists the compressor to
start and remains in the circuit during operation.
The outdoor fan motors are single phase capacitor type motors.
14
PRODUCT DESIGN
Air for condensing (cooling) is drawn through the outdoor coil
by a propeller fan, and is discharged vertically out the top of
the unit. The outdoor coil is designed for .0 static. No additional restriction (ductwork) shall be applied.
Conditioned air is drawn through the filter(s), field installed,
across the evaporator coil and back into the conditioned space
by the indoor blower.
COMPRESSORS
Some DPCH/DPHH series package units use the Compliant
Scroll compressor, instead of traditional reciprocating compressors. Still other models use reciprocating compressors.
A scroll is an involute spiral which, when matched with a mating scroll form as shown, generates a series of crescent shaped
gas pockets between the two members.
During compression, one scroll remains stationary (fixed scroll)
while the other form (orbiting scroll) is allowed to orbit (but not
rotate) around the first form.
NOTE: Operating pressures and amp draws may differ from
standard reciprocating compressors. This information can
be found in the unit's Technical Information Manual.
INDOOR BLOWER MOTOR
Some DPCH/DPHH model package units use a EEM blower
motor while others use the standard PSC type blower motor.
The EEM motor is a 3 Phase brushless DC (single phase AC
input), ball bearing construction motor with an integral control
module with an internal FCC B EMI filter.
The EEM motor is continuously powered with line voltage. The
switched 24 volt control signal is controlled by the thermostat
in the cooling and heat pump mode and the blower relay in the
electric heat mode.
ELECTRICAL WIRING
The units are designed for operation at the voltages and hertz
as shown on the rating plate. All internal wiring is complete.
Ensure the power supply to the compressor contactor is brought
to the unit as shown on the supplied unit wiring diagram. The
24V wiring must be connected between the unit control panel
and the room thermostat.
As this motion occurs, the pockets between the two forms are
slowly pushed to the center of the two scrolls while simultaneously being reduced in volume. When the pocket reaches
the center of the scroll form, the gas, which is now at a high
pressure, is discharged out of a port located at the center.
During compression, several pockets are being compressed
simultaneously, resulting in a very smooth process. Both the
suction process (outer portion of the scroll members) and the
discharge process (inner portion) are continuous.
Some design characteristics of the Compliant Scroll compressor are:
• Compliant Scroll compressors are more tolerant of liquid
refrigerant.
NOTE: Even though the compressor section of a Scroll
compressor is more tolerant of liquid refrigerant, continued
floodback or flooded start conditions may wash oil from the
bearing surfaces causing premature bearing failure.
• Compliant Scroll compressors use "POE" or polyolester
oil, which is NOT compatible with mineral oil based lubricant like 3GS. "POE" oil must be used if additional oil is
required.
• Compliant scroll compressors perform "quiet" shutdowns
that allow the compressor to restart immediately without
the need for a time delay. This compressor will restart even
if the system has not equalized.
WARNING
TO AVOID PERSO NAL INJ UR Y OR DEA T H DUE TO
ELECTRI C SHOC K, WIRING TO THE UNIT MUST BE
PROPERLY POLA RIZ ED AN D GROUNDED.
WARNING
15

PRODUCT DESIGN
LINE VOLTAGE WIRING
Power supply to the unit must be N.E.C. Class 1, and must
comply with all applicable codes. The unit must be electrically
grounded in accordance with the local codes or, in their absence, with the latest edition of the National Electrical Code,
ANSI/NFPA No. 70, or in Canada, Canadian Electrical Code,
C22.1, Part 1. A fused disconnected must be provided and
sized in accordance with the unit minimum circuit ampacity.
The best protection for the wiring is the smallest fuse or breaker
which will hold the equipment on line during normal operation
without nuisance trips. Such a device will provide maximum
circuit protection.
All line voltage connections must be made through weather
proof fittings. All exterior power supply and ground wiring must
be in approved weather proof conduit. Low voltage wiring from
the unit control panel to the thermostat requires coded cable.
The unit transformer is connected for 230V operation. If the
unit is to operate on 208V, reconnect the transformer primary
lead as shown on the unit wiring diagram.
If it is necessary for the installer to supply additional line voltage wiring to the inside of the package unit, the wiring must
comply with all local codes. This wiring must have a minimum
temperature rating of 105°C. All line voltage splices must be
made inside the unit or heat kit control box.
16

SYSTEM OPERATION
SYSTEM OPERATION
COOLING
The refrigerant used in the system is R-410A. It is a clear,
colorless, non-toxic and non-irritating liquid. R-410A is a 50:50
blend of R-32 and R-125. The boiling point at atmospheric
pressure is -62.9°F.
A few of the important principles that make the refrigeration
cycle possible are: heat always flows from a warmer to a
cooler body. Under lower pressure, a refrigerant will absorb
heat and vaporize at a low temperature. The vapors may be
drawn off and condensed at a higher pressure and temperature to be used again.
The indoor evaporator coil functions to cool and dehumidify
the air conditioned spaces through the evaporative process
taking place within the coil tubes.
Heat is continually being transferred to the cool fins and tubes
of the indoor evaporator coil by the warm system air. This
warming process causes the refrigerant to boil. The heat removed from the air is carried off by the vapor.
As the vapor passes through the last tubes of the coil, it
becomes superheated. That is, it absorbs more heat than is
necessary to vaporize it. This is assurance that only dry gas
will reach the compressor. Liquid reaching the compressor
can weaken or break compressor valves.
The compressor increases the pressure of the gas, thus adding more heat, and discharges hot, high pressure superheated
gas into the outdoor condenser coil.
In the condenser coil, the hot refrigerant gas, being warmer
than the outdoor air, first loses its superheat by heat transferred from the gas through the tubes and fins of the coil. The
refrigerant now becomes saturated, part liquid, part vapor and
then continues to give up heat until it condenses to a liquid
alone. Once the vapor is fully liquefied, it continues to give up
heat which subcools the liquid, and it is ready to repeat the
cycle.
COOLING CYCLE
Cooling Only Models
When the contacts of the room thermostat close, making
terminals R to Y and R to G, the low voltage circuit to the
contactor is completed starting the compressor and outdoor
fan motor. This also energizes the indoor blower through the
normally open contacts of the EBTDR on models equipped
with PSC type blower motors, and through the blower relay
on models equipped with EEM blower motors.
When the thermostat is satisfied, breaking the circuit between R to Y and R to G, the compressor and outdoor fan
motor will stop. The indoor blower will stop after the fan off
delay.
If the room thermostat fan selector switch should be set to
the "on" position then the indoor blower would run continuous rather than cycling with the compressor.
Heat Pump Models
Any time the room thermostat is switched to cool, the O
terminal is energized. This energizes the 24 volt coil on the
reversing valve and switches it to the cooling position.
DP[13-14]CH/HH**41A*
When the contacts of the room thermostat close, this closes
the circuit from R to Y and R to G in the unit.
This energizes the compressor contactor and will energize
the indoor blower following the EBTDR 7 second fan on delay
on models equipped with PSC type blower motors, and instantly on models equipped with EEM blower motors with
the EEM motor.
When the thermostat is satisfied, it opens its contacts breaking the low voltage circuit causing the compressor contactor
to open and indoor fan to stop after the EBTDR 65 second
delay on models equipped with PSC type blower motors,
and after the programmed 60 second off delay on models
equipped with EEM blower motors with the EEM motor.
If the room thermostat fan selector switch should be set to
the "on" position then the indoor blower would run continuous rather than cycling with the compressor.
HEATING CYCLE
Cooling Only Units
NOTE: The following only applies if the cooling only unit has
an approved electric heat kit installed for heating. If auxiliary
electric heaters should be used, they may be controlled by
outdoor thermostats (OT18-60A or OT/EHR18-60A).
DPC Models with PSC Type Blower Motors
With the thermostat set to the heat position and a call for
heat, R to W will be energized. This will energize the electric
heat sequencers. When the normally open contacts of the
heat sequencers close, this will energize the electric resistance heat and also the 240 volt coil on the isolation relay in
the control panel. The normally open contacts of the isolation relay will close energizing the indoor blower motor through
the normally closed contacts of the EBTDR.
When the thermostat is satisfied, this breaks the circuit from
R to W. This will turn off the electric heaters, and the indoor
blower after the programmed 60 second off delay on 5 ton
units with the EEM motor.
DPC Models Equipped with EEM Blower Motors
With the thermostat set to the heat position and a call for
heat, R to W will be energized. This will energize the electric
heat sequencers and the EEM motor. The electric heat will
be energized through the normally open contacts of the electric heat sequencers. The indoor blower will be energized
through W from the thermostat.
When the thermostat is satisfied, this breaks the circuit from
R to W. This will turn off the electric heaters, and the indoor
blower after the programmed 60 second off delay .
Heat Pump Units
On a call for first stage heat, the contacts of the room thermostat close. This energizes terminals R to Y and R to G,
the low voltage circuit to the contactor is completed starting
the compressor and outdoor fan motor. This also energizes
the indoor blower through the normally open contacts of the
EBTDR after a 7 second on delay on models equipped with
PSC type blower motors, and instantly on models equipped
with EEM blower motors.
17

SYSTEM OPERATION
DP[13-14]CH/HH**41A*
When the thermostat is satisfied, breaking the circuit between R to Y and R to G, the compressor and outdoor fan
motor will stop. The indoor blower will stop after the EBTDR
65 second off delay on models equipped with PSC type blower
motors, and after the programmed 60 second off delay on
models equipped with EEM blower motors .
When auxiliary electric heaters are used, a two stage heating single stage cooling thermostat would be installed.
Should the second stage heating contacts in the room thermostat close, which would be wired to W1 at the unit low
voltage connections, this would energize the coil(s) of the
electric heat relay(s). Contacts within the relay(s) will close,
bringing on the electric resistance heaters.
If auxiliary electric heaters should be used, they may be controlled by outdoor thermostats (OT18-60A or OT/EHR18-60A).
Emergency Heat Mode (Heat Pumps)
NOTE: The following only applies if the unit has an approved
electric heat kit installed for auxiliary heating.
DPH Models Equipped with PSC Type Blower Motors
With the thermostat set to the emergency heat position and
a call for 2nd stage heat, R to W1 will be energized. This will
energize the electric heat sequencers. When the normally
open contacts of the heat sequencers close, this will energize the electric resistance heat and also the 240 volt coil on
the isolation relay in the control panel. The normally open
contacts of the isolation relay will close energizing the indoor
blower motor through the normally closed contacts of the
EBTDR.
DPH Models Equipped with EEM Blower Motors
With the thermostat set to the emergency heat position and
a call for 2nd stage heat, R to W1 will be energized. This will
energize the electric heat sequencers and the EEM
The electric heat will be energized through the normally open
contacts of the electric heat sequencers. The indoor blower
will be energized through W from the thermostat.
motor.
DEFROST CYCLE
Package Heat Pumps
The defrosting of the outdoor coil is jointly controlled by the
defrost control board and the defrost thermostat.
Solid State Defrost Control
During operation the power to the circuit board is controlled
by a temperature sensor, which is clamped to a feeder tube
entering the outdoor coil. Defrost timing periods of 30, 60, or
90 minutes may be selected by setting the circuit board
jumper to 30, 60, or 90 respectively. Accumulation of time for
the timing period selected starts when the sensor closes
(approximately 32 + 2° F), and when the room thermostat
calls for heat. At the end of the timing period, the unit’s
defrost cycle will be initiated provided the sensor remains
closed. When the sensor opens (approximately 60° F), the
defrost cycle is terminated and the timing period is reset. If
the defrost cycle is not terminated due to the sensor temperature, a twelve minute override interrupts the unit’s defrost
period.
FAN OPERATION
Continuous Fan Mode
Models Equipped with PSC Type Blower Motors
If the thermostat calls for continuous fan, the indoor blower
will be energized from the normally open contacts of the
EBTDR after a 7 second delay.
Anytime there is a call for continuous fan, the indoor blower
will be energized through the normally open contacts of the
EBTDR, regardless of a call for heat or cool.
If the thermostat is not calling for heat or cool, and the fan
switch on the thermostat is returned to the automatic position, the fan will stop after a 65 second delay.
Continuous Fan Mode
Models Equipped With EEM Blower Motors
If the thermostat calls for continuous fan, the indoor blower
will be energized from the G terminal of the thermostat to the
EEM blower motor.
If a call for heat or cool occurs during a continuous fan call,
the EEM motor will always recognize the call for the highest
speed and ignore the lower speed call.
If the thermostat is not calling for heat or cool, and the fan
switch on the thermostat is returned to the automatic position, the fan will stop after the programmed 60 second off
delay on units with the EEM motor.
18

SYSTEM OPERATION
Typical Package Cooling
Indoor
Coil
Restrictor Orifice Assembly in Cooling Operation
Outdoor
Coil
Chatleff
Orifice
Assy
In the cooling mode the orifice is pushed into its seat forcing refrigerant to flow through the metered hole in the center of the
orifice.
19

SYSTEM OPERATION
Typical Heat Pump System in Cooling
Reve rs ing Valve
(Energized)
Indoor
Coil
Accumulator
Typical Heat Pump System in Heating
Outdoor
Coil
20
Indoor
Coil
Reve rs ing Valve
(De-E ner gized)
Outdoor
Coil
Accumulator

SCHEDULED MAINTENANCE
The owner should be made aware of the fact, that, as with any
mechanical equipment the Package Cooling and Heat Pump
units require regularly scheduled maintenance to preserve high
performance standards, prolong the service life of the equipment, and lessen the chances of costly failure.
In many instances the owner may be able to perform some of
the maintenance; however, the advantage of a service contract, which places all maintenance in the hands of a trained
serviceman, should be pointed out to the owner.
WARNING
ONCE A MONTH
1. Inspect the return filters of the evaporator unit and clean or
change if necessary.
NOTE: Depending on operation conditions, it may be necessary
to clean the filters more often. If permanent type filters are
used, they should be washed with warm water, dried and
sprayed with an adhesive according to manufacturers
recommendations.
2. When operating on the cooling cycle, inspect the condensate line piping from the evaporator coil. Make sure the
piping is clear for proper condensate flow.
ONCE A YEAR
Qualified Service Personnel Only
1. Clean the indoor and outdoor coils.
2. Clean the casing of the outdoor unit inside and out.
3. Motors are permanently lubricated and do not require oiling. TO AVOID PREMATURE MOTOR FAILURE, DO NOT
OIL.
4. Manually rotate the outdoor fan and indoor blower to be
sure they run freely.
5. Inspect the control panel wiring, compressor connections,
and all other component wiring to be sure all connections
are tight. Inspect wire insulation to be certain that it is
good.
6. Check the contacts of the compressor contactor. If they
are burned or pitted, replace the contactor.
7. Using a halide or electronic leak detector, check all piping
and etc. for refrigerant leaks.
8. Check the combustion chamber (Heat Exchanger) for soot,
scale, etc. Inspect all burners for lint and proper positioning.
9. Start the system, using the proper instrumentation check
gas inlet and manifold pressures, burner flame and microamp
signal. Adjust if necessary.
10.Start the system and run both a Cooling & Heating Performance Test. If the results of the test are not satisfactory,
see the "Service Problem Analysis" Chart of the possible
cause.
TEST EQUIPMENT
Proper test equipment for accurate diagnosis is as essential
as regular hand tools.
The following is a must for every service technician and service
shop:
1. Thermocouple type temperature meter - measure dry bulb
temperature.
2. Sling psychrometer- measure relative humidity and wet bulb
temperature.
3. Amprobe - measure amperage and voltage.
4. Volt-Ohm Meter - testing continuity, capacitors, and motor
windings.
5. Accurate Leak Detector - testing for refrigerant leaks.
6. High Vacuum Pump - evacuation.
7. Electric Vacuum Gauge, Manifold Gauges and high vacuum
hoses - to measure and obtain proper vacuum.
8. Accurate Electronic Scale - measure proper refrigerant
charge.
9. Inclined Manometer - measure static pressure and pressure drop across coils.
Other recording type instruments can be essential in solving
abnormal problems; however, in many instances they may be
rented from local sources.
Proper equipment promotes faster, more efficient service, and
accurate repairs with less call backs.
21

SERVICING
A
g
p
y
A
p
y
SERVICING
COOLING /HEAT PUMP- SERVICE ANALYSIS GUIDE
Complaint
POSSIBLE CA USE
DOT S IN ANALY SIS
GUIDE INDICATE
"PO S SI B L E CAUSE"
Power Fail u re
Blown Fuse
Unbalanced Power, 3PH
Loose Connection
S hor t e d or Broken Wire s
Open Fan Overload
Fa ulty Thermostat
Fa ulty Transformer
Shorte d or Open Capacitor
Inter nal Com
Shorte d or Grounded Compressor
Compressor Stuck
Fa ulty Compresso r Contactor
Fa ulty Fan Contro l
Open Control Circuit
Low V oltage
Fa ulty Evap. Fan Motor
Shorte d or Grounded Fan Motor
Improper Co oling Anticipator
Shorta ge of Refrigerant
Res t ric t ed Li quid Line
Open Elemen t or Limit on Elec. Heater
Dirty Air Filter
Dirty Indo or Coil
Not enough air across Indoor Coil
Too much air across Indoor Coil
Ove rcharg e of Refrigerant
Dirty Outdoor Coil
Non con densib les
Re c i r c ulati on of Co ndens i ng Air
Infiltration of Outdoor Air
Improperly Located Thermostat
Air Flow Unbalanced
S y s tem Un de rsi z ed
Broken Intern al Parts
Broken Valves
Inefficient Compressor
Loose Hold-down Bolts
Fa ulty Reversing Valve
Faulty Defrost Control
Faulty Defrost Thermostat
Flowrator Not Seating P roperly
ressor Overload Open
Unit will not defrost
System
Operating
Pressures
Low suct ion pressure
Lo w head pr ess u r e
High suctio n pressure
No Cooling Unsatisfactory Cooling/Hea ti ng
SYMPTOM
System will not start
Compressor will not s t art - fan r uns
Comp. and Cond. Fan will not start
Evaporator fan will not start
Condenser fan will not s tart
Compressor runs - goes of f on overload
Compressor cycles o n overload
Syste m ru ns continuous ly - little co oling/htg
Too cool and then too warm
Not cool enou gh on warm day s
Certain areas to o cool, others too warm
Co mpress or is noisy
System runs - blows cold air in heating
Unit w ill not terminate defrost
•
•••
•••
•••
••••••
••
••• •
••
•••••
•
••
•••
♦ T est Cont in ui t
♦ Use Test Cord S-17 D
•••
•
•
•••
••
••
••
••
•• •• •
♦♦
♦
••
••• •
••• •
••• •
•• •
•
•• •
••
♦
♦
♦
•
••
♦
•• •
•••
••
••
••
•• ••
•
•
•
♦
•
♦
•
♦♦ ♦ ♦ ♦♦
♦♦ ♦♦♦ ♦
♦♦♦♦♦♦♦
••
•••
Cooling or Heatin g Cycle (Heat Pump) H eating Cycle Only (Heat Pump)
•
♦
Test Method
Remedy
See Service Procedure Ref.
Hi gh he ad pr es s u re
Test Vo lt age S-1
Inspect Fuse Size & Type S-1
Test Vo lt age S-1
Inspect Connection - Tight en S-2, S -3
Test Circuits With Ohmmeter S-2, S -3
Test Cont in ui ty of Over l oa d S- 17
Test con tinu ity of Thermostat & Wirin
Check control cir cuit wi th volt mete r S-4
Test Capacitor S-15
Test Motor WindingsS-17B
Test con tinu ity of Coil & Contacts S-7, S -8
Test con tinu ity of Coil And Cont acts S-7, S-9
Test Control Circuit with Voltmeter S-4
Test Vo lt age S-1
♦ Repair or Replace S -16
Test Motor Windings S-16A,D
Check resistance of Anticipator S-3B
Test For Leaks, Add Refrigerant S-101,103
Remove Restriction, Replace Restri cted Part S-11 2
Test Heat er Ele m ent and Cont ro ls S- 26 ,S -2 7
Inspect Filter-Cle an or Replace
♦
Inspect Coil - Clean
♦
♦ Chec k Bl owe r S
Reduce Bl ow er Speed S-200
Recove r Pa rt of Charge S-113
Inspect Coil - Cle an
•
Re c ov e r Ch a rge, Evacuate, Recharge S -114
•
Remove Obstruction to Air Flow
Check Wi ndows, Doors, Ve nt Fans , Etc.
Rel oca t e Ther m os t at
Read j ust Ai r Vo lu m e D a m per s
Refigur e Cooli ng Load
Replace Compresso r S-115
Test Compressor Efficie nc
Test Com pr ess o r Ef fi ci enc y S - 104
Tighten Bolts
Replace Valve or Solenoid S-21, 122
Test Cont ro l S- 24
Test Defrost Thermostat S-25
Check Flowrator & Seat or Replace Flowrator S-111
of Over l oa d S- 17
eed, Duct Static Press, Filter S-200
S-3
S-104
22

SERVICING
S-1 CHECKING VOLTAGE
S-2 CHECKING WIRING
WARNING
1. Remove doors, control panel cover, etc. from unit being
tested.
With power ON:
2. Using a voltmeter, measure the voltage across terminals
L1 and L2 of the contactor for single phase units, and L3,
for 3 phase units.
3. No reading - indicates open wiring, open fuse(s) no power
or etc. from unit to fused disconnect service. Repair as
needed.
4. With ample voltage at line voltage connectors, energize
the unit.
5. Measure the voltage with the unit starting and operating,
and determine the unit Locked Rotor Voltage.
Locked Rotor Voltage is the actual voltage available at
the compressor during starting, locked rotor, or a stalled
condition. Measured voltage should be above minimum
listed in chart below.
To measure Locked Rotor Voltage attach a voltmeter to
the run "R" and common "C" terminals of the compressor, or to the T1 and T2 terminals of the contactor. Start
the unit and allow the compressor to run for several seconds, then shut down the unit. Immediately attempt to
restart the unit while measuring the Locked Rotor Voltage.
6. Should read within the voltage tabulation as shown. If
the voltage falls below the minimum voltage, check the
line wire size. Long runs of undersized wire can cause
low voltage. If wire size is adequate, notify the local
power company in regards to either low or high voltage.
Unit Supply Volta ge
Voltage Min. Max.
460 437 506
208/230 198 253
WARNING
1. Check wiring visually for signs of overheating, damaged
insulation and loose connections.
2. Use an ohmmeter to check continuity of any suspected
open wires.
3. If any wires must be replaced, replace with comparable
gauge and insulation thickness.
S-3 CHECKING THERMOSTAT, WIRING, AND
ANTICIPATOR
S-3A THERMOSTAT AND WIRING
With power ON and thermostat calling for cooling.
1. Use a voltmeter to verify 24 volts present at thermostat
wires C and R.
2. If no voltage present, check transformer and transformer
wiring. If 24 volts present, proceed to step 3.
3. Use a voltmeter to check for 24 volts at thermostat wires C
and Y.
4. No voltage indicates trouble in the thermostat, wiring or
external transformer source.
5. Check the continuity of the thermostat and wiring. Repair
or replace as necessary.
Indoor Blower Motor
With power ON:
1. Use a voltmeter to verify 24 volts present at thermostat
wires C and R.
2. If no voltage present, check transformer and transformer
wiring. If 24 volts present, proceed to step 3.
23

SERVICING
3. Set fan selector switch at thermostat to "ON" position.
4. With voltmeter, check for 24 volts at wires C and G.
5. No voltage, indicates the trouble is in the thermostat or
wiring.
6. Check the continuity of the thermostat and wiring. Repair
or replace as necessary.
S-3B COOLING ANTICIPATOR
The cooling anticipator is a small heater (resistor) in the thermostat. During the "off" cycle it heats the bimetal element
helping the thermostat call for the next cooling cycle. This
prevents the room temperature from rising too high before the
system is restarted. A properly sized anticipator should maintain room temperature within 1 1/2 to 2 degree range.
The anticipator is supplied in the thermostat and is not to be
replaced. If the anticipator should fail for any reason, the thermostat must be changed.
WARNING
1. Remove control panel cover or etc. to gain access to transformer.
With power ON:
S-3C HEATING ANTICIPATOR
The heating anticipator is a wire-wound adjustable heater, which
is energized during the "ON" cycle to help prevent overheating
of the conditioned space.
The anticipator is a part of the thermostat and if it should fail for
any reason, the thermostat must be replaced. See the following for recommended heater anticipator setting.
To determine the proper setting, use an amp meter to measure
the amperage on the "W" wire going to the thermostat.
Use an amprobe as shown below. Wrap 10 turns of thermostat
wire around the stationary jaw of the amprobe and divide the
reading by 10.
10 TURNS OF
THERMOSTAT WIRE
(From "W" on thermostat )
STATIONARY JAW
OF AMPROBE
2. Using a voltmeter, check voltage across secondary voltage
side of transformer (R to C).
3. No voltage indicates faulty transformer, bad wiring, or bad
splices.
4. Check transformer primary voltage at incoming line voltage
connections and/or splices.
5 If line voltage is present at the primary voltage side of the
transformer and 24 volts is not present on the secondary
side, then the transformer is inoperative. Replace.
S-7 CHECKING CONTACTOR AND/OR
RELAYS
The compressor contactor and other relay holding coils are
wired into the low or line voltage circuits. When the control
circuit is energized the coil pulls in the normally open contacts
or opens the normally closed contacts. When the coil is deenergized, springs return the contacts to their normal position.
WARNING
DISCONNECT POWER SUPPLY BEFORE SERVICING.
READS 4 AMPS
CURRENT DRAW
WOULD BE .4 AMPS
Checking Heat Anticipator Amp Draw
S-4 CHECKING TRANSFORMER AND
CONTROL CIRCUIT
A step-down transformer (208/240 volt primary to 24 volt secondary) is provided with each package unit. This allows ample
capacity for use with resistance heaters.
24
1. Remove the leads from the holding coil.
2. Using an ohmmeter, test across the coil terminals.
If the coil does not test continuous, replace the relay or contactor.
S-8 CHECKING CONTACTOR CONTACTS
WARNING
DISCONNECT POWER SUPPLY BEFORE SERV ICING.

SERVICING
SINGLE PHASE
1. Disconnect the wire leads from the terminal (T) side of the
contactor.
2. With power ON, energize the contactor.
T2
VOLT/OHM
METER
Ohmmeter for testing holding coil
Voltmeter for testing contacts
TESTING COMPRESSOR CONTACTOR
(Single Phase)
3. Using a voltmeter, test across terminals.
A. L1 to L2 - No voltage. Check breaker or fuses on
main power supply. If voltage present, proceed to step
B.
B. T1 to T2 - Meter should read the same as L1 to L2 in
step A. If voltage readings are not the same as step A,
replace contactor.
T1
CC
L1L2
3. If not as in steps 1 and 2, replace EBTDR.
Checking EBTDR Contact Operation
With power on:
1. Set the thermostat to the fan "on" position.
2. Check for 24 volts at the C and G terminals of the EBTDR.
3. If no voltage present, check fan circuit from thermostat. If
24 volts present, proceed to step 4.
4. Using a VOM, check for line voltage from the purple wire at
the transformer (terminal 3 on 240 volt units, terminal 2 on
208 volt units) to terminal NO on the EBTDR. Should read
line voltage. If no voltage present, check line voltage wiring
in unit. If line voltage present, proceed to step 5.
5. Using a VOM, check for line voltage from the purple wire at
the transformer (terminal 3 on 240 volt units, terminal 2 on
208 volt units) to the COM terminal on the EBTDR. Should
read line voltage. If not as above, replace EBTDR.
PSC Type Blower Motor Models Only
Heat pump and cooler models equipped with PSC type blower
motors have an isolation relay with a 240 volt holding coil in
addition to the EBTDR.
WARNING
DISCONNE CT PO WER SUPP LY BE FORE SE RV ICIN G.
Turn power off.
S-9 CHECKING FAN RELAY CONTACTS
The Electronic Blower Time Delay Relay is used on models
equipped with PSC type blower motors.
WARNING
Checking EBTDR High Voltage Contacts
1. With power off, remove wires from terminals NC, COM, and
NO.
2. Using a VOM, check for resistance from NO to COM. Should
read open. Next, check for resistance from NC to COM.
Should read closed.
Testing relay holding coil
1. Remove the leads from the holding coil terminals 1 and 3.
2. Using an ohmmeter, test across the coil terminals 1 and 3.
If the coil does not test continuous, replace the relay.
Testing relay contacts
WARNING
DISCONNECT POWER SUPPLY BEFORE SERVICING.
Turn power off.
1. Using a VOM, test resistance across relay terminals 2 and
4. Should read open.
2. Turn power on.
25

SERVICING
With power ON:
WARNING
3. Apply 240 volts to coil terminals 1 and 3.
4. Using a VOM, check for 240 volts from terminals 3 and 1
of relay. Should read 240 volts. In no voltage, check wiring from heater kit to relay. If voltage present, proceed to
step 5.
5. Using a VOM, check for 240 volts from L1 at contactor to
terminal 4 of relay. Should read 240 volts. Next check from
L1 at contactor to terminal 2 of relay. Should read 240
volts.
If not as above, replace relay.
S-11 CHECKING LOSS OF CHARGE
PROTECTOR
(Heat Pump Models)
The loss of charge protector senses the pressure in the liquid
line and will open its contacts on a drop in pressure. The low
pressure control will automatically reset itself with a rise in
pressure.
The low pressure control is designed to cut-out (open) at approximately 22 + 7 PSIG. It will automatically cut-in (close) at
approximately 50 + 7 PSIG.
Test for continuity using a VOM and if not as above, replace
the control.
S-12 CHECKING HIGH PRESSURE CONTROL
LINE V OLTAGE N OW PRES E NT.
4. Start the system and place a piece of cardboard in front of
the condenser coil, raising the condensing pressure.
5. Check pressure at which the high pressure control cutsout.
If it cuts-out at 610 PSIG ± 10 PSIG, it is operating normally
(See causes for high head pressure in Service Problem Analysis Guide). If it cuts out below this pressure range, replace the
control. The control should reset at 420 PSIG ± 25 PSIG.
S-15 CHECKING CAPACITOR
CAPACITOR, RUN
A run capacitor is wired across the auxiliary and main windings of a single phase permanent split capacitor motor. The
capacitors primary function is to reduce the line current while
greatly improving the torque characteristics of a motor. This is
accomplished by using the 90° phase relationship between
the capacitor current and voltage in conjunction with the motor
windings so that the motor will give two phase operation when
connected to a single phase circuit. The capacitor also reduces the line current to the motor by improving the power
factor.
HIGH VOL TAGE!
Disconnect ALL power before servicing
or installing this unit. Multiple power
sources may be present. Failure to do so
may cause property damage, personal injury
or death.
The high pressure control senses the pressure in the liquid
line. If abnormally high discharge pressures develop, the contacts of the control open, breaking the control circuit before the
compressor motor overloads. This control is automatically reset.
1. Using an ohmmeter, check across terminals of high pressure control, with wire removed. If not continuous, the contacts are open.
3. Attach a gauge to the access fitting on the liquid line.
26
CAPACITOR, START
SCROLL COMPRESSOR MODELS
Hard start components are not required on Scroll compressor
equipped units due to a non-replaceable check valve located in
the discharge line of the compressor. However hard start kits
are available and may improve low voltage starting characteristics.
This check valve closes off high side pressure to the compressor after shut down allowing equalization through the scroll
flanks. Equalization requires only about one or two seconds
during which time the compressor may turn backwards.
Your unit comes with a 180-second anti-short cycle to prevent
the compressor from starting and running backwards.
MODELS EQUIPPED WITH A HARD START DEVICE
A start capacitor is wired in parallel with the run capacitor to
increase the starting torque. The start capacitor is of the electrolytic type, rather than metallized polypropylene as used in
the run capacitor.

SERVICING
A switching device must be wired in series with the capacitor
to remove it from the electrical circuit after the compressor
starts to run. Not removing the start capacitor will overheat the
capacitor and burn out the compressor windings.
These capacitors have a 15,000 ohm, 2 watt resistor wired
across its terminals. The object of the resistor is to discharge
the capacitor under certain operating conditions, rather than
having it discharge across the closing of the contacts within
the switching device such as the Start Relay, and to reduce
the chance of shock to the servicer. See the Servicing Section
for specific information concerning capacitors.
RELAY, START
A potential or voltage type relay is used to take the start capacitor out of the circuit once the motor comes up to speed.
This type of relay is position sensitive. The normally closed
contacts are wired in series with the start capacitor and the
relay holding coil is wired parallel with the start winding. As
the motor starts and comes up to speed, the increase in voltage across the start winding will energize the start relay holding coil and open the contacts to the start capacitor.
Two quick ways to test a capacitor are a resistance and a
capacitance check.
S-15A RESISTANCE CHECK
2. Set an ohmmeter on its highest ohm scale and connect
the leads to the capacitor -
A. Good Condition - indicator swings to zero and slowly
returns to infinity. (Start capacitor will bleed resistor will
not return to infinity. It will still read the resistance of the
resistor).
B. Shorted - indicator swings to zero and stops there replace.
C. Open - no reading - replace. (Start capacitor would read
resistor resistance).
S-15B CAPACITANCE CHECK
WARNING
DISCHARGE CAPACITOR THROUGH A 20 TO 30 OHM
RESISTOR BEFORE HANDLING.
Using a hookup as shown below, take the amperage and voltage readings and use them in the formula:
Capacitance (MFD) = 2650 X Amperage
Voltage
WARNING
1. Discharge capacitor and remove wire leads.
WARNING
DISCHARGE CAPACITOR THROUGH A 20 TO 30 OHM
RESISTOR BEFORE HANDLING.
Volt / Ohm
Meter
VOLTMETER
15 AM P
FUSE
AMMETER
CAPACITOR
TESTING CAPACITANCE
acitor
p
Ca
TESTING CAPACITOR RESISTANCE
27

SERVICING
S-16 CHECKING MOTORS
S-16A CHECKING FAN AND BLOWER MOTOR
WINDINGS (PSC MOTORS)
Applies only to units with PSC Motors
The auto reset fan motor overload is designed to protect the
motor against high temperature and high amperage conditions
by breaking the common circuit within the motor, similar to the
compressor internal overload. However, heat generated within
the motor is faster to dissipate than the compressor, allow at
least 45 minutes for the overload to reset, then retest.
WARNING
C
High Voltage
Connections
3/16"
LGN
1. Remove the motor leads from its respective connection
points and capacitor (if applicable).
2. Check the continuity between each of the motor leads.
3. Touch one probe of the ohmmeter to an unpainted end of
the motor frame (ground) and the other probe in turn to
each lead.
If the windings do not test continuous or a reading is obtained
from any lead to ground, replace the motor.
S-16D CHECKING EEM (ENERGY EFFICIENT
MOTOR) MOTORS
Applies only to units with EEM Motors
The EEM Motor is a one piece, fully encapsulated, 3 phase
brushless DC (single phase AC input) motor with ball bearing
construction. Unlike the ECM 2.3/2.5 motors, the EEM features an integral control module.
Note: The GE TECMate will not currently operate the EEM
motor.
1. Using a voltmeter, check for 230 volts to the motor connections L and N. If 230 volts is present, proceed to step 2. If
230 volts is not present, check the line voltage circuit to
the motor.
2. Using a voltmeter, check for 24 volts from terminal C to
either terminal 1, 2, 3, 4 or 5, depending on which tap is
being used, at the motor. If voltage present, proceed to
step 3. If no voltage, check 24 volt circuit to motor.
3. If voltage was present in steps 1 and 2, the motor has failed
and will need to be replaced.
123
4
5
Low Voltage Connections
1/4”
EEM MOTOR CONNECTIONS
S-17 CHECKING COMPRESSOR WINDINGS
WARNING
HERMETIC COMPRESSOR ELECTRICAL TERMINAL
VENTING CAN BE DANGEROUS. WHEN INSULATING
MATERIAL WHICH SUPPORTS A HERMETIC COMPRESSOR OR ELECTRICAL TERMINAL SUDDENLY
DISINTEGRATES DUE TO PHYSICAL ABUSE OR AS A
RESULT OF AN ELECT RICAL SHORT BE TWEEN THE
TERMINAL AND THE COMPRESSOR HOUSING, THE
TERMINAL MAY BE EXPELLED, VENTING THE
VAPOR AND LIQUID CONTENTS OF THE COMPRESSOR HOUSING AND SYSTEM.
If the compressor terminal PROTECTIVE COVER and gasket
(if required) is not properly in place and secured, there is a
remote possibility if a terminal vents, that the vaporous and
liquid discharge can be ignited, spouting flames several feet,
causing potentially severe or fatal injury to anyone in its path.
This discharge can be ignited external to the compressor if the
terminal cover is not properly in place and if the discharge
impinges on a sufficient heat source.
Ignition of the discharge can also occur at the venting terminal
or inside the compressor, if there is sufficient contaminant air
present in the system and an electrical arc occurs as the
terminal vents.
Note: When replacing motor, ensure the belly band is between
the vents on the motor and the wiring has the proper drip loop
to prevent condensate from entering the motor.
28

SERVICING
Ignition cannot occur at the venting terminal without the presence of contaminant air, and cannot occur externally from the
venting terminal without the presence of an external ignition
source.
Therefore, proper evacuation of a hermetic system is essential at the time of manufacture and during servicing.
To reduce the possibility of external ignition, all open flame,
electrical power, and other heat sources should be extinguished
or turned off prior to servicing a system.
If the following test indicates shorted, grounded or open windings, see procedure S-19 for the next steps to be taken.
S-17A RESISTANCE TEST
Each compressor is equipped with an internal overload.
The line break internal overload senses both motor amperage
and winding temperature. High motor temperature or amperage heats the disc causing it to open, breaking the common
circuit within the compressor on single phase units. The three
phase internal overload will open all three legs.
Heat generated within the compressor shell, usually due to
recycling of the motor, high amperage or insufficient gas to
cool the motor, is slow to dissipate, allow at least three to four
hours for it to cool and reset, then retest.
WARNING
C
OHMMETER
TESTING COMPRESSOR WINDINGS
If either winding does not test continuous, replace the compressor.
NOTE: If an open compressor is indicated allow ample time
for the internal overload to reset before replacing compressor.
S
COMP
R
S-17B GROUND TEST
If fuse, circuit breaker, ground fault protective device, etc., has
tripped, this is a strong indication that an electrical problem
exists and must be found and corrected. The circuit protective
device rating must be checked and its maximum rating should
coincide with that marked on the equipment nameplate.
With the terminal protective cover in place, it is acceptable to
replace the fuse or reset the circuit breaker ONE TIME ONLY
to see if it was just a nuisance opening. If it opens again, DO
NOT continue to reset.
Disconnect all power to unit, making sure that all power legs
are open.
1. DO NOT remove protective terminal cover. Disconnect the
three leads going to the compressor terminals at the nearest point to the compressor.
1. Remove the leads from the compressor terminals.
WARNING
SEE WARNINGS S-17 BEFORE REMOVING COMPRESSOR TERMINAL COVER.
2. Using an ohmmeter, test continuity between terminals SR, C-R, and C-S, on single phase units or terminals T1, T2
and T3, on 3 phase units.
WARNING
DAMAGE CAN OCCUR TO THE GLASS EMBEDDED
TERMINALS IF THE LEADS ARE NOT PROPERLY
REMOVED. THIS CAN RESULT IN TERMINAL AND
HOT OIL DISCHARGING.
HI-POT
COMPRESSOR GROUND TEST
2. Identify the leads and using a Megger, Hi-Potential Ground
Tester, or other suitable instrument which puts out a voltage between 300 and 1500 volts, check for a ground separately between each of the three leads and ground (such
as an unpainted tube on the compressor). Do not use a
low voltage output instrument such as a volt-ohmmeter.
29

SERVICING
3. If a ground is indicated, then carefully remove the compressor terminal protective cover and inspect for loose
leads or insulation breaks in the lead wires.
4. If no visual problems indicated, carefully remove the leads
at the compressor terminals.
Carefully retest for ground, directly between compressor
terminals and ground.
5. If ground is indicated, replace the compressor.
S-17D OPERATION TEST
If the voltage, capacitor, overload and motor winding test fail to
show the cause for failure:
WARNING
1. Remove unit wiring from disconnect switch and wire a test
cord to the disconnect switch.
NOTE: The wire size of the test cord must equal the line wire
size and the fuse must be of the proper size and type.
2. With the protective terminal cover in place, use the three
leads to the compressor terminals that were disconnected
at the nearest point to the compressor and connect the
common, start and run clips to the respective leads.
3. Connect good capacitors of the right MFD and voltage rating into the circuit.
4. With power ON, close the switch.
WARNING
LINE VOLTAG E NOW PRESENT.
A. If the compressor starts and continues to run, the
cause for failure is somewhere else in the system.
B. If the compressor fails to start - replace.
The condition of the scroll flanks is checked in the following
manner.
and the charge is correct, test the reversing valve if equipped
(heat pump models only. See-S-21). If the reversing valves
test good, the compressor is faulty - replace the compressor.
S-18 TESTING CRANKCASE HEATER
(OPTIONAL ITEM)
Note: Not all compressors use crankcase heaters.
The crankcase heater must be energized a minimum of twentyfour (24) hours before the compressor is operated.
Crankcase heaters are used to prevent migration or accumulation of refrigerant in the compressor crankcase during the off
cycles and prevents liquid slugging or oil pumping on start up.
On some models, the crankcase heater is controlled by a crankcase heater thermostat that is wired in series with the crankcase heater.
A crankcase heater will not prevent compressor damage due
to a floodback or over charge condition.
WARNING
DISCONNECT POWER SUPPLY BEFORE SERVICING.
1. Disconnect the heater lead wires.
2. Using an ohmmeter, check heater continuity - should test
continuous, if not, replace.
S-18A CHECKING CRANKCASE HEATER
THERMOSTAT
Note: Not all models with crankcase heaters will have a
crankcase heater thermostat.
1. Install a thermocouple type temperature test lead on the
discharge line adjacent to the crankcase heater thermostat.
2. Check the temperature at which the control closes its contacts by lowering the temperature of the control. The crankcase heater thermostat should close at 67°F ± 5°F.
3. Check the temperature at which the control opens its contacts by raising the temperature of the control. The crankcase heater thermostat should open at 85°F ± 5°F.
4. If not as above, replace control.
1. Attach gauges to the high and low side of the system.
2. Start the system and run a “Cooling Performance Test.
If the test shows:
a. Below normal high side pressure.
b. Above normal low side pressure.
c. Low temperature difference across coil.
d. Low amp draw at compressor.
30
S-21 CHECKING REVERSING VALVE AND
SOLENOID
Occasionally the reversing valve may stick in the heating or
cooling position or in the mid-position.
When stuck in the mid-position, part of the discharge gas from
the compressor is directed back to the suction side, resulting
in excessively high suction pressure. An increase in the suction line temperature through the reversing valve can also be
measured. Check operation of the valve by starting the system and switching the operation from COOLING to HEATING
cycle.

SERVICING
If the valve fails to change its position, test the voltage (24V) at
the valve coil terminals, while the system is on the COOLING
cycle.
If no voltage is registered at the coil terminals, check the operation of the thermostat and the continuity of the connecting
wiring from the "O" terminal of the thermostat to the unit.
If voltage is registered at the coil, tap the valve body lightly
while switching the system from HEATING to COOLING, etc.
If this fails to cause the valve to switch positions, remove the
coil connector cap and test the continuity of the reversing valve
solenoid coil. If the coil does not test continuous - replace it.
If the coil test continuous and 24 volts is present at the coil
terminals, the valve is inoperative - replace it.
S-24 TESTING DEFROST CONTROL
NOTE: PCBDM133 defrost controls have a three (3)
minute compressor off cycle delay.
NOTE: The PCBDM133 defrost controls are shipped from the
factory with the compressor delay option selected. This will
de-energize the compressor contactor for 30 seconds on defrost
initiation and defrost termination. If the jumper is set to Normal,
the compressor will continue to run during defrost initiation
and defrost termination. The control will also ignore the low
pressure switch connected to R-PS1 and PS2 for 5 minutes
upon defrost initiation and 5 minutes after defrost termination.
To check the defrost control for proper sequencing, proceed as
follows: With power ON; unit not running.
1. Jumper defrost thermostat by placing a jumper wire across
the terminals "DFT" and "R" ("R-DFT" on PCBDM133) at
defrost control board.
2. Connect jumper across test pins on defrost control board.
3. Set thermostat to call for heating. System should go into
defrost within 21 seconds.
4. Immediately remove jumper from test pins.
5. Using VOM check for voltage across terminals "C & O"
("O-RV" on PCBDM133). Meter should read 24 volts.
6. Using VOM check for voltage across fan terminals DF1
and DF2 on the board. You should read line voltage (208230 VAC) indicating the relay is open in the defrost mode.
7. Using VOM check for voltage across "W2" (W on
PCBDM133) & "C" terminals on the board. You should read
24 volts.
8. If not as above, replace control board.
9. Set thermostat to off position and disconnect power before
removing any jumpers or wires.
NOTE: Remove jumper across defrost thermostat before returning system to service.
S-25 TESTING DEFROST THERMOSTAT
1. Install a thermocouple type temperature test lead on the
tube adjacent to the defrost control. Insulate the lead point
of contact.
2. Check the temperature at which the control closes its contacts by lowering the temperature of the control. It should
close at approximately 32°F ± 2°F.
3. Check the temperature at which the control opens its contacts by raising the temperature of the control. It should
open at approximately 60°F.
4. If not as above, replace control.
S-50 CHECKING HEATER LIMIT CONTROL(S)
(OPTIONAL ELECTRIC HEATERS)
Each individual heater element is protected with an automatic
rest limit control connected in series with each element to
prevent overheating of components in case of low airflow. This
limit control will open its circuit at approximately 150°F. to
160°F and close at approximately 110°F.
WARNING
DISCONNECT ELECTRICAL POWER SUPPLY.
1. Remove the wiring from the control terminals.
2. Using an ohmmeter test for continuity across the normally
closed contacts. No reading indicates the control is open
- replace if necessary. Make sure the limits are cool before
testing.
IF FOUND OPEN - REPLACE - DO NOT WIRE AROUND.
S-52 CHECKING HEATER ELEMENTS
Optional electric heaters may be added, in the quantities shown
in the spec sheet for each model unit, to provide electric resistance heating. Under no condition shall more heaters than the
quantity shown be installed.
WARNING
1. Disassemble and remove the heating element(s).
2. Visually inspect the heater assembly for any breaks in the
wire or broken insulators.
3. Using an ohmmeter, test the element for continuity - no
reading indicates the element is open. Replace as necessary.
31

SERVICING
S-100 REFRIGERATION REPAIR PRACTICE
DANGER
ALWAYS REMOVE THE REFRIGERANT CHARGE IN
A PROPER MANNER BEFORE APPLYING HEAT TO
THE SYSTEM.
These models use the FasTest Access Fitting System, with a
saddle that is either soldered to the suction and liquid lines or
is fastened with a locking nut to the access fitting box (core)
and then screwed into the saddle. Do not remove the core
from the saddle until the refrigerant charge has been
removed. Failure to do so could result in property damage or personal injury.
When installing a new core or reinstalling the core after removal, it is very important to note that before inserting the core
into the saddle, the core and saddle must be free of debris and
the “O” Ring
to it. The oil is to prevent the “O” Ring from being deformed
when the core is tightened completely. The core should be
torqued to 8 ft. lb.
When repairing the refrigeration system:
DISC ONN EC T EL EC T RICAL POWER SU PPLY.
1. Never open a system that is under vacuum. Air and moisture will be drawn in.
2. Plug or cap all openings.
3. Remove all burrs and clean the brazing surfaces of the
tubing with sand cloth or paper. Brazing materials do not
flow well on oxidized or oily surfaces.
4. Clean the inside of all new tubing to remove oils and pipe
chips.
5. When brazing, sweep the tubing with dry nitrogen to prevent the formation of oxides on the inside surfaces.
6. Complete any repair by replacing the liquid line drier in the
system, evacuate and charge.
At any time the system has been open for repair, the factory
installed liquid line filter drier must be replaced.
must have a thin coating of refrigerant oil applied
WARNING
S-101 LEAK TESTING
(NITROGEN OR NITROGEN-TRACED)
WARNING
WARNING
Pressure test the system using dry nitrogen and soapy water
to locate leaks. If you wish to use a leak detector, charge the
system to 10 psi using the appropriate refrigerant then use
nitrogen to finish charging the system to working pressure,
then apply the detector to suspect areas. If leaks are found,
repair them. After repair, repeat the pressure test. If no leaks
exist, proceed to system evacuation.
For a system that contains a refrigerant charge and is suspected of having a leak, stop the operation and hold the exploring tube of the detector as close to the tube as possible, check
all piping and fittings. If a leak is detected, do not attempt to
apply more brazing to the joint. Remove and capture the charge,
unbraze the joint, clean and rebraze.
For a system that has been newly repaired and does not contain a charge, connect a cylinder of refrigerant, through a gauge
manifold, to the liquid and suction line dill valves and/or liquid
line dill valve and compressor process tube.
NOTE: Refrigerant hoses must be equipped with dill valve depressors or special adaptor used. Open the valve on the cylinder and manifold and allow the pressure to build up within the
system. Check for and handle leaks, as described above.
After the test has been completed, remove and capture the
leak test refrigerant.
S-102 EVACUATION
BRAZING MATERIALS
Copper to Copper Joints - Sil-Fos used without flux (alloy of
15% silver, 80% copper, and 5% phosphorous). Recommended
heat 1400°F.
Copper to Steel Joints - Silver Solder used without a flux
(alloy of 30% silver, 38% copper, 32% zinc). Recommended
heat - 1200°F.
32
WARNING

SERVICING
This is the most important part of the entire service procedure.
The life and efficiency of the equipment is dependent upon the
thoroughness exercised by the serviceman when evacuating
air (non-condensable) and moisture from the system.
Air in a system causes high condensing temperature and pressure, resulting in increased power input and reduced performance.
Moisture chemically reacts with the refrigerant and oil to form
corrosive hydrofluoric and hydrochloric acids. These attack
motor windings and parts, causing breakdown.
The equipment required to thoroughly evacuate the system is
a high vacuum pump, capable of producing a vacuum equivalent to 25 microns absolute and a thermocouple vacuum gauge
to give a true reading of the vacuum in the system.
NOTE: Never use the system compressor as a vacuum pump
or run when under a high vacuum. Motor damage could occur.
WARNING
SCROLL COMPRESSORS
DO NOT FRONT SEAT T HE SERVICE VALV E(S) WITH
THE COMPRESSOR OPERATING IN AN ATTEMPT TO
SAVE REFRIGERANT. WITH THE SUCTION LINE OF
THE COMPRESSOR CLOSED OR SEVERLY RESTRICTED, THE SCROLL COMPRESSOR WILL DRAW A DEEP
VACUUM VERY QUICKLY. THIS VACUUM CAN CAUSE
INTERNAL ARCING OF THE FUSITE RESULTING IN A
DAMAGED OR FAILED COMPRESSOR.
2. Start the vacuum pump and open the shut off valve to the
high vacuum gauge manifold only. After the compound
gauge (low side) has dropped to approximately 29 inches
of vacuum, open the valve to the vacuum thermocouple
gauge. See that the vacuum pump will blank-off to a maximum of 25 microns. A high vacuum pump can only produce a good vacuum if its oil is non-contaminated.
3. If the vacuum pump is working properly, close the valve to
the vacuum thermocouple gauge and open the high and
low side valves to the high vacuum manifold set. With the
valve on the charging cylinder closed, open the manifold
valve to the cylinder.
4. Evacuate the system to at least 29 inches gauge before
opening valve to thermocouple vacuum gauge.
5. Continue to evacuate to a minimum of 250 microns. Close
valve to vacuum pump and watch rate of rise. If vacuum
does not rise above 1500 microns in three to five minutes,
system can be considered properly evacuated.
6. If thermocouple vacuum gauge continues to rise and levels
off at about 5000 microns, moisture and non-condensables
are still present. If gauge continues to rise a leak is present.
Repair and re-evacuate.
7. Close valve to thermocouple vacuum gauge and vacuum
pump. Shut off pump and prepare to charge.
S-103 CHARGING
WARNINGWARNING
LOW SIDE
GAUGE
AND VAL V E
1. Connect the vacuum pump, vacuum tight manifold set with
high vacuum hoses, thermocouple vacuum gauge and charging cylinder as shown.
HIGH SIDE
GAUGE
AND VALVE
CAUTION
Charge the system with the exact amount of refrigerant.
Refer to the specification section or check the unit nameplates
for the correct refrigerant charge.
After completing airflow measurements and adjustments, the
unit’s refrigerant charge must be checked. The unit comes
factory charged, but this charge is based on 400 CFM per ton
at minimum ESP per AHRI test conditions (generally between
.15 - .25 ESP). When air quantity or ESP is different than
above, charge must be adjusted to the proper amount.
33

SERVICING
All package units are charged to the superheat method at the
compressor suction line (these are fixed orifice devices).
For charging in the warmer months, 100F superheat at the compressor is required at conditions: 950F outdoor ambient (dry
bulb temperature), 800F dry bulb / 670F wet bulb indoor ambient, approximately 50% humidity. This superheat varies when
conditions vary from the conditions described.
A superheat charge chart is available for other operating conditions. Use it to provide the correct superheat at the conditions
the unit is being charged at.
After superheat is adjusted it is recommended to check unit
sub-cooling at the condenser coil liquid line out. In most operating conditions 12 + 40F of sub-cooling is adequate.
An inaccurately charged system will cause future problems.
1. Using a quality set of charging scales, weigh the proper
amount of refrigerant for the system. Allow liquid refrigerant
only to enter the high side.
2. After the system will take all it will take, close the valve on
the high side of the charging manifold.
3. Start the system and charge the balance of the refrigerant
through the low side.
NOTE: R410A should be drawn out of the storage container or drum in liquid form due to its fractionation properties, but should be "Flashed" to its gas state before entering the system. There are commercially available restriction devices that fit into the system charging hose set to
accomplish this. DO NOT charge liquid R410A into the
compressor.
4. With the system still running, close the valve on the charging cylinder. At this time, you may still have some liquid
refrigerant in the charging cylinder hose and will definitely
have liquid in the liquid hose. Slowly open the high side
manifold valve and transfer the liquid refrigerant from the
liquid line hose and charging cylinder hose into the suction
service valve port. CAREFUL: Watch so that liquid refrigerant does not enter the compressor.
Final Charge Adjustment
The outdoor temperature must be 60°F or higher. Set the
room thermostat to COOL, fan switch to AUTO, and set the
temperature control well below room temperature.
After system has stabilized per start-up instructions, compare
the operating pressures and outdoor unit amp draw to the numbers listed in the technical manual. If pressures and amp draw
are too low, add charge. If pressures and amp draw are too
high, remove charge. Check subcooling and superheat as detailed in the following section.
5. With the system still running, remove hose and reinstall
both access fitting caps.
6. Check system for leaks.
Due to their design, Scroll compressors are inherently more
tolerant of liquid refrigerant.
NOTE: Even though the compressor section of a Scroll compressor is more tolerant of liquid refrigerant, continued floodback or flooded start conditions may wash oil from the bearing
surfaces causing premature bearing failure. S-104 CHECK-
ING COMPRESSOR EFFICIENCY.
The reason for compressor inefficiency is broken or dam-
aged suction and/or discharge valves, or scroll flanks on Scroll
compressors, reducing the ability of the compressor to pump
refrigerant vapor.
The condition of the valves or scroll flanks is checked in the
following manner.
1. Attach gauges to the high and low side of the system.
2. Start the system and run a Cooling Performance Test.
If the test shows-
⇒ Below normal high side pressure.
⇒ Above normal low side pressure.
⇒ Low temperature difference across coil.
⇒ Low amp draw at compressor.
-and the charge is correct. The compressor is faulty - replace
the compressor.
S-104 CHECKING COMPRESSOR
EFFICIENCY
The reason for compressor inefficiency is broken or damaged
suction and/or discharge valves, or scroll flanks on Scroll compressors, reducing the ability of the compressor to pump refrigerant vapor.
During the "OFF" cycle, the high side pressure bleeds to the
low side through the fixed orifice restriction device. Check
equalization time as follows:
1. Attach a gauge manifold to the suction and liquid line access fittings.
2. Start the system and allow the pressures to stabilize.
3. Stop the system and check the time it takes for the high
and low pressure gauge readings to equalize.
If it takes more than seven (7) minutes to equalize, the restrictor
device is inoperative. Replace, install a liquid line drier, evacuate and recharge.
S-108 SUPERHEAT
CHECKING SUPERHEAT
Refrigerant gas is considered superheated whenever its temperature is higher than the saturation temperature corresponding to its pressure. The degree of superheat equals the degrees of temperature increase above the saturation temperature at existing pressure. See Temperature - Pressure Chart.
34

SERVICING
CAUTION
To prevent personal injury, carefully connect and
disconnect manifold gauge hoses. Escaping liquid
refrigerant can cause burns. Do not vent refrigerant
to atmosphere. Recover during system repair
or final unit disposal.
1. Run system at least 10 minutes to allow pressure to stabilize.
2. Temporarily install thermometer on suction (large) line
near compressor with adequate contact and insulate for
best possible reading.
3. Refer to the superheat table provided for proper system
superheat. Add charge to lower superheat or recover
charge to raise superheat.
Superheat Formula = Suct. Line Temp. - Sat. Suct. Temp.
Ambient Condenser
Inlet Temp (°F
Drybulb)
100
95
90
85
80
75 10 13 17 25 29
70 10 17 20 28 32
65 13 19 26 32 35
60 17 25 30 33 37
EXAMPLE:
a. Suction Pressure = 143
b. Corresponding Temp. °F. = 50
c. Thermometer on Suction Line = 59°F.
To obtain the degrees temperature of superheat, subtract 50.0
from 59.0°F.
The difference is 9° Superheat. The 9° Superheat would fall in
the ± range of allowable superheat.
S-109 CHECKING SUBCOOLING
Refrigerant liquid is considered subcooled when its temperature is lower than the saturation temperature corresponding to
its pressure. The degree of subcooling equals the degrees of
temperature decrease below the saturation temperature at the
existing pressure.
1. Attach an accurate thermometer or preferably a thermocouple type temperature tester to the liquid line close to
the pressure switch.
2. Install a high side pressure gauge on the liquid access
fitting.
3. Record the gauge pressure and the temperature of the line.
4. Compare the hi-pressure reading to the "Required Liquid
Return Air Temp. (°F Drybulb)
65 70 75
-
-
-
-
-
-
10 13 17 20
-
10 15 21 26
-
80 85
10 10
-
10 10 10
12 15 18
Line Temperature" chart. Find the hi-pressure value on the
left column. Follow that line right to the column under the
design subcooling value. Where the two intersect is the
required liquid line temperature.
Alternately you can convert the liquid line pressure gauge
reading to temperature by finding the gauge reading in Temperature - Pressure Chart and reading to the left, find the
temperature in the °F. Column.
5. The difference between the thermometer reading and pressure to temperature conversion is the amount of subcooling.
Subcooling Formula = Sat. Liquid Temp. - Liquid Line Temp.
EXAMPLE:
a. Liquid Line Pressure = 417
b. Corresponding Temp. °F. = 120°
c. Thermometer on Liquid line = 109°F.
To obtain the amount of subcooling, subtract 109°F from 120°F.
The difference is 11° subcooling. See the specification sheet
or technical information manual for the design subcooling range
for your unit.
See R410A Pressure vs. Temperature chart.
S-111 FIXED ORIFICE RESTRICTION
DEVICES
The fixed orifice restriction device (flowrator) used in conjunction with the indoor coil is a predetermined bore (I.D.).
It is designed to control the rate of liquid refrigerant flow into an
evaporator coil.
The amount of refrigerant that flows through the fixed orifice
restriction device is regulated by the pressure difference between the high and low sides of the system.
In the cooling cycle when the outdoor air temperature rises,
the high side condensing pressure rises. At the same time,
the cooling load on the indoor coil increases, causing the low
side pressure to rise, but at a slower rate.
Since the high side pressure rises faster when the temperature increases, more refrigerant flows to the evaporator, increasing the cooling capacity of the system.
When the outdoor temperature falls, the reverse takes place.
The condensing pressure falls, and the cooling loads on the
indoor coil decreases, causing less refrigerant flow.
If a restriction should become evident, proceed as follows:
1. Recover refrigerant charge.
2. Remove the orifice assembly and clean or replace.
3. Replace liquid line drier, evacuate and recharge.
35

SERVICING
CHECKING EQUALIZATION TIME
During the "OFF" cycle, the high side pressure bleeds to the
low side through the fixed orifice restriction device. Check
equalization time as follows:
1. Attach a gauge manifold to the suction and liquid line dill
valves
2. Start the system and allow the pressures to stabilize.
3. Stop the system and check the time it takes for the high
and low pressure gauge readings to equalize.
If it takes more than seven (7) minutes to equalize, the restriction device is inoperative. Replace, install a liquid line drier,
evacuate and recharge.
S-112 CHECKING RESTRICTED LIQUID LINE
When the system is operating, the liquid line is warm to the
touch. If the liquid line is restricted, a definite temperature
drop will be noticed at the point of restriction. In severe cases,
frost will form at the restriction and extend down the line in the
direction of the flow.
Discharge and suction pressures will be low, giving the appearance of an undercharged unit. However, the unit will have
normal to high subcooling.
If a restriction is located, replace the restricted part, replace
drier, evacuate and recharge.
There are other causes for high head pressure which may be
found in the "Service Problem Analysis Guide."
If other causes check out normal, an overcharge or a system
containing non-condensables would be indicated.
If this system is observed:
1. Start the system.
2. Remove and capture small quantities of refrigerant as from
the suction line access fitting until the head pressure is
reduced to normal.
3. Observe the system while running a cooling performance
test. If a shortage of refrigerant is indicated, then the system contains non-condensables.
S-114 NON-CONDENSABLES
If non-condensables are suspected, shut down the system and
allow the pressures to equalize. Wait at least 15 minutes.
Compare the pressure to the temperature of the coldest coil
since this is where most of the refrigerant will be. If the pressure indicates a higher temperature than that of the coil temperature, non-condensables are present.
Non-condensables are removed from the system by first removing the refrigerant charge, replacing and/or installing liquid
line drier, evacuating and recharging.
S-113 REFRIGERANT OVERCHARGE
An overcharge of refrigerant is normally indicated by an excessively high head pressure.
An evaporator coil, using an expansion valve metering device,
will basically modulate and control a flooded evaporator and
prevent liquid refrigerant from returning to the compressor.
An evaporator coil, using a fixed orifice restrictor device
(flowrator) metering device, could allow liquid refrigerant to return to the compressor under extreme overcharge conditions.
Also with a fixed orifice restrictor device (flowrator) metering
device, extreme cases of insufficient indoor air can cause icing
of the indoor coil and liquid refrigerant to return to the compressor, but the head pressure would be lower.
36

SERVICING
PSIG
100
102
104
106
108
110
112
°F
12
14
16
18
20
22
24
26
28 -17.9 130.0 44.7 232.0 78.9 334.0 103.7 436.0 123.5 538.0 140.1
30
32
34
36
38
40
42
44
46
48
50
52
54
56
58 7.3 160.0 56.2 262.0 86.9 364.0 110.0 466.0 128.7 596.0 148.4
60
62
64
66
68
70
72
74
76
78
80
82
84
86
88 25.4 190.0 66.4 292.0 94.3 394.0 115.8 496.0 133.6 656.0 156.6
90
92
94
96
98
-37.7
-34.7
-32.0
-29.4
-36.9
-24.5
-22.2
-20.0
-15.8
-13.8
-11.9
-10.1
-8.3
-6.5
-4.5
-3.2
-1.6
0.0
1.5
3.0
4.5
5.9
8.6
10.0
11.3
12.6
13.8
15.1
16.3
17.5
18.7
19.8
21.0
22.1
23.2
24.3
26.4
27.4
28.5
29.5
30.5
31.2
32.2
33.2
34.1
35.1
35.5
36.9
PSIG
114.0
116.0
118.0
120.0
122.0
124.0
126.0
128.0
132.0
134.0
136.0
138.0
140.0
142.0
144.0
146.0
148.0
150.0
152.0
154.0
156.0
158.0
162.0
164.0
166.0
168.0
170.0
172.0
174.0
176.0
178.0
180.0
182.0
184.0
186.0
188.0
192.0
194.0
196.0
198.0
200.0
202.0
204.0
206.0
208.0
210.0
212.0
214.0
Pressure vs. Temperature Chart
R-410A
°F
37.8
38.7
39.5
40.5
41.3
42.2
43.0
43.8
45.5
46.3
47.1
47.9
48.7
49.5
50.3
51.1
51.8
52.5
53.3
54.0
54.8
55.5
57.0
57.7
58.4
59.0
59.8
60.5
61.1
61.8
62.5
63.1
63.8
64.5
65.1
65.8
67.0
67.7
68.3
68.9
69.5
70.1
70.7
71.4
72.0
72.6
73.2
73.8
PSIG
216.0
218.0
220.0
222.0
224.0
226.0
228.0
230.0
234.0
236.0
238.0
240.0
242.0
244.0
246.0
248.0
250.0
252.0
254.0
256.0
258.0
260.0
264.0
266.0
268.0
270.0
272.0
274.0
276.0
278.0
280.0
282.0
284.0
286.0
288.0
290.0
294.0
296.0
298.0
300.0
302.0
304.0
306.0
308.0
310.0
312.0
314.0
316.0
°F
74.3
74.9
75.5
76.1
76.7
77.2
77.8
78.4
79.5
80.0
80.6
81.1
81.6
82.2
82.7
83.3
83.8
84.3
84.8
85.4
85.9
86.4
87.4
87.9
88.4
88.9
89.4
89.9
90.4
90.9
91.4
91.9
92.4
92.8
93.3
93.8
94.8
95.2
95.7
96.2
96.6
97.1
97.5
98.0
98.4
98.9
99.3
99.7
PSIG
318.0
320.0
322.0
324.0
326.0
328.0
330.0
332.0
336.0
338.0
340.0
342.0
344.0
346.0
348.0
350.0
352.0
354.0
356.0
358.0
360.0
362.0
366.0
368.0
370.0
372.0
374.0
376.0
378.0
380.0
382.0
384.0
386.0
388.0
390.0
392.0
396.0
398.0
400.0
402.0
404.0
406.0
408.0
410.0
412.0
414.0
416.0
418.0
°F
100.2
100.7
101.1
101.6
102.0
102.4
102.9
103.3
104.2
104.6
105.1
105.4
105.8
106.3
106.6
107.1
107.5
107.9
108.3
108.8
109.2
109.6
110.4
110.8
111.2
111.6
112.0
112.4
112.6
113.1
113.5
113.9
114.3
114.7
115.0
115.5
116.2
116.6
117.0
117.3
117.7
118.1
118.5
118.8
119.2
119.6
119.9
120.3
PSIG
420.0
422.0
424.0
426.0
428.0
430.0
432.0
434.0
438.0
440.0
442.0
444.0
446.0
448.0
450.0
452.0
454.0
456.0
458.0
460.0
462.0
464.0
468.0
470.0
472.0
474.0
476.0
478.0
480.0
482.0
484.0
486.0
488.0
490.0
492.0
494.0
498.0
500.0
502.0
504.0
506.0
508.0
510.0
512.0
514.0
516.0
518.0
520.0
°F
120.7
121.0
121.4
121.7
122.1
122.5
122.8
123.2
123.9
124.2
124.6
124.9
125.3
125.6
126.0
126.3
126.6
127.0
127.3
127.7
128.0
128.3
129.0
129.3
129.7
130.0
130.3
130.7
131.0
131.3
131.6
132.0
132.3
132.6
132.9
133.3
133.9
134.0
134.5
134.8
135.2
135.5
135.8
136.1
136.4
136.7
137.0
137.3
PSIG
522.0
524.0
526.0
528.0
530.0
532.0
534.0
536.0
540.0
544.0
548.0
552.0
556.0
560.0
564.0
568.0
572.0
576.0
580.0
584.0
588.0
592.0
600.0
604.0
608.0
612.0
616.0
620.0
624.0
628.0
632.0
636.0
640.0
644.0
648.0
652.0
660.0
664.0
668.0
672.0
676.0
680.0
684.0
688.0
692.0
696.0
°F
137.6
137.9
138.3
138.6
138.9
139.2
139.5
139.8
140.4
141.0
141.6
142.1
142.7
143.3
143.9
144.5
145.0
145.6
146.2
146.7
147.3
147.9
149.0
149.5
150.1
150.6
151.2
151.7
152.3
152.8
153.4
153.9
154.5
155.0
155.5
156.1
157.1
157.7
158.2
158.7
159.2
159.8
160.3
160.8
161.3
161.8
*Based on ALLIED SIGNAL Data
37

SERVICING
LIQUID PRESSURE
LIQUID PR ESSU R E
AT ACCESS FITTING (PSIG)
AT SERVICE VALVE (P SIG) 8 10 12 14 16 18
REQUIRED LIQUID LINE TEMPERATURE
REQUIRED SUBCOOLING TEMPERATURE (°F)
189 58 56 54 52 50 48
195 605856545250
202 626058565452
208 646260585654
215 666462605856
222 686664626058
229 706866646260
236 727068666462
243 747270686664
251 767472706866
259 787674727068
266 807876747270
274 828078767472
283 848280787674
291 868482807876
299 888684828078
308 908886848280
317 929088868482
326 949290888684
335 969492908886
345 989694929088
354 100 98 96 94 92 90
364 102 100 98 96 94 92
374 104 102 100 98 96 94
384 106 104 102 100 98 96
395 108 106 104 102 100 98
406 110 108 106 104 102 100
416 112 110 108 106 104 102
427 114 112 110 108 106 104
439 116 114 112 110 108 106
450 118 116 114 112 110 108
462 120 118 116 114 112 110
474 122 120 118 116 114 112
486 124 122 120 118 116 114
499 126 124 122 120 118 116
511 128 126 124 122 120 118
38

SERVICING
S-115 COMPRESSOR BURNOUT
When a compressor burns out, high temperature develops causing the refrigerant, oil and motor insulation to decompose forming acids and sludge.
If a compressor is suspected of being burned-out, attach a
refrigerant hose to the liquid line dill valve and properly remove
and dispose of the refrigerant.
NOTICE
Now determine if a burn out has actually occurred. Confirm by
analyzing an oil sample using a Sporlan Acid Test Kit, AK-3 or
its equivalent.
Remove the compressor and obtain an oil sample from the
suction stub. If the oil is not acidic, either a burnout has not
occurred or the burnout is so mild that a complete clean-up is
not necessary.
If acid level is unacceptable, the system must be cleaned by
using the clean-up drier method.
CAUTION
DO NOT ALLOW THE SLUDGE OR OIL TO CONTACT
THE SKIN, SEVERE BURNS MAY RESULT.
NOTE: Daikin does NOT approve the flushing method using R-11 refrigerant.
Suction Line Drier Clean-Up Method
The POE oils used with R410A refrigerant is an excellent solvent. In the case of a burnout, the POE oils will remove any
burnout residue left in the system. If not captured by the refrigerant filter, they will collect in the compressor or other system
components, causing a failure of the replacement compressor
and/or spread contaminants throughout the system, damaging additional components.
Install a suction line filter drier. This drier should be installed as
close to the compressor suction fitting as possible. The filter
must be accessible and be rechecked for a pressure drop after
the system has operated for a time. It may be necessary to
use new tubing and form as required.
NOTE: At least twelve (12) inches of the suction line immediately out of the compressor stub must be discarded due to
burned residue and contaminates.
1. Remove the liquid line drier and expansion valve.
2. Purge all remaining components with dry nitrogen or carbon dioxide until clean.
3 Install new components including liquid line drier.
4. Braze all joints, leak test, evacuate, and recharge system.
5. Start up the unit and record the pressure drop across the
drier.
6. Continue to run the system for a minimum of twelve (12)
hours and recheck the pressure drop across the drier. Pressure drop should not exceed 6 PSIG.
7. Continue to run the system for several days, repeatedly
checking pressure drop across the suction line drier. If the
pressure drop never exceeds the 6 PSIG, the drier has
trapped the contaminants. Remove the suction line drier
from the system.
8. If the pressure drop becomes greater, then it must be replaced and steps 5 through 9 repeated until it does not
exceed 6 PSIG.
NOTICE: Regardless, the cause for burnout must be determined and corrected before the new compressor is started.
S-122 REVERSING VALVE REPLACEMENT
Remove the refrigerant charge from the system.
When brazing a reversing valve into the system, it is of ex-
treme importance that the temperature of the valve does not
exceed 250°F at any time.
Wrap the reversing valve with a large rag saturated with water. "Re-wet" the rag and thoroughly cool the valve after each
brazing operation of the four joints involved. The wet rag around
the reversing valve will eliminate conduction of heat to the
valve body when brazing the line connection.
The use of a wet rag sometimes can be a nuisance. There are
commercial grades of heat absorbing paste that may be substituted.
After the valve has been installed, leak test, evacuate and
recharge.
39

SERVICING
S-200 CHECKING EXTERNAL STATIC
PRESSURE
The minimum and maximum allowable duct static pressure is
found in the Technical Information Manual.
Too great of an external static pressure will result in insufficient air that can cause icing of the coil, whereas too much air
can cause poor humidity control, and condensate to be pulled
off the evaporator coil causing condensate leakage. Too much
air can cause motor overloading and in many cases this constitutes a poorly designed system. To determine proper air
movement, proceed as follows:
1. Using a draft gauge (inclined manometer) measure the static
pressure of the return duct at the inlet of the unit, (Negative
Pressure).
S-201 CHECKING TEMPERATURE RISE
Temperature rise is related to the BTUH output of the unit and
the amount of air (CFM) circulated over the indoor coil.
All units are designed for a given range of temperature increase.
This is the temperature of the air leaving the unit minus the
temperature of the air entering the unit.
The more air (CFM) being delivered through a given unit the
less the rise will be; so the less air (CFM) being delivered, the
greater the rise. The temperature rise should be adjusted in
accordance to a given unit specifications and its external static
pressure.
1. Take entering and leaving air temperatures.
2. Select the proper speed tap from the unit's blower performance data in the Technical Manual for the specific unit.
3. Take motor amperage draw to determine that the motor is
not overloaded during adjustments.
Supply
Return
Total External Static
2. Measure the static pressure of the supply duct, (Positive
Pressure).
3. Add the two readings together.
NOTE: Both readings may be taken simultaneously and read
directly on the manometer as shown in the illustration above, if
so desired.
4. Consult proper table for quantity of air.
If the external static pressure exceeds the minimum or maximum allowable statics, check for closed dampers, dirty filters,
undersized or poorly laid out ductwork.
T
SUPPLY
T
RETURN
RISE = SUPPLY -TRETURN
Checking Temperature Rise
T
40

WIRING DIAGRAMS
PACKAGE SYSTE M WIRING DIAGRAM - 1 STAGE ELECTRIC HEAT
SEE NOTE 1
#18 GAUGE 7 WIRE
REQUIRED FOR
HEAT PUMPS
ROOM THERMOSTAT
YO
CW1GRE
BR
PACKAGE UNIT
LOW VOLTAG E
JUNCTION BOX
R
Y
G
O
R
Y
G
O
W
YELLOW
GREEN
ORANGE
WHITE
R
TYPICAL HP
BL
BL
BLUE
BL
12
OUTDOOR THERMOSTAT
CLOSE ON TEMPERATURE FALL
PACKAGE SYSTE M WIRING DI AGRAM - 2 STAGE ELECTRIC HEAT
ABOVE 10 KW
RED
HIGH VOLTAGE!
DISCONNECT ALL POWER BEFORE SERVICING OR INSTALLING THIS
UNIT. MULTIPLE POWER SOURCES MAY BE PRESENT. FAILURE TO
SEE NOTE 1
#18 GAUGE 8 WIRE
FOR HEAT PUMPS
DO SO MAY CAUSE PROPERTY DAMAGE, PERSONAL INJURY OR DEATH.
SEE NOTE 2
ROOM THERMOSTAT
W2 C RYO W1G E
PACKAGE UNIT
LOW VOLTAG E
JUNCTION BOX
RED
R
Y
G
O
BR
W
R
BL
R
Y
G
O
W
BR
BL
YELLOW
GREEN
ORANGE
WHITE
BROWN
BLUE
12
OUTDOOR TH ERM OSTAT
CLOSE ON TEMPERATURE FALL
TYPICAL HP
NOTES:
1) "O" and "E" us ed on heat pumps only.
2) Connect wire from terminal #1 on outdoor thermostat to the white
wire on package uni ts if sing l e stage indoor thermostat is used.
Color Codes
R - Red
Y - Yellow
BL - Blue
BR - Brown
O - Orange
W - White
G - Green
OT18-60A OUTDOOR THERMOSTAT
Wiring is subject to change. Always refer to the wiring diagram on the unit for the most up-to-date wiring.
41

WIRING DIAGRAMS
PACKAGE SYSTEM WIRING DIAGRAM - HEAT PUMPS ONLY!
TWO-STAGE ELECTRIC HEAT ABOVE 10 kW
TYPICAL H/P
ROOM THERMOST AT
W2 C RYO W1G E
#18 GAUGE 8 WIRE
PACKAGE HE AT PUMP
OUTDOO R TH ERMOSTAT #2
(IF USED, SEE NOTE 1)
R
BL
12
Y
3
12
OUTDOOR THERMOSTAT #1
CLOSE ON TEMPERATURE FALL
BL
W
BR
BL
R
Y
G
O
R
Y
G
O
W
BR
BL
LOW VOLT AGE
JUNCTI ON BOX
RED
YELLOW
GREEN
ORANGE
WHITE
BROWN
BLUE
42
HIGH VOLTAGE!
For outdoor temperatures below 0° F with 50% or higher relative humidity,
set outdoor thermostat at 0° F
DISCONNECT ALL POWER BEFORE SERVICING OR INSTALLING THIS
UNIT. MULTIPLE POWER SOURCES MAY BE PRESENT. FAILURE TO
DO SO MAY CAUSE PROPERTY DAMAGE, PERSONAL INJURY OR DEATH.
NOTE 1: OT18 #2 CAN BE CONNECTED BETWEEN W2 OF THERMOSTAT AND BROWN WIRE IF DESIRED.
OT18-60A OUTDOOR THERMOSTAT
Wiring is subject to change. Always refer to the wiring diagram on the unit for the most up-to-date wiring.
COLOR CODES
R --RED
Y --YELLOW
BL-BLUE
BR-BROWN
O --ORANGE
W -WHITE
G --GREEN

WIRING DIAGRAMS
DP[13-14]CH/HH**41*
BK
L1 L2
FL
BK
HTR1
M1
R
M2
BK
FL
FL
TL
HTR1
R
BK
BK
R
M1M2M3
R
M4
PU
BL
W
R
BK
BK
R
TL
BK
BL
W
PU
BK
R
PLM
1
2
3
4
5
6
7
8
TL
HTR2
R
9
ONE (1) ELEMENT ROWS TWO (2) ELEMENT ROWS
L2L1
BK
R
PLM
1
2
3
4
5
6
7
8
9
HIGH VOLTAGE!
DISCONNECT ALL POWER BEFORE SERVICING OR INSTALLING THIS
UNIT. MULTIPLE POWER SOURCES MAY BE PRESENT. FAILURE TO
5 KW
10 KW
FL
FL
FL
FL
FL
BL
Y
BK
BK
BK
R
PLM
BK
1
Y
PU
BL
M1
M2
R2
W
2
3
R
BL
4
BR
5
6
R
BK
7
8
9
TL
HTR1
FL
TL
HTR2
FL
HTR3
TL
R
Y
BK
M1
R
DO SO MAY CAUSE PROPERTY DAMAGE, PERSONAL INJURY OR DEATH.
BK
BK
M2
M3
M4
R1
R
Y
R
HTR1
HTR2
HTR3
HTR4
BK
M1
M2
R
TL
TL
TL
TL
R
M3
M4
R1
Y
R
PU
BL
BK
M5
M6
BL
Y
BK
R
BL
M7
M8
R2
W
BK
R
BL
BR
PLM
1
2
3
4
5
6
7
8
9
L1
L2 L1 L2
THREE (3) ELEMENT ROWS FOUR (4) EL EMENT ROWS
L2L1 L1 L2
15 KW
20 KW
SINGLE PHASE HKR/HKP HEAT KIT
Wiring is subject to change. Always refer to the wiring diagram on the unit for the most up-to-date wiring.
43

WIRING DIAGRAMS
DP[13-14]CH/HH**41*
44
HIGH VOLTAGE!
DISCONNECT ALL POWER BEFORE SERVICING OR INSTALLING THIS
UNIT. MULTIPLE POWER SOURCES MAY BE PRESENT. FAILURE TO
DO SO MAY CAUSE PROPERTY DAMAGE, PERSONAL INJURY OR DEATH.
ECONOMIZER FOR DP[13-14]CH/HH**41*
Wiring is subject to change. Always refer to the wiring diagram on the unit for the most up-to-date wiring.

WIRING DIAGRAMS
GR
B
A
TO CONTROL BOX
SEE NOTES 1 & 2
BK
PU/BK-3
CCB
GR
B
B
A
TO ELECTRIC HEAT
A
BK
BK
BK-3
BK-3
BK
BK
BK
BK
GR
GR
COLOR CODE
BK --------------- BLACK
GR---------------- GREEN
BR --------------- BROWN
PU --------------- PURPLE
WH -------------- WHITE
WIRINGCODE
FACTORY WIRING
HIGH VOLTAGE
OPTIONAL HIGH VOLTAGE
FIELD WIRING
HIGH VOLTAGE
0140G02544-A
YL --------------- YELLOW
HIGH VOLTAGE!
DISCONNECT ALL POWER BEFORE SERVICING OR INSTALLING THIS
UNIT. MULTIPLE POWER SOURCES MAY BE PRESENT. FAILURE TO
A
BK
DO SO MAY CAUSE PROPERTY DAMAGE, PERSONAL INJURY OR DEATH.
208 / 240 / 1 / 60
B
BK
GR
GR
SPB
NOTES:
1. FOR DP13/14C UNITS: A = L1 / B = L2
FOR DP13/14C UNITS: A = L2 / B = L1
2. 45, 40, 35, & 30 AMP BREAKERS WILL
SPK* - SINGLE POINT WIRING KIT
Wiring is subject to change. Always refer to the wiring diagram on the unit for the most up-to-date wiring.
HAVE A PURPLE WIRE. 50 AND 60
AMP BREAKERS WILL HAVE BLACK
WIRE LABELED WITH A #3
D
CCB - COMPRESSOR
CIRCUIT BREAKER
LEGEN
SPB - SINGLE POINT BLOCK
45

WIRING DIAGRAMS
A
(
DP14CH[24-48]41**
BK
PU
GR
SEE NOTE 2
PU
BK
BL
YL
GR
WH
G N
C
EM
YL
SA
IF USED) SEE NOTE 4
RD
BK
C
BL
YL
RD
BR
H
C
RCCF
PU
NOTE #3
GR
RD
T2
T1
CR
PU
BK
C
RD
YL
LVJB
YL
RD
GR
WH
BR
BL
SEE NOTE 5
GND
/
/
H
Y
E
R
R
G
M
W1
O
S
W2
C
++
CONTROL
BOX
PU
BL
RD
GR
WH
WH
BL
PLF
BR
BR
BK
BR
PU
BK
CM
BL
RD
RD
BK
BK
YL
RD
BK
YL
S
COMP
HIGH VOLTAGE!
DISCONNECT ALL POWER BEFORE SERVICING OR INSTALLING THIS
UNIT. MULTIPLE POWER SOURCES MAY BE PRESENT. FAILURE TO
L1
C
NOTE #2
N
DO SO MAY CAUSE PROPERTY DAMAGE, PERSONAL INJURY OR DEATH.
1
4
5
6
SUPPLY VOLTAGE
R
T1
COMP
C
S
S.A.
IF USED
EM
3
G
2
NOTE #4
R W2 W1 Y G C
208-240/1/60
RCC F
H
NOTE #4
L
208-240
3 1
24V
T2
C
C
F
CM
2
TR
C
EM
SEE NOTE #2
C
L2
COMPONENT LEGEND
C
CONTACTOR
CM
COND ENSER MOTOR
COMP
COMPRESSOR
EM
EVAPORATOR MOTOR
GND
EQUIPMENT GROUND
LVJB
LOW VOLTAGE JUNCTION BOX
PLF
FEMALE PLUG / CONNECTOR
RCCF
RUN CA PACITOR FOR^J
COMPRESSOR AND FAN
SA
START ASSIST
TR
TRANSF ORMER
FACTORY WIRING
LINE VOLTAGE
LOW VOLTAGE
OPTIONAL HIGH
VOLTAGE
FIELD WIRI NG
HIGH VOLTAGE
LOW VOLTAGE
WIRE CODE
BK BLACK
BL BLUE
BR BROWN
GR GREEN
OR ORANGE
PU PURPLE
RD RED
WH WHITE
YL YELLOW
NOTES:
1. REPLACEMENT WIRE MU ST BE SAME SIZE AND TYPE INSULATION AS
ORIGINAL (AT LEAST 105°C) USE COPPER CONDUCTOR ONLY.
2. TO C HANGE EV APORATOR MOTOR SPEED MOVE WHITE AND YELLOW
LEADS FROM EM "2" AND "3" TO "4" AND "5". IF BOTH LEADS ARE
ENERGIZE D, THE HI G HER SPEED S ETTING IS USED.
3. FOR 208 VO LT TRANSFORMER OPE RATION MOVE PU RPLE WIRES
FROM TERMINAL 3 TO TERMINAL 2 ON TRANSFORMER.
4. START ASSIST FACTORY EQUIPPED W HEN REQUIRE D
5. USE C OPP ER CONDUC TORS ONLY.
++ USE N.E.C. CLASS 2 WIRE
SEE UNIT RATING PLATE FOR TYPE AND SI ZE
OF OVER CURRENT PROTECTION
Wiring is subject to change. Always refer to the wiring diagram on the unit for the most up-to-date wiring.
46

WIRING DIAGRAMS
DP14CH[48-60]41B*
HIGH VOLTAGE!
DISCONNECT ALL POWER BEFORE SERVICING OR INSTALLING THIS
UNIT. MULTIPLE POWER SOURCES MAY BE PRESENT. FAILURE TO
PU
BK
BK
PU
BL
GR
YL
GR
4 5
T1
NOTE #2
EM
G
WH
WH
EM
SUPPLY VOLTAGE
R
COMPC
S
S.A.
IF USED
NOTE#3
C L G N
1
2 3
SEENOTE 2
L1
C
DO SO MAY CAUSE PROPERTY DAMAGE, PERSONAL INJURY OR DEATH.
N
YL
SA
(IFUSED)SEENOTE4
208-240/1/60
T2
C
RCCF
H
F
NOTE#4
L
208-240
2
3 1
24V
RD
C
CM
TR
BK
1
2
208
C
TR
24V
BL
YL
RD
BR
H
C
F
RCCF
PU
L2
NOTE #3
T2
T1
GR
RD
RD
CR
PU
BK
L2
C
L1
YL
YL
GR
WH
BR
BL
EQUIPMENTGROUND
FIELD GROUND
FIELDSPLICE
SWITCH (TEMP)
IGNITER
RD
SEENOTE 5
GND
LVJB
HPS
F
ACTORY WIRING
FIELDWIRING
WIRECODE
BK BLACK
BL BLUE
BR BROWN
GR GREEN
OR ORANGE
PU PURPLE
RD RED
WH WHITE
YL YELLOW
60
T
H
Y
E
R
R
G
M
W1
O
S
W2
T
C
A
T
++
CONTROL
BOX
LINE VOLTAGE
LOW VOLTAGE
OPTIONAL HIGH
VOLTAGE
HIGH VOLTAGE
LOW VOLTAGE
2
0
8
2
4
0
/
1
/
PU
3
240
BL
RD
GR
WH
WH
BL
PLF
9
3
8
562
41
INTEGRATEDCONTROL
BR
7
BR
BK
PU
BR
BK
CM
COMPONENT
LEGEND
BR
BLOWER INTERLOCK RELAY
C
CONTACTOR
CH
CRACKCASE HEATER
CM
CONDENSERMOTOR
COMP
COMPRESSOR
EBTDR
ELECTRONICBLOWERTIMEDELAY RELAY
EM
EVAPO RATOR MOTOR
FC
FANCAPACITOR
GND
EQUIPMENT GROUND
LVJB
LOW VOLTAGEJUNCTION BOX
PLF
FEMALE PLUG / CONNECTOR
RCCF
RUNCAPACITORFOR
COMPRESSORAND FAN
SA
START ASSIST
TR
TRANSFORMER
HPS
HIGHPRESSURESWITCH
JUNCTION
TERMINAL
INTERNALTO
PLUGCONNECTION
SWITCH(PRESS.)
OVERCURRENT
PROT. DEVICE
BL
RD
RD
BK
BK
YL
RD
BK
YL
S
COMP
C
1
PLF
EM
SEENOTE #2
2 3
4
5
6
HPS
R W2 W1 Y G C
THERMOSTAT
++
C
N
OTES:
1. REPLACEMENT WIRE MUST BE SAMESIZE AND TYPE INSULATIONAS ORIGINAL
(ATLEAST 105°C) USE CO PPERCON DUCTOR ONL Y.
2. TO CHANGEEV AP ORATORM O TORSPEEDREPLACE LEAD ONEBTDR"COM"WITH
LEAD ON EBTD R"M 1 "OR "M2"
3. FOR208 VOLT TRANSFORMER OPERATIONMOVE PURP LE WIRES FROM TERMINAL
3 TERMINAL 2 ON TRANSFORMER.
4. START ASSIST FA CTO REQUIPEDWHENREQUIRED
5. USE COPPERCONDUCTORS ONL Y
++USEN.E.C.CLASS2 WIRE
SEE UNIT RATING PLATE FOR TYPE AND SIZE
OF OVER CURRENT PROTECTION
208-240/1/60 0140G00871-C
Wiring is subject to change. Always refer to the wiring diagram on the unit for the most up-to-date wiring.
47

WIRING DIAGRAMS
DP14HH[24-60]41A*/B*
48
HIGH VOLTAGE!
DISCONNECT ALL POWER BEFORE SERVICING OR INSTALLING THIS
UNIT. MULTIPLE POWER SOURCES MAY BE PRESENT. FAILURE TO
SEE NOTE 8
SEE NOTE 7
BK
PU
L2
C
L1
P
U
K
SEE NOTE 5
P
U
B
K
GND
LVJB
YL
RD
GR
WH
OR
BR
BL
P
U
R
D
C
H
S
B
K
B
K
SEE NOTE 6
BK
PU
GR
SEE NOTE 2
BK
3
2
240
TR
BL
SA
SEE NOTE 4
P
K
B
L
/
HPS
B
L
BL
RD
W
3
P
B
/
L
SEE NOTE 3
GR
H
K
H
W
PLF
9
8
562
41
7
PU
P
U
Y
L
PU
CM
PU
RD
P
U
BR
BR
BK
BR
BK
PU
BL
T2
RD
RD
T1
BK
BK
PU
OR
RD
GR
Y
L
B
RD
BK
YL
S
CR
COMP
B
L
Y
H
W
H
RCCF
R
CONTROL
BOX
PU
1
208
C
24V
BL
P
U
O
R
L
RD
BR
H
C
F
RDYL
D
LPS
P
K
Y
L
/
YL/PK
Y
L
Y
L
R
D
R
D
B
R
CCR
LVDR
L
P
CNT
0-RV
C-RV
PS2
R
U
P
U
O
R
0
0
B
K
W
Y
Y
P
D
D
R
DFT
W
B
K
W
H
B
K
Y
L
U
D
B
K
B
K
RVC
C
C
C
DFT
DF2
R-PS1
R-DFT
R
R
D
H
W
GR
G
R
R
C
D
BL
HVDR
DF1
Y
L
YL
Y
L
C
L G N
1
2
3
4 5
EM
COMPONENT LEGEND
C
CONTACTOR
CCR
COMPRESSOR CONTACTOR RE LAY
CH
L1
C
O
P
O
L
E
2
O
N
S
E
E
T
SEE NOTE 2
N
DO SO MAY CAUSE PROPERTY DAMAGE, PERSONAL INJURY OR DEATH.
R
4
5
6
F
P
L
N
L
7
E
R
V
C
T1
C
Y
S.A.
SEE NOTE 4
EM
G
SEE NOTE 3
R
SUPPLY VOLTAGE
208-240/1/60
R
COMP
S
H
CHS
L
208-240
1 3
C
R
V
O
-
O
W
R
O
2
W
T
H
E
T2
C
RCCF
F
SEE NOTE 6
2
V
2
4
R
V
D
C
Y
H
P
S
Y
1
W
R
M
O
A
S
T
++
C
DF1
HVDR
CM
CH
TR
D
F
T
R
-
R
P
S
-
P
S
L
2
1
G
T
L2
DF2
D
T
F
D
F
T
C
P
1
S
2
C
N
T
3
C
E
M
C
N
S
E
O
T
E
E
C
NOTES:
1. REPLACEMENT WIRE MUST BE SAME SIZE AND TYPE INSULATION AS
ORIGINAL (AT LEAST 105°C) USE COPPER CONDUCTOR ONLY.
2
2. TO CHANGE EVAPORATOR MOTOR SPEED MOVE WHITE AND YELLOW
LEADS FROM EM"2" AND "3" TO "4" AND "5". IF BOTH LEADS ARE
ENERGIZED, THE HIGHER SPEED SETTING IS USED.
3 FOR 208 VOLT TRANSFORMER OPERATION MOVE PURPLE WIRES
FROM TERMINAL 3 TO TERMINAL 2 ON TRANSFORMER.
4. START ASSIST FACTORY EQUIPPED WHEN REQUIRED
5. USE COPPER CONDUCTO RS ONLY
++
6. CRANKCASE HEATER AND CRANKCASE HEATER SWITCH FACTORY
EQUIPPED WHEN REQUIRED.
7. DOUBLE POLE CO NTACTOR SHOWN. SINGLE POLE CONTACTOR
COULD BE FACTORY EQUIPPED AS AN ALTERNATE CONFIGURATION.
8. COMMON SIDE OF CONTACTOR CAN NOT BE GROUNDED OR
CONNECTED TO ANY OTHER COMMON (24V).
CRACKCASE HEATER
CHS
CRACKCASE HEATER SW ITCH
CM
CONDENSER MOTOR
COMP
COMPRESSOR
DC
DEFROST CONTROL
DFT
DEFROST THERMOSTAT
EM
EVAPORATOR MOTOR
GND
EQUIPMENT GROUND
HVDR
HIGH VOLTAGE DEFROST RELAY
LPS
LOW PRESSURE SW ITCH
LVDR
LOW VOLTAGE DEFROST RELAY
LVJB
LOW VOLTAGE JUNCTION BOX
PLF
FEMALE PLUG / CONNECTOR
RVC
REVERSING VALVE COIL
RCCF
RUN CAPACITOR FOR
COMPRESSOR AND FAN
SA
START ASSIST
TR
TRANSFORMER
HPS
HIGH PRESSURE SWI TCH
JUNCTION
TERMINAL
INTERNAL TO
INTEGRATED CONTROL
PLUG CONNECTION
IGNITER
SWITCH (PRESS.)
OVERCURRENT
PROT. DEVICE
USE N.E.C. CLASS 2 WIRE
SEE UNIT RATING PLATE FOR TYPE AND SIZE
OF OVER CURRENT PROTECTION
EQUIPMENT GROUND
FIELD GROUND
FIELD SPLICE
SWITCH (TEMP)
Wiring is subject to change. Always refer to the wiring diagram on the unit for the most up-to-date wiring.
2
0
8
2
4
0
/
1
/
60
T
H
Y
E
R
R
G
M
W1
O
O
S
W2
T
C
A
T
++
SEE NOTE 6
D
FACTORY WIRING
LINE VOLTAGE
LOW VOL TAGE
OPTIONAL HIGH
VOLTAGE
FIELD WIRING
HIGH VOLTAGE
LOW VOL TAGE
WIRE CODE
BK BLACK
BL BLUE
BR BROWN
GR GREEN
OR ORANGE
PU PURPLE
RD RED
WH W HITE
YL YELLOW
G
C
H
B
K
R
0140G01640-C
R
 Loading...