

Dahua VTO2000A, VTNS1060A, VTH1550CH, VTO2000A-C, VTO2000A-B Quick Install Manual
...
Official UK distribution partner
tel: +44 (0)1457 874 999 | fax: +44 (0)1457 829 201 | email: sales@cop-eu.com | web: www.cop-eu.com
FEBRUARY 2017
VIDEO DOOR ENTRY
Quick Install Guide
2
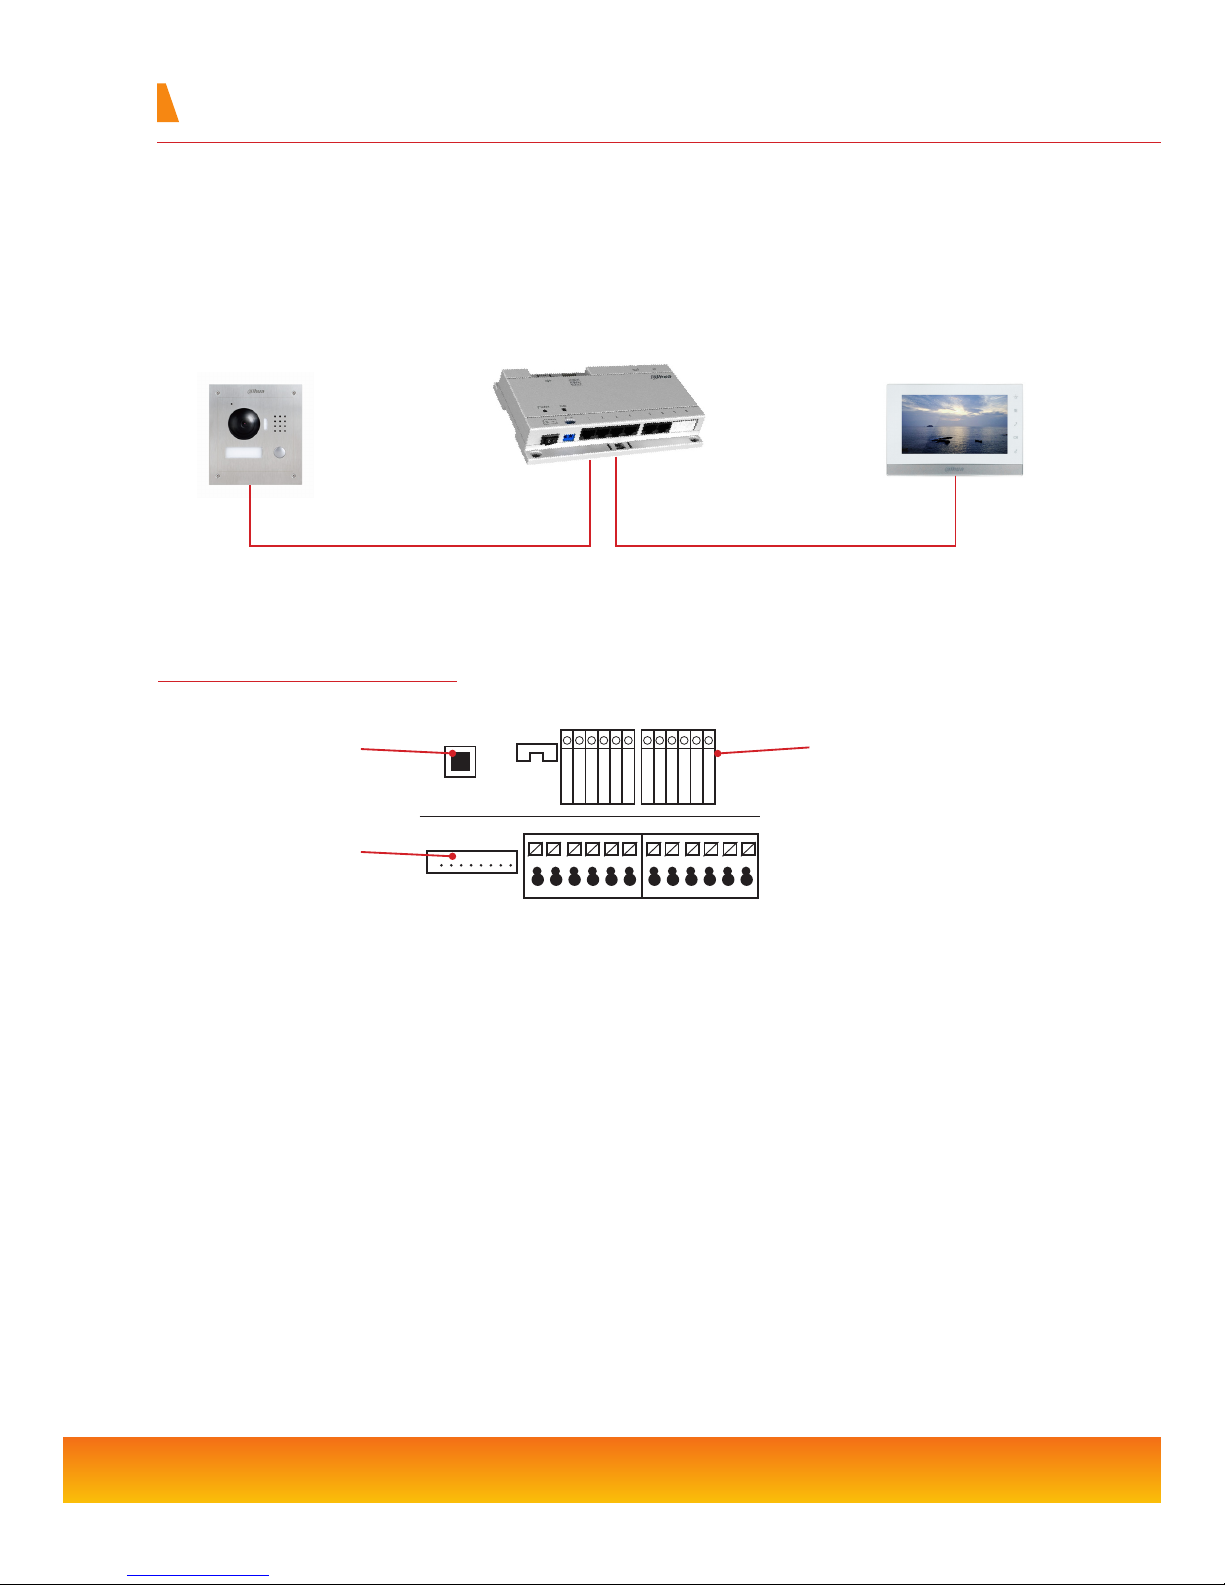
VTO Connections
Home System Configuration
VTNS1060A
VTH1550CH
When conguring a home VDP system, all devices should rst be connected together. Usually, this is done by connecting both the
camera unit (VTO) and monitor unit (VTH) to the VTNS1060A PoE switch.
The VTNS1060A is a 24v passive PoE unit, this is a different type of PoE than that seen on conventional IP devices. As such, both the
VTO2000A and VTH1550CH can only be used with 24v passive PoE or by connecting a 12/24vdc power supply to the power input
terminals on the units.
VTO2000A
24v PoE 24v PoE
Tamper Switch Sounds an alarm in the event that the VTO unit is tampered with
Network Connection Connect the supplied RJ45 adapter cable to this port
+12/24v Used when not powering the VTO via PoE, connect the 12v or 24v DC positive supply to this
terminal
GND Ground connection for 12v or 24v DC negative supply and other inputs
12v Out DC 12v continuous output for auxillary device
Unlock Button Input to connect a switch such as a push button for releasing the door lock
Feedback Input for door contact to check if the door is closed before engaging lock
NO/NC/COM Relay output used when unlocking door
Tamper
Switch
NET
Network
Connection
Inputs &
Outputs
+12V/+24V
+12V_OUT
FEEBBACK
UNLOCK BUTTON
GND
GNDNONC
COM
GND
485_A
485_B
3
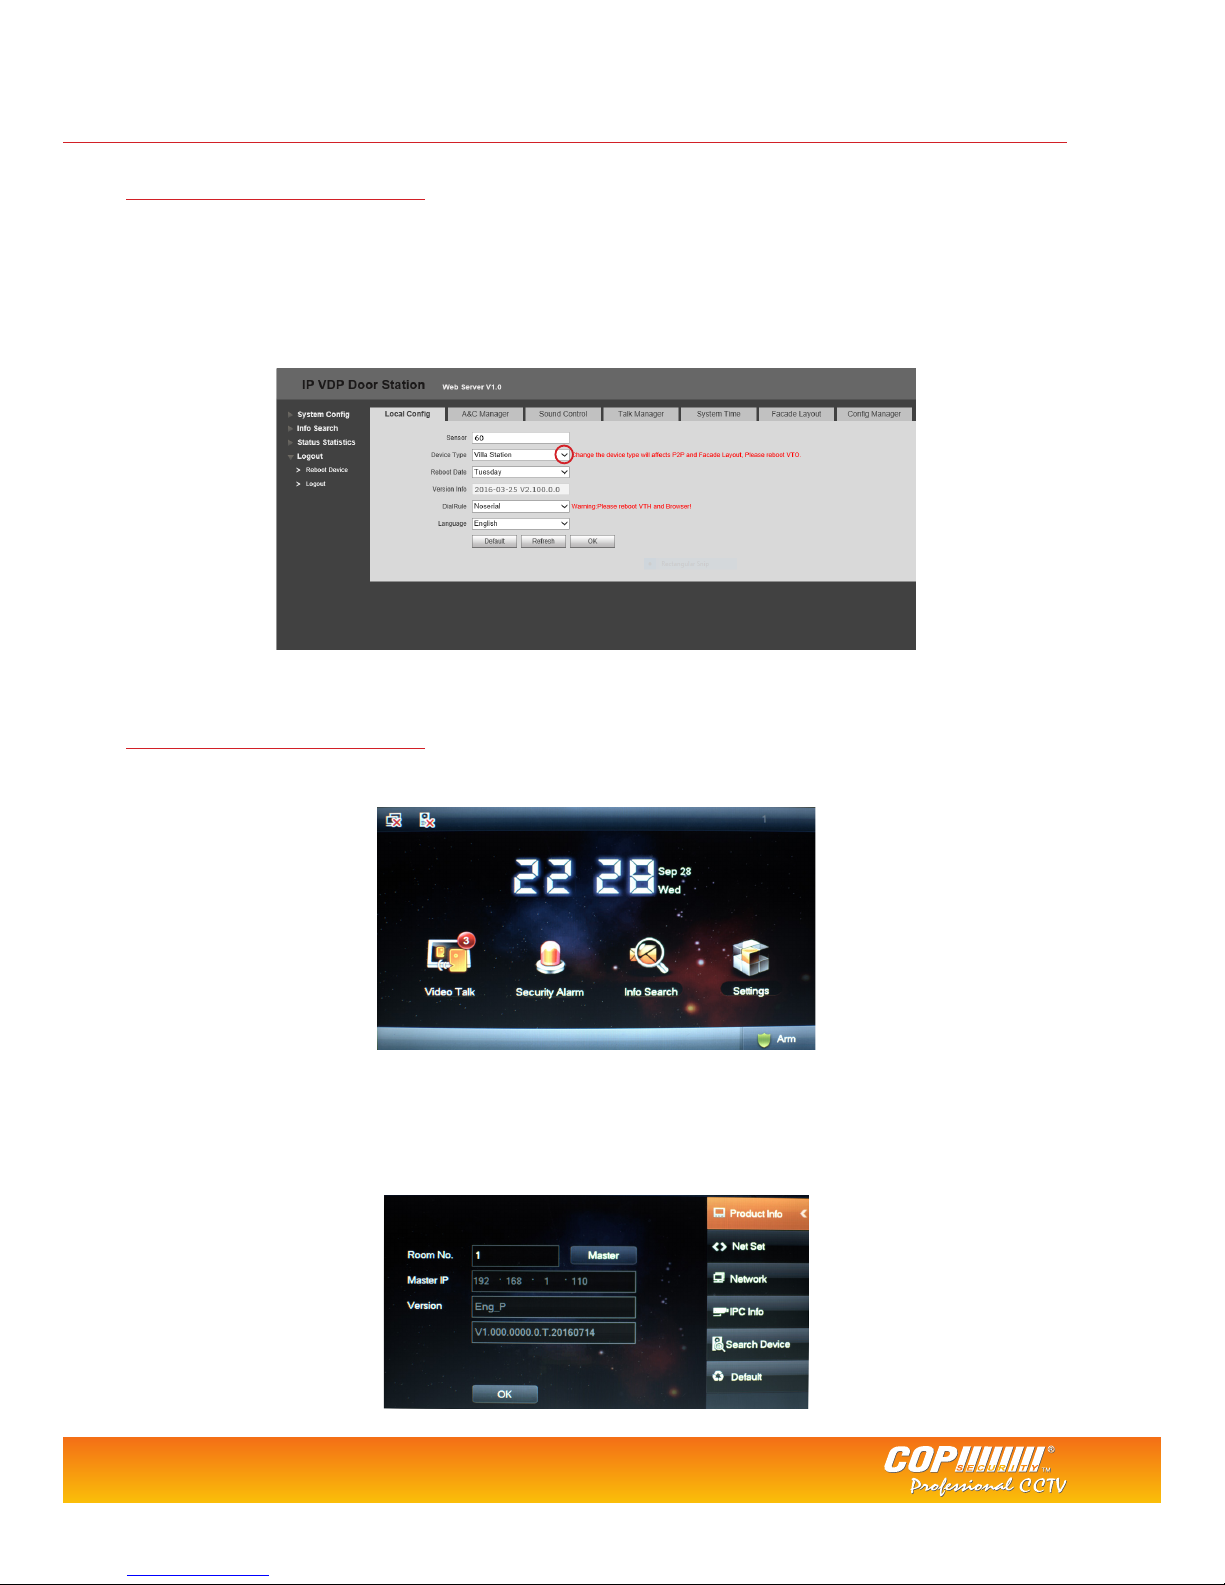
VTO Camera Conguration
With a PC or Laptop connected to the network switch, run the Dahua cong tool to nd the VTO unit. By default the VTO has an IP
address of 192.168.1.110, this can be changed if required via the cong tool or within the VTO web browser.
Login to the VTO via the computers web browser. Username: admin Password: admin
Select the Local Cong tab and change Device Type to Villa Station. Click OK to save the setting.
Select the Logout option on the left menu and click Reboot Device, this will restart the VTO.
VTH Monitor Conguration
To congure the VTH unit use the built in menu within the monitor itself. VTH units do not support web browser conguration.
Select Settings > Project Settings and input the engineer password: 002236 (default)
For DHI-VTH5221D units hold down the Settings button for 5 seconds and enter the engineer password: 888888 (default)
The Product Info menu is used to set the room number of the VTH and to congure the unit as a Master or Extension unit. If
only a single VTH is being used in the system, then this should be set to Master and a room number chosen. Adding multiple
VTH units is covered on page 5.
Tel: +44 (0)1457 874 999 | Fax: +44 (0)1457 829 201 | Email: sales@cop-eu.com | Online: www.cop-eu.com
4
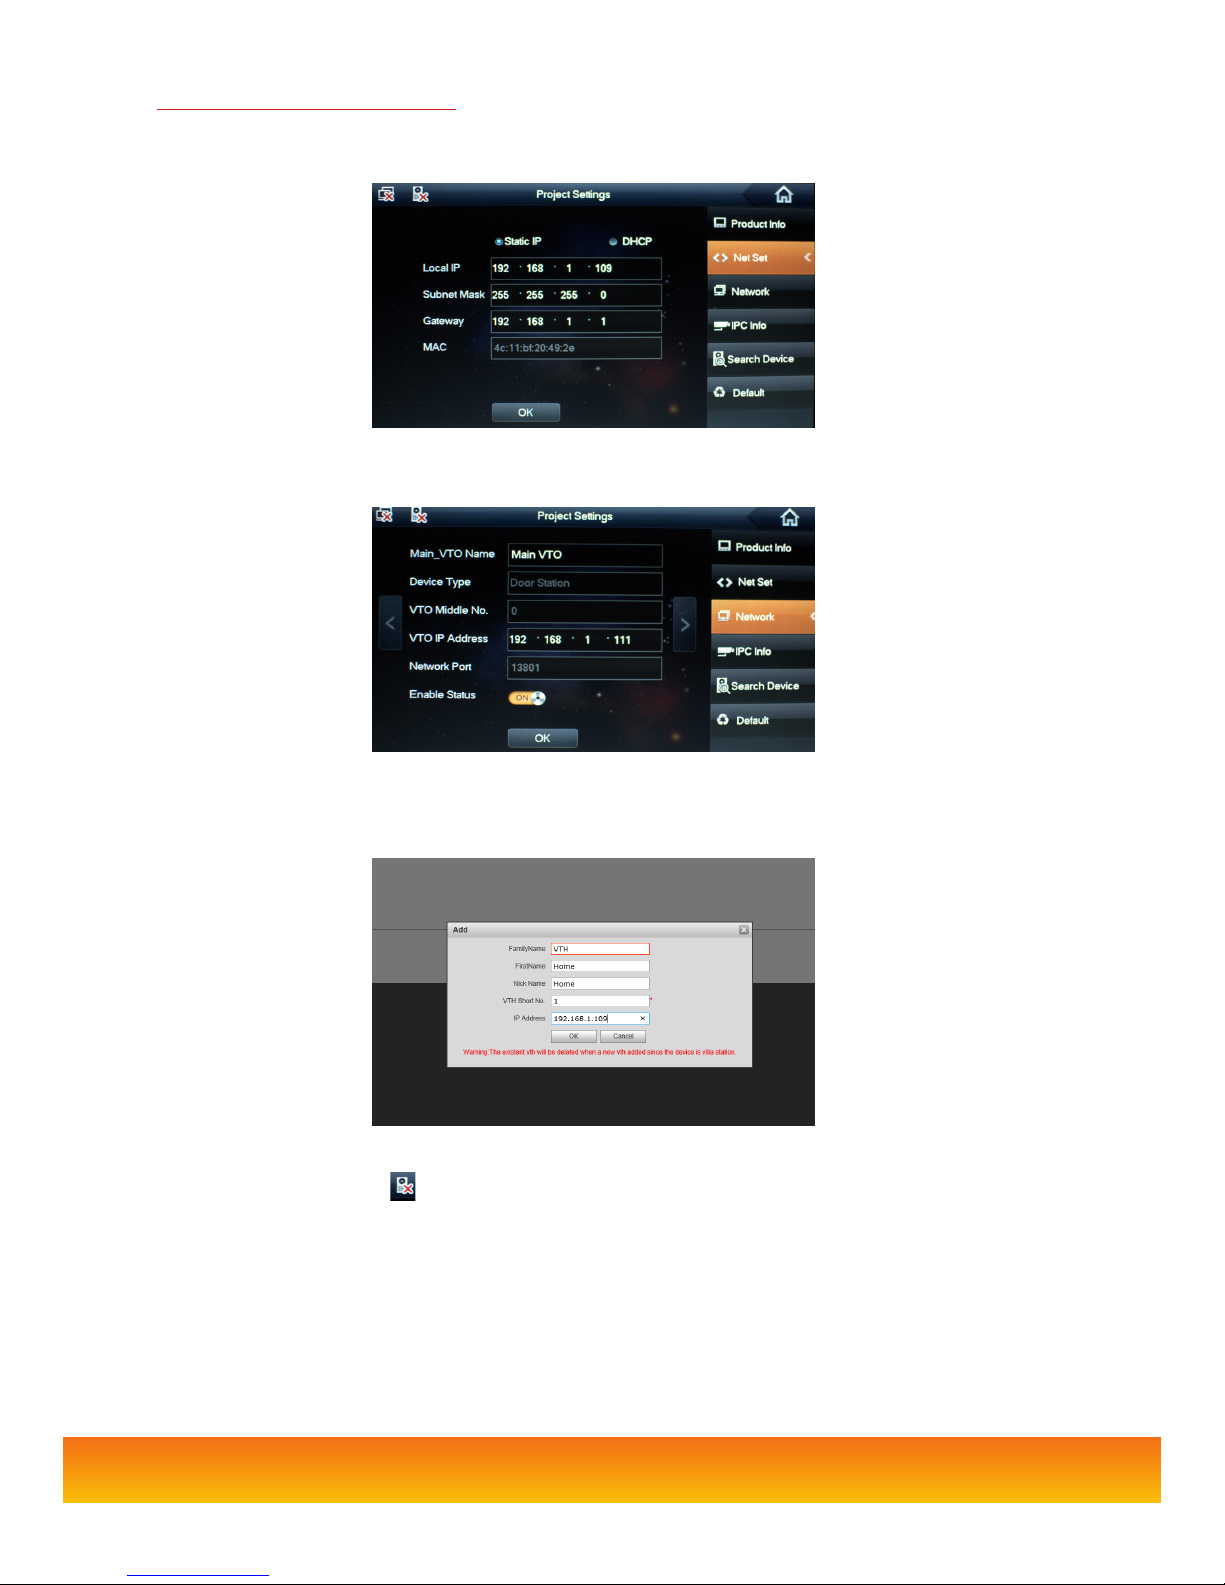
In the project settings menu select NetSet to congure the VTH network settings. When conguring the network address of the VTH it
is vital to ensure the IP address range is within the same Subnet as the VTO.
For both the VTO and VTH to communicate, each unit must have the IP address details of the other unit. To add the VTO unit to the
VTH, select Network and input the VTO units IP address and set Enable Status to ON.
To add the VTH to the VTO, revisit the VTO web browser and go to System Cong > Indoor Manager > Add. Input a family name, rst
name and Nickname, these are purely for reference. Enter the VTH Short number. This number must match the Room Number set in
the VTH Product Info page.
Click OK to conrm the setting.
At the top of the VTH screen the icon should disapear, this indicates that the VTO and VTH are now connected. To call the VTH
from the VTO, press the button on the VTO unit and press Answer to initiate two way communication.
VTH Conguration (Continued)
 Loading...