

Dahua NVR4216-16P-4 Full Manual

1
DAHUA NVR FULL MANUAL
Contents
1. Goods Checking ............................................................................................................................................... 4
1.1. Device and accessory checking ........................................................................................... 4
1.2. Power supply .................................................................................................................................. 4
1.3. Quick guide ..................................................................................................................................... 4
2. How to add and change the setting o f t he camera ........................................................................ 5
2.1. How to install HDD ...................................................................................................................... 5
2.2. Cable connection .......................................................................................................................... 6
2.3. Connect to the ground ............................................................................................................... 7
2.4. How to Change the passwor d ............................................................................................... 8
2.5. How to Close the HDD buzzer .............................................................................................. 9
2.6. Startup Wizard ............................................................................................................................ 10
2.7. How to use Navigation Bar ................................................................................................... 14
2.8. Main Menu .................................................................................................................................... 14
2.8.1 Dual-screen operation ................................................................................................... 15
2.8.2 Output Screen ................................................................................................................... 15
2.8.3 Tour ........................................................................................................................................ 15
2.8.4 PTZ ......................................................................................................................................... 15
2.8.5 Color ....................................................................................................................................... 15
2.8.6 Search ................................................................................................................................... 15
2.8.7 Alarm Status ....................................................................................................................... 15
2.8.8 Remote Device ................................................................................................................. 16
2.8.9 Network ................................................................................................................................. 16
2.8.10 HDD Manager ................................................................................................................... 16
2.8.11 USB Manager .................................................................................................................... 16
2.9 How to Add the account and set t he r ight .................................................................... 16
2.9.1 How to Add/Modify Group ........................................................................................... 18
2.9.2 Add/Modify User .............................................................................................................. 19
2.9.3 How to Change the date, time and time zone .................................................. 20
2.10 How to Use the Remote Contr oller .................................................................................. 21
3. How to add and change the setting o f t he camera? ................................................................... 23
3.1. NVR/HCVR I P a ddress setting........................................................................................... 23
3.2. How to add the camera .......................................................................................................... 23
3.3. How to add camera(s) in a quick way(Smart add) ................................................... 25
3.4. How to set the Resolution of ca m er a .............................................................................. 28
3.5. How to set the bit rate of camera ...................................................................................... 28
3.6. How to set the audio of camera ......................................................................................... 29
3.7. How to set the image parameters of camera .............................................................. 30
3.8. How to set the motion detect of camera ........................................................................ 31
3.9. How to set the Tripwire of ca mera ................................................................................... 32
3.10. How to set the intrusion of camera .................................................................................. 34
3.11. How to set the object abandon ed/ object missing of camera ............................. 36
3.12. How to set the scene change of ca mer a ...................................................................... 38
3.13. How to set the face detect of camer a ............................................................................. 39
3.14. How to set the audio detect of camera .......................................................................... 40
3.15. How to change the camera name..................................................................................... 41
4. Preview .............................................................................................................................................................. 43

2
4.1 How to change the display res olution and adjust the image value ................. 43
4.2 How to adjust the order of the splits ................................................................................ 44
4.3 How to switch from different s plits .................................................................................... 45
4.4 How to set tour ........................................................................................................................... 45
4.5 How to set the Favorite Camer as ..................................................................................... 45
4.6 How to set mask ........................................................................................................................ 46
4.7 How to make the digital zoom ............................................................................................ 46
4.8 How to open audio .................................................................................................................... 47
4.9 How to snapshot ........................................................................................................................ 47
4.10 How to enable the zero-channel........................................................................................ 48
4.11 How to set corridor mode ...................................................................................................... 49
4.12 How to use PIP (picture in picture) .................................................................................. 50
4.13 How to use the second HDMI ............................................................................................. 51
5. HDD ..................................................................................................................................................................... 52
5.1 HDD Requirements .................................................................................................................. 52
5.2 How to check the HDD informat io n .................................................................................. 52
5.1.1 HDD type ............................................................................................................................. 52
5.1.2 How to check HDD S.M.A.R.T information ........................................................ 52
5.1.3 How to do HDD detect .................................................................................................. 53
5.2 How to set HDD group sett ing ............................................................................................ 56
5.3 Redundant Option ..................................................................................................................... 56
5.4 How to set raid 5 ........................................................................................................................ 57
6 Recording ......................................................................................................................................................... 60
6.1 How to change the encode .................................................................................................. 60
6.2 How to set the Manual Recording .................................................................................... 60
6.3 Recording-Schedule (Normal, MD and Alarm) .......................................................... 62
6.3.1 How to set Pre-recording ............................................................................................. 62
6.3.2 How to set Holiday-recording .................................................................................... 62
6.3.3 How to set redundant option ...................................................................................... 64
6.3.4 How to set MD recording plan .................................................................................. 66
6.3.5 How to set alarm recording plan .............................................................................. 68
6.4 How to set snapshot plan...................................................................................................... 70
6.5 How to record into FTP .......................................................................................................... 73
7 Playback and Ba ckup ................................................................................................................................. 74
7.1 How to search and playback ............................................................................................... 74
7.2 How to make the sync playbac k ........................................................................................ 75
7.3 How to make the picture playback ................................................................................... 75
7.4 How to make the frame by fra me p layback ................................................................. 75
7.5 How to make the smart search .......................................................................................... 75
7.6 How to playback the mark v ideo ....................................................................................... 76
7.7 How to playback with IVS( fac e det ec t i on) .................................................................... 78
7.8 How to playback with splic ing ............................................................................................. 79
7.9 How to make the video cut and bac k u p ....................................................................... 80
7.10 How to lock the recording files ........................................................................................... 81
7.11 How to make quick Backup ................................................................................................. 82
7.12 How to make web backup .................................................................................................... 83
7.13 How to use smart player ........................................................................................................ 85
8 PTZ ...................................................................................................................................................................... 87
8.1 Hardware Connection ............................................................................................................. 87
8.2 Software Setup ........................................................................................................................... 87
8.3 How to Operate PTZ Control ............................................................................................... 89
8.4 How to set up Preset and call ............................................................................................. 91
8.5 How to set Tour and call ........................................................................................................ 92
8.6 How to set Pattern and call .................................................................................................. 93

3
8.7 How to set Idle Function and call ...................................................................................... 93
8.8 How to set Privacy Masking and call .............................................................................. 94
8.9 How to use Keyboard to control P TZ .............................................................................. 95
9 Event and Activation.................................................................................................................................. 100
9.1 Explain IPC ext, IPC offline, Net alarm, HDCVI alarm, IVS alarm, Video loss, Tampering
100
9.2 How to set video recording act ivation ........................................................................... 103
9.3 How to set Snapshot activation ....................................................................................... 105
9.4 How to set Alarm upload ..................................................................................................... 107
9.5 How to Set Email Upload .................................................................................................... 109
9.6 How to set up PTZ activation ............................................................................................ 112
9.7 How to set up Easy Space ................................................................................................. 113
9.8 How to set the local alarm in/out ..................................................................................... 114
9.8.1 Local alarm physical connection: .......................................................................... 114
9.8.2 Alarm Setup on NVR/HCVR/DVR. ....................................................................... 115
10 Network connection ......................................................................................................................... 117
10.1 How to set DHCP .................................................................................................................... 117
10.2 How to use P2P DMSS ........................................................................................................ 117
10.3 How to set DDNS .................................................................................................................... 122
10.4 How to use smart PSS to connect ................................................................................. 123
10.5 How to use Config tool ......................................................................................................... 125
10.6 How to use IE/Chrome/Safari ........................................................................................... 127
11 Device information and upgrade ............................................................................................... 130
11.1 NVR upgrade ............................................................................................................................. 130
11.2 IPC upgrade with NVR ......................................................................................................... 133
11.3 NVR and IPC information checking ............................................................................... 133

4
1. Goods Checking
1.1. Device and accessory checking
Be sure to use all the accessories recommended by manufacturer.
Before installation, please open the package and check all the components are included.
Normally accessories include user manual, mouse, Power cable, Power adapter, CD,
Network cable, Screw package. (Take NVR4104 as an example)
Contact your local retailer ASAP if something is broken in your package.
1.2. Power supply
Make sure the power supply and device is matched. NVR4104 is AC100~240V-12V/2A.
1.3. Quick guide
Please refer to the Quick Start Guide which is the general ftp:
(User/Password: Dahuaeuro / Dahuaeuro)
ftp://54.67.82.60/Product_User_Manuals/01NVR/NVR100_11_4_7_series/ Quick Start
Guide/
5
2. How to add and change the setting of the camera
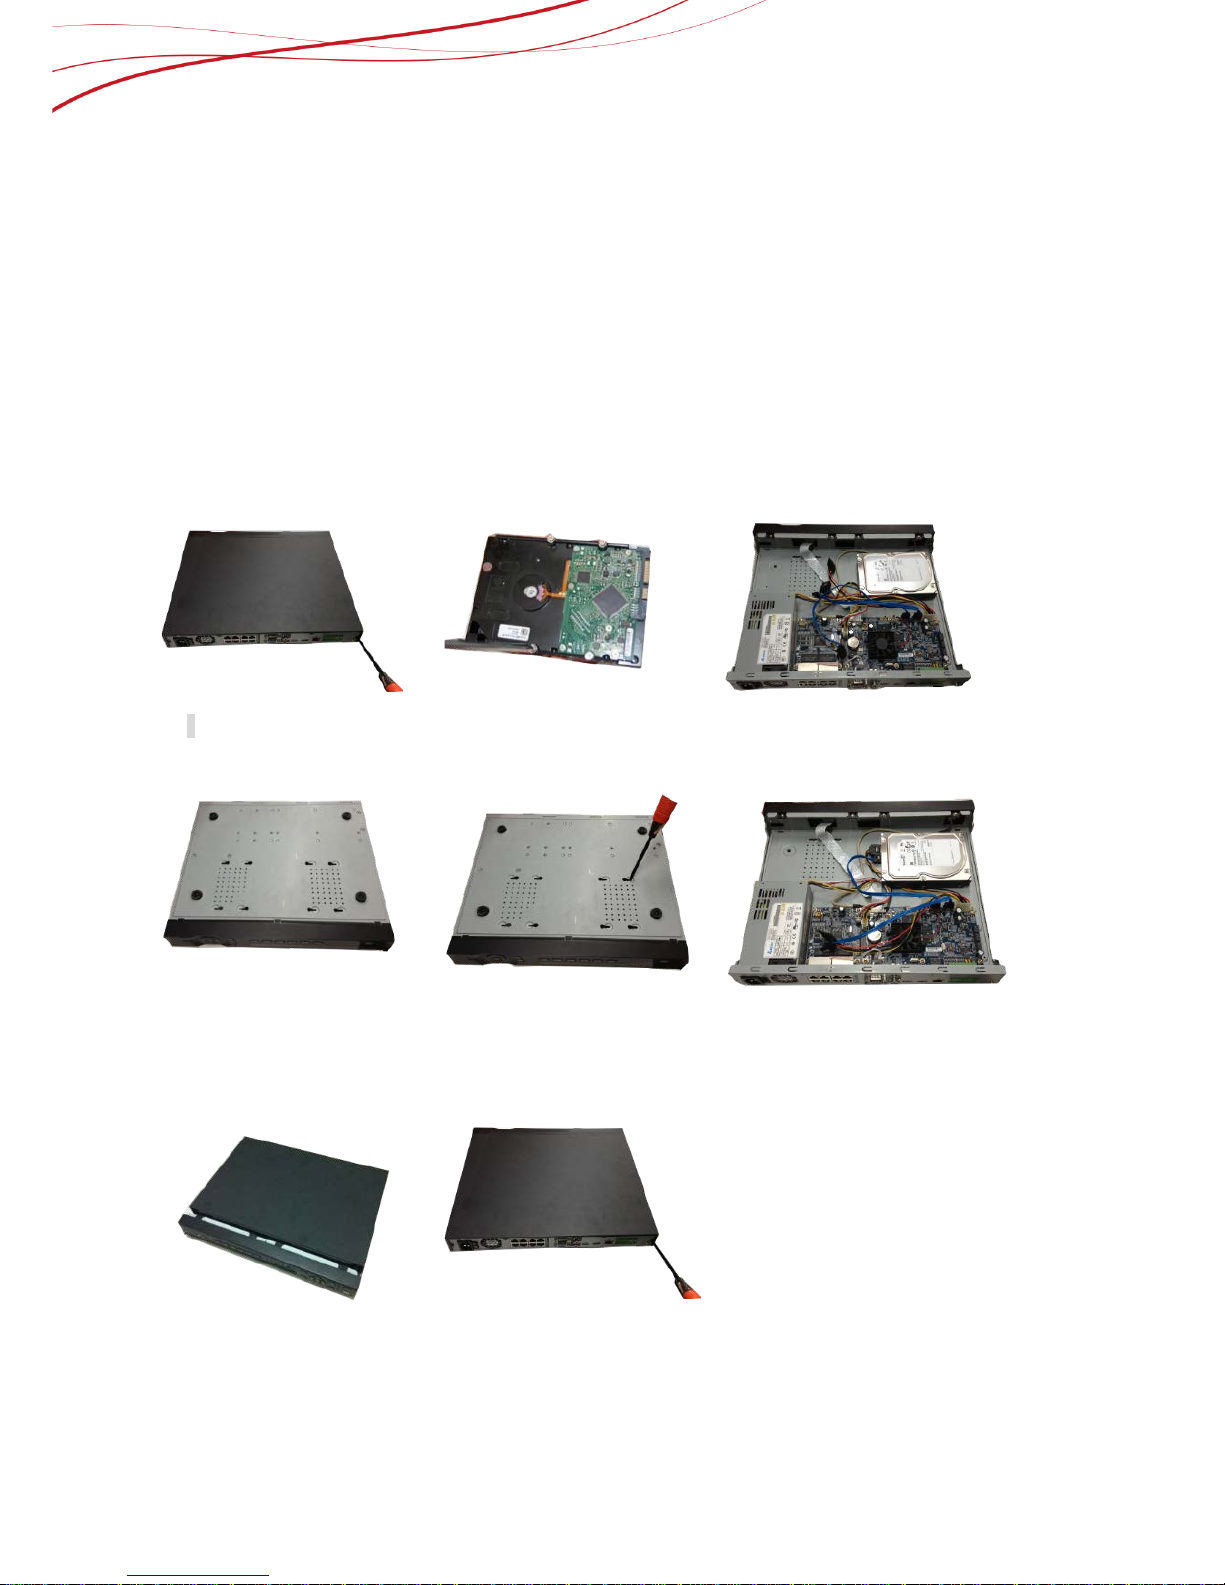
2.1. How to install HDD
Important:
Please turn off the power before you replace the HDD.
The pictures listed below for reference only.
For the first time install, please be aware that whether the HDDs have been installed.
Please use HDD of 7200rpm or higher. Usually we do not recommend the PC HDD.
Please follow the instructions below to install hard disk.
○,
1
Loosen the screws of the
upper cover and side panel.
②Fix four screws in the HDD
(Turn just three r ounds).
③Place the HDD in accordance
with the four holes in the bottom.
④
Turn the device upside
down and then turn the
screws in firmly.
⑤Fix the HDD f irmly. ⑥
Connect the HDD cable and
power cable.
⑦
Put the cover in
accordance with the clip and
then place the upper cover
⑧
Secure the screws in the
rear panel and the side
6
back.
panel.
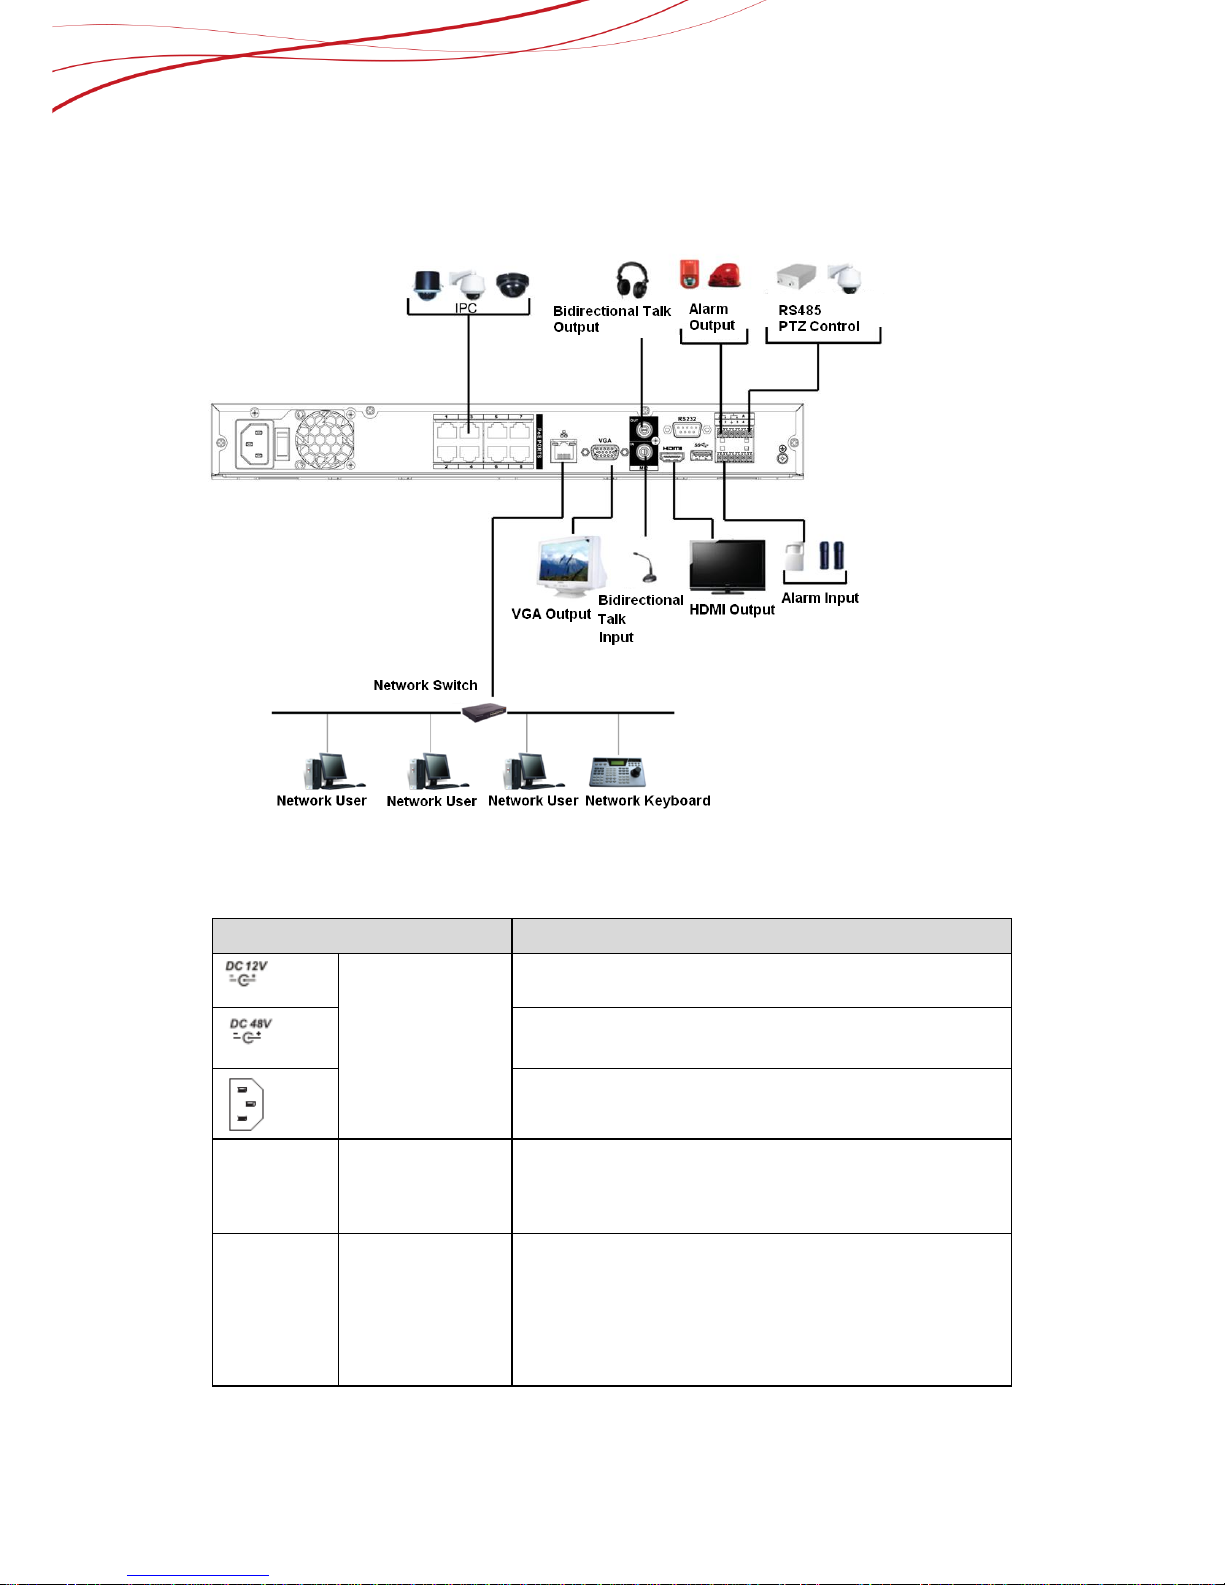
2.2. Cable connection
The NVR42-8P series rear panel is shown as below. See Figure 2-1.
Figure 2-1
Please refer to the following sheet for detailed information.
Name Function
Power input
port
Input DC 12V/5A.
For NVR42 series product only.
Switch power port. Input D C 48// 1. 04A.
For NVR42-P series product only.
Input AC 100~240V.
For NVR42-8P series product only.
MIC IN Audio input
port
Bidirectional talk input port. It is to receive the
analog audio signal output from the devices
such as microphone, pickup.
MIC OUT Audio output
port
Audio output port. It is to output t he analog audio
signal to the devices such as t he sound box.
Bidirectional talk output.
Audio output on 1-window video monitor.
Audio output on 1-window video playback.

7
Name Function
1~4
Alarm input port
1~4
There are two types; NO (normal open)/NC
(normal close).
When your alarm input device is using
external power, please
make sure the
device and the NVR have the same ground.
GND Alarm input ground port.
N1, N2
Alarm output
port
1~2
2 groups of alarm output ports. (Group 1:
port NO1 ~ C1,Group 2:port NO2 ~
C2).Output alarm signal to the alarm
device. Please make sure there is power to
the external alarm device.
NO:Normal open alarm output port.
C:Alarm output public end.
C1, C2
A
RS-485
communication
port
RS485_A port. It is the cable A. You can connect to
the control devices such as speed dome PTZ.
B
RS485_B.It is the cable B. You can connect to the
control devices such as speed d ome PTZ.
Network port
10M/100M/1000Mbps self-
adaptive Ethernet port.
Connect to the network cable.
US
B2.0 port
USB2.0 port. Connect to mouse, USB storage device,
USB burner and etc.
RS-232
RS-
232 debug
COM.
It is for general COM debug to configure IP address or
transfer transparent COM data.
HDMI
High Definition
Media Interface
High definition audio and video signal output port. It
transmits uncompressed high definition video and
multiple-
channel data to the HDMI port of the display
device. HDMI version is 1. 4.
VGA
VGA video
output port
VGA video output port. Output analog video signal. It
can connect to the monitor t o view analog video.
PoE
PORTS
/
Bult-in Switch. Support PoE.
The 4 PoE series product supports total 48V
50W.
The 8 PoE series product supports total 48V
120W.
2.3. Connect to the ground
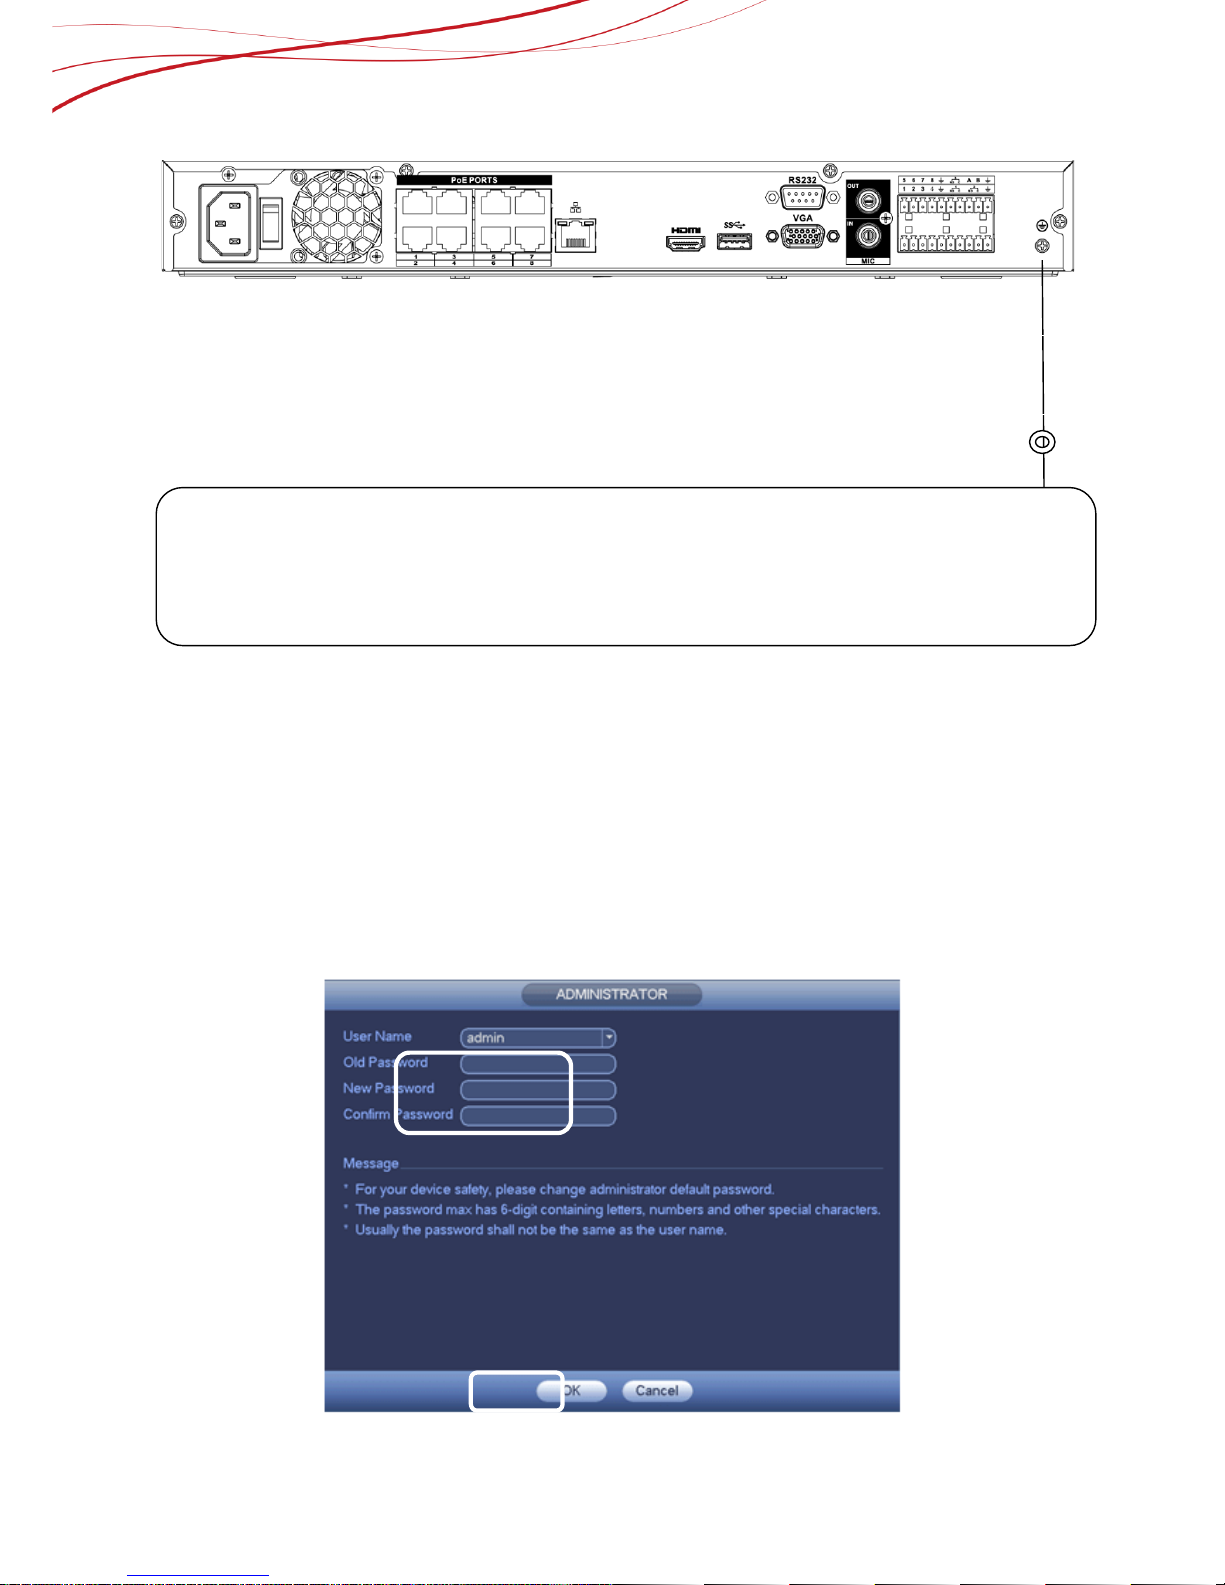
8
Connect device to the ground via metal cable to prevent device damaged by static electricity.
2.4. How to Change the pas sword
In modify interface, check the modify password box and then input old password and new password.
Input new password again to confirm the modification.The default administrator user name is admin
and the password is admin. See Figure 2-2, 2-3.
○
,1
Ground
①
②
9
1) Input old password and new password and confirm the modification.
2) Click the OK button to save the settings.
Figure 2-2
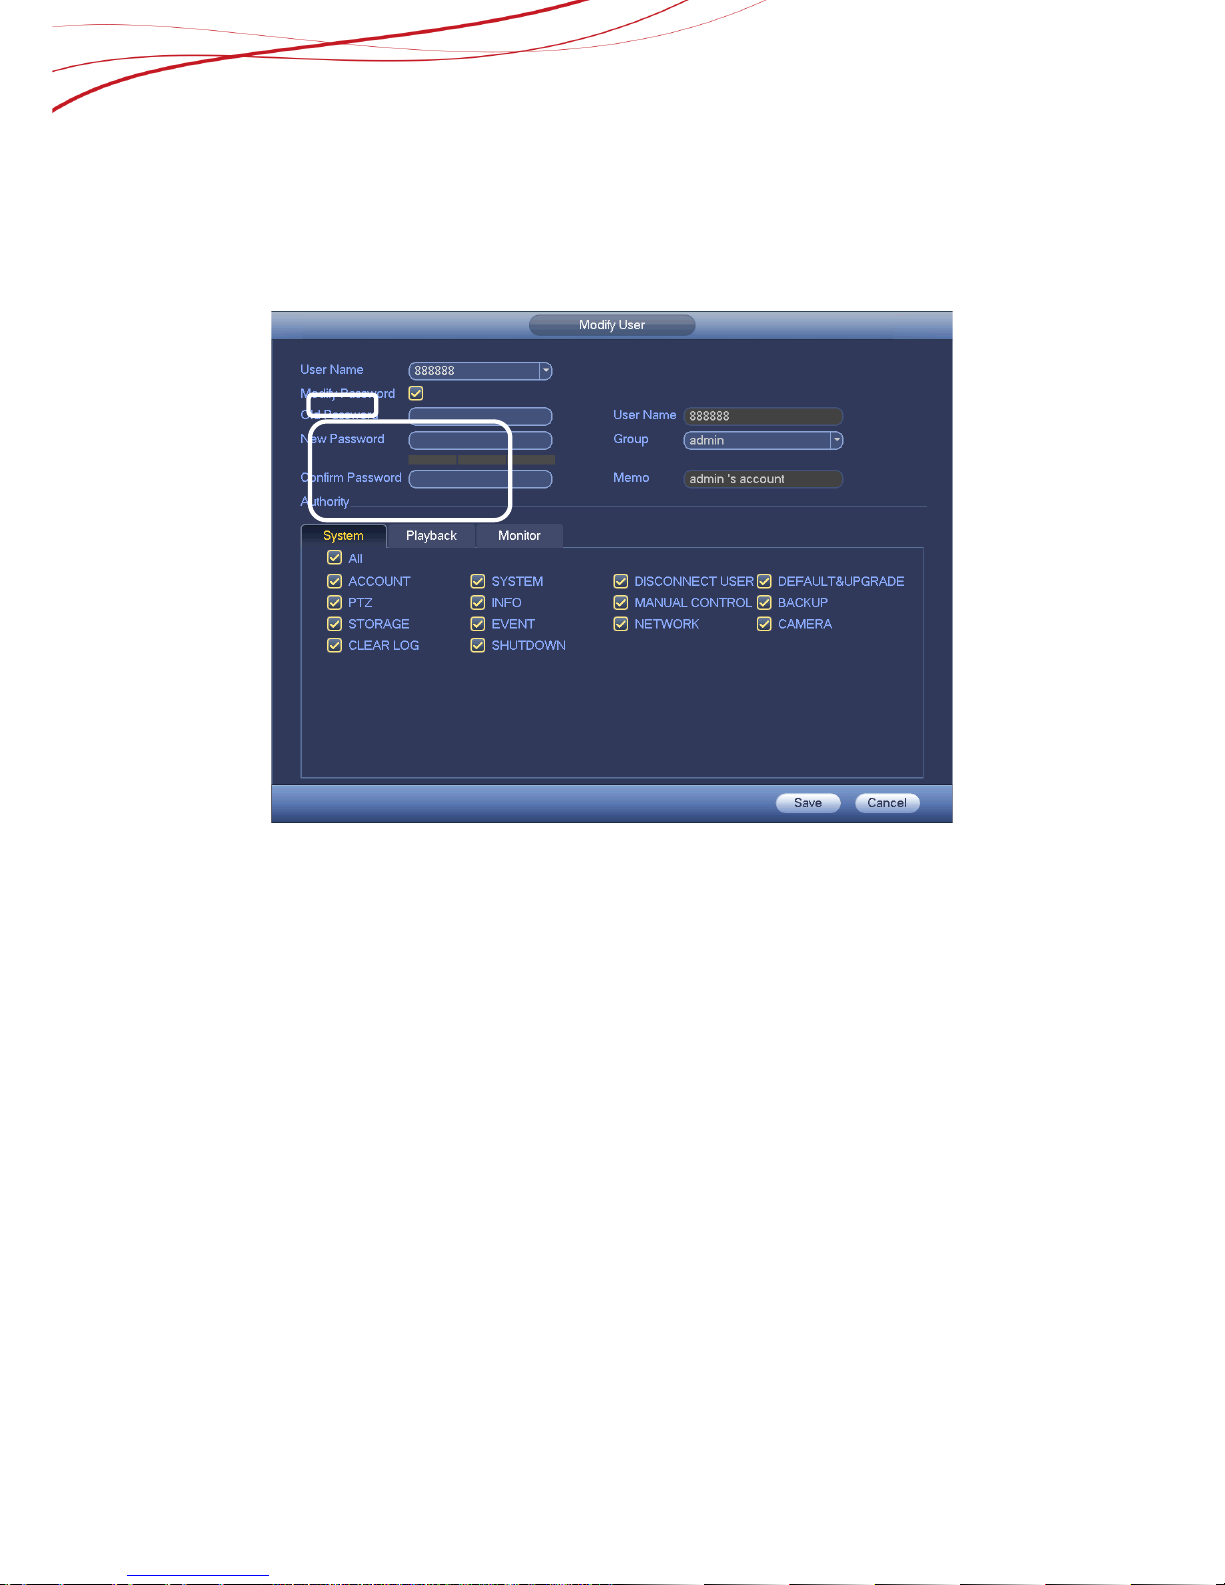
Operation Steps are as below:
1) Enable “Modify Password”.
2) Input old password and new password and confirm the modification.
3) Click the save button to save the setttings
Figure 2-3
The password max has 32 and the space in the front or at the end of the string is null. The
space is valid only in the middle of the string.
For the account of the Account function, it can change the password of other users too.
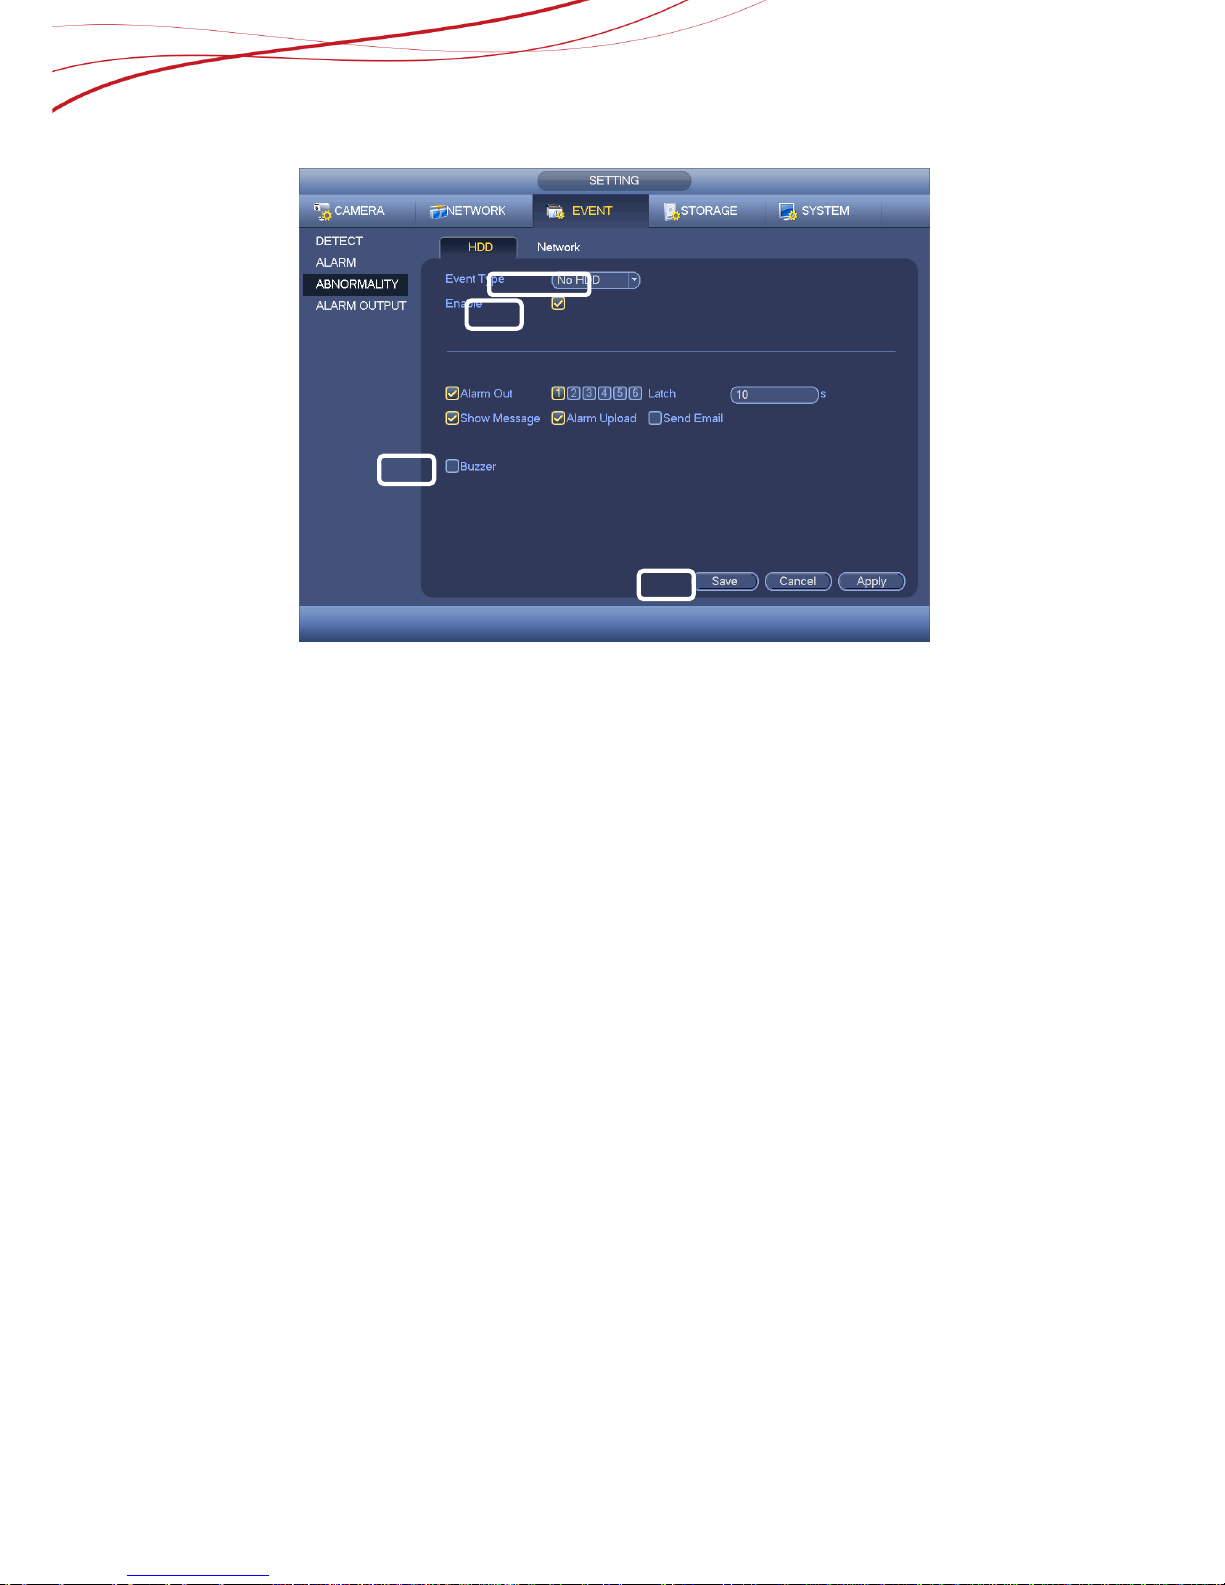
2.5. How to Close the HDD buzzer
Buzzer: The buzzer beeps when an alarm occurs. If want to close this function, choose
“NO HDD” and unable the function, then also unable the buzzer. See Figure 2-4
②
①
③
10
Operation Steps are as below:
1) Choose No HDD
2) Unable the function
3) Unable the buzzer
4) Click the save button,
Figure 2-4
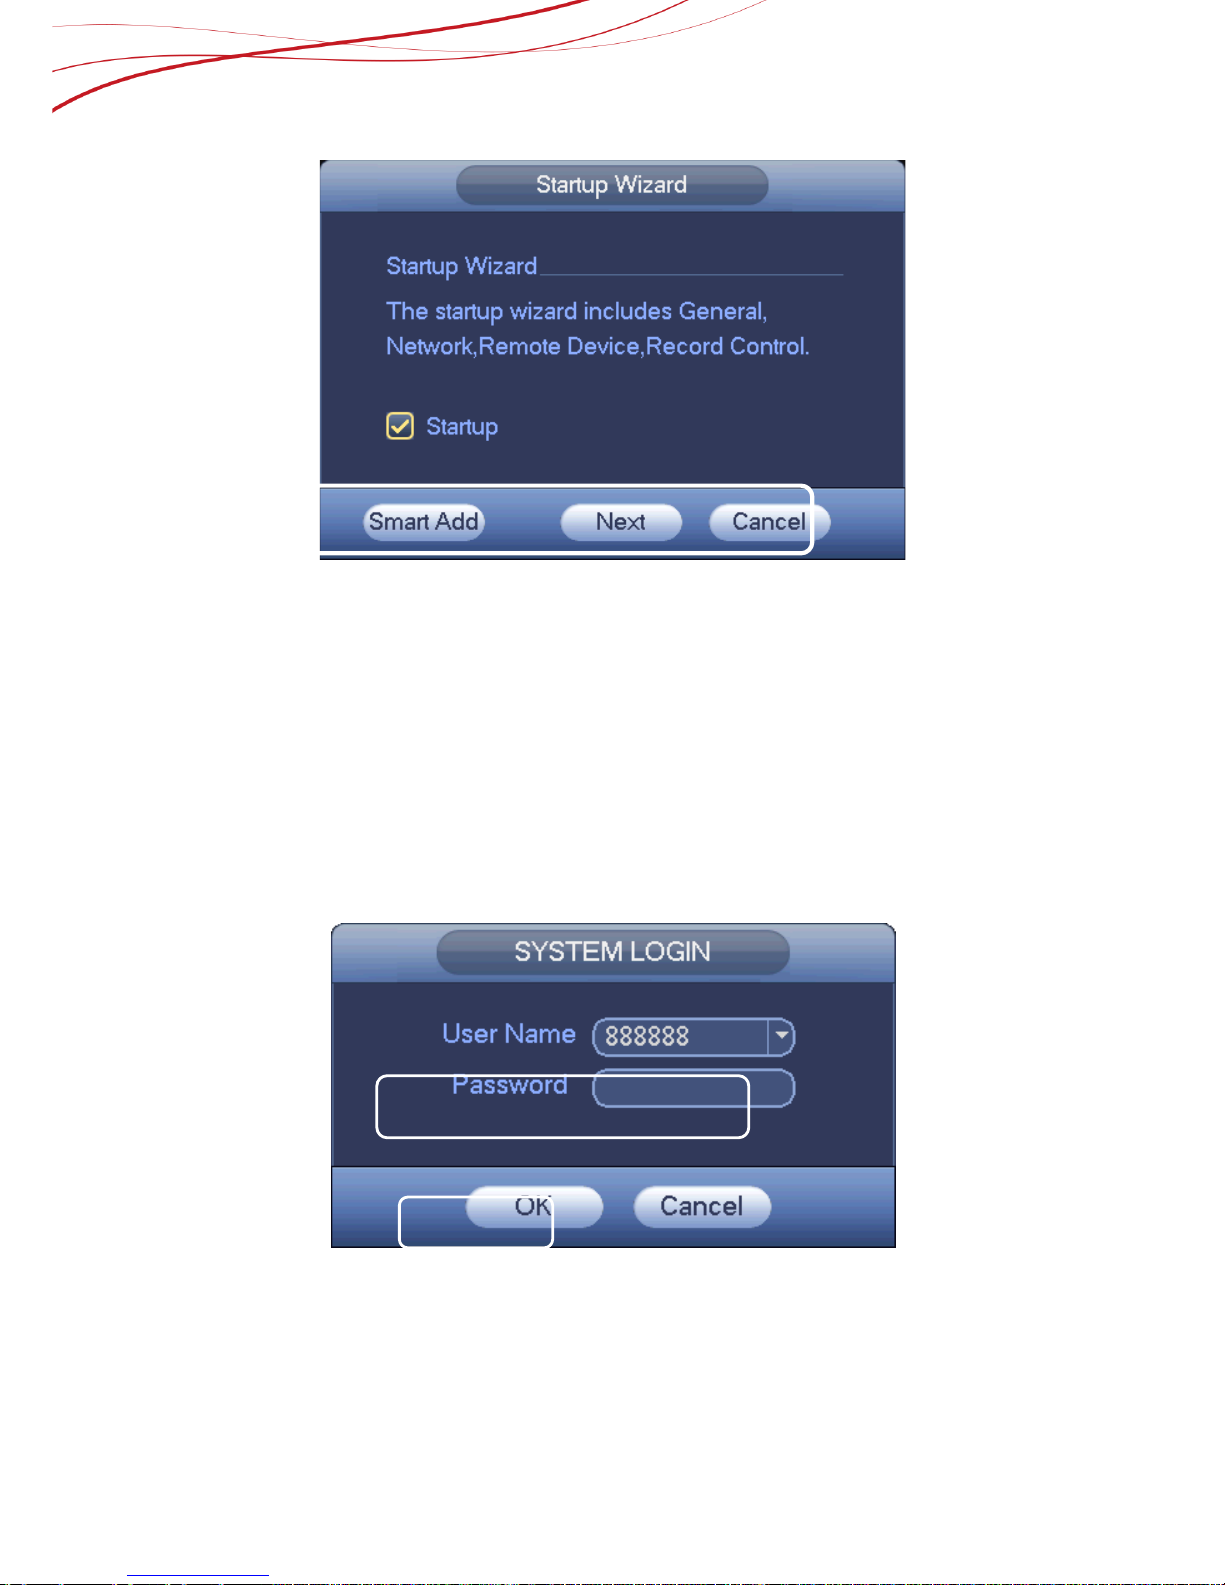
2.6. Startup Wizard
After device successfully booted up, it goes to startup wizard.
Click Cancel/Next button, you can see system goes to login interface.
Tips
Check the box Startup button here, system goes to startup wizard again when it boots up
the next time.
Cancel the Startup button, system goes to the login interface directly when it boots up the
next time.
③
②
①
④
11
Figure 2-5
Click Smart add, Cancel button or Next button, system goes to login interface. See Figure
2-6.
System consists of four accounts:
Username: admin. Password: admin. (administrator, local and network)
Username: 888888. Password: 888888. (administrator, local only)
Username: 666666. Password: 666666(Lower authority user who can only monitor,
playback, backup and etc.)
Username: default. Password: default (hidden user). Hidden user “default” is for
system interior use only and can’t be deleted. When there is no login user, hidden user
“default” automatically login. You can set some rights such as monitor for this user so
that you can view some channel view without login.
Figure 2-6
1) Input the User Name and Password
2) Click OK button, you can go to General interface. See Figure 2-7.
①
①
②
12
Figure 2-7
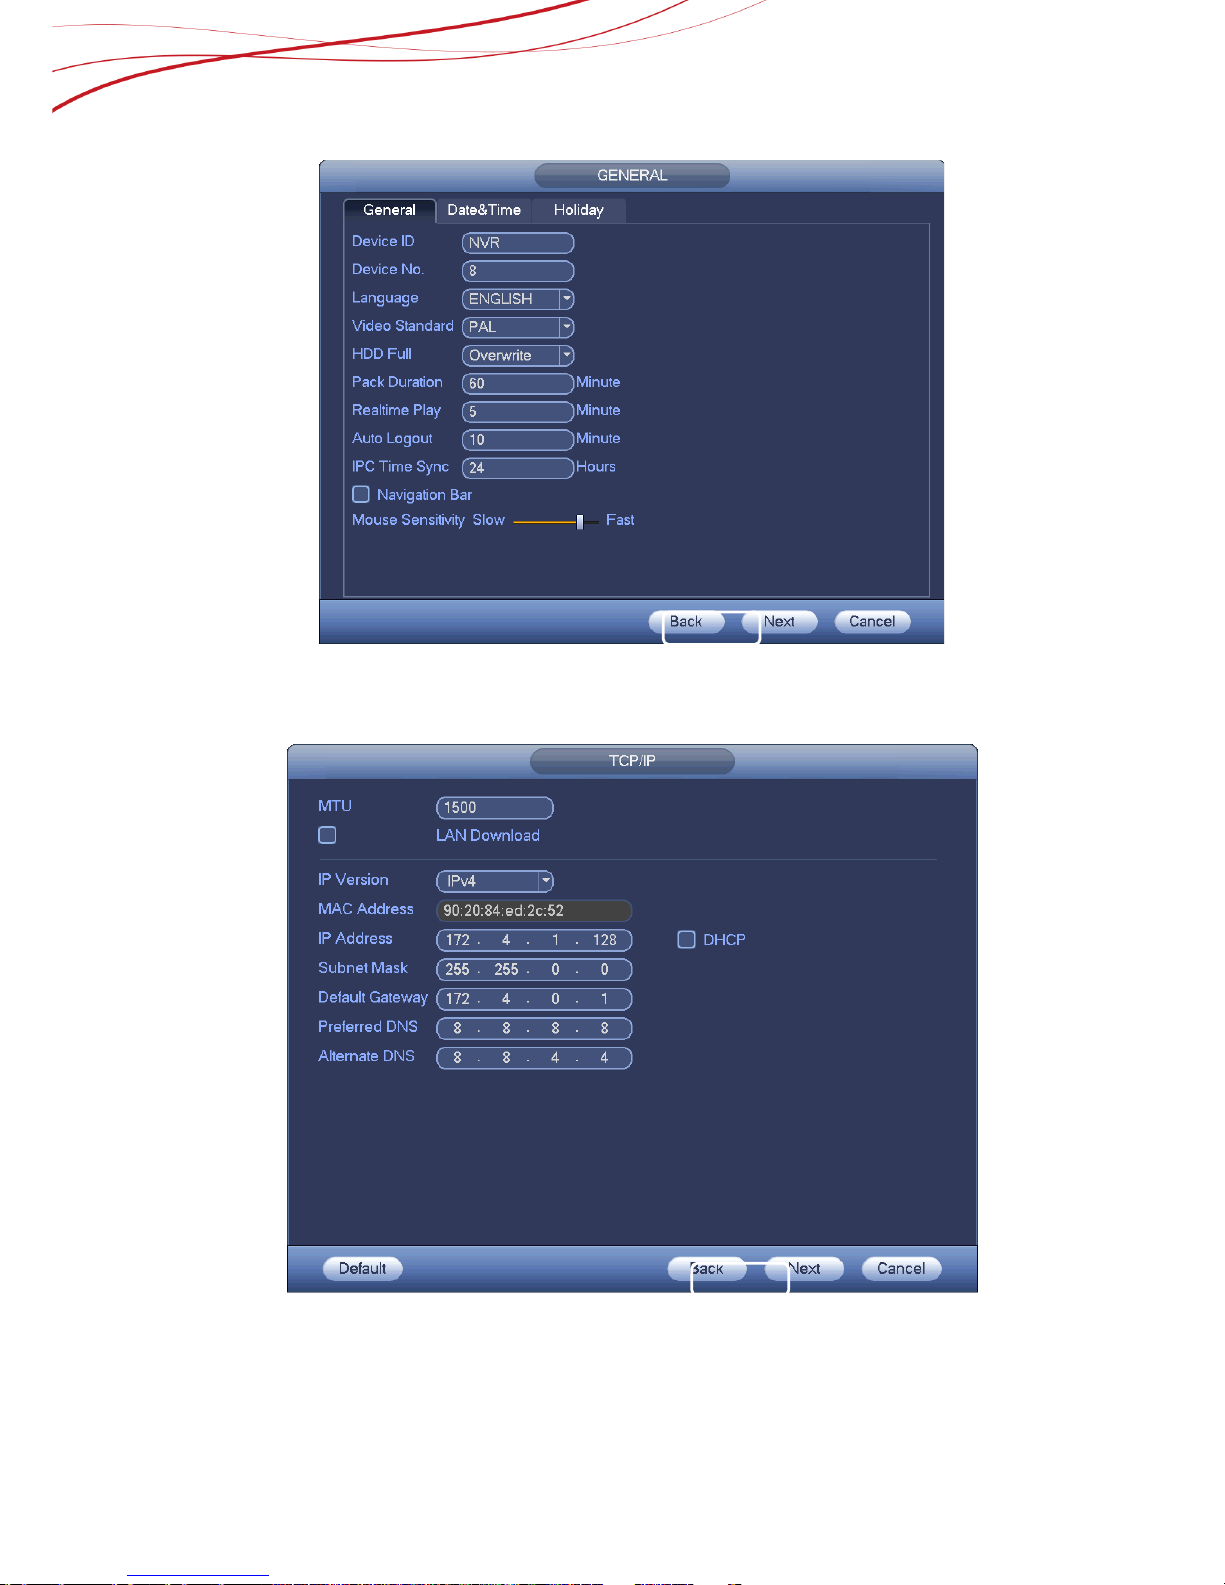
Click Next button, you can go to network interface. See Figure 2-8.
Figure 2-8
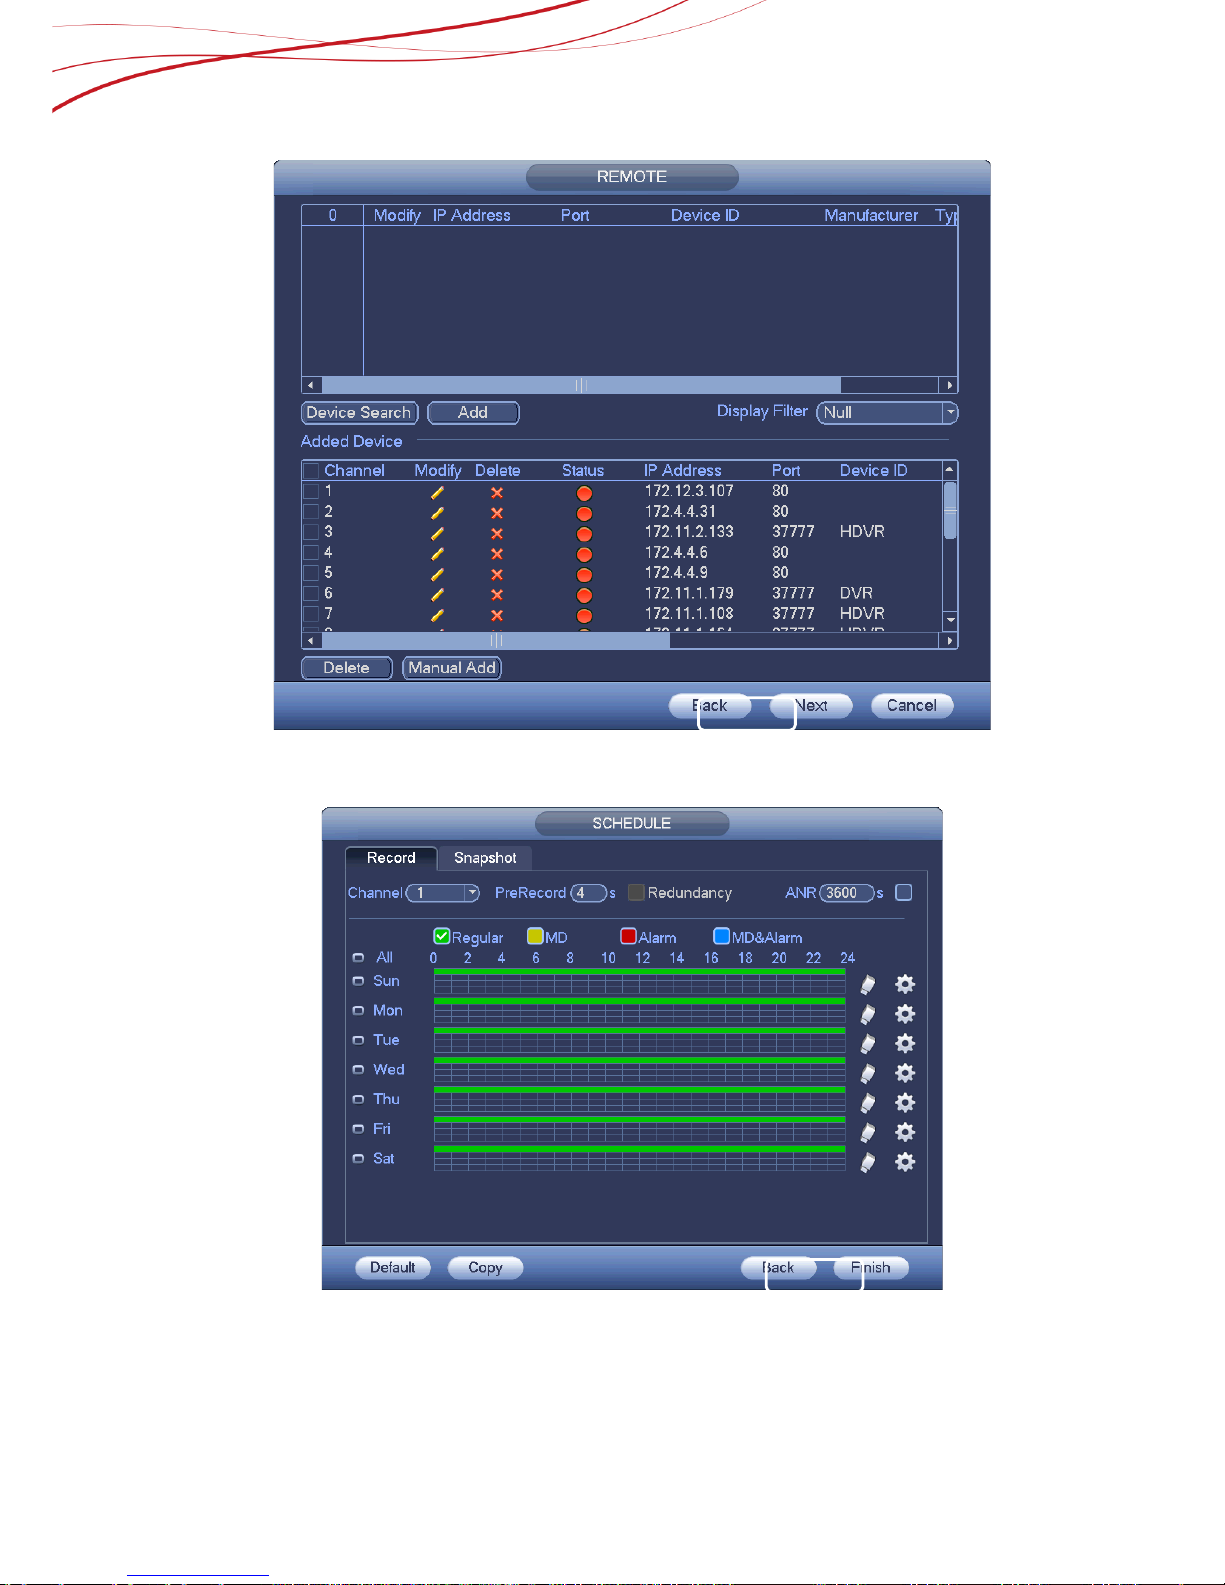
Click Next button, you can go to remote device interface. See Figure 2-9.
13
Figure 2-9
Click Next button, you can go to Schedule interface. See Figure 2-10.
Figure 2-10
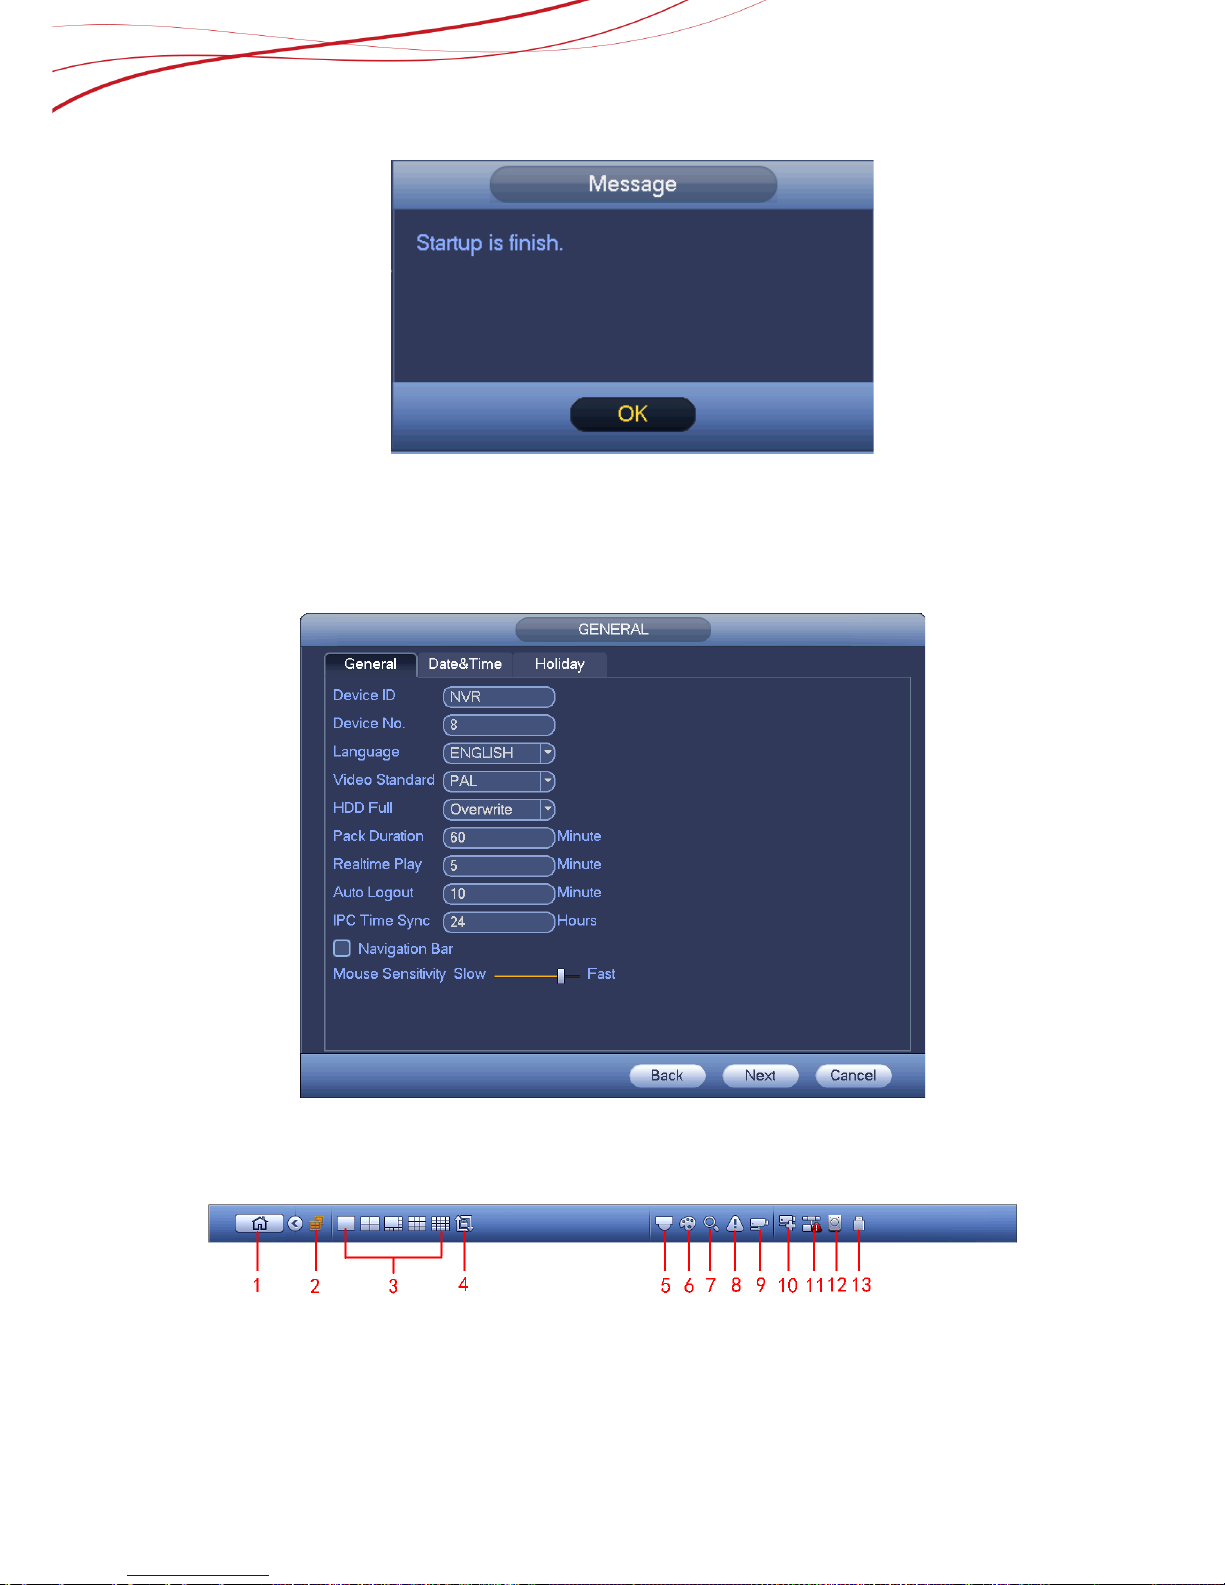
Click Finish button, system pops up a dialogue box. Click the OK button, the startup wizard
is complete. See Figure 2-11.
14
Figure 2-11
2.7. How to use Navigation Bar
You need to go to the Main menu->Setting->System->General to enable navigation bar
function; otherwise you can ’t s ee the f o llowin g inte rfac e.
Figure 2-12
Click and enable the Navigation Bar
The navigation bar is shown as below. See Figure 2-13.
Figure 2-13
2.8. Main Menu
①

15
Click button to go to the main menu interface.
2.8.1 Dual-screen operation
Important
This function is for some series only.
Click to select screen 2, you can view an interface shown as below. See Figure 2-14.
It is a navigation bar for screen 2.
Figure 2-14
Click any screen split mode; HDMI2 screen can display corresponding screens. Now you
can control two screens. See Figure 2-15.
Figure 2-1
Note
Screen 2 function is null if tour is in proc ess . Pl ease di s able tour function first,
Right now, the screen 2 operation can only be realized on the navigation bard. The
operations on the right-click menu are for screen 1 only.
2.8.2 Output Screen
Select corresponding window-split mode and output channe ls.
2.8.3 Tour
Click button to enable tour, the icon becomes , you can see the tour is in
process.
2.8.4 PTZ
Click , system goes to the PTZ control interface.
2.8.5 Color
Click button , system goes to the color interface.
Please make sure system is in one-cha nnel mod e.
2.8.6 Search
Click button , system goes to search interface.
2.8.7 Alarm Status
Click button , system goes to alarm status interface. It is to view device status and
channel status.
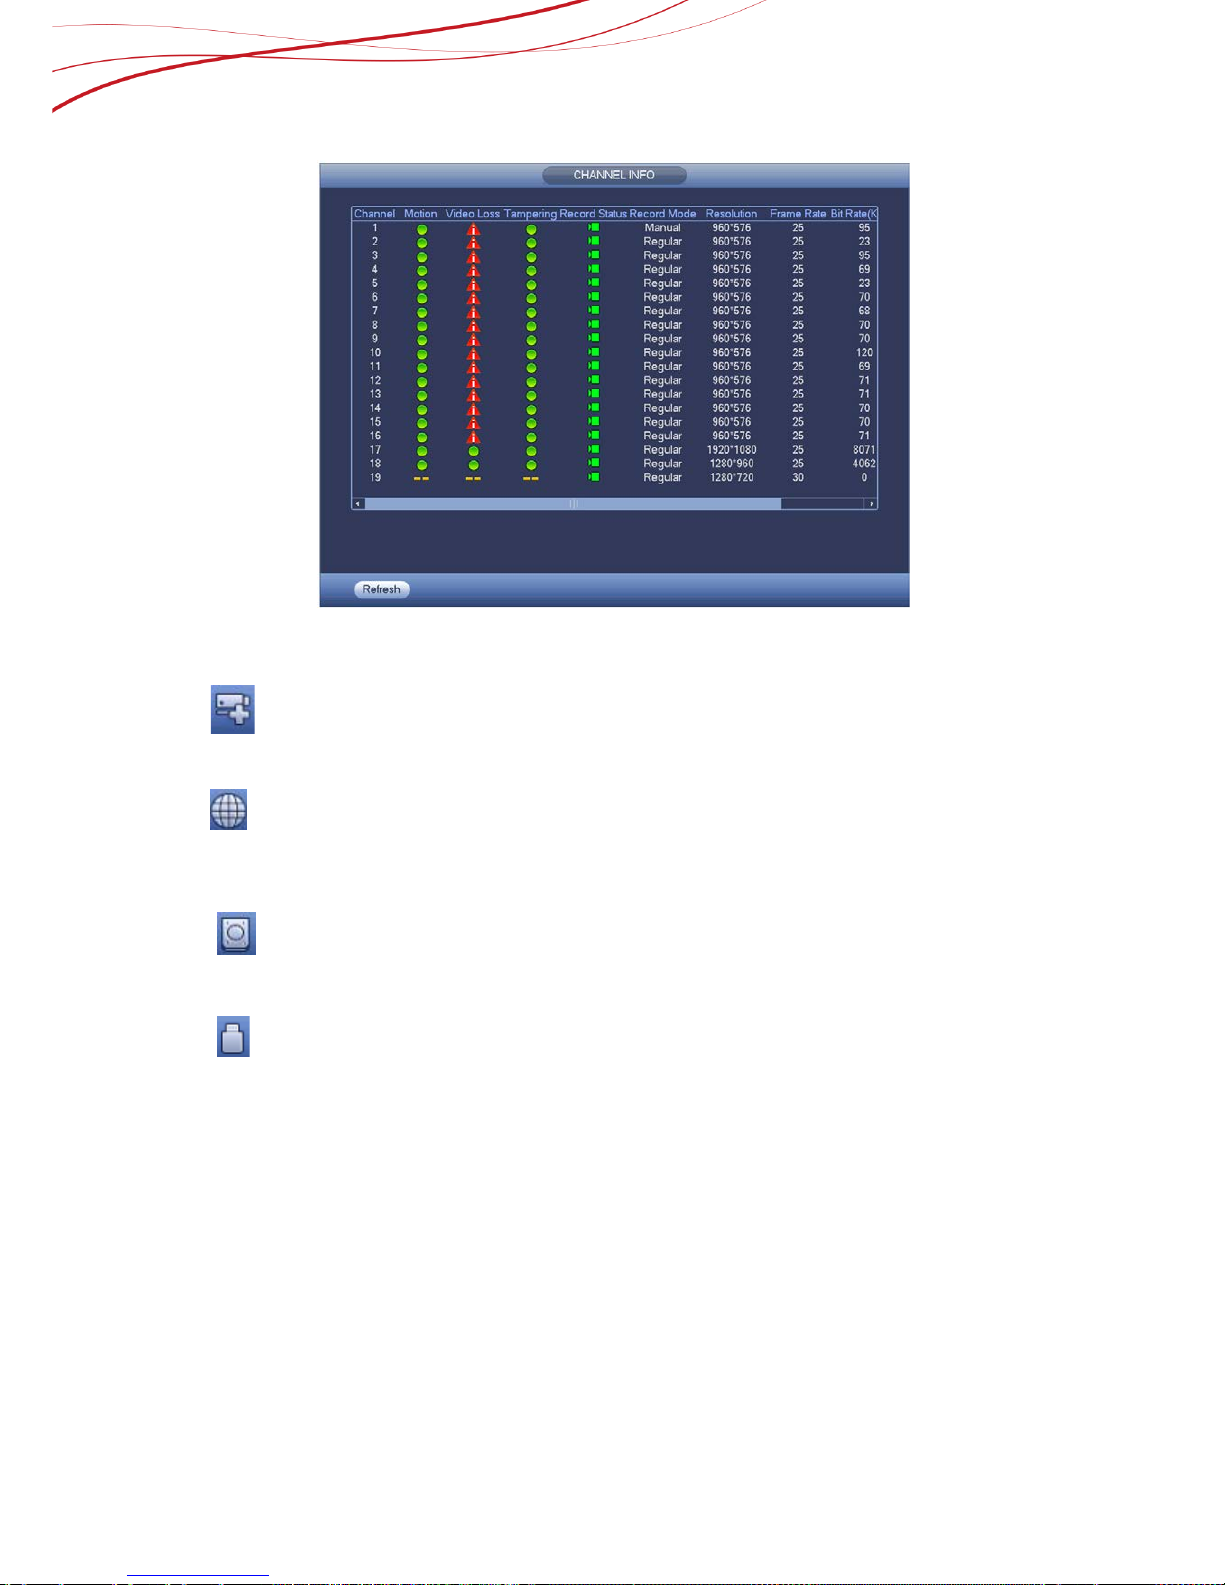
Click button , system goes to the channel information setup interface. It is to view
information of the corresponding channel. See Figure 2-16.
16
Figure 2-2
2.8.8 Remote Device
Click , system goes to the remote device interface.
2.8.9 Network
Click , system goes to the network interface. It is to set network IP address, default
gateway and etc.
2.8.10 HDD Manager
Click , system goes to the HDD manager interface. It is to view and manage HDD
information.
2.8.11 USB Manager
Click , system goes to the USB Manager interface. It is to view USB information,
backup and update.
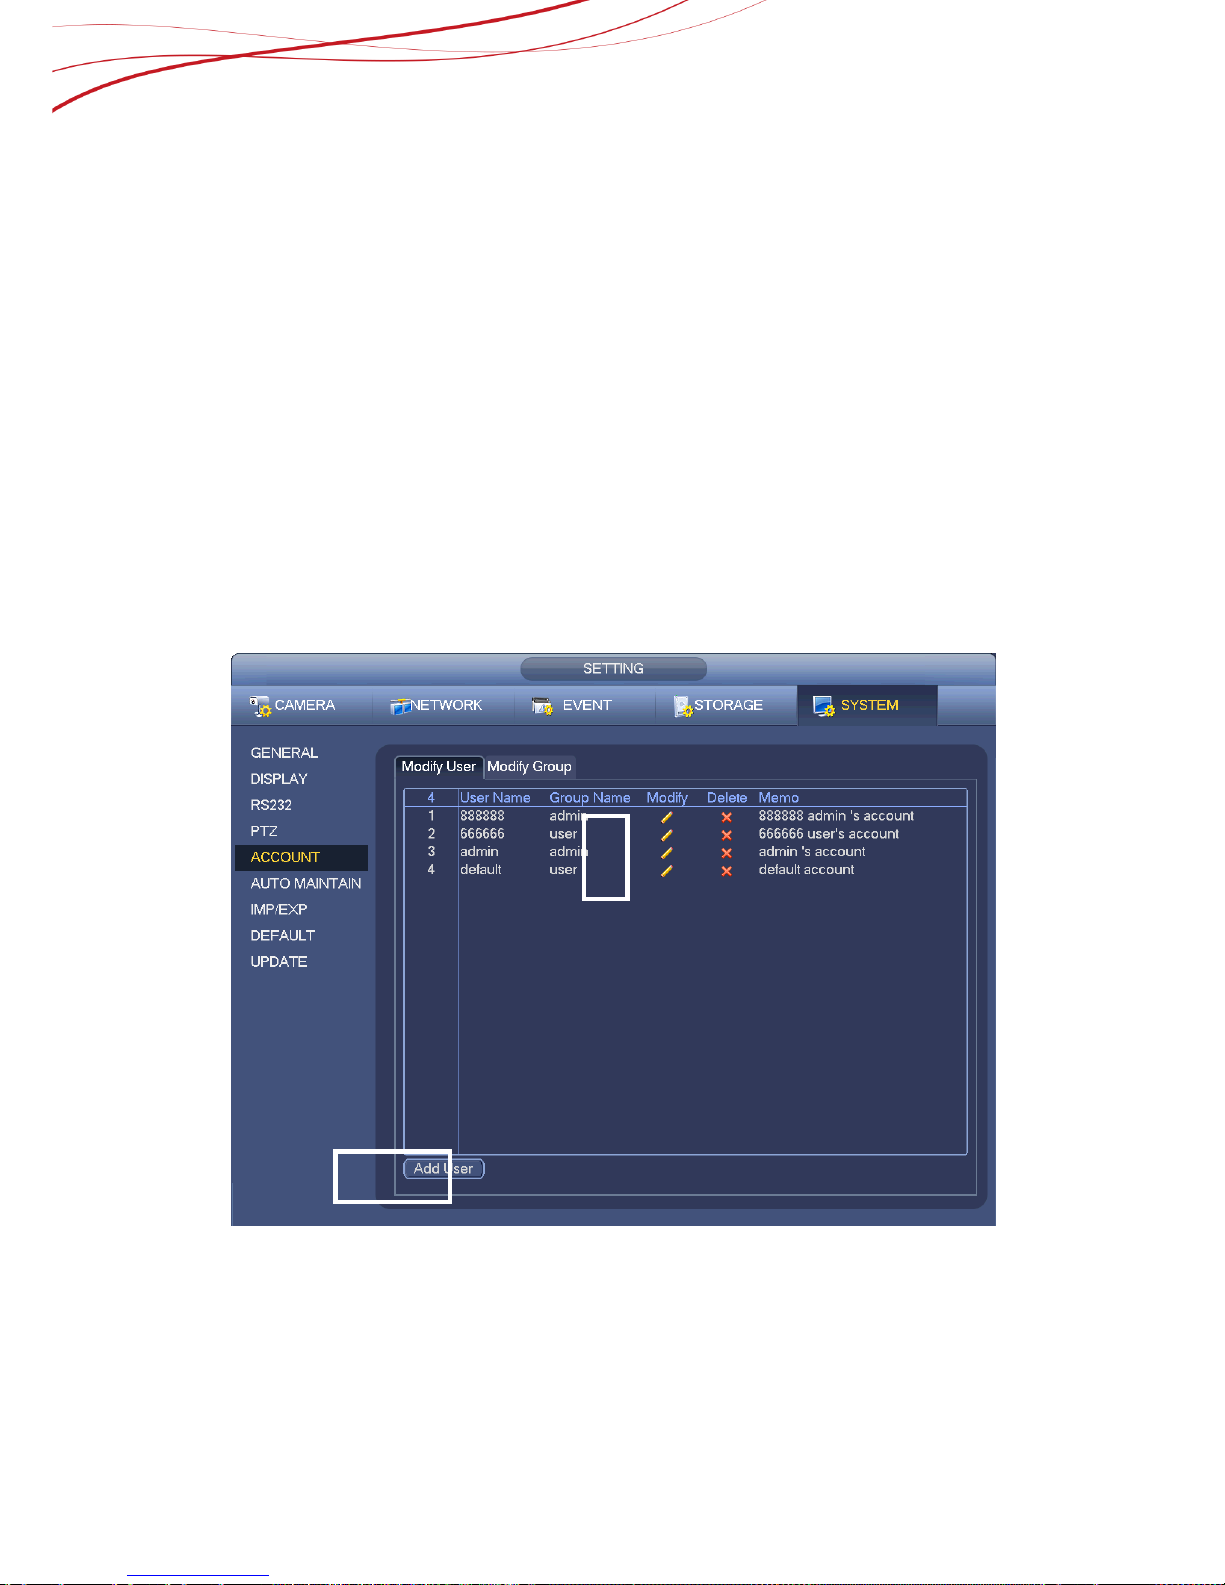
2.9 How to Add the account and set the right
Here is for you to implement account ma nag eme nt. Se e Figure 2-17 and Figure 2-18.
Here you can:
Add new user
Modify user
Add group
Modify group
Modify password.
17
For account management please note:
For the user account name and the user group, the string max length is 6-byte. The
backspace in front of or at the back of the string is invalid. There can be backspace in
the middle. The string includes the valid character, letter, number, underline,
subtraction sign, and dot.
The default user amount is 64 and the default group amount is 20. System account
adopts two-level management: group and user. No limit to group or user amount.
For group or user management, there are two levels: admin and user.
The user name and group name can consist of eight bytes. One name can only be
used once. There are four default users: admin/888888/666666 and hidden user
“default”. Except user 6666, other users have administrator right.
Hidden user “default” is for system interior use only and can not be deleted. When
there is no login user, hidden user “default” automatically login. You can set some
rights such as monitor for this user so that you can view some channel view without
login.
One user should belong to one group. User right can not exceed group right.
About reusable function: this function allows multiple users use the same account to
login.
After all the setups please click save button, system goes back to the previous menu.
Figure 2-3
1) Here you can Modify the user created
2) Here you can add the User.
①
②
18
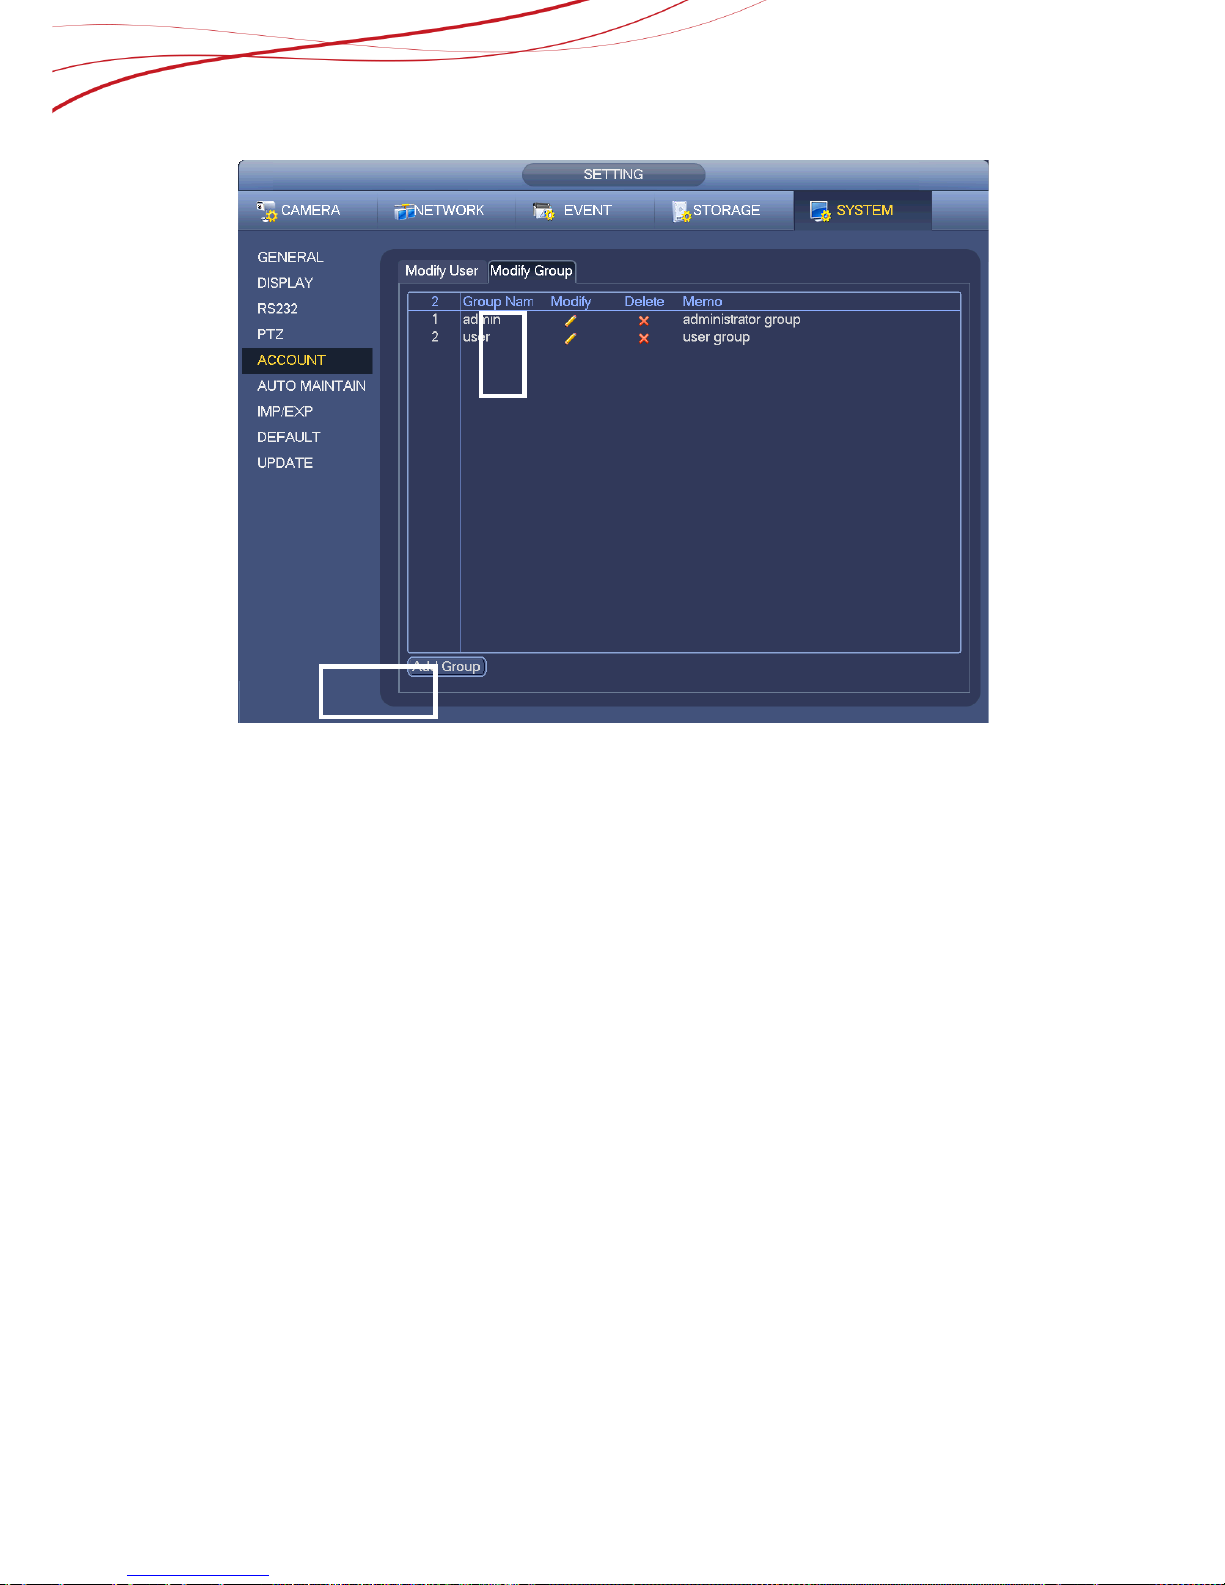
Figure 2-18
1) Here you can modify the group created.
2) Here you can add the group.
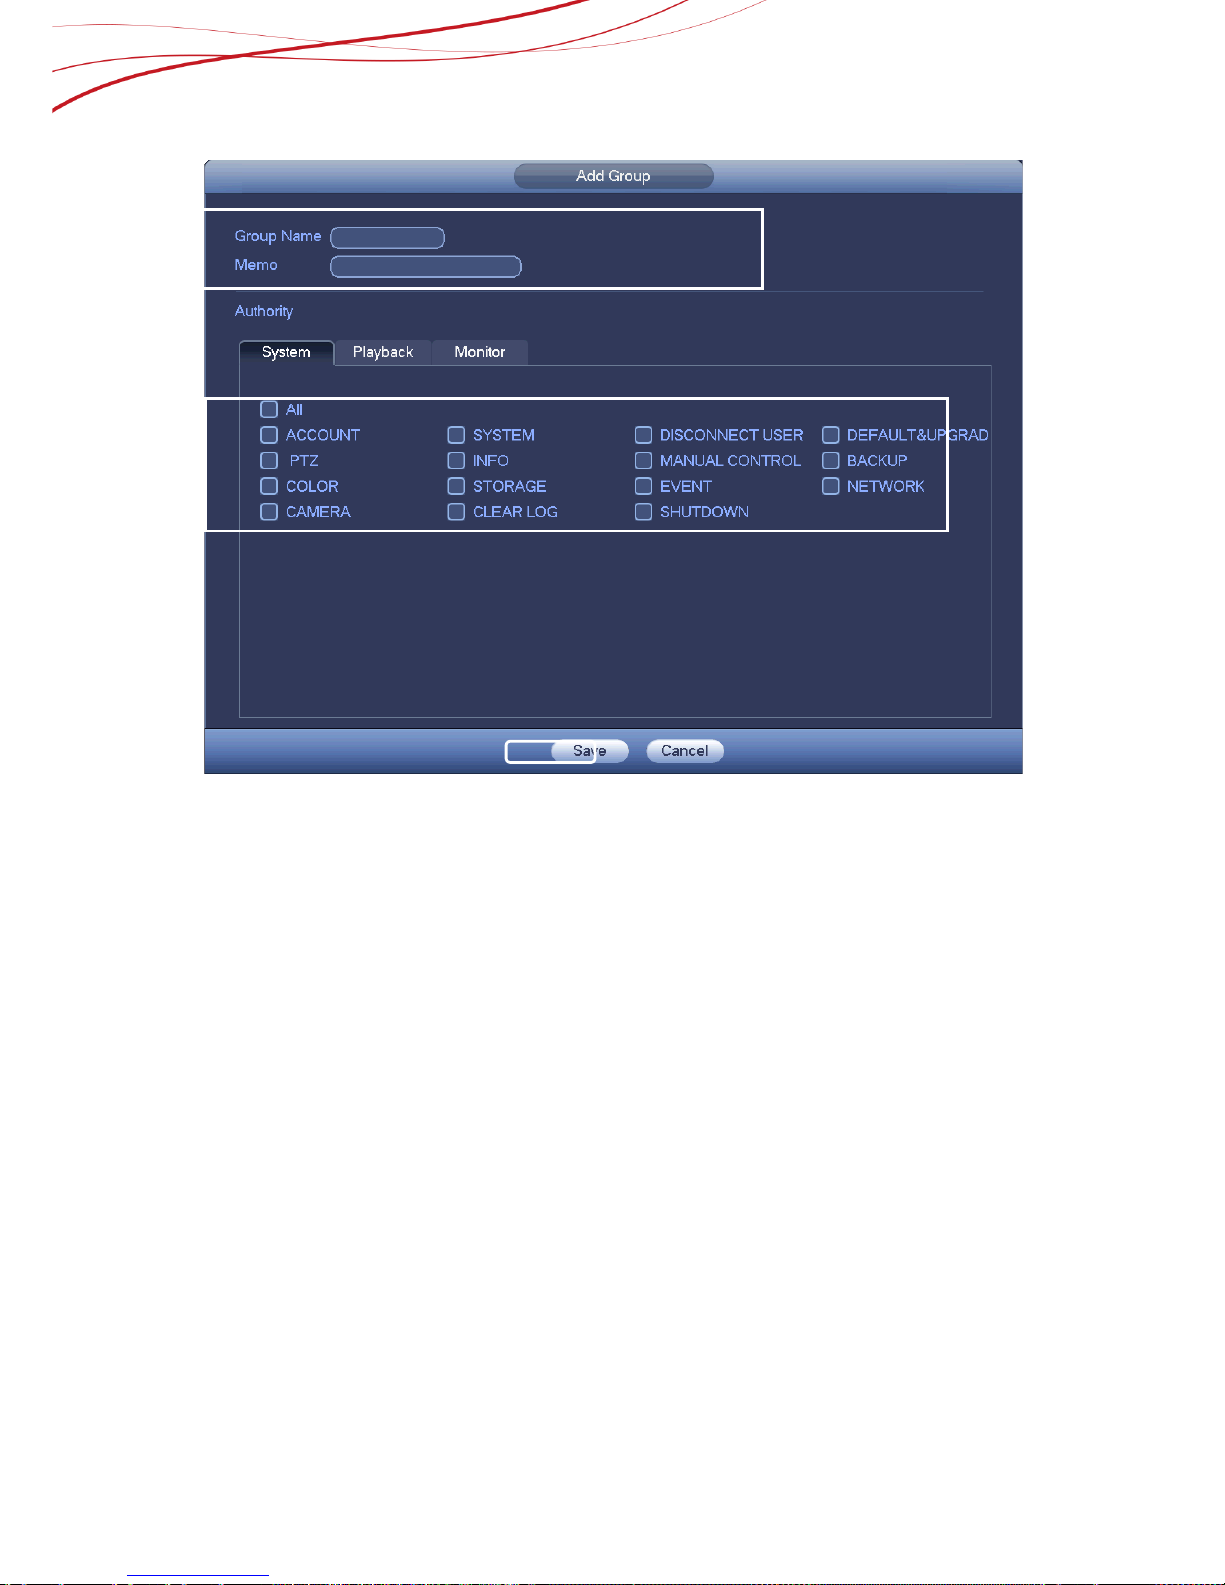
2.9.1 How to Add/Modify Group
Click add group button, the interface is shown as below. See Figure 4-152.
Here you can input group name and then input some memo information if necessary.
There are many rights such as control panel, shut down, real-time monitor, play bac k,
record, record file backup, PTZ, user account, system information view, alarm input/output
setup, system setup, log view, clear log, upgrade system, control device and etc.
The modify group interface is similar to the Figure 2-19.
①
②
19
Figure 2-4
Operation Steps are as below:
1) Input group name and then input some memo information if necessary
2) Check the corresponding rights for current group.
3) Click the Save Button to save the settings.
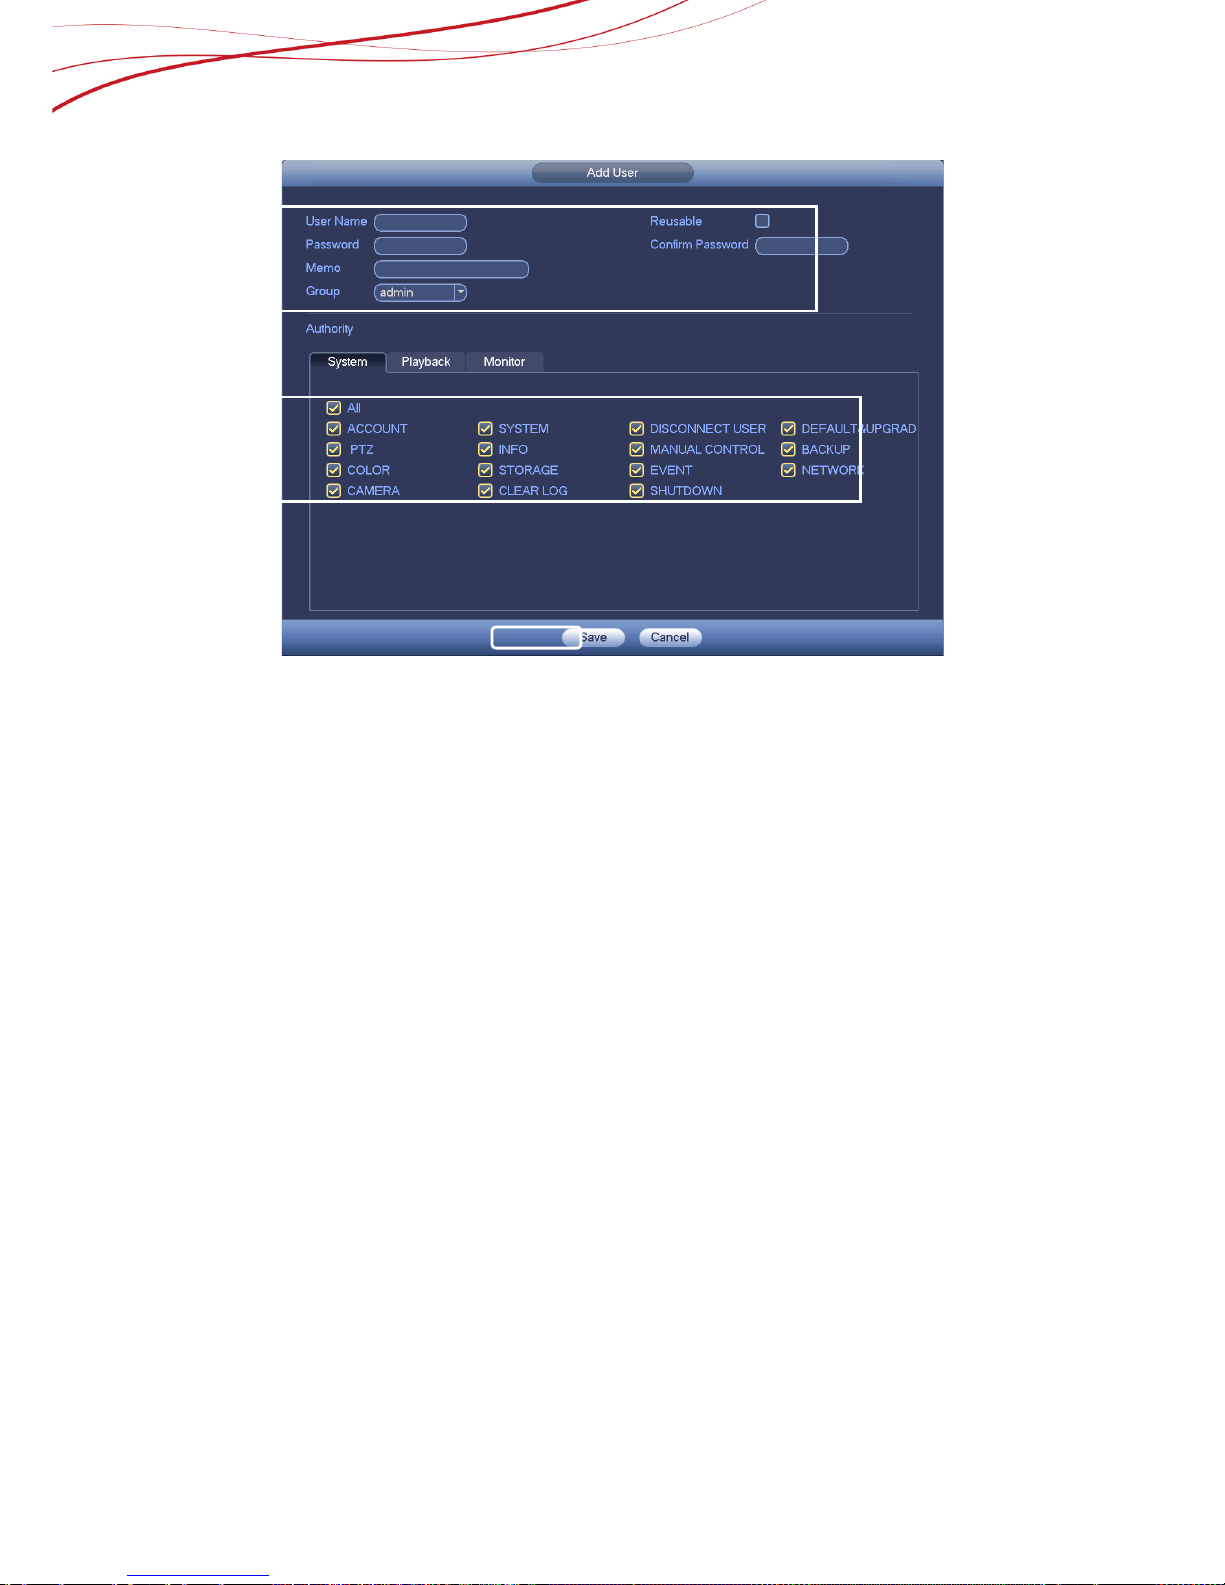
2.9.2 Add/Modif y User
Click add user button, the interface is shown as in Figure 2-20.
Please input the user name, password, select the group it belongs to from the dropdown
list.
Then you can check the corresponding rights for current user
For convenient user management, usually we recommend the general user right is lower
than the admin account.
The modify user interface is similar to Figure 2-19.
②
①
③
20
Figure 2-20
Operation Steps are as below:
1) Input the user name, pass word, select the group it belongs to from the dropdown list.
2) Check the corresponding rights for current user.
3) Click the Save Button to save the settings.
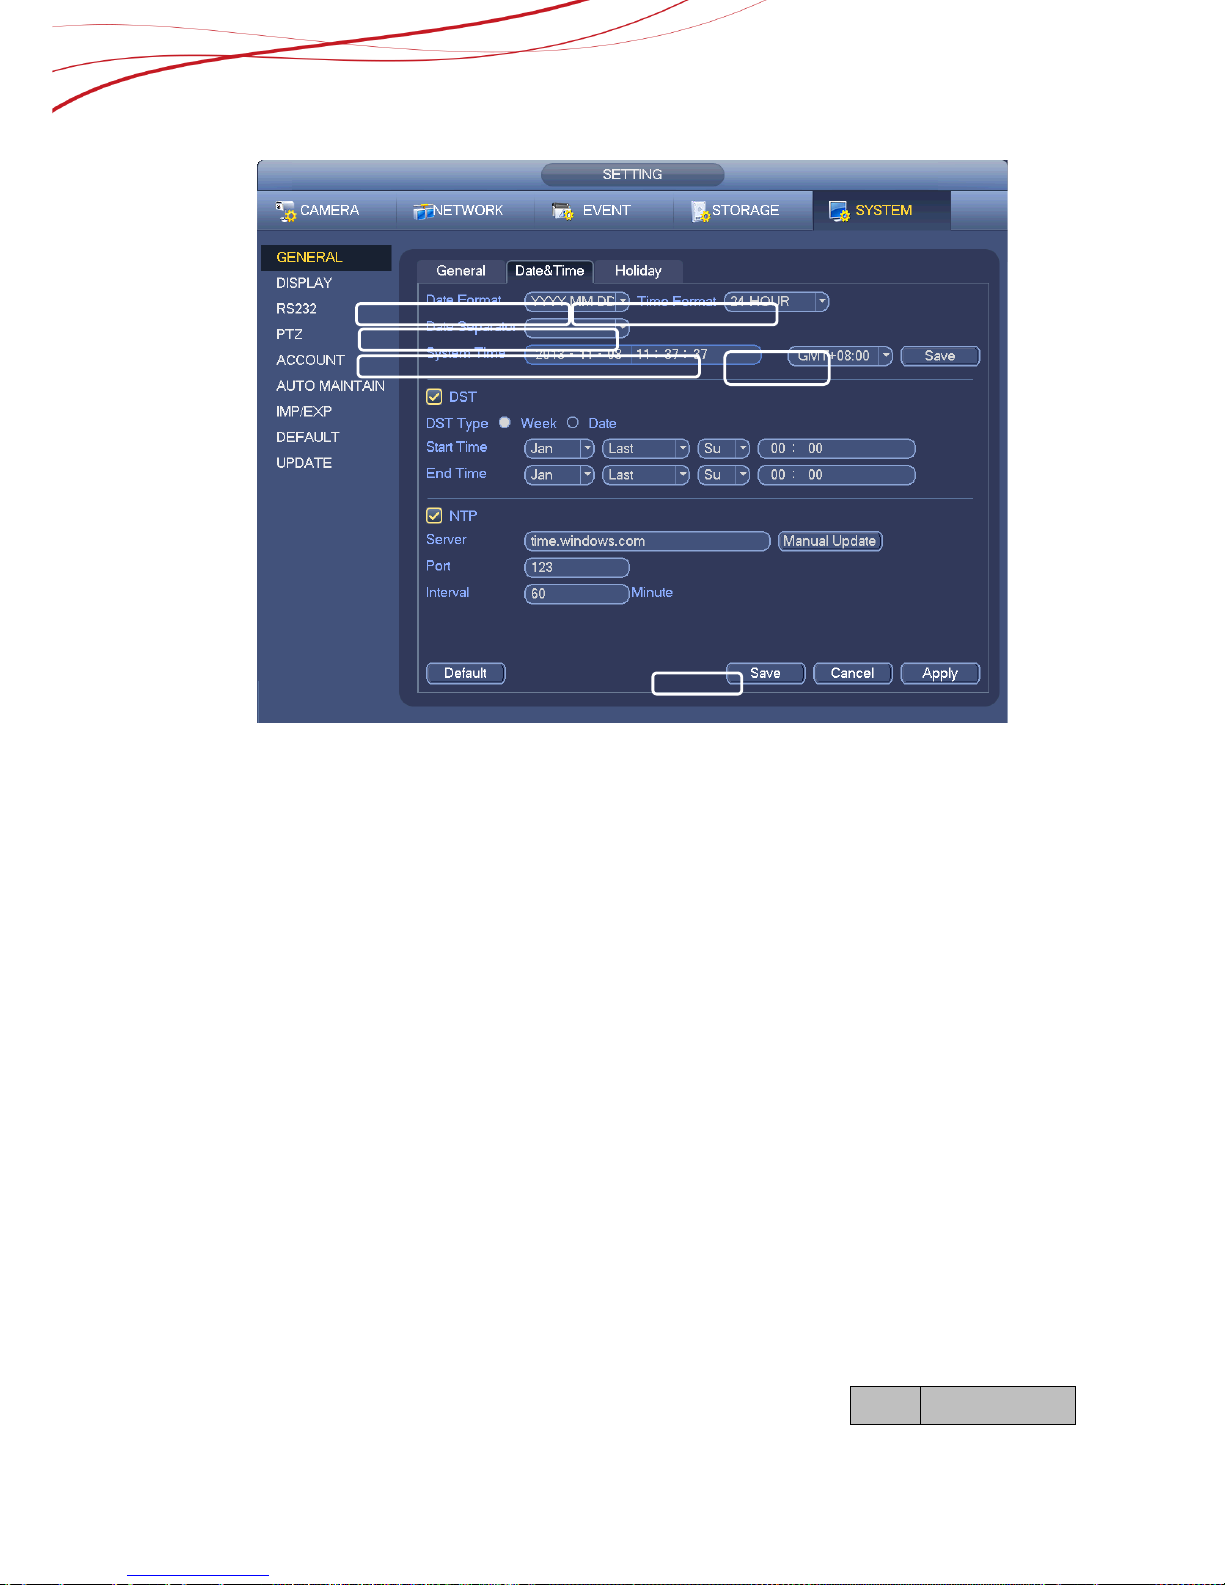
2.9.3 How to Change the date, time and time zone
From Main menu->Setting->System->General, you can go to the general interface. See
Figure 2-21.
System time: Here is for you to set system time
Date format: There are three types: YYYYY-MM-DD: MM-DD-YYYYY or DD-MM-YYYY.
Date separator: There are three denotations to separate date: dot, beeline and solidus.
DST: Here you can set DST time and date by week or by date. Please enable DST function and
then select setup mode. Please input start time and end time and click Save button.
Time format: There are two types: 24-hour mode or 12-hour mode.
NTP: It is to set NTP server, port and interval.
①
②
③
21
Figure 2-21
O
peration Steps are as below:
1) Select the date format.
2) Choose the time format.
3) Select the denotations.
4) Set the time zone
5) Set system time
6) Click the Save Button to save the settings.
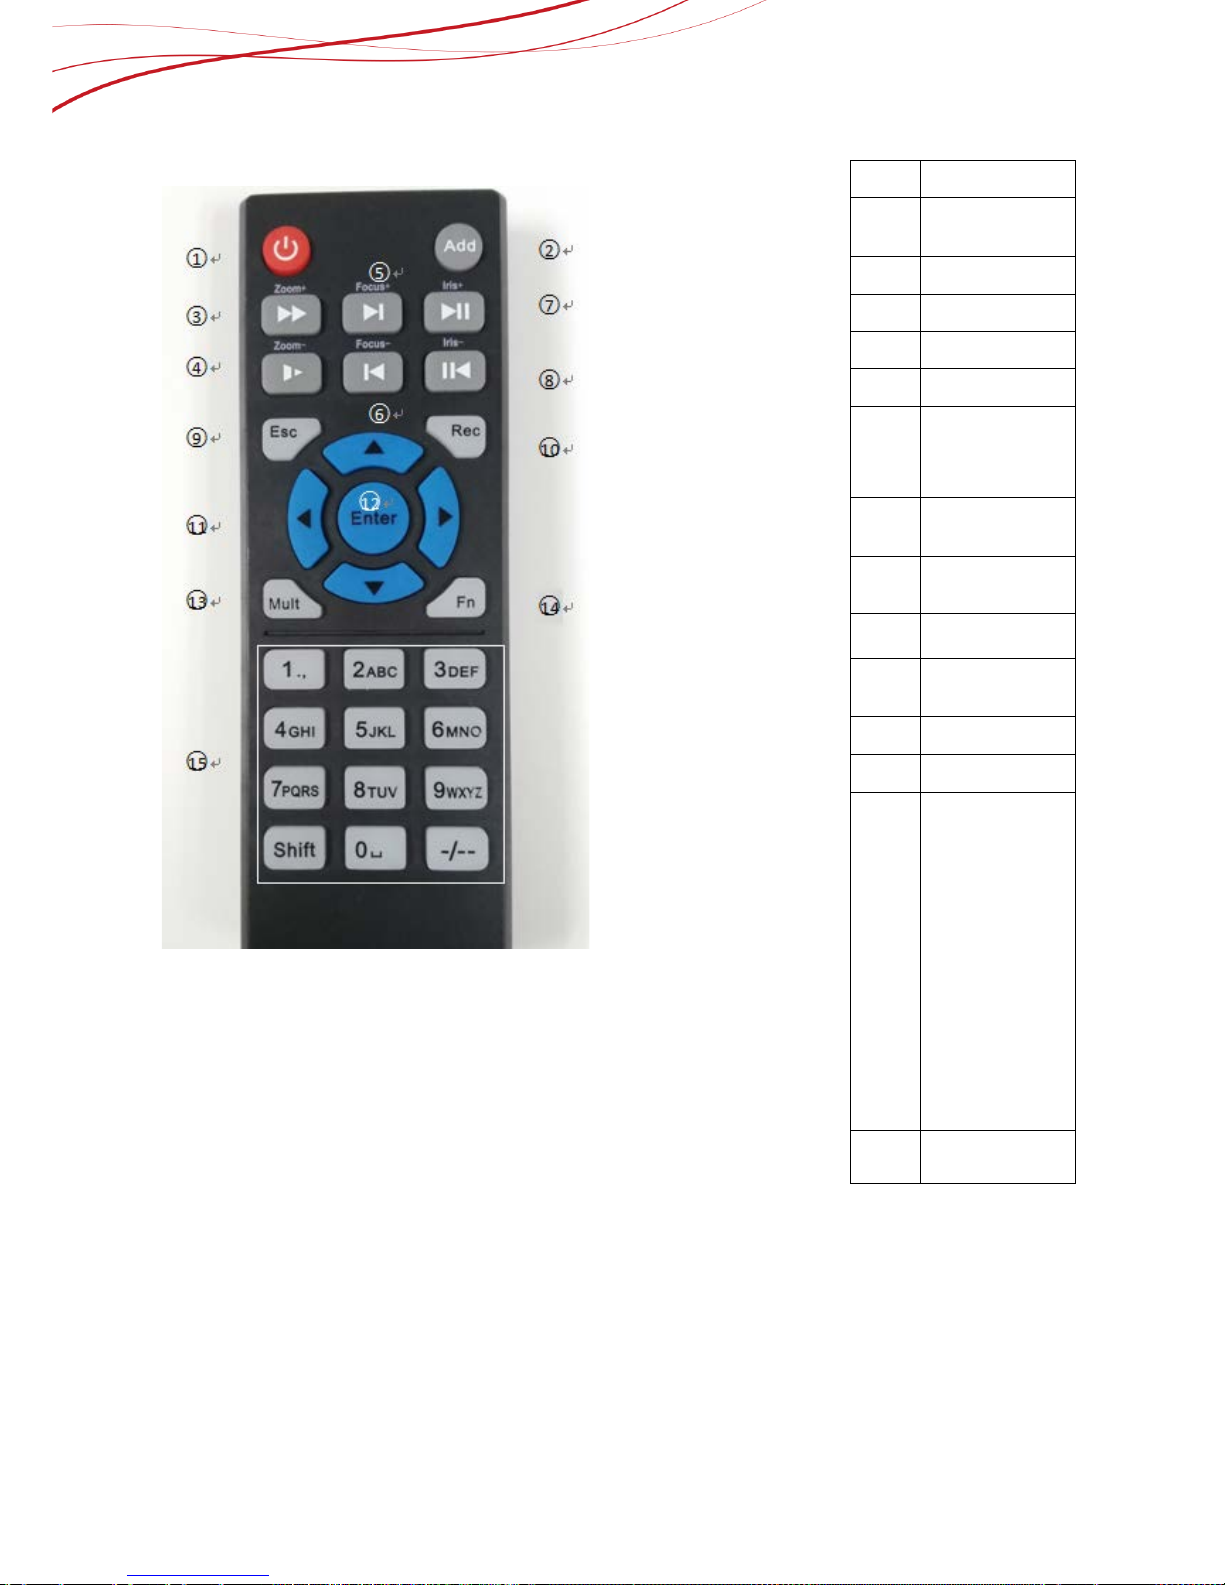
2.10 How to Use the Remote Controller
The remote controller is the optional devi c e, the specific operation can refer to the table
below:
NO
Name
③
⑤
④
①
②
⑥
22
○
,1
Power
○
,2
Add
○
,3
Speed play
○
,4
Slow play
○
,5
Next button
○
,6
Previous button
○
,7
Play /Suspend
○
,8
Playback/Suspend
○
,9
Cancel
○
,10
Record
○
,11
Direction key
○
,12
Enter /Menu
○
,13
Multi-screen
○
,14 Auxiliary button
○
,15
Numeric button
○
,8
○
,10
23
3. How to add and change the setting of the camera?
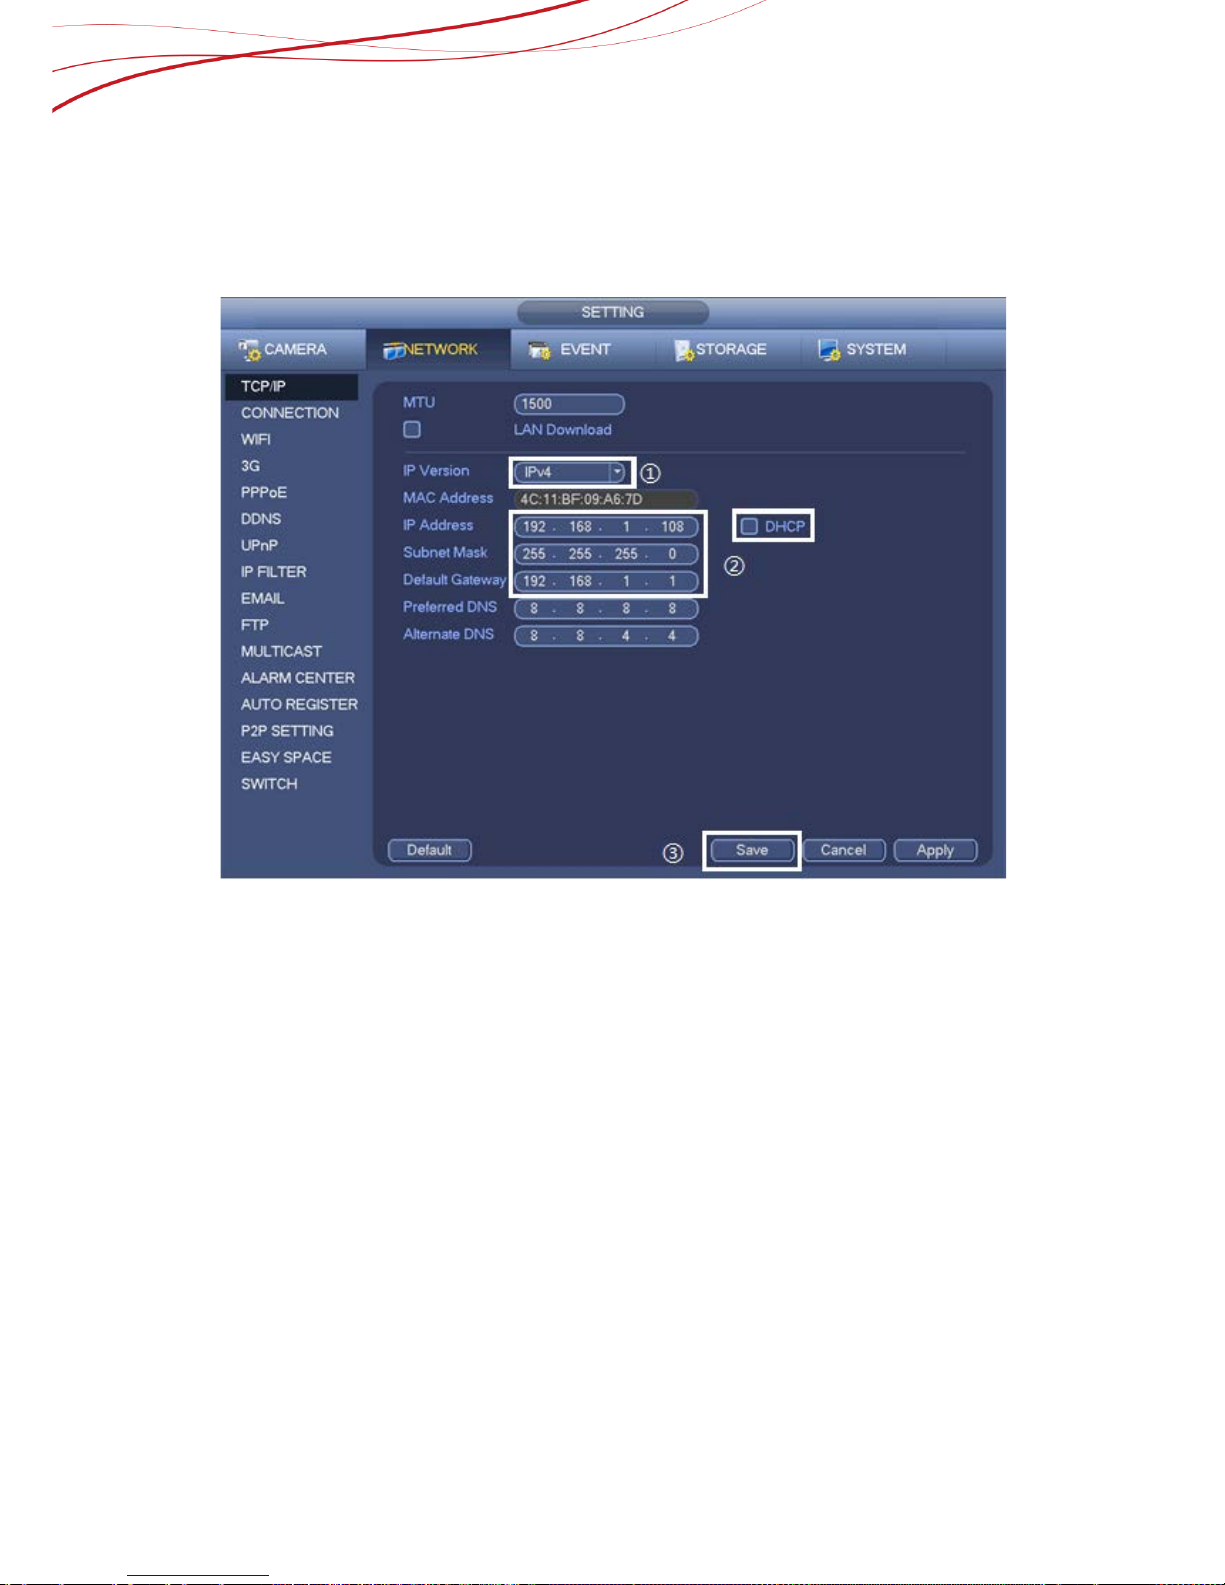
3.1. NVR/HCVR IP address setting
From main menu->Setting->Network->TCP/IP, the interface is shown as below.
Figure 3-1
Operation Steps:
1) Choose IP version. There are two o pt ions : I P v4 a nd I P v6.
2) Input IP address, subnet mask, default gateway. If there is a DHCP client in the LAN, you
can enable DHCP.
3) Click “Save” to save settings.
3.2. How to add the camera
A. POE connection
If IPC supports POE (power on Ethernet) , it can connect NVR with the POE ports in the
back panel of NVR. IPC doesn’t need to use addit ional power supply.
Operation Steps:
Connect IPC to POE ports of NVR via network cable.NVR will show images of IPC
in the monitors directly.
B. Network connection
From Main menu->Setting->Remote->Remote or right click mouse on the preview
interface and then select remote device item, you can see the following interface.
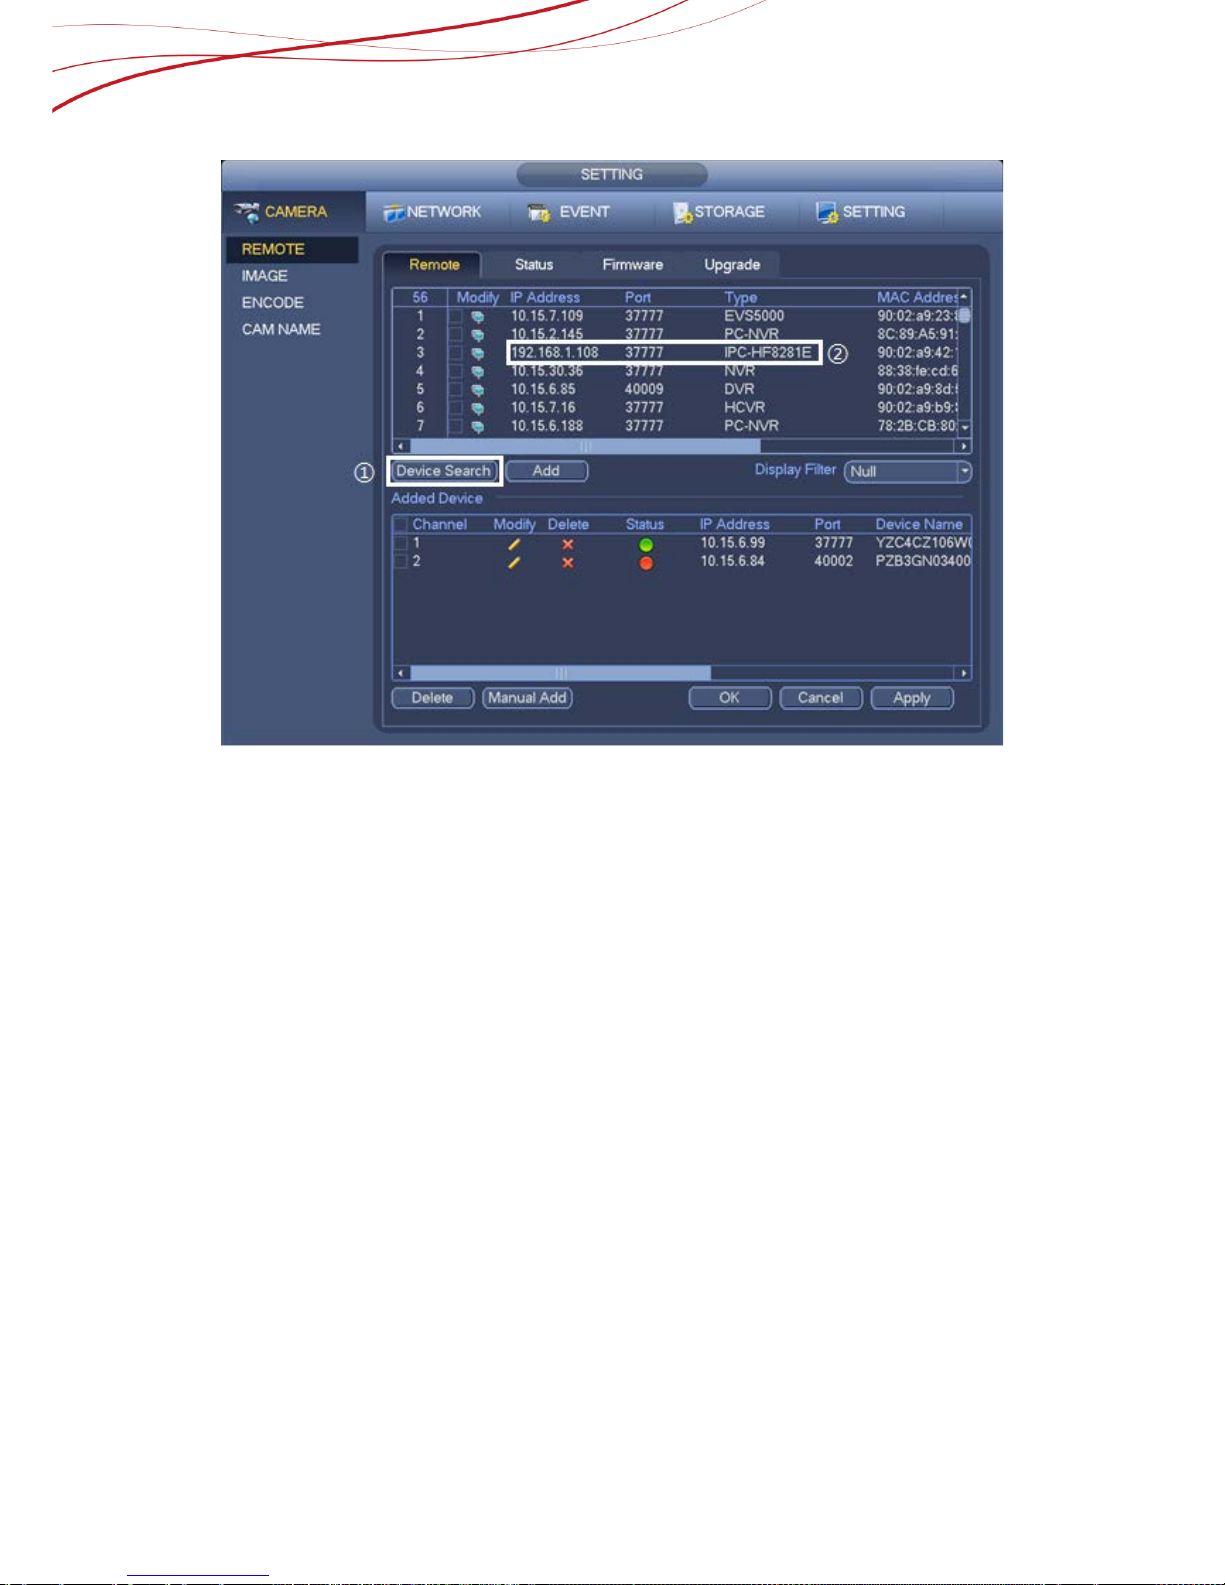
24
Figure 3-2
Auto add
Operation Steps:
1) Click Device search button, you can view the searched IP addresses at the top pane of
the interface.
2) Double click an IP address or check one IP address and then click Add button, you can
add current device to the bottom pane of the interface. System supports batch add
function.
Manual add
Operation Steps:
1) Click Manual Add button;
2) Select the manufacturer. Please choose Private if the NVR connect camera of Dahua.
3) Set IP address, Port, User name, Password.
4) Click Connect to test whether linked or not.
5) Click OK to save settings.
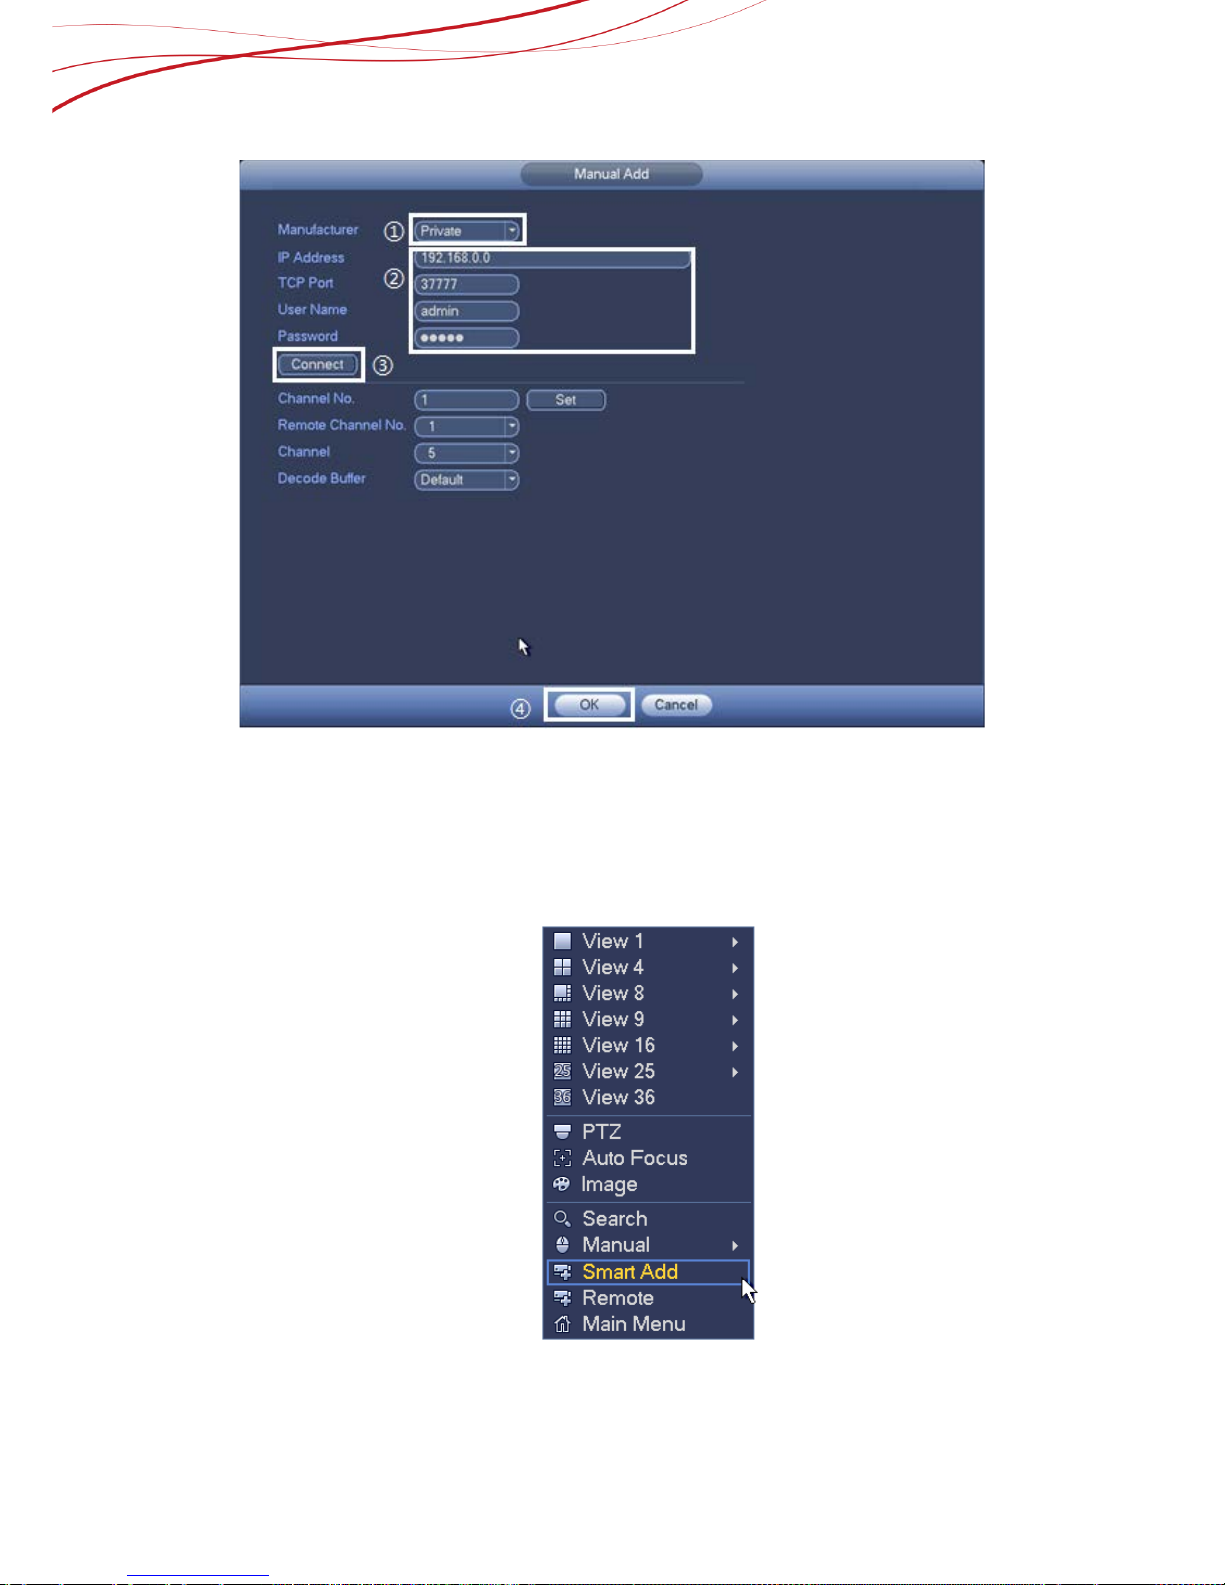
25
Figure 3-3
3.3. How to add camera(s) in a quick way(Smart add)
When the network camera(s) and the NVR are in the same router or switch, smart add function
can be used to add all network cameras to the NVR at the same time.
Operation Steps:
1) On the preview interface, right click mouse and then select Smart add.
Figure 3-4
26
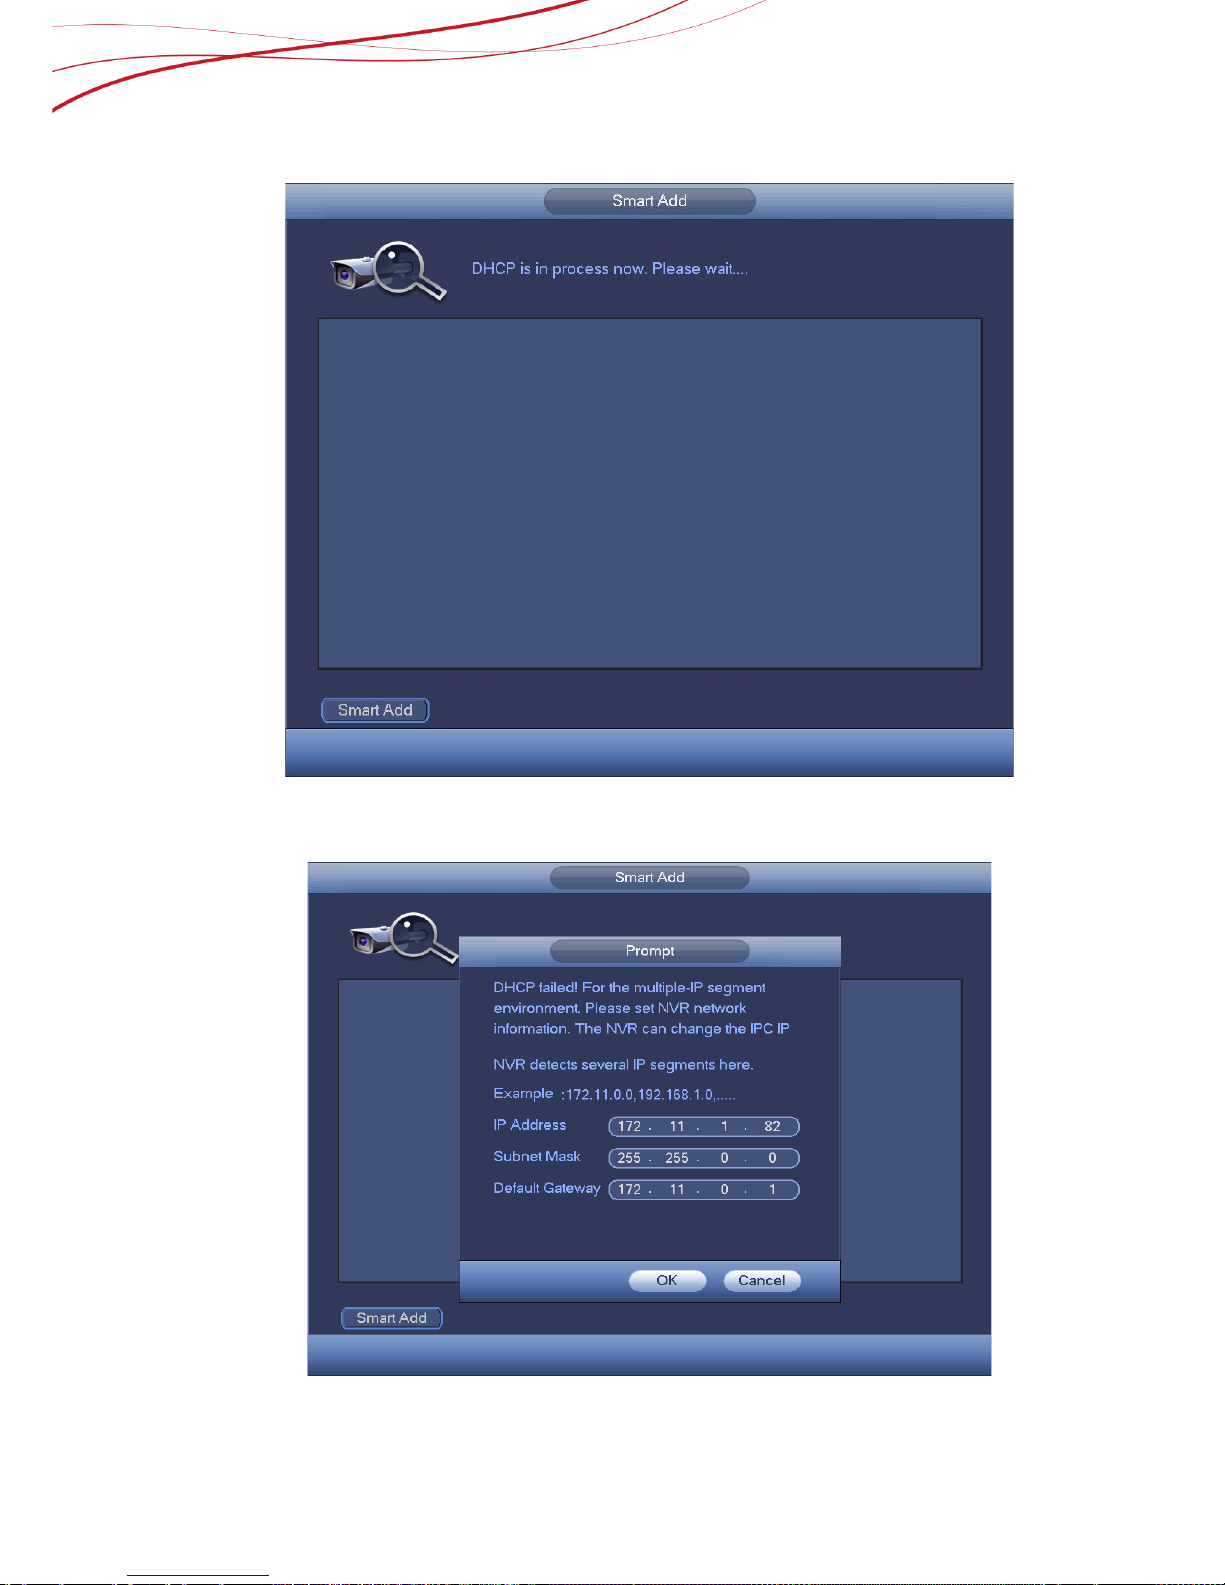
2) Click smart add button, device enables DHCP function.
Figure 3-5
3) Confirm IP information if there are several IP segments in the following interface.
27
Figure 3-6
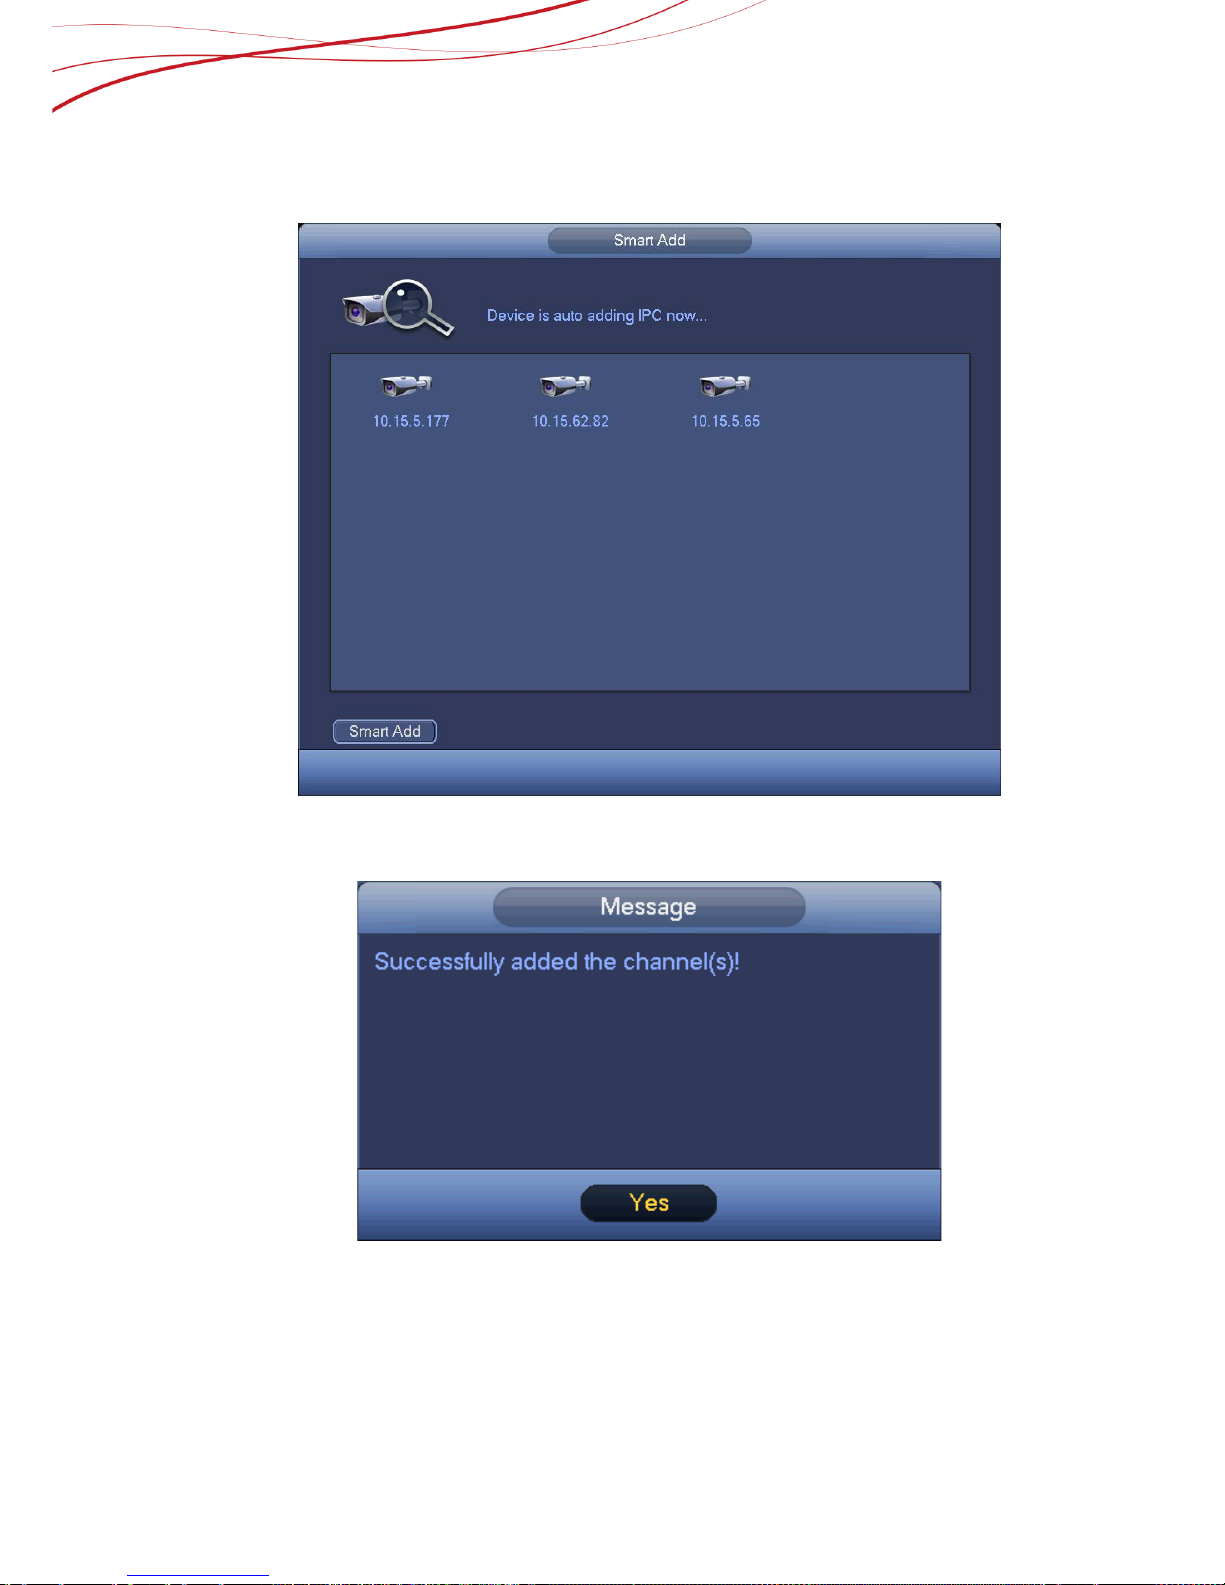
4) System will auto adding IPC to the corresponding channels.
Figure 3-7
5) After system successfully added network cameras, the following dialog box can be seen.
Figure 3-8
28
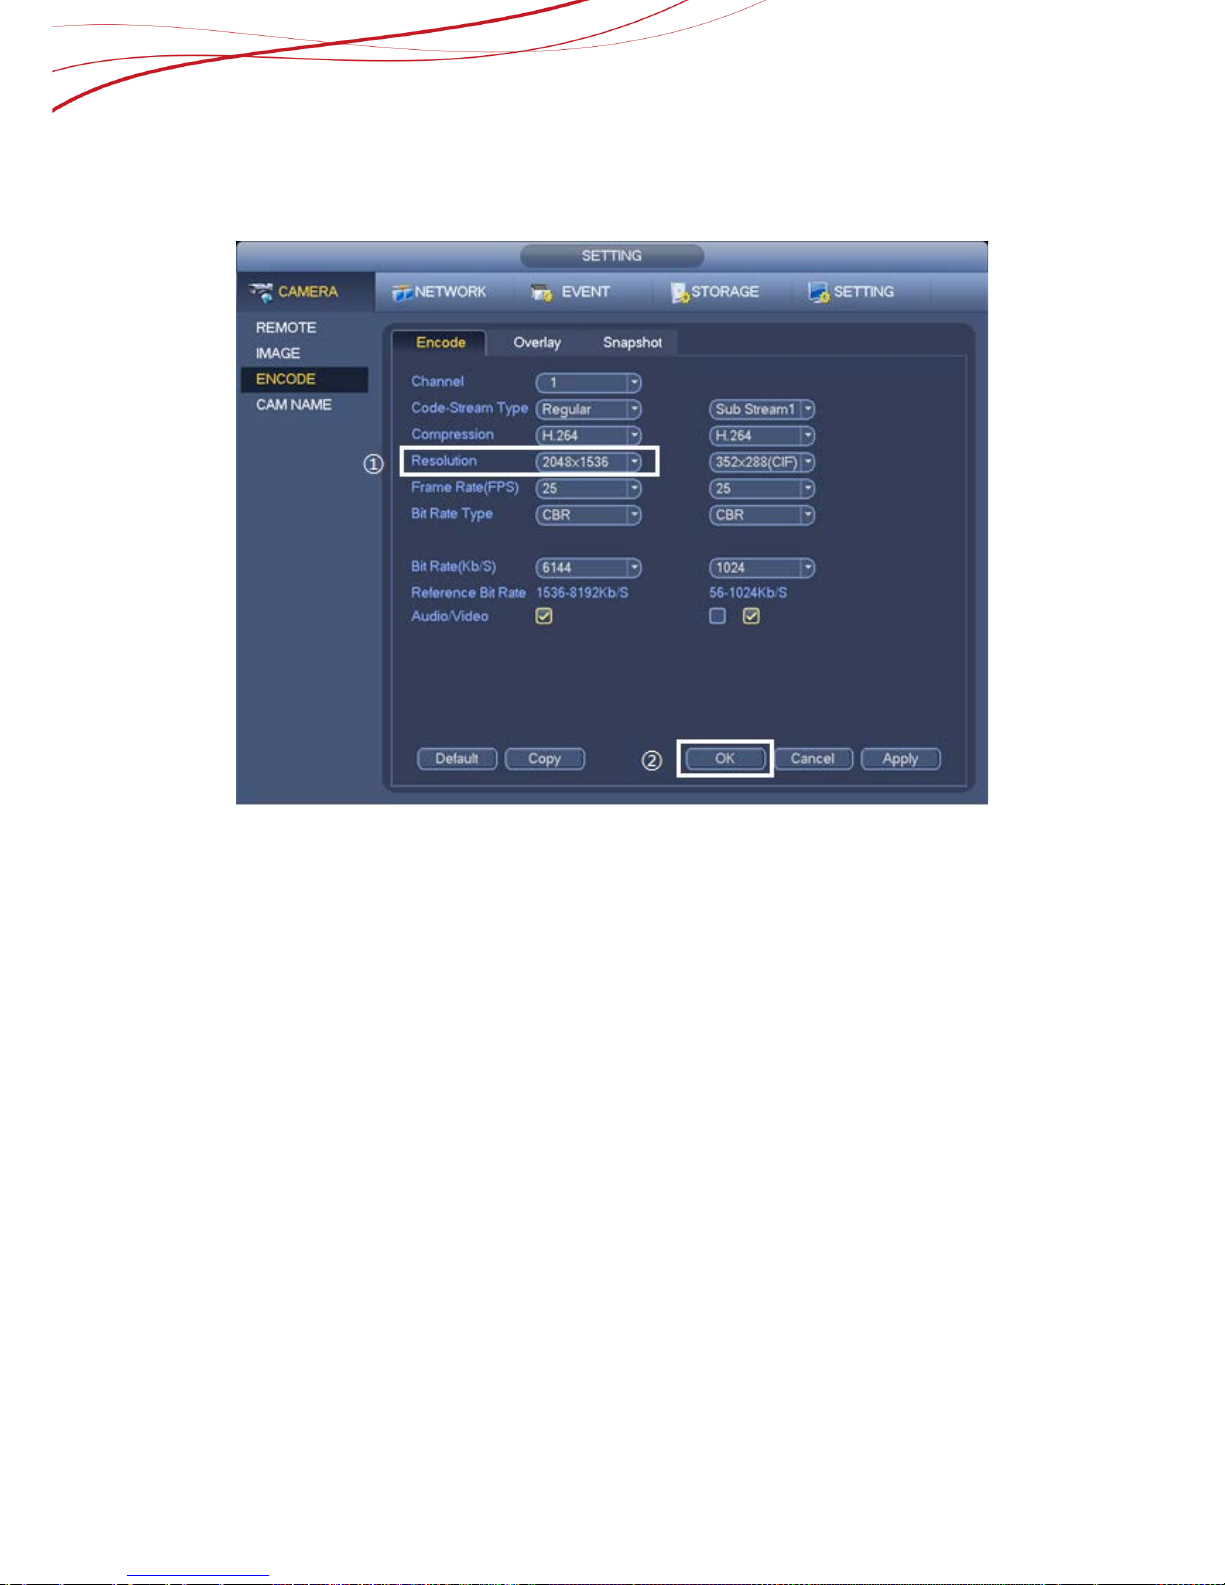
3.4. How to set the Resolution of camera
From Main menu->Setting->Encode->Encode, you can see the follow i ng interfac e. You
can set the parameter of camera in this page.
Figure 3-9
Operation Steps:
1) Enter Encode page.
2) Select the resolution.
The mainstream resolution type is IPC’s encoding config.
Generally there is D1/720P/1080P.
3) Click “OK” to save settings.
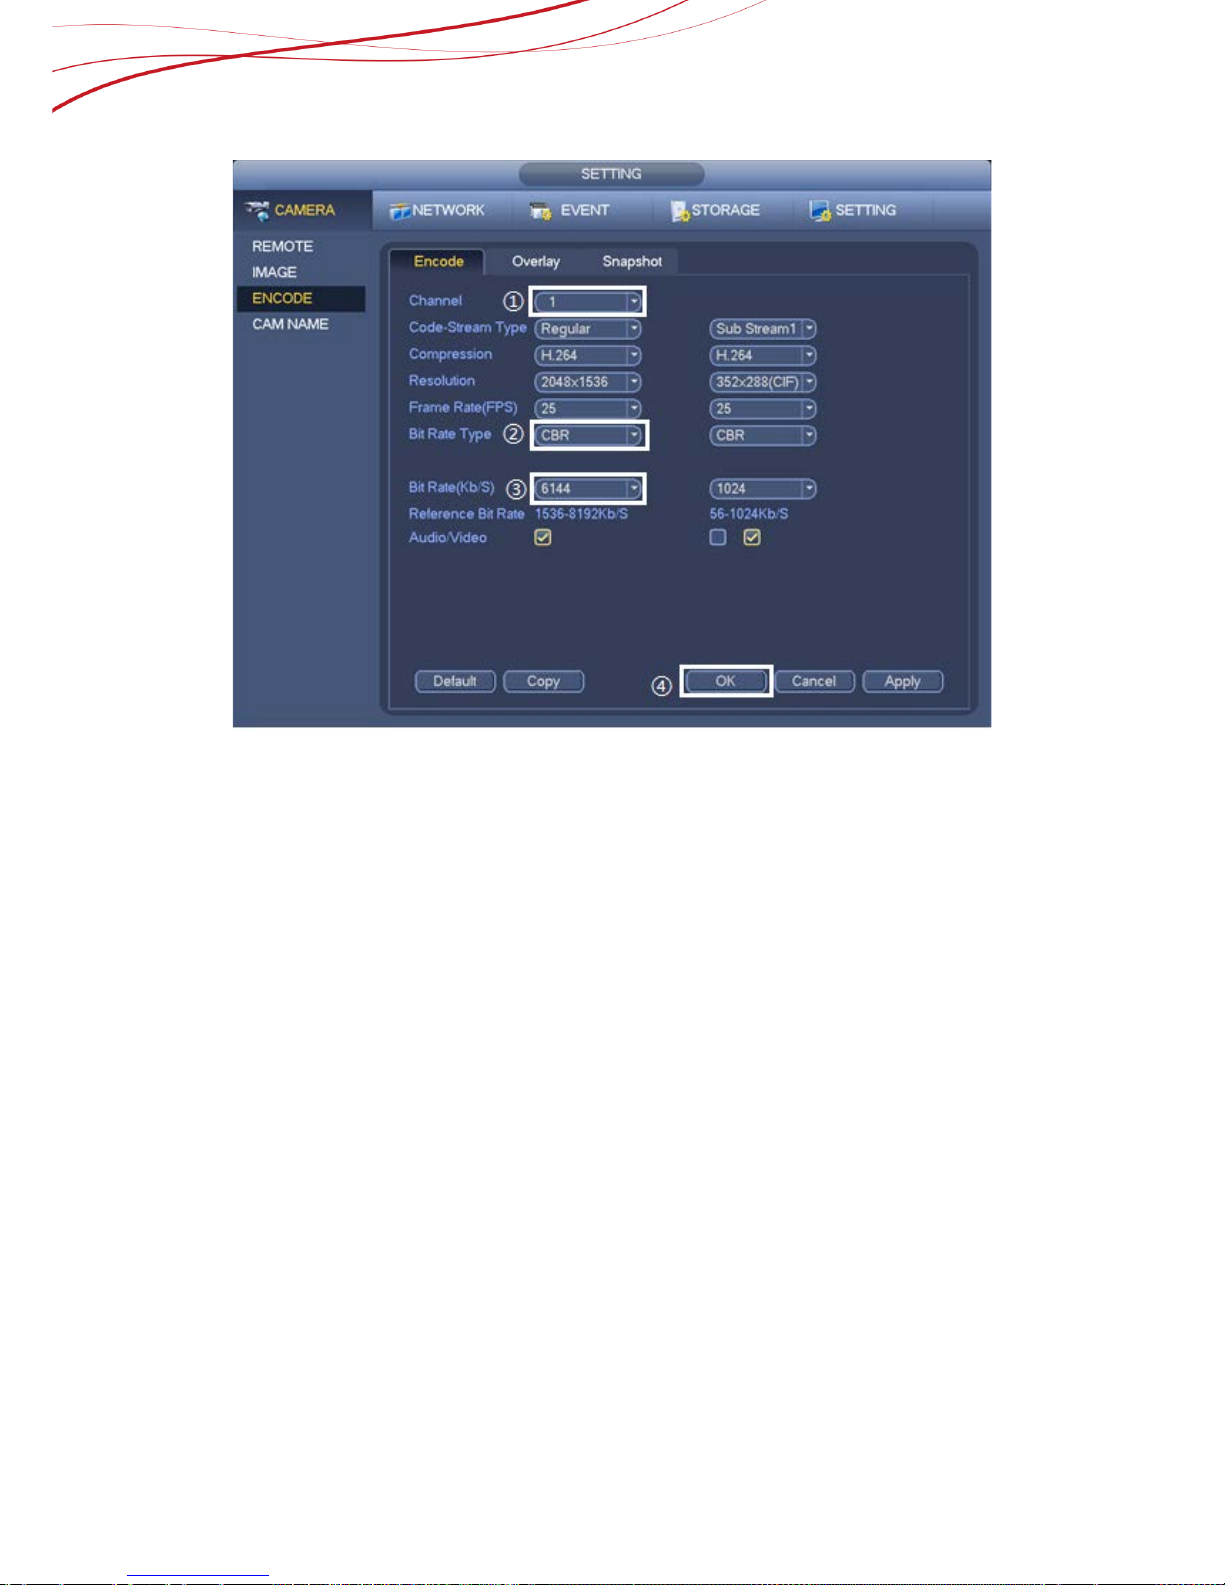
3.5. How to set the bit rate of camera
From Main menu->Setting->Encode->Encode, you can see the following interface. You
can set the parameter of camera in this page.
29
Figure 3-10
Operation Steps:
1) Select a channel from the dropdown list.
2) Select suitable bit rate (Kb/s). System su ppor t s t wo t y pes: C BR a nd V BR. I n V BR m od e,
video quality can be set up.
3) Click “OK” to save settings.
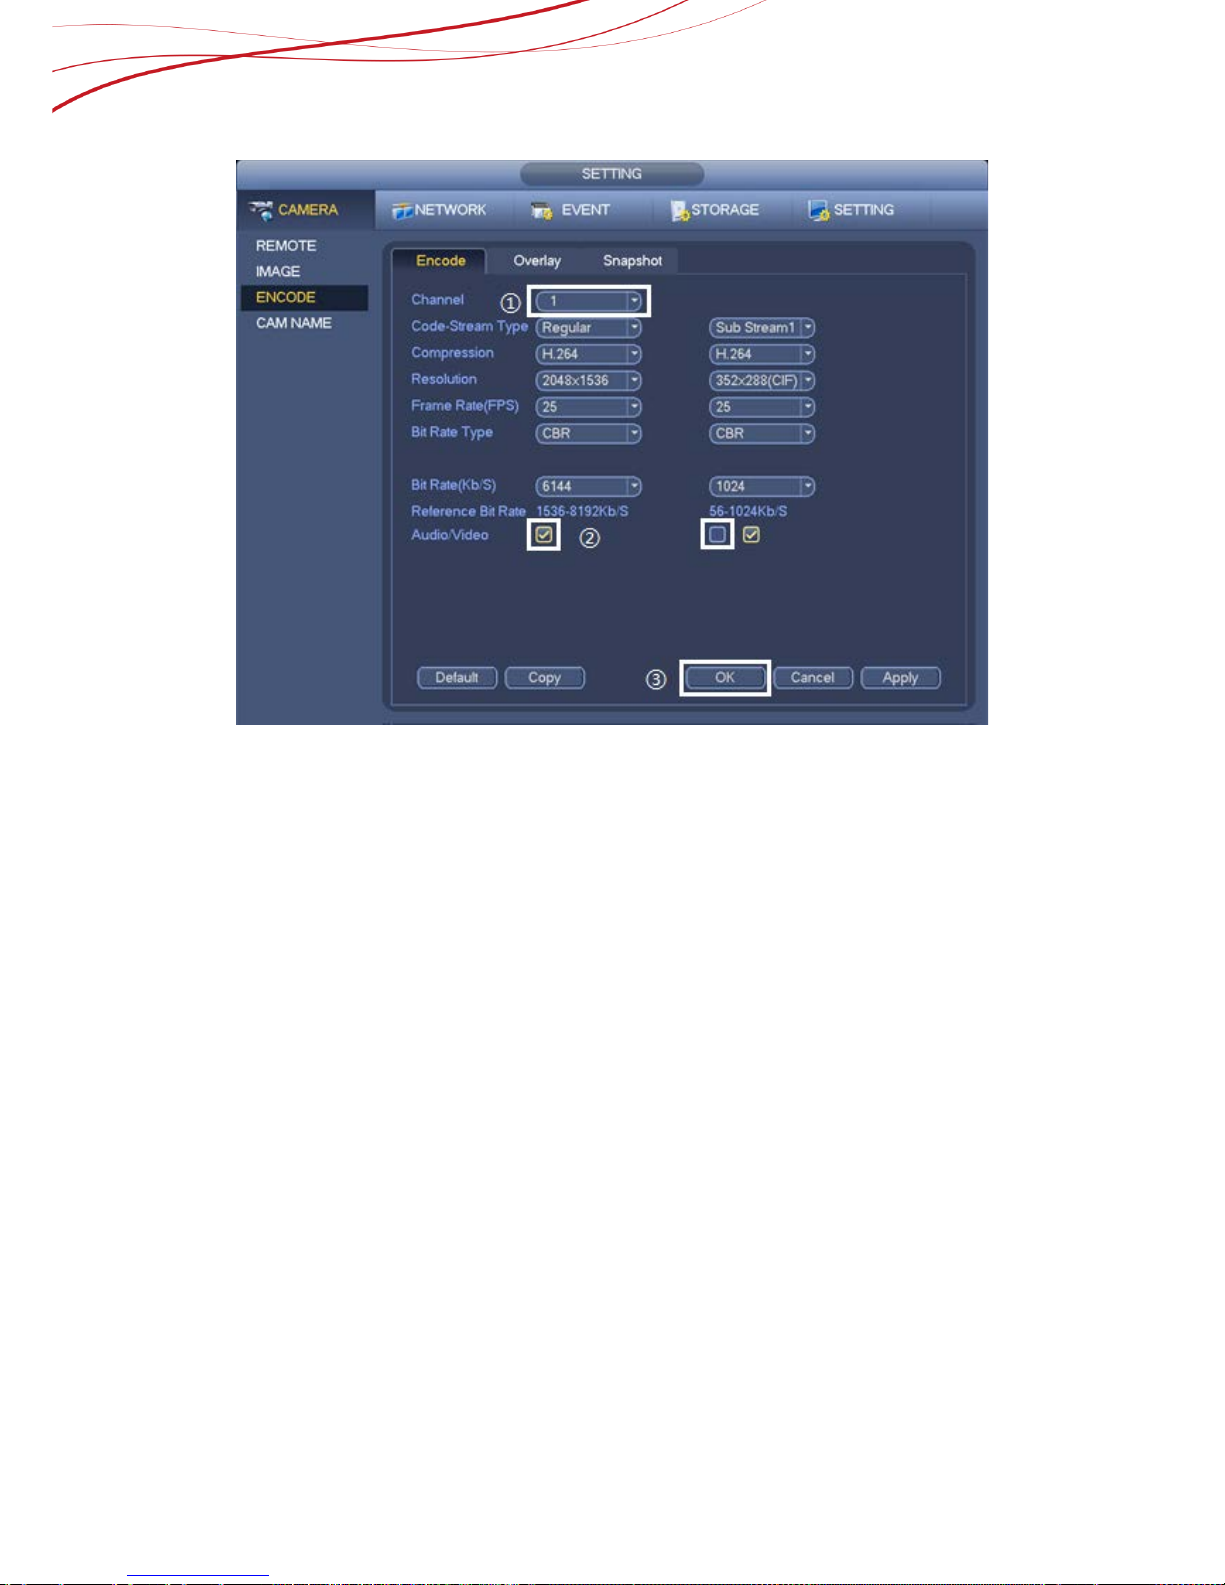
3.6. How to set the audio of camera
From Main menu->Setting->Encode->Encode, you can see the following interface. You
can set the parameter of camera in this page.
30
Figure 3-11
Operation Steps:
1) Select a channel from the dropdown list.
2) Yo u can ena ble or disab le the vid eo/ audi o. Plea se not e, onc e you e nable aud io func tion
for one channel, system may enable audio function of the rest channels by default.
3) Click “OK” to save settings.
3.7. How to set the image parameters of camera
From main menu->Setting->Camera->Image, you can see the image interface is
shown as below.
 Loading...