

Page 1

Mobile Portable Terminal
User’s Manual
Version 1.0.0
Page 2

i
Table of Contents
1 Product Introduction .................................................................................................... 1
1.1 Overview ............................................................................................................. 1
1.2 Specifications ..................................................................................................... 1
1.3 General Structure .............................................................................................. 1
2 MPT Operation ............................................................................................................. 4
2.1 Boot up and Shut down ..................................................................................... 4
2.2 Login ................................................................................................................... 4
2.3 Main Interface .................................................................................................... 4
2.3.1 Status bar ................................................................................................. 5
2.3.2 Menu ......................................................................................................... 6
2.4 Snapshot/Record Video .................................................................................... 6
2.5 Record Audio ..................................................................................................... 7
2.6 Files Manage...................................................................................................... 8
2.7 Settings ............................................................................................................. 11
2.7.1 Network .................................................................................................. 11
2.7.2 Devices ................................................................................................... 24
2.7.3 System .................................................................................................... 40
2.8 Log Manager .................................................................................................... 49
2.9 Plate Recognition ............................................................................................ 49
2.10 Alarm ................................................................ ............................................. 50
2.11 Calculator ...................................................................................................... 50
2.12 Calendar ........................................................................................................ 50
3 Upgrade ...................................................................................................................... 52
4 Platform Connection .................................................................................................. 56
4.1 MPT .................................................................................................................. 56
Page 3

ii
4.2 DSS ................................................................................................................... 57
5 FAQ ................................................................................................ ............................. 59
Appendix Toxic or Hazardous Materials or Elements ................................................... 63
Page 4

iii
Welcome
Thank you for purchasing our mobile portable terminal!
This user’s manual will help you become familiar with our mobile portable terminal in a very short
time.
Before installation and operation, please read the following safeguard and warning carefully!
Important Safeguard and Warning
1.Electrical safety
All installation and operation here should conform to your local electrical safety codes.
We assume no liability or responsibility for all the fires or electrical shock caused by improper
handling or installation.
2.Transportation security
Heavy stress, violent vibration or water splash are not allowed during transportation, storage and
installation.
3.Installation
Keep upwards. Handle with care.
Do not apply power to the mobile portable terminal before completing installation.
Do not place objects on the mobile portable terminal.
4.Qualified engineers needed
All the examination and repair work should be done by the qualified service engineers.
We are not liable for any problems caused by unauthorized modifications or attempted repair.
5.Environment
The mobile portable terminal should be used in a cool, dry place away from direct sunlight,
inflammable, explosive substances and etc.
6. Accessories
Be sure to use all the accessories recommended by manufacturer.
Before installation, please open the package and check all the components are included:
Contact your local retailer ASAP if something is missing in your package.
7. Lithium battery
Improper battery use may result in fire, explosion, or personal injury!
When replace the battery, please make sure you are using the same model!
Page 5

1
1 Product Introduction
1.1 Overview
This series product is a mobile portable terminal for persons of public security, insurance, traffic
police and etc. It can realize audio/video record, snapshot, GPS, and video surveillance, record
view and download, bidirectional talk, emergency command via 3G/4G/WIFI and etc. The system
is designed based on the Android OS. It realizes business rebuild and expansion via the security
network to meet the mobile business requirements of various industries. It can enhance quick
respond speed and general operation capability.
1.2 Specifications
Function
Specifications
OS
Android 4.1
LCD Module
4.0-inch TFT semi-permeable screen, it is visible under the sunshine.
854*480
Light Sensation
Sensor
Self-adaptive screen brightness
Touch Screen
Module
4.0-inch capacitance touch screen.,multiple-point touch screen;
Memory
1GB RAM+32GB Flash,extendable storage. Max supports 64GB
Micro SD card.
Video Encode
Standard
H.264
Record
Resolution
1080P,25fps;720P/D1/VGA/CIF/QVGA,30fps
Image Pixels
8M/5M/3M/1.3M/VGA
Audio
Audio/video sync record at the same time
Network
China Mobile: 4G TD-LTE network
China Telecom:CDMA-EVDO
Chine Unicom: WCDMA
WIFI
Function
Audio/video record, snapshot, one shortcut button to record video, one
shortcut button to record audio, one shortcut button to snapshot,
Bluetooth, fingerprint recognition, plate recognition, bidirectional talk,
one shortcut button to alarm, user manage and log manage.
Positioning
GPS
Port
HDMI digital port / USB 2.0 port/Peripheral general port/Headphone
jack/Peripheral camera port
Battery Capacity
Built-in high performance ultra-large lithium battery 4000mAh(default
accessories)
Protection Level
IP66, anti-falling capability from 1.5M height.
Working
Temperature
-10℃~+55℃
Humidity
10%-90%
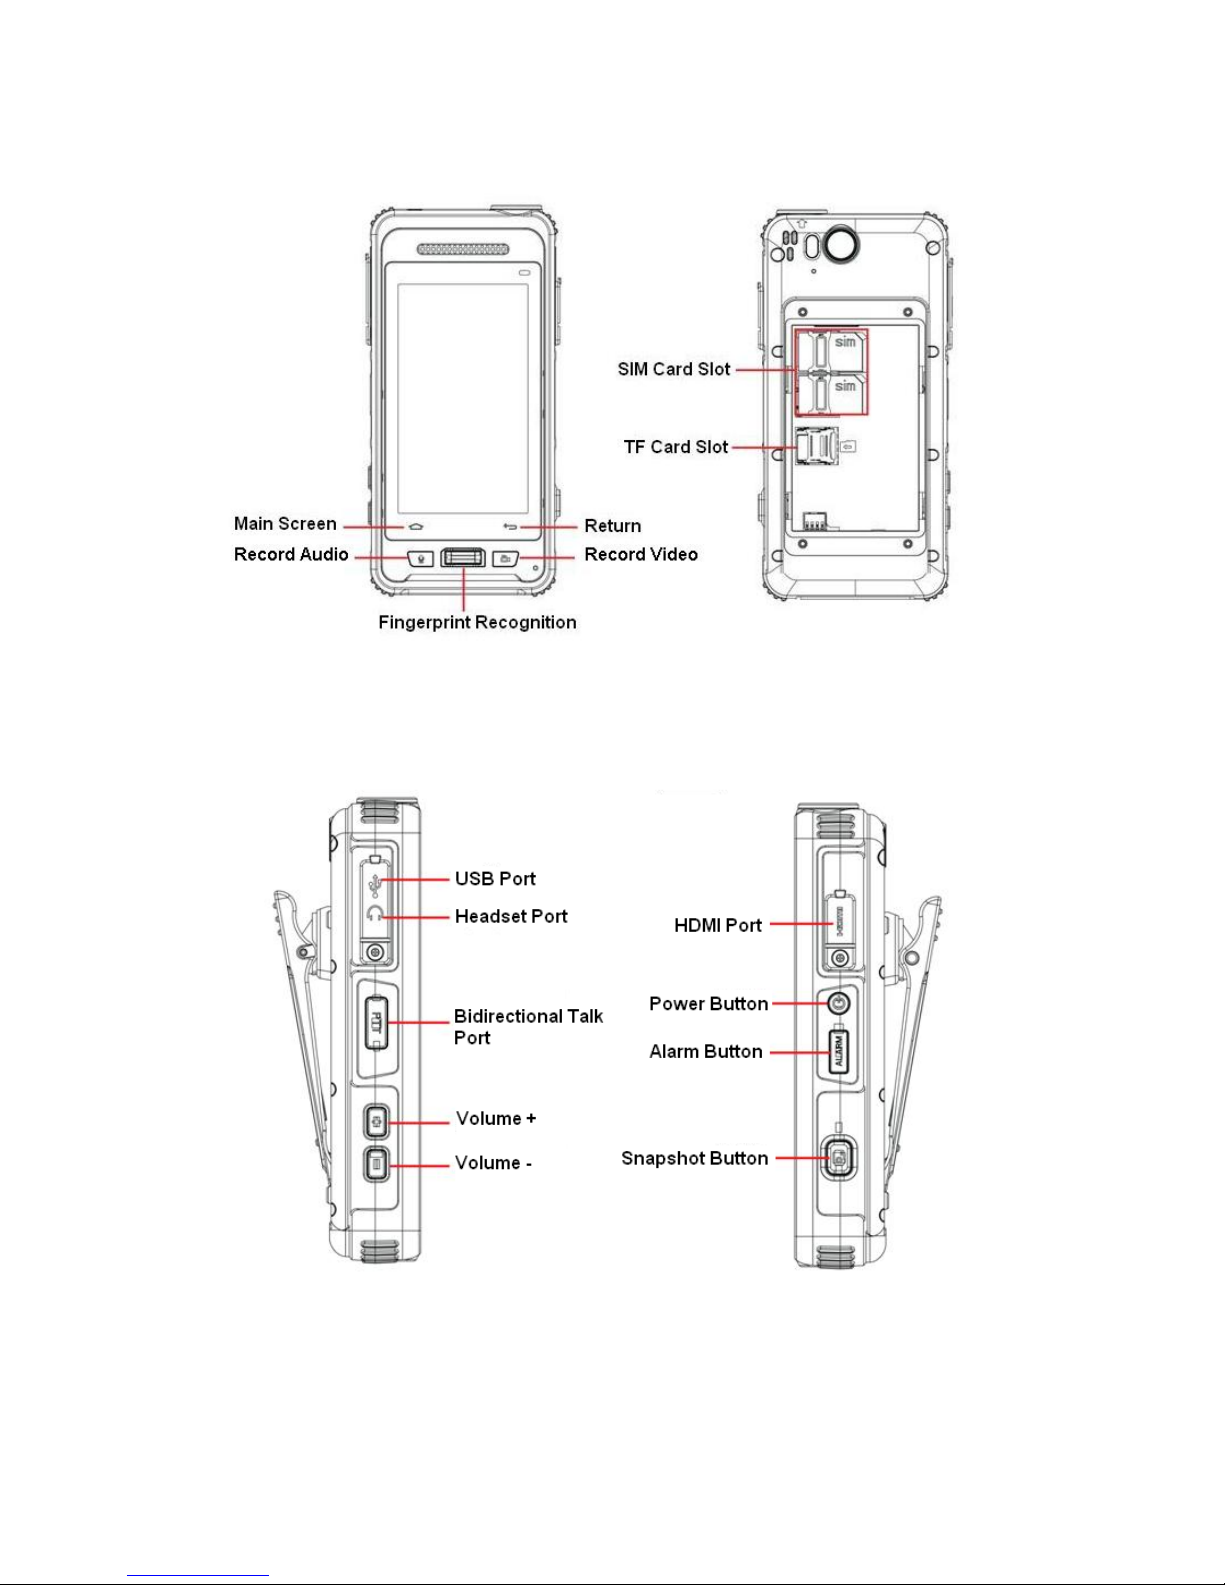
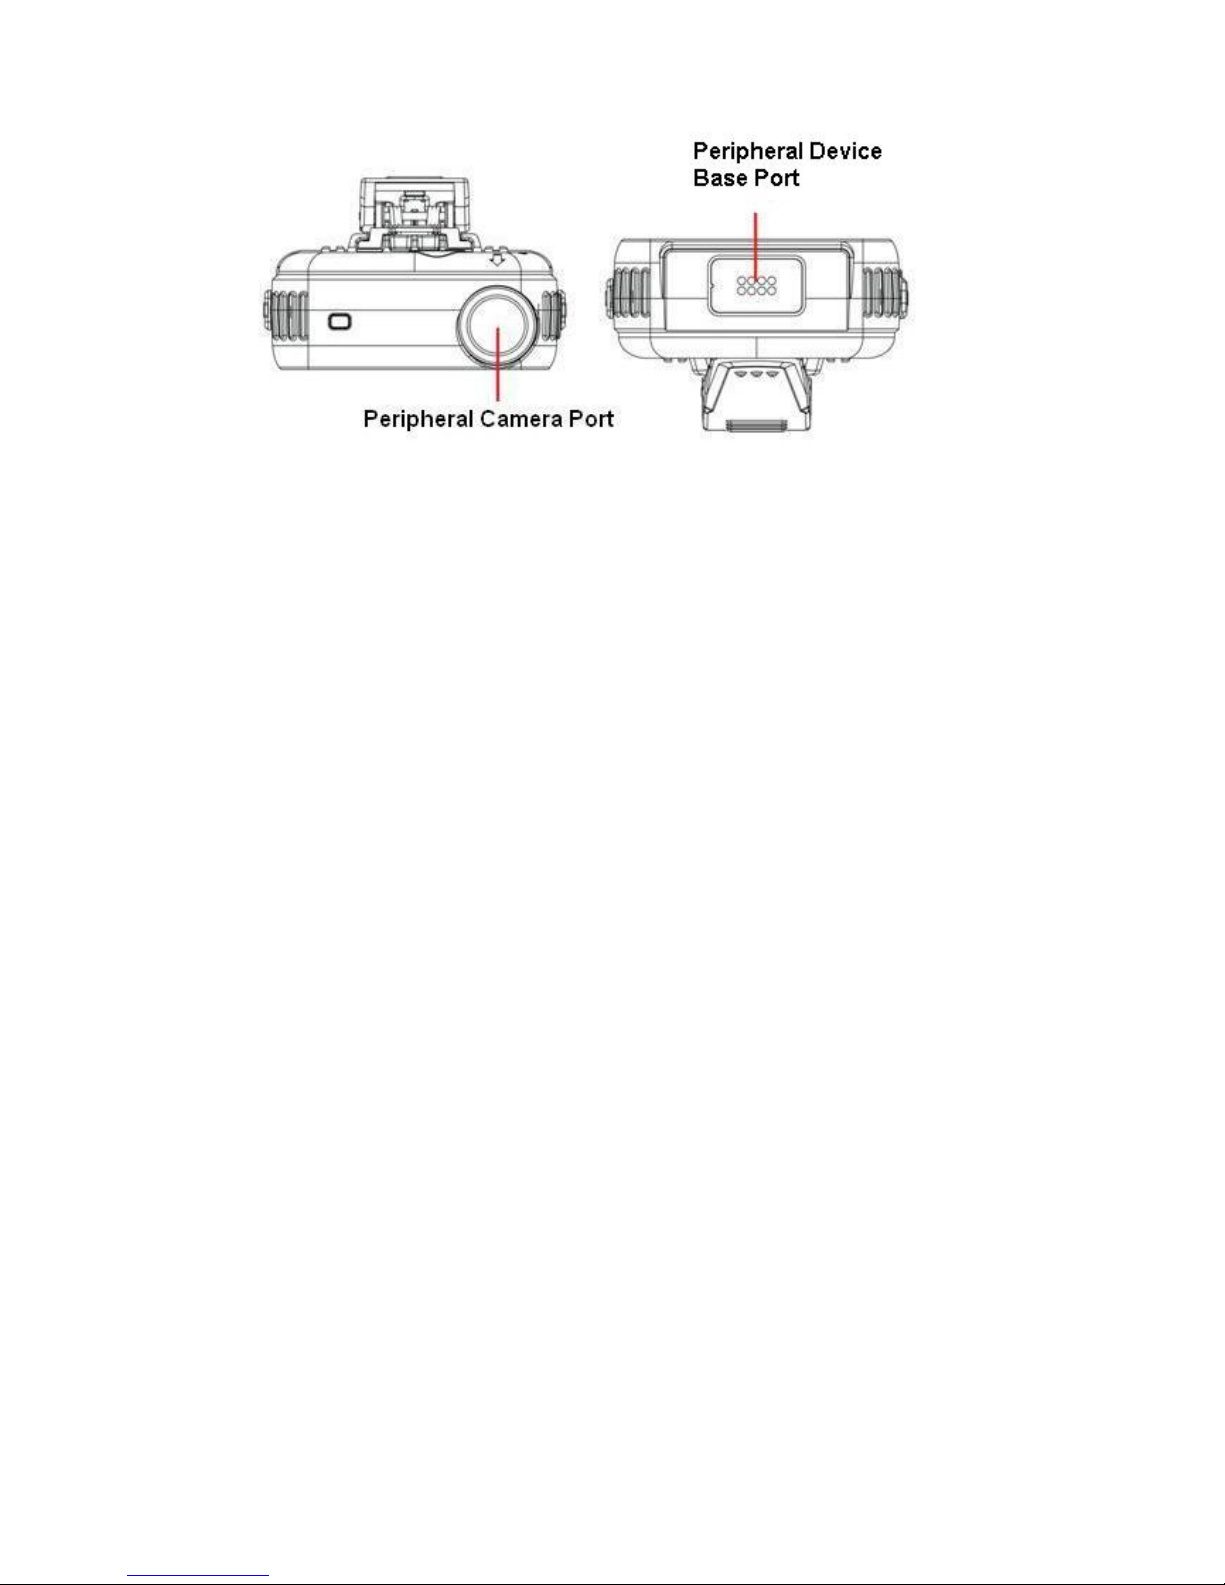
1.3 General Structure
Page 6
2
Please refer to the following figure for general structure information. See Figure 1-1 through
Figure 1-3.
Figure 1-1
Figure 1-2
Page 7
3
Figure 1-3
Page 8

4
2 MPT Operation
2.1 Boot up and Shut down
Press the power button on the right side of the device (see Figure 1-2), you can boot up or shut
down the device.
2.2 Login
After system boots up, you can go to the following interface. See Figure 2-1.
Input user name and password; click the Login button to go to the main interface.
System default user name is admin and password is 123456.
Note:
For security reason, please modify password after you first login.
Figure 2-1
Tips
You can scan your fingerprint to login. Please go to the User Manager->Personal info->Password
setting->Fingerprint manager to set first.
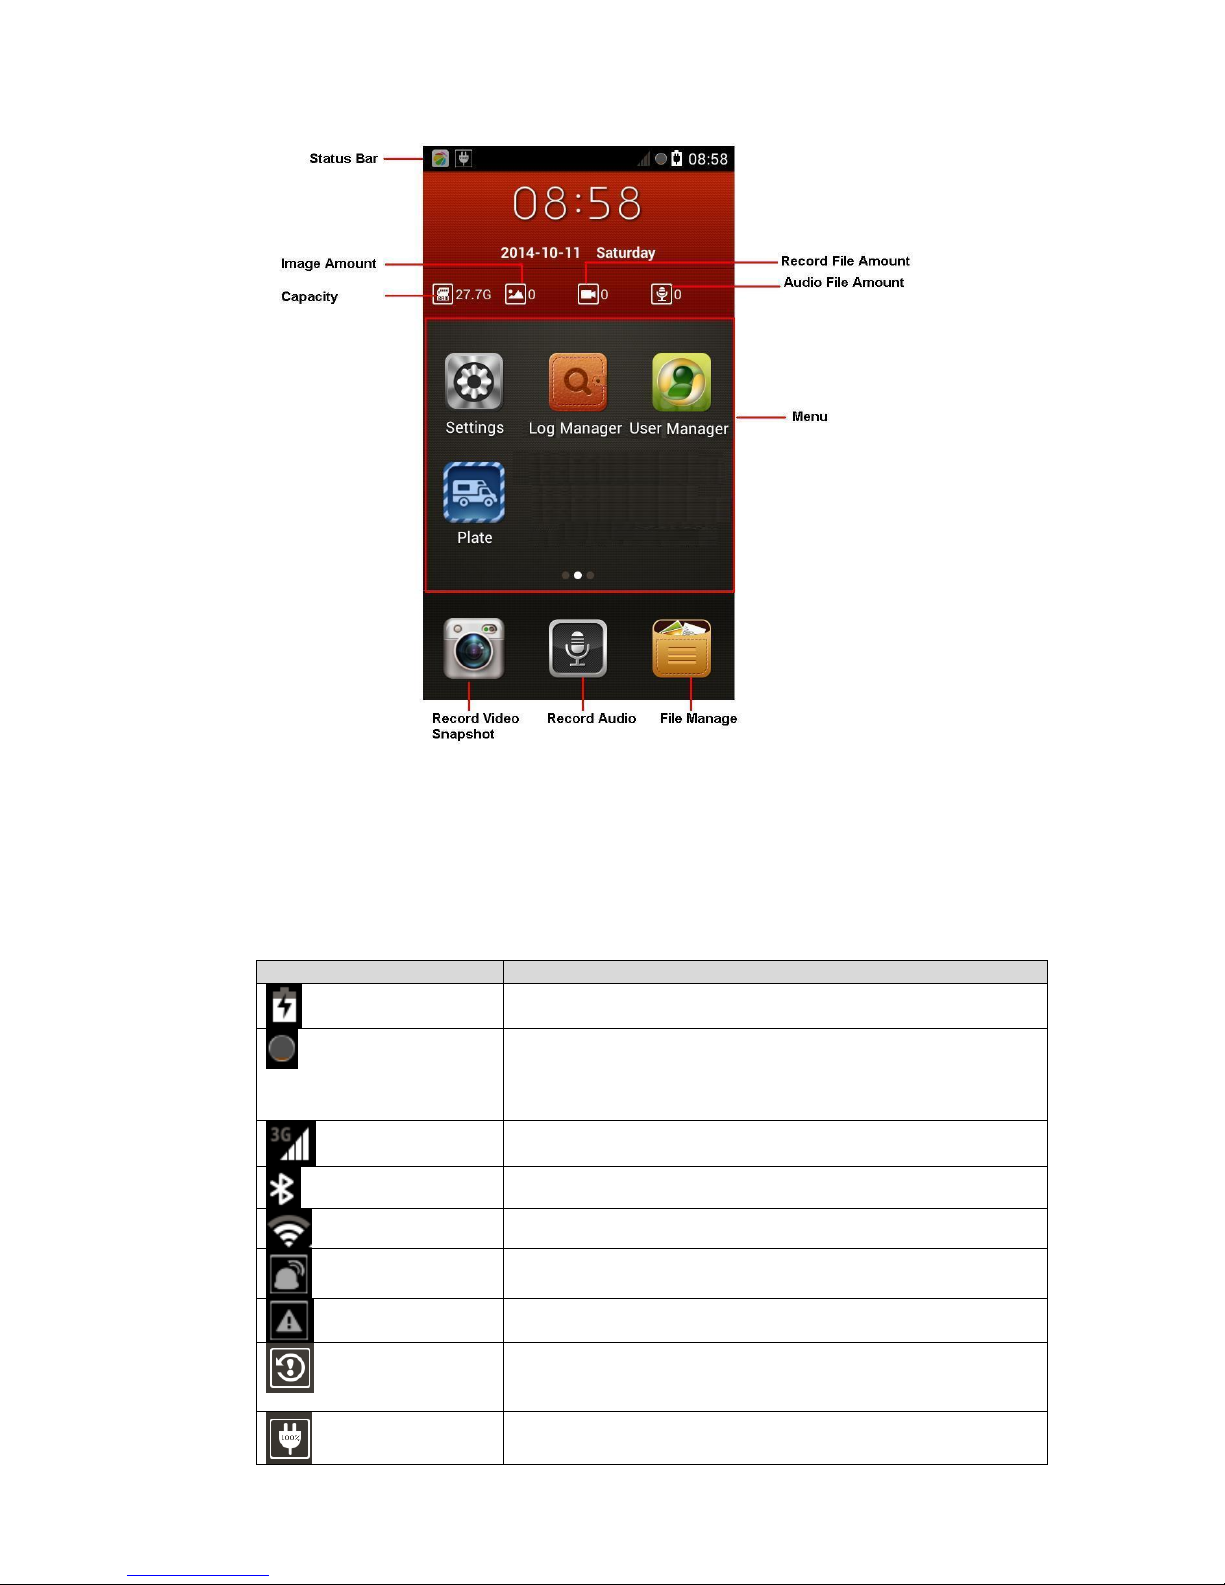
2.3 Main Interface
After you logged in, the main interface is shown as below. See Figure 2-2.
Page 9
5
Figure 2-2
2.3.1 Status bar
It is to display system information, notice, display network connection status, platform connection
and etc.
Please refer to the following sheet for detailed information.
Icon
Note
Display battery voltage.
Display storage card usage status.
Orange: It is in use.
Grey: It is idle.
Red: The space is full.
It is to display mobile signal type (such as 3G) and
intensity.
The Bluetooth function is enabled.
Current WIFI signal intensity.
An alarm occurs.
The flow has reached the alarm threshold.
The device maintaining work is in process. System needs
to reboot to maintain after long-time work. Once it works for
more than 72 hours, it sends out prompt information.
The battery is full now.
Page 10
6
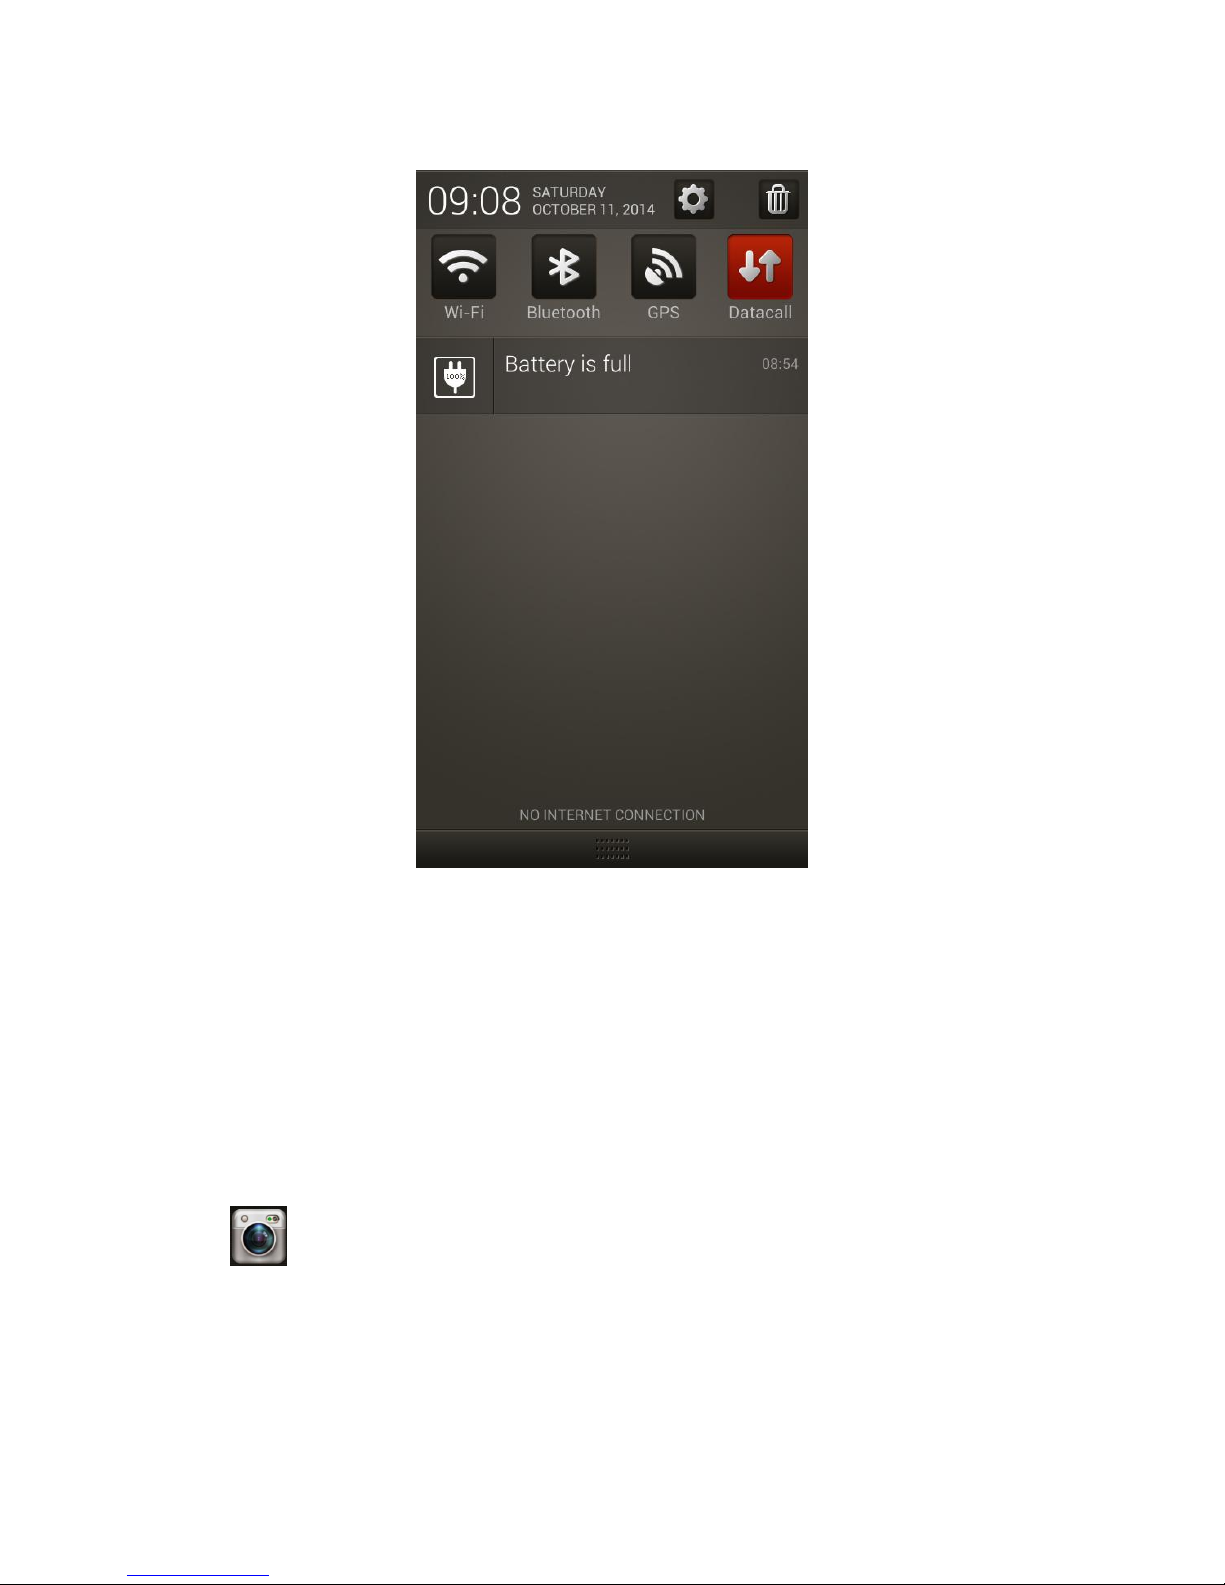
Click the status bar and move down, you can see the shortcut button such as WIFI, Bluetooth,
GPS, data, prompt information and etc. See Figure 2-3.
Figure 2-3
The red color means current function is enabled, the grey color means current function is
disabled. Click the prompt information; you can go to the corresponding setup interface.
2.3.2 Menu
Move the menu left/right, you can go to the previous/next page.
The newly installed App can be displayed on the menu bar. Press the App icon for a long time,
you can see “×”,click it you can delete the corresponding App.
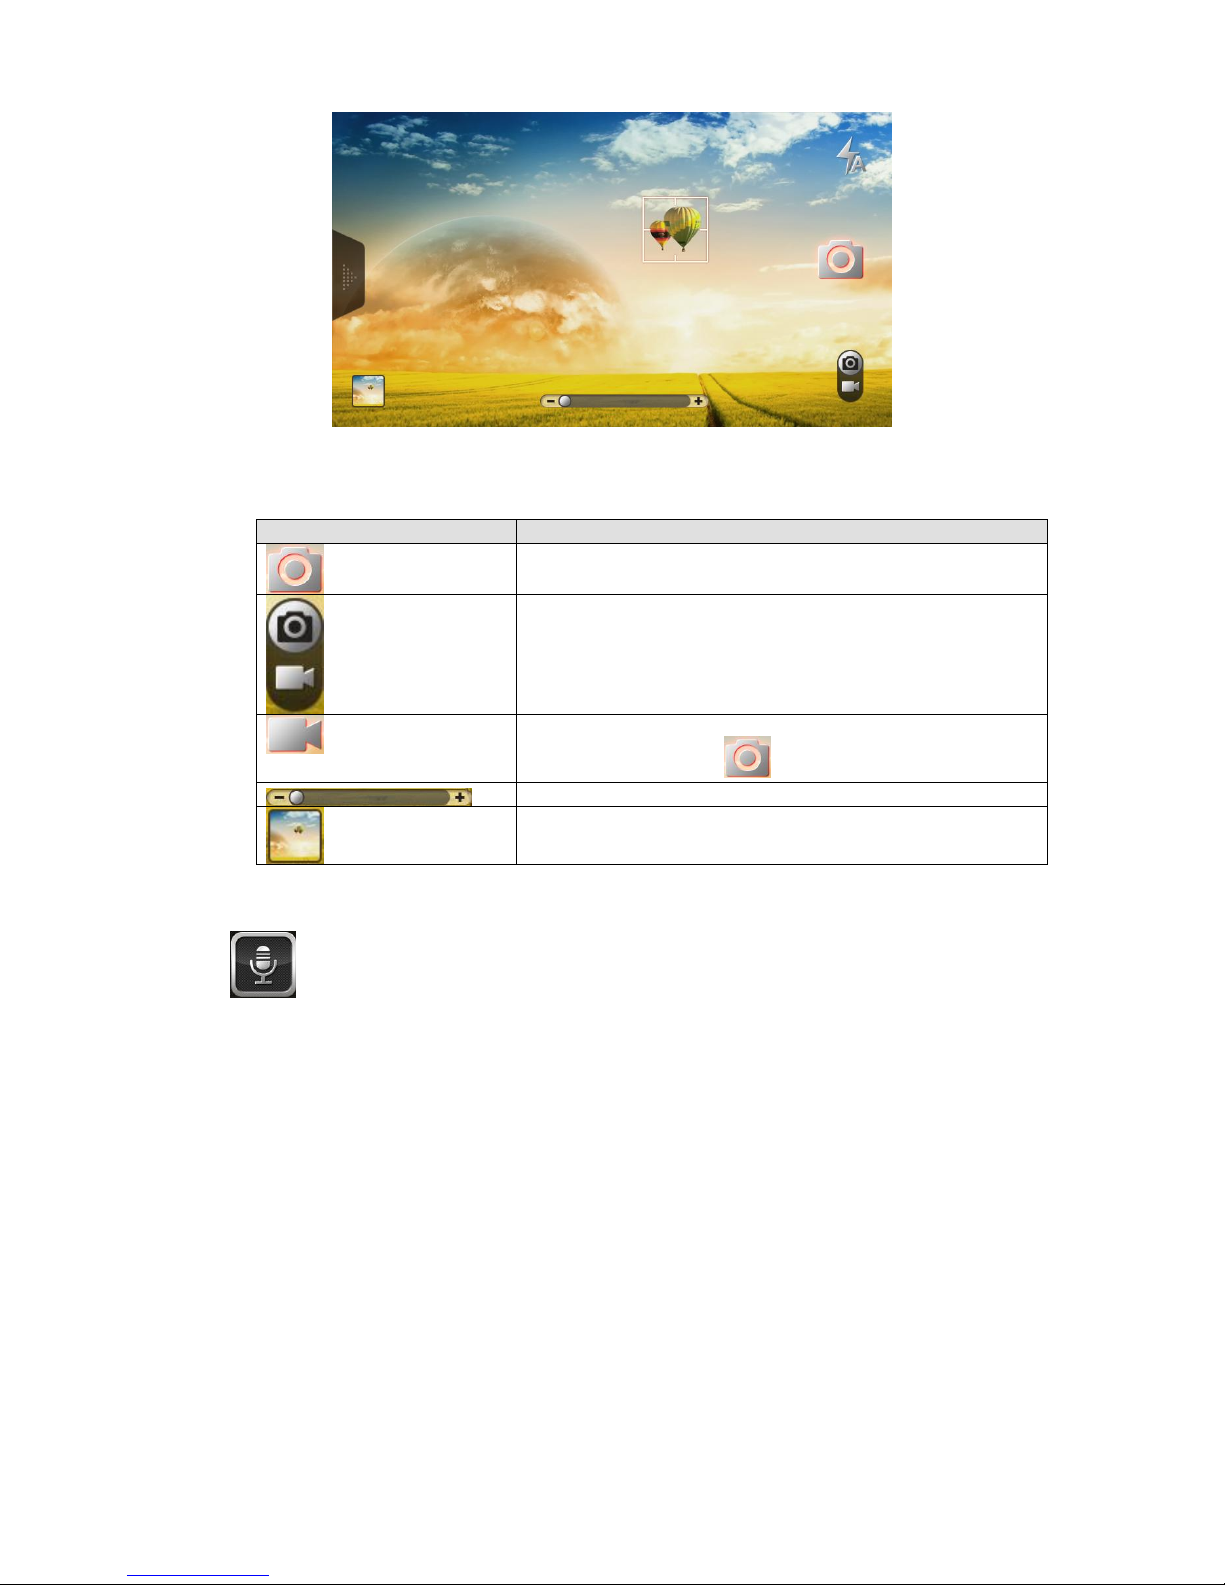
2.4 Snapshot/Record Video
Click , system goes to the snapshot/record interface. See Figure 2-4.
Page 11
7
Figure 2-4
Please refer to the following sheet for detailed information.
Icon
Function
Click it, system begins snapshot.
Switch snapshot/record video.
Click it, system begins record video. During the record
process, you can click to snapshot.
Adjust image distance (Near->Far)
Click it to view image or video record file.
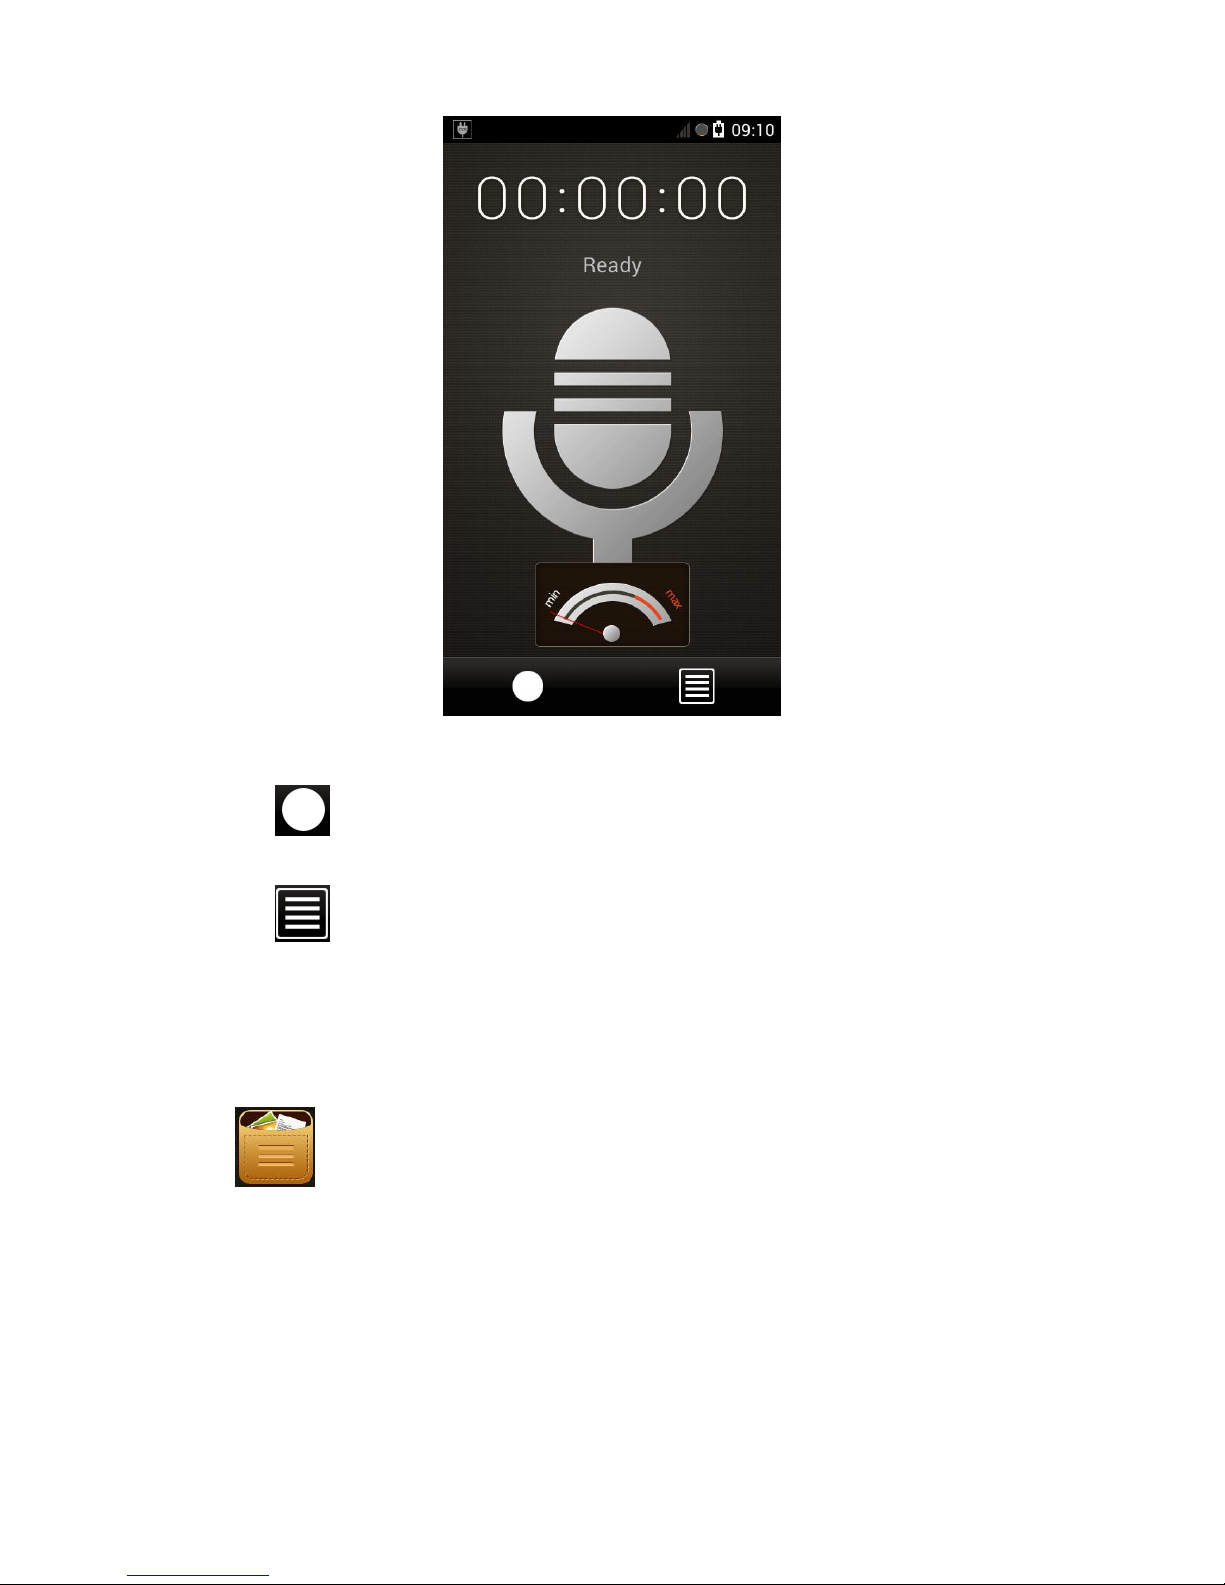
2.5 Record Audio
Click , you can go to the record audio interface. See Figure 2-5.
Page 12
8
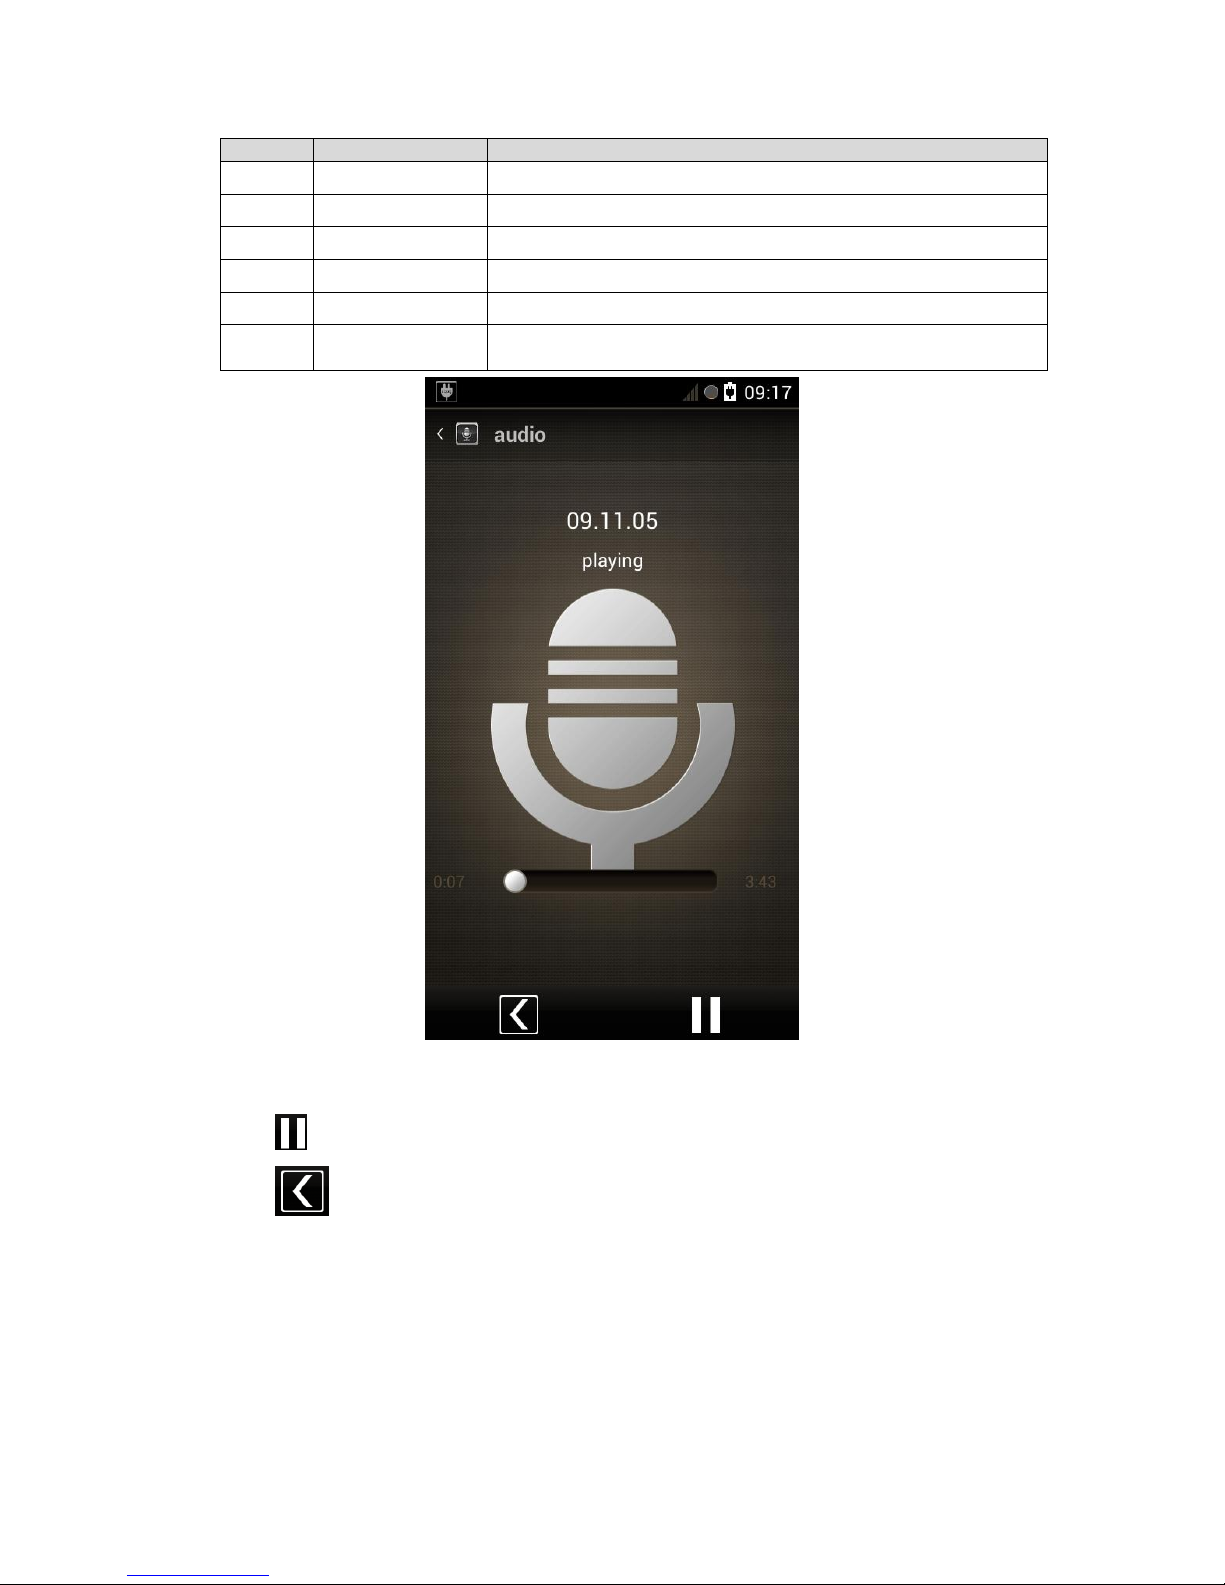
Figure 2-5
Click to begin record. The circle becomes red during the recoridng process. Click it
again to stop record.
Click to view audio file.
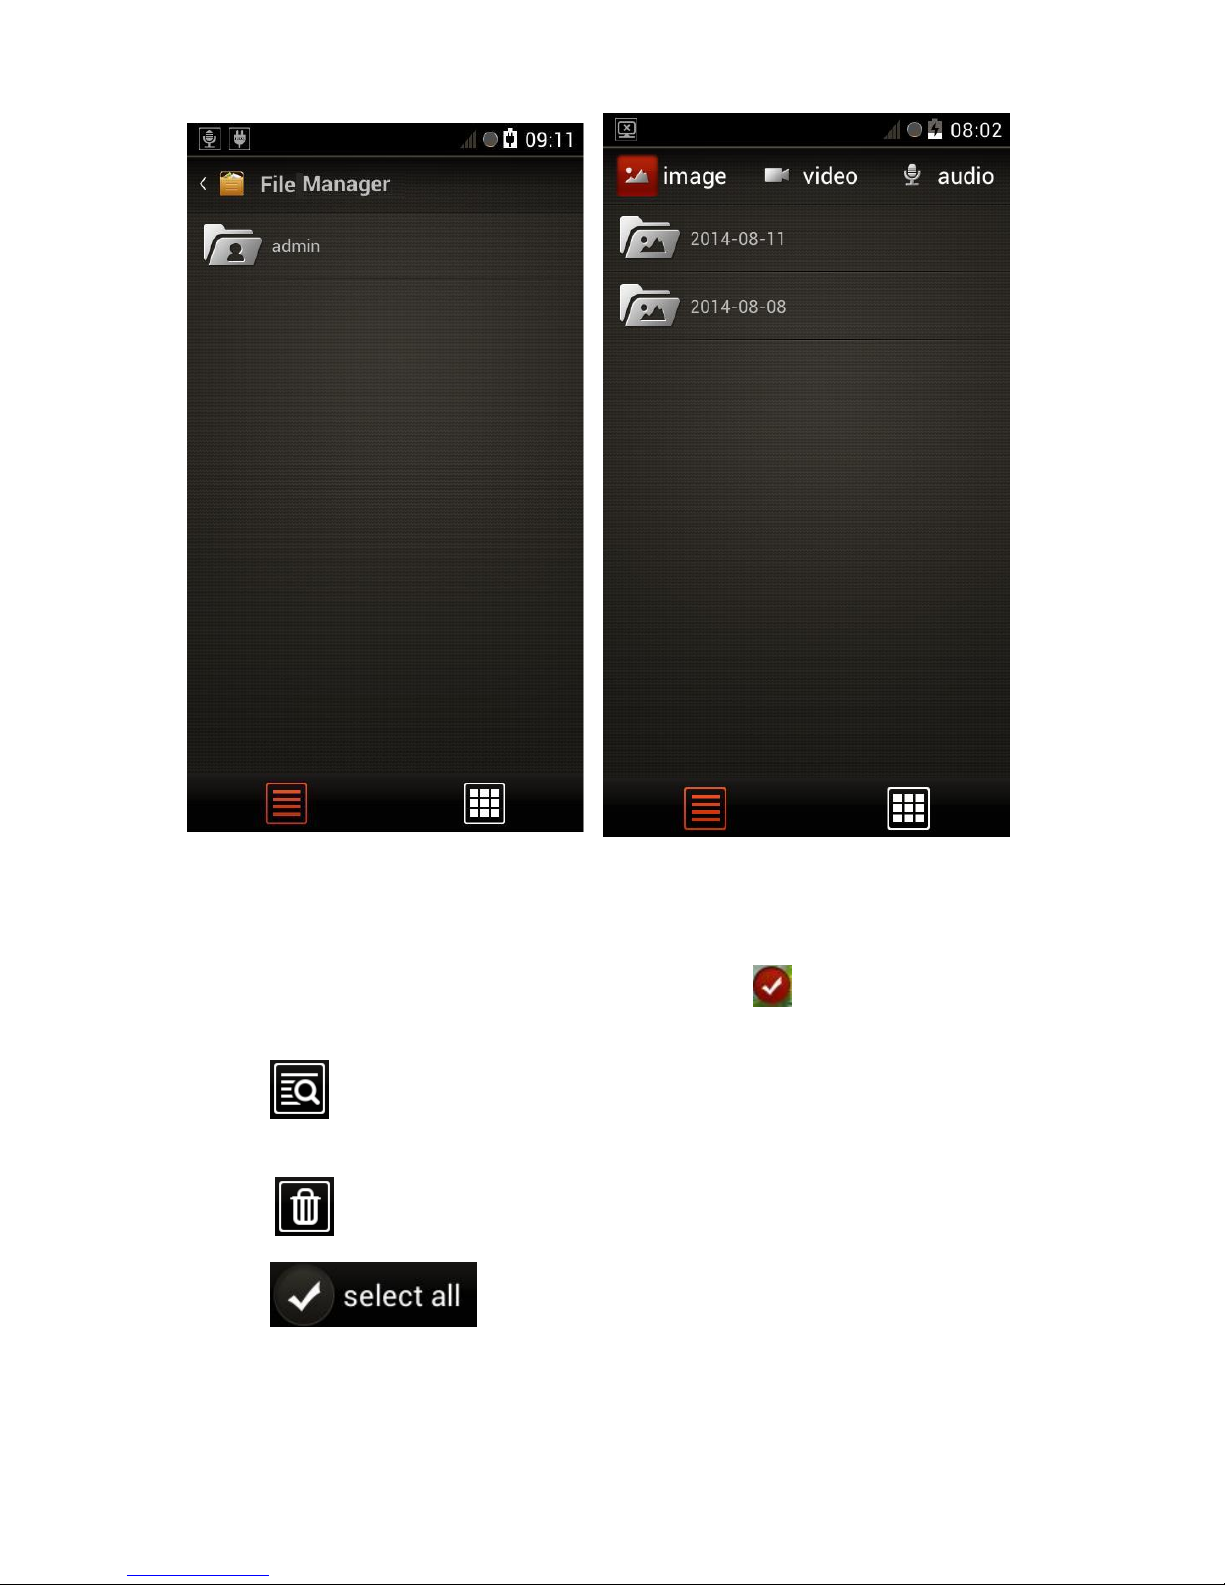
2.6 Files Manage
Note
Admin user can view files of all users. For ordinary user, he can only view his own files.
Click , you can go to the file manage interface. Here you can view image, audio/video
file. See Figure 2-6.
All file folders name after system current date such as 2014-07-05. Files name after system
current time such as 07:21:25. Files are listed by time and the latest file is always at the top.
Page 13
9
Figure 2-6
a) Click file type you want to search (image/video/audio), you can view the folder.
b) Click the folder, you can view the file.
Press the file for a long time; you can see an icon shown as at the top right of the
image. The red color means it has been selected.
Click , you can view the detailed information of current file. It includes start time, end
time, belonging user, size, resolution and type.
Click to delete selected file.
Click , you can select all files.
c) Now you can click the corresponding file to view.
Page 14
10
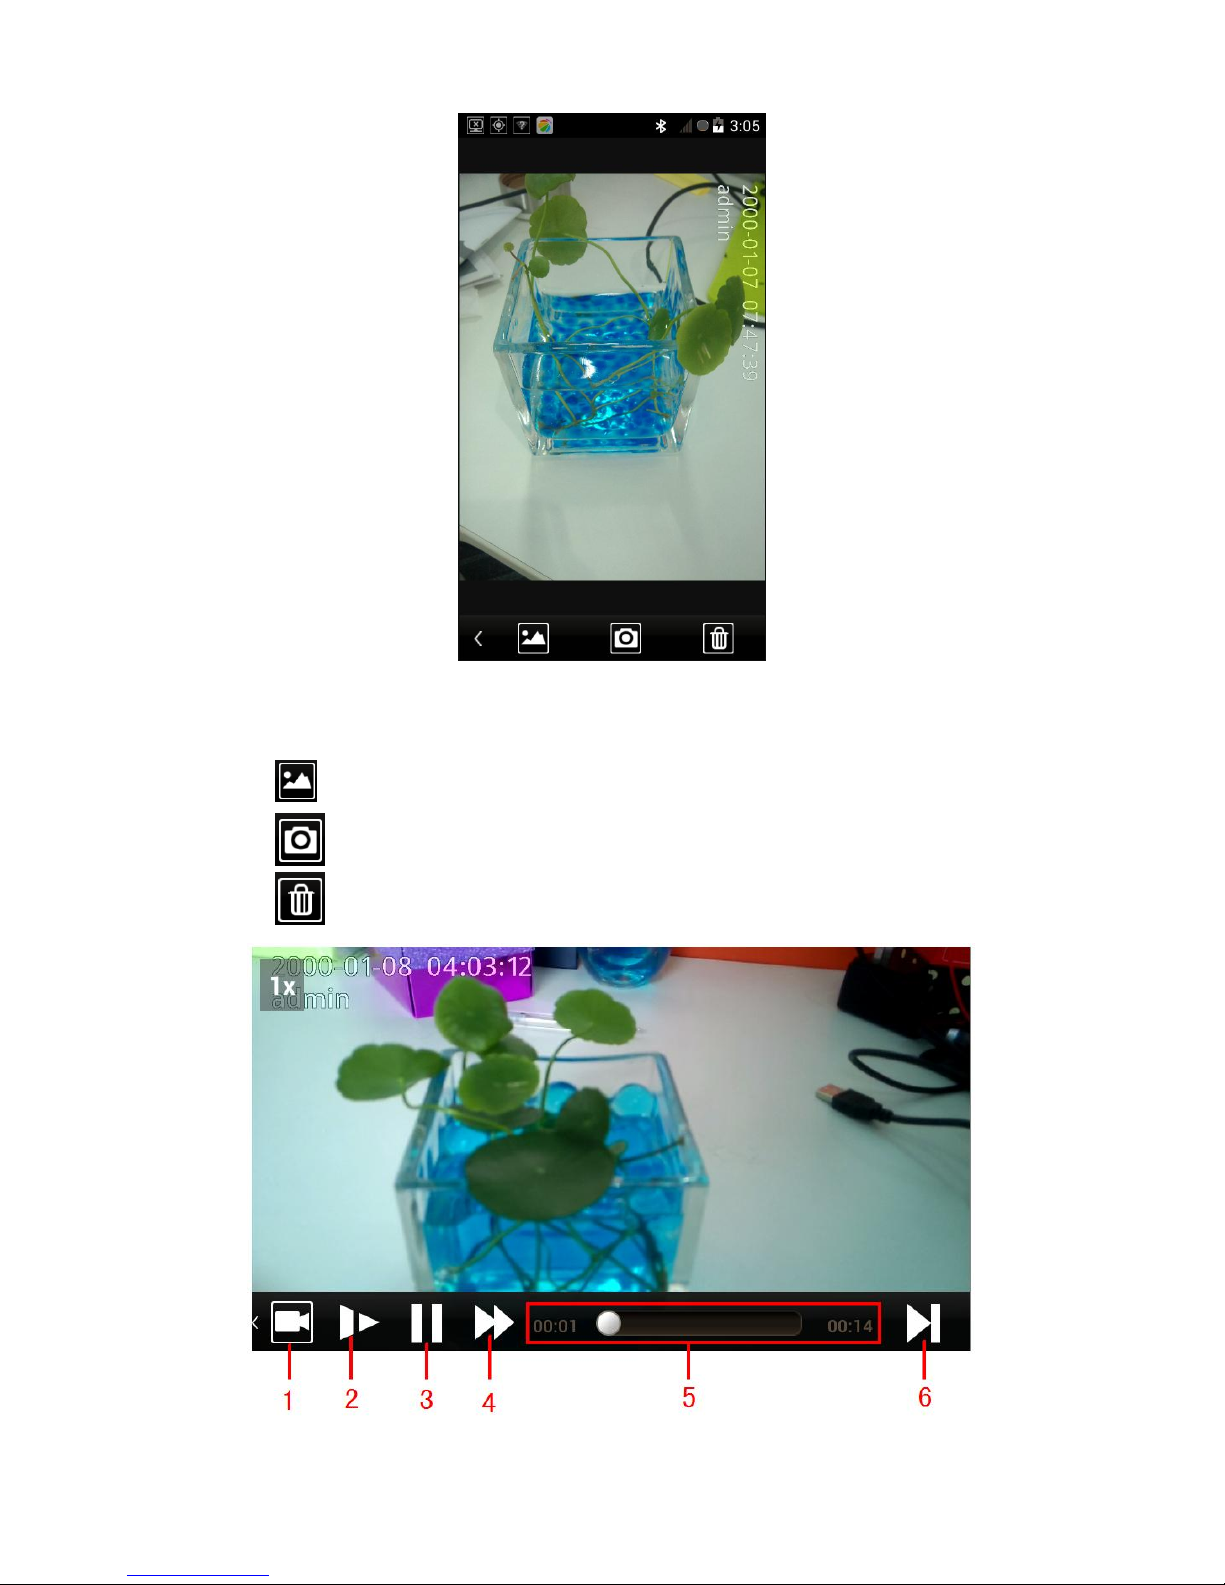
Figure 2-7
Use you finger to press left/right on the screen, you can view the previous/next image.
Click to return the image file list.
Click to snapshot.
Click to delete the image.
Figure 2-8
Page 15
11
Please refer to the following sheet for detailed informaiton.
SN
Name
Function
1
Record
It is to record a video file.
2
Slow play
It max supports 1/4X slow play speed.
3
Play
Play or pause.
4
Fast play
It max supports 4x play speed.
5
Play process bar
Current file play speed and play time.
6
Frame by frame
play
It is to play frame by frame.
Figure 2-9
Click to pause or play audio.
Click to return to the file list.
2.7 Settings
2.7.1 Network
From Settings->Network, you can go to the following interface. Here you can set WIFI, Bluetooth,
data business, positioning, Ethernet and etc. See Figure 2-10.
Page 16
12
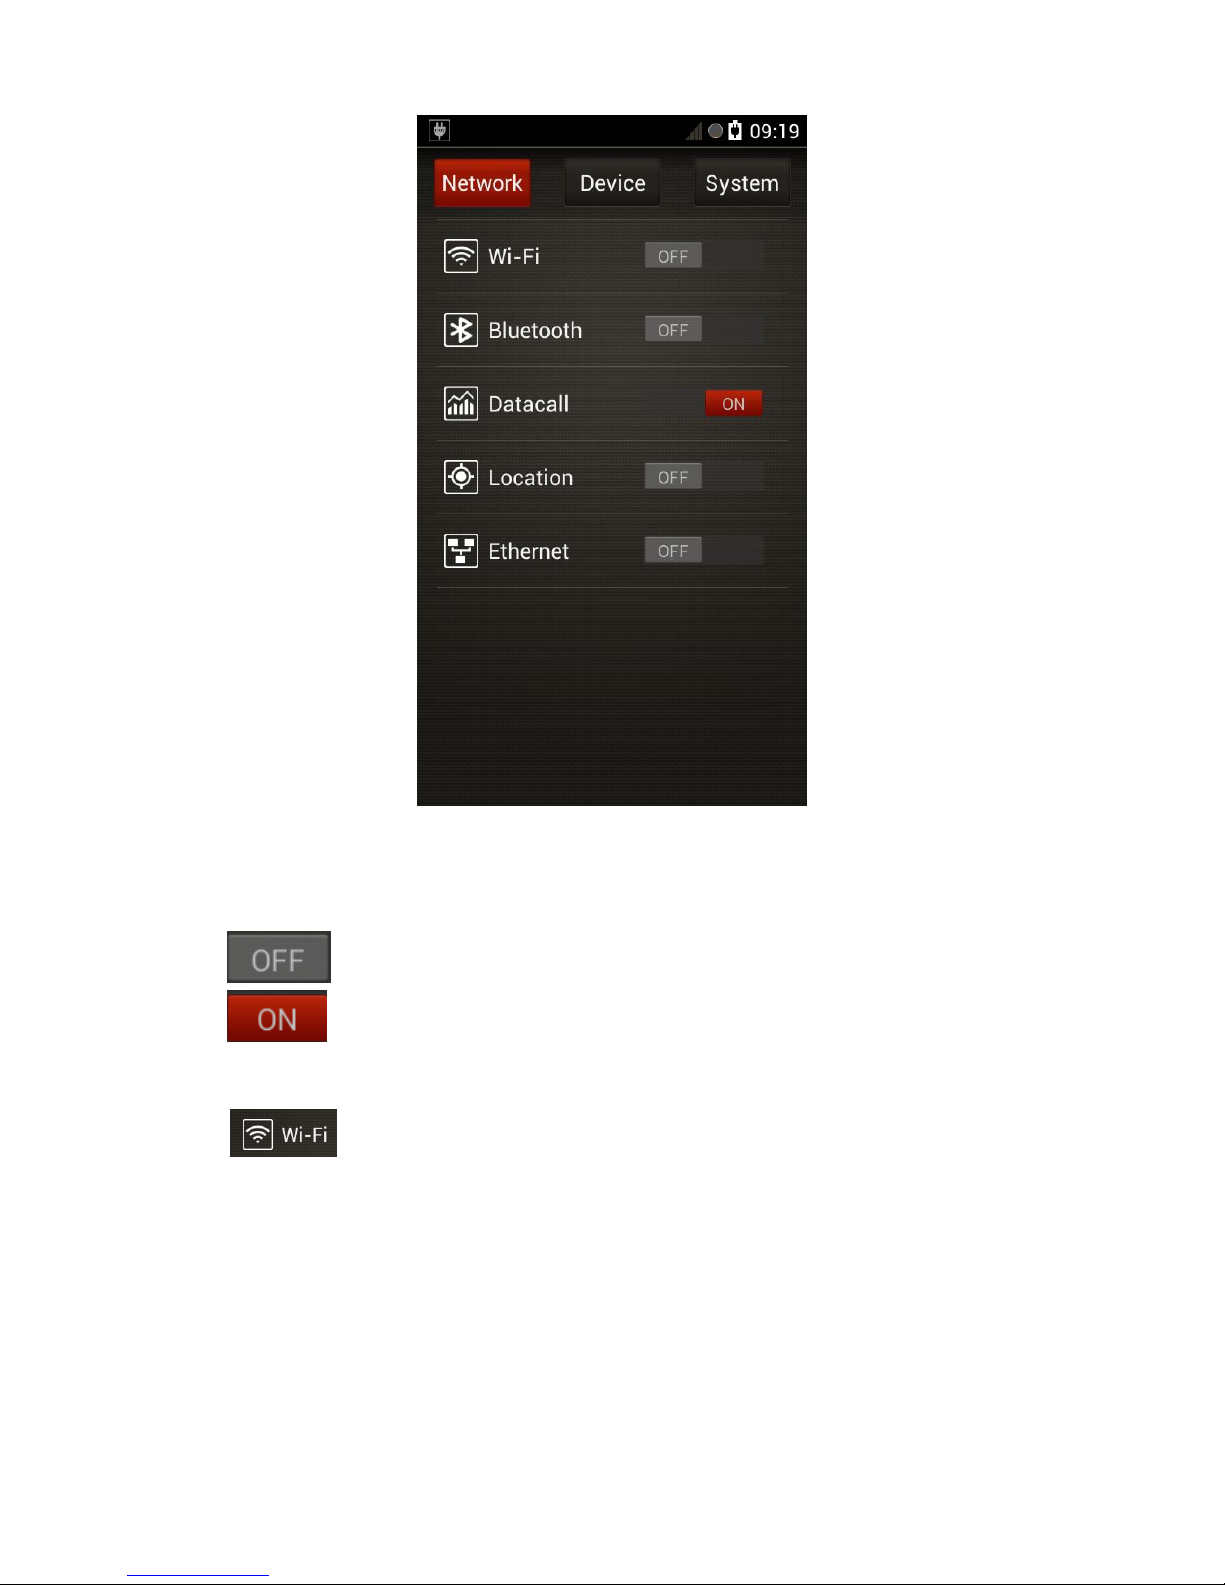
Figure 2-10
Click an item to go to the corresponding interface.
means current function is disabled.
means current function is enabled.
2.7.1.1 WIFI
Here you can search or add WIFI network.
Click , you can go to the following interface. See Figure 2-11.
Page 17
13
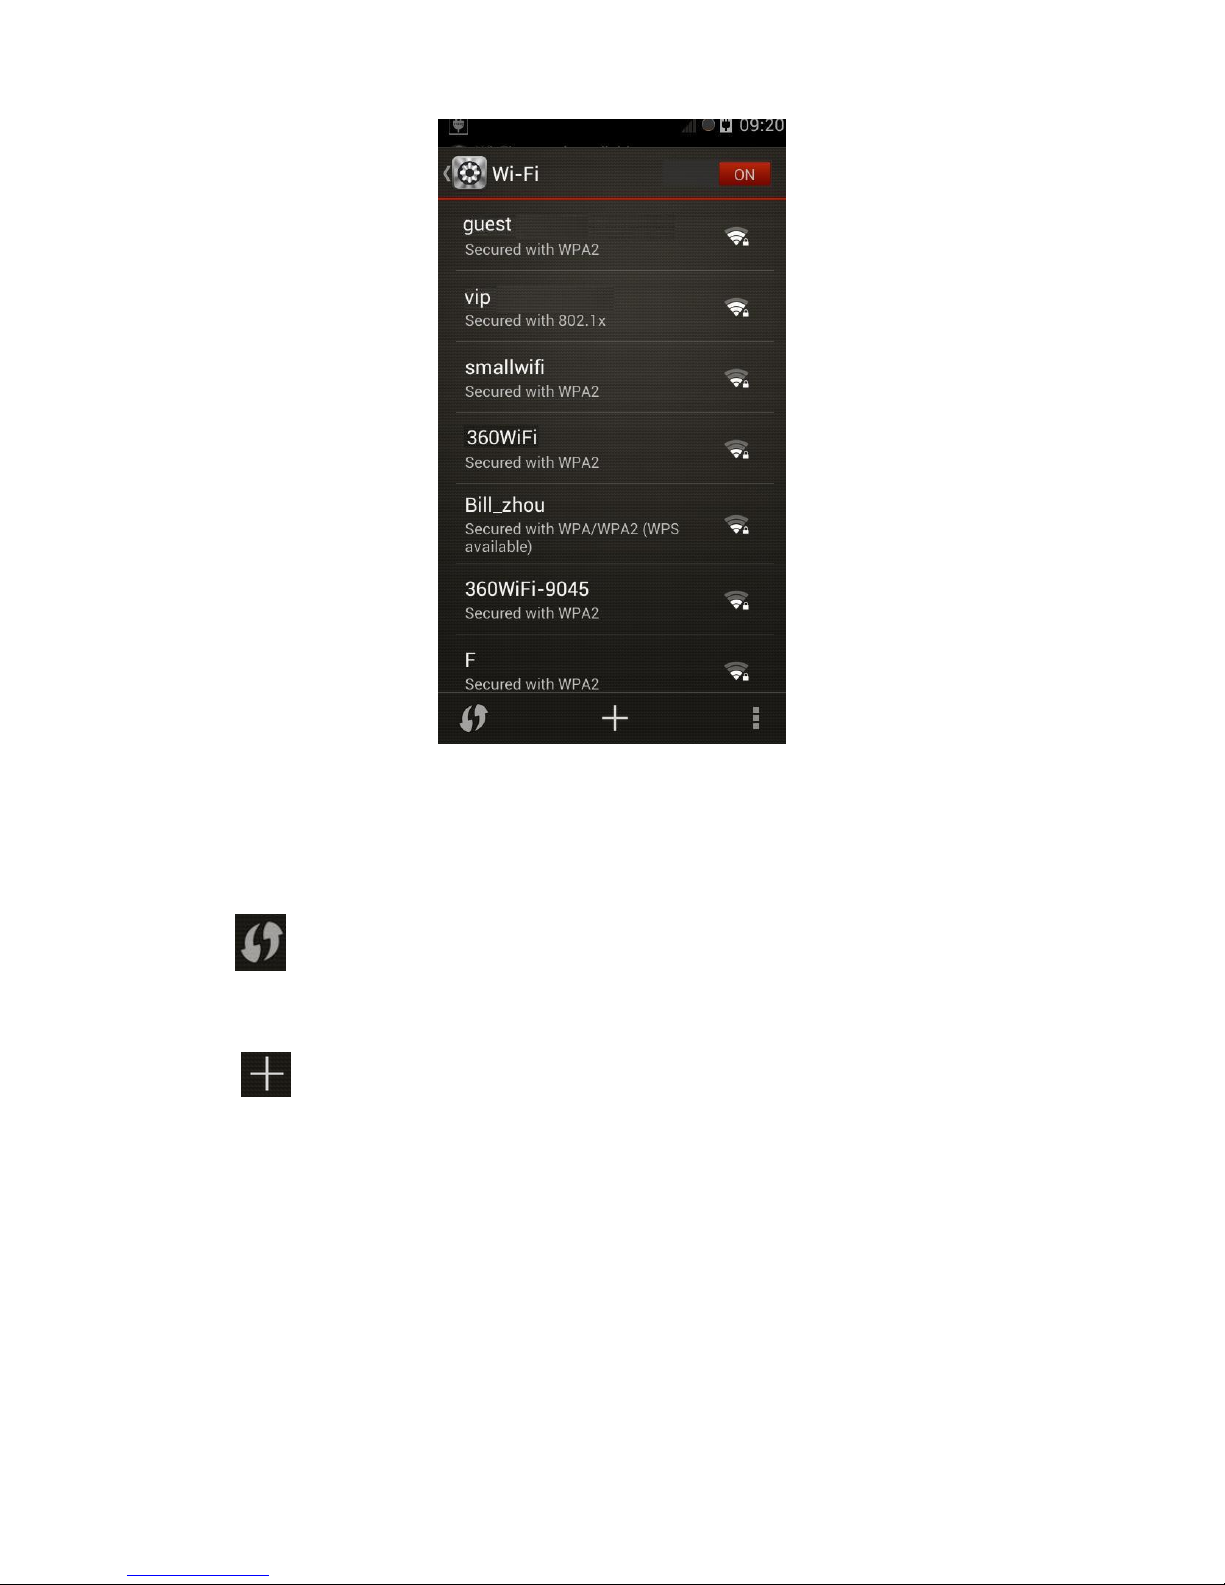
Figure 2-11
2.7.1.2 WPS
WPS (Wi-Fi Protected Setup) is used for the router of the WPS function. After you enabled this
function, the device can quickly connect to the network.
Click to view the router of the WPS function. You can follow the pop-up interface to set and
then connect to the network.
2.7.1.3 Add Network
Click , you can add the WIFI network. See Figure 2-12.
Page 18
14
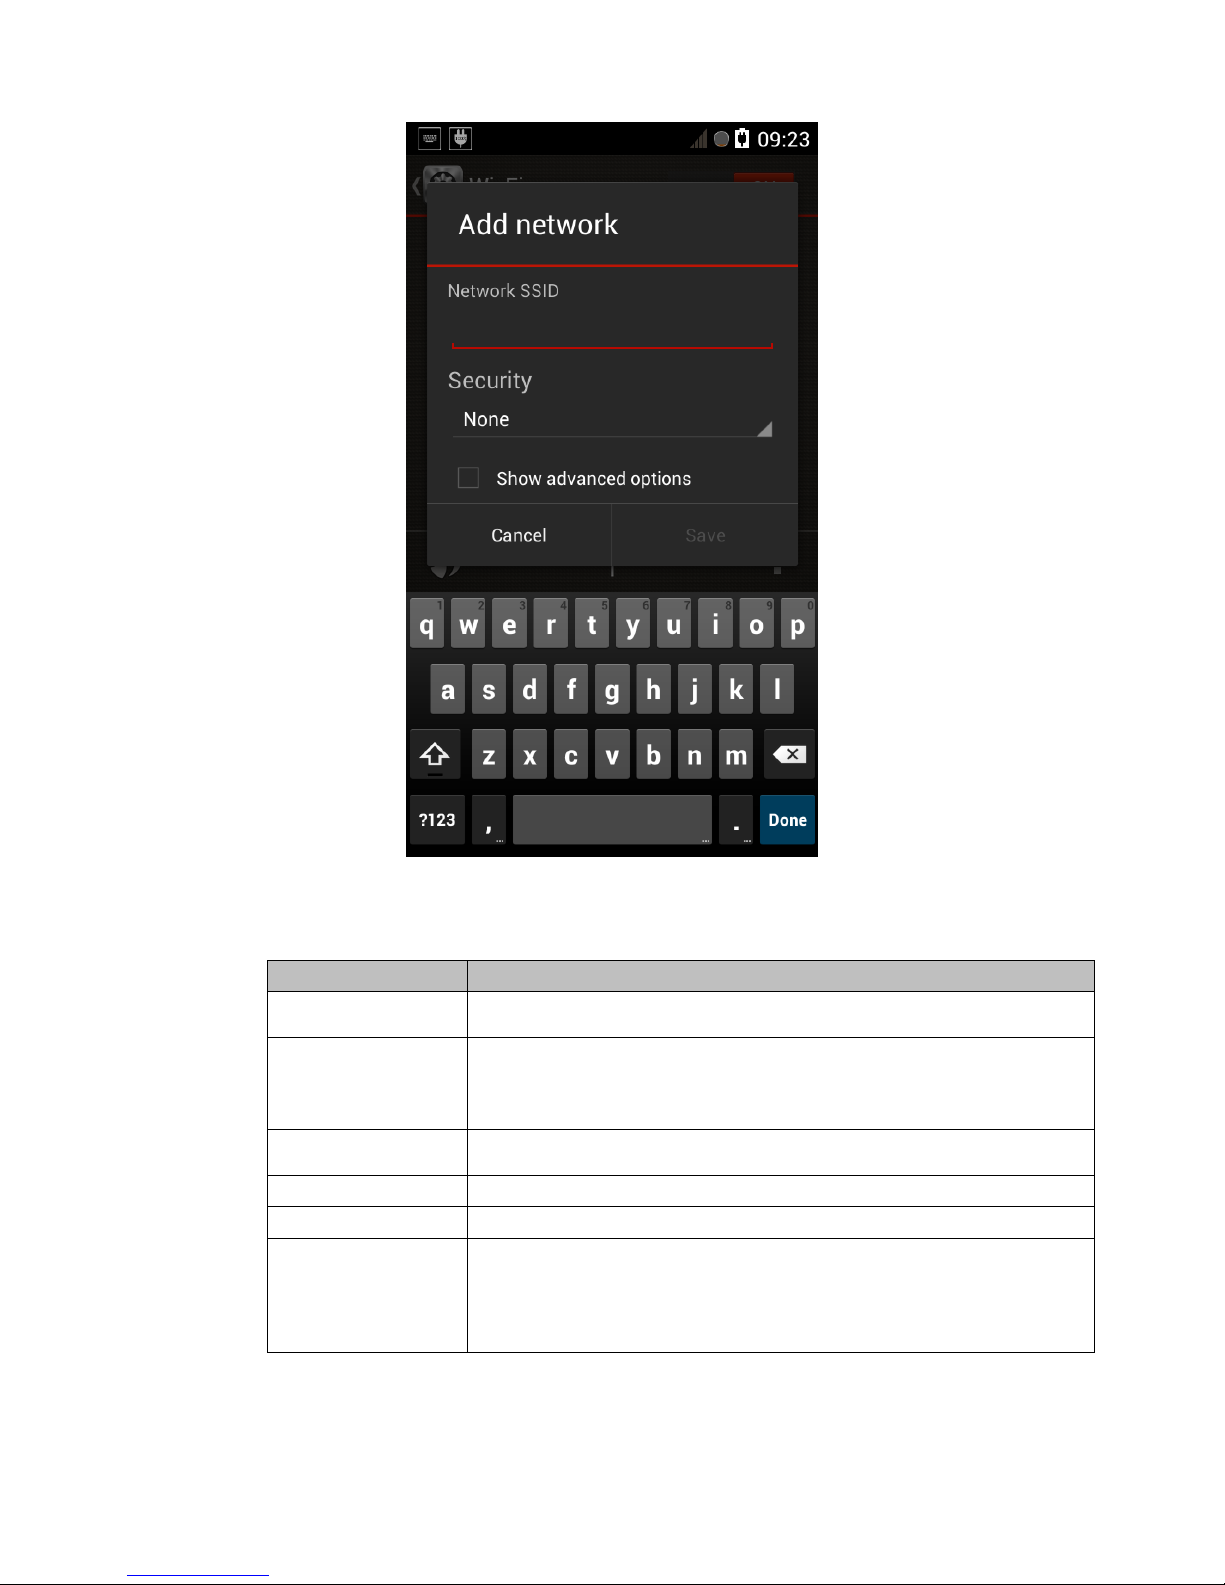
Figure 2-12
Please refer to the following sheet to set the detailed parameters.
Name
Function
SSID
The router SSID you want to connect to (It is the WIFI network
name).
Security
N/A: There is no need to input password when you login the WIFI
network.
WEP, WPA/WPA2 PSK, 802.1xEAP: You can set proper password
here.
Password
The password you need to input when you connect to the router
SSID (The password when you created the WIFI network).
Advanced
Check the box here; you can set proxy and IP.
Proxy
Check the Manual box, you can set proxy server parameters.
IP
“DHCP”: Auto search WIFI network IP.
“Static”: Set WIFI network IP address, gateway, network prefix
length, domain name 1 and domain 2.
IP address: It shall be in the same IP segment of the router.
The rest parameters shall be the same as the router.
Click Save to complete the add operation.
2.7.1.4 Advanced
Page 19
15
Click , you can view two options:scan/advanced.
Scan: Click it to search all WIFI networks.
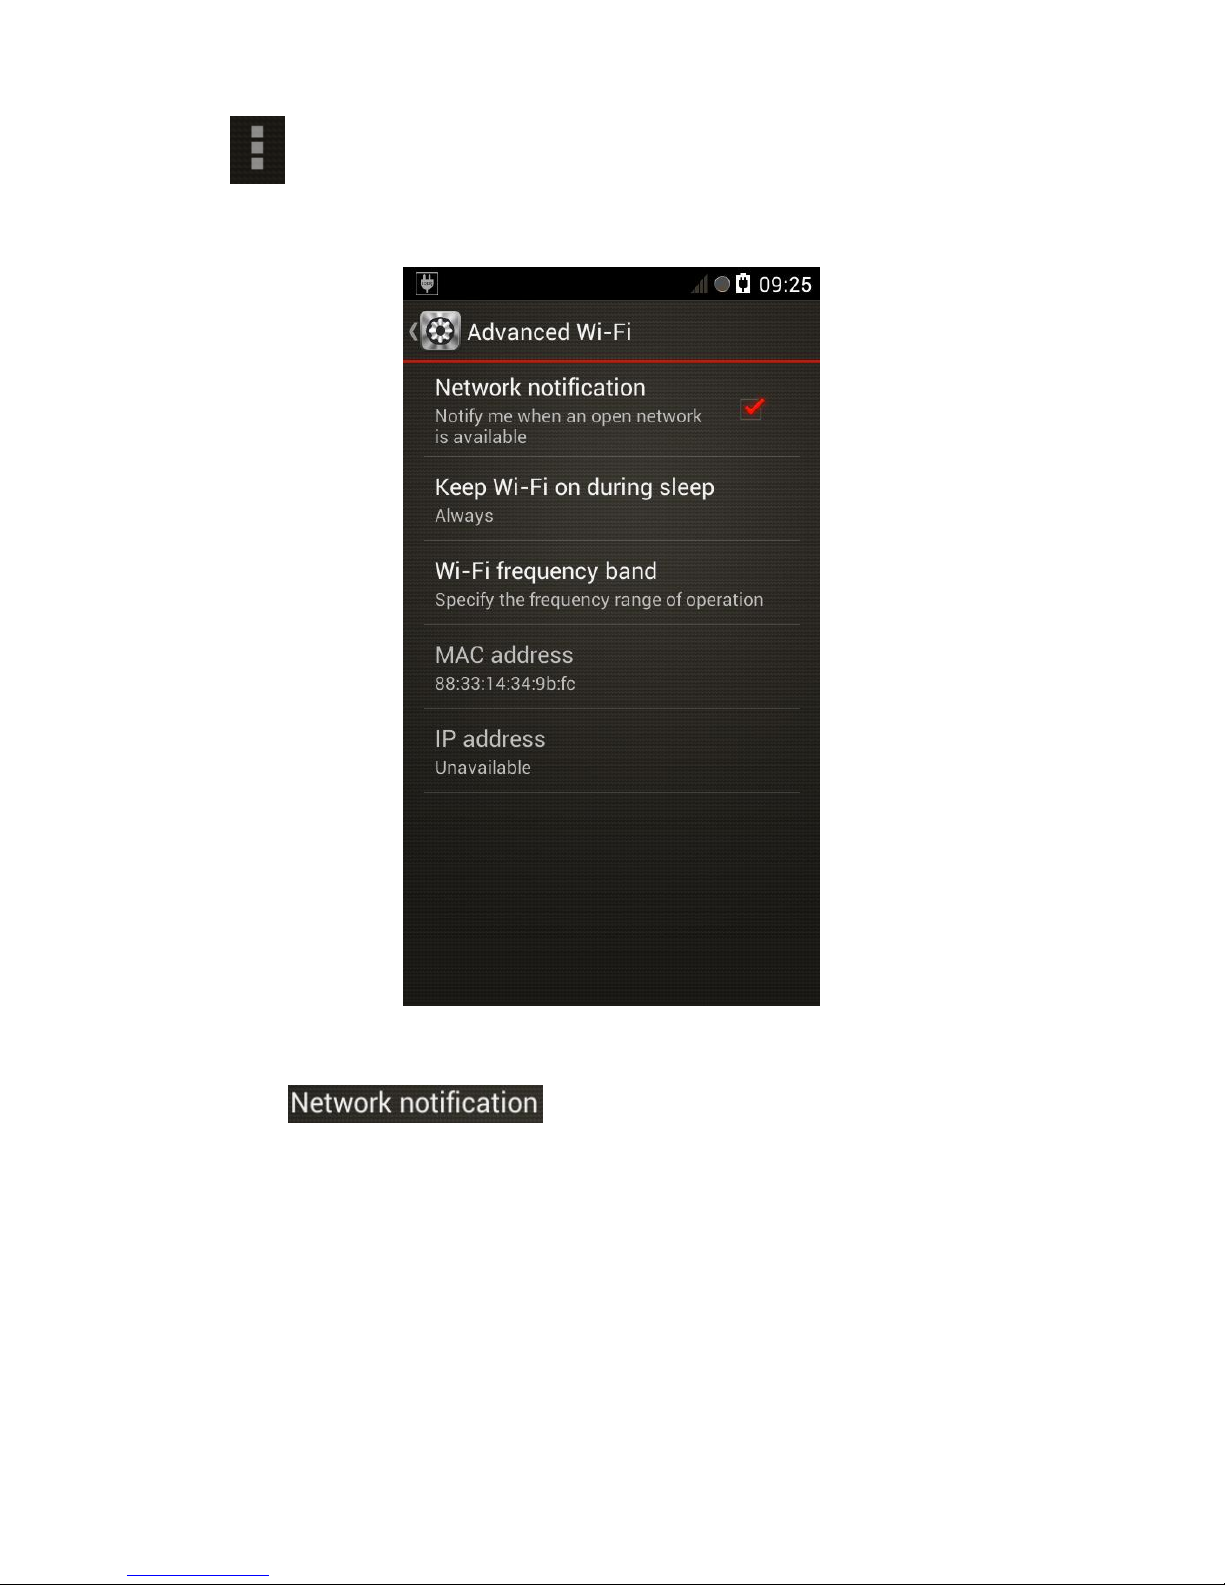
Advaced. Click it, the interface is shown as below. See Figure 2-13.
Figure 2-13
Check button, you can be informed when there is network
available.
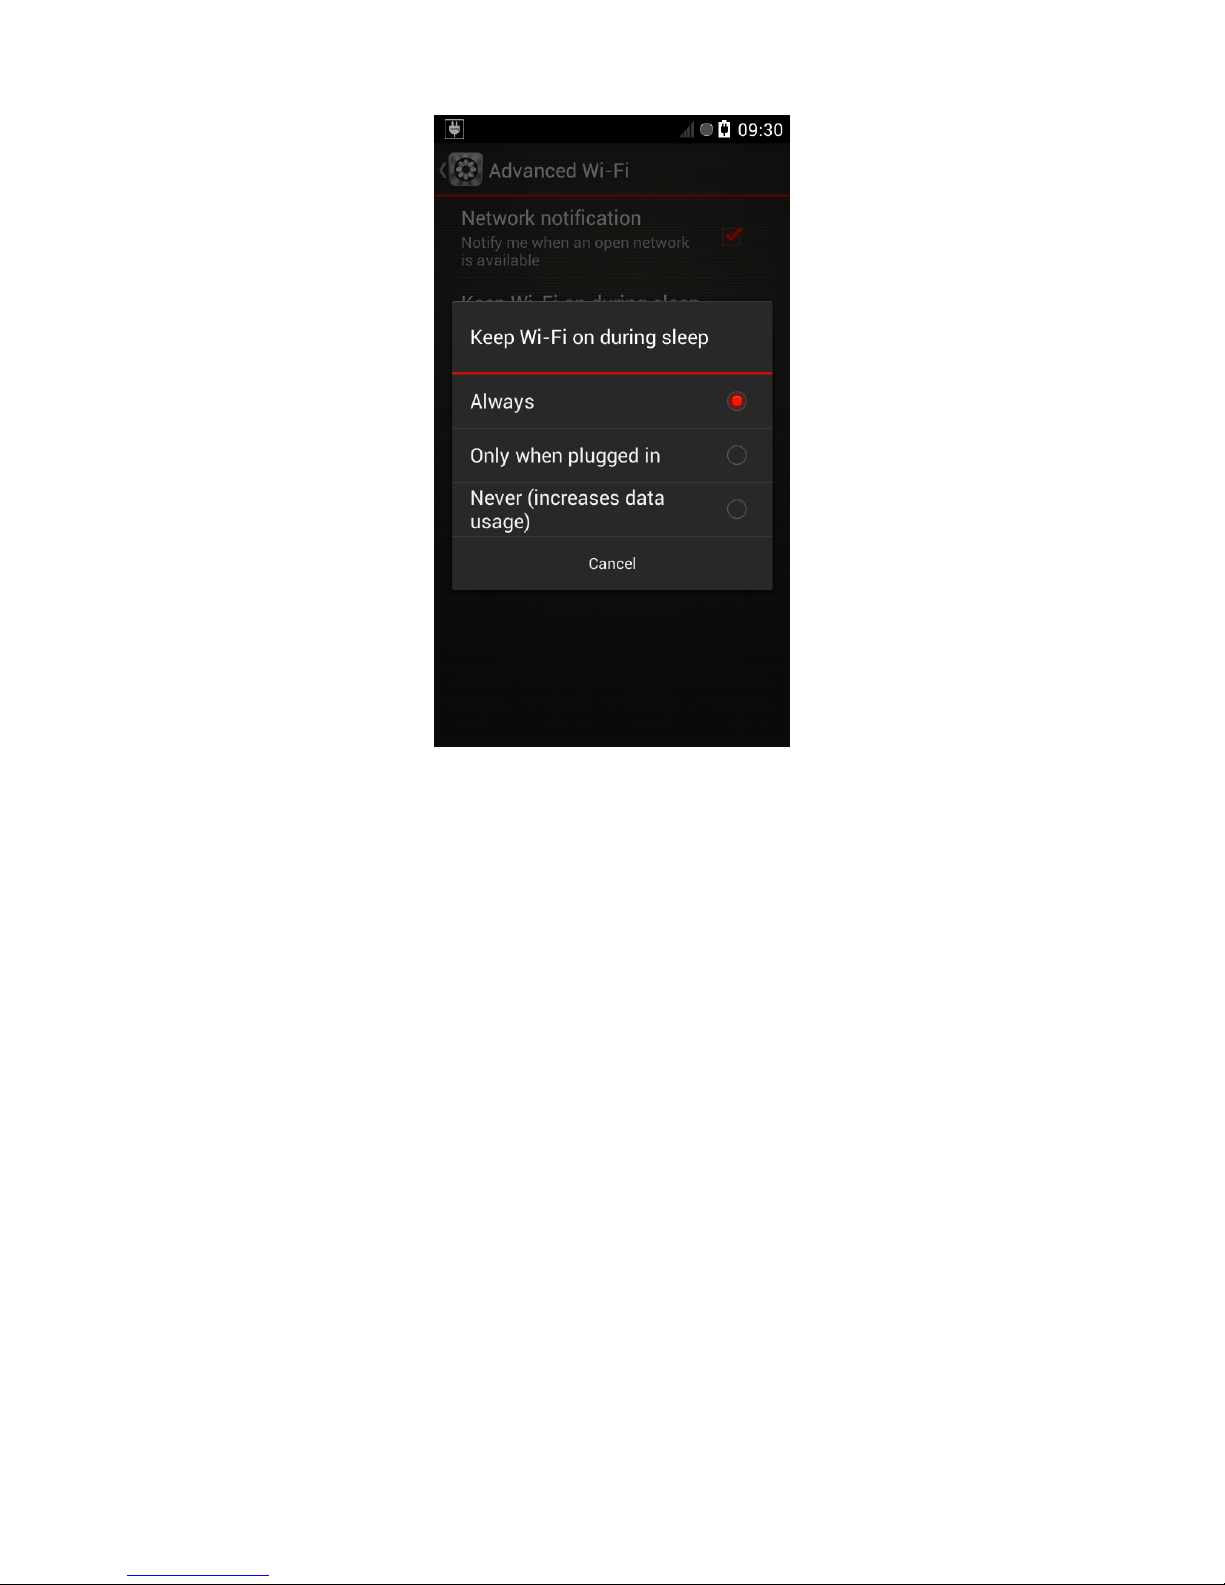
Check the box to select “keep WIFI on during sleep”, you can see the following interface.
See Figure 2-14. Now you can select:
Always: Always maintain WIFI connection even on hibernation status.
Only when plugged in: only maintain WIFI connection when recharging.
Never: Disconnect WIFI connection on hibernation status.
Page 20
16
Figure 2-14
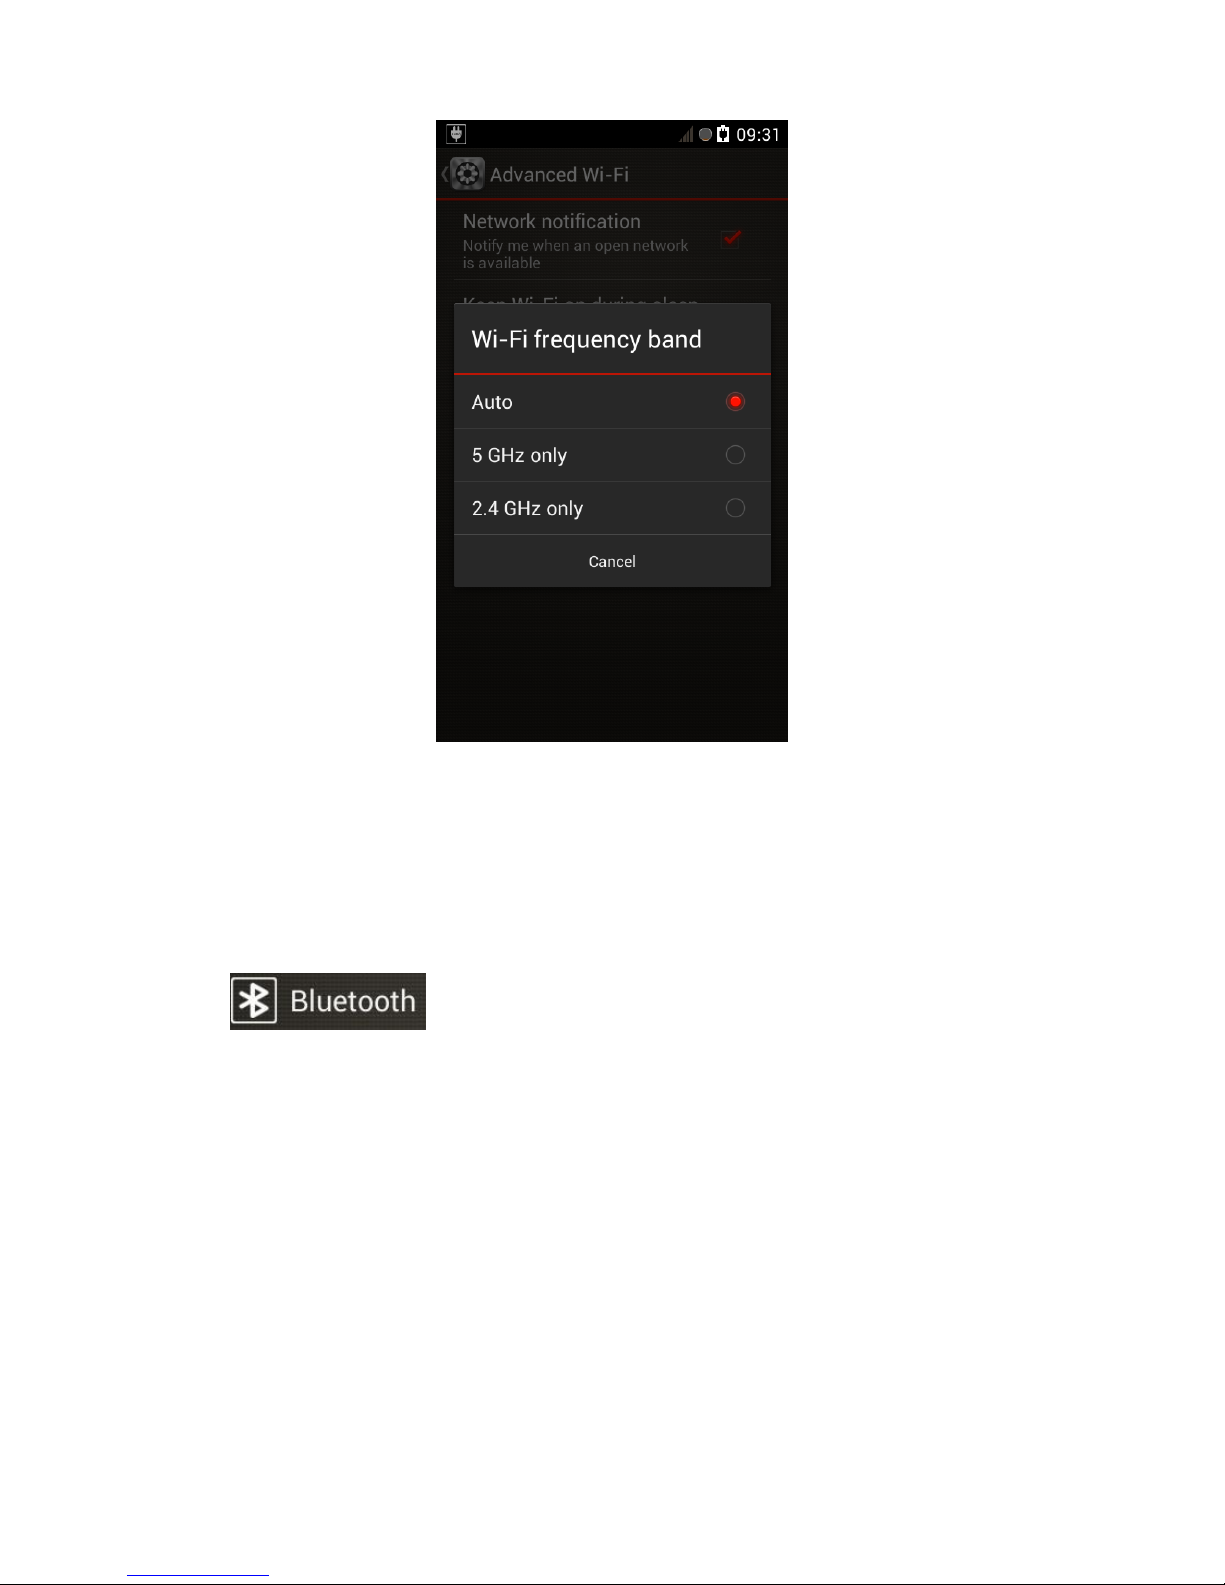
Click WIFI frequency, you can select specified frequency range. See Figure 2-15.
Auto: Auto search router frequency.
For 5Hz frequency: Only search 5Hx router.
For 2.4Hz frequency: Only search 2.4Hx router.
Note
Right now, device supports 2.4Hz only. It does not support 5Hz.
Page 21
17
Figure 2-15
You can go to the advanced interface to view the connected Ethernet card MAC address and
network IP address.
2.7.1.5 Bluetooth
You can use Bluetooth to receive the file.
Click , you can go to the following interface to enable Bluetooth function.
See Figure 2-16.
Page 22

18
Figure 2-16
Important
When it says”Not visible to other Bluetooh devices”, the other device can not search the
device.
When it says “Visible to other Bluetooh devices”, the other device can search the device.
When it says” Visible to other paried Bluetooh devices”, only the paried device to detect the
device.
Click , you can switch detect mode. You can
follow the prompt to select.
Click “search device”, you can search all devices available.
Click , you can see .
Rename device: Click it to rename the device.
Page 23

19
Detect time setup: It is to stop the detect after the specifed period if there is no detected
device.
2.7.1.6 Data
Click to enable data business. You can go to the following interface. See
Figure 2-17.
Figure 2-17
2.7.1.7 Data usage
Click data usage, you can see the flow usage information. See Figure 2-18.
Page 24

20
Figure 2-18
You can set flow threshold here. Drag the line on the screen to set the threshold value and then
warning line.
Warning line: Once the flow has reached the warning line, system can generate an alarm to
alert you.
Threshold line: Once the flow has reached the threshold line, system auto disconnect data
connection.
2.7.1.7.1 VPN
When you are using SIM card, you need to input the VPN (Virtual Private Network) user name,
password, server address and etc of the SIM card, so that you can connect to the network. See
Figure 2-19.
Page 25

21
Figure 2-19
2.7.1.7.2 Mobile network
Click mobile network, you can go to the following interface to set. See Figure 2-20.
Page 26

22
Figure 2-20
Check the enabled data flow; you can use the mobile network to upload/download data.
Check the mobile data roaming; you can connect to the mobile data network service when
you are roaming.
Click connection name (APN), you can set APN.
APN (Access Point Name) is the parameter you need to set on the cell phone. It is to define
which way you are using to access the network.
Click APN, the interface is shown as below. See Figure 2-21.
Please note the following figure for reference only. For different operators, the interface
may vary.
Page 27

23
Figure 2-21
Click it, you can go to the change APN setup interface to modify the setup.
Click the on the right corner and then click the Save button.
Please note, for SIM card from different operators, the APN setup may vary. The system adopts
the default setup after you inserted the SIM card.
Follow the steps listed below to add new APN.
a) Click the on the right corner, and then select to add APN.
Note
Click the default setup button, you can restore default setup.
b) Now you can set corresponding APN parameters.
c) Click the on the right corner, and then click the Save button.
2.7.1.8 Location
You can use the GPS to locate position after you enabled the positioning function. See Figure
2-22.
Page 28

24
Figure 2-22
2.7.1.9 Ethernet
This function shall work with the pedestal (not provided), you can use the network port on the
pedestal to connect to the network.
2.7.2 Devices
From Settings->Devices, you can go to the following interface. Here you can set camera,
platform, account, camera storage parameters. See Figure 2-23.
Page 29

25
Figure 2-23
2.7.2.1 Camera
From Settings->Device->Camera, you can go to the camera interface. See Figure 2-24.
Page 30

26
Figure 2-24
2.7.2.1.1 Snapshot
It is to set snapshot quality, WDR, size. See Figure 2-25.
Page 31

27
Figure 2-25
Please refer to the following sheet for detailed information.
Name
Functions
Image quality
It includes normal, fine and super fine.
WDR
WDR function can enhance the brightness of the dark
section and lower the brightness of the high light section
so that the both sections can be clear at the same time.
Off: It is to disable the WDR function.
Low/middle/high: It is for you to select according to
the actual environment.
Image size
The options includes:
8M(3264×2448)
5M(2592×1944)
3M(2048×1536)
1.3M(1280×960)
VGA(640×480)
2.7.2.1.2 Record
It is to set video quality, frame rate, bit stream value, and encode type. See Figure 2-26.
Page 32

28
Figure 2-26
Please refer to the following sheet for detailed information.
Name
Functions
Video quality
The higher the resolution is, the good the video quality is.
But at the same time, the storage space is large.
1080P(1920×1080)
720P(1280×720)
D1(720×576)
VGA(640×480)
CIF(352×288)
QVGA(320×240)
Frame rate
The higher the frame rate is, the fluent the video is. The
different video quality has different frame rate.
Bit stream value
For different frame rates and resolutions, the bit rate
value may vary.
Bit rate type
CBR: The average bit frame rate is the same.
VBR: The bit stream value may vary according to the
image quality.
2.7.2.1.3 Network transmit encode
It is to set the network transmission video quality, bit stream type, frame rate, and encode type.
See Figure 2-27.
Page 33

29
Figure 2-27
Please refer to chapter 2.7.2.1.3 for detailed information.
2.7.2.1.4 OSD
It is to set enable/disable OSD function or not. After you enabled this function, you can overlay
corresponding time, user name, GPS information on the image or video. See Figure 2-28.
Page 34

30
Figure 2-28
2.7.2.2 Platform
MPT can connect to the DSS platform. You can control and manage MPT device remotely via
DSS.
From Settings->Device->Platform, you can go to the platform interface. See Figure 2-29.
Page 35

31
Figure 2-29
Please refer to the following sheet for detailed information.
Name
Function
Connection state
Enable or disable the device to connect to the platform.
Device ID
It is the name of the device on the platform. Please make sure
the name here is the same on that on the platform.
IP address
Input platform server IP address.
Remote port
Platform server registration listen port. The default port value
is 9500.
Local port
Device listen port. The default port value is 37777.
After the device connected to the platform, you can view its status on the interface is shown
as , otherwise it is shown as .
2.7.2.3 User manage
From Settings->Device->User manage, or click User manage on the main interface, you can go
to the following interface. See Figure 2-30(admin account) and Figure 2-31 (ordinary account).
Page 36

32
Figure 2-30
Figure 2-31
2.7.2.3.1 Account
Click account button, you can go to the user list interface. See Figure 2-32.
Page 37

33
Figure 2-32
Important
Only the admin user has the user manage rights and can add user and set new user
authorities.
Click the admin user; you can go to the user information interface. Here you can search user
information, modify rights, modify password, add/delete fingerprint and etc.
Follow the steps listed below to add new user.
Click to add new user. See Figure 2-33.
Page 38

34
Figure 2-33
Input user name, password, confirm password, memo and then set rights.
Tips
The authorities are not displayes in one screen. Use you finger to press down the screen to view
more options.
Click OK button to complete the setup.
After you successfully added a new user, you can go to the user list and then click it, now you
can go to the followin interface to set its memo and authorties. See Figure 2-34.
Page 39

35
Figure 2-34
2.7.2.3.2 Personal information
For admin account, it can search personal information, change admin password, add/delete
fingerprint. See Figure 2-35.
For general user, you can search current account information.
Page 40

36
Figure 2-35
Click password, you can go to the password setup interface to change password and manage
fingerprints.
2.7.2.3.3 Fingerprint module
Note
This function is for admin only.
It is to manage fingerprint module storage space, format fingerprint of corresponding user. See
Figure 2-36.
Page 41

37
Figure 2-36
2.7.2.3.4 Password
You can change current login user password. See Figure 2-37.
Page 42

38
Figure 2-37
2.7.2.3.5 Fingerprint manager
Each user can max scan two fingerprints. You can scan your finger to login after you saved it.
Click finger manage, you can go to the following interface. See Figure 2-38.
Page 43

39
Figure 2-38
Follow the prompts to scan the fingerprint. See Figure 2-39.
Figure 2-39
Page 44

40
Put your corresponding fingerprint on the sensor (Refer to Figure 1-1 for detailed position), move
from the top to the down. Follow the prompts on the process bar and then stop movement. See
Figure 2-40.
Figure 2-40
Click Ok button, now the fingerprint scan is complete.
On the fingerprint list, the scanned fingerprint is shown as red.
Click one fingerprint on the list, you can delete it.
Important
The device can not save the same fingerprint twice. That is to say, once you have saved you
fingerprint of the thumbnail, you can not save it again even though you login via other account.
2.7.2.3.6 Logout
It is to logout current user from the device.
2.7.3 System
From Settings->System, you can go to the system interface. See Figure 2-41.
Click an item, you can set and search corresponding parameters.
Page 45

41
Figure 2-41
2.7.3.1 Display
Click , you can go to the following interface. See Figure 2-42.
It is for you to adjust screen brightness, sleep time and etc.
Page 46

42
Figure 2-42
2.7.3.2 Battery
Click , you can go to the following interface. See Figure 2-43.
It is for you to view current battery voltage and usage time.
Page 47

43
Figure 2-43
2.7.3.3 Language and Input Method
It is for you to set system language and input method.
Click , you can go to the following interface. Here you can set
language type and keyboard. See Figure 2-44.
Page 48

44
Figure 2-44
2.7.3.4 Default
It is to restore factory default setup.
Click , youc can go to the following interface. See Figure 2-45.
Page 49

45
Figure 2-45
Click reset device button, system begins restoring factory default setup.
2.7.3.5 Factory test
The factory test interface is shown as below. See Figure 2-46.
Page 50

46
Figure 2-46
Click Start Test button, you can test each item on the list one by one.
Click the corresponding item; you can test the selected one.
2.7.3.6 Date and Time
It is for you to set device date and time.
Click , you can go to the following interface. See Figure 2-47
Page 51

47
Figure 2-47
Check the box to select auto set date and time, device can sync time with the network.
Important
Please make sure the network connection is OK (such as 3G, 4G, WIFI and etc) if you want to
use network sync function.
2.7.3.7 About Device
In this interface, you can view device status, type, SN and version.
Click , you can go to the following interface. See Figure 2-48.
Page 52

48
Figure 2-48
Please refer to the following sheet for detailed information.
Name
Function
Battery status
Current battery status such as power consumption,
recharging status and etc.
Battery voltage
Current battery voltage.
Network
Current using network type such as CDMA.
Signal intensity
Network signal intensity
Mobile Network type
Data network type such as CDMA-EvDo rev.A:6.
Service status
It is in the service status or not.
Roaming
Device is roaming or not.
Mobile network status
It is to display mobile network status, connected or
disconnected.
My phone number
The mobile phone number after you inserted the SIM
card.
MEID
It is to display mobile device international ID.
IMEI
It is to display the international ID of the mobile phone.
IMEI SV
It is to display IMEI version.
IP address
The connected router IP.
Wi-Fi MAC address
The connected WIFI MAC address.
Bluetooth address
The connected Bluetooth address.
SN
Device serial number.
Page 53

49
Running time
The system running time after it booted up.
2.8 Log Manager
It is to search log information.
Click , you can go to the following interface. See Figure 2-49.
Figure 2-49
It is to display log type information.
,Display all logs.
,Display system logs.
,Display user logs.
,Display alarm logs.
2.9 Plate Recognition
Note
Plate recognition function is null, when device is recording, or the platform is searching
record.
Click Plate recognition on the main interface, you can go to the snapshot interface to snapshot
plate.
Page 54

50
2.10 Alarm
On the right of the side pane, there is an alarm button. After you connected the device to the
platform, it can upload the alarm information to the platform.
System can generate an alarm and save the log once it vibrates or fell down.
You can view the alarm on the billboard once there is an icon . Move down the billboard and
then click the alarm message; you can go to the following interface. See Figure 2-50.
Figure 2-50
Click to cancel the alarm.
2.11 Calculator
On the main interface, move the screen to go to the second page, click , you can go
to the calculator interface.
Click , you can clear history record or advanced pane.
2.12 Calendar
Page 55

51
On the main interface, move the screen to go to the second page, click , you can go to
the calendarr interface.
Page 56

52
3 Upgrade
Before you use the upgrade function, from the main interface->Settings->Device>Platform settings, please enable the platform function, and the local port shall be 37777.
You can use the upgrade tools included in the resources CD to update the device.
Open the upgrade tool, you can go to the main interface, click . System pops up the login
interface. See Figure 3-1.
Figure 3-1
The default user name is admin and the password is 123456.
Select a device you want to connect to on the left pane, and then click the Login button. System
pops up the device login in dialoug box. See Figure 3-2.
Figure 3-2
Input upgrade device user name and password, and then click login button.
You can view current version after you successfully logged in. See Figure 3-3.
Page 57

53
Figure 3-3
Click logout on the left pane, you can disconnect the software and then upgrade device.
Clic button to select the software and then click
button.
Now you can view the following interface during the upgrade process. See Figure 3-4.
Figure 3-4
You can view the following icon on the MPT. See Figure 3-5.
Figure 3-5
Click it; you can see an interface shown as in Figure 3-6.
Page 58

54
Figure 3-6
Now you can see the following interface, please click OK button. See Figure 3-7.
Page 59

55
Figure 3-7
System needs to reboot to complete the upgrade process.
Page 60

56
4 Platform Connection
You can control and manage MPT device via DSS.
4.1 MPT
Please follow the steps listed below.
1) Please make sure the network connection is OK and MPT device is online so that it can be
added to the platform.
2) On the MTP device, from Settings->Device->Platform, you can go to the following interface
to input parameters. See Figure 4-1.
Figure 4-1
Please refer to the following sheet for detailed information.
Item
Function
Connection state
Enable/disable device connection to the platform server.
Device ID
Input customized device ID on the platform server. Please
make sure It is the same as the platform.
IP Address
Input platform server IP address.
Remote Port
Input platform server listening port. The default setup is 9500.
Local port
Input device listening port. The default setup is 37777.
3) Enable platform connection function.
Page 61

57
4.2 DSS
Please follow the steps listed below to login the DSS.
1) Login DSS manager end and then from General->Device->Device->Encoder, and then click
Add button, you can see the following interface. See Figure 4-2.
Figure 4-2
Please refer to the following sheet for detailed information.
Item
Function
Add Type
Please check the box to enable auto register function.
Proxy port
The value ranges from 1 to 65535.
Important
The proxy port of each device is unique. It shall bot be the
same as the port of other device.
Registration ID
It is the same as the device ID in Figure 4-1.
User name/password
It is the same as the mobile portable terminal device. The user
name is admin and the password is 123456.
Page 62

58
Device name
Input customized device name.
Device type
Please select mobile portable terminal from the dropdown list.
Video channel
The value is 1.
Alarm input channel
The value is 1.
Click OK button to complete the add process.
Page 63

59
5 FAQ
Login
Q: For the new user, I want to know the default account.
A: The default user name is admin and the password is 123456.
UI
Q: How to delete the App from the third party.
A: Press the App icon on the screen for a long time and then you can see a delete icon. Click it
to delete the App.
Q: The touch screen interface is distorted when the device is recharging.
A: The problem results from the poor-quality recharger. Please use our default recharger.
File manage
Q: The file manage interface is loading file all the time.
A: Click Hone and then open the file manage again.
Q: The image is blurry when I open the file manage.
A: Reboot the device, and then open the file again.
Q: The screen becomes black when I use the file manage to play the video file.
A: Reboot the device, and then open the file again.
Record audio
Q: MIC record pointer does not move.
A: Reboot the device and then record audio again.
Q: Bluetooth record pointer does not move.
A: Disable and then enable the Bluetooth again.
Q: There is no audio when I use Bluetooth bidirectional talk or I play the audio.
A: Disable and then enable the Bluetooth again.
Setup
Q: How to set an APN?
A: From setting->Network->Data->Mobile network->Connection name (APN), click the three-
point icon at the right bottom corner. Click new button (please contact your SIM card operator for
detailed APN information.)
Q: How to set a VPN?
A: From setting->Network->Data->VPN, click add VPN configuration file (please contact your
VPN operator for detailed information.)
Q: VPDN network is offline?
Page 64

60
A: From setting->data->Mobile network->Connection name (APN), change APN name password
(Please contact your operator for the name and password). For the rest items you can use
default setup. Click Save button.
Q: GPS function is null.
A: Take the device to the outside environment, open GPS for about one minute and a half. You
can see the GPS function is valid now.
Q: My device can not recognize my inserted external TF card.
A: Insert the TF card on the computer and then format to FAT32. Now insert it on the device.
Q: Device dial function failed.
A: There are the two possibilities:
There is no SIM card. Please check the SIM card position.
There is no APN. Please set the proper APN.
Q: The device screen can not work.
A: Unplug the power cable; press the power button of the device.
Q: I can not cancel the Bluetooth pair.
A: Disable the Bluetooth function and then enable again.
Platform
Q: My device has not shown as online after I set the platform information.
A: Usually, there is about one minute delay after you set the platform information. If it is still
offline after you wait for a long time, please disable the platform connection and then enable
again (Setting->Platform->Platform connection).
Q: How can I search the device record on the platform?
A: Please follow the steps listed below.
Select the search record on the device (the default setup is search the record on the
platform.)
Select the device channel you want to search.
Select date and then click search button.
If system pops up the dialogue box “Please set at least one channel”, please select a device
channel you want to search.
If system pops up the dialogue box “There are no results to display”. Please make sure you
are searching the record on the device instead of the platform center. There is record file on
the specified period.
Q: The video is not fluent when I use the real-time monitor function.
A: Please go to the Settings->Camera->Net encode->Built-in camera, you can set the video
quality as VGA (640*480), bit stream value is 1Mbps or 512Kbps or lower.
Q: Device is not on the platform I registered.
Page 65

61
A: Check the 3G/4G/WIFI network connection is OK or not. Check the auto register device ID is
the same as the platform setup or not. Check platform address, port setup and etc. Check
platform user name and password is right or not (device default user name is admin and
password is 123456.)
Q: The platform cannot open the bidirectional talk function.
A: Check bidirectional talk setup is right or not. (The sampling rate is 8K, sampling bit is 16bits,
and audio format is AMR).
Q: I can not upload the device alarm to the platform.
A: Please go to the platform to set alarm scheme.
Q: During the bidirectional talk process; there is too much noise on the device-end.
A: Update platform ocx controls or update client to the latest version.
Pedestal recharge
Q: The network cable connection is OK but I cannot recharge.
A: There are following two possibilities.
Router or switch is not the PSE device, it does not support PoE function.
The device temperature is too high. Do not let the device at full load..
Q: The red power indicator light of the recharger pedestal is off.
A: Please check power cable connection. Please make sure the minuusb or the cable connection
is right.
Q: The Ethernet port of the recharge pedestal can not backup the data?
A: There are following two possibilities.
Check network cable connection.
Device and pedestal connection is not tight. Unplug and then insert again. Make sure the
pedestal indicator light is green.
Others
Q: I can not find the battery on the accessories bag.
A: The battery is beneath the clip and the cable.
Q: I can not recharge the device,
A: There are following two possibilities.
Check the recharger and device connection.
Device temperature is too high. Do not let the device at full load.
Q: I can not boot up the device.
A: There are following two possibilities.
There is no battery.
There is no power.
Q: Plate recognition is wrong.
Page 66

62
A: Make sure the light condition is good and then put the plate on the rectangle of the interface to
snap.
Q: Device can not indicate the south and north direction.
A: Hold you device and then move hand to draw “8”.
Q: Camera video is not clear.
A: Use clean cloth to clear the lens.
User manage
Q: How can I scan the fingerprint?
A: From user manage->personal information->password-Fingerprint, select the finger type and
then follow the prompt to move the finger from top to the down several times to scan. When the
process bar is full and become red, click the OK to exit.
Camera
Q: After I install the camera from the third-party, why the setup is not valid (Settings->Device-
>Camera)?
A: The setup here is only for the device built-in device.
Q: After I restored the default setup, I changed the camera setup. But I found the setup was null
after I went to the camera interface. Why?
A: After you restored the default setup, you need to go to the camera interface first and then exit.
Now you can change the camera setup and then save the new settings.
Q: The camera disturbed by the environment or there is illegal operation.
A: Reboot the device.
Page 67

63
Appendix Toxic or Hazardous Materials or Elements
Component
Name
Toxic or Hazardous Materials or Elements
Pb
Hg
Cd
Cr VI
PBB
PBDE
Structural
Member
○ ○ ○ ○ ○
○
Circuit Board
○ ○ ○ ○ ○
○
Internal Wire
and Cable
○ ○ ○ ○ ○
○
Accessories
○ ○ ○ ○ ○
○
Note
O: Indicates that the concentration of the hazardous substance in all homogeneous materials in
the parts is below the relevant threshold of the SJ/T11363-2006 standard.
X: Indicates that the concentration of the hazardous substance of at least one of all
homogeneous materials in the parts is above the relevant threshold of the SJ/T11363-2006
standard. During the environmental-friendly use period (EFUP) period, the toxic or hazardous
substance or elements contained in products will not leak or mutate so that the use of these
(substances or elements) will not result in any severe environmental pollution, any bodily injury or
damage to any assets. The consumer is not authorized to process such kind of substances or
elements, please return to the corresponding local authorities to process according to your local
government statutes.
Note
The user’s manual for reference only. Slight difference may be found in user interface.
All the designs and software here are subject to change without prior written notice.
All trademarks and registered trademarks mentioned are the properties of their
respective owners.
If there is any uncertainty or controversy, please refer to the final explanation of us.
Please visit our website for more information.
 Loading...