

Page 1

Manual for the DHL32 (F600 series) LCD monitor
DHL32 (F600 series)
Manual for the LCD monitor
2016 V1.0
Zhejiang Dahua
Technology Co., Ltd.
Page 2
Manual for the DHL32 (F600 series) LCD monitor
Accessory name
Qty
LCD monitor
1 unit
AC power cord
1 piece
VGA cable
Audio cable
Manual plus warranty card
Base
screws
Sequence
number
Name
Sequence
numbe
Name
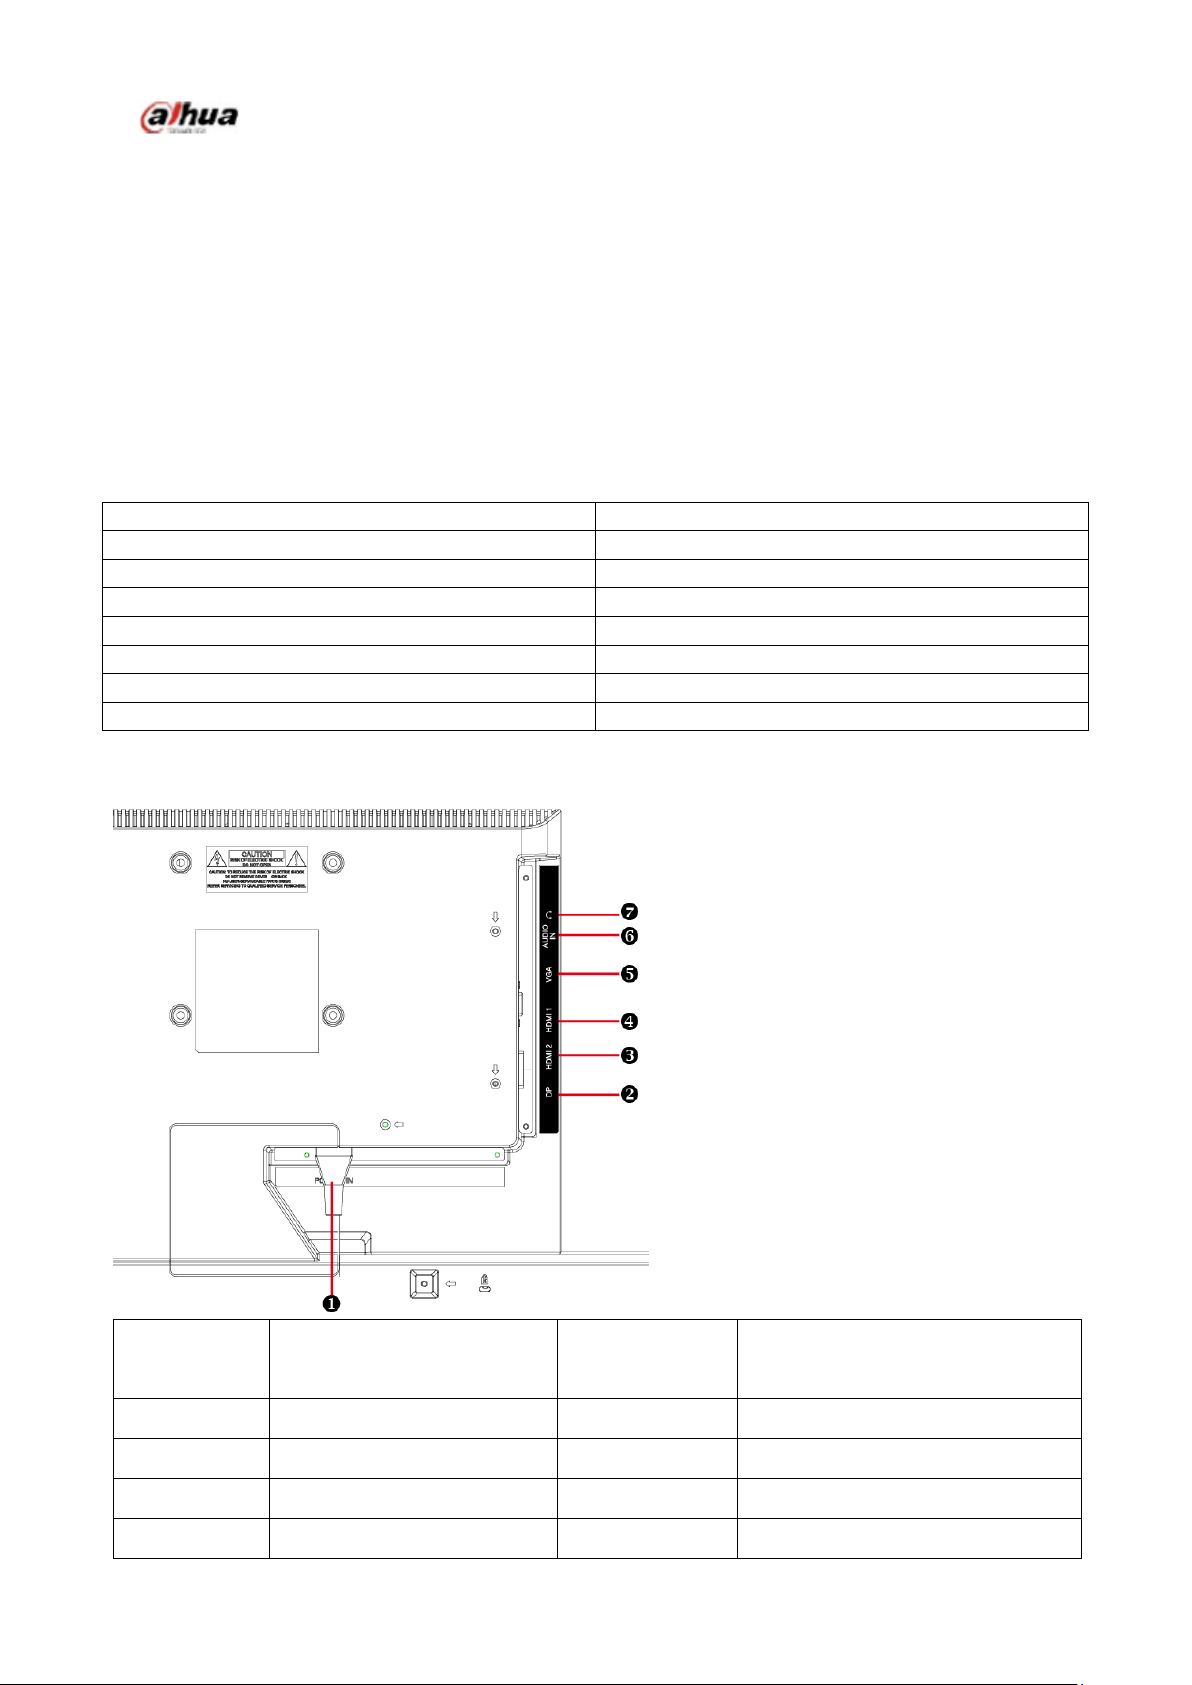
1
AC input outlet
2
DP input
3
HDMI 2 input
4
HDMI1 input
5
VGA input
6
Audio input
7
Earphone output
1. Service environment requirements
The equipment is designed for indoor use, therefore, it cannot be used in wet or dusty environment.
It is not allowed to block the ventilation hole inside the equipment or hamper air circulation around it.
If the ventilation hole of the equipment is blocked, the temperature inside it will rise, easily resulting
in a fire.
2. Accessory inspection
Refer to the following table to check whether accessories are complete (note: the list is configured
according to the standard configurations of the system, the lists for special users are subject to the
packing list).
1 piece
1 piece
1 piece
1 piece
4 piece
3. Port schematic diagram
Page 3

Manual for the DHL32 (F600 series) LCD monitor
1
Power cord socket
2
DP signal line socket
3
HDMI2 signal line socket
4
HDMI1 signal line socket
3
D-SUB signal line socket
4
Audio cable socket
5
Earphone cable socket
4. Installation instructions
4.1 Installation means
1.Lay the monitor flat on a table with the LED screen face down. To prevent the TV from being
scratched, put a piece of soft cloth on the table on which the screen will be set. Place the base
in position as shown.Insert and tighten 2 screws(provided)into pedestal holes as shown.
2.Stand the TV up.
4.2 Control and connection
Page 4

Manual for the DHL32 (F600 series) LCD monitor
1
Picture Mode
2
Brightness/contrast,
3
Volume +
4
Volume -
5
OSD Menu On/Off
6
Input Source/ Confirm Select
7
Power switch
4.3 Signal line connection
connect VGA cable
Connect the VGA cable from VGA output of computer to the VGA input of the monitor.
or connect HDMI cable
Connect the HDMI cable from HDMI output of computer to the HDMI input of the
monitor.
or connect DisplayPort cable
Connect the DisplayPort cable from DisplayPort output of computer to the DisplayPort
input of the monitor.
3. Connect Audio cable
Connect the Audio cable from Audio output of computer to the Audio input of the
monitor.
Connect Earphone (not supplied)
Connect the earphone to the earphone output terminal of the monitor. (Earphone sold
separately).
4.4 Power-ON the computer, then Power-ON the monitor. Power cord connection
Front panel operation instructions
Power switch: Press the power switch key to turn on/off the monitor power.
Power indicator: Blue-ON, Orange-Standby state
Menu/selection: Activate the OSD menu or identify adjusted functions.
5. Parameter settings
5.1 Key description
Page 5

Manual for the DHL32 (F600 series) LCD monitor
Main menu
Sub-menu
Description
Automatic
adjustment
Image auto
adjustment
Adjust the horizontal and vertical positions, phase (trimming)
and clock (horizontal width) of the screen.
Contrast/Brightness
Contrast
Adjust the display contrast
Brightness
Adjust the display brightness
DCR
Enable/disable DCR
ECO
Enable/disable ECO
OD
Enable/disable OD
Input source
VGA
Select the input VGA mode
HDMI1
Select the input HDMI1 mode
HDMI2
Select the input HDMI2 mode
Displayport
Select the input Displayport mode
AUTO
Select the input Auto mode
Audio adjustment
Volume
Adjust the loudspeaker output volume
Mute
Enable/disable Mute
Audio Input
Select Displayport/Line in/HDMI audio input
Colour Setting
Cool
Set to cold color temperature
Normal
Set to conventional color temperature
Warm
Set to warm color temperature
User colour
Adjust to red (R), Green (G) and Blue (B) respectively.
Picture mode
Select Standard, game, Video, Landscape, Text modes
Information
Information
Display information related to the current input signal (from
the graphics card)
Manual image
adjustment
H. /V.position
Adjust video horizontal and vertical positions
Horizontal size
Adjust the screen image width
Phase
Trim data and clock delay
Sharpness
Adjust non-main signal definitions
Video mode
adjustment
Select Full-Screen / Aspect Ratio/Dot by dot modes
Menu Setting
Language select
Allow the user to select from languages provided
OSD position
Adjust the horizontal and vertical OSD positions
OSD time out
After the preset time, turn off the screen menu display
automatically
logo
Display logo on/off
OSD background
Allow the user to turn on or off the menu background color
Memory recall
Restore the
setting
Restore the factory settings of video and audio widgets Press
Key to select restoration of the menu item set
5.2 Menu description
Page 6

Manual for the DHL32 (F600 series) LCD monitor
Symptoms
Troubleshooting
1) The power indicator is not lit
1. Turn on the power supply or not
2. Plug the power cord or not.
2) Cannot realize plug and play
1. Whether the PC matches the plug-and-play.
2. Whether the display adapter matches the
plug-and-play.
3. Whether the 15-pin D-type signal line contact is
bent.
3) The image is dim
Adjust the brightness and contrast
4) Image jitter or ripple
There may be electric equipment around it causing
electronic interference.
5) The power indicator is lit, however, the monitor
does not display any image
1. Inspect whether the PC power is turned on.
2. Inspect whether the PC video card has been
inserted properly
3. Inspect whether the monitor signal line has been
connected to the PC properly.
4. Inspect the monitor signal line contact and
identify that pins are not bent.
5. Identify by pressing the Caps Lock key indicator
on the PC keyboard
6) Lack of color (Red, green, blue)
Inspect the monitor signal line and identify that
pins are not bent.
7) The screen is not in the middle or its size is not
proper
Adjust the clock (CLOCK) and phase (PHASE) or
press and hold the hot key
8) The screen displays "The signal line is not
connected"
1. Inspect whether the signal line is connected
correctly; if the contact gets loosened, please
fasten the screws to the contact.
2. Inspect whether the pin of the signal line contact
is damaged.
9) The screen displays "Input is not supported"
Your PC is set to an improper display mode,
please reset your PC to the display mode listed in
the table below.
6. Common troubleshooting
If problems are not included in the following symptoms described, please contact the manufacturer
for treatment.
7. Product marking and explicit instructions
7.1 Product pollution control marking
Products manufactured by our company have adopted the following electronic and information
product pollution control markings:
7.2 Explicit instructions
Our company began to implement the requirements of the European Union's Restriction on
Hazardous Substances (RoHS) Directive in electronic and electric devices and all products in the future
will conform to the indicator requirements of relevant regulations.
 Loading...