

Page 1

DHL22 LCD Monitor Us er’s Manual
-1-
DHL22 LCD Monitor User’ Manual
V2.01
Page 2

DHL22 LCD Monitor Us er’s Manual
-2-
Table of Contents
Chapter 1 Safety ....................................................................................................................3
1.1 Product Safety Warning..............................................................................................3
1.2 Environment .............................................................................................................3
1.3 Users .......................................................................................................................3
Chapter 2 Accessories Inspection .............................................................................................4
Chapter 3 Product Appearance ................................................................................................5
3.1 Port .........................................................................................................................5
3.2 Remote Control Diagram ............................................................................................6
Chapter 4 Parameter Setup .....................................................................................................7
4.1 Video Mode .............................................................................................................7
4.1.1 Picture Setup ..................................................................................................7
4.1.2 Sound Setup....................................................................................................8
4.1.3 System Setup ..................................................................................................9
4.1.4 Advance Setup .............................................................................................. 11
4.1.5 PIP Setup ...................................................................................................... 12
4.1.6 Source Setup ................................................................................................. 13
4.2 VGA Mode .............................................................................................................. 13
4.2.1 Picture Setup ................................................................................................ 13
4.2.2 Sound Setup.................................................................................................. 15
4.2.3 System Setup ................................................................................................ 15
4.2.4 Geometry Setup ............................................................................................ 15
4.2.5 PIP Setup ...................................................................................................... 16
4.2.6 Source Setup ................................................................................................. 16
4.3 HDMI Mode............................................................................................................ 16
4.3.1 Picture Setup ................................................................................................ 16
4.3.2 Sound Setup.................................................................................................. 16
4.3.3 System Setup ................................................................................................ 17
4.3.4 PIP Setup ...................................................................................................... 17
4.3.5 Source Setup ................................................................................................. 18
Chapter 5 FAQ ..................................................................................................................... 18
Chapter 6 Product Label and Expression ................................................................................. 19
6.1 Product Pollution Control Label ................................................................................. 20
6.2Toxic or Hazardous Materials or Elements List .............................................................. 20
6.3 Product Expression .................................................................................................. 20
Page 3
DHL22 LCD Monitor Us er’s Manual
-3-
Chapter 1 Safety
1.1 Product Safety Warning
This series product has been passed the thoroughly security test before it shipped out
of the manufacturer. It is to maintain the operation safety and remove the risk of electric
shock. In the product and the user’s manual, all the warning fonts or the labels are
highlighted to guarantee the operation safety, protect the device, and ensure all the persons
are away from the risk of accident and injury. The warning significance as follows:
Warning Any ignorance of this symbol may result in improper performance
and error operation, which may cause death or other serious injuries to the operator and
other persons.
Notice Any ignorance of this symbol may result in improper performance and
error operation, which may cause personal injury or component damage.
1.2 Environment
This series product is designed to use in the indoor environments only. It is not suitable
for the outdoor use. Please make sure there is corresponding air conditioning device in
the indoor environments. Please keep it away from the humidity environments or the
environments of too much dust.
Please do not block the vent or the flow of the air around the product. The poor
ventilation may result in high temperature in the internal device and may cause fire.
1.3 Users
Screen Protector
The screen protector is designed to protect the screen, preventing scratches during
transportation. Please take it off before installation.
Remote Control
Please take out batteries in the remote control if not used for long term.
When you change battery in remote control, please follow the right polarity (+,-).
Otherwise, battery may be damaged and may cause battery liquid leakage, which may
result in fire, personal injury or product damage.
Use standard battery only. Do not mix new and used batteries. Otherwise, it may cause
battery liquid leakage, which may result in battery damage, fire, personal injury or product
damage.
Page 4

DHL22 LCD Monitor Us er’s Manual
-4-
Chapter 2 Accessories Inspection
Please check the accessories according to the following Chart 2- 1. (Note: The
following figure list is equipped with standard configuration, and special users should refer to
the packing list).
Accessories Name
Quantity
LCD Monitor
1
AC Power Line
1
VGA Cable(1.5m/1 male on both
side)
1
Remote Control ( one pair of
batteries included,1.5Vⅹ2)
1(Standards vary by series)
Screw(m4)
4
User’s Manual
1
Chassis
Optional
Wall Mount
Optional
Chart 2- 1
Page 5
DHL22 LCD Monitor Us er’s Manual
-5-
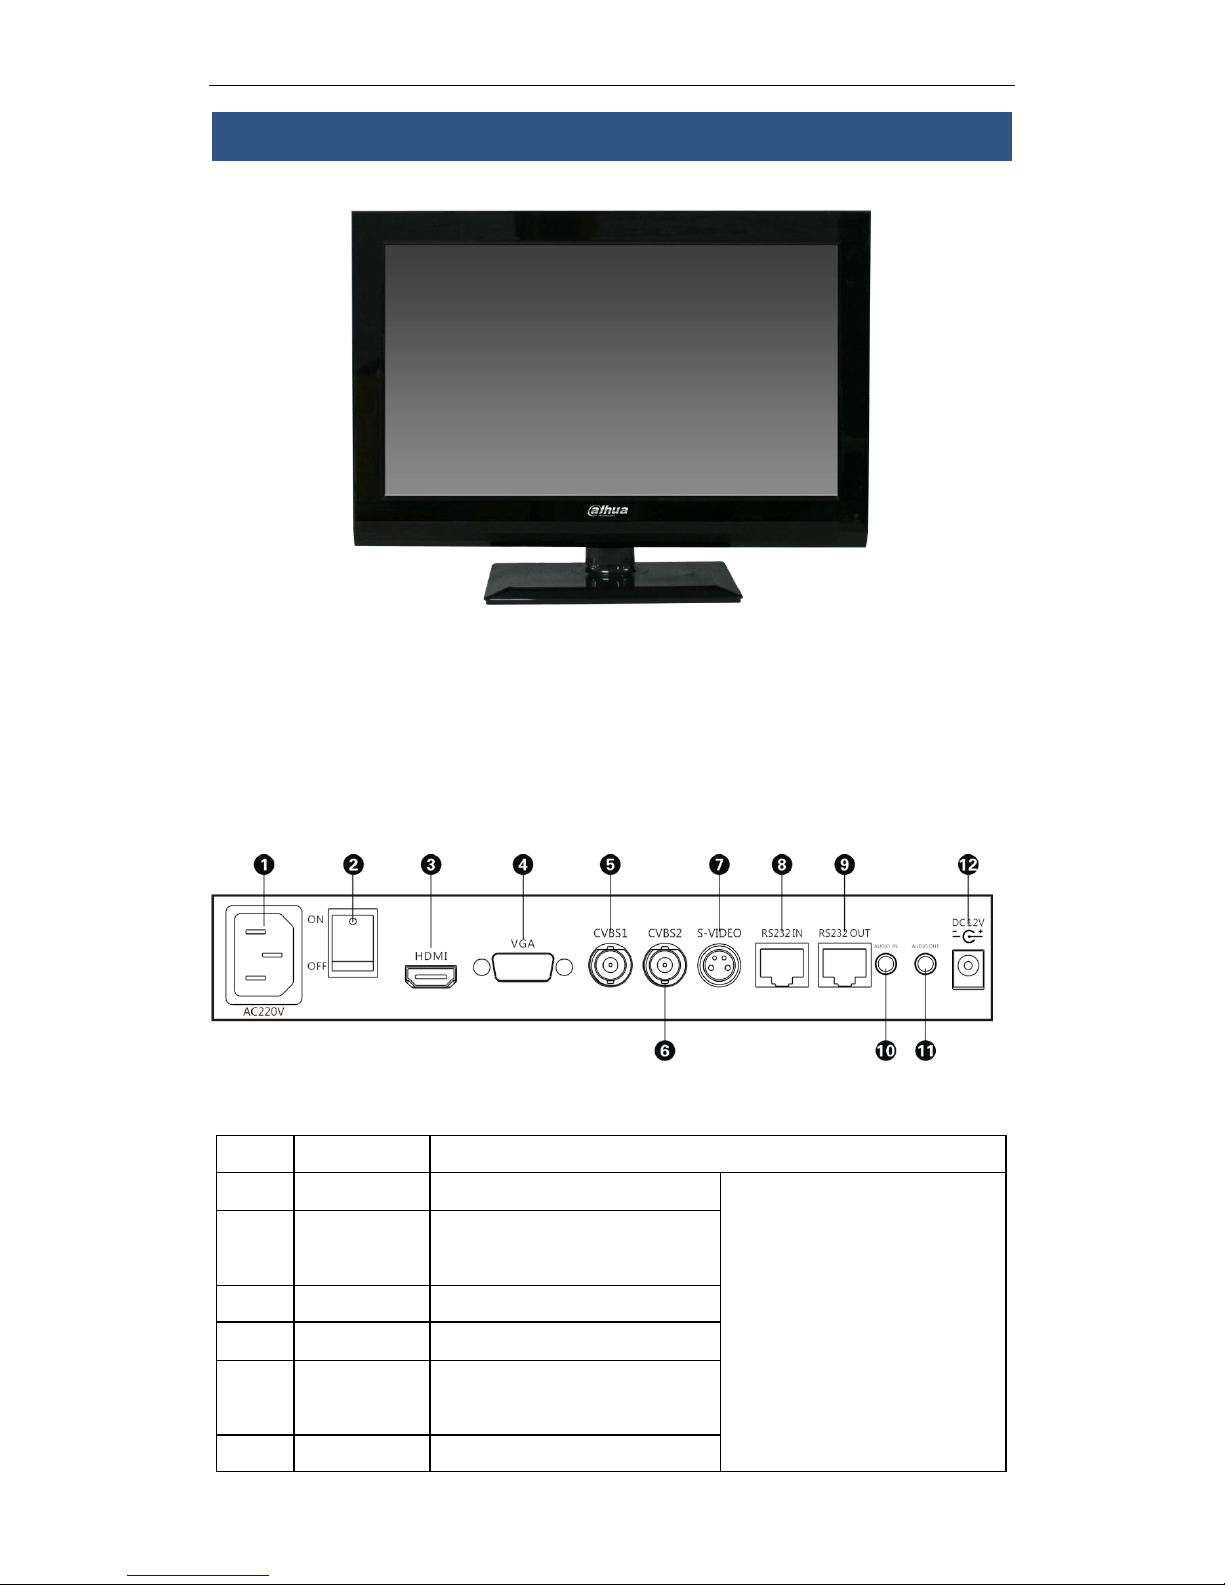
Chapter 3 Product Appearance
Figure 3- 1
The product is shown as the above. Please see Figure 3- 1.
3.1 Port
The port interface and its description are shown as follows. Please see Figure 3- 2 and
Chart 3- 1.
Figure 3- 2
SN
Name
Port Description
1
Power Plug
AC input power plug
1080P ( 1920×1080/60Hz)
downward compatible
2
Power
Switch
ACinput power switch
3
HDMI
HDMI signal input
4
VGA
VGA signal input
5
CVBS1
CVBS1 signal input
(1Vp-p ,75Ω)
6
CVBS2
CVBS2 signal input
Page 6
DHL22 LCD Monitor Us er’s Manual
-6-
(1Vp-p ,75Ω)
7
S-VIDEO
S-VIDEO signal input
8
RS232 IN
Serial 232 signal input(RJ45)
9
RS232 OUT
Serial 232 signal output
(RJ45)
10
AUDIO IN
AUDIO signal input
11
AUDIO OUT
AUDIO signal output
12
DC 12V
DC input/output
Chart 3- 1
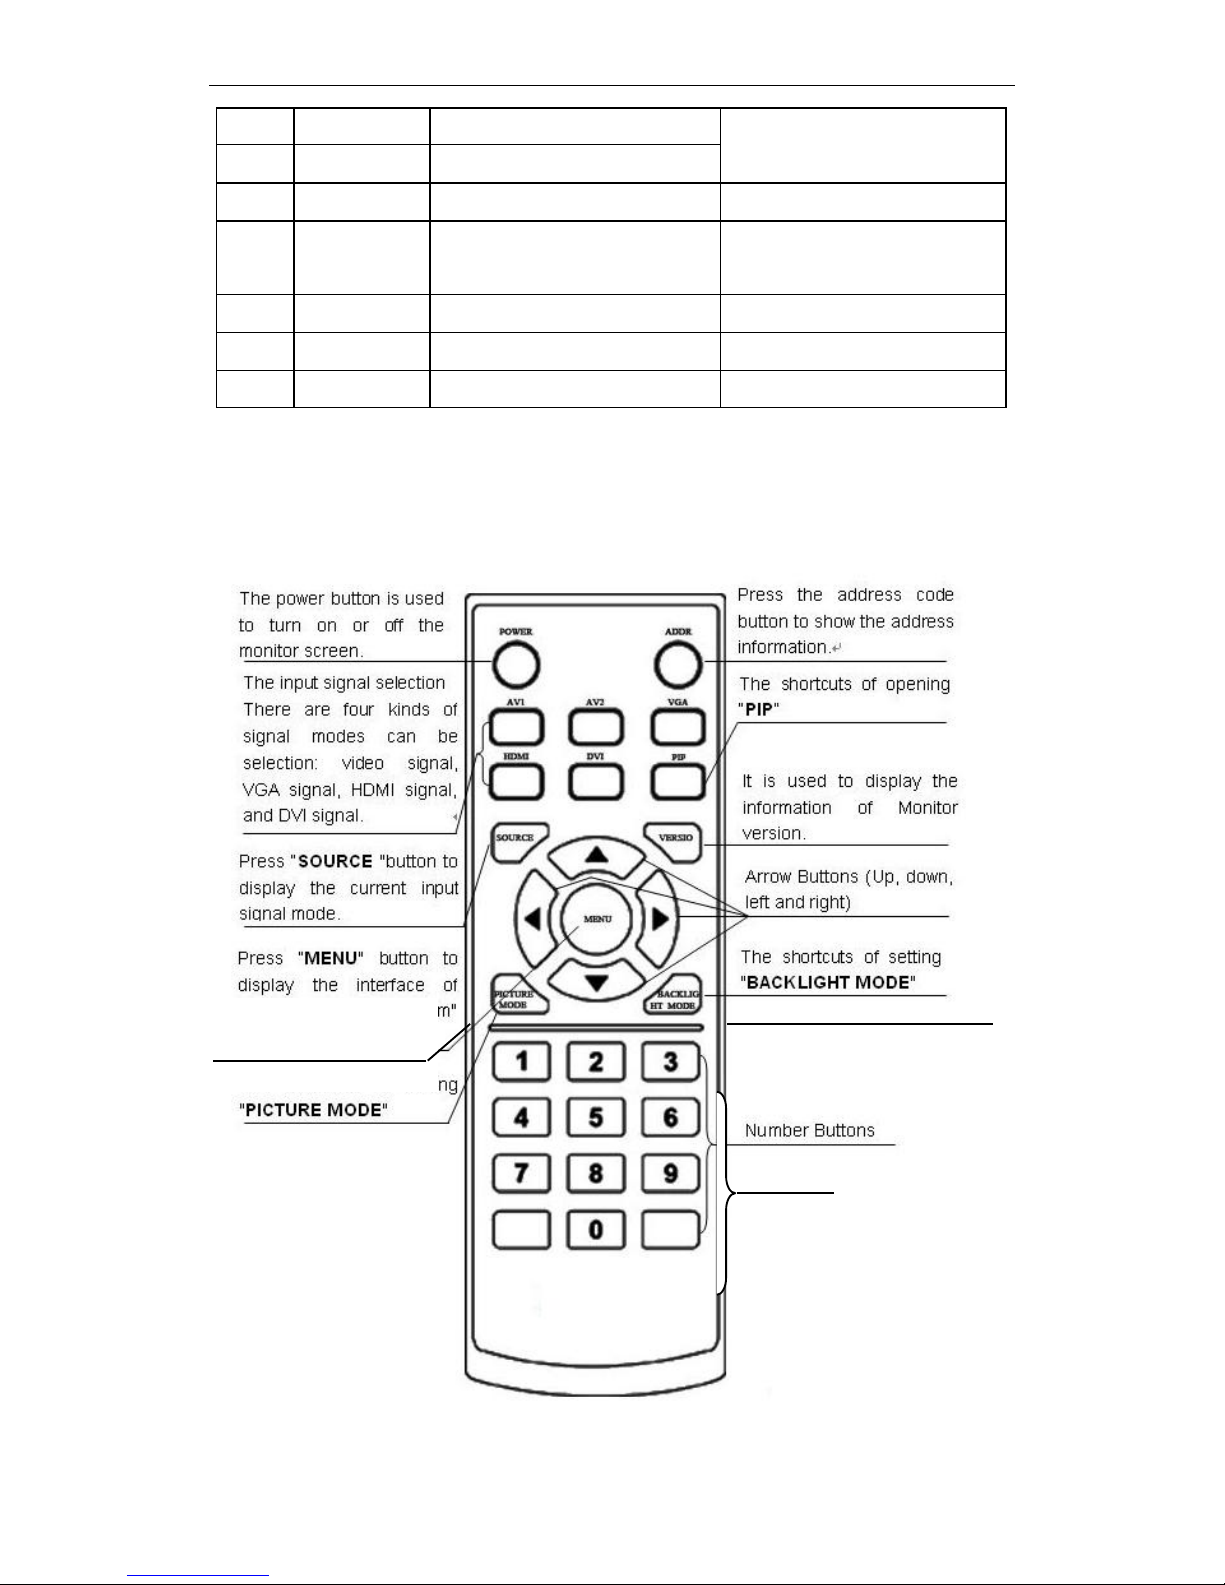
3.2 Remote Control Diagram
The remote control interface is shown as follows. Please see Figure 3- 3.
Figure 3- 3
Number
keys
Shortcut button of picture
mode parameter setup
Page 7
DHL22 LCD Monitor Us er’s Manual
-7-
Chapter 4 Parameter Setup
4.1 Video Mode
4.1.1 Picture Setup
Press menu button, select picture via arrow key ▶ on remote control to enter picture
setup page. Please see Figure 4- 1.
Figure 4- 1
Contrastness
In picture setup page, select contrastness. You can adjust via arrow keys ◀ ▶ on
remote control. The value ranges from 0 to 100.
Brightness
In picture setup page, select brightness. You can adjust via arrow keys ◀ ▶ on remote
control. The value ranges from 0 to 100.
Hue
Tone mode is effective for AV input signal only.
In picture setup page, select hue. You can adjust via arrow keys ◀ ▶ on remote control.
The value ranges from 0 to 100.
Saturation
In picture setup page, select saturation. You can adjust via arrow keys ◀ ▶ on remote
control. The value ranges from 0 to 100.
Sharpness (Definition)
Sharpness is used to adjust picture definition, the higher the sharpness, the clear the
picture will be. Meantime, disturbance increase respectively.
In picture setup page, select sharpness. You can adjust via arrow keys ◀ ▶ on remote
Page 8

DHL22 LCD Monitor Us er’s Manual
-8-
control. The value ranges from 0 to 100.
Color Tone
In picture setup page, select color tone. You can adjust via arrow keys ◀ ▶ on remote
control. It has three modes: normal, cool color, and warm color.
Scale
In picture setup page, select scale. You can adjust via arrow keys ◀ ▶ on remote control.
It has six modes: full, zoom 1, zoom 2, normal, nonlinear, and auto.
Picture Mode
In picture mode, you can adjust to preset values of contrastness, brightness, hue,
saturation and sharpness. You can maximize picture quality quickly by adjusting picture
mode.
In picture setup page, select picture mode. You can adjust via arrow keys ◀ ▶ on
remote control. It has four modes: gorgeous, normal, smooth, and user.
3D NR
3D NR adjustment reduces noises in picture.
In picture setup page, select 3D NR. You can adjust via arrow keys ◀ ▶ on remote control.
It has four modes: low, medium, high and off.
MPEG NR
In picture setup page, select MPEG NR. You can adjust via arrow keys ◀ ▶ on remote
control. It has three modes: low, high and off.
4.1.2 Sound Setup
Press menu button, select sound via arrow key ▶ on remote control to enter sound
setup page. Please see Figure 4- 2.
Figure 4- 2
Page 9

DHL22 LCD Monitor Us er’s Manual
-9-
Equalizer
In sound setup page, select equalizer. You can adjust via arrow keys ◀ ▶ on remote
control.
Balance
In sound setup page, select balance. You can adjust via arrow keys ◀ ▶ on remote
control. The value ranges from 0 to 100.
Sound Mode
In sound setup page, select sound Mode. You can adjust via arrow keys ◀ ▶ on remote
control. It has four modes: normal, movie, music and user.
Subwoofer
In sound setup page, select subwoofer. You can adjust via arrow keys ◀ ▶ on remote
control. It has two modes: on and off.
AVC
In sound setup page, select AVC. You can adjust via arrow keys ◀ ▶ on remote control:
on and off.
Loudness
In sound setup page, select loudness. You can adjust via arrow keys ◀ ▶ on remote
control. It has five modes: off, mode 1, mode 2, mode 3, and mode 4.
Superbass
In sound setup page, select superbass. You can adjust via arrow keys ◀ ▶ on remote
control. It has two modes: on and off.
Volume
In sound setup page, select volume. You can adjust via arrow keys ◀ ▶ on remote
control. The value ranges from 0 to 100.
4.1.3 System Setup
Press menu button, select system via arrow key ▶ on remote control to enter system
setup page. Please see Figure 4- 3.
Page 10

DHL22 LCD Monitor Us er’s Manual
-10-
Figure 4- 3
OSD-Language
In menu setup page, select OSD-language. You can adjust via arrow keys ◀ ▶ on
remote control. It has two types of language: Chinese and English.
OSD-H Positon
In menu setup page, select OSD-h position. You can adjust via arrow keys ◀ ▶ on
remote control. The value ranges from 0 to 100.
OSD-V Position
In menu setup page, select OSD-v position. You can adjust via arrow keys ◀ ▶ on
remote control. The value ranges from 0 to 100.
OSD-Duration
The time on screen can be set in OSD-duration.
In menu setup page, select OSD duration. You can adjust via arrow keys ◀ ▶ on remote
control. The value ranges from 0 to 60.
OSD-Half Tone
The transparency of menu background on screen can be set in OSD-half tone.
In menu setup page, select OSD-half tone. You can adjust via arrow keys ◀ ▶ on
remote control. The value ranges from 0 to 100.
Information
In menu setup page, select information, and then press arrow key ▶ on remote
control, system information will display.
Backlight Mode
In menu setup page, select backlight mode. You can adjust via arrow keys ◀ ▶ on
remote control. It has three modes: power saving, normal, and highlight.
Page 11

DHL22 LCD Monitor Us er’s Manual
-11-
MEM-Recall
In menu setup page, select MEM-recall, and then press arrow key ▶ on remote control,
the system will be initialized.
4.1.4 Advance Setup
Press menu button, select advance via arrow key ▶ on remote control to enter
advance setup page. Please see Figure 4- 4.
Figure 4- 4
Sleep Timer
The time off can be set in sleep timer menu.
In advance setup page, select sleep timer. You can adjust via arrow keys ◀ ▶ on remote
control. It has five modes: off immediately, off in 15 min, off in 30 min, off in 45 min and off in
60 min.
Overscan_H
In advance setup page, select overscan_h. You can adjust via arrow keys ◀ ▶ on
remote control. The value ranges from 0 to 60.
Overscan_V
In advance setup page, select overscan_v. You can adjust via arrow keys ◀ ▶ on
remote control. The value ranges from 0 to 30.
Underscan_H
In advance setup page, select underscan_h. You can adjust via arrow keys ◀ ▶ on
remote control. The value ranges from 0 to 60.
Underscan_V
In advance setup page, select underscan_v. You can adjust via arrow keys ◀ ▶ on
Page 12

DHL22 LCD Monitor Us er’s Manual
-12-
remote control. The value ranges from 0 to 14.
4.1.5 PIP Setup
Press menu button, select PIP via arrow key ▶ on remote control to enter PIP setup
page. Please see Figure 4- 5.
Figure 4- 5
Multi Window
In PIP setup page, select multi window. You can adjust via arrow keys ◀ ▶ on remote
control. It has three modes: on(PIP), off, and dual window.
If you select off mode, the following 7 items will be dark and not adjustable: sub source,
h-position, v-position, border color, swap, h-size, and v-size.
Sub Source
In PIP setup page, select sub source. You can adjust via arrow keys ◀ ▶ on remote
control. It has two modes: PC and HDMI. Original mode is not available.
H-Postion
In PIP setup page, select h-position. You can adjust via arrow keys ◀ ▶ on remote
control. The value ranges from 0 to100.
V-Position
In PIP setup page, select v-position. You can adjust via arrow keys ◀ ▶ on remote
control. The value ranges from 0 to100.
Border Color
In PIP setup page, select border color. You can adjust via arrow keys ◀ ▶ on remote
control. It has two modes: blue and black.
Page 13

DHL22 LCD Monitor Us er’s Manual
-13-
Swap
You can swap video input between main and sub sources in swap setup. In PIP setup
page, select swap. You can adjust via arrow keys ◀ ▶ on remote control.
H-Size
In PIP setup page, select h-size. You can adjust via arrow keys ◀ ▶ on remote control.
The value ranges from 0 to100.
V-Size
In PIP setup page, select v-size. You can adjust via arrow keys ◀ ▶ on remote control.
The value ranges from 0 to100.
4.1.6 Source Setup
Press menu button, select source via arrow key ▶ on remote control to enter source
setup page. Please see Figure 4- 6.
Figure 4- 6
Source
You can select among: PC, HDMI, SVIDEO, AV1, and AV2.
4.2 VGA Mode
4.2.1 Picture Setup
Press menu button, select picture via arrow key ▶ on remote control to enter picture
setup page. Please see Figure 4- 7.
Page 14

DHL22 LCD Monitor Us er’s Manual
-14-
Figure 4- 7
Contrastness
In picture setup page, select contrastness. You can adjust via arrow keys ◀ ▶ on
remote control. The value ranges from 0 to100.
Brightness
In picture setup page, select brightness. You can adjust via arrow keys ◀ ▶ on remote
control. The value ranges from 0 to100.
Color Mode
In picture setup page, select color tone. You can adjust via arrow keys ◀ ▶ on remote
control. It has five modes: user, normal, cool color, warm color, and S-RGB.
S-RGB (standard Red Green Blue) is the universal color standard, based on
independent color coordinate. It eliminates the need of specified color analysis of display
devices and meantime those devices can still display video file properly。
Scale
In picture setup page, select scale. You can adjust via arrow keys ◀ ▶ on remote control.
It has two modes: 16:9 and 4:3.
Picture Mode
In picture mode, you can adjust to preset values of contrastness, brightness, hue,
saturation and sharpness. You can maximize picture quality quickly by adjusting picture
mode.
In picture setup page, select picture mode. You can adjust via arrow keys ◀ ▶ on
remote control. It has four modes: gorgeous, normal, smooth, and user.
Saturation
Page 15

DHL22 LCD Monitor Us er’s Manual
-15-
In picture setup page, select saturation. You can adjust via arrow keys ◀ ▶ on remote
control. The value ranges from 0 to 100.
Color Deep
In picture setup page, select color deep. You can adjust via arrow keys◀ ▶ on remote
control. The value ranges from 0 to 8.
Auto
In picture setup page, select auto. You can adjust via arrow keys◀ ▶ on remote control.
4.2.2 Sound Setup
Sound setup is same with setup under video mode, please refer to Chapter 4.1.2.
4.2.3 System Setup
System setup is same with setup under video mode, please refer to Chapter 4.1.3.
4.2.4 Geometry Setup
Press menu button, select geometry via arrow key ▶ on remote control to enter
geometry setup page. Please see Figure 4- 8.
Figure 4- 8
H-Position
In geometry setup page, select h-position. You can adjust via arrow keys ◀ ▶ on remote
control. The value ranges from 0 to100.
V-Postion
In geometry setup page, select v-position. You can adjust via arrow keys ◀ ▶ on
remote control. The value ranges from 0 to100.
Clock
In geometry setup page, select clock. You can adjust via arrow keys ◀ ▶ on remote
control. The value ranges from 0 to100.
Page 16

DHL22 LCD Monitor Us er’s Manual
-16-
Phase
In geometry setup page, select phase. You can adjust via arrow keys ◀ ▶ on remote
control. The value ranges from 0 to100.
4.2.5 PIP Setup
PIP setup is same with setup under video mode, please refer to Chapter 4.1.5.
4.2.6 Source Setup
Source setup is same with setup under video mode, please refer to Chapter 4.1.6.
4.3 HDMI Mode
4.3.1 Picture Setup
Press menu button, select picture via arrow key ▶ on remote control to enter picture
setup page. Please see Figure 4- 9.
Figure 4- 9
Picture setup is same with setup under VGA mode, please refer to Chapter 4.2.1.
Under HDMI mode, there is no auto setup.
4.3.2 Sound Setup
Press menu button, select sound via arrow key ▶ on remote control to enter sound
setup page. Please see Figure 4- 10.
Page 17

DHL22 LCD Monitor Us er’s Manual
-17-
Figure 4- 10
Sound setup is same with setup under video mode, please refer to Chapter 4.1.2.
4.3.3 System Setup
Press menu button, select system via arrow key ▶ on remote control to enter system
setup page. Please see Figure 4- 11.
Figure 4- 11
System setup is same with setup under video mode, please refer to Chapter 4.1.3.
4.3.4 PIP Setup
Press menu button, select PIP via arrow key ▶ on remote control to enter PIP setup
page. Please see Figure 4- 12.
Page 18

DHL22 LCD Monitor Us er’s Manual
-18-
Figure 4- 12
PIP setup is same with setup under video mode, please refer to Chapter 4.1.5.
4.3.5 Source Setup
Press menu button, select source via arrow key ▶ on remote control to enter source
setup page. Please see Figure 4- 13.
Figure 4- 13
Source setup is same with setup under video mode, please refer to Chapter 4.1.6.
Chapter 5 FAQ
This chapter describes the key points and strategies to solve problems that will be
Page 19

DHL22 LCD Monitor Us er’s Manual
-19-
encountered in the process of installing or using the product. Most of the faults can be
resolved according to the following steps without maintenance services. If the problem is not
included in the following description in Chart 5- 1, please contact the supplier to handle it.
Symptom
Troubleshoot
1) I cannot boot up the
device (black screen).
1. Power(AC 220V)is connected to the device
or not.
2. Check the power cable has been damaged or
not.
3. Check the on-off button has been turned on
or not.
4. Check the power on-off button has been
damaged or not.
5. The indication light is on or not.
6. The fuse has melted down or not.
2) Blue screen (no signal)
1. Check signal cable connection is good or not.
2. Check there is signal source output or not.
3. Check signal cable is in good condition or
not.
4. Check the input signal is out of the product
input range or not.
3) Screen cannot display all
colors.
1. Check the signal cable connection is good or
not.
2. Replace the cable if the signal cable has
been damaged.
4) The device does not
respond when I control it.
1. Check there is battery in the remote control
and has been well installed.
2. Check the infrared receiver is in good
condition.
5) The device temperature
is too high.
1. Check the fan is running properly or not.
2. Check the environment ventilation is good or
not.
3. Check the device is working overload or not.
Chart 5- 1
Chapter 6 Product Label and Expression
According to China’s Measures for the Control of Pollution from Electronic Information
Products, the product label and expression are as follows:
Page 20

DHL22 LCD Monitor Us er’s Manual
-20-
6.1 Product Pollution Control Label
This product series adopts the following sign of pollution control for electronic
information product:
6.2Toxic or Hazardous Materials or Elements List
Chart 6- 1 Content label of toxic or hazardous materials or elements
Component Name
Cd
Cr VI
Hg
Pb
PBB
PBDE
Case
○ ○ ○ ○ ○
○
LCD Panel
○
○
○
○
○
○
Control Module
○ ○ ○ ╳ ○
○
Auxiliary Material
○ ╳ ○ ○ ○
○
○:Indicates that the concentration of the hazardous substance in all homogeneous materials
in the parts is below the relevant threshold of the SJ/T11363-2006 standard.
╳ : Indicates that the concentration of the hazardous substance of at least one of all
homogeneous materials in the parts is above the relevant threshold of the SJ/T11363-2006
standard.
Note: The Pb in the control module and the Cr VI in the auxiliary material conforms to the
exemption section of the EU Restriction of Hazardous Substances (RoHS) directive.
6.3 Product Expression
Our company began to implement the EU Restriction of Hazardous Substances (RoHS)
directive since 2005. From now on, all the products will confront the requirements of relevant
directions.
Note
This user’s manual is for reference only. Slight difference may be found in
Page 21

DHL22 LCD Monitor Us er’s Manual
-21-
LCD Monitor Manual user interface.
All the designs and software here are subject to change without prior written
notice.
All trademarks and registered trademarks are the properties of their respective
owners.
If there is any uncertainty or controversy, please refer to the final explanation of
us.
Please visit our website for more information.
 Loading...