

Page 1

Mobile Portable Terminal
Quick Start Guide
Version 1.0.1
Page 2

i
Table of Contents
1 Product Introduction ......................................................................................................... 1
1.1 Overview ................................................................................................................. 1
1.2 Specifications ......................................................................................................... 1
1.3 General Structure .................................................................................................. 1
2 Basic Operation ................................................................................................................ 4
2.1 Login ........................................................................................................................ 4
2.2 Main Interface ......................................................................................................... 5
2.3 Snapshot/Record Video ........................................................................................ 5
2.4 Record Audio .......................................................................................................... 7
2.5 Files .......................................................................................................................... 8
2.6 Settings .................................................................................................................... 8
2.6.1 Network ......................................................................................................... 8
2.6.2 Device ........................................................................................................... 9
2.6.3 System ........................................................................................................ 10
2.7 Account .................................................................................................................. 11
2.8 Plate Recognition ................................................................................................. 12
3 Platform Connection ...................................................................................................... 14
3.1 Device Settings .................................................................................................... 14
3.2 Platform Settings .................................................................................................. 15
Page 3

ii
Welcome
Thank you for purchasing our mobile portable terminal!
This quick start guide will help you become familiar with our mobile portable terminal in a very
short time.
Before installation and operation, please read the following safeguard and warning carefully!
Important Safeguard and Warning
1.Electrical safety
All installation and operation here should conform to your local electrical safety codes.
An apparatus with CLASS I construction shall be connected to a MAINS socket outlet with a
protective earthing connection.
Use a power supply which meets the requirements for SELV (Safety Extra Low Voltage) and
complies with Limited Power Source according to IEC 60950-1. Refer to the device label for
detailed information.
We assume no liability or responsibility for all the fires or electrical shock caused by
improper handling or installation.
2.Transportation security
Heavy stress, violent vibration or water splash are not allowed during transportation, storage
and installation.
3.Installation
Keep upwards. Handle with care.
Do not apply power to the mobile portable terminal before completing installation.
Do not place objects on the mobile portable terminal.
4.Qualified engineers needed
All the examination and repair work should be done by the qualified service engineers.
We are not liable for any problems caused by unauthorized modifications or attempted repair.
5.Environment
The mobile portable terminal should be used in a cool, dry place away from direct sunlight,
inflammable, explosive substances and etc.
Always transport,storage,operate the mobile portable terminal in the specified working
humidity and working temperature.
6. Accessories
Be sure to use all the accessories recommended by manufacturer.
Before installation, please open the package and check all the components are included:
Contact your local retailer ASAP if something is missing in your package.
7. Lithium battery
Improper battery use may result in fire, explosion, or personal injury!
Page 4

iii
When replace the battery, please make sure you are using the same model!
RISK OF EXPLOSION IF BATTERY IS REPLACED BY AN INCORRECT TYPE.
DISPOSE OF USED BATTERIES ACCORDING TO THE INSTRUCTIONS.
Important
Please set a password for admin if it is your first time to use the device. Change the
password regularly to enhance device data safety.
Note that the security and other related issues caused by the unchanged password shall be
responsible for the user.
Set password for your wireless network if you use the device with a wireless router. Being
not protected with password or using the default wireless router password may expose your
data to potential threat.
Page 5

1
1 Product Introduction
1.1 Overview
This series product is a mobile portable terminal for persons of public security, insurance, traffic
police and etc. It can realize audio/video record, snapshot, GPS, and video surveillance, record
view and download, audio talk, emergency command via 3G/4G/Wi-Fi and etc.
The device is designed based on the Android OS. It realizes business rebuild and expansion via
the security network to meet the mobile business requirements of various industries. It can
enhance quick respond speed and general operation capability.
1.2 Specifications
Function
Specifications
OS
Android 5.1
LCD Module
4.0-inch TFT LCD, it is visible under the direct sunshine. 854*480
Light Sensation
Sensor
Self-adaptive screen brightness
Touch Screen
Module
4.0-inch capacitance touch screen.,multiple-point touch screen
Memory
2GB RAM+32GB Flash,extendable storage. Max supports 128GB
Micro SD card.
Video Encode
Standard
H.264
Record
Resolution
1080P, 720P, WVGA
Image Pixels
1.3MP
Audio
Audio/video sync record at the same time
Network
2G/3G/4G
Wi-Fi: 2.4G/5G
Function
Bluetooth, fingerprint recognition, plate recognition, audio talk, onetouch activates an alarm, NFC
Positioning
GPS/Beidou/GLONASS
Port
HDMI input port / USB 2.0 port/Peripheral general port/Headphone
jack/Peripheral camera port
Battery Capacity
Built-in high performance ultra-large lithium battery 4000mAh(default
accessories)
Protection Level
IP66
Working
Temperature
-10℃~+55℃
Humidity
10%-90%
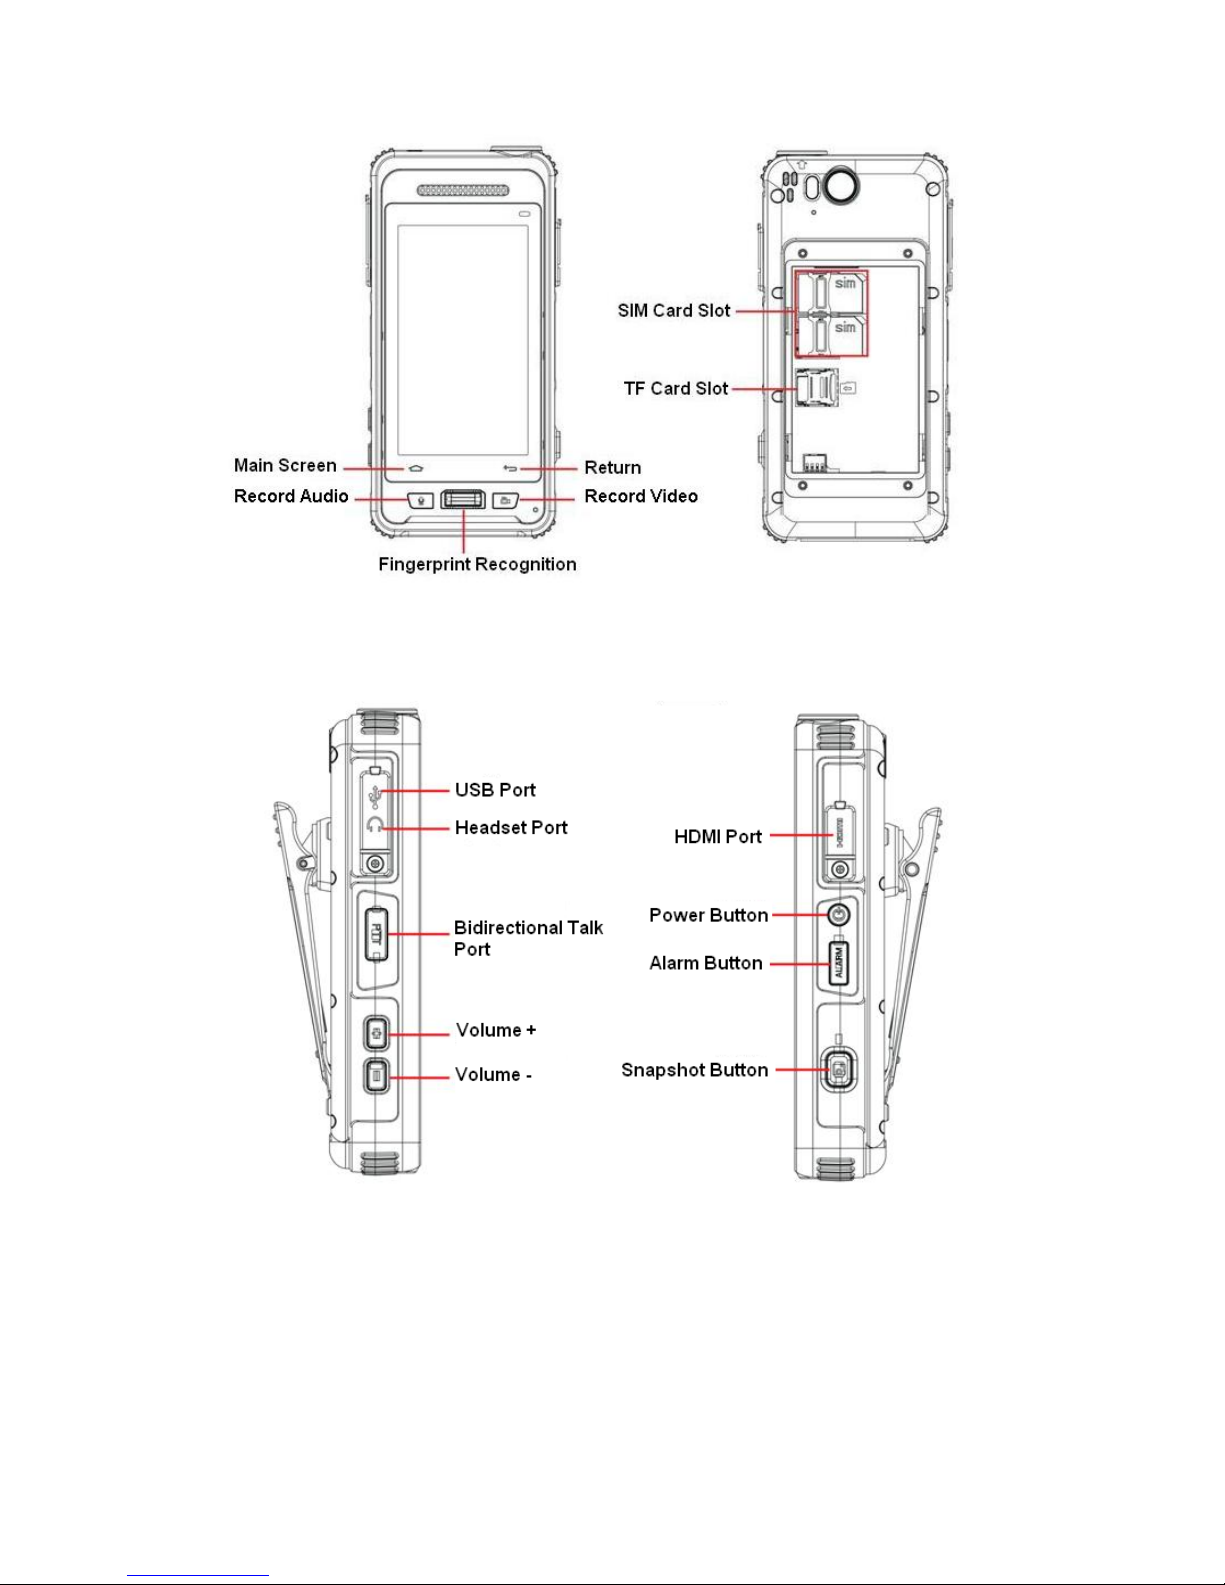
1.3 General Structure
Please refer to the following figure for general structure information. See Figure 1-1 through
Figure 1-3.
Page 6
2
Figure 1-1
Figure 1-2
Page 7

3
Figure 1-3
Page 8

4
2 Basic Operation
2.1 Login
Press the Power button on the right side of the device (see Figure 1-2), you can boot up, shut
down the device, or let it sleep.
After device boots up, it goes to login interface by default.
Please follow the steps listed below.
Step 1 Boot up the device, device goes to login interface. See Figure 2-1.
Figure 2-1
Step 2 Input user name and password.
Note
Device default user name is admin. If it is your first time to use the device, please set a
login password.
You can set three security questions in case you forgot password. Tap Forgot password
in Figure 2-1, you can reset login password after you properly answer the security
questions.
Please change the password regularly to guarantee device safety. Refer to User’s
manual for detailed information.
Step 3 Tap Login to go to the main interface. Refer to chapter 2.2 Main Interface for main
interface information.
Page 9

5
2.2 Main Interface
After you logged in, the main interface is shown as below. See Figure 2-2.
Figure 2-2
2.3 Snapshot/Record Video
Tap , system goes to the snapshot/record interface. See Figure 2-3.
Page 10

6
Figure 2-3
Please refer to the following sheet for detailed information.
SN
Note
1
Tap it to set camera parameters.
Snapshot mode: Tap the icon to go to camera settings interface. You can
enable/disable snapshot sound, set white balance, exposure, video quality
and resolution.
Record video: Tap the icon to go to camera settings interface. Here you can
set video quality frame rate, bitrate, bitrate type.
Note
When platform is playing the device realtime video, you cannot set parameters.
The left pane is shown as in .
2
Display OSD information.
Note
From Setings->Device->Camera->OSD, you can overlay time, user name, GPS
info and etc.
3
Tap it to set flashlight parameters.
: Auto flashlight. Device can enable flashlight automatically according to
the light in the surrounding environment.
: Manual flashlight function is on.
Page 11

7
SN
Note
: Flashlight function is off.
Note
In record video mode, tap to enable compensation light.
4
Tap to switch to peripheral camera to snapshot or display HDMI signal.
Note
Please make sure you have connected the peripheral camera or the HDMI
signal.
5
Tap to snapshot.
Note
In record video mode, tap to begin record video. During the recording
process, tap to snapshot.
6
Tap the icon to view photo or video file.
7
Adjust photo focus distance.
8
Switch between snapshot/record mode.
2.4 Record Audio
Tap , you can go to the record audio interface. See Figure 2-4.
Figure 2-4
Page 12

8
Tap to begin record. The circle becomes during the recoridng process. Tap
again to stop record.
Tap to check audio file.
2.5 Files
Here you can view photo, video file or audio file.
Tap , you can go to the file manager interface. Here you can view photo, audio/video
file. See Figure 2-5.
Figure 2-5
2.6 Settings
2.6.1 Network
Here you can set Wi-Fi, Bluetooth, location, datacall, Ethernet and etc.
From Settings->Network, you can go to the following interface. See Figure 2-6.
Tap an item to go to the corresponding interface.
Page 13

9
Figure 2-6
2.6.2 Device
In this interface, you can set camera basic parameters, register device to the platform, set
storage parameters, add SMS whitelist and set audio talk function.
From Settings->Device, you can go to the following interface. Here you can set camera, platform,
and video storage parameters. See Figure 2-7.
Page 14

10
Figure 2-7
Name
Function
Camera
Set snapshot, record encode, network transmit encode, OSD parameters.
Platform
The device and platform connection parameters. After you register the device
to the platform, you can use platform to control and mange device remotely.
Video storage
It is to set data to storage on the Micro SD card.
Device max supports 128GB expansible storage space. When the device
built-in space is not sufficient, you can insert Micro SD card in case you may
lose the data.
SMS Wakeup
Settings
When connect the device to the platform, the device goes to hibernation mode
and disconnect with the platform if there is no operation for a long time. Now
you can use the user name on the SMS whitelist to send out the SMS to
activate the device.
Audio talk
Enable audio talk function and then set corresponding parameters, the device
can realize dual-way talk with the platform.
2.6.3 System
From Settings->System, you can go to the system interface. See Figure 2-8.
Tap an item, you can set and search corresponding parameters. It includes interface brightness,
system date and time and etc.
Important
Page 15

11
RESET FACTORY DEFAULT SETUP IS GOING TO CLEAR ALL DATA ON THE DEVICE
BUILT-IN STORAGE SPACE. BE CAREFUL!
Figure 2-8
2.7 Account
Here you can manage user basic information.
Tap , you can go to the following interface. See Figure 2-9.
Page 16

12
Figure 2-9
Name
Function
Account
Here you can add new user, change user authorities, change password, and
etc.
Tap to add new user.
Tap a user, you can go to the user informaiton interface. Here you can
search user information, modify rights, modify password, add/delete
fingerprint and etc.
Personal info
Here you can search user information, modify rights, modify password,
add/delete fingerprint and etc.
Fingerprint
module:
It is to manage fingerprint module storage space, format corresponding user
fingerprint information.
Logout
Logout current user.
2.8 Plate Recognition
Device supports plate recognition function. You can upload plate number photo to the platform to
manage.
Tap on the main interface, you can go to the snapshot interface to snapshot plate and then
upload to the platform to manage.
Page 17

13
Please refer to the following sheet for detailed information.
SN
Note
1
Tap it, device can use the peripheral camera to snapshot or view the HDMI signal
source.
Note
Please make sure device has connected the peripheral camera or the HDMI
signal device.
2
Put the camera facing the plate number and then tap the icon, device can display
recognition results window. Tap OK button, device auto snapshot and display the
recognition result at the snapshot image.
3
Tap it, device can snapshot one image.
4
Tap it, device can upload the image to the platform.
Note
Please make sure the device has connected to the platform. Refer to chapter 3
Platform Connection for detailed information.
Page 18

14
3 Platform Connection
You can control and manage device via platform.
3.1 Device Settings
Note
Please make sure the network connection is OK and device is online so that it can be added to
the platform.
Please follow the steps listed below.
Step 1 Set platform connection parameters.
Step 2 On the device, from Settings->Device->Platform, you can go to the following interface to
input parameters. See Figure 3-1.
Figure 3-1
Step 3 Please refer to the following sheet for detailed information.
Name
Function
Platform connection
Enable/disable device connection to the platform server.
Device ID
Input customized device ID on the platform server. Please make
sure It is the same as the platform.
Page 19

15
IP Address
Input platform server IP address.
Remote Port
Input platform server listening port. The default setup is 9500.
Local port
Input device listening port. The default setup is 37777.
Step 4 Enable platform connection function and then tap OK.
3.2 Platform Settings
Please follow the steps listed below to login the platform.
Step 1 Login DSS manager end and then from General->Device->Device->Encoder, and then
Tap Add button, you can see the following interface. See Figure 3-2.
Figure 3-2
Step 2 Please refer to the following sheet for detailed information.
Name
Function
Add Type
Please check the box to enable auto register function.
Proxy port
The value ranges from 1 to 65535.
Important
Page 20

16
The proxy port of each device is unique. It shall be the
same as the port of other device.
Registration ID
It is the same as the device ID in Figure 3-1.
User name/password
It is the same as the mobile portable terminal device. The user
name is admin and the password is what you set when you
first login.
Device name
Input customized device name.
Device type
Please select mobile portable terminal from the dropdown list.
Video channel
The value is 1.
Alarm input channel
The value is 1.
Step 3 Click OK button to complete the add process.
Note
For detailed operation introduction, please refer to our resource CD included in your
package for electronic version of the User’s Manual.
Slight difference may be found in user interface.
All the designs and software here are subject to change without prior written notice.
All trademarks and registered trademarks mentioned are the properties of their
respective owners.
If there is any uncertainty or controversy, please refer to the final explanation of us.
Please visit our website for more information.
 Loading...