

Dahua ASA2212A User Manual

1
Time Attendance User’s Manual
V1.0.0

Table of Contents
Table of Contents ...................................................................................................... 2
1 Product Overview ........................................................................................ 1
1.1 Introduction ..................................................................................................... 1
2 Installation Guide ......................................................................................... 1
2.1 Checklist ......................................................................................................... 1
2.2 Panel and Interface ......................................................................................... 1
2.3 Appearance Dimensions ................................................................................. 4
2.4 Installation Wiring ............................................................................................ 5
3 System Operation ........................................................................................ 6
3.1 Attendance ...................................................................................................... 6
3.2 Main Menu ...................................................................................................... 7
3.3 User ................................................................................................................ 8
3.3.1 New User .............................................................................................. 8
3.3.2 Search and Edit User .......................................................................... 10
3.3.3 New Department ................................................................................. 12
3.3.4 Edit and Delete Department ................................................................ 12
3.4 Shift............................................................................................................... 14
3.4.1 Set Shift .............................................................................................. 14
3.4.2 Department Shift ................................................................................. 22
3.4.3 Check ................................................................................................. 22
3.5 Data .............................................................................................................. 23
3.5.1 Query Record...................................................................................... 23
3.5.2 Export 1 Month Logs ........................................................................... 24
3.5.3 Export 1 Month Exception ................................................................... 25
3.6 Features ........................................................................................................ 26
3.6.1 Add User in Batch ............................................................................... 26
3.6.2 State Switch ........................................................................................ 27

3.6.3 Bell ...................................................................................................... 28
3.7 System Config ............................................................................................... 30
3.7.1 Set Time and Date .............................................................................. 31
3.7.2 Volume................................................................................................ 32
3.7.3 Restore ............................................................................................... 32
3.7.4 Relay Mode ......................................................................................... 33
3.7.5 Restart Device .................................................................................... 34
3.8 Communication ............................................................................................. 34
3.9 USB .............................................................................................................. 35
3.9.1 Export User Info .................................................................................. 35
3.9.2 Firmware Update ................................................................................ 36
3.10 System Info ................................................................................................... 36
4 Daily Operation .......................................................................................... 37
5 FAQ ........................................................................................................... 38
Appendix a Fingerprint Operation .............................................................................. 1
Appendix 2 Text Input ............................................................................................... 1

Important Safeguards and Warnings
Please read the following safeguards and warnings carefully before using the product in
order to avoid damages losses and body injuries. After reading, please well keep this
user's manual.
Note:
Do not install the device at position exposed to sunlight or in high temperature.
Temperature rise in device may cause fire.
Do not expose the device to lampblack, steam or dust. Otherwise it may cause
fire or electric shock.
The device must be installed on solid and flat surface in order to guarantee
safety under load and earthquake. Otherwise, it may cause device to fall off or
turnover.
Do not drop or splash liquids onto the device, and do not place container with full
liquid on the device to prevent liquid spilling from entering the device.
Do not block air vent of the device or ventilation around the device. Otherwise,
temperature in device will rise and may cause fire.
Use the device only within rated input and output range.
Do not disassemble the device without professional instruction.
Please transport, use and store the product under appropriate temperature and
humidity.
Warning:
Please use button cell properly to avoid fire, explosion and other dangers.
Please replace used battery with battery of the same type.
Do not use power line other than the one specified. Please use it properly within
rated range. Otherwise, it may cause fire or electric shock.
Please use power supply matching SELV requirements, and IEC60950-1 Limited
Power Source. Power supply shall follow requirements on device label.
For I-type structure product, connect it to power supply plug with GND
protection.
If you use power plug or appliance coupler as disconnecting device, please
maintain the disconnecting device available to be operated all the time.
Special Announcement
This manual is for reference only, subjected to the actual product.
All the designs, software and instructions here are subject to change without
prior written notice.
All damaged and losses caused by operation not following instructions in this
manual, are borne by the user.
All trademarks and registered trademarks are the properties of their respective
owners.

If there is any uncertainty or controversy, please refer to the final explanation of
us.
Please visit our website for more information.

1
1 Product Overview
1.1 Introduction
All-in-one time attendance is an attendance device integrating card, fingerprint, config and
execution. It is suitable office, commercial building, school and etc.
Time attendance functions:
Touch button+LCD display, TCP-IP protocol
Fixed and flexible attendance mode.
Card, fingerprint or password
3000 fingerprints and 1000 users.
150,000 card records
Simple Access control or External bell
64 groups of holiday setup.
Warning:
This product needs external power, please use DC 12V 0.5A adaptor as power, and work
temperature shall be within -5℃~55℃.

1
2 Installation Guide
2.1 Checklist
Before installation, please check
No.
Name
Quantity
Note
1
Unit
1
-
2
Installation bracket
1
-
3
Installation map
1
-
4
M4×30 cross pan head flat
screw
2
Used to fix bracket for
concealed mount
5
M3×6 inner hex sunk head
screw
1
Used to fix device from
bottom to installation
bracket
6
T10 inner hex wrench
1
-
7
Screws
1 pack
ST3×18 self-tapping
screw, 4
Expansion bolt,4
When there is direct
mount, used to fix
installation on surface.
8
Quick start guide
1
-
Chart 2-1
2.2 Panel and Interface
Time attendance is in Figure 2-2 and Figure 2-3.
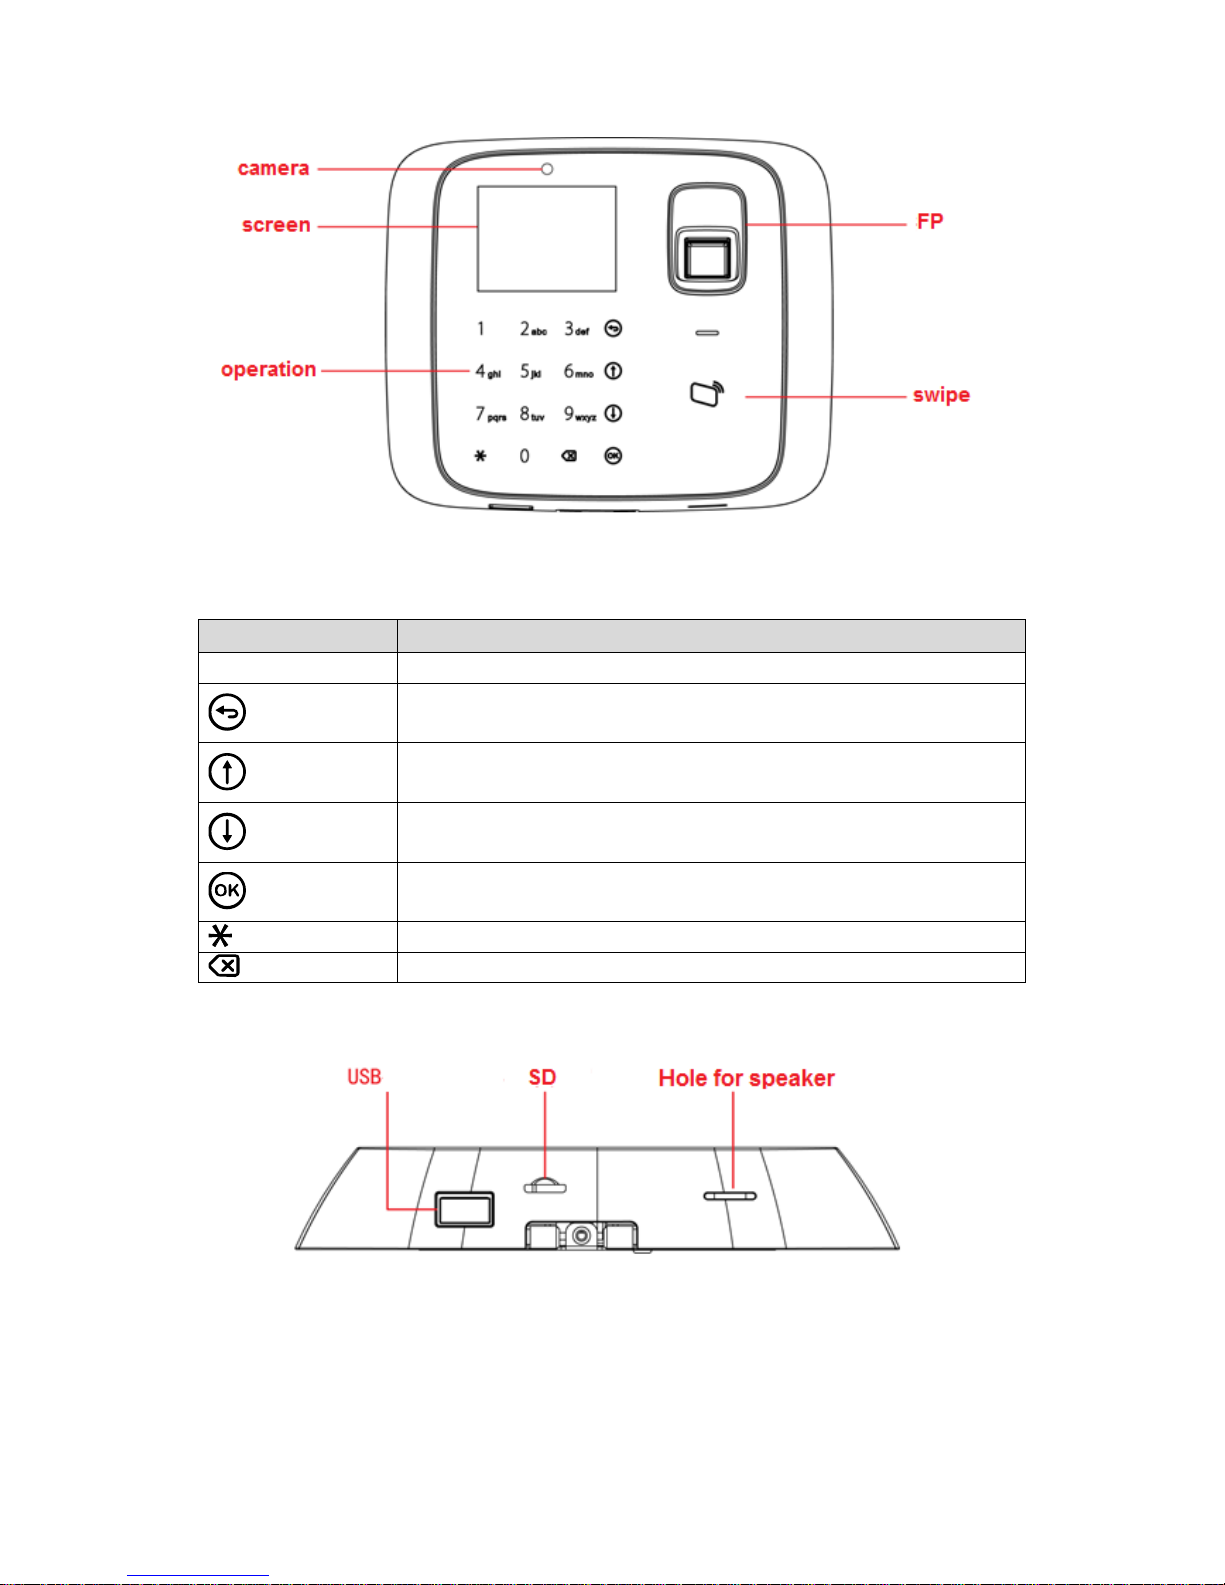
Figure 2-1
Icon
Note
0~9
Number key, for number and letter input
Return or exit
Up Down
Enter or confirm
Switch, between function or input
Delete
Chart 2-2
Figure 2-2
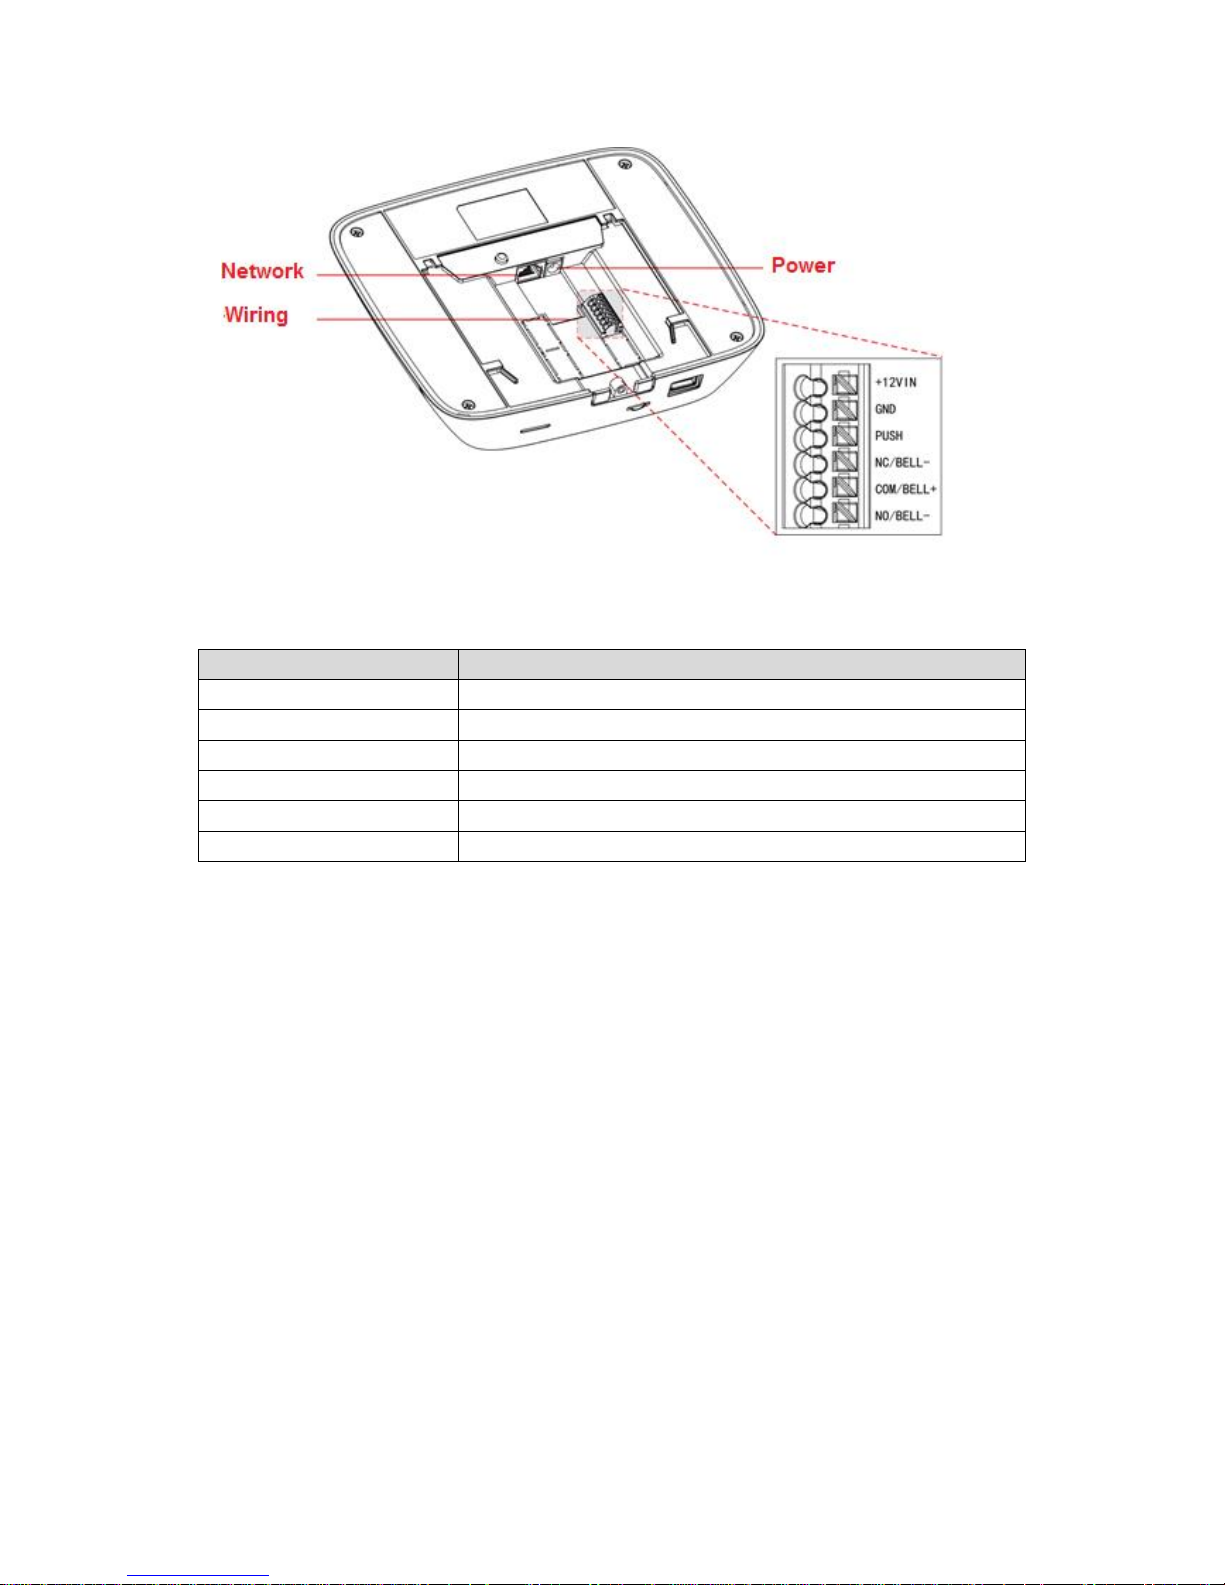
Figure 2-3
Port
Note
+12VIN
DC 12V power
GND
GND
PUSH
Unlock
NC/BELL-
Lock NC or BELL(disconnect triggered)
COM/BELL+
Lock COM or BELL+
NO/BELL-
Lock NO or BELL-(close triggered)
Chart 2-3
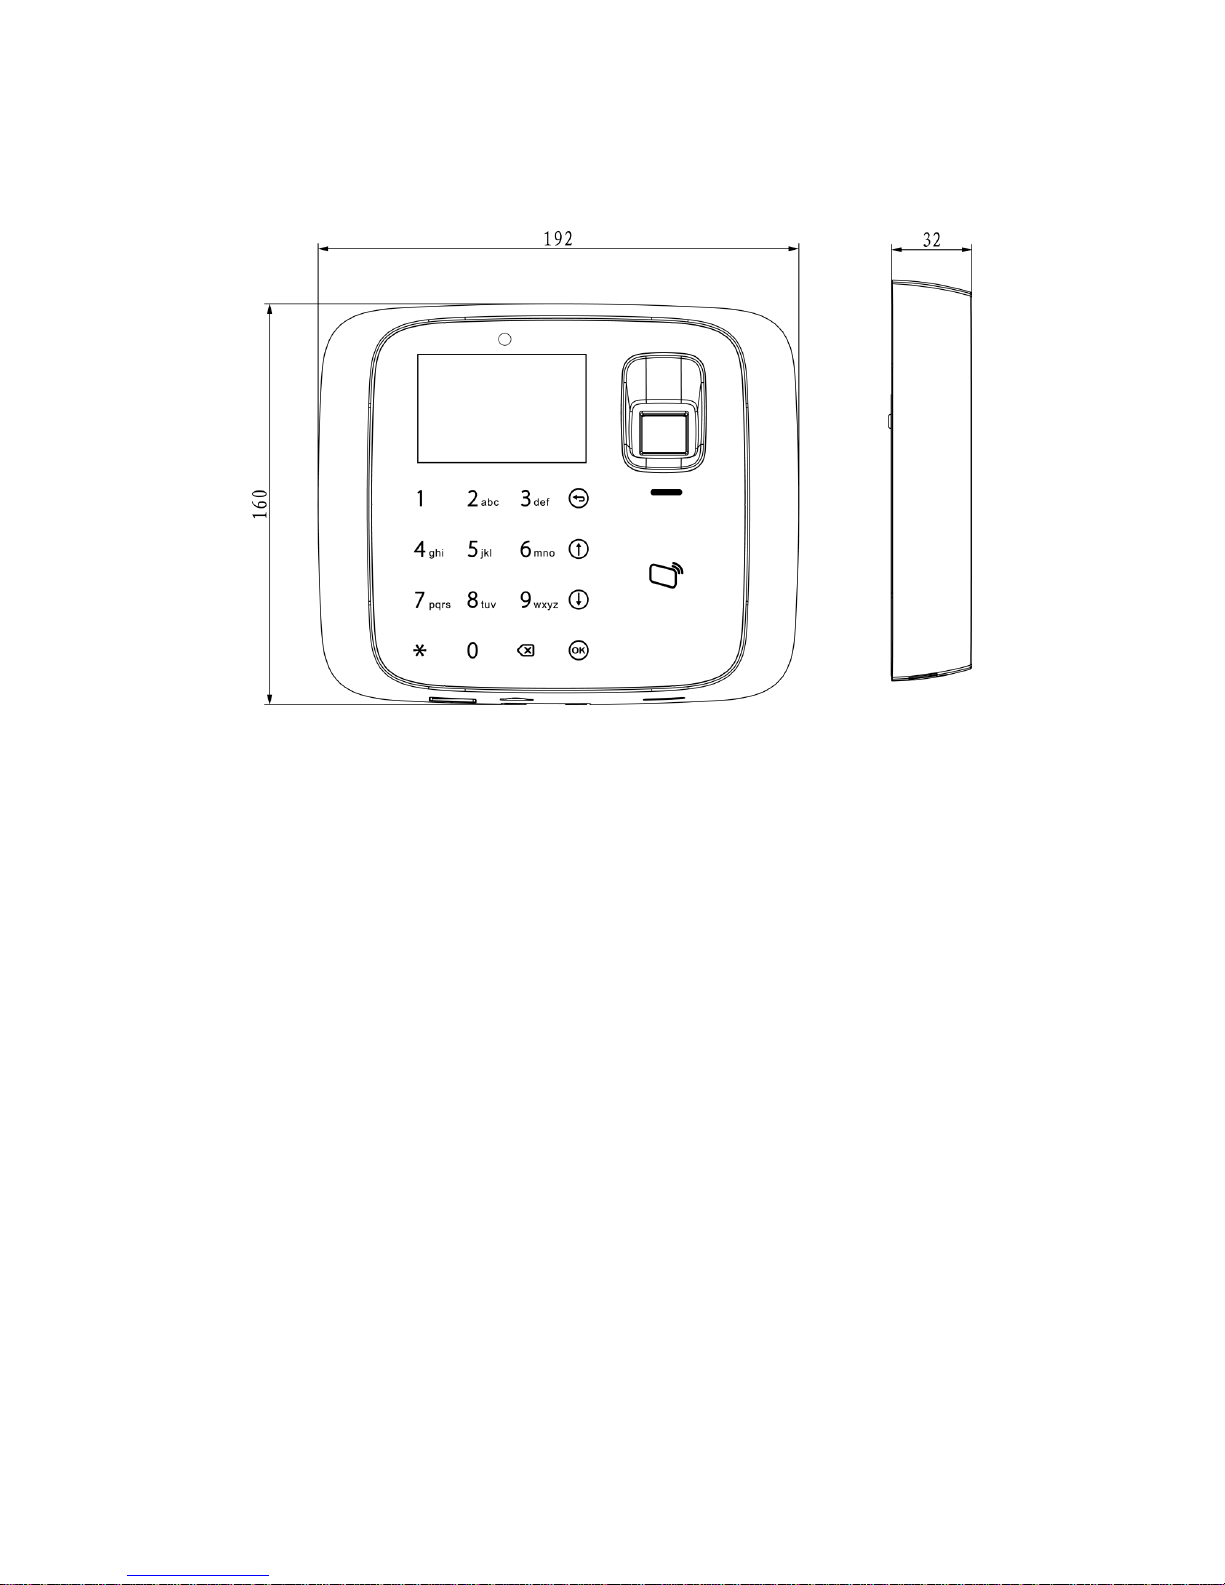
2.3 Appearance Dimensions
Figure 2-4

2.4 Installation Wiring
Figure 2-5
Installation step:
Step 1. Paste installation map on installation surface, and open hole according to the
map. Insert expansion bolt into the hole.
Step 2. Install bracket.
If there is concealed mount, fix bracket on concealed mount with screw A.
If there is no direct mount or cannot be well fixed, fix bracket on wall with screw B.
You must embed expansion bolt in wall first.
Step 3. According to direction on map, hang the device on bracket.
Step 4. From device bottom, insert and fasten screw, lock the device.
3 System Operation
Note:
Fingerprint record is in Appendix 1.
Input of text is in Appendix 2.
3.1 Attendance
Warning:
During attendance, please DO NOT change system config, system time or power off the
device, since these will cause abnormal attendance.
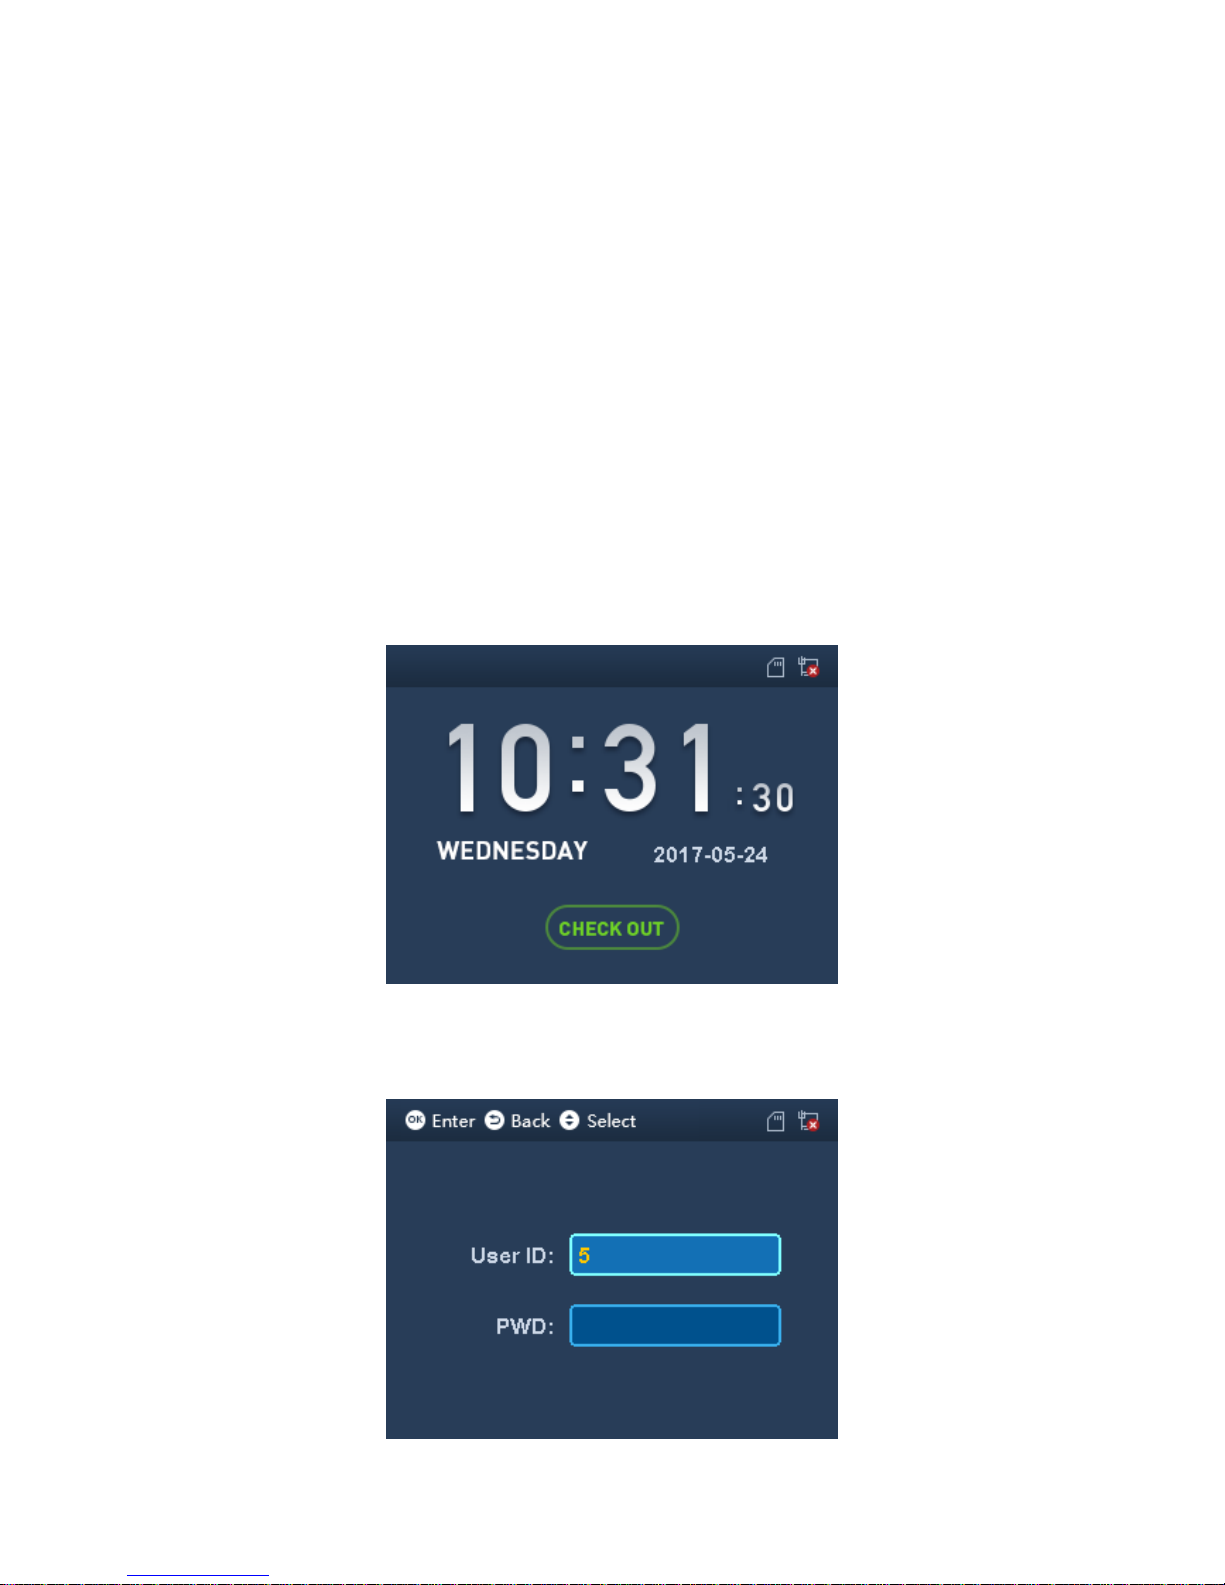
Plug the device to power, device boots up and shows time info, see Figure 3-1.
Note:
If you did not operate over 45s in one page, it will return to standby page.
Figure 3-1
Click number key, see Figure 3-2. Enter user ID and password can pass attendance.
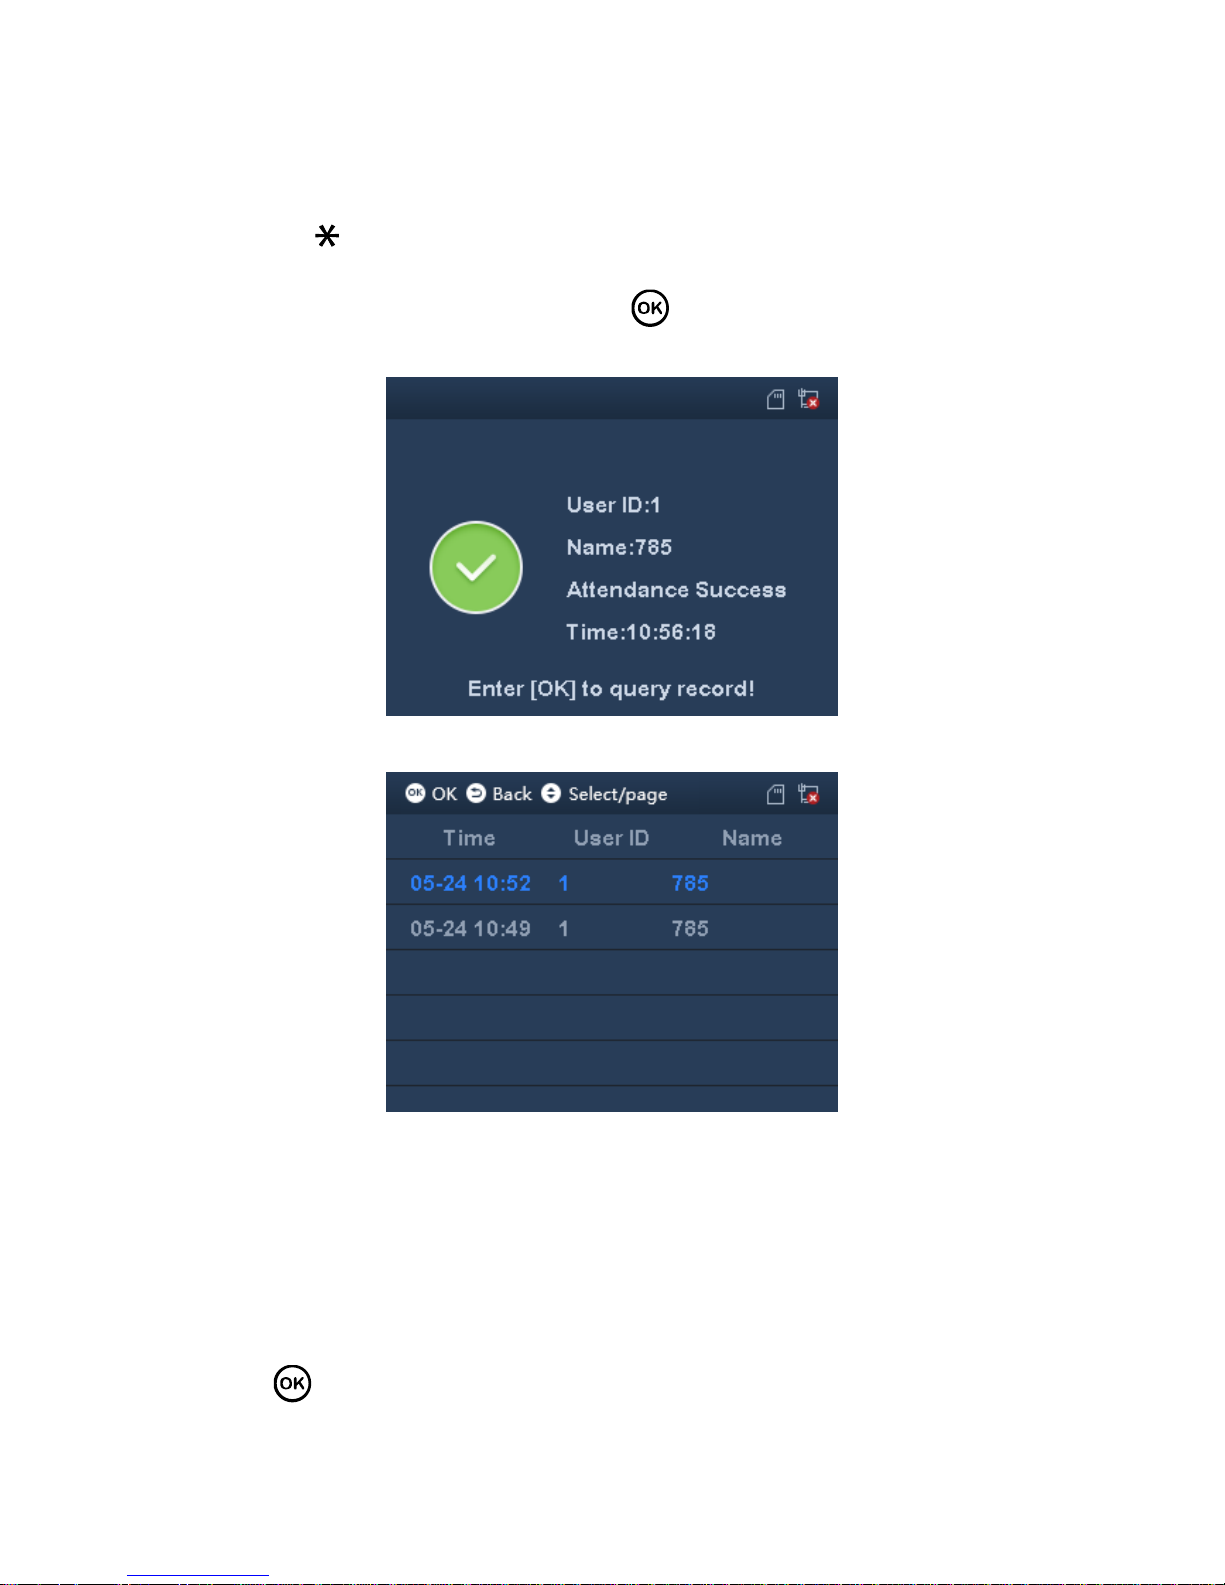
Figure 3-2
In fingerprint area, press your finger to pass attendance.
In card swiping area, swipe card and pass attendance.
Click to switch attendance status. Connect to platform and sync status to
platform, used on platform.
After you pass personal attendance, click , to show personal attendance record,
see Figure 3-3 and Figure 3-4.
Figure 3-3
Figure 3-4
Note:
Add password, fingerprint and card, refer to Ch 3.3.1.
Details of attendance refer to Ch 3.6.2.
3.2 Main Menu
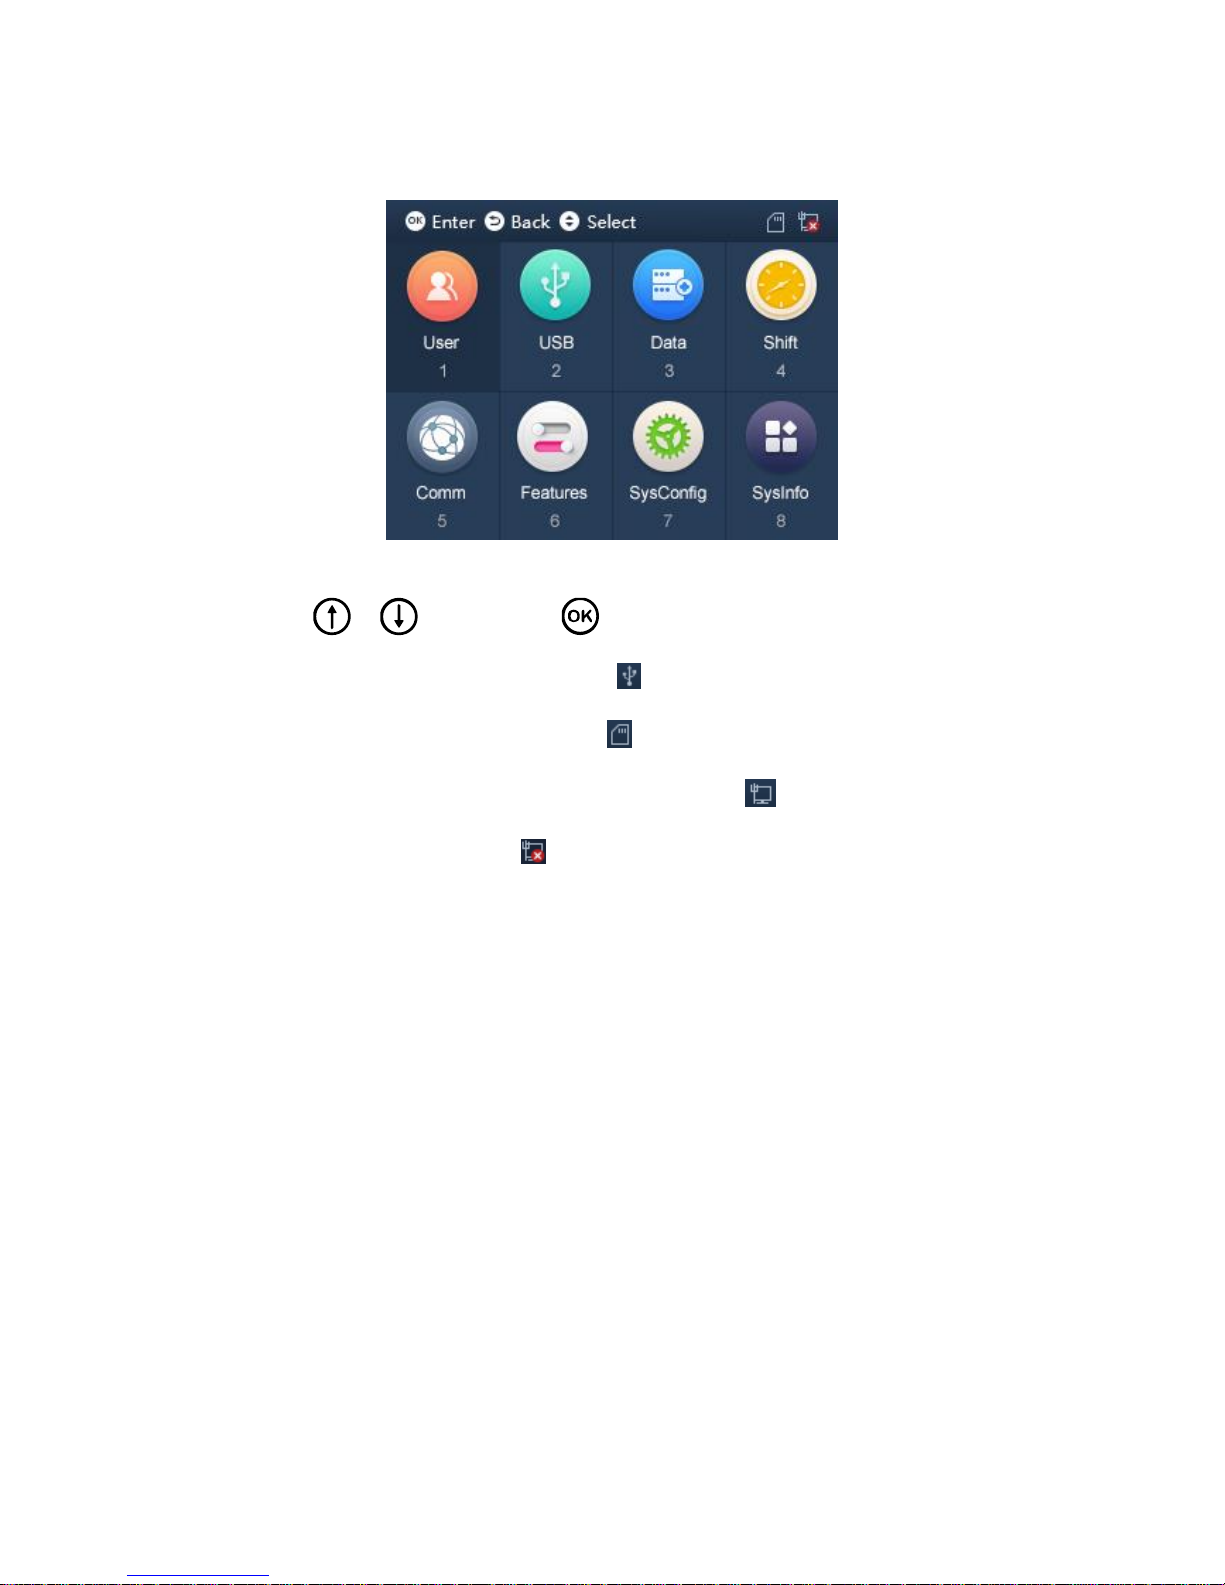
Click , system shows main menu, see Figure 3-5.
Note:
If you have added admin user in User Level (User→User Level), you can login via
fingerprint, card or password.
Figure 3-5
Click or to select, click or directly enter number below each function.
When you insert USB disk, you can see at the upper right corner.
When you insert SD card, you can see at the upper right corner.
When you connect the device to network, you can see at the upper right corner.
If disconnected, you can see .
3.3 User
3.3.1 New User
You can create user, and set new user info which includes ID, username, fingerprint, card,
password, photo and etc. A user can pass attendance via fingerprint, card or password.
System supports up to 1000 users.
Step 1. Select User>New User, click OK. See Figure 3-6 and Figure 3-7.
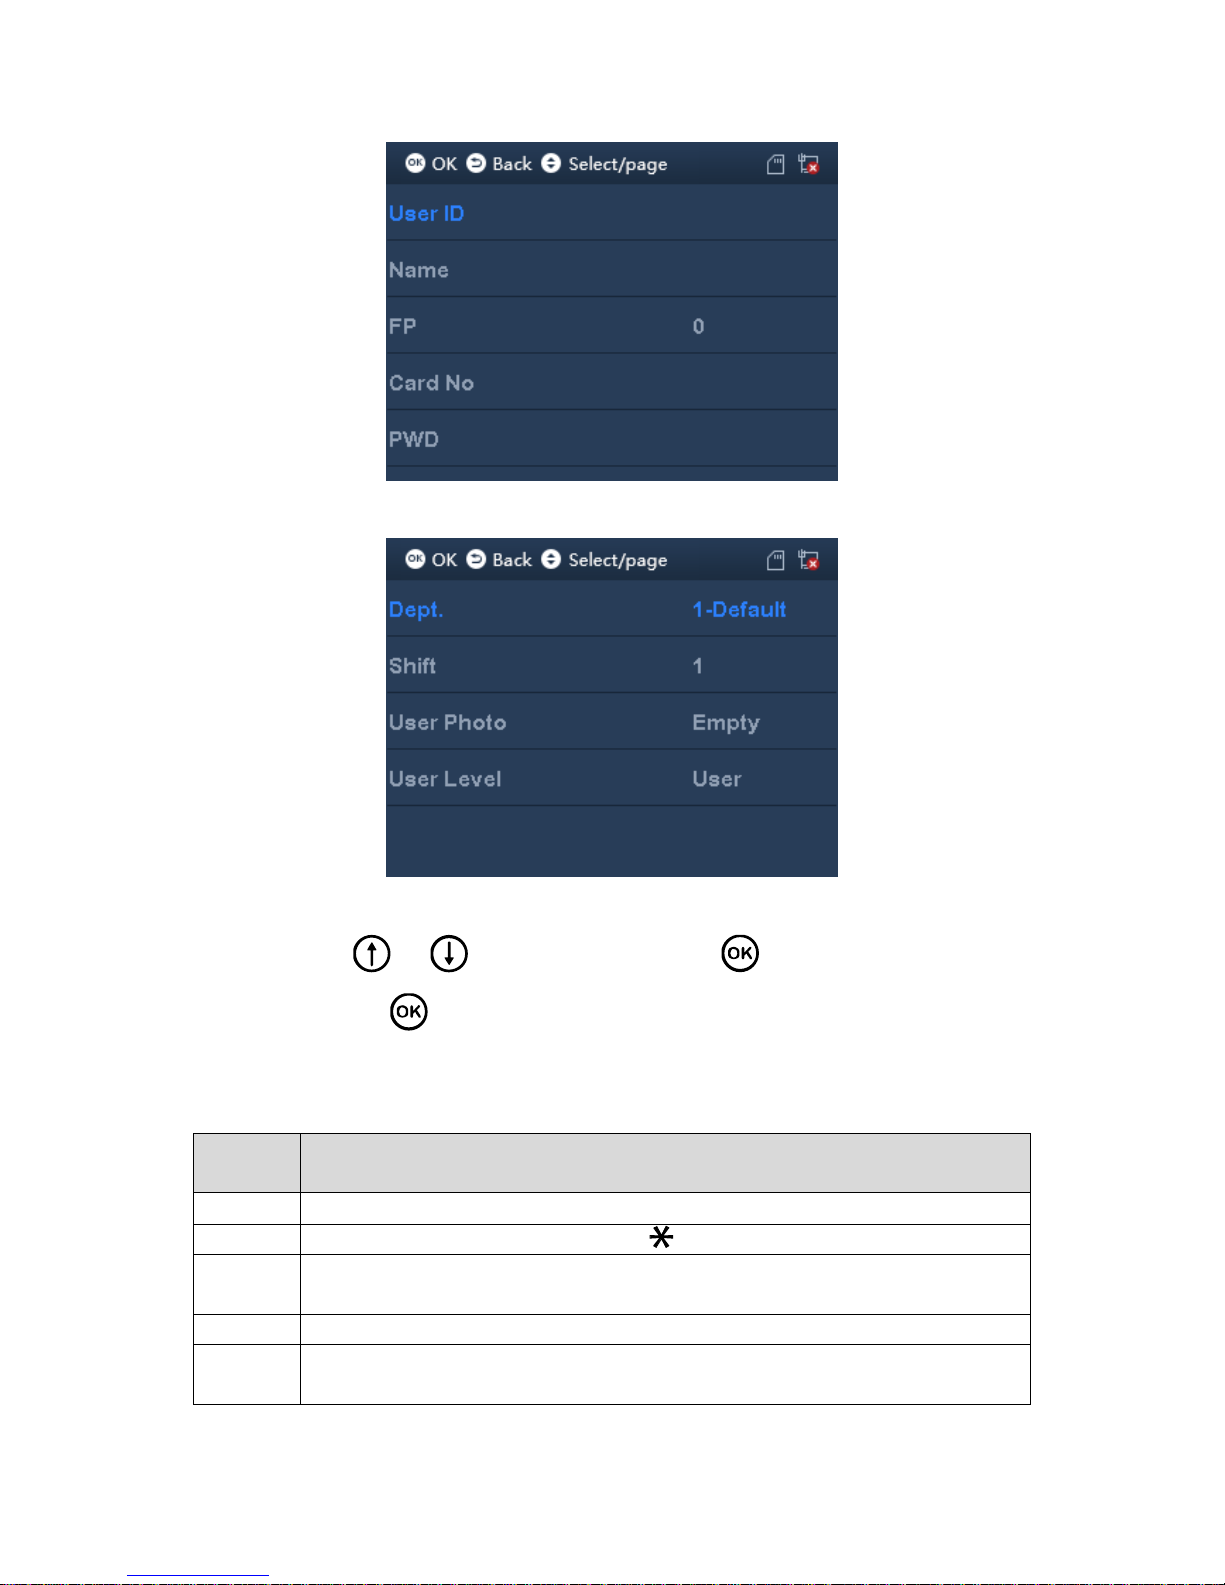
Figure 3-6
Figure 3-7
Step 2. Click or to select parameter, click to confirm. Enter number
into, and click to save.
Note:
User ID, card, password, department and shift can be edited via number key or
backspace.
Paramete
r
Note
User ID
Enter user no., max 11 digits of number.
Name
Enter username, max 32 letters. Click to switch input method.
FP
Record fingerprint. One user can record up to 3 fingerprints, and each fingerprint
requires confirmation of three times. Follow audio prompts to add.
Card No.
Enter card no., or swipe card.
Passwor
d
Enter password, which can be 1-8 digits of number.
 Loading...