

Dahua ASA1222E User Manual

1
Time Attendance (Standalone) User’s Manual
V1.0.0

Table of Contents
Table of Contents ...................................................................................................................... 2
Cybersecurity Statement and Recommendations ..................................................................... 4
Cybersecurity Statement ........................................................................................................... 4
Cybersecurity Recommendations ............................................................................................. 4
1 Product Overview ....................................................................................................... 1
1.1 Introduction ................................................................................................................... 1
2 Device Installation ...................................................................................................... 2
2.1 Checklist ......................................................................................................................... 2
2.2 Panel and Port ................................................................................................................ 2
2.3 Dimensions ..................................................................................................................... 3
2.4 Installation ..................................................................................................................... 3
3 System Operation ....................................................................................................... 5
3.1 Main Menu ..................................................................................................................... 5
3.2 User ................................................................................................................................ 6
3.2.1 Add User ............................................................................................................. 6
3.2.2 Edit User ............................................................................................................. 8
3.2.3 Set Department .................................................................................................. 9
3.3 Shift .............................................................................................................................. 10
3.3.1 Set Shift ............................................................................................................. 10
3.3.2 Schedule Setup ................................................................................................. 12
3.3.3 Set Late Time and Early leave Time .................................................................. 16
3.4 Attendance Statistics ................................................................................................... 16
3.4.1 Query User Attendance Log ............................................................................. 17
3.4.2 Export Monthly Attendance Log ....................................................................... 18
3.4.3 Export Monthly ATT. Report ............................................................................. 19
3.5 Feature ......................................................................................................................... 20
3.5.1 Date and Time .................................................................................................. 20

3.5.2 Features ............................................................................................................ 21
3.5.3 System .............................................................................................................. 25
3.6 USB ............................................................................................................................... 27
3.6.1 Import ............................................................................................................... 27
3.6.2 Export ............................................................................................................... 28
3.7 System Info .................................................................................................................. 28
3.7.1 Log .................................................................................................................... 28
3.7.2 Management .................................................................................................... 29
3.7.3 Registration Info ............................................................................................... 29
3.7.4 Device Info ........................................................................................................ 30
3.8 Attendance Operation ................................................................................................. 30
3.9 Attendance Statistics ................................................................................................... 30
3.9.1 Attendance Calculation .................................................................................... 31
3.9.2 Length Statistics ................................................................................................ 32
4 FAQ ........................................................................................................................... 33
Appendix 1 Note of Fingerprint ............................................................................................... 34
Appendix 2 Text Input ............................................................................................................. 36

Cybersecurity Statement and Recommendations
Cybersecurity Statement
You are responsible for the risks resulting from connecting your product to the
internet, including but not limited to, cyber-attacks, hacking attacks, computer viruses
and malware, etc. Please protect your data and personal information by taking
necessary actions, such as changing the default password and using a strong
combination, changing your password periodically, keeping your firmware up-to-date,
etc. Dahua is not responsible for any dysfunction, information leakage or other
problems caused by failure to take necessary precautions to secure your devices. We
will provide product maintenance services.
To the extent not prohibited by applicable laws, Dahua and its employees, licensees,
and affiliates are not liable for personal injury, or any incidental, special, indirect, or
consequential damages whatsoever, including, without limitation, damages for loss of
profits, corruption or loss of data, failure to transmit or receive any data, business
interruption, or any other commercial damages or losses arising out of or related to
the use or inability to use its products or services, however caused, regardless of the
theory of liability (contract, tort or otherwise), even if it has been advised of the
possibility of such damages. Some jurisdictions do not allow the exclusion or
limitation of liability for personal injury, or of incidental or consequential damages, so
this limitation may not apply to you.
In no event shall liability for all damages (other than as may be required by applicable
laws in cases involving personal injury) exceed the amount paid for products or
services.
Cybersecurity Recommendations
Mandatory actions to be taken towards cybersecurity
1. Change Passwords and Use Strong Passwords:
The number one reason systems get “hacked” is due to having weak or default passwords.
Dahua recommends changing default passwords immediately and choosing a strong
password whenever possible. A strong password should be made up of at least 8
characters and a combination of special characters, numbers, and upper and lower case
letters.
2. Update Firmware
As is standard procedure in the tech-industry, we recommend keeping NVR, DVR, and IP
camera firmware up-to-date to ensure the system is current with the latest security

patches and fixes.
Check the firmware release of your running devices. If the firmware release date is over
18 months old, please contact a Dahua authorized local distributor or Dahua technical
support for available update releases.
“Nice to have” recommendations to improve your network security
1. Change Passwords Regularly
Regularly change the credentials to your devices to help ensure that only authorized users
are able to access the system.
2. Change Default HTTP and TCP Ports:
● Change default HTTP and TCP ports for Dahua systems. These are the two ports used
to communicate and to view video feeds remotely.
● These ports can be changed to any set of numbers between 1025-65535. Avoiding the
default ports reduces the risk of outsiders being able to guess which ports you are using.
3. Enable HTTPS/SSL:
Set up an SSL Certificate to enable HTTPS. This will encrypt all communication between
your devices and recorder.
4. Enable IP Filter:
Enabling your IP filter will prevent everyone, except those with specified IP addresses,
from accessing the system.
5. Change ONVIF Password:
On older IP Camera firmware, the ONVIF password does not change when you change
the system’s credentials. You will need to either update the camera’s firmware to the
latest revision or manually change the ONVIF password.
6. Forward Only Ports You Need:
● Only forward the HTTP and TCP ports that you need to use. Do not forward a huge
range of numbers to the device. Do not DMZ the device's IP address.
● You do not need to forward any ports for individual cameras if they are all connected to
a recorder on site; just the NVR is needed.
7. Disable Auto-Login on SmartPSS:
Those using SmartPSS to view their system and on a computer that is used by multiple
people should disable auto-login. This adds a layer of security to prevent users without the
appropriate credentials from accessing the system.
8. Use a Different Username and Password for SmartPSS:

In the event that your social media, bank, email, etc. account is compromised, you would
not want someone collecting those passwords and trying them out on your video
surveillance system. Using a different username and password for your security system
will make it more difficult for someone to guess their way into your system.
9. Limit Feature of Guest Accounts:
If your system is set up for multiple users, ensure that each user only has rights to Feature
and functions they need to use to perform their job.
10. UPnP:
● UPnP will automatically try to forward ports in your router or modem. Normally this
would be a good thing. However, if your system automatically forwards the ports and you
leave the credentials defaulted, you may end up with unwanted visitors.
● If you manually forwarded the HTTP and TCP ports in your router/modem, this feature
should be turned off regardless. Disabling UPnP is recommended when the function is not
used in real applications.
11. SNMP:
Disable SNMP if you are not using it. If you are using SNMP, you should do so only
temporarily, for tracing and testing purposes only.
12. Multicast:
Multicast is used to share video streams between two recorders. Currently there are no
known issues involving Multicast, but if you are not using this feature, deactivation can
enhance your network security.
13. Check the Log:
If you suspect that someone has gained unauthorized access to your system, you can
check the system log. The system log will show you which IP addresses were used to
login to your system and what was accessed.
14. Physically Lock Down the Device:
Ideally, you want to prevent any unauthorized physical access to your system. The best
way to achieve this is to install the recorder in a lockbox, locking server rack, or in a room
that is behind a lock and key.
15. Connect IP Cameras to the PoE Ports on the Back of an NVR:
Cameras connected to the PoE ports on the back of an NVR are isolated from the outside
world and cannot be accessed directly.
16. Isolate NVR and IP Camera Network

The network your NVR and IP camera resides on should not be the same network as your
public computer network. This will prevent any visitors or unwanted guests from getting
access to the same network the security system needs in order to function properly.
For latest information about Dahua the cybersecurity statement and recommendations,
please visit www.dahuasecurity.com.

1
1 Product Overview
1.1 Introduction
Time attendance is an attendance device signing by fingerprint and password. The device
supports local attendance setup, USB attendance statistical export with no software. It
has simple and neat appearance, suitable for commercial building, shop, factory and etc.
The device mainly supports:
16 mechanical keys and 2.4 inch LCD.
Attendance by fingerprint or password.
Max of 2,000 fingerprints and 1,000 users.
Max of 100,000 attendance records.
Internal bell as prompt.
24 groups of shift.
20 departments.
Time shift prompt.
Warning:
Please use a DC 5V 1A adaptor, and work temperature cannot exceed ‐10℃~+55℃.
2 Device Installation
2.1 Checklist
No.
Name
Quantity
1
Unit
1
2
Power adaptor
1
3
Power line
1
4
Screw
Screw bag*1
Expansion bolt*3
5
Quick Start Guide
1
Chart 2-1
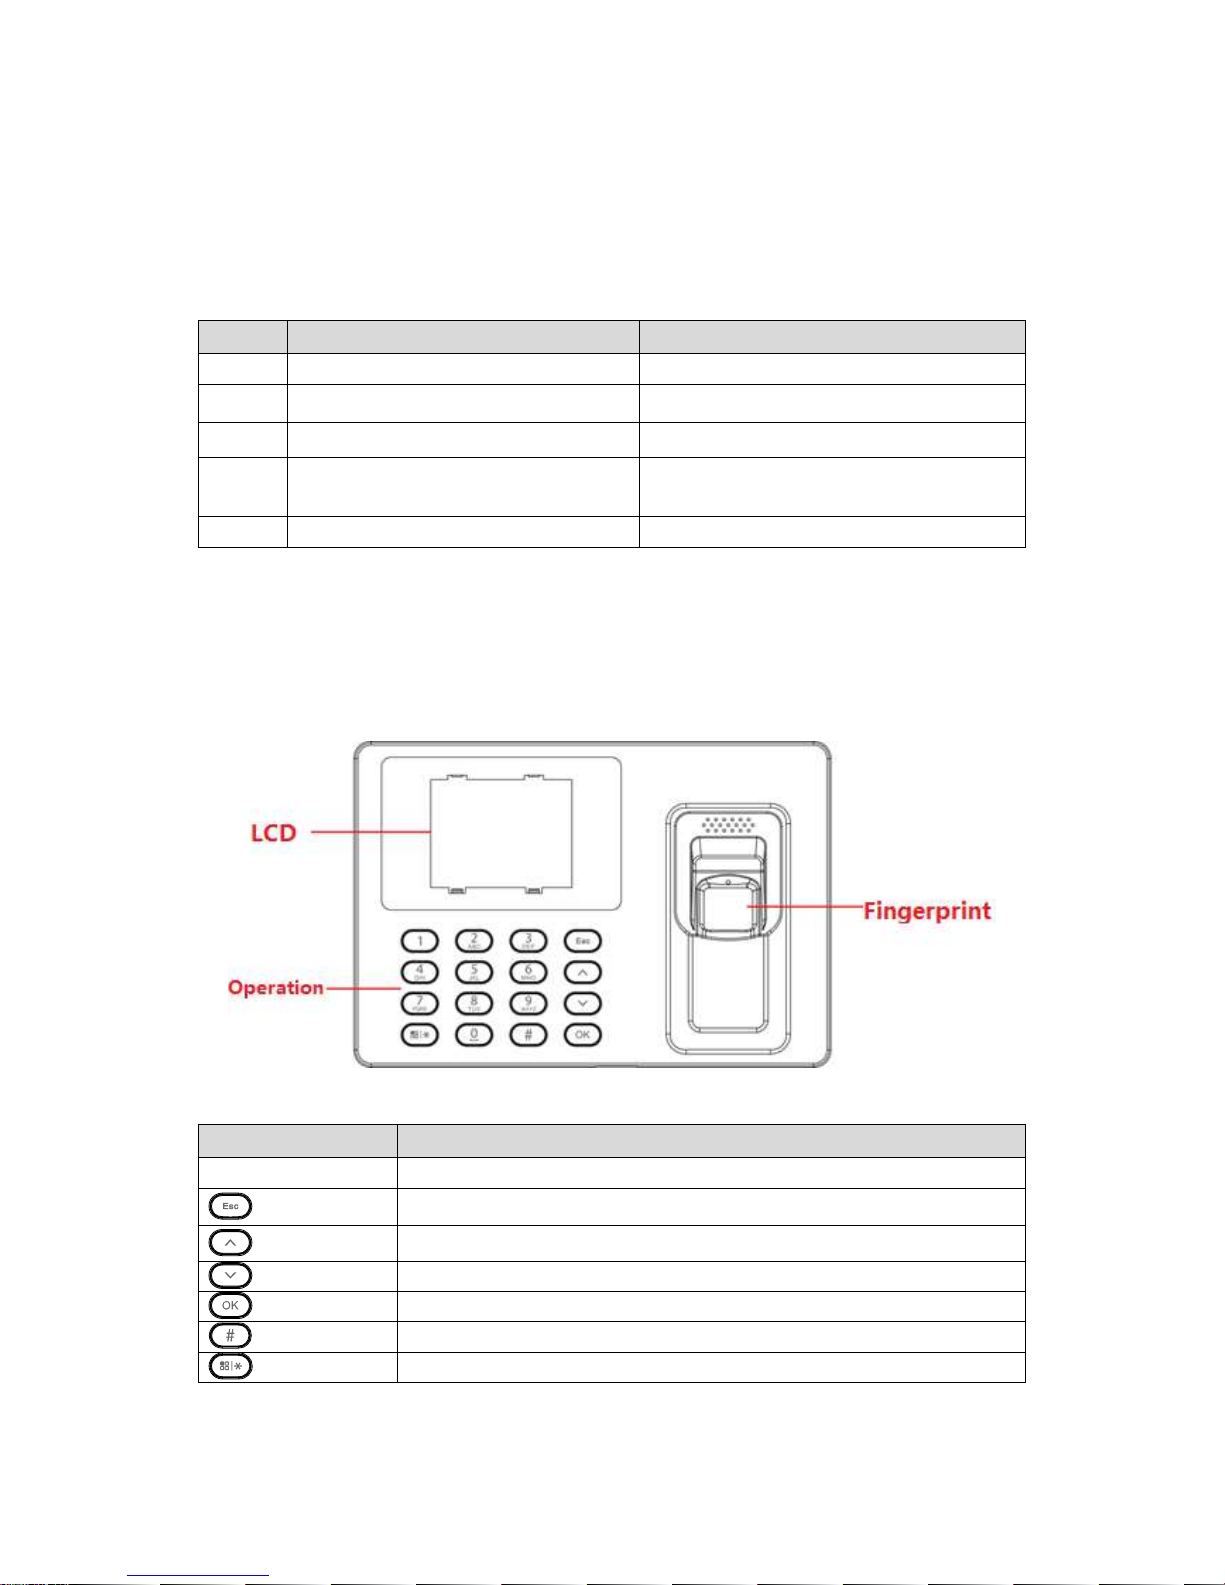
2.2 Panel and Port
Access controller appearance is shown in Figure 2-1 and Figure 2-2.
Figure 2-1
Icon
Note
0~9
Number key for input of number and letter
Back or exit
Up
Down
Enter or confirm
Backspace
Enter main menu or switch input
Chart 2-2

Figure 2-2
2.3 Dimensions
Figure 2-3
2.4 Installation
Time attendance installation is shown in Figure 2-4.
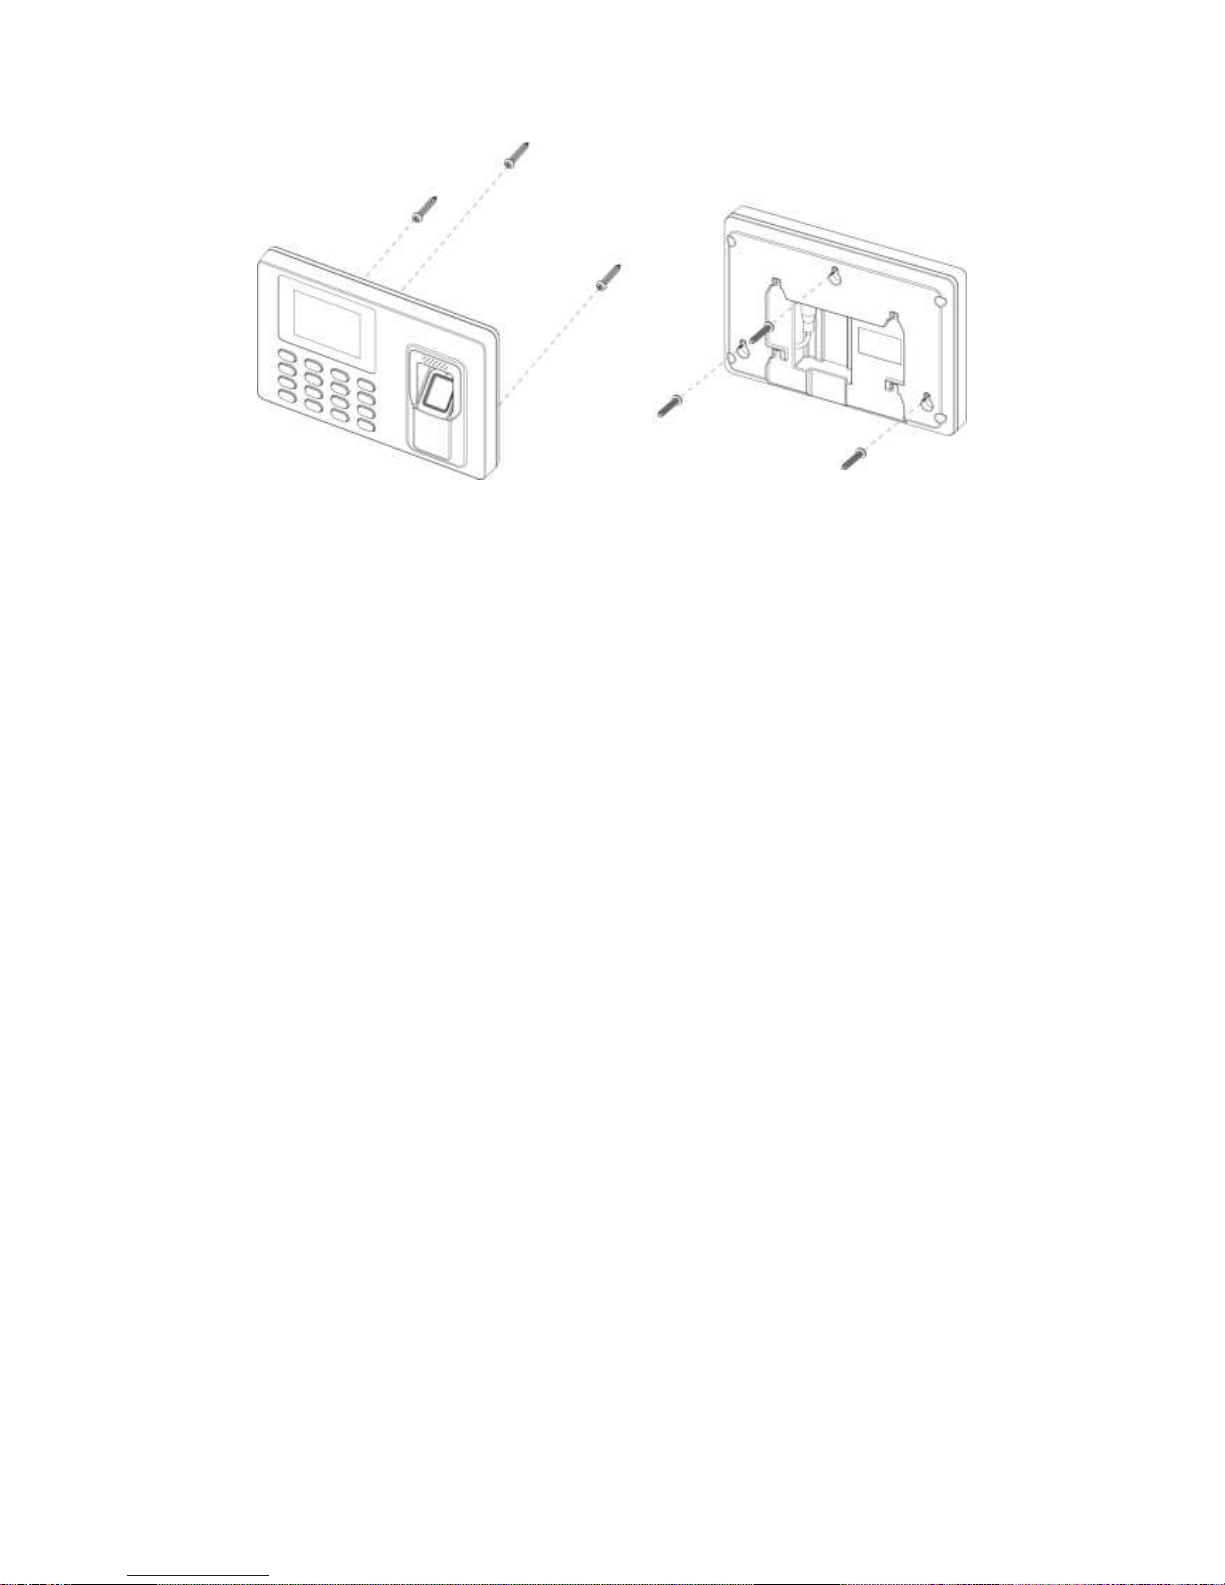
Figure 2-4
Installation steps:
Step 1. Stick installation map on the surface you are going to install, and dig hole in
accordance with hole position on the map. Insert expansion bolt into installation hole.
Step 2. Fix screw on wall in accordance with the map, leave a space of 2mm~2.5mm
between screw and wall.
Step 3. Plug in power plug, put wire in order to their corresponding areas.
Step 4. Hang the device on the screw.
3 System Operation
Note:
For fingerprint input, see Appendix 1.
For language input, see Appendix 2.
3.1 Main Menu
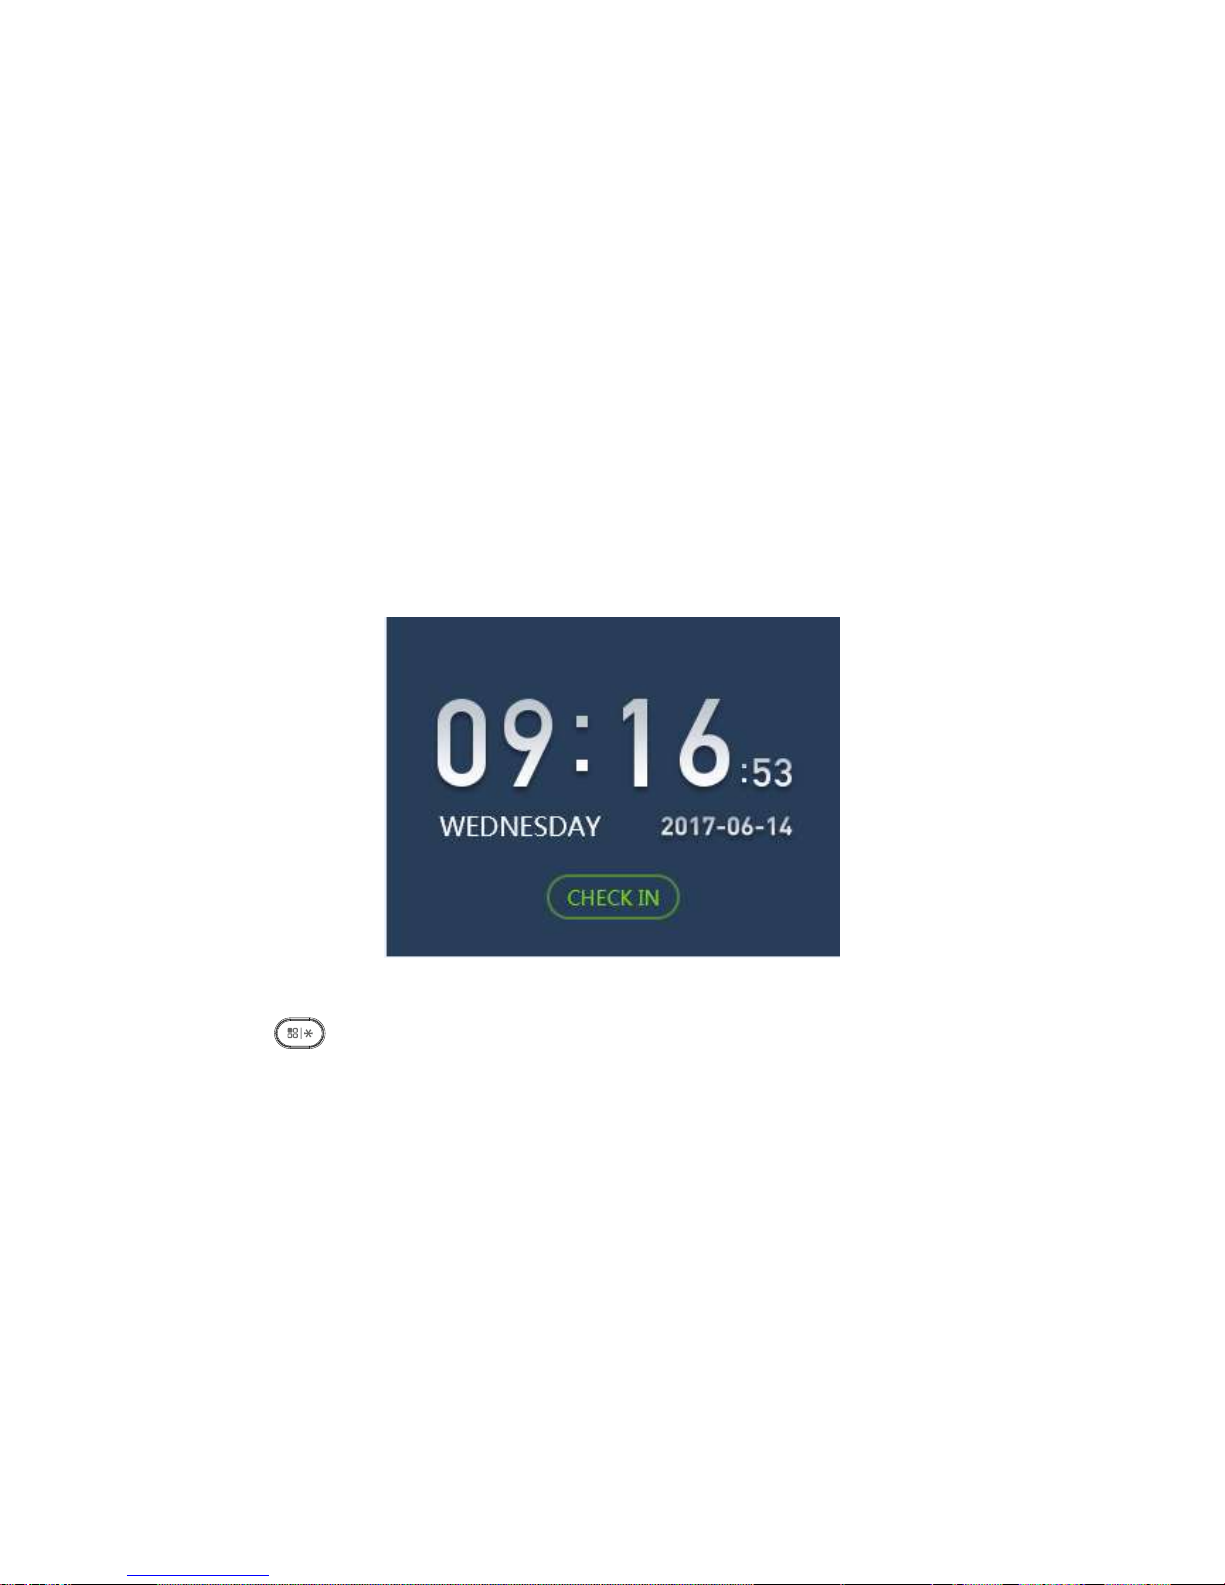
Plug in power, the device enters running status, and you can see time display when it
boots up, see Figure 3-1.
Note:
If you have no operation for a while in an interface, the system will go standby.
Figure 3-1
Click , system shows main menu, see Figure 3-2.
Note:
If you have added administrator user, you can enter administrator user ID and
password or fingerprint to log in.
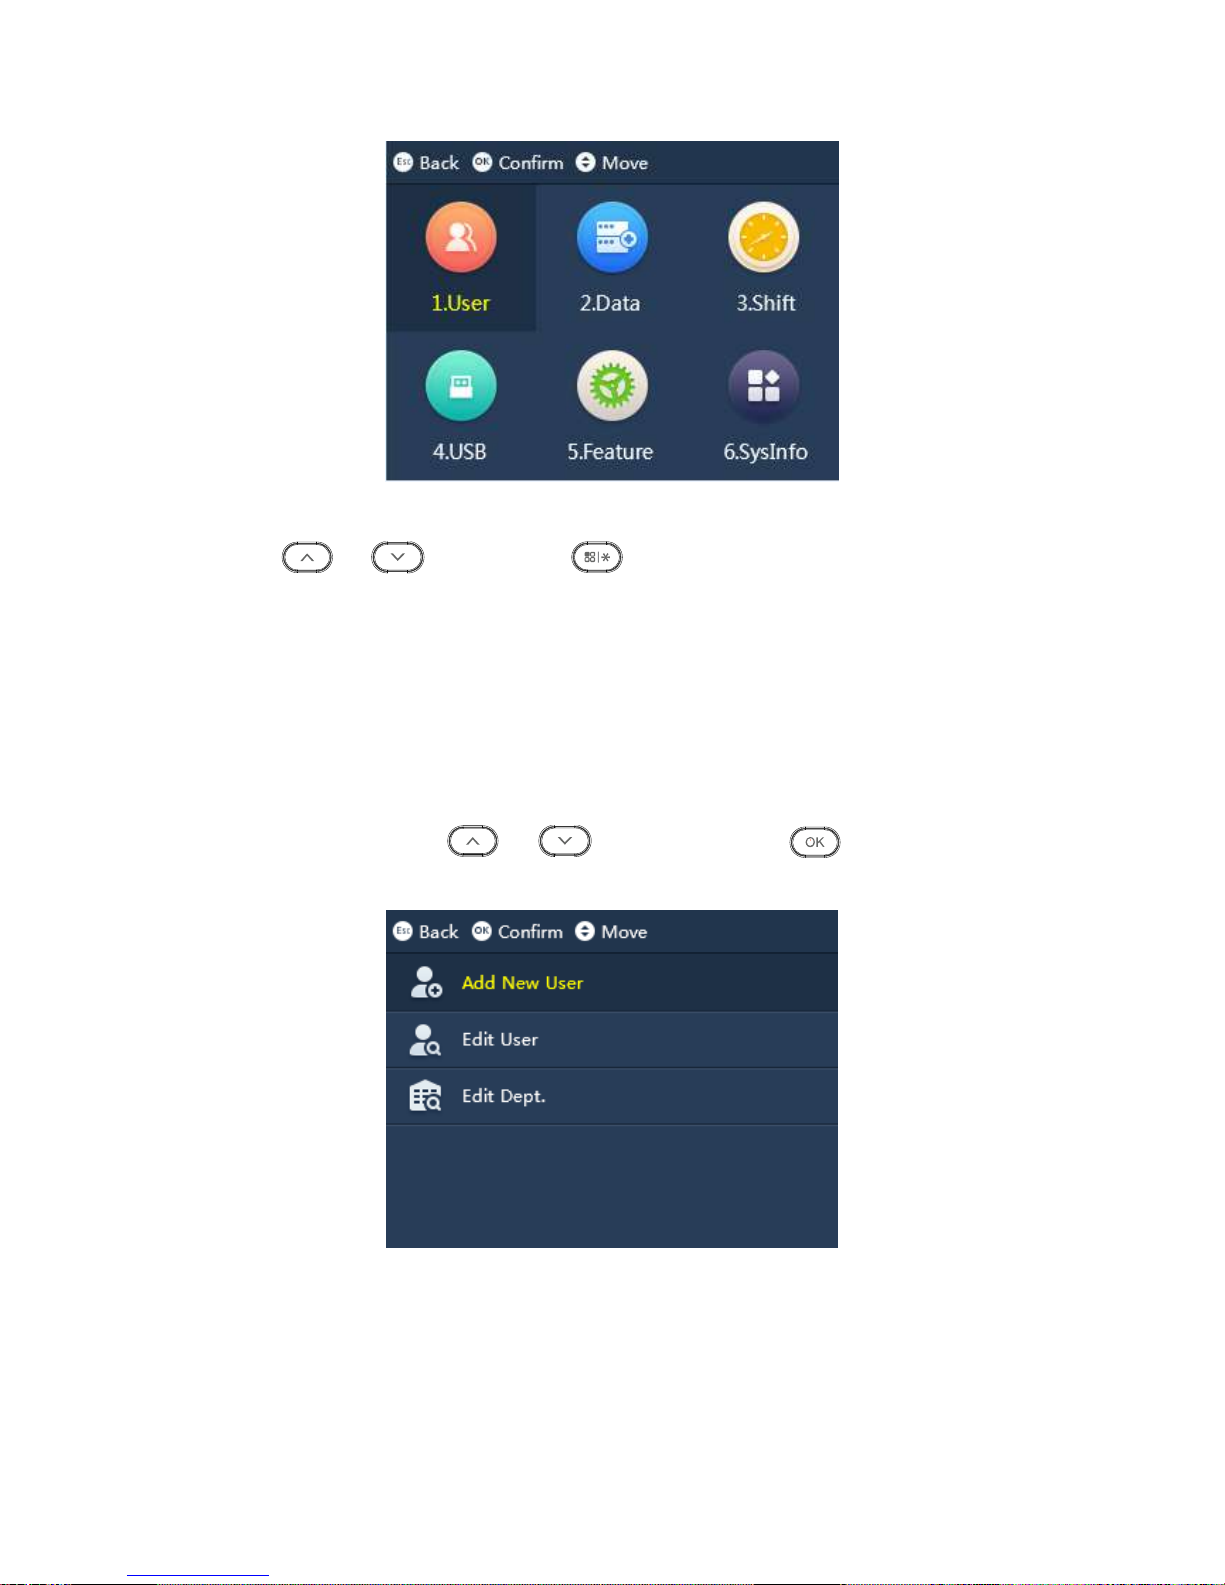
Figure 3-2
Press or to select, click or directly click number key to enter each
function.
3.2 User
You can add attendance user and department, and search and edit user and department
info. You can link user to department as to set shift of the entire department.
Enter main menu, click or , select User , click . Or directly click
number 【1】. See Figure 3-3.
Figure 3-3
3.2.1 Add User
You can add new user, as well as record new user info, including ID, name, fingerprint,
password and etc. A user can register for attendance by fingerprint and password. The
system supports up to 1000 users and 5 admin users.
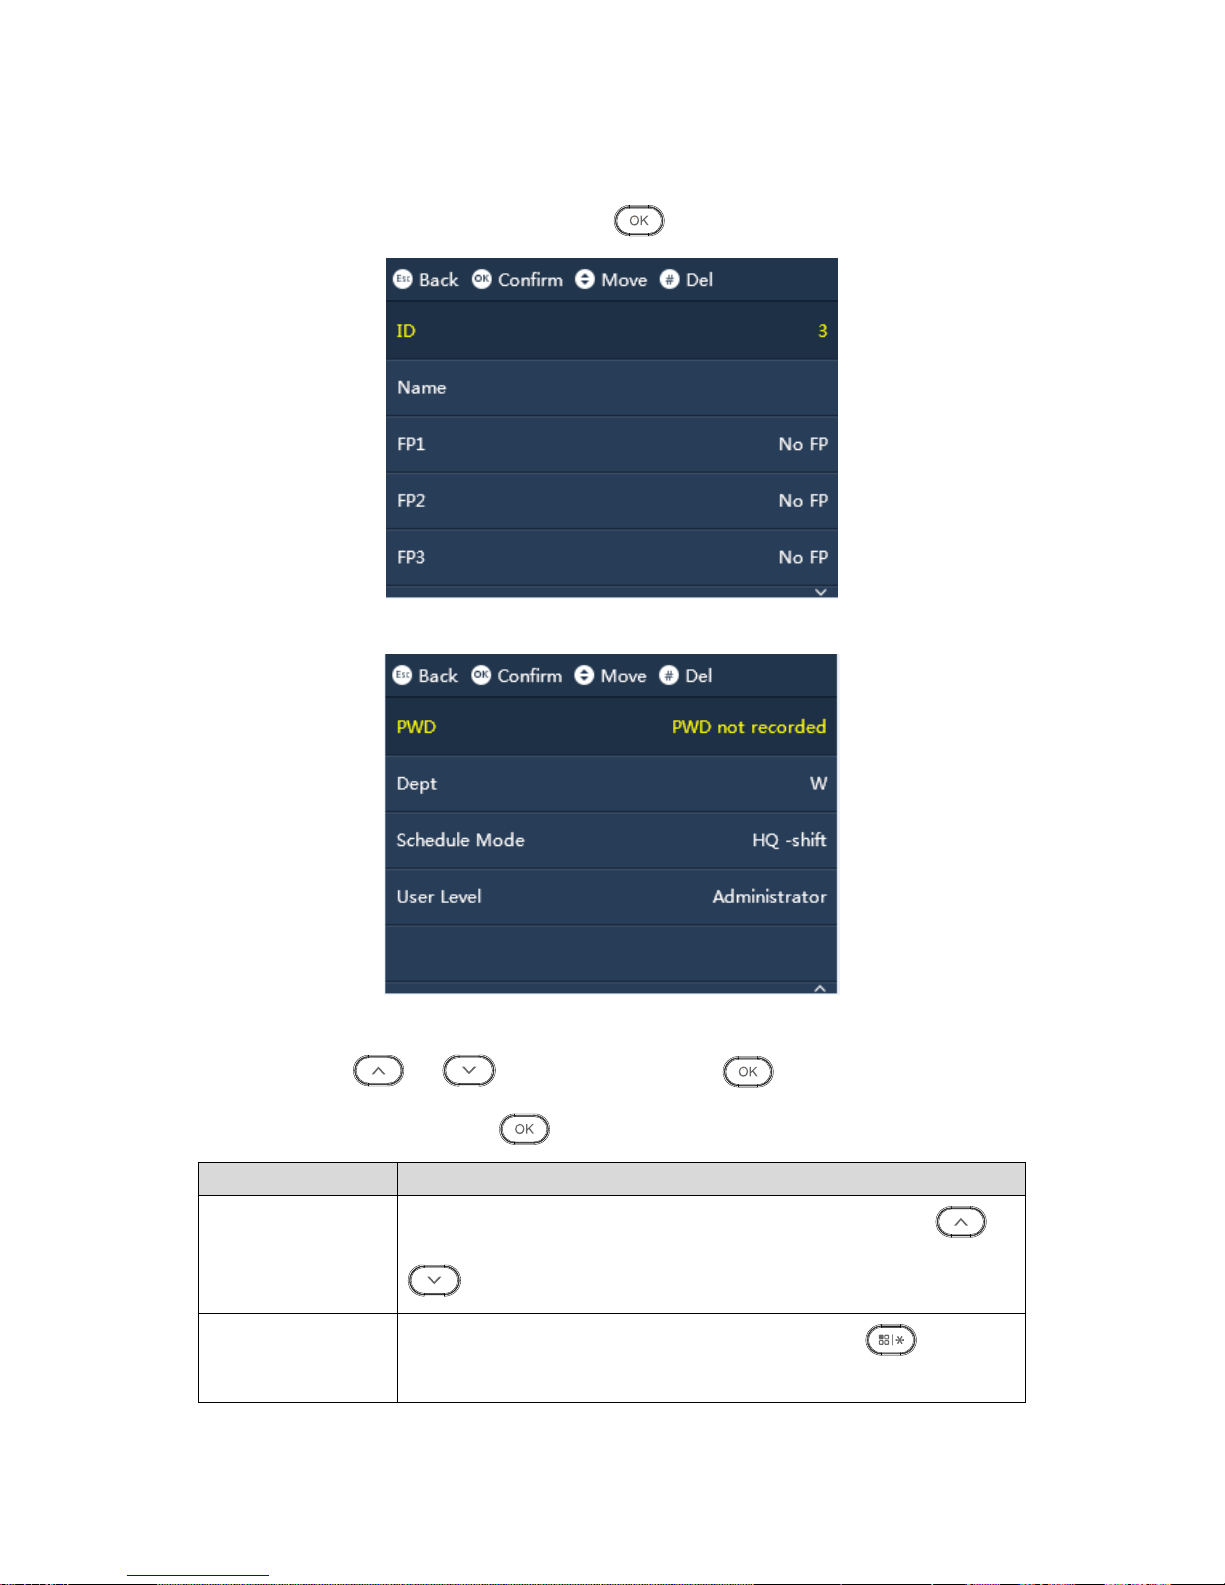
Step 1. Select “User>Add New User”, click . See .Figure3-4 and Figure3-5
Figure 3-4
Figure 3-5
Step 2. Click or , select parameter. Click to confirm. Click number
key to enter info, and click again to save. See Chart 3-2.
Parameter
Note
ID
Enter user ID, max of 8 digits of number. You can click or
to select number.
Name
Enter user name, max of 16 characters, click to switch
language input, including letter, symbol and number.
 Loading...