

DAHON SPEED DIAL, SPEED DIAL 5, SPEED DIAL 7 Installation And Operation Instructions Manual
Page 1

Installation Tools Needed:
2mm and 5mm hex wrenches,
torque wrench and cable cutters.
IMPORTANT!
Only brakes designated for direct-pull
levers such as the Single Digit
®
Ultimate, Single Digit®Ti, 7, 5 and 3
brakes can be used with Avid levers. If
you have any questions concerning
compatibility of levers and brakes, contact your professional bike dealer.
Follow these instructions carefully. If
you do not understand the instructions,
have the installation done by a professional bike mechanic.
1
2
LEVER INSTALLATION
IIMMPPOO RRTTAANNTT
Brakes are a safety-critical item on a bicycle.
Improper set-up or use of brakes can result in
loss of control or an accident, which could lead
to a severe injury.
It’s your responsibility to learn and understand
proper braking techniques. Consult the owner’s
manual for your bicycle and a professional bike
dealer. Practice your riding and braking techniques on a flat and level surface prior to
aggressive riding.
The effectiveness of braking is dependent on
many conditions over which Avid has no control
including the speed of the bicycle, type and condition of the riding surface, braking lever force,
proper installation and maintenance of brakes,
cables, levers, brake pads, the condition of the
bike, weight of the rider, proper braking techniques, weather, terrain, and a variety of other
factors.
Avid brakes and levers are not intended for use
on any motorized bicycle or vehicle. Any such
use could result in a serious personal injury.
ALWAYS RIDE UNDER CONTROL.
Remember, it takes longer to stop in wet conditions. To reduce the possibility of an accident
and minimize trail erosion, you should avoid
locking-up your wheels.
SPD-02/02
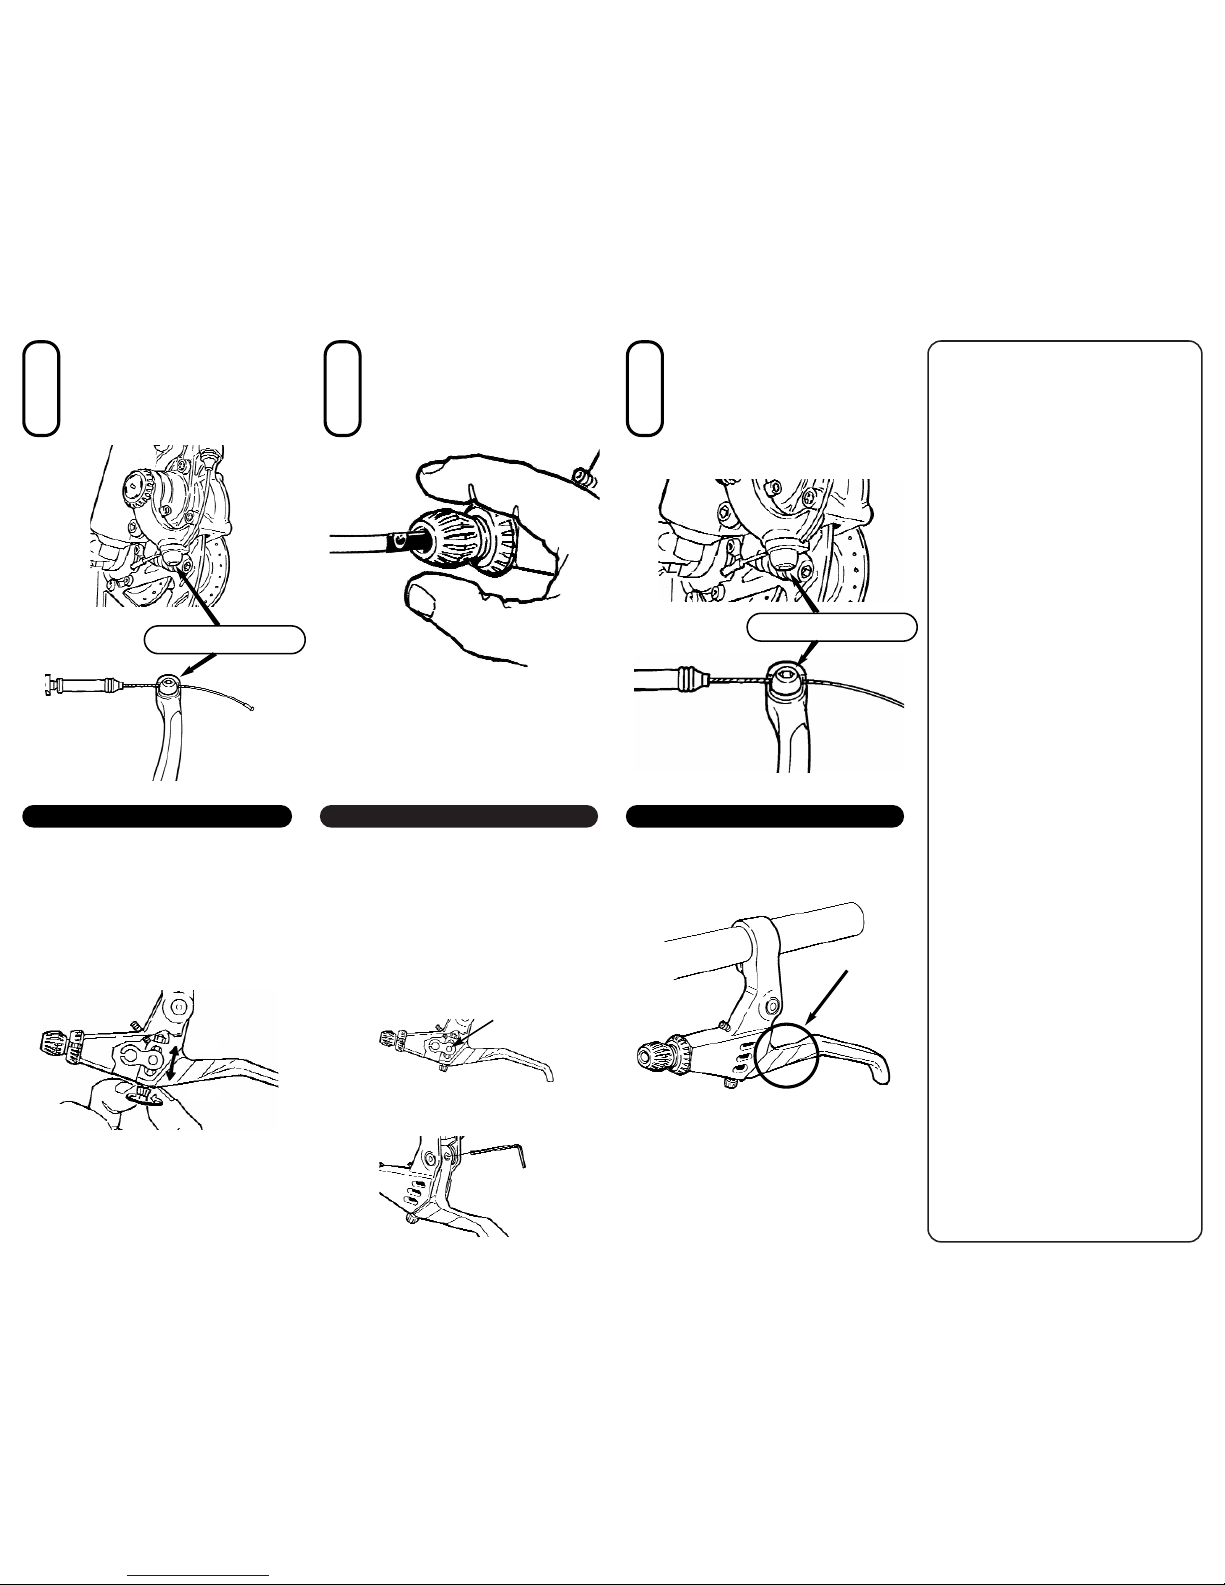
INSTALL THE LEVER
Slide the lever onto the bar to the
proper position. Tighten the clamp
bolt.
43
SET SPEED DIAL
Before setting the brake cable
length, turn the Speed Dial adjusting
thumbscrew so it is in the middle of
the range. After installation, adjust
the knob for the exact brake feel
that you want.
SET ADJUSTER BARREL
Before installing the cable, adjust
the barrel adjuster about half way
out. Make sure that the barrel slot
lines up with the slot in the body.
SET THE REACH
If you have smaller hands, you can
adjust the reach of the lever by
adjusting the reach adjustment
screw.
INSTALL CABLE
Feed the cable through the housing
to the brake and install the cable
end into the link.
5
SPEED DIAL
®
INSTALLATION
AND
OPERATION INSTRUCTIONS
These instructions apply to the Speed Dial
5, 7, and Ti brake levers.
Tighten Clamp Bolt to:
5 - 7 Nm (40 - 60 in lb)
Slots
Page 2
Avid, LLC 2875 W Oxford Ave # 7 Englewood, CO 80110 USA
tel 303.762.9353 fax 303.762.1133
Website: www.avidbike.com Email: tech@avidbike.com
Avid, Speed Dial, and Bend Zone are trademarks of Avid, LLC
Tech Tips/Maintenance
TEST THE SYSTEM
With two fingers, squeeze the brake
lever firmly about a dozen times to
ensure the cables are seated properly and operate smoothly. Make
sure the cable has not slipped at the
cable anchor bolt. Re-torque if necessary.
6 8
Crash Replacement
The primary feature that sets these
levers apart is the patented
Speed Dial Adjustable Leverage function. This design allows you to dial in
whatever feel you want, from a soft
feel (greater modulation) to a firmer
feel, or anywhere in between. This
adjustment can be done without any
tools.
ATTACH CABLE TO BRAKE
Follow the installation instructions
for your specific brake. Refer to
these instructions for torque specifications and brake setup.
Speed Dial
®
LIMITED WARRANTY
Avid, LLC (Avid) warrants to the original consumer purchaser of every Avid product that the product shall be free
from defects in workmanship and materials for a period of
one (1) year from the original date of purchase. The sole
remedy under this warranty is limited to, at Avid's sole discretion, repair or replacement of the defective product.
Labor and shipping costs are excluded from this warranty.
This warranty only applies to the original consumer purchaser and is not transferable.
THIS WARRANTY DOES NOT COVER normal wear
and tear (including, without limitation, brake pad wear), or
defects or failures that are related in any way to improper
installation or follow-up maintenance, accident, abuse or
neglect (including, without limitation, thread damage).
Since Avid has no control over the product's final use,
Avid also does not warrant the suitability of the product for
specific riders and/or uses.
IN NO EVENT SHALL AVID BE RESPONSIBLE FOR
INCIDENTAL OR CONSEQUENTIAL DAMAGES,
WHETHER BASED ON CONTRACT, WARRANTY,
NEGLIGENCE, OR STRICT OR PRODUCTS LIABILITY, INCLUDING WITHOUT LIMITATION, PERSONAL
INJURY DAMAGES, PROPERTY DAMAGE OR ECONOMIC LOSSES. Some states do not allow the exclu-
sion or limitation of incidental or consequential damages,
so the above limitation or exclusion may not apply to you.
AVID MAKES NO OTHER EXPRESS WARRANTIES.
ALL IMPLIED WARRANTIES, INCLUDING ANY WARRANTIES OF MERCHANTABILITY OR FITNESS FOR
A PARTICULAR PURPOSE, ARE EXPRESSLY LIMITED TO THE ONE (1) YEAR DURATION OF THIS WARRANTY. Some states do not allow limitations on how
long an implied warranty lasts, so the above limitation
may not apply to you.
Claims under this warranty may be initiated with any Avid
dealer. If this is not practical, you may contact Avid in
writing at the address listed below. Dated proof of purchase must accompany all warranty claims.
This warranty gives you specific legal rights, and you may
also have other rights which vary from state to state.
Tighten cable anchor bolt to
manufacturer’s specs.
Other benefits of Speed Dial include
matching the feel of the front
and rear brakes, especially if the arm
lengths or brake boss heights
differ.
Softer
Firmer
ADJUST BARREL
Use the barrel adjuster to take up
any slack in the cable.
7
Did you know that Avid offers a crash
replacement program? You see, our
lever blades have a Bend Zone
TM
.
This design allows the blade to bend
without damaging the body. So, if you
crash, you can finish your ride, replace
the blade, and get on with your life at a
reasonable price. Contact your local
bike shop for details.
Bend Zone
TM
Tighten cable anchor bolt to
manufacturer’s specs.
3. Loose lever blade? Use a 2mm hex
wrench to check the pivot pin set
screw.
1. If you use lighter spring tension at
the brake, you will use less hand energy when operating the brake lever.
Lighter spring tension will also keep
the brakes better centered.
2. To keep your levers creak-free and
operating smoothly, place a drop of
light-weight oil on both sides of the
cable link at the cross dowel.
Oil here
(Don’t forget the other side!)
 Loading...