

Daewoo WNK-340.G User Manual
1
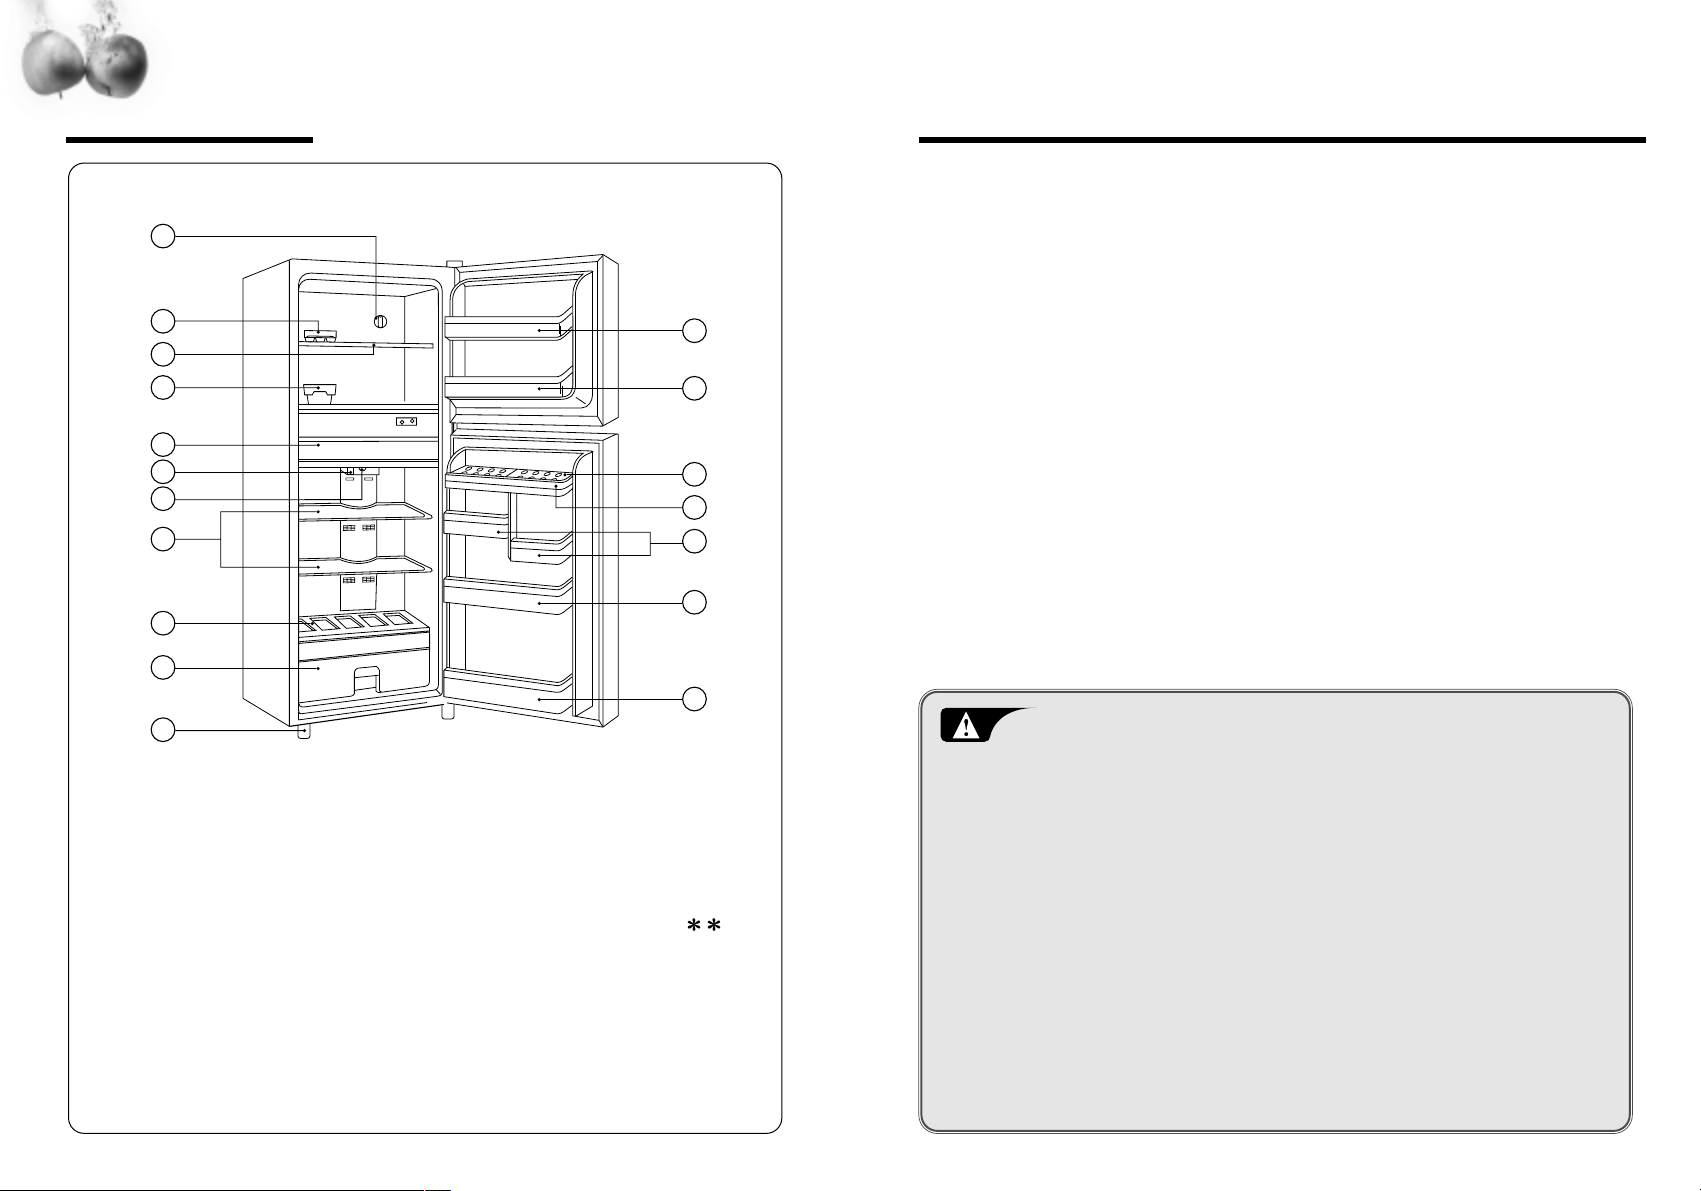
HERE ARE THE FEATURES OF YOUR NEW REFRIGERATOR
FEATURE CHART
2
2
4
3
5
7
8
9
10
11
1
12
13
17
18
15
16
6
14
! FREEZER
TEMPERA TURE
CONTROL KNOB
@ ICE TRA Y
# F SHELF
$ ICE BOX
% CHILLED CORNER
^ LAMP COVER
& REFRIGERA T OR
TEMPERA TURE
CONTROL SWITCH
* R SHELF
( CRISPER COVER
) CRISPER
1 ADJUST ABLE FOOT
2 F POCKET (SM)
-“2-ST AR” SECTION(
)
3 F POCKET (SM)
4 EGG CASE
5 EGG POCKET
6 R POCKET (SM)
7 R POCKET (MEDIUM)
8 R POCKET (BG)
Take a moment to know all the features and convenience. Numbers
match those in the illustration on page 1.
■ Ice Tray
Fill tray 3/4 full to allow expansion of water during freezing. Place tray in
freezer chest. To release cubes, twist lid slightly .
■ Removable Shelf
Both shelves can be removed by pulling forward.
■ Crisper
Use for fruit and vegetable storage. Both the crisper and its cover shelf are
removable for easy cleaning. Simply slide forward to remove.
■ Egg Pocket
Egg supporter in this pocket can be turned upside down.
Use for small size goods.
■ No Frost
No frost in freezing-room.
CAUTION
1. Be sure to check with your voltage, before inserting the power supply cord
into the socket.
2. Contact the earthing conductor to this unit with an attachment earthing
screws.
3. Don’t spill to this unit.
4. Don’t work with flammable spray , such as painting, near this unit.
5. Don’t put ignitable materials, such as benzine, L .P . Gas, alcohol, etc.,
into this unit.
6. Be careful of the leakage of any gas equipment near this unit.
7. Be sure not to hold to the door of this unit by children.
8. Be sure not to reinsert the power supply , cord with 5 minutes after
releasing it from socket. If not, a trouble may be occurred to compressor .

4
■Turn the temperature control in the refrigerator and freezer compartment
toward WINTER for colder temperature and toward MIN for warmer
temperature.
■Allow approximately 12 hours or overnight for the temperature to stabilize,
Then check to see if further adjustments are necessary .
To turn off the refrigerator
Disconnect the power supply cord. Remove ice tray and food. Leave
doors ajar for air circulation and dehumidification of both sections.
DEFROSTING THE REFRIGERA T OR
It is defrosted automatically in the refrigerator.
To Avoid The Risk of Electrical Shock or Death unplug the power
cord before replacing a burned out light bulb or cleaning.
Cleaning
Remove all food from the freezer and refrigerator sections.
Exterior : Wash with warm, soapy water, rinse and dry .
Use appliance polish or wax periodically to keep the exterior looking
like new.
Door gasket : Clean at least twice a year with mild soap and water . Rinse and dry.
Apply a light film of petroleum jelly to the gaskets to keep them soft.
Interior : Wash the liner with warm, soapy water, rinse and dry .
Interior and Exterior
1. DO NOT USE abrasive, heavy-duty Powders, etc.
These can scratch and dull the surface, depending on their abrasiveness
and the cleaning pressure applied.
Avoid metal pads and abrasive impregnated plastic, nylon and cloth pads,
etc.
2. DO NOT USE concentrated liquid dishwashing detergent (dissiove in
warm water before using.), abrasive cleaners, solvents or polishing agents
on plastic parts. These cleaners may cause cracking or discoloring.
HOW TO OPERATE
1. TEMPERA TURE CONTROL
3
Temperature is controlled by thermostat automatically .
The Temperature Control inside the refrigerator controls the degree of
cooling for each compartment.
Freezer T emperature Control
The control has four settings form
MIN to WINTER. The WINTER
mode is available only if atmosphere
temperature is below 10°C.
Refrigerator T emperature Control
The control has the four settings from
MIN to WINTER. The WINTER mode
is available only if atmosphere
temperature is below 10°C.
WINTER
MAX
MED
MIN
TEMP. CONTROL
WINTER
MAX
MED
MIN
TEMP. CONTROL
Starting your new refrigerator
To control temperature
Many factors may influence the internal temperature of the refrigerator
and freezer compartments.
■The temperature and humidity of the surrounding environment.
■The opening frequency of the doors and the amount of warm food placed in
the refrigerator.
■
The combination of food and containers stored in the refrigerator.
For these reasons, you may want to adjust the control to suit the season and your needs.
1. Clean the refrigerator thoroughly. Wipe the outside with a dry cloth, and the inside
with a damp cloth.
2. Set the temperature control knob at normal position.
3. Connect the power supply cord.
CAUTION
 Loading...