

Page 1

OWNER’S MANUAL
VACUUM CLEANER
CONTENTS Pages
READ AND KEEP THIS
■ Thank you for purchasing this vacuum cleaner.
■ For proper operation, please read this manual before using.
Important safety instruction
. . . . . . . . . . . . . . . . . . . . . .
2
Names of parts and using . . . . . . . . . . . . . . . . . . . . .
3~4
Using the dusting brush / crevice nozzle
. . . . . . . . . . . .
5
Storage. . . . . . . . . . . . . . . . . . . . . . . . . . . . . . . . . . . . .
5
Using the carry handle . . . . . . . . . . . . . . . . . . . . . . . . .
6
Cleaning the floor nozzle. . . . . . . . . . . . . . . . . . . . . . . .
6
Emptying the dust box. . . . . . . . . . . . . . . . . . . . . . . . . .
7
Cleaning the exhaust filter . . . . . . . . . . . . . . . . . . . . . . .
8
Before asking for service. . . . . . . . . . . . . . . . . . . . . . . .
9
RCC-740 EN 6/19/06 3:26 PM Page 1
Page 2
IMPORTANT SAFETY INSTRUCTIONS
WARNING
To reduce the risk of fire, electrical shock, injury to persons or damage when
using your vacuum cleaner, follow basic safety precautions including the
following;
1. Use only as description in this manual.
Use only manufacturer’s recommended attachments.
2. Do not leave appliance when plugged in, Unplug from outlet when not in use and
before servicing.
3. Do not use outdoors or on wet surfaces.
4.
Do not allow to be used as a toy.Close attention is necessary when used by or near children.
5. Do not use with damaged cord or plug. If appliance is not working as it should, has been
dropped, damaged, left outdoors, or dropped into water, return it to a service center.
6.
Do not pull or carry by cord, use cord as a handle,close a door on cord, or pull cord around
sharp edges of corners. Do not run appliance over cord. Keep cord away from heated surfaces.
7. Do not unplug by pulling on cord. To unplug, grasp the plug, not the cord.
8. Do not handle plug or appliance with wet hands.
9. Do not put any object into openings. Do not use with any opening blocked; keep free of lint,
hair, and any thing that may reduce air flow.
10. Keep hair, loose clothing, fingers, and all parts of body away form openings and moving
parts(Covers, Handle, Floor nozzle, etc.).
11. Do not use without the dust box or filters.
12. Always turn the vacuum cleaner off before;
Emptying the dust box. Cleaning filters.
13. Do not leave vacuum cleaner with the plug connected to mains outlet-unplug when not in use.
14. Do not vacuum anything that is burning or smoking, such as cigarettes ends, matches or
hot ashes.
15. Do not vacuum flammable or combustible liquids, such as gasoline, or use in areas where
they may be present.
16. Keep end of hose, wands and other opening away from your face and body.
Keep your hands, feet, hair and clothing away from moving parts.
17. Turn off controls(switch) before unplugging.
18. Use extra care when cleaning on stairs.
19. This appliance is intended for household use only and not for commercial
or industrial use.
20. It must be replaced by the manufacturer or its service agent or a similarly qualified person
in order to avoid a hazard.
☞
2
RCC-740 EN 6/19/06 3:26 PM Page 3
Page 3

NAMES OF PARTS AND USING
CABLE REWIND BUTTON
CABLE REWIND BUTTONCABLE REWIND BUTTON
3
FLOOR NOZZLE
TELESCOPIC TUBE
TUBE / NOZZLE CONNECTOIN
HOSE INSTALLATION / REMOVAL
Select the appropriate settting
of the pedal according to the
surface to be cleaned.
Press the button
in the direction shown
by the arrows or
pull(or push) out
the tube.
Rotate the tubes in the direction
shown by the arrows and pull
tubes(or floor nozzle) apart.
Hold the hose and match tabs to
align with slot inlets
of the vacuum cleaner.
Insert the hose.
Push firmly until hose locks
into place.
To remove hose, press the button
on the hose, then pull the hose
out from the vacuum cleaner.
Carpet Hard Floor
Handle grip
Suction control
Telescopic tube
Main floor nozzle
①
①
①
②
②
②
CABLE REWIND BUTTON
RCC-740 EN 6/19/06 3:26 PM Page 4
Page 4

CABLE REWIND BUTTON
CABLE REWIND BUTTONCABLE REWIND BUTTON
4
SUCTION CONTROL
POWER CONTROL SWITCH
DUST FULL INDICATOR
ON/ OFF SWITCH BUTTON
If you slide the suction
control on the hose,
you can adjust suction
power.
This red on which means
the dust box is full or the
filter in the dust box is
blocked by the dust.
Please empty the
dust box and
clean the filter in
the dust box.
Pull out the power cable to
the desired length.
Do not pull out past the
red tape.
To rewind the power cable, push
down on the carry handle.
Hold the plug while the power
cable is rewinding to prevent the
power cable from whipping.
Turn the unit
off(on) by pressing
the ON/OFF
switch button
on the unit.
Adjust the suction power by rotating
the swich on the unit.
Carry handle,
Cord rewind
Dust box
CABLE REWIND BUTTON
RED
RCC-740 EN 6/19/06 3:26 PM Page 5
Page 5

USING THE DUSTING BRUSH / CREVICE NOZZLE
STORAGE
5
Collapse the telescopic tube completely.
Slide the tube clip on the telescopic
tube into the slot on the rear of the
vacuum cleaner.
Slide the tube clip on the telescopic
tube into the slot on the bottom of
the vacuum cleaner.
Fit the dusting brush or crevice nozzle onto
the end of the handle grip or the telescopic
tube.
The dusting brush is for vacuuming the window
frame or irregular surfaces.
The crevice nozzle is for vacuuming in those
hard-to-reach places.
Crevice
nozzle
Dusting
brush
Tube clip
Slot
Slot
①
②
Tube clip
Button
NOTE
When use the crevice mozzle, the
dust full indicator may be operated.
RCC-740 EN 6/19/06 3:26 PM Page 6
Page 6

USING THE CARRY HANDLE
6
CLEANING THE FLOOR NOZZLE
Fit the dusting brush or crevice nozzle onto the end of the handle grip, then
remove the hair, loose clothing or lint on the opening of the floor nozzle.
Hair, loose clothing, lint, etc.
NOTE
If you lift the handle of the dust box
up, the dust box is separated.
Do not use the handle of the dust
box for carrying.
Use the handle of the dust box for
only emptying the dust box.
Handle of
dust box
Dust box
Vacuum cleaner
Move the vacuum cleaner to the
other place by holding the carry
slot under the one.
Pull the carry handle out from the
vacuum cleaner, then move the
vacuum cleaner to the other place
by holding the one.
Carry slot
Carry handle
RCC-740 EN 6/19/06 3:26 PM Page 7
Page 7

EMPTYING THE DUST BOX
7
EMPTYING THE DUST BOX
SEPARATING THE DUST BOX
CLEANING THE FILTERS
The dust box needs emptying when dust reaches the MAX mark on the
dust box or the dust full indicator is on.
If the dust full indicator is on after emptying the dust box, dust box or
filter needs cleaning.
Lift the dust box
up.
Pull out of the cover
release button in the
direction shown by
the arrows.
Remove the
filters by rotating
clockwise.
Pull out the filter
from the frame.
Hold the dust box
over wastebasket
and press the release
button, then dust will
fell down as the cover
is open.
Dust
box
vacuum
cleaner
Cover Release
button
Release
button
Cover
1
1
1
2
2
3
34
2
NOTE
The dust box when separating,
put certainly in table place or
the dust box catch. If not, the
dust box there is a possibility
of falling.
NOTE
If not dry out the washable filter, do not use the vacuum cleaner.
The wet washable filter make the vacuum cleaner trouble.
Pull out the washing brush from the unit and clean the washable filter with
the washing brush.
Clean the dust box with running water.
Allow the washable or mesh filter to dry completely in a shaded location for dry.
①
①
②
②
➂
RCC-740 EN 6/19/06 3:26 PM Page 8
Page 8
EMPTYING THE DUST BOX
8
EMPTYING THE DUST BOX
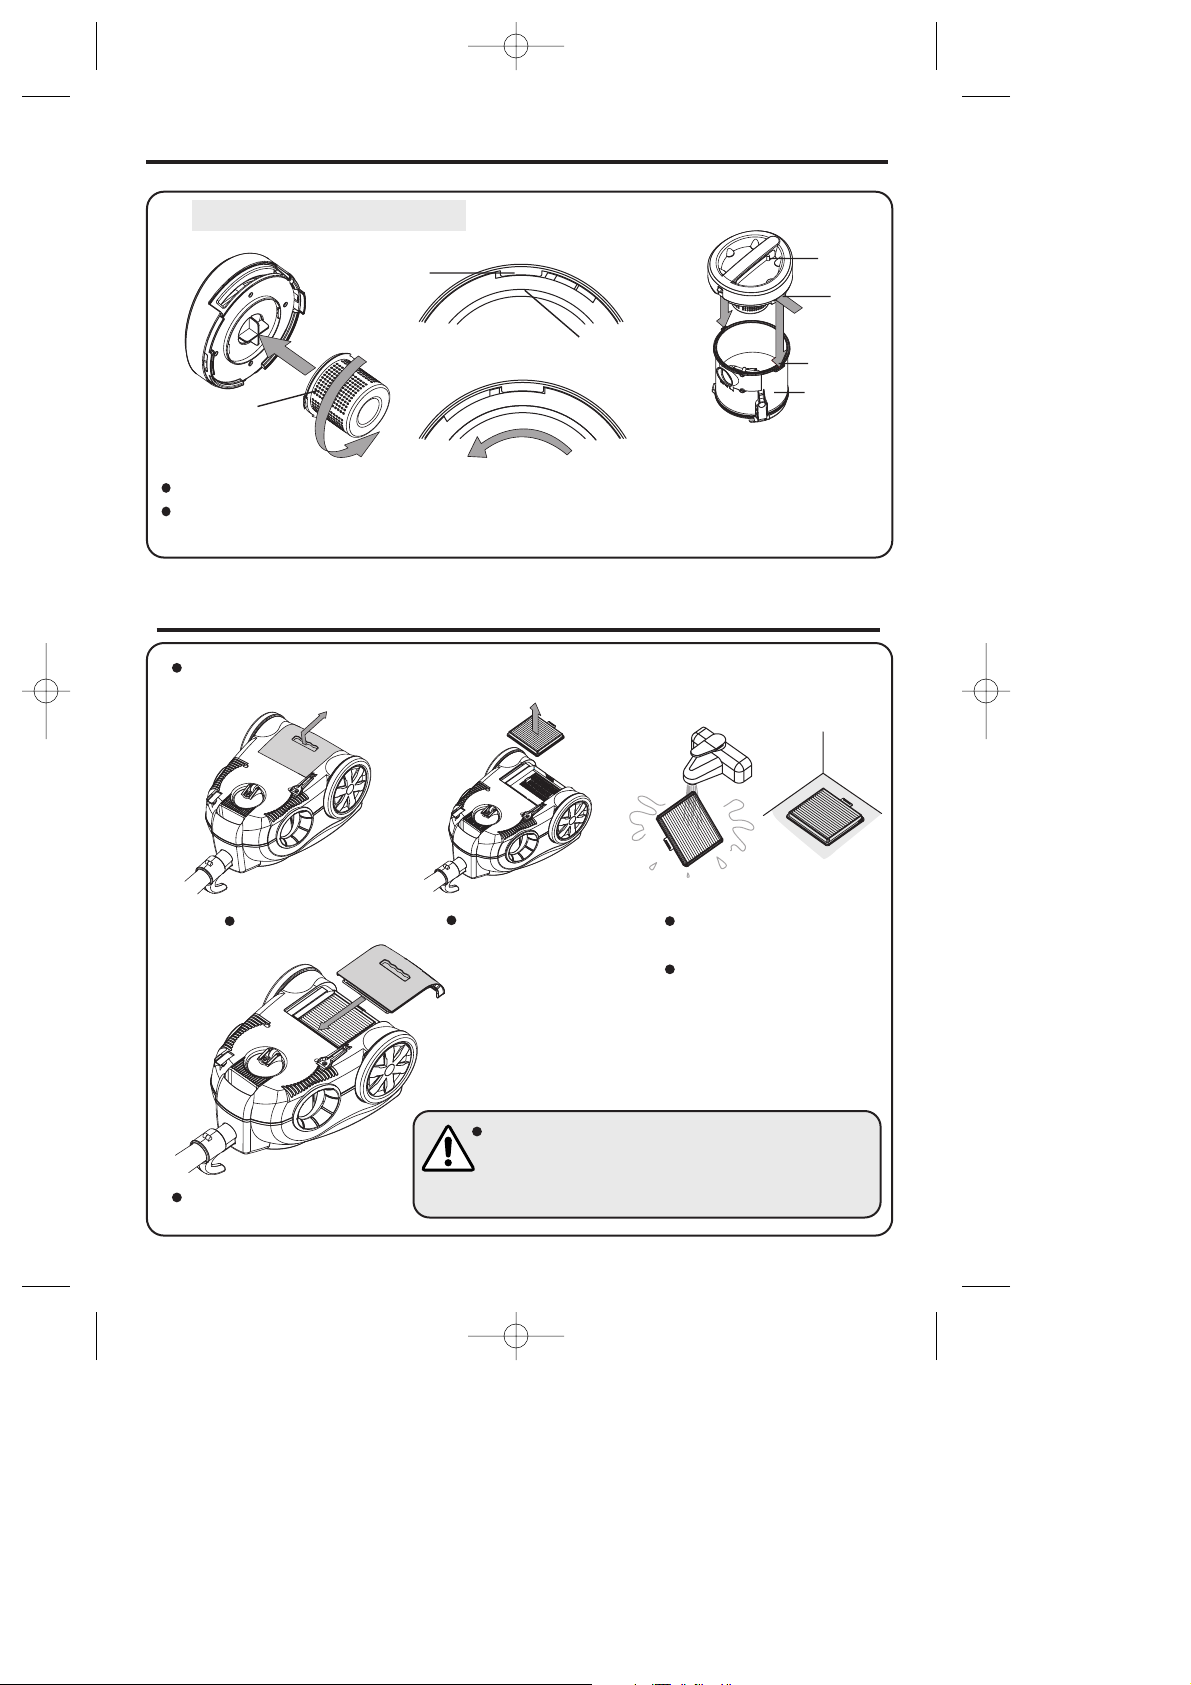
CLEANING THE EXHAUST FILTER
Attach filter assembly to the guide by rotating counter clockwise unit it locks into place.
Insert the tab first in the wide projection and press the opposition side.
Please check fixation between the cover and dust box.
Open the filter cover.
Pull out the filter
box.
Assemble the filter box to
the vaccum cleaner.
Clean the HEPA filter
with running water.
Allow the filter to dry
completely in a
shaded
location for dry.
The filter needs cleaning when suction power is low.
The filter should be cleaned by perisods(about every 2 months.)
1
13
4
2
2
①
①
①
②
②
②
If not dry out the washable filter, do not use
the vaccum cleaner.
The wet washable filter make the vacuum
cleaner trouble.
NOTE
Filter
assembly
Guide
Cover
Ta b
Projection
Dust box
Filter
assembly
RCC-740 EN 6/19/06 3:26 PM Page 9
Page 9

BEFORE ASKING FOR SERVICE
SPECIFICATIONS
9
PROBLEM POSSIBLE REASON
POSSIBLE SOLUTION
Cleaner won’t run.
Dust escaping
from cleaner.
Cleaner tools
won’t pick up.
Cleaner won’t
pick-up or
low suction
1. Power cable not firmly
Plugged into outlet.
2. Hose not firmly installed.
3. Needs service.
1. Dust box not installed correctly.
2. Dust box is full.
3. Filter clogged.
4. Nozzle/dirt passage clogged.
1. Dust box is full.
2. Dust box not installed correctly.
3. Hose not installed correctluy.
1. Hose clogged.
2. Hose inlet clogged.
3. Dust box is full.
4. Filters clogged.
5. Floor nozzle clogged.
1. Remove hose and tools; remove obstruction.
2. Remove hose and clean inlet.
3. Empty dust box.
4. Clean filters.
5. Remove obstruction.
1. Empty dust box.
2. Review dust box.
3. Review hose installation.
1. Review dust box.
2. Empty dust box.
3. Remove filter and clean.
4. Remove nozzle;
Check hose; remove obstruction.
1. Plug vacuum cleaner firmly.
2. Review hose installation/renival.
3. Take to a Service Center.
Rating
Watts
Size(unit)
Weight(unit)
Power cable length
230V 50Hz
1800W
413✕228✕295mm(L✕W✕H)
4.5kg
5m
Specifications can be changed for improvement without notice.
☞
Disposal of Used Electrical & Electronic Equipment
The meaning of the symbol on the product, its accessory or packaging indicates that this product shall not
be treated as household waste. Please, dispose of this equipment at your applicable collection point for the
recycling of electrical & electronic equipments waste. In the European Union and Other European countries
which there are separate collection systems for used electrical and electronic product. By ensuring the correct disposal of this product, you will help prevent potentially hazardous to the environment and to human
health, which could otherwise be caused by unsuitable waste handling of this product. The recycling of
materials will help conserve natural resources. Please do not therefore dispose of your old electrical and
electronic equipment with your household waste. For more detailed information about recycling of this product, please contact your local city office, your household waste disposal service or the shop where you purchased the product.
RCC-740 EN 6/19/06 3:26 PM Page 10
Page 10
MEMO
RCC-740 EN 6/19/06 3:26 PM Page 11
Page 11

MEMO
RCC-740 EN 6/19/06 3:26 PM Page 12
 Loading...