

Precautions
Please keep the video machine's guarantee card and receipt safe for warranty purposes.
◆ Read carefully through this manual to familiarize yourself with this
high-quality video recorder.
◆ Make sure the rating of your household electricity supply matches
that shown on the back of the video recorder.
◆ Refer to this chapter and the "Initial installation" chapter to help you
install and adjust your video recorder.
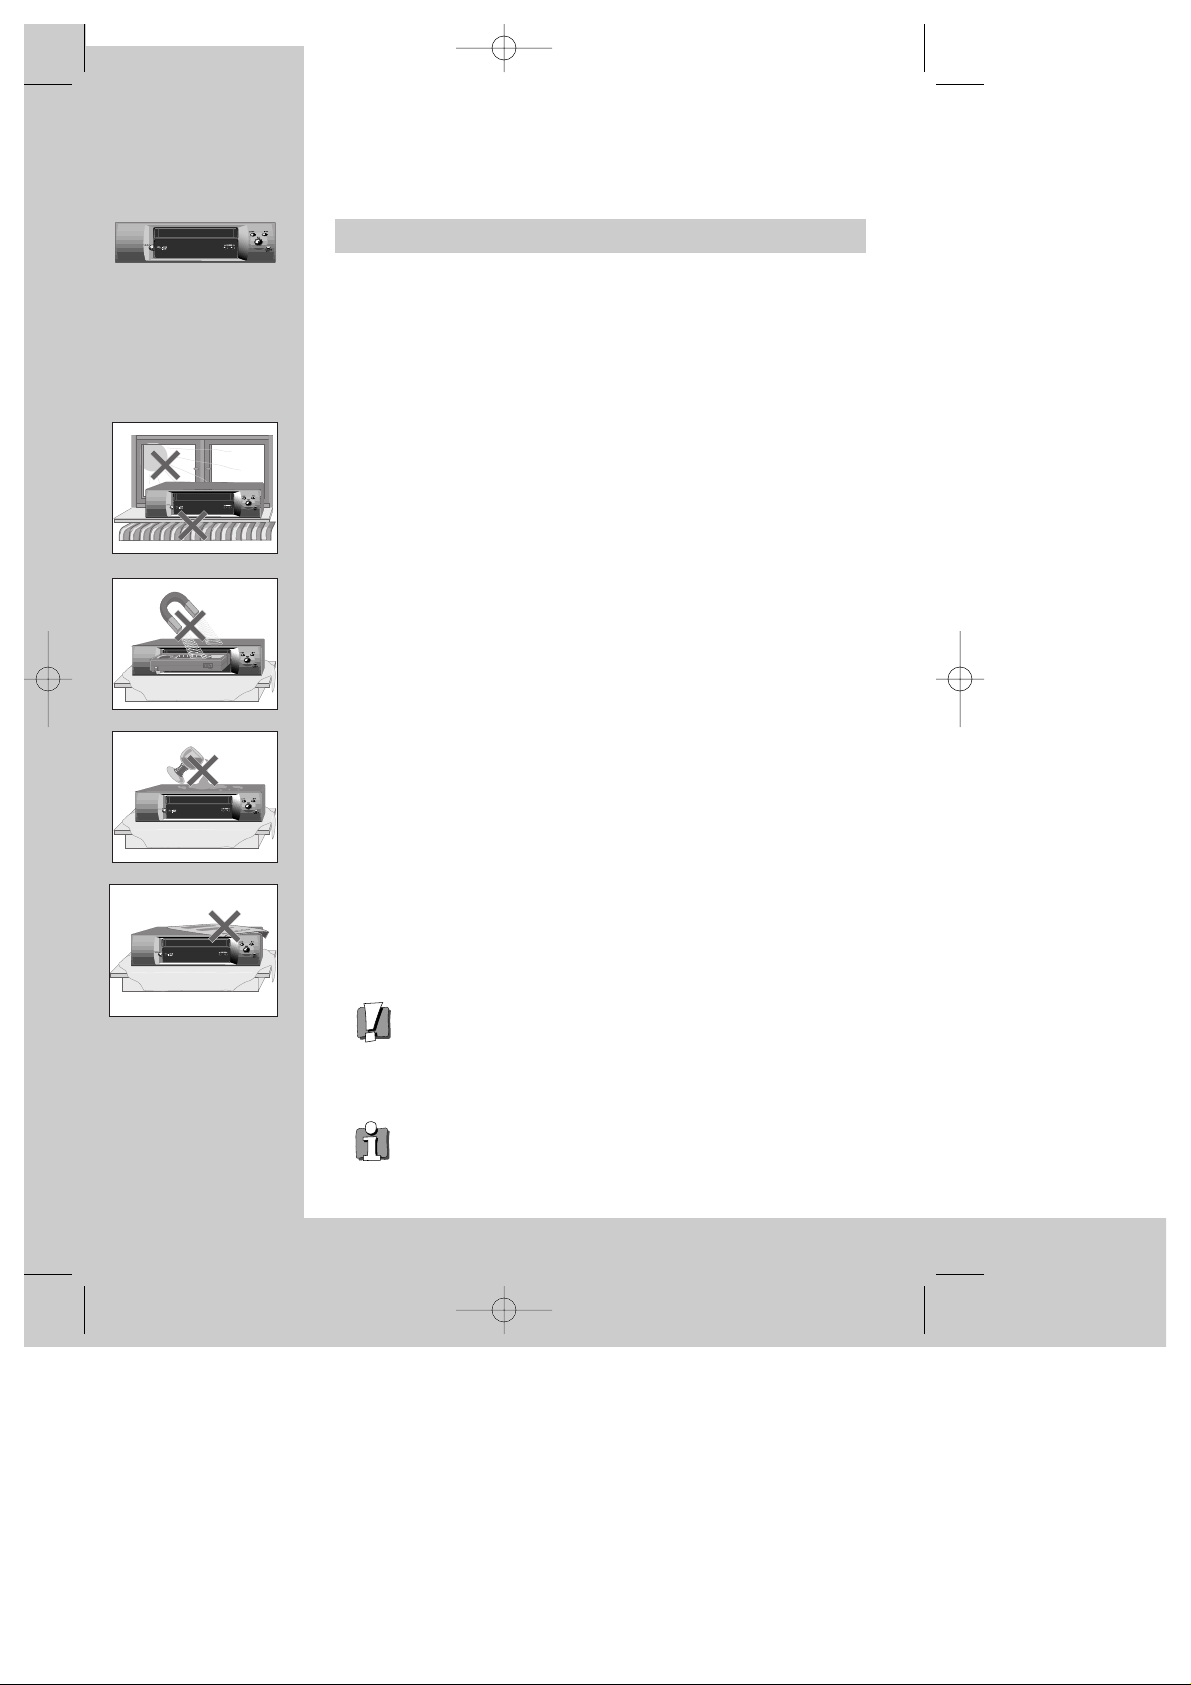
Do not ...
... expose the video recorder to high levels of humidity and heat, to
avoid the risk of fire and electric shock.
...
open the video recorder. Have a qualified technician carry out repairs.
... connect the video recorder to the power supply if you have just moved
it from a cold to warm environment. This can result in condensation
inside the recorder and cause serious damage to the machine and
cassettes. Wait around two hours to allow it to reach room
temperature.
Make sure ...
... the recorder is placed on a steady, flat surface.
... the recorder should be placed at least 10cm apart from the other
home appliances or the obstacles to get sufficient ventillation.
... you clean the recorder only with a soft, lint-free cloth; do not use
aggressive or alcohol-based cleaning agents.
... you disconnect the power supply if the recorder appears to be
working incorrectly, is making an unusual sound, has a strange smell,
has smoke emitting from it or liquids have got inside it. Have a
qualified technician check the recorder.
... you disconnect the power supply and aerial if you will not be using
the recorder for a long period or during a thunderstorm.
◆
This apparatus shall not be exposed to dripping or splashing and no objects
filled with liquids, such as vases, shall be placed on this apparatus.
For your own safety!
◆ There are no components in this video recorder you can
service or repair yourself.
◆ Do not open the case of the video recorder. Only allow
qualified personnel to repair or service your set.
◆ This video recorder is designed for continuous operation.
Switching it off does not disconnect it from the mains
(stand-by). To disconnect it from the mains, you have to
unplug it.
◆ Recording any copyright protected material may infringe a
copyright.
AUTO SET
CH.
OP EJECT
WORTH
knowing
DVST2C1D-RB/H(148*210) 01.4.13 3:32 PM ˘`1
Contents
1
WORTH
knowing
Before doing anything with the machine, please read the
chapter "Initial installation".
◆ On the following pages, the pictures show the buttons you press on the remote control to perform the
function, and what you should see in the On Screen Display or machine display (if present).
Controls
The remote control unit ................................................................................................. 2
The machine, On screen display ................................................................................... 3
Initial installation
Connecting up the video recorder, Fitting the remote control’s batteries ................... 4
Setting up the video recorder ....................................................................................... 5
OSD (On Screen Display) ON & OFF .............................................................................. 7
Playing cassettes
Playing back ...................................................................................................................8
Still, Variable picture search, Variable slow motion,
Accessing new recordings (index scan), CM Skip ........................................................ 9
Recording cassettes
Simple recording ......................................................................................................... 10
One touch recording (OTR) .......................................................................................... 11
More functions
Normal timer recording ...............................................................................................12
Timer Review – changing and erasing, Setting time and date .................................. 13
Clock/Counter display, Remaining time and Cassette length,
Accessing counter zero position, Resetting the counter to zero ............................... 14
Menu languages, Child lock, Cassettes, and ... .......................................................... 15
Tuning in new stations
Tuning ..........................................................................................................................16
Station names ............................................................................................................. 17
Sorting programme locations, Clearing programme locations ...................................18
Connections and copying
To the TV via antenna cable (if you are not using a RCA cable) ................................ 19
Copying, Assembling ................................................................................................... 20
Appendix
Brief instruction for experienced users ................................................................. 21/22
Before you ask a specialist ......................................................................................... 23
Index, Technical data .................................................................................................. 24
DVST2C1D-RB/H(148*210) 01.4.13 3:32 PM ˘`1
2
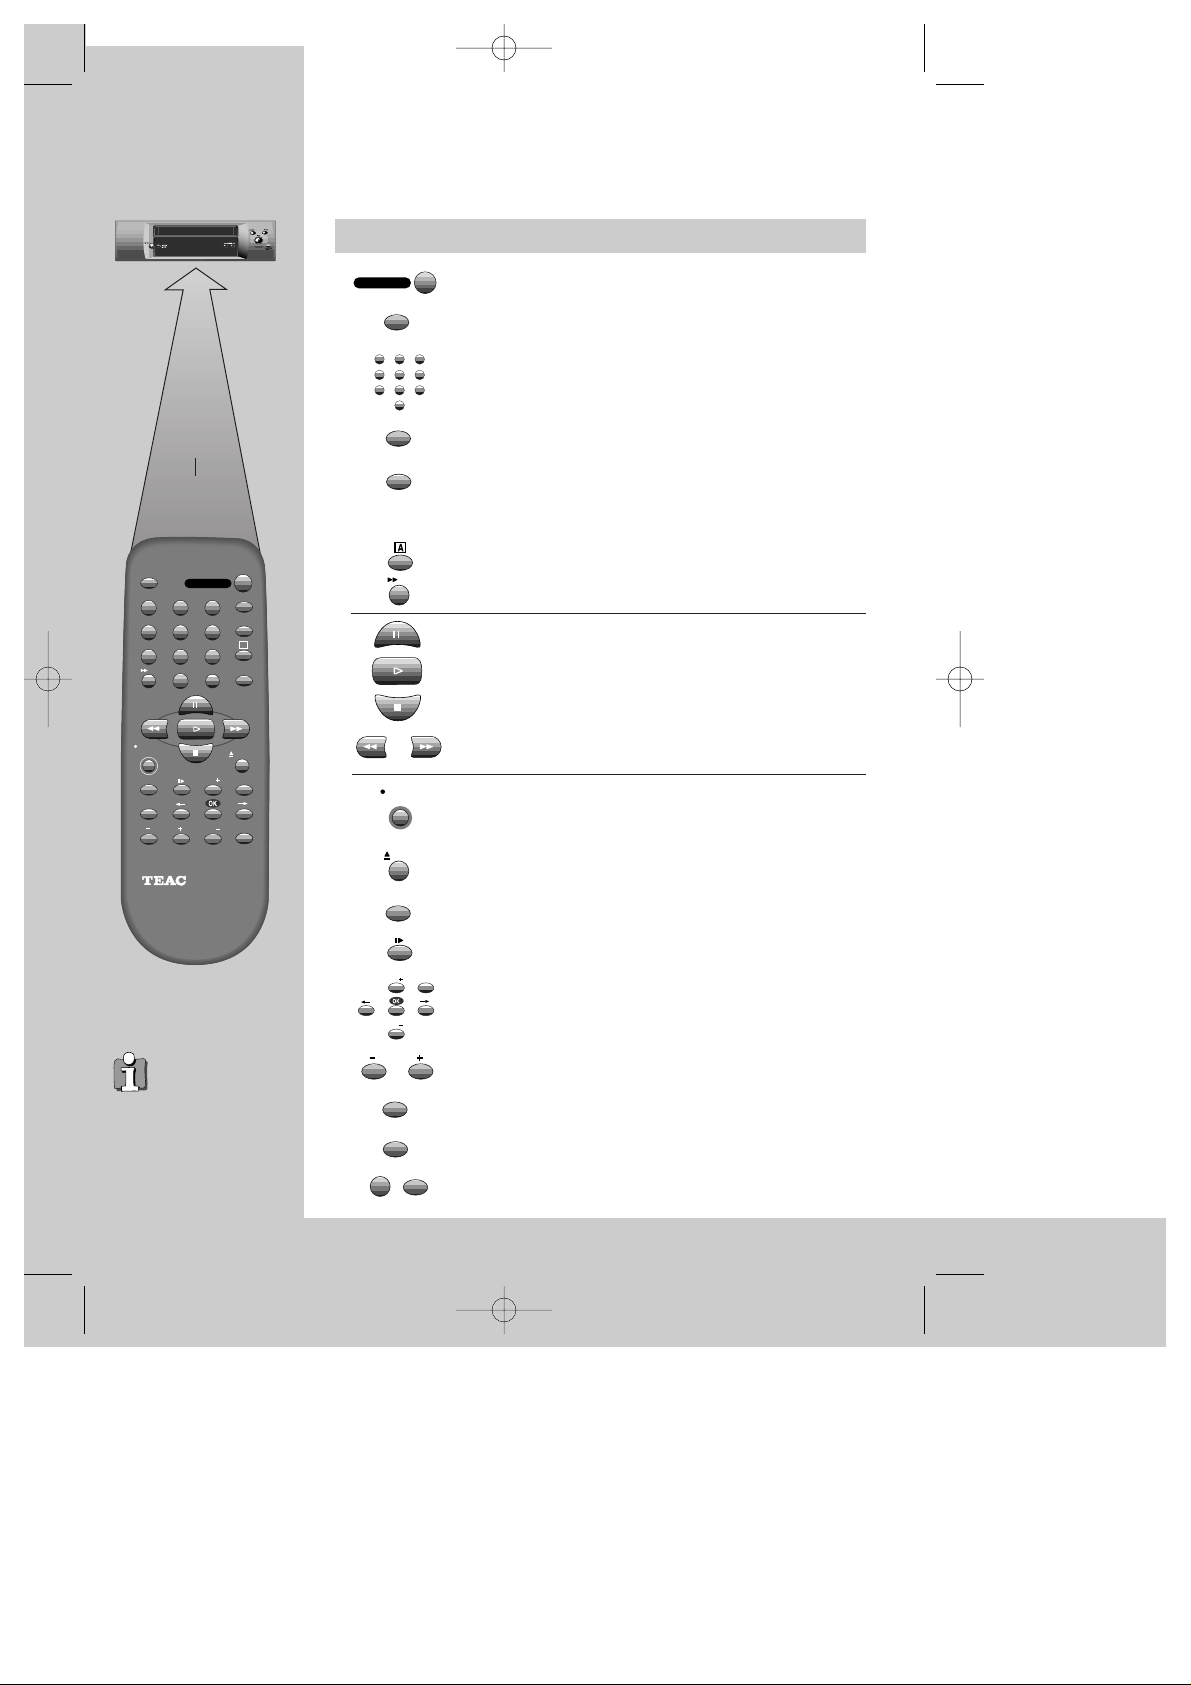
The remote control unit
The buttons to
use are marked
on the following
pages.
CONTROLS
30°
max. 7 m.
30°
TV/VCR
PR
PR
MENU
EJECT
PAL/SEC
A.SEL
AV
SP/LP
INDEX
1
2
3
456
789
0
30
A
OPERATE
REC/
OTR
RC-795 REMOTE CONTROL UNIT
◆
The remote control is the principle means of control, but the main playback and record
functions are also available on the front of the machine.
◆
Press any button to turn on the power.
operate on/off
this button is not available for this set
this button is not available for this set
a button for selecting input sources for recording:
TV stations – input sockets
You can select the external line by using “00”, “AV”, or
“PR+/-“ button. (refer to page 20)
clock/counter on-screen display
CM skip button to cue the tape for 30 seconds
to eject the cassette
the variable slow motion button
this button is not available for this set
to search the beginnings of records (index)
a button that doubles the maximum recording time for
very long recordings
the record or OTR button
(One Touch Recording means: each time you press the
button recording is extended by 30 minutes)
pause (record), still (playback)
playback start
playback stop
rewinding/fast forwarding a cassette from stop, or
picture search backwards/forwards from playback mode
number buttons to select programmes (stations) or to
type in numbers
the menu controls, programme (station) selection (PR +/–)
this button is not available for this set
OPERATE
TV/VCR
AV
30
REC/
OTR
EJECT
SP/LP
PR
PR
MENU
A.SEL
PAL/SEC
INDEX
1
2
3
456
789
0
these buttons are not available for this set
DVST2C1D-RB/H(148*210) 01.4.13 3:32 PM ˘`2
The machine
3
CONTROLS
◆
Press any button to turn on the power.
operate on/off
playback stop and ejecting the cassette
programme (station) selection
recording or OTR
(One Touch Recording means: each time you press the button recording is extended by
30 minutes)
rewinding / fast forwarding a cassette from Stop, or picture search backwards /
forwards from playback mode.
playback start
On screen display
MAIN MENU
example
The menus show you
which button to press for
the next step.
In addition, some other
functions appear on
screen temporarily.
REW SP PR04 EURO
The video’s menu system
gives you easy-to-understand
access to the less used
functions such as tuning to
stations, clock setting and
more.
“Tape Control” Menu
appears only when a tape is
in the VCR.
*
2x
MENU
PR
TIMER PROGRAM
PR PRESET
VCR SETUP
TAPE CONTROL
PR+/-:SELECT
OK:CONFIRM MENU:END
VCR SETUP
CLOCK SET
LANGUAGE SET
RF OUTPUT SET
16:9 SET
OSD ON/OFF
PR+/-:SELECT
OK:CONFIRM MENU:END
* Though the ”16:9 Set” is displayed on the screen, this function is not available for this set.
DVST2C1D-RB/H(148*210) 01.4.13 3:32 PM ˘`3
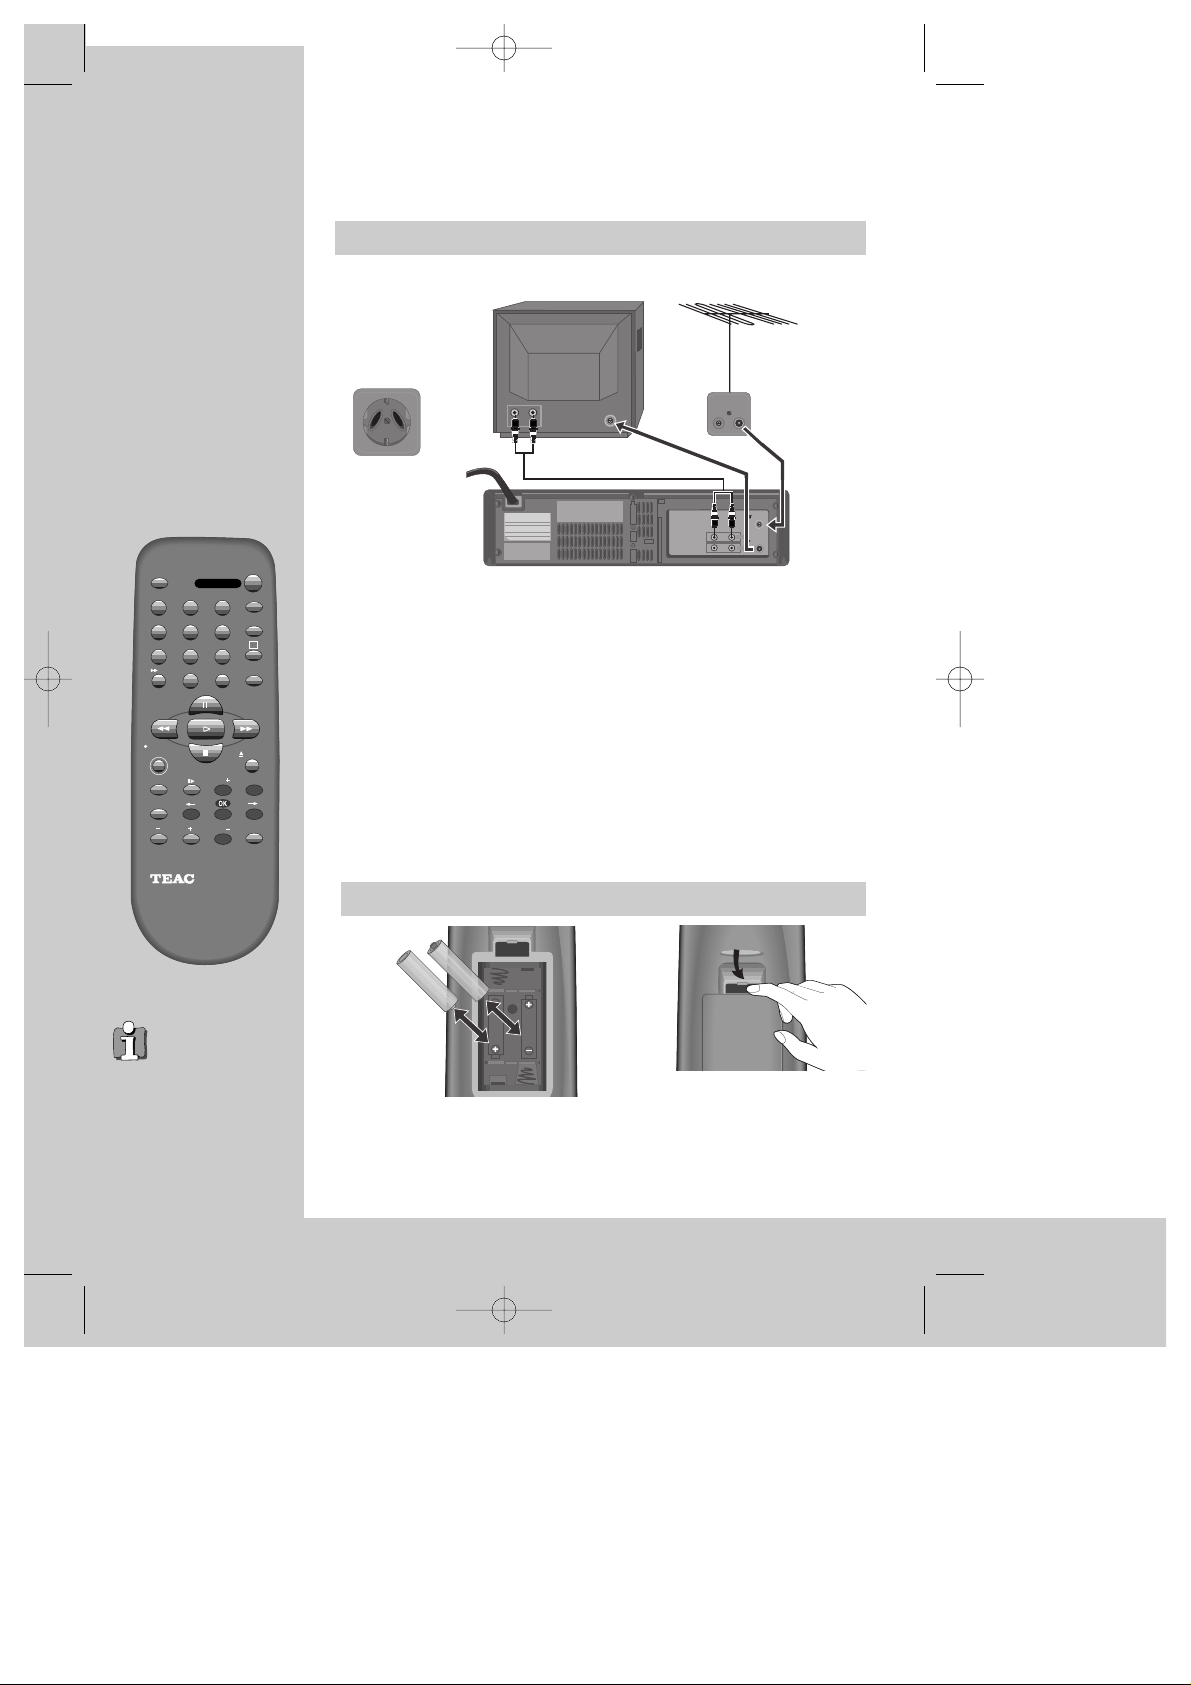
Connecting up the video recorder
4
TV/VCR
PR
PR
MENU
EJECT
PAL/SEC
A.SEL
AV
SP/LP
INDEX
1
2
3
456
789
0
30
A
OPERATE
REC/
OTR
RC-795 REMOTE CONTROL UNIT
Place your video
◆
horizontally on a flat, steady base so that air can circulate around it for ventilation.
◆
away from humidity and heat, magnetic fields, such as those from loudspeakers etc.,
and with no heavy objects placed on top.
Initial
INSTALLATION
Fitting the remote control's batteries
Switch off all components when connecting or disconnecting cables.
◆ Unplug the aerial cable from your TV and plug it into the "ANT. IN"
socket of the video.
Plug the short coaxial cable provided into the "ANT.OUT" socket of
the video and the aerial socket of the TV.
◆ Plug a RCA cable into the "RCA” socket of the video and the AV
socket on the TV if available.
This connection will provide best picture and sound quality.
Ask your dealer for an appropriate cable if you do not have one.
Without a RCA cable, you need to follow the steps described under "If you are not
using a RCA cable" (right page and page 19).
◆ Make sure the rating of the household mains supply matches the rating shown on
the back of the video.
Now plug in the mains lead. The display of the video should now
light.
Fit the batteries as shown by
the pictures in the bay.
AUDIO VIDEO
OUT
IN
+
–
+
–
1.5 V (AAA)
AC 240 V,
50 Hz
◆ Protect your environment by returning used batteries to your dealer. Since batteries
contain toxic substances they require special disposal methods.
◆ Make sure the batteries are always of the same type and age, and remove them
from the remote control if you are not using it for a long period.
The buttons to
use are marked
on the following
pages.
DVST2C1D-RB/H(148*210) 01.4.13 3:32 PM ˘`4
ANT. IN
ANT. OUT
Setting up the video recorder
◆
Switch the TV on.
◆
You can also start "Auto Search" in the menu "PR
Preset" "Auto Search".
◆
To tune in new stations (manual tuning) and to enter
station names see page 16-18.
Initial
INSTALLATION
You should see this picture the first
time you switch on the TV and video.
Choose your language.
OK for "Auto Search!".
PR
"AUTO SEARCH" tunes in all the stations you can
receive in your country and ...
... sorts them in an order common for your country.
LANGUAGE SET
ENGLISH
DEUTSCH
ITALIANO
ESPAÑOL
FRANÇAIS
NEDERLANDS
SVENSKA
SUOMI
PR+/-:SELECT
OK:CONFIRM MENU:END
AUTO SEARCH!
OK:CONFIRM MENU:END
AUTO SEARCH
MENU:END
PR03
V-L - - - - - - - - - - - - - -
76%
PLEASE WAIT...
AUTO SEARCH
5
DVST2C1D-RB/H(148*210) 01.4.13 3:32 PM ˘`5
Setting up the video recorder (continued)
6
TV/VCR
PR
PR
MENU
EJECT
PAL/SEC
A.SEL
AV
SP/LP
INDEX
1
2
3
456
789
0
30
A
OPERATE
REC/
OTR
RC-795 REMOTE CONTROL UNIT
Initial
INSTALLATION
If other stations are positioned
on near the current RF OUTPUT
PR, the guide message appears
automatically.
The VCR recommends the optimal RF
OUTPUT PR number automatically.
Should you wish the stations to
have the same numbers as those
used on the TV, follow the
instructions in "Sorting
programme locations" on page 18.
Else ...
exit the basic installation function and
enjoy your video recorder.
MANUAL SET
PR01 P-01 PR08 P-08
PR02 P-02 PR09 P-09
PR03 P-03 PR10 P-10
PR04 P-04 PR11 P-11
PR05 P-05 PR12 ---PR06 P-06 PR13 ---PR07 P-07 PR14 ----
PR+/-:SELECT
OK:CONFIRM MENU:END
ONE OR MORE STATIONS ARE
CLOSE TO THE VIDEO PICTURE.
PLEASE SELECT ANOTHER.
Press the OK button to confirm
the recommended PR.
PLEASE CHANGE THE TV
PR TO 36.
0-9:SELECT (21-69)
OK:CONFIRM MENU:END
CURRENT PR 26
RECOMMENDED PR 36
IMPORTANT!
Then type in the current time and
date.
CLOCK SET
1
2
3
456
789
0
MENU
0-9:SETUP (HOUR)
/ :CORRECT MENU:END
TIME - - : - DATE - - / - - /- - - -
◆ If you don´t see this picture, because you don´t use a RCA cable, search this
picture now (CH 26) with the station tuning functions of your TV set (see its
user manual).
◆ In case of interference problems on CH 26, type in an
other transmission channel between 21 and 69 using the
number buttons.
DVST2C1D-RB/H(148*210) 01.4.13 3:32 PM ˘`6
7
OSD ON/OFF
ON
OFF
PR+/-:SELECT
OK:CONFIRM MENU:END
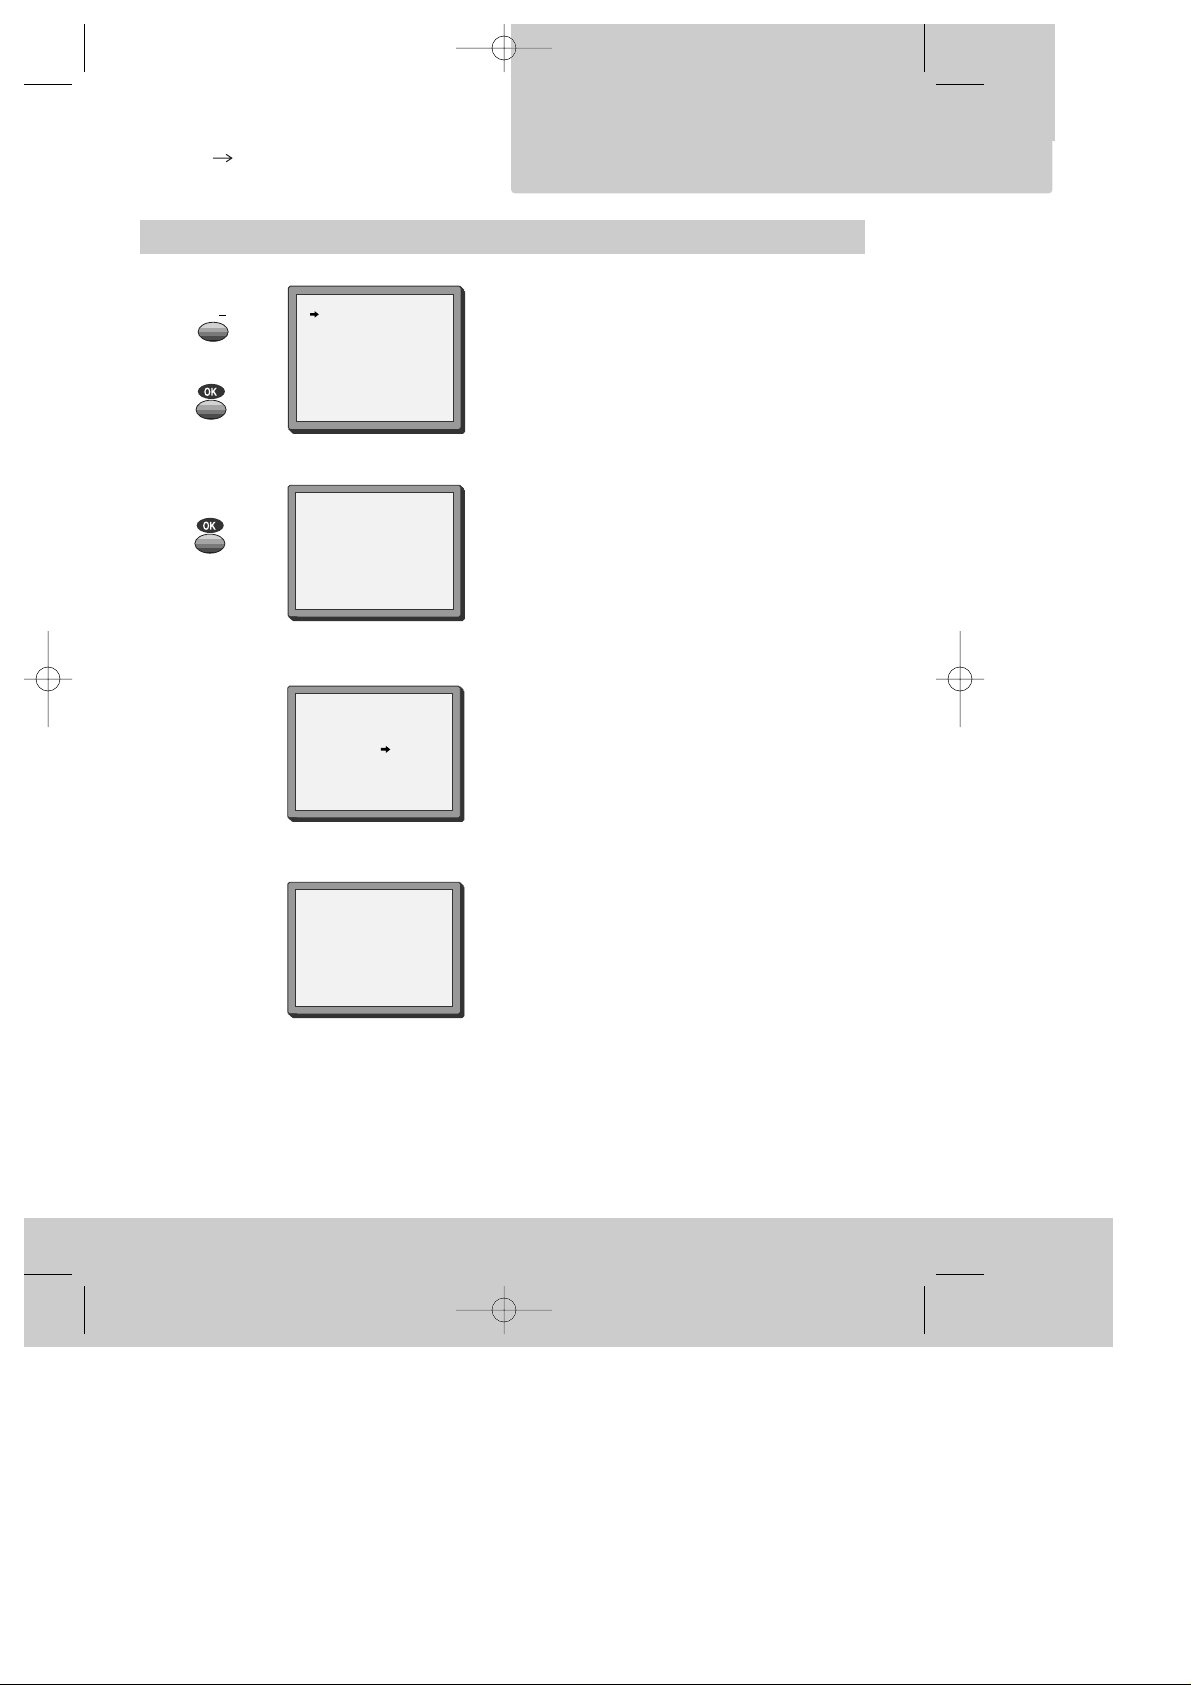
OSD(On Screen Display) ON & OFF
This OSD (On Screen Display) indicates the channel program number and time information onto the
television screen. The factory default is ON for this feature. If you do not wish to have such
information shown during normal picture, follow the steps below and select the OSD OFF mode.
Call the video’s "MAIN MENU".
Choose “VCR SETUP”.
And press the OK button.
Select “OSD ON/OFF”.
If you want OSD OFF mode, select it and press OK
button to confirm.
Then OSD characters are not displayed in the
normal picture.
MENU
MENU
MAIN MENU
TIMER PROGRAM
PR PRESET
VCR SETUP
TAPE CONTROL
PR+/-:SELECT
OK:CONFIRM MENU:END
VCR SETUP
CLOCK SET
LANGUAGE SET
RF OUTPUT SET
16:9 SET
OSD ON/OFF
PR+/-:SELECT
OK:CONFIRM MENU:END
Initial
INSTALLATION
DVST2C1D-RB/H(148*210) 01.4.13 3:32 PM ˘`7
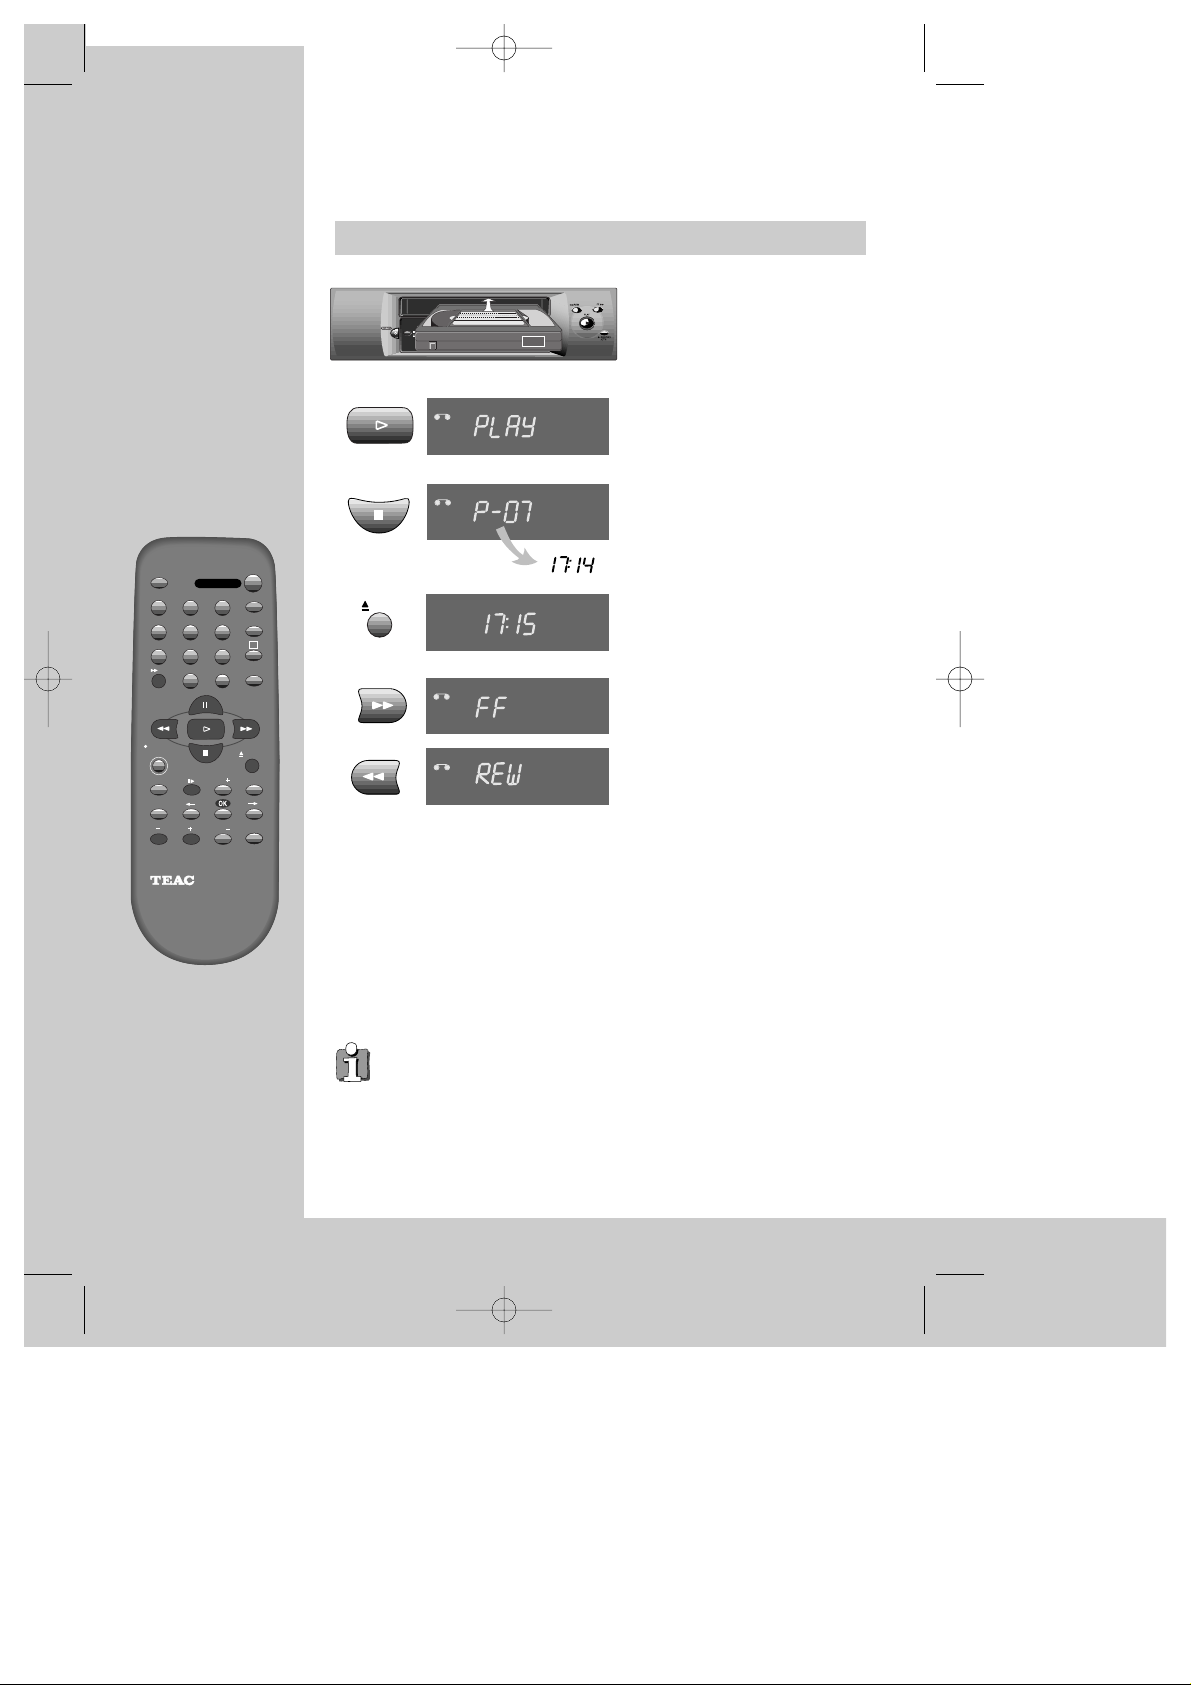
Playing back
8
TV/VCR
PR
PR
MENU
EJECT
PAL/SEC
A.SEL
AV
SP/LP
INDEX
1
2
3
456
789
0
30
A
OPERATE
REC/
OTR
RC-795 REMOTE CONTROL UNIT
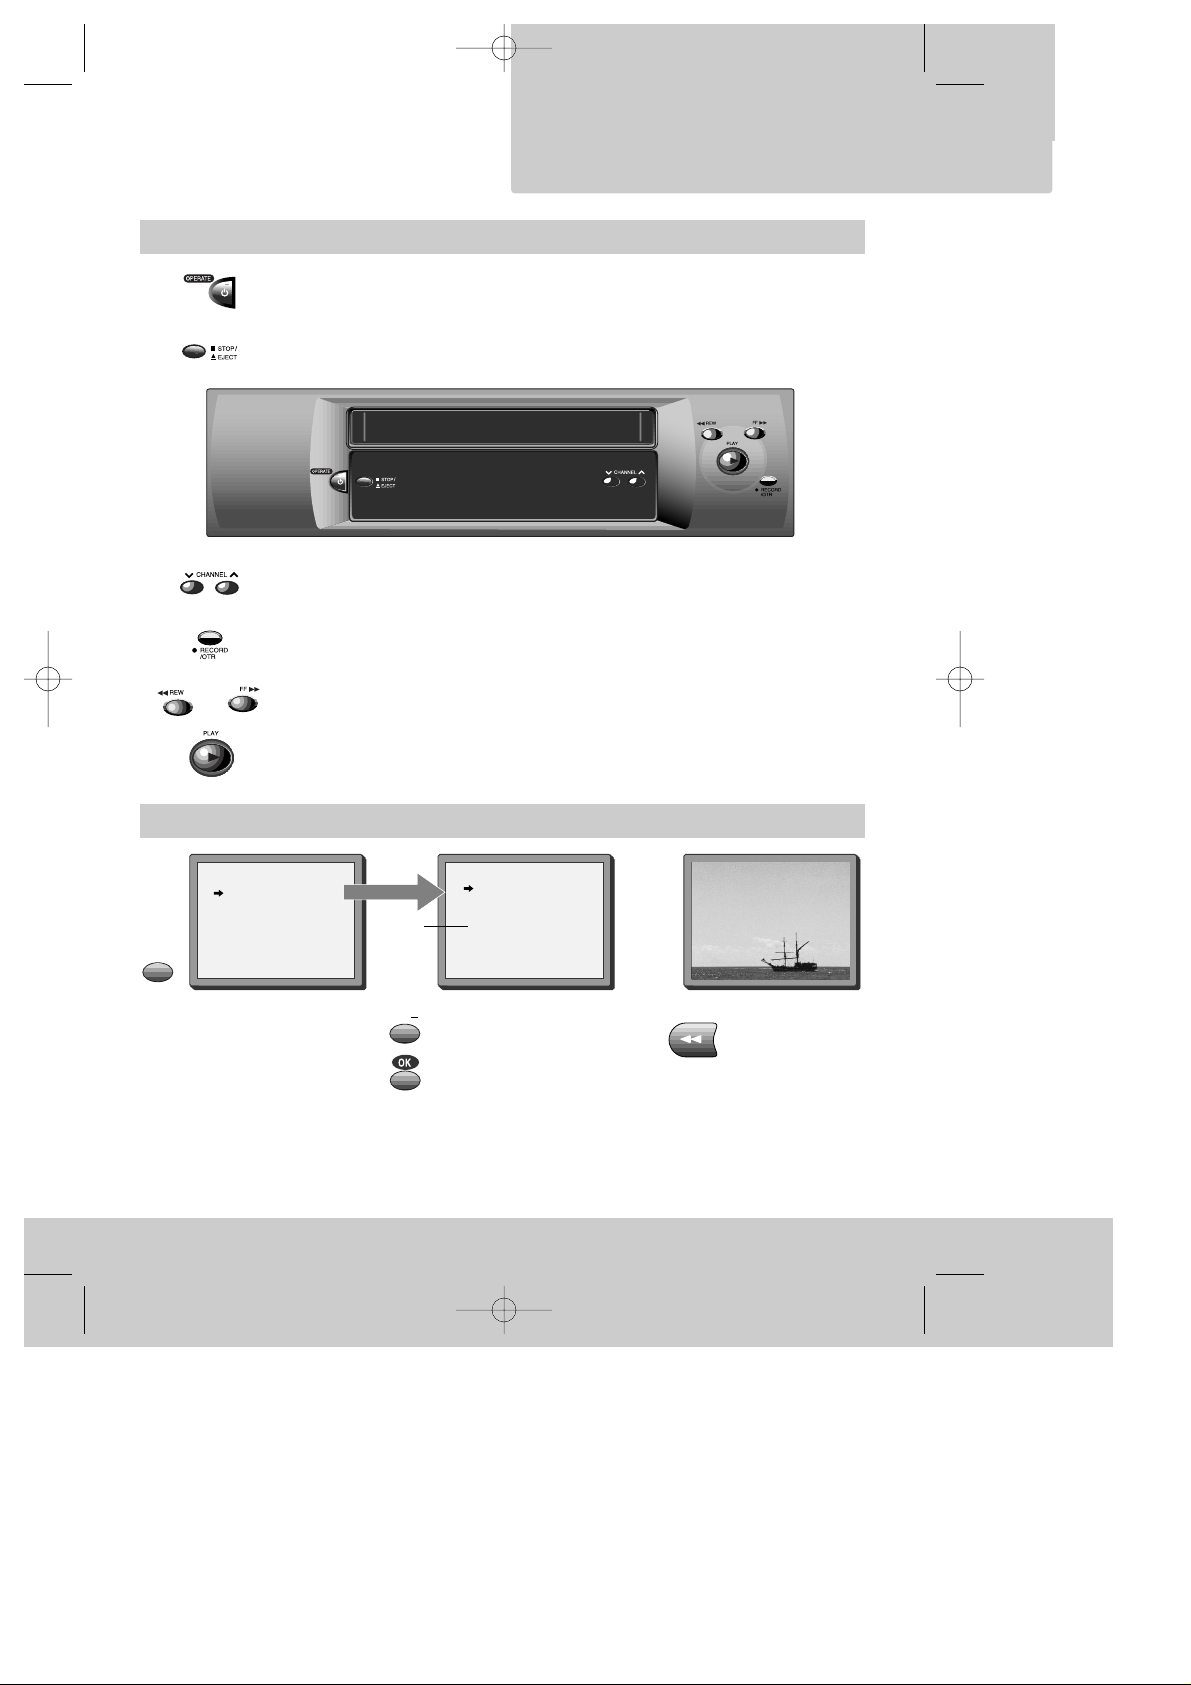
◆
Your TV and your video recorder are switched on.
◆
To see the picture from your video, press the station button on the TV reserved for
video input or the AV (Audio/Video) button.
PLAYING
cassettes
Load the cassette by pushing
it smoothly and squarely into
the cassette bay, with its
windows pointing up.
Start playback.
Stop playback.
Eject the cassette.
Fast forward or rewind the
cassette from stop.
AUTO SET
20 : 10
VHS
VCR
VCR
VCR
VCR
VCR
◆ When you load a protected cassette (e.g. pre-recorded film,
see page 15) playback starts automatically.
◆ PLAY switches back to normal playback.
◆ During still, slow or search, you don’t hear the sound.
◆ If the still picture is jittering, you can steady it by using the PR +/– buttons.
◆ You can reduce horizontal interference stripes resulting from inaccurate
tracking (when playing tapes of poor quality or recorded on other machines)
by using the PR +/– buttons during playback.
◆ After approx. 5 minutes in still, the cassette plays back automatically.
◆ NTSC PLAYBACK on PAL TV ; If you playback the tapes, which have been
recorded on NTSC color system, on this VCR, you can watch the pictures on a
PAL TV.
◆ Clock / Counter / Remaining time – page 14.
DVST2C1D-RB/H(148*210) 01.4.13 3:32 PM ˘`8
EJECT

Still
PLAYING
cassettes
9
Variable picture search
Variable slow motion
Accessing new recordings (index scan)
Still picture from playback.
Each press of the button advances the picture
one frame.
PLAY switches back to normal playback.
Starting from playback you can control search
speed in 2 steps either forwards ( ) or
backwards ( ). Press
repeatedly.
PLAY switches back to normal playback.
Starting from playback you can control slow
motion speed in 6 steps (1/15, 1/10, 1/5, 1/30,
1/25, 1/20, 1/15, ...). Press repeatedly.
PLAY switches back to normal playback.
Select INDEX + or INDEX – to search forwards or
backwards.
The video will now wind to the beginning of the first
recording, play it for about 6 seconds then wind on to the
next one.
When you see the recording you want, press
PLAY.
Access the beginning of recordings in the middle of the tape using the Index + / – function.
The video recorder automatically sets an electronic marker (index) at the beginning of each recording. It is these markers
which the Index + / – function detects.
FF SP
INDEX 01
0:11:09
VCR
VCR
+
VCR
-
VCR
CM Skip
If you press [CM Skip] button on the remote control, tape advances for 30
seconds segment.
30
INDEX
DVST2C1D-RB/H(148*210) 01.4.13 3:32 PM ˘`9

Simple recording
10
TV/VCR
PR
PR
MENU
EJECT
PAL/SEC
A.SEL
AV
SP/LP
INDEX
1
2
3
456
789
0
30
A
OPERATE
REC/
OTR
RC-795 REMOTE CONTROL UNIT
RECORDING
cassettes
◆
The TV stations on the video have been tuned in (page 5).
◆
The video is switched on.
◆
You can either watch the picture from the video on the TV by pressing the station
button reserved for video input or the AV button, watch another TV station or switch
off the TV altogether.
Load a cassette with its safety
tab in place (see page 15).
Start your recording.
If you wish to interrupt recording
briefly - then continue.
Stop your recording.
Choose the station whose
programme you want to record.
If the programme you wish to
record is very long, double the
possible recording time with "LP"
(Long Play).
Up to eight hours with an E-240 cassette.
VCR
STOP SP PR09 EURO
◆ The video stops automatically, if
pause exceeds five minutes.
VCR
VCR
PR
SP/LP
REC/
OTR
REC/
OTR
PR
DVST2C1D-RB/H(148*210) 01.4.13 3:32 PM ˘`10

One touch recording – OTR
◆ If you want to record from a source connected to your video see page 20.
◆ To CANCEL OTR press the button (stop) for more than 5 seconds.
◆ Clock / Counter / Remaining time – page 14.
Choose the station you want and press the button once
for every 30 minutes of programme you wish to record.
Up to ten hours are possible.
VCR
TMR
◆
For timer recordings, clock, date, and stations must be
set correctly.
◆
Load a cassette with its safety tab in place
(see page 15) and with sufficient free space for the
recording.
RECORDING
cassettes
11
DVST2C1D-RB/H(148*210) 01.4.13 3:32 PM ˘`11
REC/
OTR

Normal timer recording
12
TV/VCR
PR
PR
MENU
EJECT
PAL/SEC
A.SEL
AV
SP/LP
INDEX
1
2
3
456
789
0
30
A
OPERATE
REC/
OTR
RC-795 REMOTE CONTROL UNIT
MORE
functions
◆
For timer recordings, clock, date, and stations must be set correctly.
◆
Load a cassette with its safety tab in place
(see page 15) and with sufficient free space for the recording.
Call the video’s "MAIN MENU",
choose "Timer Program".
Decide if you want to record
"Once", "Weekly" or "Daily"...
... and confirm.
If you wish to make changes:
Move to the position you want to change
using the / buttons. Change the
setting using the PR+/- or number buttons.
If all setting are ok, press or , till
you see “OK : confirm” in the bottom line.
Confirm.
Switch your video off.
Type in one after the other:
◆ The programme location
number;
◆ the time the broadcast starts,
◆ the time the broadcast ends,
◆ the day of the broadcast, if it
is not today.
◆ Select LP if you wish to make
a very long recording .
TMR
2x
MENU
OPERATE
1
2
3
456
789
0
PR
HOW OFTEN DO YOU WANT
TO RECORD THIS PROGRAM?
PR+/-:SELECT
OK:CONFIRM MENU:END
ONCE
WEEKLY(ONCE A WEEK)
DAILY(MON-FRI)
DAILY(MON-SAT)
DAILY(MON-SUN)
PR+/-:SET (AV)
0-9 :SETUP (PR)
/ :CORRECT MENU:END
PR -START TIME --:-END TIME --:-START DATE --/-TAPE SPEED SP
TIMER PROGRAM (ONCE)
TIMER PROGRAM (ONCE)
PR 01
START TIME 18:10
END TIME 20:30
START DATE 12/04(THU)
TAPE SPEED LP
PR+/-:SET (AV)
0-9 : SETUP (PR)
/ :CORRECT
OK:CONFIRM MENU:END
◆ Wait a few seconds after typing a one-digit-number.
◆ If you have made a mistake, move to the position you want to change using the
/ buttons and change the setting.
◆ If programme timings overlap, the machine will give a warning message. If you
don’t adjust the times, the machine will record the first programme completely
then continue with the second one.
◆ If there is no sufficient free space for the recording on the cassette the video
switches automatically to “LP” for double recording capacity.
◆ The recorder will eject cassettes which have the safety tab removed (page15).
DVST2C1D-RB/H(148*210) 01.4.16 11:14 AM ˘`12

Timer Review – changing and erasing
MORE
functions
Call the video’s "MAIN MENU",
choose "Timer Program".
Select the programming to change or erase.
If you want to erase this programming press
button 0, confirm with OK.
If you wish to make changes:
Move to the position you want to change using
the / buttons.
Change the settings using the PR +/– or number
buttons.
If all setting are ok, press or , till you see
"OK: confirm" in the bottom line.
Confirm changes with OK. Exit the menus.
TIMER PROGRAM
PR START END DATE
03 21:20 22:20 14/04
01 18:30 20:20 12/04
-- -- : -- -- : -- -- / --
-- -- : -- -- : -- -- / --
-- -- : -- -- : -- -- / --
-- -- : -- -- : -- -- / --
-- -- : -- -- : -- -- / --
-- -- : -- -- : -- -- / --
PR+/-:SELECT
OK:CONFIRM MENU:END
MENU
PR
PR
MENU
1
2
3
456
789
0
Setting time and date
Call the video’s "MAIN MENU",
choose "VCR Setup", then "Clock Set".
Move to the position you want to change and type
in the new values.
Wait a few seconds after typing a one-digit number.
Store with OK button and exit with MENU button.
2x
2x
MENU
MENU
1
2
3
456
789
0
PR
TIMER PROGRAM (ONCE)
PR 03
START TIME 21:20
END TIME 22:20
START DATE 14/04(SAT)
TAPE SPEED SP
0 :ERASE
/ :CORRECT MENU:END
13
CLOCK SET
0-9:SETUP (HOUR)
/ :CORRECT MENU:END
TIME - - : - DATE - - / - - /- - - -
CLOCK SET
0-9:SETUP (HOUR)
/ :CORRECT
OK:CONFIRM MENU:END
TIME 06:05
DATE 10/04/2001(TUE)
DVST2C1D-RB/H(148*210) 01.4.13 3:32 PM ˘`13

Clock / counter display
14
TV/VCR
PR
PR
MENU
EJECT
PAL/SEC
A.SEL
AV
SP/LP
INDEX
1
2
3
456
789
0
30
A
OPERATE
REC/
OTR
RC-795 REMOTE CONTROL UNIT
MORE
functions
◆
The counter counts in real time from the point you load the cassette. This does not
have to be its beginning! The counter does not count unrecorded parts of the tape.
◆
If you rewind beyond the zero position, the counter counts in negative values
(e.g. – 0:01:15).
Remaining time and cassette length
STOP SP PR01 ARD
14:00 10/04
1x: Time and date+current
status Time and date
2x: Counter+current status
counter
3x: disappear
If didn’t wind tape (PLAY, FF, REW,...), it
doesn’t appear the tape remain time.
When you want the video to show the time remaining from the current video
tape position (to find out if there is sufficient space for a recording, for example).
To ensure the remaining time shown is accurate, select the length of cassette
currently loaded by selecting this function until you reach the correct length.
Remaining time display is only possible when the cassette is loaded.
E-240 01:27
Call the video’s “MAIN MENU”, choose “Tape Control”.
TAPE REMAIN
E-180
E-240
E-300
PR+/-:SELECT
OK:CONFIRM MENU:END
TAPE CONTROL
TAPE REMAIN
GO TO ZERO
COUNTER RESET
PR+/-:SELECT
OK:CONFIRM MENU:END
Resetting the counter to zero
Accessing counter zero position
Reset the counter.
The video will wind to the
position 0:00:00 and stop.
COUNTER RESET
REW SP
GO TO ZERO
0:02:13
DVST2C1D-RB/H(148*210) 01.4.13 3:32 PM ˘`14

Menu languages
15
MORE
functions
Child lock
Call the video’s "MAIN MENU", choose
"VCR Setup", then "Language Set".
Select your language.
Confirm.
Press the button for about 5 seconds.
Your video can´t be operated now, only timer recordings
will be performed. Keep your remote control in a safe
place.
To release child lock, press the button again for 5 seconds.
2x
MENU
PR
PR
OPERATE
LANGUAGE SET
ENGLISH
DEUTSCH
ITALIANO
ESPAÑOL
FRANÇAIS
NEDERLANDS
SVENSKA
SUOMI
PR+/-:SELECT
OK:CONFIRM MENU:END
and ...
Cassettes
Dimmer
Your video recorder dims its display when switched to stand-by mode.
Auto power off
Your video recorder switches to stand-by when no tape is played and no station is
received for more than 5 minutes.
Use only good quality tape cassettes with the VHS logo.
◆ Keep cassettes away from excessive moisture or dust, magnetic and
electrical fields (loudspeakers and computer monitors, for example).
◆ Always wind the tape to the beginning when you have finished. Store
with the full spool at the bottom and with the cassette in its cover.
You can protect your precious recordings from being wiped by breaking out
the safety tab on the side of the cassette (some cassettes have a slide).
Should you wish to re-use the tape after removing the tab, cover the hole
with adhesive tape.
PAL
DVST2C1D-RB/H(148*210) 01.4.13 3:32 PM ˘`15

Tuning
16
TV/VCR
PR
PR
MENU
EJECT
PAL/SEC
A.SEL
AV
SP/LP
INDEX
1
2
3
456
789
0
30
A
OPERATE
REC/
OTR
RC-795 REMOTE CONTROL UNIT
T u n i n g i n
NEW STATIONS
◆
The TV and video recorder are switched on.
◆
To see the picture from your video, press the station button on the TV reserved for
video input or the AV (Audio / Video) button.
◆
"AV" should not be selected with the AV button on the video.
Call the video’s "MAIN MENU",
choose "PR Preset".
Select "Manual Set".
Choose any unused location
number "----" or "P-xx" ...
It's simplest to use the same location
number on both the TV and video.
... and confirm.
Tune in the station you want.
Press button to see the
picture.
If it isn’t the station you want,
or the picture is disturbed,
carry on tuning.
Once you see the station you
want, store it.
Tune in further stations (from
step 3 onwards) or exit tuning
mode.
MENU
MENU
PR
PR
PR
PR
PR
PR
PR PRESET
AUTO SEARCH
MANUAL SET
PR ERASE
PR ALIGN
PR+/-:SELECT
OK:CONFIRM MENU:END
MANUAL SET
PR01 P-01 PR08 P-08
PR02 P-02 PR09 P-09
PR03 P-03 PR10 P-10
PR04 P-04 PR11 P-11
PR05 P-05 PR12 ---PR06 P-06 PR13 ---PR07 P-07 PR14 ----
PR+/-:SELECT
OK:CONFIRM MENU:END
MANUAL SET
PR29 P-29
PR+/-:SEARCH UP/DOWN
: NAME CORRECT
: PR VIEW
OK:CONFIRM MENU:END
MANUAL SET
PR+/-:SEARCH UP/DOWN
MENU :END
PR29
V-L ----------- -----
68%
MANUAL SET
PR29 P-29
PR+/-:SEARCH UP/DOWN
: NAME CORRECT
: PR VIEW
OK:CONFIRM MENU:END
DVST2C1D-RB/H(148*210) 01.4.13 3:33 PM ˘`16

Station names
T u n i n g i n
NEW STATIONS
If your video is showing no station name or is showing a station name incorrectly, you can correct this. Select “ : name
correct” on the “MANUAL SET” menu.
Call this menu (just see the left page),
if it isn't displayed.
Select "name correct".
Either select the name from the stored list ...
... or you select " : name create" and enter
a 4-digit name.
Change the letters with the PR +/– buttons, move
to the next letter with the / buttons.
Store and exit.
2x
PR
MENU
PR
PR
MENU
MENU
PR
PR
PR
MANUAL SET
PR29 P-29
PR+/-:SEARCH UP/DOWN
: NAME CORRECT
: PR VIEW
OK:CONFIRM MENU:END
MANUAL SET
PR+/-:NAME CHANGE
:NAME CREATE
OK:CONFIRM MENU:END
PR01 P-01
MANUAL SET
PR+/-:SELECT CHARACTER
/ :SELECT (POSITION)
OK:CONFIRM MENU:END
PR01 E-01
MANUAL SET
PR01 E-01 PR08 P-08
PR02 P-02 PR09 P-09
PR03 P-03 PR10 P-10
PR04 P-04 PR11 P-11
PR05 P-05 PR12 ---PR06 P-06 PR13 ---PR07 P-07 PR14 ----
PR+/-:SELECT
OK:CONFIRM MENU:END
◆ The video's automatic tuning system usually produces the best results. In poor reception areas, fine tuning
may improve reception. Choose the station and tune using the / buttons.
Store, typing in the
location number again.
◆ Should you wish to tune in all the channels available in your region, please refer to page 5.
◆ Should you wish to sort or clear stations, please refer to page 18.
17
DVST2C1D-RB/H(148*210) 01.4.13 3:33 PM ˘`17

Sorting programme locations
18
TV/VCR
PR
PR
MENU
EJECT
PAL/SEC
A.SEL
AV
SP/LP
INDEX
1
2
3
456
789
0
30
A
OPERATE
REC/
OTR
RC-795 REMOTE CONTROL UNIT
T u n i n g i n
NEW STATIONS
If the location numbers used for programmes stored in your TV and video are
different, you can change them on the video.
To do this, move the stations to the right numbers, until they are arranged the
way you want.
Call the video’s "MAIN MENU",
choose "PR Preset" then "PR Align".
Select the programme to swap.
Confirm.
Move the station to the desired
location number.
Confirm.
PR ALIGN
PR+/-:ALIGN
:PR VIEW
OK:CONFIRM MENU:END
PR01 P-01 PR08 P-08
PR02 P-02 PR09 P-09
PR03 P-03 PR10 P-10
PR04 P-04 PR11 P-11
PR05 P-05 PR12 ---PR06 P-06 PR13 ---PR07 P-07 PR14 ----
MENU
PR
PR
PR
MENU
PRPRPR
Clearing programme locations
PR ERASE
PR+/-:SELECT
:PR VIEW
OK:ERASE MENU:END
Call the video’s "MAIN MENU",
choose "PR Preset" then "PR Erase".
Select the station (location
number) you want to clear.
Review the picture.
Clear.
2x
MENU
PR
PR
MENU
PR
PR
PR01 P-01 PR08 P-08
PR02 P-02 PR09 P-09
PR03 P-03 PR10 P-10
PR04 P-04 PR11 P-11
PR05 P-05 PR12 ---PR06 P-06 PR13 ---PR07 P-07 PR14 ----
PR03 P-03
IMPORTANT!
THE ‘OK’ BUTTON WILL
ERASE THIS PR.
:PR VIEW
OK:CONFIRM MENU:END
DVST2C1D-RB/H(148*210) 01.4.13 3:33 PM ˘`18

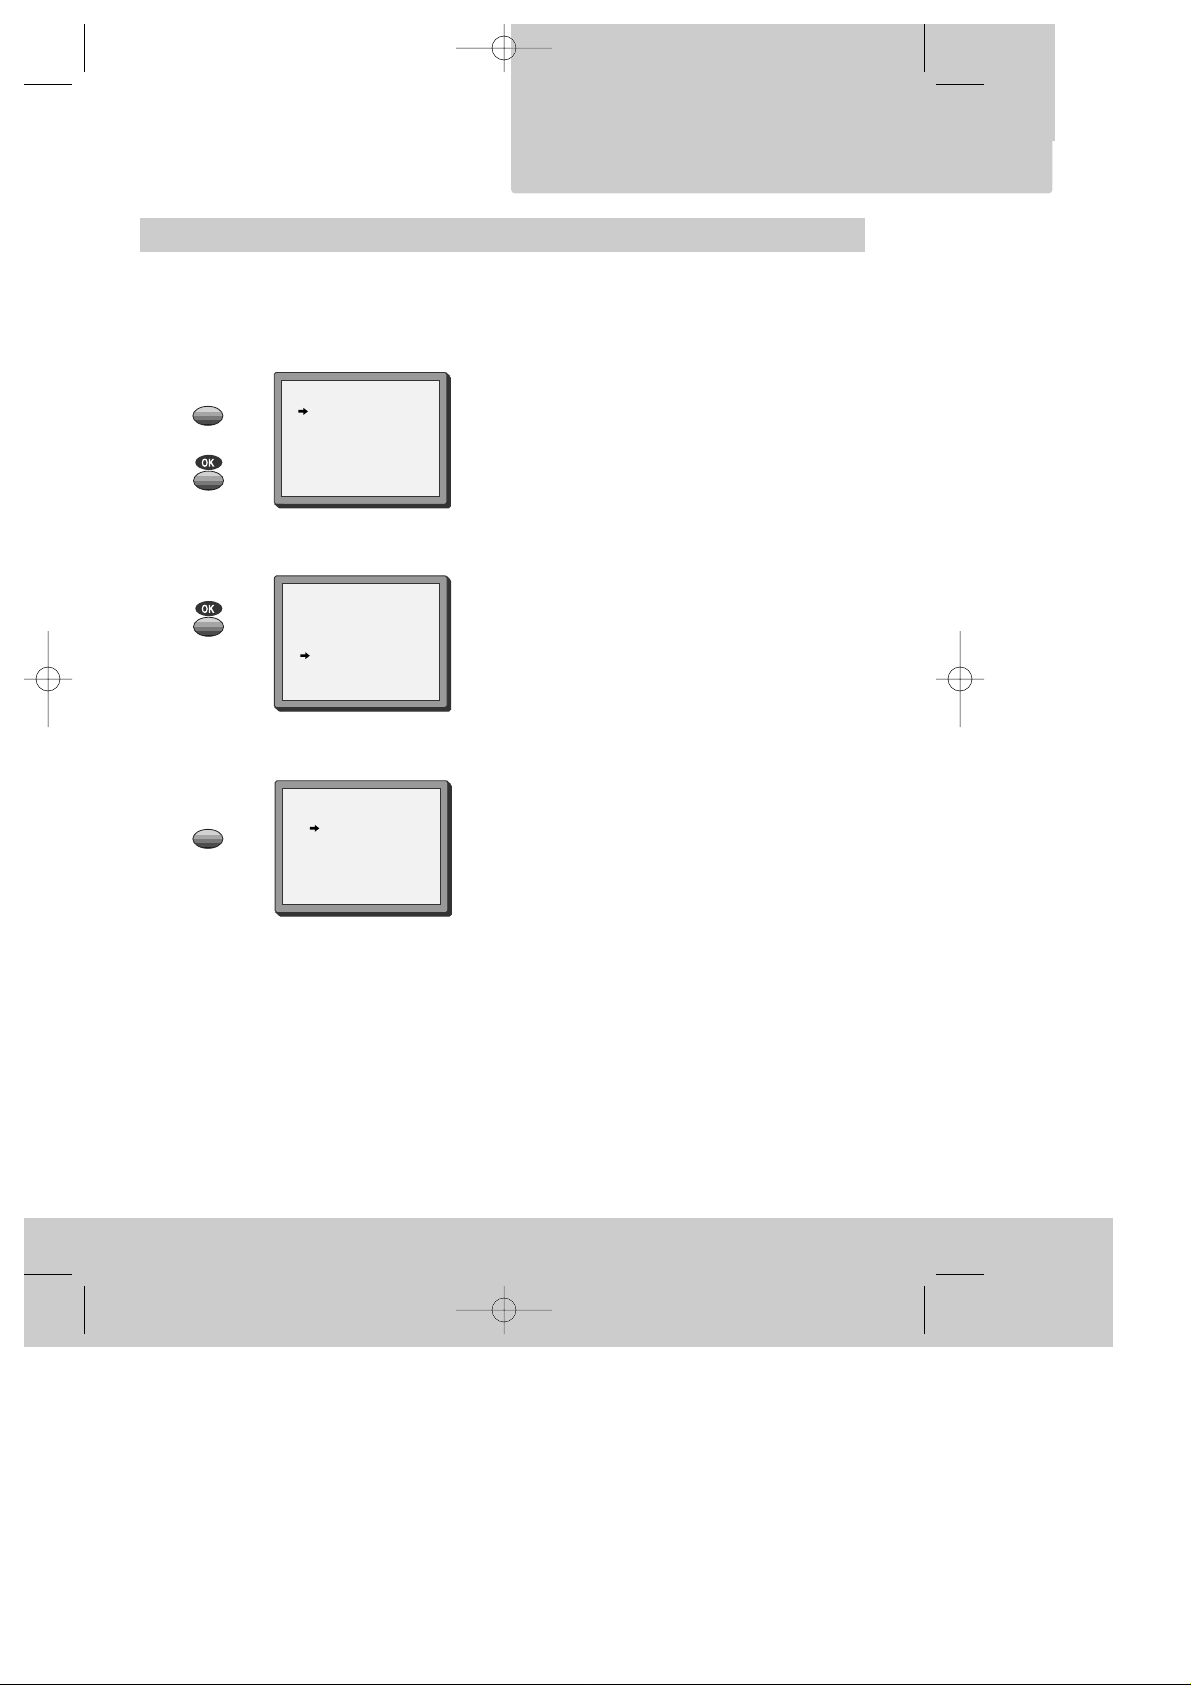
To the TV via antenna cable (if you are not using a RCA cable)
CONNECTIONS
a n d c o p y i n g
◆
If you are using a RCA cable, select the AV input on
the TV to see the picture from the video.
◆
If you are not using a RCA cable, select the button
number on the TV reserved for video input to see the
picture from the video.
If you are not using a RCA cable, your video can transmit pictures and sound to the TV via the coax aerial
cable. Just tune the TV to the video's transmitting channel (factory set to UHF CH 26). Tune the TV carefully
to ensure the best pictures and sound.
Once you have carried out the steps in
"Connecting up the video recorder" (page 4),
switch on your TV.
Press the OK button of the video’s remote control
longer than 5 seconds to call the video´s test
picture.
Tune the TV to the test picture using the channel
pre-set functions of your TV as described in its
manual.
Once you have found the test picture, follow this
instructions within your television manual to store
this new channel into a programme location.
Press the OK button of the video’s remote control
again longer than 5 seconds to release the test
picture.
Call the video’s "MAIN MENU" choose
"VCR Setup" then "RF Output Set".
Type in the free channel.
Store and exit.
If the quality of the test picture transmitted to the TV is poor due to interference caused by a
station transmitting on channel 26, you can tune the video to a different transmitting channel. Find a
free channel between 21 and 69 on your TV.
5 Sec.
2x
2x
MENU
MENU
PR
PR
1
2
3
456
789
0
RF OUTPUT SET
0-9:SELECT (21-69)
OK:CONFIRM MENU:END
PR 26
◆ If the quality of the test picture transmitted to the TV is poor, fine-tuning on the TV may help
(refer to the TV manual).
19
DVST2C1D-RB/H(148*210) 01.4.16 11:14 AM ˘`19

Copying
20
TV/VCR
PR
PR
MENU
EJECT
PAL/SEC
A.SEL
AV
SP/LP
INDEX
1
2
3
456
789
0
30
A
OPERATE
REC/
OTR
RC-795 REMOTE CONTROL UNIT
CONNECTIONS
a n d c o p y i n g
◆
Switch off all components when connecting or disconnecting cables.
To copy to your video from
another video machine,
connect the two machines with a
cable between their RCA sockets
and select as programme "AV" or
“F. AV” (front sockets) using the
[AV], [PR+/-], or [00] button.
Set the other video machine to
playback and your machine to
record.
To copy to another video
machine from your video,
connect the two machines by
means of their
RCA
sockets.
On the other video, select its AV
input and set the machine to
record.
Switch your video to play back
at the position you want
copying to start.
TV
(other VCR)
ANT. OUT
ANT. IN
AUDIO VIDEO
OUT
IN
Other VCR
Decoder for Pay-TV
Camcorder
Video Player
AV
Assembling
For the best results, the source cassette from which you are recording should already be
playing back when you start recording.
Should you wish to assemble your own film, from camcorder footage for example, use the
assembly technique for smooth edit points:
◆
Move the tape to the
position at which the new
scene is to be added using
the play functions (pages
8/9).
◆ Wind back slightly before
the edit point and put the
machine into pause
using the
button (do not press
STOP!).
◆ Now go directly into record.
VCR
VCR
VCR
2x
REC/
OTR
DVST2C1D-RB/H(148*210) 01.4.13 3:33 PM ˘`20

21
B R I E F I N S T R U C T I O N
f o r e x p e r i e n c e d u s e r s
Playing back
◆ Your TV and your video recorder are switched on.
◆ To see the picture from your video, press the station
button on the TV reserved for video input or the AV
(Audio/Video) button.
Start playback.
Stop playback.
Fast forward or rewind the
cassette from stop.
Still picture from playback.
Each press of the button
advances the picture one
frame.
PLAY switches back to normal
playback.
Starting from playback you
can control search speed in
2 steps either forwards
( ) or backwards ( ).
Press repeatedly.
PLAY switches back to normal
playback.
Starting from playback you
can control slow motion
speed in 6 steps (1/15, 1/10,
1/5, 1/30, 1/25, 1/20, 1/15,
...). Press repeatedly.
PLAY switches back to normal
playback.
Select INDEX + or INDEX – to
search forwards or backwards.
The video will now wind to the
beginning of the first recording, play
it for about 6 seconds then wind on
to the next one.
When you see the recording you
want, press PLAY.
INDEX
Simple recording
One touch recording – OTR
◆ The TV stations on the video have been tuned in (page
5).
◆ The video is switched on.
◆ You can either watch the picture from the video on the
TV by pressing the station button reserved for video
input or the AV button, watch another TV station or
switch off the TV altogether.
Load a cassette with its safety
tab in place (see page 15).
Start your recording.
If you wish to interrupt recording
briefly – then continue.
Stop your recording.
Choose the station whose
programme you want to record.
If the programme you wish to
record is very long, double the
possible recording time with
"LP" (Long Play).
Up to eight hours with an E-240
cassette.
Choose the station you want and
press the button once for every
30 minutes of programme you
wish to record.
Up to ten hours are possible.
REC/
OTR
PR
SP/LP
REC/
OTR
REC/
OTR
PR
DVST2C1D-RB/H(148*210) 01.4.13 3:33 PM ˘`21

22
B R I E F I N S T R U C T I O N
f o r e x p e r i e n c e d u s e r s
Normal timer
◆
For timer recordings, clock, date, and stations must be set correctly
.
◆
Load a cassette with safety tab in place (page 15) and with sufficient free space for the recording.
Call the video’s "MAIN MENU", choose "Timer
Program".
Decide if you want to record "Once", "Weekly" or
"Daily"...
... and confirm.
If you wish to make changes:
Move to the position you want to change using the / button.
Change the setting using the +/- or number buttons.
If all setting are ok, press or , till you see “OK:confirm” in
the last line.
Confirm.
Switch your video off.
Type in one after the other:
◆ the programme location number,
◆ the time the broadcast starts,
◆ the time the broadcast ends,
◆ the day of the broadcast, if it is not today.
◆ select LP if you wish to make a very long
recording.
2x
MENU
OPERATE
1
2
3
456
789
0
PR
TMR
HOW OFTEN DO YOU WANT
TO RECORD THIS PROGRAM?
PR+/-:SELECT
OK:CONFIRM MENU:END
ONCE
WEEKLY(ONCE A WEEK)
DAILY(MON-FRI)
DAILY(MON-SAT)
DAILY(MON-SUN)
PR+/-:SET (AV)
0-9 :SETUP (PR)
/ :CORRECT MENU:END
PR -START TIME --:-END TIME --:-START DATE --/-TAPE SPEED SP
TIMER PROGRAM (ONCE)
TIMER PROGRAM (ONCE)
PR 01
START TIME 18:10
END TIME 20:30
START DATE 12/04(THU)
TAPE SPEED LP
PR+/-:SET (AV)
0-9 : SETUP (PR)
/ :CORRECT
OK:CONFIRM MENU:END
DVST2C1D-RB/H(148*210) 01.4.16 11:15 AM ˘`22

Before you ask a specialist
23
APPENDIX
Mains supply
the video's display does not light
the video doesn’t work
Recording
doesn’t start
the cassette starts playback
or is ejected
Playback
no picture
poor picture quality
poor still picture
Remote control doesn’t work
General
a cassette won’t load
the cassette won't rewind, fast forward,
play or record mode
timer is recording incorrectly
a loud noise when left in Stop mode
"ERR" occurs in the display
-
The mains lead is not connected to the wall socket.
-
condensation may have formed when moving the video recorder
from a cold to a warm room. Wait until the video (and cassette!)
reach room temperature.
- Is a cassette loaded?
- the safety tab may be missing.
Cover the hole with adhesive tape (page 15).
- Are the TV stations tuned in on the video (page 5)?
- Is there a recording on the video tape?
- Use PR. –/+ buttons to adjust tracking if horizontal stripes appear.
- Is the cassette of poor quality or worn out? Test with another
cassette.
-
If you are not using a RCA cable, have you tuned the location for
video input on the TV properly? pages 5/19.
-
Try a different cassette. The video head drum may need cleaning
- ask your dealer.
- Press (pause) several times. Adjust with the PR +/- buttons until
you get the best picture.
- are the batteries run down?
- is the distance between remote control and video more than 7
meters?
- is there an object blocking the direct line between remote control
and video?
-
is there a cassette already loaded? If so, the video’s display will
indicate it.
-
the cassette is already fully wound back or to the end.
- is the clock set correctly (page 13)?
- if no play or record function is used for about five minutes when
left in Stop mode, the video switches its motor off to conserve the
mechanism.
- Your video has detected abnormal conditions. Release this mode
with any button , your video then safely switches to stand-by.
DVST2C1D-RB/H(148*210) 01.4.13 3:33 PM ˘`23

24
APPENDIX
Index
Technical data
Aerial ............................................................. 4
Assembling recordings ................................ 20
Cassette length ............................................ 14
Channel ............................................... 5/16-19
Child lock ...................................................... 15
CM Skip .......................................................... 9
Condensation ................................ Precautions
Counter ......................................................... 14
Fine-tuning ................................................... 17
Location number ................................. 5/16-19
LP (Long Play) .......................................... 10-12
Mains ....................................................... 4/24
Menu .............................................................. 3
OSD ON& OFF................................................. 7
OTR ............................................................... 11
Protected cassette ....................................... 15
RCA .............................................................. 19
Remaining time ............................................ 14
RF out ........................................................ 5/19
SP (Standard Play) .................................. 10-12
Stand-by ........................................ Precautions
Station ..................................................5/16-19
Still frame adjustment ................................... 8
Test picture ...................................................19
Tracking .......................................................... 8
Dimensions
W x H x D 360 x 90 x 288 mm
Weight 3.85 kg
Power supply
Voltage AC 240 V, 50 Hz
Power consumption 14 Watt
System
Video PAL-B/G
Channel range VHF 2 - 12,
UHF 21 - 69,
CATV S1 - S41, x, y, z
(Hyperband)
Channel locations 99 + AUX
RF Out UHF CH 21 - 69 (26)
Video
System VHS
Speeds SP / LP
General
Temperature range 5 - 35° C
Humidity range < 80 %
Timer 8 events,
1 month
Subject to technical alterations without notice.
DVST2C1D-RB/H(148*210) 01.4.13 3:33 PM ˘`24

Thanks for buying a TEAC. Read this manual carefully to get the best performance
from your new TEAC products.
CAUTION:
Use of controls or adjustments or performance of procedures other than those
specified herein may result in hazardous radiation exposure.
MV-3094
2HEAD VIDEO CASSETTE RECORDER
OWNER’S MANUAL
This appliance has a serial number located on the rear
panel. Please record the model number and serial
number and remain for your records.
model number
serial number
WARNING - DANGEROUS VOLTAGE INSIDE
WARNING - TO PREVENT FIRE OR SHOCK HAZARD, DO NOT EXPOSE
THIS UNIT TO RAIN OR MOISTURE.
DVST2C1D-RB/H(148*210) 01.4.13 3:33 PM ˘`25
PAL

TEAC CORPORATION
3-7-3, Nakacho, Musashino-shi, Tokio 180-8550, Japan
Phone : (0422) 52-5081
TEAC AUSTRALIA PTY., LTD. A.B.N. 80 005 408 462
HEAD OFFICE 106 Bay Street, Port Melbourne, VIC 3207
Phone : (03)9644-2444
NSW OFFICE Unit 4, 175-179 James Ruse Drive, Rosehill, NSW 2142.
Phone : (02)8845-1122
QLD OFFICE 335 Montague Road, West End, QLD 4101.
Phone : (07)3844-9060
WA OFFICE 273 Great Eastern Highway, Belmont, WA 6104.
Phone : (08)9479-6522
SA OFFICE Cnr, Burbridge & Marion Roads, Cowandilla, SA 5033.
Phone : (08)8234-1044
TEAC TOTAL CARE
info@teac.com.au
or visit our website at http://www.teac.com.au
Freecall telephone 1-800-656-700 between Monday to Friday-EST 9am to 5pm
[New Zealand: TOLL FREE 0508 347328, 8am to 4:30pm]
DVST2C1D-RB/H(148*210) 01.4.13 3:33 PM ˘`26
 Loading...