

Page 1

Micro System
ServiceService
Service
Service
Service
MCM275
all versions
Service Manual
TABLE OF CONTENTS
Location of pc boards & Version variations................1-2
Technical Specifications .............................................1-3
Measurement setup ....................................................1-4
Service Aids, Safety Instruction, etc................ 1-5 to 1-6
Lead-free Information & Service Instruction ..............1-7
Preparations & Controls & Troubleshooting.. 1-8 to 1-10
Troubleshooting ........................................................1-11
Disassembly Instructions & Service positions .............. 2
Service Test Programs ............................................... 3-1
Set Block diagram ...................................................... 4-1
Set Wiring diagram .....................................................5-1
Main Board .................................................................... 6
CD/MCU Board .............................................................. 7
AC Power Board ............................................................8
Set Mechanical Exploded view & parts list ................... 9
Revision List ................................................................ 10
COMPACT
DIGITAL AUDIO
Page
©
Copyright 2006 Philips Consumer Electronics B.V. Eindhoven, The Netherlands
All rights reserved. No part of this publication may be reproduced, stored in a retrieval system or
transmitted, in any form or by any means, electronic, mechanical, photocopying, or otherwise
without the prior permission of Philips.
Published by SL 06
19 Service Audio Printed in The Netherlands Subject to modification
Version 1.1
CLASS 1
LASER PRODUCT
GB
3141 785 30332
Page 2

1-2
VERSION VARIATIONS
VERSION VARIATIONS:
Type /Versions: MCM275
/05
Features &
Board in used:
Aux in / CDR in x x x x
Line Out
Video Out
Surround Out
Subwoofer Out
Power Booster Out
Digital Out
Digital in
Matrix Surround
RDS x x
News x x
Dolby Pro Logic (DPL)
Incredible Surround
Karaoke Features
Voltage Selector
ECO Power Standby (LCD Display Off) x x
ECO6 Tuner Board - Systems Non-Cenelec
ECO6 Tuner Board - Systems Cenelec
USB Direct
/12 /37 /98
x
x
x
x
x x x x
x
x
Page 3

SPECIFICATIONS
GENERAL:
Mains voltage : 127/240V -15%+10% Switchable for /98
120V ± 10% for /37
230V ± 10% for /05/12
Mains frequency : 50/60Hz
Clock accuracy : < 4 seconds per day
Dimension centre unit : xx x xx x xx (mm)
Power consumption
Active : 20W
Standby : < 5.5W (DEMO mode)
ECO Power Standby : < 0.5W for /05/12/37
TUNER:
FM
Tuning range : 87.5-108MHz
Grid : 50kHz for /98/12/05
100kHz for /98/55/37
IF frequency : 10.7MHz ± 20kHz
Aerial input : 75 Ω coaxial /05/12/98
300 Ω for /37
Sensitivity at 26dB S/N : < 22µf
Selectivity at 300kHz bandwidth : > 25dB
Image rejection : > 25dB [> 75dB]
Distortion at RF=1mV, dev. 75kHz : < 3%
-3dB Limiting point : < 23.5dBf
Crosstalk at RF=1mV, dev. 40kHz : > 18dB
MW
Tuning range : 531-1602kHz for /05/12/55/98
530-1700kHz for /37/98
Grid : 9kHz for /05/12/55/98
10kHz for /37/98
IF frequency : 450kHz ± 1kHz
Aerial input : Frame aerial 18.1µH
Sensitivity at 26dB S/N : < 4.4mV/M
Selectivity at 300kHz bandwidth : > 18dB
IF rejection : > 45dB
Image rejection : > 28dB
Distortion at RF=50mV, M=80% : < 5%
AMPLIFIER:
Output power
L & R : 2 x 5.0W (4Ω, 1kHz, 10% THD)
Frequency response within -3dB : 50Hz-16kHz
Digital Sound Control (DSC) : Jazz / Rock / Pop / Classic
Input sensitivity
Aux in (at 1kHz) : 500mV at 600 Ω
Output sensitivity
Headphone output at 32 Ω : 10mW ± 2dB (Max. vol.)
COMPACT DISC:
Frequency response within ± 3dB : 125Hz - 16kHz
Output level (in Vrms) : 500mV, Z
out
= 100Ω
Signal/Noise ratio (A-weighted) : > 76dB
Distortion at 1kHz : < 0.02%
Channel unbalance (-40dB) : < ±2dB
Channel separation at 1kHz : > 30dB
Emphasis : 15/50 µS (switched
automatically by CD10)
THD Noise(1kHz,500mW) : < 1.0%
[....] Values indicated are for /05/12 only.
MP3-CD Bit Rate : 8-320 kbps
WMA-CD Bit Rate
Sampling Rate : 8, 11.025, 12, 16, 22.05,
24, 32, 44.1, 48 kHz
Format
: 64-192 kbps
: ISO9660, Joliet,UDF
IF rejection : > 60B [> 80dB]
:2 x 4.5W (4Ω, 1kHz, 10% THD) /98
:2 x 4.5W (FTC Power, 4Ω, 1kHz, 10% THD
63Hz-12.5kHz) /37
Dynamic Bass Boost (DBB) : ON / OFF
USB : Host
Signal/Noise ratio (unw.) : > 65dB
Volume attenuation(1kHz) : > 60dB
ID3 : V1 tag/V2 2.0/V2 3.0
MP3 CD WMA:
MP3 : MPEG 1 (ISO/IEC 11172-3)
Layer3
Language Support : English
1-3
Page 4
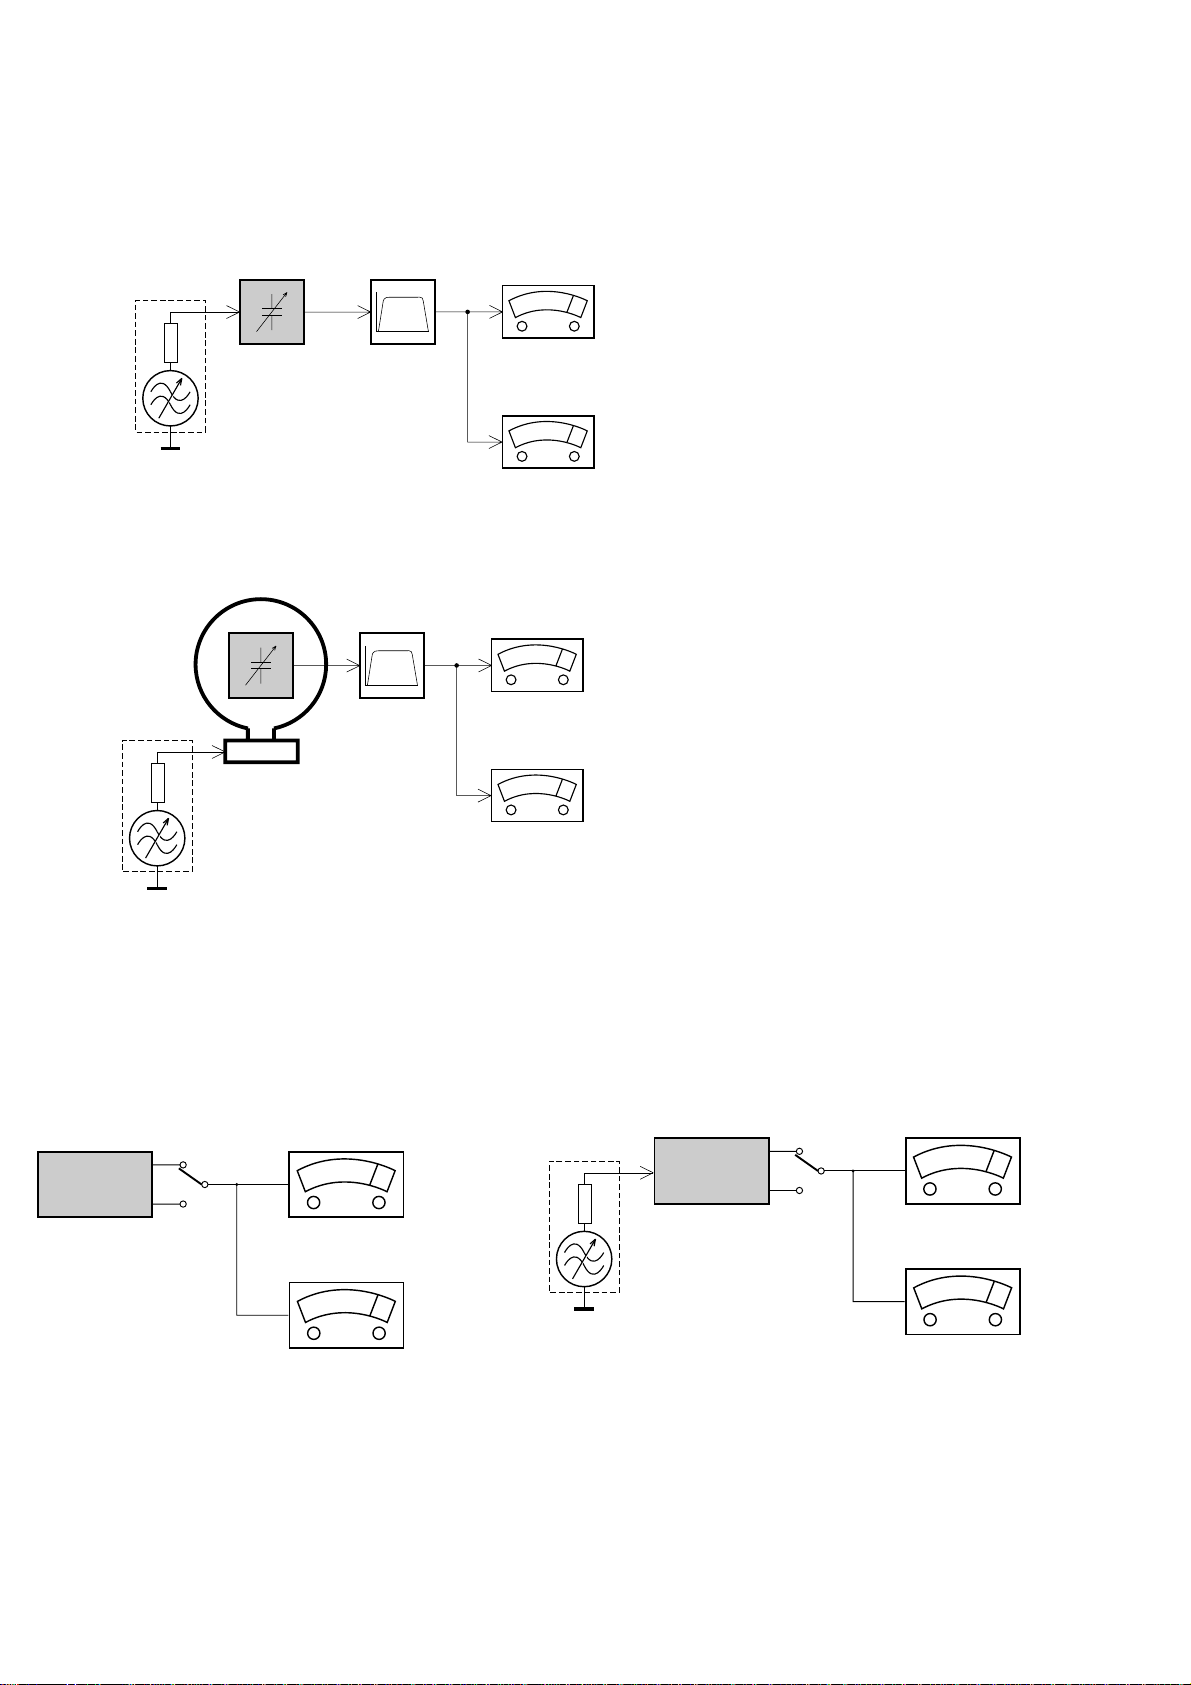
MEASUREMENT SETUP
Tuner FM
1-4
Bandpass
LF Voltmeter
e.g. PM2534
RF Generator
e.g. PM5326
DUT
250Hz-15kHz
e.g. 7122 707 48001
Ri=50Ω
S/N and distortion meter
e.g. Sound Technology ST1700B
Use a bandpass filter to eliminate hum (50Hz, 100Hz) and disturbance from the pilottone (19kHz, 38kHz).
Tuner AM (MW,LW)
RF Generator
e.g. PM5326
Ri=50Ω
DUT
Frame aerial
e.g. 7122 707 89001
Bandpass
250Hz-15kHz
e.g. 7122 707 48001
LF Voltmeter
e.g. PM2534
S/N and distortion meter
e.g. Sound Technology ST1700B
To avoid atmospheric interference all AM-measurements have to be carried out in a Faraday´s cage.
Use a bandpass filter (or at least a high pass filter with 250Hz) to eliminate hum (50Hz, 100Hz).
CD
Use Audio Signal Disc
(replaces test disc 3)
DUT
L
R
SBC429 4822 397 30184
S/N and distortion meter
e.g. Sound Technology ST1700B
LEVEL METER
e.g. Sennheiser UPM550
with FF-filter
Recorder
Use Universal Test Cassette CrO2 SBC419 4822 397 30069
or Universal Test Cassette
LF Generator
e.g. PM5110
Fe SBC420 4822 397 30071
DUT
L
R
S/N and distortion mete
e.g. Sound Technology ST1700B
LEVEL METER
e.g. Sennheiser UPM550
with FF-filter
Page 5
SERVICE AIDS
1-5
Service Tools:
Universal Torx driver holder .................................4822 395 91019
Torx bit T10 150mm ...........................................4822 395 50456
Torx driver set T6-T20 .........................................4822 395 50145
Torx driver T10 extended .....................................4822 395 50423
Compact Disc:
SBC426/426A Test disc 5 + 5A ...........................4822 397 30096
SBC442 Audio Burn-in test disc 1kHz .................4822 397 30155
SBC429 Audio Signals disc .................................4822 397 30184
Dolby Pro-logic Test Disc ....................................4822 395 10216
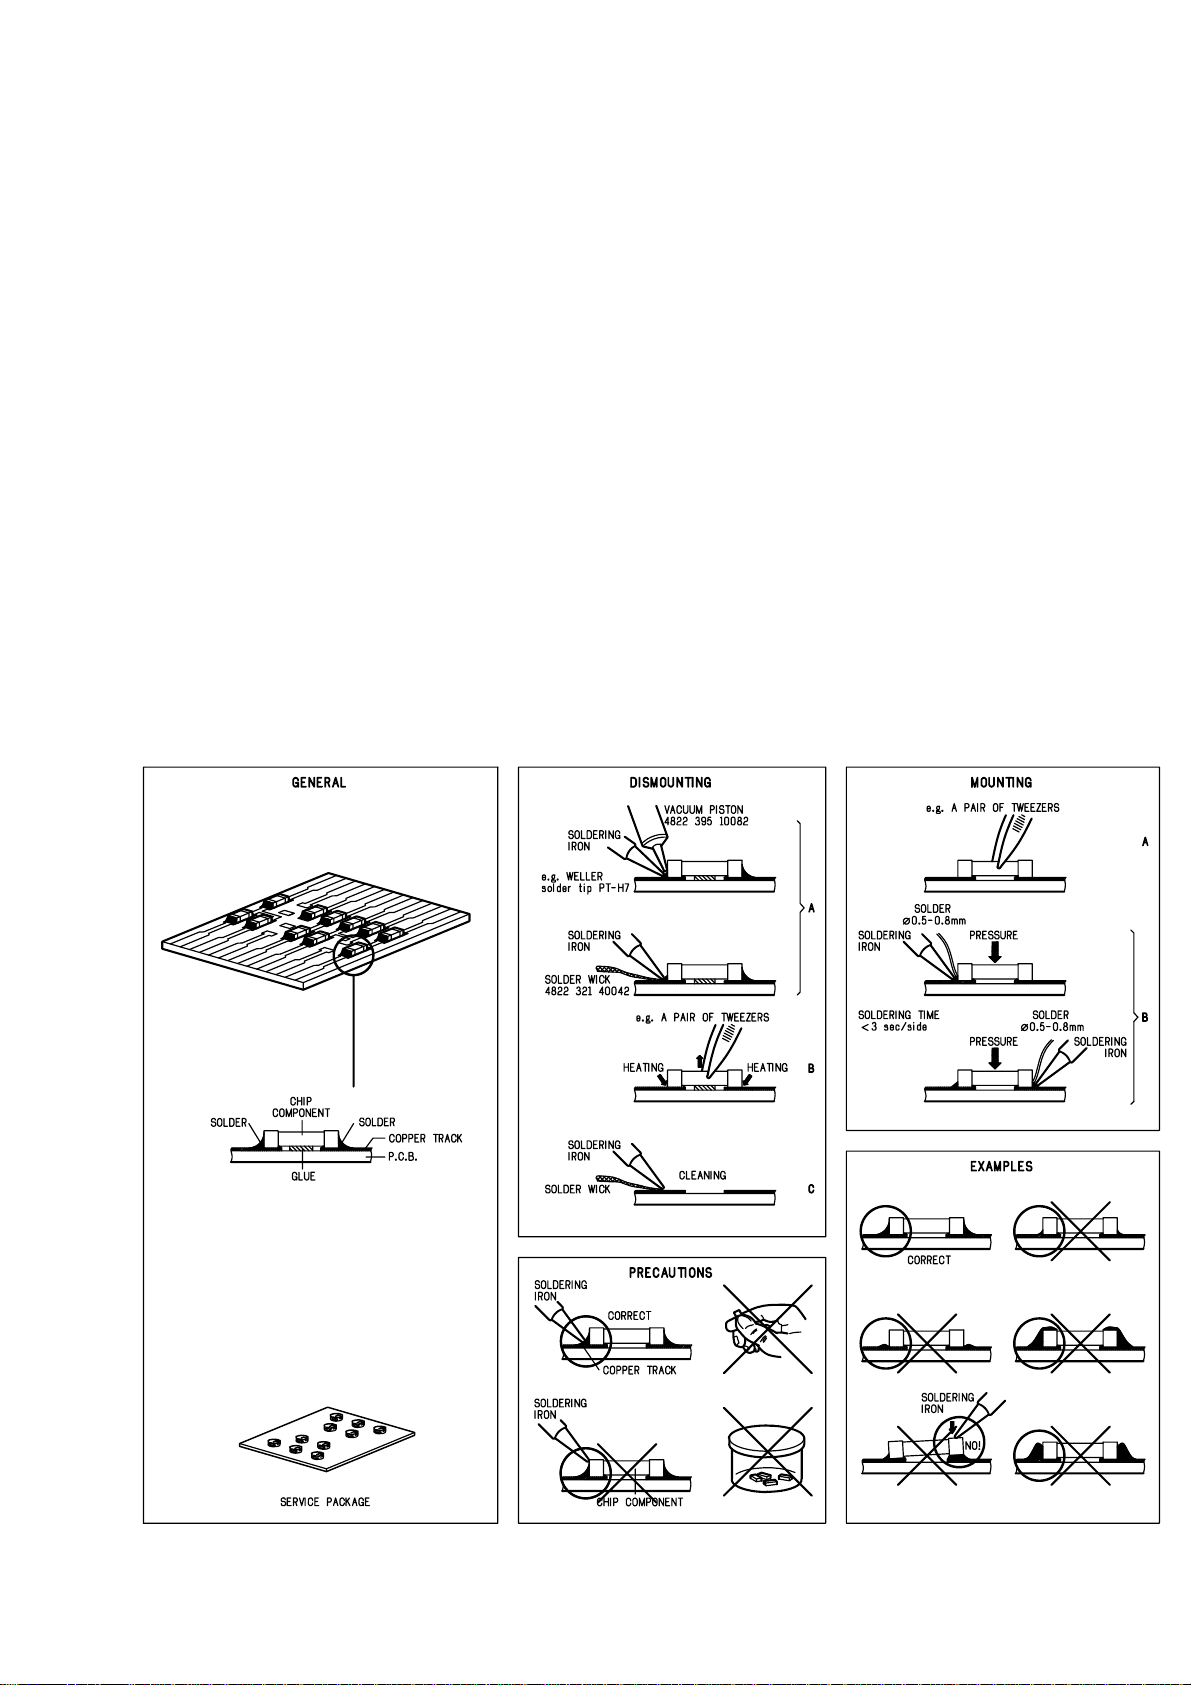
HANDLING CHIP COMPONENTS
ESD Equipment:
Anti-static table mat - large 1200x650x1.25mm ...4822 466 10953
anti-static table mat - small 600x650x1.25mm .....4822 466 10958
Anti-static wristband ............................................4822 395 10223
Connectorbox (1M
Extension cable
(to connect wristband to conn.box) ..........4822 320 11305
Connecting cable
(to connect table mat to conn.box) ...........4822 320 11306
Earth cable (to Connect product to mat or box) --4822 320 11308
Complete kit ESD3
(combining all above products) ...............4822 320 10671
Wristband tester ...................................................4822 344 13999
Ω) ..........................................4822 395 11307
Page 6
WARNING
GB
All ICs and many other semi-conductors are
susceptible to electrostatic discharges (ESD).
Careless handling during repair can reduce life
drastically.
When repairing, make sure that you are
connected with the same potential as the mass
of the set via a wrist wrap with resistance.
Keep components and tools also at this
potential.
F
ATTENTION
Tous les IC et beaucoup d’autres
semi-conducteurs sont sensibles aux
décharges statiques (ESD).
Leur longévité pourrait être considérablement
écourtée par le fait qu’aucune précaution n’est
prise à leur manipulation.
Lors de réparations, s’assurer de bien être relié
au même potentiel que la masse de l’appareil et
enfiler le bracelet serti d’une résistance de
sécurité.
Veiller à ce que les composants ainsi que les
outils que l’on utilise soient également à ce
potentiel.
1-6
ESD
D
WARNUNG
Alle ICs und viele andere Halbleiter sind
empfindlich gegenüber elektrostatischen
Entladungen (ESD).
Unsorgfältige Behandlung im Reparaturfall kan
die Lebensdauer drastisch reduzieren.
Veranlassen Sie, dass Sie im Reparaturfall über
ein Pulsarmband mit Widerstand verbunden
sind mit dem gleichen Potential wie die Masse
des Gerätes.
Bauteile und Hilfsmittel auch auf dieses gleiche
Potential halten.
WAARSCHUWING
NL
Alle IC’s en vele andere halfgeleiders zijn
gevoelig voor electrostatische ontladingen
(ESD).
Onzorgvuldig behandelen tijdens reparatie kan
de levensduur drastisch doen verminderen.
Zorg ervoor dat u tijdens reparatie via een
polsband met weerstand verbonden bent met
hetzelfde potentiaal als de massa van het
apparaat.
Houd componenten en hulpmiddelen ook op
ditzelfde potentiaal.
I
AVVERTIMENTO
Tutti IC e parecchi semi-conduttori sono
sensibili alle scariche statiche (ESD).
La loro longevità potrebbe essere fortemente
ridatta in caso di non osservazione della più
grande cauzione alla loro manipolazione.
Durante le riparazioni occorre quindi essere
collegato allo stesso potenziale che quello della
massa dell’apparecchio tramite un braccialetto
a resistenza.
Assicurarsi che i componenti e anche gli utensili
con quali si lavora siano anche a questo
potenziale.
GB
Safety regulations require that the set be restored to its original
condition and that parts which are identical with those specified,
be used.
NL
Veiligheidsbepalingen vereisen, dat het apparaat bij reparatie in
zijn oorspronkelijke toestand wordt teruggebracht en dat onderdelen,
identiek aan de gespecificeerde, worden toegepast.
F
Les normes de sécurité exigent que l’appareil soit remis à l’état
d’origine et que soient utiliséés les piéces de rechange identiques
à celles spécifiées.
D
Bei jeder Reparatur sind die geltenden Sicherheitsvorschriften zu
beachten. Der Original zustand des Geräts darf nicht verändert werden;
für Reparaturen sind Original-Ersatzteile zu verwenden.
“Pour votre sécurité, ces documents
doivent être utilisés par des spécialistes agréés, seuls habilités à réparer
votre appareil en panne”.
CLASS 1
LASER PRODUCT
GB
Invisible laser radiation when open.
Avoid direct exposure to beam.
Osynlig laserstrålning när apparaten är öppnad och spärren
är urkopplad. Betrakta ej strålen.
Warning !
S
Varning !
3122 110 03420
I
Le norme di sicurezza esigono che l’apparecchio venga rimesso
nelle condizioni originali e che siano utilizzati i pezzi di ricambio
identici a quelli specificati.
"After servicing and before returning set to customer perform a
leakage current measurement test from all exposed metal parts to
earth ground to assure no shock hazard exist. The leakage current
must not exceed 0.5mA."
Varoitus !
SF
Avatussa laitteessa ja suojalukituksen ohitettaessa olet alttiina
näkymättömälle laserisäteilylle. Älä katso säteeseen!
DK Advarse !
Usynlig laserstråling ved åbning når sikkerhedsafbrydere er
ude af funktion. Undgå udsaettelse for stråling.
Page 7
1-7
INFORMATION ABOUT LEAD-FREE SOLDERING
Philips CE is producing lead-free sets from 1.1.2005 onwards.
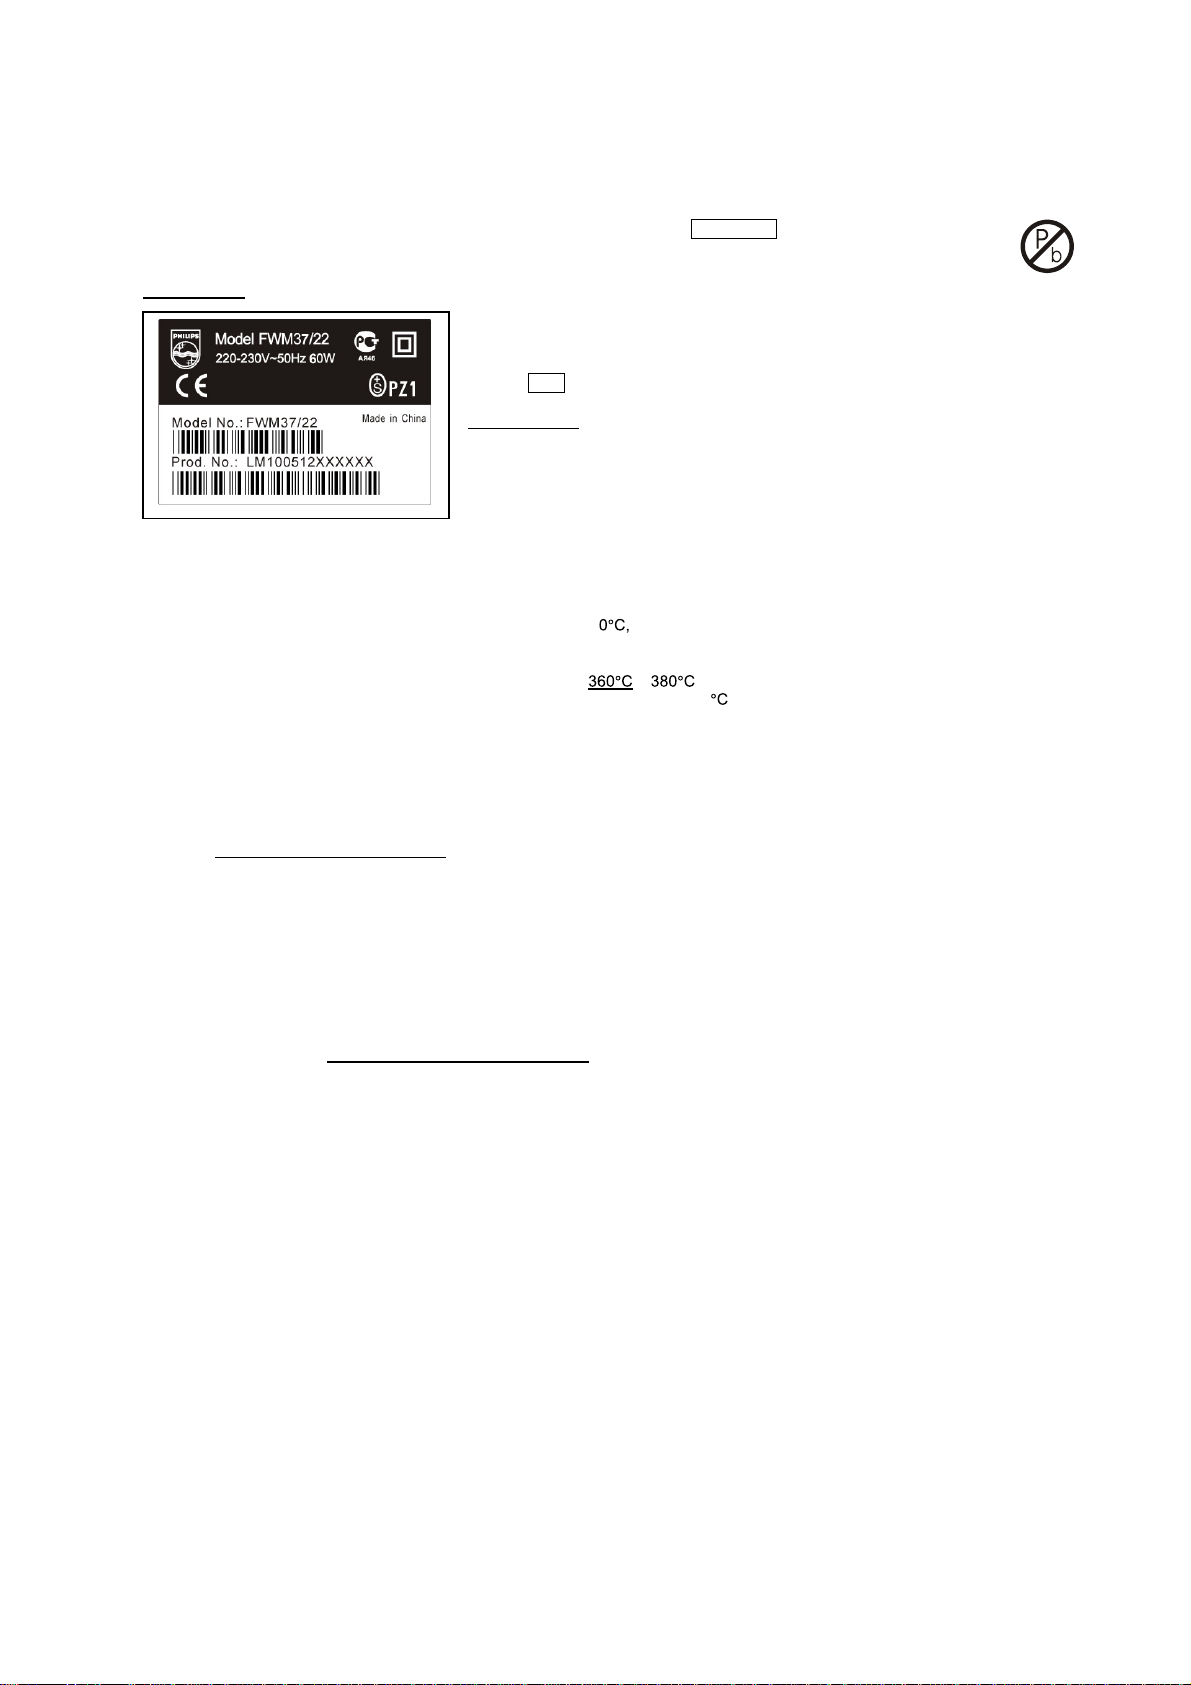
IDENTIFICATION:
Regardless of special logo (not always indicated) one must treat all sets from 1 Jan 2005 onwards, according next rules:
Example S/N:
• Use only lead-free solder alloy Philips SAC305 with order code 0622 149 00106. If lead-free solder-paste is required, please contact
the manufacturer of your solder-equipment. In general use of solder-paste within workshops should be avoided because paste is not
easy to store and to handle.
• Use only adequate solder tools applicable for lead-free solder alloy. The solder tool must be able
• Adjust your solder tool so that a temperature around
• Mix of lead-free solder alloy / parts with leaded solder alloy / parts is possible but PHILIPS recommends strongly to avoid mixed
• Use only original spare-parts listed in the Service-Manuals. Not listed standard-material (commodities) has to be purchased at
• Special information for BGA-ICs:
• For sets produced before 1.1.2005 (except products of 2004), containing leaded solder-alloy and components, all needed spare-parts
• On our website www.atyourservice.ce.Philips.com
o To reach at least a solder-temperature of 40
o To stabilize the adjusted temperature at the solder-tip
o To exchange solder-tips for different applications.
solder-joint should not exceed ~ 4 sec. Avoid temperatures above 400 otherwise wear-out of tips will rise drastically and flux-fluid
will be destroyed. To avoid wear-out of tips switch off un-used equipment, or reduce heat.
solder alloy types (leaded and lead-free).
If one cannot avoid or does not know whether product is lead-free, clean carefully the solder-joint from old solder alloy and re-solder
with new solder alloy (SAC305).
external companies.
- always use the 12nc-recognizable soldering temperature profile of the specific BGA (for de-soldering always use the lead-free
temperature profile, in case of doubt)
- lead free BGA-ICs will be delivered in so-called 'dry-packaging' (sealed pack including a silica gel pack) to protect the IC against
moisture. After opening, dependent of MSL-level seen on indicator-label in the bag, the BGA-IC possibly still has to be baked dry.
(MSL=Moisture Sensitivity Level). This will be communicated via AYS-website.
Do not re-use BGAs at all.
will be available till the end of the service-period. For repair of such sets nothing changes.
BGA-de-/soldering (+ baking instructions)
∗
Heating-profiles of BGAs and other ICs used in Philips-sets
∗
Bottom line of typeplate gives a 14-digit S/N. Digit 5&6 is the year, digit 7&8 is the week number,
so in this case 2005 wk12
So from 0501 onwards = from 1 Jan 2005 onwards
Important note
you avoid mixing solder-alloys (leaded/ lead-free). So best to always use SAC305 and the
higher temperatures belong to this.
Due to lead-free technology some rules have to be respected by the workshop during a repair:
: In fact also products of year 2004 must be treated in this way as long as
− is reached and stabilized at the solder joint. Heating-time of the
you find more information to:
For additional questions please contact your local repair-helpdesk.
You will find this and more technical information within the "magazine", chapter "workshop news".
SERVICE INSTRUCTION
Safety regulations require that after a repair, the set must be returned in its original condition. Pay in particular attention to
the following points:
· Route the wire trees correctly and fix them with the
mounted cable clamps.
· Check the insulation of the AC Power lead for external
damage.
· Check the strain relief of the AC Power cord for proper
function.
· Check the electrical DC resistance between the AC Power
Plug and the secondary side (only for sets which have a AC
Power isolated power supply):
1. Unplug the AC Power cord and connect a wire
between the two pins of the AC Power plug.
2. Set the AC Power switch to the "on" position (keep the
AC Power cord unplugged!).
3. Measure the resistance value between the pins of the
AC Power plug and the metal shielding of the tuner or
the aerial connection on the set. The reading should be
larger than 4.5 Mohm (For U.S. it should be between
4.2 Mohm and 12 Mohm).
4. Switch "off" the set, and remove the wire between the
two pins of the AC Power plug.
• Check the cabinet for defects, to avoid touching of any
inner parts by the customer.
Page 8
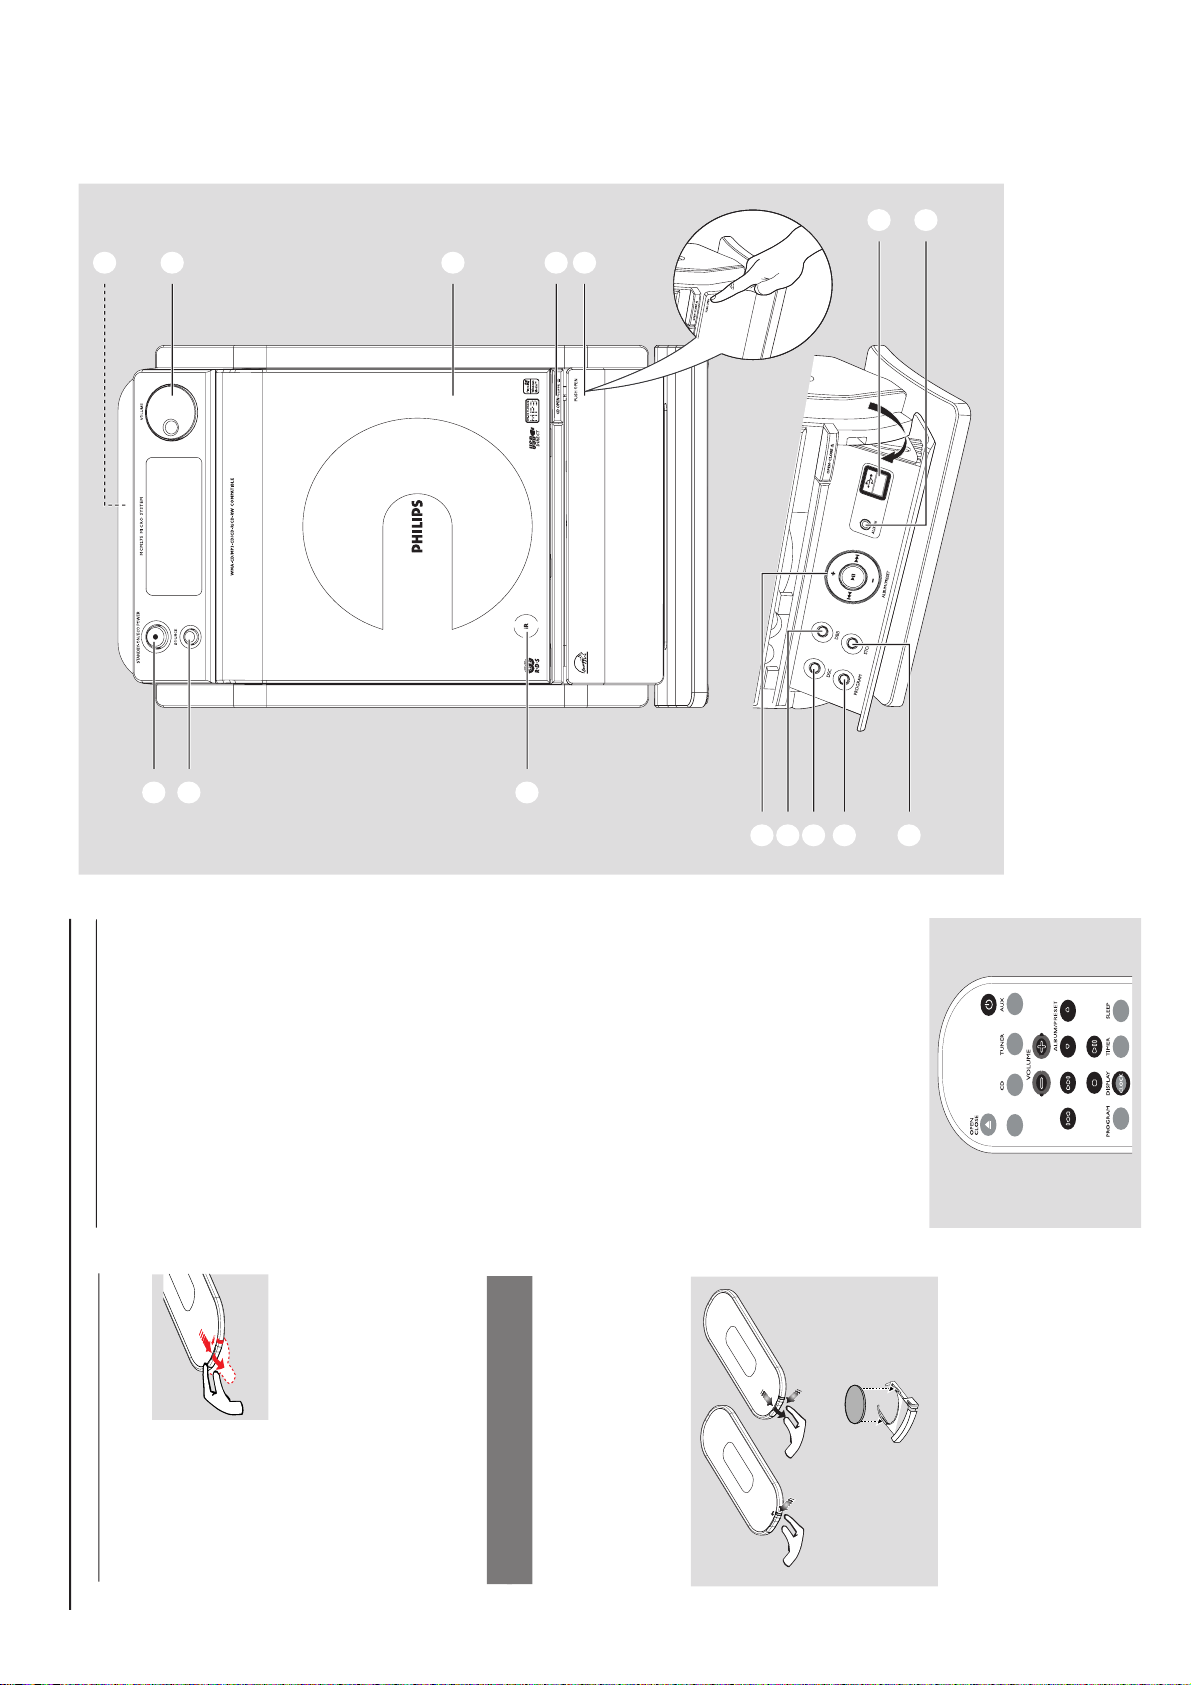
PREPARATIONS AND CONTROLS
Preparation
Setting the clock
After connecting MCM275 to the power supply,
set the clock first.
1
Press and hold STANDBY-ON/ ECO
POWER to switch the set to Standby mode
The display shows the set time
-- --:-- -- flashes by default if you have not set
the clock
2
In the standby mode, press and hold DISPLAY/
CLOCK on the remote control
SET CLOCK scrolls on the display
24 HR or 12 HR appears for the initial
clock setting. To select 24-hour clock or
12-hour clock,
On the remote control, press VOLUME +/-
once or more (or turn VOLUME on the
set)
On the remote control, press DISPLAY/
CLOCK to confirm
The hours digits star t flashing
3
Hold down or press VOLUME +/- repeatedly
to set the hours (or turn VOLUME on the
set)
4
Press DISPLAY/CLOCK to confirm
The minutes digits start flashing
5
Hold down or press VOLUME +/- repeatedly
to set the minutes (or turn VOLUME on the
set)
6
Press DISPLAY/CLOCK to confirm
– To exit without storing the clock setting press
STOP 9
Helpful hints:
– The clock setting will be erased when the system
is disconnected from the power supply.
– The set will exit from the clock setting mode if
no button is pressed within 90 seconds.
–To set the clock automatically by using a time
signal which is broadcast together with the RDS
signal see chapter RDS: Automatic clock
setting via RDS.
USB
/
Using the remote control
IMPORTANT!
– Remove the
protective plastic tab
before using the
remote control.
– Always point the
remote control directly
towards IR area.
Notes for remote control:
– First select the source you wish to
control by pressing one of the source select
keys on the remote control (for example
CD, TUNER).
–Then select the desired function (for
example
ÉÅ
,
í
,
ë
).
To replace the remote controls’
battery
C
R
2
0
2
5
L
I
T
H
I
U
M
2
3
1
CAUTION!
– Remove the battery if it is exhausted
or will not be used for a long time.
– Batteries contain chemical substances,
so they should be disposed of properly.
1
Press and hold 1 as indicated.
2
Simultaneously, pull the battery tray at 4.
3
Remove the old battery and put a new CR2025
battery in place.
4
Put back the battery tray.
1
2
3
!
9
@
0
#
7
6
5
4
8
%
$
1-8
Page 9
PREPARATIONS AND CONTROLS
Controls
1
STANDBY-ON/ ECO POWER
– press briefly to switch the set on or off (standby/
ECO POWER);
– In standby or Eco Power mode: press and
hold to toggle between Standby and ECO
POWER mode (power-saving mode)
– Red indicator: lights up red when the set is
switched to ECO POWER mode
2
SOURCE
–selects sound source CD, USB, TUNER or
AUX
– In standby or Eco Power mode: switches the
set on and selects sound source CD, USB,
TUNER or AUX
3
IR
–sensor for the infrared remote control
Helpful hints: Always point the remote control
towards this sensor.
4
PUSH OPEN
– push to unfold or fold the control panel
5
CD OPEN • CLOSE 0
– opens/closes the CD door
6
CD door
7
VOLUME
–adjusts the volume level
– Clock/Timer: adjusts the hours and minutes
8
nn
nn
n
– 3.5 mm headphone socket
Helpful hints:
– Adjust the volume to a moderate level
before you plug in the headphones.
– Connecting headphones will switch off the
speakers.
9
ALBUM/ PRESET + /-
– CD/USB: selects albums (for MP3/WMA only)
– TUNER: selects a preset radio station
4 / ¢
– CD/USB: skips or searches CD tracks/titles
backwards/forwards
– Tu n er : tunes to radio stations
6
– CD/USB: starts or pauses playback
0
DBB (Dynamic Bass Boost)
– turns the bass enhancement on/off
!
DSC (Digital Sound Control)
–selects predefined sound settings: ROCK,
JAZZ, POP, CLASSIC
@
PROGRAM
– CD/USB: programs tracks
– Tuner: programs preset radio stations
#
STOP
– CD/USB: stops playback; erase a program
$
AUX-IN
– connects to the AUDIO OUT jack on the
external appliance
%
– jack for the external USB mass storage device
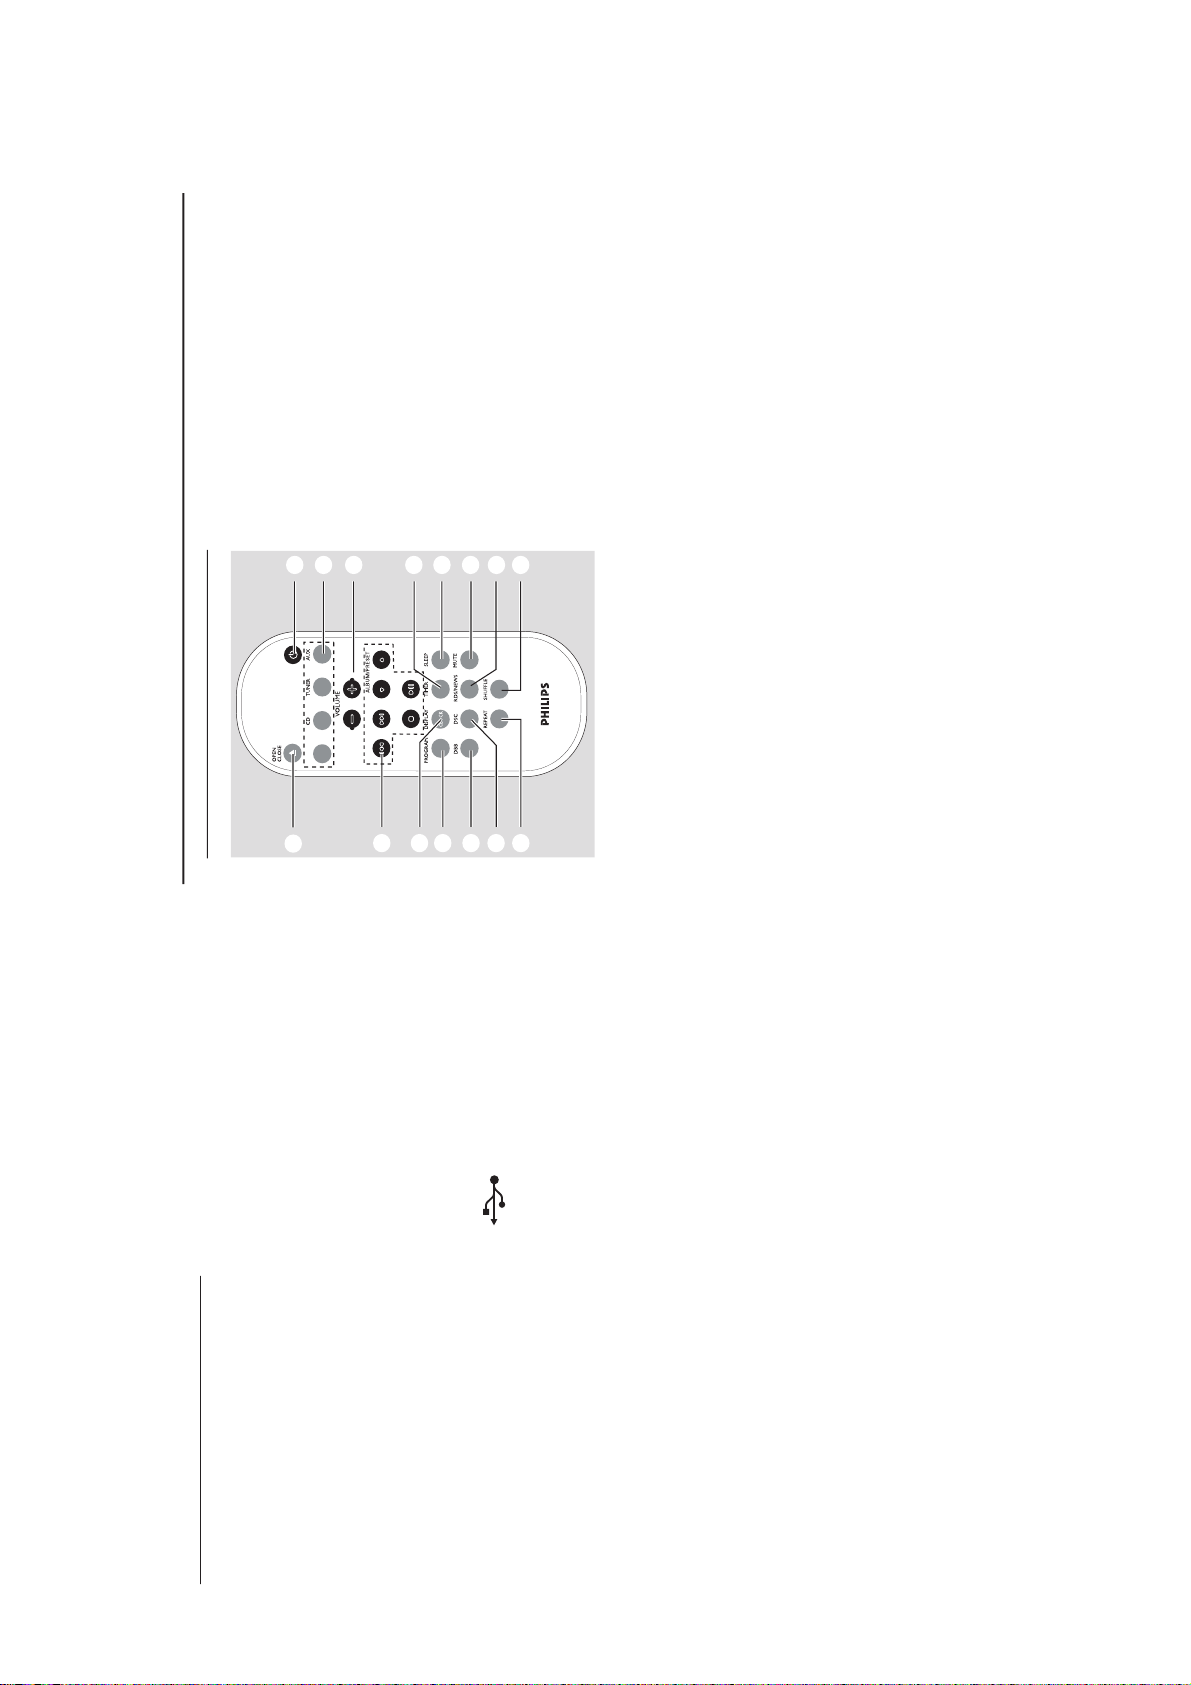
Remote control
7
8
1
%
$
@
!
9
0
#
2
4
5
6
3
USB
/
AUX
– selects the audio input from an additional
connected appliance
– In standby or Eco Power mode:: switches the
set on and selects the audio input from an
additional connected appliance
3
VOLUME +/-
– adjusts the volume level
– Clock/Timer: adjusts the hours and minutes
4
TIMER
–displays the timer setting
– switches the timer on/off
– enters the timer setting mode (press and hold
for more than 2 seconds)
5
SLEEP
– set the sleep timer
6
MUTE
– switches the sound off temporarily
7
RDS/NEWS
– Tu ne r : selects RDS (Radio Data System)
information
– CD/USB/AUX: activates/deactivates news
8
SHUFFLE
– selects random playback
9
REPEAT
– selects continuous playback
0
DSC (Digital Sound Control)
–selects predefined sound settings: ROC K,
JAZZ, POP, CLASSIC
!
DBB (Dynamic Bass Boost)
– turns the bass enhancement on/off
@
PROGRAM
– CD/USB: programs tracks
– Tu n er : programs preset radio stations
#
DISPLAY/CLOCK
– Clock: - displays the set time
- In standby mode: enters the clock
setting mode (press and hold for more
than 2 seconds)
– TUNER/Audio CD: switches between clock
display and playback
display
– MP3/WMA files: displays disc information
during playback
Notes for remote control:
– First select the source you wish to
control by pressing one of the source select
keys on the remote control (for example
CD, TUNER).
–Then select the desired function (for
example
ÉÅ
,
í
,
ë
).
1
BB
BB
B
–press briefly to switch the set on or off (standby/
ECO POWER);
– In standby or Eco Power mode: press and
hold to toggle between Standby and ECO
POWER mode (power-saving mode)
2
Source buttons
USB
–selects USB source
– In standby or Eco Power mode:: switches the
set on and selects USB source.
CD
–selects CD source
– In standby or Eco Power mode:: switches the
set on and selects CD source.
TUNER
– selects TUNER source and toggles between the
wavebands: FM and MW
– In standby or Eco Power mode:: switches the
set on and selects TUNER source
Controls
1-9
Page 10
CONTROLS & INSTALLATIONS
$
4 / ¢
– CD/USB: skips or searches CD tracks
backwards/forwards
– Tuner: tunes to radio stations
ALBUM/ PRESET 3 / 4
– CD/USB: selects the next/previous album (for
MP3/WMA only)
– TUNER: selects a preset radio station
ÉÅ
– CD/USB: starts or pauses playback
9
– CD/USB: stops playback; erase a program
%
OPEN • CLOSEç
– opens/closes the CD door
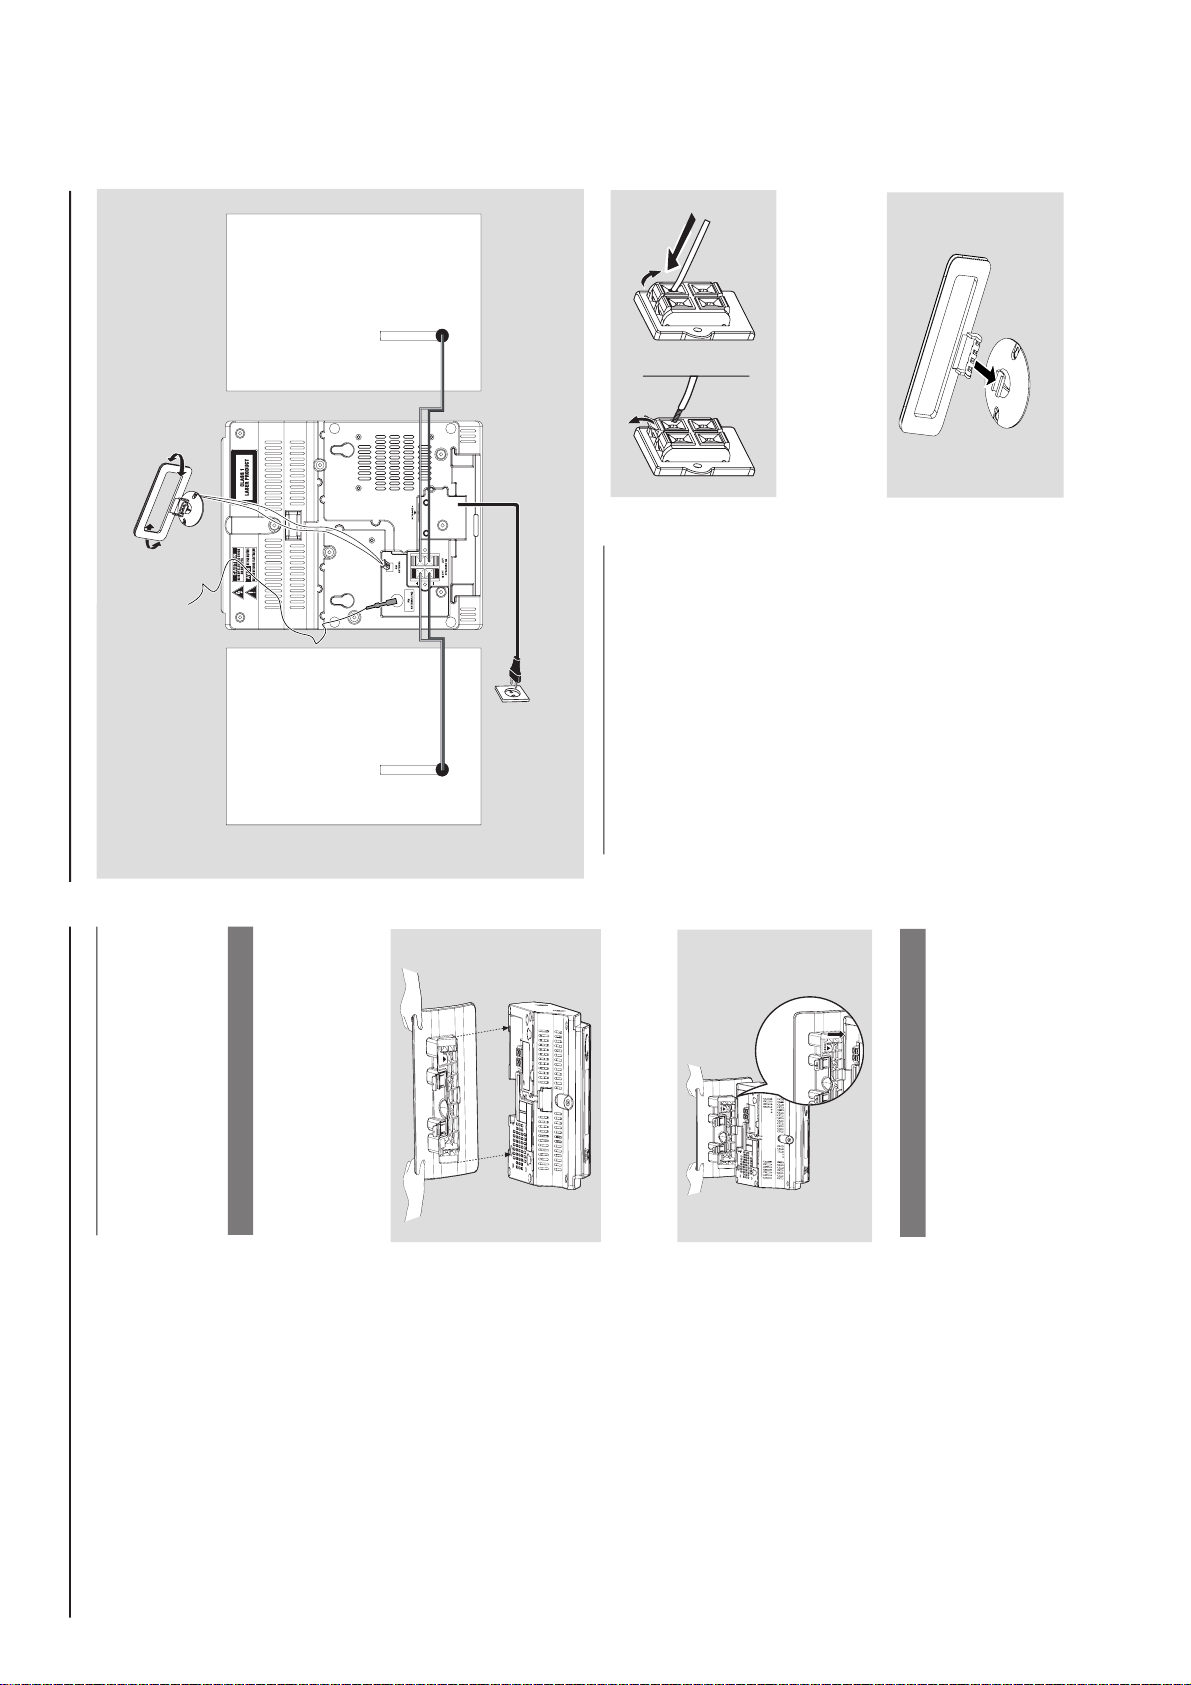
Controls Installation
Placing MCM275
With the detachable stand and by-packed wall
mounting kit , MCM275 allows you to place it in
two ways: on desktops with stand or on
walls without stand.
Mounting stand onto the set
MCM275 is equipped with a stand. To mount
the stand onto the set,
1
Put MCM275 on a flat and firm surface, rear side
facing up
2
As shown, align the stand to the slots at set’s
bottom, 4 FRONT facing down
P
R
E
S
S
F
R
O
N
T
F
R
O
NT
P
R
E
S
S
3
Push the stand down into the slots
When the stand is in place, you will hear a
click
See Appendix: How to mount your
MCM275 onto walls to learn more about
wall mounting.
Mounting MCM275 onto walls
Installation
MW loop
antenna
Speaker
(left)
Speaker
(right)
FM wire
antenna
AC power cord
Rear connections
Warning:
– Never make or change connections with
the mains supply switched on.
– Install your set near the AC outlet and
where the AC power plug can be reached
easily.
A
Speaker connections
Use the supplied speakers only. Using other
speakers can damage the set or the sound
quality will be negatively affected.
Connect the cable of the left speaker to LEFT
(red and black) and the cable of the right
speaker to RIGHT (red and black) as follows:
a. Press the clip of the red terminal and fully
insert the stripped portion of the colored (or
marked) speaker cable into the socket, then
release the clip
b. Press the clip of the black terminal and fully
insert the stripped portion of the black (or
unmarked) speaker cable into the socket, then
release the clip
B
Antenna connections
MW antenna
1
Assemble the loop antenna as shown:
1-10
Page 11
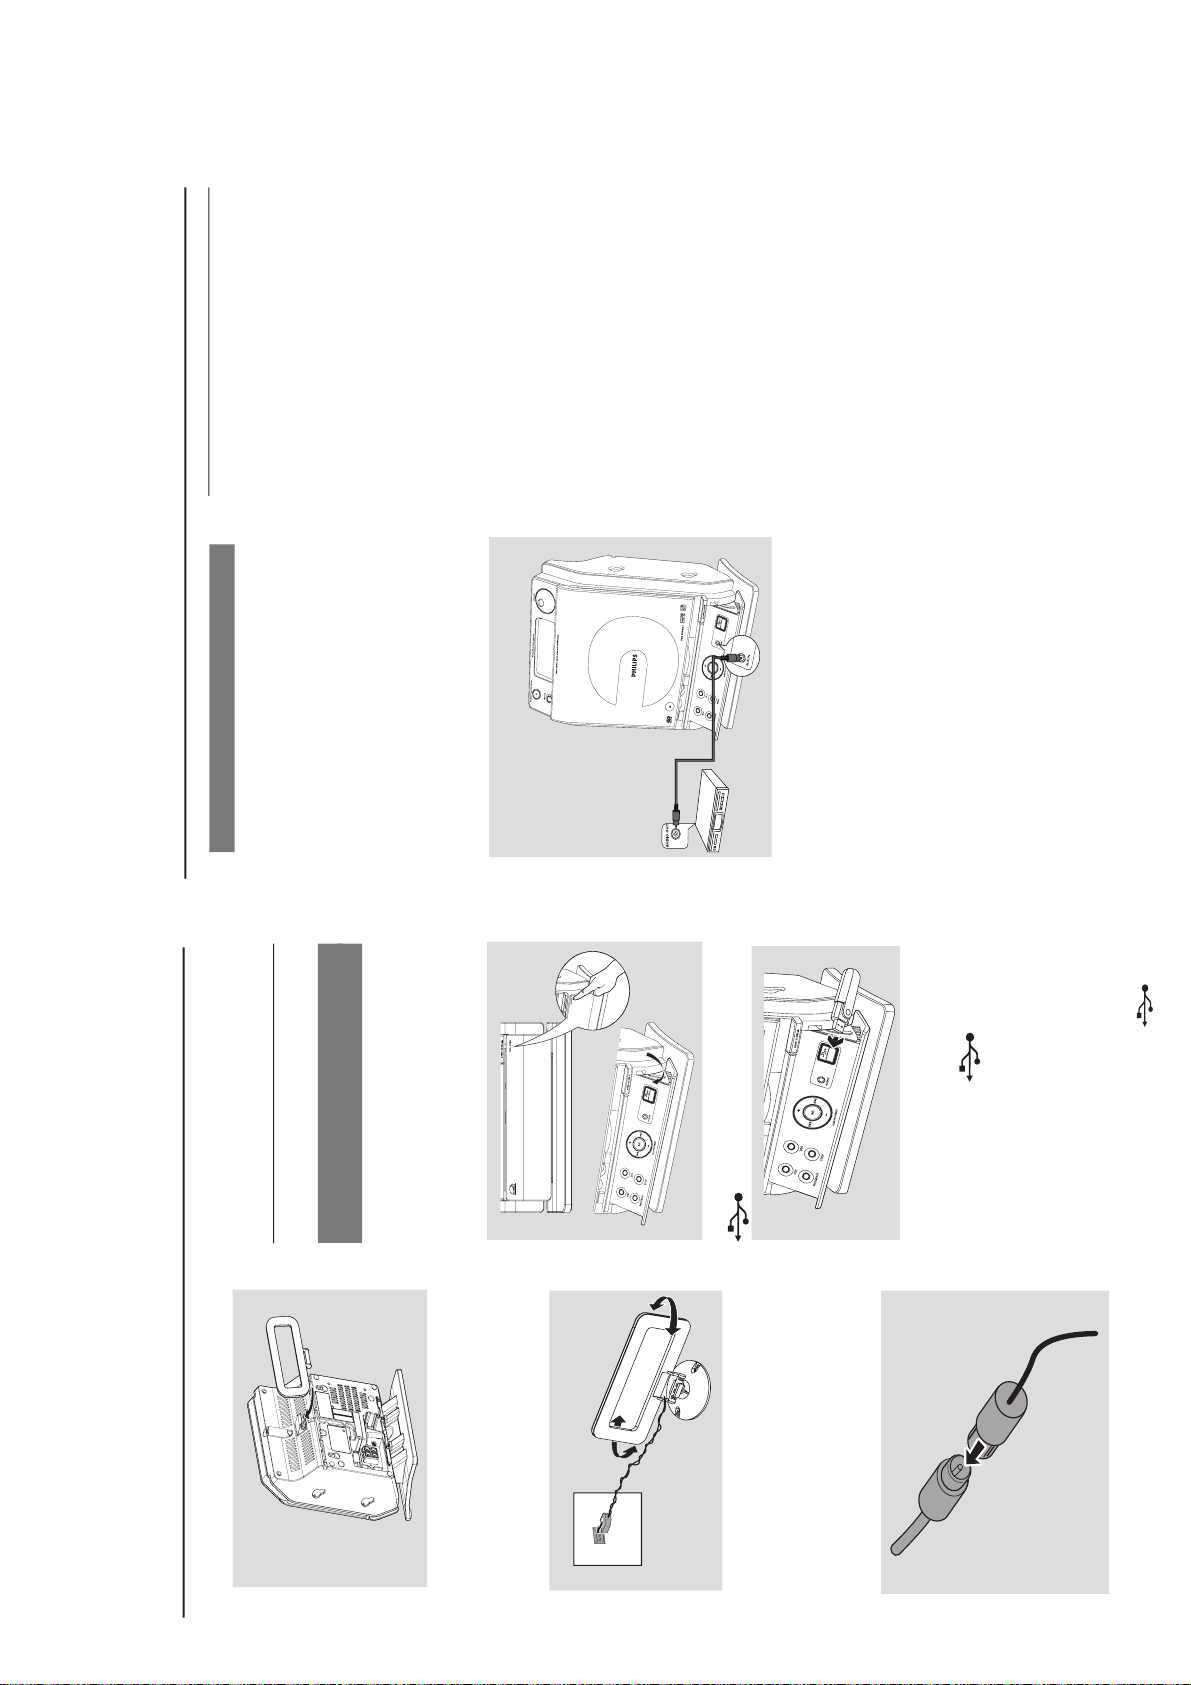
CONTROLS & INSTALLATIONS
Installation
2
Fit the plug of the loop antenna to AM (MW)
ANTENNA as shown below
3
Adjust the position of the antenna for optimal
reception (as far away as possible from the TV,
VCR or other radiation sources)
FM antenna
The wire antenna supplied can only be used to
receive nearby stations. For better reception we
recommend using a cable antenna system or an
outdoor antenna.
1
Extend the wire antenna and fit it to FM
ANTENNA as shown below
AM
ANTENNA
Or
Insert the loop antenna into the slot on the set
Note: If you are using a cable antenna system or
an outdoor antenna, fit the antenna plug, instead of
the wire antenna, to FM ANTENNA .
By connecting a USB mass storage device
(including USB flash memory, USB flash players
or memory cards) to the Hi-Fi system, you can
enjoy the device’s stored music through the
powerful speakers of Hi-Fi system.
1
Check you have unfolded the control panel
2
Insert the USB device’s USB plug into the socket
on the set ‘s foldable control panel
2
Move the antenna in different positions for
optimal reception (as far away as possible from
the TV, VCR or other radiation sources)
3
Fix the antenna’s end to the wall
Connecting an additional
appliance
Connecting a USB device or memory
card
or
for the devices with USB cable:
a. Insert one plug of the USB cable (not
supplied) to the socket
on the set ‘s
foldable control panel
b. Insert the other plug of the USB cable to the
USB output terminal of the USB device
or
for the memory
card:
a. Insert the memory card into a card reader
(not supplied)
b. Use a USB cable (not supplied) to connect
the card reader to the socket
on the set ‘s foldable control panel
Installation
Using AC power
1
Make sure all the connections have been made
before switching on the power supply
2
Connect the AC power cord to the wall socket.
This switches on the power supply
When MCM275 is switched to standby, it is still
consuming some power. To disconnect the
system from the power supply completely,
remove the power plug from the wall
socket.
The type plate is located on the rear of the
set.
For users in the U.K.: please follow the
instructions.
Warning!
To avoid overheating of the system, a safety
circuit has been built in. Therefore, your
system may switch to Standby mode
automatically under extreme conditions. If
this happens, let the system cool down
before reusing it (not available for all versions).
This product complies with the radio
interference requirements of the European
Community.
CAUTION
Visible and invisible laser radiation. If the
cover is open, do not look at the beam.
High voltage! Do not open. You run the risk
of getting an electric shock.
The machine does not contain any user-
serviceable parts.
Modification of the product could result in
hazardous radiation of EMC or other
unsafe operation.
4
Select AUX mode on the set
Helpful hints:
–Always refer to the owner’s manual of other
equipment for complete connection.
Connecting a non-USB device
It is possible to use an additional appliance, e.g.
TV, VCR or CD recorder with the set. On
MCM275, you can playback music from an
external source.
1
Follow the Step 1 under Connecting a USB
device or memory card
2
Insert one plug of the audio cable (not supplied)
to the socket AUX IN on the set ‘s foldable
control panel
3
Connect the other end of the audio cable to the
AUDIO OUT terminal of the additional
appliance
1-11
Page 12

English
Troubleshooting
WARNING
Under no circumstances should you try to repair the system yourself, as this will invalidate the
warranty. Do not open the system as there is a risk of electric shock.
If a fault occurs, first check the points listed below before taking the system for repair. If you
are unable to remedy a problem by following these hints, consult your dealer or Philips for
help.
“NO DISC” is displayed.
Some files on the USB device are not
displayed.
Radio reception is poor.
The system does not react when buttons
are pressed.
Sound cannot be heard or is of poor
quality.
The left and right sound outputs are
reversed.
Problem
Solution
Insert a disc.
Wait until the moisture condensation at the lens
has cleared.
Replace or clean the disc, see “Maintenance”.
Use a finalised CD-RW or a correct MP3/WMA
-CD format disc.
Check if the number of folders exceeds 99 or
the number of titles exceeds 999
If the signal is too weak, adjust the antenna or
connect an external antenna for better
reception.
Increase the distance between the Micro HiFi
System and your TV or VCR.
Remove and reconnect the AC power plug and
switch on the system again.
Adjust the volume.
Disconnect the headphones.
Check that the speakers are connected correctly.
Check if the stripped speaker wire is clamped.
Make sure the MP3-CD was recorded within
32~256 kbps bit rate with sampling frequencies
at 48 kHz, 44.1 kHz or 32 kHz.
Check the speaker connections and location.
The remote control does not function
properly.
The timer is not working.
The Clock/Timer setting is erased.
Select the source (CD or TUNER, for example)
before pressing the function button (ÉÅ,í,
ë).
Reduce the distance between the remote
control and the system.
Insert the batter y with its polarities
(+/– signs) aligned as indicated.
Replace the battery.
Point the remote control directly toward
IR sensor on the front of the system.
Check the set is switched off
Set the clock correctly.
Press TIMER to switch on the timer.
Power has been interrupted or the power cord
has been disconnected. Reset the clock/timer.
Troubleshooting
TROUBLESHOOTING
1-12
Page 13
DISMANTLING INSTRUCTIONS
2-1 2-1
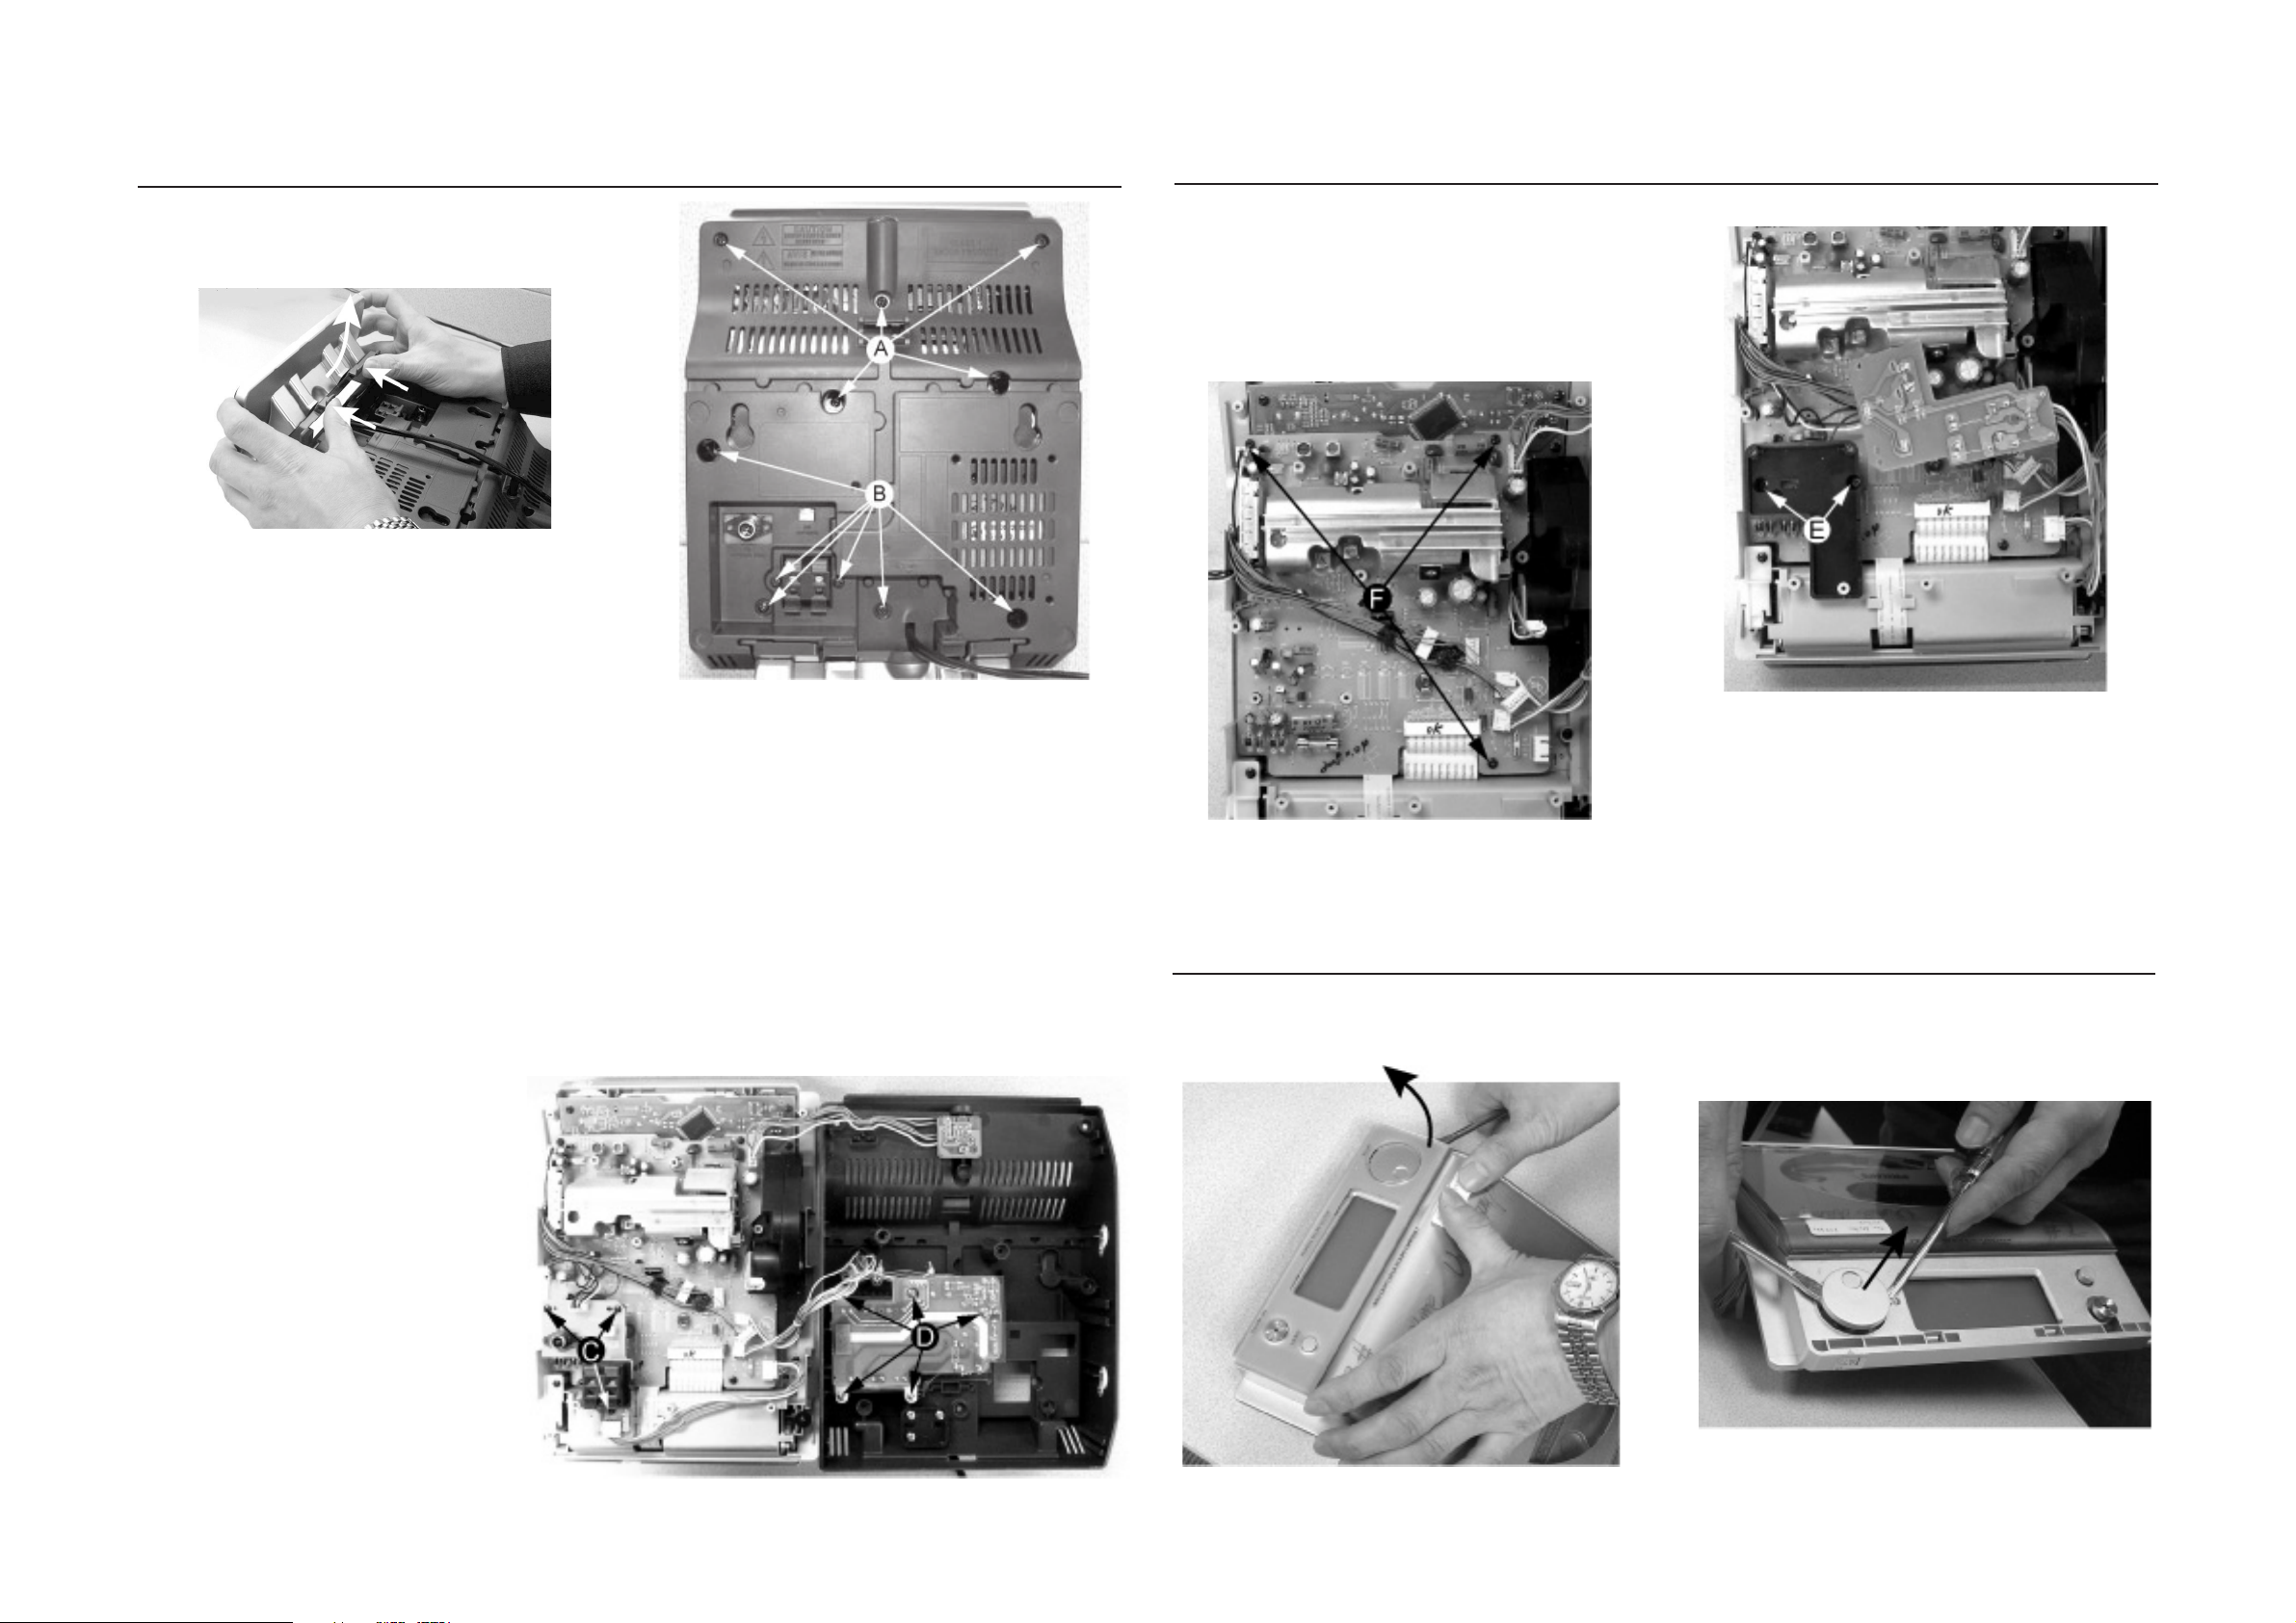
Dismantling the Rear Portion and PCBs
1) Press the 2 juts and pull out the Stand as shown in figure
1.
Figure 1
Figure 2
Dismantling the Rear Portion and PCBs
5) Loosen 2 screws E to remove the Bracket Jack Board as
shown in Figure 4.
6) Loosen 3 screws F to remove the Main Board as shown
in figure 5.
Figure 4
2) Loosen 5 screws A and 6 screws B to remove the Rear
Cabinet as shown in figure 2.
3) Loosen 3 screws C to remove the SP & ANT Jack Board
as shown in figure 3.
4) Loosen 5 screws D to remove the Power Module as
shown in figure 3.
Figure 5
Dismantling of the Display Lens & the Volume knob
1) Use a flat head screw driver to give a push in the direction
as shown in figure 6.
2) Place two small screw drivers in between the front cabinet
& knob to give more leverage in pulling out the Volume
Knob as shown in figure 7.
Figure 3
Figure 7
Figure 6
Page 14
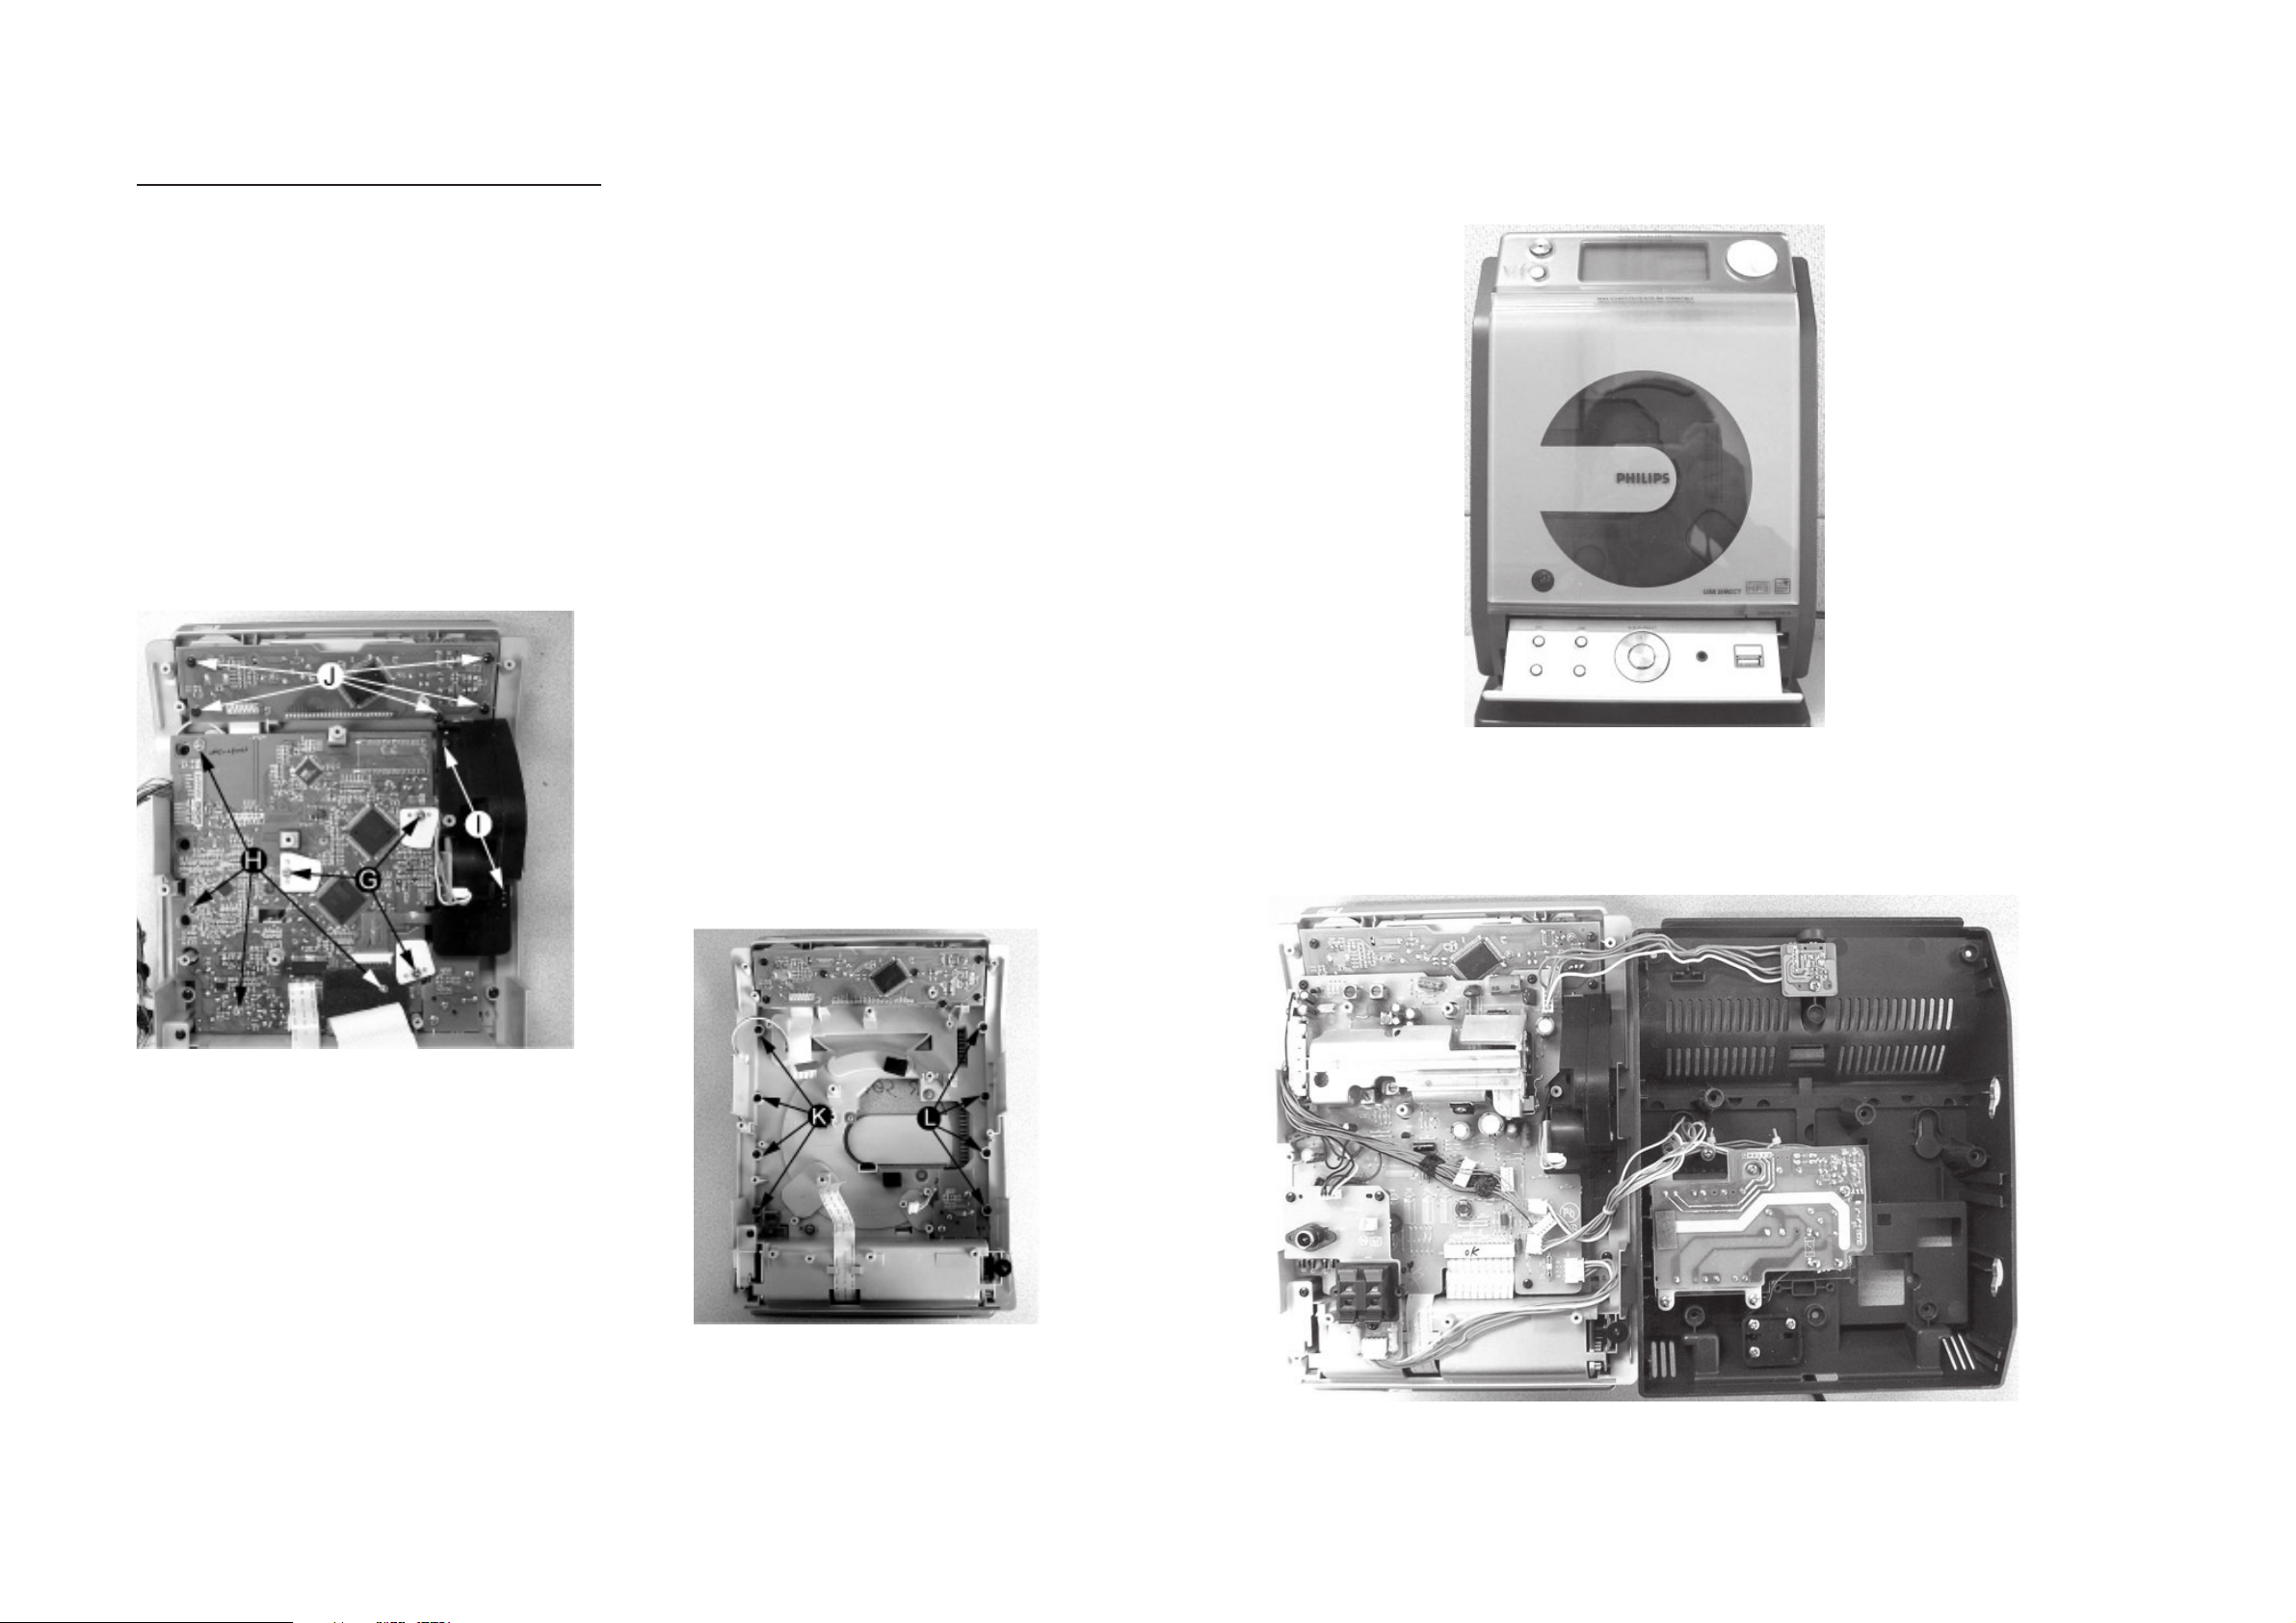
Dismantling of the CD Module & CD Door Carrier
1) Loosen 5 screws J mounting the Key Board to the Front
Cabinet to remove the Key Board as shown in figure 8.
2) Loosen 4 screws H and 3 screws G to CD Module as
shown in figure 8.
3) Loosen 2 screws I to remove the Servo Motor Mechanism
as shown in figure 8.
2-2
2-2
Service pos A
Figure 8
4) Loosen 4 screws K to remove the Right CD Door Carrier
and 4 screws L to remove the Left CD Door Carrier as
shown in figure 9.
Service pos B
Figure 9
Note: After re-assembly, it is very important to ensure all
wires are routed properly to ensure that they do not
touch/obstruct all moving parts.
Page 15
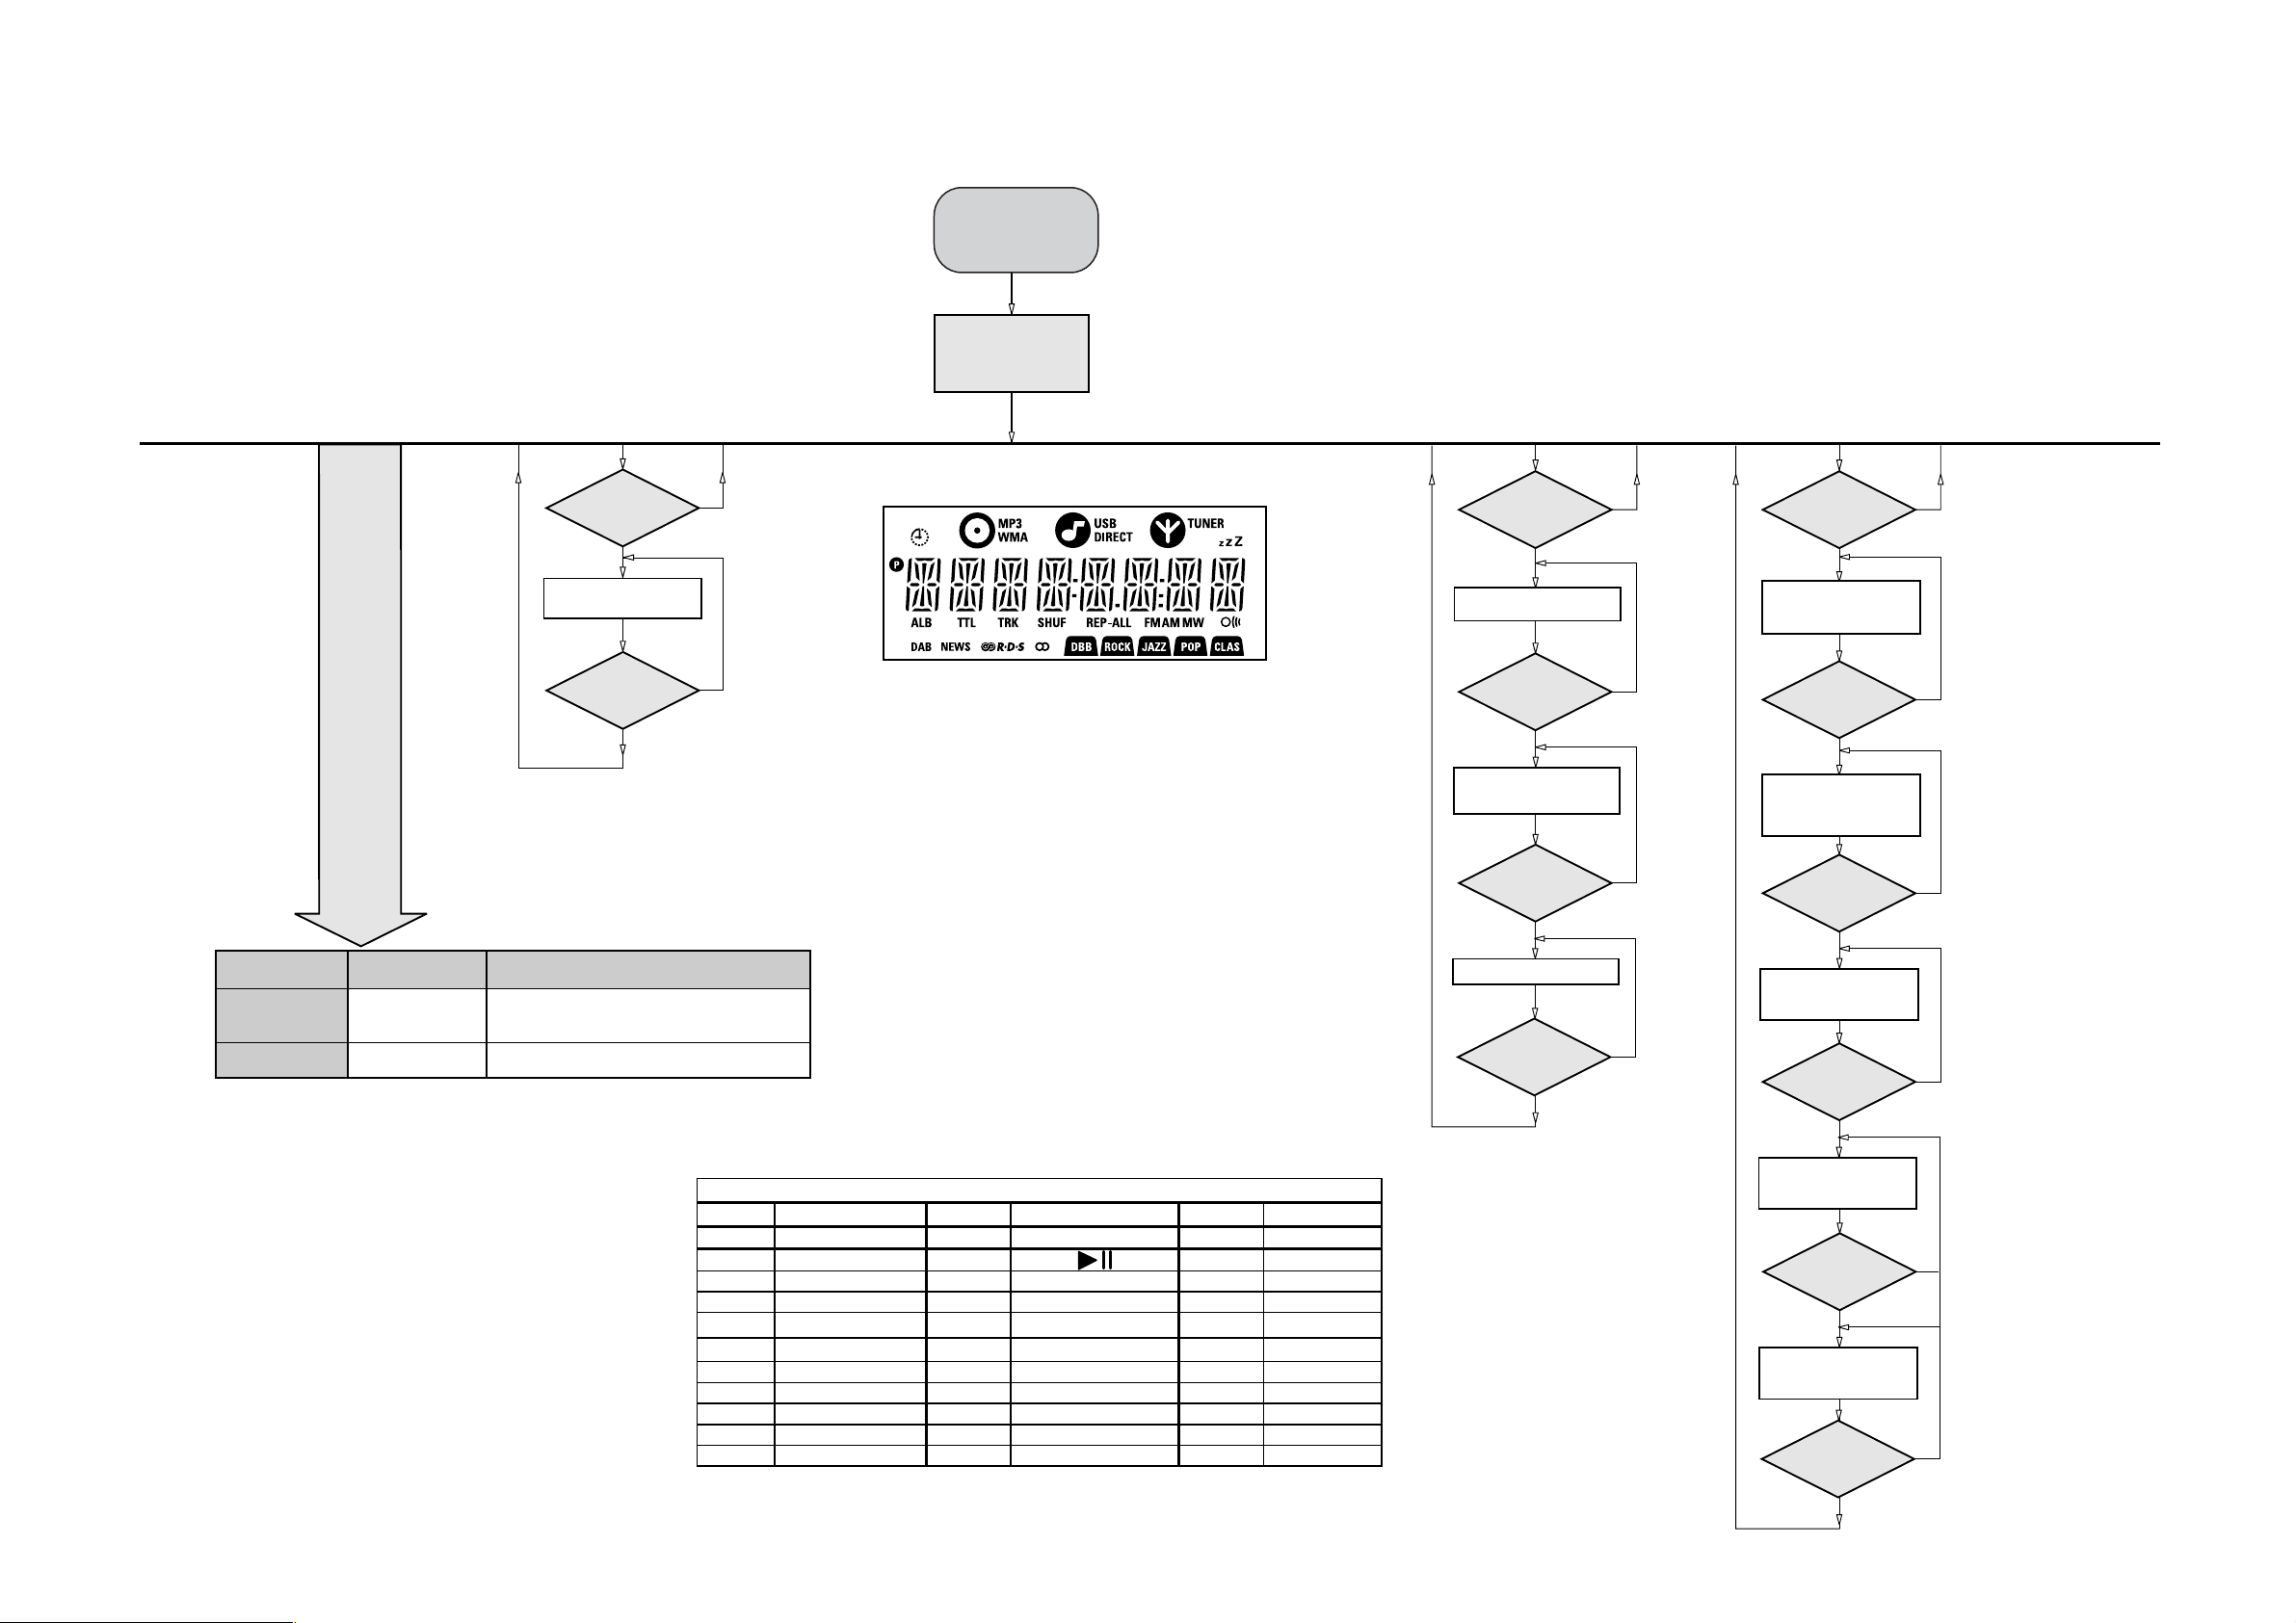
SERVICE TEST PROGRAM
3-1
3-1
KEY
TEST
Button pressed?
Button pressed?
NEXT
Y
Display shows
Table 1
9
Y
To enter Service
Testprogram hold
PLAY & Door Open/Close
buttons
depressed while
plugging mainscord in.
Display shows the
MCU version
"MCU-V
yy"
(Main menu)
N
N
Figure 1
Door switch is ignored → CD door can be opened.
*
V refers to Version
yy refers to Software version number of the uProcessor
(counting up from 01 to 99)
DISPLAY
TEST
PREV
Button pressed?
Y
Display shows Figure 1
All display flags on.
PREV
Button pressed?
Y
Display shows alternate
segment display from SEG0
to SEG64.
ADC
TEST
N
N
DBB
Button pressed?
Y
Display shows "ADC0 Value"
for ADC0
(Input Line - For key scanning)
DBB
Button pressed?
Y
Display shows "ADC1 Value"
for ADC1
(Input Line - ioNTC Heat
detection for transformer)
N
N
Various
other Tests
TEST
EEPROM CLEAR A test pattern will be sent to the EEPROM.
LEAVE SERVICE
TEST PROGRAM
Activated with
PROGRAM
9
to Exit
Disconnect
mains cord
ACTION
"EEP CLR" is displayed while the erase processing.
Caution! All presets from the customer will be lost!!
Key test table
KeyNr Set key KeyNr Set key KeyNr Set key
0 CD 10 RDS 20 PROGRAM
1 AUX 11
2 TUNER 12 CLOCK/DISP
LAY
3 SOURCE 13 ALBUM + SLEEP
4
STANDBY/ON
5
OPEN/CLOSE
6
VOLUME DOWN
14 ALBUM - TIMER
15
SKIP PREV 25 DBB
16 SKIP NEXT 26 DSC
7 VOLUME UP 17 NULL 27 MUTE
8 NULL 18 NULL 28 USB
9 NULL 19 REPEAT
Table 1
21 SHUFFLE
22 NULL
23
24
PREV
Button pressed?
Y
No Display shows
9
Button pressed?
Y
ADC Test is used for checking the
ADC inputs to the microprocessor.
The display shows an ADC value
between 0 and 255 for an input
signal between 0 and 5V.
N
N
DBB
Button pressed?
Y
Display shows "ADC2 Value"
for ADC2
(Input Line - Rotary volume)
DBB
Button pressed?
Y
Display shows "ADC3 Value"
for ADC3
(Input Line - Door switch status)
DBB
Button pressed?
Y
Display shows "ADC4 Value"
for ADC4
(Input Line - Version detection)
9
Button pressed?
Y
N
N
N
N
Page 16

SET BLOCK DIAGRAM
4-1
4-1
Page 17

SET WIRING DIAGRAM
5-1
5-1
Page 18

6-1
6-1
BLOCK DIAGRAM - RDS/RBDS PRE-PROCESSOR
SAA6588T
BLOCK DIAGRAM
multi-path
data
available
pause
output
output
C-BUS
2
I
MAIN BOARD
TABLE OF CONTENTS
Internal IC Diagram ............................................... 6-1 to 6-5
Main Board(5757) Layout Top View ................................ 6-6
Main Board(5757) Layout Bottom View .......................... 6-7
Circuit Diagram - Main Board(5757) ............................... 6-8
Main Board(5762) Layout Top View ................................ 6-9
Main Board(5762) Layout Bottom View ........................ 6-10
Circuit Diagram - Main Board(5762) ............................. 6-11
HP Jack Board............................................................... 6-12
Electrical Parts List ........................................................ 6-13
2.2 nF
input
SDA
9
2
POWER
14
DDA
V
SCL
10
12
C-BUS SLAVE
I
OSCILLATOR
TEST
6
TRANSCEIVER
4
AND CLOCK
5
1
3
CONTROL
17
15
SUPPLY
AND RESET
C8
100 nF
5 V
MAD
SSD
V
OSCO
OSCI
TCON MRO
ref
V
SSA
V
R1
C7
R4
C6
2.2 嘕F
1 k"
Q1
470
100
k"
nF
MGK535
C5
MHz
n h4.332
C4
82 pF
n = 1 to 4
47 pF
DAVN
C9
100 nF
DDD
VNICT
5 V
C10
560 pF
UOCS
8
71918
RDS/RDBS
RDS/RDBS
CLOCKED
57 kHz
16
MPX
330 pF
C1
multiplex
PSWN
11
DECODER
DEMODULATOR
COMPARATOR
8th ORDER
BAND-PASS
嘕F
0.47
C2
audio
input
MPTH
2
SAA6588
"
10
k
R2
0.47 嘕F
C3
inputs
k"
10
R3
REGISTER
INTERFACE
4
DETECTOR
SIGNAL QUALITY
DETECTOR
MULTI-PATH
PAUSE
DETECTOR
13
AFIN
5
4
20
LVI N
C11
level
Page 19

6-2 6-2
BLOCK DIAGRAM
mute/stand-by
switch input
MLC351
output 1
15 k
15 k
x 1
VA
stand-by
switch
V
P
mute
switch
stand-by
reference
voltage
18 k
18 k
2
k
60
k
mute switch
C
m
power stage
4
8
mute switch
VA
VA
C
m
2
k
60
k
power stage
6
275
SGND
signal
ground
PGND
output 2
non-inverting
input 1
non-inverting
input 2
9
supply voltage
ripple rejection
output
3
1
TDA1517
mute
reference
voltage
input
reference
voltage
V
P
power
ground
(substrate)
PIN DESCRIPTION - RDS/RBDS PRE-PROCESSOR
SAA6588T
PINNING
SYMBOL PIN DESCRIPTION
MRO 1 mXOWLSDWKUHFWL¿HURXWSXW
MPTH 2 mXOWLSDWKGHWHFWRURXWSXW
TCON 3 WHVWFRQWUROLQSXWSLQ
OSCO 4 RVFLOODWRURXWSXW
OSCI 5 RVFLOODWRULQSXW
V
V
SSD
DDD
6 digital gURXQG0V)
7 digital supply vROWDJH5V)
DAVN 8 data availabOHRXWSXWDFWLve LOW)
2
SDA 9 I
SCL 10 I
C-bus serial data I/O
2
C-bus serLDOFORcNLQSXW
SYMBOL PIN DESCRIPTION
PSWN 11 pause sZLWFKRXWSXWDFWLve LOW)
MAD 12 slavHDGGUHVV/6%LQSXW
AFIN 13 DXGLRVLJQDOLQSXW
V
V
DDA
SSA
14 DQDORJVXSSO\vROWDJH5V)
15 DQDORJgURXQG0V)
MPX 16 multiple[LQSXWVLJQDO
V
ref
17 refHUHQFHvROWDJHRXWSXW
SCOUT 18 EDQGSDVV¿OWHURXWSXW
CIN 19 FRPSDrDWRULQSXW
LV IN 20 le vHOLQSXW
BLOCK DIAGRAM - POWER AMPLIFIER
TDA1517
MRO
OSCI
1
2
3
4
5
MPTH
TCON
OSCO
SAA6588T
V
V
DAVN
SSD
DDD
SDA
SCL
6
7
8
9
10
MGK534
20
19
18
17
16
15
14
13
12
11
LVIN
CIN
SCOUT
V
ref
MPX
V
SSA
V
DDA
AFIN
MAD
PSWN
Page 20

6-3
.This text is here in
BLOCK DIAGRAM
PRESCALER
PROGRAMMABLE
COUNTER
STABILIZER
WINDOW
DETECTOR
LAST-STATION
MEMORY
AM/FM
INDICATOR
IN-LOCK
DETECTOR
FM
DETECTOR
PILOT
DETECTOR
CHARGE
PUMP
MULTIPLEXER
CRYSTAL
OSCILLATOR
SHIFT REGISTER
FM
FRONT-END
FM
OSCILLATOR
FM
IF2
FM
IF1
FM
MIXER
SEQUENTIAL
CIRCUIT
STATUS
REGISTER
AM
FRONT-END
AM
OSCILLATOR
AM
DETECTOR
V/I
CONVERTER
AM
MIXER
AM
IF
AGC
AFC
hard mute
level
PLL
DECODER
MATRIX
SDS
MUTE
up
down
level
RFGND
DATA
BUS-CLOCK
WRITE-ENABLE
FM-RFI
V
STAB(A)
V
STAB(B)
AM-RFI
XTAL
RIPPLE
25
23
1
263031
2
AGC
AM-IFI/O2
AM-MIXERAMOSC
AM-IFI1
6
40 41
36 44
822
32
20
19
13
15
14
9
12
24
16
181739 37 333535
38
43
422827
29
34
7
21
10
11
4
MO/ST
AFRO
MUTE
AFC
(n)
AFC
(p)
AFC
VCO
LFI
PILFIL
AFLO
stereo
stereo
mono
38 kHz
19 kHz
FM-IFI1 FM-IFI2
FM-IFO1
FM-MIXER
FMOSC
FM-RFO
V
CC1
V
DDD
TEA5757;
TEA5759
FM
AM
DGND
P1
P0
TUNE
RFGND
MPXI
AFO
V
CC2
IFGND FSIFMDEM
MHA111
6-3
PIN DESCRIPTION - POWER AMPLIFIER
TDA1517
PINNING
" 1tupni gnitrevni-non11VNI
V
P
" 2tupni gnitrevni-non92VNI
handbook, halfpage
7supply voltage
INV1
SGND
SVRR
OUT1
PGND
OUT2
V
P
M/SS
INV2
1
2
3
4
5
6
7
8
9
TDA1517
MLC352
1tuptuo41TUO
2tuptuo62TUO
dnuorg langis2DNGS
dnuorg rewop5DNGP
tupni hctiws ybdnats/etum8SS/M
tuptuo noitcejer elppir egatlov ylppus3RRVS
NOITPIRCSEDNIPLOBMYS
BLOCK DIAGRAM - SELF TUNED RADIO
TEA5757
Pin configuration for SOT110-1 and
SOT352-1.
Page 21

k3 lacipyt ecnadepmi tupni( tupni retl¿ cimarec ro TFI141IFI-MA " )
dnuorg FRMF24DNGFR
04 lacipyt ecnadepmi tupni( tupni lairea FRMF34IFR-MF " )
tupni roticapac CGA44CGA
NOITPIRCSEDNIPLOBMYS
Pin configuration.
TEA5757H
TEA5759H
MHA112
1
2
3
4
5
6
7
8
9
10
11
33
32
31
30
29
28
27
26
25
24
23
12
13
14
15
16
17
18
19
20
21
22
44
43
42
41
40
39
38
37
36
35
34
RIPPLE
AM-RFI
FM-RFO
RFGND
FMOSC
AMOSC
V
CC1
TUNE
VCO
AFO
MPXI
FM-IFI2
AFC
P1
P0
WRITE-ENABLE
DATA
BUS-CLOCK
DGND
XTAL
MO/ST
V
DDD
LFI
MUTE
AFLO
AFRO
PILFIL
IFGND
FMDEM
AFC
(n)
AFC
(p)
FSI
V
CC2
AGC
FM-RFI
RFGND
AM-IFI1
AM-MIXER
FM-MIXER
V
STAB(A)
FM-IFI1
AM-IFI/O2
FM-IFO1
V
STAB(B)
6-4
6-4
PIN DESCRIPTION - SELF TUNED RADIO
TEA5757
PINNING
NOITPIRCSEDNIPLOBMYS
tupni roticapac elppir1ELPPIR
tupni FRMA2IFR-MA
dnuorg ot tiucric FRMF denut lellarap3OFR-MF
etartsbus dna dnuorg FR4DNGFR
V
CC1
7supply voltage
tuptuo tnerruc gninut8ENUT
tupni rotallicso dellortnoc egatlov9OCV
tupni retl¿-pool21IFL
tupni etum31ETUM
tupni retl¿ rotceted tolip61LIFLIP
tupni rotanimircsid cimarec81MEDMF
AFC
(n)
AFC
(p)
V
CC2
V
DDD
BUS-CLOCK 27 bus-clock input
WRITE-ENABLE 29 bus write-enable input
V
STAB(B)
AM-IFI/O2 36 input/output to IF-Tank (IFT); output: current source
V
STAB(A)
19 AFC negative output
20 AFC positive output
22 supply voltage for tuning
23 digital supply voltage
tupni latsyrc52LATX
dnuorg latigid62DNGD
tuptuo/tupni atad sub82ATAD
tiucric-CL zHk05423CFA
34 internal stabilized supply voltage (B)
38 internal stabilized supply voltage (A)
rotacidni htgnerts-dle¿12ISF
)0P(trop tuptuo elbammargorp030P
)1P(trop tuptuo elbammargorp131P
FM-MIXER 39 FHUDPLF¿OWHURXWSXWRXWSXWLPSHGDQFHW\SLFDO )
AM-MIXER 40 open-collector output to IFT
dnuorg ot tiucric rotallicso-MF denut lellarap5CSOMF
dnuorg ot tiucric rotallicso-MA denut lellarap6CSOMA
k5 lacipyt ecnadepmi tuptuo( tuptuo FA MF/MA01OFA )
egats XPM dna rotceted ,FI fo dnuorg71DNGFI
tuptuo noitacidni gninut dna oerets/onom42TS/OM
033 lacipyt ecnadepmi tupni( 2tupni FIMF332IFI-MF )
033 lacipyt ecnadepmi tuptuo( 1tuptuo FIMF531OFI-MF )
033 lacipyt ecnadepmi tupni( 1tupni FIMF731IFI-MF )
PIN DESCRIPTION - SELF TUNED RADIO
TEA5757
k051 lacipyt ecnadepmi tupni( tupni redoced oerets11IXPM )
k3.4 lacipyt ecnadepmi tuptuo( tuptuo lennahc tfel41OLFA )
k3.4 lacipyt ecnadepmi tuptuo( tuptuo lennahc thgir51ORFA )
Page 22

PINNING
NOITPIRCSEDNIPLOBMYS
tupni roticapac elppir1ELPPIR
tupni FRMA2IFR-MA
etartsbus dna dnuorg FR3DNGFR
dnuorg retnuoc4DNGC
tupni retnuoc5ITNUOC
dnuorg ot tiucric rotallicso-MA denut lellarap6CSOMA
V
CC1
7supply voltage
tnerruc tuptuo gninut8ENUT
tupni rotallicso dellortnoc egatlov9OCV
k5 lacipyt ecnadepmi tuptuo( tuptuo FA MF/MA01OFA )
k051 lacipyt ecnadepmi tupni( tupni redoced oerets11IXPM )
tupni retl¿ pool21IFL
tupni etum31ETUM
k3.4 lacipyt ecnadepmi tuptuo( tuptuo lennahc tfel41OLFA )
k3.4 lacipyt ecnadepmi tuptuo( tuptuo lennahc thgir51ORFA )
tupni retl¿ rotceted tolip61LIFLIP
egats XPM dna rotceted ,FI fo dnuorg71DNGFI
tupni rotanimircsid cimarec81MEDMF
AFC
(n)
19 AFC negative output
AFC
(p)
20 AFC positive output
rotacidni htgnerts dle¿12ISF
V
CC2
22 supply voltage for tuning
V
DDD
23 digital supply voltage
tuptuo noitacidni gninut dna oerets/onom42TS/OM
tupni latsyrc52LATX
dnuorg latigid62DNGD
BUS-CLOCK 27 bus-clock input
tuptuo/tupni atad sub82ATAD
WRITE-ENABLE 29 bus write-enable input
)0P(trop tuptuo elbammargorp030P
)1P(trop tuptuo elbammargorp131P
CFA MA rof tiucric tupni-CL zHk05423CFA
033 lacipyt ecnadepmi tupni( 2tupni FIMF332IFI-MF )
V
STAB(B)
34 internal stabilized supply voltage (B)
033 lacipyt ecnadepmi tupni( 1tuptuo FIMF531OFI-MF )
AM-IFI/O2 36 input/output to IFT; output: current source
033 lacipyt ecnadepmi tupni( 1tupni FIMF731IFI-MF )
V
STAB(A)
38 internal stabilized supply voltage (A)
FM-ON/OFF 39 FM ON/OFF port
AM-MIXER 40 open-collector output to IFT
6-5
6-5
BLOCK DIAGRAM - SELF TUNED RADIO
TEA5762 (FOR /12/05)
PILFIL
16
PILOT
MO/ST
24
DETECTOR
LFI
12
19 kHz
PLL
VCO
9
38 kHz
DECODER
21
18172728
FM
IFGND FSIFMDEM
FM
DETECTOR
IF2
AM/FM
INDICATOR
BUS-
CLOCK
STATUS
REGISTER
SHIFT REGISTER
DATA
WRITE-
FM-IFI2
29
ENABLE
333537
FM
IF1
FM-IFI1 FM-IFO1
TUNER
SWITCH
39
FM-ON/OFF
38
34
7
CC1
V
STAB(A)VSTAB(B)
V
STABILIZER
23
DDD
V
RIPPLE
AFLO
14
stereo
IN-LOCK
DETECTOR
up
level
down
LAST-STATION
1
AFRO
15
mono
MATRIX
stereo
MEMORY
PRESCALER
4
5
COUNTI
MUTE
13
MUTE
SDS
level
PUMP
CHARGE
hard mute
CIRCUIT
SEQUENTIAL
FM
AM
COUNTER
PROGRAMMABLE
MULTIPLEXER
CGND
AFC
WINDOW
CRYSTAL
25
XTAL
(n)
AFC
20
19
TEA5762
DETECTOR
OSCILLATOR
26
DGND
(p)
AFC
AFC
32
V/I
CONVERTER
AM
DETECTOR
AGC
IF
AM
AM
MIXER
AM
OSCILLATOR
AM
END
FRONT
2
AM-RFI
MBE815
10 11 342
2280313446314046
CC2
V
TUNE RFGND RFGNDMPXIAFO
P0
P1AGCAM-IFI/ O2AM-MIXERAMOSC
AM-IFI1
PIN DESCRIPTION - SELF TUNED RADIO
TEA5762 (FOR /12/05)
Page 23

6-6
LAYOUT DIAGRAM - MAIN BOARD (5757) for /37/98
TOP SIDE
6-6
Page 24

6-7
LAYOUT DIAGRAM - MAIN BOARD (5757) for /37/98
BOTTOM SIDE
6-7
Page 25

6-8
CIRCUIT DIAGRAM - MAIN BOARD (5757) for /37/98
6-8
Page 26

6-9
LAYOUT DIAGRAM - MAIN BOARD (5762) for /05/12
TOP SIDE
6-9
Page 27

6-10 6-10
LAYOUT DIAGRAM - MAIN BOARD (5762) for /05/12
BOTTOM SIDE
Page 28

6-11 6-11
CIRCUIT DIAGRAM - MAIN BOARD (5762) for /05/12
Page 29

6-12
6-12
LAYOUT DIAGRAM - HP JACK BOARD
TOP SIDE
LAYOUT DIAGRAM - HP JACK BOARD
BOTTOM SIDE
CIRCUIT DIAGRAM - HP JACK BOARD
Page 30

6-13
6-13
Q631 9940 000 02642 TRANSISTOR, 3CA8550
Q803 9940 000 04218 TRANS PHP20N06T
RF401 9940 000 04237 FM MODULE FE450-G11.
T401 9940 000 04518 AM IFT 7MM C712KC-004
T402 9940 000 04518 AM IFT 7MM C712KC-004
T403 9940 000 01213 AM IFT 7MM
T404 9940 000 04519 FM IFT 7MM KS2599
T405 9940 000 04517 AM OSC 7MM 7M1A2146
UR11 9940 000 04239 IC SAA6588T
UR12 9940 000 04241 IC 78L05 REGULATOR
VC403 9940 000 01615 TRIMMER CAP 10PF N450
VR401 9940 000 04232 VAR RES 100K 3P 1/10W
X401 9940 000 04231 CRYSTAL 75KHZ DT381
XR11 9940 000 04238 CRYSTAL 4.332MHZ
Note: Only these parts mentioned in the list are
normal service parts.
Page 31

7-1
CD & MCU BOARD
7-1
TABLE OF CONTENTS
Main Board Layout Top View........................................... 7-2
Main Board Layout Bottom View ..................................... 7-3
Circuit Diagram - CD Part................................................ 7-4
Circuit Diagram - MCU Part............................................. 7-5
Layout Diagram - SW Board ........................................... 7-6
Electrical Parts List .......................................................... 7-6
Page 32

LAYOUT DIAGRAM - CD&MCU BOARD
TOP SIDE
7-2
7-2
Page 33

LAYOUT DIAGRAM - CD&MCU BOARD
BOTTOM SIDE
7-3
7-3
Page 34

CIRCUIT DIAGRAM - CD&MCU BOARD
CD PORTION
7-4
7-4
Page 35

CIRCUIT DIAGRAM - CD&MCU BOARD
MCU PORTION
7-5
7-5
Page 36

LAYOUT DIAGRAM - SW BOARD
TOP SIDE
7-6 7-6
LAYOUT DIAGRAM - SW BOARD
BOTTOM SIDE
Page 37

8-1
AC POWER BOARD
8-1
IC BLOCK DIAGRAM - LCD DRIVER
HT1622
Block Diagram
TABLE OF CONTENTS
Internal IC Diagram ......................................................... 8-1
Layout Diagram - AC Power Board ................................. 8-2
Circuit Diagram - AC Power Board.................................. 8-3
Layout Diagram - AC Socket Board ................................ 8-4
Layout Diagram - Door Moter Board ............................... 8-4
Layout Diagram - RC Board ............................................ 8-4
Display Board .................................................................. 8-5
Key Board ........................................................................ 8-6
Speaker & Ant Board....................................................... 8-7
Electrical Parts List .......................................................... 8-8
PIN DESCRIPTION - LCD DRIVER
HT1622
Pad Description
1CS
2RD
3WR
4DAT AI/O Serial data input/output with Pull-high resistor
5 VSS
6 OSCI I
7 VDD
8 VLCD I LCD operating voltage input pad
9 IRQ
10, 11 BZ, BZ
12~14 T1~T3 I Not connected
15~22 COM0~COM7 O LCD common outputs
23~54 SEG0~SEG31 O LCD segment outputs
I
I
I
O
O 2kHz or 4kHz tone frequency output pair
noitpircseDO/IemaNdaP.oNdaP
Chip selection input with Pull-high resistor. When the CS
high, the data and command read from or written to the HT1622
are disabled. The serial interface circuit is also reset. But if CS
at logic low level and is input to the CS
mand transmission between the host controller and the HT1622
are all enabled.
READ clock input with Pull-high resistor. Data in the RAM of
the HT1622 are clocked out on the rising edge of the RD
The clocked out data will appear on the data line. The host con
troller can use the next falling edge to latch the clocked out data.
WRITE clock input with Pull-high resistor. Data on the DATA
line are latched into the HT1622 on the rising edge of the WR sig
nal.
Negative power supply, ground
If the system clock comes from an external clock source, the ex
ternal clock source should be connected to the OSCI pad.
Positive power supply
Time base or Watchdog Timer overflow flag, NMOS open drain
output
pad, the data and com
is logic
signal.
is
-
-
-
-
Page 38

8-2
8-2
LAYOUT DIAGRAM - AC POWER BOARD
TOP SIDE
LAYOUT DIAGRAM - AC POWER BOARD
BOTTOM SIDE
Page 39

CIRCUIT DIAGRAM - AC POWER BOARD
8-3
8-3
Page 40

8-4
8-4
LAYOUT DIAGRAM - AC SOCKET BOARD
TOP SIDE
LAYOUT DIAGRAM - AC SOCKET BOARD
BOTTOM SIDE
LAYOUT DIAGRAM - RC BOARD
TOP SIDE
LAYOUT DIAGRAM - RC BOARD
BOTTOM SIDE
LAYOUT DIAGRAM - DOOR MOTOR BOARD
TOP SIDE
LAYOUT DIAGRAM - DOOR MOTOR BOARD
BOTTOM SIDE
CIRCUIT DIAGRAM - RC BOARD
Page 41

8-5
8-5
LAYOUT DIAGRAM - DISPLAY BOARD
TOP SIDE
CIRCUIT DIAGRAM - DISPLAY BOARD
LAYOUT DIAGRAM - DISPLAY BOARD
BOTTOM SIDE
Page 42

8-6 8-6
LAYOUT DIAGRAM - KEY BOARD
TOP SIDE
CIRCUIT DIAGRAM - KEY BOARD
LAYOUT DIAGRAM - KEY BOARD
BOTTOM SIDE
Page 43

8-7 8-7
LAYOUT DIAGRAM - SP & ANT BOARD
TOP SIDE
CIRCUIT DIAGRAM - SP & ANT BOARD
LAYOUT DIAGRAM - SP & ANT BOARD
BOTTOM SIDE
Page 44

8-8
8-8
VR701 9940 000 04258 ROTARY ENCODER
9940 000 04251 EC TERMINAL 1P
F901 9940 000 04243 FUSE PTU 1A 250V 3.9X10.5MM /37/98
RL901 9940 000 04246 RELAY DC6V AC10A /05/12/37
T901 9940 000 04244 POWER TRASFO AC230V /05/12
T902 9940 000 04245 POWER TRASFO AC230V /05/12
T901
!
!
!
!
!
9940 000 04431
POWER TRASFO AC115/230V /98
Note: Only these parts mentioned in the list are
normal service parts.
Page 45

9-1
SET MECHANICAL EXPLODED VIEW
8
7
6
5
4
3
2
9
!
@
#
$
%
9-1
^
& *
1
·
‹
?
º
ª
•
§
‡
£
™
(
)
¡
›
Page 46

9-2
M
2
8
9-2
ECHANICAL & ACCESSORIES PARTSLIST ELECTRICAL PARTSLIST - MISCELLANEOUS
1 9940 000 04295 LENS-CD DOOR /05/12 T901 9940 000 04521 TRASFO AC120V 60HZ /37
1 9940 000 04417 LENS-CD DOOR /37/98 T902 9940 000 04522 TRASFO AC120V 60HZ /37
2 9940 000 04294 DOOR-CD 9940 000 01675 POWER AC WIRE VDE 230V /1
3 9940 000 04296 HOLDER CD DOOR CARRIER (L)
4 9940 000 04302 COVER POWER BUTTON 9940 000 02223 POWER AC WIRE BSI /05
5 9940 000 04305 KNOB-VOLUME
6 9940 000 04299 LENS DISPLAY /12/05 9940 000 04262 FFC 7P P1.25MM L155MM /37
9940 000 04418
6
7 9940 000 04297 HOLDER CD DOOR CARRIER (R) 9940 000 04281 FFC 21P P1.25MM L110MM
8 9940 000 04306 LENS BAR 9940 000 04282 CD MECHANISM KSM900AAA
9 9940 000 04293 CABINET FRONT 9940 000 04413 MAIN PWB ASSEMBLY /37
11 9940 000 04303 BUTTON POWER/SOURCE 9940 000 04414 AC POWER ASSEMBLY /37
12 9940 000 04319 GEAR WHEEL C 9940 000 04415 CD/MCU PWB ASSEMBLY /37
13 9940 000 04317 GEAR WHEEL A
14 9940 000 04318 GEAR WHEEL B
15 9940 000 04325 BELT MOTOR
17 9940 000 04292 CABINET REAR
17 9940 000 04416 CABINET REAR /37
17
18 9940 000 04327 RUBBER A (DIA.10X2)
9940 000 04435
LENS DISPLAY /37/98 9940 000 04271 FFC 12PIN P1.25MM L95MM
CABINET REAR /98
Note: Only these parts mentioned in the list are
9940 000 04328 SPEAKER BOX ASSY
9940 000 04329 FM ANT WIRE 75R 1.0M
9940 000 04331 AM LOOP ANT 164X75MM
9940 000 04332 REMOTE CONTROL
9940 000 04421 FM ANT WIRE 2P 300R L=2.6M /37
9940 000 04798 PLASTIC WALL PLUG
normal service parts.
!
!
9940 000 02082
9940 000 04262
Note: Only these parts mentioned in the list are
normal service parts.
AC CORD 1.5M 2.5A 250V /98
FFC 7P P1.25MM L155MM /37/9
19 9940 000 04322 STAND COVER
20 9940 000 04321 STAND BASE
21 9940 000 04326 RUBBER FOOT (DIA.12X4)
22 9940 000 04323 CD DAMPER (BLACK) 20DEG
24 9940 000 01664 DAMPER GEAR ASSEMBLY
26 9940 000 05312 CATCH ASSEMBLY
28 9940 000 04304 BRACKET OPEN/CLOSE BUTTON
29 9940 000 04324 SPRING CONTROL PANEL
30 9940 000 04307 BUTTON OPEN/CLOSE
31 9940 000 04315 COVER PLAY BUTTON
32 9940 000 04309 BUTTON FW/FF
33 9940 000 04312 PANEL FUNCTION /05/12/37
33
34 9940 000 04313 COVER FUNCTION PANEL
35 9940 000 04311 BUTTON FUNCTION
36 9940 000 04308 BUTTON PLAY
37 9940 000 04333 IR LENS
38 9940 000 04316 PULLEY SERVO MOTOR
39 9940 000 04314 BRACKET FUNCTION PANEL
9940 000 04419
PANEL FUNCTION /98
Page 47

10-1
REVISION LIST
1.0 Manual 3141 785 30330
Initial Service Manual released.
1.1 Manual 3141 785 30331
In this version, Mechanical & Accessories Partslist (Page 9-2) has been updated, the Plastic Wall Plug
is added to Mechanical and Accessories Parts List as below.
9940 000 04798 Plastic Wall Plug
1.1 Manual 3141 785 30332
In this version, Set Exploded View (Page 9-1) and Mechanical & Accessories Partslist (Page 9-2) have been
updated, the Catch Assembly has been added to Mechanical and Accessories Parts List as below .
26 9940 000 05312 Catch Assembly
and replace 9940 000 03371 Hook-Cassette Door, 9940 000 03384 Spring Torsion Left and 9940 000 04298
Bracket - Cassette Recloser in Partslist.
 Loading...