

Page 1
Instruction manual
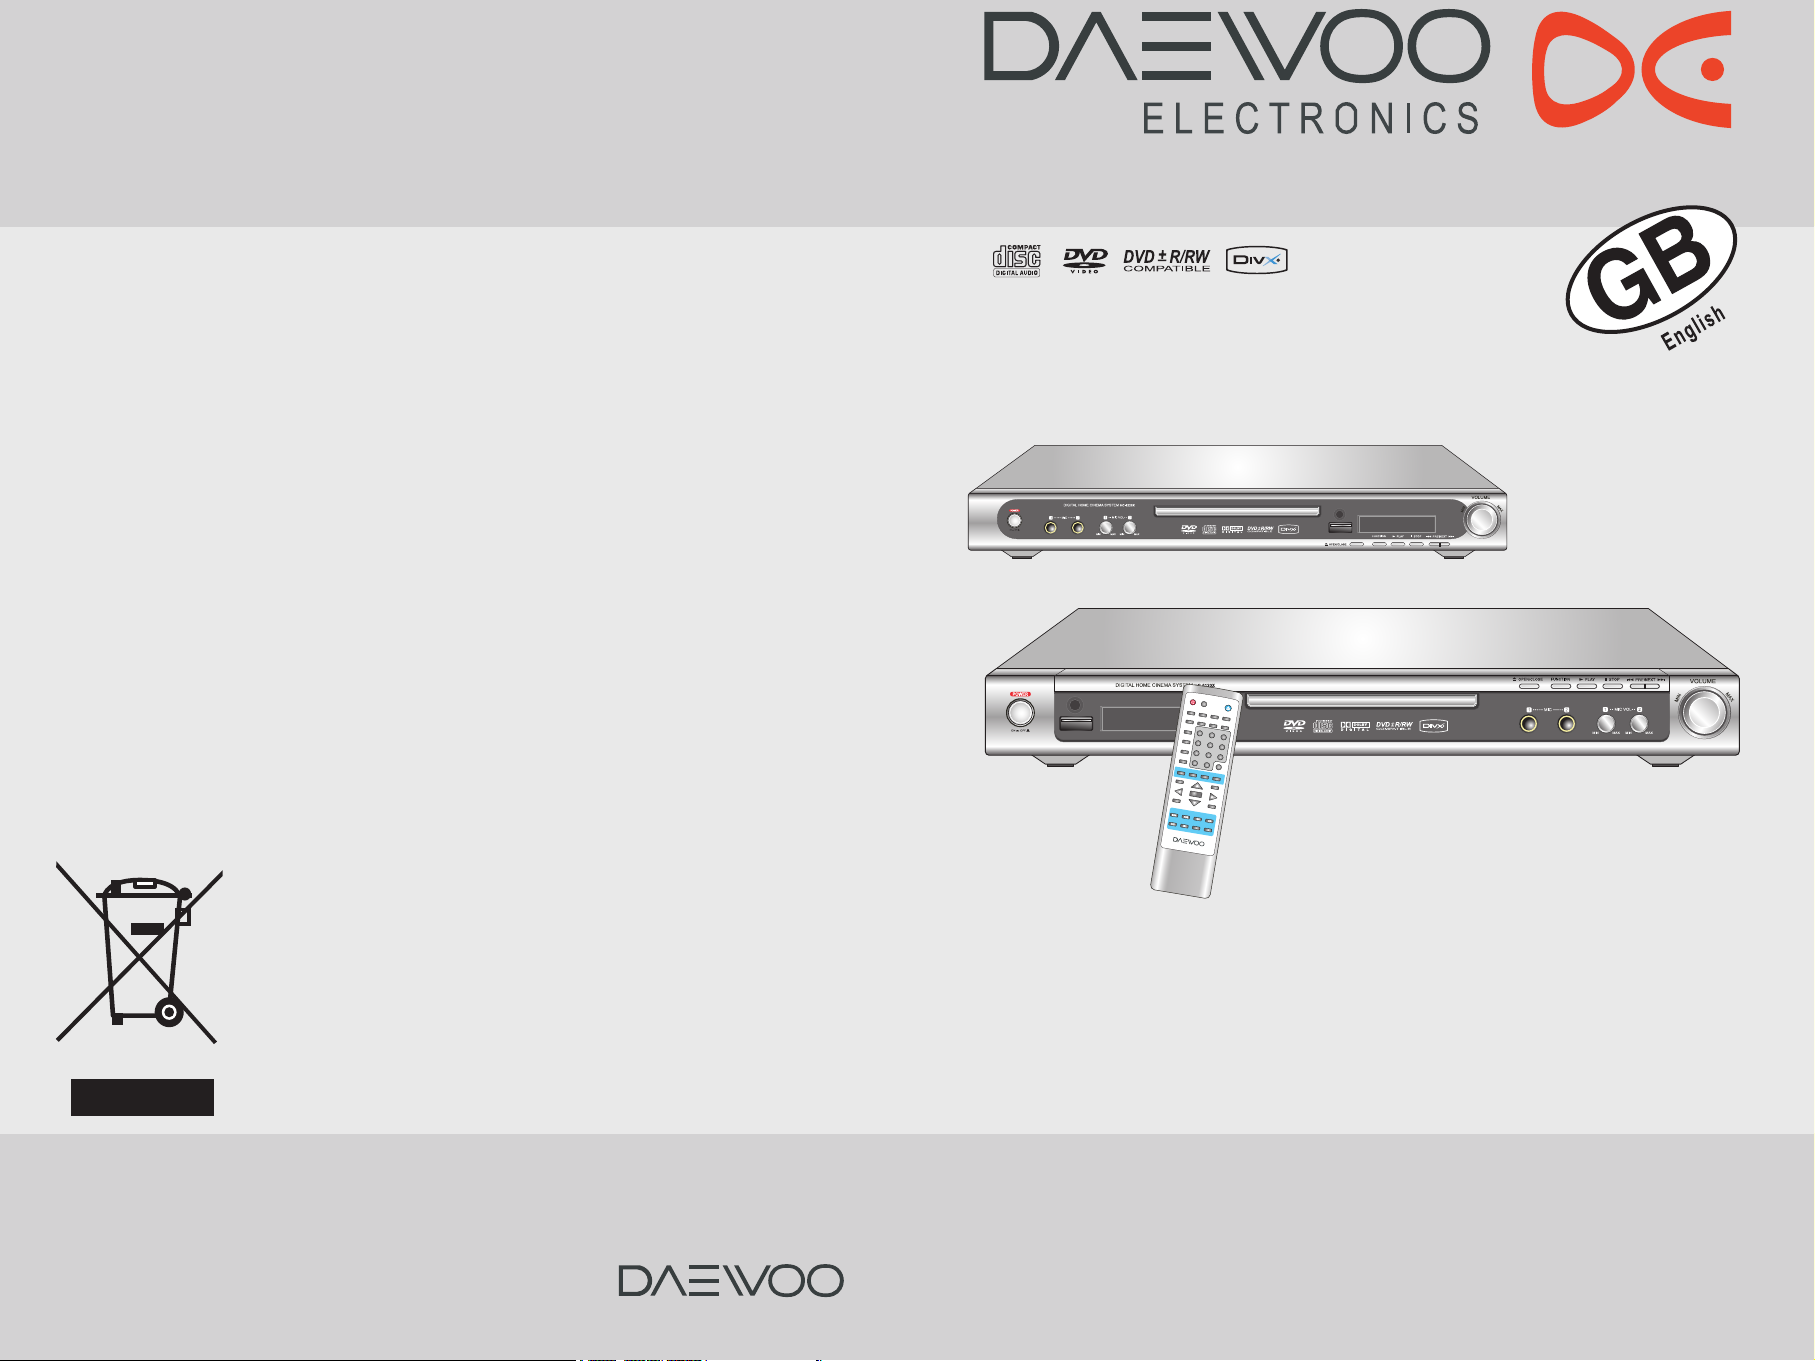
DIGITALHOMECINEMASYSTEM
HC-6120[U]X/6220[U]X
Thank you for purchasing the Digital Home Cinema System.
Please read this manual thoroughly before making connections and turning on the power.
Following the instructions in this manual will enable you to obtain optimum performance and listening
enjoyment from your Digital Home Cinema System.
Please retain this manual for future reference.
1
2
3
4
5 6
7
8
9
0
+10
MUTE
REPEAT
PBC
RETURN
STEP
SLOW
PREV
NEXT
REV
FWD
ZOOM
TITLE
SETUP
MENU
ENTER
PLAY/PAUSE
STOP/BAND
+
VOLUME
DISPLAY
PROG
ANGLE
LANGUAGE
DPLIIMODE
DVD/TUNER
RDS
SUBTITLE
AUTO/MEMORY
SEARCH
FM MODE
A-B
P/I SCAN
P/N
R/L
TUNING+
TUNING-
POWER
OPEN/CLOSE
HC-6120[U]X
Disposal of Used Electrical & Electronic Equipment
The meaning of the symbol on the product, its accessory or packaging indicates that this
product shall not be treated as household waste. Please, dispose of this equipment at your
applicable collection point for the recycling of electrical & electronic equipments waste. In
the European Union and Other European countries which there are separate collection
systems for used electrical and electronic product. By ensuring the correct disposal of this
product, you will help prevent potentially hazardous to the environment and to human
health, which could otherwise be caused by unsuitable waste handling of this product. The
recycling of materials will help conserve natural resources. Please do not therefore dispose
of your old electrical and electronic equipment with your household waste. For more
detailed information about recycling of this product, please contact your local city office,
your household waste disposal service or the shop where you purchased the product.
HC-6220[U]X
Page 2
32
Getting Started
Important Safeguards
Important Safeguards
CAUTION : TO REDUCE THE RISK OF ELECTRIC SHOCK, DO NOT REMOVE COVER(OR BACK).
NO USER SERVICEABLE PARTS INSIDE.
REFER SERVICING TO QUALIFIED SERVICE PERSONNEL.
WARNING : TO PREVENT FIRE OR ELECTRIC SHOCK, DO NOT EXPOSE THIS APPLIANCE TO RAIN OR MOISTURE.
THIS SYMBOL IS INTENDED TO ALERT THE USER TO THE PRESENCE OF UNINSULATED "DANGEROUS
VOLTAGE" WITHIN THE PRODUCT'S ENCLOSURE THAT MAY BE SUFFICIENT MAGNITUDE TO
CONSTITUTE A RISK OF ELECTRIC SHOCK TO PERSONS.
THIS SYMBOL IS INTENDED TO ALERT THE USER TO THE PRESENCE OF IMPORTANT
OPERATING AND MAINTENANCE(SERVICING) INSTRUCTIONS IN THE LITERATURE
ACCOMPANYING THE APPLIANCE.
CAUTION
TO PREVENT ELECTRIC SHOCK, DO NOT USE THIS POLARIZED AC PLUG WITH AN EXTENSION CORD,
RECEPTACLE OR OTHER OUTLET UNLESS THE BLADES CAN BE FULLY INSERTED TO PREVENT BLADE
EXPOSURE.
LASER SAFETY
THIS UNIT EMPLOYS A LASER. ONLY QUALIFIED SERVICE PERSONNEL SHOULD REMOVE THE COVER
OR ATTEMPT TO SERVICE THIS DEVICE DUE TO POSSIBLE EYE INJURY.
CAUTION : USE OF ANY CONTROLS, ADJUSTMENTS, OR PROCEDURES OTHER THAN THOSE
SPECIFIED HEREIN MAY RESULT IN HAZARDOUS RADIATION EXPOSURE.
CAUTION : TO PREVENT ELECTRIC SHOCK, MATCH WIDE BLADE OF PLUG TO WIDE SLOT,
FULLY INSERT.
ATTENTION : POUR EVITER LED CHOCS ELECTRIQUES, INTRODUIRE LA LAME LA PLUS LARGE DE LA
FICHE DANS LA BORNE CORRESPONDANTE DE LA PRISE ET POUSSER JUSQU'AU FOND.
RISK OF ELECTRIC SHOCKS
DO NOT OPEN
CAUTION
- All the safety and operating instructions should be read before the appliance is operated.
- The safety and operating instructions should be retained for future reference.
- All warnings on the appliance and in the operating instructions should be adhered to.
- All operating and use instructions should be followed.
5. Ventilation - The appliance should be situated so that its location or position does not interfere with its proper
ventilation. For example, the appliance should not be situated on a bed, sofa, rug, or similar surface that may block the
ventilation openings; or, placed in a built-in installation, such as a bookcase or cabinet that may impede the flow of air
through the ventilation openings.
6. Heat - The appliance should be situated away from heat sources such as radiators, heat registers, stoves, or other
appliances (including amplifiers) that produce heat.
7. Power Sources - The appliance should be connected to a power supply only of the type described in the operating
instructions or as marked on the appliance.
8. Grounding or Polarization - The precautions that should be taken so that the grounding or polarization means of an
appliance is not defeated.
9. Power - Cord Protection - Power-supply cords should be routed so that they are not likely to be walked on or pinched
by items placed upon or against them, paying particular attention to cords at plugs, convenience receptacles, and the
point where they exit from the appliance.
10. Protective Attachment Plug - If the appliance is equipped with an attachment plug having overload protection. This
is a safety feature. See Instruction Manual for replacement or resetting of protective device. If replacement of the plug
is required, be sure the service technician has used a replacement plug specified by the manufacturer that has same
overload protection as the original plug.
11. Cleaning - The appliance should be cleaned only as recommended by the manufacturer.
12. Power Lines - An outdoor antenna should be located away from power lines.
13. Nonuse Periods - The power cord of the appliance should be unplugged from the outlet when left unused for a
long period of time.
14. Object and Liquid Entry - Care should be taken so that objects do not fall and liquids are not spilled into the
enclosure through openings.
15. Damage Requiring Service - The appliance should be serviced by qualified service personnel when:
a) The power-supply cord or the plug has been damaged; or
b) Objects have fallen, or liquid has been spilled into the appliance; or
c) The appliance has been exposed to rain; or
d) The appliance does not appear to operate normally or exhibits a marked change in performance; or
e) The appliance has been dropped, or the enclosure damaged.
16. Servicing - The user should not attempt to service the appliance beyond that described in the operating instructions.
All other servicing should be referred to qualified service personnel.
1. Water and Moisture - The appliance should not be used near water - for example, near a bathtub,
washbowl, kitchen sink,
laundry tub, in a wet basement, or near a swimming pool, and the like.
2. Carts and Stands - The appliance should be used only with a cart or stand that is recommended
by the manufacturer.
3. An appliance and cart combination should be moved with care. Quick stops, excessive force,
and uneven surfaces may cause the appliance and cart combination to overturn.
4. Wall or Ceiling Mounting - The appliance should be mounted to a wall or ceiling only as
recommended by the manufacturer.
Important Safety Instructions
Page 3
5
Table of Contents
4
Precautions
1. Warranty Claim
You can find the serial number on the rear panel of this unit.
In case of warranty claim, please report this number.
2. Recording Copyright
Recording of copyrighted material for other than personal use
is illegal without permission of the copyright holder.
3. AC Fuse
The fuse is located inside the chassis and is not user-
serviceable. If power does not come on, contact your
authorized service center.
4. Power
WARNING
BEFORE PLUGGING IN THE UNIT FOR THE FIRST TIME,
READ THE FOLLOWING SECTION CAREFULLY.
The voltage of the available power supply differs according to
country or region. Be sure that the power supply voltage of the
area where this unit will be used meets the required voltage
(e.g., Free Voltage: AC 95 - 250V, 50/60Hz) written on the rear
panel.
Worldwide models are equipped with a voltage selector to
conform to local power supplies. Be sure to set this switch to
match the voltage of the power supply in your area before
plugging in the unit.
5. Do not touch this unit with wet hands
Do not handle this unit or power cord when your hands are wet
or damp. If water or any other liquid enters the case, take this
unit to an authorized service center for inspection.
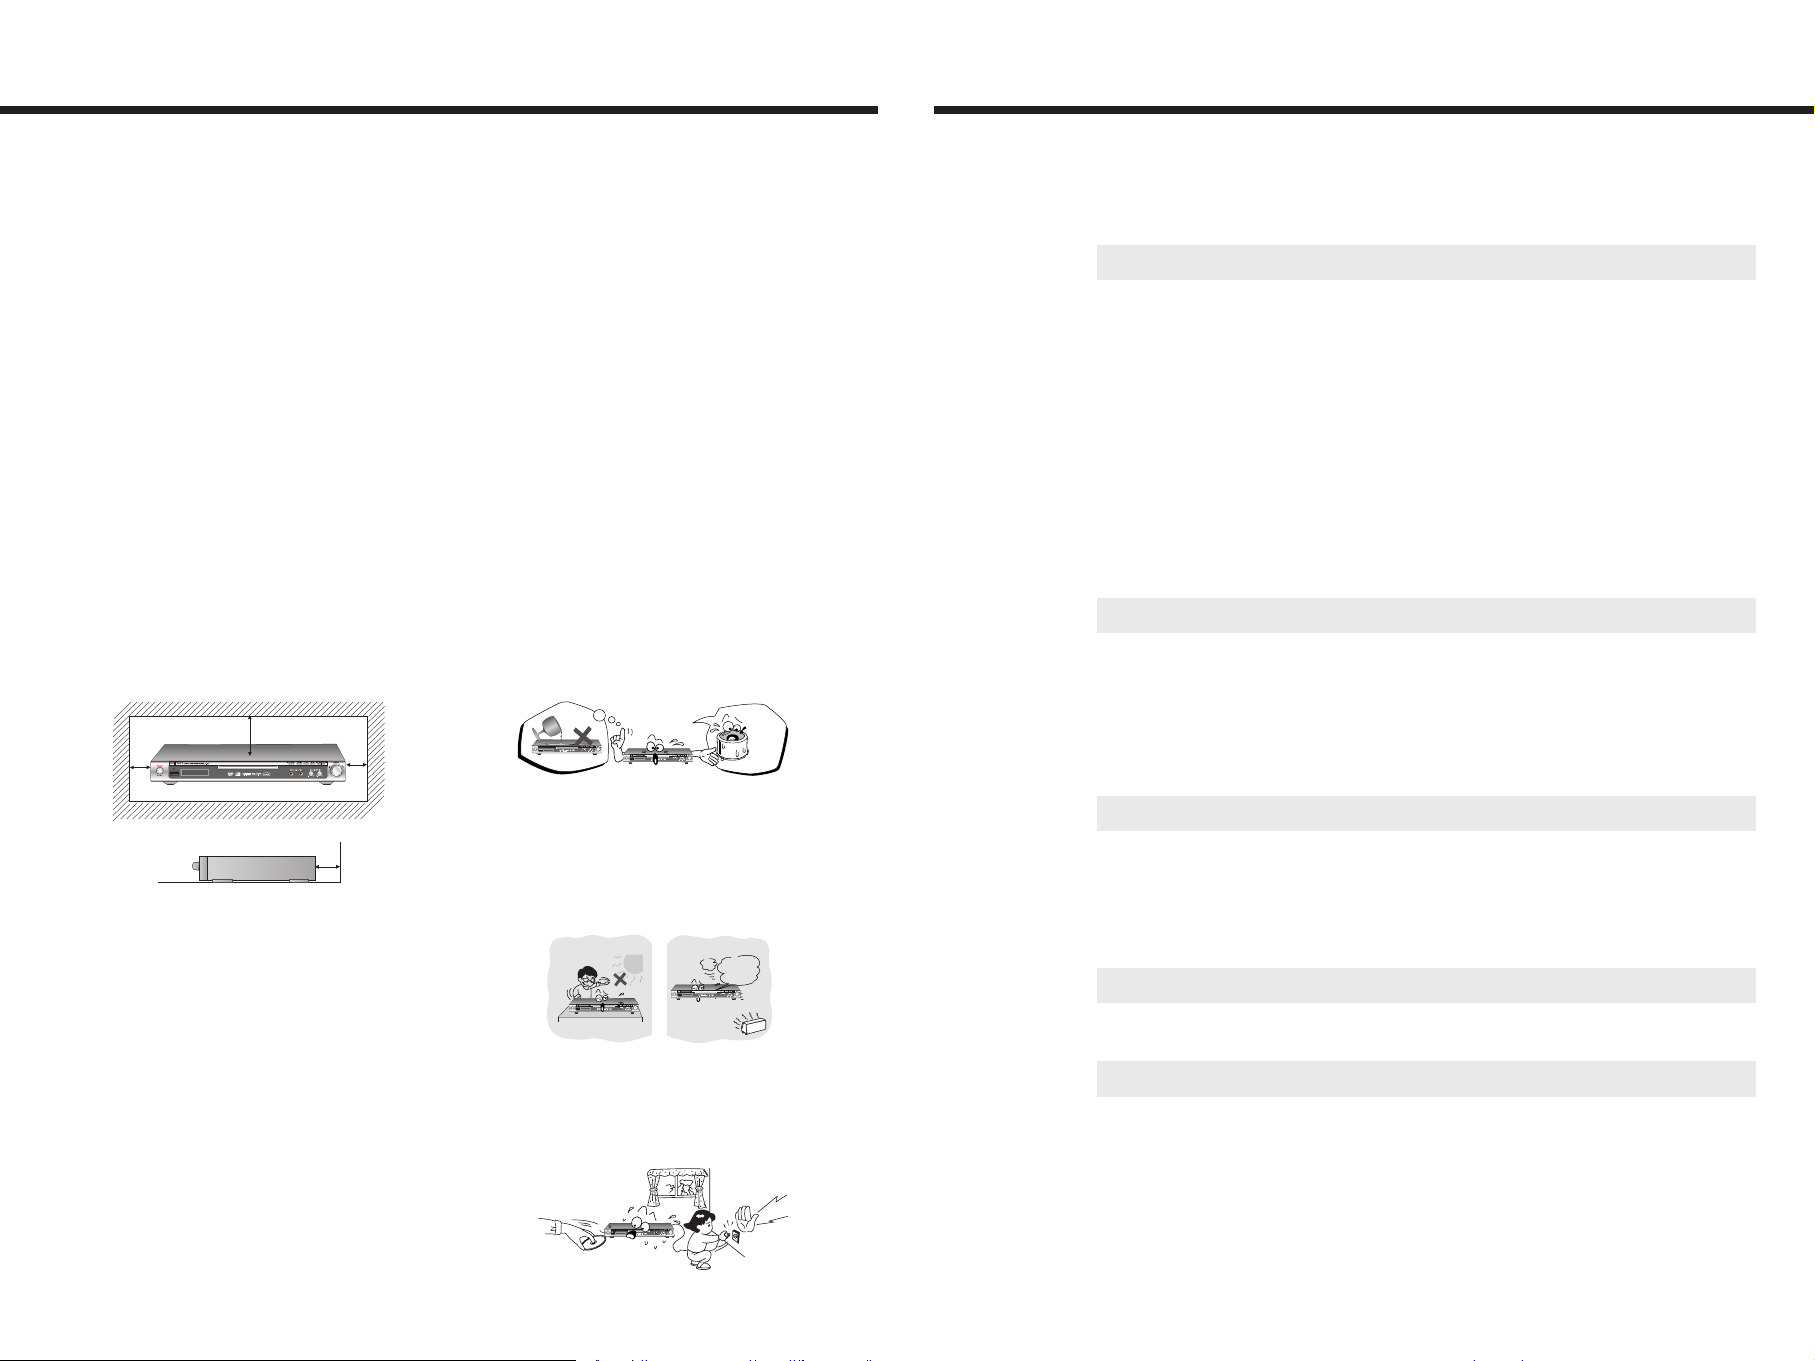
6. Location of this unit
Place this unit in a well-ventilated location.
Take special care to provide plenty of ventilation on all sides of
this unit especially when it is placed in an audio rack.
If ventilation is blocked, this unit may overheat and malfunction.
●
Do not expose this unit to direct sunlight or heating units as this
unit's internal temperature may rise and shorten the life of the
pickup.
●
Avoid damp and dusty places and places directly affected by
vibrations from the speakers. In particular, avoid placing the unit
on or above one of the speakers.
●
Be sure this unit is placed in a horizontal position. Never place it
on its side or on a slanted surface as it may malfunction.
●
When you place this machine near a TV, radio, or VCR, the
playback picture may become poor and the sound may be
distorted. In this case, place the machine away from the TV,
radio, or VCR.
7. Care
From time to time you should wipe the front and rear panels and
the cabinet with a soft cloth. For heavier dirt, dampen a soft
cloth in a weak solution of mild detergent and water, wring it out
dry, and wipe off the dirt. Following this, dry immediately with a
clean cloth.
Do not use rough material, thinners, alcohol or other chemical
solvents or cloths since these could damage the finish or
remove the panel lettering.
8. Notes on Handling
●
Any changes or modifications in construction of this device
which are not expressly approved by the party responsible for
compliance could void the user’s authority to operate the
equipment.
●
When shipping the machine, use the original shipping carton
and packing materials. For maximum protection, repack the unit
as it was originally packed at the factory.
●
Do not use volatile liquids, such as insect spray, near the
machine. Do not leave rubber or plastic products in contact with
the machine for a long time. They will leave marks on the finish.
●
The top and rear panels of the machine may become warm
after a long period of use. This is not a malfunction.
●
When the machine is not in use, be sure to remove the disc and
turn off the power.
●
If you do not use the machine for a long period, the unit may not
function properly in the future. Turn on and use the machine
occasionally.
9. To Obtain a Clear Picture
The machine is a high technology, precision device. If the
optical pick-up lens and disc drive parts are dirty or worn down,
the picture quality becomes poor. To obtain a clear picture, we
recommend regular inspection and maintenance (cleaning or
parts replacement) every 1,000 hours of use depending on the
operating environment.
For details, contact your nearest dealer.
10. Notes on Moisture Condensation
Moisture condensation damages the machine.
Please read the following carefully.
Moisture condensation occurs, for example, when you pour a
cold drink into a glass on a warm day. Drops of water form on
the outside of the glass. In the same way, moisture may
condense on the optical pick-up lens inside this unit, one of the
most crucial internal parts of the machine.
●
Moisture condensation occurs in the following cases.
- When you bring the machine directly from a cold place to a
warm place.
- When you use the machine in a room where you just turned on
the heater, or a place where the cold wind from the air
conditioner directly hits the unit.
- In summer, when you use the machine in a hot and humid place
just after you move the unit from an air conditioned room.
- When you use the machine in a humid place.
●
Do not use the machine when moisture condensation may occur.
If you use the machine in such a situation, it may damage discs
and internal parts. Remove the disc, connect the power cord of
the machine to the wall outlet, turn on the machine, and leave it
for two or three hours. After a few hours, the machine will have
warmed up and evaporated any moisture. Keep the machine
connected to the wall outlet and moisture condensation will
seldom occur.
Over 20 Cm
Over 10 Cm Over 10 Cm
Over 10 Cm
Important Safeguards, Precautions. Table of Contents
.....................................
2/3/4/5
Getting Started 6
Features
......................................................................................................................
6
Index to Parts and Controls
..................................................................................
6/7/8
Preparing the Remote Controller, About This Instruction Manual,
Note on Copyright, Accessories
...................................................................................
9
Notes on Discs
...........................................................................................................
10
Connecting to a TV
....................................................................................................
11
Connecting to USB Device of Flash Memory Type(Option), Connecting the
microphone for KARAOKE, Making Antenna Connections
......................................
12
Connecting Speakers / Positioning Speakers
...........................................................
13
Connecting the Power, Turning on the machine, TV system Setup
.........................
14
Speaker Setup
...........................................................................................................
15
Basic Operation 16
Playing DVD Videos/Video CDs/MP3 CD/Audio CDs
....................................
16/17/18
Locating a Specific Title/Chapter/Track by Disc Menu
........................................
18/19
Locating a Specific Title/Chapter/Track/MP3 File/Location
.................................
19/20
Playing JPEG PHOTO File, Radio Listening
............................................................
20
Receiving FM stations with RDS, Various Functions Common to all the Sources
...
21
Advanced DVD/VIDEO CD/MP3/Audio CD Operation 22
Playing Repeatedly, Zooming a Picture
....................................................................
22
Selecting the Camera Angle, Selecting the Subtitles Included on the DVD
..............
23
Selecting the Audio Language/Sound Included on the Disc
.....................................
24
Using information on the On-Screen display
.............................................................
25
Additional Operation 25
Customizing the Function Settings
............................................................
25/26/27/28
Others 29
Troubleshooting
...................................................................................................
29/30
Specifications
............................................................................................................
31
Page 4
76
Features
◆
Player Features
●
Video CD and CD Disc Playback Capability
●
Official DivX®certified product
●
Plays all version of DivX®video (including DivX®6) with
standard playback of DivX
®
media files
●
JPEG File Playback Capability
●
Coaxial Digital Audio Output for MD or CD Recording
●
On-screen Display
●
Adopting 10-Bit, 27 MHz Video D/A Conversion
●
8-Mode “Zoom-In/Out” Function
(Off, Zoom 2, 3, 4, 1/2, 1/3, 1/4/Off)
●
Search (DVD : title, chapter, time, VCD : time)
●
Resume Play(DVD only)
5-Mode Repeat (title, chapter, track, all tracks,
A-B section)
●
Program DVD Playback
●
Slow Motion DVD Playback
(SF 1/2, 1/3, 1/4, 1/5, 1/6, 1/7 and normal speed)
●
Fast Forward/Reverse
(2x, 4x, 8x, 20x and normal speed)
●
Multi Aspect Ratio (16:9 and 4:3)
●
Multi Camera Angle
●
Multi-Language Soundtrack Capability
●
Multi Subtitle Languages Capability
●
Parental Viewing Control
●
Screen Saver protection
●
1 S-Video Output
●
2 Microphone Jacks for KARAOKE (3.5
Ø
)
●
2 Microphone Input Level Control for KARAOKE)
◆
High Fidelity FM Tuner Features
●
40 FM / 20 MW(AM) Auto Scan Presets
●
FM Indoor Antenna / MW(AM) Loop Antenna
◆
USB Device Playback Features(Option)
●
USB full speed Support
●
MP3 and JPEGFile on the USB Device
Playback Capability
** Manufactured under license from Dolby Laboratories. "Dolby", "Pro Logic", and the double-D symbols are trademarks
of Dolby Laboratories. Confidential Unpublished Works.
ⓒ
1992-2004 Dolby Laboratories, Inc. All rights reserved.
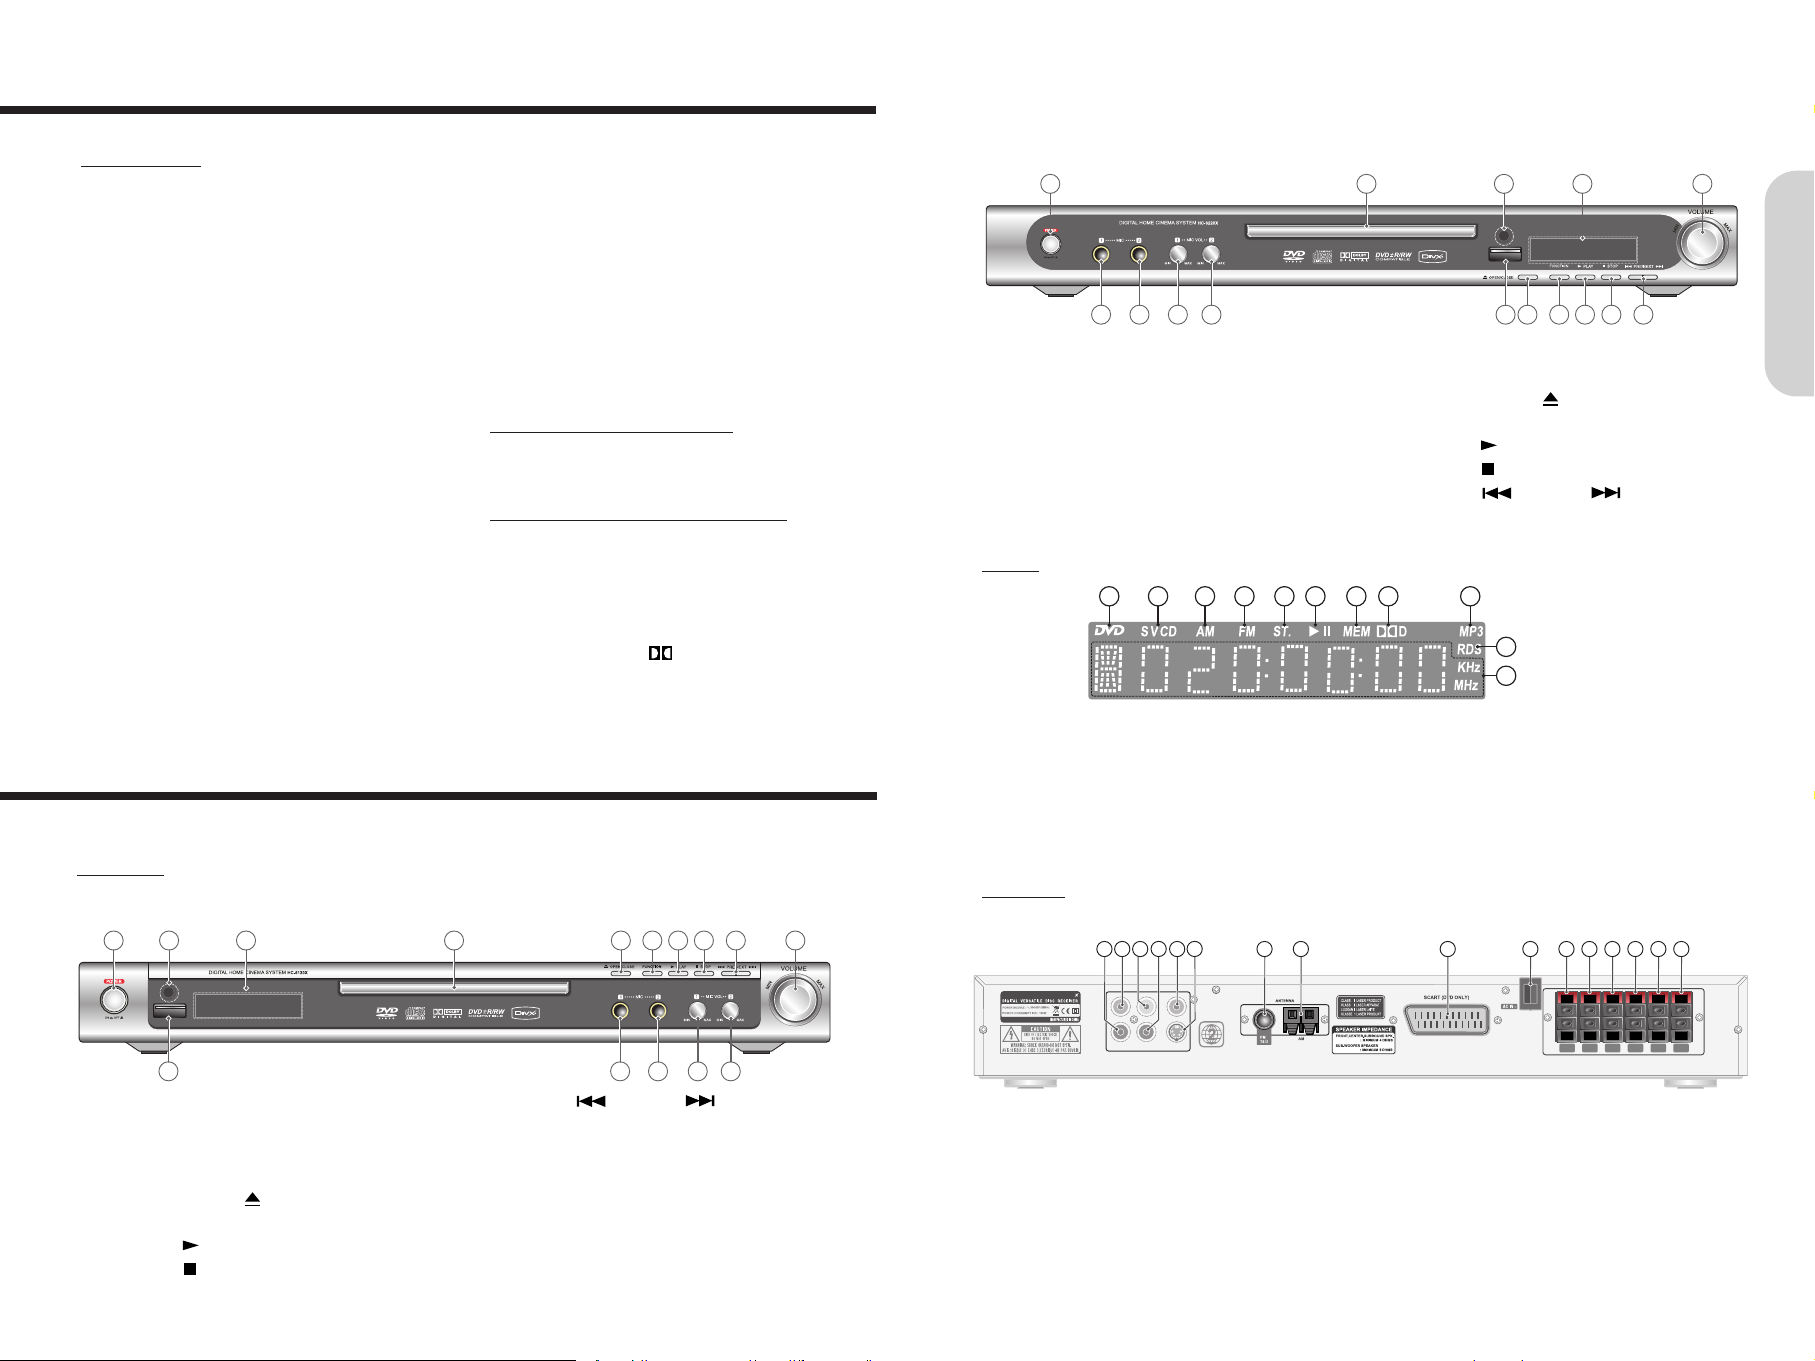
Getting Started
1. DVD indicator
2. CD/VCD/S VCD indicator
3. AM(MW) indicator
4. FM indicator
5. STEREO indicator
6. PLAY/PAUSE indicator
◆
Display
1 2 3 4 5 6 7 8 9
10
11
7. MEMORY indicator
8. DOLBY DIGITAL indicator
9. MP3 indicator
10. RDS indicator(Option)
11. Multi-Function Information Displaying Area
1. POWER ON/OFF push button
2. DISC Tray
3. Remote Control Sensor
4. Display
5. MASTER VOLUME Control
6. MIC 1 jack
7. MIC 2 jack
8. MIC 1 VOLUME Control
9. MIC 2 VOLUME Control
10. USB Port(Option)
11. OPEN/CLOSE ( ) button
12. FUNCTION button
13. PLAY ( ) button
14. STOP ( )/BAND button
15. PREV ( ) / NEXT ( ) button
1
3 54
106 7 8 9 11 13 14 1512
2
HC-6220[U]X
For operational instructions, refer to the page indicated in brackets.
◆
Front panel
Index to Parts and Controls
1. POWER ON/OFF push button
2. Remote Control Sensor
3. Display
4. DISC Tray
5. OPEN/CLOSE ( ) button
6. FUNCTION button
7. PLAY ( ) button
8. STOP ( )/BAND button
9. PREV ( ) / NEXT ( ) button
10. MASTER VOLUME Control
11. USB Port(Option)
12. MIC 1 jack
13. MIC 2 jack
14. MIC 1 VOLUME Control
15. MIC 2 VOLUME Control
1 3
5
6 7
8
9
10
1211 13 1514
2 4
HC-6120[U]X
1. COAXIAL OUTPUT jack
2. COMPONENT VIDEO OUTPUT Y jack
3. COMPONENT VIDEO OUTPUT Cb/Pb jack
4. COMPONENT VIDEO OUTPUT Cr/Pr jack
5. VIDEO OUT jack
6. S VIDEO OUT jack
7. FM ANTENNA connector
8. MW(AM) ANTENNA connectors
◆
Rear Panel
Y Cb/Pb
Cr/PrCOAX
VIDEO
S-VIDEO
MODEL No.
HC-6120U
FL FR SL SR CEN SUB
2 5 7 8 9 10 11 12 13 14 15 16
4
6
1 3
9. SCART jack (Option)
10. Power cord
11. FRONT-L SPEAKER connectors
12. FRONT-R SPEAKER connectors
13. REAR-L SPEAKER connectors
14. REAR-R SPEAKER connectors
15. CENTER SPEAKER connectors
16. SUBWOOFER SPEAKER connectors
Page 5
9
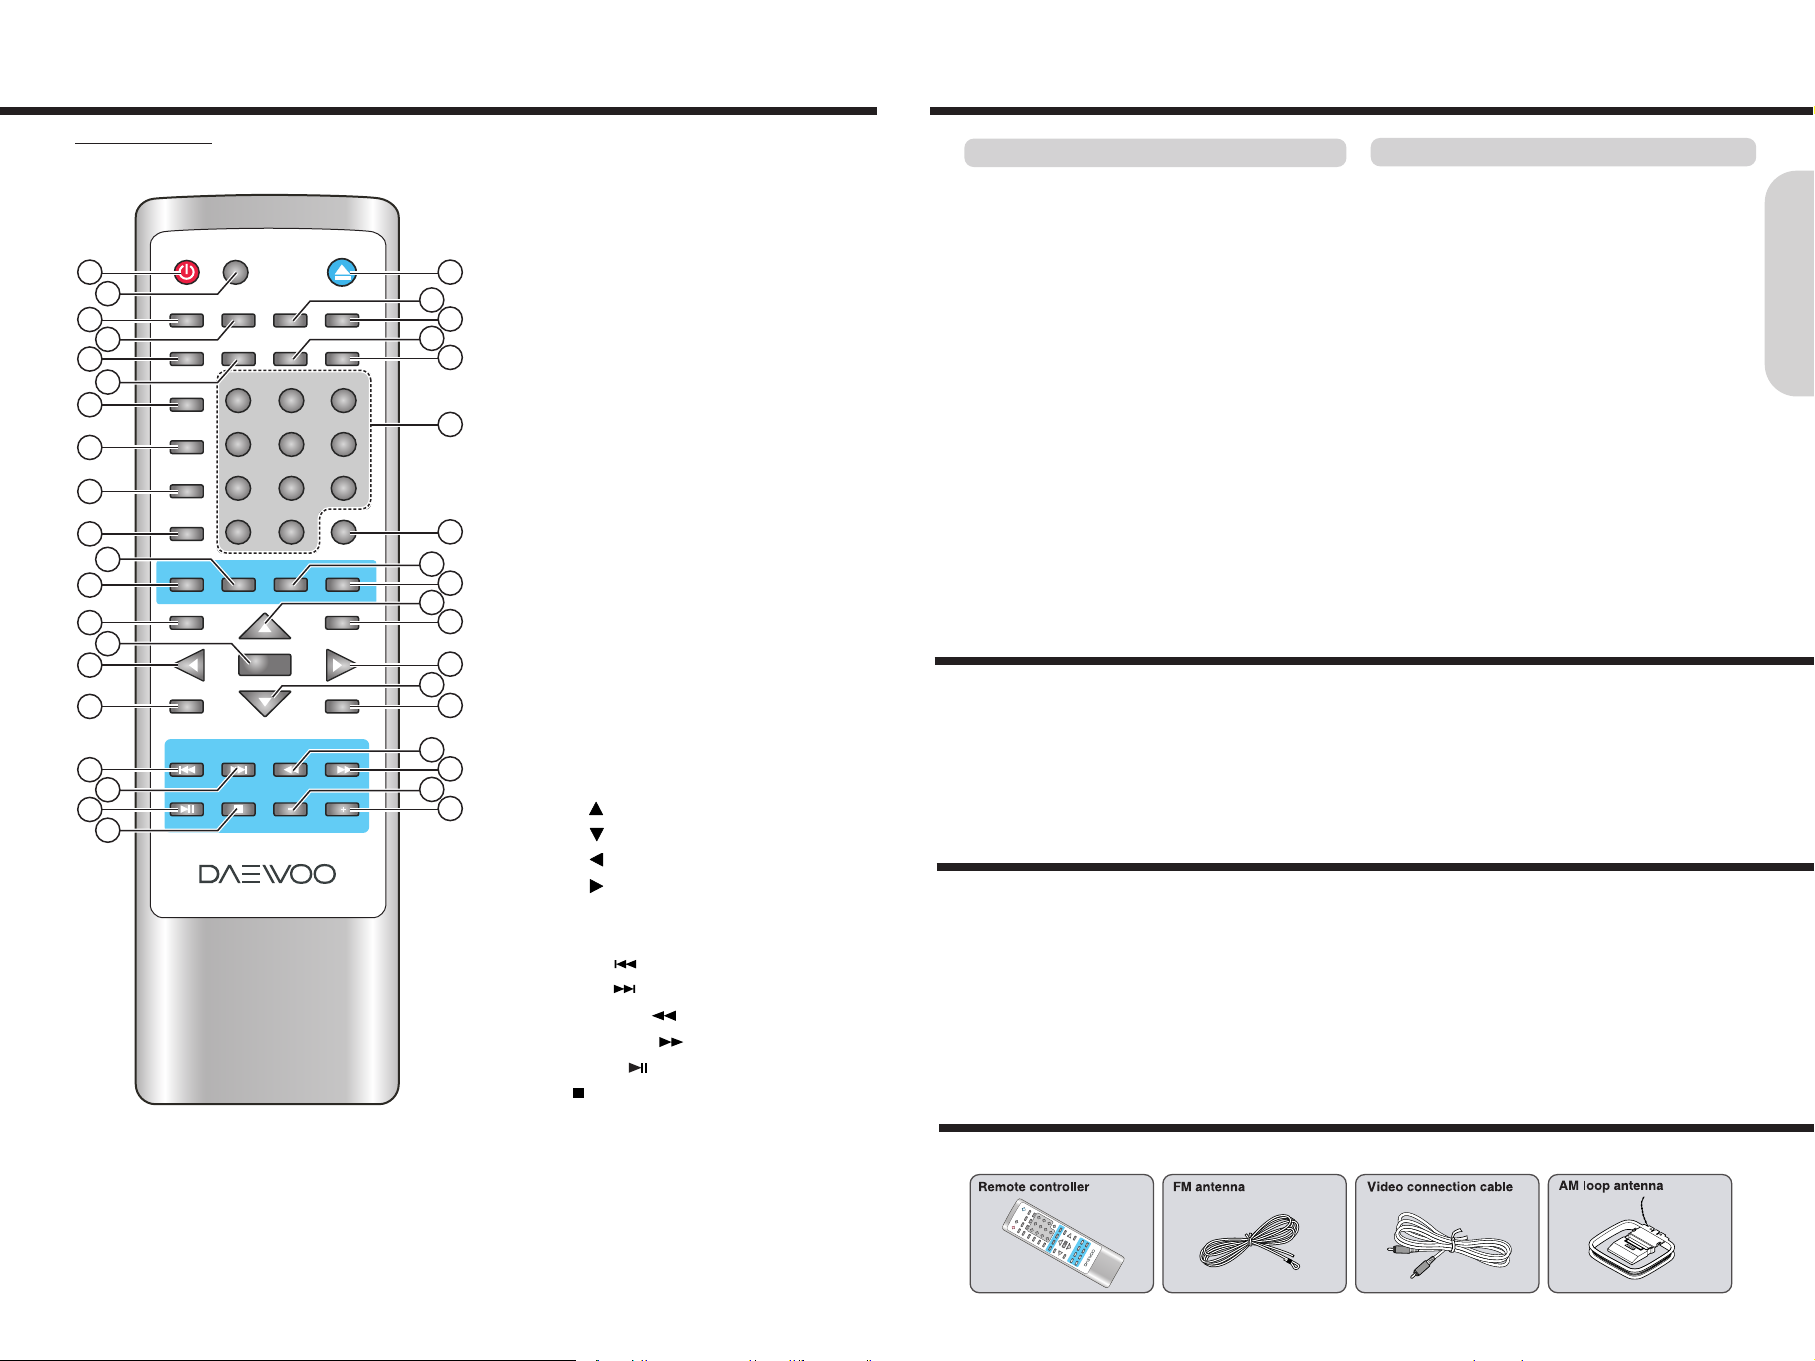
Preparing the Remote Controller
8
◆
Remote controller
1. POWER ON/STANDBY button
2. MUTE button
3. OPEN/CLOSE button
4. PBC button
5. RETURN button
6. STEP button
7. SLOW button
8. DISPLAY button
9. PROGRESSIVE/INTERLACE Scan button
10. TV SYSTEM(PAL/NTSC: DVD only) button
11. R/L button
12. Number(1~10, 10+) buttons
13. PROGRAM button
14. ANGLE button
15. LANGUAGE button
16. DOLBY PRO LOGIC II MODE button
17. REPEAT button
18. RDS/SUBTITLE button
19. DVD/TUNER button
20. AUTO MEMORY/SEARCH button
21. FM MODE/A-B REPEAT button
22. SETUP button
23. MENU button
24. Enter button
25. Direction( ) button
26. Direction( ) button
27. Direction( )/TUNING - button
28. Direction( )/TUNING + button
29. ZOOM button
30. TITLE button
31. SKIP PREV ( ) button
32. SKIP NEXT ( ) button
33. FAST REVERSE ( ) button
34. FAST FORWARD ( ) button
35. PLAY/PAUSE ( ) button
36. STOP ( )/BAND button
37. VOLUME - buttons
38. VOLUME + buttons
1 2 3
4 5 6
7 8 9
10
+10
MUTE
REPEAT
PBC RETURN STEP SLOW
PREV NEXT REV FWD
ZOOM TITLE
SETUP MENU
ENTER
PLAY/PAUSE STOP/BAND
- +
VOLUME
DISPLAY
PROG
ANGLE
LANGUAGE
DPLIIMODE
DVD/TUNER
RDS
SUBTITLE
AUTO/MEMORY
SEARCH
FM MODE
A-B
P/I SCAN P/N R/L
TUNING+TUNING-
POWER
OPEN/CLOSE
12
2
5
9
32
36
1
3
7
6
11
17
10
21
23
30
20
25
26
38
37
34
33
4
8
13
14
15
16
19
22
29
28
27
31
35
18
24
Index to Parts and Controls
Getting Started
1. Detach the battery cover.
2. Insert the batteries.
Be sure to match the + and - ends of the batteries with
the diagram inside the battery compartment.
3. Attach the battery cover.
Notes
●
Do not mix new batteries with old batteries or different kinds of
batteries.
●
To avoid corrosion, remove the batteries if the remote
controller is not to be used for a long time.
●
Remove dead batteries immediately to avoid damage from
corrosion. If the remote controller does not operate smoothly,
replace both the batteries at the same time.
●
The life of the batteries supplied is about six months but this will
vary depending on usage.
Point the remote controller towards the remote
control sensor on the machine.
The remote controller will operate to approximately 4 ~ 7
meters directly from the remote control sensor and within
angle of 30 degrees from the each side of the remote
control sensor.
Notes
●
Place the unit away from strong light such as direct sunlight or
inverted fluorescent light which can prevent proper operation of
the remote controller.
●
Using another remote controller of the same type in the same
room or using the unit near equipment which uses infrared rays
may cause operational interference.
●
Do not put any object such as a book on the remote controller.
The buttons of the remote controller may be pressed by
mistake and drain the batteries.
●
Make sure the audio rack doors do not have colored glass.
Placing the unit behind such doors may prevent proper remote
controller operation.
●
If there is any obstacle between the remote controller and the
remote control sensor, the remote controller will not operate.
Inserting the Batteries
Using the Remote Controller
This instruction manual explains the basic procedures for operating of the machine. Some DVD videos are produced in a
manner that allows specific or limited operation during playback. As such, the machine may not respond to all operating
commands. Refer to instruction notes on discs.
A “INVALID KEY” mark may appear on the TV screen during operation.
The “INVALID KEY” mark means that the operation is not permitted by the machine or the disc.
It is forbidden by law to copy, broadcast, show, broadcast on cable, play in public, and rent copyrighted material without
permission.
DVD videos are copy protected, and any recordings made from these discs will be distorted.
This product incorporates copyright protection technology that is protected by method claims of certain U.S. patents and
other intellectual property rights owned by Macrovision Corporation and other rights owners. Use of this copyright protection
technology must be authorized by Macrovision Corporation, and is intended for home and other limited viewing uses only
unless otherwise authorized by Macrovision Corporation. Reverse engineering or disassembly is prohibited.
About This Instruction Manual
Note on Copyright
1
2
3
4
5
6
7
8
9
0
+10
MUTE
REPEAT
PBC
RETURN
STEP
SLOW
PREV
NEXT
REV
FWD
ZOOM
TITLE
SETUP
MENU
ENTER
PLAY/PAUSE
STOP/BAND
-
+
VOLUME
DISPLAY
PROG
ANGLE
LANGUAGE
DPLIIMODE
DVD/TUNER
RDS
SUBTITLE
AUTO/MEMORY
SEARCH
FM MODE
A-B
P/I SCAN
P/N
R/L
TUNING
+
TUNING-
POWER
OPEN/CLOSE
Accessories
Page 6

This machine can play back the following discs.
Maximum
playback time
Approx. 240minutes
(Single sided disc)
Approx. 480minutes
(Double sided disc)
Approx. 80minutes
(Single sided disc)
Approx. 160minutes
(Double sided disc)
Approx. 74 minutes
Approx. 20 minutes
Approx. 74 minutes
Approx. 20 minutes
Approx. 74 minutes
Approx. 20 minutes
Approx. 640 MBytes
Approx. 200 MBytes
Contents
Digital Audio
+
Digital Video
(MPEG2)
Digital Audio
+
Digital Video
(MPEG1)
Digital Audio
Digital
Video(MPEG1),
Digital Audio or
Only MP3 files
MP3, JPEG
Files
Disc
size
12 Cm
8 Cm
12 Cm
8 Cm
12 Cm
8 Cm
(CD Single)
12 Cm
8 Cm
(CD Single)
12 Cm
8 Cm
Disc Type
DVD videos
with an suitable
region number
or ALL
VIDEO CDs
(Version 1.0 /
1.1 / 2.0) or
SVCD
Audio CDs
(PCM)
CD-Rs,
CD-RWs
CD-ROMs
11
The region number are allocated to machine and software
according to where they are sold.
DVDs can be played on this machine if their region number is
the same or includes the same number, or if the DVD is
marked “ALL”.
Confirm the region number for this machine before choosing
discs. The number for machine is indicated on the rear panel.
On Storing Discs
Note on Region Numbers
●
Do not store discs in a place subject to direct sunlight or
near heat sources.
●
Do not store discs in places subject to moisture and dust
such as a bathroom or near a humidifier.
●
Store discs vertically in a case. Stacking or placing objects
on discs outside of their case may cause warping.
Playable Discs
On VIDEO CDs
This machine supports VIDEO CDs equipped with the
PBC(Version 2.0) function. (PBC is the abbreviation of
Playback Control.)
You can enjoy two playback variations depending on the type
of disc.
●
VIDEO CD not equipped with PBC function(Version 1.1)
Sound and movies can be played on this machine in the same
way as an audio CD.
●
You cannot play back discs other than those listed above.
- DVD with an un suitable region number
- DVD-Audio - DVD-ROM - DVD-RAM
- VSD - CD-ROM - CDV
- CVD - CD-G - SACD
- DIVX Video Disc
●
This machine uses the PAL/NTSC color system, and cannot
play back DVD videos recorded in any other color system
(SECAM, etc.).
●
Avoid using heart-shaped or octagonal discs. Playing
irregularly shaped discs may damage the internal mechanism
of the machine.
●
Do not use discs on which adhesive from adhesive tape or a
disc label (if it is a rental disc) remains. Otherwise, you may not
be able to eject the discs or the machine may become
inoperative.
This section shows you how to handle, clean, and store discs.
On Handling Discs
On Cleaning Discs
●
Fingerprints and dust on the disc cause picture and sound
deterioration. Wipe the disc from the center outwards with a
soft cloth. Always keep the disc clean.
●
If you cannot wipe off the dust with a soft cloth, wipe the
disc lightly with a slightly moistened soft cloth and finish
with a dry cloth.
●
Do not use any type of solvent such as thinner, benzine,
commercially available cleaners or antistatic spray for vinyl
LPs. It may damage the disc.
●
Do not touch the playback side of the disc.
●
Do not attach paper or tape to discs.
Connecting to a TV
●●
VIDEO CD equipped with PBC function (Version 2.0)
In addition to operation of the VIDEO CD not equipped with the
PBC function, you can enjoy playback with interactive software
and with search function by using the menu displayed on the TV
screen (Menu Playback). Some of the functions described in
this Instruction Manual may not work with some discs.
Notes : playing MP-3 CD
●
The machine can play only single session made CD-R/RW for
ISO9660, Joliet format.
For other format, it may not play the discs.
10
Notes on Discs
Getting Started
Notes : Using the USB Device(Option)
●
The machine can play flash memory type of USB device only.
For other type of USB device, it may not be played.
●
The USB devices may not playback. If this is the case, refer
also to instruction manual of USB device.
●
The machine can play FAT16 or FAT32 file system of USB
device. Should formatting become necessary, be sure to always
use the FAT16 or FAT32 file system.
◆
Before connecting
●
Refer also to the instruction manual of the TV.
●
When you connect the machine to the TV, be sure to turn
off the power and unplug both the units from the wall
outlets before making any connections.
●
Connect the machine to the TV directly. If you connect the
machine to a VCR, TV/VCR combination, or video selector,
the playback picture may be distorted as DVD videos are
copy protected.
●
Note that one video connection cable for monitor out is
supplied.
●
Automatically switched to the TV set A/V mode(DVD,
Video)
Do not change to Video Aspect Ratio.
Connecting to a TV without Color Difference Inputs
●
If the TV or monitor is equipped with an S video input, make the S video connection in addition to the normal video connection.
The S video connection will provide higher quality picture playback.
Connecting to a TV with Color Difference Inputs
If the TV or monitor is equipped with the color difference inputs, select the connection on the above.
Connecting to these inputs allows you to enjoy higher quality picture playback compared to the above connection.
Notes
●
Actual labels for color difference inputs may vary depending on the TV manufacturer (ex. Y/Cb/Cr, Y/R-Y/B-Y , Y/P
b/Pr
or Component
video).
●
In some TVs or monitors, the color levels of the playback picture may be reduced slightly or the tint may change.
In such a case, adjust the TV or monitor for optimum performance.
Caution
You may need to maximize the volume of the TV speaker(s) when you carry out steps in "Speaker Setup".
Be sure to turn down the volume of the TV speaker(s) before changing the TV source input and using the TV speaker(s) as a
normal TV speaker(s).
Y Cb/Pb
Cr/PrCOAX
VIDEO
S-VIDEO
MODEL No.
HC-6120U
FL FR SL SR CEN SUB
for EU version: optional
●
21-Pin SCART Cable(not included) to 21-pin SCART input terminal on TV
●
SCART Specification : Composite and Component Video output(DVD, Video)Audio L/R Output(DVD only)
Page 7

1312
Connecting to USB Device of Fresh memory type(Option)
Getting Started
Connecting the microphone for KARAOKE
◆
Before connecting
●
Refer also to the instruction manual of each USB Device to be connected.
●
Before using the USB devices, make sure there is no disc on the machine.
USB function works only under the condition that the display shows “NO DISC” at DVD function mode.
●
Connect the plugs securely.
Connecting Speakers
◆
Before connecting
●
This machine is designed to reproduce optimum sound quality when speakers with the specified impedance below are
connected. Please check the following information and choose speakers with appropriate impedance for the connections.
Front speakers / Center speaker / Surround Speakers : 4 ohms min. per speaker
Woofer speaker : 8 ohm min.
Y Cb/Pb
Cr/PrCOAX
VIDEO
S-VIDEO
MODEL No. HC-6120U
FL FR SL SR CEN SUB
Surround speakerSurround speaker
Center speaker
Woofer speaker
Front speaker
Left ch.
Front speaker
Right ch.
Left ch.Right ch.
◆
Standard speaker placement
For ideal Surround effects, all speakers should be installed.
Front
The left, right, and center speakers should face the seated
listener and be placed at ear level. The center speaker
reproduces a richer sound image by enhancing the
perception of the sound's source and movement.
Surround
Place the left and right Surround speakers 1 meter (3 feet)
above the listener's ear level and facing toward the sides of
the room, making sure that the listener is within the speakers'
dispersion angle. These speakers reproduce the feel of a
moving sound while creating the sensation of being in the
middle of the action.
Woofer
Install a subwoofer for powerful bass sounds. The placement
of the subwoofer does not affect the final quality of the sound
image too much, so you can install it wherever it is
convenient.
*Note that installing too close to the TV may make a
distortion the TV screen.
Speaker placement plays an important role in the reproduction of Surround sound. The placement of the speakers varies
depending on the size of the room and the wall coverings used in the room. The illustration below shows an example of a layout
for standard speaker placement. Refer to this example when you position the speakers in order to experience the best of
Surround sound.
●
To prevent damage to circuits, never short-circuit the positive (+) and negative (-) speaker wires.
●
Do not connect the speaker cable to the L and R connectors at the same time and do not connect
more than one speaker to the same speaker connectors.
Positioning Speakers
R L
R L
NO!
NO!NO!
Y Cb/Pb
Cr/PrCOAX
VIDEO
S-VIDEO
MODEL No.
HC-6120U
FL FR SL SR CEN SUB
Connecting the Supplied FM Antennas
Making Antenna Connections
◆
Adjusting the position of the FM antenna
While listening to an FM program, extend the
antenna and move it in various directions until
the clearest signal is received, then secure the
antenna with push pins in the position with the
least distortion.
Page 8

1514
Connecting the Power/Turning on the machine
Getting Started
◆
Before connecting
●
Turning on the machine may cause a momentary power surge, which might interfere with other electrical equipment such as
computers. If this happens, use a wall outlet on a different circuit.
1. Connect the power cord to a wall outlet.
2. Push POWER ON/OFF button on the machine.
If the machine is in standby mode, press POWER
ON/STANDBY button on the remote controller.
The machine turns on.
Note
●
To enter standby mode the machine, press POWER button on
the remote controller. The machine enters standby mode.
●
To turn off the machine, push POWER ON/OFF button on the
machine. The machine turn off.
●
The buttons on the remote controller do not operate if the
POWER ON/OFF button is set to OFF.
CAUTION
●
Do not neglect the machine for a long period in standby mode, or it may cause the unit to malfunction or be overheated.
●
When the machine is not in use, be sure to remove the disc or USB device(option) and turn off the power by pushing the
POWER ON/OFF on the machine.
Preparation for TV System Setup
1. Press SETUP button while the disc is
stopped. The setup main page appears on
the TV screen.
2. Press
◀/▶
button to select the
“SYSTEM SETUP” page. The System
setting menu appears on the display.
◆
Before setting
●
Turn the TV on. Switch the video input mode of TV to suit
the type of connection you have made(e.g., VIDEO)
Selecting a TV system
1. Press
▲/▼
button to select the “TV
SYSTEM” while the “SYSTEM SET UP”
page is displayed on the TV screen, then
press
▶
button to move.
2. Press
▲/▼
button to select the required
TV system, then press ENTER to
confirm.
Selecting a TV Aspect
1. Press
▲/▼
button to select the “TV
TYPE” while the “SYSTEM SET UP”
page is displayed on the TV screen,
then press
▶
button to move.
2. Press
▲/▼
button to select the required
TV type, then press ENTER to confirm.
Selecting a Video Signal Type
1. Press
▲/▼
button to select the “VIDEO”
while the “SYSTEM SET UP” page is
displayed on the TV screen, then press
▶
button to move.
2. Press
▲/▼
button to select the required
Signal type, then press ENTER to confirm.
Note : To switch the TV system directly.
Press P/N button repeatedly to select the required
TV system type (NTSC, PAL60, PAL or AUTO)
.
Note : To switch the Video signal type directly.
Press P/I SCAN button repeatedly to select the
required Video signal type (INTERLACE-YUV, TVRGB, P-SCAN YPBPR, PC-VGA or S-VIDEO)
.
TV system setup
Speaker Setup
Before operating your machine, you need to set up the speaker configuration and the delay time from the listening position to
each speaker.
Preparation for Speaker Setup
1. Press SETUP button while the disc is
stopped. The setup main page appears on
the TV screen.
2. Press
◀/▶
button to select the
“SPEAKER SETUP” page. The speaker
setting menu appears on the display.
◆
Before setting
●
Turn the TV on.
●
Switch the video input mode of TV to suit the type of
connection you have made(e.g., VIDEO)
Turning on/off the Subwoofer output
1. Press
▲/▼
button to select the
“SUBWOOFER ” while the “SPEAKER
SET UP” page is displayed on the TV
screen, then press
▶
button to move.
4. Press
▲/▼
button to select the “OFF”
or “ON”, then press ENTER to confirm.
Adjusting Each Speaker's Position
1. Press
▲/▼
button to select the “CENTER
or REAR DELAY” while the “SPEAKER
SETUP” menu is displayed on the TV
screen, then press
▶
to confirm.
The speaker delay time appears on the
display.
2. Press
▲/▼
button to select the Center
or Rear speaker’s delay time.
The speaker’s delay time can be adjusted
from OFF to 15 mSEC.
3. Repeat step 1~2 to adjust other speaker’s
delay time.
1. Press
▲/▼
button to select the “EXIT”,
then press ENTER button to exit.
To finish the setup
Note : To exit the setup function directly.
Press SETUP button, the machine is return to previous
function mode.
Before operating your machine, you need to set up the TV system.
SYSTEM SETUP
TV SYSTEM
SCREEN SAVER
VIDEO
TV TYPE
PASSWORD
RATING
DEFAULT
EXIT SETUP
SYSTEM SETUP
NTSC
PAL60
PAL
AUTO
TV SYSTEM
SCREEN SAVER
VIDEO
TV TYPE
PASSWORD
RATING
DEFAULT
EXIT SETUP
SYSTEM SETUP
INTERLACE-YUV
TV-RGB
P-SCAN YPBPR
PC-VGA
S-VIDEO
TV SYSTEM
SCREEN SAVER
VIDEO
TV TYPE
PASSWORD
RATING
DEFAULT
EXIT SETUP
SYSTEM SETUP
4:3PS
4:3LB
16:9
TV SYSTEM
SCREEN SAVER
VIDEO
TV TYPE
PASSWORD
RATING
DEFAULT
EXIT SETUP
SPEAKER SETUP
DOWNMIX
SUBWOOFER
CENTER DELAY
REAR DELAY
FRONT
CENTER
REAR
EXIT SETUP
SPEAKER SETUP
OFF
ON
DOWNMIX
SUBWOOFER
CENTER DELAY
REAR DELAY
FRONT
CENTER
REAR
EXIT SETUP
SPEAKER SETUP
OFF
ON
DOWNMIX
SUBWOOFER
CENTER DELAY
REAR DELAY
FRONT
CENTER
REAR
EXIT SETUP
SPEAKER SETUP
DOWNMIX
SUBWOOFER
CENTER DELAY
REAR DELAY
FRONT
CENTER
REAR
EXIT SETUP
4:3PS
4:3LB
16:9
+
4 MS
2 MS
0 MS
SPEAKER SETUP
DOWNMIX
SUBWOOFER
CENTER DELAY
REAR DELAY
FRONT
CENTER
REAR
EXIT SETUP
4:3PS
4:3LB
16:9
+
4 MS
2 MS
0 MS
SPEAKER SETUP
DOWNMIX
SUBWOOFER
CENTER DELAY
REAR DELAY
FRONT
CENTER
REAR
EXIT SETUP
Page 9

1716
Basic Operation
Playing DVD Videos / VIDEO CDs / MP3 CDs / Audio CDs
This section shows you the basics on how to play discs.
Before playing
●
DVD Videos, VIDEO CDs, MP3/JPEG/DivX CDs, audio CDs or MP3/JPEG file on USB device can be played with the
machine. Do not play anything else.
●
When playing DVD videos and VIDEO CDs, MP3 CDs turn on the TV and set the TV to the machine's input.
About the disc or file icons in the pages related to DVD video/DVD audio, VIDEO CD, MP3 CD, DivX CD, audio CD, MP3
file and file JPEG operation
e.g. means "The function or title is related to DVD operation."
means "The function or title is related to MP3 disc operation."
means "The function or title is related to JPEG file operation."
Tip to obtain a higher quality picture
Occasionally, some picture noise not usually visible during a normal broadcast may appear on the TV screen while playing a DVD video
because the high resolution pictures on these discs include a lot of information. While the amount of noise depends on the TV you use,
you should generally adjust the TV to reduce sharpness when viewing DVD videos.
DVD
1. Press OPEN/CLOSE.
The disc tray opens.
2. Place the disc on the disc tray.
Put the disc on the tray with the label side
facing up.
There are two different disc sizes. Place
the disc in the correct guide on the disc tray.
Basic Playback
CAUTION
Keep your fingers well clear of the disc tray as it is closing.
Neglecting to do so may cause serious personal injury.
3. Press PLAY/PAUSE.
The disc tray is closed and playback starts.
If you press OPEN/CLOSE to close the tray
after step 2, playback may automatically
starts depending on the disc.
One of the indicators which indicate the digital
sound format of the playing source lights.
If a title menu appears on the TV screen
The DVD video has a title menu, or the VIDEO
CD is equipped with the PBC (Playback
Control) function.
Follow steps 2 and 3 in "Locating a title using
the title menu".
2. Press
▲/▼/◀/▶
repeatedly to select the
folder and a file you want to play.
3. To start playback, press PLAY/PAUSE.
The machine starts playback from the
selected file.
DOLBY DIGITAL
The type of the inserted disc lights
◆
In case of Disc used
DVD VCD C D MP3 JPG
Note : Using the MP3/JPEG/DivX disc
When an MP3/JPEG/DivX disc is loaded, File Explorer
screen is displayed automatically depending on the disc's
folder (directory) structure as shown below.
MP3
JPG
1. Press
◀/▶
to select a Search icon for
Audio(MP3/WMA), Picture(JPEG, BMP)
or, Video(DivX) files then press ENTER
to search the files.
[ - ] Dance Dance.mp3
01. My Music
01. Dance Dance
02. Piano solo #3
03. Jazz_Vocal_
Search for Video Files
Search for Picture Files
Search for Audio Files
1. Plug the USB Device in the USB port
while no disc on the machine
The machine starts loading from USB Device.
◆
In case of USB Device used
(only for USB model option)
When the USB device loading is completed,
the File Explorer screen is displayed
automatically depending on USB device’s
folder(directory) structure as shown below.
2. Press
◀/▶
to select a Search icon for
Audio(MP3/WMA), Picture(JPEG) or,
Video files then press ENTER to search
the files.
Press OPEN/CLOSE to open the disc tray.
Remove the disc after the disc tray opens
completely.
After removing the disc, be sure to press the
button again to close the tray.
To remove the disc
DVD VCD C D MP3 JPG
To remove the USB Device
(only for USB model option)
Disconnect the USB Device from the USB port
during the stop mode.
MP3 JPG
Before using the USB devices, make sure there is no disc on
the machine. USB function works only under the condition
that the display shows “NO DISC” at DVD function mode.
MP3 JPG
[ - ] Dance Dance.mp3
01. My Music
01. Dance Dance
02. Piano solo #3
03. Jazz_Vocal_
Search for Video Files
Search for Picture Files
Search for Audio Files
3. Press
▲/▼/◀/▶
repeatedly to select the
folder and a file you want to play.
4. To start playback, press PLAY/PAUSE.
The machine starts playback from the
selected file.
Press PLAY/PAUSE during playback.
To start playback, press PLAY/PAUSE.
To play frame by frame
Press the STEP button repeatedly during
pause. Each time you press the button the
picture advances one frame.
To resume normal playback, press
PLAY/PAUSE.
Press STOP/BAND.
When you press PLAY to restart playback,
playback starts from the location where you
stopped playback because the location index
is stored in memory.(This state is called
PRESTOP: DVD only.)
Resuming playback from the beginning
Press STOP again after stopping playback to
clear the location index memory, then press
PLAY to start playback.
Playback starts from the beginning of the current
title.
To start playback from the beginning of the DVD
video, open and close the disc tray (press
OPEN/CLOSE twice) then press PLAY to start
playback.
Playback starts from the beginning of the disc.
To pause playback (still mode)
To stop playback
Note
The location index memory will also be cleared when:
●
The power cord is unplugged,
●
The machine has entered standby mode,
●
The disc tray is opened, and
●
The parental lock setting is changed or a disc menu language
is selected.
Note
The location where playback resumes may vary depending on the
disc or the stopped scene.
Note
The sound is muted during still mode and frame by frame
playback.
MP3
JPG
Notes
●
Do not move the machine during playback.
Doing so may damage the disc.
●
Use OPEN/CLOSE on the remote controller or machine to open
and close the disc tray. Do not touch the disc tray while it is
moving. Doing so may cause the machine to malfunction.
●
Do not press down on the disc tray or put any objects other than
playable discs on the disc tray. Doing so may cause the
machine to malfunction.
●
In many instances, a menu screen appears when playback of a
movie is complete. Prolonged display of an on-screen menu
may damage your television set, permanently etching that
image onto its screen. To avoid this, be sure to press STOP
once the movie is complete.
Page 10

18
Playing DVD Videos / VIDEO CDs / MP3 CDs / Audio CDs
Press SLOW during playback.
Each press of SLOW changes the slowmotion speed as follows:
SF 1/2 SF 1/3 SF 1/6 PLAY
SF 1/2 SF 1/3 SF 1/6 PLAY
SF 1/7
...
SF 1/7
...
Slow searching
Notes
●
The sound is muted during slow-motion
playback.
●
To resume normal playback, press PLAY/
PAUSE or press SLOW repeatedly until “PLAY”
displayed.
19
Press ◀◀(Fast Reverse) or ▶▶(Fast
Forward) during playback or pause.
The playback speed becomes two times the
normal speed. Each press of
◀◀
or
▶▶
changes the playback speed as follows:
FORWARD X 2 FORWARD X 4 FORWARD X 8
Notes
●
No sound is reproduced and no subtitles appear during fast
forward or reverse playback while playing back a DVD or a
VIDEO CD, whereas the sound is reproduced while playing
back an audio CD.
●
The x2, x4, x8 and x20 speeds are only approximate speeds.
●
These speeds may vary slightly depending on disc.
Fast Searching
To resume normal playback, press PLAY/
PAUSE or press
◀◀/ ▶▶
repeatedly until
"PLAY" displayed.
Normally, DVD videos are divided into titles, and the titles are subdivided into chapters. VIDEO CDs, and audio CDs are divided
into tracks. Certain MP3 CDs are divided into MP3 files or folders, and the folders are subdivided into MP3 files or subfolders.
You can quickly locate any specific title, chapter, track or MP3 file.
Locating a Specific Title/Chapter/Track by Disc Menu
1. Press TITLE. (Depending on the DVD
video, press MENU.)
The title menu appears on the TV screen.
Example of a title menu.
3. Press ENTER or PLAY/PAUSE.
The machine starts playback from chapter
1 of the selected title
4. In case of MP3 CD, repeat steps 2 and
3 to select MP3 file. The machine start
playback the selected MP3 file.
Locating a title using the title menu
e.g. DVD Title
2. Press
▲/▼/◀/▶
to select the title, MP3
file or directory you want.
If the titles in the title menu are assigned a
number, you can also directly locate a
specific title by entering its assigned
number using the number buttons.
FORWARD X 20 PLAY
If a DVD video contains a title menu, you can locate a
specific title using the title menu function.
Notes
●
The instructions above describe basic procedures which may
vary depending on the contents of the DVD video. If different
instructions appear on the TV screen, follow those
instructions.
●
If you display the title menu during playback and press TITLE
again without selecting any title, the machine usually resumes
playback from the point where you first pressed TITLE. (There
may be exceptional cases depending on the discs.)
●
This method of locating a title is available only on a disc that
contains a title menu.
●
Instruction notes of discs may refer to the button that displays
the title menu as "TOP MENU".
Press the MENU to return to the preceding
PBC menu.
If there is no preceding menu(in case of the
first menu), this function may not be
executed.
Locating a track using the PBC menu
If a Video CD has “Playback Control” written on its disc or jacket, it means that particular scene or information can be selected
for viewing interactively with the TV monitor using the PBC menu screen.
Locating a Specific Title/Chapter/Track/MP3 File/Location
Locating a specific location by entering
the time
Notes
●
Some discs may not respond to this procedure.
●
Some scenes may not be located precisely.
●
When VCD Stop, this method for accessing specific
locations is available only within the current title of the VIDEO
CD.
1. Press AUTO MEMORY/SEARCH.
Make sure that the number next to
"CHAPTER" is highlighted.
2. Press
◀/▶
to move the time field.
3. Press the number button(s) to enter the
title number for the desired time.
4 . Press ENTER or PLAY/PAUSE.
The machine starts playback from the
selected time.
You can locate a specific location by entering its
corresponding time (hours, minutes, and seconds).
TT 01/03 CH 001/032 00:03:52
If a DVD video contains the numbers corresponding to the
titles and chapters, you can locate a specific chapter in a
specific title directly by entering the numbers.
Locating a specific chapter
1. Press AUTO MEMORY/SEARCH to
select CHAPTER.
Make sure that the number next to
"CHAPTER" is highlighted.
2. Press the number button(s) to enter
the chapter number for the desired
chapter.
3. Press ENTER or PLAY/PAUSE.
The machine starts playback from the
selected chapter.
TT 01/03 CH 001/032 00:03:52
TT 01/03 CH 001/032 00:01:18
TT 01/03 CH 001/032 00:03:52
TT 01/03 CH 007/032 00:03:52
Basic Operation
Press PBC to select
[ON] To view the PBC menu screen when
playing a PBC featured Video CD.
[OFF] For playing a PBC featured Video CD
without using the menu PBC screen.
Page 11

21
Locating a Specific Title/Chapter/Track/MP3 File/Location
20
1. Press the number button(s) to enter the
track number for the desired track.
e.g. To select track 10
2. Press ENTER or PLAY/PAUSE.
The machine starts playback from the
selected track.
Locating a specific track directly
Locating a specific chapter, track or MP3
file consecutively
Press
I
◀◀or▶▶I
(repeatedly) to select the
chapter, track or MP3 file you wish to start
playing
●
Press
I
◀◀
once to start playback from the
beginning of the current chapter, track or MP3
file.
●
Press
I
◀◀
repeatedly to select the former
chapters, tracks or files in reverse order.
●
Press
▶▶I
repeatedly to select the next
chapter, track or MP3 file in order.
Notes
●
Some title may not display chapter numbers.
●
This location method is available only on a disc that contains
the numbers corresponding to the titles and chapters.
●
To cancel the entered title and chapter numbers, press
STOP before pressing ENTER.
1. Press AUTO MEMORY/SEARCH.
Make sure that the number next to
"CHAPTER" is highlighted.
2. Press to move the title field.
3. Press the number button(s) to enter the
title number.
4. Press ENTER or PLAY/PAUSE.
The machine starts playback from the
selected chapter in the selected title.
You can locate consecutive chapters, tracks or MP3 files.
You can locate the desired track by entering the number.
Locating a specific title
Playing JPEG PHOTO File
●
To rotate, press ◀(counter-clockwise 90
°
by each pressing) or
▶
(clockwise 90°) or
▶
(180°).
●
To flip pressing ▲or ▼button
.
TT 01/03 CH 001/032 00:03:52
TT 01/03 CH 007/032 00:03:52
TT 03/03 CH 007/032 00:03:52
1. Press STOP/BAND to select FM or MW
(AM).
2. Press AUTO MEMORY/SEARCH.
Preset number and Frequency displayed on
the display.
Programming Station Preset Automatically
Before selecting preset stations, you need to preset the
radio stations.
Selecting Preset Stations
●
You can store up to 40 FM and 20 MW(AM) stations .
●
You can preset radio stations only with the buttons on the
remote controller.
Press
I
◀◀or▶▶I
repeatedly to select a
station you want.
The Channel and Frequency indicators
appears in the machine’s display.
Press FM MODE/A-B to select FM Mono.
The “STEREO” indicators turn off. At this time,
the station will be in mono and interstation noise
will be heard. Select the station to which you
want to listen.
Press VOLUME - /+ on the remote controller
or turn VOLUME on the machine.
The volume level increases or decreases.
Adjusting the Volume
Press MUTE.
MUTE indicator in the machine’s display is displayed.
To restore the sound, press MUTE or Volume
- / +
.
Muting the Sound
The volume of the front left, right, center, surround left and right,
and subwoofer speakers will be adjusted at the same time.
Notes :
●
To avoid damage to the speakers, do not keep operating the
volume with distorted strong sound.
Adjust the volume to the optimum listening level.
●
To adjust the volume of the microphone
connected the MIC 1 jack, turn MIC VOL-- 1.
●
To adjust the volume of the microphone
connected the MIC 2 jack, turn MIC VOL-- 2.
Adjusting the MIC Volume
Notes : Tuning in a weak frequency (for FM stations)
●
When you tune in a stereo FM station, the “STEREO”
indicator lights up if the signal is normal. If the signal is weak,
you may not be able to tune to the station. In this case, tune in
as follows.
Various Functions Common to all the Sources
RDS(Radio Data System) is a broadcasting service which a growing number of FM stations are now providing. It allows the FM stations
to send additional signals along with their regular program signals. For example, the stations send their station names and informations
about what type of program they broadcast, such as sports or music, etc.
When tuned to an FM station which provides the RDS service, the RDS indicator lights up, the station frequency(and then the station
name if sent)is displayed.
Not all FM stations provide RDS service, nor do all RDS stations provide same services. If in doubt, check with local radio stations for
details on RDS services in your area.
To view RDS information on the display.
Each time you press the button, the display
changes to show the following informations.
PS(Programme Service)→→PTY(Programme Type)
→→
RT(Radio Text)→→Station frequency
→→PPSS
Receiving FM stations with RDS(Europe only)
Notes :
●
The sound of the microphone is not outputted in the stop or
pause mode.
●
If feedback occurs ...
Move the microphone(s) away from the speaker.
●
After finishing MIC function ..
Disconnect the microphones or turn down the MIC VOL--1
and 2 to MIN(Minimum).
●
To zoom pressing ZOOM button.
If you press ZOOM repeatedly, the
magnification level increases.
Notes
●
Press
▲/▼/◀/▶
to enjoy pan scan mode.
To enjoy variety shows, when a picture is displayed on screen.
Radio Listening
There are two ways to select radio stations: one is manual tuning and the other is presetting radio stations then selecting the
preset channels.
Tuning Stations
1. Press DVD/TUNER.
2. Press STOP/BAND to select FM or MW
(AM).
3. Press
◀or▶
to tune to the station.
Station select mode will be changed from
PRESET to Manual Tuning.
4. Press and hold ◀or▶more then one
second, to scan the previous or next
station automatically.
When a broadcast is received, scanning stops.
This unit can use the following RDS service.
PS (Programme Service name) : Identifies each station by a name.
RT (Radio Text) : Allows the RDS station to send text messages that
appear on the display of the unit.
PTY (Programme Type) : Identifies the type of RDS programme.
This allows you to locate a specific type name of program being
broadcast.
Basic Operation
Page 12

23
You can play a specific title, chapter, track/file, folder or segment repeatedly.
You can play the same title, chapter, track/file or folder
repeatedly.
Repeating a Title, Chapter, Track or Folder
Press repeatedly REPEAT to select the
repeat function.
when use DVD;
REP: [OFF] --- normal playback
REP: [CHAPTER] --- repeat a current chapter
REP: [TITLE] --- repeat a current title
when use Video CD/Audio CD;
REP: [OFF] --- normal playback
REP: [REP1] --- repeat a current track
REP: [REP ALL] --- repeat all tracks
when use MP3/JPEG file;
REP: [OFF] --- normal playback
REP: [REP1] --- repeat a current track
REP: [REP DIR] --- repeat all tracks of current
folder
REP: [REP ALL] --- repeat all tracks on disc or
USB device
◆
To resume normal playback
Keep on pressing REPEAT button until “REP:
[OFF]” is displayed on the TV or disappear
REPEAT indicator on the machine's display.
The repeat function becomes cleared and the
playing state changes to normal.
1. Press FM MODE/A-B at the beginning of
the segment (point A) you want to play
repeatedly.
2. Press FM MODE/A-B again at the end of
the segment (point B).
The machine automatically returns to point
A and starts repeat playback of the
selected segment (A-B).
◆
To resume normal playback
Press FM MODE/A-B repeatedly until “A-B
CANCEL” displayed on screen.
Repeating a Specific Segment
You can play a specific segment repeatedly (A-B repeat).
Notes
●
Some discs may not permit A-B repeat operation.
●
You can play a specific segment only within the current title or
track.
●
You cannot set the A-B repeat function for segments that include
multiple camera angles.
●
There may be a slight difference between point A and the location
where playback actually resumes depending on the disc.
Playing Repeatedly
Advanced DVD/Audio CD
Operation
REPEAT A-
REPEAT A-B
A-B CANCEL
22
Notes
●
Some discs may not permit repeat operation.
●
Repeat play works only with discs for which the elapsed
playing time appears in the machines display during playback.
VCD C D
DVD
MP3 JPG Div
MP3 JPG
1. Press ZOOM during normal or still
playback.
If you press ZOOM repeatedly, the
magnification level increases.
You can zoom in on a picture. You can also shift the zoom point.
◆
To resume normal playback
Press ZOOM repeatedly until “ZOOM OFF”
display.
Notes
●
Some discs may not permit to zoom operation.
●
During some scenes, the buttons may not work as described
above.
●
Zooming does not work on subtitles or menu screens included
on DVD videos.
●
During zoom playback,
▲/▼/◀/▶
does not work on menu
screens included on DVD videos. If you want to view the
menus, cancel zoom playback.
●
The magnification level varies depending on the picture size
you select.
Zooming a Picture
ZOOM 1
ZOOM 4
ZOOM 1/2
ZOOM OFF
Zooming a Picture and Shifting the Zoom Point
To shift the zoom point
Press
▲/▼/◀/▶
.
1. Press ANGLE while playing a scene
recorded with multiple angles.
Press ANGLE while the angle icon is
displayed.
Some DVD discs may contain scenes, which have been shot simultaneously from a number of different angles. For these discs,
the same scene can be viewed from each of these different angles using the ANGLE button. If the loaded disc supports multiple
angles, you can see indicator on the machine’s display and TV screen.
Changing the Camera Angle
If the scene was recorded from multiple angles, you can easily change the camera angle of the scene you are watching.
◆
To turn off the angle number display
Press ANGLE repeatedly to select the
Original Angle Number.
Selecting the Camera Angle
2. Press ANGLE or while the angle number
is displayed on the TV screen.
Each time you press ANGLE, the camera
angle changes.
1. Press RDS/SUBTITLE during playback.
The subtitle setting is displayed for about 3
seconds.
Selecting a Subtitle Language
You can display subtitles on the TV screen and select a subtitle language from those included on the DVD video.
: [ 1 ENGLISH]
You can select a subtitle language from those included on the
DVD video and DivX file.
◆
To turn subtitles off
During playback, press RDS/SUBTITLE
repeatedly until the [OFF] displayed on the
TV screen.
Notes
●
This function is a disc dependent. There are some DVD discs
that prevent selecting subtitle even though the disc supports
multiple subtitles. In this case, the subtitle should be selected
via the disc menu.
●
When you select a subtitle language which is not included on
the disc, the machine plays the prior language programmed
on the disc.
●
During some scenes, the subtitles may not appear
immediately after you change the subtitle language.
Notes
●
Some DVD videos are set to display subtitles automatically,
and you cannot turn them off even if you set the subtitle
function to off.
●
During some scenes, the subtitles may not appear
immediately after you select “On”.
●
Some DVD videos will allow you to make subtitle selections
and turn subtitles on or off only by using the disc menu.
●
If you want to see subtitle against DivX file, you make sure
either DivX move file must contain proper subtitle or both of
them should be in same disc.
●
Some AVI files made of Windows Media format can’t playback.
: [ 5 OFF ]
Selecting Subtitles Included on the DVD
◆
Viewing a subtitle for DivX
1. Before selecting a DivX move file, place
cursor to folder that have a subtitle.
2. Select a proper subtitle file by cursor
and then press ENTER button.
3. Lastly, select and play a DivX move file
same as the above.
- Supportable format for DivX subtitle :
*.SMI, *.SRT, *.SUB, *.TXT
2. Press RDS/SUBTITLE.
Each time you press SUBTITLE, the subtitle
language changes to the next language
included on the DVD video.
Page 13

Customizing the Function Settings
Press DISPLAY while the disc is stopped or playback.
Each time you press DISPLAY, the on-screen display on the TV screen changes as follows.
25
You can view information about a disc and its operational status on the TV screen.
Checking the Total Number of the Titles/Tracks, Current Title/Chapter/Track, Remaining
and Elapsed Time, etc.
In case of VIDEO CD
In case of MP3 CD
Using information on the On-Screen display
24
1. Press LANGUAGE during playback.
The audio setting is displayed for about 3
seconds.
Selecting a Playback Audio Setting
You can select the preferred audio language and sound
system as a set from those included on the DVD video.
This function lets you temporarily change the audio
language which you selected as the automatic setting in
the setting menu, and choose the sound system if the DVD
video is recorded in more than one sound format.
: [ 1 ENGLISH D 5.1CH
: [ 1 ENGLISH D 5.1CH
: [ 2 ENGLISH PCM 2CH
: [ 3 KOREA D 5.1CH
◆
About recording systems
This machine uses the Dolby Digital and PCM systems and
cannot play DVD videos recorded in any other sound
system.
Notes
●
Some discs allow you to change audio selections only by using
the disc menu. If this is the case, press MENU and choose the
appropriate language from the selections in the disc menu.
●
Some discs may have only one audio language and sound
recording system set and you cannot change this selection.
●
The “Audio Language” setting in the setting menu is for automatic
selection of the audio language among those included on the
DVD video when the DVD is inserted.
Therefore, the selection in this section will not change the setting
of “Audio Language” in the setting menu. (Occasionally, the audio
language and sound system are selected by the disc.)
A Video CD may left and right channels which contain
sounds or languages on each channel. You can switch
these two channels to hear a preferred sound or language.
CHANNEL : [STEREO]
CHANNEL : [MONO L]
CHANNEL : [MONO R]
CHANNEL : [AUTO L]
CHANNEL : [AUTO R]
Selecting Sound Channels
Note
Dolby Digital 5.1 Channel sound may be displayed as “ D
5.1”.
Selecting the Audio Language/Sound Included on the Disc
Additional Operation
TT 01/03 CH 007/032 00:03:52
1/5 ENG D 5.1CH 1/5 ENG OFF
2. Press LANGUAGE.
Each time you press LANGUAGE, the
language and audio recording system set
changes.
In case of VIDEO CD/AUDIO CD
TRK 4/4 PBC 00:03:52
VCD
TRK 2/14 00:01:12
C D
TT 01/03 CH 007/032 00:03:52
In case of DVD video
Selecting a Setting
When you insert a DVD Video, VIDEO CD, the various functions of the machine will be set (reset) according to the setting
menu. You can customize this setting menu according to your preference.
The setting menu asks you to select a setting category from among SYSTEM, LANGUAGE, AUDIO, VIDEO, SPEAKER, and
DIGITAL. Each selected setup menu will provide you with setting details.
1. Press SETUP button while the disc is stopped.
The on-screen display appears.
2. Press
◀/▶
button to select the setup page.
3. Press
▲/▼
to select the setting menu and then
press
▶
button to move selected item.
4. Press
▲/▼
to select the setting item, then
press ENTER button to confirm.
In case of the password setup menu.
Press
▲/▼/◀/▶
and ENTER to set 4 digits
password number.
Repeat 2 ~ 6 steps to select your desired setting.
5. To finish the setup, Press SETUP button or
press ENTER button after select EXIT SETUP .
During playback, press R/L (repeatedly) to
select the sound channel.
DVD videos that have the mark are recorded using this format.
DOLBY DIGITAL Surround
This 5.1-channel digital surround format lets you individually play
five full-range (20Hz-20kHz) channels (left and right front, center,
two surround channels) plus an LFE(Low Frequency Effect)
channel for the low-range effect sound.
It creates a realistic sound like that heard in theaters and concert
halls.
DSP(Digital Signal Processor)
Press DPLII MODE button repeatedly until
the desired DSP mode appears in the
machine's display.
The DSP indicator lights up when one of the
DSP modes is selected. Each press of the
button changes the DSP mode as follows:
Ex) STEREO →MUSIC(PRO LOGIC II)
→
MOVIE(PRO LOGIC II) →STEREO
Note : DOLBY PRO LOGIC II Surround
Dolby Pro Logic II creates five full-bandwidth output
channels from two-channel sources.
This is done using an advanced, high purity matrix
surround decoder that extracts the spatial properties of the
original recording without adding any new sounds or tonal
colorations.
The machine automatically detects the sound system when
DOLBY DIGITAL Surround is played back.
While playing back sources other than DOLBY DIGITAL
Surround sounds, you can select the desired DSP mode.
LANGUAGE SETUP PAGE
LANGUAGE SETUP
OSD LANGUAGE
AUDIO LANG
SUBTITLE LANG
MENU LANG
DIVX[R] VOD
EXIT SETUP
AUDIO SETUP PAGE
AUDIO SETUP
AUDIO OUT
MIC SETUP
PROLOGIC
KEY
ECHO
MIC VOL
EXIT SETUP
VIDEO SETUP PAGE
VIDEO SETUP
BRIGHTNESS
CONTRAST
HUE
SATURATION
SHARPNESS
EXIT SETUP
SPEAKER SETUP PAGE
SPEAKER SETUP
DOWNMIX
SUBWOOFER
CENTER DELAY
REAR DELAY
FRONT
CENTER
REAR
EXIT SETUP
SYSTEM SETUP PAGE
SYSTEM SETUP
TV SYSTEM
SCREEN SAVER
VIDEO
TV TYPE
PASSWORD
RATING
DEFAULT
EXIT SETUP
DIGITAL SETUP PAGE
DIGITAL SETUP
OP MODE
DYNAMIC RANGE
DUAL MONO
EXIT SETUP
Note :
●
The setup menu is available only for a DVD function.
●
Some of the item can be changed while a disc isplaying.
Retry while a disc stop, no disc or tray open mode.
Page 14

27
26
Customizing the Function Settings
This function is to disable the playing of specified DVD that are unsuitable for children. As each disc has slightly different codes,
please refer to the disc instruction. There are 8 levels. If the level is 8, the contents of the disc are suitable for adult.
If the level is 1, the contents of the disc are suitable for child. If you didn't set a new password and level, there is no restriction
playing discs. When you turn on this unit for the first time, setting the new password is recommended
RATING (Parental Lock)
You can set the parental lock level what you want.
Once selected, whenever you play a disc, the selected
parental is compared to the level on the disc, if the level
you selected is greater then the level of the disc, you may
play the loaded disc. If not, you may not play the disc.
To set appropriate parental level, do the following
instruction.
PASSWORD
You can change the password for the parental lock.
To change the current password to the new one, do the
following instruction.
1. Press SETUP button while the disc is
stopped. The setup main page appears on
the TV screen.
2. Press
◀/▶
button to select the
“SYSTEM SETUP” page. The System
setting menu appears on the display.
3. Press
▲/▼
button to select the
“PASSWORD” while the “SYSTEM SET
UP” page is displayed on the TV screen,
then press
▶
button to move.
4. Input your current password on OLD
PASSWORD.
Input the new password what you want to
use from now on NEW PASSWORD.
Re-input the new password on CONFIRM .
If it is the first time changing password,
Input "0000" on OLD PASSWORD.
1. Press
▲/▼
button to select the
“RATING” while the “SYSTEM SET UP”
page is displayed on the TV screen,
then press
▶
button to move.
2. Move to the level what you want using
▲/▼
button. The parental level will be
changed by pressing the ENTER.
Once the initial settings have been completed, the player can always be operated under the same conditions whenever the
power is switched on. These settings are called SETUP data that are easily modified and stored using the SETUP menu. The
SETUP menu includes the information for AUDIO and other system controls.
Additional Operation
TV SYSTEM
NTSC
PAL60
PAL
AUTO
Set up TV type according to type supported by your TV or monitor.
When you select AUTO, the output video type is dependent on the disc loaded.
If the recorded video type is PAL then it outputs PAL.
If NTSC then NTSC.
SCREEN SAVER
ON
OFF
ON : When enabled, if the unit has been idle (e.g. in stop/pause state has
been waiting for user input for about 60 seconds), a screen saver will
bounce around the screen to protect screen.
OFF : setting without screen saver.
VIDEO
INTERLACE-YUV
TV-RGB
P-SCAN YPBPR
S-VIDEO
Select the video output signal formats from the machine.
Because VIDEO OUTPUT is useful only for selected signal format, select the
appropriate item matching with TV input function.
Note : The machine has component jack instead of scart jack in accordance
with region. Though you select RGB, the machine having component
jack is not useful for RGB video signal format.
TV TYPE 4:3 PS
4:3 LB
16:9
Set up TV aspect according to your TV set.
If 16:9 WIDE screen is supported on your TV, select 16:9(WIDE).
If your TV supports only 4:3, you may select both 4:3 PS (Pan & Scan) and 4:3
LB (Letter Box).
When using a wide screen TV (16:9 aspect ratio)
Select 16:9(WIDE) in the TV TYPE value.
Discs may be recorded in more than one screen format. Following the chart
below, make screen aspect adjustments in your wide screen TV according to
the aspect ratio on the disc you are viewing.
When using a standard TV (4:3 aspect ratio)
Select 4:3 LB (Letter Box) or 4:3 PS (Pan & Scan) in the TV TYPE value.
Following the chart below, make screen aspect adjustments according to the
aspect ratio on the disc you are viewing.
PASSWORD
(DVD only)
CHANGE Set/Change the password for the parental lock.
If it is the first time changing password, input “0000” on old PASSWORD.
RATING
(DVD only)
1 G
2
3 PG
4 PG13
5
6 PG-R
7 NC-7
8
This function is to disable the playing of specified DVD that are unsuitable for
children. As each disc has slightly different codes, please refer to the disc
instruction. There are 8 levels. If the level is 8, the contents of the disc are
suitable for adult. If the level is 1, the contents of the disc are suitable for child. If
you didn't set a new password and level, there is no restriction playing discs.
When you turn on this unit for the first time, setting the new password is
recommended.
DEFAULT RESTORE Change the your settings to defaults.
System Setup page
Menu Item Description
Language Setup page
OSD
AUDIO
SUBTITLE
MENU
DIVX[R] VOD
CHINESE
ENGLISH
:
:
LATIN
GERMAN
AUDIO : Select a preferred language for the sound track.
SUBTITLE : Select a preferred language for subtitles.
DISC MENU : Select a preferred language for menus.
Note : Selecting languages in the SET UP can be changed / added/ deleted in
accordance with region.
Use this procedure to display the registration code for leasing or purchasing DivX
VOD format video files using the DivX VOD(Video On Demand) service.
For details, go to the URL://www.divx.com/vod
Menu Item Description
SYSTEM SETUP
TV SYSTEM
SCREEN SAVER
VIDEO
TV TYPE
PASSWORD
RATING
DEFAULT
EXIT SETUP
SYSTEM SETUP
TV SYSTEM
SCREEN SAVER
VIDEO
TV TYPE
PASSWORD
RATING
DEFAULT
EXIT SETUP
SYSTEM SETUP
----
TV SYSTEM
SCREEN SAVER
VIDEO
TV TYPE
PASSWORD
RATING
DEFAULT
EXIT SETUP
SYSTEM SETUP
XXXX
TV SYSTEM
SCREEN SAVER
VIDEO
TV TYPE
PASSWORD
RATING
DEFAULT
EXIT SETUP
SYSTEM SETUP
TV SYSTEM
SCREEN SAVER
VIDEO
TV TYPE
PASSWORD
RATING
DEFAULT
EXIT SETUP
1 G
2
3 PG
4 PG13
5
6 R
7NC-17
8
1 G
2
3 PG
4 PG13
5
6 R
7NC-17
8
SYSTEM SETUP
TV SYSTEM
SCREEN SAVER
VIDEO
TV TYPE
PASSWORD
RATING
DEFAULT
EXIT SETUP
Page 15

29
Remedies
• Check the connection of the power cord.
• Turn on the main power.
• Switch off the main power, then switch it on again.
If not recovered, disconnect the power cord, then
connect it again.
• Contact your nearest service center.
• Deactivate the muting function.
• Check the connections to the machine.
• Contact your nearest service center.
• Check the speaker connections.
• Select the appropriate surround mode.
• No sound is output from the center speaker when
the surround mode is set to either of them.
• Set the TV to the machine’s input.
• Check the connections between the machine and
TV set.
• Make also video connection.
• Select the appropriate input source.
• Switch off the main power, then switch it on again.
If not recovered, disconnect the power cord, then
connect it again.
• Insert a disc. (Check that “DVD,” “VCD,” or
“CD” is lit in the machine’s display.)
• Only discs with the machine’s playable region
code (See region code of the machine’s rear
panel) or , or with no region number can be
played by the machine.
• Check the playable discs.
• Place the disc with the playback side down.
• Place the disc within the proper guide on the disc
tray.
• Eject the disc and clean it.
• Deactivate the parental lock function or change
the parental lock level.
• Connect the machine directly to the TV. Avoid
connecting the machine to the TV through a VCR.
• Eject the disc and clean it.
• Sometime a small amount of picture distortion may
appear. This is not a malfunction.
• Resume normal playback.
• Set the TV to the machine’s input.
Check the following guide for the possible cause of a problem before contacting service. Refer also to the respective instruction
manuals of the connected components and TV.
Causes
• The power cord is disconnected.
• The main power is set to OFF.
• There is external noise in the computer circuits
of the machine.
• The AC fuse is blown.
• The muting function is activated.
• The machine is not properly connected.
• The amplifier protection circuitry has activated.
• The speakers are not properly connected.
• The surround mode is set to “STEREO”
• The volume level of the center speaker
“CENTER” is set to minimum.
• The TV is not set to receive the output signals
from the machine.
• The video cable is not connected securely.
• Only S video connection is made.
• Another input source is selected.
• Power supply fluctuations or other abnormalities
such as static electricity may interrupt correct
operation.
• No disc is inserted.
• The region number of the disc is unmatched to
the machine.
• An unplayable disc is inserted.
• The disc is placed upside down.
• The disc is not placed within the disc tray guide.
• The disc is dirty.
• The parental lock function is activated.
• Copy protection is activated.
• The disc is dirty.
• It is in fast forward or fast reverse playback.
• The machine is in repeat playback mode,
memory playback mode, or random playback
mode, etc.
• The TV is not set to receive the output signals
from the machine.
Symptoms
The machine doesn’t switch on.
No sound is reproduced.
No sound or very little sound is
reproduced from the center speaker.
No picture appears on the TV screen.
The sound of the playback source is
not heard.
The buttons on the remote controller
and machine do not operate.
The machine does not start playback.
Brightness is unstable or noise is
visible on playback picture.
The playback picture is occasionally
distorted.
Playback doesn’t follow the course of
the disc’s programs.
The picture from the machine doesn’t
appear on the TV screen.
Amplifier
DVD (VIDEO CD / Audio CD)
Troubleshooting
Others
Customizing the Function Settings
28
AUDIO OUT
SPDIF/OFF
SPDIF/RAW
SPDIF/PCM
When you use coaxial output, please select SPDIF/RAW or SPDIF/ PCM output.
Note : When you don’t use coaxial output, make sure that you set the audio
output mode to be SPDIF/OFF. If not, the mix channel of 5.1 ch output
con not be used.
Audio Setup page
MIC SETUP AUTO / OFF
To adjust the tone level.KEY b, -4 ~ +4, #
To select status of the AUTO or OFF.
ECHO OFF, 1 ~ 8 To adjust the echo level.
MIC VOL OFF, 1 ~ 8 To adjust the KARAOKE volume.
Video Setup page
BRIGHTNESS
CONTRAST
HUE
SATURATION
SHARPNESS
0 ~ 12
-6 ~ +6
0 ~ 12
0 ~ 8
You can adjust brightness, contrast, hue, saturation or sharpness of the video
output.
Menu Item Description
Menu Item Description
Menu Item Description
Speaker Setup page
DOWNMIX
LT/RT
STEREO
VSS
5.1CH
LT/RT: When you play a disc that has pro logic Dolby effect, you can choose
LT/RT output. The disc information will be decoded and shoe better effect.
STEREO: When use 5.1ch output, the front left and right channel have audio
output signals. When use 2ch output, the audio output in normal output
stereo signals.
VSS: When play discs which has 5.1ch output, the main channel is able to
output virtual surround effects.
OFF : Use 5.1ch output.
OFF
ON
ALL SM SPK
0 MS ~ +
REAR DELAY
0 MS ~ 12, +
SUBWOOFER
FRONT/CENTER
/REAR
CENTER DELAY
DIGITAL Setup page
OP MODE
LINE OUT
RF REMOD
LINE OUT : The input signals are linear compressed and the volume is lower.
You should better choose LINE OUT setting at night.
RF REMOD : The volume is higher and adapt to daytime use.
OFF ~ FULL
STEREO
MONO L
MONO R
MIX MONO
DYNAMIC RANGE
DUAL MONO
When you choose LINE OUT mode, select DYNAMIC RANGE to adjust the
compression ratio and you can get different effects. When you adjust to FULL,
the compression ratio will be set to the lowest level. When adjust is OFF, then
compression ratio will be set to the highest level.
You can set the audio output way of L and R channel.
There are four modes : STEREO, MONO L, MONO R and MIX MONO.
ON : The subwoofer responds according to audio input.
OFF : No sound output of subwoofer.
There is fixed.
You can set delay time of the center or rear speaker for audio output.
Menu Item Description
PROLOGIC
MOVIE MODE
MUSIC MODE
OFF
To select the Dolby PROLOGIC mode.
Page 16

Power Output at 10% THD(RMS)
THD(Total Harmonic Distortion)
Frequency Response(Analogue)
S/N Ratio, IHF-A Weighted
Subwoofer Turnover Frequency
Channel Separation
At 1 KHz, 4 ohms
At 1 KHz, 1 W
1 W
CD PLAY
1 KHz
15 W
0.5 %
100Hz ~ 20 KHz
>55 dB
≤
120 Hz
50 dB
General specifications
Specifications
Remedies
• Switch the frequency receiving mode to mono.
• Lower the treble level.
• Adjust the position, height, and direction of the FM
antenna.
• Connect an outdoor FM antenna. Try to use an
antenna with more elements. (For installation of
the outdoor antenna, consult your nearest dealer
as it requires special skills and experience.)
–
–
–
• Insert new batteries.
• Replace with new batteries.
• Point the remote controller at the remote sensor of
the machine.
• Operate the remote controller within 5 m.
Tuner
Remote Controller
Causes
• FM stereo waves may produce a hiss noise
when a certain level is reached.
• The position or direction of the FM antenna is
incorrect.
• The station is too weak.
• The radio wave is distorted.
• Cars are running or airplanes are flying near the
house.
• There is a tall building or a mountain nearby.
[The waves transmitted from the transmission
center (direct waves) and the waved diffracted
by buildings or mountains (diffraction waves)
interfere with each other causing multi pass
distortion.]
• No batteries are inserted in the remote controller.
• The batteries are worn out.
• The remote controller is not pointed at the
remote sensor of the machine.
• The remote controller is too far from the
machine.
Symptoms
Too much noise is heard or sound is
interrupted occasionally. (“STEREO”
indicator does not light steadily.)
Sound is distorted or sound volume
decreases.
Sound is excessively distorted.
The buttons on the machine operate
but the buttons on the remote
controller do not operate.
Troubleshooting
30 31
Front Amp. Section
Front Amp.
Power Output at 10% THD(RMS)
THD(Total Harmonic Distortion)
S/N Ratio, IHF-A Filter
Frequency Response
At 1 KHz, 4 ohms
At 1 KHz, 1 W
Rated Output
1 W
15 W
0.5 %
>55 dB
135 Hz ~ 18 KHz
Center Amp.
Power Output at 10% THD(RMS)
THD(Total Harmonic Distortion)
S/N Ratio, DOLBY
Frequency Response
At 1 KHz, 4 ohms
At 1 KHz, 1 W
Rated Output
1 W
15 W
0.5 %
>55 dB
135 Hz ~ 18 KHz
Rear Amp.
Power Output at 10% THD(RMS)
Frequency Response
S/N Ratio, IHF-A Weighted
At 100 Hz, 8 ohms
1 W
30 W
20 Hz ~ 150 Hz
>50 dB
Woofer
Composite Video(Video)
Composite 75 ohm
S-Video(Y/C) 75 ohm(DVD only)
Component Out(Y/ Cb/ Cr) :Option
Ref 500KHz
@1MHz
DVD
1.0Vp-p/75 ohm
1.0Vp-p/75 ohm
1Vp-p/ 0.286Vp-p
1Vp-p/0.7Vp-p/0.7Vp-p
45dB
60dB
±
0.5 dB
±
0.5 dB
±
0.5 dB
±
0.5 dB
5Hz~5.7MHz
40dB
Video Section
Input Sen./Impedance
Output Level/Impedance
Frequency Response
Crosstalk
S/N Ratio
Tuning Range
Scanning Frequency Interval
Usable Sensitivity, 75 ohms
S/N Ratio @1mV IHF-A FILTER
USA Version
Australia / Europe Version
USA Version
Australia / Europe Version
S/N=30dB, USA Version
S/N=26dB, Australia / Europe Version
Mono USA Version
Mono Australia / Europe Version
Stereo USA Version
Stereo Australia / Europe Version
87.5~108.0MHz
87.5~108.0MHz
100KHz
50KHz
2uV(17.2dBf)
3uV(20.8dBf)
55dB
55dB
50dB
50dB
FM Tuner Section
(FM ANT Impedance : 75 ohms)
Power output at 10%THD(RMS)
Power supply
Operating Voltage AC 90V - 250 V, 50/60Hz
(Free Voltage)
Power consumption Operating 85Watt
Dimensions (W x D x H) / Weight 430 x 305 x 52 mm / ??? kg
Model
HC-6120
HC-6220
Front / Center / Rear
15 W, 4 ohm
15 W, 4 ohm
Woofer
30 W, 8 ohm
30 W, 8 ohm
Others
 Loading...