

Page 1

100
GB
INSTRUCTION
MANUAL
GB14H3T1/GB20H4T1
GB14H3T2/GB20H4T2
CUSTOMER SERVICES
HELPLINE
01189 252 577
Page 2
Please keep the televideo machine’s guarantee card receipt safe
for warranty purposes.
WORTH
knowing
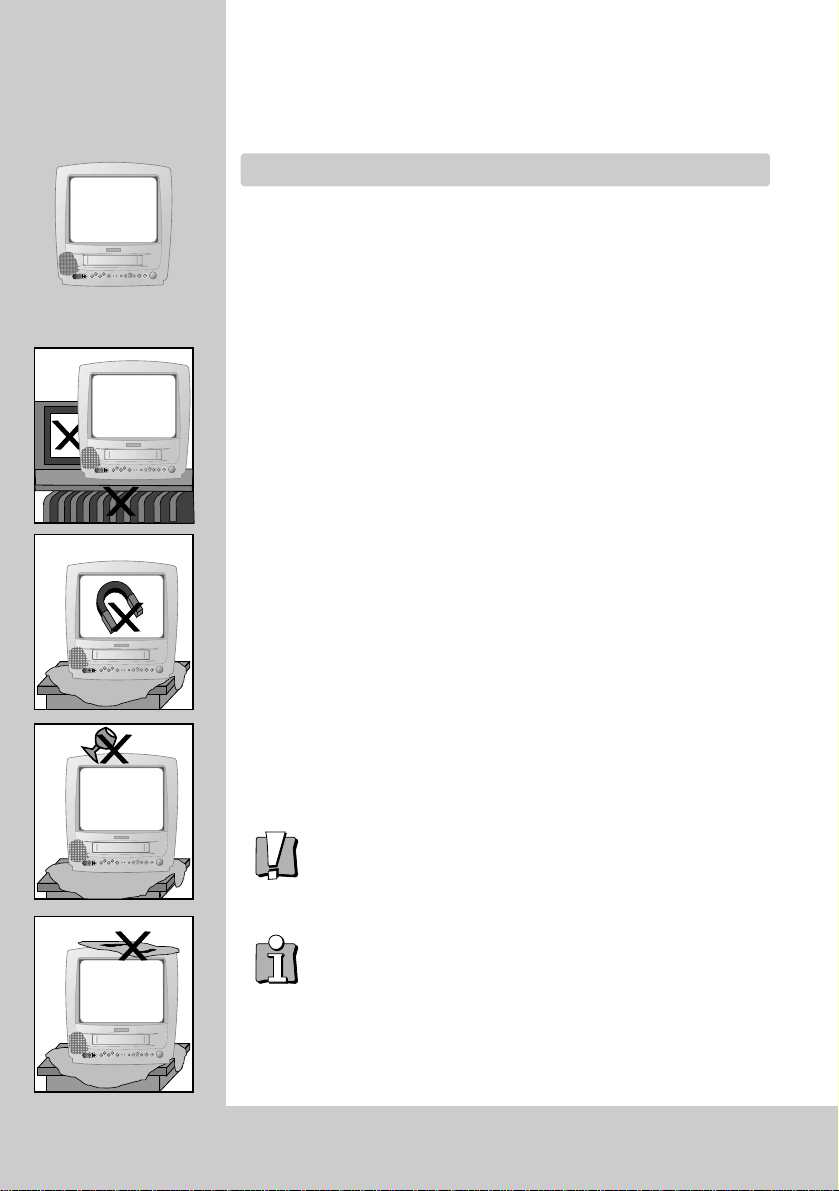
Precautions
◆
Read carefully through this manual to familiarise yourself with this high quality
televideo.
◆
Make sure the rating of your household electricity supply matches that shown
on the back of the televideo.
◆
Refer to this chapter and the “Initial installation” chapter to help you install
and adjust your televideo.
Do not…
◆
Expose the televideo to high levels of humidity and heat, to avoid the risk of
fire and electric shock.
◆
Open the televideo. Have a qualified technician carry out repairs.
◆
Connect the televideo to the power supply if you have just moved it from a
cold to warm environment. This can result in condensation inside the recorder
and cause serious damage to the machine and cassettes. Wait around two
hours to allow it to reach room temperature.
Make sure…
◆
The televideo is placed on a steady, flat surface.
◆
You place the televideo where there is a minimum distance(Of 10Cm) around
the apparatus for good ventilation.
◆
You clean the televideo only with a soft,lint-free cloth : do not use aggressive
or alcohol-based cleaning agents.(Unplug the set from the mains)
◆
You disconnect the power supply if the televideo appears to be working
incorrectly, is making an unusual sound, has a strange smell, has smoke
emitting from it or liquids have got inside it.
Have a qualified technician check the televideo.
◆
You disconnect the power supply and ANTENNA if you will not be using the
televideo for a long period or during a thunderstorm.
◆
The apparatus shall not be exposed to drips or splashes and that no objects
filled with liquids, such as vases, shall be placed on the apparatus.
For your own safety!
◆
There are no components in this televideo you can service or repair
yourself.
◆
Do not open the case of the televideo. Only allow qualified
personnel to repair or service your set.
◆
This televideo is designed for continuous operation. Switching it off
does not disconnect it from the mains (stand-by)
To disconnect it from the mains, you have to unplug it.
◆
Recording any copyright protected material may infringe a
copyright.
Note : If the televideo is moved or placed in a different direction, the main power
switch must be switched off for at least 15 minutes in order to take out colour
purity errors on the screen.
Page 3
Page 4

1
WORTH
Knowing
Contentss
Controls
The remote control unit
2
The front panel’s button, On screen display
3
Initial installation
Connecting up the televideo, Fitting the remote control’s batteries
4
Setting time and date, Language selection
5
Auto setup, Manual tuning, Fine tuning, Edit
6~7
Playing cassettes
Playing back
8
Variable picture search, Auto repeat, VCR system
9
Recording Cassettes
Simple recording - REC, One touch recording - OTR
When recording time overlaps
10
Timer programme, Auto tracking, PDC(VPS)
11
Timer recording using Videoplus+
12
More functions
Index +/-, Resetting the counter to zero, Mute , Child lock
13
Cassettes, Picture adjustment, Recall
14
Wake up, Aspect, Counter setting, Sleep feature
15
Teletext(option)
16
Connections
Copying
17
Scart socket
18
Before requesting service
19
◆
On the following pages, the pictures show the buttons you press on the remote control to
perform the function, and what you should see on the On Screen Display or machine
display (if present).
Before doing anything with the televideo, please
read the chapter “initial installation”.
Page 5
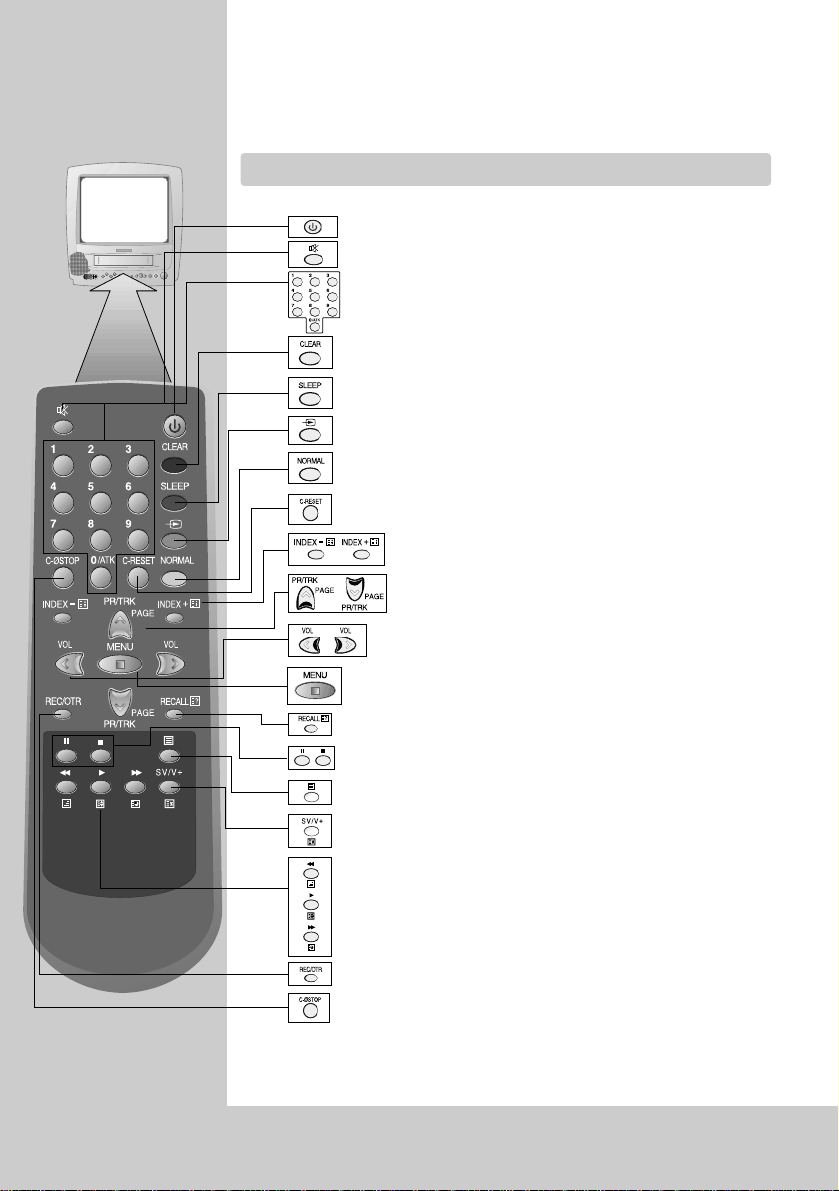
◆
The remote control is the principle means of control, but the main playback and
record functions are also available on the front of televideo.
2
CONTROLS
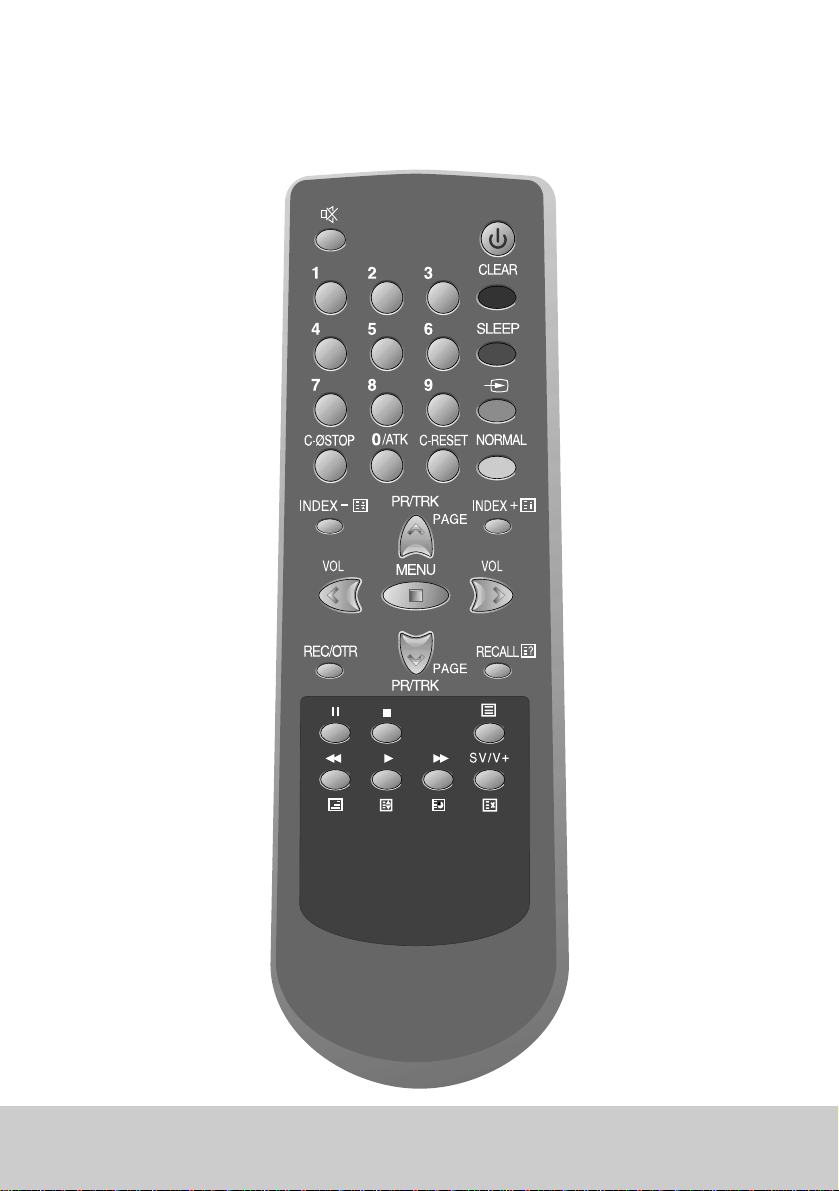
The remote control unit
To switch televideo on and off (stand by)
Sound on/off
Digit key
0/ATK : Auto tracking.
To delete input data or programme.
Button for the sleep timer.(press repeatedly)
To select external input source.(EG:-SATELLITE,
DVD,CAMCORDER)Also for selecting the source for recording.
NORMAL1/NORMAL2/FAVOURITE picture control.
To reset the counter data.
VHS Index Search System +/- . TXT Page Hold/Index Page.
PR up/down. Tracking up/down while PB mode.TXT Page
Up/Down
Volume up/down.
Select main menu
To select on screen displays.TXT Reveal
Playback stop, Pause while recording, Still while playback.
Teletext on/off
The controls for Timer Recording using the VIDEOPLUS+/SHOWVIEW
codes via ON-SCREEN DISPLAY. TXT Cancel
Rewinding/fast forwarding a cassette from stop, or picture
search backwards/forwards from playback.TXT Mix, Size, Sub-page
The record or OTR button (One touch recording means : each
time you press the button recording is extended by 30 minutes)
To wind the cassette to counter position 0:00:00
Máx. 7 m
30˚ | 30˚
Page 6
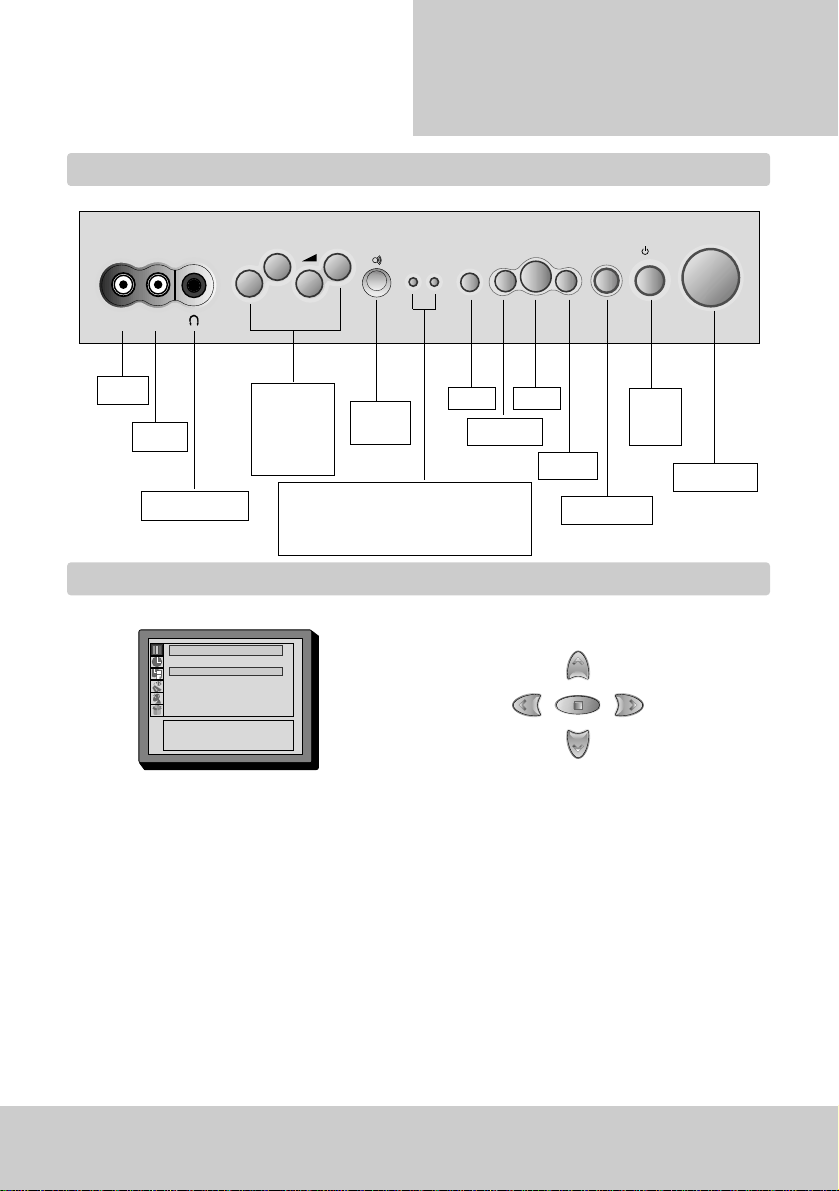
3
Controls
The front panel’s button
On screen display
The televideo’s menu system gives you
easy-to-understand access to the less
used functions such as tuning to stations,
clock setting and more
The menus show you which button to
press for the next step.
NOTE : The televideo closes the menus automatically after approx.1 minute, if no entry is made.
VW
: Select
CB
: Adjust
MENU : Previous
VIDEO AUDIO
PR
REC REW FF
STAND
-BY
REC/
T.REC
PLAY
STOP/
EJECT
/
I
ON/OFF
Remote
sensor
VIDEO
AUDIO
HEAD PHONE
Power
on/off
Indicator
ST-BY : Stand by led(Red)
REC/T.REC : Record/Timer.Record(Red)
PLAY
REW/REV
STOP/EJECT
FF/CUE
VOL/ PR.
UP/DOWN
CURSOR :
CB VW
AC ON/OFF
Picture
Contrast 58
Brightness 32
Colour 32
Sharpness 48
REC
Page 7
Please place your televideo
◆
Horizontally on a flat, steady base so that air can circulate around it for ventilation.
◆
Away from humidity and heat, magnetic fields, such as those from loudspeakers
etc. and with no heavy objects placed on top.
4
INITIAL
installation
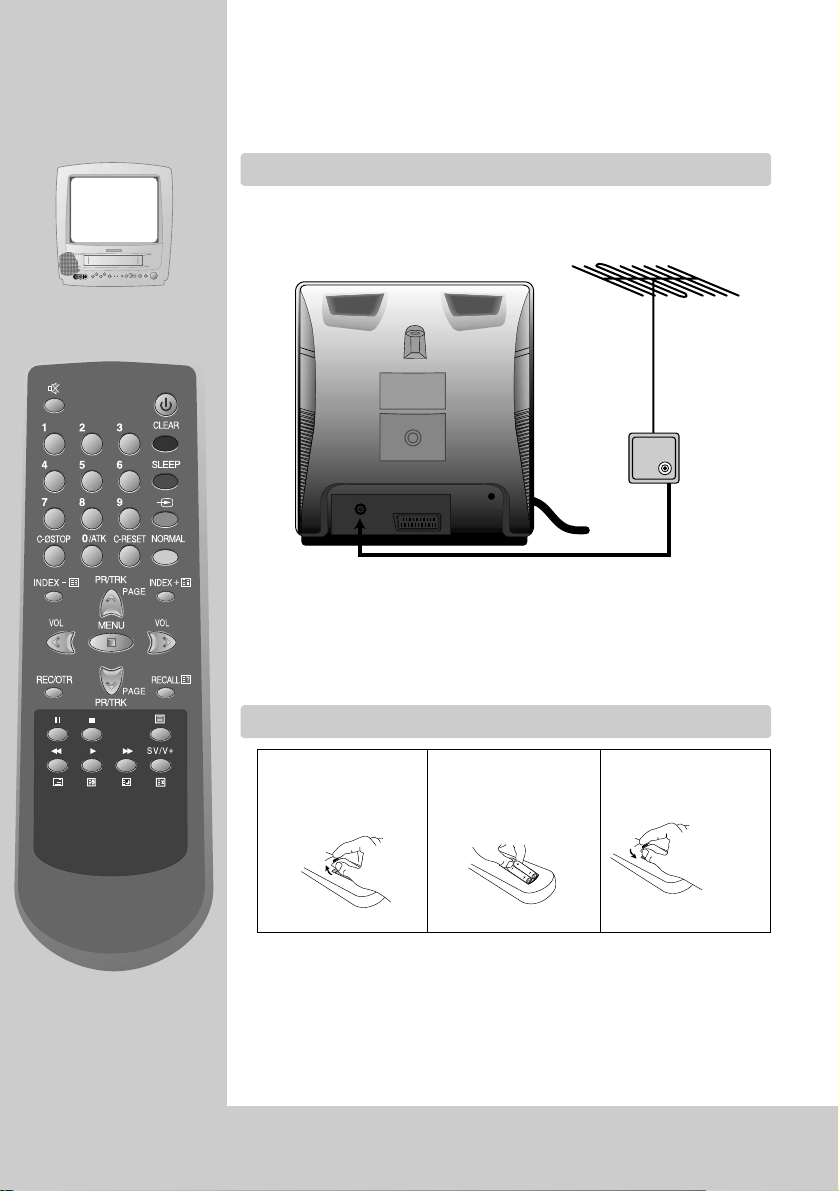
Connecting up the televideo
Fitting the remote control’s batteries
Switch off all components when connecting or disconnecting cables.
◆
Plug the aerial cable into “ANT” socket of the televideo.
◆
Make sure the rating of the household mains supply matches the rating
shown on the back of the televideo.
Now plug in the mains lead.
◆
Fit the batteries, size 1.5V AAA as shown above
◆
Protect your environment by returning used batteries to your dealer. Since
batteries contain toxic substances they require special disposal methods.
◆
Make sure the batteries are always of the same type and age, and remove
them from the remote control if you are not using it for a long period.
1
Remove the battery
cover on the reverse
side of the remote control.
2
Install two batteries(“AAA” size)into the
remote control.
3
Replace the battery
cover
Page 8

5
Initial
INSTALLATION
Setting time and date
Language selection
Call up the televideo menu.
And move the cursor down to the “Clock” line.
Place the cursor to “Clock:” with the VW buttons.
Access by pressing the CB buttons.
Set the numbers for the exact time and the correct
date.
Date : dd/mm/yy
Time : hour/min.
You can choose to display the on screen menus in
English, Deutsch, Italiano, Español, Nederlands,
Français, Svenska...
To change the on screen language, select the language
menu at the Main menu using VWbuttons.
Access by pressing the CBbuttons.
Place the cursor to “Required Language” with the PR.
VW buttons.
◆
Mistake or change?
Move cursor to the position you wish to correct by using CB VW.
◆
If you do not set “Date” and “Time”menu, you can not set Wake up timer and Timer
programme.
◆
N.B. : The time and date will be lost if the set is ever switched off by the main ON-OFF switch.
◆
AUTO CLOCK SETTING (OPTION)
If you want to set automatically the clock data, you must change the auto column from “No” to “Yes”, then
ensure the Pr. No. column has a channel with uncorrupted teletext If selected channel has a poor signal,
clock setting data may be corrupted. if your aerial reception is generally poor then please set the clock data
using the manual method.
Recommended channels are as follows:(with TELETEXT channel)
◆
Press the main power switch on the front panel
to turn on the set and then press
/I
button.
Language, Country selection menus will be
displayed.
VW
: Select CLEAR: Delete
CB
: Access
MENU : Previous
Clock
Clock set
Date Web
03/01/2001
Time --:-Auto No
Pr 01
Country Channel name Country Channel name Country Channel name
U.K BBC1, BBC2 Spain TVE, TV3 Ireland RTE1, NET2
Switzerland SF1 Germany ARD, ZDF Belgium BRTN
France TF1, FR2 Sweden SVT1 Italy RAI1, RAI2
Norway NRK1 Nederland NED1, NED2 Denmark DR1
VW
: Select
CB
: Access
MENU : Previous
Language
English
Deutsch
Italiano
Español
Nederlands
Français
Svenska
W
Page 9

◆
If you want to use AV(Audio Video input) from satellite, DVD or CAMCORDER
instead of RF(ANT input). Press the
button .
6
INITIAL
installation
Auto setup(Automatic tuning system)
Manual tuning
Fine tunig
Select the Install menu from the menu.
Place the cursor to “Auto setup” with the VW buttons.
Please wait!
Manual tuning C21 > P01
Fine tuning 06
Press the
CB
button.
Country set menu will be displayed. Please select country, then access.
The cursor will move from left to right on the UHF Band.
Please wait until the Edit menu appears.
VW
: Select
CB
: Access
MENU : Previous
Install
Auto setup
Manual tuning
Fine tuning
Edit
VW
: Select
CB
: Access
MENU : Previous
Country Set
UK
Ireland
Others
Please wait!
Auto setup C21 > Pr01
Locate the cursor to Manual tuning with VW buttons
at the Install menu and then press CB buttons.
During manual tuning “Please wait !” will be displayed
on the screen.
Keep tuning until the channel received matches the
programme number.
If you are unable to get a good picture or sound because
of poor reception, it is possible to adjust the fine tuning,
to try to improve it Select the Fine tuning at the Install
menu press CB buttons to get the best picture and
sound.
Page 10

7
Initial
INSTALLATION
Edit
Moving the channels
Position the cursor to Pr. No. to move and press the SLEEP button.
Selected Pr. No. colour will be changed.
Position the cursor to Pr. No. to change and press the SLEEP button.
Skipping the channels
You can select skip “Yes” or “No” with theVWbuttons.
A programme marked with with Skip “Yes” is skipped when using PR
buttons, however, whenever a skipped.
Pr. No. is selected by Digits 0~9 the number on the screen will be
displayed in red along with the picture.
Delete programme position data
Position the cursor to Pr. No. to delete and press the CLEAR button.
While this is being carried out the “Please wait !” appears and the
deleted Pr.No. will transfer to programme No. 99 and is changed to
skip “Yes”.
Enter a station Name
Press the CB button.
Station name tables appear above the screen.
Using the VW button, select the desired letter or number or blank .
If you want to store press button.
The Edit menu shows you the programme position assignment.
You can change this programme position assignment according to your personal preferences.
ABCDEFGHIJKLMNOPQRST
UVWXYZ+- /0123456789
VW
: Select CLEAR: Delete
CB
: Access SLEEP: Move
MENU : Previous : Store
Edit
Pr Name Ch Skip
01
-----
C52 Yes
02
-----
C52 Yes
03
-----
C52 Yes
04
-----
C52 Yes
05
-----
C52 Yes
06
-----
C52 Yes
W
Page 11

◆
Your televideo is switched on by the main power switch on the front panel and by
the button.
8
PLAYING
cassettes
Playing back
Load the cassette by pushing it.
smoothly and squarely into the cassette
bay, with its windows pointing up.
Start playback by using the B button
on the(Remote controller or front panel
button).
Stop playback by using the L button
on the(Remote controller or front panel
button).
Eject the cassette (front panel button
only).
To fast forward use the F button on
either the front panel or remote controller
from the cassette stop position.
Rewind by using the G button on
either the front panel or the remote
controller.
Still while playback by using the
K
button.
We cannot guarantee the quality of
picture in this mode.
◆
A smaller picture may be seen while switching from the Search mode to the
PB mode. This is not a sign of malfunction.
◆
When you load a protected cassette (e.g.pre-recorded film) playback starts
automatically.
◆
During search, you don’t hear the sound.
◆
You can reduce horizontal interference stripes resulting from inaccurate
tracking (when playing tapes of poor quality or recorded on other machines) by
using the PR/TRK buttons during playback or try auto tracking using 0/ATK button.
B
PLAY SP
00:12:34
L
STOP
00:12:34
EJECT
00:12:34
Pr 01 ARTE
Clock 12:34
F
FF
00:12:34
Pr 01 ARTE
Clock 12:34
G
REW
00:12:34
Pr 01 ARTE
Clock 12:34
K
STILL
00:12:34
Pr 01 ARTE
Clock 12:34
Page 12

9
Playing
CASSETTES
Variable picture search
Auto repeat
VCR system
◆
Your televideo is switched on by the main power
switch on the front panel and by the button.
Start from playback you can control search speed in 2
steps either forwards (F) or backwards (G). Press
repeatedly.
Play ( B) button switches back to normal playback.
Choose “Miscellaneous” from the “main menu”
Move the cursor down to the “Auto repeat” line.
Change to “Yes” by cursorCB.
Auto repeat works with or without safety tab.
Playback > End of cassette > Rewind >
Playback
F
CUE SP
00:12:34
G
REV SP
00:12:34
B
PLAY SP
00:12:34
Note : This televideo has the function of NTSC playback (SP tape only) Don’t use NTSC SLP tape. Although you
can see the picture and sound, we can not guarantee picture and sound quality.
This is the mode to set up the color of picture.
Choose “Miscellaneous” from the “main menu”
After selecting the “VCR system”, you should select the
wanted mode of picture of
“Auto“ “4.43NTSC” “PAL”, by pushing the
CBbuttons.
It will set up “Auto” if TAPE is inserted.
VW
: Select
CB
: Change
MENU : Previous
Miscellaneous
Wake up
Lock
Aspect Auto
Auto repeat No
Tape speed SP
Counter setting
VCR system Auto
VW
: Select
CB
: Change
MENU : Previous
Miscellaneous
Wake up
Lock
Aspect Auto
Auto repeat No
Tape speed SP
Counter setting
VCR system Auto
Page 13

●
OTR preparation
Before setting OTR, Make sure that.....
The cassette tape has the safety tab.
The tape is long enough to record the programme.
◆
During recording you can switch the screen off pressing button.
Meanwhile the recording continues.
◆
Yor can release the OTR mode by pressing “stop” during REC mode.
◆
If the display shows “AV” instead of “PR” press button.
◆
If you program events without setting the time, it will automatically return to
“Clock” mode. If you program events that overlap, at least one of your events
will not record correctly.
When setting the programmable timer, be careful not to overlap the
preset times. If you happen to overlap the preset programs, the End
time has priority and the overlapped programmes cannot be recorded.
◆
Your televideo is switched on by the main power switch on the front panel and by
the button.
10
RECORDING
cassettes
Simple recording - REC
One touch recording - OTR
When recording time overlaps
Choose the station whose
programme you want to record.
Start your recording.
If you wish to interrupt recording
briefly -then continue.
Stop your recording.
Choose the station you want and
press “REC/OTR” repeatedly until
desired period is displayed.
L
STOP
00:12:34
Pr 01 ARTE
Clock 12:34
PAUSE
00:12:34
Pr 01 ARTE
Clock 12:34
L
STOP
00:12:34
Pr 01 ARTE
Clock 12:34
M
REC SP
00:12:34
M
OTR SP
00:12:34
00:30
Pr 01 ARTE
Clock 12:34
REC Pr01
Pr 01 ARTE
Clock 12:34
REC Pr01
Page 14

11
Recording
CASSETTES
Timer programme
Auto tracking
◆
For timer recording, clock, date, and stations
must be set correctly.
◆
Load a cassette with its safety tab in place and
with sufficient free space for the recording.
◆
To enter station numbers using the cursors VW.
◆
You can switch your televideo off during recording using the button.(Don’t use the
main power button (ON/OFF) on the front panel of the set.)
The televideo will switch on and off automatically to record the timer event.
◆
If you have made a mistake, move to the position you want to change using the
VW
CB
button and change the setting.
◆
The recorder will eject cassettes which have the safety tab removed.
◆
You cannot access “Install menu” when “Timer porgramme” is setting. That means, if
you want to access “Install menu”, you should delete all data in “Timer programme”.
◆
Select the programming to erase or change If you want to erase this programming
press button CLEAR.
◆
If you wish to record from a satellite receiver select under “Pr” the satellite programme
location or AV (depending on the connection with the aerial cable or a SCART cable.)
NB : Leave the satellite tuner switched on and to the programme you want to record.
Choose”Timer programme”.
Select a free timer memory.
Set ......
-
Pr.No
-
The date (date, daily = osd is displayed ”day”, sun~ sat)
- Start and end time.
- The recording speed.
If you press the 0/ATK key in Playback mode, the televideo will operate the auto tracking function again.
VW
: Change CLEAR: Delete
CB
: Select : Store
MENU : Previous
Timer programme
No. Pr. Date Start End PDC SP/LP
1 01 05 14:18 17:15 Off SP
2 --- --- --:-- --:-- Off SP
3 --- --- --:-- --:--- Off SP
4 --- --- --:-- --:--- Off SP
5 --- --- --:-- --:--- Off SP
6 --- --- --:-- --:--- Off SP
PDC(VPS)
If a programme starts late or runs over, programme delivery control PDC(VPS) makes sure it gets recorded.
In rare cases, poor reception or a fault at the TV station may stop PDC(VPS) from working properly: if this
happens, set PDC(VPS) to ‘NO’ when you programme the timer.
Allow a few extra minutes recording when PDC(VPS) is off. Your television guide might show a PDC(VPS)
start time different to the normal programme start time; be sure to enter PDC(VPS) start time.
Page 15

12
◆
If you have not set the clock, when you press the VideoPlus+
button to set timer recording, the set will automatically change to the “CLOCK”
menu.
◆
If you don’t have the VideoPlus+ numbers see page 11 for the normal timer.
◆
If you have made a mistake, move back to the relevant position with the C
button and change the setting.
◆
During recording you can switch the screen off by pressing button.
◆
The screen will indicate if the station is not programmed (page 5~7).
◆
In the case of error messages, correct the input or check the date and time on
your televideo (also check your TV guide).
◆
For timer recordings, clock, date, and stations must be set correctly (page 5).
◆
Load a cassette with its safety tab in place (see page 10) and with sufficient free
space for the recording.
RECORDING
cassettes
Timer recording using VideoPlus+
Call the VideoPlus+ menu
using SV/V+ button.
From your TV magazine, type
in the number next to the
programme you want to
record. (Digit key)
Confirm ( button)
0 - 9 : Digit Entry
: Store
CLEAR : Delete
SV/V+ : Exit
Video Plus+
---------
01/01/2001 13:57
If you press the button,
Timer Programme menu will
be displayed.
If you want to change data,
Press
VW
buttons.
Confirm ( button)
VW
: Change CLEAR: Delete
CB
: Select : Store
MENU : Previous
Timer programme
No Pr Date Start End PDC SP/LP
1 01 05 14:18 17:15 Off SP
2 -- -- --:-- --:-- Off SP
3 -- -- --:-- --:--- Off SP
4 -- -- --:-- --:--- Off SP
5 -- -- --:-- --:--- Off SP
6 -- -- --:-- --:--- Off SP
Page 16

More
FUNCTIONS
◆
Your televideo automatically sets an electronic
marker (index) at the beginning of each
recording and timer recordings.
It is these markers which are detected by the
index function.
INDEX +/-
Resetting the counter to zero
Child lock
Mute
Press the button depending on the number of recordings (index
marks) that you wish to wind forward.
e.g. 3x for 3 recordings ahead.
Press the button depending on the number of recordings (index
marks) that you wish to wind backwards.
e.g. 3x for 3 recordings back.
Press C-RESET button to reset the counter to 0 : 00 : 00
After you have finished recording pressing the C-ØSTOP button will
cause the televideo to wind to the position 0 : 00 : 00 and stop.
Pressing the mute button once turns the sound off.
The sound returns if button is pressed once more
Choose “Miscellaneous” from the “main menu” and select “Lock”.
You can prevent use of the Televideo with the remote controller.
The set is child locked after you input any secret number.
Subsequently the TV picture will be overlaid with the child lock (OSD)
On Screen Display and the sound will be muted. And VCR playback
will be inopperable.
To unlock (Child lock mode) re-enter your secret four figure number.
If you select “Local lock” to yes, all the buttons on the front panel
become inoperative.
F
IFF
00:12:34
INDEX 02
Pr 01 ARTE
Clock 12:34
IGREW
00:12:34
INDEX -02
Pr 01 ARTE
Clock 12:34
M
REC
00:00:00
Pr 01 ARTE
Clock 12:34
G
REW
00:12:34
Go to zero
Pr 01 ARTE
Clock 12:34
0 - 9 : Digit Entry
: Store
CLEAR : Delete
MENU : Previous
Child lock
Enter number
to lock
----
13
VW
: Select
CB
: Change
MENU : Previous
Lock
Child lock
Local lock Yes
Page 17

14
MORE
functions
Cassettes
Use only good quality tape cassettes with the VHS logo.
◆
Keep cassettes away from excessive moisture or dust, magnetic and
electrical fields eg. (loudspeakers and computers).
◆
Always wind the tape to the beginning when you have finished. Store
with the full spool at the botton and with the cassette in its cover.
You can protect your precious recordings from being wiped by breaking
out the safety tab on the side of the cassette (some cassettes have a
slide).
Should you wish to re-use the tape after removing the tab, cover the
hole with adhesive tape.
Recall
When this button is pressed, the following contents are displayed.
Pr No., Present time (Clock), VCR status, VCR counter.
These items remain on screen for about 5 seconds.
During VCR mode (e.g. FF/REW, CUE/REV, INDEX+/-,etc) On Screen Display does not disappear.
Type
Timer Recording/Playbacktime
SP Mode(Standard Play) LP Mode(Long Play)
E-30 30 min. 1 hour
E-60 1 hour 2 hours
E-90 1 hour 30 min. 3 hours
E-120 2 hours 4 hours
E-180 3 hours 6 hours
E-240 4 hours 8 hours
E-300 5 hours 10 hours
Recording/Playback time of Video tape.
Picture adjustment
Choose “Picture” menu and after selecting the appropriate title.
Press CBbutton to adjust to desired level.
◆
When you press the NORMAL button repeatedly you can
call up three picture settings for NORMAL1(hard picture),
NORMAL2(soft picture),FAVOURITE(adjustable picture).
◆
Note that if you set the brightness and contrast values too
low, the On Screen Display becomes so dark.
You can not see it.
Contrast 48
Page 18

15
More
FUNCTIONS
◆
You can program your televideo so that it
switches on and/or off (with the selected
station) at a time you want.
Wake up
Sleep feature
Choose “Miscellaneous” from the “main menu”.
Press CBVW buttons to adjust to desired wake up time
and Pr. No.
◆
Adjusting the “Wake up” once will cause the televideo
to switch on every day at the same time (till you clear or
change the setting)
You can set your televideo to automatically switch off
after a period of 20 to 120minutes.
By pressing the sleep button repeatedly.
To cancel select ”0”
◆
In eject mode if the Playback, FF/REW, STOP/EJECT, INDEX+/- key is pressed symbol On Screen Display
is displayed.
Sleep 60
VW
: Select
CB
: Access
MENU : Previous
Wake up
Wake up No
Time 06:00
Pr 01
Aspect
This is the mode to set up the size of picture.
Choose “Miscellaneous” from the “main menu”
After selecting the “Aspect”, you should select the wanted size of picture of
“Auto” “4:3” “16:9” by pushing the CBbuttons.
VW
: Select
CB
: Change
MENU : Previous
Miscellaneous
Wake up
Lock
Aspect Auto
Auto repeat No
Tape speed SP
Counter setting
VCR system Auto
Counter setting
Choose “Miscellaneous” from the “main menu”.
Access “Counter setting”.
Length
You can set length of tape (e.g. E-180, E-240,E-300)
Time
You can display counter of tape selecting either “used” or “remain”.
If you playback or record in “used” mode, OSD display looks like
“00:00:10”.
This counter shows how much tape has been used.
And if you playback or record in “remain” mode, the OSD display looks
like “R00:30”. This counter shows how much tape remains.
VW
: Select
CB
: Change
MENU : Previous
Counter setting
Length E-180
Time used
Page 19

16
MORE
functions
Teletext (Option)
SWITCHING TELETEXT ON/OFF
Press the TELETEXT button ( ). The index page viewed last will appear. Press the TELETEXT button to return to the TV mode.
COLOUR BUTTONS IN TOP/FLOF TELETEXT
A red, green,yellow and cyan field is shown at the bottom of the screen.
If TOP or FLOF teletext (FASTEXT) is transmitted by the station, by pressing the corresponding colour button on the remote controller, you can
easily select the desired page.
SELECTING PAGES
The NUMBER buttons 0...9 are used to enter a page number.
The selected page number appears at the top of the screen and the page appears after a short time.
The UP/DOWN buttons increase or decrease the current page number by 1.
INDEX PAGE
You can switch directly to the progamme preview(with TOP text) or the overview page of the station you are currently viewing by pressing
the INDEX ( ) button.
PAGE HOLD
Several sub pages can be combined under a page number and are scrolled at an interval determined by the TV station.
The presence of sub pages is indicated by, for example, 3/6 beneath the time, which means that you are looking at the 3
rd
page of a total of
6 pages.
If you want to look at a subpage for a longer period of time, press the HOLD ( ) button.The contents of the subpage shown are kept on the
screen and no longer updated or switched to other subpages. Pressing the HOLD button again, the current subpage appears.
CALLING UP SUBPAGE DIRECTLY
Pressing the SUBPAGE ( ) button “Page No./...”
appears at the bottom of the screen. Enter the subpage number that you want to call up with the NUMBER buttons 0...9, for example, the 2
nd
page. sequence 0002. The desired subpage is sought and displayed. To exit, press SUBPAGE ( ) button again.
WATCHING TELEVISION DURING TELETEXT MODE
Some pages are continually updated, for example, stock market reports, sports announcements, and the latest news. If you want to watch
TV and stay informed at the same time, press CANCEL ( ) button.
The regular programme is still visible when the teletext symbol ( ) appears at the top of the screen. Pressing the CANCEL button again,
the teletext page will appear with the updated information.
REVEAL ANSWER
This function can be used on certain pages to reveal the solution of riddles. Press the REVEAL button ( ) to reveal a hidden answer and
press again to hide it.
TV/TELETEXT
Watch the TV programme and the Teletext pages simultaneously. The next press returns to the normal display.
CONTRAST AND BRIGHTNESS CONTROL IN TELETEXT MODE
Press the MENU button in teletext mode, the contrast and brightness control menu will be displayed in the bottom of the screen. You can
adjust contrast and brightness using the corresponding colour button on the remote controller.
DOUBLING CHARACTER SIZE
Repeatedly pressing the SIZE button ( ) doubles the character size in the following order:
Upper half of the page Lower half of the page Return to normal size.
Page 20

17
Copying
To copy to your televideo from another video machine, connect the two machines with a scart cable between
their AV sockets and select as programme “AV” (using the button).
(The AV socket on this machines is the scart socket at the rear).
Set the other video machine to playback and your Televideo machine to record.
Picture and sound of the selected station is always available on the EURO AV socket, e.g. to record with
another VCR.
On the other video, select its AV input and set the machine to record.
Switch your televideo to playback at the position you want copying to start.
◆
Switch off all components when connecting or
disconnecting cables.
Connections and
ASSEMBLING
Page 21

18
Connections and
ASSEMBLING
Scart socket
This is used to connect : a VCR a CAMCODER and a video game console or satellite TV receiver or DVD.
In most cases, the set changes automatically to AV mode, when the VCR connected is in playback mode.
If not, press the AV button on the remote controller.
The AV will be displayed on the screen with the current programme number.
In AV mode, you can change the TV programme number with the VWbuttons or the Number buttons 0~9.
You must turn the external equipment off to return to the TV mode or press the button.
◆
In SCART Slow SW mode, when you insert the tape without tab, it will playback.
But, in SCART Fast SW mode, when you insert the tape without tab, it will not playback and only load.
◆
If you insert the SCART plug in playback status it will change to scart mode and VCR will revert to stop
mode.
PIN Signal Designation Matching Values
1 Audio Out (linked with 3) 0.5Vrms, lmp < 1kΩ(RF 60% MOD)
2 Audio In (linked with 6) 0.5Vrms, lmp > 10kΩ
3 Audio Out (linked with 1) 0.5Vrms, lmp < 1kΩ(RF 60% MOD)
4 Audio earth
5 BIue earth
6 Audio In (linked with 2) 0.5Vrms, lmp > 10kΩ
7 Blue In 0.7Vpp +3dB, lmp 75Ω
8 Slow (Function)Switching TV : 0-2V, PERI : 9.5-12V, lmp > 10kΩ
9 Green earth
10 NC
11 Green In 0.7Vpp +3dB, lmp 75Ω
12 NC
13 Red earch
14 NC
15 Red In 0.7Vpp +3dB, lmp 75Ω
16 Rapid Blanking Switching Logic 0:0-0.4V, Logic 1:1-3V, lmp 75Ω
17 Video earth
18 Rapid Blanking Earth
19 Video Out 1Vpp +3dB, lmp 75Ω
20 Video In 1Vpp +3dB, lmp 75Ω
21 Common earth
Page 22

19
Before requesting service
– The mains lead is not connected to the wall socket.
– Condensation may have formed when moving the televideo
from a cold to a warm room.
Wait until the video reaches room temperature.
– Various safety devices have been triggered.
> Switch off the main power supply and switch it on once
again, after waiting a few minutes.
– Is a cassette loaded?
– Has the record tab been removed from the tape?
– Has tracking been adjusted? > Adjust the tracking
– Are the video heads dirty? > Request professional service
– Are the video heads worn out?
> Replace them.
– Is the tape old?
– Is a non-recorded part of the tape being played back?
> When a non-recorded part of the tape is played back,
The tape counter does not advance.
– Is there a cassette already loaded?
– The cassette is already fully wound back or to the end.
– Is the clock set correctly?
– If no play or record function is used for about 5minutes when
left in Stop mode, the televideo switches its motor off to
conserve the mechanism.
Mains supply
the televideo’s power indicator does not
light your televideo doesn’t work
Recording
doesn’t start, the cassette starts playback
or is ejected.
Play back
no colour in picture reproduction, on tape
playback
Snowy picture on tape playback
The digits of the tape counter do not
change, during tape playback.
A cassette won’t load.
The cassette won’t FF/REW,PB,REC
Timer is recording incorrectly
A loud noise when left in Stop mode.
◆
We strive to continuously improve our products - we therefore reserve the right to make technical changes
without notice. The information contained in this booklet is therefore subject to change and is not legally
binding.
 Loading...