

Page 1
CODE:U06EM-01
הלעפה תוארוה
רב ינימ ררקמל
םגדמ
FR-062
הז ררקמ םתשכרש לע הדות.
הלא תוארוה ןויעב וארק שומישה ינפל.
Page 2
A
םידבכנ תוחוקל,
ןארידת תרבח לש הז רב ינימ ררקמ םתשכרש לע םכל הדומ אפמא
SPECTR
.
ולכותש תנמ לע וז תרבוחבש הלעפהה תוארוה תא ןויעב וארק אנא
ררקמהמ האנהה ברימ תא קיפהל , תוארוה לע הדפקה ךות
תוחיטבה.
ררקמב הלקת הלגתתש וא הלעפהב תויעבב ולקתתש הדימב ,אנא
טוריפה יפ לע הכימתו תוריש דקומל ונפתרבוחה בגב אצמנה .
הכרבב,
אפמא ןארידת תרבח
2
Page 3
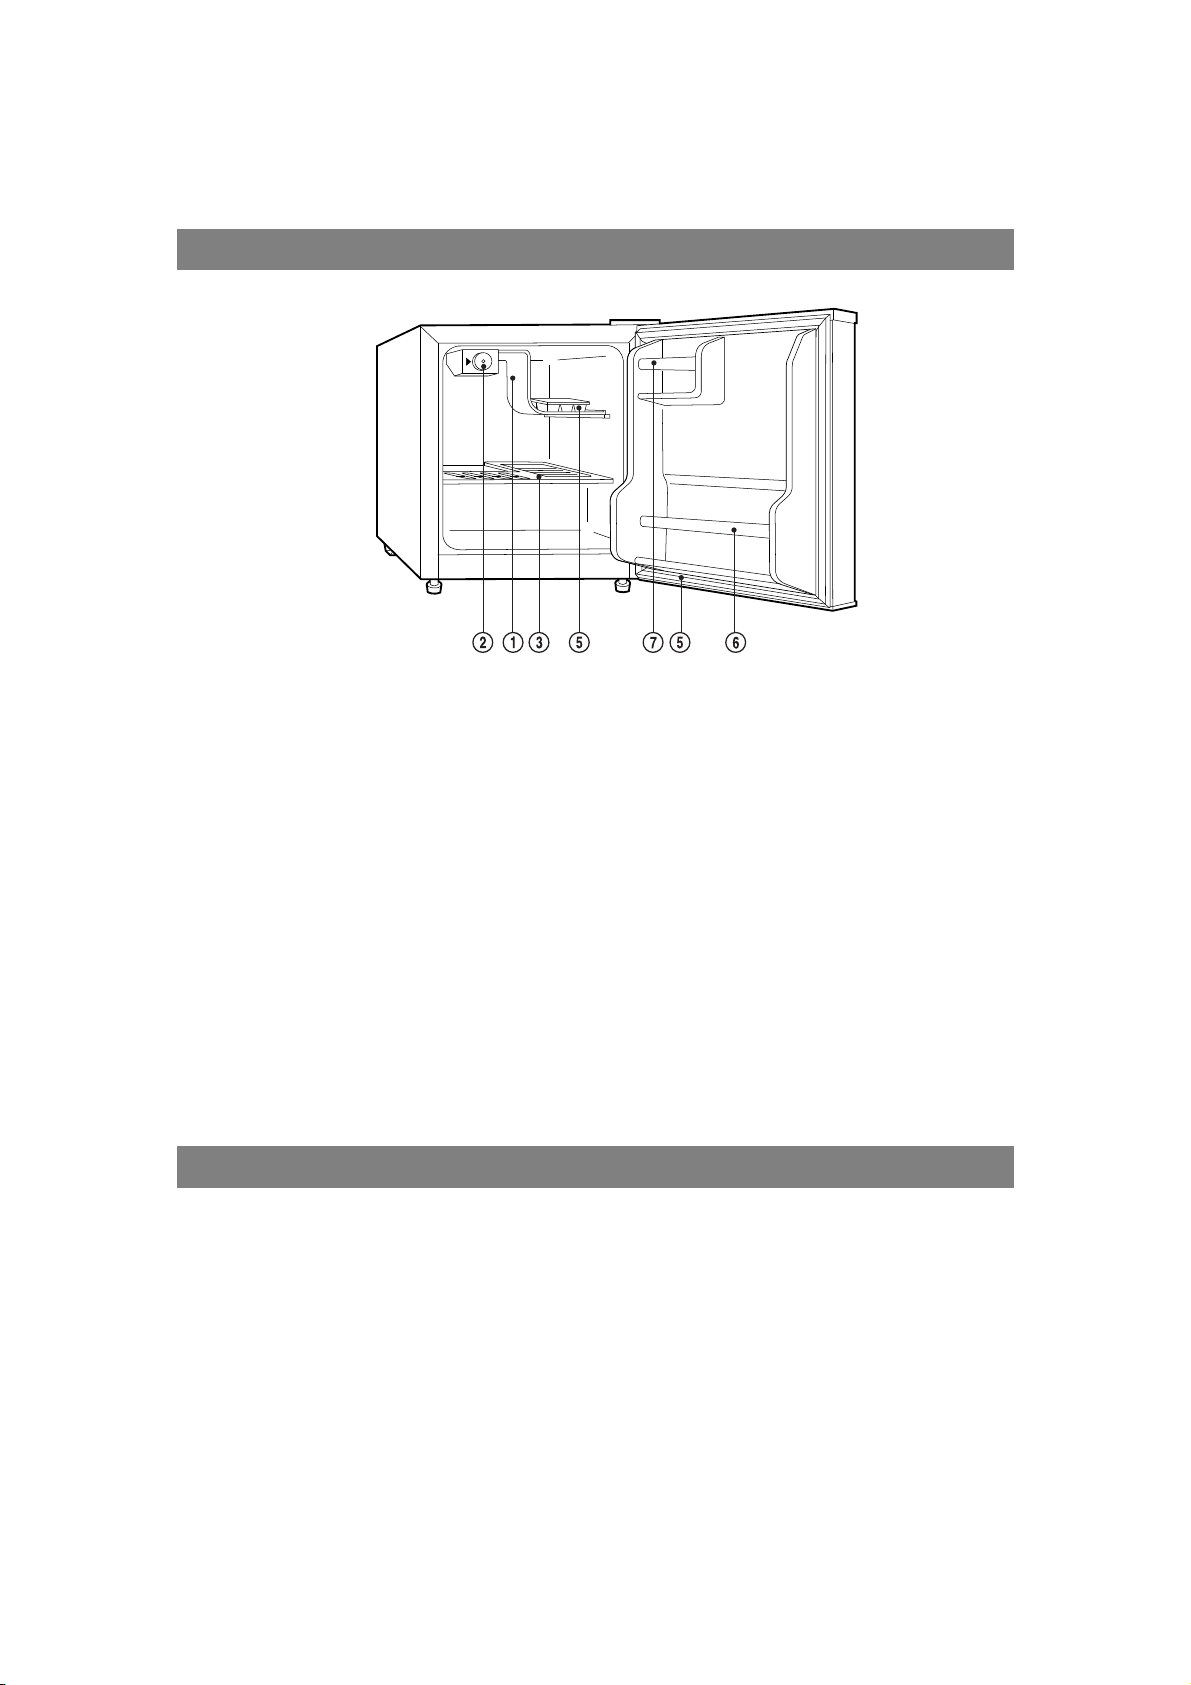
ררקמה רואית
1. דייאמ
"בל "ררקמה. גפוס וז ךרדבו רוריקה לזונ תא הדאמ הביבסהמ םוחה תא.
רוהט םוינימולאמ יושע.
2. הרקב תבית
רוקה תגרד תאו עונמה תלועפ תא תתסוומ ררקמה ךותב.
3. ףדמ
אלמ בחורב ,תורשפא םע הצוחה הכישמ.
4. םייטנגמ תלד ימטא
ררקמה תא םימטוא , ךאהחיתפ םירשפאמ תאז םע דחי תלדה לש הלק.
5. חרק תויבוק שגמ
המ חרקה תויבוק תא איצוהל לקמגש.
6. םיקובקב ףדמ
םיקובקב רובע ,תונצנצו תואספוק.
7. ףדמ
האמח רובע ,הנירגרמ ,םיציב וא תונצנצ.
ררקמה תלעפה
הנושארה םעפב ררקמה תלעפה
1. תא בטיה וקנ ררקמה .חבמ ררקמה תא ובגנ תילטמב ררקמה םינפ תאו השביו הכר תילטמב ץו
החל.
2. תלד תא וריאשה למשחל ותוא ורבחו החותפ ררקמה.
3. ל טטסומרתה רותפכ תא ובבוס הגרד"7" , לועפל ררקמל וחינהו תלדה תא ורגיס15-20תוקד .
3
Page 4

רוקה תגרד תרקב
רד תא תסוול ןתינ רותפכ בוביס ידי לע ררקמה ךותב רוקה תג
טטסומרתה .רתוי קזח רוק םיגציימ רתוי םיהובג םירפסמ , דועב
רתוי שלח רוק םיגציימ רתוי םיכומנ םירפסמש.
הרעה :למשחהמ ררקמה תא םתקתינ םא , וניתמה3-5שדחמ ורוביח ינפל תוקד .תרחא , ןכתי
לעפי אל ררקמהש.
ררקמה תרשפה
ה תא ורישפה רבטצמש חרקה יבוע רשאכ ררקמל עיגמ דייאמה לע-5מ "מ.
OFF) "יובכ .( ןוזמ ררקמהמ ואיצוהקהלכתמו אופ . תא וחינה
בצמל טטסומרתה רותפכ תא ובבוס"
ומוקמב זוקינה שגמ .תועש רפסמ ללכ ךרדב ךשמנ הרשפהה ךילהת . רהמ ררקמה תא רישפהל ידכ
רתוי ,ריאשהו ןוזמה לכ תא ונממ ואיצוההחותפ ררקמה תלד תא ו . ץפח לכב וא ןיכסב שמתשהל ןיא
רחא דח ,דייאמהמ חרק ריסהל ידכ .הרשפהה רחאל , תא ובבוסו זוקינה שגממ םימה תא ונקור
שדחמ ררקמה תא ררקל ליחתהל ידכ שקובמה בצמל טטסומרתה רותפכ.
ררקמה יוקינ
יוקינ ירמוח: וא םיטרוש וא םיקזח יוקינ ירמוחב ושמתשת לא םיסיממ םירמוח םיליכמה יוקינ ירמוחב.
תוינוציח תונפד:ימב הבטרה רחאל תילטמב ובגנ -ןובס .ושבייו ופטישםימתכ תרסהל .
OFF”) יובכ .( ושמתשת לא
םידח םילכב.
רוריקה את:ב םירחא םיקרפתמ םיקלחו םיפדמה תא וצחר םימח ןובס ימ ,ושבייו ופטיש . תא וצחר
הייפאל הדוס תסימת םע רוריקה את)3 תופכ לםימ רטיל (םימח ןובס ימב וא .ושבייו ופטיש.
תלדה לש םייטנגמ םימטא:םימח ןובס ימב וצחר .
רייאמ:הרשפהב ךרוצ שי רשאכ , בצמל טטסומרתה רותפכ תא ובבוס“
םויס:תשקובמה רוקה תגרדל טטסומרתה רותפכ תא ובבוסו םמוקמל םיקלחה לכ תא וריזחה .
4
Page 5

רקמה תנקתהר
חונ םוקמב ררקמה תא וביצה ,םיינוציק רוק וא םוח רוקממ קחרה .
וילא םיכומסה תוריקהו ררקמה ןיב קיפסמ חוורמ וריאשה , ידכ
ללח לש אלמ לוצינל האולמב ררקמה תלד תא חותפל ולכותש
ררקמה .החמוג ךותב הנקתהל דעוימ וניא ררקמה.
חבהרשיו הקזח הפצר םע םוקמב ור.
לש חוורמ וריאשה12ס "םיכומס תוריקו ררקמה ןיב תוחפל מ.
םיאבה םירקמב תושעל המ
1. תכשוממ הפוקת ררקמב שמתשהל םינווכתמ םכניא רשאכ:
למשחהמ ררקמה תא וקתנ.
ךשמל החותפ תלדה תא וריאשה2-3ררקמה תא שבייל ידכ םימי .
2. ררקמה תרבעה ינפל:
הפילשו קוריפל םינתינה םיימינפה םיקלחה תא וקזח)דרפנב םתוא וזרא וא.(
יקפוא בצמב ררקמה תא וביכשת לא ,סחדמל קזנ םורגל הלולע וז הלועפש םושמ.
לעופ וניא ררקמה רשאכ:
למשחל רבוחמ ררקמה םאה?
םאההנשילמשח תקספה ?
םאה שילמשחה חולב ףורש ךיתנ?
ליגרהמ םח ררקמה רשאכ:
אהםיכורא םינמזלו תובורק םיתעל ררקמה תלד תא םתחתפ ם?
ריווא לש בוט רורחס ענמנו ידמ סומע ררקמה םאה?
הליחת ותוא ררקל ילבמ םע ןוזמ ררקמב םתנסחא םאה?
ריקהו ררקמה תונפד ןיב קיפסמ חוורמ םייק םאה?
םיגירח םישער םיעמשנ רשאכ:
ןזואמ ררקמה םאה?
וחאמ םירז םימצע םימייק םאהררקמה יר?
תוחלצ םאהתוטטור ררקמה יפדמ לע ?ןכ םא ,תוחלצה תא שדחמ ורדס.
הרעה:עה יתמדקומ העדוה אלל תונתשהל םייושע םהו ןרציה ינותנל םיפופכ םיינכטה םיטרפמהו בוצ.
5
Page 6

HOW TO INSTALL
Install refrigerator in a convenient location away from
extreme heat and cold. Allow sufficient clearance between
the refrigerator and sidewall so the door will open for a fully
usable interior. Refrigerator is not designed for recessed
installation.
Select a place with strong level floor.
Allow 5 inches of space between the refrigerator’s side and
the wall.
WHAT TO DO…
1. When out of operating for a long time:
Remove the power supply cord.
Dry your refrigerator opening the door for 2-3 days.
2. When you get ready to move:
Securely fasten removable interior parts (or move and package them separately).
Do not lay your refrigerator horizontally, or compressor may be damaged.
When you need service: Before you call for service, make sure you need it, check a few
things noted below for yourself first.
If refrigerator is not operating:
Is the power supply cord unplugged?
Is a home fuse blown or the circuit breaker off?
If refrigerator is warmer than usual:
Has the door been opened frequently or for a long period?
Is refrigerator overcrowded-preventing good air circulation?
Has a hot dish been stored without cooling?
Is there sufficient clearance between refrigerator’s side and the wall?
If there are unusual sounds:
Is refrigerator placed on a level surface?
Are foreign objects behind the refrigerator?
Are dishes on refrigerator shelves vibrating? If so, rearrange the dishes.
3
Page 7

HOW TO OPERATE
Starting your new Refrigerator
1. Clean the refrigerator thoroughly. Wipe the outside with a soft dry cloth, the inside with a
damp cloth.
2. Keep the door open and insert the power supply cord into the socket.
3. Turn the thermostat dial to “7”. Close the door and let the refrigerator operate for 15-20
minutes.
Temperature Control
You can control the inside temperature by turning the
thermostat dial. Higher numbers mean greater cooling
power, smaller numbers mean less cooling power.
NOTE: Wait 3 to 5 minutes before restarting if you unplug the machine. Unit may fail to
operate properly if restarted too quickly.
How to defrost
Defrost the refrigerator when the frost accumulated on the evaporator is about 5mm (1/5 inch)
thick.
Set the thermostat dial to “OFF”. Remove frozen or perishable foods. Keep drip tray in place.
Defrosting usually takes a few hours. To defrost quickly remove all foods from the refrigerator
and leave door open. Never use a knife or other metal instrument to remove ice/frost from the
evaporator. After defrosting empty water from drip tray, return the thermostat dial to the
desired position to start refrigerating again.
HOW TO CLEAN
Cleaners: The cleaners notes below are available. Never use harsh, abrasive cleaners,
heavy-duty cleaners, or solvents on any surface.
Exterior: Wipe with damp, sudsy cloth, rinse and dry. For stubborn stains and for periodic
waxing, use silicon wax.
Evaporator: When refrigerator needs defrosting turn thermostat dial to “OFF”. Do not use
sharp instruments.
Refrigeration Section: Wash shelves and other removable parts in warm sudsy water, rinse
and dry. Wash interior with baking soda solution (3 table spoons to one quart of water) or
warm sudsy water, rinse and dry.
Magnetic Door Seals: Wash with warm sudsy water.
The Finishing Touch: Replace all parts and return thermostat dial to desired setting.
2
Page 8

NAMES OF THE PARTS
1. EVAPORATOR: The heart of the refrigerator.
It evaporates the refrigerant fluid and thereby absorbs heat from the
2. CONTROL BOX: Regulates the operation of the motor and controls the inside
3. PLASTIC SHELF: Has full width and can slide out.
4. MAGNETIC DOOR SEALS: Keeps the refrigerator virtually airtight all along the edge, but
5. ICE CUBE TRAY: Ice cubes are easy to remove from the tray.
6. BOTTLE RACK: For bottles, cans or jars.
7. USABLE RACK: For butter, jars or eggs.
surrounding. Made of pure aluminum.
temperature of the refrigerator.
is nevertheless easy to open.
1
Page 9

CODE:U06EM-01
Instruction Manual
Refrigerator
Model NO.:
FR-062
Thank you for selecting this refrigerator.
Before using this refrigerator, please read this manual carefully.
 Loading...