

Page 1
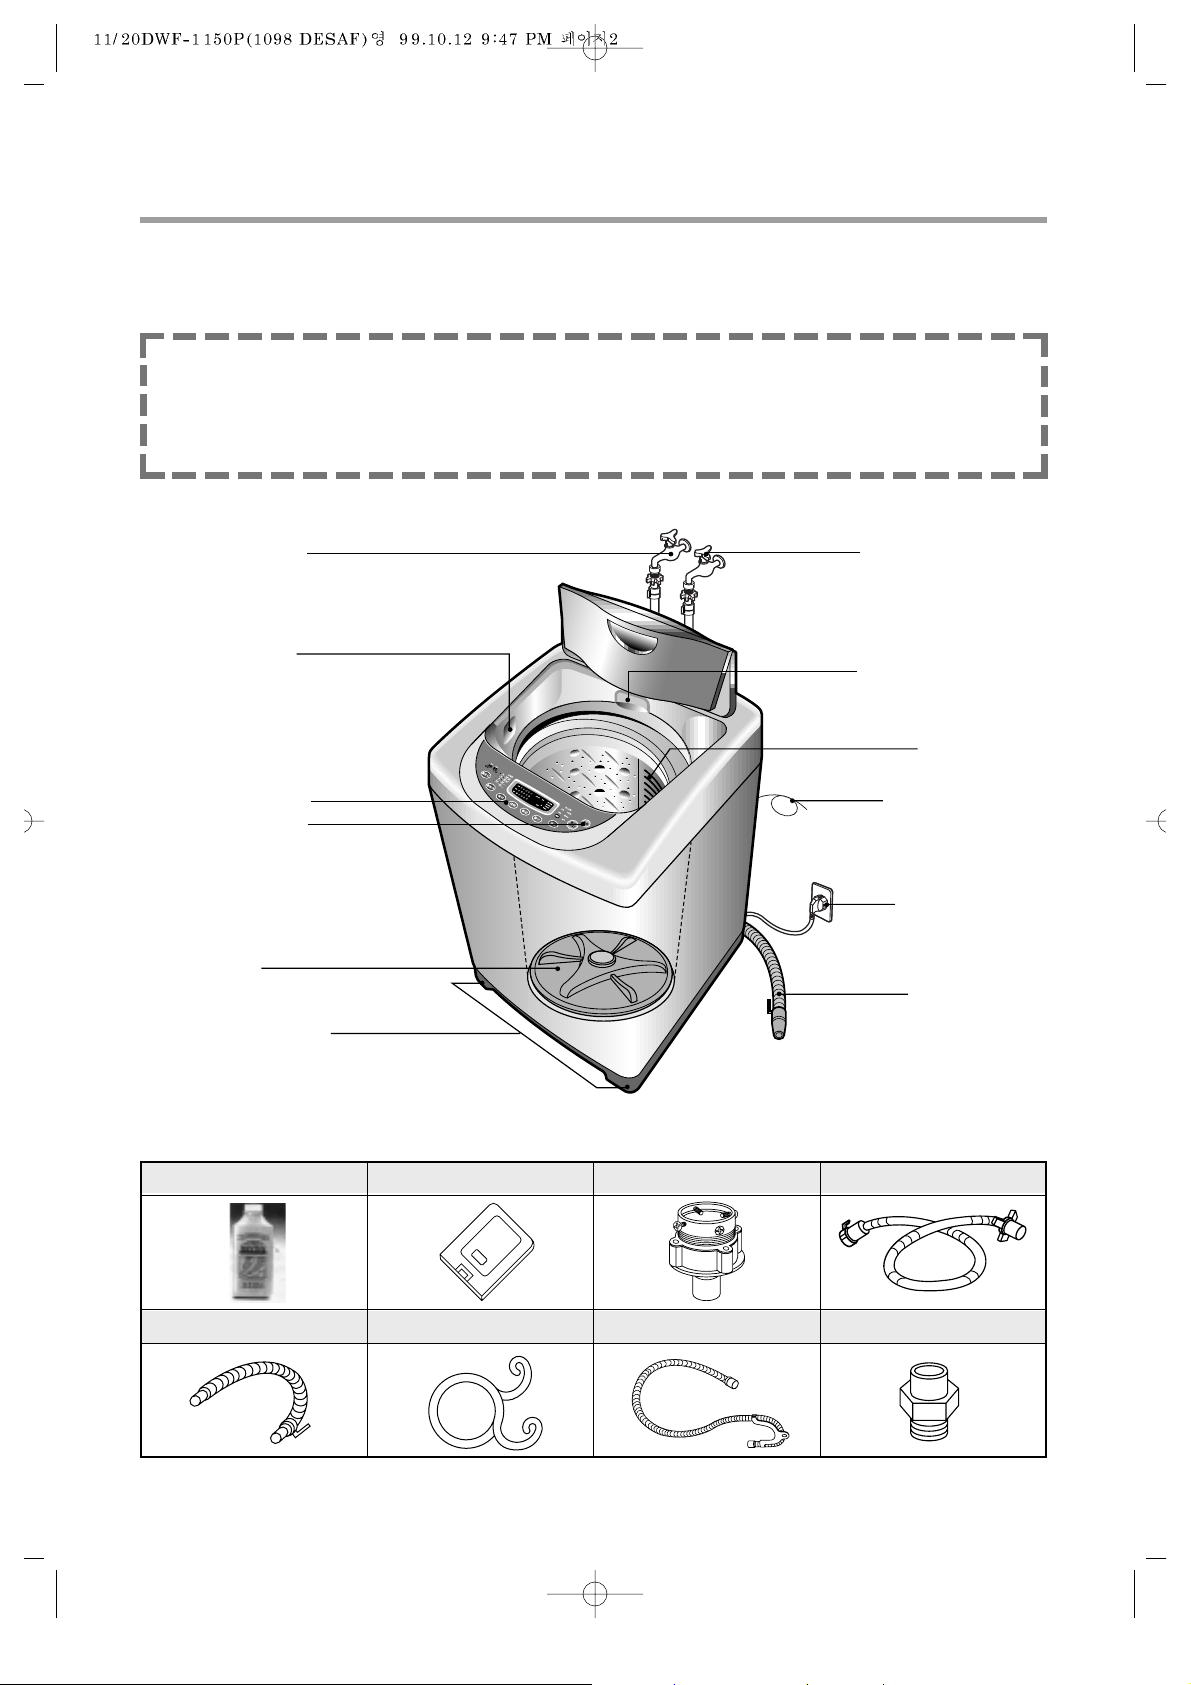
• GROUND WIRE
In case of 3-wire
power cord ground
wire will not be
provided
• LINT FILTER
• PULSATOR
• POWER CORD
• HOSE DRAIN
• COLD WATER TAP
After using the washer,
close the water tap
⁄°°
=
=
Airpower
dkdkfdkdldldldkffm
fn
dlssdds
• ADJUSTABLE LEGS
• POWER SWITCH
• CONTROL PANEL
• BLEACH INLET
• HOT WATER TAP
After using the washer, close the water tap.
In case of the single valve model,
there is no hot water valve.
• DETERGENT CASE
2
PART AND FEATURES
ACCESSORIES
DRYTEN (OPTION) COVER UNDER (OPTION) WATER TAP ADAPTER INLET HOSE
HOSE DRAIN (OPTION) HOSE DRAIN CLAMP GUIDE DRAIN HOSE(OPTION) CONNECTOR INLET(OPTION)
UP
The parts and features of your washer are illustrated on this page.
Become familiar with all parts and features before using your washer.
NOTE
• The drawing in this book may vary from, your washer model.
They are designed to show the differ ent featur es of all models covered by this book,
Your model may not include all features.
Page 2
Save these instructions
Your safety is important to us.
To reduce the risk of fire, electrical shock, or injury when using your washer follow basic
precautions including the following.
Understanding your responsibilities
• Do not wash that are soiled with vegetable or cooking oil.
These items may contain some oil after laundering.
Due to the remaining oil, the fabric may smoke or catch fire by itself.
• Do not use chlorine bleach and ammonia or acid (Such as vinegar or rust remover) in the
same wash. Hazardous fumes can form.
• Unplug power supply cord before attempting to service your washer.
• Do not machine wash fiberglass materials.
Small particles can stick to fabrics washed in following loads and cause skin irritation.
• Do not use hot water of coach temperature is over 50 ¡£C (120¡£F).
It can cause a deformation of plastic parts.
• Do not spray water on the control panel and back cover of the washer.
It can cause a fire or an electric shock.
• Flammable fluids (dry-cleaning solvents,
kerosene, gasoline, etc.) should not be
used or stored in or near your washer.
Do not add flammable fluids to you wash
water.
• These substances give off vapors that can
create a fire hazar d or explosion.
• Do not allow children to operate, play with,
or crawl on or inside your washer.
Supervise children closely when your
washer is used near them.
• After starting a cycle, do not reach into the
spin basket unless all motion stops.
• Do not tamper with the controls.
Please ...
• Have only a qualified person install, repair,
or replace parts on washer.
• Maintain washer properly.
• Protect washer from the weather and
keep it where the temperature will not fall
below freezing.
• Do not install the washer at a place of
extremely high humidity. It could cause an
Electric shock or a short circuit
• Connect washer to the correct outlet,
electrical supply, water supply, and drain
supply , and drain
• Ground washer properly.
WASHER SAFETY
3
Read all instructions before using your washer
Page 3
Location of washer
Check location where washer will be installed. Make sure you have everything necessary for
correct installation.
Proper installation is your responsibility.
•Do not place or store your washer below 0°C (32°F) to avoid any damage from freezing.
•Install the washer on the horizontal solid floor.
Drain system
Never forget to install drain hose before operating your washer.
The packing box is opened, there are a drain hose, and a hose guide in the washer.
INSTALLATION INSTRUCTIONS
4
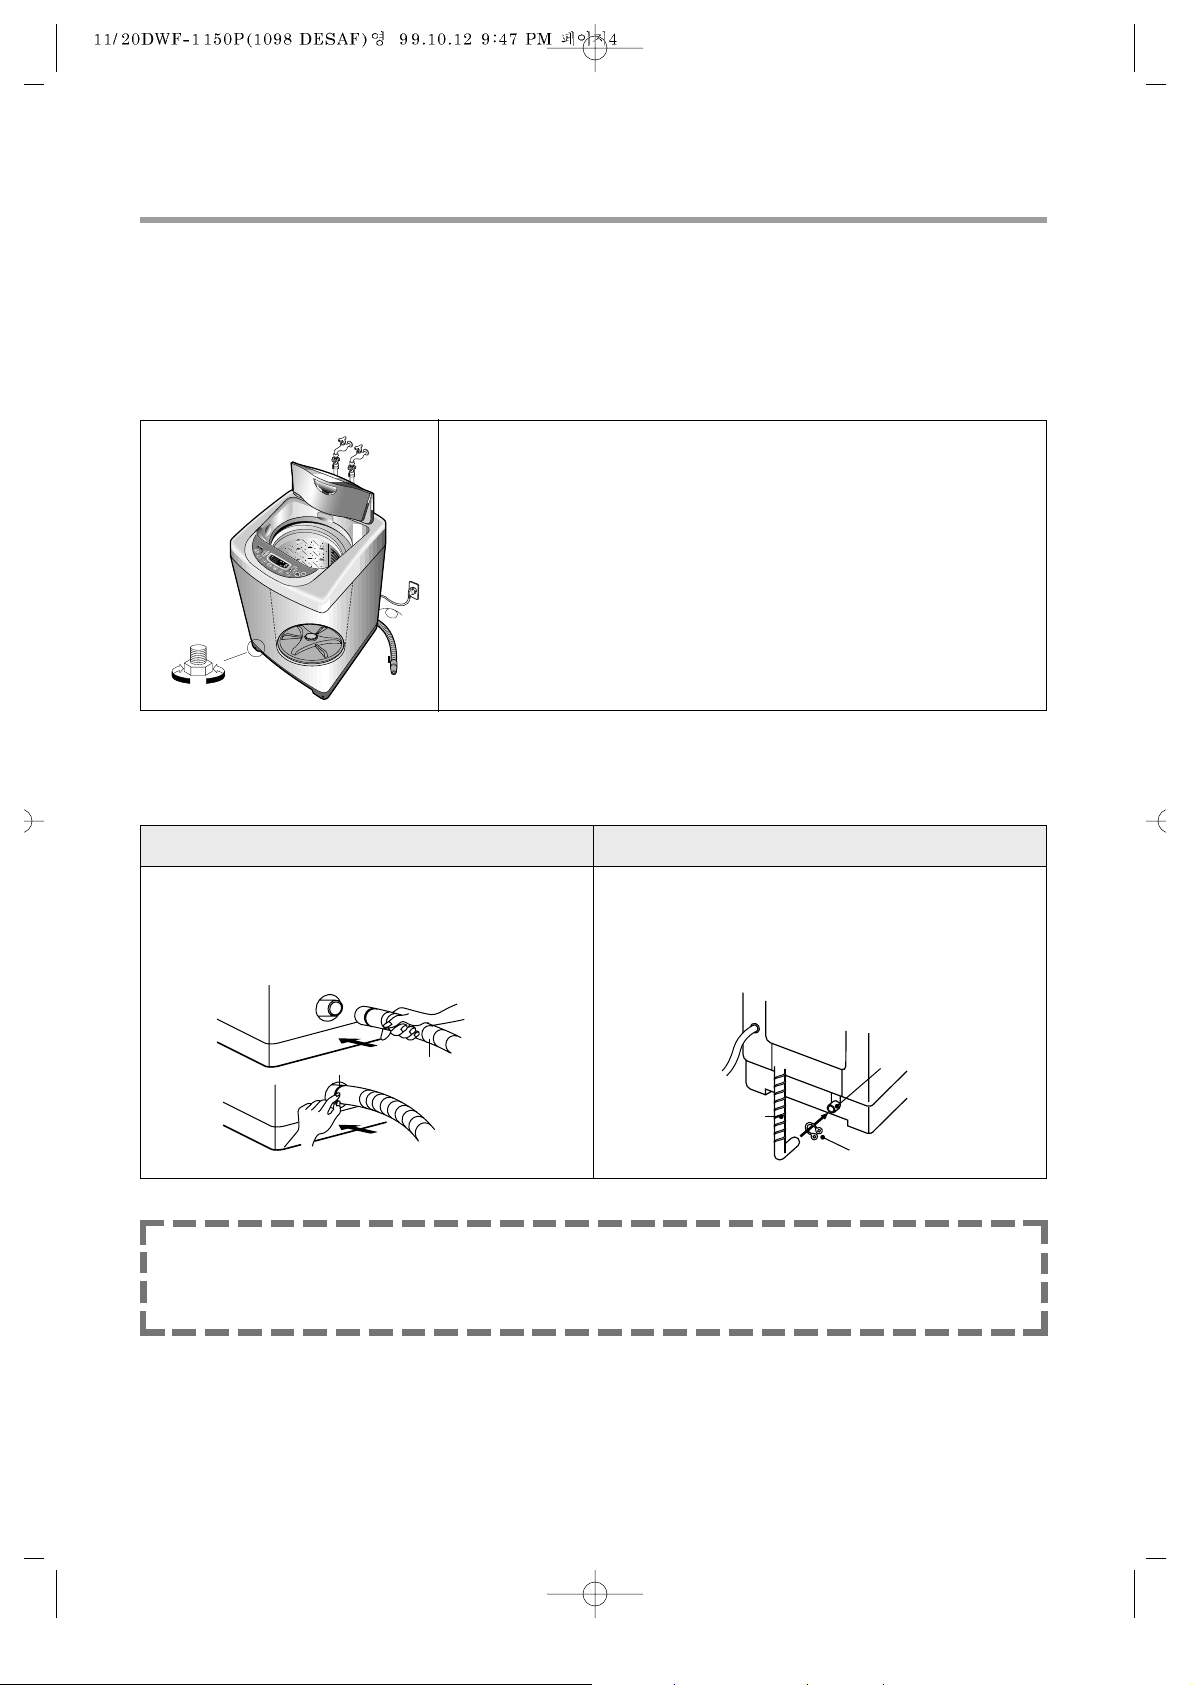
• Connect the drain hose to the drain outlet
at the back side of the washer, and fasten it
tightly with the clamp attached.
• Connect the drain hose to the drain outlet
at the back side of the washing machine,
and fasten it tightly with the clamp
supplied.
Non-Pump Model Pump Model
Hose clamp
Drain hose
Hose Clamp
Drain Outlet
Drain hose
If the washer is installed on an unsuitable floor, it could make
considerable noise and vibrate and could cause a
malfunction.
If washer is not level, adjust the front legs(A) up or down for
horizontal setting,
•Earthed electrical outlet(B) is required with 20cm of bottom
back of washer cabinet.
•Hot and cold water faucets (C) must be within 1M of the
upper back of the washer cabinet and provide water
pressure 0.3kgf/cm
2
-8kgf/cm
2
NOTES
• The openings must not be obstructed by carpeting when the washing machine is
installed on a carpeted floor.
C
Airpower
d
k
d
k
f
d
k
=
d
=
ld
l
d
ld
k
ff
m
f
n
d
l
s
s
d
d
s
⁄°°
A
UP DOWN
B
Page 4
5
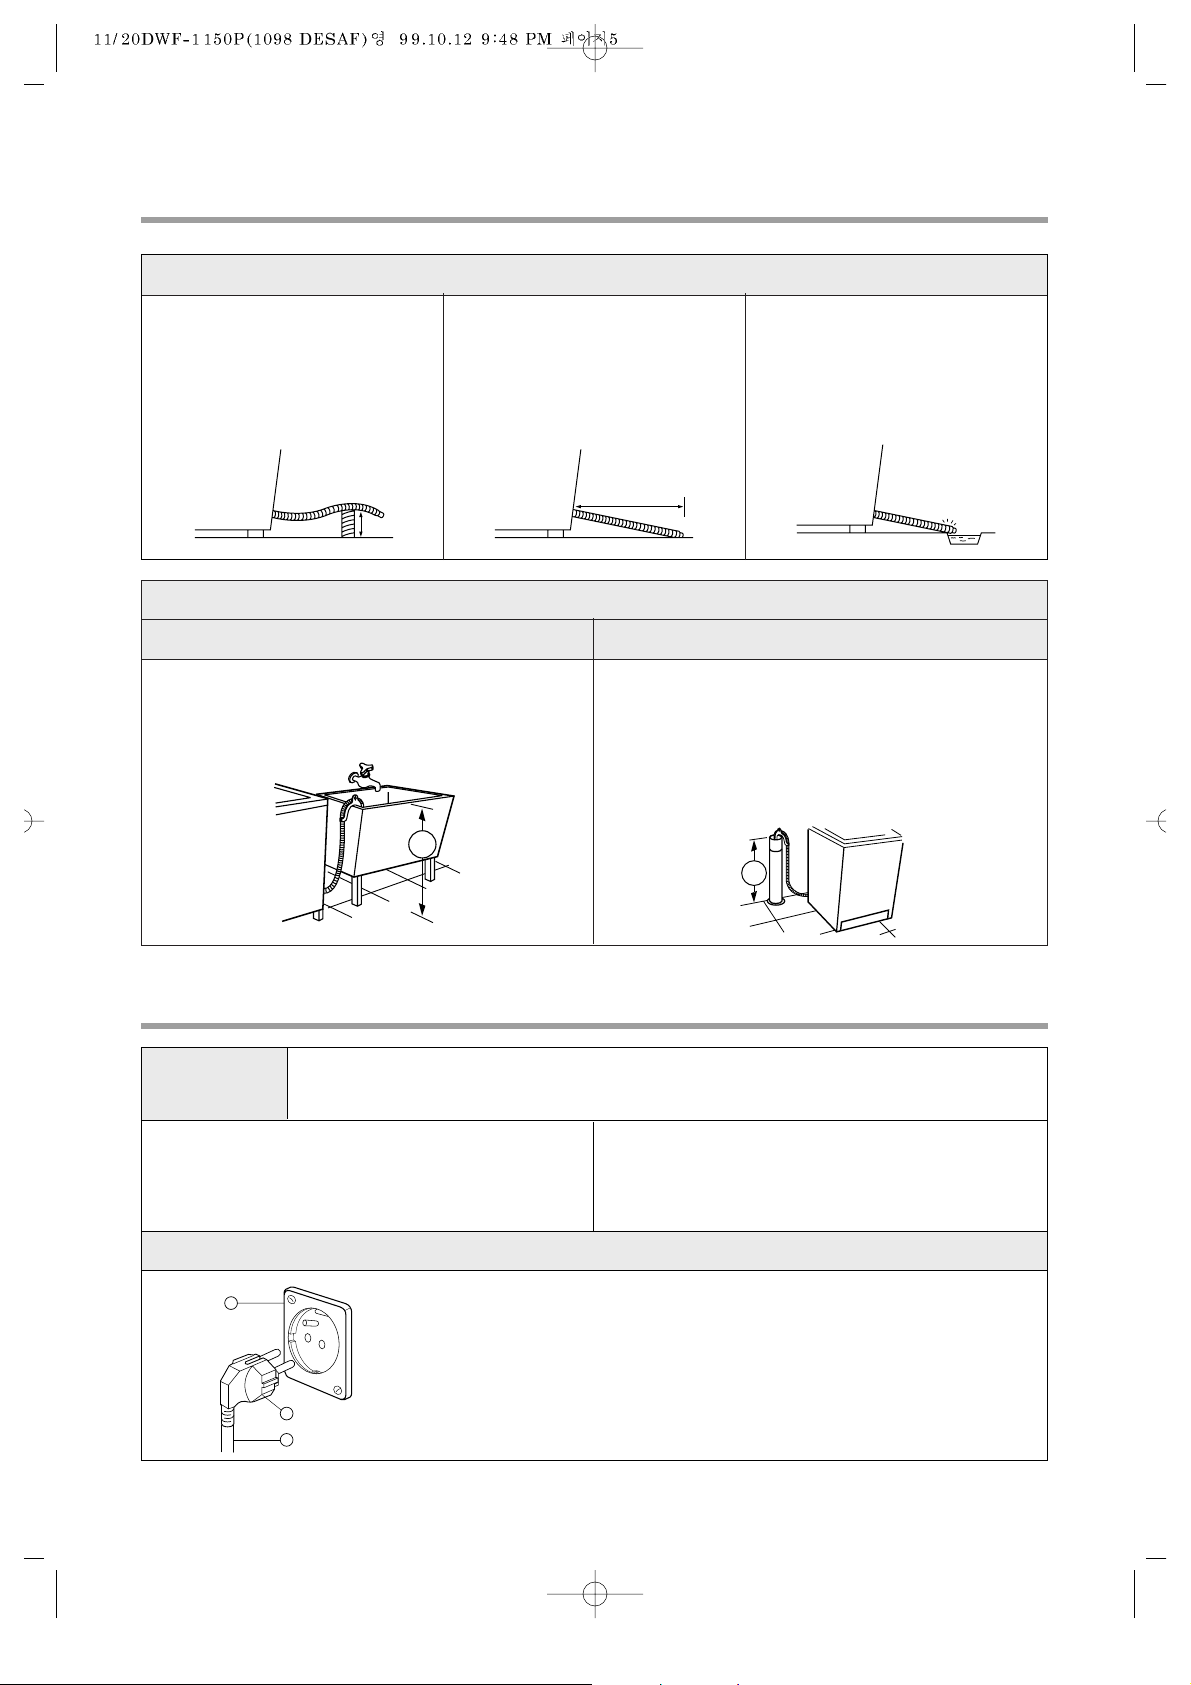
! In case that it goes over a
door sill.
Don't let the height of the
drain hose exceed 20cm
from the bottom of
washer.
@ In case of extending the
drain hose.
Don't let the total length
exceed 3m
# Be car eful that the end of
the drain hose is not
immersed in water
Non-Pump Model
• Top of tub must be at least 86cm
(34inches) high and no higher than 130cm
from bottom of washer (A)
• Needs a 3cm minimum diameter standpipe
with minimum carry away capacity of
30liters per minute.
• Top of tub must be at least 86cm
(34inches) high and no higher than 130cm
from bottom of washer (B)
Laundry tub drain system Standpipe drain system
Pump Model
20Cm
3m
A
B
C
B
A
ELECTRICAL REQUIREMENTS
For your personal safety, this washer must be earthed.
This washer is equipped with a power supply cord (A) having a
earthing plug (B). To minimize possible shock hazard, the cord
must be plugged into a mating earthing-type wall receptacle (C).
If a mating wall receptacle is not available, it is the personal
responsibility and obligation of the customer to have the proper
earthed wall receptacle installed by a qualified electrician.
• Electrical earth is required on this washer
• If it does not fit the outlet, have a proper
outlet installed by a qualified electrician.
• Don't earth to a gas pipe
• Don't change the power supply cord plug.
• Check with a qualified electrician if you are
not sure the washer is proper earthen.
WARNING
electrical shock hazard: failure to follow these instructions could r esult in
death or serious injury.
Recommended earthing method
Page 5
6
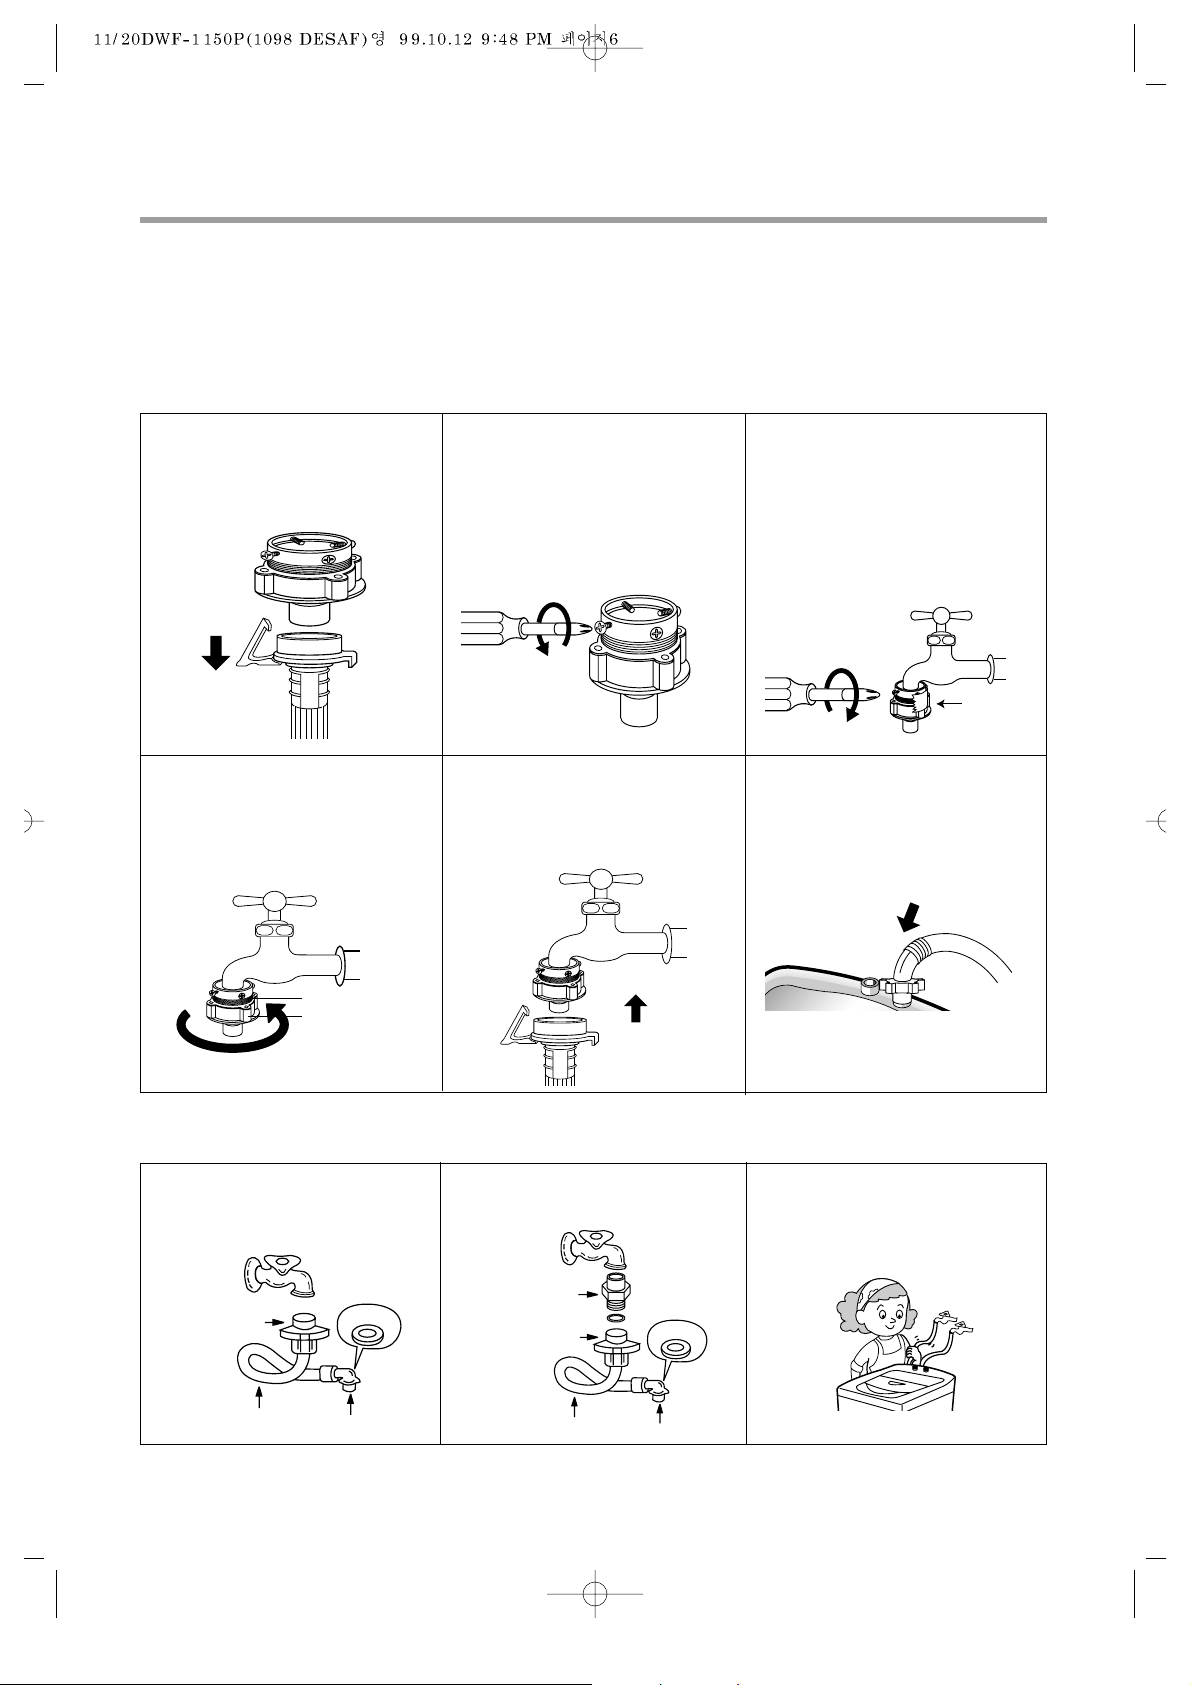
Be careful not to confuse hot water inlet and cold water inlet.
In using only one water tap or in case of attached one water inlet valve, connect the inlet hose
to the cold water inlet valve.
For Ordinary Tap
For Screw-Shaped Tap
INLET HOSE CONNECTION
! Pull down the collar of the
inlet hose to separate it
from the water tap
adapter.
@ Loosen the four scr ews
properly in fitting into
water tap.
# Fit the water tap adapter
into the water tap tap and
tighten the four screws
evenly while pushing up
the adapter so that the
rubber packing can stick
to the water tap tightly.
$ Remove the tape, and
screw connector B into
connect A tightly.
% Connect the inlet hose to
the water tap adapter by
puling down the collar of
the hose end.
^ Connect the inlet hose
adapter of the hose to the
water inlet of the washer
by turning it clockwise to
be fixed tightly.
• Please check the rubber
packing inside the inlet
hose adapter of the hose.
! Connect the inlet hose to
the water tap by screwing
the connector tightly.
@ Connect the connector-
inlet supplied if necessary.
# Insert the inlet hose
adapter into the water
inlet of a washer and turn
it to be fixed.
ƒNAssert the packing in the inlet
TAPE
Connector B
Connector A
Connector
Connector
Rubber
Packing
Hose
Connector
Connector
Rubber
Packing
Hose
Connector
inlet
Page 6
7
To obtain the best wahing results, you must operate your washer properly.
This section give you this important information.
OPERATING YOUR WASHER
• Close zippers, snaps, and hooks to avoid
snagging other items.
Remove pins, buckles, and other hard
objects to avoid scratching the washer
interior.
• Empty pockets and turn them inside out.
• Turn down cuffs and turn synthetic knits
out to avoid pilling.
• Tie strings and sashes so they will not
tangle.
• Treat spoats and stains.
(see "Removing stains" on page)
Preparing clothes for washing
• Drop items into washer loosely. Items
should move easily through wash water for
best cleaning and wrinkle-free results.
• Load washer properly and select correct
load size setting.
Overloading and selecting a setting too
small for the wash load can:
- cause poor cleaning
- increase wrinkling
- create excessive lint
- wear out items faster (because of pilling)
• Mix large and small items in each load.
Load evenly to maintain washer balance.
An off balance load can make the washer
vibrate during spin.
• Reduce wash time when using a small load
size setting. Loads with only a few small
items need less wash time.
• Use a large load size setting to reduce
wrinkling with permanent press clothes and
some synthetic knits. These items should
have more room to move in the water than
heavy items (towels, jeans)
Loading
• Separate heavily soiled items from, lightly soiled ones, even if they would normally be
washed together.
• Separate dark colors from light colors, colorfast items from non-colorfast item.
Sorting
Page 7
8
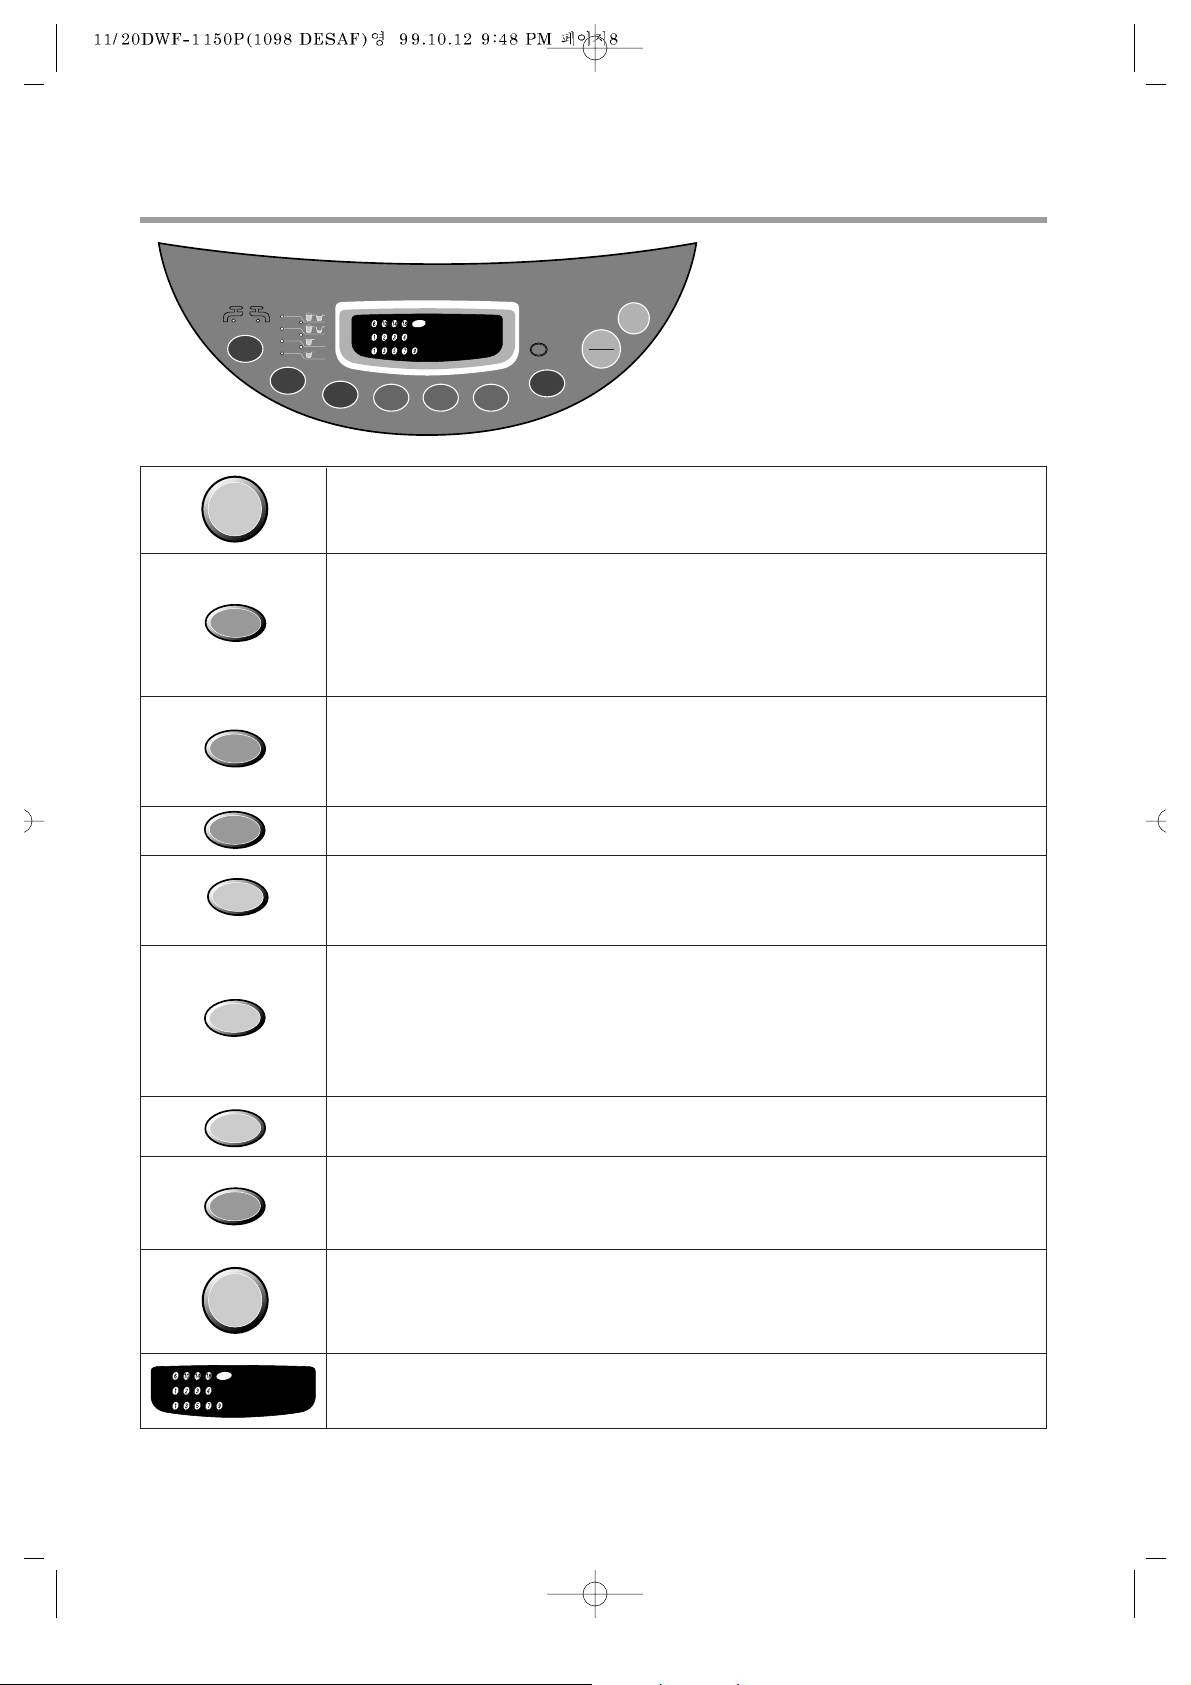
Control panel has micom sensor.
As the buttons are pressed, the
lamps indicating the selection of
your desired washing program will
light up.
THE FUNCTIONS OF THE CONTROL PANEL
⁄°°
=
=
Airpower
dkdkfdkdldldldkffmfndlssdds
HOT
WASH
TEMP.
WATER
LEVEL
RES.
WASH RINSE
SPIN
START
HOLD
POWER
COURSE
COLD
DETERGENT
HIGHT
MEDIUM
LOW
E.LOW
WASH
SOAK
REM.
HOUR
RES OE
IE
LE
UE
RINSE
SPIN
MIN.
COURSE
ECO.
FUZZY
BLANKET
LIGHT
HEAVY
SUIT
• Press this switch to turn the power on or off.
After turning off the power, wait for more then 3seconds and then turn it
on again.
• It can be used to choose water temperature to be supplied.
• As the button is pressed, it will be repeated.
COLD → COLD+HOT → HOT
• In case of the single valve model, there is no wash temperature selector
function.
• It can be used to adjust amount of water according to the size of the
load to be washed.
• As the button is pressed, water level is selected by MEDIUM →¡ →
HIGH → E.LOW → ¡ → LOW → ¡ → MEDIUM
• It can be used to pre-engage time for wash
• It can be used to adjust washing time.
• As the button is pressed, you will see the repeated.
6 → 10 → 14 → 18 → SOAK
• This button selects the number of times you want to rinse.
• As the button is pressed, it will repeat.
• 1time rinse → 1time feed → 2times rinse → 2times feed →3times rinse
→ 3times feed → 4times rinse → 4times feed
• In case of the pump model, there is no shower rinse or spray rinse
selector function.
• It can be used to change spin time.
• As the button is pressed, it will repeat. 5 →7 →9 → of f →1 → 3 → 5
• It can be used to select the full-automatic course.
• As the button is pressed, it will selected by following order:
FUZZY → BLANKET → ECONOMY → LIGHT → HEAVY →SUIT
• Operation and temporary stop are repeated as they ar e pr essed.
• When you want to change course in operating;
press the "START/HOLD" button → Select the course that you want to
change → press the "START/HOLD" button again.
• The lamps easily indicate the option selection of washing program and
process by letters.
POWER
WASH
TEMP.
WATER
LEVER
RES
WASH
RINSE
SPIN
WASH
RINSE
SPIN
COURSE
START/
HOLD
SOAK
REM.
RES OE
IE
LE
⁄°°
MIN.
UE
HOUR
Page 8
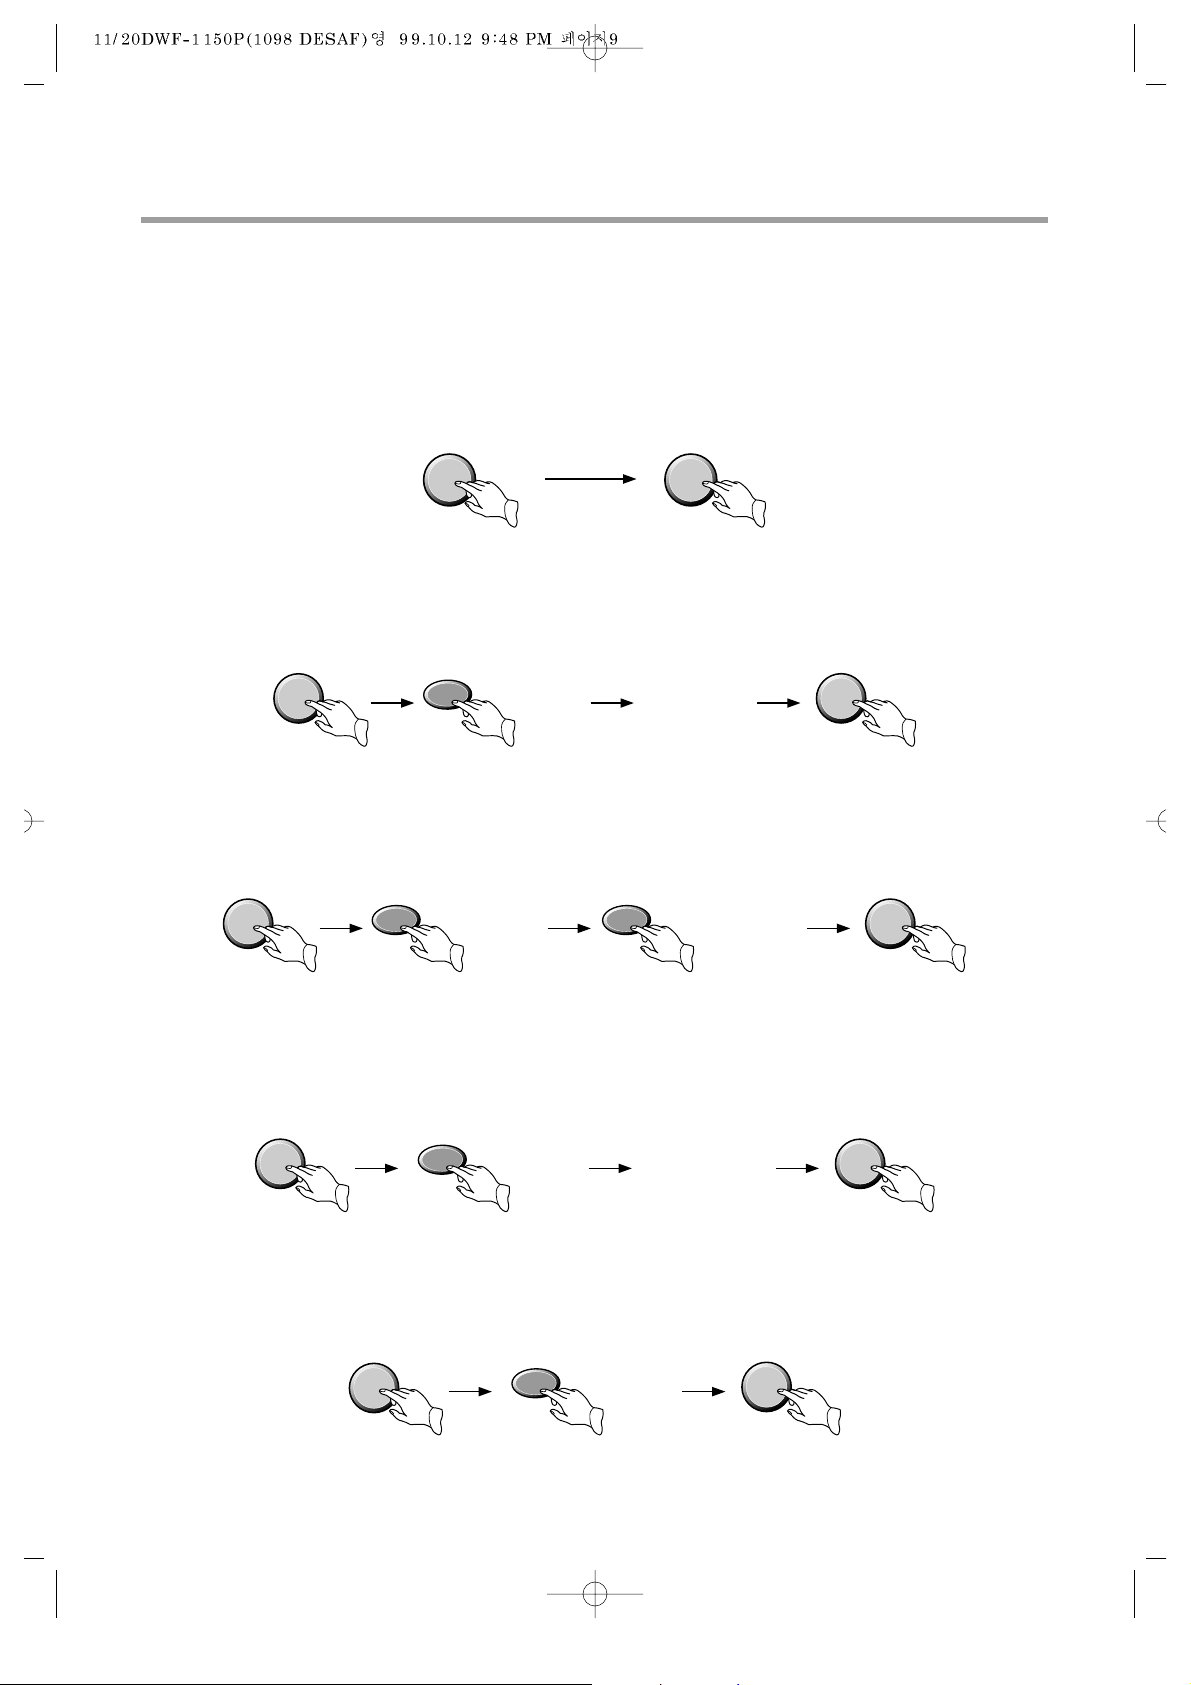
FULL AUTOMATIC COURSE
1. FUZZY COURSE (SENSOR);
• This selection is for general washing except extraordinary clothes.
• Artificial brain sensor selects properly the various kind of washing condition such as
washing time, rinse times, spin time water level.
if you want to soak, press the "WASH"button to adjust "SOAK" after the course selection.
Procedure to press the button;
2. BLANKET COURSE;
• This selection is effective for blanket, curtain, carpet, etc ...
• Do not wash general-electric blanket absolutely. (4kg's limitation for one-time-wash)
Procedure to press the button;
3. ECONOMY COURSE;
• This selection is useful to reduce water consumption and washing time for less dirty clothes.
Procedure of press the button;
4. LIGHT COURSE
• This selection is effective for washing light or less dirty wash.
Artifical brain sensor selects properiy water level.
Procedure to press the button;
5. HEAVY COURSE;
• This selection is effective for blue-jean, climbing clothes, ruck sack, sports wear, etc...
• If you want to soak, press the "WASH" button to adjust to "SOAK" after the course selection.
9
adjust to
"HEAVY"
POWER
START/
HOLD
COURSE
adjust to
"ECONOMY"
adjust to
water level and
water temperature
POWER
COURSE
START/
HOLD
WASHING PROCEDURE AND COURSE SELECTION
POWER
START/
HOLD
COURSE
POWER
START/
HOLD
adjust to
"LIGHT"
add your desired
item. (Select items:
washing time, rinsing
time, spin time)
See page;8
adjust to
"BLANKET"
POWER
START/
HOLD
COURSE
adjust to water
level and water
temperature
Page 9
10
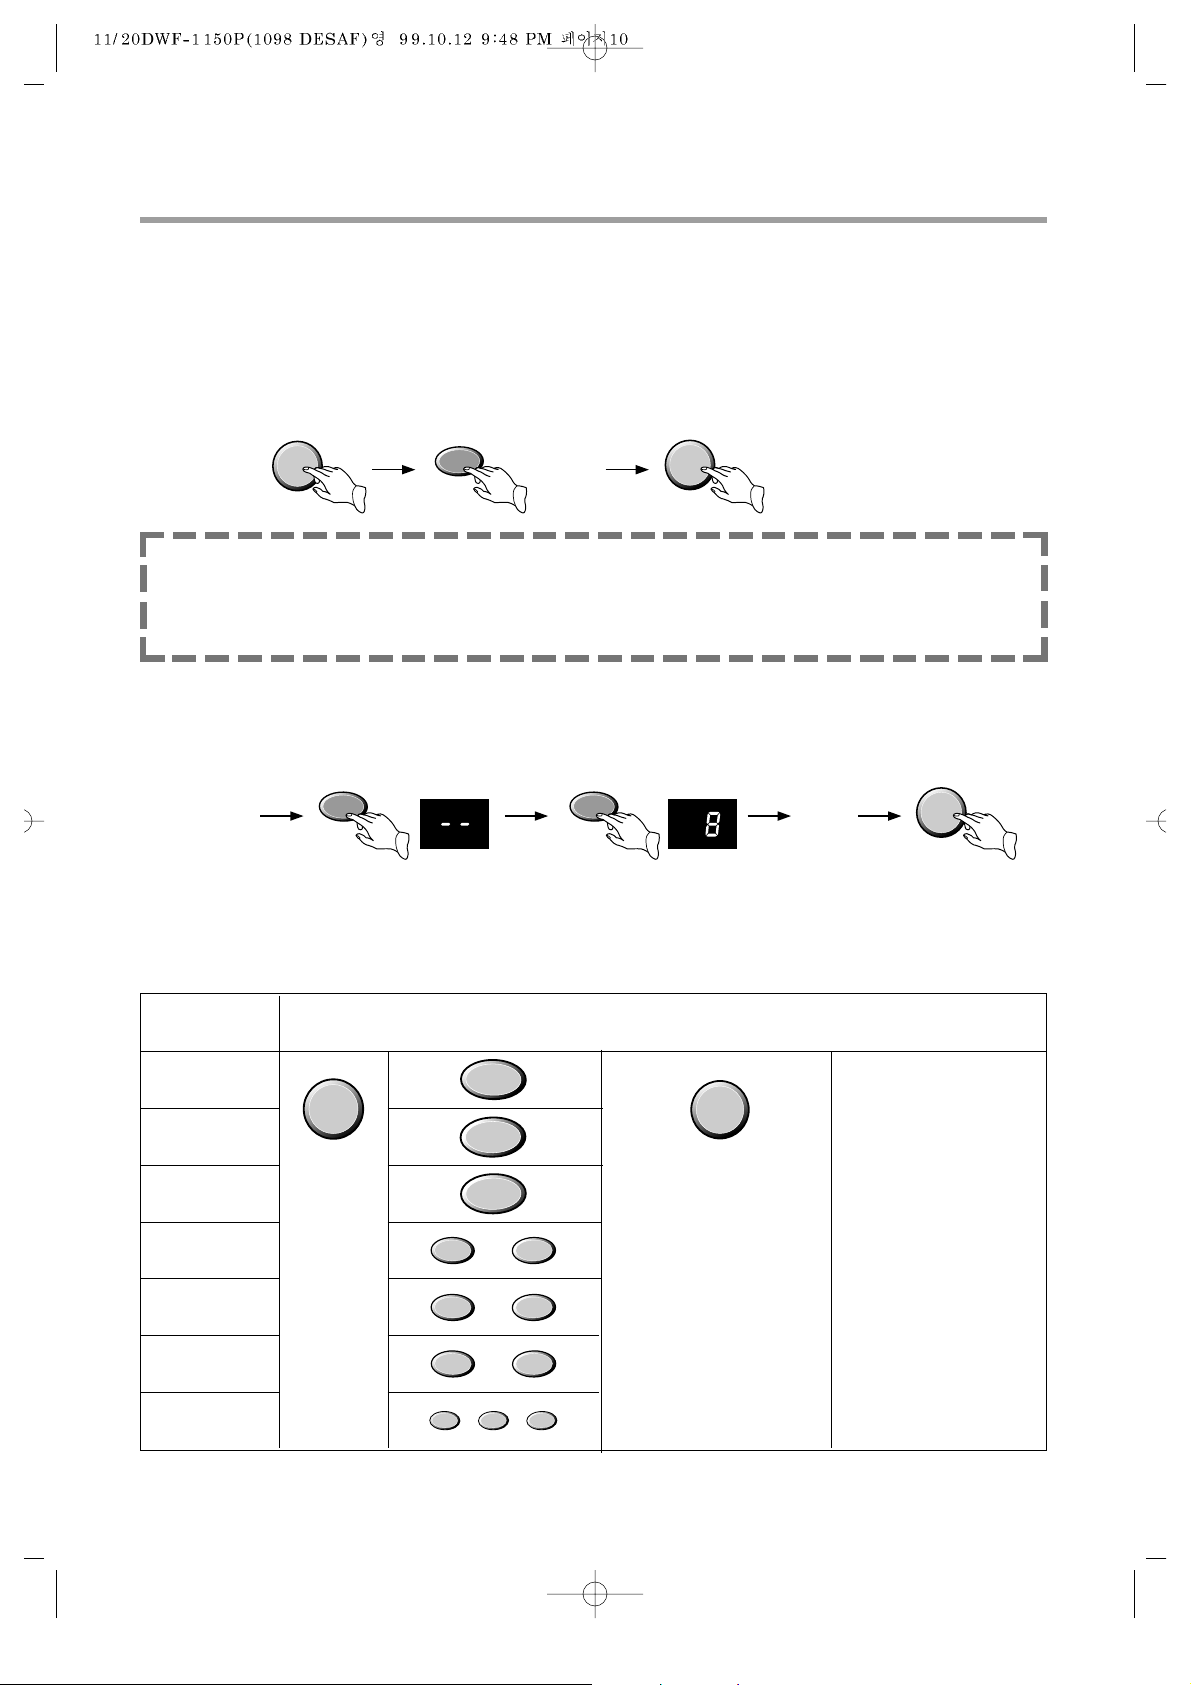
6. WOOL COURSE;
• This selection is effective for wool clothes. (1.2kg’s limitation for 1 time-wash)
• Do not put leather clothes, or chamois clothes into the washing tub for washing.
It may cause shrinkage or deformation to the clothes.
• Please use the neutral detergents only.
• The water temperature is fixed to “COLD”
• The water level “LOW” is not select.
Reserved Washing
• Reservation can be made from 2 hours to 48hours.
example) To make reservation to complete washing in 8hours.
• Now the reservation is mode.
Partial Selection Among Wash, Rinse or Spin
"– –" shall blink
adjust to
"the COURSE"
close
the lid
adjust to "8"
RES RESHOUR HOUR
RES RES
START/
HOLD
Only Wash
Only Rinse
Only Spin
Wash & Rinse
Wash & Spin
Rinse & Spin
Wash → Rinse
→
Spin
Washing
contents
Procedure to press the button
Press the
START/HOLD
button.
If once more Pressed, the
washer will be stopped.
For Keeping Operation
continuously to the set
program, press another
time
End of washing
informed by
buzzer.
At the end of the
washing, the
power switch will
be turned off
automatically .
POWER
WASH
RINSE
SPIN
➞
WASH RINSE
➞
WASH SPIN
➞
RINSE SPIN
➞
WASH RINSE➞SPIN
➞
START/
HOLD
NOTE • Only cold water should be supplied for washing.
• Be sure to use only the detergent exclusively used for the washer.
• Do not use the washer to wash leather clothes, or chamois clothes.
• Separate white color/light-colored from colorfast clothes.
adjust to
"WOOL"
POWER
START/
HOLD
COURSE
Page 10
11
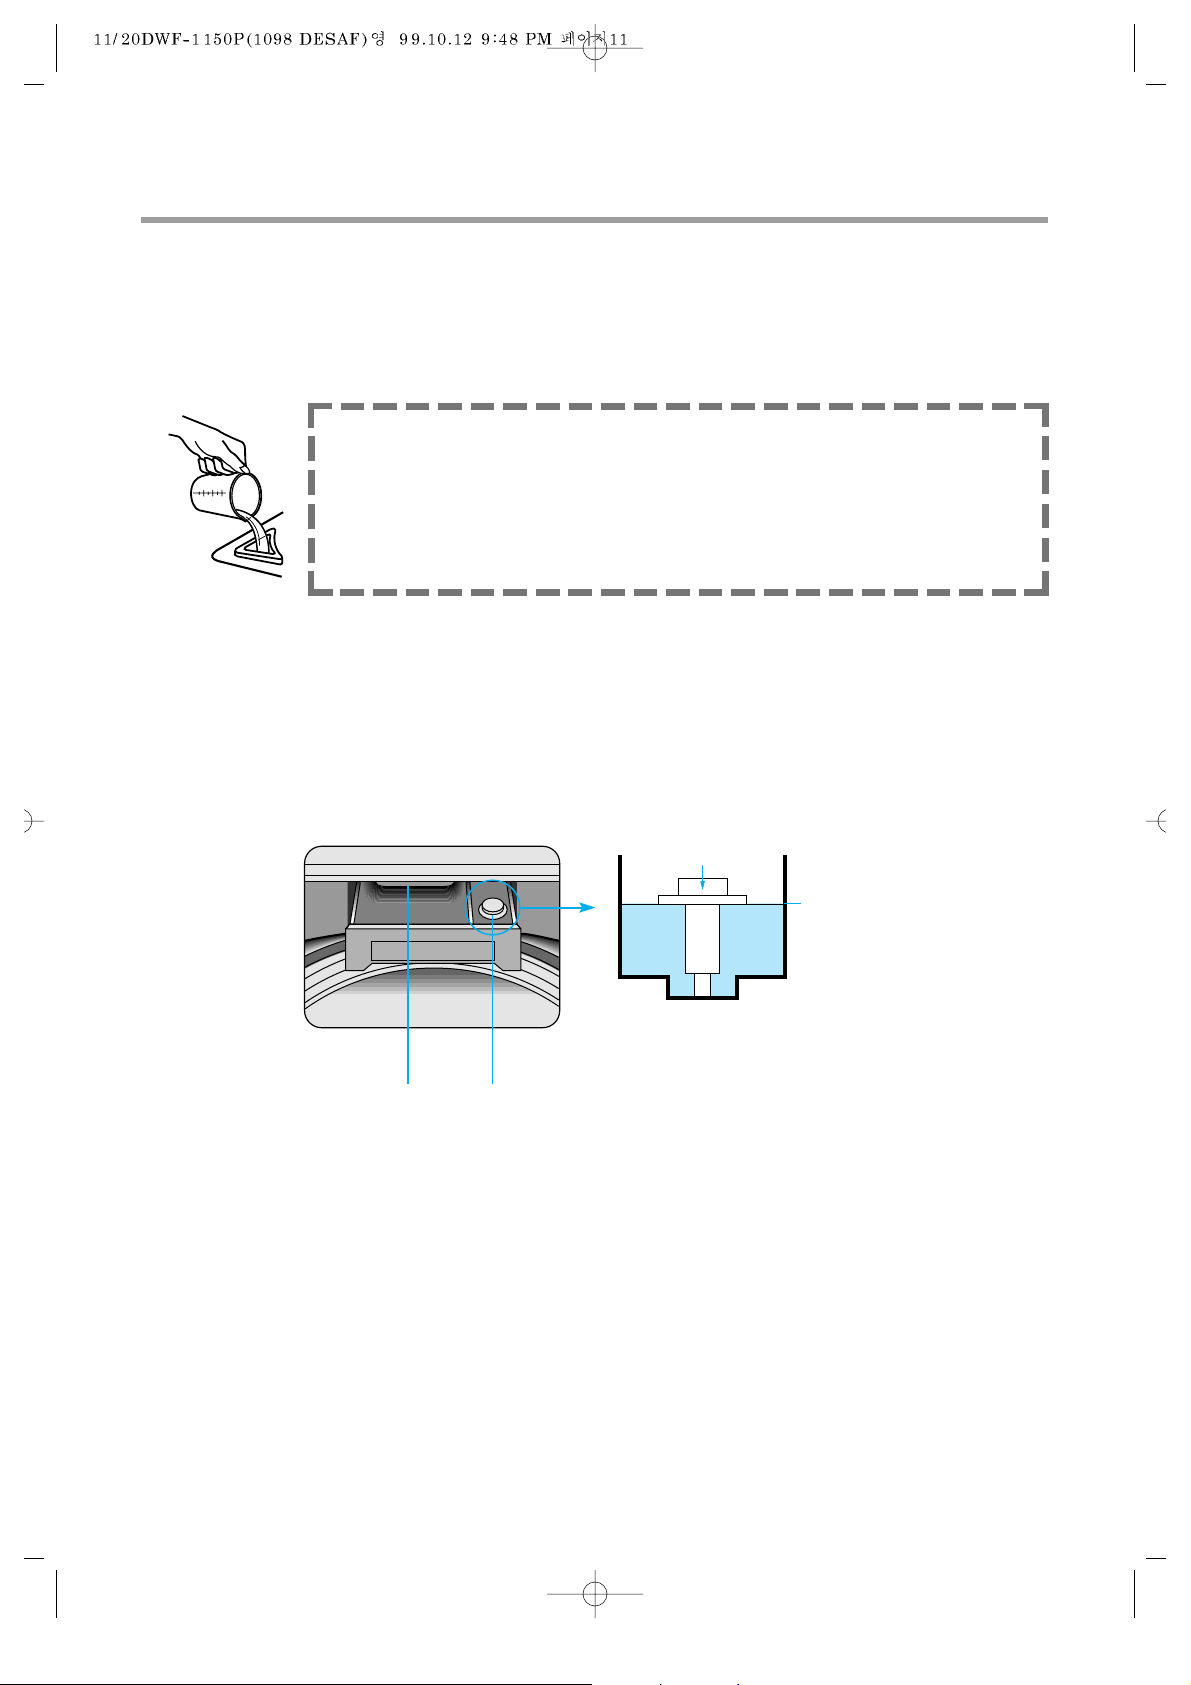
1. Add measured detergent to the washer, (Follow manufacturer's directions for safe use)
2. OPTIONAL STEP
If desired, add measured liquid chlorine bleach to the bleach inlet. use only liquid chlorine in
the bleach inlet
* Follow manufacturer's direction for safe use.
3. OPTIONAL STEP
If desired, add measured liquid fabric softener to the softener inlet.
• Pour liquid fabric softener into the dispenser using the amount recommended on the
package. Avoid dripping or spilling any fabric softener on the load.
• Dilute fabric softener with warm water.
Fill dispenser with warm water until liquid reaches the base line in the case.
The dispenser is for liquid fabric softener use only.
4. Close the washer lid (door)
5. Press the power button.
6. Select the course. The full automatic course has six settings. (See page 8)
7. Press the "START/HOLD" button.
To change the course after the washer has started to fill, press the "START/HOLD" button and
select the course that you want to new course.
STARTING YOUR W ASHER
NOTE
• Do not let bleach splash, drip, or run down into washer basket.
Undiluted bleach will damage any fabric it to touches.
• Do not use this dispenser to add powdered chlorine or color safe
bleach to your wash load. The dispenser is for liquid chlorine bleach
use only .
Detergent
Inlet Hole
Base Line
Softener inlet
Page 11
12
Proper care of your washer can extend its life. This section explains how to care for your
washer properly and safely.
Cleaning your washer
Winter storage or moving care
Install and store your washer where it will not fr eeze. Because some water may stay in the
hoses, freezing can damage your washer.
If storing or moving your washer during freezing weather, winterize it.
Non-use or vacation care
Operate your washer only when you are at home.
If will be on vacation or not using your washer for an extended period of time, you should:
• Unplug the power supply cord or turn off eletrical power to the washer.
• Turn off the water supply to the washer.
This helps avoid accidental flooding (due to a water pressur e sur ge) while you ar e away.
CARING FOR YOUR WASHER
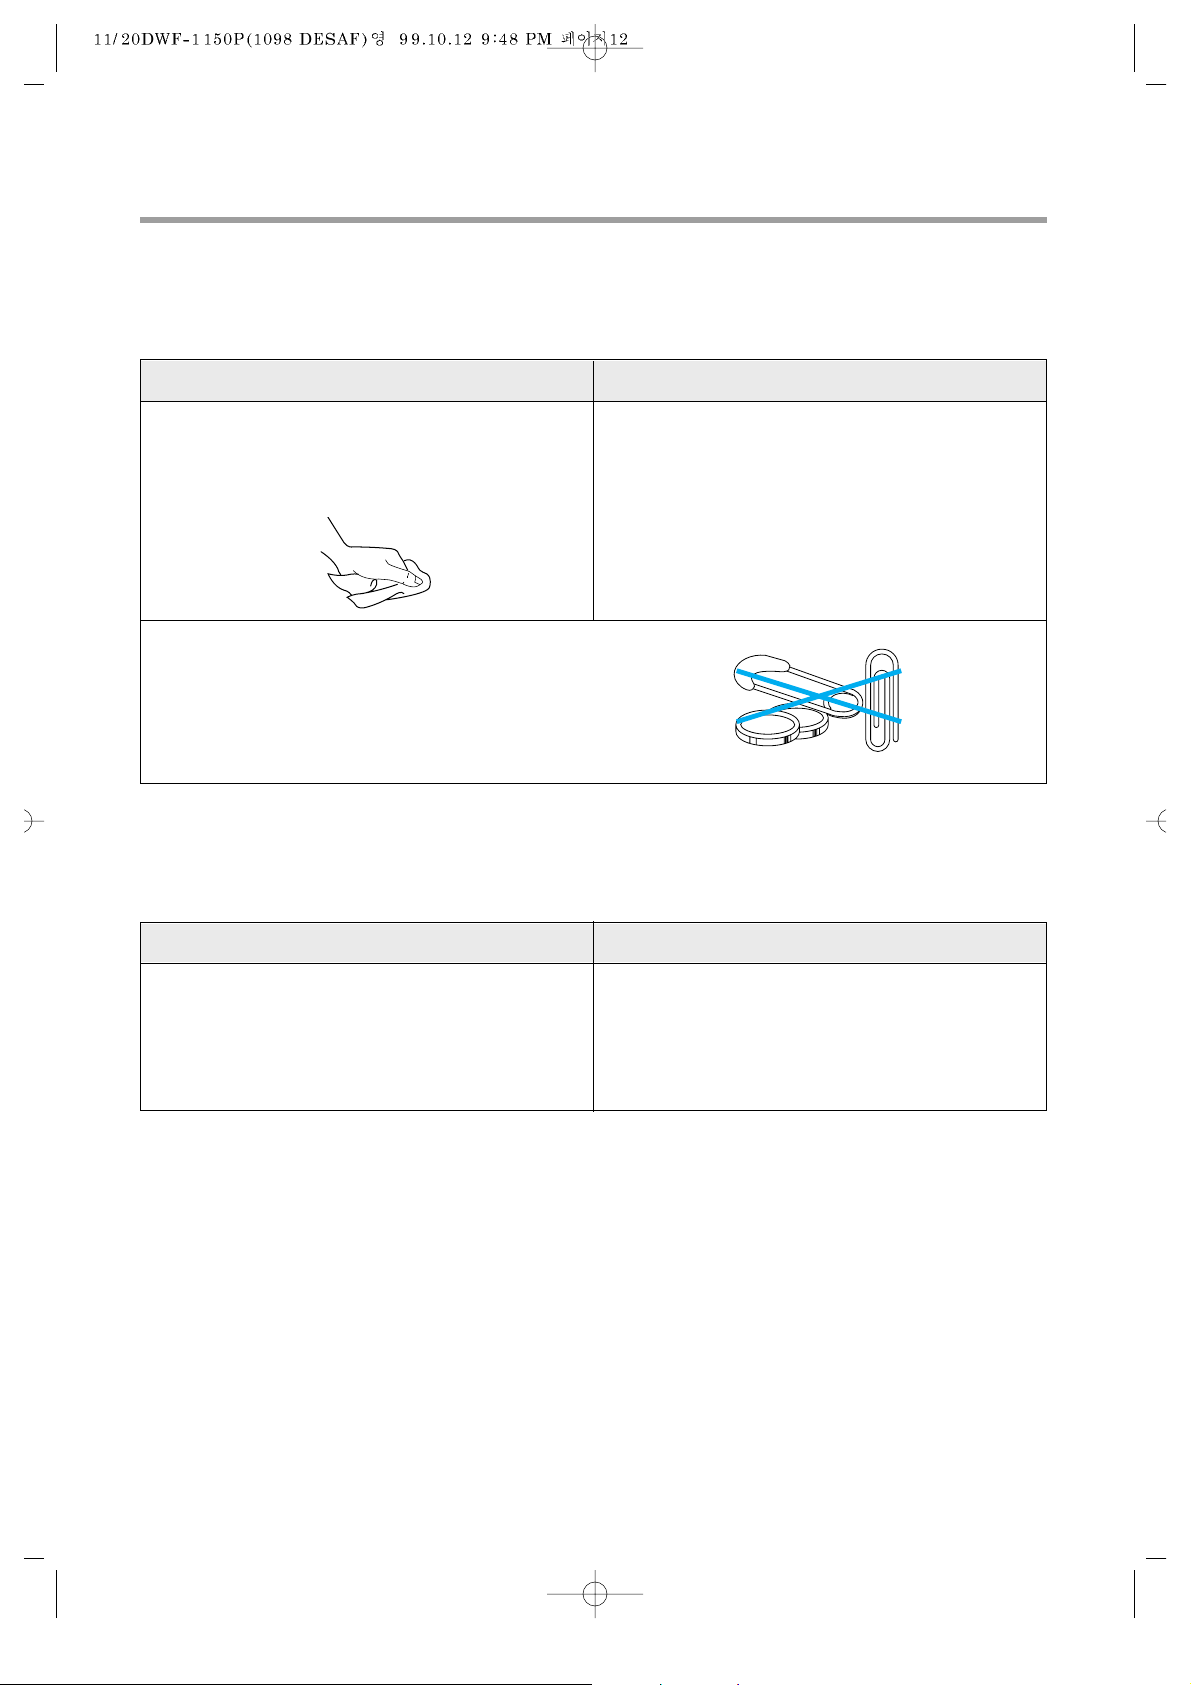
Wipe up detergent, bleach, and other spills
with a soft, damp cloth or sponge as they
occur. occasionally wipe the outside of the
washer to keep it looking like new .
Clean interior with 250ml of chlorine bleach
mixed with 500ml of detergent.
Run washer through a complete cycle.
Repeat process if necessary.
Exterior Interior
• Turn off water faucet.
• Disconnect and drain water inlet hoses
• Run washer on a drain and spin setting
(see page 10) for 1 minute.
• Unplug the power supply cord.
• Flush water pipes and hoses.
• Recombination water inlet hoses.
• Turn on water faucet.
• Recombination power supply cord.
To winterize washer To use washer again
Do not put sharp or metal object in your
washer, they can damage the finish. Check all
pockets for pins, clips, money , bolts, nuts, etc.
Do not lay these objects on your washer after
emptying pockets.
Page 12
13
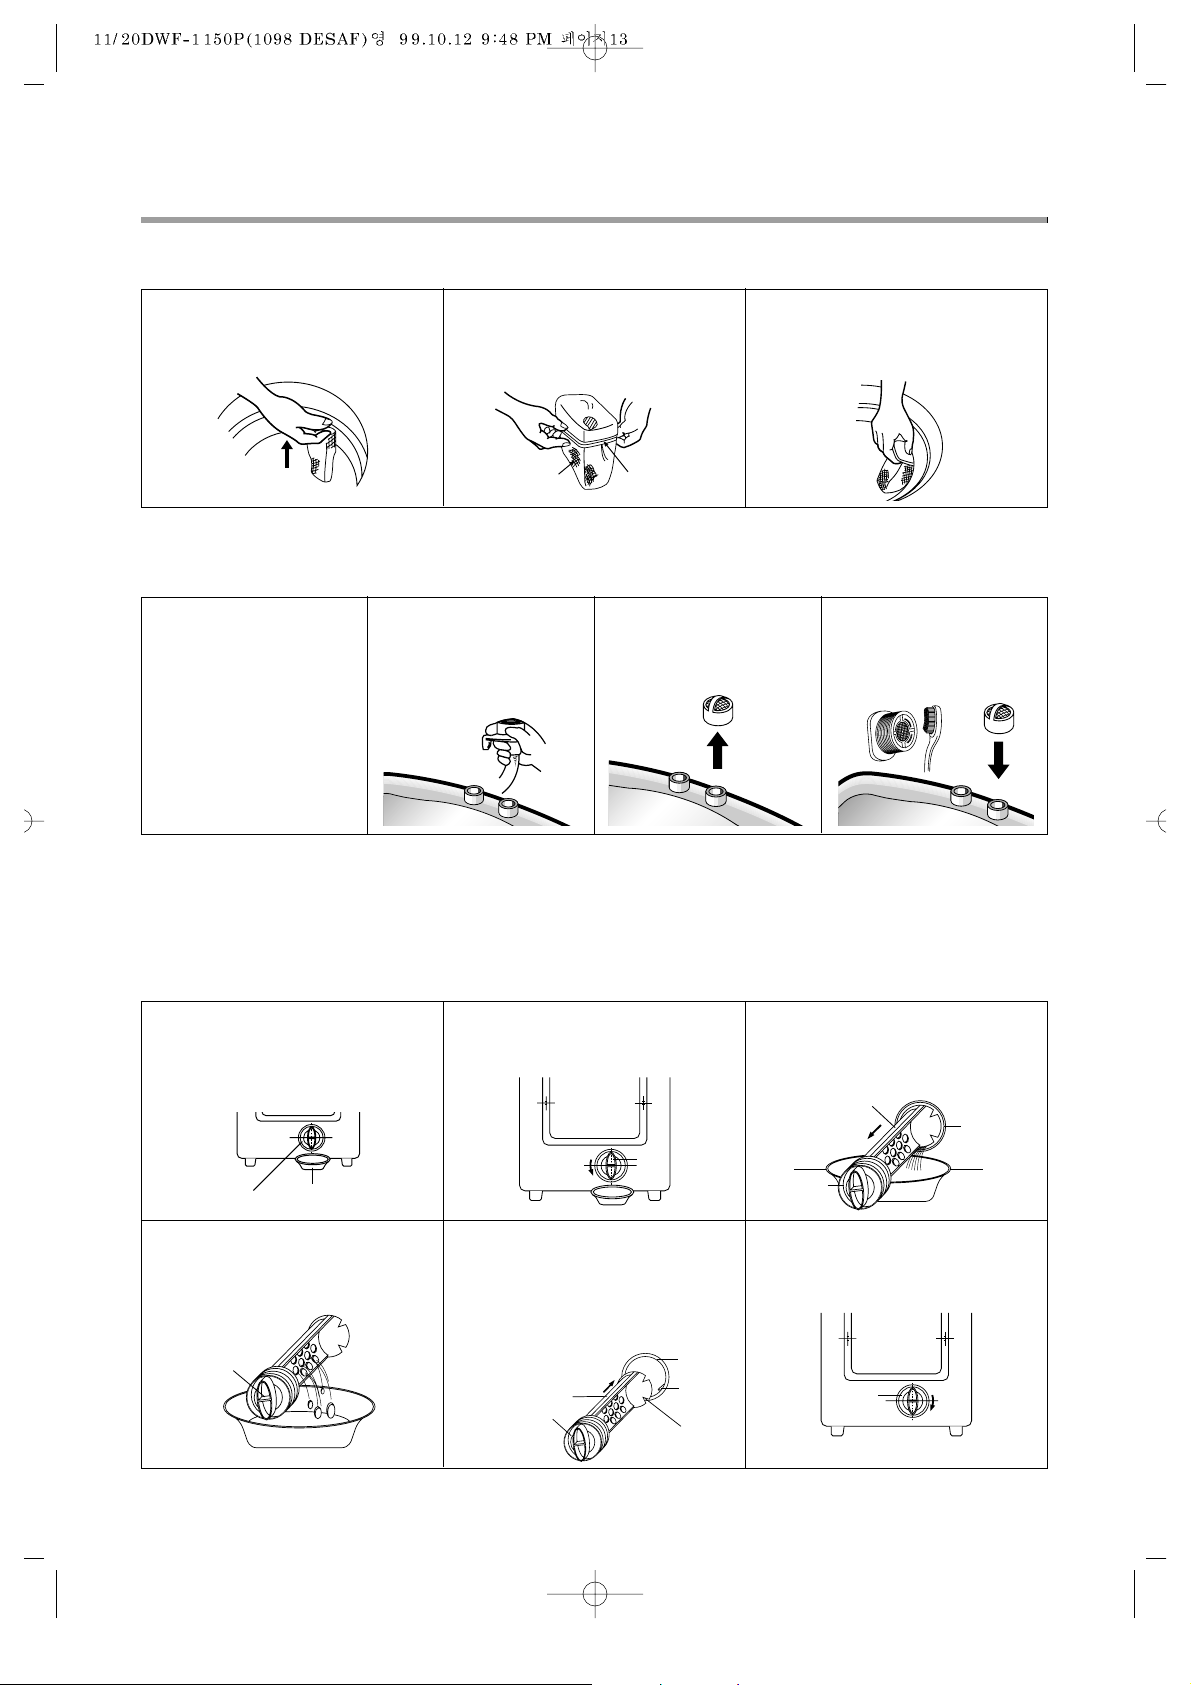
HOW TO CLEAN THE FILTER
Cleaning the Lint Filter
Cleaning the water inlet filter
• Clean the filter when water leaks from, the water inlet.
Cleaning the drain filter
• In case "Pump-Model" drain hose, this filter's equipped at the back side of washer.
• This drain filter is to screen the foreign stuf fs such as thr eads, coins, pins, buttons etc ...
• If the drain filter is not cleaned at proper time (every 10 times of use), Drain pr oblem could be
caused. see page
! Pull the Fiter frame up-
ward.
@ Turn the lint filter inside
out, wash to the lint off
with water
# Return the filter as it was,
and insert the filter frame
into the slot
! Pull the power
plug out before
cleaning it.
@ Turn off the water
supply to the
washer and
sperate the inlet
hose.
# Pull the inlet filter
out.
$ Remove the dirt
from the inlet
filter with a brush.
! Put down the r emained
water in the hose. And put
a container under the filter
to collect water.
@ Turn the cap counter
clockwise.
# Pull out the filter
assembly off the case of
the main body .
$ Clean the drain filter
removing the foreign
stuffs.
% Put in the filter along the
guiding prominence of the
case. Please note the left
position of the filter
adjusting the groove to
the guide rib.
^ Turn the cap clockwise
tightly.
Filter Frame
Lint Filter
FILTER
CONTAINER
CAP
CAP
FILTER
CASE
GUIDE
RIB
SUIT
CAP
CASE
FILTER
CAP
CAP
Page 13
14
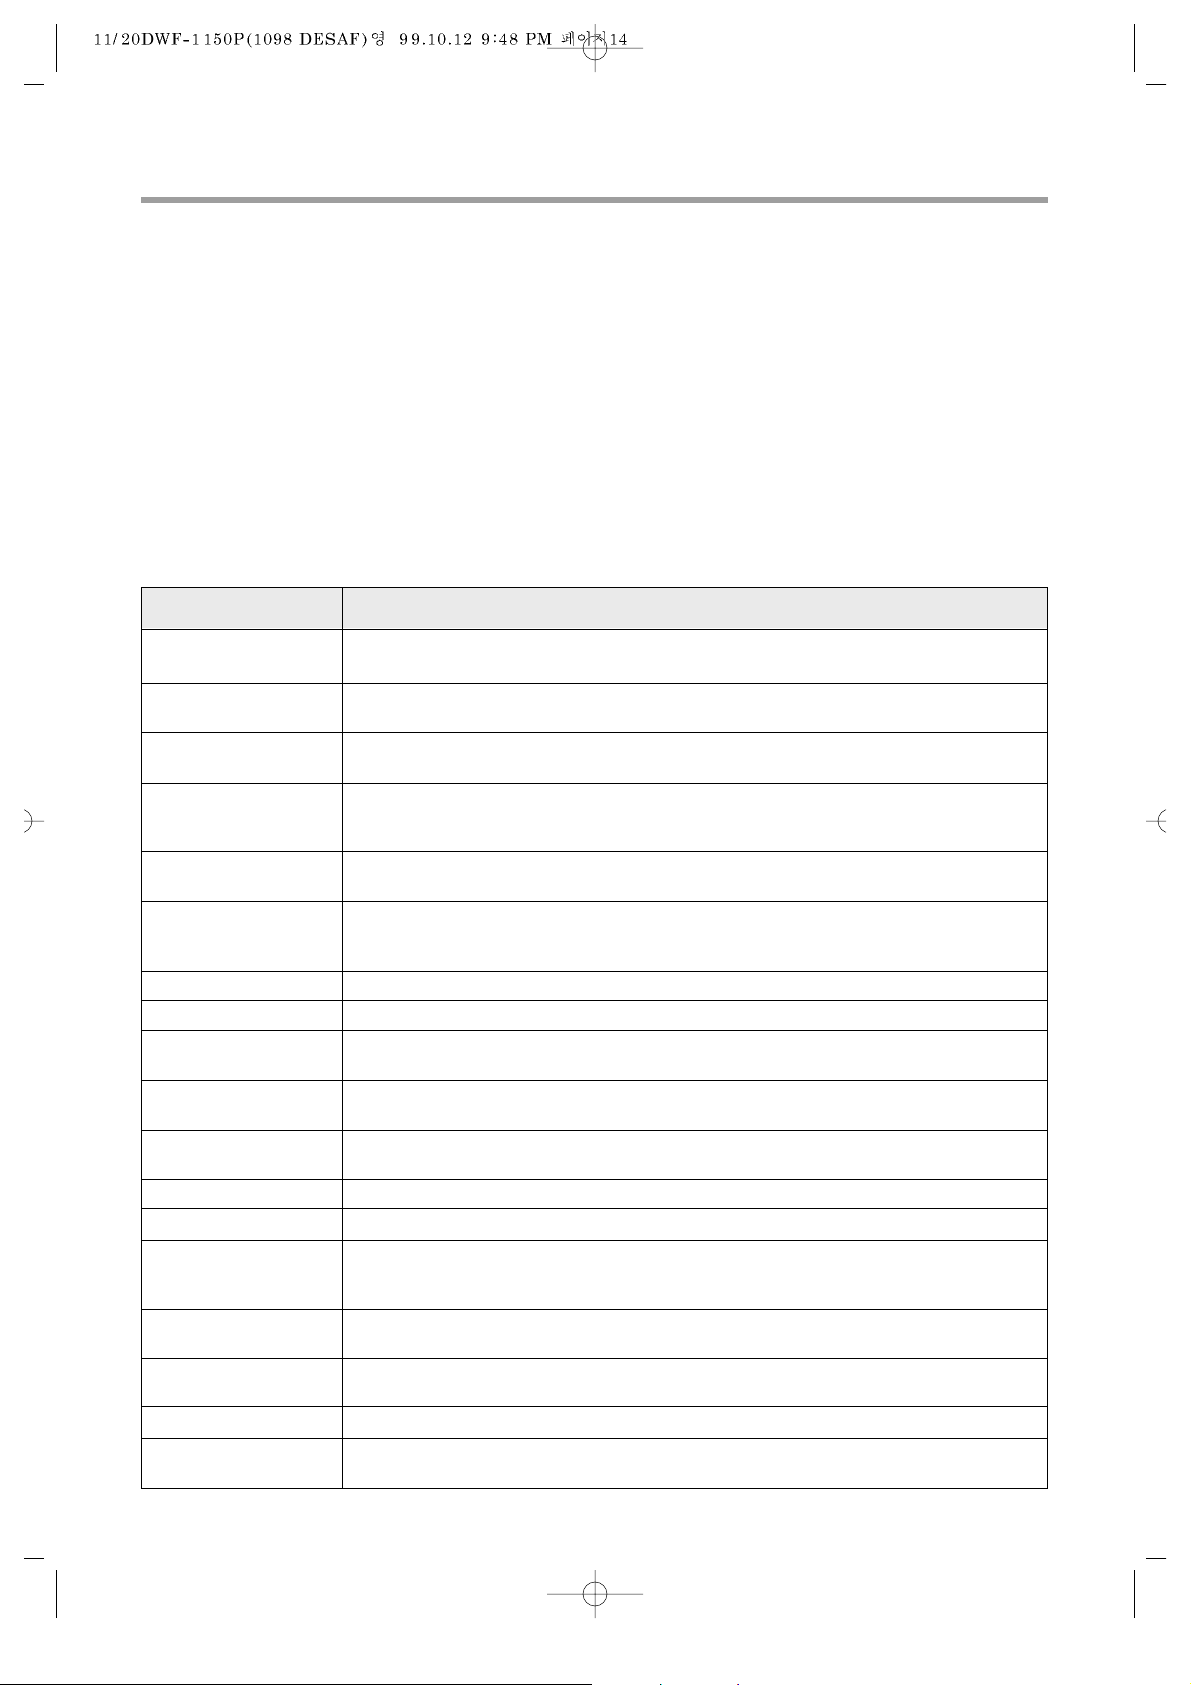
Stained, heavily-soiled, or greasy items may need to be prewashed or soaked for best results. Soaking
helps remove protein-type stains like blood, milk, or grass. Prewashing helps loosen soil before washing.
Stain removal rules
• Use warm water for soaking or prewashing stained laundry. Hot water can set stains.
• Most stains are easier to remove when they ar e fr esh. Old or set stains may not coconut
• Before treating any stain, find out what kind of stain it is, how old the stain is, what kind of
fabric it is, and if the fabric is colorfast. (Check the care label)
• Washing and drying can set some stains.
• Start with cold or warm water, hot water can set some stain.
• When bleach is recommended, use a bleach that is safe for the fabric.
• Put the stained area face down on a paper towel or white cloth. Apply the stain remover to
the back of the stain. This forces the stain off fabric instead of thr ough it.
Stain removal guide
REMOVING STAINS
Blood
Chewing gum
Cocoa, Chocolate
Coffee
Cream/Milk
Ice cream
Deodorant
Egg
Fabric/Softener
Fruit stains
Grass
Grease and oil
Iron or rust
Lipstick
Mildew
Mud
Paint-oil based
Paint-water based
Scorch marks
Rinse immediately in COLD water.
If stain remains, soak in cold water with an enzyme prewash.
Use ice in plastic bag to harden the gum.
Scrape off what you can and then sponge with white spirits.
Sponge with COLD water and soak in an enzyme prewash.
If stains persist, rub in a little detergent and rinse in cold water.
Blot up quickly and rinse out in COLD water.
Rub in a little detergent and wash in the maximum temperature allowed for the
fabric type.
Rinse in COLD water and wash normally.
If stain is still apparent, sponge with white spirits.
Rub affected area with white vinegar and then rinse under running COLD water.
Sponge with white spirits.
Treat stiffened areas with enzyme prewash
Soak in a COLD enzyme prewash, rinse and wash normal.
Rub affected area with bar soap and wash normally.
Treat as soon as pressible by sponging with COLD water.
Rub a little detergent on the stain and wash normally
Sponge with white sprites.
Rub in an enzyme prewash and wash as normal
Lay the affected area face down on an absorbent cloth and work from the back.
Sponge with white spirits or dry cleaning fluid. Wash normally.
Apply lemon juice and salt and place in the sun. Wash normally.
Sponge with white methylated spirits and wash normally.
Wash in WARM water and detergent.
Moisten area with lemon juice, dry in the sun and wash normally.
If stain persists and the fabric allows, use a bleach.
Brush off any dry mud. Rinse in cold water.
If stain persists rub in a little detergent and wash normally.
Scrape off any fresh paint and sponge with a non flammable dry cleaning fluid and
wash normally.
Treat while still wet, rinse in WARM water and wash normally.
Dampen a cloth with hydrogen peroxide, lay it over the affected area and press
with a fairly hot iron.
STAIN TO REMOVE
Page 14
TROUBLE SHOOTING
15
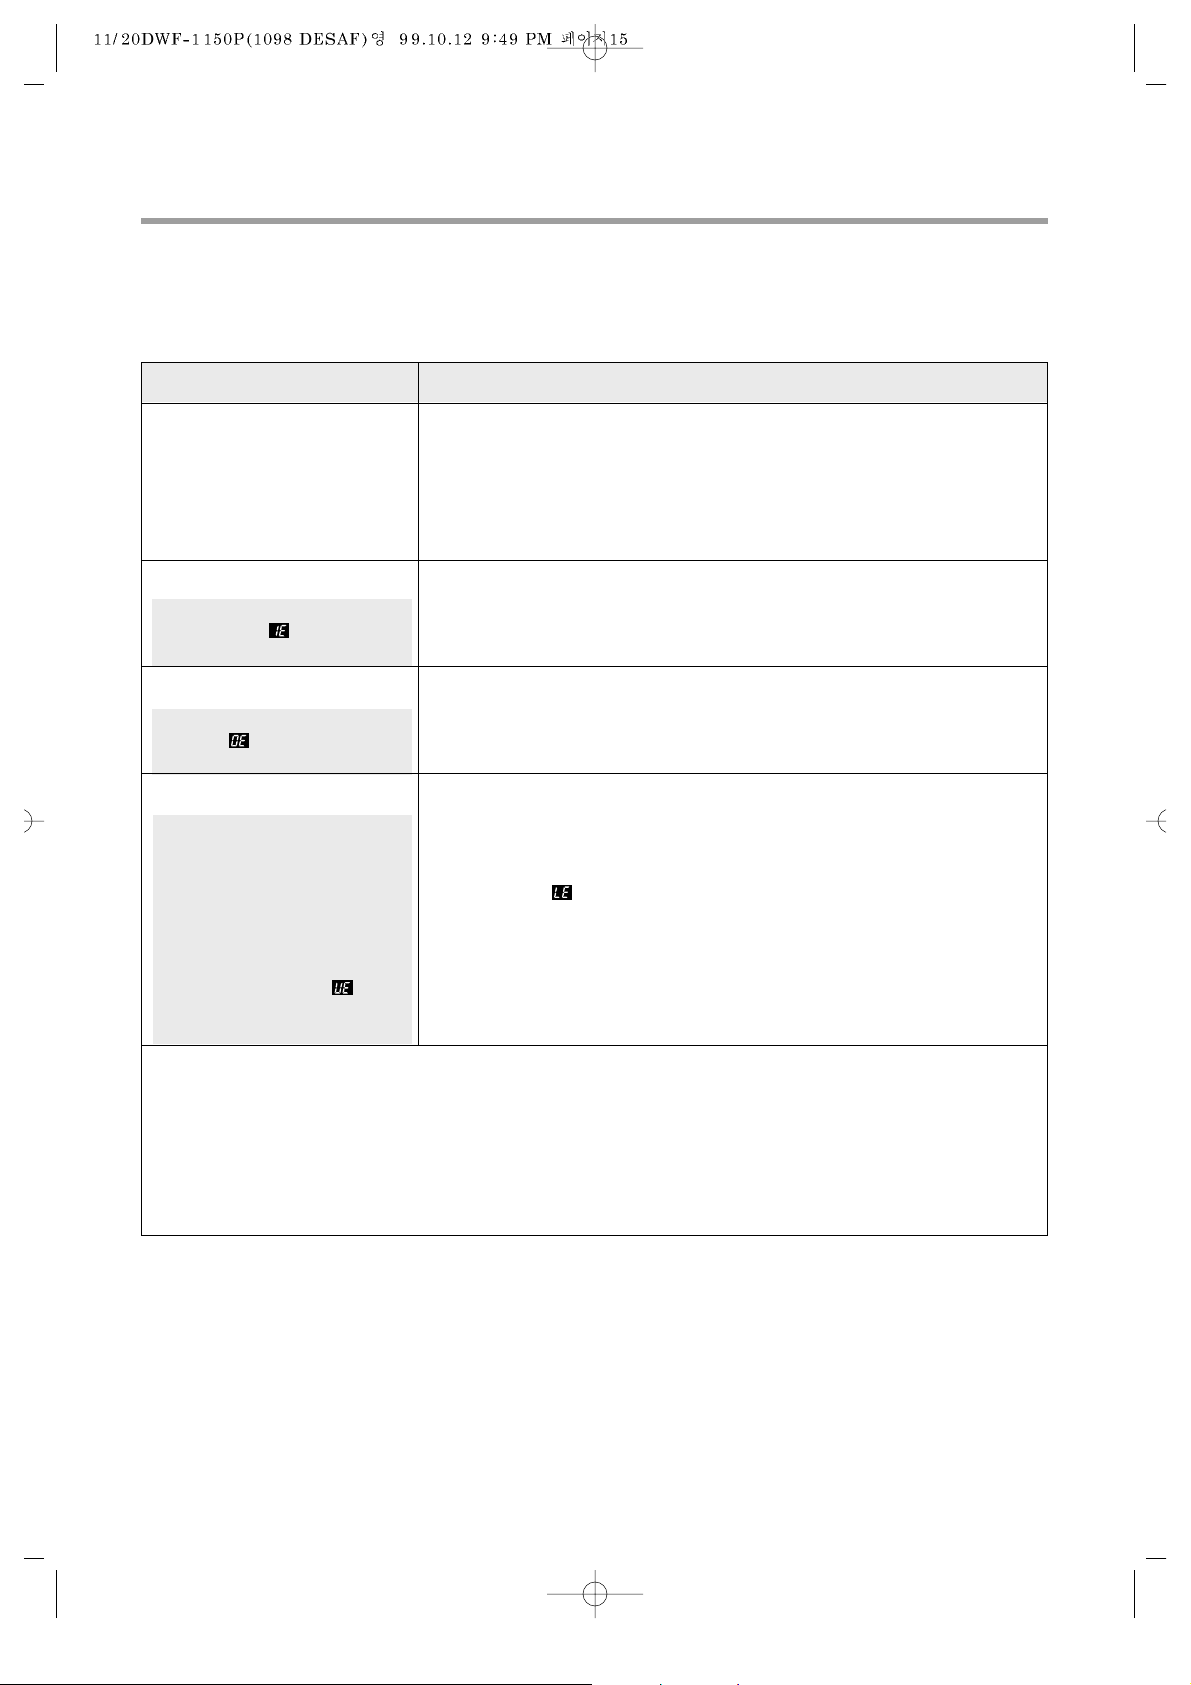
• These cases are not malfunctions
• The sound "wing" heard during water supply is the operating sound made by the water
inlet valve.
• The sound "sha" heard in stopping the tub is the sound that comes from the autobalancer
of the tub.
• The sound "wung" heard during wash or spin is the operating sound made by the air
bubble generator.
• The washer will not spin;
If the clothes is collected on one side
during spin and the tub becomes
unbalanced, the spin operation will be
interrupted, and then this unbalanced
condition will be corrected by following
operation: WATER SUPPLY → RINSE→
DRAIN However if the unbalanced
condition is unchanged despite repeating
the above operation, the lamp will
light up, and the buzzer will sound to
indicate a problem.
• Is the clothe in the tub collected on one side?
• Is the washing machine installed on an uneven floor or is the
vibration serious?
• Is the lid open?
(The lamp will light up in this case.)
Most problems are easily solved if you understand the cause. Check the following list for
problem befor calling for service.
Before calling for service, check these
• The washer will not
operate at all.
• Water is not supplied;
If water supply is not finished within 20
minutes, the lamp will light up, and
the buzzer will sound to indicate a problem.
• The washer will not drain;
If the drain is not finished within selected
time, lamp will light up, and the
buzzer will sound to indicate a problem.
• Is there a power failure?
• Is the power cord correctly connected to an electric outlet?
• Is the electric fuse broken?
• Did you turn on the power?
• Did you press Start/Hold button?
• Is there correct amount of water in the tub?
• Did you connect the inlet hose and open the water tap?
• Is the inlet hose or the water tap frozen?
• Is the water supply shut off?
• Does foreign matter block up the inlet hose filter?
• Is the drain hose frozen or blocked up by dirt?
• Is the drain hose kinked or deformed?
• Is the end of the drain hose immersed in water?
• Is there excessive dirt inside the pump housing?
PROBLEM CHECK POINT
Page 15
16
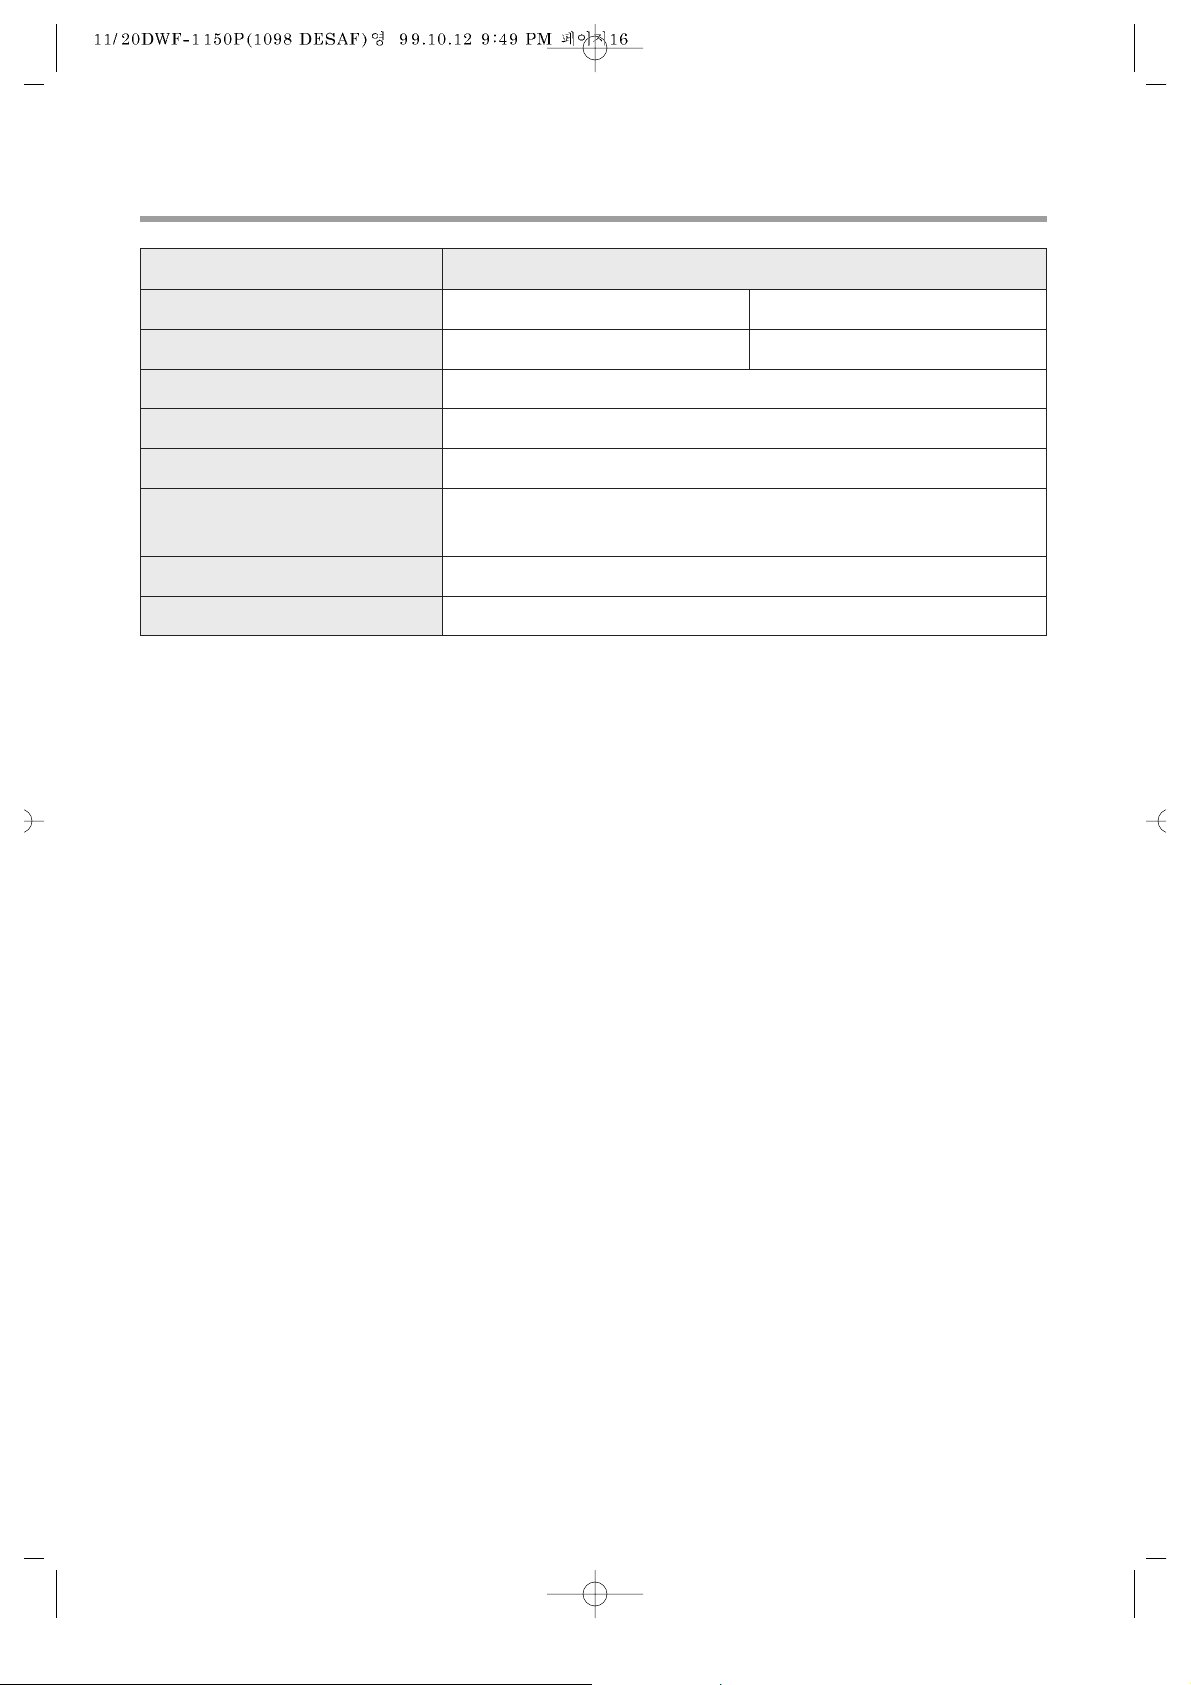
MODEL NO. DWF-1150P
Power Source AC110, 127V/60HZ AC220, 230, 240V/50, 60Hz
Power Consuption 550W 480W
Dimension (WxHxD, mm) 630x1010x670
Unit Weight 47Kg / 49Kg (Pump)
Standard Water Consumption 250`
Standard Water Level
HIGH (97`), •(87`), MEDIUM (77`),
•(70`), LOW (62`), •(47`), E.LOW (36`)
Operating Water Pressur e 0.3Kgf/cm2~8Kgf/cm2(2.94N/cm2~78.4N/cm2)
Wash Mode Double – Washing Type (Air-Bubble + Pulsator)
SPECIFICATION
Page 16
,
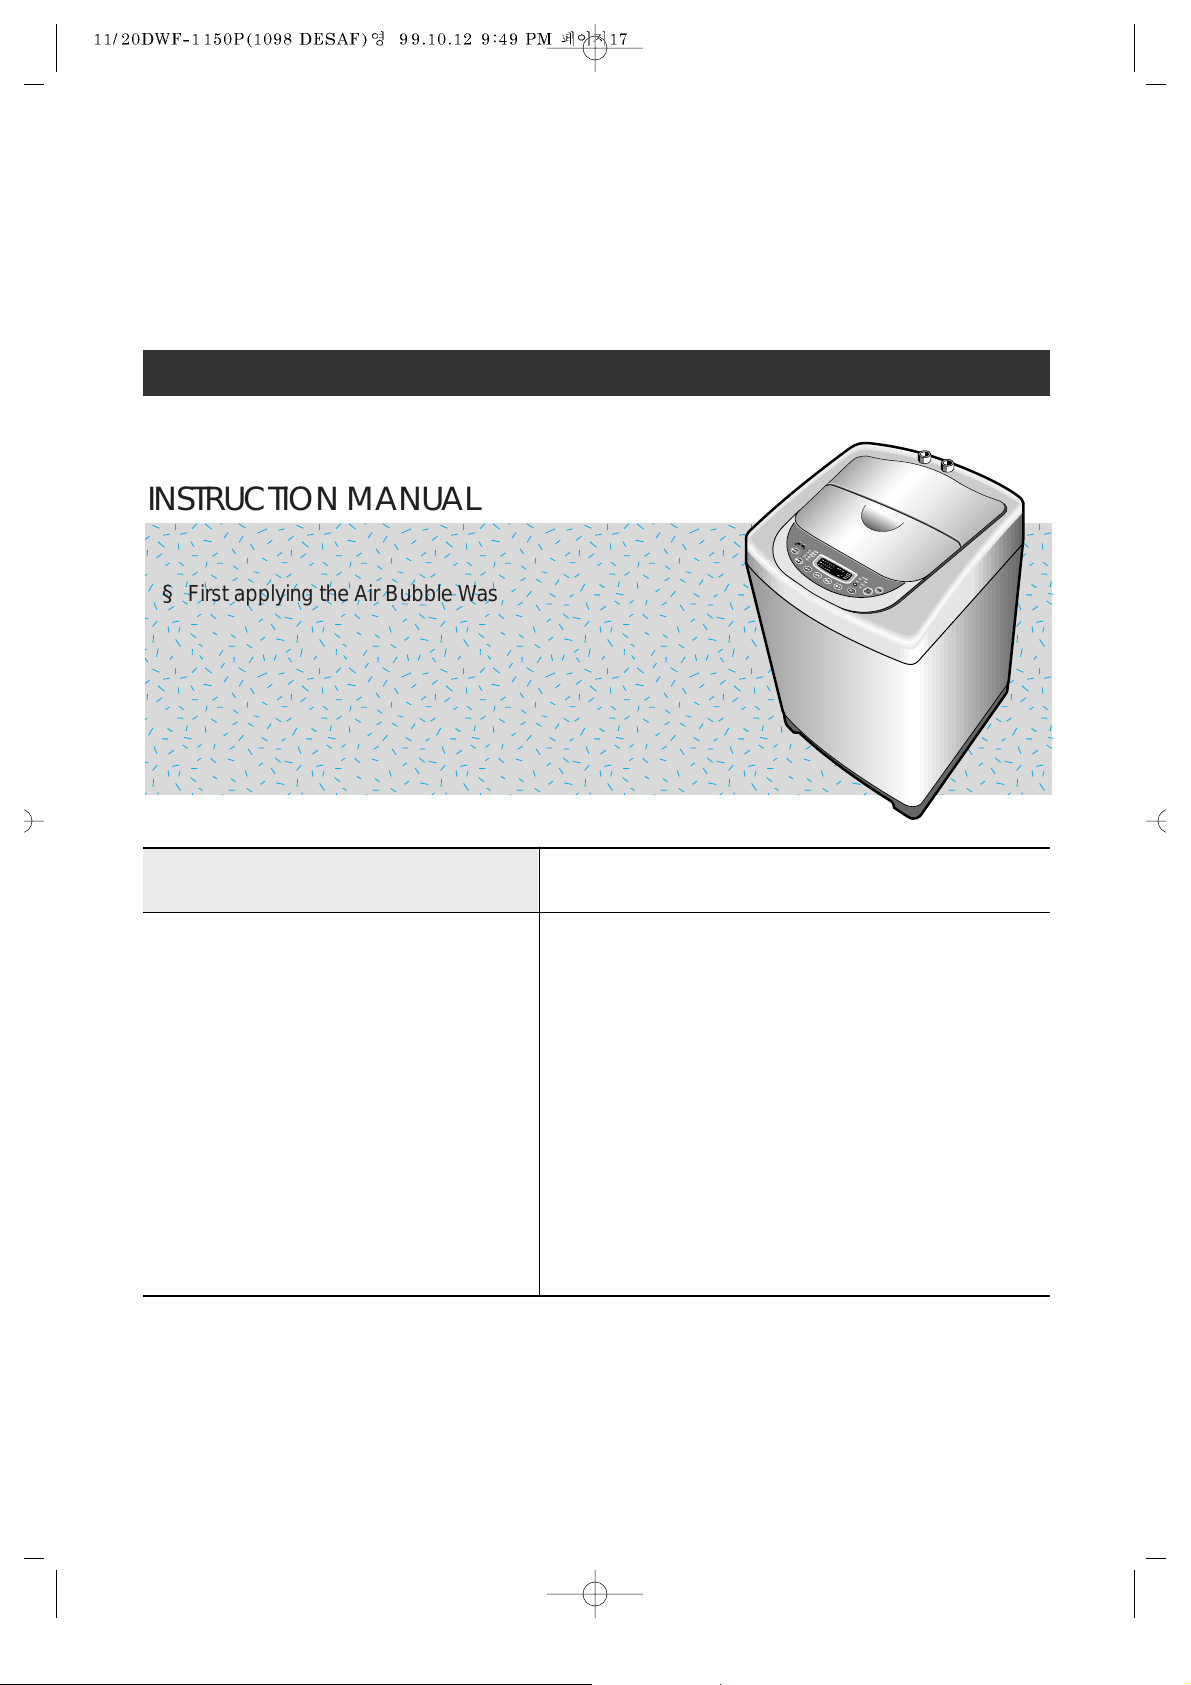
INSTRUCTION MANUAL
§ First applying the Air Bubble Washing System in the world.
§ Applying One-Touch Operation System.
§ Realizing calm washing through the innovational low-noise
design.
§ Before operating this washer, please read this instruction
completely . Thank you
Model: DWF-1150P
=
Full-Auto Electric Washing Machine
¢”Your washer is equipped with the
bubble generator that generates a
great deal of air bubble.
¢”The air bubbles knok the dirt out of
the clothes during wash and they
push up the heavy dirt to remove it
during rinse.
¢”Because the double washing
method using both air bubble &
water current is applied to this
washer the wash effects
comparison with the original
washer system.
The First Air Bubble Washing
System in the W orld
CONTENTS Page
PART AND FEATURES .........................................................2
WASHER SAFETY.................................................................3
INSTALLA TION INSTR UCTIONS.........................................4
ELECTRICAL REQUIREMENTS..........................................5
INLET HOSE CONNECTION................................................6
OPERATING YOUR W ASHER.............................................7
THE FUNCTIONS OF THE CONTROL PANEL..................8
WASHING PR OCEDURE AND COURSE SELECTION
.......9
STARTING Y OUR W ASHER...............................................11
CARING FOR Y OUR WASHER.........................................12
HOW T O CLEAN THE FILTER...........................................13
REMOVING STAINS............................................................14
TROUBLE SHOOTING........................................................15
SPECIFICATION ..................................................................16
A NOTE T O YOU
Thank you for b uying a D AEW OO appliance.
DAEWOO w ashers are easy to use, sa v e time, and help y ou manage y our home better .
To ensure that enjoy yours of trouble-free operation, we de v eloped this instruction manual.
It contains valuable inf ormation about how to operate and maintain y our washer properly and saf ely.
Please read it carefully.
⁄°°
=
=
Airpower
dkdkfdkdldldldkffmfndlssdds
,,,,,
 Loading...