

Page 1
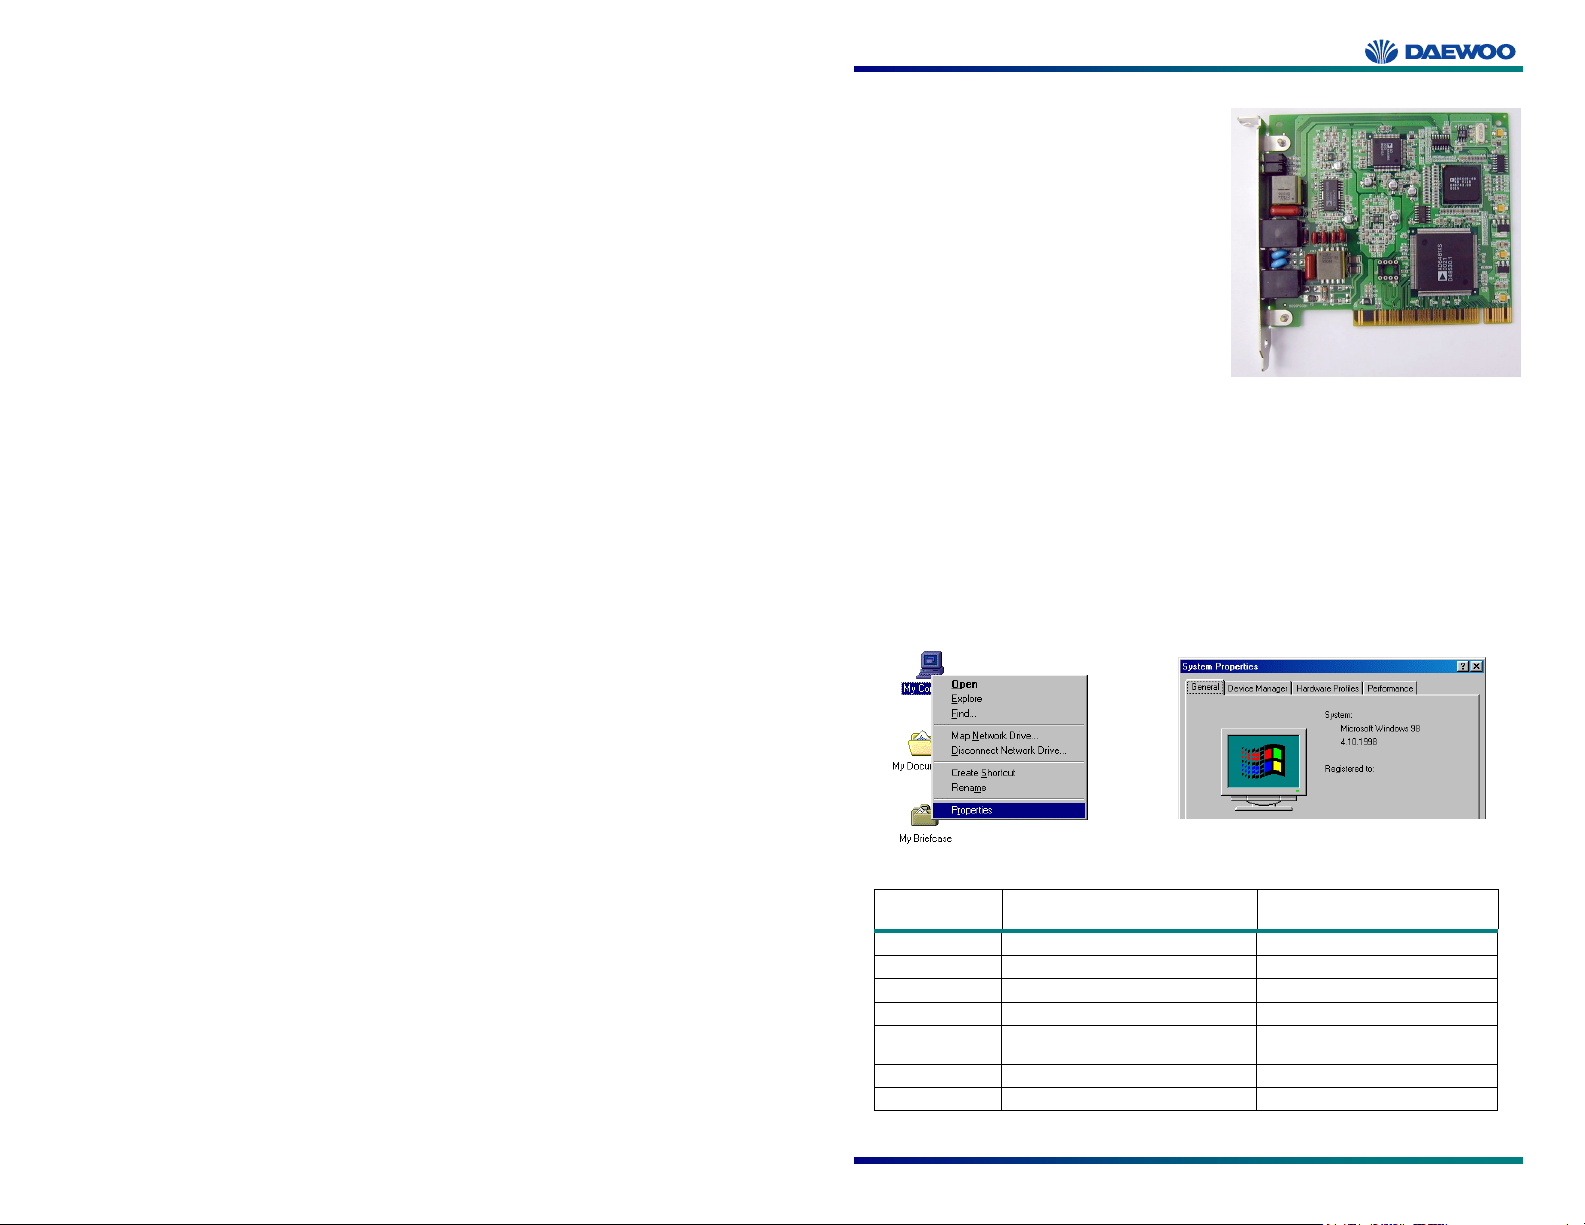
Table of Contents
CONGRATULATIONS!................................................................................................... 2/
STEP 1 - KNOW YOUR PC’S OPERATING SYSTEM ...............................................2/
STEP 2 - DETERMINE YOUR CONNECTION SETTINGS....................................... 3/
STEP 3 - INSTALL THE ADSL MODEM CARD......................................................... 4/
STEP 4 - INSTALL THE DRIVERS............................................................................... 6/
WINDOWS 95A................................................................................................................. 7/
WINDOWS 95B............................................................................................................... 10/
WINDOWS 98, 98SE....................................................................................................... 14/
WINDOWS ME ................................................................................................................16/
WINDOWS NT4.0 ...........................................................................................................18/
WINDOWS NT4.0: ADDING TCP/IP PROTOCOL .............................................................. 21/
WINDOWS 2000.............................................................................................................. 23/
STEP 5 - EDITING YOUR SERVICE CONNECTION.............................................. 25/
IP CONFIGURATION ........................................................................................................ 25/
DAEWOO DSL MONITOR........................................................................................... 26/
MODEM INFORMATION AND RENEWING IP CONFIGURATION ........................................... 26/
ADVANCED SETTING ....................................................................................................... 26/
REMOVING DRIVERS .................................................................................................27/
WINDOWS 95/98/ME/NT4.0/2000.................................................................................. 27/
TROUBLE SHOOTING................................................................................................. 28/
Congratulations!
You are about to accelerate into ADSL
technology. Your new ADSL modem card is an
internal Asymmetric Digital Subscriber Line
(ADSL) PCI modem card, which conveniently
plugs into your computer system. The modem
connects directly to your telephone line via a
standard connector.
This guide is designed to walk you through
installation of your ADSL Modem card in the
easiest and quickest way possible. Please follow
the instructions carefully.
Step 1 - Know your PC’s Operating System
You will need to know the exact version of Microsoft Windows installed in your computer.
If you do not know or are unsure, please proceed as follows to determine your version of
the Microsoft Operating System.
On your desktop, first right-click “My Computer”, then select “Properties”. The version
number of the Microsoft Windows Operating System installed in your computer will be
displayed on the General tab. Refer to the following table for more detailed information.
CONNECTOR PIN-OUT ............................................................................................... 30/
LED FUNCTIONS FOR THE DW-8000P MODEM ................................................... 30/
SYSTEM REQUIREMENTS & COMPLIANCE CERTIFICATION ....................... 31/
COPYRIGHT & REGULATORY INFORMATION...................................................31/
Windows OS System Properties Description Release (Microsoft Web)
Win 95A 4.00.950A Windows 95 OSR1
Win 95B 4.00.950B Windows 95 OSR2
Win 98 4.10.1998 Windows 98
Win 98SE 4.10.2222A 2nd Edition Windows 98 2nd Edition
Win Me 4.90.3000 Windows Millennium
Edition
Win 2000 5.00.2195 Windows 2000
Win NT4 4.00.1381 Windows NT 4.0
2
Page 2
If you have questions regarding your PC system and the Microsoft Windows Operating
System, please contact your original PC manufacturer or Microsoft for assistance.
Before Installing the ADSL PCI Modem Card, it is important to verify that the ADSL data
port RJ-11 jack is configured so that the center two pins, pins 3 and 4, are used for ADSL
data, otherwise the ADSL PCI modem card will not make a proper connection. If the
ADSL data port installation uses pins 2 and 5 for data, a wiring converter will be required.
Do not alter or remove a wiring converter if present. Consult with your ADSL service
provider regarding a wiring converter or before attempting any wiring changes.
Step 2 - Determine your Connection settings
You need to know your PC systems Windows OS. Refer to the following chart for your
ADSL Driver.
ADSL Driver Selection RFC1483
Win 95A & 95B Win95
Win 98 & 98SE & Me Win98Me
Win NT 4.0 WinNT
Win 2000 Win2k
Having determined the ADSL Driver you will be installing, you now need to gather the
connection information supplied by your ADSL service provider.
VPI value:_________
VCI value:_________
Framing: VC_Mux LLC/SNAP
ADSL Mode: ANSI T1.413 ITU G.lite ITU G.dmt
For RFC 1483
Host:
Domain:
Gateway:
IP Address:
Subnet Mask:
DNS or server address:
Step 3 - Install the ADSL modem card
Caution: To avoid possible damage to your modem card, touch the
metal chassis of your PC system to remove static charge first, then
remove your ADSL modem card from the protective anti-static bag.
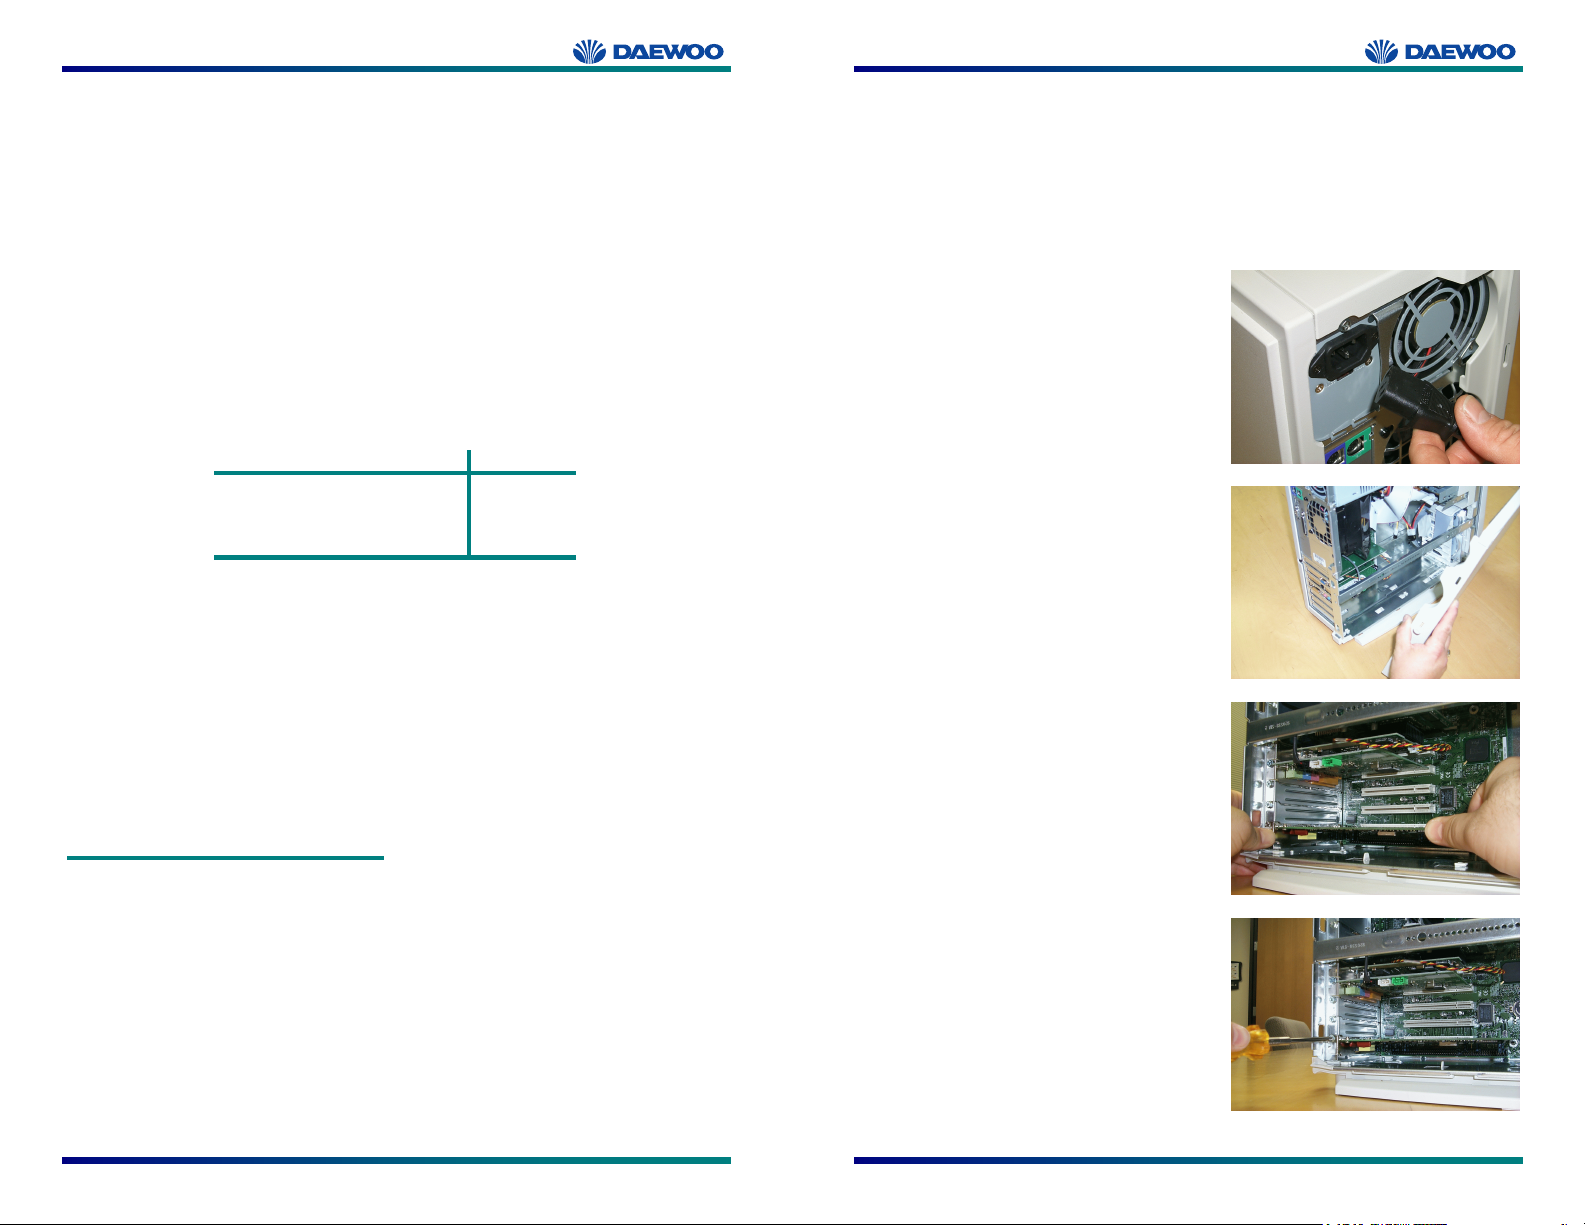
1. Shut down your computer and switch the
power off.
2. Unplug the power cord for your computer
from the electrical outlet.
3. Remove the cover from your systems
chassis (see your PC manufacturer’s
manual)
4. Unscrew “slot cover bracket” from an
unused PCI (usually white in color) slot.
5. Gently and evenly insert the PCI modem
card into your empty PCI slot.
6. Make sure the card is firmly seated, then
secure the card with the bracket screw.
7. Replace the cover of your computer
system.
3
4
Page 3
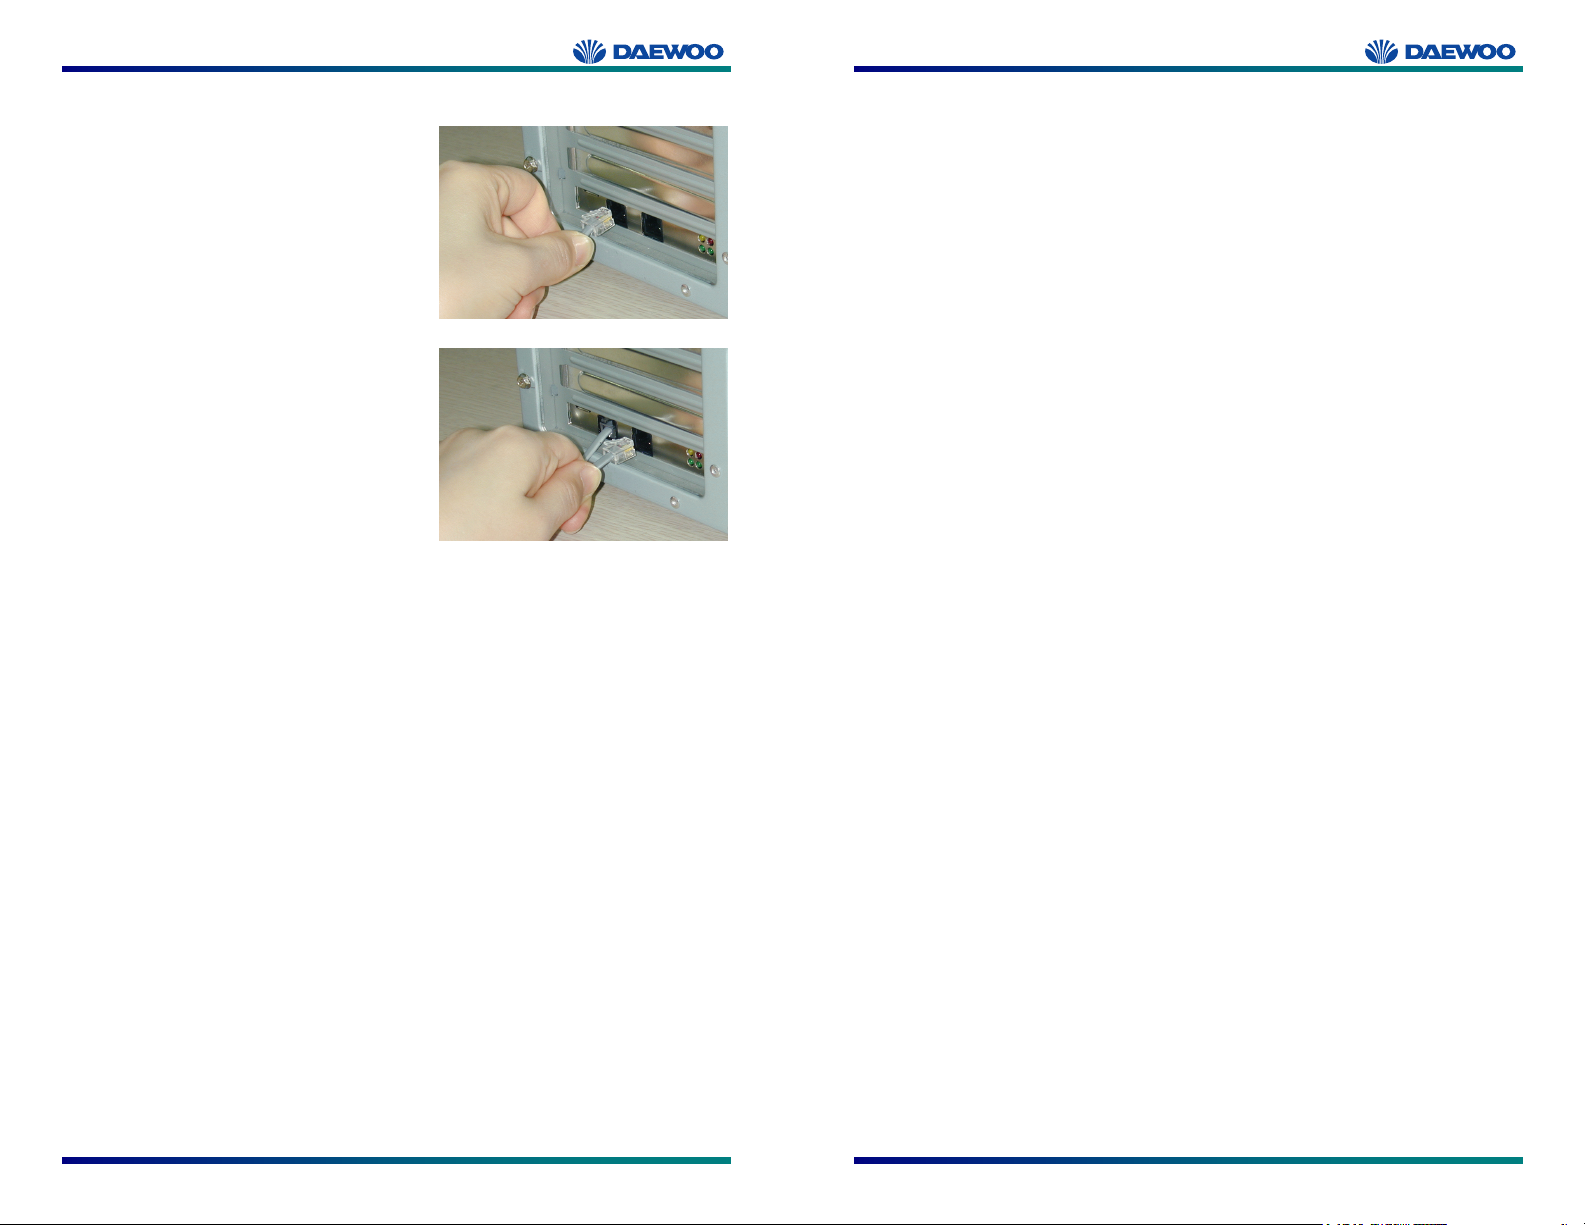
8. Connect the ADSL/phone line to the
connector port (ADSL) on the modem card
and plug the other end of the cable into
your ADSL/phone service.
9. You can connect a phone to the internally
micro-filtered phone connector port
(PHONE).
Step 4 ---- Install the driver
You will be installing drivers and proceeding to make an Internet connection. This process
requires you to enter information as prompted by the Microsoft Installation Wizard.
NOTE: You may need the Microsoft Windows Operating System
installation files (CAB files) to complete the installation. The CAB
files are contained in the Microsoft’s system CD-ROM. Some
systems may have already installed the CAB files to the hard drive,
but you should have the Microsoft Windows CD-ROM handy just in
case.
Proceed now to the installation procedure for the Windows Operating System
installed in your computer.
5
6
Page 4

Windows 95A
After installing the ADSL modem card, plug the power cable back into the PC system and
turn the power on.
Before you proceed to install drivers you will need to upgrade your Dial-Up Networking
(DUN) application to version 1.3 or above. The Microsoft DUN is conveniently contained
on your ADSL Driver CD-ROM.
1. After restart, the Update Device Driver
Wizard will detect the ADSL modem as a
PCI Card. [Cancel] the New Hardware
Found window.
2. At your desktop, click [Start], then select
[Run].
3. The Run window appears. Insert the
ADSL Driver CD, then click on [Browse]
and proceed to locate the ADSL Driver
CD-ROM. Locate and select the
Msdun13.exe file (F:\Support
\MSDUN13\English\MSDUN13.exe). The
MSDUN13.exe appears in the Open box.
Click [OK].
NOTE: The example uses “F” as the CD-ROM drive letter. Drive
letters may vary.
4. The Microsoft Dial-Up Networking 1.3
window appears with the message “This
will install Microsoft Dial-Up Networking
1.3 for Windows 95. Do you wish to
continue?” Click [Yes].
5. An End-User License Agreement will
appear. To accept, click [Yes].
6. You will be asked: “Do you want to restart
your computer now?” Click [Yes].
NOTE: You may need the Microsoft Windows Operating System
installation files (CAB files) to complete the installation. The CAB
files are contained in the Microsoft’s OS CD-ROM. Some systems
may have already installed the CAB files to the hard drive, but you
should have the CD-ROM handy just in case.
7. After your computer reboots, the New
Hardware Found window will detect the
ADSL modem card as a PCI Card. Select
the “Driver from disk provided by
hardware manufacturer” option. Click
[OK].
8. Insert the ADSL Driver CD-ROM into
your systems CD drive.
9. The Install From Disk window appears.
Click [Browse] to locate the driver on your
CD-ROM for your computer’s OS
(F:\Drivers\WIN95), then click [OK].
10. The DW-8000P NIC ADSL Driver
Settings window appears. This is the
Advanced Settings section. Enter in the
PVC_VPI, PVC_VCI, and ADSL Line
Type values supplied by your ADSL
service provider.
e.g.) TELUS VCI: 33, VPI: 0
7
8
Page 5
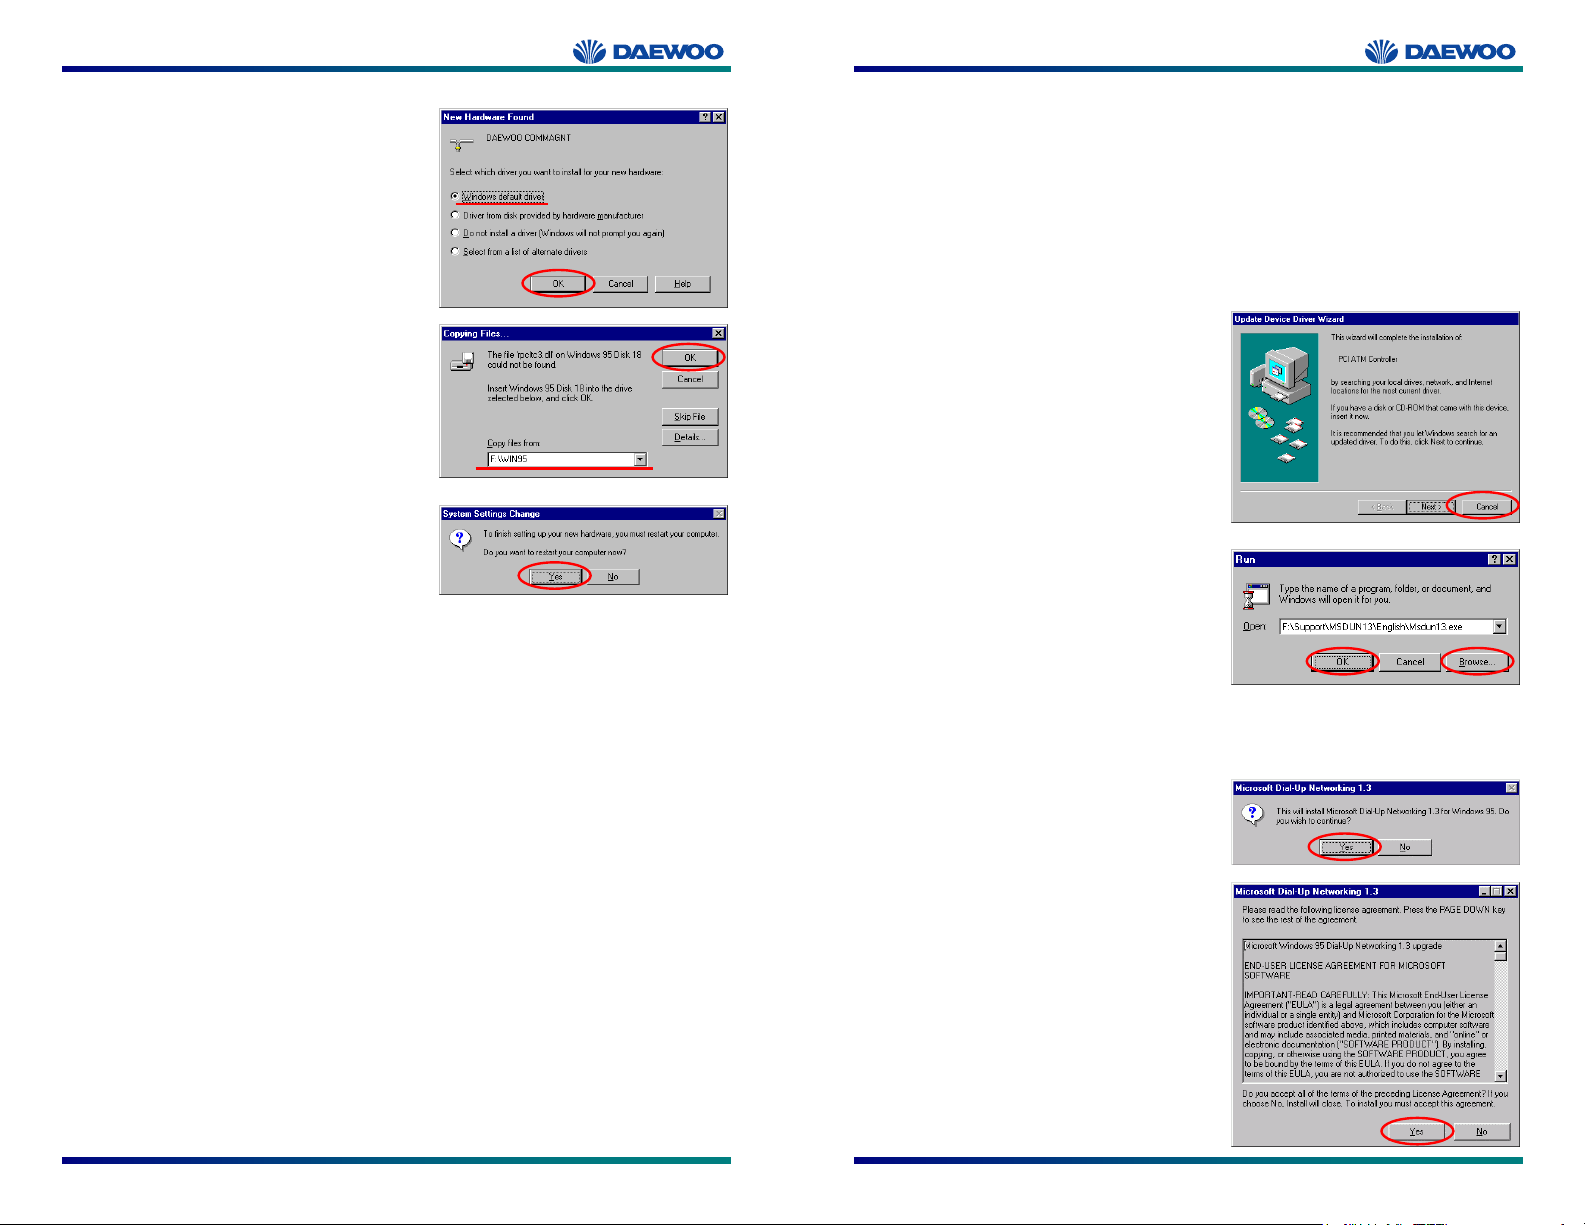
11. The New Hardware Found window will
detect the ADSL modem card as a
DAEWOO COMMAGNT. Select the
“Windows default driver” option. Click
[OK].
12. Enter the Windows 95 install files path
(F:\Win95) and click [OK]
13. The System Settings Change window
appears. For the PC system to set up the
DW-8000P PCI NIC ADSL Driver, a
system Restart is required. Click [Yes].
Congratulations, you are done. Your ADSL Internet connection is
established!
Windows 95B
After installing the ADSL modem card, plug the power cable back into the PC system and
turn the power on.
Before you proceed to install drivers you will need to upgrade your Dial-Up Networking
(DUN) application to version 1.3 or above. The Microsoft DUN is conveniently contained
on your ADSL Driver CD-ROM.
1. After restart, the Update Device Driver
Wizard will detect the ADSL modem card
as a PCI ATM Controller. [Cancel] the
New hardware found window.
2. At your desktop, click [Start], then select
[Run].
3. The Run window appears. Insert the
ADSL Driver CD, then click on [Browse]
and proceed to locate the ADSL Driver
CD-ROM. Locate and select the
Msdun13.exe file (F:\Support
\MSDUN13\English\MSDUN13.exe). The
MSDUN13.exe appears in the Open box.
Click [OK].
NOTE: The example uses “F” as the CD-ROM drive letter. Drive
letters may vary.
4. The Microsoft Dial-Up Networking 1.3
window appears with the message “This
will install Microsoft Dial-Up Networking
1.3 for Windows 95. Do you wish to
continue?” Click [Yes].
5. An End-User License Agreement will
appear. To accept, click [Yes].
9
10
Page 6

6. You will be asked “Do you want to restart
your computer now?” Click [Yes].
NOTE: You may need the Microsoft Windows Operating System
installation files (CAB files) to complete the installation. The CAB
files are contained in the Microsoft’s system CD-ROM. Some
systems may have already installed the CAB files to the hard drive,
but you should have the CD-ROM handy just in case.
7. After your computer reboots, the Update
Device Driver Wizard will detect the
ADSL modem card as a PCI ATM
Controller, click [Next].
8. Insert the ADSL Driver CD-ROM into
you systems CD drive.
9. The Update Device Driver Wizard will
appear and indicate, “Windows was unable
to locate a driver for this device”. Click
[Other Locations].
10. The Select Other Location window
appears. Click [Browse] to locate the
driver on your CD-ROM for the protocol
supported by your ADSL provider:
F:\Drivers\Win95 (The example uses “F”
as the CD-ROM drive letter. Your drive
may have a different letter). Then click
[OK].
11. The Update Device Driver Wizard will
appear and find the DW-8000P PCI ADSL
Driver. Click [Finish].
12. The DW-8000P NIC ADSL Driver
Settings window appears. This is the
Advanced Settings section. And enter in
the PVC_VPI, PVC_VCI, and ADSL
Line Type values supplied by your ADSL
service provider.
e.g.) TELUS VCI: 33, VPI: 0
7. If prompted to insert your Windows CD, do
so at this time, then click [OK].
8. Enter the Windows 95 installation files
path (F:\Win95) and click [OK].
9. The Update Device Driver Wizard will
detect the ADSL modem card as a
DAEWOO COMMAGNT, then click
[Next].
11
12
Page 7

10. The Update Device Driver Wizard will
appear and indicate, “Windows was
unable to locate a driver for this device”.
Click [Other Locations].
11. The Select Other Location window
appears. Click [Browse] to locate the
driver on your CD-ROM for the protocol
supported by your ADSL provider:
F:\Drivers\Win95 (The example uses “F”
as the CD-ROM drive letter. Yours may
have a different letter), then click [OK].
12. The Update Device Driver Wizard will
find the DAEWOO COMMAGNT. Click
[Finish].
Windows 98, 98SE
After installing the ADSL modem card, plug the power cable back into the PC system and
turn the power on.
1. The Add New Hardware Wizard window
will automatically appear to indicate that a
new PCI ATM Controller has been found.
Click [Next].
2. Still in the Add New Hardware Wizard.
You will be asked, “What do you want
Windows to do?” Select the “Search for
the best driver for your device” option,
then click [Next].
3. Insert the ADSL Driver CD into your
systems CD-ROM drive.
13. If prompted to insert your Windows CD, do
so at this time, then click [OK].
14. Enter the [CD drive Letter] and :\Win95
(e.g. F:\Win95), then click [OK].
15. The System Settings Change window
appears. For the PC system to set up the
DW-8000P PCI NIC ADSL Driver, a
system Restart is required. Click [Yes].
Congratulations, you are done. Your ADSL Internet connection is
established!
13
4. Select “Specify a location” and click
[Browse] to locate the driver on your CDROM for the protocol supported by your
ADSL provider: F:\Drivers\Win98Me
(The example uses “F” as the CD-ROM
drive letter. Your drive may have a
different letter), then click [Next].
5. The Add New Hardware Wizard will
appear and indicate the DW-8000P PCI
NIC ADSL Driver has been recognized
and will install a new driver. Click [Next].
14
Page 8

6. The DW-8000P NIC ADSL Driver
Settings window appears. This is the
Advanced Settings section. And enter in
the PVC_VPI, PVC_VCI, and ADSL
Line Type values supplied by your ADSL
service provider.
e.g.) TELUS VCI: 33, VPI: 0
7. If prompted to insert your Windows CD, do
so at this time, then click [OK].
8. Enter the [CD drive Letter] and :\Win98
(e.g. F:\Win98), then click [OK].
9. At the conclusion of the ADSL modem
driver installation, the Add New
Hardware Wizard window appears and
displays your newly installed DW-8000P
PCI NIC ADSL Driver. Click [Finish].
10. The System Settings Change window
appears. For the PC system to set up the
DW-8000P PCI NIC ADSL Driver, a
system Restart is required. Click [Yes].
Congratulations, you are done. Your ADSL Internet connection is
established!
Windows Me
After installing the ADSL modem card, plug the power cable back into the PC system and
turn the power on.
1. The Add New Hardware Wizard window
will automatically appear to indicate that a
new PCI ATM Controller has been found.
You will be asked, “What would you like
to do?” Select the “Specify the location of
the driver” option, then click [Next].
2. Still in the Add New Hardware Wizard.
Insert the ADSL Driver CD into your
systems CD-ROM drive. Select “Specify
a location” and click [Browse] to locate
the driver on your CD-ROM for the
protocol supported by your ADSL
provider: F:\Drivers\Win98Me (The
example uses “F” as the CD-ROM drive
letter. Your drive may have a different
letter), then click [Next].
3. The Add New Hardware Wizard will
appear and indicate the DW-8000P PCI
NIC ADSL Driver has been recognized
and will install a new driver. Click [Next].
4. The DW-8000P NIC ADSL Driver
Settings window appears. This is the
Advanced Settings section. And enter in
the PVC_VPI, PVC_VCI, and ADSL
Line Type values supplied by your ADSL
service provider.
15
16
Page 9

5. At the conclusion of the ADSL modem
driver installation, the Add New
Hardware Wizard window appears and
displays your newly installed DW-8000P
PCI NIC ADSL Driver. Click [Finish].
6. The System Settings Change window
appears. For the PC system to set up the
DW-8000P PCI NIC ADSL Driver, a
system restart is required. Click [Yes].
Congratulations, you are done. Your ADSL Internet connection is
established!
Windows NT4.0
After installing the ADSL modem card, plug the power cable back into the PC system and
turn the power on.
1. On your desktop, double
Computer, then double-click Control
Panel.
2. In the Control Panel window, double-click
the Network icon. The Network window
appears. Select the Adapters tab, then click
[Add].
-click My
3. The Select Network Adapter window
appears. Click [Have Disk].
4. Insert ADSL Driver CD-ROM into your
systems CD drive.
5. The Insert Disk window appears. Type in:
F:\Drivers\WinNT (The example uses “F”
as the CD-ROM drive letter. Your drive
may have a different letter.) Click [OK].
6. The Select OEM Option window will find
the DAEWOO NicAdsl PCI Ethernet
Adapter, Click [OK].
17
18
Page 10

7. The DAEWOO NicAdsl PCI Adapter
Card Setup window appears. Select
Protocol supplied by your ADSL service
provider. Click [OK].
8. The DW-8000P NIC ADSL Driver
Settings window appears. This is the
Advanced Settings section. And enter in
the PVC_VPI, PVC_VCI, and ADSL
Line Type values supplied by your ADSL
service provider.
e.g.) TELUS VCI: 33, VPI: 0
9. The Network window will appear. Click
the Adapters tab to verify that DAEWOO
NicAdsl PCI Ethernet Adapter has been
found.
NOTE: To review the Network window properties at any time, rightclick the Network Neighborhood icon and select Properties.
NOTE: If no previous network devices have been installed, then the
Network Neighborhood icon will not be present on your desktop. To
open the Network window, double-click My Computer then Control
Panel then Network.
10. Click on the Protocols tab and verify that
the ADI Comm Agent Driver and
TCP/IP Protocol are present.
11. If TCP/IP Protocol doesn’t exist, go to the
“Windows NT4: Adding TCP/IP
Protocol” section (Page 21).
12. If TCP/IP Protocol exists, just go on.
13. Select “TCP/IP Protocol”. Click
[Properties].
14. Microsoft TCP/IP Properties window
appears. Select “Adapter: DAEWOO
NicAdsl PCI Ethernet Adapter”.
15. If your ISP supports DHCP, select
“Obtain an IP address from a DHCP
server”. If not, select “Specify an IP
address”.
16. If you select “Specify an IP address”, you
need to input IP Address, Subnet Mask,
Default Gateway. Ask to your ISP.
17. You may need to input DNS, DHCP relay,
Routing information. Ask to your ISP.
18. The Network Settings Change window
appears. You must now restart your
computer for the settings to take effect.
Click [Yes].
Congratulations, you are done. Your ADSL Internet connection is
established!
19
20
Page 11

Windows NT4.0: Adding TCP/IP Protocol
If TCP/IP Protocol doesn’t exist, you must add TCP/IP Protocol.
1. Open Network window. Click on the
[Protocols] tab. Click [Add].
2. Select Network Protocol window appears.
Select “TCP/IP Protocol”. Click [OK].
3. The TCP/IP Setup window appears. If
your ISP supports DHCP, click [Yes]. If
not, click [No].
4. The Window NT Setup window appears.
Insert your Windows NT CD, and type in
the path (e.g. F:\winnt\english The
example uses “F” as the CD-ROM drive
letter. Your drive and path may be
different.) Click [Continue].
5. TCP/IP Protocol will be in the Network
Protocols list box.
6. You can configure TCP/IP Protocol’s
Properties now. About your TCP/IP
Properties, ask to your ISP.
21
22
Page 12

Windows 2000
After installing the ADSL modem card, plug the power cable back into the PC system and
turn the power on.
1. After installing the ADSL modem card,
power on the PC system. After start-up, the
Found New Hardware Wizard will
appear. Click [Next].
2. Still in the Found New Hardware Wizard,
select the “Search for a suitable …
device” option. Click [Next].
3. Next you will be prompted for software
drivers. Select the “Specify a location”.
Click [Next].
4. Insert the ADSL Driver CD into the
systems CD-ROM drive. Click [Browse] to
locate the driver on your CD-ROM for the
protocol supported by your ADSL
provider: F:\Drivers\Win2k (The example
uses “F” as the CD-ROM drive letter. Your
drive may have a different letter.) Click
[OK].
5. The Found New Hardware Wizard will
appear and find the ATM Network
Controller, click [Next].
6. The Digital Signature Not Found window
appears. You will be asked; Do you want to
continue installation? Click [Yes].
7. The DW-8000P NIC ADSL Driver
Settings window appears. This is the
Advanced Settings section. And enter in
the PVC_VPI, PVC_VCI, and ADSL
Line Type values supplied by your ADSL
service provider.
e.g.) TELUS VCI: 33, VPI: 0
8. The Found New Hardware Wizard will
prompt, “Windows has finished installing
the software for this device”. Click
[Finish].
Congratulations, you are done. Your ADSL Internet connection is
established!
23
24
Page 13

Step 5 - Editing Your Service Connection
IP Configuration
1. This section includes the IP configuration specifics for Windows NT4.0. The NT 4.0
windows are slightly different from those of Windows 95 /98. Other than minor
screen differences, the process for editing the IP address settings is the same for
Windows NT 4.0 and Windows 95/98.
2. At your desktop, first double-click My Computer, then double-click Control Panel
to view the contents of the control panel. In the Control Panel window, double-click
the Network icon.
Note: The Network window shortcut is a right-click on the Network Neighborhood
icon on your desktop, then a left-click on Properties.
3. Select the Protocols tab of the network window. Select “TCP/IP” Protocol and click
[Properties].
4. Select the “IP address” option and note that the IP Address and Subnet Mask
regions will turn from gray to active.
5. Enter the IP Address (e.g. 192.168.4.39) and Subnet mask (e.g. 255.255.255.0).
6. Enter the Default Gateway in this window, then enter the Host Name and Domain.
NOTE: Please refer to your ADSL service provider. To enter the
Domain search (DNS) entries, click Add, and then enter the
address. Click Add to save the address. Repeat the process for
additional DNS entries. Click Ok to update the changes.
DAEWOO DSL Monitor
Modem Information and Renewing IP Configuration
1. After your PC has rebooted, right-click on
the DSL Monitor Icon, and select the
“DAEWOO DSL Monitor…” option (or
you can double-click
2. The DAEWOO DSL Monitor window
appears.
3. There are ‘Modem’, ‘ATM’, and ‘Info’
tabs.
4. ‘Modem’ tap shows Status, Line Type,
and VPI/VCI setting.
5. You can use [Reset Modem] to re-sync
ADSL link.
6. You can use [Ipconfig Renew] to renew
your TCP/IP configuration in case of using
DHCP.
7. ‘ATM’ tab shows ATM cell and packet
statistics.
8. ‘Info’ tab shows Hardware, Firmware,
Driver, and Package versions.
the icon).
25
Advanced setting
1. Right-click on the [DSL Monitor Icon],
and select the “Advanced Settings…”
option
2. The DW-8000P NIC ADSL Driver
Settings window appears. This is the
Advanced Settings section. And enter in
the PVC_VPI, PVC_VCI, and ADSL
Line Type values supplied by your ADSL
service provider.
26
Page 14

Removing Drivers
Windows 95/98/Me/NT4.0/2000
1. On the desktop, click the Start Menu on
the Task Bar.
2. Select Programs. The system window
appears.
3. Select the DW-8000P PCI NIC ADSL
Driver, and then click on the Uninstall.
4. The Uninstall DW-8000P ADSL Driver
window appears. For the PC system to set
up the DW-8000P PCI NIC ADSL Driver,
a system Restart is required. Click [Yes].
5. The Uninstall DW-8000P ADSL Driver
window appears. For the PC system to set
up the DW-8000P PCI NIC ADSL Driver,
a system Restart is required. Click [OK].
Note: For Windows 95/98/Me/NT4.0, an Uninstall Finished windows
message appears. Click [Yes] to restart your system and confirm
changes.
Trouble Shooting
If you have completed the ADSL modem card installation procedures and your ADSL
connection is not operational, then refer to the following guidelines for assistance in
getting your ADSL modem connection up and running.
Is there a Diagnostic ICON on the Taskbar?
Try Restarting the PC system.
Are the correct drivers installed for the Operating system used?
Point-to-Point - If system OS is Windows 95, is the DUN upgraded v1.3?
Have you deleted the drivers and tried the installation again?
Is the NIC achieving ADSL connection?
Try using the Diagnostic Tools Connect option.
Is the cable installed between the ADSL modem card and the ADSL
service?
Try Restarting the PC system.
Has any cabling adapter or wiring converter been removed?
Is the NIC constantly trying to make a connection – with blinking yellow
panels?
Select Disconnect from the Diagnostic Tools then try to reconnect.
Restart the PC system and try to reconnect.
Examine the RJ-11 connectors and cable for any deterioration.
Has the wiring for your ADSL service been altered recently?
Does condition change with time of day? (a possible problem with line
noise)
27
Are appliances near the PC system introducing noise into your ADSL
service?
Power down the PC system and re-seat the ADSL modem card.
Is the NIC achieving ADSL connection - but you can’t reach the Internet?
Is the service connection address correct?
28
Page 15

Bridged Ethernet – Are the TCP/IP, Gateway and DNS addresses correct
(refer to your ADSL or ISP provider documentation)
Point-to-Point – For Windows 95 is the Dial-Up Network Upgrade v1.3
installed?
Browser configured correctly – check your browser documentation.
How can I determine the TCP/IP address for Point-to-Point?
For Windows 95/98, run the program Ipconfig from the DOS prompt (e.g.
C:\Windows\IPCONFIG).
Must TCP/IP be loaded for both Point-to-Point and Bridged Ethernet
protocols?
Yes. Please carry out the TCP/IP installation procedure before loading the
driver.
Driver installation resulted in errors or warnings, and you can’t connect.
Perform the driver removal procedure.
Verify which version of Microsoft Windows is loaded in the PC system.
For Point-to-Point Protocol– Reload Dial-Up Network upgrade 1.3
Install the driver again.
Connector Pin-out
The ADSL modem card is equipped with a RJ-11 jack for connection to
the ADSL data port. The center two pins, pins 2 and 3, are used for
ADSL data. For the card to make a proper ADSL connection, the
installed ADSL data port should also use pins 2 and 3 for data. If the
ADSL data port installation uses pins 1 and 4 for data, then a wiring
converter will be required. Do not alter or remove the wiring converter if
present. Consult with your ADSL provider before attempting any wiring changes.
LED functions for the DW-8000P Modem
LED Status Signals Description
Green LED on
Left Top
Green LED on
Right Top
Orange LED on
Right Bottom
Red LED on Left
Bottom
ACT O n
Off
LINK On
Blink
Off
DATA Blink
Off
CRC Blink CRC error occurred
Activation Request exists
Activation Request doesn’t exist
Modem not connected
Modem connecting
Modem connected
Data Transmission occurred
No Data Transmission occurred
29
30
Page 16

System Requirements & Compliance Certification
System Requirements
IBM PC/AT or compatible
Pentium 100Mhz or faster speed
30Mbytes available hard disk space or more
2x CD-ROM drive or better
32Mbyte available system memory or more
Power Requirements
0.75A Max @ +5V ± 5%, 0.1A max @ ± 12V, ± 5%
Environmental Requirements
Operating Temperature: 0 °C to 70°C with airflow
Non-operating Temperature: -10 °C to 85 °C
Operating Humidity: 10% to 90% non-condensing
Non-operating storage humidity: 5% to 95% non-condensing
Compliance Certification
FCC approved Part 15, Class B
IC approved CS-03 and ICES-003
cUL Listed
Copyright & Regulatory Information
Copyright 2001, DAEWOO Corp. All rights reserved.
This manual and software described in it are copyrighted with all rights reserved. This
manual may not be copied, in whole or in part, without written consent. All product names
are trademarks and or registered trademarks of their respective companies.
FCC Statement
This equipment has been tested and found to comply with the limits for a Class B digital
device, pursuant to Part 15 of the FCC Rules. These limits are designed to provide
reasonable protection against harmful interference in a residential installation. This
equipment generates, uses and can radiate radio frequency energy and, if not installed and
used in accordance with the instructions, may cause harmful interference to radio
communications. However, there is no guarantee that interference will not occur in a
particular installation. If this equipment does cause harmful interference to radio or
television reception, which can be determined by turning the equipment off and on, the
user is encouraged to try to correct the interference by one or more of the following
measure:
Reorient or relocated the receiving antenna.
Increase the separation between the equipment and receiver.
Connect the equipment into a different outlet circuit from than the receiver.
Consult an experienced radio/TV technician for help.
Shielded cables must be used to comply with FCC regulations.
Canadian IC CS-03 Compliance Statement
NOTICE: The Industry Canada label identifies certified equipment. This
certification means that the equipment meets telecommunications network
protective, operational and safety requirements as prescribed in the
appropriate Terminal Equipment Technical Requirements documents(s).
The department does not guarantee the equipment will operate to the
user’s satisfaction.
Before installing this equipment, users should ensure that it is permissible to be connected
to the facilities of the local telecommunications company. The equipment must also be
installed using an acceptable method of connection. The customer should be aware that
compliance with the above conditions might not prevent degradation of service in some
situations.
Repairs to certified equipment should be coordinated by a designated representative from
the supplier. Any repairs or alterations made by the user to this equipment, or equipment
malfunctions, may give the telecommunications company cause to request the user to
disconnect the equipment.
Users should ensure for their own protection that the electrical ground connections of the
power utility, telephone lines and internal metallic water pipe system, if present, are
connected together. This precaution may be particularly important in rural areas.
Caution: Users should not attempt to make such connections
themselves, but should contact the appropriate electric inspection
authority, or electrician, as appropriate.
EQUIPMENT ATTACHMENTS LIMITATIONS
The Ringer Equivalence Number (REN) of this device is 0.1
NOTICE: The Ringer Equivalence Number (REN) assigned to each
terminal device provides an indication of the maximum number of
terminals allowed to be connected to a telephone interface. The
termination on an interface may consist of any combination of devices
subject only to the requirement that the sum of the ringer equivalence
Numbers of all the devices does not exceed 5.
The Standard connection arrangement (telephone jack type) for his equipment is CA11A
.
.
31
32
 Loading...