

Page 1
! WASH TIMER
Use to select the desired time for washing or rinsing.
@ WASH ACTION
This is used to select wash action.
# VALVE SELECTOR
Select “WASH• RINSE” for washing and rinsing, and
“DRAIN” to drain the water.
$ WATER GUIDE KNOB
During washing, WATER GUIDE KNOB should be selected
to wash.
During spin rinsing, WATER GUIDE KNOB should be
selected to spin.
% SPIN TIMER
Use to select the desired time for spinning.
! @ # $ %
DESCRIPTION OF P ARTS
WASH TIMER
R
O
T
A
T
I
O
N
L
I
M
I
T
S
T
R
O
N
G
N
O
R
M
A
L
WASH ACTION
O
F
F
W
A
S
H
•
R
I
N
S
E
D
R
A
I
N
VALVE SELECTOR
WASH SPIN
0
MIN
3
6
9
12
15
SPIN TIMER
0
MIN
1
2
3
4
5
R
O
T
A
T
I
O
N
L
I
M
I
T
CONTROL P ANEL
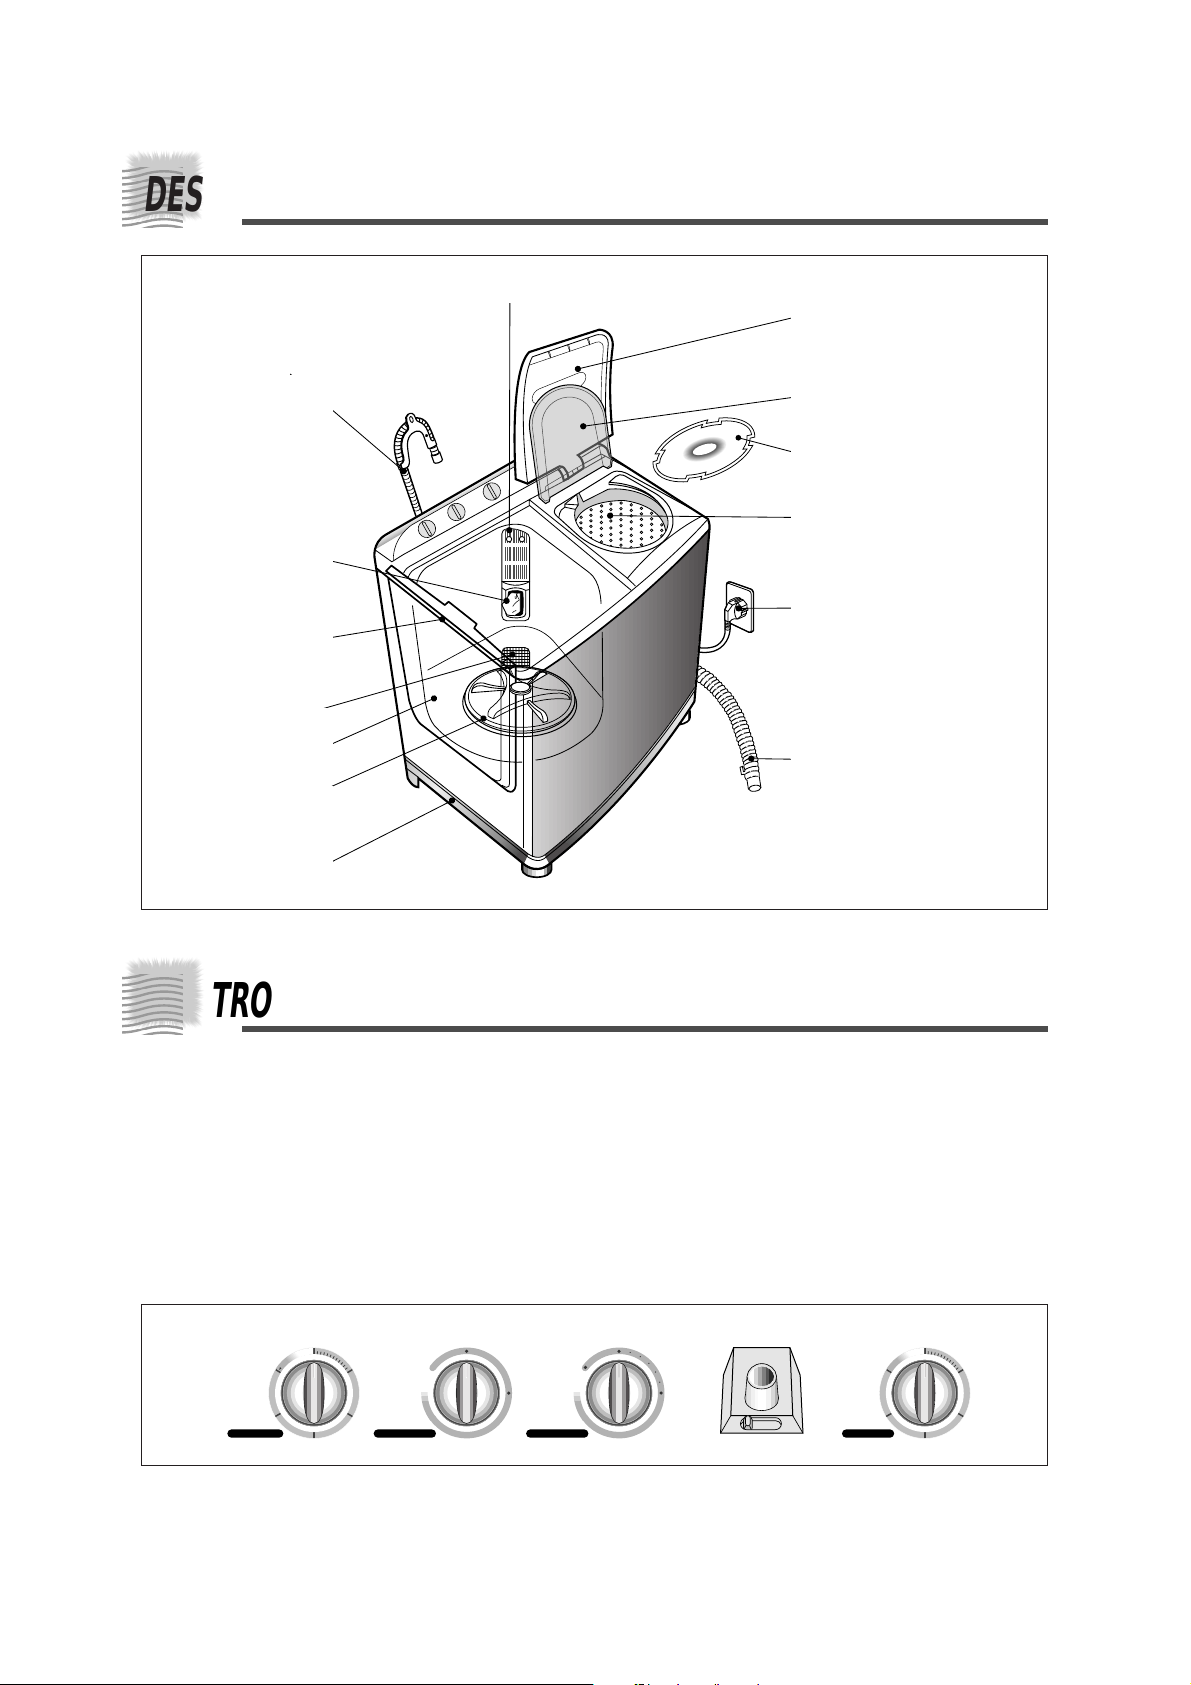
SPIN DRYER LID
When you open this lid while the spin
basket is spinning, the spinning
will be stopped by brake system.
WATER DRAIN HOSE
(PUMP MODEL)
LINT FILTER
This is used for gathering
the dregs which are made
during washing.
WASH TUB LID
Duing operation, close the
wash tub lid.
DRAIN FILTER
WASH TUB
PULSATOR
BASE UNDER
POWER CORD
The plug’s shape may not correspond
with this drawing.
INNER LID
SPIN DRYER BASKET.
OVERFLOW FILTER
WATER DRAIN HOSE
(NON-PUMP MODEL)
SAFETY COVER
1
Page 2

WASHING PROCEDURE
¡ÆTO WASH
! Before starting washing, check followings.
Lay the drain hose down toward a sink hole.
(In case no drain pump model)
Place the drain hose in sink or bath.
(In case drain pump model)
Connect the water supply hose and open the water tap.
Connect the power cord to the power supply outlet.
@ Set the WASH ACTION SELECTOR to the desired mode.
# Set the VALVE SELECTOR to “WASH
•
RINSE”.
(In case drain pump model “WASH• RINSE” or “OFF”)
$ Set the WATER GUIDE KNOB to “WASH”.
% Fill water in the wash tub up to the indicated water
level and add detergent. (See page 5)
^ Load laundry in the wash tub.
& Set the WASH TIMER 1~15 minutes.
* After washing, set the VALVE SELECTOR to “DRAIN”
for drain.
¡ÆTO SPIN DRY
! Transfer the laundry into the spin basket and arrange
it evenly.
@
Be sure to put the safety cover and close the inner lid.
# Close the spin dryer lid.
$ Set theSPIN TIMER 1~5 minutes.
¡ÆTO RINSE
! Set theVALVE SELECTOR to“WASH• RINSE”.
(In case drain pump model “WASH
•
RINSE” or “OFF”)
@ Supply the proper amount of water.
# Set the WASH TIMER 2~3 minutes.
$ Drain the water.
Set the VALVE SELECTOR to “DRAIN”.
% Repeat this cycle until drain water is clean.
(2~3 cycles)
¡ÆTO OVER FLOW RINSE
! Set theVALVE SELECTOR to“WASH• RINSE”.
@
Keep suppling water. (Adjust water pressure to ensure that
the amount of supplied does not exceed the amount of drain.)
# Set the WASH TIMER 6~8 minutes.
$ As soon as the WASH TIMER shuts off or the rinsing
water became clear, turn off the water tap.
% Drain the water.
Set the VALVE SELECTOR to “DRAIN”.
¡ÆTO SPIN RINSE (ADDITIONAL COURSE)
After rinsing you can select this course for more effective rinse.
! Load the laundry evenly into the spin basket.
@ Cover the laundry with safety cover and
close the inner lid.
# Close the spin dryer lid.
$ Set the WATER GUIDE KNOB to “SPIN”.
% Supply water for about 1 minute.
Adjust the water flow not to overflow to the side of the
wash tub.
^ After water supply, Set theSPIN TIMER 1~2 minutes.
& Repeat %~^, if you want.
2
Page 3

¡ÆBe sure that the washer is grounded.
To avoid electrical shock, use a metal pipe for the ground
connection.
But, do not ground the washer with gas pipes or telephone
lines to avoid dangers of explosion or lightning strike.
¡ÆDo not put your hands into the spin dryer
basket when it is spinning.
Your fingers can be caught by spinning laundry and
damaged.
¡ÆNever allow children to operate or play
with the washer.
Children playing with the washer may accidentally fall into
the washing tub.
¡ÆDisconnect the power cord from the power
supply when not in use.
¡ÆVentilationopenings must not be obstructed by
carpeting when the washing machine is installed on a
carpeted floor.
¡ÆTurn off the SPIN TIMER immediately
when the spin dryer makes noise and vibration excessively
during spinning.
¡ÆDon’t use excessively hot water.
(Below 50°C)
Plastic parts may be deformed or damaged.
Also, clothing may be deformed or decolored.
¡ÆBefore washing, check all pockets.
If nails or pins remain in pockets, they may damage the
washer or clothes.
¡ÆClose the water tap a little if the water
pressure is too high.
¡ÆBe sure to cover with the safety cover on
laundry before spinning.
This prevents laundry from being tossed out and damaged.
¡ÆTo avoid water splashes, close the wash
tub lid.
PRECAUTIONS WHEN OPERATING
¡ÆMake sure that electric connector is set for your
available voltage before operating the washing machine.
¡ÆThis unit is set for 220V.
¡ÆIf you want to change the voltage, remove the back cover
and reset the connector as figures.
ELECTRIC CONNECTION
CAUTIONS
(ONLY FOR DUAL VOLTAGE MODEL)
3
Page 4

INSTALLATION
¡ÆLOCA TION & ENVIRONMENT
Leave some space.
Space at least 10cm between the washer and the wall.
Place washer on a sturdy flat surface.
If the washer is placed on an uneven or weak surface,
noise or vibration may be occurred.
(allowable inclination is max. 2 degrees)
Never install the washer near water.
Do not place the washer in steamy rooms or where the
washer is directly exposed to rain.
Moisture may destroy the electrical insulation and cause
an electrical shock harzard.
Aviod direct sunlight or heating devices.
As plastic and electrical components are affected by direct
heat, never place the washer near heater, boilers, etc..
Do not place it under direct sunlight.
Aviod cold place.
Do not place or store the washer below 0°C(32°F) to avoid
any damage from freezing.
¡ÆINLET HOSE SETTING
Attach the water inlet hose to the water inlet located near
WATER GUIDE KNOB.
¡ÆDRAIN HOSE SETTING
! Connect the drain hose to the drain outlet at the rear
side of your washer, and then fasten it tightly with the
hose clamp.
@ The other end of the drain hose setting toward the bath
or sinkhole.
# Install the drain hose about 85cm from the ground.
(In case drain pump model)
Hose Clamp
Drain Outlet
Drain hose
85Cm
(NON-PUMP)
(PUMP)
4
CLEANING & MAINTENANCE
¡ÆCLEANING THE LINT FIL TER
If the dregs are piled up in the lint filter after finishing the
wash, push down and pull it out as shown in figure.
Remove the collected lint and rinse the filter net.
¡ÆCLEANING THE DRAIN FIL TER
In case of incomplete drain, remove the lint from the drain
filter with soft brush.
¡ÆCLEANING THE OVER FLOW FIL TER
Insert your fingers into the hole “A”
and then pull the overflow filter
in the direction of arrow as shown
in the figure.
¡ÆCLEANING THE WASH TUB
Fill water in the wash tub to "L" level,
then drain water from the wash tub
simultaneously with operating wash
cycle for 1~2 minutes.
Close the wash tub lid.
¡ÆCLEANING THE WASHER BODY
Wipe of stains on the cabinet and the control panel with
soft cloth.
Do not use benzene, thinner, cleanser or wax.
(Painted surface or plastic parts will be damaged.)
Proper care of your washer can extend its life.
A
!
@
Hose Clamp
Less than 10cm
Page 5

DIMENTIONS 874mm¡¿532mm¡¿989mm (W¡¿D¡¿H)
WEIGHT 38kg (NON-PUMP MODEL) 40kg (PUMP MODEL)
WATER PRESSURE 0.2kg/cm
2
~3.0kg/cm
2
(2N/cm2~30N/cm2, 20kPa~300kPa)
WATER CONSUMPTION LOW(52\), MID(61\), HIGH(72\)
POWER SOURCE/CAPACITY REFER TO RATING LABEL
RATING TIME Washing Continuous Spinning 15 minutes
BEFORE YOU CALL FOR SERVICE
SPECIFICATIONS
LAUNDRY GUIDE
¡ÆWASHING TIME & WASH ACTION TABLE
¡ÆWHEN YOU LOAD THE LAUNDRY INTO THE
SPIN BASKET
Press the laundry evenly and put the safety cover into the
spin basket as shown in the figures.
Design and specifications are subject to change without notice.
P/CODE: 3613922500
The amount of detergent is average.
Follow the instructions printed on the package of detergent for
amount of detergent.
Choose the amount of detergent depending on the fabric type.
When you fill the water up in the wash tub,
refer the upper line of each marks on the
overflow filter.
KIND OF CLOTHING WASHING TIME WASH ACTION
Extremely soiled
10~15 minutes
heavy fabric
Linen, cotton, etc. 8~10 minutes
Ordinary clothes
7 minutes
(underwear, etc.)
Slightly soiled
2~5 minutes
synthetic fiber
100% wool, mixed
wool knitting, thin
synthetic fiber with 2~5 minutes
tags indicating hand
washing
STRONG
NORMAL
¡ÆSPIN DRY TIME
TIME TYPE OF LAUNDRY
1 min. thin (synthetic fiber)
1~2 min. wool
3~5 min. cotton
5 min. thick (cotton)
¡ÆDETERGENT & WATER LEVEL
AMOUNT OF DET. WATER LEVEL
52g LOW(52|)
61g MID(61|)
72g HIGH(72|)
TROUBLE CHECK POINT
The washer
Check the power cord is connected
does not work.
to a power outlet well.
Power stoppage?
Clothes will not
Is the laundry overloaded?
move freely.
Incomplete spinning Is the laundry arranged evenly?
TROUBLE CHECK POINT
Is the drain filter clogged with lint?
Incomplete draining
Power stoppage?
The spin dryer Is the spin dryer lid closed
basket will not run. completely?
5
Page 6

WASHING MACHINE
INSTRUCTION MANUAL
=
Model: DW-7510
WELCOME!
THANK YOU FOR PURCHASING THIS
WASHING MACHINE.
SOME FEATURES ARE:
¡ÆSuper big size tub that lets the laundry
rotate up and down easily. Especially
blanket, long skirt and blue jean.
¡ÆSpin rinse function that helps rinsing.
¡ÆWash tub lid that can be handled
alternatively, whether standing by hinges or
hanging on the side.
¡ÆUnder base that is partitioned effectively,
so prevents rat(mouse) and noise.
¡ÆLint filter that seperates lint from the
laundry.
¡ÆEnergy saving design that reduces
electrical consumption.
WARNING
¡ÆAgainst humidity
Don’t install your washer at the place of
extremely high humidity.
It could cause an electric shock or short circuit.
¡ÆNever splash water on the control panel or
cabinet.
¡ÆIf your washer is installed in the area subject
to freeze, ensure that it is completely drained
after use.
¡ÆThe appliance is not intended for use by young
children or infirm persons without supervision.
Y oung children should be supervised to ensure
that they do not play with the appliance.
¡ÆIf the supply cord is damaged, it must be
replaced by the manufacturer or its service
agent or a similarly qualified person in order to
avoid a hazard.
If the appliance is supplied from a cord
extension set or electrical portable outlet
device it should be positioned so it is not
subjected to splashing or ingress of moisture.
 Loading...