

Page 1
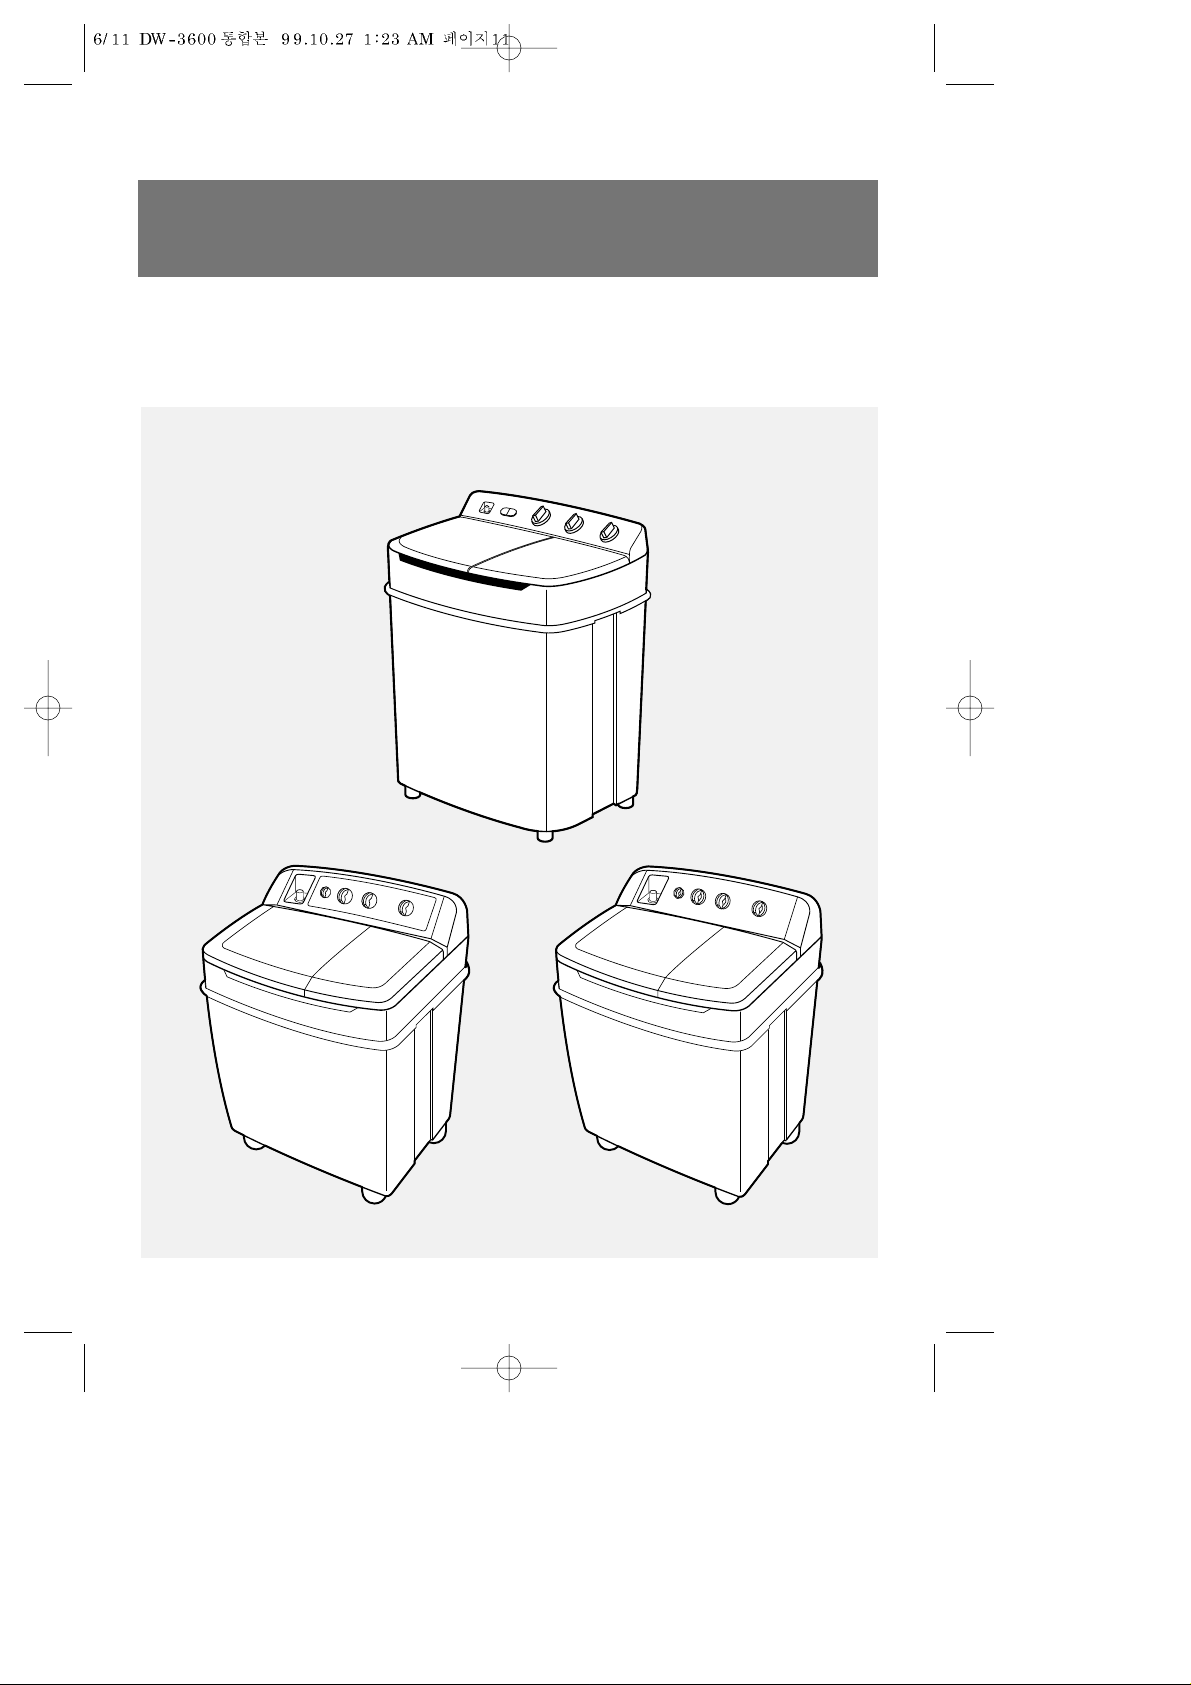
WASHER-SPINDRYER
INSTRUCTION MANUAL
Page 2
1
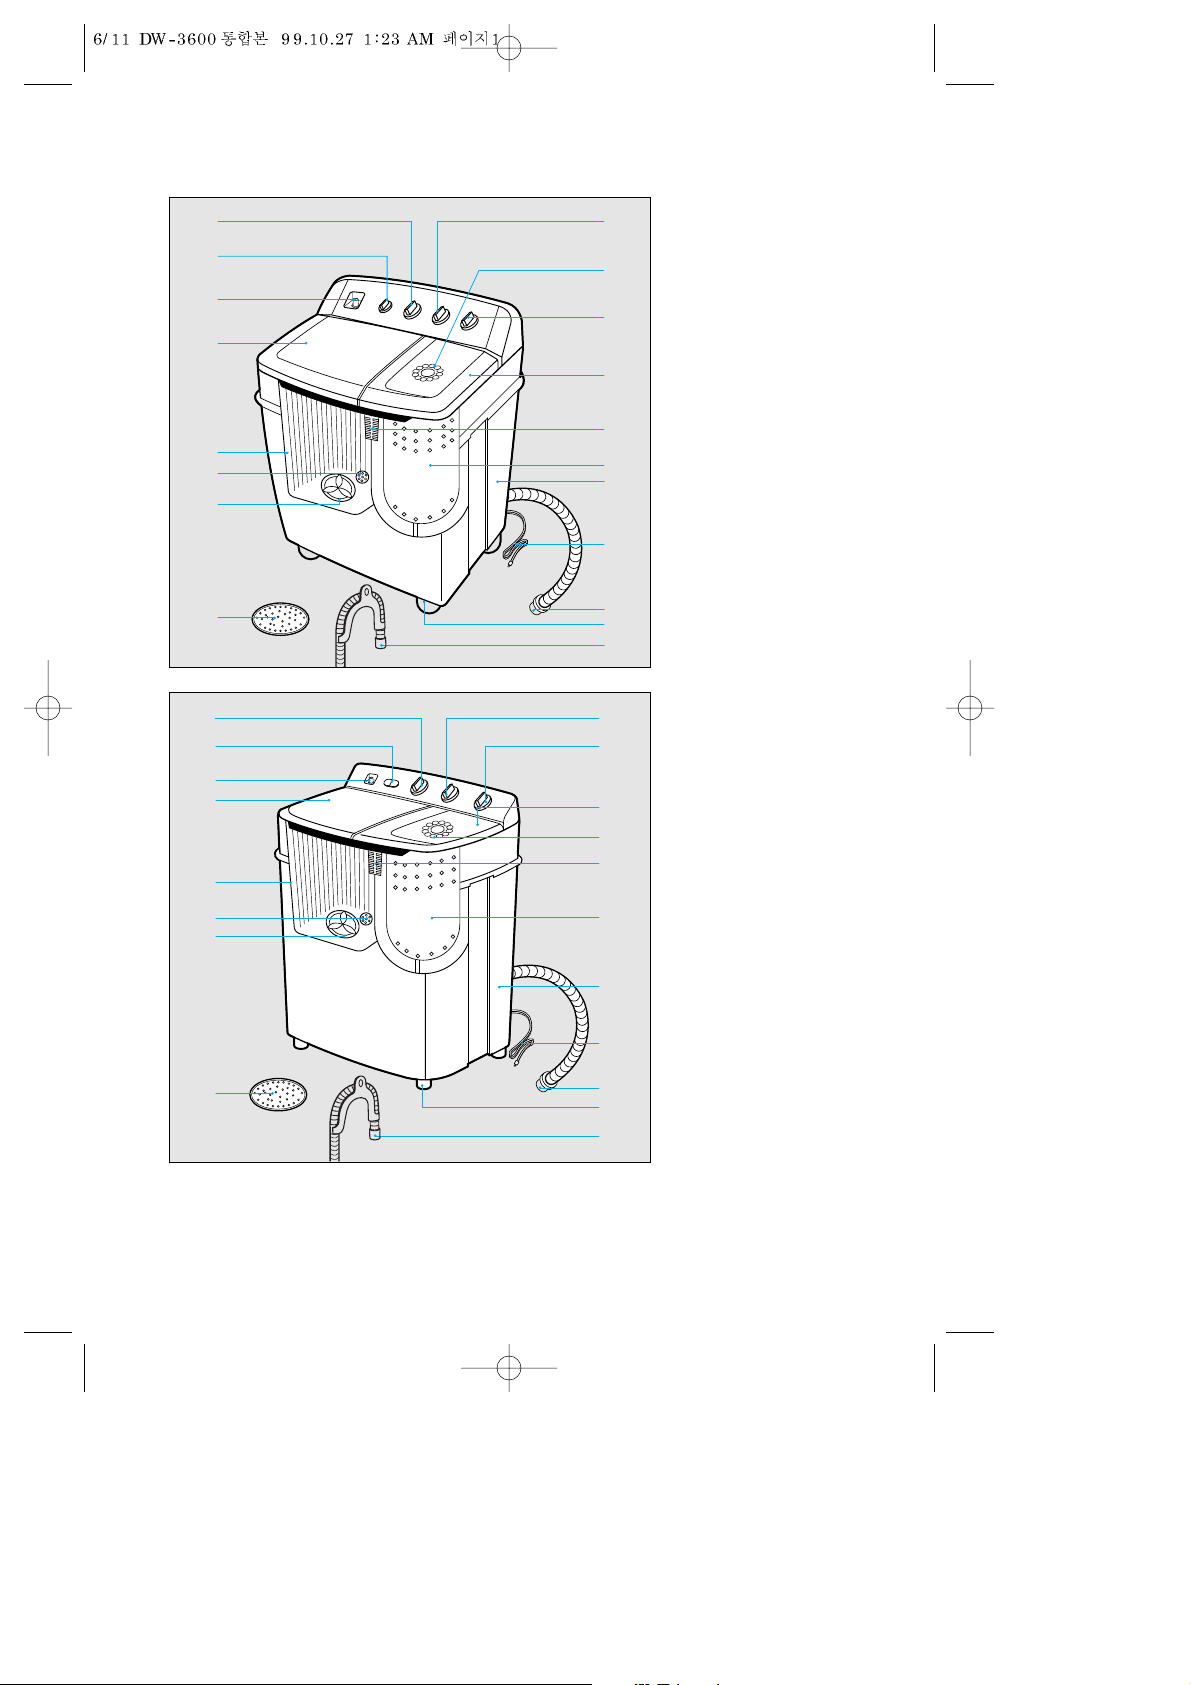
NAME OF P AR TS
7
%
$
#
@
!*
1
(
)
2
3
4
8
9
5
6
^
&
! Wash Timer
@ Select Switch
# Water Inlet Port
$ Washer Lid
% Washer Tub
^ Strainer
& Pulsator
* Valve Selector
( Spin Dryer Timer
) Spin Dryer Lid
1 Inner Lid
2 Overflow Filter
3 Spin Dryer Drum
4 Base Under
5 Power Cord
6 Leg (4EA)
Accessories
7 Spin Mat
8 Drain Hose Assembly
9 Drain Hose Assembly
(Pump Only)
!
@
#
$
%
*
(
)
1
2
^
&
7
3
4
5
8
6
9
Page 3
2
INST ALLATION
Electrical Connection
• This unit is designed to operate from an adequate supply mentioned at the
rating label sticked to the rear of it.
• In case of 3-core cord: The power cord plug must be connected to an earthed
3-pin power point within reach of the power cord.
• In case of 2 conductor power cord: Connect the grounding wire to a water faucet etc. Make sure that the power cord is unplugged during ground work.
• Do not connect the grounding wire end to a gas tube.
• If the power cord is damaged, it should be replaced by a repair shop appointed
by the manufacturer, because special purpose tools are required.
Connection of Hose
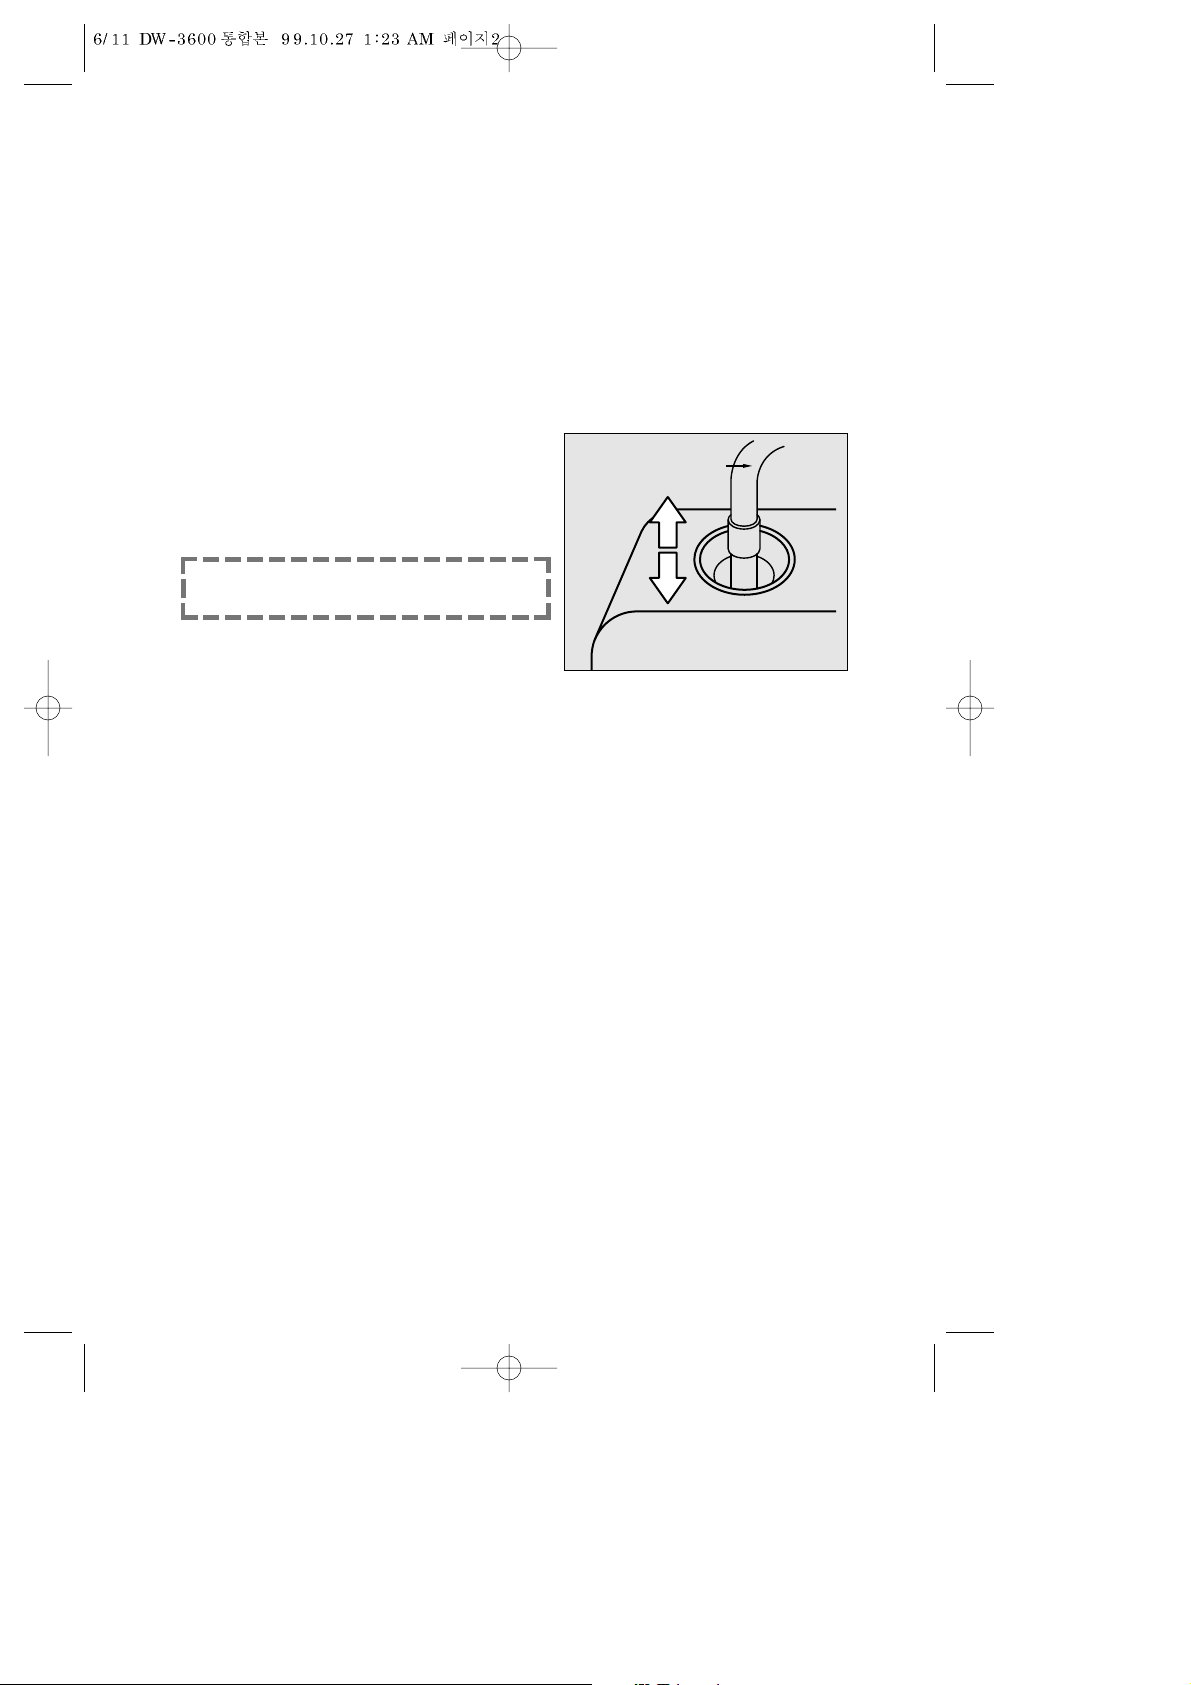
• Attach the water intake hose to the water
inlet located at the left-hand side of the control panel. Press fit the other end of the hose
to either a hot or cold water tap as required.
(Fig. 1).
• Attach the drain hose to the drain outlet at
the rear of the base and secure with the
clamp provided.
•The drain hose should be laid flat on the ground. Water flow will be restricted
if any portion of the drain hose is raised 20 cm (8 in) from the ground.
• The opening must not be obstructed by carpeting when the washing machine
is installed on a carpeted floor.
OPERATING INSTRUCTIONS
Preparing the Wash
• Sort the clothes into groups-whites, colorfast, non-colorfast, delicates, lint
free, lint producers, etc., and wash according to the laundry guide.
• Clothes with worn patches or tears should first be mended. Empty out all pockets and close all side fasteners. Treat bad stains prior to washing.
Prior to Washing
• Remove the plastic spin mat from the spin bowl.
• Check that wash timer knob is set to position “0” and that the drain selector
is set to “WASH •RINSE”.
• Also check that lint filter is correctly positioned.
• Ensure the drain hose is in its correct position (see Installation).
• Inlet power cord plug into the power point and switch on.
T o Wash
• Place the wash load and detergent in the wash tub. Refer to “Preparing the
Wash” and “Points to Remember”.
• Set the drain selector to “WASH •RINSE”.
• Turn the water tap on fill the tub of your washing machine to the level recommended in the Laundry Guide.
Caution: This unit is made of poly propylene, use water below 50°C.
WATER INTAKE HOSE
WATER INLET
Figura 1.
Page 4
3
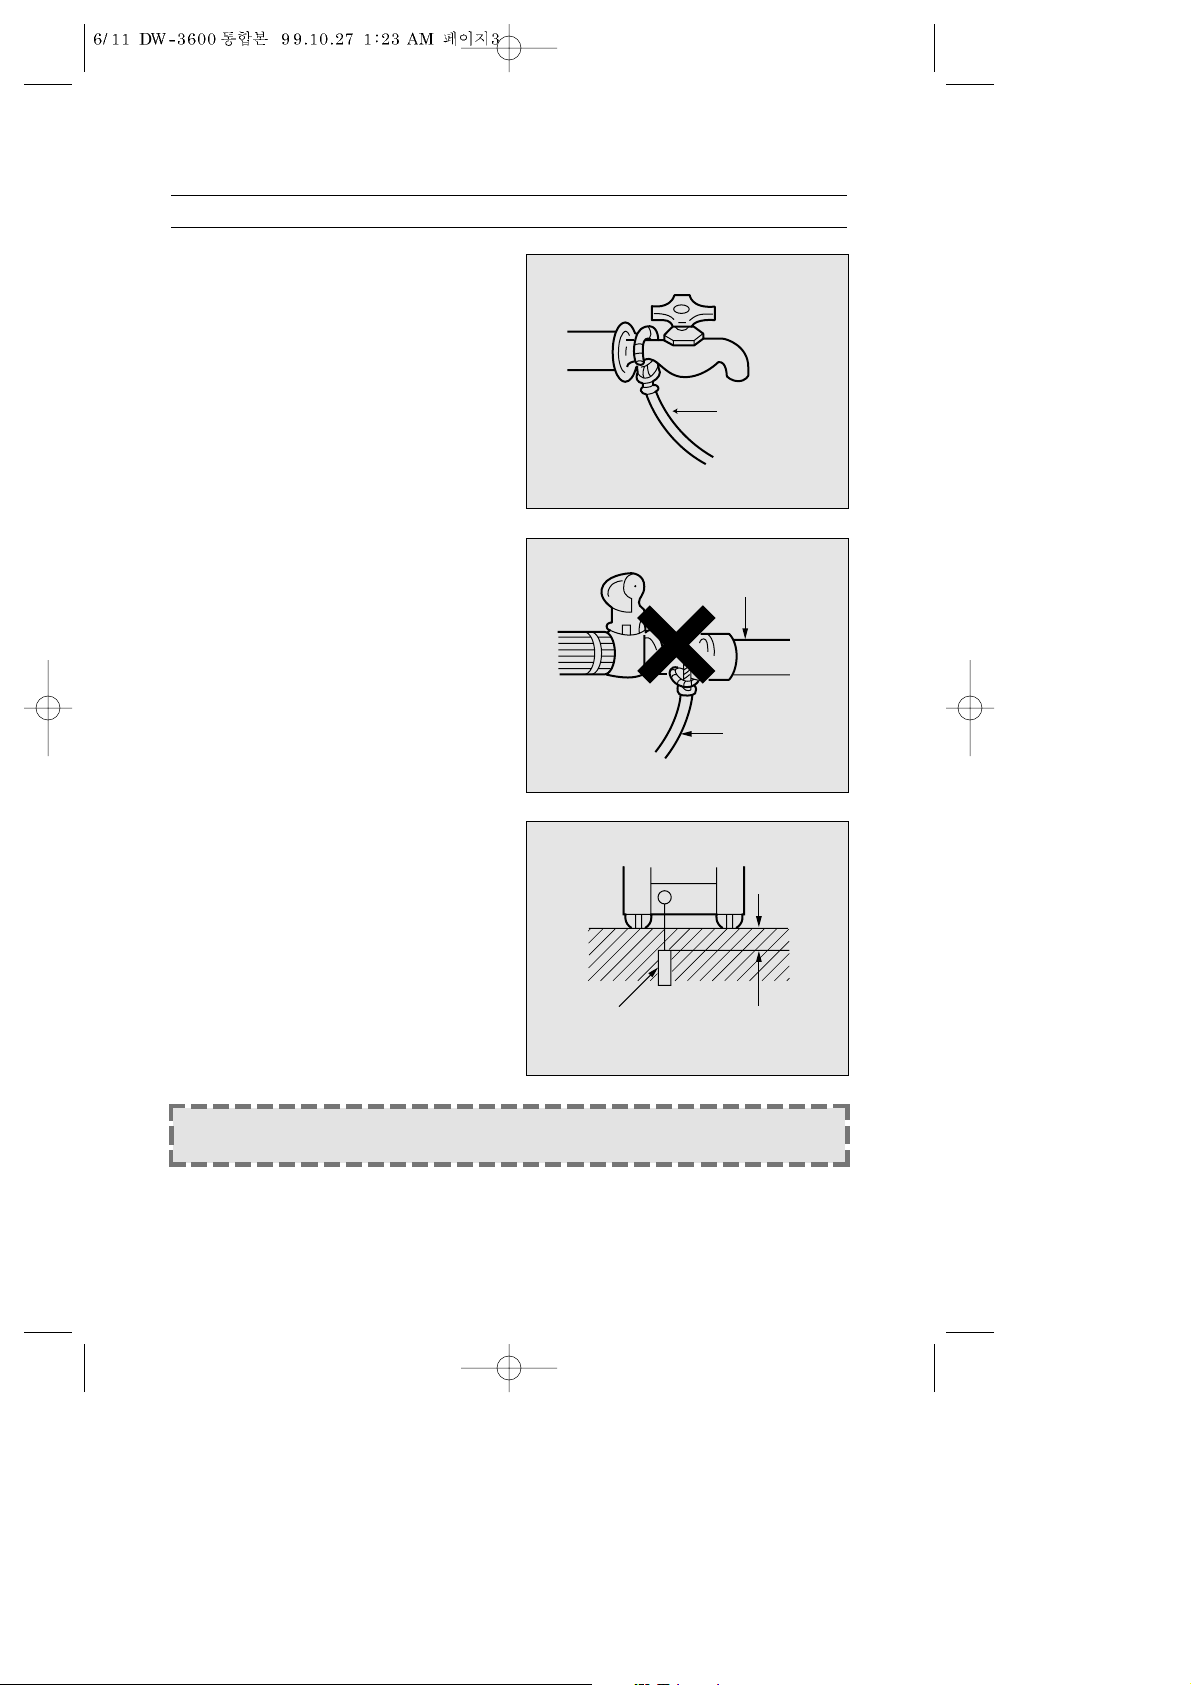
4. Grounding
In case of the machine with two conductor power cord.
§ Connect the grounding wire to a
water faucet if the pipe is made of
metal, Before plugging the power
cord into the socket. If the water
supply pipe is made of a synthetic
material like vinyl, it is not possible
to ground the machine to the water
supply pipe, another ground source
must be found.
§ Do not connect the grounding wire
end to a gas tube.
§ For maximum security, attach the
grounding wire to a copper plate or
grounding rod and bury it at least
20cm in the ground.
NOTE: Make sure that the power cord is unplugged during ground work.
In case of 3-core cord, there is no need for a grounding wire.
Grounding
wire
Grounding
wire
Grounding
rod
More than
20 cm
Gass pipe
Page 5
4
HOW TO OPERATE
1. Wash
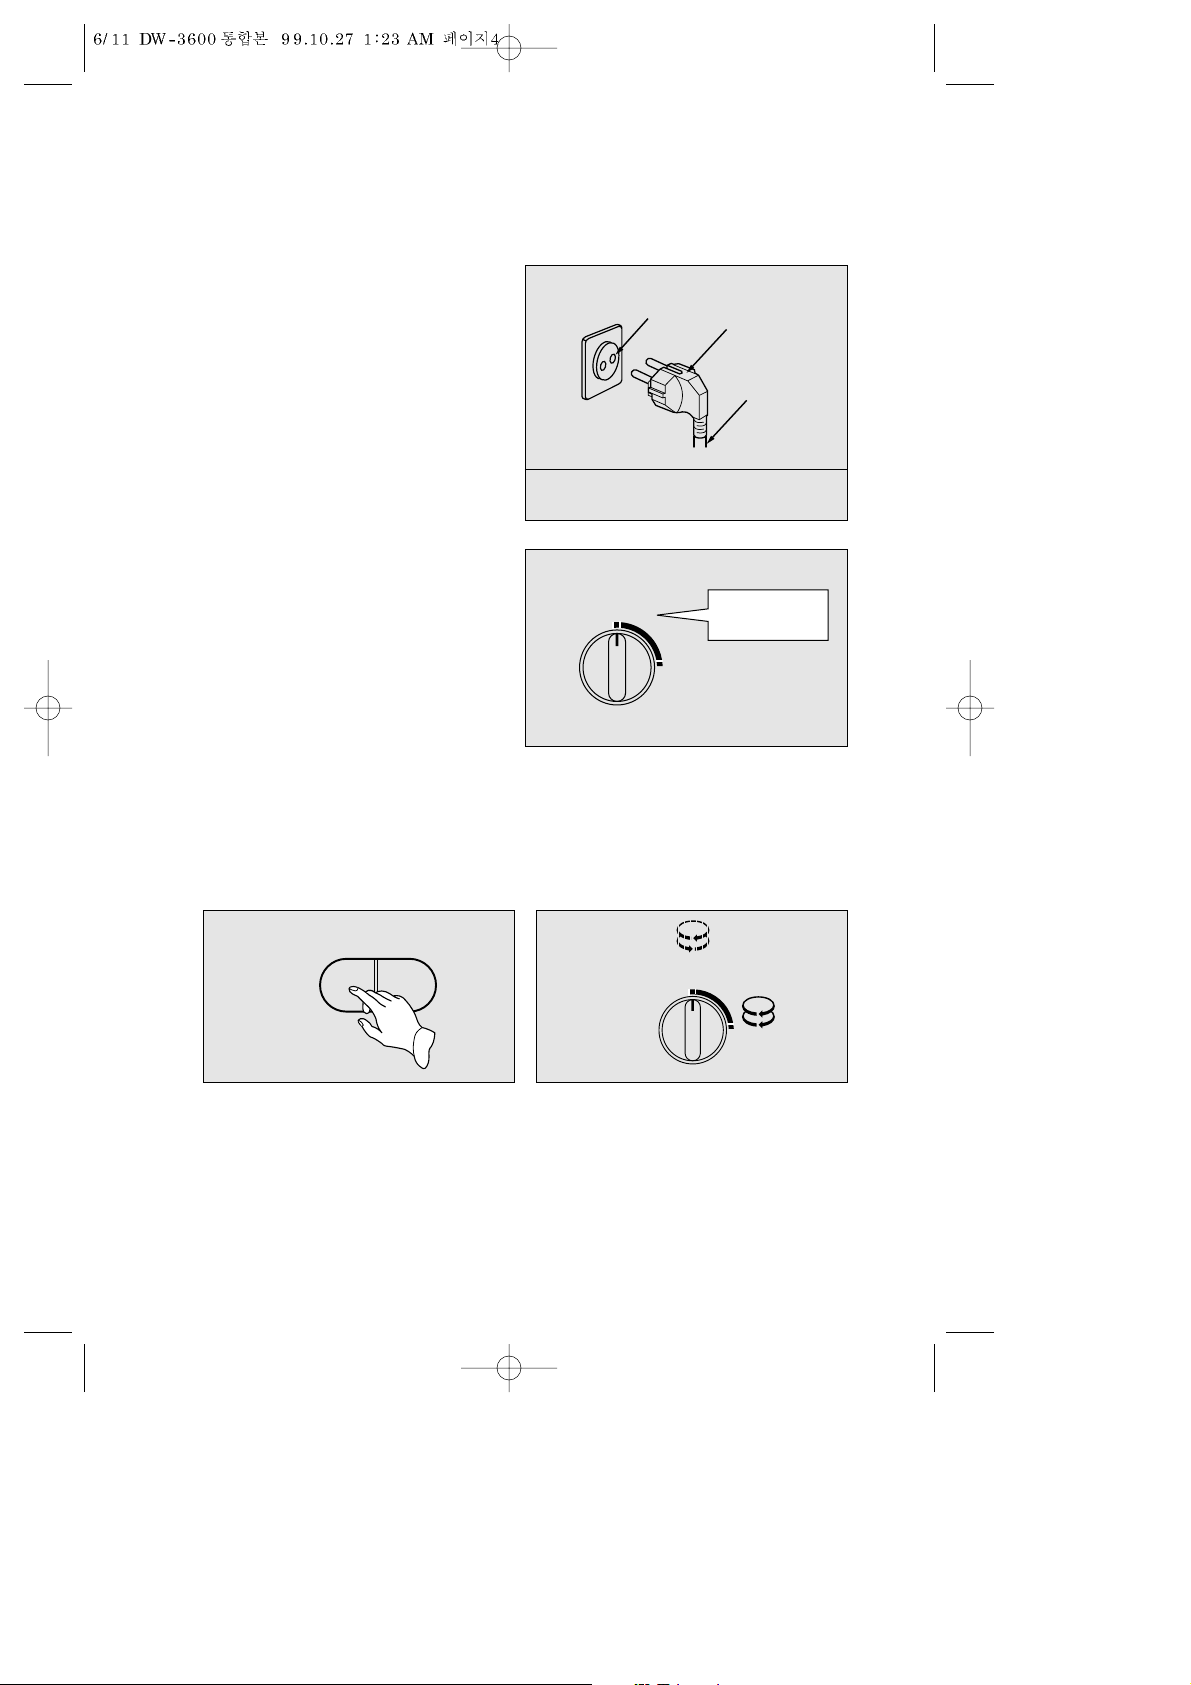
§ Insert the power plug into a wall
socket.
§ Set the selector at WASH AND
RINSE, and fill up the washer with
enough water for the washing load.
§ Put in the proper amount of detergent.
Pre-washing takes about 2 minutes and is immediately followed by the main
washing process.
Delicate fabric such as silk, wool do not need prewashing.
Divide colored and white clothing into seperate batches.
§ Depress one of the select switches for SOFT or NORMAL washing.
§ Turn the washer timer to clockwise until you reach the desired wash time posi-
tion. This will activate the pulsator and washing will begin.
Do not attempt to turn the dial from “OFF” to the left, nor past the “15” mark.
After using the machine, unplug the
power cord from the socket.
Socket
Plug
Power cord
DRAIN
SOFT
BOTH-WAY
WASH AND
RINSE
WASH RINSE
SOFT
BOTH-WAY
NORMAL
BOTH-WAY
SELECTOR
SWITCH
SELECTOR
SWITCH
NORMAL
BOTH-WAY
Page 6
5
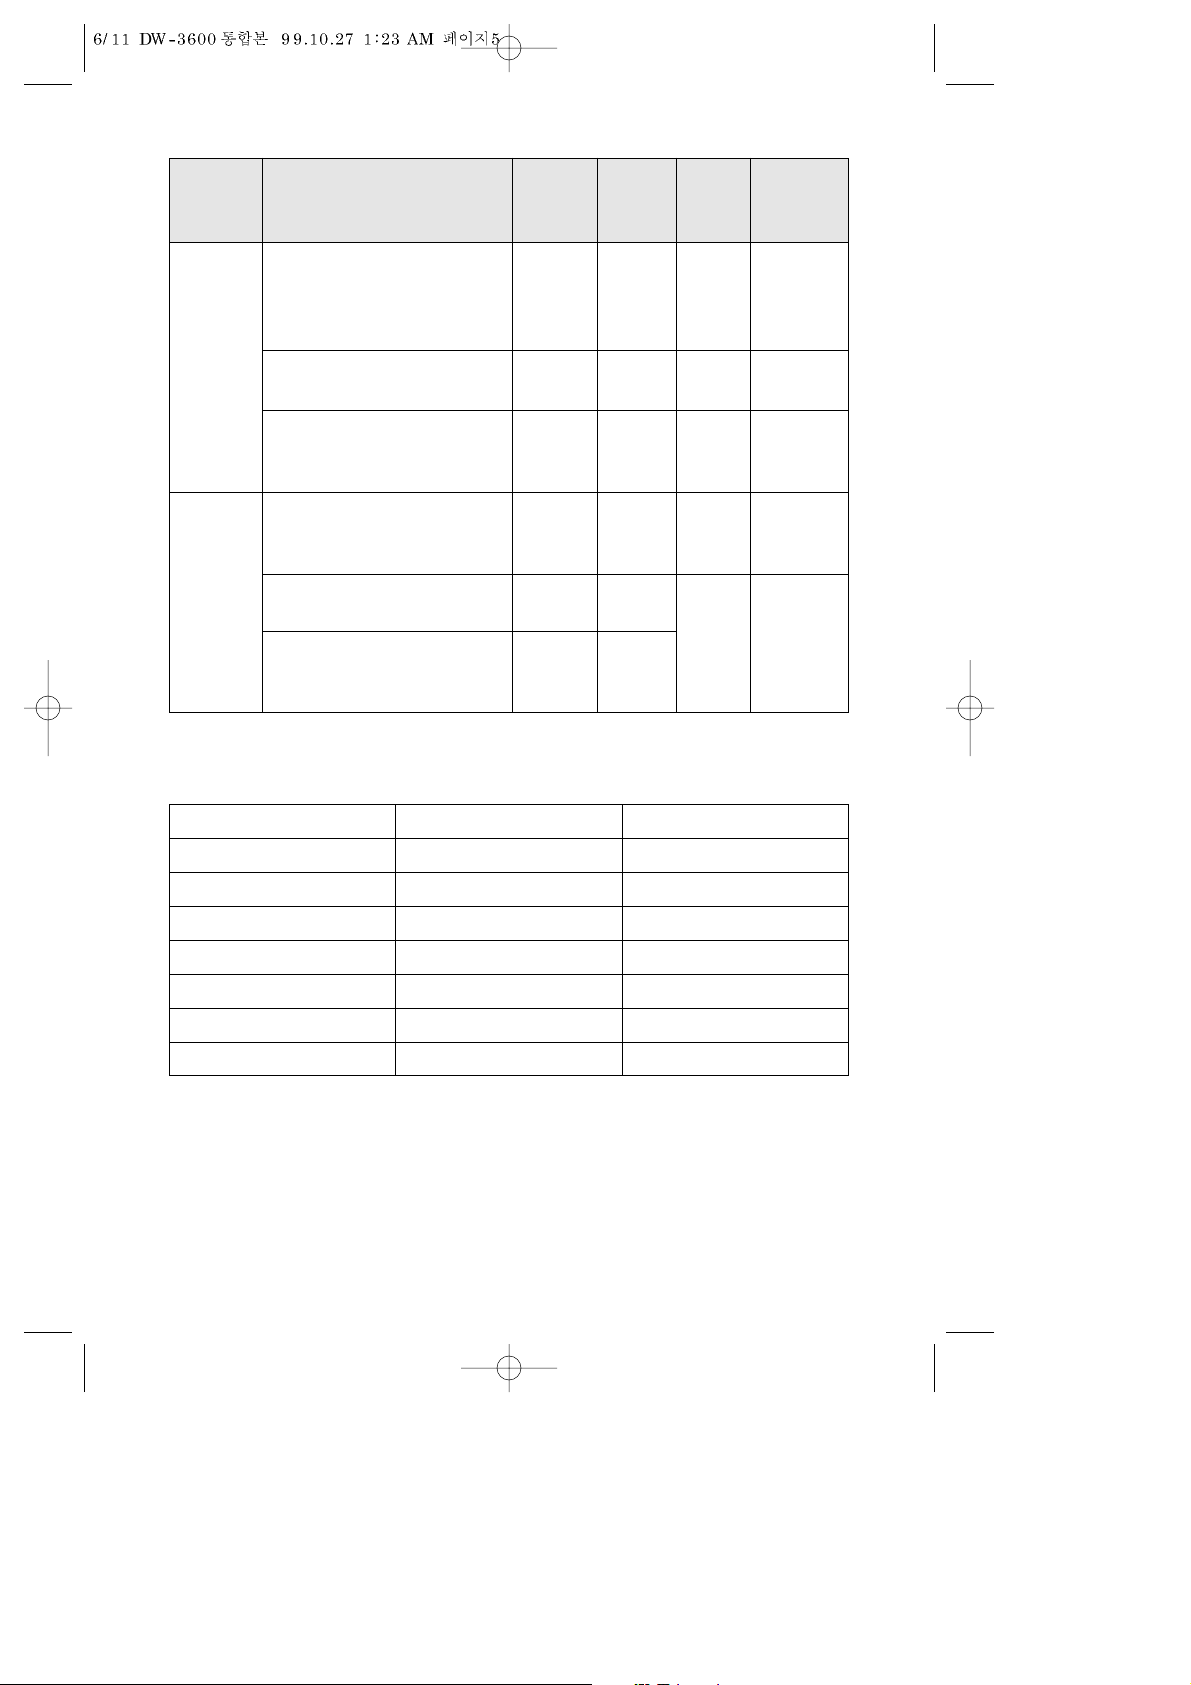
Reference
Water
Washing
Fabric
Washing Selector
level & Detergent
Capacity Time Switch
Volume
(Inner clothing)
Silk, Wool, Rayon, Nylon About
Soft
Natural/Synthetic fiber 2-4min
blends (Outer garments)
Cotton, Linen (light fabric) About
Normal
Low
40-50 g
Underwear Pajamas, Shirts 5-7 min 31 L
Heavily solied work
About Normal
clothes, Cotton, Linens
8-10 min
(heavy fabric)
Silk, Wool, Nylon, Natural/
About
Synthetic fiber blends
2-4 min
Normal
(heavy fabric)
Cotton, Linens
About
Normal
6-8 min
Heavily Solied
About
High
55-65 g
Work Clothes
10 min
Normal
43 L
Cotton, Linens
Below
1.5 kg
Above
1.5 kg
Item Fabric Unit weight
Sheet
Cotton About 400g
Under wear Crape About 130g
Shirts Synthetic fiber About 200g
Sweater Wool About 300g
White shirt Broad About 200g
White shirt Nylon About 160g
Work c lothes Cotton About 600g
Page 7
6
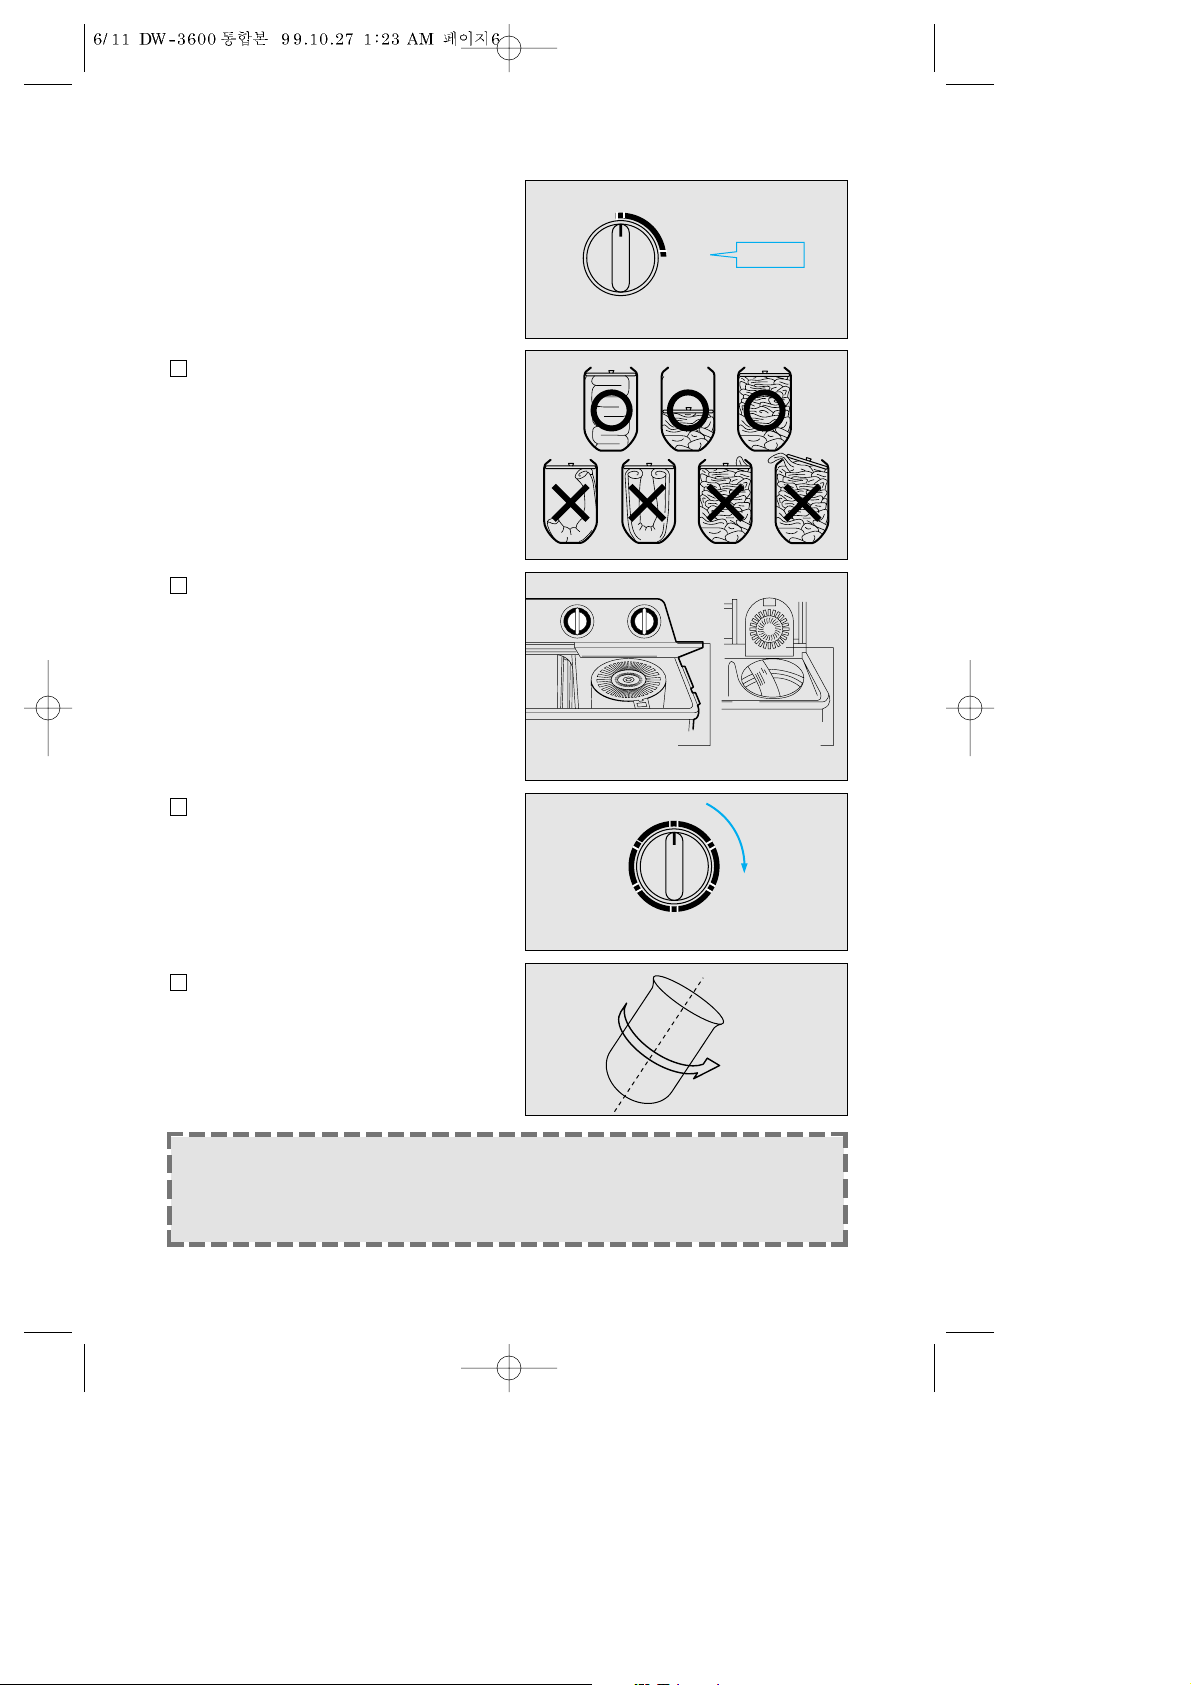
2. Drain
By setting the selector DRAIN, the
water will drain out of the washer. To
spin dry and drain at the same time,
first begin the spin drying process and
after one minute or so start to drain out
the water.
3. Spin Dry 1
Spread out the clothes and place
them one at time into the spin
basket.
Close the spin dryer inner cover
and outer cover.
Remember that the machine will
not spin if the cover is opened.
By turning the spin dryer timer to
the desired time, rotation will begin.
If there is any abnormal vibrating
during spin drying, turn off the spin
basket and rearrange the clothes
uniformly inside the dry.
NOTE:
It is advisable to wiring out by hand any remaining suds in the clothing
before placing them in the spin basket.
If the spin dry outer lid is opened during spin drying rotation will
automatically stop.
1
2
3
4
WASH RINSE
DRAIN
VALVE SELECTOR
open outer lid open inner lid
DRAIN
0
5
4
SPIN TIMER
1
2
3
stops
Page 8
7
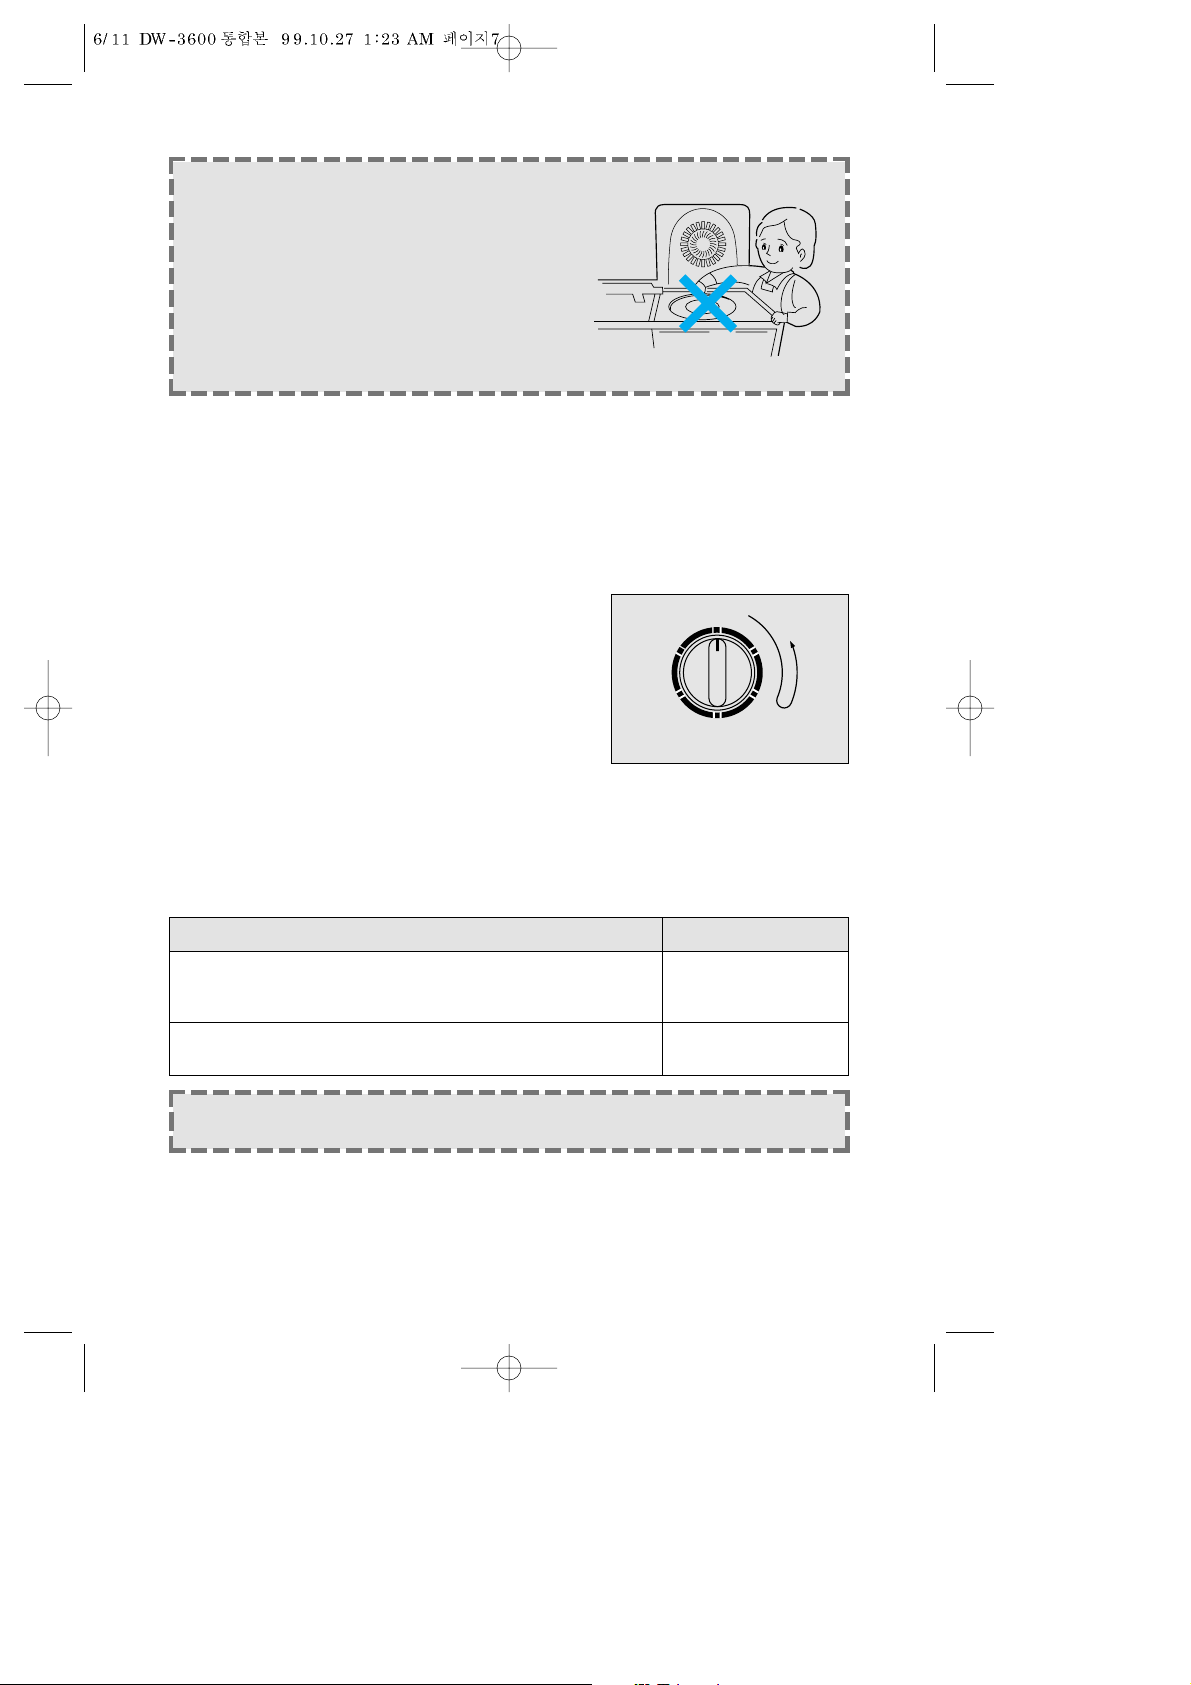
CAUTION
Make sure that the spin basket has stopped
rotating before opening the inner cover.
Never reach into spin basket while it is
still in motion.
Be especially careful when children are
present.
4. Rinse
§ Return the clothing to the washer tub and set the selector to WASH AND
RINSE.
§ Open the faucet and supply water to the washer tub.
Too mush water supplying during rinsing results in overflow and waste. Not
enough water requires an excessive amount of time for through rinsing.
Supply the proper amount of rinse water.
§ Adjust the washer timer in accordance with
the clothes to be rinsed.
Once the water becomes clean during the rinsing process, shut off the faucet and turn the
washer time back to “0”.
5. Spin Dry 2
§ After rinsing, spin dry the clothes again.
§ Supply water to the dryer to make sure that is completely free of any remain-
ing detergent before putting in the clothes.
Then follow the same process as in SPIN DRY.
After the dryer comes to a complete stop remove the clothing.
NOTE:
It is better to put small articles of clothing first such as socks and underwear
into the spin basket, then put bulky and heavy clothing on top.
Clothing Spin dryer time
Clothing that wrinkless easily
Light fabrics such as synthetics fibers, delicate About 1 minute
material.
Clothing that does not wrinkless easily Workclothes,
3-5 minutes
Sheets, Underwear, thick fabric
0
15
3
12
WASH TIMER
6
9
Page 9
8
USEFUL INFORMATION FOR YOU
WASHING MACHINE
To ensure longer service from your washer, be sure to observe the
following instructions.
§ Never operate the washer until the water has risen to a pre-set level.
§ Never pour boiling water directly into the washer tub.
§ The color of the plastic portions of the machine is liable to fade and may even
be deformed through exposure to direct sunlight.
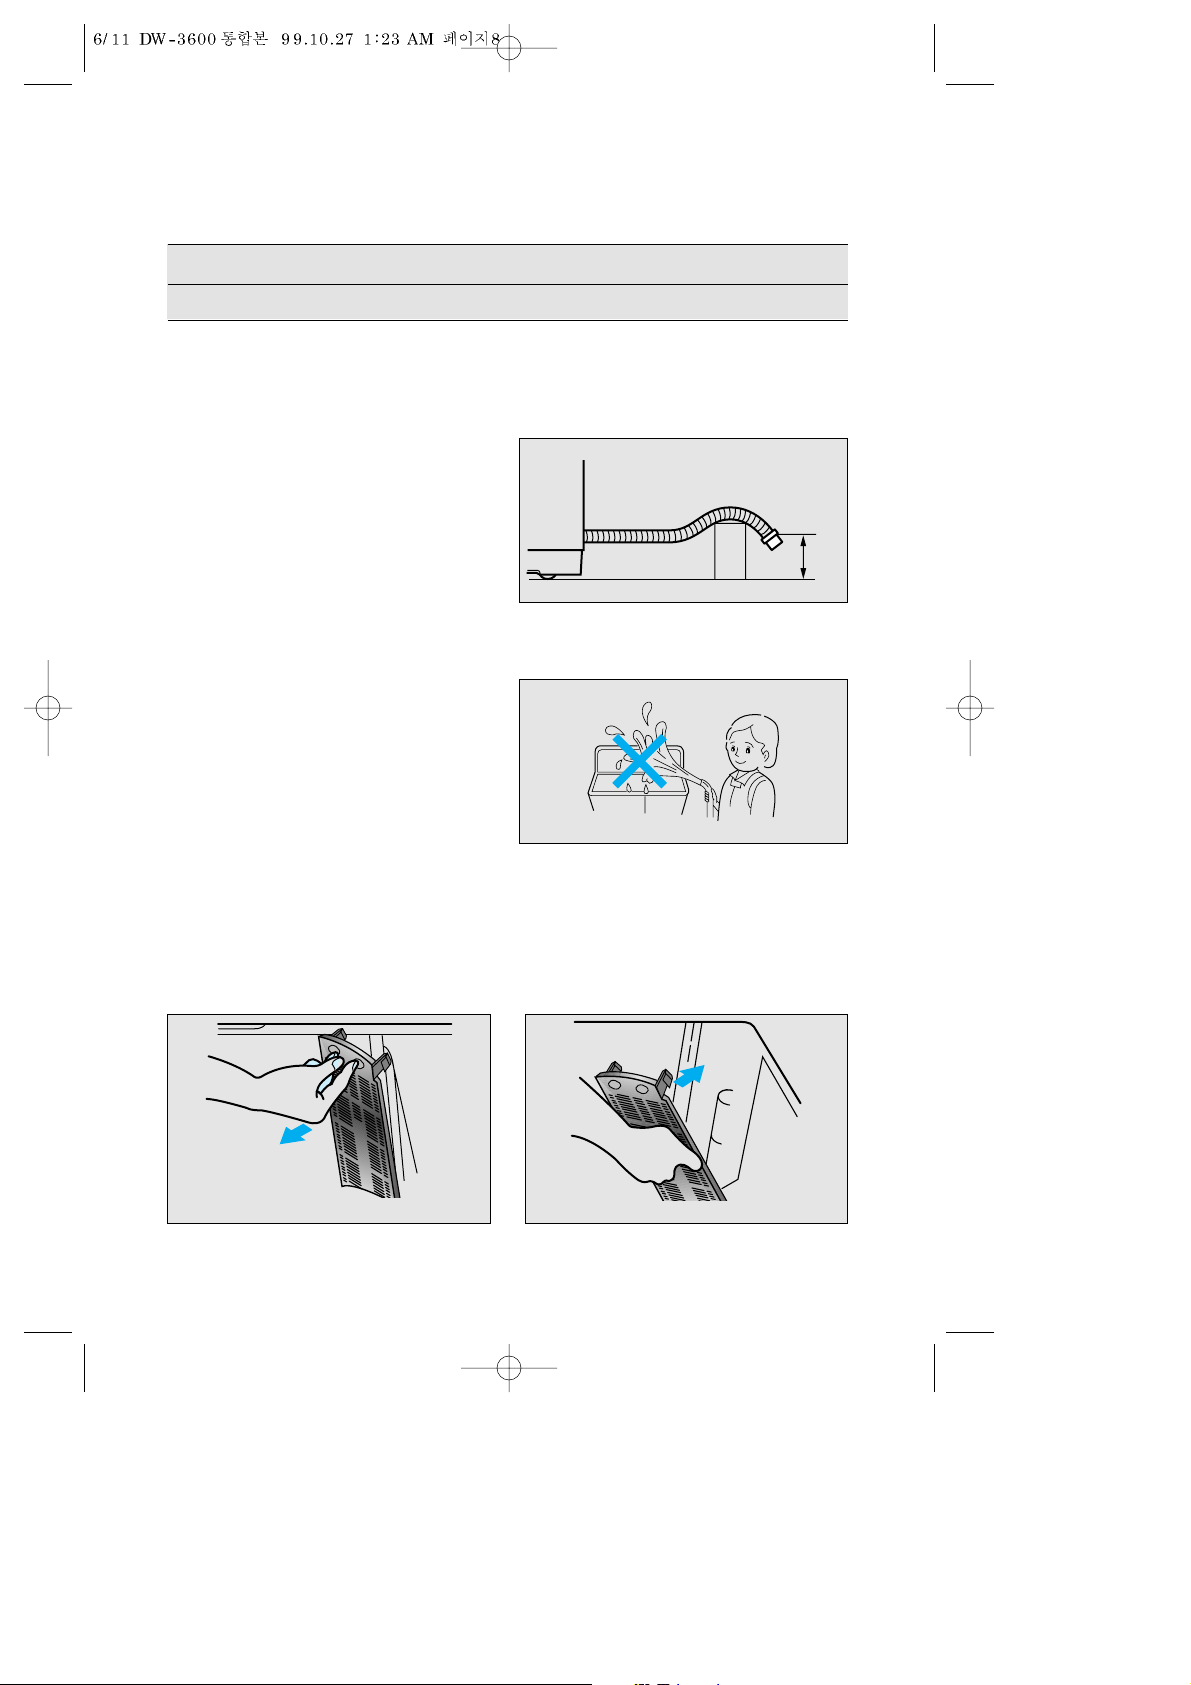
§ The drain hose should be laid flat
on the ground. Water flow will be
restricted if any portion of the drain
hose is raised more than 20cm (8
in) from the ground.
§ Do not use the washer in a damp place such as a bathroom.
§ Keep the spin tub cover closed during operation. If the cover is opened the
spin basket will stop rotating.
§ Do not splash water on the control
panel.
§ For good air ventilation, install the washer at least 5 cm from the wall.
§ Be sure to use the proper electrical outlet.
§ The overflow filter will need occasional cleaning.
Grasp it at the upper and pull out to remove it. Then, after cleaning out thread
and other matter, replace the filter inserting, its bottom section and then pushing
the upper part firmly into place.
Below
20 cm
Page 10
9
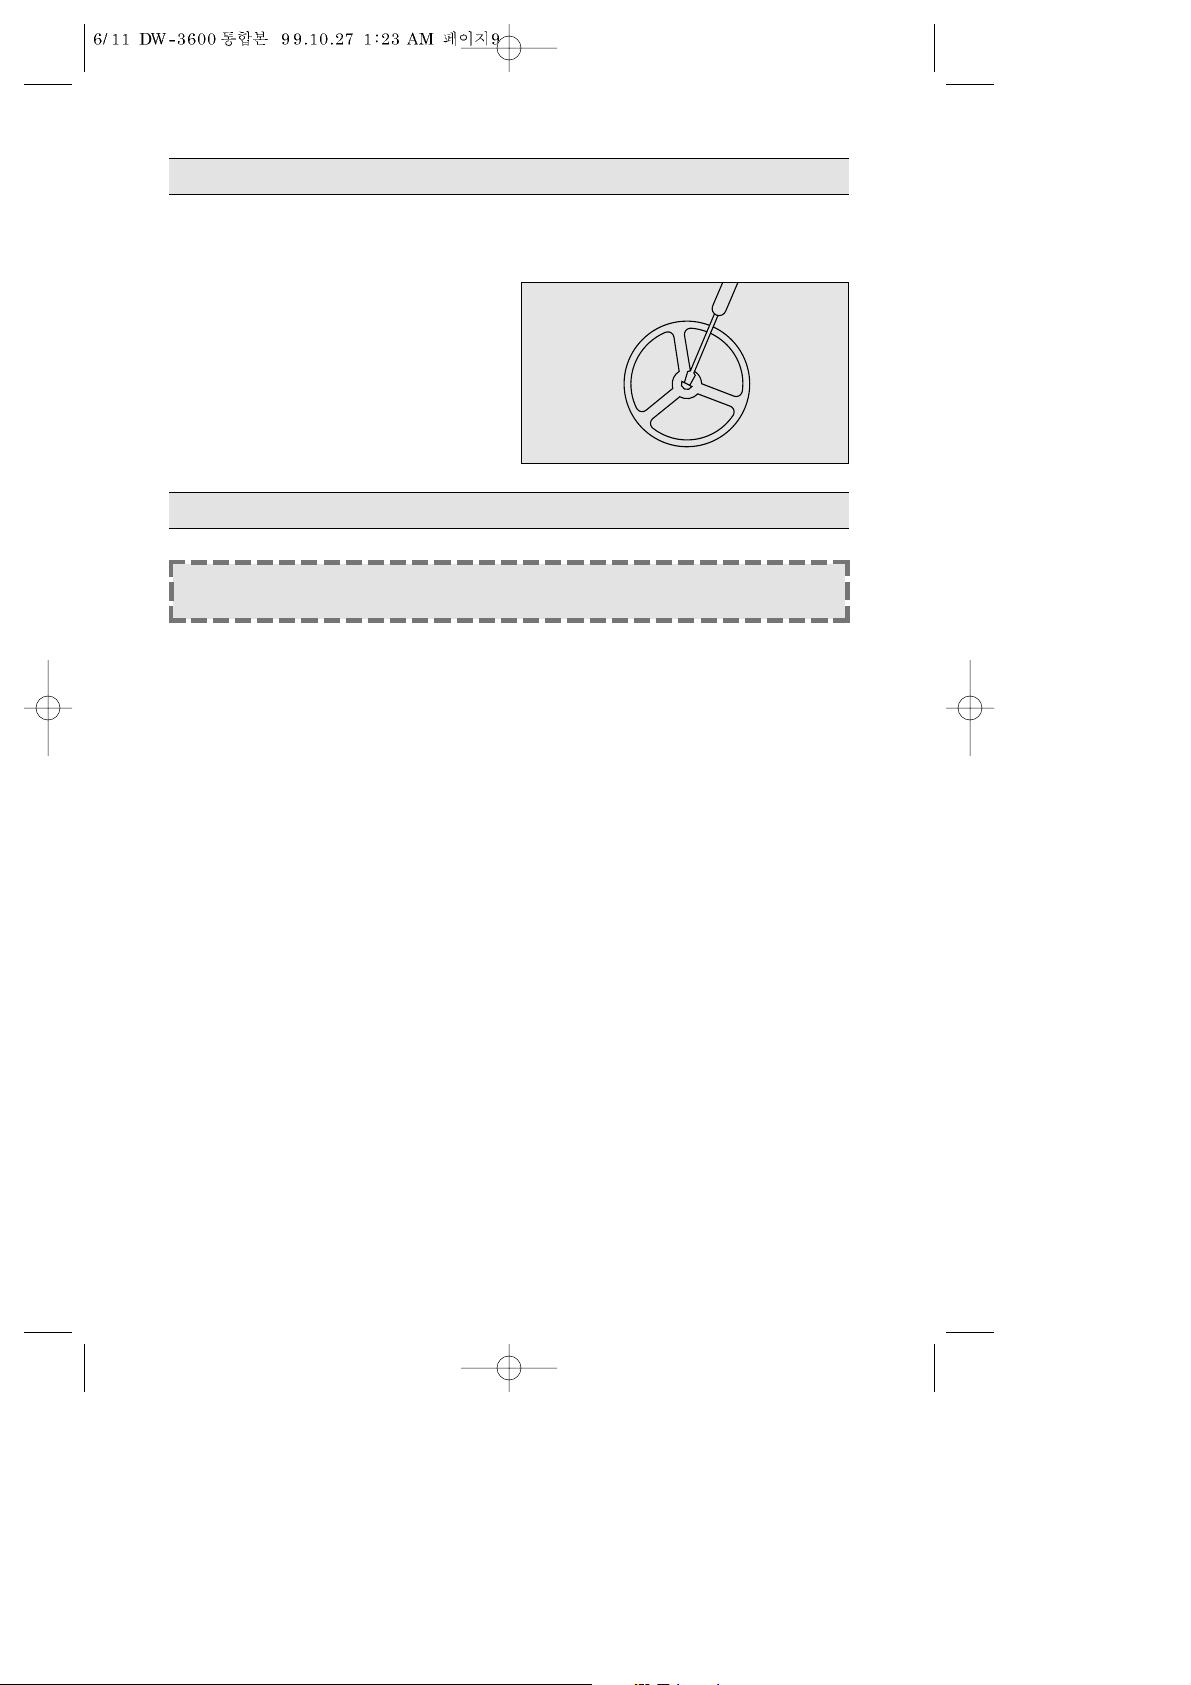
Dirt may also collect underneath the pulsator.
Clean out occasionally by:
§ Remove the screw located in the center of the pulsator.
§ Hook the pulsator and pull upwards.
§ Wiping clean the bottom of the
washer tub.
(When replacing the pulsator, make
sure that screw is firmly tightened)
When opening and closing the inner lid, make sure to pull it toward you.
CAUTION:
For your safety, do not put your hands into spin basket until it
has stopped spinning completely.
IN CASE OF TROUBLE
Please check the following. Unplug the power cord from the socket
before checking.
1. If the washer will not start:
§ Check whether the house circuit breaker is tripped or a fuse is blown.
Check whether the power cord is connected to the socket properly.
Check whether something is preventing the pulsator from rotation.
Check whether the belt is attached properly.
(Check by removing rear cover0
2. If there is excessive noise:
§ Check whether something is touching the pulsator as rotates.
Check whether the machine is placed level on the floor.
Check whether there is an excessively unbalanced load in the spin basket while
spinning.
Page 11
10
CAUTION:
After installing, DO NOT REMOVE LEGS.
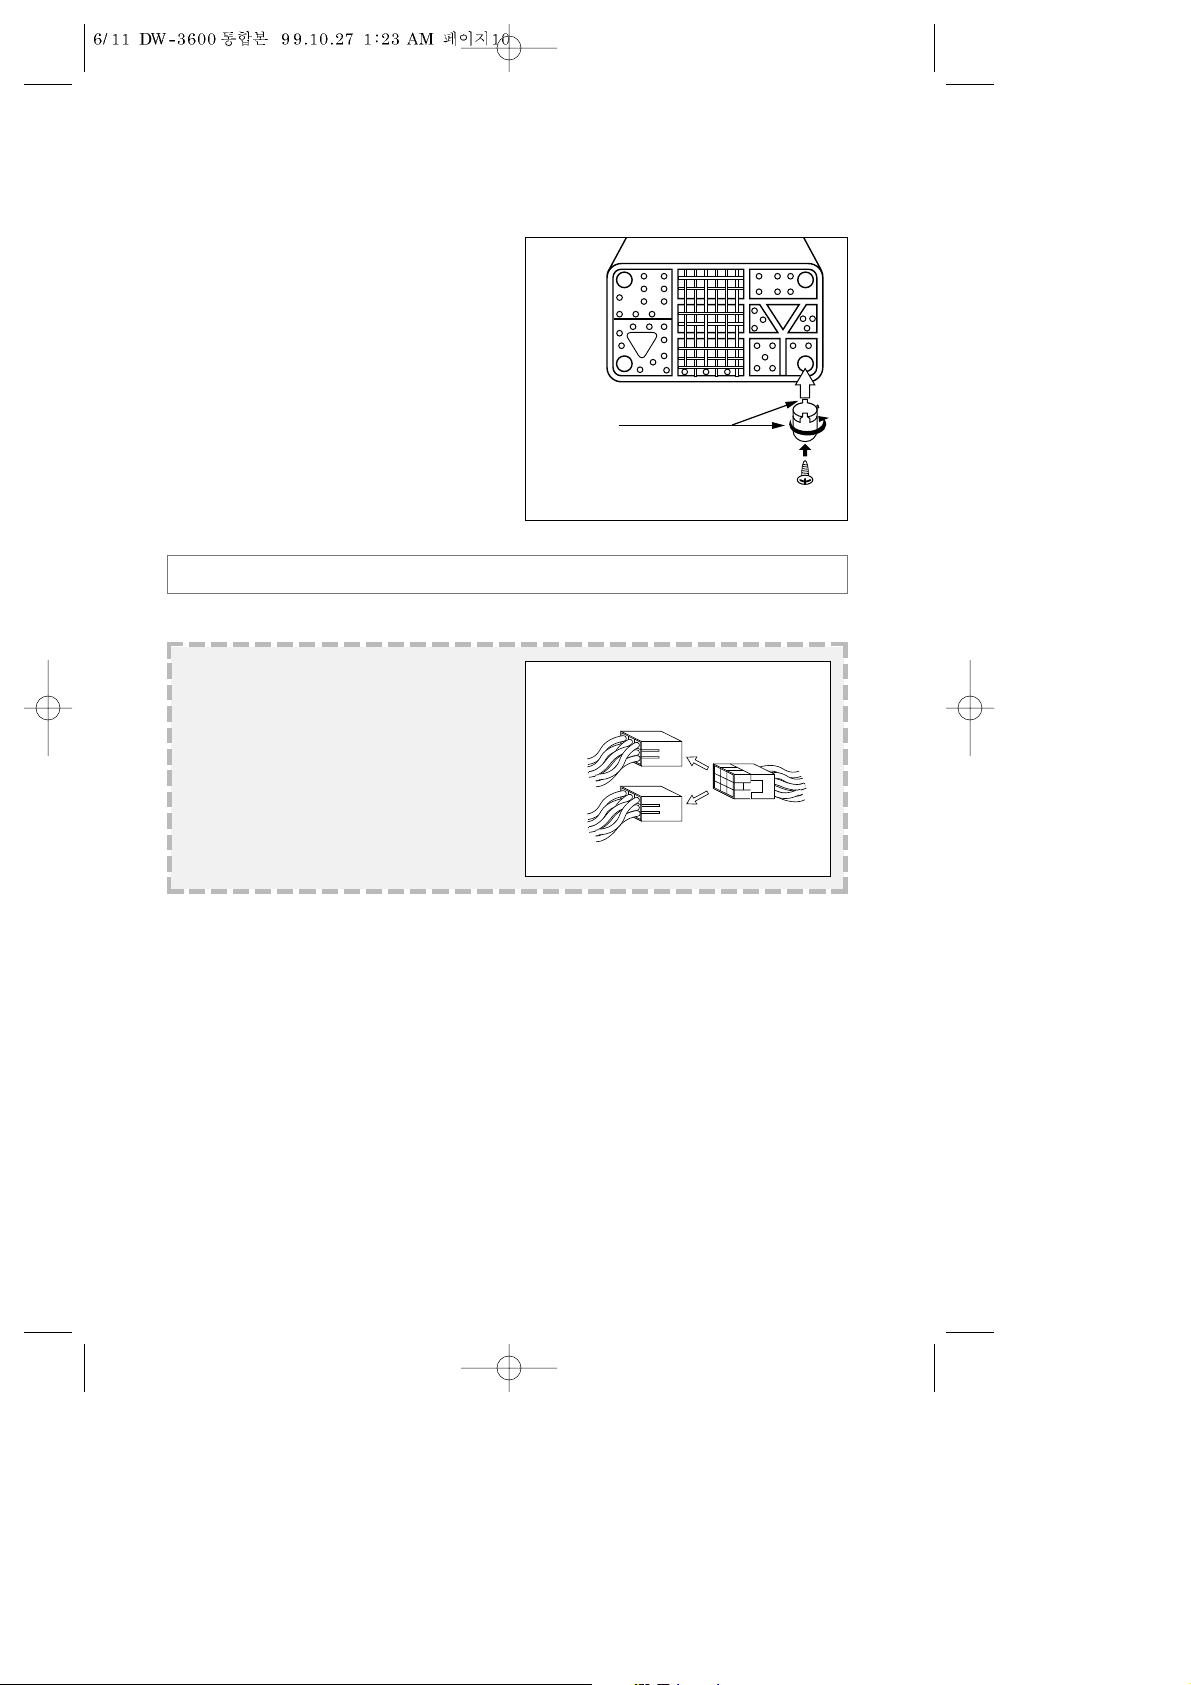
HOW TO FIX LEG TO BASE-HOLE FOR
INSTALLATION
• When you install this unit, be sure to
assemble LEGS(4EA) to base
under(Fig.4).
• Place this unit on its rear side on a
carton to prevent damage to the body.
• Insert the leg(4EA) into the base
under hole as it was. By first inserting
its two hooks.
• Turn right and screw on leg.
• Make the allows of leg and base
under face with each other at each
corner.
HOOK (2EA)
1. Inserting
2. Turn right
3. Screw on.
Figure 4.
Caution (Only dual voltage model)
• Make sure that the electric connector
is set for your available voltage before
operating the washing machine.
This unit is set for 220V. If you want to
change the voltage, remove the back
cover and reset the connector as a
figure on the right.
CONNECTOR
PLUG
CONNECTOR
AC 110V AC 220V
AC 130V AC 240V
 Loading...