

Page 1

Video Cassette Recorder
User’s Guide
DV-T5DN / DV-T3DN
As an ENERGY STAR®Partner, DAEWOO has
determined that this product meets the ENERGY STAR
¨
guidelines for energy efficiency.
Page 2
Safety information,
continued
have it replaced by your service technician
7 Power-Cord Protection- Power-supply cords should be routed so that they are not likely to be
walked on or pinched by items placed upon or against them, paying particular attention to
cords at plugs, convenience receptacles, and the point where they exit from the video product.
8 Ventilation- Slots and openings in the case are provided for ventilation to ensure reliable
operation of the video product and to protect it from overheating. These openings must not be
blocked or covered. The openings should never be blocked by placing the video product on a
bed, sofa, rug, or other similar surface. This video product should never be placed near or
over a radiator or heat register. This video product should not be placed in a built-in
installation such as a bookcase or rack unless proper ventilation is provided or the video
product manufacturer’s instruction’s have been followed.
9 Attachments- Do not use attachments unless recommended by the video product manufacturer
as they may cause hazards.
10 Water and Moisture- Do not use this video product near water- for example, near a bath tub,
wash bowl, kitchen sink or laundry tub, in a wet basement, or near a swimming pool and the
like. Caution : Maintain electrical safety. Powerline operated equipment or accessories
connected to this unit should bear the UL listing mark or CSA certification mark on the
accessory itself and should not be modified so as to defeat the safety features. This will help
avoid any potential hazard from electrical shock or fire. If in doubt, contact qualified service
personnel.
11 Accessories- Do not place this video product on an unstable cart, stand, tripod, bracket, or
table. The video product may fall, causing serious injury to a child or adult as well as serious
damage to the video product. Use this video product only with a cart, stand , tripod, bracket,
or table recommended by the manufacturer or sold with the video product. Any mounting of
the product should follow the manufacturer’s instructions and use a
mounting accessory recommended by the manufacturer.
11A A video product and cart combination should be moved with care. Quick
stops, excessive force, and uneven surfaces may cause the video product
and cart combination to overturn.
Note to CATV system installer
This reminder is provided to call the CATV system installer’s attention to Section 820-40 of the NEC
which provides guidelines for proper grounding and, in particular, specifies that the cable ground shall
be connected to the grounding system of the building, as close to the point of cable entry as practical.
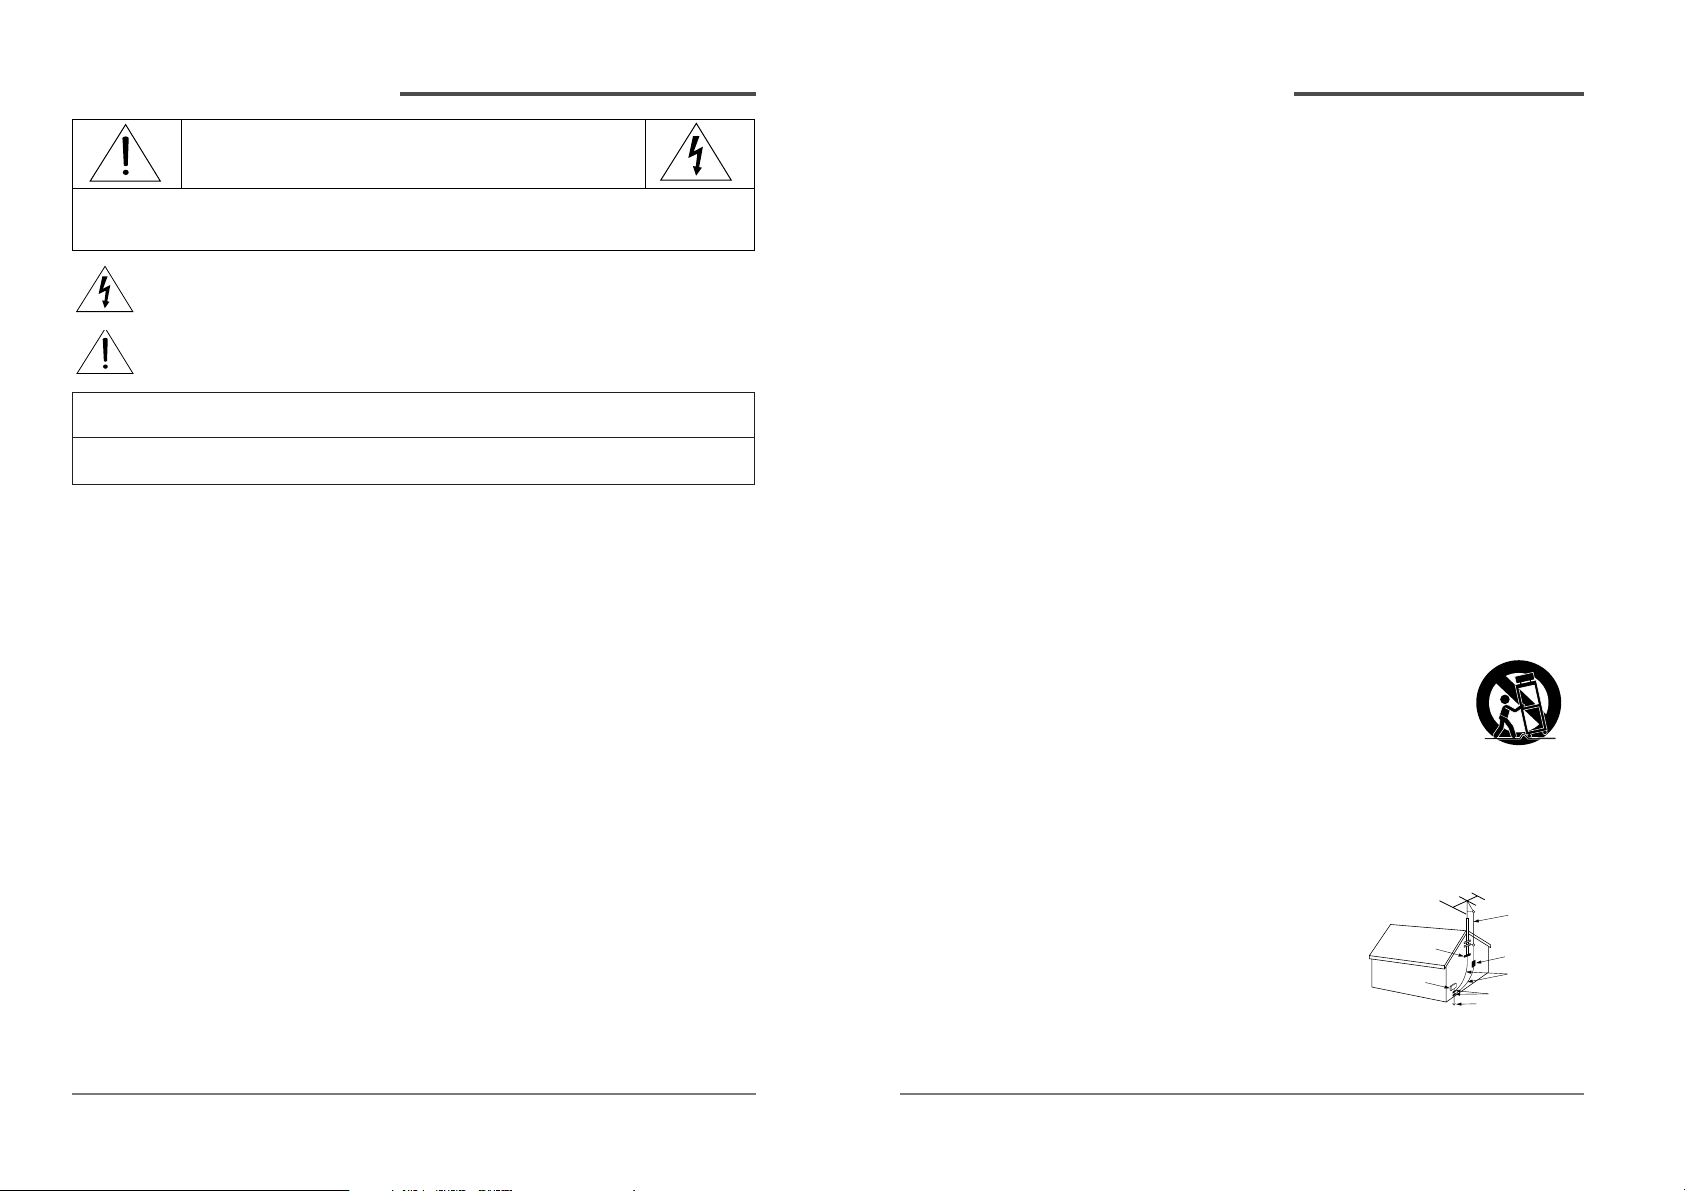
12 Outdoor Antenna Grounding- If an outside antenna or cable system is connected to the video
product, be sure the antenna or cable system is grounded
so as to provide some protection against voltage surges
and built-up static charges. Section 810 of the National
Electrical Code, ANSI/NFPA No. 70-1984 (Section 54 of
Canadian Electrical Code, Part 1) provides information
with respect to proper grounding of the mast and
supporting structure, grounding of the lead-in wire to
an antenna-discharge unit, connection to grounding
electrodes, and requirements for the grounding electrode. See example as shown.
i.
ANTENNA DISCHARGE UNIT
(NEC SECTION 810-20)
ANTENNA LEAD
IN WIRE
POWER SERVICE GROUNDING
ELECTRODE SYSTEM
(NEC ART 250 PART H)
GROUND CLAMP
ELECTRIC
SERVICE
EQUIPMENT
GROUNDING CONDUCTORS
(NEC SECTION 810-21)
GROUND CLAMPS
EXAMPLE OF ANTENNA
GROUNDING
NEC - NATIONAL ELECTRICAL CODE
ii.
CAUTION
RISK OF ELECTRIC SHOCK
DO NOT OPEN
CAUTION: TO REDUCE THE RISK OF ELECTRIC SHOCK, DO NOT REMOVE
COVER (OR BACK). NO USER-SERVICEABLE PARTS INSIDE.
REFER SERVICING TO QUALIFIED SERVICE PERSONNEL.
The lightning flash with arrowhead symbol, within an equilateral triangle, is intended to alert
the user to the presence of uninsulated “dangerous voltage” within the product’s enclosure
that may be of sufficient magnitude to constitute a risk of electric shock.
The exclamation point within an equilateral triangle is intended to alert the user to the
presence of important operating and servicing instructions in the literature accompanying
the appliance.
WARNING : TO REDUCE THE RISK OF FIRE OR ELECTRIC SHOCK, DO NOT EXPOSE THIS
APPLIANCE TO RAIN OR MOISTURE.
CAUTION : TO PREVENT ELECTRIC SHOCK, MATCH WIDE BLADE OF PLUG TO WIDE SLOT,
FULLY INSERT.
IMPORTANT SAFEGUARDS
In addition to the careful attention devoted to quality standards in the manufacture of your video
product, safety is a major factor in the design of every instrument. However, safety is your
responsibility too. This sheet lists important information that will help to assure your enjoyment
and proper use of the video product and accessory equipment. Please read them carefully
before operating and using your video product.
Installation
1 Read and Follow Instructions- All the safety and operating instructions should be read before the
video product is operated. Follow all operating instructions.
2 Retain Instructions- The safety and operating instructions should be retained for future reference.
3 Heed Warnings-Comply with all warnings on the video product and in the operating instructions.
4 Polarization- This video product is equipped with a polarized alternating -current line plug (a plug
having one blade wider than the other). This plug will fit into the power outlet only one way.
This is a safety feature. If you are unable to insert the plug fully into the outlet, try reversing the
plug. If the plug still fails to fit, contact your electrician to replace your obsolete outlet. To prevent
electric shock, do not use this polarized plug with an extension cord, receptacle, or other outlet
unless the blades can be fully inserted without blade exposure. If you need an extension cord, use
a polarized cord.
5 Power Sources-This video product should be operated only from the type of power source
indicated on the marking label. If you are not sure of the type of power supply to your home,
consult your video dealer or local power company. For video products intended to operate from
battery power, or other sources, refer to the operating instructions.
6
Overloading- Do not overload wall outlets of extension cords as this can result in a risk of fire or
electric shock. Overloaded AC outlets, extension cords, frayed power cords, damaged or cracked
wire insulation, and broken plugs are dangerous. They may result in a shock or fire hazard.
Periodically examine the cord, and if its appearance indicates damage or deteriorated insulation,
Daewoo Video Cassette Recorder User’s Guide Daewoo Video Cassette Recorder User’s Guide
Safety information
Page 3

Contents
Daewoo Video Cassette Recorder User’s Guide
Overview of the equipment ............................................................................... 1
Front panel ...............................................................................................................1
Front panel display .................................................................................................. 2
Back panel .............................................................................................................. 3
Remote control ....................................................................................................... 4
Connecting your VCR ........................................................................................... 8
Connecting an antenna to the VCR ........................................................................... 8
Connecting your VCR to your TV .............................................................................. 9
Connecting a cable system ..................................................................................... 11
Setting up your VCR ......................................................................................... 13
Turning the VCR on ............................................................................................... 13
Changing the on-screen menu language ................................................................. 13
Setting the clock .................................................................................................... 14
Selecting cable or antenna viewing ........................................................................ 15
Programming the channel memory........................................................................ 15
Setting the Cable Box (Cable Box Setup)................................................................ 18
Selecting output channel(CH3 or CH4).................................................................. 19
Using video cassettes ........................................................................................ 20
Protecting video cassettes from accidental erasure ................................................ 20
Inserting /Removing video cassettes ...................................................................... 20
Watching recorded programs ......................................................................... 21
Playing a video cassette ......................................................................................... 21
Searching forward while viewing a video cassette .................................................. 21
Searching backward while viewing a video cassette ............................................... 21
Pausing a video cassette during playback .............................................................. 21
Stopping video cassette playback ........................................................................... 21
Fast forwarding the video cassette ......................................................................... 21
Rewinding the video cassette ................................................................................ 22
Slow motion / Adjusting the picture ...................................................................... 22
Recording programs ......................................................................................... 23
Preparing to record a program (manual or timer) / Manual recording ................. 23
Timer recording ................................................................................................... 24
Reviewing timer programs / Cancelling timer programs ........................................ 26
One touch timer recording (OTR)......................................................................... 27
Using advanced features ................................................................................. 28
Play the tape automatically..................................................................................... 28
Switch the VCR to TV or VCR mode automatically .................................................. 28
Searching a cassette tape for programs (indexing)................................................ 29
Searching with the tape counter (go-to search)..................................................... 29
Marking a tape for zero search / Child Lock ........................................................ 30
CM Skip / Display(O.S.D) / Daylight-Saving Time ................................................. 31
Duplicating video cassette tapes with another VCR ................................................ 32
Connecting a Audio system to this VCR ................................................................. 33
Glossary ............................................................................................................. 34
Troubleshooting ................................................................................................. 35
Specifications ..................................................................................................... 37
Warranty ............................................................................................................ 38
13
Power Lines- An outside antenna system should not be located in the vicinity of overhead power
lines, other electric light or power circuits, or where it can fall into such power lines or circuits.
When installing an outside antenna system, extreme care should be taken to keep from touching
or approaching such power lines or circuits as contact with them might be fatal. Installing an
outdoor antenna can be hazardous and should be left to a professional antenna installer.
Use
14 Cleaning- Unplug this video product from the wall outlet before cleaning. Do not use liquid
cleaners or aerosol cleaners. Use a damp cloth for cleaning.
15 Object and Liquid Entry-Never push objects of any kind into this video product through
openings as they may touch dangerous voltage points or “short-out” parts that could result in
a fire or electric shock. Never spill liquid of any kind on the video product.
16 Lightning-For added protection for this video product during a lightning storm, or when it is
left unattended and unused for long periods of time, unplug it from the wall outlet and
disconnect the antenna or cable system. This will prevent damage to the video product due to
lightning and power line surges.
Service
17 Servicing-Do not attempt to service this video product yourself as opening or removing covers
may expose you to dangerous voltage or other hazards. Refer all servicing to qualified service
personnel.
18 Conditions Requiring Service-Unplug this video product from the wall outlet and refer servicing
to qualified service personnel under the following conditions.
A. When the power-supply cord or plug is damaged.
B. If liquid has been spilled, or objects have fallen into the video product.
C. If the video product has been exposed to rain or water.
D. If the video product does not operate normally by following the operating instructions.
Adjust only those controls that are covered by the operating instructions. Improper
adjustment of other controls may result in damage and will often require extensive work by
a qualified technician to restore the video product to its normal operation.
E. If the video product has been dropped or the cabinet has been damaged.
F.
When the video product exhibits a distinct change in performance-this indicates a need for
service.
19 Replacement Parts-When replacement parts are required, have the service technician verify
that the replacements he uses have the same safety characteristics as the original parts. Use of
replacements specified by the video product manufacturer can prevent fire, electric shock, or
other hazards.
20 Safety Check- Upon completion of any service or repairs to this video product, ask the service
technician to perform safety checks recommended by the manufacturer to determine that the
video product is in safe operating condition.
21 Wall or Ceiling Mounting- The product should be mounted to a wall or ceiling only as
recommended by the manufacturer.
22 Heat-The product should be situated away from heat sources such as radiators, heat registers,
stoves, or other products (including amplifiers) that produce heat.
iii.
Daewoo Video Cassette Recorder User’s Guide
Safety information,
continued
Page 4
1 2
Daewoo Video Cassette Recorder User’s Guide
Overview of the equipment,
continued
9 REC/OTR
Press to record the program currently airing on the
channel. Press multiple times to process onetouch-recording (OTR)time options.
10 Display panel
Displays information to assist you in operating
the VCR successfully.
11 Remote Sensor
This receiver receives a signal from your remote
control. Do not block it.
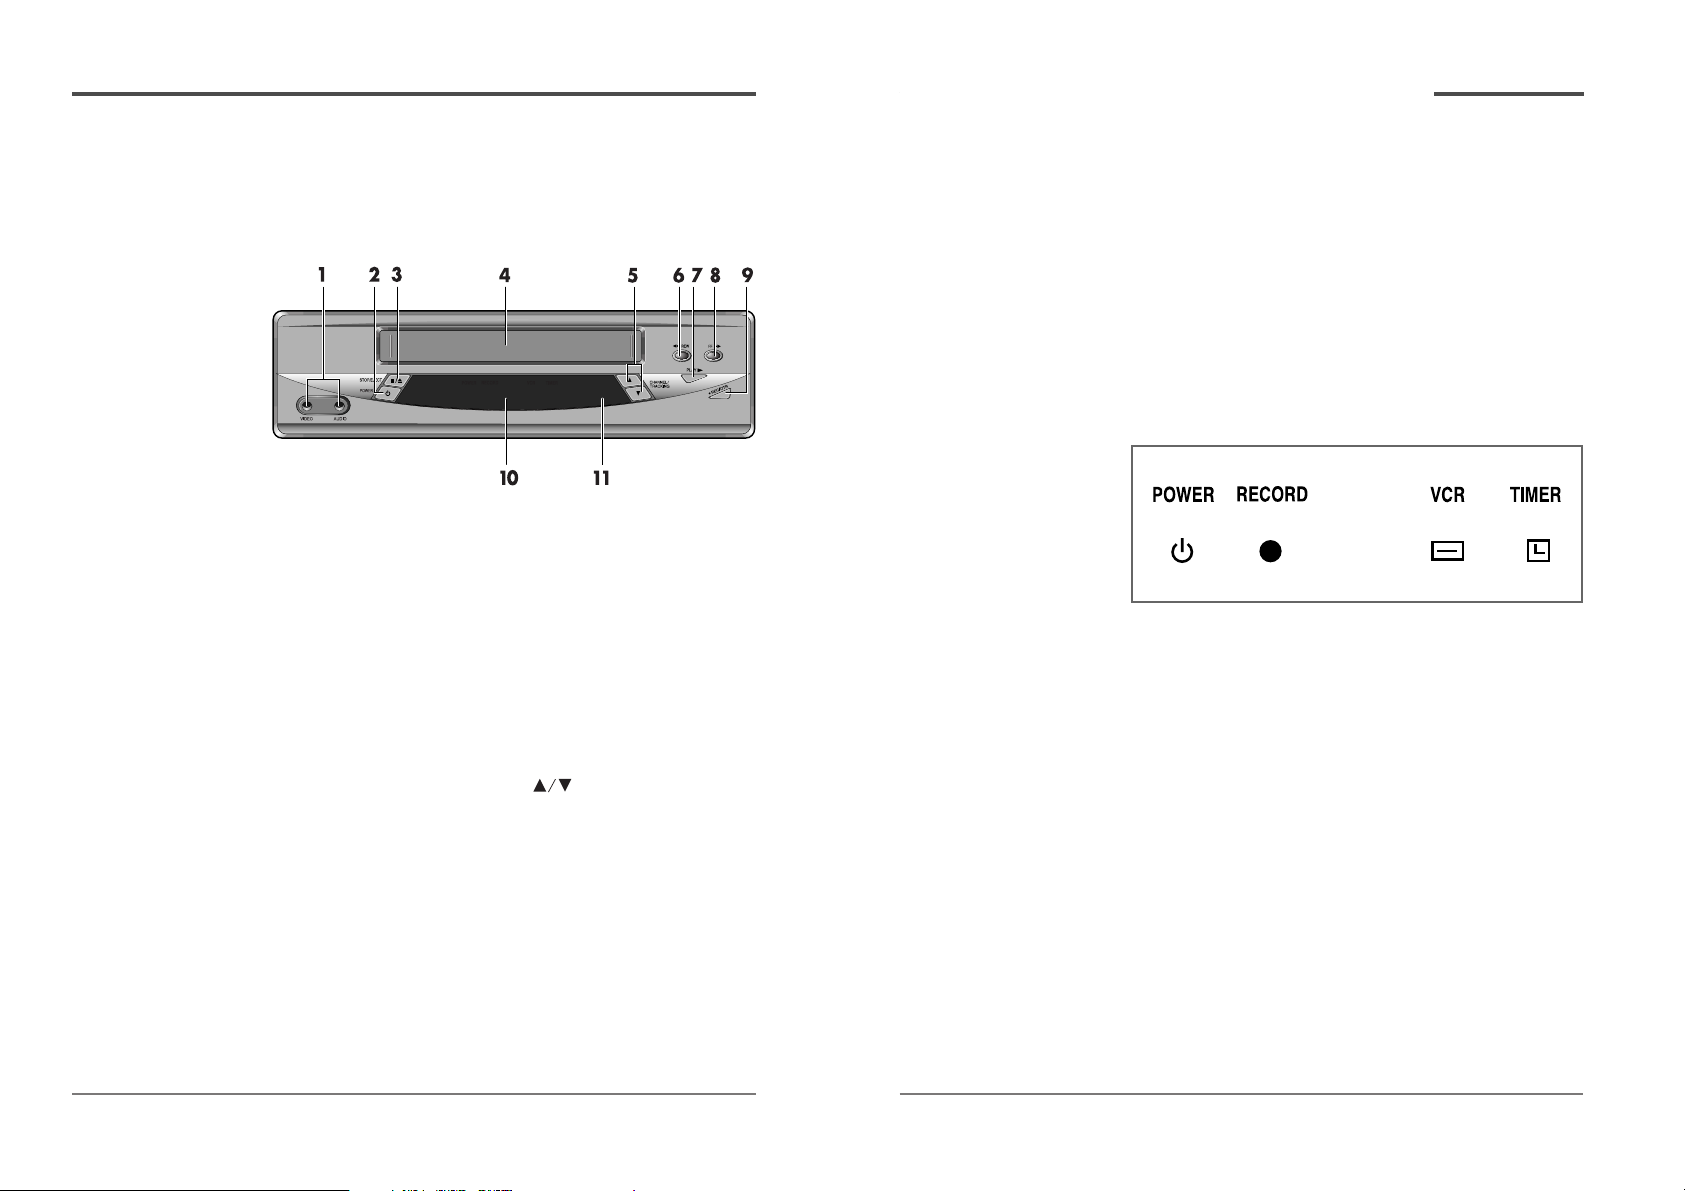
Front panel display
1 POWER
Indicates that the VCR Power is on.
2 RECORD
Indicates that the VCR is recording a program.
3 VCR
Indicates that the VCR is in VCR mode when lit.
When not lit, the VCR is in TV mode.
4 TIMER
Indicates that a timer recording has been
programmed.
* When the power indicator is blinking on the display panel, the
VCR is in the child lock mode.
Daewoo Video Cassette Recorder User’s Guide
This section summarizes the buttons, controls, and
terminals that you will use with your VCR.
Front panel
1 FRONT AUDIO/VIDEO JACK
Attach the VCR’s audio & video input at these
terminals.
2 POWER
Press to turn the VCR on or off.
3 STOP/EJECT
Press to stop tape movement and to eject a video
cassette.
4 Cassette compartment
Insert a video cassette into this slot.
5 CHANNEL/TRACKING
Press to change the channel (channels stored in
memory only) or to adjust the tracking.
6 REW
Press to rewind a video cassette.
7 PLAY
Press to play a video cassette or press to during
video cassette playback to temporarily stop playback
8 FF
Press to fast forward a video cassette.
Overview of the equipment
Page 5
4
3
Daewoo Video Cassette Recorder User’s Guide
Daewoo Video Cassette Recorder User’s Guide
Overview of the equipment,
continued
Overview of the equipment,
continued
Remote control
1 POWER
Press to turn your VCR on or off.
2 0-9
Press to select channels or to make certain
selections when using the menu system.
3 100
Press in combination with the 0-9 buttons to
select channels greater than 100.
4 P/S
Press to pause video tape playback for
temporarily still picture. Each press of the
button advances the picture one frame.
5 PLAY
Press to play a video cassette.
6 REW
Press to rewind a video cassette.
7 STOP
Press to stop tape movement.
8 REC/OTR
Press to record the program currently airing
on the channel. Press multiple times to
process one-touch-recording (OTR)time
options.
9 SPEED
Press to select tape recording speed (SP, or
EP)
10 MENU
Press to display the main menu.
11 CLEAR
Press to delete previous selections.
12 INDEX + / - (Up / Down)
In stop mode, Press to displays Index Search.
1
3
2
4
5
6
7
8
9
10
11
12
23
22
21
20
19
18
14
15
17
16
13
✔
• Objects between the
remote control and VCR
will block the path of the
remote control beam.
• Dark walls, direct
sunshine or very bright
light will reduce the
remote sensor’s sensitivity.
• The remote control will not
work correctly if you press
several buttons at the
same time.
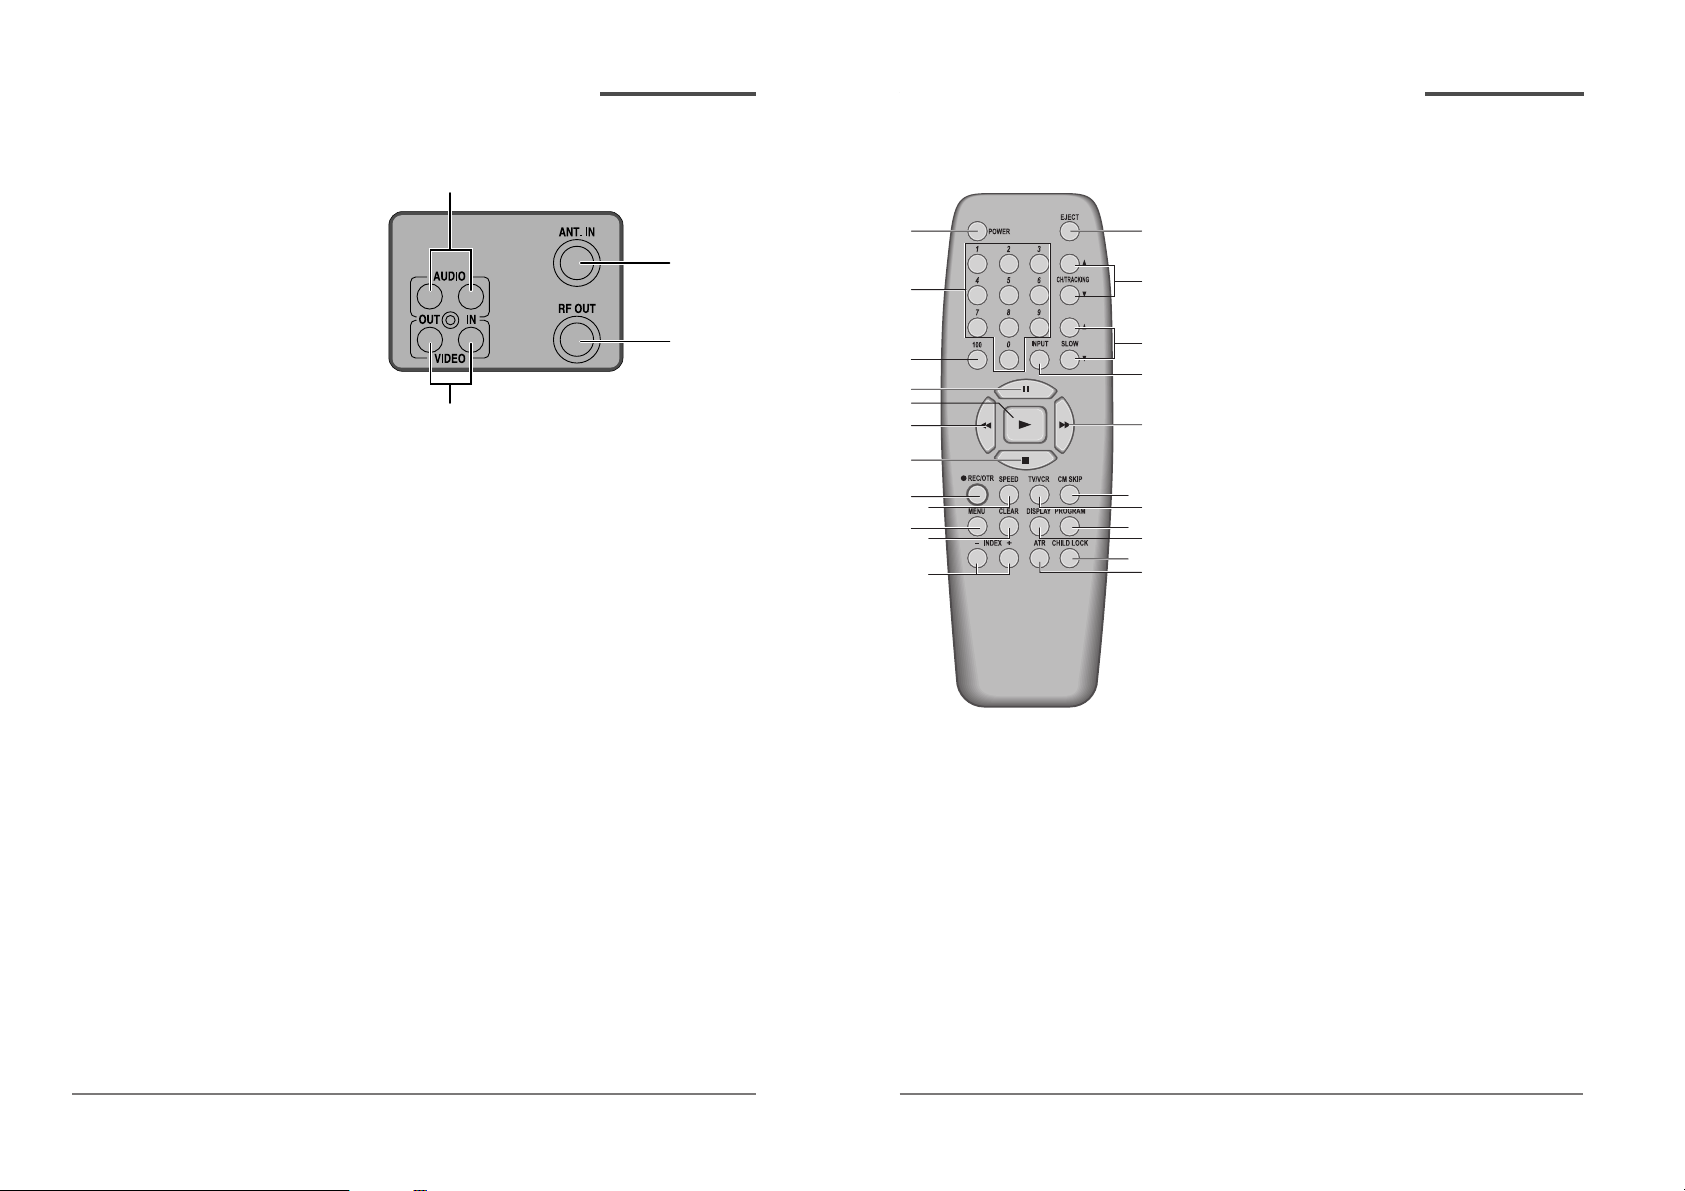
Back panel
1 VIDEO IN/OUT
Attach the VCR’s video input/output at these
terminals.
2 AUDIO IN/OUT
Attach the VCR’s audio input/output at these
terminals.
3 Antenna terminal
Attach an antenna or cable system at this terminal.
4 RF OUT
Use this terminal to connect to a VHF/UHF antenna
or to your television RF input.
1
2
3
4
Page 6
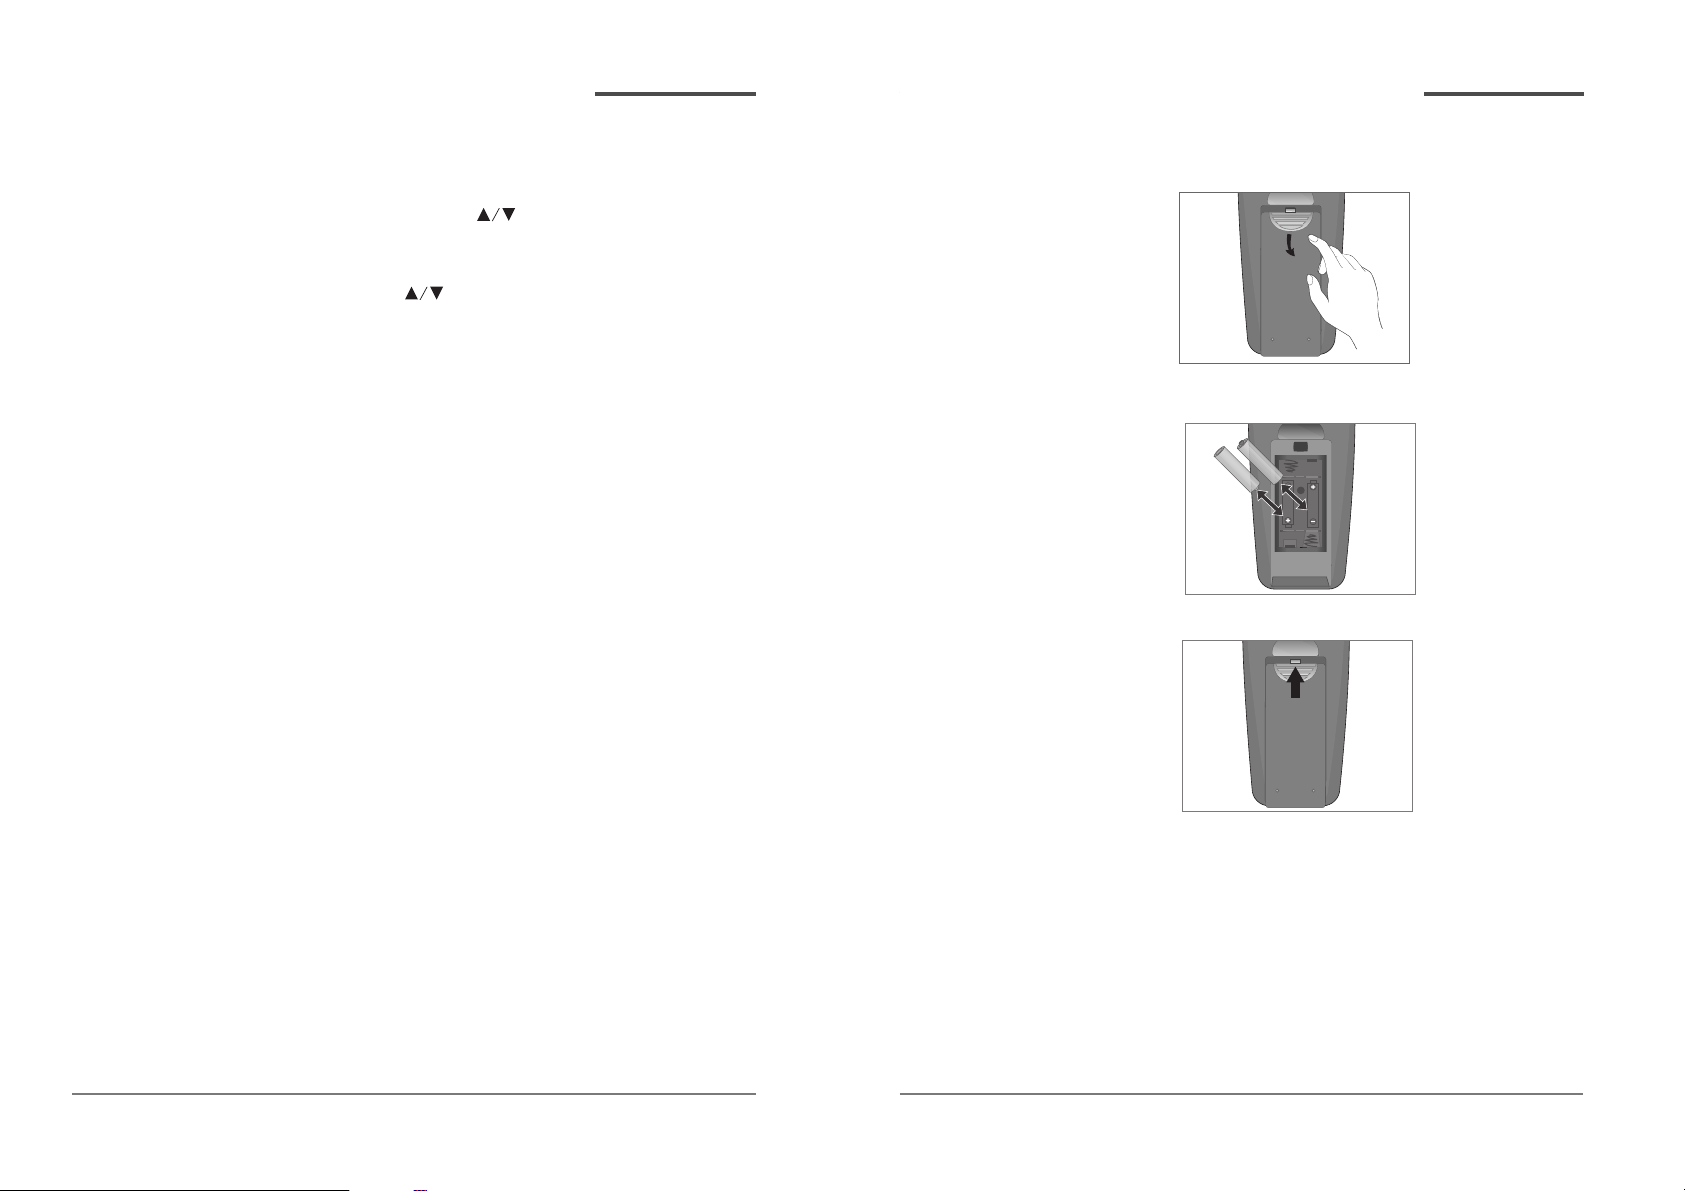
Installing the remote control batteries
1 Open the battery compartment on the back of the
remote control.
2 Install two AAA size batteries as shown. Make sure
the “+” and “–” terminals are oriented correctly.
3 Replace the cover.
Using the remote control
Hold the remote control within an angle range of about
30° from either side of the remote sensor. The remote
control range is about 23 feet (7m) from the VCR.
Point the front of the remote control directly at the front
of the VCR.
+
–
+
–
✔
• Do not mix different types
of batteries, or mix an old
and a new battery.
• Remove and replace
weak batteries. Weak
batteries can leak and
damage your controller.
Dispose of batteries
properly; never throw
them into a fire.
6
5
Daewoo Video Cassette Recorder User’s Guide
Daewoo Video Cassette Recorder User’s Guide
Overview of the equipment,
continued
Overview of the equipment,
continued
13 EJECT
Press to eject a video cassette from the
compartment.
14 CH/TRACKING (Up / Down)
Press to change the channel (channels stored in
memory only) or to adjust the tracking.
15 SLOW (Up / Down)
Press to allow slow-motion playback.
16 INPUT
Press to select between the VCR tuner and the
Audio/Video Input jacks. (auxiliary).
17 FF
Press to fast forward a video cassette.
18 CM SKIP
Press during playback mode to skip commercials or
program segments.
19 TV/VCR
Press to select the TV or VCR tuner.
20 PROGRAM
Press to go directly "TIMER RECORDINGS" in MENU.
21 DISPLAY
Press to display the tape counter, clock and status
mode on the TV screen.
22 CHILD LOCK
Press to disable VCR usage or to protect set timer
recordings, the unit can be locked so that the
buttons on the VCR or remote control don't work.
23 ATR
Press to remove any streaks from the picture
automatically.
Page 7
8
Daewoo Video Cassette Recorder User’s Guide
Connecting your VCR
You must connect your VCR to an external antenna or
cable system. Next you will connect the VCR to the
television. Follow the directions below to make these
connections. You will normally only make one of the
connections shown below, not all of them.
Connecting an antenna to the VCR
• If your antenna ends in a single coaxial lead,
press or screw the cable onto the ANT. IN terminal
on the back of your VCR.
• If your antenna ends in a pair of 300 ohm twin
leads, use a 300-ohm/75-ohm adapter
(Not Supplied). Place the leads underneath the
screws on the adapter, tighten the screws, then press
the adapter onto the VCR ANT. IN terminal.
Antennas with two sets of leads
You may have two sets of leads from your antenna system.
• If your antenna system has both a coaxial lead
and twin 300-ohm leads, purchase a combiner
(available at electronics stores). Press or screw the
coaxial lead onto the combiner; place the twin leads
underneath the screws on the combiner and tighten
the screws. Press the cable from the combiner onto
the ANT. IN terminal on the back of your VCR.
VCR
ANT.IN
7
Daewoo Video Cassette Recorder User’s Guide
Overview of the equipment,
continued
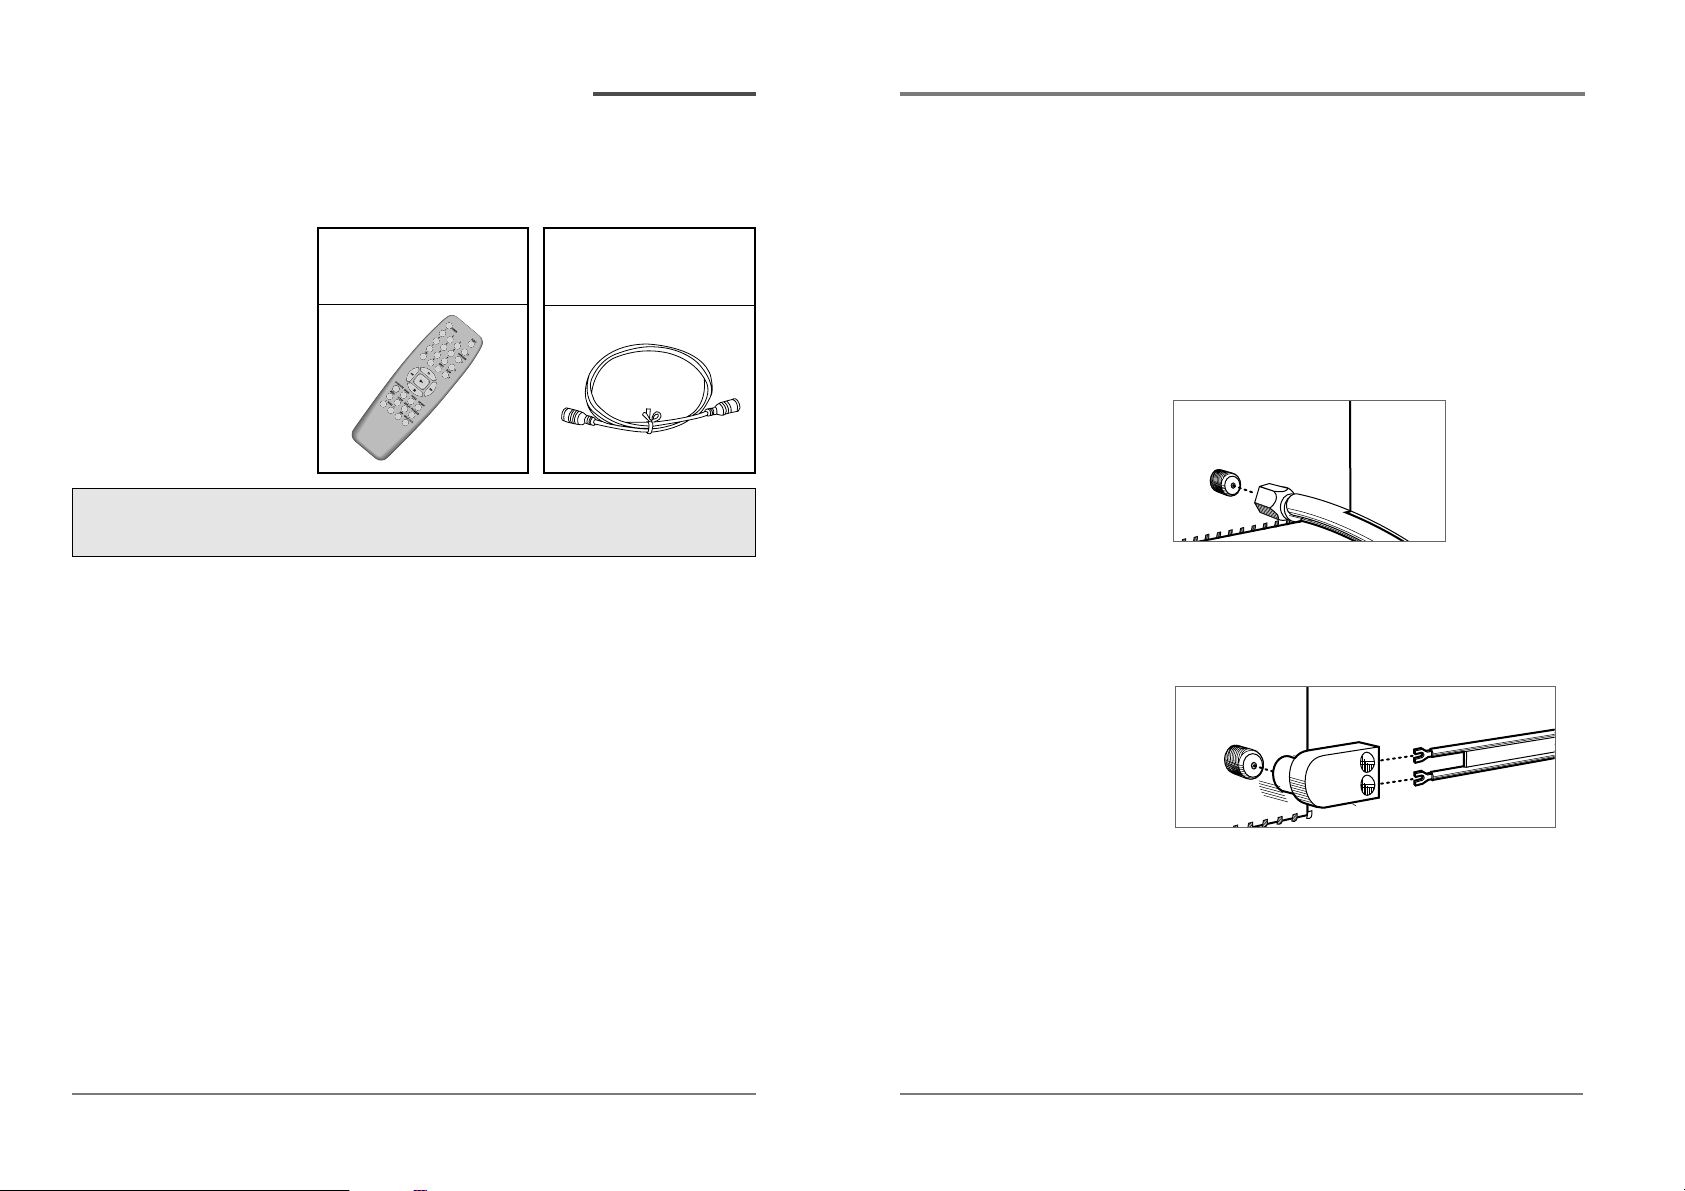
Accessories
Carefully remove the VCR from the carton. Check that the
VCR has not been damaged. The following accessories
are included.
1 Wireless Remote Control
NOTE : Required 2 ‘AAA’
batteries.
2 Coaxial cable for
connecting the VCR to your
TV’s VHF terminal.
To get a replacement remote, please call1-800-DAEWOO8(1-800-323-9668)
to get a replacement remote and talk to parts department.
VCR
ANT.IN
Page 8

10
Daewoo Video Cassette Recorder User’s Guide
9
Daewoo Video Cassette Recorder User’s Guide
Connecting your VCR,
continued
• If you have a coaxial terminal for VHF signals
and twin lead terminals for UHF signals, you
need an adapter(Not supplied) as shown below:
• If you have twin lead terminals for all signals,
you need an adapter(Not supplied) like this:
If your TV does not have Audio/Video inputs, you
have finished connecting your VCR to your TV. If
your TV does have Audio/Video inputs, you may
want to follow the section below.
Connecting to a TV with Audio/Video inputs
1 Connect a video cable to the VIDEO OUT terminal on
the back of the VCR.
2 Connect the other end of the video cable to the
VIDEO IN terminal on the TV.
.
VHF
TV
Connecting your VCR,
continued
• If your antenna system has two sets of twin
300-ohm leads, purchase a combiner (available at
electronics stores). Place one set of twin leads
underneath the screws on the combiner and tighten
the screws. Do the same with the other set of twin
leads. Press the cable from the combiner onto the
ANT. IN terminal on the back of your VCR.
Connecting your VCR to your TV
1 Connect one end of a coaxial cable to the RF OUT
terminal on the back of the VCR.
2 Connect the other end of the coaxial cable to the
ANT. IN terminal on the back of the TV.
ANT.IN
VCR
VCR
ANT.IN
.
TV
TV
TV
.
TV
.IN
IN
IN
.
IN
IN
Page 9

12
Daewoo Video Cassette Recorder User’s Guide
11
Daewoo Video Cassette Recorder User’s Guide
• If your cable system requires you to use a
converter box for all channels, connect the
incoming cable to the IN terminal on the converter
box. Connect another cable between the OUT
terminal on the converter box and the ANT. IN
terminal on the VCR. Keep your VCR tuned to channel
3 or 4 and change channels using the converter box.
• If your cable system only requires you to use a
converter box for some channels (i.e., pay-TV
channels), follow these steps: Find the primary
incoming coaxial cable. Plug this cable into a splitter
(available at your local electronics store.) Connect
one coaxial cable between one OUT terminal on the
splitter and the IN terminal on the converter box.
Connect another coaxial cable between the other
OUT terminal on the splitter and the A-IN terminal on
an A/B switch (available at your local electronics
store.) Connect a third coaxial cable between the
OUT terminal on the converter box and the B-IN
terminal on the A/B switch.
Connect a coaxial cable between the OUT terminal on
the A/B switch and the ANT. IN on your VCR.
When the A/B switch is in the B position, use the
converter box to change channels ; when the A/B
switch is in the A position, use the VCR to change
channels.
VCR
ANT.IN
Connecting your VCR,
continued
3 Connect a pair of audio cables to the AUDIO OUT
terminal on the back of the VCR. If you have a mono
(non-stereo) TV, connect only the white (left)
terminal.
4 Connect the other end of the audio cables to the
AUDIO IN terminals on the TV. If you have a mono
(non-stereo) TV, connect only the white (left)
terminal.
Connecting a cable system
If your cable set-up is not described below, please
contact your cable company for more information.
• If your cable system does not require the use
of a cable box, simply press or screw the incoming
cable onto the ANT IN terminal on the back of your
VCR.
.
.
.
TV
VCR
Connecting your VCR,
continued
.
TV
.
ANT.IN
VCR
Page 10

14
Daewoo Video Cassette Recorder User’s Guide
13
Daewoo Video Cassette Recorder User’s Guide
Setting the clock
The clock displays the current time and is used for timer
recording. Therefore, it is important to set the time and
date accurately.
If you are setting the clock for the first time, or if a power
failure has erased the clock settings, the clock will
display --:--.
1 Press MENU to display the menu.
2 Press 2 to select Clock Set
3 Press 1 to select Time and Date Set.
4 Use 0-9 to enter the hour and the minutes.
5 Press 1 if it is AM; press 2 if it is PM.
6 Use 0-9 to enter the month, day, and year. The VCR
will automatically adds the correct day of the week
according to the date that is selected.
Setting up your VCR,
continued
Setting up your VCR
Once you have connected your VCR and put batteries in the
remote control, you are ready to use the VCR. Before you start,
however, you must be certain to do the following:
• Turn on the television.
• Tune the television to channel 3 or 4 (whichever
channel you selected when connecting the VCR).
Turning the VCR on
1 Press POWER on the remote control. You can also
press POWER on the VCR’s front panel.
2 Set the VCR to VCR mode by pressing TV/VCR on the
remote control if the VCR indication is not lit.
Changing the on-screen menu language
You may select the language in which you would like the
VCR’s menu to be displayed: English, Spanish, or French.
1 Press MENU to display the main menu.
2 Press 5 to select Language.
3 Press 1 to select English, 2 to select Español
or 3 to select Français.
4 Press MENU once to return the main menu, which
will be displayed in the language you selected. Press
MENU again to exit the menu system and return to
normal viewing.
MENU
1 TIMER RECORDINGS
2 CLOCK SET
3 CHANNEL SET
4 FUNCTIONS
5 LANGUAGE SELECT
MENU Exit
Page 11

7 Press Menu to save the settings and exit from the
Time and Date Set menu.
8 Press MENU again to exit the menu system and
return to normal viewing.
Selecting cable or antenna viewing
You must set the viewing mode for your VCR, choosing
either CABLE (cable system connection) or ANTENNA
(antenna connection). To set the viewing mode:
1 Press MENU to display the menu.
2 Press 3 to select Channel Set.
3 Press 3 to toggle the setting between CABLE and
ANTENNA. When the desired viewing mode is
displayed, press MENU twice to exit.
Programming the channel memory
The VCR’s channel memory determines the channels that
are visible when you press CH/TRACKING . You can
add or remove channels from memory.
16
Daewoo Video Cassette Recorder User’s Guide
15
Daewoo Video Cassette Recorder User’s Guide
Setting channels automatically (Auto Channel Search)
Make sure that you use the auto channel search feature
during daytime broadcast hours. If you use the auto
channel search feature at late night, you may eliminate
channels that air only daytime programming.
1 Press MENU display the main menu.
2 Press 3 to select Channel Set.
3 Press 1 to select Auto Channel Search mode and
press 3 to detect the channel automatically and the
scanning channel number appears. Wait until the
channel numbers stop changing (one to two
minutes), and one of the memorized channel
appears.
4 Press CH/TRACKING to view the memorized
channels.
Removing channels manually
To erase a channel manually,
1 Press MENU to display the menu.
2 Press 3 to select Channel Set.
✔
• Detect Automatically
;A strong cable or
antenna signal in your
area may cause Auto
Detect to mis-detect.
If this should happen,
select 1 or 2 for the
system you have.
Setting up your VCR,
continued
Setting up your VCR,
continued
Page 12

4 Press 2 to select Add/Remove Channels.
5 Press DISPLAY to add the channel.
6 Press MENU three times to exit from the menus.
Setting the Cable Box (Cable Box Setup)
1 Press MENU to display the menu.
2 Press 3 to select Channel Set.
3 Press 4 to process Cable Box setup
4 Press the channel number (01~13) or input key
which matches to the output of the Cable Box to
connect between Cable Box and VCR.
5 Press CLEAR on the remote to correct setup status.
6 Press MENU when you are finished.
7 Press MENU to exit the menu system.
18
Daewoo Video Cassette Recorder User’s Guide
17
Daewoo Video Cassette Recorder User’s Guide
✔
When you make a timer
recording, the preset
channel number will be
displayed automatically.
ADD/REMOVE CHANNELS
Channel 06
is now REMOVED.
DISPLAY Add
MENU Exit
Setting up your VCR,
continued
Setting up your VCR,
continued
3 Press 2 to select Add/Remove Channels.
4 Use 0-9 to enter the channel you want to remove.
5 Press CLEAR to erase the channel.
6 When you are finished removing channels, press
MENU three times to exit from the menus.
Adding channels to memory
If you have removed a channel from memory, you can
easily add it back again. To add channels:
1 Use 0-9 to tune to the channel you would like to add.
2 Press MENU to display the main menu.
3 Press 3 to select Channel Set.
Page 13

20
Daewoo Video Cassette Recorder User’s Guide
19
Daewoo Video Cassette Recorder User’s Guide
Using video cassettes
Before you play or record on a video cassette tape, be
certain to read this information on the proper care and
use of video cassettes.
Only use video cassettes that bear the VHS mark: .
There are four types of video cassettes: T-60, T-90,
T-120, and T-160. The amount you can record on a tape
is dependent upon the tape speed at which you record.
The table below lists the recording time(hours:minutes)
for each tape type according to recording speed.
Tape SP Mode EP Mode
Type (Standard Play) (Extended Play)
T-60 1:00 3:00
T-90 1:30 4:30
T-120 2:00 6:00
T-160 2:40 8:00
Protecting video cassettes from accidental erasure
Cassettes have a safety tab to prevent
erasure. Break off the safety tab
with a screw driver. If you wish to
record on a cassette without a safety
tab, cover the hole with cellophane
tape.
Inserting video cassettes
Firmly insert the cassette into the cassette compartment
with the label up. An inverted cassette cannot be inserted.
Removing video cassettes
Press STOP/EJECT on the VCR front panel and the VCR
will eject the tape. Pull the cassette out gently.
✔
Audio-visual material
may include works of
copyright which must not be
recorded without
authorization of the
copyright owner.
✔
If you insert a video
cassette without a safety tab
into the VCR:
•After setting the timer
recording program, “ ” will
blink on the display panel
in the power off mode and
the VCR will automatically
eject the cassette.
• In the power on mode, the
VCR will playback
automatically.
✔
If you insert a video
cassette with a safety tab
intact into the VCR:
• After setting the timer
recording program,the VCR
will be stand-by mode in
power off mode.
!
• Do not attempt to pull out
the video cassette once the
VCR begins to load the
video cassette.
• Do not insert fingers or
any foreign object
beyond the door flaps of
the cassette compartment;
this could lead to injury or
equipment damage.
• Do not attempt to insert a
video cassette if the VCR
in unplugged.
Setting up your VCR,
continued
Selecting output channel (CH3 or CH4)
you must set output channel for your VCR
choosing either CH3 or CH4. To set the out channel :
1 Press MENU to display the menu.
2 Press 5 to select output channel.
3 Press 5 to toggle the setting between CH3 and CH4.
When the desired output channel is displayed, Press
MENU twice to exit
* The default output channel is setup CH3
Page 14

22
Daewoo Video Cassette Recorder User’s Guide
21
Daewoo Video Cassette Recorder User’s Guide
Watching recorded programs,
continued
Rewinding the video cassette
To rewind the video cassette:
1 Press STOP if the VCR is currently playing.
2 Press REW. The video cassette will rewind at high
speed without picture and sound.
Slow motion
You can view a tape during Play-Pause using slow motion.
1 Press P/S to freeze the picture.
2 Press FF/REW to speed up or down slow motion
playback.
The VCR switches automatically from slow motion
playback to stop after a few minutes.
Adjusting the picture
The Digital Auto Tracking System automatically adjusts
the tracking to obtain the best possible picture. To
manually adjust the tracking during playback, press
CH/TRACKING .
Watching recorded programs
To watch a program recorded on a video cassette tape:
•Turn on the television.
•Set the TV to channel 3 or 4 or to the video input.
•Insert a video cassette.
Playing a video cassette
If the video cassette has no safety tab(e.g., a rented video
cassette), the VCR will automatically play the tape once
you insert it. If the VCR does not play the video cassette,
press PLAY.
Searching forward while viewing a video cassette
To search forward on a video cassette, press FF. The
video cassette will advance rapidly and display a picture,
but no sound. If you repress the FF, the video cassette will
advance more rapidly. Press PLAY to return to normal
play.
Searching backward while viewing a video cassette
To search backward on a video cassette, press REW. The
video cassette will rewind rapidly and display a picture,
but no sound.If you repress the REW, the video cassette
will rewind more rapidly. Press PLAY to return to normal
play.
Pausing a video cassette during playback
To temporarily stop playback, press P/S. The picture will
freeze and the sound will stop. Press PLAY to return to
normal play.
Stopping video cassette playback
To stop a video cassette, press STOP.
Fast forwarding the video cassette
To quickly advance the video cassette:
1 Press STOP if the VCR is currently playing.
2 Press FF. The video cassette will advance at high
speed without picture and sound.
✔
In the searching forward,
searching backward and
Pause mode, the picture
noise may be appeared on
the screen in 2 Head model
(DV-T3DN).
✔
In the slow motion, the
picture noise may be
appeared on the screen in 2
Head model (DV-T3DN).
Page 15

24
Daewoo Video Cassette Recorder User’s Guide
23
Daewoo Video Cassette Recorder User’s Guide
Recording programs,
continued
Timer recording
There are four timer modes: One time, Daily, Weekdays,
and Weekly
1 Be certain to do the steps in the section, “Preparing
to record a program,” as shown on previous page.
2 Make certain the clock is set to the correct time.
3 Press MENU to display the menu.
4 Press 1 to select Timer Recordings.
5 Press 1 to select Make a New Program.
6 Press 1 for One Time; 2 for Daily; 3 for Weekdays,
or 4 for Weekly.
7 Use 0-9 to enter the channel number to record.
While the VCR is in the CABLE mode, if a channel
over 100 is desired, press 100’s key and then the
next 2 digits in order.
✔
Timer recording allows
you to record up to eight
different programs within
one year period.Once you
have set the timer for timer
recording, the VCR will
turn on, record the
program you selected, and
then shut off automatically.
✔
If the VCR is in cable
box setup mode, the preset
channel number will be
displayed automatically.
Recording programs
You have three options for recording TV programs:
Manual, Timer, and One touch recording.
Preparing to record a program (manual or timer)
Before you begin recording:
•Turn on the television.
•Set the TV to channel 3 or 4 or to the video input.
•Insert a video cassette (with a safety tab) into the VCR.
•If the VCR indicator is not lit, press TV/VCR.
•If your VCR is connected to:
– an antenna, set the viewing mode to “ANTENNA.”
– a cable system, set the viewing mode to “CABLE.”
Manual recording
Watching and recording the same channel
To watch and record the same channel:
1 Be certain to do the steps in the section, “Preparing
to record a program,” above .
2 Use 0-9 or CH/TRACKING to select the channel
number.
3 Press SPEED to select the recording speed.
4 Press REC/OTR to begin recording. The REC
indicator lights.
• Press STOP to stop the recording.
Watching one channel and recording another
1 Perform steps 1-4 in “Watching and recording the
same channel,” above.
2 Press TV/VCR to switch to TV mode.
3 Use the television’s remote control to select the
television channel you want to watch. The VCR will
continue to record the program.
✔
See “Selecting cable or
antenna viewing. “p.15,
for information on setting
the viewing mode.
✔
Press P/S if you would
like to momentarily stop the
recording. Press REC/OTR to
resume recording. If you do
not press REC within five
minutes of pressing P/S, the
VCR will automatically
release the pause and stop
the recording to prevent
damage to the tape.
✔
Since the VCR has its
own TV tuner, it is not
necessary to turn on the TV
in order to make a
recording. Turning on the
TV merely allows
confirmation of proper
channel settings on your
VCR.
Page 16

26
Daewoo Video Cassette Recorder User’s Guide
25
Daewoo Video Cassette Recorder User’s Guide
Recording programs,
continued
Reviewing timer programs
If you want to review the timer programs that you set up:
1 Press MENU to display the menu.
2 Press 1 to select Timer Recordings.
3 Press 2 to select Review/Cancel Programs.
4 Press MENU to view additional timer programs.
Cancelling timer programs
To cancel timer recording programs before recording
starts :
1 Press MENU to display the menu.
2 Press 1 to select Timer Recordings.
TIMER RECORDINGS
1 Make a New Program
2 Review/Cancel Programs
MENU Exit
Recording programs,
continued
8 Use 0-9 to enter the recording start time.
9 Use 0-9 to enter the recording end time.
AM/PM and the current date/year will be selected
automatically.
10 Use 0-9 to set the date that the program airs.
Day(Sat)/Year(01) will be automatically.
11 Press 1 or 2 to select the recording speed and press
MENU and the following screen will appear.
12 Press MENU three times repeatedly to return to
normal viewing and if you want to make a new
program, press MENU and restart from step 4 to 11.
✔
See page 20 for
information, about tape
speed. Understanding tape
speed options will ensure
that you are able to
completely record a
program without running
out of tape and that you
are able to record
programs with the level of
picture quality you desire.
✔
To turn the VCR off after
setting up a timer recording
program, press POWER on
the remote control or
POWER on the VCR. The
timer recording indicator
will light.
• To stop a timer recording
program in process, press
and hold STOP for about
five seconds.
• When the timer recording
indicator appears, the
VCR is in standby and
cannot be operated. To
release the VCR from
standby, press POWER.
Page 17

28
Daewoo Video Cassette Recorder User’s Guide
Using advanced features
Play the tape automatically
This feature allows the VCR to automatically start playing
when you insert a tape with the safety tab removed.
1 Press MENU to display the menu.
2 Press 4 to choose Functions
3 Press 1 to switch between ON and OFF
- Select ON if you want a tape with its safety tab
removed to start playing automatically when the tape
is inserted.
- Select OFF if you do not want a tape with its safety
tab removed to start playing automatically.
Switch the VCR to TV or VCR mode automatically
This feature controls whether the TV/VCR switch changes
automatically to the VCR mode when the VCR is turned
on.
1 Press MENU to display the menu.
2 Press 4 to choose Functions
3 Press 2 to switch between ON and OFF
- Select ON if you want the VCR to switch to the VCR
mode when the VCR is turned on or a cassette is
inserted. This only applies if you connect the ANT.IN
and RF OUT jacks of your VCR and TV and watch
your VCR on channel 3 or 4 of your TV.
27
Daewoo Video Cassette Recorder User’s Guide
Recording programs,
continued
3 Press 2 to select Review/Cancel Programs. Press
MENU to cycle the programs.
4 When the program contents to be erased is
displayed, press CLEAR to cancel it.
5 Press MENU repeatedly to return to normal viewing.
One touch timer recording (OTR)
One touch timer records a program for a preset
recording time (30 minutes to 4 hours).
1 Be certain to do the tasks in the section, “Preparing
to record a program”.
2 Use 0-9 or CH/TRACKING to select the channel
to record.
3 Press REC/OTR to begin recording.
4 Continue to press REC/OTR to increase the time
length of the recording.
Press REC/OTR To record
one time normal (no recording time limit)
two times 30 mins.
three times 1 hour
four times 1 hour 30 mins.
five times 2 hours
six times 3 hours
seven times 4 hours
eight times normal (no recording time limit)
•To stop the recording in progress, press and hold
STOP approximately 5 seconds.
PROGRAM1 (ONE TIME)
Channel 06 Cable
Start Time 0
4 : 3 0 A M
End Time 0 5 : 3 0 A M
Start Date 07 / 06 / 02 Sat
Tape Speed EP
CLEAR Cancel
MENU For next program
✔
Be certain when using
manual or one-touch recording
that your recording does not
conflict with timer recordings
that you set up.
Page 18

30
Daewoo Video Cassette Recorder User’s Guide
29
Daewoo Video Cassette Recorder User’s Guide
Using advanced features,
continued
2 Press 4 to choose Functions.
3 Press 4 to display Go-To Search.
4 The tape counter is displayed on the screen. Input
the tape counter you want to go and press REW or
FF, the VCR will search for the time counter you
want.
Marking a tape for zero search
1 Use PLAY, REW,or FF to reach the point on the tape
that you would like to mark as 0:00:00.
2 Press DISPLAY to display the tape counter on the
screen.
3 Press CLEAR to reset the tape counter to 0:00:00.
4 You can continue to play the tape or perform other
functions with the VCR.
Child Lock
To disable to usage of the VCR, or to protect your timer
recordings, you can lock the VCR so that the buttons
on the VCR or remote won’t work.
- To lock : Press and hold CHILD LOCK key on the
remote for approximately six seconds.
- To release : Press and hold CHILD LOCK key on the
remote for approximately six seconds.
Using advanced features,
continued
- Select OFF if you want the VCR to remain in the TV
mode. This is useful if you watch your VCR on the
TV’s video input and you don’t want your
antenna/cable signal interrupted by the VCR.
Searching a cassette tape for programs (indexing)
When you record a programs, the VCR places an index
mark at the start of the recording. To search for an index
mark:
1 Press MENU to display the menu.
2 Press 4 to choose Functions.
3 Press 3 to choose Index Search.
4 If you want to search through a certain number of
index marks, press two number buttons to enter the
number of marks you want to search. Press CLEAR
on the remote to correct an entry.
5 Press REW to search backward or FF to search
forward. The VCR will locate your index mark and
begin playback. If you did not enter a specific index
number, the VCR will locate the next index mark and
begin playback. Press STOP to stop index searching.
Searching with the tape counter (go- to search)
You can mark a segment of the video cassette with the
tape counter that will help you easily locate the segment
later.
1 Press MENU to display the menu.
!
• If two recordings overlap, the
index mark for the second
program will be erased.
Therefore, when you use the
index feature to find the second
program, the VCR will skip
over it.
• If you record multiple programs
in one recording session, the
VCR will only find the index
mark that was placed on the
video cassette tape when the
recording session began.
!
Some index marks that may
be missed by the VCR :
• A mark too close to your
location on the tape.
• The mark at the beginning of a
recorded segment of five
minutes or less.
• The first index mark on the tape
when you start at the beginning
of the tape.
Page 19

32
Daewoo Video Cassette Recorder User’s Guide
31
Daewoo Video Cassette Recorder User’s Guide
Using advanced features,
continued
Duplicating video cassettes tape with another VCR
You can duplicate a video cassette tape if you connect a
second VCR to this VCR.
Connecting another VCR to this VCR
Make all connections before turning on the power.
Be sure to press INPUT on the recording VCR.
Connecting a Camcorder to this VCR
For duplicating a previously recorded tape from a
camcoder, follow the camcorder manufacturer’s
instructions.
A type of dubbing hookup is shown below. Be sure to
press INPUT on the recording VCR.
Using advanced features,
continued
CM Skip
This is useful for skipping commercials or program
segments.
- Press CM skip once during playback to advance the
tape approximately 30 seconds.
- Each press of the CM skip adds an additional 30
seconds up to 5 minutes.
Display (O.S.D)
Press DISPLAY to display the tape counter, clock and
status mode on the TV screen.
And, by one more pressing DISPLAY before disappearing
the OSD from the screen, only the tape counter will
remain on the screen.
Daylight-Saving Time
1 Press MENU to display the menu.
2 Press 2 to choose Clock Set.
3 Press 2 in the Clock Set mode to toggle the setting
between AUTO DST ON and OFF.
- Select ON if you want the VCR’s clock to
automatically adjust for daylight-saving time.
- Select OFF if you do not want the VCR’s clock to
adjust for daylight-saving time.
✔
Use the tape counter to note
the current location of playback on the video cassette.
• To reset the tape counter,
press CLEAR and the time
counter will be reset to
00:00 anywhere on a
tape. See “Searching
with the tape counter (goto search),” p.29/30,
for more information on
this feature.
✔
SPRING Forward ; Fall
Backward
In the Spring, daylight-saving
time begins on the first Sunday
in April. Because the clock
automatically changes from
2:00 AM to 3:00 AM
(forward one hour), remember
to include the extra hour for
timer recording falling within
this time frame.
In the Autumn, daylight-saving
time ends on the last Sunday in
October.
The VCR clock automatically
changes from 2:00 AM to
1:00 AM (back one hour).
Therefore, it can affect your
recording length.
Page 20

34
Daewoo Video Cassette Recorder User’s Guide
33
Daewoo Video Cassette Recorder User’s Guide
34
Glossary
AFT: Automatic fine tuning, a circuit that automatically
adjusts TV reception to optimum condition.
CABLE: Cable television.
EP: Extended play, the slowest recording speed. Designed
to store the maximum amount of program material on a
single video cassette. There is some degradation in
picture/audio quality.
Index Search: A feature of this VCR that automatically
records an index each time recording begins. It helps you
locate a particular segment of the tape quickly and easily.
LP: Long Play, an intermediate tape recording speed that
combines most of the picture/audio quality obtainable at
the standard recording speed with some of the tape
economy of Extended Play (EP).
OSD: On-screen display of information pertinent to the
features of the VCR.
OTR: One-touch recording, a feature that allows you to
record the program you’re watching by pressing the REC
key. Each press of the key increases the recording time
by 30 minutes, up to four hours.
RF: Radio frequency, the composite audio/video signal
supplied to a TV receiver (or other video component) by
an antenna or cable system.
Safety tab: The plastic tab at the back of a video tape
cassette which, when removed, prevents accidental
erasure of a recording.
SP: Standard play, the recording speed to use when the
best picture quality is of prime importance (and when
total recording time is not).
Using advanced features,
continued
Setting up the VCRs for video cassette duplication
To duplicate a video cassette:
1 Load a blank video cassette tape with the safety tab
intact into the recording VCR. Press INPUT on the
recording VCR.
2 Load a previously recorded cassette into the
playback VCR or camcorder.
3 Press REC/OTR on the recording VCR, then press
P/S.
4 Press PLAY on the playback VCR or camcorder, then
press P/S.
5 Press PLAY on the playback VCR and REC/OTR on the
recording VCR simultaneously to begin the
duplicating process.
Connecting a Audio system to this VCR
!
• It is recommended that the tape
speed be set to the SP mode on
the recording VCR for best
results.
• Unauthorized recording of
copyrighted television
programs, films, video tapes
and other materials may
infringe on the rights of
copyright owners and be
contrary to copyright laws.
Page 21

36
Daewoo Video Cassette Recorder User’s Guide
35
Daewoo Video Cassette Recorder User’s Guide
Troubleshooting,
continued
side of the remote sensor centre and no more than
23 feet from the VCR.
• Make sure there is no obstruction between the
remote control and the VCR.
Timer clock does not work.
• Make sure the VCR is plugged in and receiving
power.
• If the unit has been without power for some period
of time, you must reset the clock and all your timer
programs.
Video cassette won’t go into the cassette
compartment.
• Make sure there is not a tape already loaded into the
cassette compartment.
• Insert the video cassette with the label side up.
VCR and remote control buttons don’t work.
The REW button does not work at the very beginning of a
video cassette. The FF, PLAY and REC/OTR buttons do not
work at the end of a video cassette.
Emergency indicator ‘ ’ is blinking.
Check whether it is in child lock mode or not and then
press POWER to remove the indicator. If the emergency
indicator continues to blink, contact a service technician.
The VCR buzzes when it is on.
The VCR may be in standby mode and the motor is
running. This sound is normal.
Video cassette recorder doesn’t rewind all the way
to the end.
To avoid video cassette tape damage, the VCR stops
rewinding near the end of the tape and then slowly
finishes rewinding. Do not prematurely eject the tape.
Troubleshooting
Your Daewoo VCR is designed to give you trouble-free
performance for many years. If you have a problem with
your VCR, try the solutions listed below.
If the suggestions listed below do not solve your problem,
contract your Daewoo dealer or an authorized Daewoo
service center. You can also call Daewoo directly at
1-800-DAEWOO8(1-800-323-9668).
The front panel display is blank.
Make sure the VCR is plugged in.
The power is on but the VCR does not operate.
Make sure there is a video cassette inserted in the VCR.
A timer recording failed to record on the video
cassette.
• Make sure the video cassette’s safety tab is in place.
• Verify that you set the timer correctly.
• Make sure there is a video cassette in the VCR.
• Make sure the VCR is plugged in.
Picture quality during playback is poor.
• Adjust the picture quality by pressing
CH/TRACKING .
• The head may be dirty. Use a head-cleaning tape.
Picture does not appear when you attempt to play
a video cassette.
• Make sure the TV and VCR are set to the same
channel (channel 3, 4 or video input).
• Verify the connections between the VCR and the TV.
• Verify that the VCR indicator is lit on the front display.
Remote control doesn’t work.
• Make sure the batteries are fresh.
• Make sure that you are using the remote control
within the operational range-no more than 30° either
Page 22

38
Daewoo Video Cassette Recorder User’s Guide
37
Daewoo Video Cassette Recorder User’s Guide
Warranty
Daewoo Electronics Corporation of America warrants each new electronic product manufactured by it to be
free from defective material and workmanship and agrees to remedy any such defect or to furnish a new part
(at the Company’s option) in exchange for any part of any unit of its manufacture which under normal
installation, use and service disclosed such defect, provided the unit is delivered by the owner to us or to our
authorized distributor from whom purchased or authorized service station intact, for our examination with all
transportation charges prepaid to our factory. To establish and receive warranty service at our factory or
authorized service facilities, proof of purchase/dated sales invoice is required. Written authorization must be
obtained before any merchandise is returned to the factory.
This warranty does not extend to any of our electronic products which have been subjected to misuse,
neglect, accident, incorrect wiring not our own, improper installation, unauthorized modification, or used in
violation of instructions furnished by us, nor units which have been repaired or altered outside of our factory,
nor to cases where the serial number thereof has been removed, defaced or changed.
This warranty is in lieu of all warranties expressed or implied and no representative or person is authorized
to assume for us any other liability in connection with the sale of our electronic products.
Over-the-counter exchange of initially defective units
A unit is described as initially defective when the dealer opens the unit and finds that it is inoperative or a
customer opening a new unit finds that it is initially defective. This unit may be returned to the factory by the
dealer for exchange. Under no circumstances will a customer be permitted to return an initially defective unit
directly to the factory.
Model Parts Labor
DV-T5DN/DV-T3DN 1 Year 3 months
This instrument is listed by Underwriter’s Laboratories, Inc. It is
designed and manufactured to meet rigid U.L. safety standards
against X-radiation, fire, casualty and electrical hazards.
Daewoo Electronics
Corporation of America
120 Chubb Avenue
Lyndhurst, NJ 07071
For more information about this or other
Daewoo products, call 1-800-DAEWOO8.
Specifications
System
VHS
Video signal NTSC color
Channel coverage VHF Channel 2-13
UHF Channel 14-69
CATV Channels A1-A5, A8, A-W,
W+1-W+84
VHF output signal Channel 3 or 4 (selectable)
Video
Input: Video line in Phono-type connector 1.0V (p-p)
75 ohms unbalanced, sync.negative
Output: Video line out Phono-type connector 1.0V (p-p)
75 ohms unbalanced, sync.negative
Signal to noise ratio More than 43dB (SP)
Horizontal resolution 220 lines
Audio
Input: Audio line in Phono-type connector more than 47K ohms
-8.8 dBm, unbalanced
Output: Audio line out Phono-type connector less than 1.5K ohms
-5.8 dBm , unbalanced
Frequency response 100Hz-l0KHz (SP)
Signal to noise ratio more than 42 dB
Audio distortion less than 4% (SP)
Tape transport
Tape width 12.65 mm (1/2”)
Tape speed SP: 33.35 mm/sec
EP: 11.12 mm/sec
Maximum recording time 480 min, with T-160 tape (EP)
Rewind/fast forward time Approx 130 sec (T-120 tape)
General
Power requirements AC120V 60 Hz only
Power consumption l7 W (under 3W in standby mode)
Dimensions
Set size (W x H x D) 14.17 x 3.58 x 9.37 inches
Carton size (W x H x D) 17.52 x 6.11 x 12.21 inches
Weight (Net) 6.41 lbs
(Gross) 8.37 lbs
 Loading...