


• 1 •
SAFETY INFORMATION
CLASS 1
LASER PRODUCT
NOTE:
This player can be used only where the power supply is
AC 100~240V, 50/60Hz. It cannot be used elsewhere.
WARNING:
TO REDUCE THE RISK OF FIRE OR ELECTRIC
SHOCK, DO NOT EXPOSE THIS PLAYER TO RAIN
OR MOISTURE.
TO REDUCE THE RISK OF FIRE OR ELECTRIC
SHOCK, AND ANNOYING INTERFERENCE, USE
THE RECOMMENDED ACCESSORIES ONLY.
CAUTION:
DVD/CD PLAYER IS A CLASS 1 LASER PRODUCT.
HOWEVER THIS DVD/CD PLAYER USES A
VISIBLE LASER BEAM WHICH COULD CAUSE
HAZARDOUS RADIATION EXPOSURE IF
DIRECTED. BE SURE TO OPERATE THE DVD/CD
PLAYER CORRECTLY AS INSTRUCTED.
WHEN THIS DVD/CD PLAYER IS PLUGGED TO
THE WALL OUTLET, DO NOT PLACE YOUR EYES
CLOSE TO THE OPENING OF THE DISC TRAY
AND OTHER OPENINGS TO LOOK INTO THE
INSIDE OF THIS PLAYER.
USE OF CONTROLS OR ADJUSTMENTS OR
PERFORMANCE OF PROCEDURES OTHER THAN
THOSE SPECIFIED HEREIN MAY RESULT IN
HAZARDOUS RADIATION EXPOSURE.
DO NOT OPEN COVERS AND DO NOT REPAIR
YOURSELF, REFER SERVICING TO QUALIFIED
PERSONNEL.
Cb
Cr
(Back of player)
(Inside of player)
CAUTION -LASER RADIATION WHEN OPEN.
DO NOT STARE INTO BEAM.
ATTENTION-RAYONNEMENT LASER EN CAS D’OUVERTURE.
NE PAS REGARDER DANS LE FAISCEAU.
VORSICHT -LASERSTRAHLUNG, WENN ABDECKUNG GEÖFFNET.
NICHT IN DEN STRAHL BLICKEN.
ADVARSEL -LASERSTRÅLING VED ÅBNING.
SE IKKE IND I STRÅLEN.
ADVARSEL -LASERSTRÅLING NÅR DEKSEL ÅPNES.
STIRR IKKE INN I STRÅLEN.
VARNING -LASERSTRÅLING NÄR DENNA DEL ÄR ÖPPNAD.
STIRRA EJ IN I STRÅLEN.
VARO! -AVATTAESSA OLET ALTTIINA LASERSÄTEILYLLE.
ÄLÄ TUIJOTA SÄTEESEEN.

• 2 •
TABLE OF CONTENTS
1. IMPORTANT SAFEGUARDS---------------------1
2. T ABLE OF CONTENTS ----------------------------2
3. FEATURES---------------------------------------------3
4. ABOUT MANUAL-----------------------------------4
5. PLAYABLE DISCS-----------------------------------4
6. TERMS FOR DISCS ---------------------------------5
7. BEFORE OPERATION------------------------------7
8. PRECAUTIONS FOR DISC------------------------7
9.PREPARATIONS BEFORE OPERATION -------8
• CHECK ACCESSORIES --------------------------8
• USE REMOTE CONTROL -----------------------8
• FRONT PANEL -------------------------------------9
• DISPLAY -------------------------------------------10
•
NAMES AND LA YOUT OF REMOTE CONTROLS
--11
• REAR PANEL -------------------------------------12
10. CONNECTIONS-----------------------------------13
11. BASIC OPERATIONS----------------------------16
• PLAY DISCS ---------------------------------------16
• SYSTEM SETTING-------------------------------17
• STEP, PAUSE---------------------------------------17
• OSD --------------------------------------------------17
• VOLUME CONTROL----------------------------18
• DVD MENU PLAY -------------------------------18
• MP3 PLAY------------------------------------------18
• PBC PLAY ------------------------------------------19
• SELECT WITH NUMBER BUTTONS -------19
12. PLAY DISCS IN VARIOUS WAYS------------20
• SELECT LANGUAGE ---------------------------20
• SELECT CHANNEL------------------------------20
• MUTE------------------------------------------------20
• F AST PLAY-----------------------------------------21
• SLOW PLAY ---------------------------------------22
• REPEAT PLAY-------------------------------------22
• PLAYING A DISC REPEATEDLY ------------22
• REPEAT SOME PARTS--------------------------23
• SELECT SUBTITLES ----------------------------24
• SELECT ANGLES --------------------------------25
• 3D SURROUND-----------------------------------25
• TIME SEARCH AND REMAINING TIME--26
• RESUME PLAY -----------------------------------28
• ZOOM PLAY---------------------------------------28
• PROGRAM PLAY---------------------------------29
• DIGEST PLAY-------------------------------------29
• PLAY KARAOKE---------------------------------31
13. FUNCTION SETTING---------------------------32
• DVD MENU SETTING --------------------------32
• GENERAL SETUP--------------------------------33
• DOLBY DIGIT AL SETUP-----------------------35
• PREFERENCES -----------------------------------35
14. TROUBLESHOOTING---------------------------37
15. TECHNICAL SPECIFICATIONS --------------38
16. REGIONAL RESTRICTION CODE-----------39
FEATURES
❏ OUTSTANDING SOUND QUALITY
Dolby Digital system developed by Dolby Laboratories and DTS
developed by DTS Inc., features high quality surround sound, can be played in
DVD or CD disc at home, to reproduce high quality sound effects.
❏ HIGH DEFINITION
The unit adopts MPEG2 coding format and brings the horizontal resolution over
500 lines.
❏ UNIQUE FUNCTIONS
Multi-angle and multi-language bring unique trick functions.
Parent lock makes it easy to control the content of discs.
❏ SCREEN
Ordinary screen and wide screen (16:9) are available.
❏ COMP
ATIBILITY
The unit can play DVDs, and is compatible with CDs.
❏ ZOOM
It can enlarge pictures 1.5 times, twice or four times their size.
❏ 9-PICTURE DIGEST (VCD)
It can look through the content of discs and select to play.
❏ MULTI-FUNCTIONS
Fast forward, fast reverse, slow play, frame play , repeat play and program play.
❏ TIME SEARCH
It can search a specificpart on a disc, especially good for watching fiction
movies.
❏ RESUME PLA
Y
It can memorize the position where the disc is stopped and resume playback.
❏ CONTENT DISPLAY
It adopts (a coloured) fluorescent display and English/French/Spanish OSD,
making the disc content clearer.
❏ VIDEO OUTPUT
Standard video, S-video signal output mode and component output easy system
change.
❏ AUDIO OUTPUT
Analog audio output, coaxial and optical digital audio output, can be connected
with the appropriate amplifier to enjoy high quality sound effects.
❏ MIC
Used to make connection with the MIC. Please insert the MIC jack into this socket.
The downmix mode is selected analog audio out whenever the MIC are plugged in.
❏ MIC LEVEL
Used to adjust the MIC volume.
• 3 •
• 4 •
ABOUT MANUAL
• This manual mainly introduces how to
use buttons on the remote control.
• You may operate the unit if the buttons
on the unit have the same or similar
names as or to those on the remote
control.
• The marks shown in the chart on the
right are used in the manual.
MARK
INDICATION
functions of DVD
functions of super-VCD
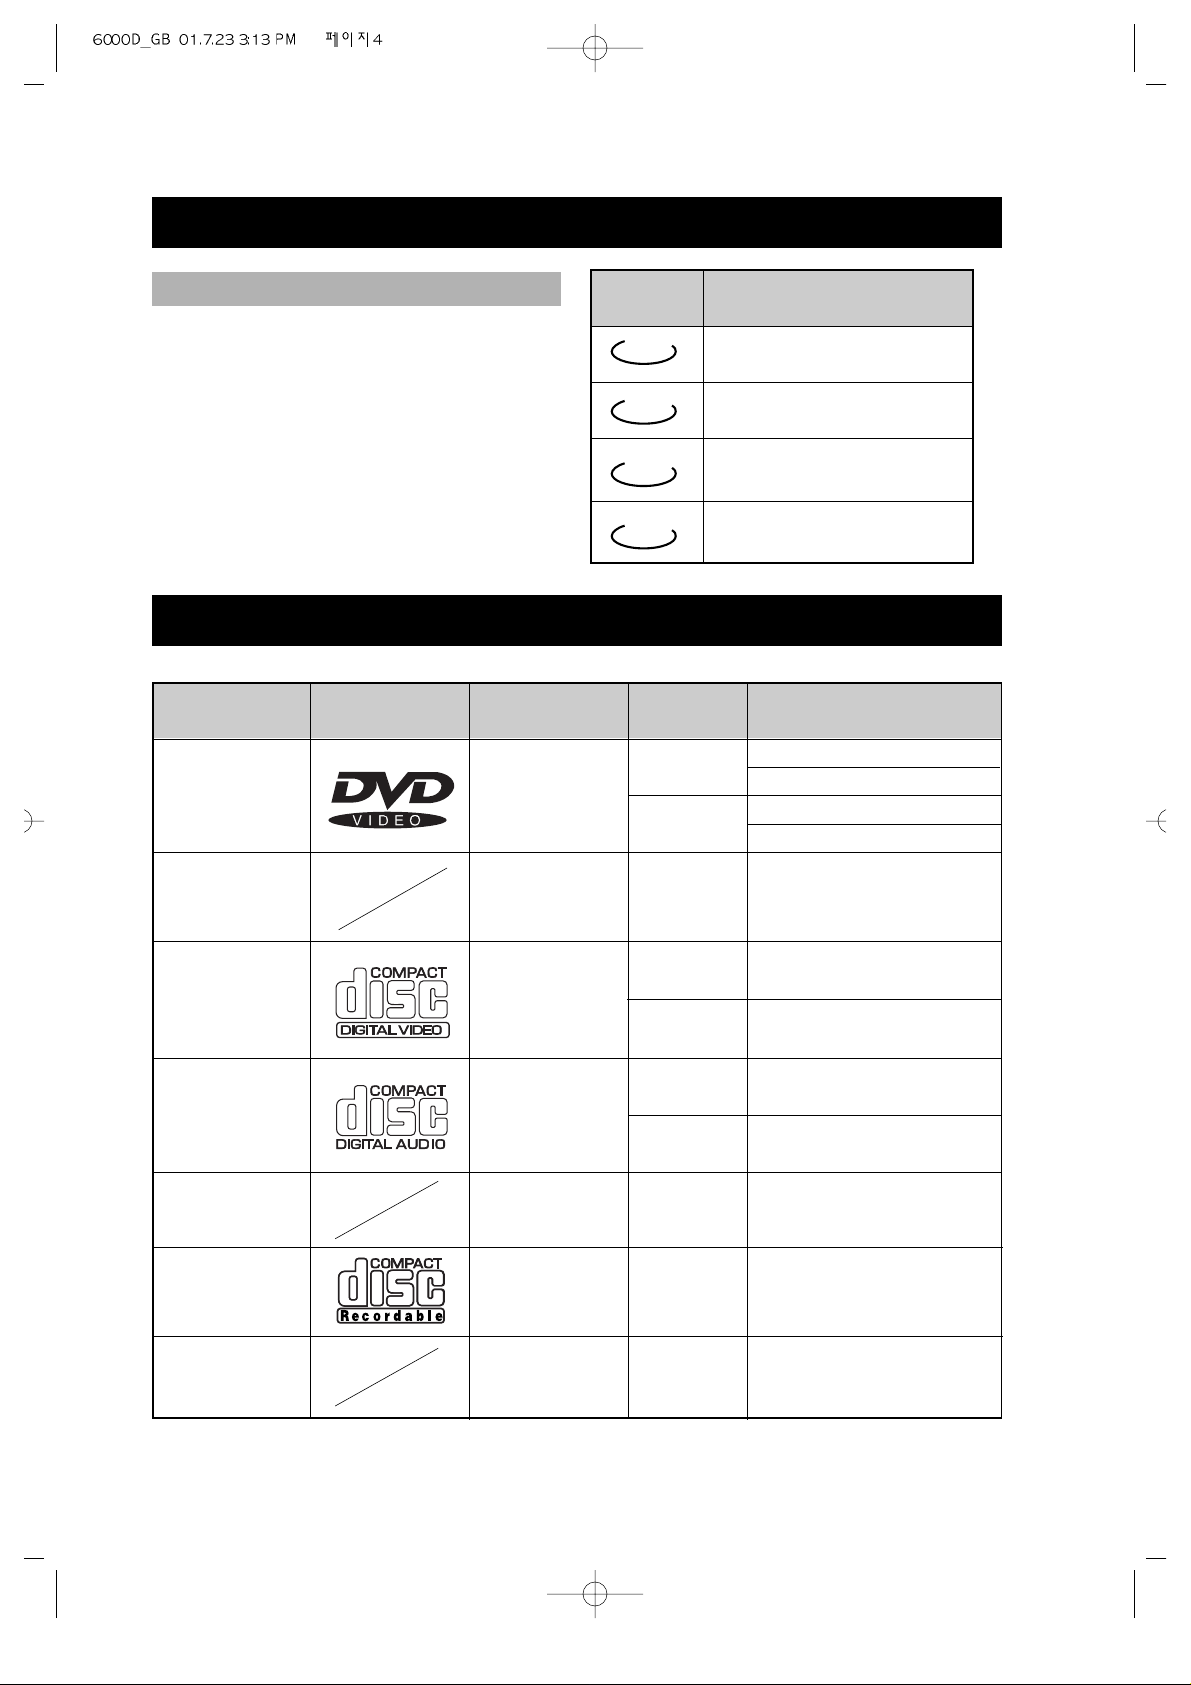
TYPE
DVD
CD
MARK CONTENT
audio+video
(motion
pictures)
audio
SIZE
12cm
about 2hrs (single-side disc)
about 8hrs (double-side disc)
about 80mins (single-side disc)
about 160mins(double-side disc)
about 74mins
about 20mins
8cm
12cm
8cm
PLAYING TIME
DVD
SVCD
VCD
CD
PRINCIPLES FOR WRITING
PLAYABLE DISCS
Super-VCD
audio+video
(motion pictures)
12cm
about 45mins
VCD
audio+video
(motion pictures)
12cm
8cm
about 74mins
about 20mins
MP3
audio
12cm about 160mins
about 600mins
about 600mins
functions of VCD
functions of CD
CD-R
audio
12cm
CD-RW
audio
12cm
REGION MANAGEMENT INFORMATION
This unit is designed and manufactured to respond to the Region Management
information that is recorded on a DVD disc. The region number of this player is
“2”. If the region number described on the DVD discs does not correspond to the
Region number of this player, the player will not play this disc. This player will
play DVD discs made for “ALL” regions. Therefore, this player will play DVD
discs marked with labels containing the region number “2” or “ALL”.
(Region 2) (Region ALL)
2
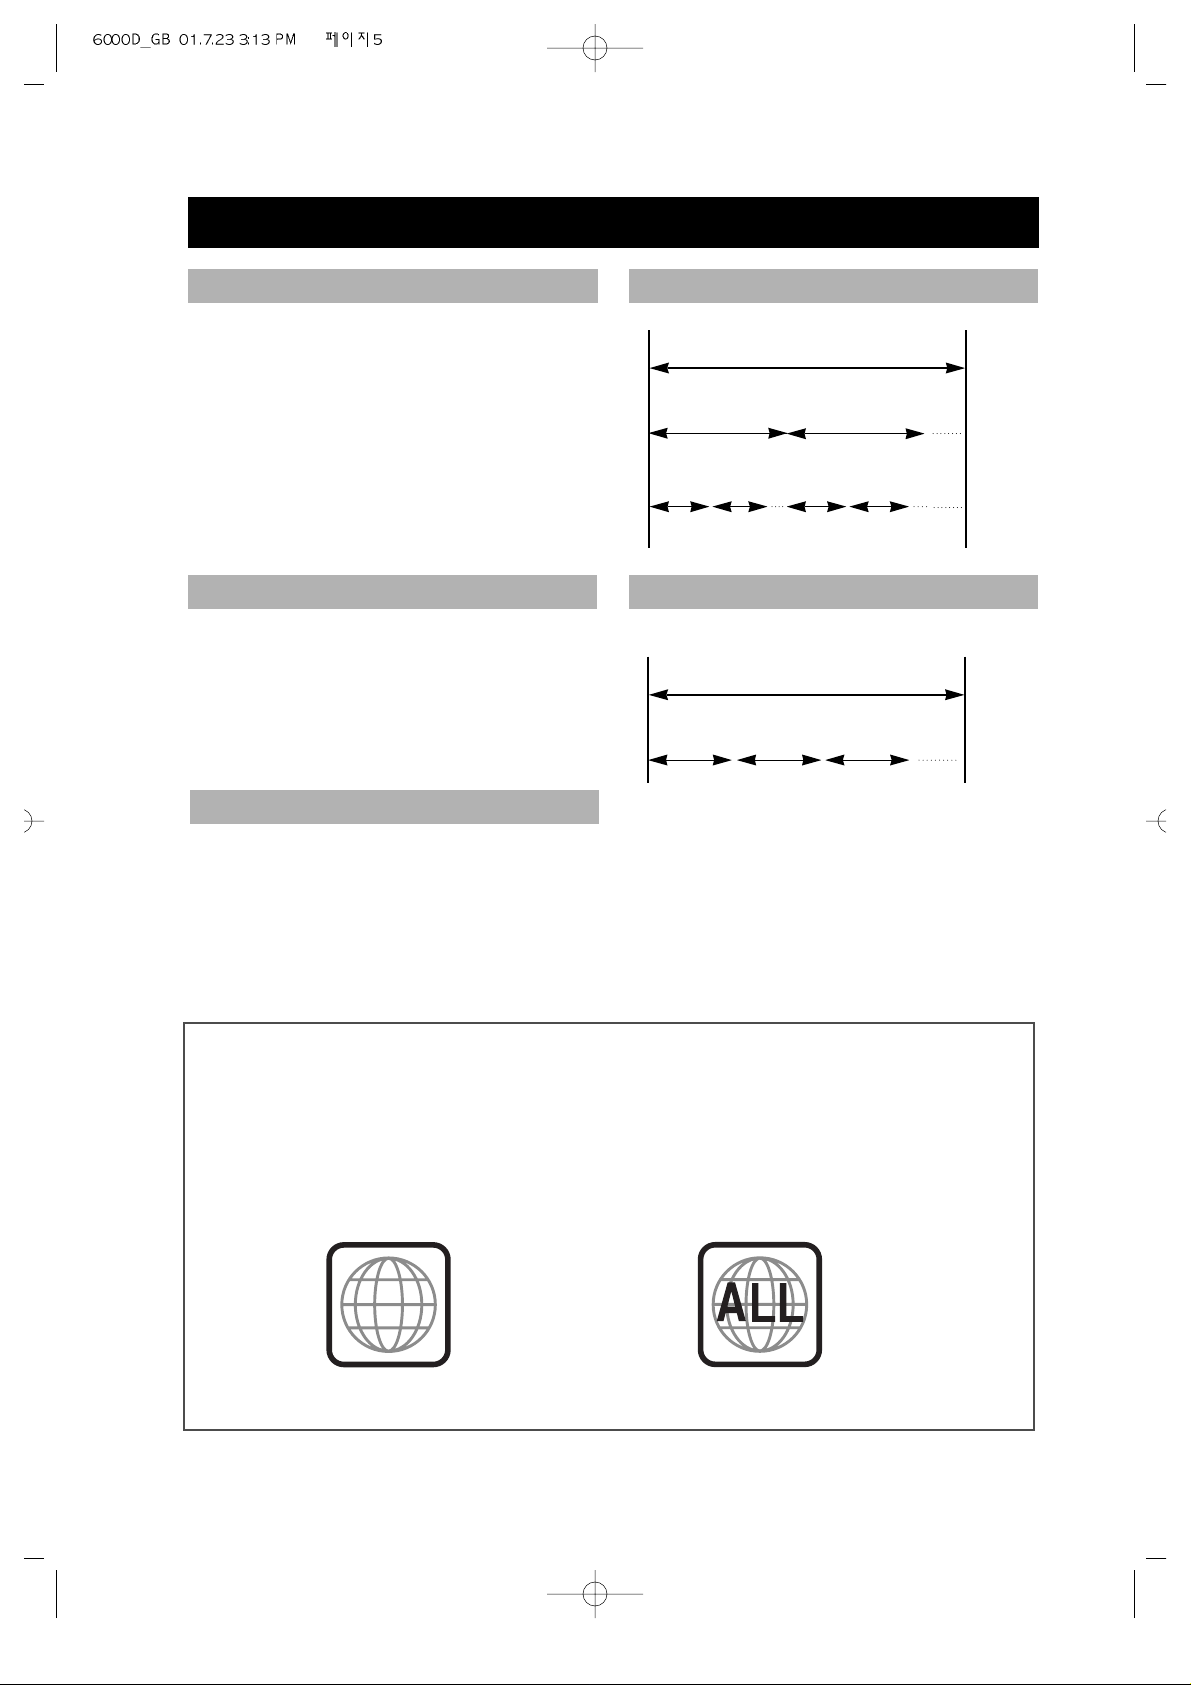
TERMS FOR DISCS
The images or music of a DVD are
divided into some units, among which
title is the biggest one.
When playing a DVD, the movie is the
title.
When playing a CD, the combined tracks
make up the title.
It is smaller than title among the units of
a DVD. A title is made up of several
chapters , and each chapter has a
number for search. But some discs
may not have numbered chapters.
In a CD, each track has a number to
enable search functions.
DISC
TITLE
CHAPTER
DISC
TRACK
TITLE
CHAPTER
TRACK
STRUCTURE OF DVD
STRUCTURE OF CD
• 5 •
• 6 •
TERMS FOR DISCS (Continued)
The menu pictures, motion and motionless pictures of a Super-VCD, VCD or CD with
PBC function can be divided into some parts, these parts are scenes. Each scene has a
number for search.
SCENE
PBC (PLAYBACK CONTROL) (SUPER-VCD, VCD)
This product incorporates copyright protection technology that is protected by
method claims of certain U.S. patents and other intellectual property rights owned
by Macrovision Corporation and other rights owners. Use of this copyright
protection technology must be authorized by Macrovision Corporation, and is
intended for home and other limited viewing uses only unless otherwise
authorized by Macrovision Corporation. Reverse engineering or disassembly is
prohibited.
It is signals recorded in a super- VCD or VCD2.0 to control playback.
DISC TYPE
VCD1.1
without PBC
FUNCTION
enjoy music and images (motion pictures)
super-VCD and VCD with
PBC
Besides the images of VCD1.1, play interactive
software with the menu pictures shown on the TV
screen (PBC play). If the disc has motionless
pictures, high-resolution playback is also available.
BEFORE OPERATION
• Before operation, check if the voltage of the unit is in line with the local voltage.
• Hold the plug to disconnect it from the mains outlet. Do not pull the power cord.
• When the plug of the unit is connected to the mains outlet , the unit will be still
connected to AC even if the power is turned off.
• Disconnect the plug as soon as liquid or objects enter the unit. The unit can not be used
until being checked by experts.
• Do not open the cabinet as laser rays employed by the unit may damage eyes. Any
servicing should be done by qualified service personnel.
• Put the unit where ventilation is good enough to prevent overheating.
• Never put the unit in direct sunlight or near heat sources.
• Put the unit horizontally, never put any heavy object on the unit.
• To protect the pickup, do not put the unit where there is dust. If there is dust on the
pickup, use a cleaning disc to clean it. Paying particular attention to the operating
instructions of the cleaning disc.
Moisture will appear on the pickup lens in the following cases:
• The unit is suddenly moved from a cold place to a warm place.
• The unit is put in a room with a heater, or in cold air from an air-conditioner .
• Using the unit in a humid place. In these cases, the unit can not work. Unload the disc
and leave the unit on for about one hour to evaporate the moisture.
• Use a soft cloth with a little neutral detergent to wipe the cabinet, panel and controls.
Never use abrasive paper, polishing powder , solvent like alcohol or gasoline.
SECURITY
PRECAUTIONS FOR DISC
HANDLING DISC CLEANING DISC
PLACEMENT
CONDENSATION
CLEANING
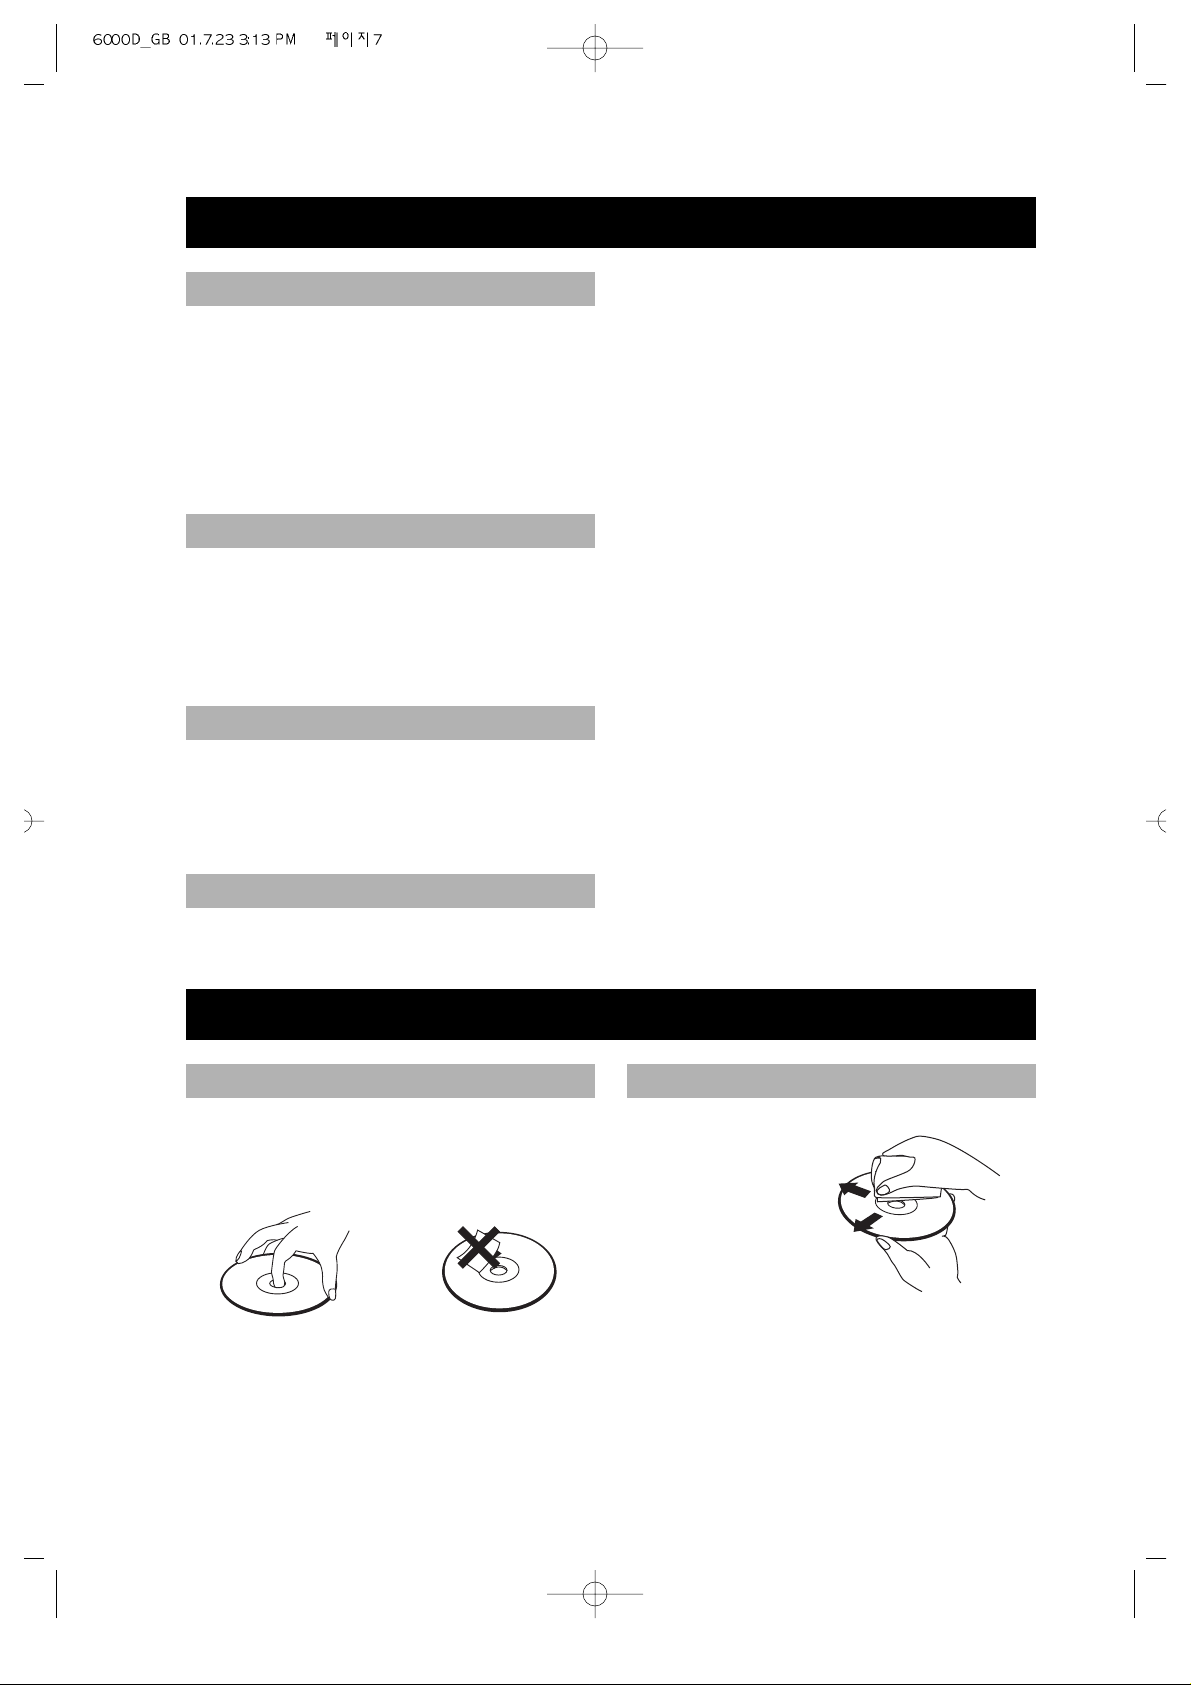
• To keep the disc clean, do not touch the
playsides of the disc.
• Do not attach paper or tape to the disc.
• Keep the disc away from direct
sunlight or heat sources.
• Store the disc in a disc case after
playback.
• Before playback,
wipe the disc
outwards from
the centre with
clean cloth.
• Do not use any type of solvent such as
thinner, benzine, commercially
available cleaners or antistatic spray.
• 7 •
• 8 •
PREPARATIONS BEFORE OPERATION
This part introduces the work to be done before operating the unit.
Check if you have all the accessories after the carton is opened.
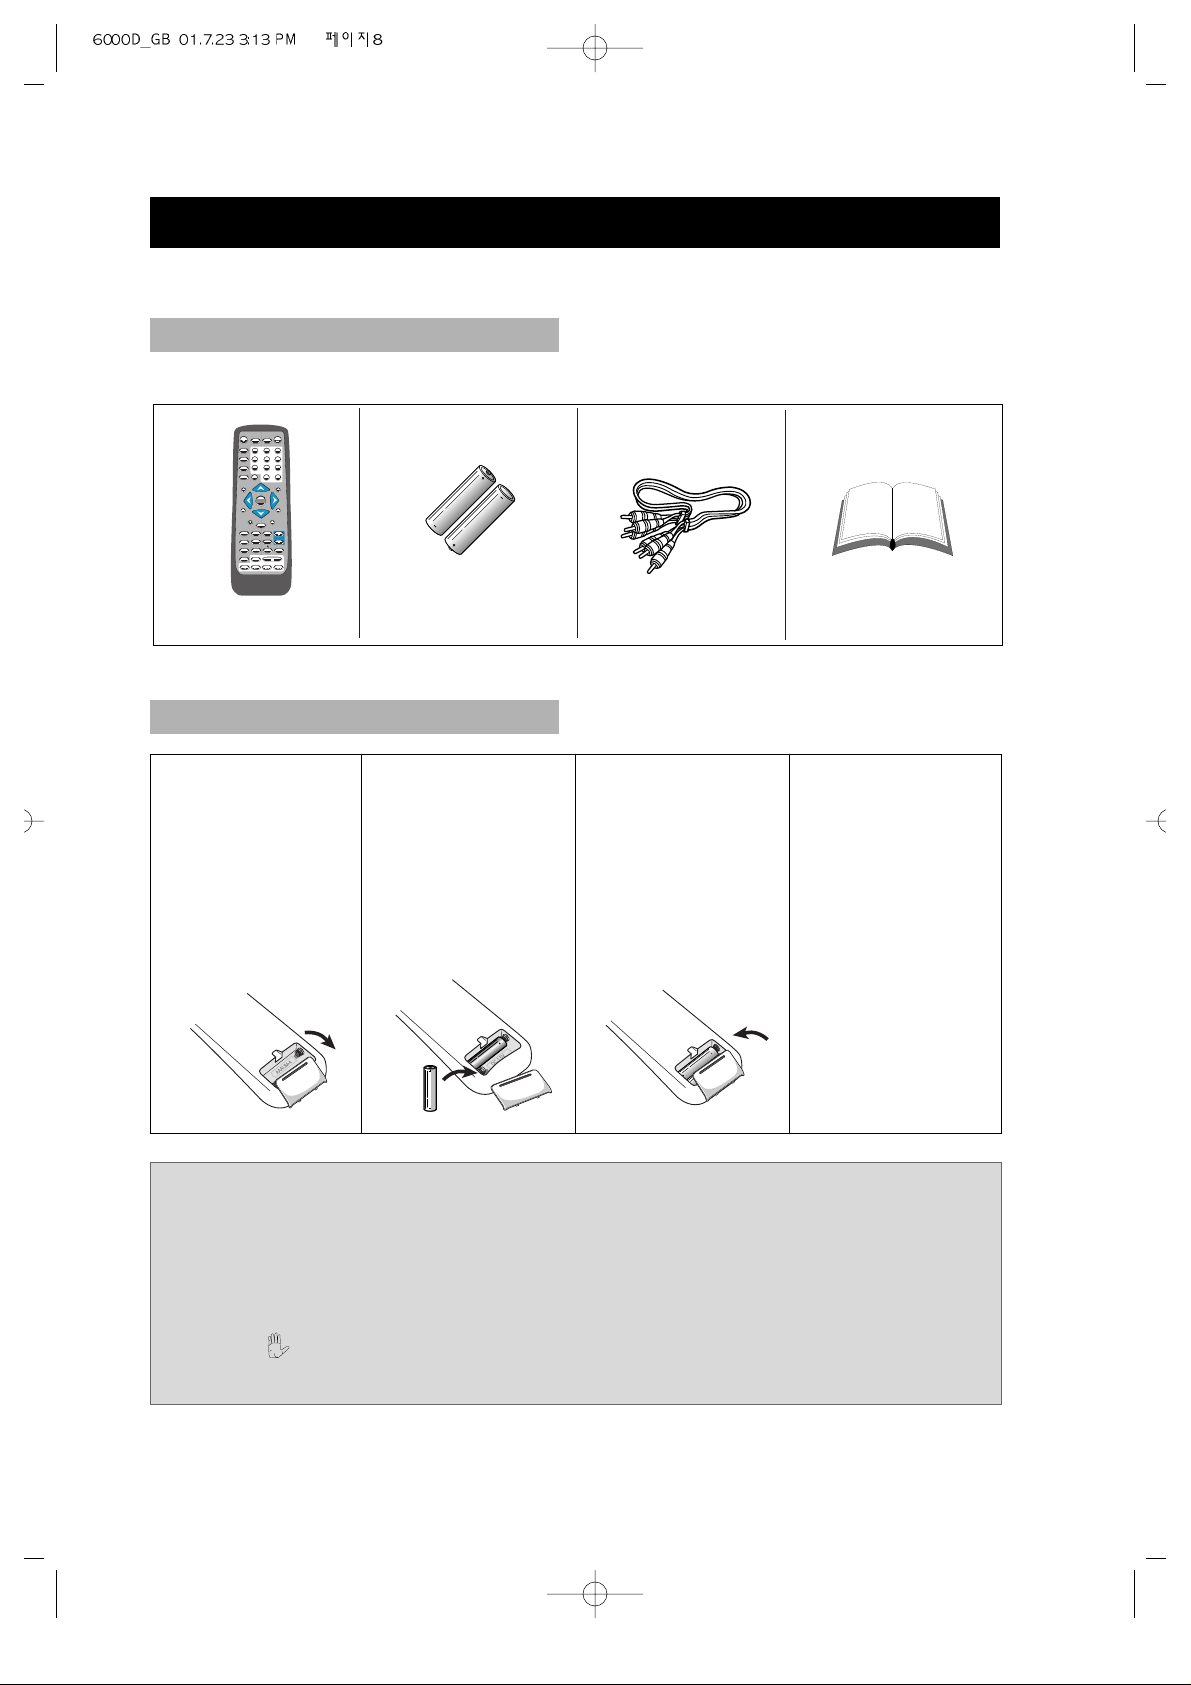
CHECK ACCESSORIES
USE REMOTE CONTROL
Notes:
1. Batteries can generally last for about 6 months. Change the batteries if the
remote control does not work, or the operating range reduces.
2. If the remote control is not used for a long time, remove the batteries to prevent
battery leakage.
3. When appears on the TV screen by pressing any button, the disc does not
have the pertinent function.
1. Open the battery
compartment.
2. Insert two AAA
batteries, make
sure to
match"+"and ""of the batteries
to the marks in
the battery
compartment.
3. Close the battery
compartment.
4. Point the remote
control at the
remote sensor.
It will operate up
to a range of 7
metres and an
angle of 30°
either side of the
remote sensor on
the front of the
player.
OSD
SUBTITLE
ANGLE
SET UP
V-MODE
TITLE.PBC
INTRO
REPEAT
P/N
RETURN
A-B
MENU
STEP
PROGRAM
ZOOM
SLOW
A-TIME
MEMORY
CHANNEL
LANGUAGE
#
MUTE 3D
123
654
7
8
0/10
9
10+
VOLUME
PLAY
b
•
Remote control
•
AAA batteries
•
Video/Audio cord
•
Owner’s manual

DVD PLAYER DVG-6000D
PREPARATIONS BEFORE OPERATION (Continued)
FRONT PANEL
!
@ # $ %
8
0
9
“
‘
+
= Q
6
* 1 2
3
4
^
5
7
)
! STANDBY/ON button
To switch the unit On or Off when
connected to AC power outlet
@ TITLE /PBC
# OSD
$ LANGUAGE
% INTRO
^ SUBTITLE
& ANGLE
* DISPLAY
Displays operation status
( 10+ NUMBER
) PAUSE/STEP button
Used to view one frame at a time
during play. When you continue
pressing this button, it will function
continuously. Press PLAY/SELECT
button for normal play.
1 MIC 1 JACK
2 MIC 2 JACK
3 MIC LEVEL
4 ECHO ADJUSTMENT
5 NUMBER (1~ 0/10)
6 STOP
7 PLAY(SELECT) button
To play the loaded disc. Press this
button to go to the preferred item when
the menu is displayed on the TV screen.
8 OPEN/CLOSE button
To open or close the disc tray.
9 POWER INDICATOR
0 DISK TRAY
To load or unload a disc. Put a disc to
be played on here.
“ NEXT button
To skip forward to the next chapter (for
DVD) or track (for VCD or CD. If playing a
Video CD with PBC, this button works as the
NEXT button to move to the next play list.
‘ PREV button
To skip back from the current chapter (for
DVD) or track (for VCD or CD).
+ FF (Fast Forward) button
To play the disc fast forward.
= FR (Fast Reverse) button
To play the disc fast reverse.
Q REMOTE SENSOR
Receives a light signal from the remote
controller.
• 9 •
&
(
• 10 •
PBC
DVD
SVCD
DTS
(1) (2) (3)
MUTEAC-3 RESUME
REPEAT 1 ALL
A-B
OVER
D
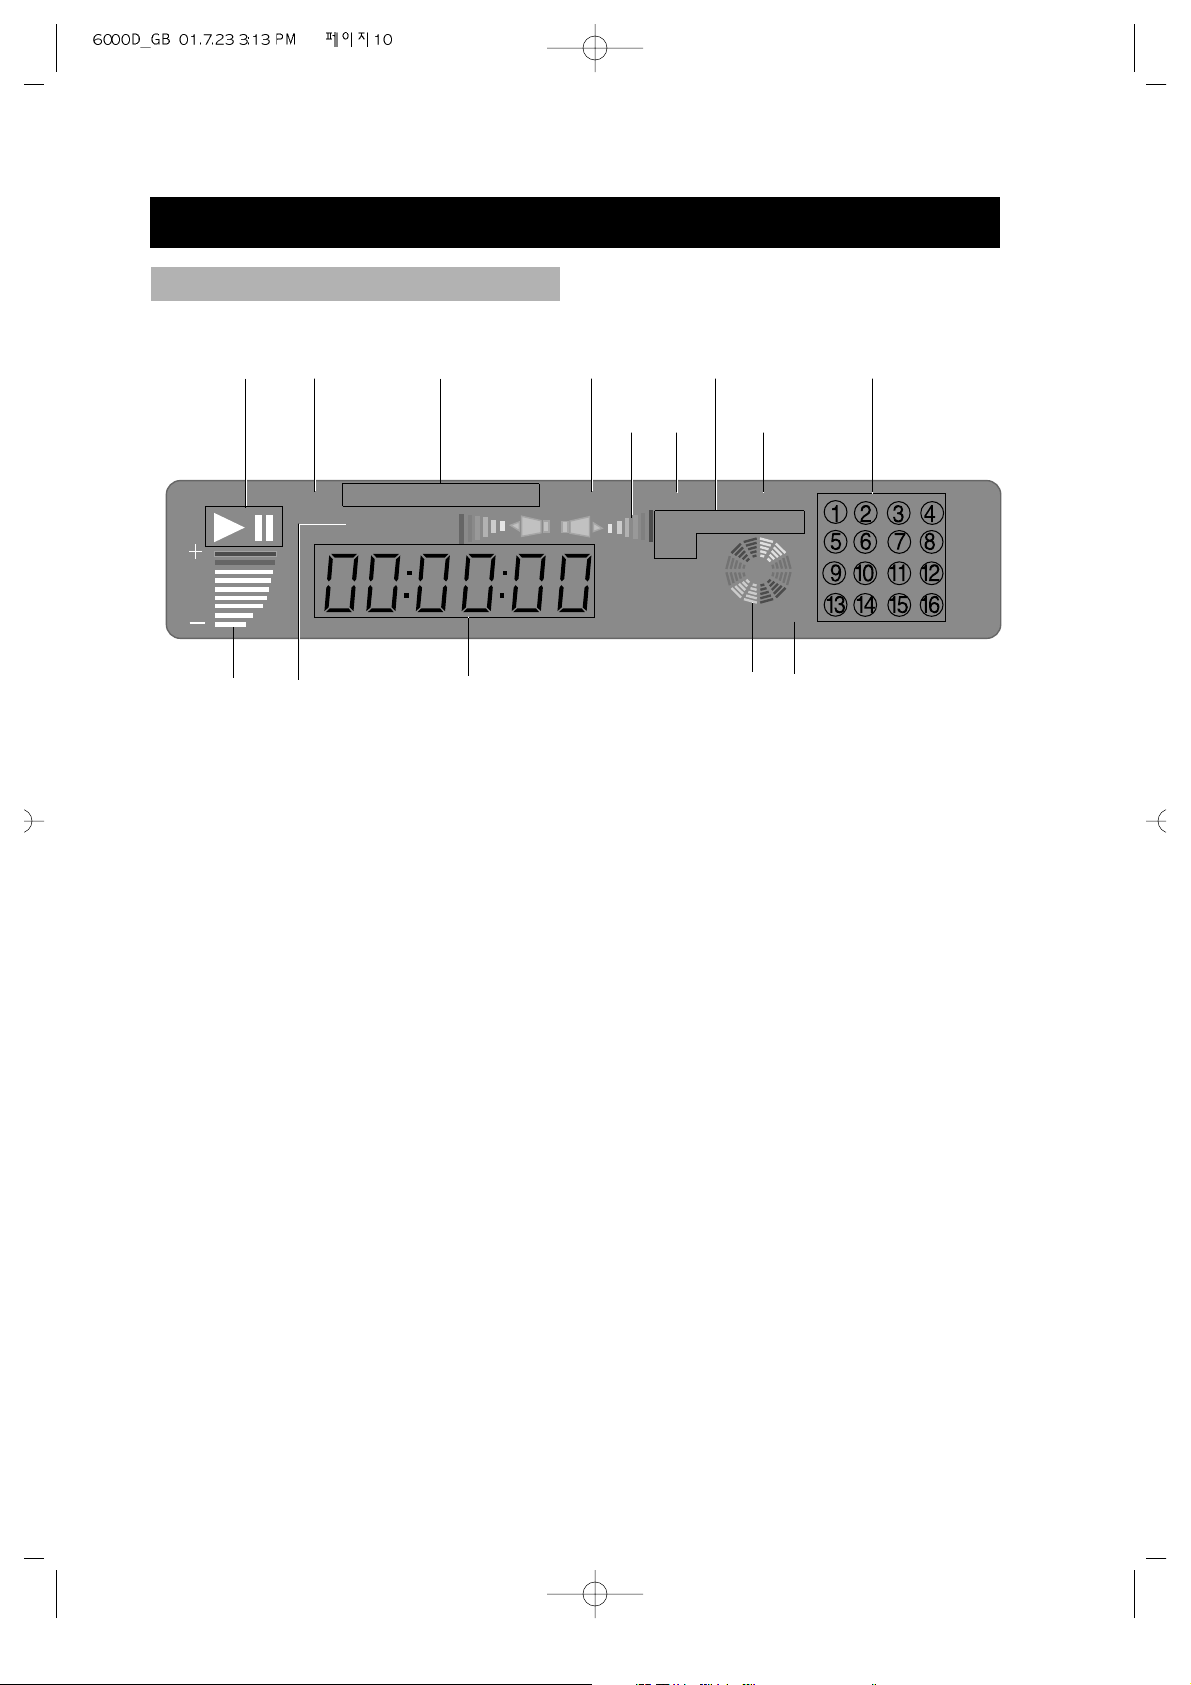
PREPARATIONS BEFORE OPERATION (Continued)
VFD
! PLAY/PAUSE/STEP
Illuminates the current operation mode.
@ PBC
Indicates the PBC PLAY under play
SVCD or VCD2.0.
# DVD/SVCD
Illuminates the type of a disc loaded on
disc tray.
$ DTS
Indicates the audio type of the disc
under play is DTS.
% AC-3
Indicates the audio type of the disc
under play is DOLBY DIGITAL.
^ AUDIO INDICATION
Illuminates the information of the AUDIO.
& MUTE
Illuminates when MUTE mode.
* REPEAT 1, ALL, A-B
Illuminates when the current play mode
is under repeat title, chapter, track
(single), disc (all), A-B respectively.
( RESUME
Illuminates when RESUME mode.
) TRACK CALENDAR
Illuminates the information of the
TRACK.
1 OVER
Illuminates the over than 16 track under
play CD or VCD.
2 ROTATION
Rotates when the disc is spinning
3 TITLE/CHAPTER/TRACK
Illuminates the information of the
TITLE, CHAPTER or TRACK of the
DVD and CD disc under play.
4 VOLUME LEVEL
Indicates the volume level of analog
audio output.
! @ # %
$
* )
& (^
1
2
3
4
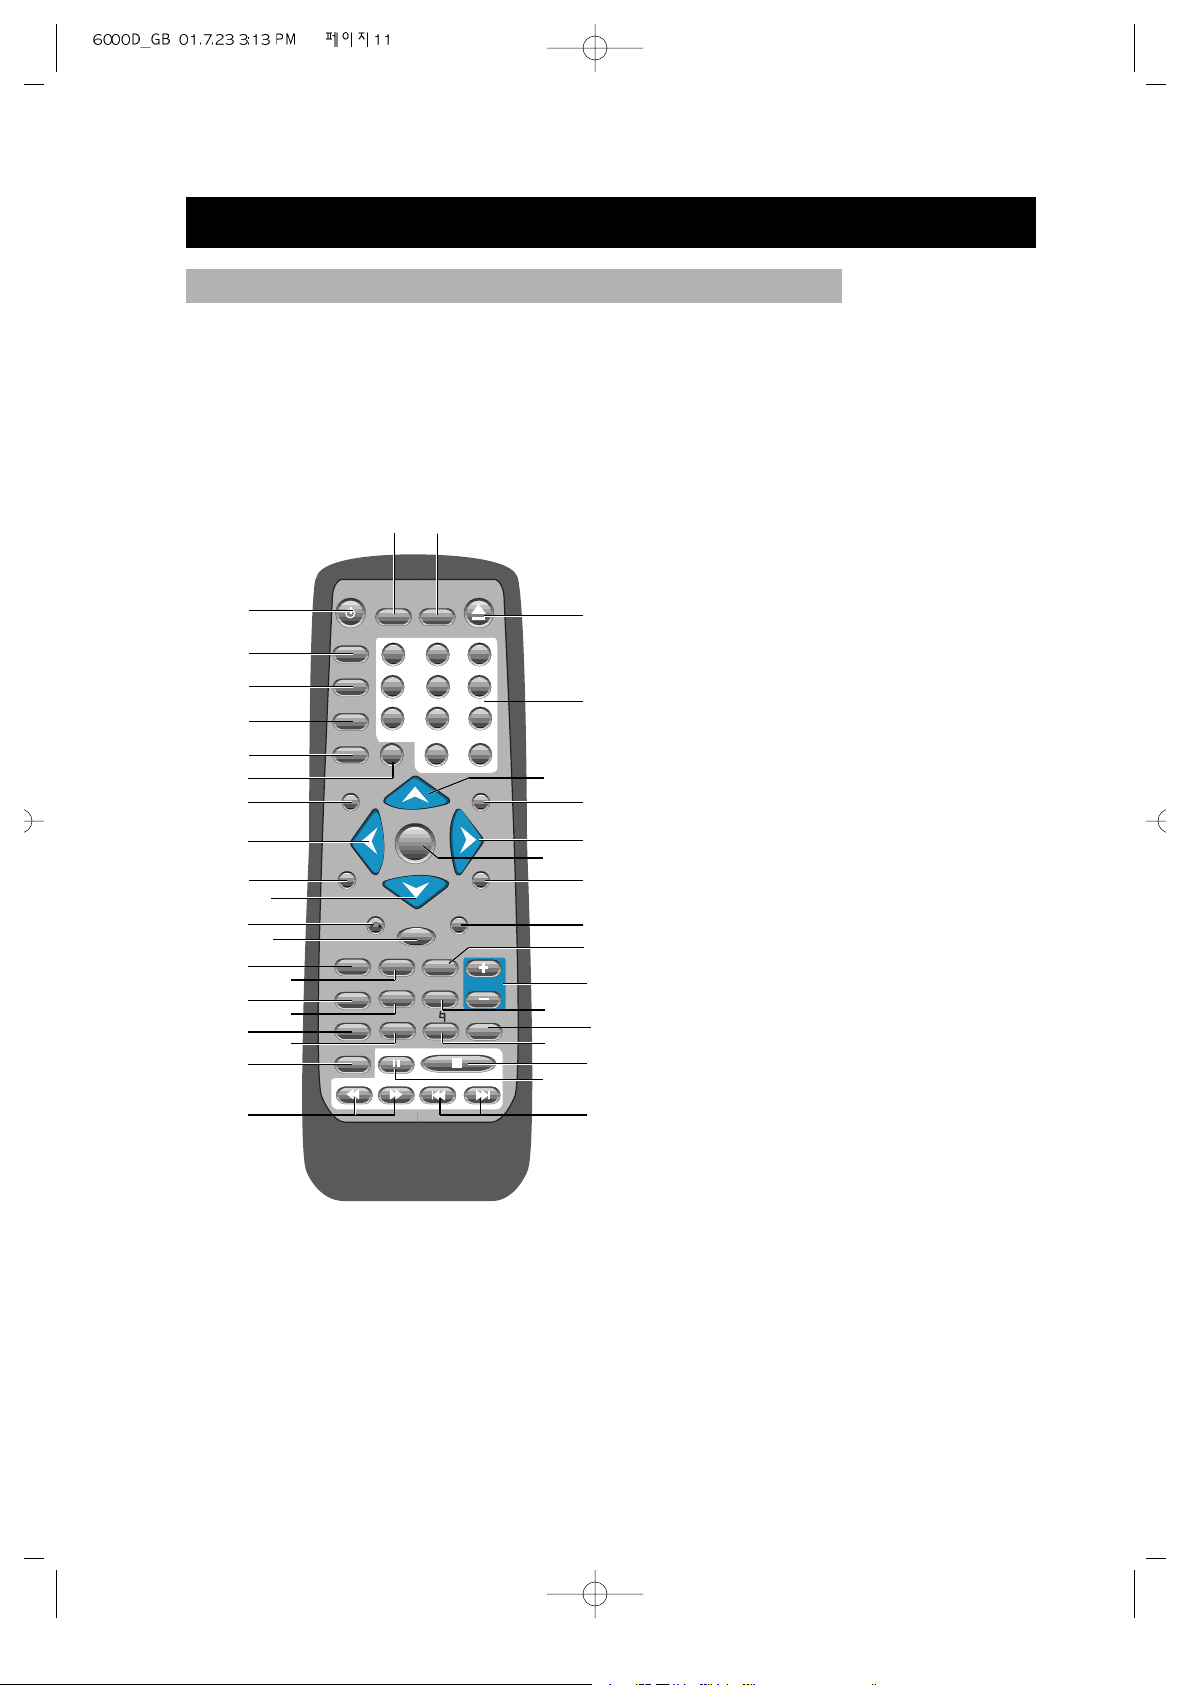
PREPARATIONS BEFORE OPERATION (Continued)
! STANDBY/ON
@ OSD
# SUBTITLE
$ ANGLE
% SETUP
^ V-MODE
& TITLE.PBC
* LEFT DIRECTION
( SYSTEM(AUTO/NTSC/PAL)
CONVERT
) DOWN DIRECTION
1 RETURN
2 MENU
3 STEP PLAYING
4 PROGRAM PLAYING
5 SLOW PLAYING
6 TIME-SEARCH PLAYING
7 CHANNEL CONVERT
8 LOWER TONE
9 LANGUAGE SWITCH
0 FAST BACKWARD /
FAST FORWARD SEARCH
“
ONE CHAPTER/TRACK
PREV/NEXT
‘ PAUSE
+ STOP
= ATONIC TONE
Q RAISE TONE
q
MEMORY (RESUME) PLAYING
W VOLUME (-/+)
w ZOOM PLAYING
E A-B
e REPEAT PLAYING
R PLAY (ENTER)
r RIGHT DIRECTION
T INTRO
t UP DIRECTION
Y NUMBER (1~ 10+)
y OPEN/CLOSE
U 3D PLAYING
u MUTE
NAMES AND LAYOUT OF REMOTE CONTROLS
OSD
SUBTITLE
ANGLE
TITLE.PBC
INTRO
REPEAT
P/N
RETURN
A-B
MENU
STEP
PROGRAM
ZOOM
SLOW
A-TIME
MEMORY
CHANNEL
LANGUAGE
#
123
654
7
8
0/10
9
10+
VOLUME
PLAY
b
!
@
#
$
%
3
5
7
9
0“
+
W
Q
w
E
e
r
T
Y
y
Uu
R
t
‘
=
q
4
(
)
2
&
1
*
^
6
8
MUTE 3D
SET UP
V-MODE
• 11 •
• 12 •
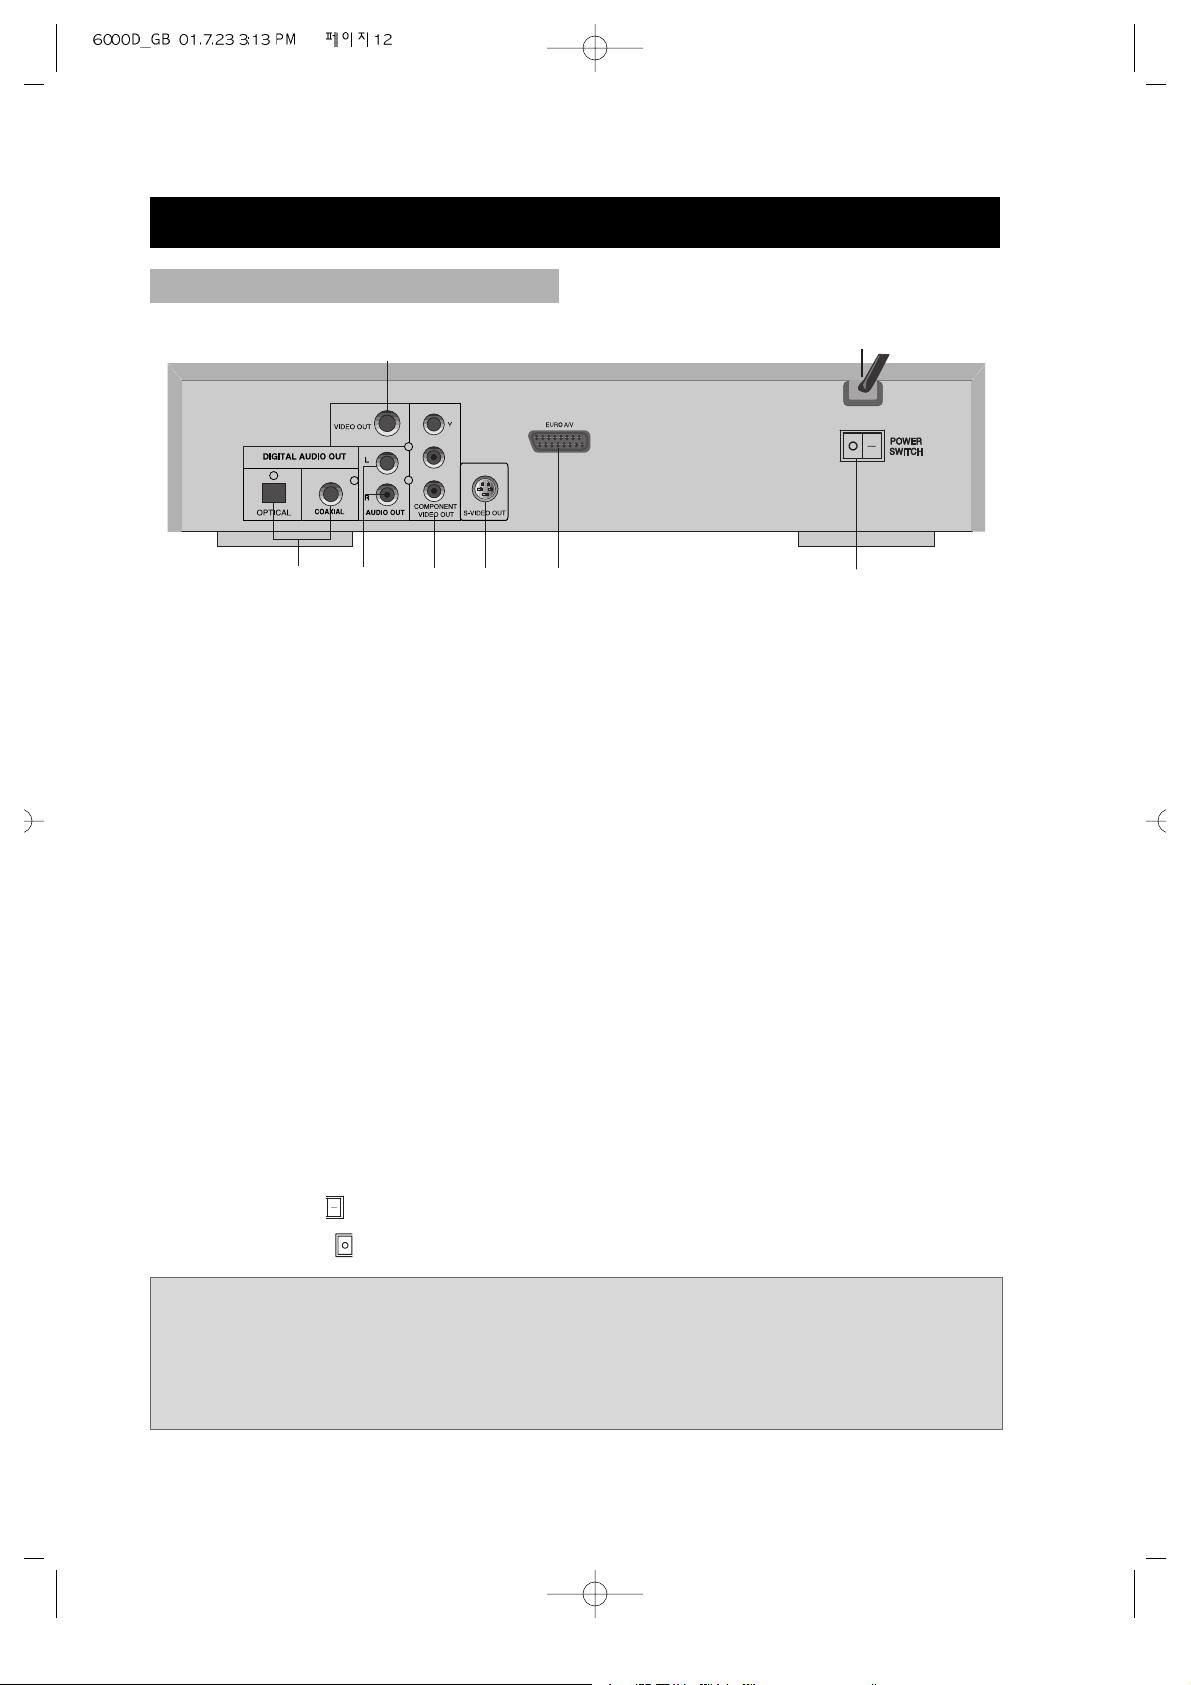
PREPARATIONS BEFORE OPERATION (Continued)
! DIGITAL AUDIO COAXIAL/OPTICAL OUT
Connects digital audio under play mode into an AV amplifier or a receiver equipped with
digital audio decoder for you to enjoy the theatre-quality sound in your home.
@ VIDEO OUT
Connects composite video signal to input AV or PHONO sockets of TV or monitor to
achieve high fidelity colour reproduction.
# AUDIO OUT (L/R TRACK)
Two phono sockets for analogue 2 channel audio output in order to connect to a TV or
stereo amplifier.
$ S-VIDEO OUTPUT
Connects to TV or monitor equipped with S-VIDEO input. In order to achieve a sharper and
cleaner picture than that when connected via VIDEO OUT (composite video).
% COMPONENT(Y.Cb.Cr)
Connects to TV or monitor equipped with Component input . In order to achieve a sharper
and cleaner picture than that when connected via VIDEO OUT (composite video).
^ EURO AV JACK
If VIDEO OUT phono is not utilized, the SCART socket can be used to connect to a TV set,
monitor or VCR.
& POWER SUPPLY SOCKET WIRE
Creates POWER between wall outlet and the unit.
* POWER SWITCH
Turns on or off the MAIN POWER.
• ON : Press “ ” .
• OFF : Press “ ” .
#
%
^
$
!
@
Cb
Cr
*
&
REAR PANEL
Notes:
•
Remove the dust protection cap from the optical digital audio output connector and connect the
cable firmly so that the configurations of both the cable and connector match.
•
Do not connect to the digital audio input of an amplifier that does not have Dolby Digital and dts
decoder when you set the digital out option of setup information to SPDIF/RAW.

CONNECTIONS
1. If the TV has S -VIDEO input, please connect the unit and the TV with S-video cord
(not supplied). You do not have to utilise S-VIDEO but it will give clearer images.
2. Set the unit. You have to set the unit according to the TV connected.
•
If the system of the TV is AUTO (multi-system), press P/N and select AUTO.
•
If the system of the TV is NTSC, press P/N and select NTSC.
•
If the system of the TV is PAL, press P/N and select PAL.
•
Connect the unit to a wide-screen TV.
Set the "TV DISPLAY" to "WIDE " in the function setting column.
•
Connect the unit to an ordinary TV.
Set the "TV DISPLAY" to "NORMAL/ PS" (Pan scan) or "NORMAL/ LB" (Letter box) in the
function setting column.
Turn off all equipment before operation.
The unit has many kinds of output modes like A/V output, S-VIDEO output and
digital signal output (COAXIAL, OPTICAL). You may select as you need.
VIDEO AUDIO IN L R
Cb
Cr
* If you use SCART JACK,
the other connection is not needed.
CONNECTED TO A TV
• 13 •

• 14 •
CONNECTIONS (Continued)
•
If the TV has component input, please connect the unit and the TV with component
cord (not supplied). You do not have to utilise component but it will give clearer images.
Cb
Cr
* If you use SCART JACK,
the other connection is not needed.
CONNECTED TO A TV WITH COMPONENT
Notes:
• In case of connecting the component, press the V-MODE on the remote control to
select YUV.
•
When you connect the Composite or S-VIDEO and picture is not displayed, press the V-
MODE on the remote control to check if DVD player position in the video mode.

CONNECTIONS (Continued)
• Optical or coaxial can be selected at your option while connecting
• If you have a DTS decoder of processor, you can enjoy DVD disc or CD sound
decoded by 5.1 channel DTS. ie : 5 surround speakers + 1 woofer
• Refer to page 35 for the setting.
DVD
CENTER
WOOFER
CD
IN
WOOFER
OUT
DVD
IN
MONITOR
OUT
VIDEO
COAXIAL IN OPTICAL
R SURROUND L
Cb
Cr
Manufactured under license from Dolby Laboratories. "Dolby", "Pro Logic" and
the double-D symbol are trademarks of Dolby Laboratories. Confidential
Unpublished works.
©1992-1997 Dolby Laboratories. All rights reserved.
"DTS" and "DTS Digital Out" are trademarks of Digital Theater Systems, Inc.
CONNECT TO AN ORDINARY AMPLIFIER
• 15 •
AMPLIFIER

• 16 •
BASIC OPERATIONS
TV/AUDIO SELECTION
Press on the TV and audio
system.
1. Press "TV/VIDEO" on the TV, select
VIDEO mode (TV).
• Select S-VIDEO mode if using an ‘S’
Video connection.
2. Select the right audio input on the
amplifier.
• Each amplifier is different from
another, please refer to the manual of
the amplifier.
(e.g., connect the audio output of the
DVD player to the DVD audio input of
an amplifier.)
DVD/LD
1. Press to turn on the unit.
2. Press to open the disc tray and load
a disc with the label side.
3. Press again to close the disc tray.
The unit begins to read the disc.
4. Press to play the disc.
AFTER STEP4 IS FINISHED:
• PLAY DVD
The TV screen shows the DVD
menu and title menu.
• PLAY SUPER-VCD, VCD2.0
The TV screen shows the menu, the
unit enters PBC status.
• PLAY CD, VCD1. 1 , MP3
Press , the unit plays the disc
according to the track numbers.
5. Stop playback.
Press .
• You have to press this
button twice to stop
the playback of a
DVD.
6.
Unload the disc and
turn off the unit. Press and again.
or
- REMOTE CONTROL -- FRONT PANEL -
STANDBY/ON
TV/VIDEO
PLAY DISCS
Notes: This step can be cancelled if
you do not connect it to the amplifier.
Notes: If the power is not turned on,
check whether the power switch on
the rear of DVD is turned on.
or
PLAY
PLAY
STANDBY/ON

Press STEP .
•
WHEN PLAYING DVD PICTURES, VCD
Press STEP to make the playback
step. Pressing
STEP again moves the
picture forward frame by frame.
•
WHEN PLAYING MUSIC CD, MP3
Press to make the playback pause.
Press to resume playback.
Press OSD , when the unit is operated,
the TV screen shows the operation
functions and information about the
disc.
• Remove the OSD, press OSD 4 times.
BASIC OPERATIONS (Continued)
According to the system of the TV to be
connected ,set the system of the unit to
make it match the TV.
1. If the system of the TV is NTSC
: Press P/N , select NTSC.
The screen shows:
2. If the system of the TV is PAL
:Press P/N , select PAL.
The screen shows:
3. If the TV is multi-system
: Press P/N , select AUTO.
The screen shows:
TITLE.PBC
INTRO
REPEAT
P/N
RETURN
A-B
MENU
PLAY
STEP
PROGRAM
ZOOM
SLOW
A-TIME
MEMORY
CHANNEL
LANGUAGE
#
VOLUME
b
NTSC
PAL
AUTO
STEP
SYSTEM SETTING
STEP, PAUSE
OSD
OSD
SUBTITLE
ANGLE
SET UP
MUTE 3D
123
654
7
8
0/10
9
10+
• 17 •
PLAY

• 18 •
BASIC OPERATIONS (Continued)
Some DVDs have title menus and chapter menus.
1. Press MENU or TITLE , the screen
shows the menu.
Use direction buttons to select the
desired item, then press .
2. Press
TITLE once to return to the title
menu; press it again to return to
the current playback.
Press
MENU once to return to the root
menu; press it again to return to the
current playback.
+
-
STEP
PROGRAM
ZOOM
SLOW
A-TIME
MEMORY
CHANNEL
LANGUAGE
#
VOLUME
b
•
Press VOLUME on the TV or
amplifier to adjust the volume.
•
Press VOLUME on the remote control.
1. Press + to raise the volume.
2. Press - to lower the volume.
VOLUME CONTROL (EXCEPT SPDIF/RAW)
DVD MENU PLAY
Notes:
•
When appears on the TV screen by
pressing TITLE . The disc does not have
the title list in the menu.
• When appears on the TV screen
by pressing MENU . The disc does not
have the menu.
MP3 PLAY
1. When an MP3 disc is loaded, MP3
menu screen is displayed automatically
depending on MP3 disc’s folder
(directory) structure as shown below.
OTHER FUNCTIONS
When playing a MP3 disc, the unit has
functions like mute, volume control, pause,
previous/next track, repeat and channel
selection. You may operate as you do with a
CD.
2. Use the direction button to select the
folder you want to play, by pressing the
PLAY button. This button allows, you
to see the file lists under the folder.
3. Use the direction button and select an
MP3 title using the PLAY button then
play will start automatically. When you
know the title number, enter the MP3
title number using the numeric buttons
on the remote control and then press
the PLAY button.
4. Press NEXT button on the remote
control to choose next title. Press
PREV button for previous title. When
you know the title number, enter MP3
title number using the numeric buttons
on the remote control and then press
the PLAY button.
PLAY
SMART NAV1
CD-1
CD-2
CD-3
CD-1 0
MP3 01-ABC 1
MP3 02-BCE 2
MP3 03-EIC 3
MP3 04-FGH 4
MP3 05-ADC 5

BASIC OPERATIONS (Continued)
• 19 •
1. If the track number is less than 10,
just press buttons 1-10.
Example: press 8 to select track 8.
The screen shows:
2. If the track number is over 10, press
10+ once and a button among 1-10.
Example: if you select track 12, press
10+ once and button 2.
The screen shows:
+
SELECT 08
00:00:21
SELECT 12
00:00:00
SELECT WITH NUMBER
BUTTONS (IN CASE OF CD)
When playing a super-VCD or VCD2.0,
you can enjoy the basic interactive
function.
Example: VCD2.0
1. Press , the screen shows the home
menu.
2. Press number buttons to select.
Example: select home menu1.
3. The screen shows the sub-menu after
the unit enters home menu1.
4. Press , to see the previous or
next page.
5. Press number buttons to select submenus.
6. Press
RETURN to return to the sub-
menu, press it again to return to the home
menu.
PBC PLAY
EXCHANGE DISCS
1. Press to open the disc tray.
2. Unload the disc and load another one.
3. Press again to close the disc tray.
Load a disc. Press number buttons to
select tracks after the unit finishes reading
the disc.
8
10+
2

• 20 •
PLAY DISCS IN VARIOUS WAYS
WHEN PLAYING DVD
Press LANGUAGE , the screen shows as
below.
Press
LANGUAGE again.
Different discs differ in languages.
When playing a disc, this function can
remove the sound.
1. REMOVE SOUND
Press
MUTE , the screen shows
"MUTE".
2. RESUME SOUND
Press MUTE again.
AUDIO 1/2:AC-3 2CH ENGLISH
AUDIO 2/2:AC-3 5.1CH ENGLISH
SELECT LANGUAGE
WHEN PLAYING CD
You may select one mode.
MUTE
MUTE
MUTE
CHANNEL
CHANNEL
CHANNEL
MONO LEFT
MONO RIGHT
STEREO
Note:
• Different discs differ in languages.
• CHANNEL works when playing a
super-VCD, you may select mono
channel (left or right) or stereo.
• As to a two-language fiction VCD,
you may press
LANGUAGE to select
a needed language.
MUTE OFF
SELECT CHANNEL

PLAY DISCS IN VARIOUS WAYS (Continued)
When playing a disc, you may play it
in Cue or Review mode to find what you
want.
WHEN PLAYING DVD
1. Press to play forward fast.
Each time you press the button, the
screen shows in order:
2. Press to reverse the disc fast.
Each time you press the button, the
screen shows in order:
3. Press to switch back to normal
play.
WHEN PLAYING SUPER-VCD or VCD
1. Press to play forward fast.
Each time you press the button, the
screen shows in order:
2. Press to reverse the disc fast.
Each time you press the button, the
screen shows in order:
WHEN PLAYING CD, MP3
1. Press to play forward fast.
2. Press to reverse the disc.
3. Release (or ) to play normally.
FF 2X
FF 4X
FF 8X
FF 16X
FF 32X
PLAY
1
2
3
4
5
6
FAST PLAY
FF 1X
FF 2X
FF 3X
FF 4X
PLAY
1
2
3
4
5
FR 1X
FR 2X
FR 3X
FR 4X
PLAY
1
2
3
4
5
FR 2X
FR 4X
FR 8X
FR 16X
FR 32X
PLAY
1
2
3
4
5
6
PLAY
Notes: In case of fast play (DVD)
mode , slow play mode or step mode,
the sound is muted.
• 21 •

• 22 •
3. Remove "REPEAT" function.
Press REPEAT , to remove the display
on the screen.
REPEAT
CHAPTER REPEAT ON
DVD
You may repeat a title or chapter.
1. Repeat a chapter.
Press REPEAT , the screen shows:
"CHAPTER REPEAT ON".
2. Repeat a title
Press
REPEAT , the screen shows:
“TITLE REPEAT ON”
CHAPTER REPEAT ON
TITLE REPEAT ON
REPEAT OFF
PLAYING A DISC REPEATEDLY
REPEAT
TITLE REPEAT ON
Enjoy slow motions by the following
steps.
WHEN PLAYING DVD
1. Press SLOW to play slowly.
The screen shows in order:
SLOW PLAY
2.Press to play normally.
SF 2X
SF 4X SF 8X
SR 2X
SR 4X SR 8X
SLOW
WHEN PLAYING SUPER-VCD or VCD
1. Press SLOW to play slowly. The unit
has three steps for slow play.
The screen shows orderly.
2. Press to play normally.
SF 1X
SF 2X
SF 3X
PLAY
1
2
3
4
SLOW
This function can be used to repeatedly
play a title, chapter, track, disc or some
parts on a disc.
REPEAT PLAY
PLAY DISCS IN VARIOUS WAYS (Continued)
REPEAT
REPEAT
P/N
RETURN
A-B
MENU
STEP
PROGRAM
ZOOM
SLOW
A-TIME
MEMORY
CHANNEL
#
VOLUME
PLAY
b
A-B
RETURN
STEP
SLOW
CHANNEL
LANGUAGE
PROGRAM
A-TIME
A-B
MENU
ZOOM
VOLUME
MEMORY
b
#
PLAY
PLAY

PLAY DISCS IN VARIOUS WAYS (Continued)
REP-ONE
REP- ALL
REP- ONE REP- ALL REPEAT OFF
2. Repeat a CD
Press
REPEAT , the screen shows:
"REP- ALL".
REPEAT OFF
3. Remove "REPEAT" function.
Press
REPEAT , to remove the display
on the screen.
Super-VCD, VCD, CD, MP3
• You may repeat a track, a disc
according to the following steps
• VCD 1.1 and CD can play repeatedly
directly.
• Super VCD and VCD 2.0 can play
repeatedly in PBC OFF mode.
• After the unit stops, press number
buttons directly to select tracks.
1. Repeat one track
Press REPEAT , the screen shows:
"REP- ONE".
You may press A-B to enjoy some parts
repeatedly when playing a disc.
PLAY DVD, SUPER-VCD, VCD, CD
1. Set a starting point A.
The screen shows:
2. Set an end point B.
The screen shows:
3. Remove A-B repeat
The screen shows:
Afterwards, the unit plays from A to B.
A TO B SET A
A TO B SET B
REPEAT SOME PARTS (EXCEPT MP3)
REPEAT
REPEAT
REPEAT
A-B
A-B
A-B
A TO B CANCELLED
• 23 •

• 24 •
PLAY DISCS IN VARIOUS WAYS (Continued)
When playing a multi-subtitle DVD or
super-VCD, you may select one subtitle
to show it on the screen.
SELECT SUBTITLES
WHEN PLAYING DVD
1. Press SUBTITLE to select one.
The screen shows:
2. Remove the subtitle.
Press
SUBTITLE until the screen
shows "SUBTITLE OFF".
SUBTITLE
SUBTITLE 01/03:ENGLISH
Notes:
• For some discs, subtitles can not be
removed.
• Different discs differ in the
languages of subtitles.
• If the subtitles of discs can not be
selected, press
SUBTITLE , the
screen shows forbidden mark .
SUPER-VCD
A super-VCD has only four channels for
recording, so it has four subtitles at the
most.
Press SUBTITLE , the screen shows
orderly:
You may select a subtitle as you need.
Some discs may not have "SUBTITLE OFF"
function.
SUBTITLE 01/04
SUBTITLE 02/04
SUBTITLE 03/04
SUBTITLE 04/04
SUBTITLE OFF
1
2
3
4
5
OSD
123
SUBTITLE
ANGLE
SET UP
7
10+
654
9
8
0/10

PLAY DISCS IN VARIOUS WAYS (Continued)
Some discs have images with different
screen angles, you may select among
them. For example,when you watch a
running train, you may select to watch it
from the front, the left window or the
right window without stopping it.
OSD
SUBTITLE
ANGLE
SET UP
V-MODE
TITLE.PBC
INTRO
123
654
7
8
0/10
9
10+
Example:
A DVD has four screen angles at your
option.
1. Press
ANGLE to select ANGLE1.
2. Press
ANGLE to select other angles,
the screen shows respectively:
3. Resume normal playback. Press
ANGLE until there is no display on
the screen.
2/4 (select ANGLE2)
3/4 (select ANGLE3)
4/4 (select ANGLE4)
1/4
SELECT ANGLES 3D SURROUND
SCREEN
This function outputs 3D effects on the
stereo audio analog output 3D effects are
broken down into 4 surround modes.
OSD
SUBTITLE
ANGLE
MUTE 3D
123
654
7
8
9
1. Press 3D button.
3D SURROUND MODE 1 is
displayed on TV screen. And analog
stereo output is changed to surround
mode 1.
2. Press 3D button again.
Press the 3D button continuously until
the desired 3D sound mode is selected.
3D SURROUND 1
Notes: This 3D function is operated
in case only that the AUDIO
OUTPUT is set to the ANALOG or
SPDIF/PCM.
• 25 •

• 26 •
PLAY DISCS IN VARIOUS WAYS (Continued)
A-TIME
MENU
STEP
PROGRAM
ZOOM
SLOW
A-TIME
MEMORY
CHANNEL
LANGUAGE
#
VOLUME
b
2. Time search
• Press A-TIME until the screen
shows:
• Press number buttons to enter hour,
minute and second.
Example: Enter 0, 1, 0, 2, 3, 8
After setting, the disc is played from
01:02:38.
PLAY SUPER-VCD, VCD, CD
You can only enter a time to search the
content from that time.
Example: Play from 01:38 of track 6.
1. Press button 6 to select track 6. The
screen shows:
2. Press
A-TIME , the screen shows:
3. Press button 0, 1, 3, 8 to enter the time.
The screen shows:
• The unit plays from 01:38 of track 6
after setting.
• Press 0/10 to enter 0.
You may directly enter a time, title or
chapter number to search fast on a disc,
the unit plays from the point entered.
PLAY DVD
1. Search a title or a chapter.
Example: Search chapter 2 in title 2.
• Press A-TIME , the screen shows:
• Press the left or right button and
move the cursor to illuminate the title
number. The screen shows:
• Press button 2 to select title 2, the
screen shows:
• Repeat the steps above, select
chapter 2 in title 2.
SELECT: 06
GO TO
_ _: _ _
GO TO 01:38
TIME SEARCH AND REMAINING TIME
TIME SEARCH
TITLE 03/03 CHAPTER 01 /04
TITLE 02/03 CHAPTER 01 /04
TITLE 02/03 CHAPTER 02 /04
TITLE 03/03 CHAPTER 01 /04
TITLE 02/03 TIME : :

PLAY DISCS IN VARIOUS WAYS (Continued)
This function can be used to know the
remaining time of a title, chapter or track.
DVD
1. Press OSD , the screen shows the
remaining time of the title.
2. Press
OSD , the screen shows the
playing time of the chapter.
3. Press OSD , the screen shows the
remaining time of the chapter.
SUPER-VCD, VCD, CD
Example: Check the remaining time
when playing track 2.
1. Press OSD , the screen shows the
playing time of the track.
4. Press OSD again, the screen shows the
remaining time of the disc.
5. Press
OSD once more, the screen
shows:
OSD
OSD
OSD
CHAPTER REMAIN
00:01:19
TITLE REMAIN
00:56:45
CHAPTER ELAPSED
00:02:41
SINGLE ELAPSED
00:04:23
TOTAL REMAIN
00:33:23
OFF
REMAINING TIME
2. Press OSD , the screen shows the
remaining time of the track.
3. Press OSD , the screen shows the
playing time of the track.
SINGLE REMAIN
00:01:25
TOTAL ELAPSED
00:04:25
• 27 •

• 28 •
PLAY DISCS IN VARIOUS WAYS (Continued)
This function can be used to enjoy a
motion or motionless picture.
DVD/SUPER-VCD/VCD
1. Press ZOOM when playing a DVD, the
screen shows:
The picture is enlarged 1.5 times as big.
2. Press
ZOOM again. the screen shows:
The picture is enlarged twice as big.
3. Press
ZOOM again. the screen shows:
The picture is enlarged four times as
big.
4. Press , , , to move the enlarged
picture.
5. To resume the picture, press
ZOOM
once more, then screen shows
“ZOOM OFF”.
ZOOM X1.5
ZOOM X2
ZOOM X4
ZOOM PLAY
The unit can memorize the last point
where it stops and resume playback from
there.
WHEN PLAYING CD
1. Press STOP to stop playing.
2. Press MEMORY to resume playback.
MEMORY
RESUME PLAY
Notes:
1. This function does not work for any
programmed playback.
2. This function is removed when the
disc is unloaded or the unit is off.
RETURN
STEP
PROGRAM
A-TIME
SLOW
CHANNEL
A-B
MENU
ZOOM
VOLUME
MEMORY
b
#

PLAY DISCS IN VARIOUS WAYS (Continued)
WHEN PLAYING SUPER-VCD, VCD, CD
1. After the unit stops, press PROGRAM to
select.
The screen shows:
PROGRAM
PROGRAM P00:00
2. Press number buttons in order, according
to the track to be programmed.
Example: Press 2, 4, 6, 8.
screen
Notes:
track number
program order
P
* *
* *
PROGRAM P01:02
PROGRAM P04:08
.
.
.
You may program the tracks on a disc
and play them in the programmed order.
RETURN
A-B
MENU
STEP
PROGRAM
ZOOM
SLOW
A-TIME
MEMORY
CHANNEL
#
VOLUME
b
PROGRAM PLAY (VCD, AUDIO CD only)
.
.
.
2
8
3. Press to start playing.
4. Press PROGRAM twice to remove
program play.
PLAY
WHEN PLAYING SUPER-VCD, VCD
1. Press INTRO after the unit stops.
The screen shows:
2. Press number buttons to select a digest
mode.
Press button 1 for intro mode.
The unit plays each scene for about 10
seconds.
3. Press button 2 for disc digest.
SET UP
DIGEST PLAY
(VCD, AUDIO CD only)
1. INTRO
2. DISC
3. TRACK
4. EXIT
INTRO
1
2
• 29 •
:
10+
0/10
INTRO
TITLE.PBC
V-MODE
PLAY

• 30 •
If the scene number is more than 9,
press to look at the next picture.
4. Press number buttons to select a track.
Press button 3 for scene digest.
Press to select a track.
PLAY DISCS IN VARIOUS WAYS (Continued)
SCENE01 SCENE02 SCENE03
SCENE08 SCENE09 SCENE04
SCENE07 SCENE06 SCENE05
3
The unit shows the starting picture of all
the scene on the screen simultaneously.
The unit divides scene 3 into nine parts
ans shows the starting picture of each part
on the screen.
5. Press button 4 to exit from digest play.
6. Remove digest play.
Press , digest play is removed and the
unit stops.
1
2
3
8
9
4
7
6
5

PLAY DISCS IN VARIOUS WAYS (Continued)
WHEN PLAYING CD
1. Press INTRO after the unit stops.
The screen shows:
2. Press number buttons to select a digest
mode.
Press button 1 for intro mode.
The unit plays the first 15 seconds of
each track one after another.
Press , to play the first 15
seconds at the previous or next track.
3. Press button 4 to exit from digest play.
4. Remove digest play.
Press , digest play is removed and the
unit stops.
Notes : CD only has “INTRO” function.
1. INTRO
2. ----
3. ----
4. EXIT
INTRO
1
4
Load a karaoke disc and play it.
1. Set karaoke disc and play it.
2. Insert the microphone into MIC1 or
MIC2.
3. Turn knob “MIC LEVEL” and
“ECHO” to obtain the needed degree.
4. Push number buttons to select tracks.
KEY CONTROL
You may change the pitch to adapt to
your voice.
1. Push to raise the pitch.
Each time you push the button, the pitch
is raised by one step. It can be raised by 7
steps at the most.
2.Push to lower the pitch.
Each time you push the button, the pitch
is lowered by one step. It can be raised by
7 steps at the most.
PLAY KARAOKE
LEVEL
MIN
MAX
MIC
MIN
MAX
ECHO
#
b
MIC1 MIC2
• 31 •

• 32 •
FUNCTION SETTING
According to the recorded information
and external equipment,set the following
functions for DVD to obtain the best
playing status.
1. Press
SETUP to set the main menu.
2. Press direction buttons ( , ) and press
to confirm.
Example: Set "DUAL MONO" in "DOLBY
DIGITAL SETUP" to "L- MONO".
• Press direction button to select. The
screen shows:
The screen shows:
• Press to confirm and enter
"DOLBY DIGITAL SETUP".
SET UP
V-MODE
TITLE.PBC
INTRO
7
8
0/10
9
10+
SETUP
The screen shows:
After entering the menu, the unit
automatically selects a column.
•
Press the direction button to
select "DUAL MONO".
The screen shows:
Press direction button , to select
"L- MONO"
The screen shows:
•
Press to confirm.
SETUP MENU -- MAIN PAGE
GENERAL SETUP
DOLBY DIGITAL SETUP
PREFERENCES
EXIT SETUP
SETUP MENU -- MAIN PAGE
GENERAL SETUP
DOLBY DIGITAL SETUP
PREFERENCES
EXIT SETUP
DVD MENU SETTING
PLAY
PLAY
PLAY
PLAY
-- DOLBY DIGITAL SETUP -OP MODE LINE OUT
DUAL MONO
DYNAMIC
MAIN PAGE
-- DOLBY DIGITAL SETUP -OP MODE
DUAL MONO STEREO
DYNAMIC L-MONO
R-MONO
MIX-MONO
MAIN PAGE
-- DOLBY DIGITAL SETUP -OP MODE
DUAL MONO STEREO
DYNAMIC L-MONO
R-MONO
MIX-MONO
MAIN PAGE

FUNCTION SETTING (Continued)
3.Exit from menus.
Using direction buttons go to
“ MAIN PAGE” menu, then press .
The screen shows.
•
To select “GENERAL SETUP” menu,
press .
2. NORMAL / LB (LETTER BOX)
This is selected when the unit is
connected with a normal TV. Widescreen images are shown on the screen,
with black belt on the top and bottom.
The setting structure is as follows:
3. WIDE
This is selected when the unit is
connected with a wide-screen TV.
TV DISPLAY >> NORMAL/PS
NORMAL/LB
WIDE
TV TYPE >> AUTO
NTSC
PAL
PIC MODE >> AUTO
HI-RES
N-FLICKER
ANGLE MARK >> ON
OFF
OSD LANG >> ENGLISH
FRENCH
SPANISH
AUDIO OUT >> ANALOG
SPDIF/RAW
SPDIF/PCM
CAPTIONS >> ON
OFF
SCR SAVER >> ON
OFF
MAIN PAGE
TV DISPLAY
1. NORMAL/ PS (PAN SCAN)
This is selected when the unit is
connected with a normal TV.
Wide- screen images are shown on the
screen, but with some parts cut
automatically.
SETUP MENU--MAIN PAGE
GENERAL SETUP
DOLBY DIGITAL SETUP
PREFERENCES
EXIT SETUP
GENERAL SETUP
PLAY
PLAY
• 33 •

• 34 •
FUNCTION SETTING (Continued)
AUDIO OUT
• ANALOG: No signal is output from the
coaxial and optical port.
• SPDIF/RAW: Select this when the DVD
player is connected with a power
amplifier through coaxial port, refer to
page 15. When a Dolby Digital DVD,
DTS DVD or MPEG DVD is played,
the coaxial port will output in the
corresponding digital(Source code)
format. The power amplifier to be
connected must have Dolby Digital,
DTS and MPEG decoding.
• SPDIF/PCM: Select this when the DVD
player is connected with a 2-channel
digital mode or stereo amplifier (refer
to page 15 for the connection). When a
Dolby Digital or MPEG DVD is
played, the coaxial port will output in
PCM 2-channel format.
CAPTIONS
CAPTION was invented for hearing
impaired person. But it is very useful
when learning foreign languages. If your
TV supports closed caption, select ON. If
not, closed caption won’t be displayed.
• ON : The hidden subtitle is shown.
• OFF : The hidden subtitle is turned off.
SCREEN SAVER
Start the screen saver, the screen saver
image appears when the unit stops or
the image is frozen for a few minutes.
This saver can keep the screen from
being damaged.
• ON: Start the screen saver.
• OFF: Remove the screen saver.
TV TYPE
You may select according to the colour
system of the TV to be connected.
•
Select "AUTO" for a multi-system TV.
•
Select "NTSC" for a NTSC TV.
•
Select "PAL" for a PAL TV.
PIC MODE
•
Select "AUTO" for automatically setup.
•
Select "HI-RES" for high-resolution picture.
•
Select "N-FLICKER" for no flicker picture.
ANGLE MARK
This only works when there is an angle
mark on the disc.
•
Select "ON",the screen shows the mark
when playing a DVD.
•
Select "OFF",the mark is not shown.
OSD LANGUAGE
• ENGLISH
The OSD is in English.
• FRENCH
The OSD is in French.
• SPANISH
The OSD is in Spanish.
Notes:
In case of selecting SPDIF/RAW or
SPDIF/PCM, no signal is output from the
audio analog output.

FUNCTION SETTING (Continued)
AUDIO >> ENGLISH
FRENCH
SPANISH
GERMAN
ITALIAN
DUTCH
SUBTITLE >> ENGLISH
FRENCH
SPANISH
GERMAN
ITALIAN
DUTCH
OFF
DISC MENU >> ENGLISH
FRENCH
SPANISH
GERMAN
ITALIAN
DUTCH
PARENTAL >> 1. G
2.
3. PG
4. PG 13
5.
6. PG-R
7. NC-17
8. ADULT
NO PARENTAL
PASSWORD >> CHANGE
>> OLD PASSWORD
NEW PASSWORD
CONFIRM PWD
DEFAULTS >> RESET
MAIN PAGE
The setting structure is :
PREFERENCES
Notes:
To enter into the preference setting mode
during the play, press the STOP button twice.
OP MODE >> LINE OUT
DUAL MONO >> STEREO
L-MONO
R-MONO
MIX-MONO
DYNAMIC >> FULL
6/8
4/8
2/8
OFF
MAIN PAGE
OP MODE
• LINE OUT: Compress input signals
linearly.
DUAL MONO
There is the output mode of the L and
R signals of the set audio output. If it is
set to "MIX-MONO", the function only
works when the DVD being played is
5.1-channel.
DYNAMIC
When the compression mode is set to
"LINE OUT", this is selected to adjust
linear compression rate to obtain the
different compression results of the
signals.
The setting structure is :
- -DOLBY DIGITAL SETUP PAGE- -
DOLBY DIGITAL SETUP
• 35 •

• 36 •
FUNCTION SETTING (Continued)
DEFAULTS >> RESET
Each function setting returns to the initial
status in the factory if you select this.
SELECT LANGUAGE
If a language mentioned above is
recorded on the disc, you can select
audio, subtitle or disc menu languages. If
not, the language recorded on the disc is
shown.
- -PASSWORD SETUP - -
PASSWORD >>CHANGE>> OLD PASSWORD
NEW PASSWORD
CONFIRM PWD
Select this to adapt the code, the
screen shows:
Enter a password according to the screen.
PASSWORD CHANGE PAGE
OLD PASSWORD
NEW PASSWORD
CONFIRM PWD
Notes:
The password is 3308 when the unit
is turned on initially or you forget the
password.
PASSWORD
PARENTAL
The content of a disc with lock function
is evaluated by grades.
You may select an age control grade as
you need.
Example: Select "G", the scenes of
violence inadvisable are not
played to children.
For adults, the screen suggests you enter
the code after pressing ,
you can watch if the password is right.
Notes: The password is set by yourself
PLAY

TROUBLESHOOTING
If you experience the following problems
while using the unit, this troubleshooting
guide can help you.
No sound
•
Check if you press the MUTE.
•
Check if the unit is properly connected.
•
Make sure you operate the TV or
amplifier correctly.
•
Make sure the DVD player or the
amplifier position is properly selected .
•
Make sure the audio output is set
properly . (Check the audio output mode
of the general setup in Setup menu)
•
Check whether the disc plays in slow or
fast forward (or reverse) mode.
No image
•
Check if the unit is properly connected.
•
Make sure you operate the TV correctly.
•
Make sure you set the colour system
correctly.
Bad sound quality
•
Make sure the audio output mode is set
correctly.
•
Make sure the audio connection
between the unit and amplifier is right.
•
Check whether the disc is dirty or
damaged.
Image rolls and no colour
•
The colour system set by this unit does
not match with that of TV. Press
P/N on the remote control to select
the correct one.
•
Check whether the disc is dirty or
damaged.
Disc can not be played
•
There is no disc in the unit.
•
Insert the disc on the disc tray properly
with the label side up.
•
Clean the disc.
•
Moisture has condensed in the unit.
Remove the disc and leave the unit on
for about one hour.
•
Make sure that the area code of disc is 2
or All. (In case of DVD, it may not play
the disk which come from abroad.)
Remote control does not work
•
Remove barriers between the remote
control and the unit.
•
Point the remote control at the remote
control sensor of the unit.
•
Replace the batteries with new ones.
•
Reference page 8.
• 37 •

• 38 •
TECHNICAL SPECIFICATIONS
Laser
Television signal
Frequency response
Audio Signal/noise ratio
output level : 2.0 ± 0.2Vrms
(Load impedance : 10KΩ)
output level : 0.5 ± 0.1Vp-p
(Load impedance : 75Ω)
output level : 1.0 ± 0.2Vp-p
(Load impedance : 75Ω, imbalance, negative polarity)
output level : brightness (Luma) 1.0 ± 0.2Vp-p
chromaticity (Clor) 0.286 ± 20% (Load impedance : 75Ω)
AC100~240V, 50/60Hz
<25W
Around 4.5Kgs
wavelength 650nm
NTSC /PAL/AUTO
20Hz ~ 20KHz
≥
90dB (At 1KHz, JIS A-Weighted)
≤- 60dB (At 1KHz, 0dB)
≥
90dB ( 1KHz)
≥
85dB ( 1KHz)
Audio distortion + noise
Channel separation
Dynamic range
Output
Audio
Output
Video
Analog
Digital
Composite
S-video
Power supply
Component
Power consumption
Dimensions (W x H x D)
Net Weight
430 x 76.5 x 277 mm
Notes : Design and specifications in this owner’s manual are subjected to change
without prior notice to improve quality and function.
0.7Vp-p (Load impedance : 75Ω)

Regional restriction codes are built in this DVD player model and all DVD discs for
each sales region throughout the world. If regional code of this DVD player does not
match with regional code of DVD disc that you want to playback, if won’t work. The
regional code number can be found the diagram below .
reREGIONAL RESTRICTION CODE
• 39 •

DVD PLAYER DVG-6000D
DVD Player
OWNER’S MANUAL
DVG-6000D
 Loading...