

Page 1
• 1 •
IMPORTANT SAFEGUARDS
CAUTION: TO REDUCE THE RISK OF ELECTRIC
SHOCK, DO NOT REMOVE COVER (OR BACK). NO
USER-SERVICEABLE PARTS INSIDE. REFER
SERVICING TO QUALIFIED SERVICE PERSONNEL.
CAUTION
RISK OF ELECTRIC SHOCK
DO NOT OPEN
The lightning flash with arrowhead symbol,
within an equilateral triangle, is intended to
alert the user to the presence of uninsulated
“dangerous voltage” within the product’s
enclosure that may be of sufficient magnitude
to constitute a risk of electric shock.
The exclamation point within an equilateral
triangle is intended to alert the user to the
presence of important operating and servicing
instructions in the literature accompanying the
appliance.
WARNING : TO REDUCE THE RISK OF FIRE OR ELECTRIC SHOCK, DO NOT EXPOSE THIS
APPLIANCE TO RAIN OR MOISTURE.
CAUTION : TO PREVENT ELECTRIC SHOCK, MATCH WIDE BLADE OF PLUG TO WIDE SLOT,
FULLY INSERT.
IMPORTANT FOR LASER PRODUCTS
• LASER : This Digital Video Disc Player employs a Laser System. To ensure proper use of this product please
read this owner’s manual carefully and retain for future reference. Should the unit require
maintenance, contact an authorized service location - see service procedure.
Use of control adjustments or the performance of procedures other than those specified may result in
hazardous radiation exposure.
T o prevent direct exposure to the laser beam, do not try to open the enclosure. Visible laser radiation
when open and interlocks defeated.
DO NOT STARE INTO THE BEAM.
• DANGER : Visible laser radiation when open and interlock failed or defeated.
Avoid direct exposure to beam.
• CAUTION : Do not open the top cover. There are no user serviceable parts
inside the Unit; leave all servicing to qualified service personnel.
CLASS 1
LASER PRODUCT
FCC NOTICE:This equipment has been tested and found to comply with the limits for a Class B digital
device, pursuant to part 15 of the FCC Rule. These limits are designed to provide
reasonable protection against harmful interference in a residential installation. This
equipment generates, uses and can radiate radio frequency energy and if not installed and
used in accordance with the instructions, may cause harmful interference to radio
communications. However, there is no guarantee that interference will not occur in a
particular installation. If this equipment does cause harmful interference to radio or
television reception; which can be determined by turning the equipment off and on, the
user is encouraged to try to correct the interference by one or more of the following
measures:
• Reorient or relocate the receiving antenna.
• Increase the separation between the equipment and receiver.
• Connect the equipment to an outlet on a circuit different from that to which the receiver
is connected.
• Consult the dealer or an experience radio/TV technical for help.
CAUTION: Any changes or modification in construction of this device which are not expressly
approved by the party responsible for compliance could void the user’s authority to
operate the equipment.
Page 2

• 2 •
IMPORTANT SAFEGUARDS (Continued)
This set has been designed and manufactured to assure personal safety. Improper use can result
in electric shock or fire hazard. The safeguards incorporated in this unit will protect you if you
observe the following procedures for installation, use and servicing. This unit is fully
transistorized and does not contain any parts that can be repaired by the user.
1 READ INSTRUCTIONS
All the safety and operating instructions should be read before the unit is operated.
2 RETAIN INSTRUCTIONS
The safety and operating instructions should be retained for future reference.
3 HEED WARNINGS
All warnings on the unit and in the operating instructions should be adhered to.
4 FOLLOW INSTRUCTIONS
All operating and use instructions should be followed.
5 CLEANING
Unplug this
unit
from the wall outlet before cleaning. Do not use liquid cleaners or aerosol
cleaners. Use a damp cloth for cleaning.
6 ATTACHMENTS
Do not use attachments unless recommended by the unit’s manufacturer as they may cause
hazards.
7 WATER AND MOISTURE
Do not use this unit near water- for example, near a bath tub, wash bowl, kitchen sink or
laundry tub, in a wet basement, or near a swimming pool.
8 ACCESSORIES
Do not place this unit on an unstable cart, stand, tripod, bracket, or
table. The unit may fall, causing serious injury to a child or adult
as well as serious damage to the unit. Use this unit only with a cart,
stand , tripod, bracket, or table recommended by the manufacturer.
8A
A unit and cart combination should be moved with care. Quick
stops, excessive force, and uneven surfaces may cause the video
product and cart combination to overturn.
9 VENTILATION
Slots and openings in the case are provided for ventilation to ensure reliable operation of the
unit and to protect it from overheating. These openings must not be blocked or covered.
These openings must not be blocked by placing the unit on a bed, sofa, rug, or other similar
surface. This unit should never be placed near or over a radiator or heat radiator. This unit
should not be placed in a built-in installation such as a bookcase or rack unless proper
ventilation is provided or the manufacturer’s instructions have been adhered to.
10 POWER SOURCES
This unit should be operated only from the type of power source indicated on the marking label.
If you are not sure of the type of power supply to your home, consult your video dealer or local
power company . For units intended to operate from battery power , or other sources, refer to the
operating instructions.
11 GROUNDING OR POLARIZATION
This unit is equipped with a polarized alternating -current line plug (a plug having one blade
wider than the other). This plug will fit into the power outlet only one way.
PORTABLE CART WARNING
(symbol provided by RETAC)
Page 3

• 3 •
IMPORTANT SAFEGUARDS (Continued)
This is a safety feature. If you are unable to insert the plug fully into the outlet, try reversing
the plug. If the plug still fails to fit, contact your electrician to replace your obsolete outlet.To
preventelectric shock, do not use this polarized plug with an extension cord, receptacle, or other
outlet unless the blades can be fully inserted without blade exposure. If you need an extension
cord, use a polarized cord.
12 POWER-CORD PROTECTION
Power-supply cords should be routed so that they are not likely to be walked on or pinched
by items placed upon or against them, paying particular attention to cords at plugs,
convenience receptacles, and the point where they exit from the unit.
13 LIGHTNING
For added protection for this unit during a lightning storm, or when it is left unattended and
unused for long periods of time, unplug it from the wall outlet and disconnect the antenna or
cable system. This will prevent damage to the unit due to lightning and power line surges.
14 DISC TRAY
Keep your fingers well clear of the disc as it is closing. It may cause serious personal injury.
15
OVERLOADING
Do not overload wall outlets of extension cords as this can result in a risk of fire or electric shock.
16 OBJECT AND LIQUID ENTRY
Never push objects of any kind into this unit through openings as they may touch dangerous
voltage points or “short-out” parts that could result in a fire or electric shock. Never spill
liquid of any kind on the unit.
17 BURDEN
Do not place a heavy object on or step on the product. The object may fall, causing serious
personal injury and serious damage to the product.
18 DISC
Do not use a cracked, deformed or repaired disc. These discs are easily broken and may cause
serious personal injury and product malfunction.
19 SERVICING
Do not attempt to service this unit yourself as opening or removing covers may expose you
to dangerous voltage or other hazards. Refer all servicing to qualified service personnel.
20 DAMAGE REQUIRING SERVICE
Unplug this unit from the wall outlet and refer servicing to qualified service personnel under
the following conditions.
A. When the power-supply cord or plug is damaged.
B. If liquid has been spilled, or objects have fallen into the unit.
C. If the unit has been exposed to rain or water.
D. If the unit does not operate normally by following the operating instructions. Adjust
only those controls that are covered by the operating instructions. Improper adjustment
of other controls may result in damage and will often require extensive work by a
qualified technician to restore the unit to its normal operation.
E. If the video product has been dropped or the cabinet has been damaged.
F.
When the unit exhibits a distinct change in performance-this indicates a need for service.
21 REPLACEMENT PARTS
When replacement parts are required, have the service technician verify that the replacements
he uses have the same safety characteristics as the original parts. Use of replacements
specified by the unit manufacturer can prevent fire, electric shock, or other hazards.
Page 4

• 4 •
IMPORTANT SAFEGUARDS (Continued)
22 SAFETY CHECK
Upon completion of any service or repairs to this unit, ask the service technician to perform
safety checks recommended by the manufacturer to determine that the unit is in safe operating
condition.
23 WALL OR CEILING MOUNTING
The product should be mounted to a wall or ceiling only as recommended by the
manufacturer.
24 HEAT
The product should be situated away from heat sources such as radiators, heat registers,
stoves, or other products (including amplifiers) that produce heat.
Page 5

• 5 •
TABLE OF CONTENTS
1. IMPORTANT SAFEGUARDS---------------------1
2. T ABLE OF CONTENTS ----------------------------5
3. FEATURES---------------------------------------------6
4. ABOUT MANUAL-----------------------------------7
5. PLAYABLE DISCS-----------------------------------7
6. TERMS FOR DISCS ---------------------------------8
7. BEFORE OPERATION ----------------------------10
8. PRECAUTIONS FOR DISC ----------------------10
9.PREPARATIONS BEFORE OPERATION------11
• CHECK ACCESSORIES-------------------------11
• USE REMOTE CONTROL----------------------11
• FRONT PANEL -----------------------------------12
• DISPLAY -------------------------------------------13
•
NAMES AND LA YOUT OF REMOTE CONTROLS
--14
• REAR PANEL -------------------------------------15
10. CONNECTIONS-----------------------------------16
11. BASIC OPERATIONS ----------------------------18
• PLAY DISCS ---------------------------------------18
• SYSTEM SETTING-------------------------------19
• STEP, PAUSE---------------------------------------19
• OSD --------------------------------------------------19
• VOLUME CONTROL----------------------------20
• DVD MENU PLAY -------------------------------20
• MP3 PLAY------------------------------------------20
• PBC PLAY ------------------------------------------21
• SELECT WITH NUMBER BUTTONS -------21
12. PLAY DISCS IN V ARIOUS WAYS ------------22
• SELECT LANGUAGE ---------------------------22
• SELECT CHANNEL------------------------------22
• MUTE------------------------------------------------22
• F AST PLAY-----------------------------------------23
• SLOW PLAY ---------------------------------------24
• REPEAT PLAY-------------------------------------24
• PLAYING A DISC REPEATEDLY ------------24
• REPEAT SOME PARTS --------------------------25
• SELECT SUBTITLES ----------------------------26
• SELECT ANGLES --------------------------------27
• 3D SOUND -----------------------------------------27
• TIME SEARCH AND REMAINING TIME--28
• RESUME PLAY -----------------------------------30
• ZOOM PLAY---------------------------------------30
• PROGRAM PLAY---------------------------------31
• DIGEST PLAY-------------------------------------31
13. FUNCTION SETTING---------------------------34
• DVD MENU SETTING --------------------------34
• GENERAL SETUP--------------------------------35
• DOLBY DIGIT AL SETUP-----------------------37
• PREFERENCES -----------------------------------37
14. TROUBLESHOOTING---------------------------39
15. TECHNICAL SPECIFICATIONS --------------40
16. REGIONAL RESTRICTION CODE-----------41
Page 6
• 6 •
FEATURES
❏ OUTSTANDING SOUND QUALITY
Dolby Digital system developed by Dolby Laboratories and DTS
developed by DTS Inc., features high quality surround sound, can be played in
DVD or CD disc at home, to reproduce high quality sound effects.
❏ HIGH DEFINITION
The unit adopts MPEG2 coding format and brings the horizontal resolution over
500 lines.
❏ UNIQUE FUNCTIONS
Multi-angle and multi-language bring unique trick functions.
Parent lock makes it easy to control the content of discs.
❏ SCREEN
Ordinary screen and wide screen (16:9) are available.
❏ COMP
ATIBILITY
The unit can play DVDs, and is compatible with CDs.
❏ ZOOM
It can enlarge pictures 1.5 times, twice or four times their size.
❏ 9-PICTURE DIGEST (VCD)
It can look through the content of discs and select to play.
❏ MULTI-FUNCTIONS
Fast forward, fast reverse, slow play, frame play , repeat play and program play.
❏ TIME SEARCH
It can search a specificpart on a disc, especially good for watching fiction
movies.
❏ RESUME PLA
Y
It can memorize the position where the disc is stopped and resume playback.
❏ CONTENT DISPLAY
It adopts (a coloured) fluorescent display and English/Spanish/French OSD,
making the disc content clearer.
❏ VIDEO OUTPUT
Standard video, S-video signal output mode and easy system change.
❏ AUDIO OUTPUT
Analog audio output and coaxial digital audio output, can be connected with the
appropriate amplifier to enjoy high quality sound effects.
❏ PHONES
Used to make connection with the head phone. Please insert the head phone jack into
this socket. The downmix mode is selected analog audio out whenever the
headphons are plugged in.
❏ PHONES LEVEL
Used to adjust the phone volume.
Page 7
• 7 •
ABOUT MANUAL
• This manual mainly introduces how to
use buttons on the remote control.
• You may operate the unit if the buttons
on the unit have the same or similar
names as or to those on the remote
control.
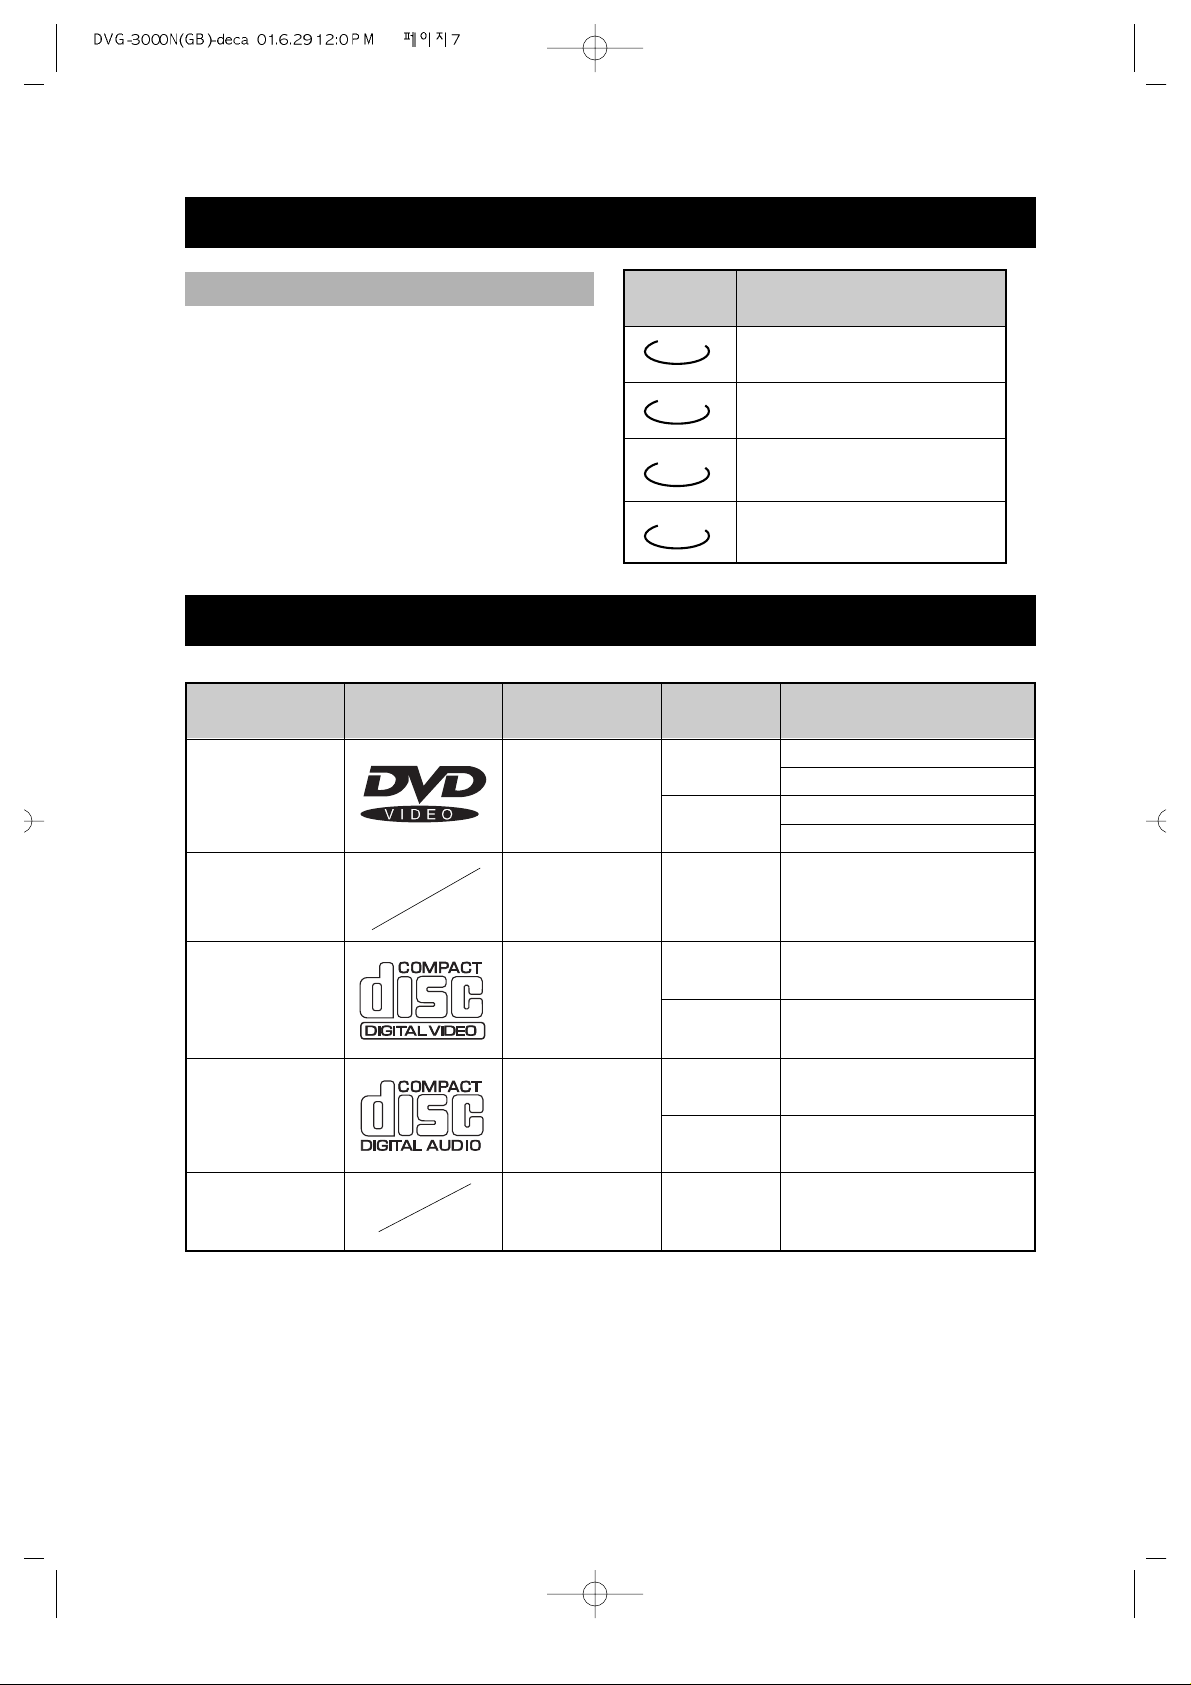
• The marks shown in the chart on the
right are used in the manual.
MARK
INDICATION
functions of DVD
functions of super-VCD
TYPE
DVD
CD
MARK CONTENT
audio+video
(motion
pictures)
audio
SIZE
12cm
about 2hrs (single-side disc)
about 8hrs (double-side disc)
about 80mins (single-side disc)
about 160mins(double-side disc)
about 74mins
about 20mins
8cm
12cm
8cm
PLAYING TIME
DVD
SVCD
VCD
CD
PRINCIPLES FOR WRITING
PLAYABLE DISCS
Super-VCD
audio+video
(motion pictures)
12cm
about 45mins
VCD
audio+video
(motion pictures)
12cm
8cm
about 74mins
about 20mins
MP3
audio
12cm about 160mins
functions of VCD
functions of CD
Page 8
• 8 •
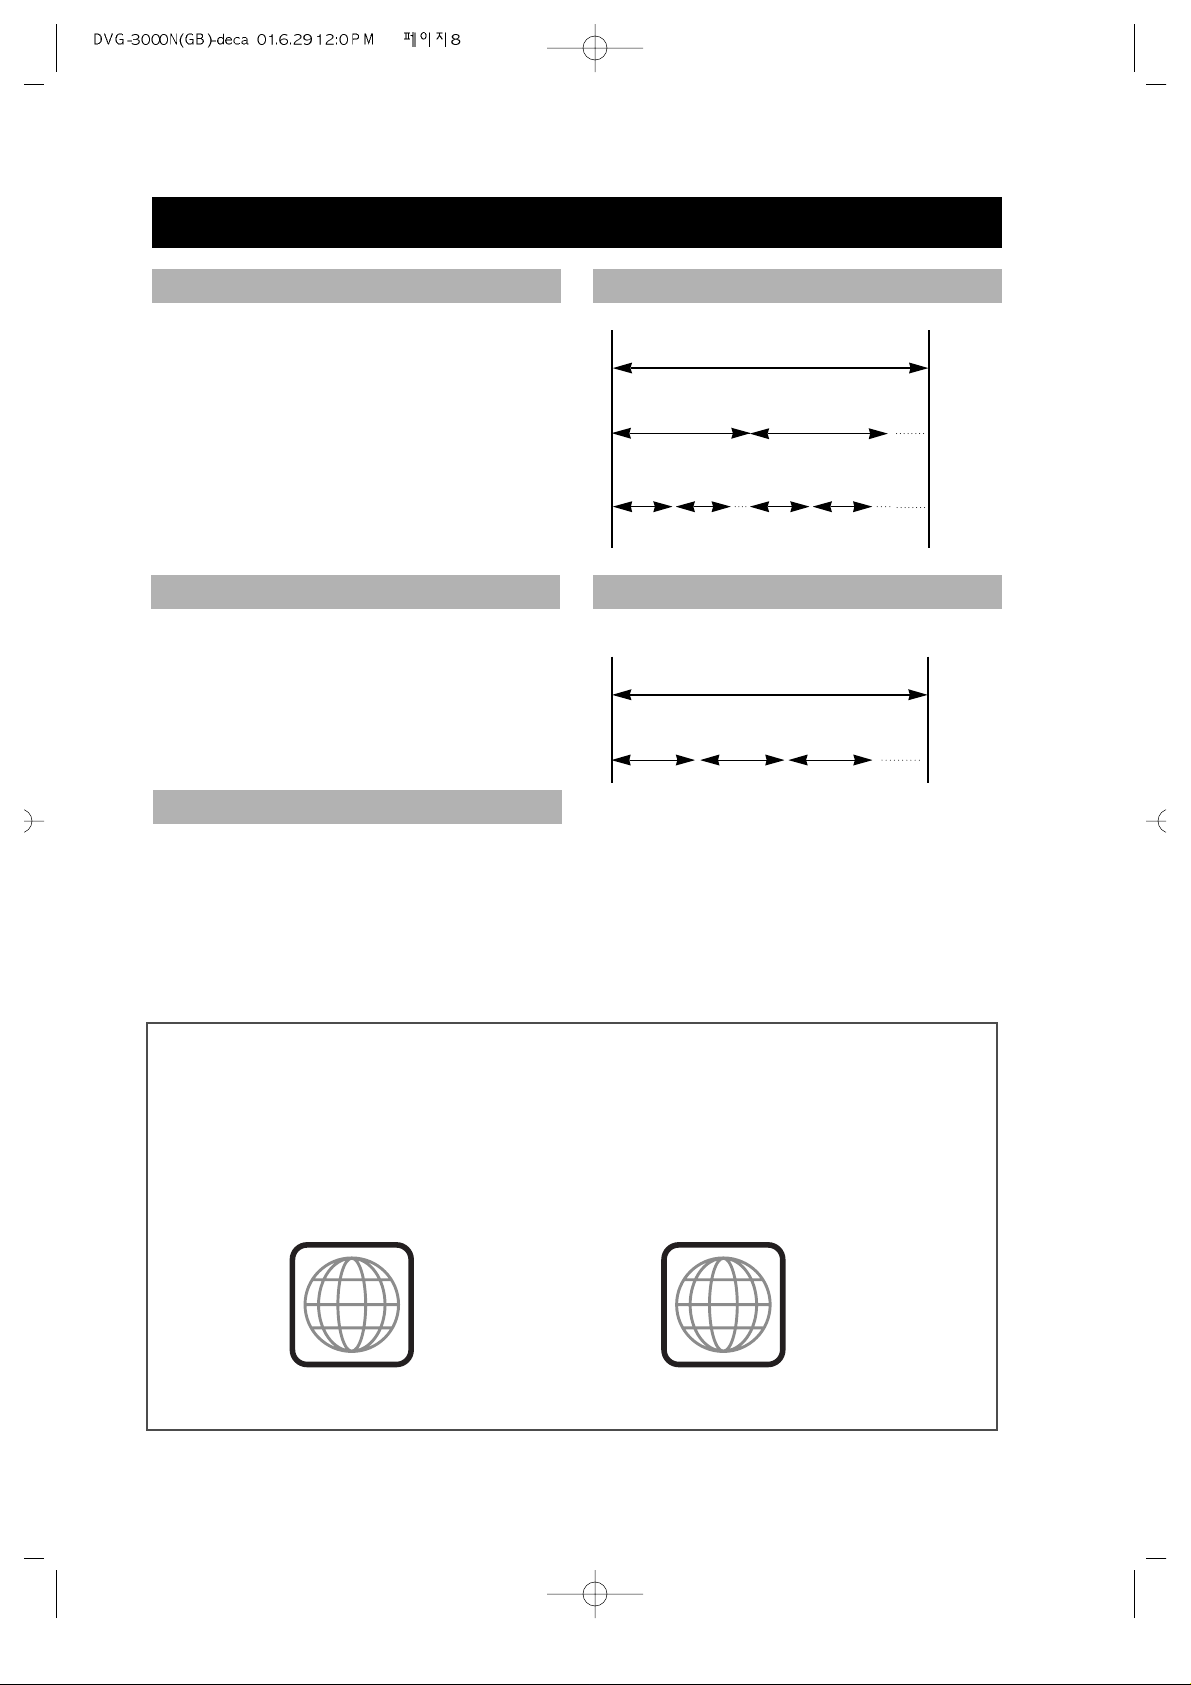
REGION MANAGEMENT INFORMATION
This unit is designed and manufactured to respond to the Region Management
information that is recorded on a DVD disc. The region number of this player is
“1”. If the region number described on the DVD discs does not correspond to the
Region number of this player, the player will not play this disc. This player will
play DVD discs made for “ALL” regions. Therefore, this player will play DVD
discs marked with labels containing the region number “1” or “ALL”.
(Region 1) (Region ALL)
1
ALL
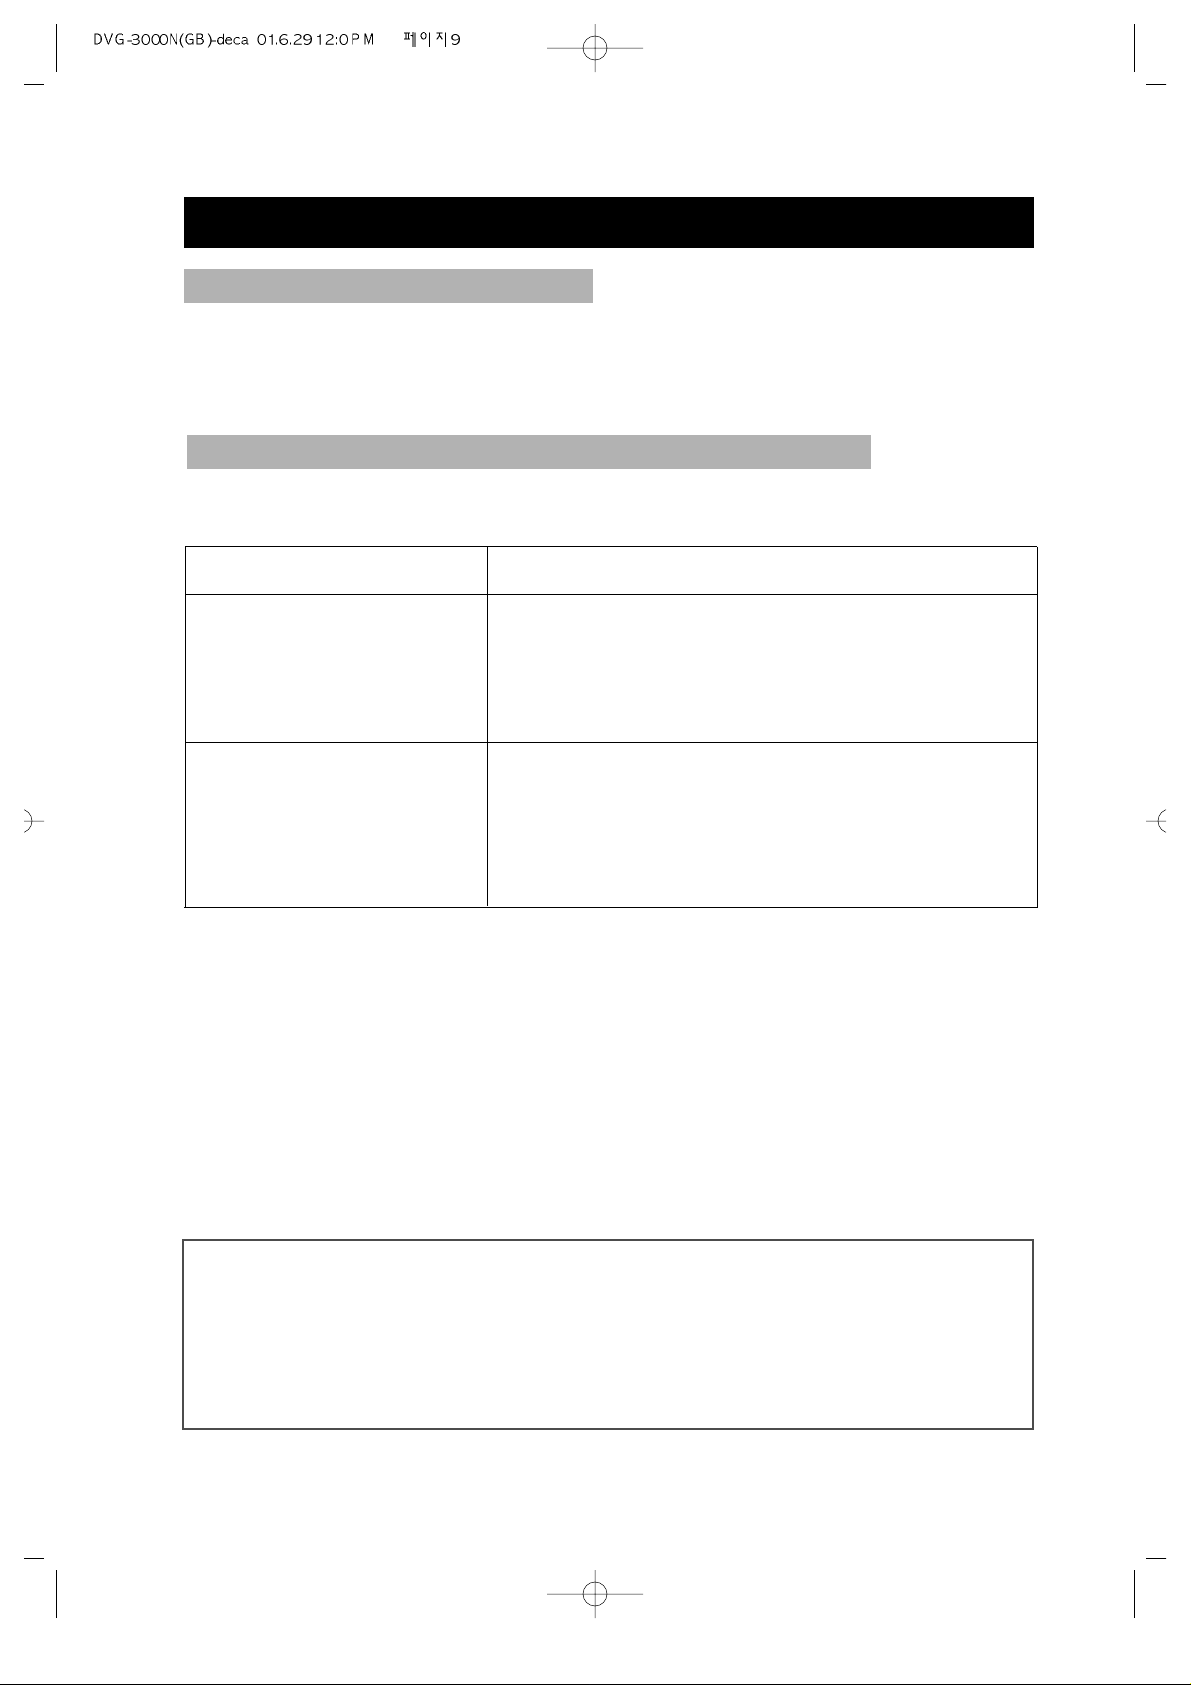
TERMS FOR DISCS
The images or music of a DVD are
divided into some units, among which
title is the biggest one.
When playing a DVD, the movie is the
title.
When playing a CD, the combined tracks
make up the title.
It is smaller than title among the units of
a DVD. A title is made up of several
chapters , and each chapter has a
number for search. But some discs
may not have numbered chapters.
In a CD, each track has a number to
enable search functions.
DISC
TITLE
CHAPTER
DISC
TRACK
TITLE
CHAPTER
TRACK
STRUCTURE OF DVD
STRUCTURE OF CD
Page 9
• 9 •
TERMS FOR DISCS (Continued)
The menu pictures, motion and motionless pictures of a Super-VCD, VCD or CD with
PBC function can be divided into some parts, these parts are scenes. Each scene has a
number for search.
SCENE
PBC (PLAYBACK CONTROL) (SUPER-VCD, VCD)
This product incorporates copyright protection technology that is protected by
method claims of certain U.S. patents and other intellectual property rights owned
by Macrovision Corporation and other rights owners. Use of this copyright
protection technology must be authorized by Macrovision Corporation, and is
intended for home and other limited viewing uses only unless otherwise
authorized by Macrovision Corporation. Reverse engineering or disassembly is
prohibited.
It is signals recorded in a super- VCD or VCD2.0 to control playback.
DISC TYPE
VCD1.1
without PBC
FUNCTION
enjoy music and images (motion pictures)
super-VCD and VCD with
PBC
Besides the images of VCD1.1, play interactive
software with the menu pictures shown on the TV
screen (PBC play). If the disc has motionless pictures,
high-resolution playback is also available.
Page 10

• 10 •
BEFORE OPERATION
• Before operation, check if the voltage of the unit is in line with the local voltage.
• Hold the plug to disconnect it from the mains outlet. Do not pull the power cord.
• When the plug of the unit is connected to the mains outlet , the unit will be still
connected to AC even if the power is turned off.
• Disconnect the plug as soon as liquid or objects enter the unit. The unit can not be used
until being checked by experts.
• Do not open the cabinet as laser rays employed by the unit may damage eyes. Any
servicing should be done by qualified service personnel.
• Put the unit where ventilation is good enough to prevent overheating.
• Never put the unit in direct sunlight or near heat sources.
• Put the unit horizontally, never put any heavy object on the unit.
• To protect the pickup, do not put the unit where there is dust. If there is dust on the
pickup, use a cleaning disc to clean it. Paying particular attention to the operating
instructions of the cleaning disc.
Moisture will appear on the pickup lens in the following cases:
• The unit is suddenly moved from a cold place to a warm place.
• The unit is put in a room with a heater , or in cold air from an air -conditioner.
• Using the unit in a humid place. In these cases, the unit can not work. Unload the disc
and leave the unit on for about one hour to evaporate the moisture.
• Use a soft cloth with a little neutral detergent to wipe the cabinet, panel and controls.
Never use abrasive paper, polishing powder , solvent like alcohol or gasoline.
SECURITY
PRECAUTIONS FOR DISC
HANDLING DISC CLEANING DISC
PLACEMENT
CONDENSATION
CLEANING
• To keep the disc clean, do not touch the
playsides of the disc.
• Do not attach paper or tape to the disc.
• Keep the disc away from direct
sunlight or heat sources.
• Store the disc in a disc case after
playback.
• Before playback,
wipe the disc
outwards from
the centre with
clean cloth.
• Do not use any type of solvent such as
thinner, benzine, commercially
available cleaners or antistatic spray.
Page 11
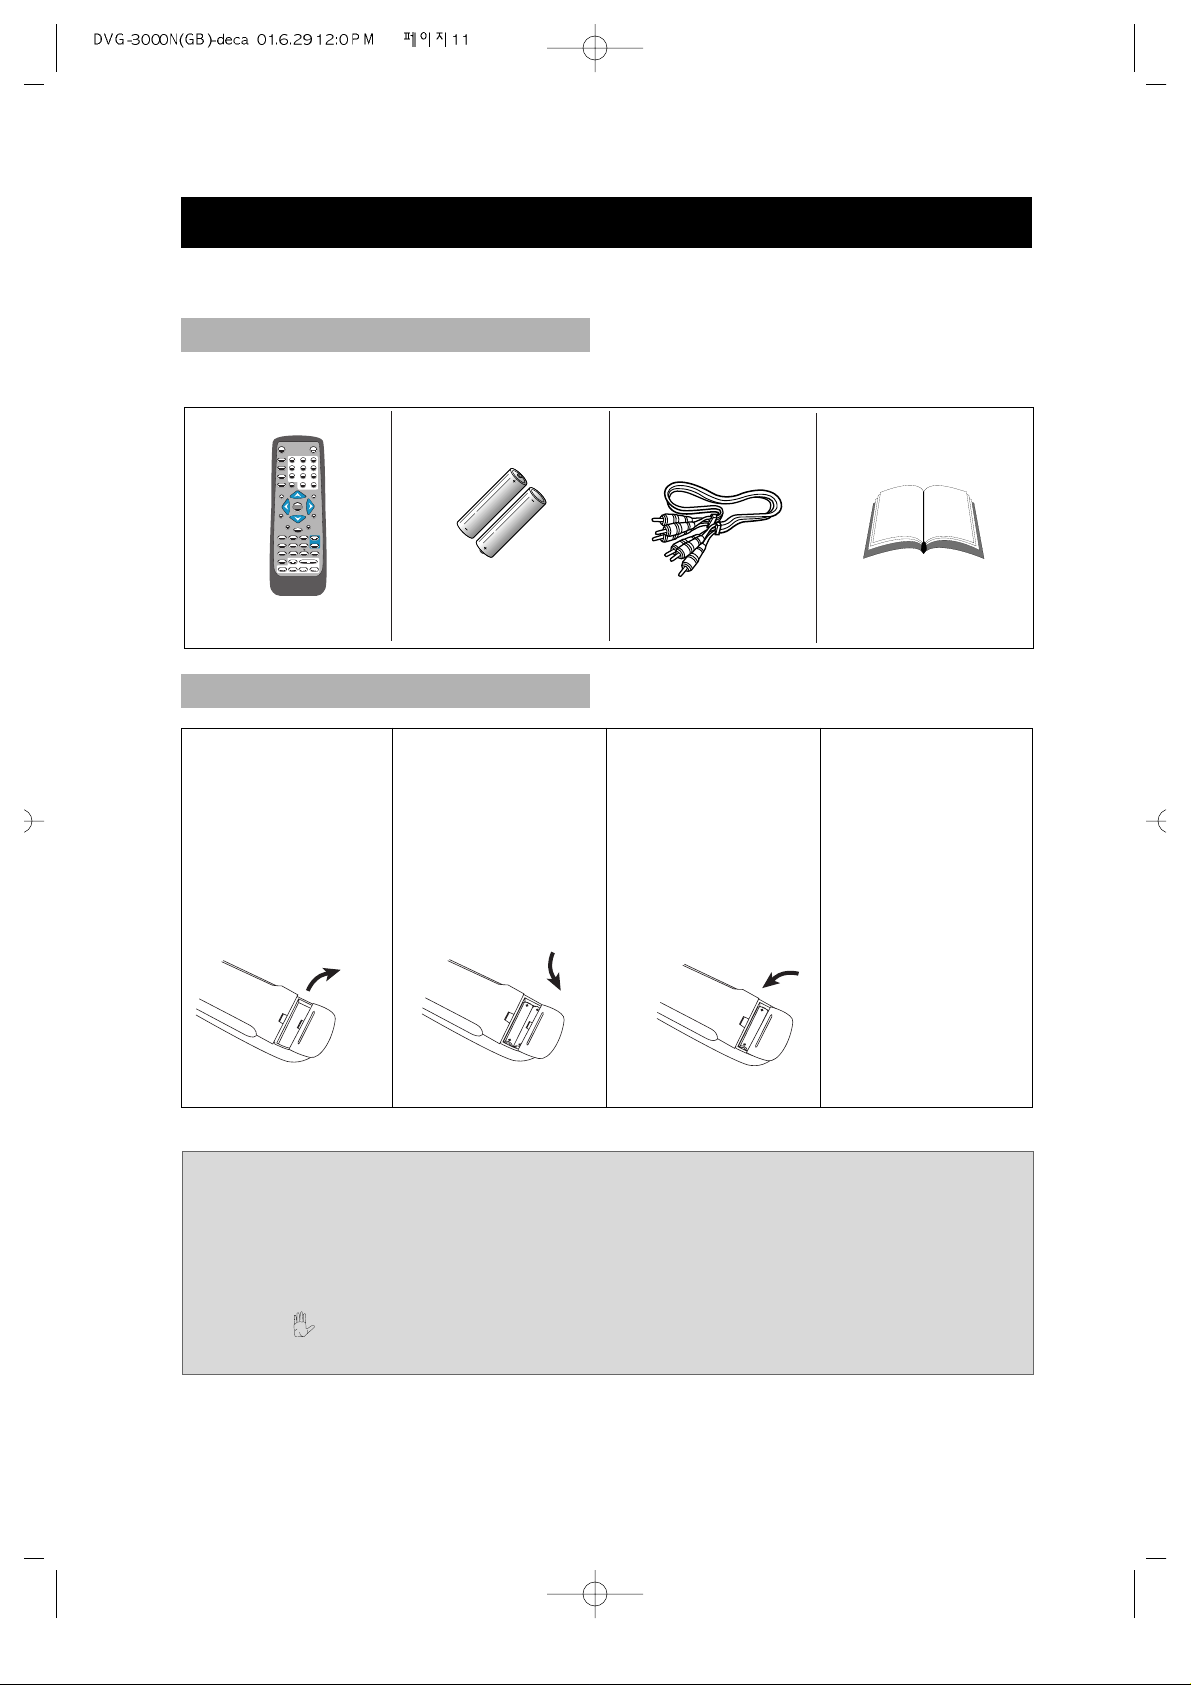
1. Open the battery
compartment.
2. Insert two AAA
batteries, make
sure to
match"+"and "-"
of the batteries
to the marks in
the battery
compartment.
3. Close the battery
compartment.
4. Point the remote
control at the
remote sensor.
It will operate up
to a range of 7
metres and an
angle of 30°
either side of the
remote sensor on
the front of the
player.
• 11 •
PREPARATIONS BEFORE OPERATION
This part introduces the work to be done before operating the unit.
CHECK ACCESSORIES
USE REMOTE CONTROL
Check if you have all the accessories after the carton is opened.
MUTE
OSD
SUBTITLE
ANGLE
SETUP
TITLE
INTRO
REPEAT
P/N
RETURN
A-B
MENU
STEP
PROGRAM
ZOOM
SLOW
A-TIME
MEMORY
CHANNEL
LANGUAGE
#
123
654
7
8
0/10
9
10+
3D
VOLUME
PLAY
b
•
Remote control
•
AAA batteries
•
Video/Audio cord
•
Owner’s manual
Notes:
1. Batteries can generally last for about 6 months. Change the batteries if the
remote control does not work, or the operating range reduces.
2. If the remote control is not used for a long time, remove the batteries to prevent
battery leakage.
3. When appears on the TV screen by pressing any button, the disc does not have
the pertinent function.
Page 12
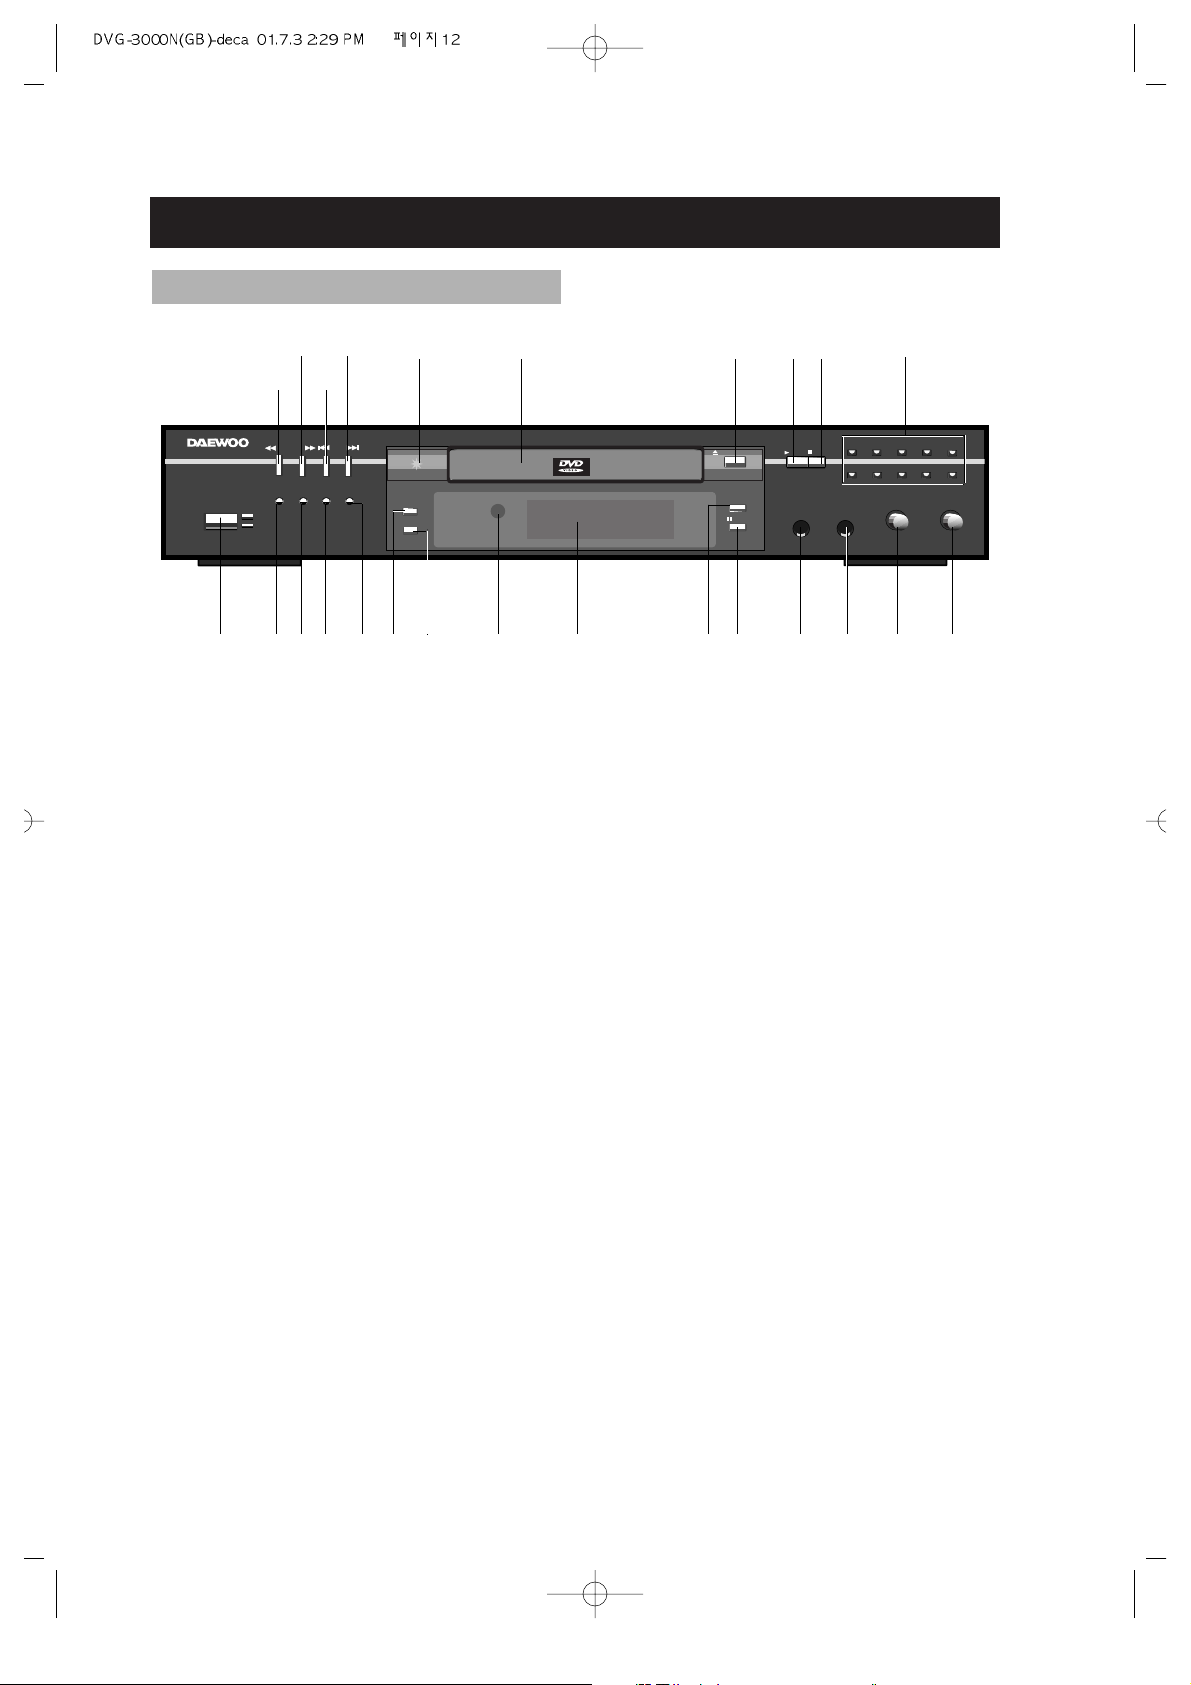
• 12 •
PREPARATIONS BEFORE OPERATION (Continued)
! POWER ON/OFF button
To switch the unit On or Off when
connected to AC power outlet
@ TITLE /PBC
# OSD
$ LANGUAGE
% INTRO
^ ANGLE
& SUBTITLE
* REMOTE SENSOR
Receives a light signal from the remote controller.
( DISPLAY
Displays operation status
) 10+ NUMBER
1 PAUSE/STEP button
Used to view one frame at a time
during play. When you continue
pressing this button, it will function
continuously. Press PLAY button for
normal play.
2 PHONE 1 JACK
3 PHONE 2 JACK
4 PHONE 1 LEVEL ADJUSTMENT
5 PHONE 2 LEVEL ADJUSTMENT
6 NUMBER
7 STOP
8 PLAY button
To play the loaded disc. Press this
button to go to the preferred item when
the menu is displayed on the TV screen.
9 OPEN/CLOSE button
To open or close the disc tray.
0 DISK TRAY
To load or unload a disc. Put a disc to
be played on here.
“ POWER INDICATOR
‘ NEXT button
To skip forward to the next chapter (for
DVD) or track (for VCD or CD). If playing a
Video CD with PBC, this button works as the
NEXT button to move to the next play list.
+ PREV button
To skip back from the current chapter (for
DVD) or track (for VCD or CD).
= FF (Fast Forward) button
To play the disc fast forward.
Q FR (Fast Reverse) button
To play the disc fast reverse.
DVD PLAYER DVG-3000N
POWER
OFF
ON
PBC
TITLE
ANGLE
DVD/VCD/SVCD/DVCD/CD/MP3
SUBTITLE
/STEP
10+
PHONE1
PHONE2
PHONE1LEVEL
PHONE2 LEVEL
MIN
MIN
MAX
MAX
1
2
3
4
5
6
7
89
0/10
OSD
LANGUAGE
INTRO
SEARCH
SKIP
OPEN/CLOSE
PLAY
STOP
FRONT PANEL
! @ # $ %
)
90“
8
7
( 1 2 3 4 5*
=+Q‘
6
^
&
Page 13
• 13 •
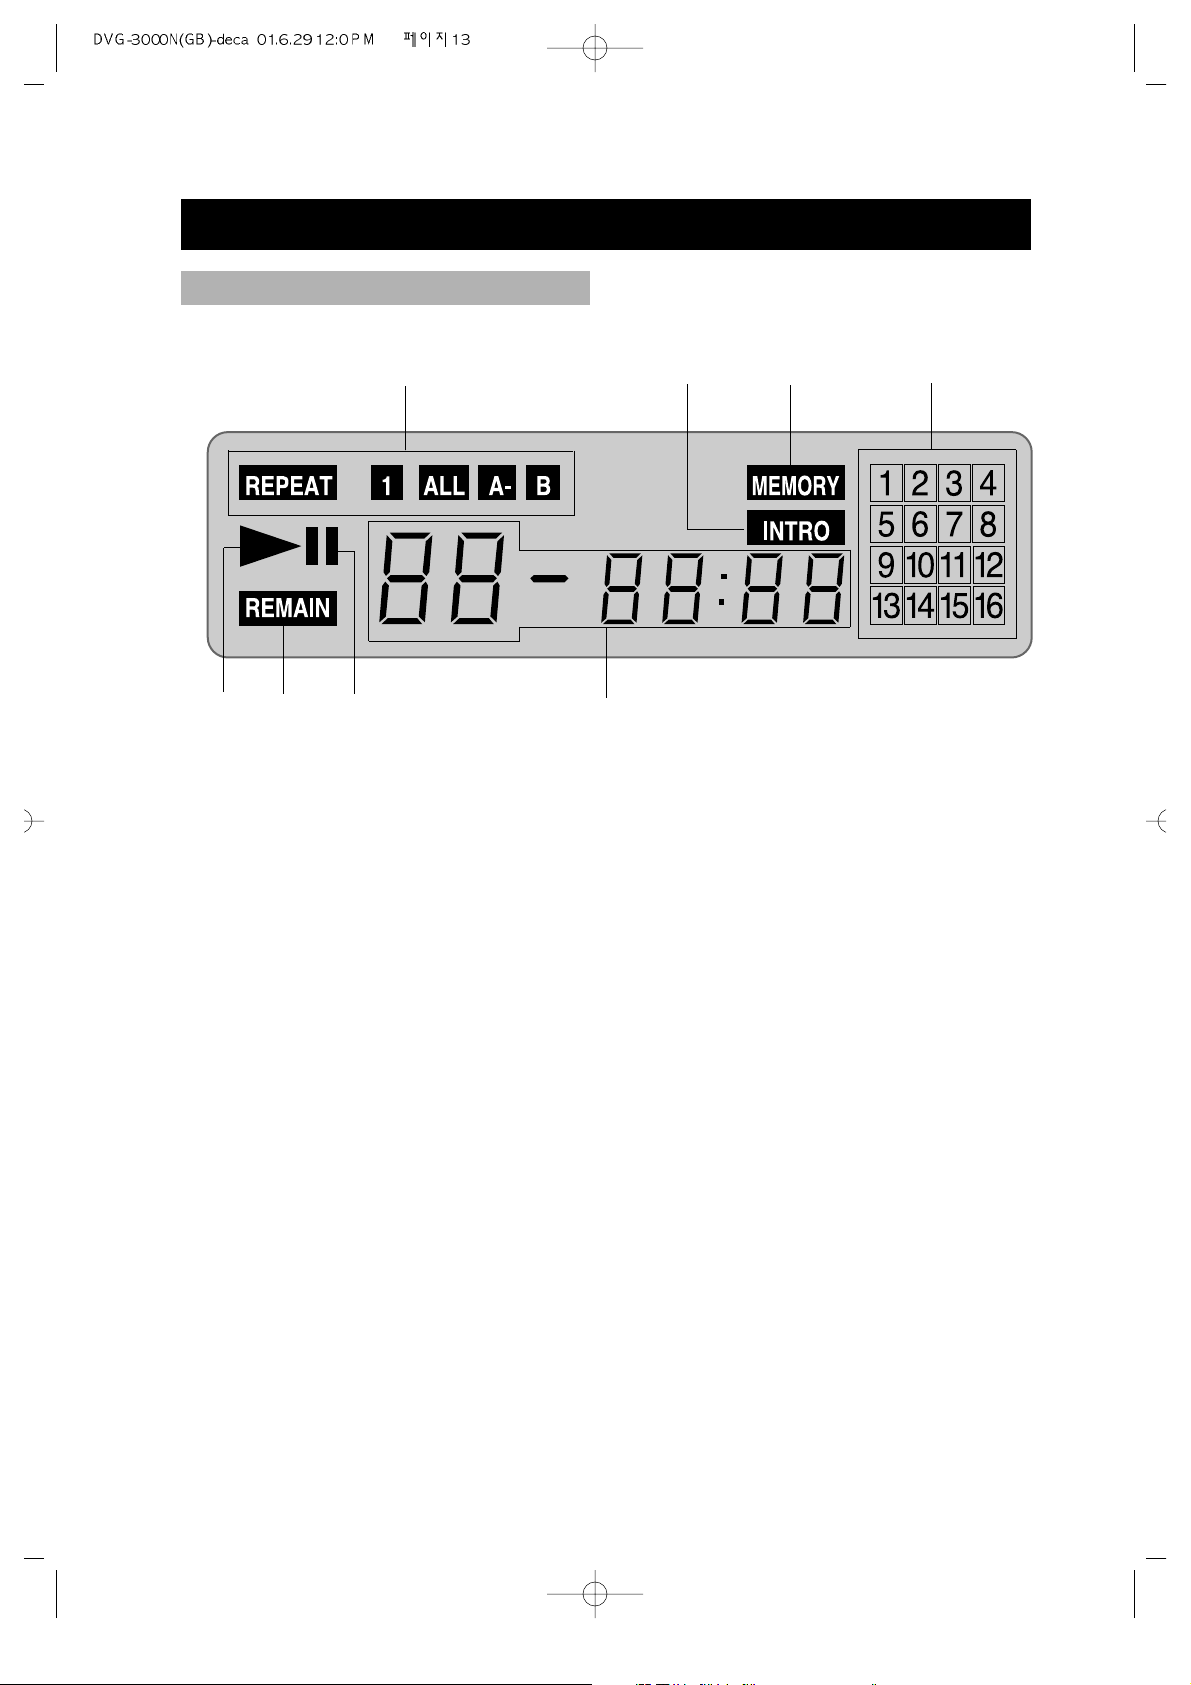
PREPARATIONS BEFORE OPERATION (Continued)
DISPLAY
!@#$
! REPEAT PLAY, REPEAT 1, ALL, A-B
Illuminates when the current play mode is under repeat title, chapter, track (single), disc
(all), A-B respectively.
@ INTRO (DIGEST) PLAY
# MEMORY PLAY
$ TRACK CALENDAR
Illuminates the information of the TRACK.
% TITLE/CHAPTER/TRACK
Illuminates the information of the TITLE, CHAPTER, or TRACK of the DVD and CD disc
under play.
^ PAUSE INDICATOR
Illuminates when PAUSE mode.
& REMAIN INDICATOR
Illuminates when REMAIN mode.
* PLAY INDICATOR
Illuminates when PLAY mode.
%
^&*
Page 14

• 14 •
PREPARATIONS BEFORE OPERATION (Continued)
! MUTE
@ OSD
# SUBTITLE
$ ANGLE
% SETUP
^ 3D PLAYING
& TITLE
* LEFT DIRECTION
( SYSTEM(AUTO/NTSC/PAL)
CONVERT
) DOWN DIRECTION
1 RETURN
2 MENU
3 STEP PLAYING
4 PROGRAM PLAYING
5 SLOW PLAYING
6 TIME-SEARCH PLAYING
7 CHANNEL CONVERT
8 LOWER TONE
9 LANGUAGE SWITCH
0 FAST BACKWARD /
FAST FORWARD SEARCH
“
ONE CHAPTER/TRACK
PREV/NEXT
‘ PAUSE
+ STOP
= ATONIC TONE
Q RAISE TONE
q
MEMORY (RESUME) PLAYING
W VOLUME (-/+)
w ZOOM PLAYING
E A-B
e REPEAT PLAYING
R PLAY (ENTER)
r RIGHT DIRECTION
T INTRO
t UP DIRECTION
Y NUMBER (1~ 10+)
y OPEN/CLOSE
NAMES AND LAYOUT OF REMOTE CONTROLS
MUTE
OSD
SUBTITLE
ANGLE
SETUP
TITLE
INTRO
REPEAT
P/N
RETURN
A-B
MENU
STEP
PROGRAM
ZOOM
SLOW
A-TIME
MEMORY
CHANNEL
LANGUAGE
#
123
654
7
8
0/10
9
10+
3D
VOLUME
PLAY
b
!
@
#
$
%
3
5
7
9
0“
+
W
Q
w
E
e
r
T
Y
y
R
t
‘
=
q
4
(
)
2
&
1
*
^
6
8
Page 15

• 15 •
PREPARATIONS BEFORE OPERATION (Continued)
! DIGITAL AUDIO COAXIAL OUT
Connects digital audio under play mode into an AV amplifier or a receiver equipped with
digital audio decoder for you to enjoy the theatre-quality sound in your home.
@ VIDEO OUT
Connects composite video signal to input AV or PHONO sockets of TV or monitor to
achieve high fidelity colour reproduction.
# AUDIO OUT (L/R TRACK)
Two phono sockets for analogue 2 channel audio output in order to connect to a TV or
stereo amplifier.
$ S-VIDEO OUTPUT
Connects to TV or monitor equipped with S-VIDEO input. In order to achieve a sharper and
cleaner picture than that when connected via VIDEO OUT (composite video).
% POWER SUPPLY SOCKET WIRE
Creates POWER between wall outlet and the unit.
@
$
%
#!
REAR PANEL
Page 16

• 16 •
CONNECTIONS
1. If the TV has S -VIDEO input, please connect the unit and the TV with S-video cord
(not supplied). You do not have to utilise S-VIDEO but it will give clearer images.
2. Set the unit. You have to set the unit according to the TV connected.
•
If the system of the TV is AUTO (multi-system), press P/N and select AUTO.
•
If the system of the TV is NTSC, press P/N and select NTSC.
•
If the system of the TV is PAL, press P/N and select PAL.
•
Connect the unit to a wide-screen TV.
Set the "TV DISPLAY" to "WIDE " in the function setting column.
•
Connect the unit to an ordinary TV.
Set the "TV DISPLAY" to "NORMAL/ PS" (Pan scan) or "NORMAL/ LB" (Letter box) in the
function setting column.
Turn off all equipment before operation.
The unit has many kinds of output modes like A/V output, S-VIDEO output and
digital signal output (COAXIAL). You may select as you need.
CONNECTED TO A TV
Page 17

• 17 •
CONNECTIONS (Continued)
• Coaxial can be selected at your option while connecting
• If you have a DTS decoder of processor, you can enjoy DVD disc or CD sound
decoded by 5.1 channel DTS. ie : 5 surround speakers + 1 woofer
• Refer to page 37 for the setting.
Manufactured under license from Dolby Laboratories. "Dolby", "Pro Logic" and
the double-D symbol are trademarks of Dolby Laboratories. Confidential
Unpublished works.
©1992-1997 Dolby Laboratories, Inc. All rights reserved.
"DTS" and "DTS Digital Out" are trademarks of Digital Theater Systems, Inc.
CONNECT TO AN AUDIO AMPLIFIER
Page 18

• 18 •
BASIC OPERATIONS
TV/AUDIO SELECTION
Press on the TV and audio
system.
1. Press "TV/VIDEO" on the TV, select
VIDEO mode (TV).
• Select S-VIDEO mode if using an ‘S’
Video connection.
2. Select the right audio input on the
amplifier.
• Each amplifier is different from
another, please refer to the manual of
the amplifier.
(e.g., connect the audio output of the
DVD player to the DVD audio input of
an amplifier.)
DVD/LD
1. Press to turn on the unit.
2. Press to open the disc tray and load
a disc with the label side.
3. Press again to close the disc tray.
The unit begins to read the disc.
4. Press to play the disc.
AFTER STEP4 IS FINISHED:
• PLAY DVD
The TV screen shows the DVD
menu and title menu.
• PLAY SUPER-VCD, VCD2.0
The TV screen shows the menu, the
unit enters PBC status.
• PLAY CD, VCD1. 1, MP3
Press , the unit plays the disc
according to the track numbers.
5. Stop playback.
Press .
• You have to press
this button twice to
stop the playback of
a DVD.
6. Unload the disc and
turn off the unit.
Press and again.
POWER
OFF
ON
or
- REMOTE CONTROL -- FRONT PANEL -
STOP
TV/VIDEO
PLAY DISCS
Notes: This step can be cancelled if
you do not connect it to the amplifier.
POWER
OFF
ON
OPEN/CLOSE
OPEN/CLOSE
PLAY
PLAY
STOP
Page 19

• 19 •
Press STEP .
•
WHEN PLAYING DVD PICTURES, VCD
Press STEP to make the playback
step. Pressing
STEP again moves the
picture forward frame by frame.
•
WHEN PLAYING MUSIC CD, MP3
Press to make the playback pause.
Press to resume playback.
Press OSD , when the unit is operated,
the TV screen shows the operation
functions and information about the
disc.
• Remove the OSD, press OSD 4 times.
BASIC OPERATIONS (Continued)
According to the system of the TV to be
connected ,set the system of the unit to
make it match the TV.
1. If the system of the TV is NTSC
: Press P/N , select NTSC.
The screen shows:
2. If the system of the TV is PAL
:Press P/N , select PAL.
The screen shows:
3. If the TV is multi-system
: Press P/N , select AUTO.
The screen shows:
TITLE
INTRO
REPEAT
P/N
RETURN
A-B
MENU
PLAY
STEP
PROGRAM
ZOOM
SLOW
A-TIME
MEMORY
CHANNEL
LANGUAGE
#
VOLUME
b
NTSC
PAL
AUTO
STEP
SYSTEM SETTING
STEP, PAUSE
OSD
OSD
SUBTITLE
ANGLE
SETUP
TITLE
INTRO
123
654
7
8
0/10
9
10+
3D
PLAY
PLAY
Page 20

• 20 •
BASIC OPERATIONS (Continued)
Some DVDs have title menus and chapter menus.
1. Press MENU or TITLE , the screen
shows the menu.
Use direction buttons to select the
desired item, then press .
2. Press
TITLE once to return to the title
menu; press it again to return to
the current playback.
Press
MENU once to return to the root
menu; press it again to return to the
current playback.
+
-
STEP
PROGRAM
ZOOM
SLOW
A-TIME
MEMORY
CHANNEL
LANGUAGE
#
VOLUME
b
•
Press VOLUME on the TV or
amplifier to adjust the volume.
•
Press VOLUME on the remote control.
1. Press + to raise the volume.
2. Press - to lower the volume.
VOLUME CONTROL (EXCEPT SPDIF/RAW)
DVD MENU PLAY
Notes:
•
When appears on the TV screen by
pressing TITLE . The disc does not have
the title list in the menu.
• When appears on the TV screen
by pressing MENU . The disc does not
have the menu.
MP3 PLAY
1. When an MP3 disc is loaded, MP3
menu screen is displayed automatically
depending on MP3 disc’s folder
(directory) structure as shown below.
OTHER FUNCTIONS
When playing a MP3 disc, the unit has
functions like mute, volume control, pause,
previous/next track, repeat and channel
selection. You may operate as you do with a
CD.
2. Use the direction button to select the
folder you want to play, by pressing the
PLAY button. This button allows, you
to see the file lists under the folder.
3. Use the direction button and select an
MP3 title using the PLAY button then
play will start automatically. When you
know the title number, enter the MP3
title number using the numeric buttons
on the remote control and then press
the PLAY button.
4. Press NEXT button on the remote
control to choose next title. Press
PREV button for previous title. When
you know the title number, enter MP3
title number using the numeric buttons
on the remote control and then press
the PLAY button.
PLAY
SMART NAV1
CD-1
CD-2
CD-3
CD-1 0
MP3 01-ABC 1
MP3 02-BCE 2
MP3 03-EIC 3
MP3 04-FGH 4
MP3 05-ADC 5
Page 21

• 21 •
BASIC OPERATIONS (Continued)
+
SELECT 08
00:00:21
SELECT 12
00:00:00
SELECT WITH NUMBER
BUTTONS (IN CASE OF CD)
When playing a super-VCD or VCD2.0,
you can enjoy the basic interactive
function.
Example: VCD2.0
1. Press , the screen shows the home
menu.
2. Press number buttons to select.
Example: select home menu1.
3. The screen shows the sub-menu after
the unit enters home menu1.
4. Press , to see the previous or
next page.
5. Press number buttons to select submenus.
6. Press
RETURN to return to the sub-
menu, press it again to return to the
home menu.
PBC PLAY
Load a disc. Press number buttons to
select tracks after the unit finishes reading
the disc.
8
10+
2
1. If the track number is less than 10,
just press buttons 1-10.
Example: press 8 to select track 8.
The screen shows:
2. If the track number is over 10, press
10+ once and a button among 1-10.
Example: if you select track 12, press
10+ once and button 2.
The screen shows:
EXCHANGE DISCS
1. Press to open the disc tray.
2. Unload the disc and load another one.
3. Press again to close the disc tray.
Page 22

• 22 •
PLAY DISCS IN VARIOUS WAYS
WHEN PLAYING DVD
Press LANGUAGE , the screen shows as
below.
Press
LANGUAGE again.
Different discs differ in languages.
When playing a disc, this function can
remove the sound.
1. REMOVE SOUND
Press
MUTE , the screen shows
"MUTE".
2. RESUME SOUND
Press MUTE again.
AUDIO 1/2:AC-3 2CH ENGLISH
AUDIO 2/2:AC-3 5.1CH ENGLISH
SELECT LANGUAGE
WHEN PLAYING CD
You may select one mode.
MUTE
MUTE
MUTE
CHANNEL
CHANNEL
CHANNEL
MONO LEFT
MONO RIGHT
STEREO
Note:
• Different discs differ in languages.
• CHANNEL works when playing a
super-VCD, you may select mono
channel (left or right) or stereo.
• As to a two-language fiction VCD,
you may press
LANGUAGE to select
a needed language.
MUTE OFF
SELECT CHANNEL
Page 23

• 23 •
PLAY DISCS IN VARIOUS WAYS (Continued)
When playing a disc, you may play it
in Cue or Review mode to find what you
want.
WHEN PLAYING DVD
1. Press to play forward fast.
Each time you press the button, the
screen shows in order:
2. Press to reverse the disc fast.
Each time you press the button, the
screen shows in order:
3. Press to switch back to normal
play.
WHEN PLAYING SUPER-VCD or VCD
1. Press to play forward fast.
Each time you press the button, the
screen shows in order:
2. Press to reverse the disc fast.
Each time you press the button, the
screen shows in order:
WHEN PLAYING CD, MP3
1. Press to play forward fast.
2. Press to reverse the disc.
3. Release (or ) to play normally.
FF 2X
FF 4X
FF 8X
FF 16X
FF 32X
PLAY
1
2
3
4
5
6
FAST PLAY
FF 1X
FF 2X
FF 3X
FF 4X
PLAY
1
2
3
4
5
FR 1X
FR 2X
FR 3X
FR 4X
PLAY
1
2
3
4
5
FR 2X
FR 4X
FR 8X
FR 16X
FR 32X
PLAY
1
2
3
4
5
6
PLAY
Notes: In case of fast play (DVD)
mode, slow play mode or step mode,
the sound is muted.
Page 24

• 24 •
3. Remove "REPEAT" function.
Press REPEAT , to remove the display
on the screen.
REPEAT
CHAPTER REPEAT ON
DVD
You may repeat a title or chapter.
1. Repeat a chapter.
Press REPEAT , the screen shows:
"CHAPTER REPEAT ON".
2. Repeat a title
Press
REPEAT , the screen shows:
“TITLE REPEAT ON”
CHAPTER REPEAT ON
TITLE REPEAT ON
REPEAT OFF
PLAYING A DISC REPEATEDLY
REPEAT
TITLE REPEAT ON
Enjoy slow motions by the following
steps.
WHEN PLAYING DVD
1. Press SLOW to play slowly.
The screen shows in order:
SLOW PLAY
2.Press to play normally.
SF 2X
SF 4X SF 8X
SR 2X
SR 4X SR 8X
SLOW
WHEN PLAYING SUPER-VCD or VCD
1. Press SLOW to play slowly. The unit
has three steps for slow play.
The screen shows orderly.
2.Press to play normally.
SF 1X
SF 2X
SF 3X
PLAY
1
2
3
4
SLOW
This function can be used to repeatedly
play a title, chapter, track, disc or some
parts on a disc.
REPEAT PLAY
PLAY DISCS IN VARIOUS WAYS (Continued)
REPEAT
REPEAT
P/N
RETURN
A-B
MENU
STEP
PROGRAM
ZOOM
SLOW
A-TIME
MEMORY
CHANNEL
#
VOLUME
PLAY
b
A-B
RETURN
STEP
SLOW
CHANNEL
LANGUAGE
PROGRAM
A-TIME
A-B
MENU
ZOOM
VOLUME
MEMORY
b
#
PLAY
PLAY
Page 25

• 25 •
PLAY DISCS IN VARIOUS WAYS (Continued)
REP-ONE
REP- ALL
REP- ONE REP- ALL REPEAT OFF
2. Repeat a CD
Press
REPEAT , the screen shows:
"REP- ALL".
REPEAT OFF
3. Remove "REPEAT" function.
Press
REPEAT , to remove the display
on the screen.
Super-VCD, VCD, CD, MP3
• You may repeat a track, a disc
according to the following steps
• VCD 1.1 and CD can play repeatedly
directly.
• Super VCD and VCD 2.0 can play
repeatedly in PBC OFF mode.
• After the unit stops, press number
buttons directly to select tracks.
1. Repeat one track
Press REPEAT , the screen shows:
"REP- ONE".
You may press A-B to enjoy some parts
repeatedly when playing a disc.
PLAY DVD, SUPER-VCD, VCD, CD
1. Set a starting point A.
The screen shows:
2. Set an end point B.
The screen shows:
3. Remove A-B repeat
The screen shows:
Afterwards, the unit plays from A to B.
A TO B SET A
A TO B SET B
REPEAT SOME PARTS (EXCEPT MP3)
REPEAT
REPEAT
REPEAT
A-B
A-B
A-B
A TO B CANCELLED
Page 26

• 26 •
PLAY DISCS IN VARIOUS WAYS (Continued)
When playing a multi-subtitle DVD or
super-VCD, you may select one subtitle
to show it on the screen.
SELECT SUBTITLES
WHEN PLAYING DVD
1. Press SUBTITLE to select one.
The screen shows:
2. Remove the subtitle.
Press
SUBTITLE until the screen
shows "SUBTITLE OFF".
SUBTITLE
SUBTITLE 01/03:ENGLISH
Notes:
• For some discs, subtitles can not be
removed.
• Different discs differ in the
languages of subtitles.
• If the subtitles of discs can not be
selected, press
SUBTITLE , the
screen shows forbidden mark .
SUPER-VCD
A super-VCD has only four channels for
recording, so it has four subtitles at the
most.
Press SUBTITLE , the screen shows
orderly:
You may select a subtitle as you need.
Some discs may not have "SUBTITLE OFF"
function.
SUBTITLE 01/04
SUBTITLE 02/04
SUBTITLE 03/04
SUBTITLE 04/04
SUBTITLE OFF
1
2
3
4
5
OSD
123
SUBTITLE
ANGLE
SETUP
7
3D
10+
654
9
8
0/10
Page 27

• 27 •
PLAY DISCS IN VARIOUS WAYS (Continued)
Some discs have images with different
screen angles, you may select among
them. For example,when you watch a
running train, you may select to watch it
from the front, the left window or the
right window without stopping it.
OSD
SUBTITLE
ANGLE
SETUP
TITLE
INTRO
123
654
7
8
0/10
9
10+
3D
Example:
A DVD has four screen angles at your
option.
1. Press
ANGLE to select ANGLE1.
2. Press
ANGLE to select other angles,
the screen shows respectively:
3. Resume normal playback. Press
ANGLE until there is no display on
the screen.
2/4 (select ANGLE2)
3/4 (select ANGLE3)
4/4 (select ANGLE4)
1/4
SELECT ANGLES 3D SOUND
SCREEN
This function outputs 3D effects on the
stereo audio analog output 3D effects are
broken down into 4 surround modes.
SUBTITLE
ANGLE
SETUP
TITLE
INTRO
654
7
8
0/10
9
10+
3D
PLAY
1. Press 3D button.
3D SOUND MODE 1 is displayed on
TV screen. And analog stereo output
is changed to surround mode 1.
2. Press 3D button again.
Press the 3D button continuously until
the desired 3D sound mode is selected.
3D SURROUND 1
Notes: This 3D function is operated
in case only that the AUDIO
OUTPUT is set to the ANALOG or
SPDIF/PCM.
Page 28

• 28 •
PLAY DISCS IN VARIOUS WAYS (Continued)
A-TIME
MENU
STEP
PROGRAM
ZOOM
SLOW
A-TIME
MEMORY
CHANNEL
LANGUAGE
#
VOLUME
b
2. Time search
• Press A-TIME until the screen
shows:
• Press number buttons to enter hour,
minute and second.
Example: Enter 0, 1, 0, 2, 3, 8
After setting, the disc is played from
01:02:38.
PLAY SUPER-VCD, VCD, CD, MP3
You can only enter a time to search the
content from that time.
Example: Play from 01:38 of track 6.
1. Press button 6 to select track 6. The
screen shows:
2. Press A-TIME , the screen shows:
3. Press button 0, 1, 3, 8 to enter the time.
The screen shows:
• The unit plays from 01:38 of track 6
after setting.
• Press
0/10 to enter 0.
You may directly enter a time, title or
chapter number to search fast on a disc,
the unit plays from the point entered.
PLAY DVD
1. Search a title or a chapter.
Example: Search chapter 2 in title 2.
• Press A-TIME , the screen shows:
• Press the left or right button and
move the cursor to illuminate the title
number. The screen shows:
• Press button 2 to select title 2, the
screen shows:
• Repeat the steps above, select
chapter 2 in title 2.
SELECT: 06
GO TO _ _ : _ _
GO TO 01:38
TIME SEARCH AND REMAINING TIME
TIME SEARCH
TITLE 03/03 CHAPTER 01 /04
TITLE 02/03 CHAPTER 01 /04
TITLE 02/03 CHAPTER 02 /04
TITLE 03/03 CHAPTER 01 /04
TITLE 02/03 TIME : :
Page 29

• 29 •
PLAY DISCS IN VARIOUS WAYS (Continued)
This function can be used to know the
remaining time of a title, chapter or track.
DVD
1. Press OSD , the screen shows the
remaining time of the title.
2. Press
OSD , the screen shows the
playing time of the chapter.
3. Press OSD , the screen shows the
remaining time of the chapter.
SUPER-VCD, VCD, CD, MP3
Example: Check the remaining time
when playing track 2.
1. Press OSD , the screen shows the
playing time of the track.
4. Press OSD again, the screen shows the
remaining time of the disc.
5. Press OSD once more, the screen
shows:
OSD
OSD
OSD
CHAPTER REMAIN
00:01:19
TITLE REMAIN
00:56:45
CHAPTER ELAPSED
00:02:41
SINGLE ELAPSED
00:04:23
TOTAL REMAIN
00:33:23
OFF
REMAINING TIME
2. Press OSD , the screen shows the
remaining time of the track.
3. Press
OSD , the screen shows the
playing time of the track.
SINGLE REMAIN
00:01:25
TOTAL ELAPSED
00:04:25
Page 30

• 30 •
PLAY DISCS IN VARIOUS WAYS (Continued)
This function can be used to enjoy a
motion or motionless picture.
• DVD/SUPER-VCD/VCD
1. Press ZOOM when playing a DVD, the
screen shows:
The picture is enlarged 1.5 times as big.
2. Press
ZOOM again. the screen shows:
The picture is enlarged twice as big.
3. Press
ZOOM again. the screen shows:
The picture is enlarged four times as
big.
4. Press , , , to move the enlarged
picture.
5. To resume the picture, press
ZOOM
once more, then screen shows
“ZOOM OFF”.
RETURN
A-B
MENU
STEP
PROGRAM
ZOOM
SLOW
A-TIME
MEMORY
CHANNEL
#
VOLUME
b
ZOOM X1.5
ZOOM X2
ZOOM X4
ZOOM PLAY
The unit can memorize the last point
where it stops and resume playback from
there.
• WHEN PLAYING CD, MP3
1. Press STOP to stop playing.
2. Press MEMORY to resume playback.
MEMORY
RESUME PLAY
Notes:
1. This function does not work for any
programmed playback.
2. This function is removed when the
disc is unloaded or the unit is off.
Page 31

• 31 •
PLAY DISCS IN VARIOUS WAYS (Continued)
•
WHEN PLAYING SUPER-VCD, VCD, CD
1. After the unit stops, press PROGRAM to
select.
The screen shows:
PROGRAM
PROGRAM P00:00
2. Press number buttons in order , according
to the track to be programmed.
Example: Press 2, 4, 6, 8.
screen
Notes:
track number
program order
P
* *
* *
PROGRAM P01:02
PROGRAM P04:08
.
.
.
You may program the tracks on a disc
and play them in the programmed order.
RETURN
A-B
MENU
STEP
PROGRAM
ZOOM
SLOW
A-TIME
MEMORY
CHANNEL
#
VOLUME
b
PROGRAM PLAY (VCD, AUDIO CD only)
.
.
.
2
8
3. Press to start playing.
4. Press PROGRAM twice to remove
program play.
PLAY
•
WHEN PLAYING SUPER-VCD, VCD
1. Press INTRO after the unit stops.
The screen shows:
2. Press number buttons to select a digest
mode.
Press button 1 for intro mode.
The unit plays each scene for about 10
seconds.
3. Press button 2 for disc digest.
SETUP
TITLE
INTRO
0/10
10+
3D
PLAY
DIGEST PLAY
(VCD, AUDIO CD only)
1. INTRO
2. DISC
3. TRACK
4. EXIT
INTRO
1
2
:
Page 32

• 32 •
If the scene number is more than 9,
press to look at the next picture.
4. Press number buttons to select a track.
Press button 3 for scene digest.
Press to select a track.
PLAY DISCS IN VARIOUS WAYS (Continued)
SCENE01 SCENE02 SCENE03
SCENE08 SCENE09 SCENE04
SCENE07 SCENE06 SCENE05
3
The unit shows the starting picture of all
the scene on the screen simultaneously.
The unit divides scene 3 into nine parts
ans shows the starting picture of each part
on the screen.
5. Press button 4 to exit from digest play.
6. Remove digest play.
Press , digest play is removed and the
unit stops.
1
2
3
8
9
4
7
6
5
Page 33

• 33 •
PLAY DISCS IN VARIOUS WAYS (Continued)
• WHEN PLAYING CD
1. Press INTRO after the unit stops.
The screen shows:
2. Press number buttons to select a digest
mode.
Press button 1 for intro mode.
The unit plays the first 15 seconds of
each track one after another.
Press , to play the first 15
seconds at the previous or next track.
3. Press button 4 to exit from digest play.
4. Remove digest play.
Press , digest play is removed and the
unit stops.
Notes : CD only has “INTRO” function.
1. INTRO
2. ----
3. ----
4. EXIT
INTRO
1
4
Page 34

• 34 •
FUNCTION SETTING
According to the recorded information
and external equipment,set the following
functions for DVD to obtain the best
playing status.
1. Press
SETUP to set the main menu.
2. Press direction buttons ( , ) and press
to confirm.
Example: Set "DUAL MONO" in "DOLBY
DIGITAL SETUP" to "LEFT MONO".
• Press direction button to select. The
screen shows:
The screen shows:
• Press to confirm and enter
"DOLBY DIGITAL SETUP".
SETUP
TITLE
INTRO
7
8
0/10
9
10+
3D
SETUP
The screen shows:
After entering the menu, the unit
automatically selects a column.
•
Press the direction button to
select "DUAL MONO".
The screen shows:
Press direction button , to select
"L- MONO"
The screen shows:
•
Press to confirm.
SETUP MENU -- MAIN PAGE
GENERAL SETUP
DOLBY DIGITAL SETUP
PREFERENCES
EXIT SETUP
SETUP MENU -- MAIN PAGE
GENERAL SETUP
DOLBY DIGITAL SETUP
PREFERENCES
EXIT SETUP
DVD MENU SETTING
PLAY
PLAY
PLAY
PLAY
-- DOLBY DIGITAL SETUP -OP MODE LINE OUT
DUAL MONO
DYNAMIC
MAIN PAGE
-- DOLBY DIGITAL SETUP -OP MODE
DUAL MONO STEREO
DYNAMIC L-MONO
R-MONO
MIX-MONO
MAIN PAGE
-- DOLBY DIGITAL SETUP -OP MODE
DUAL MONO STEREO
DYNAMIC L-MONO
R-MONO
MIX-MONO
MAIN PAGE
Page 35

• 35 •
FUNCTION SETTING (Continued)
3.Exit from menus.
Using direction buttons go to
“ MAIN PAGE” menu, then press .
The screen shows.
•
To select “GENERAL SETUP” menu,
press .
2. NORMAL / LB (LETTER BOX)
This is selected when the unit is
connected with a normal TV. Widescreen images are shown on the screen,
with black belt on the top and bottom.
The setting structure is as follows:
3. WIDE
This is selected when the unit is
connected with a wide-screen TV.
TV DISPLAY >> NORMAL/PS
NORMAL/LB
WIDE
TV TYPE >> AUTO
NTSC
PAL
PIC MODE >> AUTO
HI-RES
N-FLICKER
ANGLE MARK >> ON
OFF
OSD LANG >> ENGLISH
FRENCH
SPANISH
AUDIO OUT >> ANALOG
SPDIF/RAW
SPDIF/PCM
CAPTIONS >> ON
OFF
SCR SAVER >> ON
OFF
MAIN PAGE
TV DISPLAY
1. NORMAL/ PS (P ANSCAN)
This is selected when the unit is
connected with a normal TV.
Wide- screen images are shown on the
screen, but with some parts cut
automatically.
SETUP MENU--MAIN PAGE
GENERAL SETUP
DOLBY DIGITAL SETUP
PREFERENCES
EXIT SETUP
GENERAL SETUP
PLAY
PLAY
Page 36

• 36 •
FUNCTION SETTING (Continued)
AUDIO OUT
• ANALOG: No signal is output from the
coaxial port.
• SPDIF/RAW: Select this when the DVD
player is connected with a power amplifier
through coaxial port, refer to page 17.
When a Dolby Digital DVD, DTS DVD or
MPEG DVD is played, the coaxial port
will output in the corresponding
digital(Source code) format. The power
amplifier to be connected must have Dolby
Digital, DTS and MPEG decoding.
• SPDIF/PCM: Select this when the DVD
player is connected with a 2-channel
digital mode or stereo amplifier (refer to
page 17 for the connection). When a Dolby
Digital or MPEG DVD is played, the
coaxial port will output in PCM 2-channel
format.
CAPTIONS
CAPTION was invented for hearing
impaired person. But it is very useful when
learning foreign languages. If your TV
supports closed caption, select ON. If not,
closed caption won’t be displayed.
• ON
The hidden subtitle is shown.
• OFF
The hidden subtitle is turned off.
SCREEN SAVER
Start the screen saver, the screen saver
image appears when the unit stops or
the image is frozen for a few minutes.
This saver can keep the screen from
being damaged.
• ON: Start the screen saver.
• OFF: Remove the screen saver.
TV TYPE
You may select according to the colour
system of the TV to be connected.
•
Select "AUTO" for a multi-system TV.
•
Select "NTSC" for a NTSC TV.
•
Select "PAL" for a PAL TV.
PIC MODE
•
Select "AUTO" for automatically setup.
•
Select "HI-RES" for high-resolution picture.
•
Select "N-FLICKER" for no flicker picture.
ANGLE MARK
This only works when there is an angle
mark on the disc.
•
Select "ON",the screen shows the mark
when playing a DVD.
•
Select "OFF",the mark is not shown.
OSD LANGUAGE
• ENGLISH
The OSD is in English.
• FRENCH
The OSD is in French.
• SPANISH
The OSD is in Spanish.
Notes:
In case of selecting SPDIF/RAW or
SPDIF/PCM, no signal is output from the
audio analog output.
Page 37

• 37 •
FUNCTION SETTING (Continued)
AUDIO >> ENGLISH
FRENCH
SPANISH
KOREAN
PORTUGUESE
JAPANESE
SUBTITLE >> ENGLISH
FRENCH
SPANISH
KOREAN
PORTUGUESE
JAPANESE
OFF
DISC MENU >> ENGLISH
FRENCH
SPANISH
KOREAN
PORTUGUESE
JAPANESE
PARENTAL >> 1. G
2.
3. PG
4. PG 13
5.
6. PG-R
7. NC-17
8. ADULT
NO PARENTAL
PASSWORD >> CHANGE
>> OLD PASSWORD
NEW PASSWORD
CONFIRM PWD
DEFAULTS >> RESET
MAIN PAGE
The setting structure is :
PREFERENCES
Notes:
To enter into the preference setting mode
during the play, press the STOP button twice.
OP MODE >> LINE OUT
DUAL MONO >> STEREO
L-MONO
R-MONO
MIX-MONO
DYNAMIC >> FULL
6/8
4/8
2/8
OFF
MAIN PAGE
OP MODE
• LINE OUT: Compress input signals
linearly.
DUAL MONO
There is the output mode of the L and
R signals of the set audio output. If it is
set to "MIX-MONO", the function only
works when the DVD being played is
5.1-channel.
DYNAMIC
When the compression mode is set to
"LINE OUT", this is selected to adjust
linear compression rate to obtain the
different compression results of the
signals.
The setting structure is :
- -DOLBY DIGITAL SETUP PAGE- -
DOLBY DIGITAL SETUP
Page 38

• 38 •
FUNCTION SETTING (Continued)
DEFAULTS >> RESET
Each function setting returns to the initial
status in the factory if you select this.
SELECT LANGUAGE
If a language mentioned above is
recorded on the disc, you can select
audio, subtitle or disc menu languages. If
not, the language recorded on the disc is
shown.
- -PASSWORD SETUP - -
PASSWORD >>CHANGE>> OLD PASSWORD
NEW PASSWORD
CONFIRM PWD
Select this to adapt the code, the
screen shows:
Enter a password according to the screen.
PASSWORD CHANGE PAGE
OLD PASSWORD
NEW PASSWORD
CONFIRM PWD
Notes:
The password is 3308 when the unit
is turned on initially or you forget the
password.
PASSWORD
PARENTAL
The content of a disc with lock function
is evaluated by grades.
You may select an age control grade as
you need.
Example: Select "G", the scenes of
violence inadvisable are not
played to children.
For adults, the screen suggests you enter
the code after pressing ,
you can watch if the password is right.
Notes: The password is set by yourself
PLAY
Page 39

• 39 •
TROUBLESHOOTING
If you experience the following problems
while using the unit, this troubleshooting
guide can help you.
No sound
•
Check if you press the MUTE.
•
Check if the unit is properly connected.
•
Make sure you operate the TV or
amplifier correctly.
•
Make sure the DVD player or the
amplifier position is properly selected .
•
Make sure the audio output is set
properly . (Check the audio output mode
of the general setup in Setup menu)
•
Check whether the disc plays in slow or
fast forward (or reverse) mode.
No image
•
Check if the unit is properly connected.
•
Make sure you operate the TV correctly.
•
Make sure you set the colour system
correctly.
Bad sound quality
•
Make sure the audio output mode is set
correctly.
•
Make sure the audio connection
between the unit and amplifier is right.
•
Check whether the disc is dirty or
damaged.
Image rolls and no colour
•
The colour system set by this unit does
not match with that of TV. Press
P/N on the remote control to select
the correct one.
•
Check whether the disc is dirty or
damaged.
Disc can not be played
•
There is no disc in the unit.
•
Insert the disc on the disc tray properly
with the label side up.
•
Clean the disc.
•
Moisture has condensed in the unit.
Remove the disc and leave the unit on
for about one hour.
•
Make sure that the area code of disc is 1
or All. (In case of DVD, it may not play
the disk which come from abroad.)
Remote control does not work
•
Remove barriers between the remote
control and the unit.
•
Point the remote control at the remote
control sensor of the unit.
•
Replace the batteries with new ones.
•
Reference page 11.
Page 40

• 40 •
TECHNICAL SPECIFICATIONS
Laser
Television signal
Frequency response
Audio Signal/noise ratio
output level : 2.0 ± 0.2Vrms
(Load impedance : 10KΩ)
output level : 0.5 ± 0.1Vp-p
(Load impedance : 75Ω)
output level : 1.0 ± 0.2Vp-p
(Load impedance : 75Ω, imbalance, negative polarity)
output level : brightness (Luma) 1.0 ± 0.2Vp-p
chromaticity (Clor) 0.286 ± 20% (Load impedance : 75Ω)
AC100~240V, 50/60Hz
<25W
Around 4.5Kgs
wavelength 650nm
NTSC /PAL/AUTO
20Hz ~ 20KHz
≥
90dB (At 1KHz, JIS A-Weighted)
≤- 60dB (At 1KHz, 0dB)
≥
90dB ( 1KHz)
≥
85dB ( 1KHz)
Audio distortion + noise
Channel separation
Dynamic range
Output
Audio
Output
Video
Analog
Digital
Composite out
S-video out
Power supply
Power consumption
Dimensions(WXHXD)
Net Weight
430 x 76.5 x 277 mm
Notes : Design and specifications in this owner’s manual are subjected to change
without prior notice to improve quality and function.
Page 41

• 41 •
Regional restriction codes are built in this DVD player model and all DVD discs for
each sales region throughout the world. If regional code of this DVD player does not
match with regional code of DVD disc that you want to playback, if won’t work. The
regional code number can be found the diagram below .
reREGIONAL RESTRICTION CODE
Page 42

DVD PLAYER DVG-3000N
POWER
OFF
ON
PBC
TITLE
ANGLE
DVD/VCD/SVCD/DVCD/CD/MP3
SUBTITLE
/STEP
10+
PHONE1
PHONE2
PHONE1LEVEL
PHONE2 LEVEL
MIN
MIN
MAX
MAX
1
2
3
4
5
6789
0/10
OSD
LANGUAGE
INTRO
SEARCH
SKIP
OPEN/CLOSE
PLAY
STOP
OWNER’S MANUAL
DVG-3000N
Page 43

Warranty
Daewoo Electronics Corporation of America warrants each new electronic product
manufactured by it to be free from defective material and workmanship and agrees to remedy
any such defect or to furnish a new part (at the Company’s option) in exchange for any part of
any unit of its manufacture which under normal installation, use and service disclosed such
defect, provided the unit is delivered by the owner to us or to our authorized distributor from
whom purchased or authorized service station intact, for our examination with all
transportation charges prepaid to our factory. To establish and receive warranty service at our
factory or authorized service facilities, proof of puchase/dated sales invoice is required.
Written authorization must be obtained before any merchandise is returned to the factory.
This warranty does not extend to any of our electronic products which have been subjected to
misuse, neglect, accident, incorrect wiring not our own, improper installation, unauthorized
modification, or used in violation of instructions furnished by us, nor units which have been
repaired or altered outside of our factory, nor to cases where the serial number thereof has
been removed, defaced or changed.
This warranty is in lieu of all warranties expressed or implied and no representative or person
is authorized to assume for us any other liability in connection with the sale of our electronic
products.
Over-the-counter exchange of initially defective units
A unit is described as initially defective when the dealer opens the unit and finds that it is
inoperative or a customer opening a new unit finds that it is initially defective. This unit may be
returned to the factory by the dealer for exchange. Under no circumstances will a customer be
permitted to return an initially defective unit directly to the factory.
Model Parts Labor
DVG-3000N 1 Year 3 months
This instrument is listed by Underwriter’s Laboratories, Inc. It
is designed and manufactured to meet rigid U.L. safety
standards against X-radiation, fire, casualty and electrical
hazards.
Daewoo Electronics
Corporation of America
120 Chubb Avenue
Lyndhurst, NJ 07071
For more information about this or other
Daewoo products, call 1-800-DAEWOO8.
 Loading...