


INSTRUCTION MANUAL
COLOR TELEVISION
DTU-1420 (ME/MT/MTF/MTFB/MP/MZ/MZF/MZFB/TP/P/T/TF/Z/ZF/NZF)
DTU-14A7 (ME/MT/MTF/MTFB/MP/MZ/MZF/MZFB/TP/P/T/TF/Z/ZF/NZF)
DTU-14D4 (ME/MT/MTF/MTFB/MP/MZ/MZF/MZFB/TP/P/T/TF/Z/ZF/NZF)
DTU-14D7 (ME/MT/MTF/MTFB/MP/MZ/MZF/MZFB/TP/P/T/TF/Z/ZF/NZF)
DTU-14D9 (ME/MT/MTF/MTFB/MP/MZ/MZF/MZFB/TP/P/T/TF/Z/ZF/NZF)
DTU-14K2 (ME/MT/MTF/MTFB/MP/MZ/MZF/MZFB/TP/P/T/TF/Z/ZF/NZF)
DTU-14K3 (ME/MT/MTF/MTFB/MP/MZ/MZF/MZFB/TP/P/T/TF/Z/ZF/NZF)
DTU-14K5 (ME/MT/MTF/MTFB/MP/MZ/MZF/MZFB/TP/P/T/TF/Z/ZF/NZF)
DTU-20D4 (ME/MT/MTF/MTFB/MP/MZ/MZF/MZFB/TP/P/T/TF/Z/ZF/NZF)
DTU-20D7 (ME/MT/MTF/MTFB/MP/MZ/MZF/MZFB/TP/P/T/TF/Z/ZF/NZF)
DTU-20D9 (ME/MT/MTF/MTFB/MP/MZ/MZF/MZFB/TP/P/T/TF/Z/ZF/NZF)
DTU-20K5 (ME/MT/MTF/MTFB/MP/MZ/MZF/MZFB/TP/P/T/TF/Z/ZF/NZF)
DTU-21A7 (ME/MT/MTF/MTFB/MP/MZ/MZF/MZFB/TP/P/T/TF/Z/ZF/NZF)
DTU-21D2 (ME/MT/MTF/MTFB/MP/MZ/MZF/MZFB/TP/P/T/TF/Z/ZF/NZF)
DTU-21D4 (ME/MT/MTF/MTFB/MP/MZ/MZF/MZFB/TP/P/T/TF/Z/ZF/NZF)
DTU-21D7 (ME/MT/MTF/MTFB/MP/MZ/MZF/MZFB/TP/P/T/TF/Z/ZF/NZF)
DTU-21D8 (ME/MT/MTF/MTFB/MP/MZ/MZF/MZFB/TP/P/T/TF/Z/ZF/NZF)
DTU-21D9 (ME/MT/MTF/MTFB/MP/MZ/MZF/MZFB/TP/P/T/TF/Z/ZF/NZF)
DTU-21F2 (ME/MT/MTF/MTFB/MP/MZ/MZF/MZFB/TP/P/T/TF/Z/ZF/NZF)
DTU-21K2 (ME/MT/MTF/MTFB/MP/MZ/MZF/MZFB/TP/P/T/TF/Z/ZF/NZF)
DTU-21K3 (ME/MT/MTF/MTFB/MP/MZ/MZF/MZFB/TP/P/T/TF/Z/ZF/NZF)
DTU-21K5 (ME/MT/MTF/MTFB/MP/MZ/MZF/MZFB/TP/P/T/TF/Z/ZF/NZF)
DTU-21U6 (ME/MT/MTF/MTFB/MP/MZ/MZF/MZFB/TP/P/T/TF/Z/ZF/NZF)
DTU-2120 (ME/MT/MTF/MTFB/MP/MZ/MZF/MZFB/TP/P/T/TF/Z/ZF/NZF)
DTU-2130 (ME/MT/MTF/MTFB/MP/MZ/MZF/MZFB/TP/P/T/TF/Z/ZF/NZF)
DTU-2131 (ME/MT/MTF/MTFB/MP/MZ/MZF/MZFB/TP/P/T/TF/Z/ZF/NZF)
DTU-2132 (ME/MT/MTF/MTFB/MP/MZ/MZF/MZFB/TP/P/T/TF/Z/ZF/NZF)
DTU-2134 (ME/MT/MTF/MTFB/MP/MZ/MZF/MZFB/TP/P/T/TF/Z/ZF/NZF)
DTU-2135 (ME/MT/MTF/MTFB/MP/MZ/MZF/MZFB/TP/P/T/TF/Z/ZF/NZF)
DTU-2136 (ME/MT/MTF/MTFB/MP/MZ/MZF/MZFB/TP/P/T/TF/Z/ZF/NZF)
DTU-2137 (ME/MT/MTF/MTFB/MP/MZ/MZF/MZFB/TP/P/T/TF/Z/ZF/NZF)
DTU-29M5 (ME/MT/MTF/MTFB/MP/MZ/MZF/MZFB/TP/P/T/TF/Z/ZF/NZF)
DTU-29M6 (ME/MT/MTF/MTFB/MP/MZ/MZF/MZFB/TP/P/T/TF/Z/ZF/NZF)
DTU-29M7 (ME/MT/MTF/MTFB/MP/MZ/MZF/MZFB/TP/P/T/TF/Z/ZF/NZF)
DTU-29U1 (ME/MT/MTF/MTFB/MP/MZ/MZF/MZFB/TP/P/T/TF/Z/ZF/NZF)
DTU-29U5 (ME/MT/MTF/MTFB/MP/MZ/MZF/MZFB/TP/P/T/TF/Z/ZF/NZF)
DTU-29U8 (ME/MT/MTF/MTFB/MP/MZ/MZF/MZFB/TP/P/T/TF/Z/ZF/NZF)
DTU-29F1 (ME/MT/MTF/MTFB/MP/MZ/MZF/MZFB/TP/P/T/TF/Z/ZF/NZF)
DTU-29F2 (ME/MT/MTF/MTFB/MP/MZ/MZF/MZFB/TP/P/T/TF/Z/ZF/NZF)
DTU-29F3 (ME/MT/MTF/MTFB/MP/MZ/MZF/MZFB/TP/P/T/TF/Z/ZF/NZF)

TABLE OF CONTENTS
SAFEGUARDS 2
INTRODUCTION
FEATURES 3
INSTALLATION 3
IDENTIFICATION OF CONTROLS 4
REMOTE CONTROL 4
SWICTHING THE SET ON/OFF 5
TUNING THE TV CHANNELS 5
CONVENIENT PICTURE CONTROL 8
PICTURE FORMAT CONTROL 9
CONVENIENT SOUND CONTROL 10
USING OTHER MENUS 12
WATCHING PICTURE IN PICTURE (OPTION) 15
CONNECTING THE EXTERNAL EQUIPMENT 16
CONNECTING WITH OTHER EQUIPMENT 17
CONNECTING DVD PLAYER/BS RECEIVER(OPTION) 18
THE OTHELLO GAME
19
TELETEXT(OPTION)
21
SPECIFICATION 22

2
SAFEGUARDS
To operate your receiver at the peak performance, please read this Instruction Manual carefully and retain it for the
future reference.
M Water and Moisture : Never install the set in the following places : in the bathroom, in a wet basement(Dripping or
splashing water).
No objects filled with liquids, such as vases, shall be placed on the apparatus.
M Heat : No naked flame sources, such as candles, should be placed on the apparatus.
M Ventilation : The ventilation should not be impeded by covering the ventilation openings with items, such
as newspapers, table-clothes, curtains, etc. Accidental contact with high voltage components
could result in electric shock. Never place the set in a confined space such as a bookcase or built-in
cabinet, unless proper ventilation is provided. The set requires minimum distances around the
apparatus for sufficient ventilation.
M Object Entry : Do not insert foreign objects, such as needles and coins, into the ventilation openings.
M Lightning Striking : You should disconnect your set from the main and the aerial system during thunderstorms.
M Cleaning : Unplug the set from the main before cleaning. Do not use liquid cleaners of aerosol cleaners. Use only a
lightly dampened soft cloth.
M Do not place liquids including flower vases and vessels filled with chemicals or water, etc. on the top of the unit.
Keep the inside of the unit free from foreign objects such as hairpin. If hazardous objects fall inside of the unit,
unplug it immediately and call a qualified technician for removal.
M When you don’t use the set for an extended period during vacation or other occasions, always make sure of
switching off the MAIN POWER(ON/OFF) SWITCH of the TV set.
M Do not place this television equipment on an unstable cart, stand, or table.
The television equipment may fall, causing serious injury to a child or adult, and serious damage to the
equipment. Use only with a cart or stand recommend by the manufacture’s instructions, and should use a
mounting kit approved by the manufacture.
M When replacement parts are required, be sure the service technician has used replacement parts specified by the
manufacture that have the same characteristics as the original parts. Unauthorized substitutions may result fire,
electric shock, or other hazards.
M Upon completion of any service or repairs to the set, ask the service (as specified by the manufacture) to
determine that the set is in safe operating condition.
M If anything goes wrong, don’t try any fix it yourself, get a qualified service agent to look at it.
M When Install the TV set, make the gap at least 10cm from the wall(at back, bottom, top and side of the TV set).
M The appliance is not intended for use by young children or infirm persons without supervision;
M Young children should be supervised to ensure that they do not play with the appliance.
NOTE
If the receiver is moved or placed in a different direction, the MAIN POWER (ON/OFF) SWITCH must be switched off for
at least 15 minutes in order to take out a colour stain on the screen.

3
Features
INTRODUCTION
Installation
16:9 / 14:9 Screen : You can select a desired 16:9(or 14:9) screen mode for movies
as well as the most 4:3 picture mode.
Selectable picture and selectable sound : Allows one-touch selection of your favorite picture
quality and tone quality.
On-timer: Turns on the TV automatically at a preset time.
Picture-In-Picture (Option)
Digital-Eye (Option)
Teletext (Option)
RF NTSC (Option)
AFTER MOVING THE SET
If the used set is moved or placed in a different direction, the ON/OFF button must be switched off for
at least 15minutes in order to take out a colour stain on the screen.
INSERTING BATTERIES INTO THE REMOTE CONTROL UNIT
Press down the battery compartment grip and slide the cover. Insert the batteries supplied(two 1.5V,
type AAA).
Make sure that the polarity matches with the (+) and (-) marks inside of the battery compartment.
Used batteries should be disposed of properly.
AERIAL CONNECTION
For better picture and sound quality, an effective aerial installation is the most important.
If you are located in a relatively strong area, you will be able to use the indoor aerial.
When using an outdoor aerial, it is usually connected to the set by means of 75 ohm coaxial cable.
MAINS CONNECTION
Plug the mains cable into the power socket with 110-250V AC, 50/60Hz.
INTRODUCTION
4
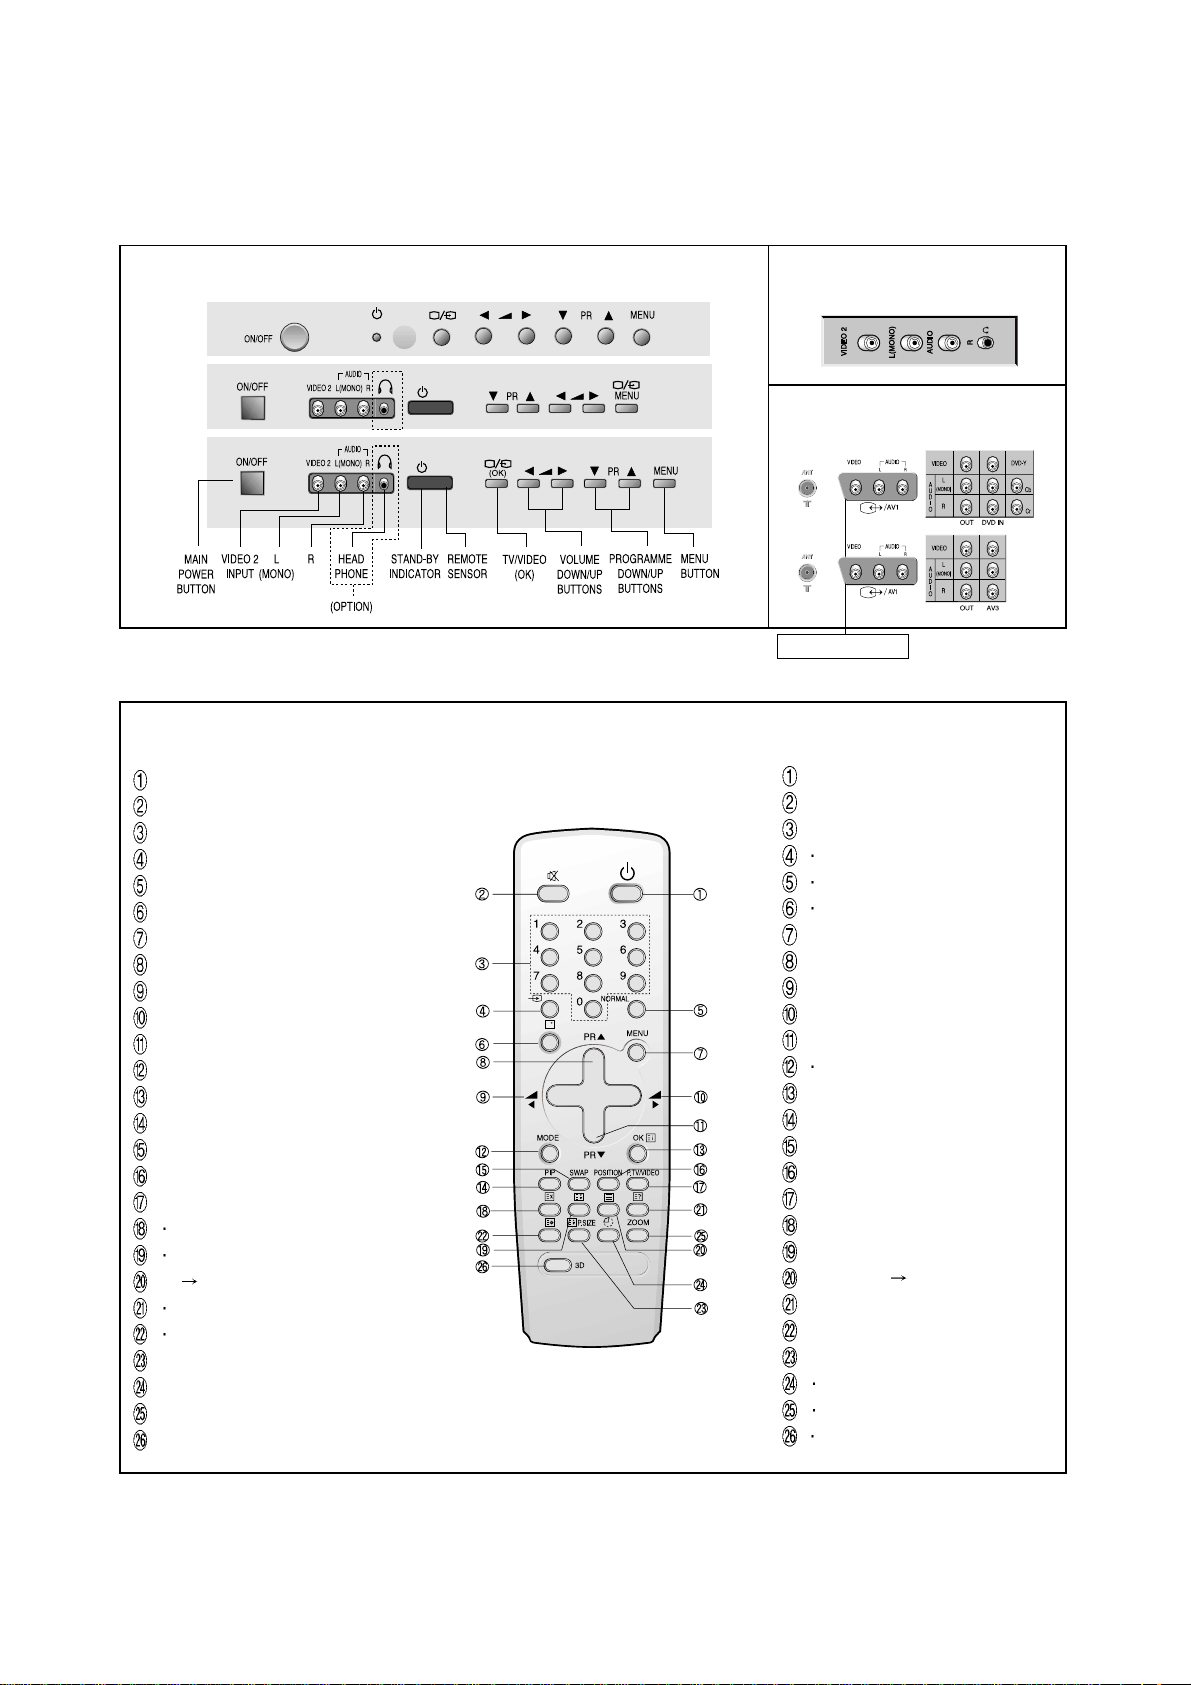
Identification of controls
SIDE
(OPTION)
Remote control
TV MODE
POWER
SOUND MUTE
NUMBER 0..9
TV / AV
NORMAL
RECALL
MENU
PROGRAM UP (CURSOR UP)
VOLUME DOWN (CURSOR LEFT)
VOLUME UP (CURSOR RIGHT)
PROGRAM DOWN (CURSOR DOWN)
MODE
OK / PRESET
PIP ON
PIP PICTURE SWAP
PIP POSITION
PIP PICTURE SOURCE
TV TELETEXT
PIP PICTURE SIZE
SLEEP
ZOOM
3D (SOUND EFFECT)
TELETEXT MODE
POWER
SOUND MUTE
NUMBER 0..9
VOL/BRIGHT MENU SELECTION
PAGE UP
VOL / BRIGHT DOWN
VOL / BRIGHT UP
PAGE DOWN
INDEX
RED
GREEN
YELLOW
CYAN
CANCEL
PAGE HOLD
TELETEXT TV
REVEAL
SUBPAGE
HEIGHT
REAR
SCART(OPTION)
FRONT
5
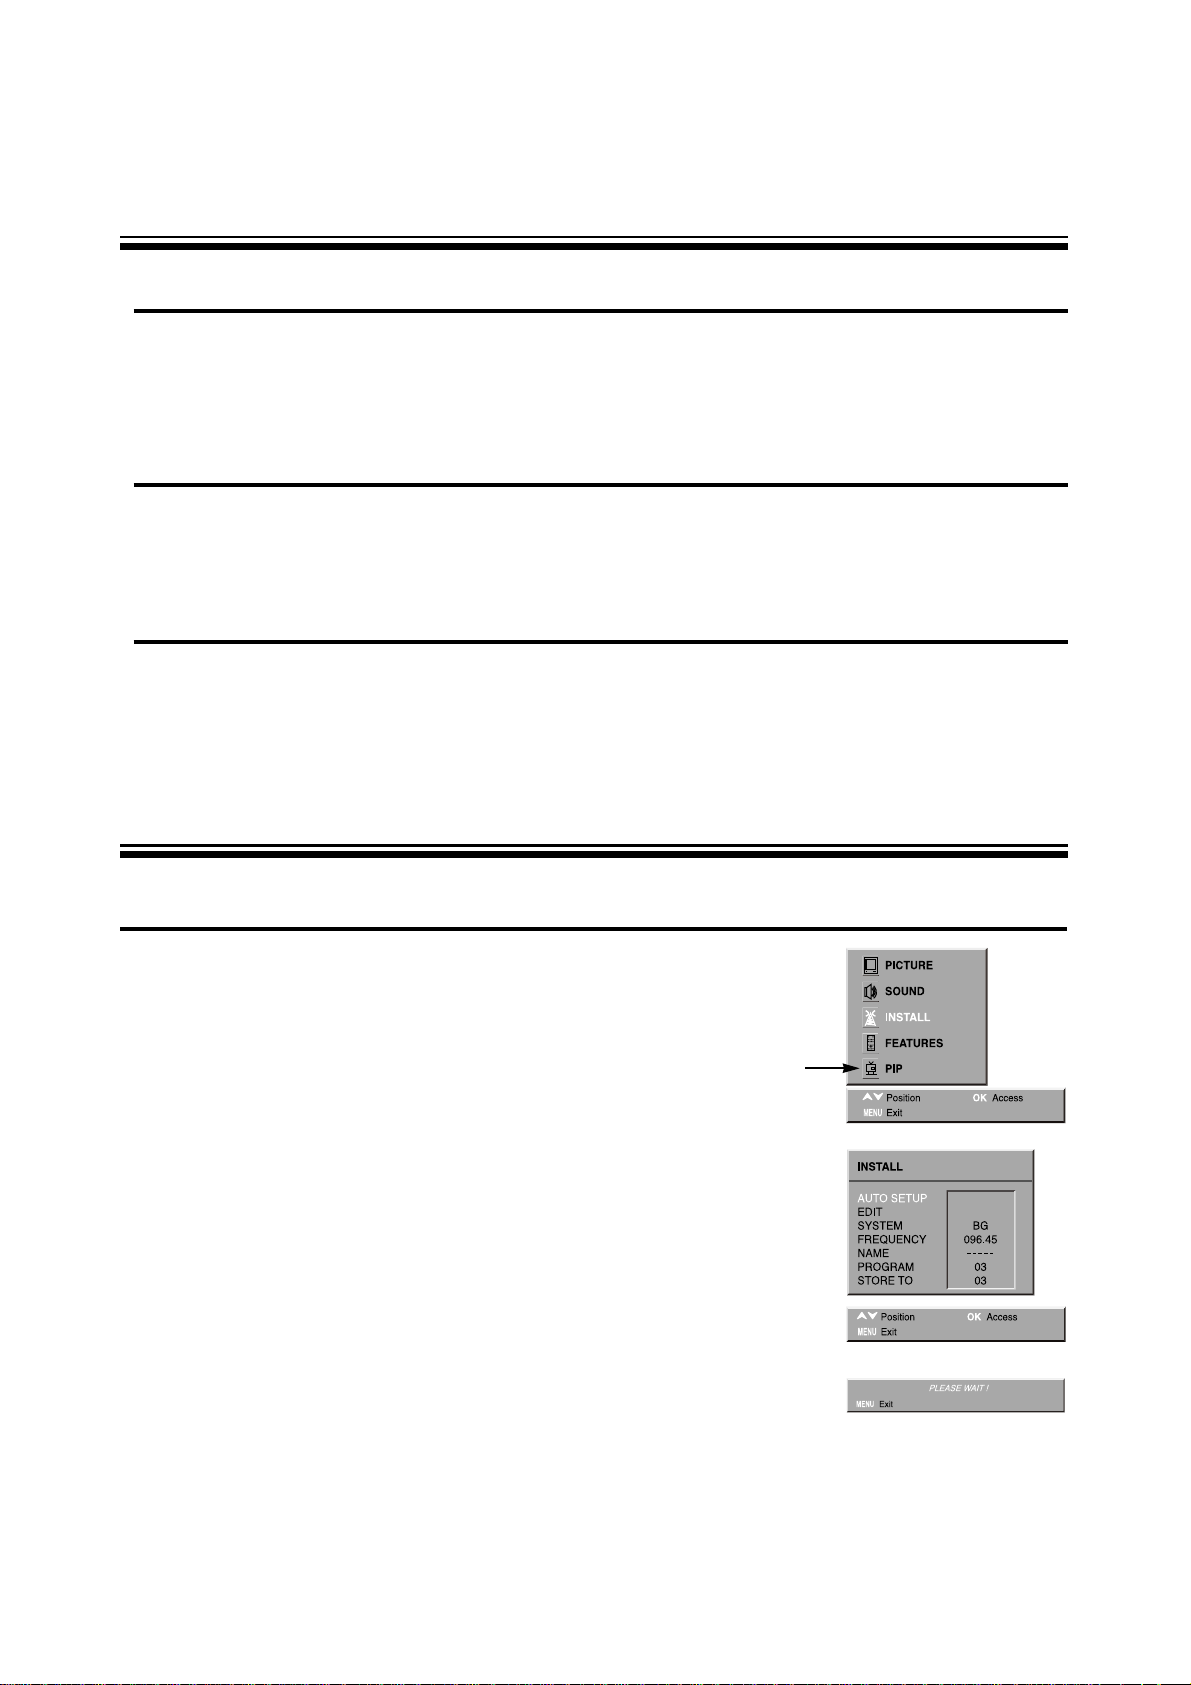
AUTO SETUP SYSTEM
1.Press the MENU button to select INSTALL.
2.Press the PRy/x buttons and then select INSTALL.
3.Press the OK button.
4.Select AUTO SETUP with the PRy/x buttons.
Press and hold for more than 1 second the OK button to start AUTO
SETUP.
5.Please wait until the EDIT menu appears.
TUNING THE TV CHANNELS
SWITCHING THE SET ON AND OFF
Switching On
Switch the set on with the ON/OFF button in front of the receiver TV. The set will be turn on.
If not, press either : - PR UP or DOWN button on the front of set - or POWER button or the PR
UP/DOWN button or one of the NUMBER button 0..9 on the remote controller.
The STAND-BY INDICATOR turns “RED” to “OFF”, then picture will appear on the screen.
Switching Off
Press POWER button on the remote controller to return the set to its stand-by mode.
The STAND-BY INDICATOR will illuminate.
If you don't use the set for extended period of time, turn it off with ON/OFF button in front of the
receiver.
Auto-power-off
If broadcasting signal is not present for 30 minutes, the TV will automatically turn off after about 30
minutes. However, if the Sleep time is operating, it takes precedence.
This Auto-Power-Off function does not operate in the “AV1”, “AV2”, “DVD1”, “DVD2”, “GAME” (or
“AV1”, “AV2”, “AV3”, “GAME”) mode.
OPTION
6
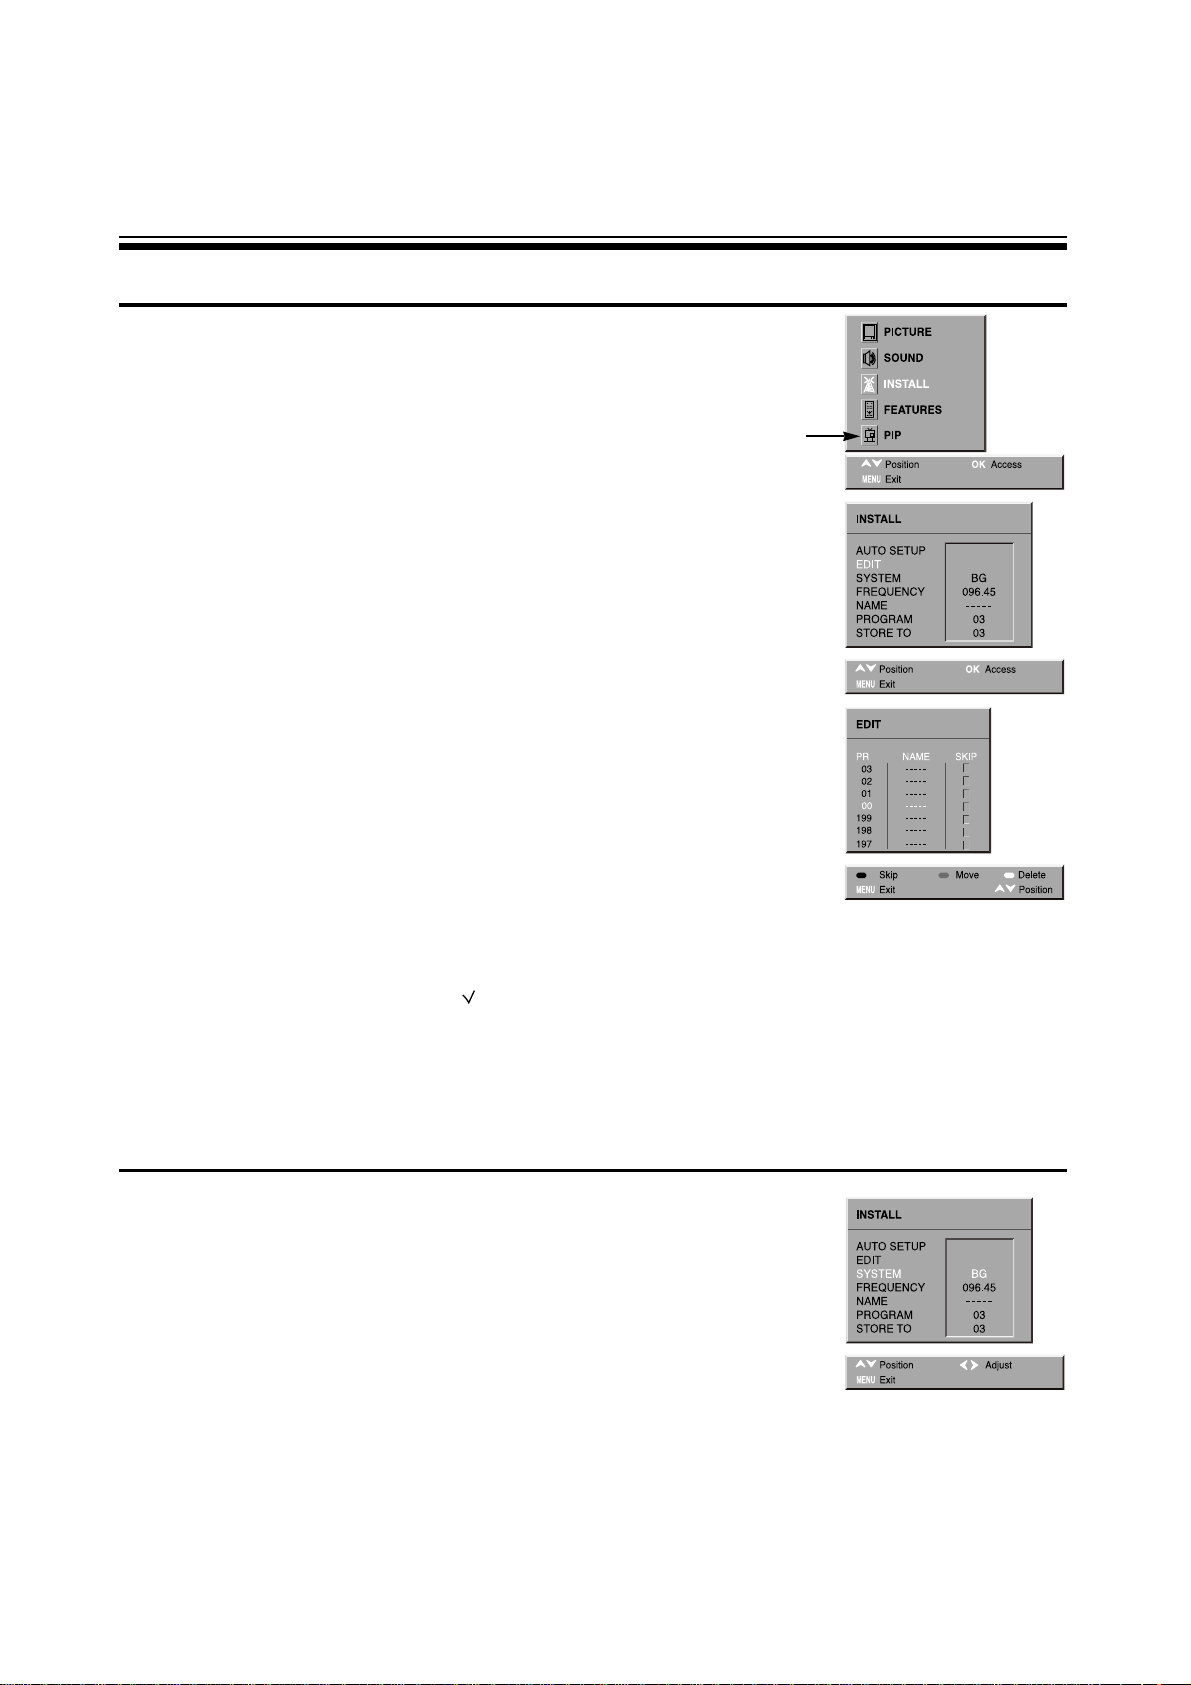
EDIT
1.Press the menu button to select INSTALL.
2.Press the PR y/x buttons and then select INSTALL.
3. Press the OK button.
4.Select EDIT with the PR y/x buttons and press the OK buttons to
start EDIT.
5.DELETE PROGRAM POSITION DATA.
Position the blue-line to the program to delete with the PR y
/
x
buttons and the DELETE(YELLOW) button.
6.CHANGING THE ORDER OF THE CHANNELS
Position the blue-line to a program to move with the PR y/x buttons
and the MOVE(GREEN) button.
Press the PR y/x buttons to position the blue-line to another
program to move.
By pressing the MOVE(GREEN) button again, selected two
program will be moved.
7.SKIPPING THE CHANNELS
You can select SKIP with the SKIP(RED) button in EDIT mode then press the PR y/x buttons
to skip the desired program.
A program marked with skip “ ” is skipped when changing program using the program
UP/DOWN(on normal operation).
Press the PR y/x buttons to select program number you want. The screen will change
according to the selected program number.
SOUND SYSTEM
1.Press the MENU button to select INSTALL.
2.Press the PR y/x buttons and then select INSTALL.
3. Press the OK button.
4. When the sound is abnormal, select SYSTEM with the
PR y/x buttons.
Select the correct sound system with the C/B buttons.
OPTION
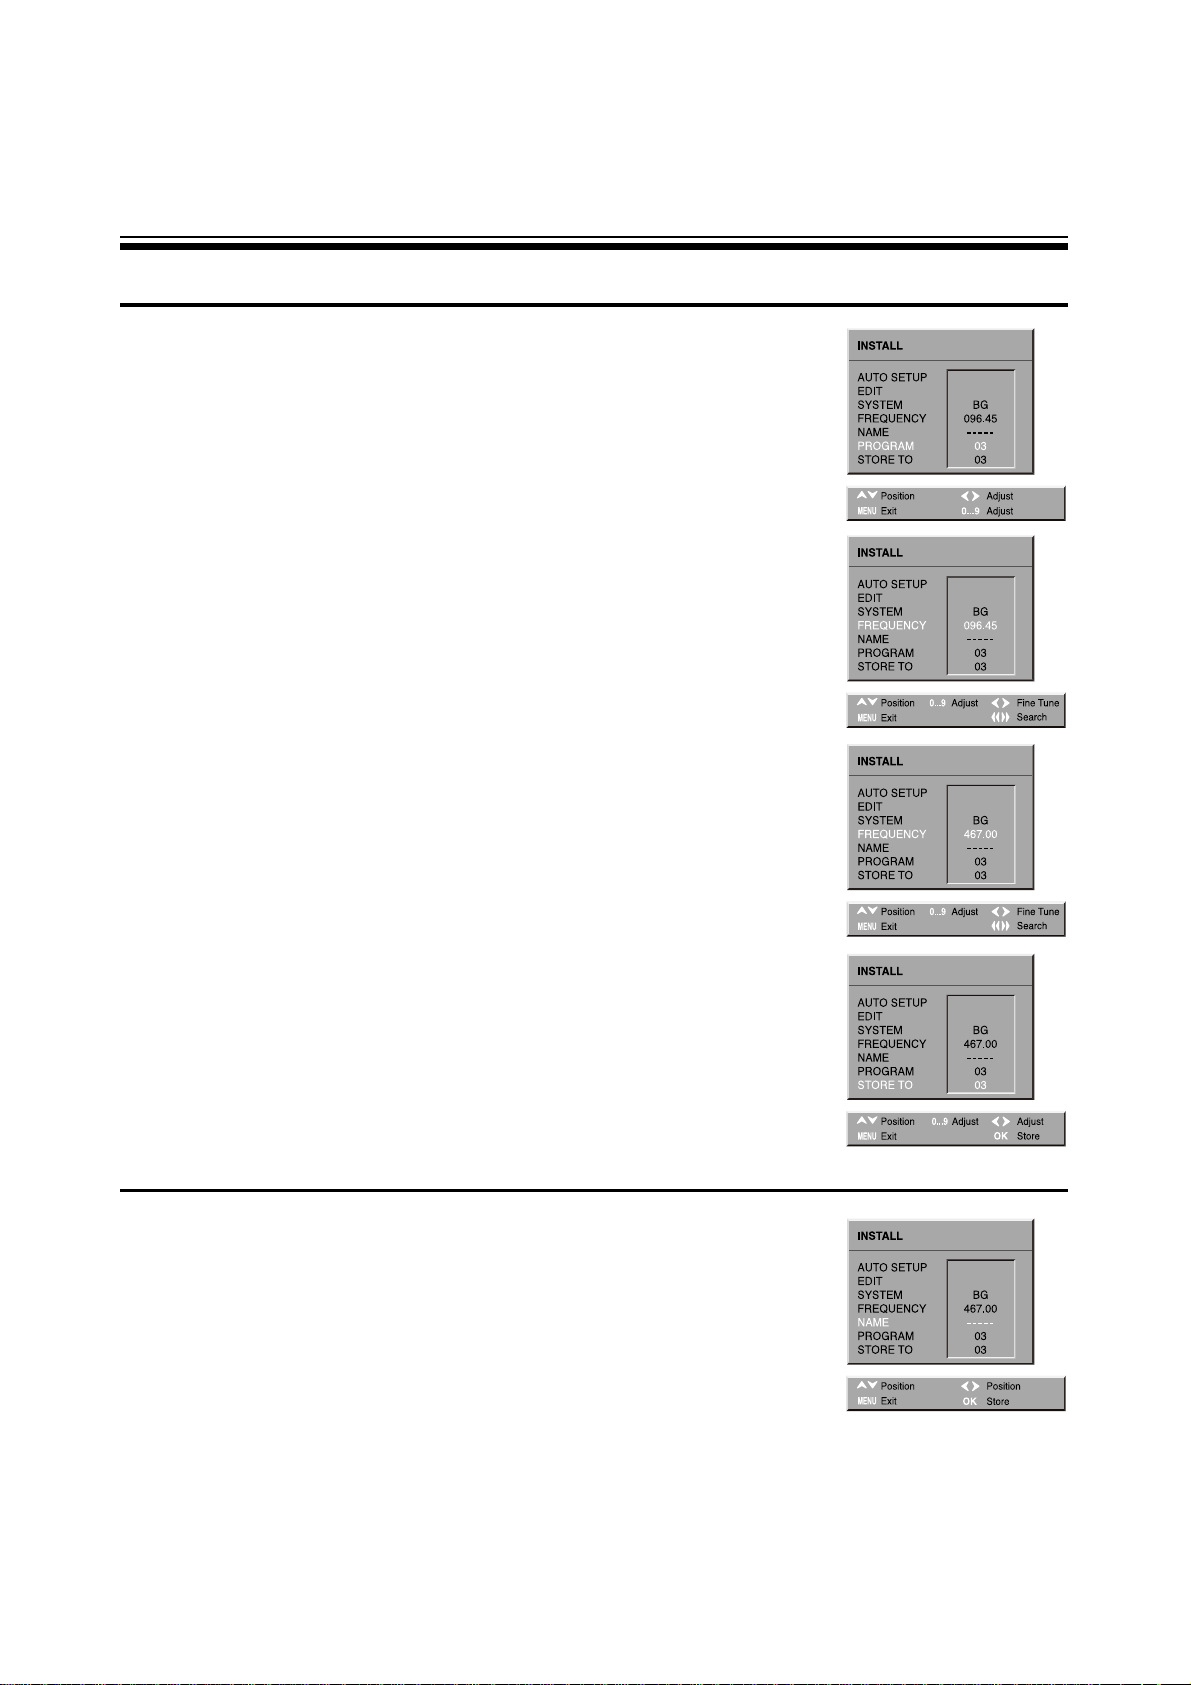
MANUAL CHANNEL TUNING AND FINE TUNING
1.Manual Channel Tuning
Choose a starting point
- Select with “Program” the program from which you want to start
manual tuning.
Then the program number, the frequency, the name and the program
number of this program are displayed in the install menu.
2.Channel searching
- Select the “Frequency” function.
- Press, and hold for more than 1 second, the remote control C
/
B
buttons to start up [down] manual tuning.
- Searching will stop automatically at the next channel found (to stop
tuning, press the remote control MENU button.)
Note : You can directly locate a program by entering the data into the
“Program” or the “Frequency” function.
3.Perform fine tuning
- If you are unable to get a good picture or reasonable quality sound
due to poor reception, it is possible to perform fine tuning.
- Select the “Frequency” function.
- Press, for less than 1 second, the remote control C/B buttons to
perform up [down] fine tuning in steps of 0.05MHz (50KHz)
4. Store program in memory
- Select the “Store to” function.
- Enter the program number you want to store to either by using the
remote control C/B buttons, or directly by using the remote control
NUMBER 0...9 buttons.
- Press the OK button to confirm.
Remarks : This function can also be used if you want to copy a program
already memoried to another program number.
ENTER A STATION NAME
It is possible to enter your own choice of name for each program. You
can change an existing name, or enter a name where none exists. If
none exists “-----” will be shown in the Install menu, and program status
display.
- Select the “NAME” function.
- Select one of the 5 character positions by using the remote control
C
/
B buttons to move the cursor.
- Then use the PR y/x buttons to select the desired character for that
position.
- Repeat the last two instructions for other positions, as desired.
7

8
TO SELECT THE PICTURE MODE
1.press the MENU button to select the PICTURE and then to be
displayed on the right appearance.
BY pressing the OK button, the following four mode change cyclically.
2. You can select the BRIGHTNESS, CONTRAST, COLOUR, and SHARPNESS with the PR y
/
x
buttons.
Select the desired item with the PR y/x buttons and press with the C/B buttons to adjust the
level.
3. If the NTSC standard is detected (eg from VHS player connected to AV), then TINT will available.
Otherwise TINT will be displayed, but not selectable.
4. NOISE REDUCTION feature can be activated or not.
CONVENIENT PICTURE CONTROL
M
You can select the picture quality instantly.
MODE Picture Quality
NORMAL hard picture
MILD soft picture
DIGITAL EYE picture by optical-sensor
FAVOURITE adjustable
Item
Pressing
CB
BRIGHTNESS darker lighter
CONTRAST weaker stronger
COLOUR paler deeper
SHARPNESS softer sharper
OPTION

9
TO SELECT THE WIDE OR ZOOM SCREEN
By pressing the ZOOM button in remote control, the following four modes change cyclically.
1. Or press the MENU button.
2.Press the PR y/x buttons and then select FEATURES.
3. Press the OK button.
4. And then to be displayed on the right appearance.
Select the ZOOM with the PR y/x buttons.
5. By pressing the C/B buttons, the following three mode
change cyclically.
This function is only selectable when the default picture format is currently active.
This selects the default format to be used only when the format selected with the ZOOM button is
AUTO, and no picture format signalling data is received.
Note : For 4:3 TVs FULL SCREEN is represented by 4:3.
For 16:9 TVs FULL SCREEN is represented by 16:9.
PICTURE FORMAT CONTROL
Auto 14 : 9 16:9 Full Screen Auto
4:3 14 : 9 16:9
OPTION

10
TO VOLUME CONTROL
Adjust the volume with the volume Down/Up button on the front of the set, or with the C/B buttons
on the remote control.
TO MUTE THE SOUND
The muting function is convenient when you need to pay attention to surround sounds, answer a
phone call, receive a visitor, etc.
1. Press the button.
2. To restore the sound, press the button again or volume Down/Up.
SOUND MENU
- Select VOLUME function to adjust the volume level.
- Select BALANCE function to adjust sound between the left and
right speakers. If the indicator is highlighted in red, then the
central balance position has been found.
- Use the EQUALIZER function to select the sound presets
NORMAL,SPEECH, MUSIC, FAVOURITE by use of the C/B buttons.
The FAVOURITE preset contains the settings
that you last entered into the EQUALIZER menu.
- The OK button will enter the EQUALIZER menu, and allow you
to change the FAVOURITE settings.
- Automatic Volume LEVEL (AVL) feature has 4 levels
according to your preference. This feature corrects for large
volume level changes, such as occur when passing from a movie
to advertisements. The AVL solves this problem by equalizing the
volume level, over a SHORT, MEDIUM or LONG period (referring to
the time constant over which the equalizing effect lasts).
CONVENIENT SOUND CONTROL
M
You can select and adjust the sound quality as you like.

11
EQUALIZER MENU
- Select the equalizer band by use of the C/B buttons.
- Adjust the level of each of the 5 equalizer bands, 100Hz, 300Hz, 1000Hz,
3000Hz, 8000Hz, by use of the PR y/x buttons.
- The above modified values are automatically stored in FAVOURITE
mode.
- The OK button will select the picture presets NORMAL,SPEECH, MUSIC,
FAVOURITE. The currently selected preset is displayed in the menu
header.
- The FAVOURITE preset always contains the settings that you last
entered.
- You can also select the sound presets by using remote control MODE
button.
SOUND EFFECTS
- A SPATIAL sound effect is available, using remote control 3D button.
The following display appears :
- To return to initial sound effect, press again the 3D button.
Spatial sound effect
No sound effect
NORMAL SPEECH MUSIC FAVOURITE

12
TO SELECT THE ON-SCREEN DISPLAY LANGUAGE
Use this function to choose the language of the on-screen display(OSD)
among English, Russian, Arabic, Persian, French and Romanian.
(Or English, Vietnamese, Indonesian)
1.Press the MENU button to select the FEATURES and then to be
displayed on the right appearance.
Press the PR y/x buttons to select LANGUAGE.
Press the OK buttons to enter the sub menu for LANGUAGE.
TO SELECT THE SCREEN COLOR
When no signal is being received, the TV will automatically turn blue if
the SCREEN is BLUE.
1. Press the MENU button to select the FEATURES and then to be
displayed on the right appearance.
Press PR y/x buttons to select the SCREEN.
2. Press the C/B buttons to change the color of SCREEN.
(BLUE RED OFF)
TO SELECT CHILD LOCK
1. You can prevent the use of the TV set without the remote control.
Press the MENU button to select the FEATURES and press the PR
y
/
x buttons to select the CHILD LOCK.
2. Press the C/B buttons to change CHILD LOCK ON/OFF .
3. Once the user has set this CHILD LOCK to ON or OFF, it will remain in
this condition until the user changes it again.
TO SELECT QURAN MODE
You can select the QURAN mode when you have selected the ARABIC or PERSIAN.
Press the DELETE (YELLOW) button to select the QURAN mode, and the QURAN will be displayed.
If you want to exit the QURAN mode, press the DELETE (YELLOW) button again.
USING OTHER MENUS

13
TO SET CLOCK
1. Press the MENU button to select the FEATURES and then to be
displayed on the right appearance.
2. Select the CLOCK with PR y/x buttons.
3. Press the OK buttons to activate the hour or the minute and preset the
hour or minute with the direct(0~9) buttons.
If the clock setting is not done, you can set the clock by setting the
‘CLOCK PROG.’ to the channel which has Text Signal. The present
time of Text channel will be automatically set up. If the clock setting is
done already, the clock doesn’t changed by doing like up.
TO TURN ON THE TV AUTOMATICALLY(WAKE TIME)
With the CLOCK, the WAKE TIME, the WAKE PR.
Preset, the TV will automatically turn on to a preset program number at a
preset time.
Select the WAKE TIME with PR y/x buttons.
Press the C/B buttons to activate the hour or the minute and preset the
hour or the minute with the direct(0~9) buttons.
The WAKE TIME function is only selectable when the clock is set. The
TV set turns from stand-by at the WAKE TIME with the programme
entered on the WAKE PROG. line. Put the TV set on stand-by with the
remote control.
PRAY TIME
You can set the “PRAY TIME” if you set the OSD Language to Arabic or Persian.When became the selected
pray time, the Quaran will be displayed(“PRAY TIME” Mode).
If you want to release the “PRAY TIME” mode, please press the YELLOW button of remote controller.
Select the pray time with PR y/x buttons, press the C/B buttons to enter the sub-menu.
If the present time is set, select pray time with direct key(0~9).
You can set the clock in this mode, unless the present time is set.
You can set “PRAY TIME” each 5 times a day.(dawn, noon, evening, dusk, night).
OPTION

14
SLEEP TIME SETTING
1. By pressing the button repeatedly, you can set the sleep time.
2. If you press the button for the first time, SLEEP OFF sign of
the non set sleep-timer appears on the upper left side of the screen.
3. When this button pressed again, 20 minute are set to the sleep-timer.
4. This display disappears within 4 seconds unless any button is pressed.
Whenever pressed again, the setting time is increased by 20 minute.
(OFF 20 40 60 80 100 120 OFF)
5. If this button is pressed again, during the sleep-timer operation, the remaining time of the sleep-
timer appears on the screen.
6. In addition, if this button is pressed repeatedly, the setting time is increased by 20 minute
continuously.
7. When the remaining time become “0”, the TV receiver is turn off automatically.
TO PLAY DEMO
1. Press the MENU button to select the FEATURES.
2. Select the DEMO with PR y/x buttons.
3. Press C/B buttons to play OSD demo.
4. To exit demo play, press the MENU button.

WATCHING PICTURE IN PICTURE(OPTION)
The unit is capable of displaying two picture with the small sub picture simultaneously.
This is called the Picture-In-Picture function. A TV picture or a picture from external source equipment such as a VTR can
be displayed as another picture.
TO WATCH A TV OR AN EXTERNAL SOURCE AS A SUB-PICTURE
1.Select the desired program.
2.Press the PIP button to display a sub-picture.
3.Press the sub TV/VIDEO button repeatedly to select the input for the sub picture(the
small picture). The picture from the AV1, AV2, DVD1(or AV3) will appear cyclically[The picture from
the DVD2(option) does not appear].
4.To turn off the sub-picture, press the PinP button again.
5.Or press the MENU button to select the PIP and then to be displayed on the
right appearance.
Select the PIP with the PR y/x buttons. Press the C/B buttons to select the PIP
ON(or OFF).
6.Select SELECT with the PR y/x buttons.
Press the C/B buttons to select the input the sub-picture(the small picture). The
picture from the AV1, AV2, DVD1(or AV3) will appear cyclically.
7.Select MODE with the PR y/x buttons. Press the C/B buttons to
select the mode(LARGE, SMALL). Or press P.SIZE button directly.
The mode will be appear cyclically.
SUB-PICTURE
15
TO SWITCH THE MAIN AND SUB-PICTURE OF THE PIP
Press the SWAP button when a picture-in-picture is displayed.
The main picture(the large picture) and sub-picture(the small picture) are switched.
Press the SWAP button again to switch again.
TO CHANGE THE POSITION OF THE SUB PICTURE
Press the POSITION button repeatedly when a sub-picture is displayed.
The display position of the sub-picture will changed in order to
PIP mode.
4
1

16
HEADPHONE JACK(OPTION) [SIDE, FRONT]
Insert the headphone plug (3.5mm ) into the headphone socket. The sound
from the speaker will be cut off.
AV2 INPUT TERMINAL[SIDE, FRONT]
1. Prepare the connective plug for picture/sound.
2. Connect the VIDEO picture output terminal with the TV picture input
terminal.
3. Connect the VIDEO sound output terminal with the TV sound input
terminal. In case of mono VIDEO, connect the VIDEO sound output
terminal with left sound input of TV.
4. Press the AV button( ) on the remote control or on the front of the set and
select AV2.
CONNECTING AT AV1
1. Prepare the connective plug for picture/sound.
2. Connect the VIDEO input/output terminal with the
VIDEO(AV1) terminal.
In case of mono VIDEO, connect the VIDEO sound output
terminal with RIGHT (not same as AV2 mode) sound input
of TV.
3. Press the AV button( ) and select AV1.
Press the TV/AV( ) button to change mode.
(RF AV1 AV2 DVD1 DVD2 GAME) or
(RF AV1 AV2 AV3 GAME)
OPTION(SCART)
1. The SCART terminal can be used in place of RCA terminal for AV1.
2. The SCART provides Input(AV1) and Output of picture/sound.
3. Do not connect the SCART and the TV picture output terminal simultaneously, because the
SCART and the TV picture output terminal is common.
16
CONNECTING THE EXTERNAL EQUIPMENT
When connecting other equipment, please ensure you turn the main switch OFF to prevent any
damage to the equipment.
SCART(OPTION)

17
CONNECTING WITH OTHER EQUIPMENT
1. You can use other equipment with TV signal.
2. Connect external input terminal of other equipment to output of TV SET.
When connecting other equipment, please ensure you turn the main switch OFF to prevent any
damage to the equipment.

18
CONNECTING DVD PLAYER/BS RECEIVER(OPTION)
1. Prepare the connective plug for picture/sound.
2. Connect the DVD-Y output terminal of DVD player with the
DVD-Y input terminal of TV.
3. Connect the DVD-Cr, Cb output terminal of DVD player
with the DVD-Cr, Cb input terminal of TV.
4. Press the AV( ) button and select DVD mode
DVD MODE
1. DVD1(VIDEO) : When DVD Player Output is not Y-Cb-Cr output, but Video(Composite) signal.
2. DVD2 (Y Cb Cr) : In case of component output
Some models have the AV3(VIDEO), instead of DVD1(VIDEO) and DVD2(Y, Cb, Cr)
OUTPUT TERMINAL
DVD TERMINAL

19
THE OTHELLO GAME
1. Introduction
Othello is a two player strategy game. Othello is player on an 8 x 8 square board, one taking yellow
while the other taking green. The object of Othello is to flip as many of your opponents discs to your
color as possible without opponent flipping your discs.
2. The Rules
The initial configuration, before the game starts, is:
Green starts playing first. Each player puts one disc on the board at each turn, unless:either no one
can move, or one player cannot move, and then the other player can play again. The game ends
when no plaer can move, and the one who has the most discs of his own colors has won.
Now how to put a disc on the board? The idea is one can put a disc of his own color at a square, if
and only if there is at least one disc of the opposite color immediately surrounding it, and at the
extension of this line there is a disc of his own color. For example, at the beginning of the game,
green can play at the following squares marked with an X:

20
3. How to Play
1. Press the TV/AV( ) button to open the Game mode
(RF AV1 AV2 DVD1 DVD2 GAME) or
(RF AV1 AV2 AV3 GAME)
2. Select Opponent
This option allow you to choice opponent.
You can select Man vs Man or Man vs TV.
If you choose Man vs Man, game start directly.
.
Move to your choice :
.
Select your opponent :OK
3. Select TV level (When opponent is TV)
You can change the difficulty level of the TV player. You can select
Easy, Medium or Hard.
.
Move to your choice :
.
Select level of the TV :OK
4. Start game
When game is started, the player1(Man) plays green and the
player2(Man or TV) yellow. The player1 plays first.
.
Move to your disc :
Use the Program Up/Down & Volume Up/Down button.
.
Place your disc : Press the OK button.
.
Restart game : Press the MENU button.
.
Quit game : Press the TV/AV button.

SWITCHING TELETEXT ON/OFF
Press the TELETEXT button ( ). The index page viewed last will appear.
Press the TELETEXT button to return to the TV mode.
Note that the TELETEXT at this TV set is operated to Level 1.5.
SELECTING PAGES
The NUMBER button 0..9 are used to enter a page number.
The selected page number appears at the top of the screen and the page appears after a short time.
The UP/DOWN buttons increase or decrease the current page number step by step.
Once a request is made, the page number is shown in the extreme top left corner of the screen."
If the requested page is not immediately available the rolling header will be active until the page arrives.
PAGE HOLD
Several sub pages can be combined under a page number and are scrolled at an interval determined by the television station.
The presence of sub pages is indicated by, for example, 3/6 beneath the time, which means that you are looking at the 3rd page of a
total of 6 pages.
If you want to look at a subpage for a longer period of time, press the HOLD( ) button.The contents of the subpage shown are kept
on the screen and no longer updated or switched to other subpages.
Pressing the HOLD button again, the current subpage appear.
COLOUR BUTTONS IN TOP/FLOF TELETEXT
A red, green, yellow and cyan field is shown at the bottom of the screen.
If TOP or FLOF teletext (FASTEXT) is transmitted by the station, pressing the corresponding colour button on the remote controller,
you can select the desired page easily.
INDEX PAGE
You can switch directly to the programme preview (with TOP text) or the overview page of the station you are currently viewing by
pressing the INDEX( )button
CALLING UP SUBPAGE DIRECTLY
Press the SUBPAGE ( ) button. In the extreme top left corner, instead of the page number, "S...
.
" will be displayed. This is ready to
accept the subpage number. Enter directly the subpage number you want with the remote control NUMBER 0..9 buttons. After a few
seconds the subpage number is replaced by the page number in the header. You can press again SUBPAGE button, to display the
subpage number. If the requested page is not immedietly available the rolling header will be active until the page arrives.
Warning : If the subpage is not available(dose not exist), then the header will roll continuously and" no new page will be found.
Note : Teletext specification allows for subpage numbers 0000 to 3979(the first figure is limited to the range 0..3, and the third figure 0..7).
Press RED / GREEN / YELLOW / BLUE button or 0....9 number button directly to enter the Subpage you want, then the subpage is
sought and displayed.
To exit, press SUBPAGE ( ) button again.
WATCHING TELEVISION DURING TELETEXT MODE
Some pages are continually updated, for example, stock market reports, sports announcements, and the latest news.
If you want to watch television and stay informed at the same time, press CANCEL ( ) button.
The regular programme is still visible and the teletext programme number appears at the top of the screen.
Pressing the CANCEL button again, the teletext page appears with the updated information.
DOUBLING CHARACTER SIZE
Repeatedly pressing the SIZE( ) button doubles the character size in the following order: Upper half of the page Lower half of the
page Return to normal size.
REVEAL ANSWER
This function can be used on certain pages to reveal the solution of riddles.
Press the REVEAL( ) button to reveal a hidden answer and press again to hide it.
VOLUME, BRIGHTNESS CONTROL
Repeatedly pressing the MENU button in teletext mode, VOLUME or BRIGHTNESS appears at the bottom of the screen .
You can control it with the LEFT/RIGHT button.
21
TELETEXT(OPTION)

2222
SPECIFICATION
TV Standard Color system PAL/SECAM, NTSC(AV only) or PAL/SECAM, NTSC
Sound system B/G, D/K, I/I, H, M(Option)
Rated voltage 110-250V~, 50/60Hz
Power consumption
14”(37cm):55W, 20”(51cm):64W, 21”(55cm)Normal:72W,
21”(55cm)Flat:74W, 29”(73cm)Normal:73W, 29”(73cm)Flat:110W
Tuning System FS Tuning System
Program No. Indication On-Screen-Display
Program Selection 200 Programs

48586500E10C-R0
 Loading...