

Page 1

Color Television
INSTRUCTION MANUAL
DTQ 25G1
DTQ 29G1
Page 2
CAUTION
RISK OF ELECTRIC SHOCK
DO NOT OPEN
CAUTION : T O REDUCE THE RISK OF ELECTRIC SHOCK,
DO NOT REMOVE COVER (OR B A CK)
NO USER-SER VICEABLE PARTS INSIDE.
REFER SER VICING T O QUALIFIED SER VICE PERSONNEL.
The lightning flash with arrowhead symbol, within an equilateral triangle, is
intended to alert the user to the presence of uninsulated “dangerous voltage” within the product’s enclosure that may be of sufficient magnitude to constitute a risk
electric shock.
The exclamation point within an equilateral triangle is intended to alert the user to
the presence of important operating and servicing instructions in the literature
accompanying the appliance.
WARNING
TO PREVENT FIRE OR SHOCK HAZARD, DO NOT EXPOSE THIS APPLIANCE TO RAIN
OR MOISTURE.
CAUTION
CHANGES OR MODIFICATIONS NOT EXPRESSLY APPROVED BY THE MANUFACTURER COULD VOID THE USER’S AUTHORITY TO OPERATE THE EQUIPMENT.
NOTE TO CATV SYSTEM INST ALLER
THIS REMINDER IS PROVIDED TO CALL THE CATV SYSTEM INSTALLER'S ATTENTION TO ARTICLE 820-40 OF THE NEC THAT PROVIDES GUIDELINES FOR PROPER
GROUNDING AND, IN PARTICULAR, SPECIFIES THAT THE CABLE GROUND SHALL
BE CONNECTED TO THE GROUNDING SYSTEM OF THE BUILDING, AS CLOSE TO
THE POINT OF CABLE ENTRY AS PRACTICAL.
CAUTION
To provide power to the TV, insert the AC plug into a standard 220V 50/60Hz outlet.
NOTE
If you feel a static discharge when touching the unit, and the unit does not function, simply unplug
the unit from the outlet. When you plug the unit back in, it should work normally.
Do not install power cords near any heating element or cooking appliances.
Page 3

1
CONTENTS
Table of Contents
Chapter 1: Connecting an Antenna/Cable and VCR to your TV 3
Connecting an Antenna 3
Antennas with two sets of leads 4
Connecting a Cable System 4
Connecting a VCR 6
Connecting Other pieces of Equipment 6
Safety note 6
Chapter 2 : Overview of Your Equipment 7
Your TV’s Front view 7
Your TV’s Back view 7
Your remote control 8
Installing your remote control batteries 10
Notes 10
Chapter 3 : Operating Your TV 11
Turning your TV ON/OFF 11
Changing channels 11
Changing volume 11
Understanding on-screen menu 12
Selecting the input source 13
Using the direct button on the remote control. 13
Using on-screen Menu 13
Programming your TV’s channel memory 14
Source selection 14
Auto programming function 14
Adding and Erasing channels 15
Adjusting the picture 16
Custom mode 16
Preset mode 17
Adjusting the sound 18
Selecting Stereo/SAP broadcasts 18
About AVC 18
About Loudness 18
Convenient Remote Function 20
Display on-screen information 20
Muting the sound 20
Table of Contents
Page 4

2
Chapter 4 : Using the Advanced Features 21
Changing on-screen Display language 21
Using closed-captioned Function 22
Captioning 22
Viewing caption 22
Programming your Favorite channels 24
Programming your favorite channels 24
Selecting your favorite channels 24
Setting the Timer 25
Setting the Clock 25
Setting the on-timer 25
Setting the off-timer 25
Setting the sleep timer 26
Using the power restore feature 27
Chapter 5 : Using the Special Features 28
Watching Picture-In-Picture (PIP Function) 28
Display the PIP image 28
Changing the PIP channels 28
To change the position of the small picture 28
To Display a picture from an external source as a small picture 28
To switch the main and small picture 29
To freeze the small picture is displayed 29
Changing the PIP image size 29
Using channel label feature 30
Programming the channel labels 30
Clearing channel labels 31
Watching Auto demo feature 32
Starting the on-screen demonstration 32
To stop the demonstration 32
Chapter 6 : Troubleshooting 33
Warranty 34
Table of Contents
Page 5
3
CHAPTER
1
Your TV will provide you with the best performance if you connect it to an external antenna or cable system. Follow the directions below to make this connection. Please note that
you will normally only have to make one of the connections shown below, not all of them.
All connections will be made to the antenna terminal on the back of your TV. The antenna
terminal is a silver metal post partially surrounded by two plastic tabs. For help in locating
the antenna terminal, see “Your TV’s Back View” on page 7.
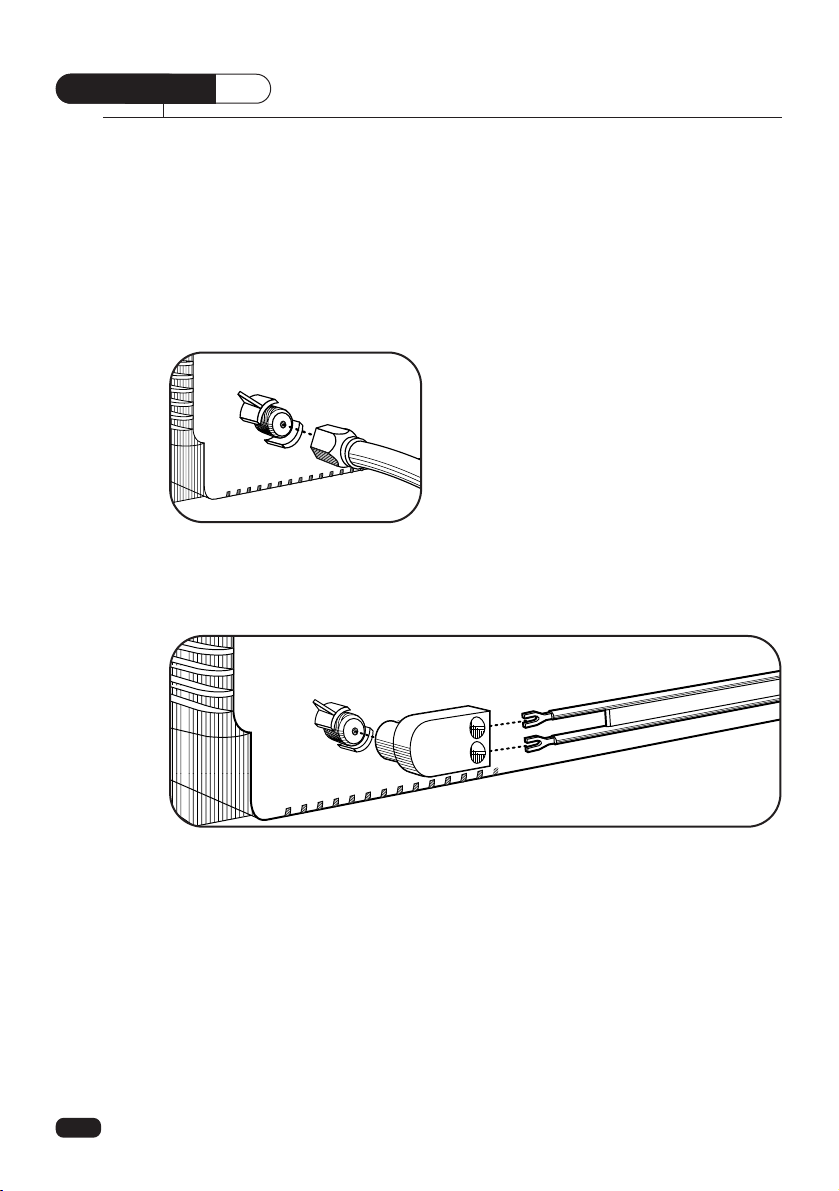
Connecting an Antenna
If your antenna ends in a single coaxial lead,
simply press or screw the cable onto the antenna
terminal on the back of your TV.
If your antenna ends in a pair of 300 ohm twin leads, you must use a 300-ohm/75-ohm
adapter. Place the leads underneath the screws on the adapter, tighten the screws, then press
the adapter onto the antenna terminal on the back of the TV.
Chapter 1 : Connecting an Antenna/Cable and VCR to Your TV
Connecting an Antenna/Cable and VCR to Your TV
Page 6

4
Antennas with two sets of leads
You might have two sets of leads from your antenna system, especially if you have one
antenna for VHF signals and one antenna for UHF signals.
If your antenna system has both a coaxial lead and twin 300-ohm leads, you must
obtain a combiner (available at your local electronics store). Press or screw the coaxial lead
onto the combiner; place the twin leads underneath the screws on the combiner and tighten
the screws. Press the cable from combiner onto the antenna terminal on the back of your
TV.
If your antenna system has two sets of twin 300-ohm leads, you must obtain a combiner
(available at your local electronics store). Place one set of twin leads underneath the screws
on the combiner and tighten the screws. Do the same with the other set of twin leads. Press
the cable from the combiner onto antenna terminal on the back of your TV.
Connecting a cable system
If your cable set-up is not described below, please contact your cable company for more
information.
If your cable system does not require the use of
a cable box, simply press or screw the incoming
cable onto the antenna terminal on the back your
TV.
Chapter 1 : Connecting an Antenna/Cable and VCR to Your TV
Page 7
5
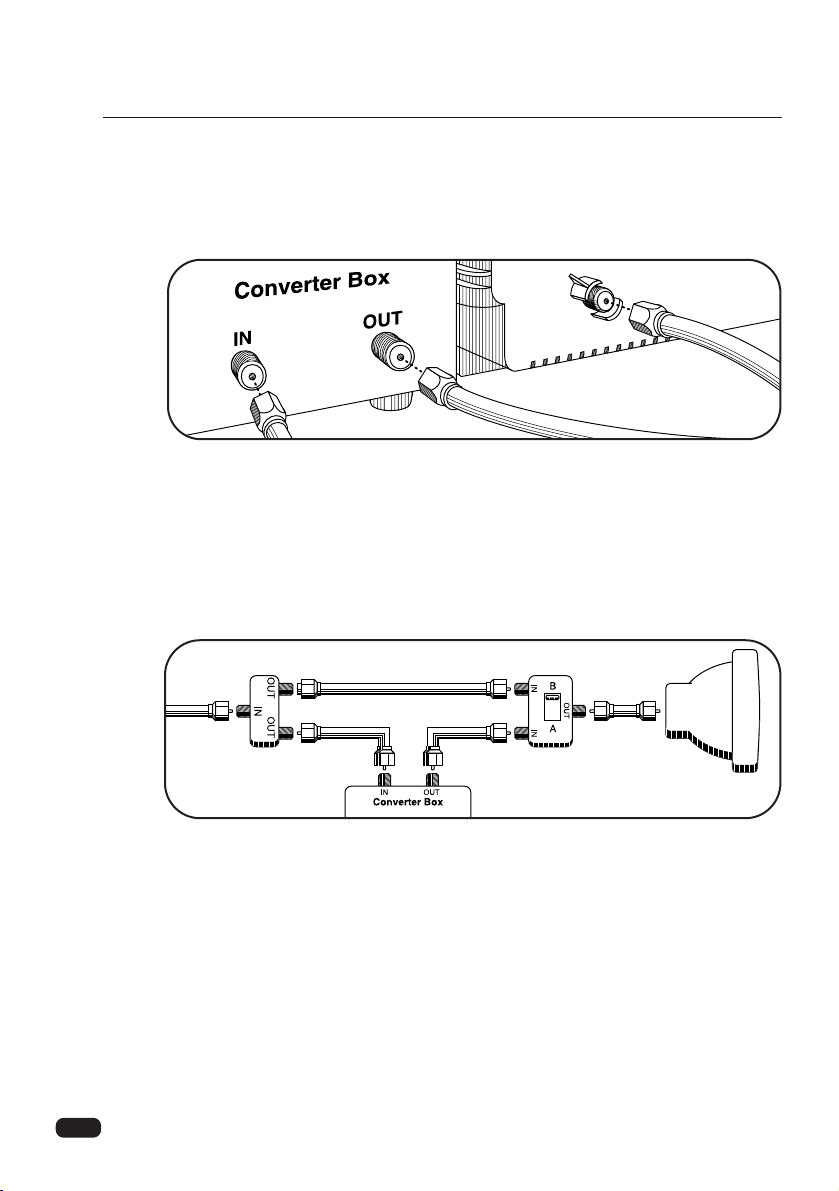
If your cable system requires you to use a converter box for all channels, connect the
incoming cable to the IN terminal on the converter box. Connect another cable between the
OUT terminal on the converter box and the antenna terminal on the TV. You will need to
keep your TV tuned to channel 3 or 4 and change channels using the converter box.
If your cable system only requires you to use a converter box for some channels (i. e.
pay-TV channels), follow these steps: Find the primary incoming coaxial cable. Plug this
cable into a splitter (available at your local electronics store). Connect one coaxial cable
between one OUT terminal on the splitter and the IN terminal on the converter box.
Connect another coaxial cable between the other OUT terminal on the splitter and the B-IN
terminal on an A/B switch (available at your local electronics store.) Connect a third coaxial
cable between the OUT terminal on the converter box and the A-IN terminal on the A/B
switch. Finally, connect a coaxial cable between the OUT terminal on the A/B switch and
the antenna terminal on the back of your TV.
When the A/B switch is in the A position, you need to change channels on the converter
box (and your TV should be tuned to channel 3 or 4); when the A/B switch is in the B position you can change channels on the TV.
Chapter 1 : Connecting an Antenna/Cable and VCR to Your TV
Page 8
6
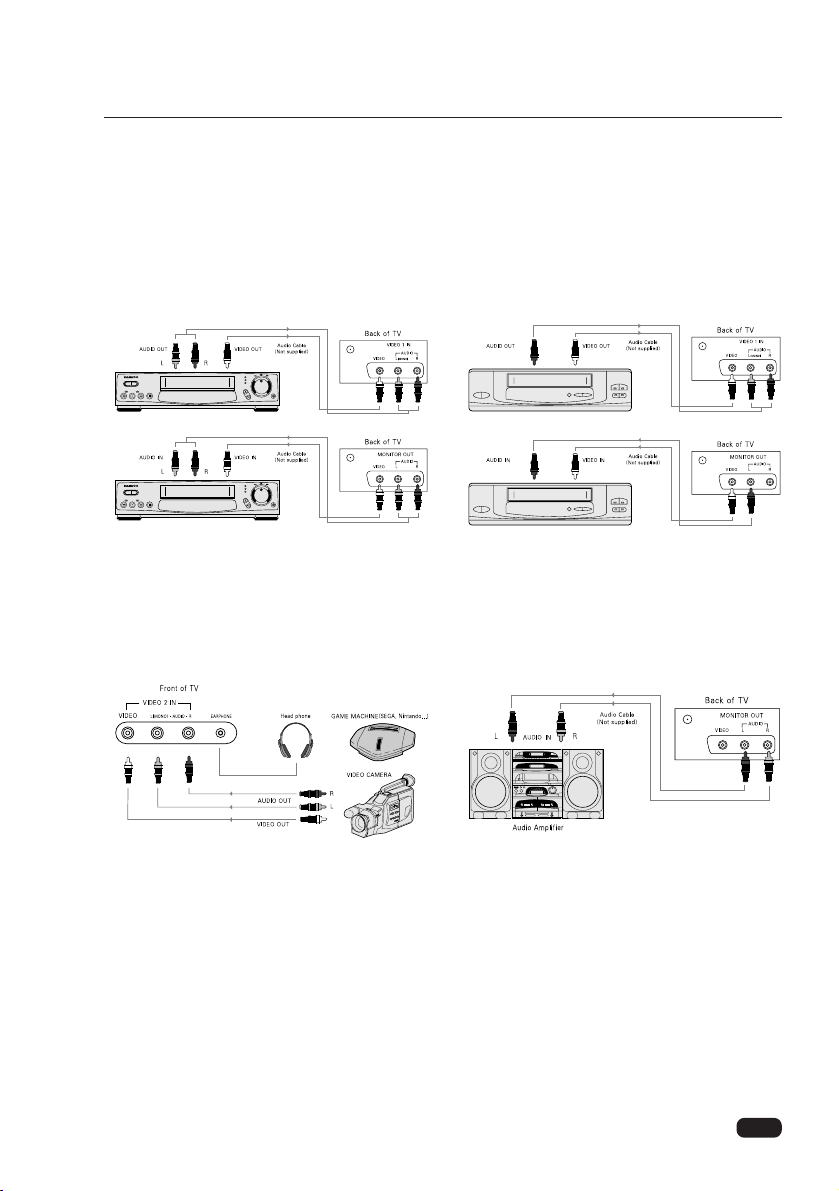
Connecting a VCR
Connecting VIDEO 1 IN(rear panel) or VIDEO 2 IN(front panel) jacks on the TV panel to
the video/audio output jacks of an installed VCR, Laser disk player, video camera, etc. for
playback of video material.
Connecting Other Pieces of Equipment
You may want to connect a VCR, laser disc player, satellite receiver, or another type of
equipment to your TV. We recommend that you follow the instructions included with the
piece of equipment you wish to connect.
Safety Note
If you plan on being away from your home for an extended period of time, or if a thunderstorm is approaching, you should unplug your television, and you may wish to disconnect
your TV from a rooftop or satellite antenna. You do not need to disconnect your TV from a
cable system.
Chapter 1 : Connecting an Antenna/Cable and VCR to Your TV
Connecting Stereo VCR Connecting Mono VCR
Connecting Video camera or Game machine
Connecting an Audio Amplifier
Page 9
7
Chapter 2 : Overview of your equipment
CHAPTER
2
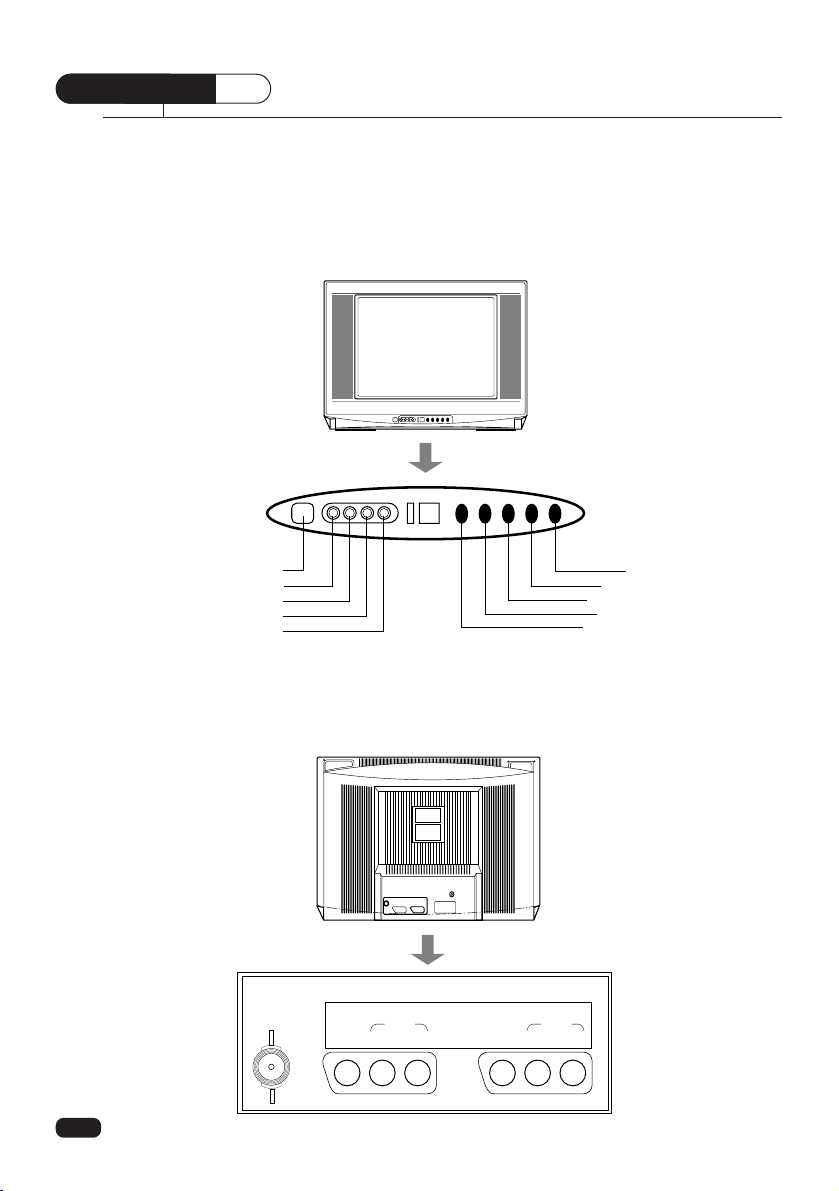
Your TV comes with a remote control. The section below summarizes the buttons, controls,
and terminals that you will use with your TV.
Overview of your equipment
Menu
Volume Up
Volume down
Channel Up
Channel down
POWER
Video
L(Mono)
R
Earphone
ANT
T
VIDEO1 IN MONITOR OUT
VIDEO
AUDIO
L(mono) R
VIDEO
AUDIO
L R
Your TV’s Front View
Your TV’s Back View
Page 10
8
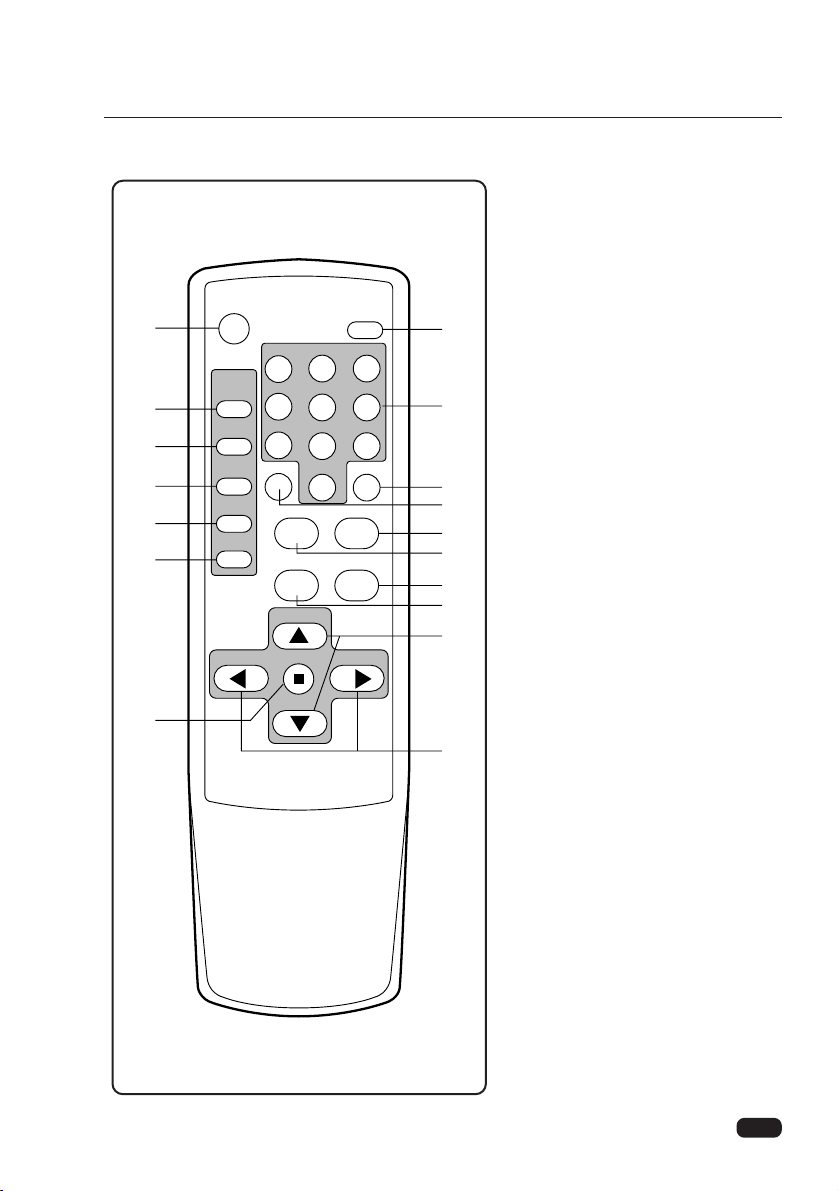
1 POWER
Use this button to turn your TV on
or off.
2 MUTE
Use to turn the TV’s sound on and
off.
3 PIP ON/OFF
Use this button to turn PIP on/off.
4 PIP POSITION
Use this button to move PIP display
position.
5 PIP SOURCE
Use this button to select PIP source.
6 PIP SWAP
Use this button to exchange PIP
source and main source.
7 PIP STILL
Use this button to still PIP source.
8 0-9
Use these buttons to select
channels.
9 SLEEP
Use this button to program the TV
to turn off after a certain time.
10 RECALL
-Use this button to display the
channel number, channel label and
stereo status.
-Use this button repeatedly to select
the main menu or sub menu.
(Changing the channel)
11 TV/VIDEO
Use this button to select main
picture source.
Chapter 2 : Overview of your equipment
Your remote control
POWER
123
456
7809
SLEEP RECALL
MUTE
PIP
ON/OFF
POSITION
SOURCE
SWAP
STILL
TV/VIDEO FAVORITE CH
CAPTION
CH
CH
REMOTE CONTROLLER R-35H13
MENUVOL VOL
MTS
1
3
4
5
6
7
17
2
8
10
9
12
11
14
13
15
16
Page 11

9
Chapter 2 : Overview of your equipment
12 FAVORITE CH
Use this button to scan through your favorite channels only, skipping other channels you do
not normally watch.
13 CAPTION
Use this button to select a caption mode.
14 MTS
Use this button to select one mode of Mono, Stereo or SAP
15 WCHV
Use these buttons to change main channel/PIP channel or select items in the menu system.
16 CVOLB
Use this buttons to change TV’s sound volume, to activate selections in the menu system, or
to change audio and video setting.
17 MENU
Use this button to turn the TV’s menu system on and off.
Page 12
10
Chapter 2 : Overview of your equipment
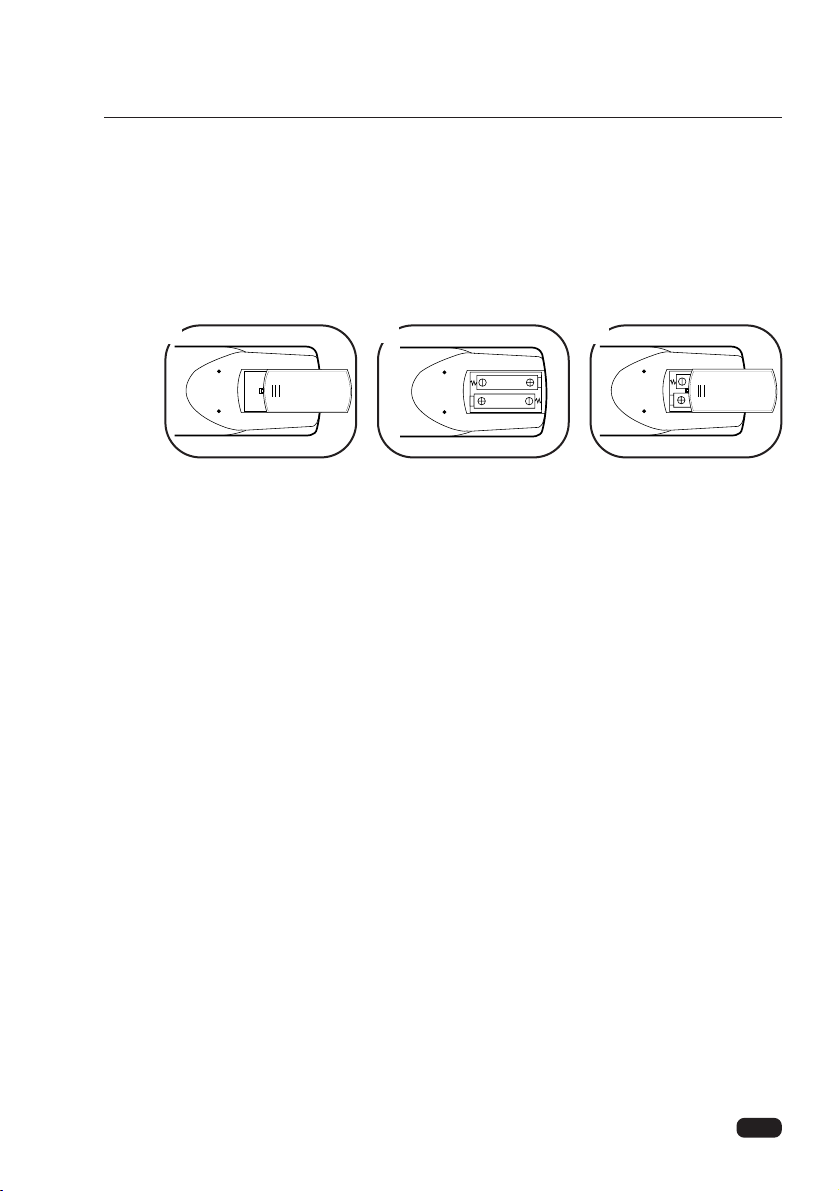
Installing your remote control batteries
1 Open the battery compartment on the back of the remote control.
2 Install two AA-size batteries (not included) as shown. Make sure the “+” and “-” termi-
nals are oriented correctly.
3 Replace the cover.
Notes
Do not mix different types of batteries, or mix an old and a new battery.
Remove and replace weak batteries. Weak batteries can leak and damage your controller.
Dispose of batteries properly; never throw them into a fire.
Point your remote at the receiver on the center of the front of the TV. Make sure the receiv-
er is not blocked.
The remote control can operate up to 30 feet away from the TV, if you are directly facing
the front of the TV. Operating distance diminishes as you move to the sides of the TV
1
2
3
Page 13

11
Operating Your TV
Chapter 3 : Operating Your TV
CHAPTER
3
Turning your TV ON/OFF
To turn your TV on, press the POWER button on the remote
control. You can also use the POWER button on the front panel
of the TV. Make sure your TV is plugged in before you try to
turn it on. The on-screen information which is channel number
or VIDEO mode, channel label and audio status will be displayed in a few seconds. To turn off the TV, press POWER button again.
Changing channels
You can change channels in three ways:
1. The WCHV buttons will take you through all memorized
channels, one by one. The WCHV buttons will not access
channels that have not been programmed into the TV’s memory. For more information about programming channels into
memory, see the section “Programming Your TV’s Channel
Memory.”
2. The number buttons (0~9) will take you to any channel, even
if it has not been memorized. To changed to a channel, enter
its number, the TV will tune to the new channel when you
enter the second digit of the channel.
3. The FAVORITE CH button on the remote will take you
instantly to the favorite channel you were memorizing.
Changing volume
1. To change the volume of the TV set, use the CVOLB but-
tons on the remote or on the front panel of the TV.
2. To quickly turn off the sound, press the MUTE button on the
remote. The “Muted” character appear on screen. To return
the volume to its previous level, press MUTE again.
Ch11
ABCD
Stereo
POWER
STAND-BY CH
VOL
MENU
Volume 24
C ||||||||||| - - - - - - -B
POWER
STAND-BY CH
VOL
MENU
POWER
STAND-BY CH
VOL
MENU
Page 14

Video
12
Chapter 3 : Operating Your TV
Understanding ON-Screen Menu.
One of the distinctive features of this TV is an on-screen menu system that provides stepby-step instructions for using some of the TV’s special capabilities.
When using any of the on-screen menus, please keep the following in mind.
1. The on-screen menus will clear if no item is selected within a few second.
2. Some on-screen menu items must be set before other items are available.
For example, “Timer” will only be available if Clock has been set.
3. You can exit the on-screen menus any times by pressing the MENU button repeatedly.
You will them return to regular TV viewing.
L
Prev WVMove CBSelect
L
Prev WVSelect CBAdjust
Setup
Edit Program
Favorite Ch
Language
Captions
Power Restore
Input
Auto Program
CB
To Press
L
Prev WVSelect CBAdjust
L
Prev WVSelect CBAdjust
L
Prev WVSelect CBAdjust
L
Prev WVSelect CBAdjust
Setup
Video
Audio
Timer
Function
L
Prev WVMove CBSelect
Setup
Video
Audio
Timer
Function
L
Prev WVMove CBSelect
Setup
Video
Audio
Timer
Function
L
Prev WVMove CBSelect
Setup
Video
Audio
Timer
Function
L
Prev WVMove CBSelect
Setup
Video
Audio
Timer
Function
Main Menu Sub Menu
Picture Pref
Contrast
Brightness
Sharpness
Color
Tint
Custom
Stereo
Audio
Audio Mode
AVC
Loudness
12:34 PM
Timer
Clock
On Time
Off Time
Sleep
Function
PIP
Ch Labels
Auto Demo
off
Page 15

13
Chapter 3 : Operating Your TV
Selecting the Input Source
Using the direct button on the remote control.
Press the TV/VIDEO button on the remote control to select the input source you wish to
view : TV, External Video 1 or External Video 2.
Each time you press the TV/VIDEO button, Video1, Video2 or channel number will be displayed to show which signal source you are watching.
Note) Your TV will display a blue screen whenever it is receiving a weak signal from a VCR.
Using On-Screen Menu
1. Press MENU button on the remote
control (or on the TV) to display main
menu.
2. Press WCHV button on the remote
control (or on the TV) repeatedly to
select ‘Set up’ and press CVOLB
button on the remote control (or on
the TV).
3. Press WCHV button on the remote
control (or on the TV) repeatedly to
select ‘Input’ and press CVOLB button on the remote control (or on the
TV)
4. When you select input source correctly, press menu button on the remote
control (or on the TV) repeatedly to
exit on-screen menu.
5. Even if you don’t press any button on
the remote control (or on the TV) the
on-screen menu disappear after a few
second.
L
Prev WVMove CBSelect
Setup
Video
Audio
Timer
Function
L
Prev WVSelect CBAdjust
Setup
Auto Program
Edit Program
Favorite Ch
Language
Captions
Power Restore
TV
Input
Setup
Language
Captions
Power Restore
Video 1
Input
TV Video 1 Video 2
VOL
MENU
VOL
MENU
VOL
MENU
VOL
MENU
Ch 11
Video 1Video 2
1
2
3
Page 16

14
Chapter 3 : Operating Your TV
Programming Your TV’s Channel Memory
VOL
MENU
VOL
MENU
AND-BY CH
VOL
MENU
AND-BY CH
VOL
MENU
L
Prev
WV
Move CBSelect
Setup
Video
Audio
Timer
Function
L
Prev WVSelect CBAdjust
Setup
Edit Program
Favorite Ch
Language
Captions
Power Restore
Input
Auto Program
CB
To Press
L
Prev WVSelect CBAdjust
Auto Prog.
Auto Program
Source Air
L
Prev WVSelect CBAdjust
Auto Prog.
Source
Auto Program
CB
To Program
Your TV automatically memorizes the channels you can receive. Once channels are memorized, you
can scan through them using WCHV buttons on the remote control or on the TV.
3. Press WCHV buttons on the remote control or on the TV to select ‘Auto Program’ and press
CVOLB buttons on the remote control or on the TV.
4. Press WCHV buttons on the remote control or on the TV to select ‘Source’ and press CVOLB
buttons on the remote control or on the TV. If you connected to antenna to your TV, select ‘Air’, if
you connected a cable system, select ‘CABLE’.
Auto Programming Function
1. Select Auto Program following step 2 and 3 in “SOURCE selection” above.
2. Press CVOLB(button an the remote control or on the TV) to start auto programming process. The
TV will automatically cycle through all the TV or CABLE channels on the mode selected by the
Air/Cable mode, and store active channels in the channel memory
3. Press menu button on the remote control or on the TV repeatedly to exit on-screen menu when
channel programming is complete. This process takes a few minutes.
4. Even if you don’t press any button, the on-screen menu disappear after a few second.
SOURCE Selection
1. Press power to turn on the TV.
2. Press menu button on the remote control or on the TV to display the main menu.
2
3
4
2
Page 17

15
Chapter 3 : Operating Your TV
Adding and Erasing Channels
VOL
MENU
VOL
MENU
VOL
MENU
VOL
MENU
VOL
MENU
Setup
Video
Audio
Timer
Function
Setup
Auto Program
Favorite Ch
Language
Captions
Power Restore
Input
Edit Program
CB
To Press
L
Prev WVCH CBErase
Ch 45
Added
L
Prev WVCH CBAdd
Ch 45
Erased
L
Prev WVCH CBAdd
Ch 46
Erased
After all available channels have been programmed automatically channels with weaker signals can
be added or erased with the following procedure.
1. MENU button on the remote control or on the TV to display main menu.
2. Press WCHV buttons an the remote control or on the TV to select “Set up” and press CVOLB
buttons on the remote control or on the TV.
3. Press WCHV buttons repeatedly on the remote control or on the TV to select “Edit Program” and
press CVOLB buttons on the remote control or on the TV.
4. Press WCHV buttons on the remote control or on the TV to select “Add/Erase channels”, then
press CVOLB buttons on the remote control or on the TV.
5. If a channel is added or erased, the channel number is displayed in White or Red.
6. Repeat steps 4 to 5 for other channels.
7. When you are finished adding and erasing channels, press the menu button repeatedly to exit the
menu and return to normal TV viewing.
L
Prev
WV
Move CBSelect
L
Prev
WV
Move CBSelect
2
3
4
5
6
Page 18

16
Adjusting the Picture
You can adjust the picture quality to suit your taste for next items.
– CONTRAST, BRIGHTNESS, COLOR, TINT, SHARPNESS
Custom mode (Adjust each item of the
Picture)
You may wish to adjust the video settings(e.g. contrast or
color) to obtain the most pleasing picture. To do so, follow
these directions;
1. With the TV on, press the MENU button.
2. Use the WCHV buttons to select Video menu for
adjust picture quality.
3. Press the CVOLB buttons. The Video menu will
appear.
4. Use the WCHV buttons to select the video setting you
wish to adjust. Descriptions of the video settings are
described below.
5. Use the CVOLB buttons to adjust the video setting to
the level you prefer.
6. Use the WCHV buttons to select another video setting
to adjust.
7. When you are finished, press the MENU button twice or
wait few second to return to normal viewing.
Chapter 3 : Operating Your TV
Setup
Video
Audio
Timer
Function
L
Prev WVSelect CBAdjust
Selection
Pressing
Remark
CVOL VOLB
CONTRAST lower (-) higher (+)
Contrast controls the level of
white-to-black in the picture
BRIGHTNESS darker(-) lighter(+)
Brightness controls the light
level of the image on screen
SHARPNESS softer(-) sharper(+)
Sharpness adjusts the detail
and clarity of the picture
COLOR paler(-) deeper(+)
Color determines the intensity
of the color
TINT reddish(-) greenish(+)
Tint adjusts the proportion of
red to green that determines
the delicate tones of color
L
Prev
WV
Move CBSelect
Custom
Video
Picture Pref
Contrast
Brightness
Sharpness
Color
Tint
2
3
Page 19

17
Chapter 3 : Operating Your TV
Preset mode (Reset the Picture adjustment to the factory-preset
level)
1. Press MENU button on the remote control or on the TV
to display main menu.
2. Press the WCHV buttons repeatedly on the remote
control or on the TV to select Video menu for adjust
picture quality and press CVOLB buttons.
3. Press the WCHV buttons to select ”Picture Pref.” and
press CVOLB buttons to select “Preset”.
4. Press the MENU button twice or wait few second to
return to normal viewing.
Setup
Video
Audio
Timer
Function
L
Prev
WV
Move CBSelect
L
Prev WVSelect CBAdjust
Custom
Video
Picture Pref
Contrast
Brightness
Sharpness
Color
Tint
2
3
Page 20

Adjusting the Sound.
Selecting stereo/SAP.
The MTS(Multi-channel TV Sound) provides for an extra
sound channel, So MTS feature allows you to improve your
TV viewing with high fidelity stereo sound. SAP(Second
Audio Program) used to transmit a second language of other
audio information. If your TV receives a stereo sound(or SAP)
broadcast when the TV is turned on, select other channel or
press the RECALL button on the remote control, the word
“Stereo”(or “SAP”) is displayed on the screen.
Listening to stereo sound.
1. With the TV turned on, press the MENU button.
2.
Use the WCHVbuttons to select Audio and press
CVOLB
.
The Audio menu will be displayed.
3. Use the
WCHV
buttons to select Audio Mode.
4. Press the
CVOLB
buttons repeatedly until :Stereo” is displayed.
5. Press the MENU button twice or wait few seconds to return to normal TV viewing.
6. Your setting will remain intact until you change it. Your TV will then automatically reproduce
either stereo or monaural sound, whichever is broadcast.
Listening to second Language
1. Follow steps 1~3 in “Listening to stereo sound” above.
2. Press the CVOLB
buttons repeatedly until “SAP” is displayed.
3. Press the MENU button twice or wait few seconds to return to normal TV viewing.
4. If a SAP broadcast is received, you will hear only the second language from the speaker.
18
Chapter 3 : Operating Your TV
L
Prev WVMove CBSelect
Setup
Video
Audio
Timer
Function
Audio
AVC
Loudness
Audio Mode
Stereo
L
Prev WVSelect CBAdjust
About AVC
This function performs an Automatic Volume Control Function. the
sound signal conditions coming out of TV stations are different
from each other. Some signals are intense and other are not . When
the AVC is on, uniform sound can be ensured regardless of the conditions of TV station.
About Loudness
This function performs a bass and treble boost when the volume
control is low position. This makes the sound magnificent. When
the Loudness is On, you can hear the dynamic sounds for a movie
or music.
Audio
Loudness
On
L
Prev WVSelect CBAdjust
Audio Mode
AVC
Audio
AVC
On
L
Prev WVSelect CBAdjust
Audio Mode
Loudness
2
44
Page 21

19
Chapter 3 : Operating Your TV
Using Direct button on the remote control.
1.
You can also change the Audio Mode setting with the remote control.
Press the MTS button on the remote control to select Audio Mode.
2. Use this button to select the Stereo, Mono or SAP.
Present Broadcast Your Selection Speaker Out
MONO Stereo Mono
MONO SAP Mono
STEREO SAP Mono
STEREO and SAP Stereo Stereo
STEREO and SAP SAP SAP
Audio Mode
Mono SAP
Stereo
Note>If a broadcast signal is weak, it may cause noise and hum in
stereo sound. Please select the Mono mode, the noise and hum
should be reduced.
1
Page 22

20
Chapter 3 : Operating Your TV
Convenient Remote Function.
Display On-Screen information.
Press “Recall” button on the remote control to
display on screen information of channel number or VIDEO mode.
Note) When you Displayed PIP picture, the
Recall button can select the Main or
PIP display for changing channels.(See
Chapter 5. for details)
Muting the Sound
Press MUTE button on the remote control to
mute the sound.
The word “Muted” will display on the screen.
To restore the sound, press MUTE again.
Ch14
BCh
12
CH12
Muted
Volume 24
C||||||||||| - - - - - - -B
To Move cursor : RECALL
BCh
14
To Move cursor : RECALL
Page 23

Changing the Language of the On-screen Menus
You can choose to display the on-screen menus in English,
Spanish or French. To change the on-screen language:
1. With the TV turned on, press the MENU button.
2. Use the WCHV buttons to select Setup and press CVOLB.
3. Use the WCHV to select Language.
4. Use the CVOLB button to select the language you want to
use : English, Spanish or French.
5. Press the MENU button twice or wait few seconds to return to
normal TV viewing.
21
CHAPTER
4
Chapter 4 : Using the Advanced Features.
Using the Advanced Features.
Setup
Video
Audio
Timer
Function
L
Prev WVSelect CBAdjust
Setup
Auto Program
Edit Program
Favorite Ch
Captions
Power Restore
Input
EnglishLanguage
L
Prev WVMove CBSelect
2
3,4
Page 24

Using Closed-Captioned Function
Captioning
Many TV shows contains “closed captions.” These captions are hidden words that can be
displayed on your TV screen. There are two types of these words: “ captions” usually
follow the action on-screen, providing a written version of the dialogue, narration, and
sound effects: “ text” is not usually related to the action on-screen, often providing
information such as news or weather. A TV program might be providing more than one set
of captions or one set of text.
Viewing caption
To set your TV to display captions:
1. With the TV turned on, press the MENU
button.
2. Use the WCHV buttons to select Setup and
press CVOLB.
3. Use the WCHV buttons to select Captions,
then pressCVOLB to select Off, Caption1
or Caption2.
4. Press the MENU button twice or wait few
seconds to return to caption viewing. Your
setting will remain intact until you change it.
At that the time these instructions were
written, only Caption1 is normally available,
but feel free to try to the other selections.
5. You can also change the caption setting with
the remote control. Press the CAPTION
button on the remote control to display the
caption menu. Use this button to select
Caption Off, Caption1 or Caption2.
About captions
Once you have chosen a caption setting, all available captions on that
setting will be displayed when you watch TV. If no captions appear, it is
because there are no captions being broadcast for that show. Look for a
“CC” mark in the TV listings or on video tapes. This mark indicates that
captions are provided for that program.
Please note: The content and appearance of captions are determined by the
broadcaster, not by the TV. If the captions display strange characters,
misspellings, or odd words, those errors are made by the broadcaster, not
your TV. Errors in captioning are more common during live programs than
during taped programs.
Your TV cannot display captions when it is displaying any other on-screen
information. If you use the RECALL or VOL buttons, the captions will
briefly disappear.
22
Chapter 4 : Using the Advanced Features.
Setup
Video
Audio
Timer
Function
L
Prev WVSelect CBAdjust
Setup
Auto Program
Edit Program
Favorite Ch
Language
Power Restore
Input
Caption 1Captions
Captions
Off 2
1
CC
L
Prev WVMove CBSelect
2
3
5
2
Page 25

23
Note
A closed-captioned signal may not be decoded in the following situations.
– When a video tape has been dubbed
– When the signal reception is weak
– When the signal reception is non-standard
Chapter 4 : Using the Advanced Features.
Page 26

24
Chapter 4 : Using the Advanced Features.
Programming Your Favorite Channels.
Using Favorite Channels.
The Favorite channel Programming feature allows you to program your favorite
channels. Once programmed, you can use the FAVORITE CH button on the remote
control to scan through only your favorite channels. Skipping other channels you do not
normally view.
Programming your favorite channels
1. With the TV turned on, press the MENU button on the
remote control or on the TV to display the main menu.
2. Use the WCHV buttons to select Setup and press the
CVOLB buttons.
3. Press the WCHV buttons repeatedly to select Favorite
Ch, then press the CVOLB buttons. The Favorite
channel menu will be displayed.
4. Press the WCHV buttons to select your favorite
channels, then press theCVOLB buttons to program
the favorite channel. If you wish to return to normal
channel, press theCVOLB buttons again.
5. Press MENU button repeatedly to exit the menu and
return to normal TV viewing.
Selecting your favorite channels.
To select your favorite channels you have programmed, use
the “FAVORITE CH” button on the remote control.
L
Prev WVMove CBSelect
Setup
Video
Audio
Timer
Function
L
Prev WVSelect CBAdjust
Setup
Auto Program
Edit Program
Language
Captions
Power Restore
Input
CB
To Press
Favorite Ch
L
Prev WVCh CBNormal
Ch45
Favorite
L
Prev WVCh CBFavorite
Ch45
Normal
1
2
3
4
Page 27

25
Setting the Timer
Your TV has a built in-clock, and you can set the TV to turn on and off at the time that you
select. You can also set your TV to turn off after counting down a certain amount of time.
Setting the Clock
1. With the TV turned on, press the MENU button on the
remote control or on the TV to display the main menu.
2. Use the WCHV buttons to select Timer and press the
CVOLB buttons. The Timer menu will be displayed.
3. Press the WCHV buttons to select Clock.
4. Press C VOL button to set the hours (including AM/PM):
press the VOLB button to set the minutes.
5. Press MENU button twice to exit this menu.
Setting the On Timer
If you enter a time in the On Time setting, your TV will
automatically turn on at that time. Follow these instructions to
set the On Time.
1. Follow steps 1~2 in “Setting the Clock” above.
2. Press the WCHV buttons to select On Time
3. Press C VOL button to set the hours (including AM/PM):
press the VOLB button to set the minutes.
4. Press MENU button twice to exit this menu.
Setting the Off Timer
If you enter a time in the Off Time setting, your TV will automatically turn off at that time.
Follow these instructions to set the Off Time.
1. Follow steps 1~2 in “Setting the Clock” above.
2. Press the WCHV buttons to select Off Time
3. Press C VOL button to set the hours (including AM/PM): press the VOLB button to
set the minutes.
4. Press MENU button twice to exit this menu.
Canceling the On Timer or Off Timer
If you would like to cancel the On Timer or the Off Timer, Press theCVOLB
buttons until the timer settings return to “- - : - -” .
The On Timer and Off Timer will not function correctly unless the clock has been set.
Chapter 4 : Using the Advanced Features.
Setup
Video
Audio
Timer
Function
L
Prev WVMove CBSelect
3
Timer
On Time
Off Time
Sleep
Clock
12:34 PM
L
Prev WVSelect CBAdjust
4
Page 28

26
Chapter 4 : Using the Advanced Features.
Setting the Sleep Time.
The sleep timer allows you to set an amount of time from 15
minutes to 4 hours, in 15 minute increments; the TV will
count down the amount of time you set, then turn itself off.
To set the sleep timer:
1. Follow steps 1~2 in “Setting the Clock” on the previous
page.
2. Press the WCHV buttons to select Sleep.
3. Use the C VOLB buttons to set the sleep timer. Each
time you press VOL, you step between the available
sleep times: 15min., 30min., 45min., 60min., 90min., 120
min., 150min., 180min., 210min., 240min. or
0 min.(Off).
4. Press MENU button twice to exit this menu.
5. You can also set the Sleep Timer during normal TV
viewing, simply by pressing the SLEEP button on the
remote control. This button steps through the available
sleep times (see step 3), one by one.
6. To cancel the sleep timer, turn the TV off, or set the sleep
time to “0” using one of the methods described above.
Sleep Timer
1:30
5
Page 29

27
Using the Power Restore feature.
If the Power Restore is On, the TV will automatically turn On
when electric power is supplied. It is very useful function for
using with cable set top box or for displaying with other AC
switching device.
1. With the TV turned on, press the MENU button on the
remote control or on the TV to display the main menu.
2. Use the WCHV buttons to select Setup and press the C
VOLB buttons. The Setup menu will be displayed.
3. Press the WCHV buttons to select Power Restore.
4. Press C VOLB buttons to set On the Power Restore. If
you wish to set Off the Power Restore, press theC VOLB
buttons again.
5. Press MENU button twice to exit this menu.
Notes
Even when the Power Restore feature is used, turning off the electric power will reset the
some function such as built-in clock.
Chapter 4 : Using the Advanced Features.
L
Prev WVMove CBSelect
Setup
Video
Audio
Timer
Function
L
Prev WVSelect CBAdjust
Setup
Auto Program
Edit Program
Favorite Ch
Language
Captions
Input
offPower Restore
2
3
Page 30

Watching picture-in-Picture (PIP function)
One of the special features of this TV is the Picture-in-Picture, which allows you to
view two different inputs at the same time.
Display the PIP
1. With the TV turned on, press the MENU button on the remote control or on the
TV to display the main menu.
2. Use the WCHV buttons to select Function and press the C VOLB buttons.
3. Press the WCHV buttons to select PIP and press the C VOLB to select PIP On.
4. Press MENU button twice to exit this menu.
5. You can also display PIP during normal TV viewing, simply by pressing the PIP
ON/OFF button on the remote control.
Changing the PIP channels
1. With the PIP display is On, press the RECALL button twice on the remote control to
select PIP channel.
2. Use the WCHV buttons to select channel you want to view.
3. Press Menu button to exit this menu.
4. You can also changing the PIP channel directly by pressing the channel number
buttons on the remote control.
To change the PIP position
Press PIP POSITION button repeatedly when the PIP picture is
displayed. The display position of the PIP picture will moved a
to different location.
To Display a picture from an external source as a
PIP picture.
1. Connect external source equipment such as VCR for the
PIP picture.
2. Turn On the TV and select the desired program.
3. Press PIP button to display the PIP picture.
4. Press PIP SOURCE repeatedly to select the PIP input source (TV, Video 1 or Video 2)
for the PIP picture.
5. The selected source will be displayed.
28
Chapter 5 : Using the special feature
CHAPTER
5
Using the special feature
Function
Ch Labels
Auto Demo
PIP
On
L
Prev WVSelect CBAdjust
Ch14
To move cursor : RECALL
B
Ch12
B
Ch14
To move cursor : RECALL
Ch12
L
Prev WVMove CBSelect
Setup
Video
Audio
Timer
Function
L
Prev WVSelect CBAdjust
Function
PIP
Ch Labels
Auto Demo
off
o
k
i
m
2 4
3
1 2
Page 31

Note) 1. When the main image is black and white, the PIP image will also appear in black
and white even though the PIP source is in color.
2. If your TV displays a blue screen (when your video is no signal), the PIP image
does not display.
3. You cannot display video1 for main screen and video2 for PIP screen at the same
time or vise versa.
To switch the main and PIP picture.
Press PIP SWAP button when the PIP picture is displayed.
The main and PIP picture will switch. To switch them again, press PIP SWAP again.
To freeze the PIP picture.
Press PIP STILL button when the PIP picture is displayed. The PIP picture will become
a still image. To return it to a normal viewing, press PIP STILL button again.
29
Chapter 5 : Using the special feature
Ch14
To move cursor : RECALL
B
Ch12
video2
video1
video1
Not available
video2
Video1
To move cursor : RECALL
B
Ch12
Video2
To move cursor : RECALL
B
Ch12
gc
SWAP
3 4 5
Page 32

Using channel label Feature.
This feature allows you to enter a 4 letter channel identifier of your choice that will appear
over the channel number display.
The labeling can be anything you want.
Programming the channel labels
1. Select the channel you want to apply labels.
Example : To assign “ABCD” to channel 12.
2. Press menu button on the remote control or on the TV to
display main menu.
3. Press WCHV buttons on the remote control or on the
TV to select Function and press C VOLB buttons on the
remote control or on the TV.
4. Press VOLB on the remote control (or on the TV) to
select the 1st character space.
5. Press WCH or CHV repeatedly until the 1st character
(“A” in this example) appear in the 1st character space.
6. Press VOLB once to enter the 1st character and to
advance to the next character space.
7. Repeat steps
➄~➅
to enter the 2nd 3rd and 4th characters (“B”, “C”, “D” in this example), when the on-screen
message at the right appears, the channel label has been
stored in the memory.
8. Repeat steps
➀
through ➆for other channels. The label
will appear when you turn the TV on, select a channel, or
Press the recall button.
30
Chapter 5 : Using the special feature
CH 12
CH 12
ABCD
Function
PIP
Auto Demo
Ch Labels
CB
To Press
L
Prev WVSelect CBAdjust
Function
PIP
Auto Demo
Ch Labels
L
Prev WVSelect CBAdjust
A B L-
L
Prev WVMove CBSelect
Setup
Video
Audio
Timer
Function
Page 33

31
Chapter 5 : Using the special feature
Note
Each time you press the WCHV button, the displayed character will change in the following order.
Clearing channel labels.
1. Select the channel which has the label you want to clear.
2, 3, 4. Follow steps 2~4 on the previous page to call up the
CH labels mode display.
5. Enter “–” in first character spaces.
Function
PIP
Auto Demo
Ch Labels
–
BCD
CH V A → B → C → D →……→ Z → 0 → 1 → ……→ 9 → –
WCH 9 → 8 → ……→ 0 → Z → Y → ……→ B → A → –
L
Prev WVSelect CBAdjust
5
Page 34

32
Chapter 5 : Using the special feature
Watching Auto demo Feature
When this function is activated, your TV will automatically display a variety of its onscreen menus and special features.
This function is provided for demonstration purpose only.
Starting the on-screen demonstration.
1. With the TV turned on, press the MENU button on the
remote control or on the TV to display the main menu.
2. Use the WCHV buttons to select Function and press the
C VOLB buttons.
3. Press the WCHV buttons to select Auto Demo.
4. Press C VOLB buttons to start the Auto Demo.
To stop the demonstration.
* Press menu button on the remote control or on the TV.
Protection Features
The Following one features protect your TV from operation
unnecessarily.
Automatic power off
If your television does not receive a television signal for 15
minutes, it will automatically turn off.
Function
PIP
Ch Labels
Auto Demo
Off
L
Prev WVSelect CBAdjust
L
Prev WVMove CBSelect
Setup
Video
Audio
Timer
Function
2
3
Page 35

33
Chapter 6 : Troubleshooting
CHAPTER
6
Troubleshooting
Your Daewoo televison is designed to give you trouble-free performance for many years. If
you have a problem with your TV, try the solutions listed below.
If the suggestions listed below do not solve your problem, contact your Daewoo dealer or an
authorized Daewoo service center.
There is no picture or sound, or the TV won't turn on.
• Make sure the TV is plugged in.
• Make sure the MUTE is not set.
• Make sure the power is on.
• If there is neither picture or sound, unplug the TV for 30 seconds, then plug it in and try
again.
There is no picture or sound on some UHF channels.
• Try another station. If the other stations are OK, it may be a station problem.
• Check that the antenna is connected, is in good working order, has no broken wires, and is
adjusted correctly.
• See if anything is interfering with the antenna signal.
• Make sure the AIR/CABLE setting is correct.
The sound is OK, but the picture is poor.
• Try another station. If the other stations are OK, it may be a station problem.
• Check that the antenna is connected and is in good working order, has no broken wires,
and is adjusted correctly.
The picture is OK, but the sound is poor.
• Try another station. If the other stations are OK, it may be a station problem.
• Check that the antenna is connected, is in good working order, has no broken wires, and
adjusted correctly.
There is poor reception on some channels.
• Try another station. If the other stations are OK, it may be a station problem.
• Check that the antenna is connected, is in good working order, has no broken wires, and is
adjusted correctly.
You cannot tune to a cable channel.
• Make sure the AIR/CABLE setting is correct.
• The channel may not be programmed into memory.
The picture rolls, slants, shows lines, is grainy, has poor color, or has ghosts.
• Try another station. If the other station are OK, it may be a station problem.
• Check that the antenna is connected, is in good working order, has no broken wires, and is
adjusted correctly.
• See of anything is interfering with the antenna signal.
The remote control does not work.
• Make sure the TV is plugged in.
• Make sure there are fresh batteries in the remote control.
• Make sure there is nothing blocking the remote control signal.
Page 36

34
WARRANTY
Daewoo Electronics Co., LTD. warrants each new electronic product manufactured by
it to be free from defective material and workmanship and agrees to remedy any such
defect or to furnish a new part (at the Company’s option) in exchange for any part of any
unit of its manufacture which under normal installation, use, and service disclosed such
defect, provided the unit is delivered by the owner to us or to our authorized distributor
from whom purchased or authorized service station, intact, for our examination with all
transportation charges prepaid to our factory. To establish and receive warranty service
at our factory or authorized service facilities, proof of purchase/dated sales invoice is
required
Return authorization must be obtained before any merchandise is returned to the factory.
This warranty does not extend to any of our electronic products which have been sub-
jected to misuse, neglect, accident, incorrect wiring not our own, improper installation,
unauthorized modification, or to use in violation of instructions furnished by us, nor
units which have been repaired or altered outside of our factory, nor to cases where the
serial number thereof has been removed, defaced, or changed.
This warranty is in lieu of all warranties expressed or implied and no representative or
person is authorized to assume for us any other liability in connection with the sale of
our electronic products.
Over-the-counter exchange for units that are initially defective
“Initially defective” is described as when the dealer opens the unit and finds that it is
inoperative or a customer opens a new unit and finds that it is inoperable. This unit may
be returned to the factory by the dealer for exchange. Under no circumstances will the
customer be permitted to return the defective unit directly to the factory.
Exchange must be directly with the dealer.
Model Parts Labor Picture Tube
DTQ-25G1 1 year 1 year 2 years
DTQ-29G1 1 year 1 year 2 years
Warranty
WARRANTY
Page 37

P/N:48586217E101
 Loading...