

Page 1

DMP3954200
Page 2
DTG-28, 29
GB
DTH-28, 29
Colour Television
MANUAL INSTRUCTION
Page 3
CONTENTS
REMOTE CONTROL & TV CONNECTIONS . . . . . . . . . . . . . . . . . . . . . . 2
IMPORTANT SAFEGUARDS . . . . . . . . . . . . . . . . . . . . . . . . . . . . . . . . . . 3
INSTALLATION . . . . . . . . . . . . . . . . . . . . . . . . . . . . . . . . . . . . . . . . . . . . . 4
START UP . . . . . . . . . . . . . . . . . . . . . . . . . . . . . . . . . . . . . . . . . . . . . . . . . . 5
CONNECTING EXTERNAL EQUIPMENT . . . . . . . . . . . . . . . . . . . . . . . 5
DAILY USE . . . . . . . . . . . . . . . . . . . . . . . . . . . . . . . . . . . . . . . . . . . . . . . . . . 6
MENUS DESCRIPTION . . . . . . . . . . . . . . . . . . . . . . . . . . . . . . . . . . . . . . . 9
TELETEXT . . . . . . . . . . . . . . . . . . . . . . . . . . . . . . . . . . . . . . . . . . . . . . . . . 14
REMOTE CONTROL & TV CONNECTIONS
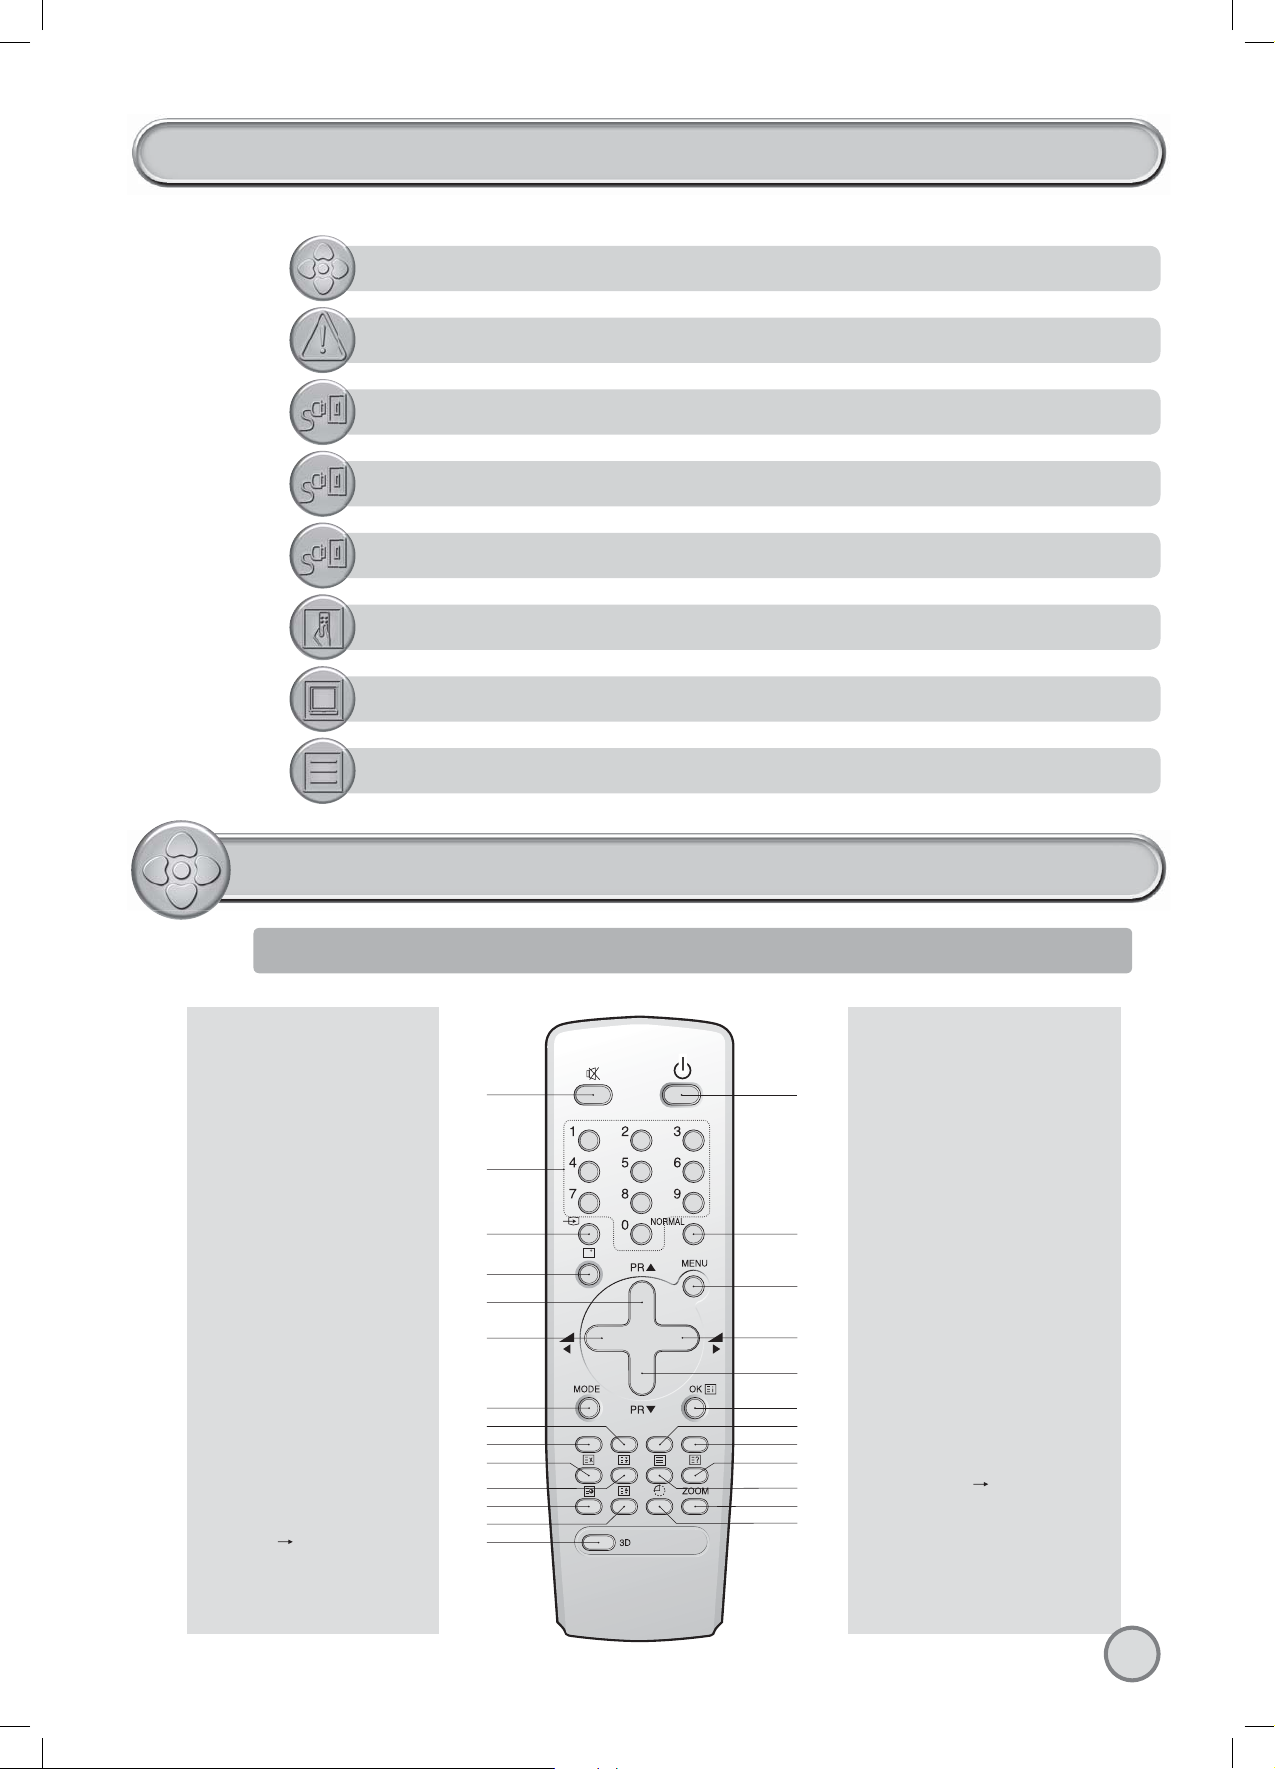
REMOTE CONTROL UNIT
TV mode
A1 POWER
A2 SOUND MUTE
A3 NUMBER 0..9
A4 SLEEP
A5 TV / AV
A6 PROGRAM UP
(CURSOR UP)
A7 VOLUME DOWN
(CURSOR LEFT)
A8 .
A9 .
A10 .
A11 SKIP
A12 MOVE
A13 3D(SOUND EFFECT)
A14 MODE
A15 ZOOM
A16 RECALL
A17 NORMAL
A18 OK/PRESET
A19 MENU
A20 VOLUME UP
(CURSOR RIGHT)
A21 PROGRAM DOWN
(CURSOR DOWN)
A22 TV TELETEXT
A23 .
A24 .
A25 .
A26 DELETE / FREEZE
A2
A3
A5
A16
A6
A7
A14
A12
A11
A8
A9
A10
A23
A13
A1
A17
A19
A20
A21
A18
A26
A25
A24
A22
A15
A4
TELETEXT mode
A1 POWER
A2 SOUND MUTE
A3 NUMBER 0..9
A4 .
A5 .
A6 PAGE UP
A7 VOL/BRIGHT
A8 CANCEL
A9 PAGE HOLD
A10 SUBPAGE
A11 RED
A12 GREEN
A13 .
A14 .
A15 .
A16 .
A17 .
A18 INDEX
A19 VOL/BRIGHT
MENU SELECTION
A20 VOL/BRIGHT
A21 PAGE DOWN
A22 TELETEXT
A23 HEIGHT
A24 REVEAL
A25 CYAN
A26 YELLOW
TV
2
Page 4
Front
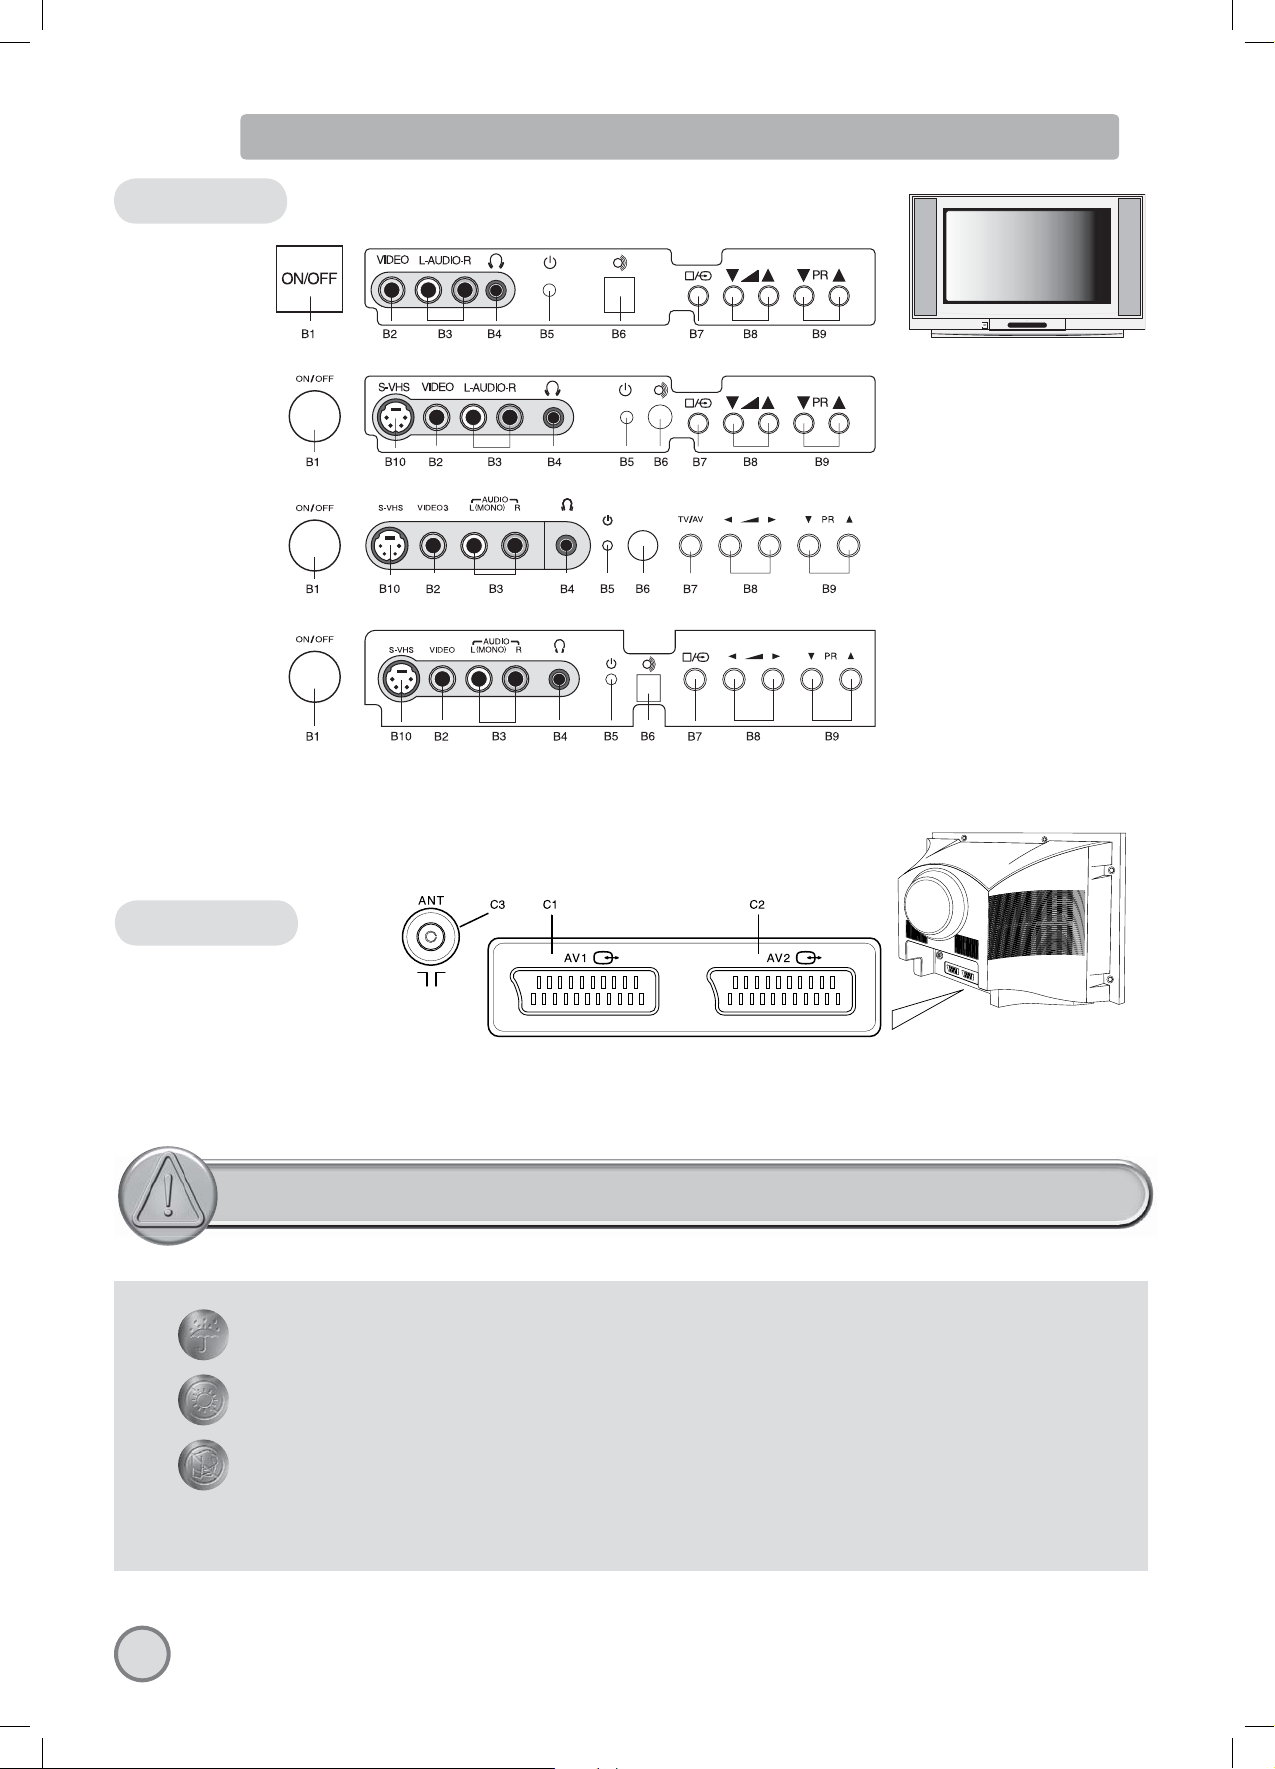
LOCAL CONTROL
DTG-28 / DTG-29
DTH-28 / DTH-29U7
DTH-29U3
DTH-2820 / DTH-29G2
Rear
B1 MAIN POWER button
B2 FRONT VIDEO INPUT socket
B3 FRONT AUDIO INPUT (L + R) socket
B4 HEADPHONE socket
B5 STAND-BY indicator
C1 SCART 1 socket
C2 SCART 2 socket
C3 AERIAL jack
B6 REMOTE sensor
B7 TV / AV button
B8 VOLUME UP/DOWN buttons
B9 PROGRAM UP/DOWN buttons
B10 FRONT PANEL S-VIDEO jack
IMPORTANT SAFEGUARDS
WATER AND MOISTURE
The apparatus shall not be exposed to dripping or splashing water and no object filled with liquids, such as vases , should be
placed on the apparatus.
HEAT
Never place the set near heat sources.
Never put a naked flame, such as a candle, on the top of TV set.
VENTILATION
Do not cover the ventilation openings in the cabinet and never place the set in a confined space such as in a bookcase
or built-in cabinet unless proper ventilation is provided. Leave a minimum 10 cm gap all around the unit.
3
Page 5
OBJECT ENTRY
Do not insert foreign objects, such as needles and coins, in the ventilation openings.
LIGHTNING STRIKE
You should disconnect the set from the mains and the aerial system during thunderstorms.
CLEANING
Unplug the set from the mains while cleaning.
AFTER MOVING THE SET
If the set is moved or turned, the MAIN POWER button must be switched off for at least 15 minutes
in order to take out colour patches on the screen.
DISPOSAL OF USED ELECTRICAL & ELECTRONIC EQUIPMENT
The meaning of the symbol on the product, its accessory or packaging indicates that this product shall not be treated as household
waste. Please, dispose of this equipment at your applicable collection point for the recycling of electrical & electronic equipments
waste. In the European Union and Other European countries which there are separate collection systems for used electrical and
electronic product. By ensuring the correct disposal of this product, you will help prevent potentially hazardous to the environment
and to human health, which could otherwise be caused by unsuitable waste handling of this product. The recycling of materials
will help conserve natural resources. Please do not therefore dispose of your old electrical and electronic equipment with your
household waste. For more detailed information about recycling of this product, please contact your local city office, your household
waste disposal service or the shop where you purchased the product.
INSTALLATION
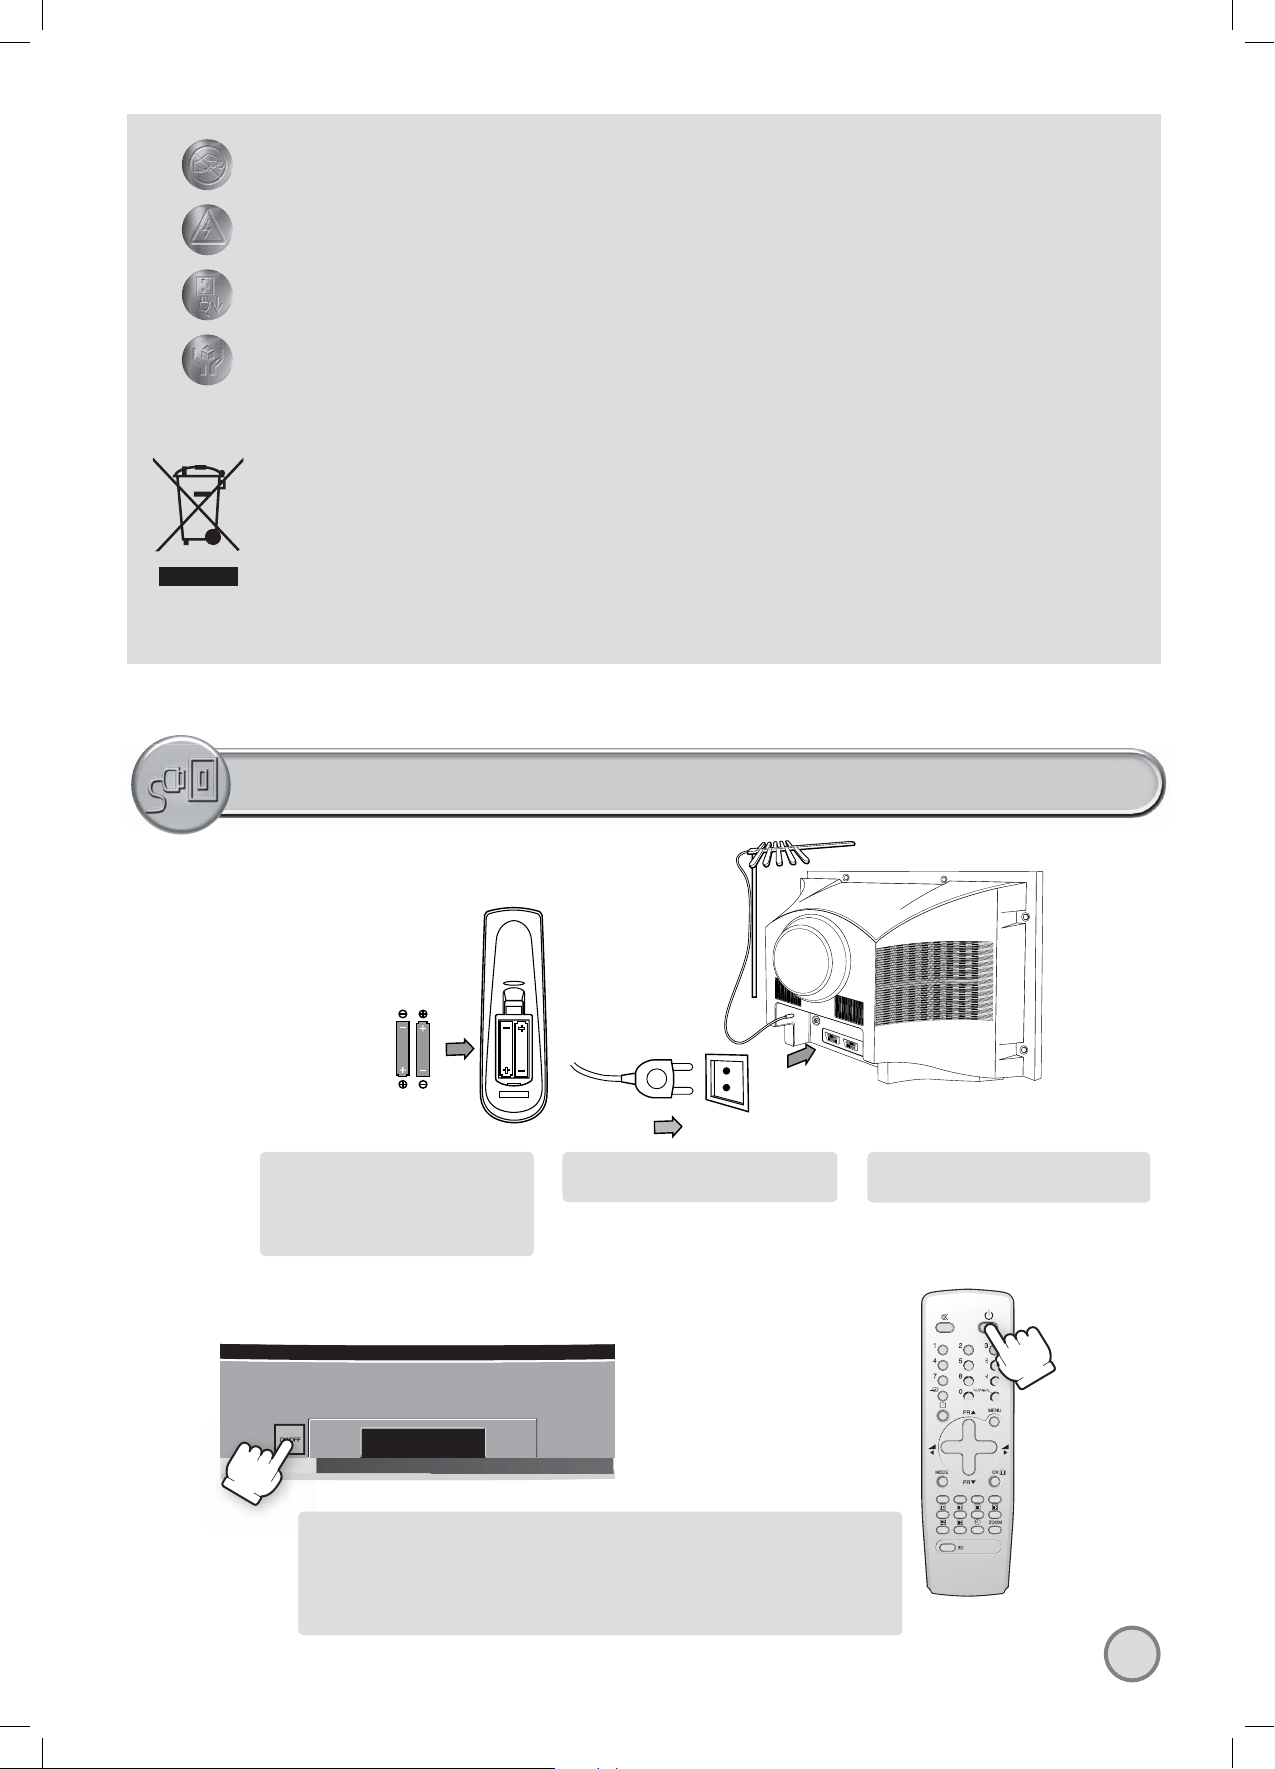
Batteries
Open remote control battery
compartment (at the rear) and insert
two 1.5V type AAA batteries. Warning:
be careful to respect battery polarities.
SWITCHING ON AND OFF
Insert the main plug into a
230V 50Hz AC power socket.
Connect aerial to aerial jack (C3).
Power on the TV set using front panel MAIN POWER button (B1).
Select your preferred language from the LANGUAGE menu (see section START UP on
page 5).
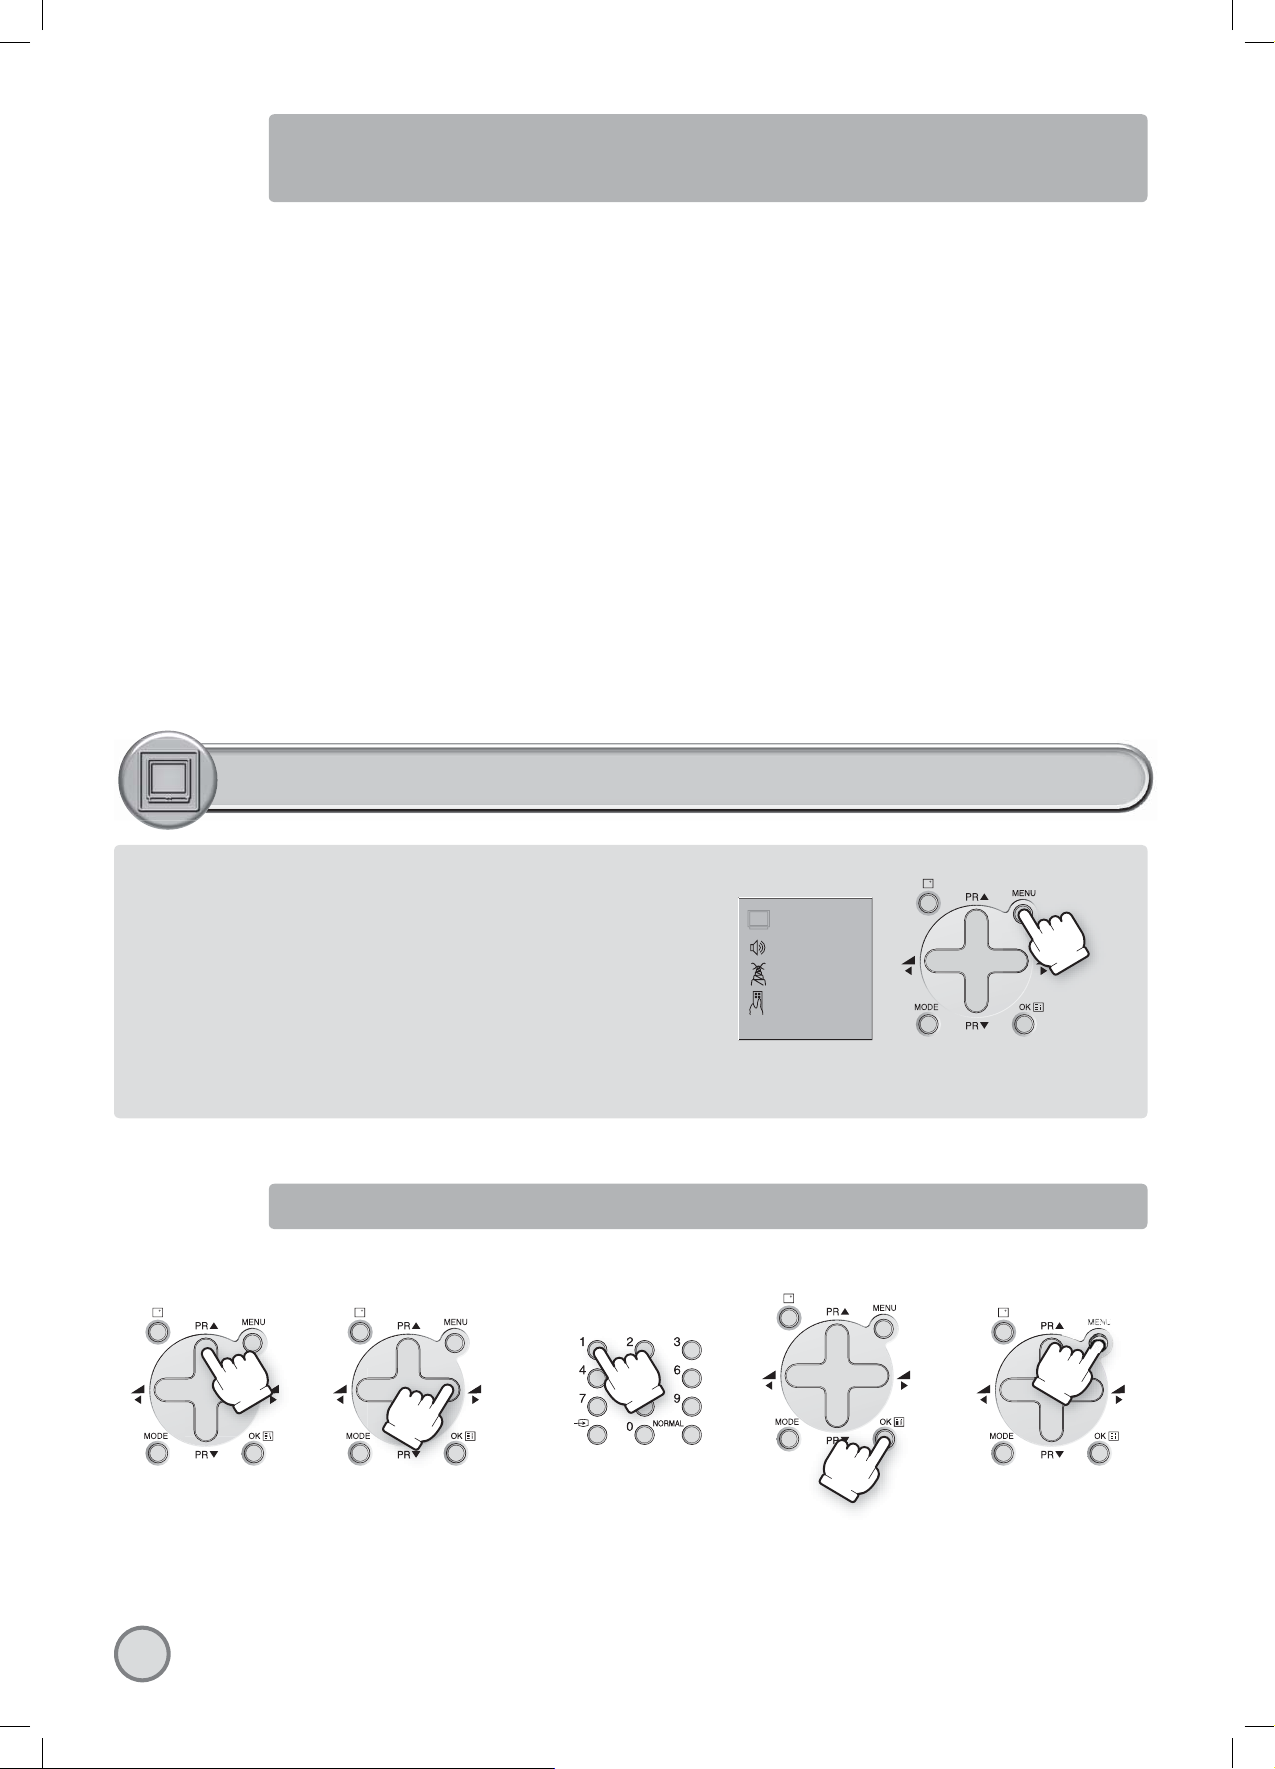
Press the remote control MENU button (A19) to enter the main menu.
Select Install menu to tune and memorise TV programs.
4
Page 6
START UP
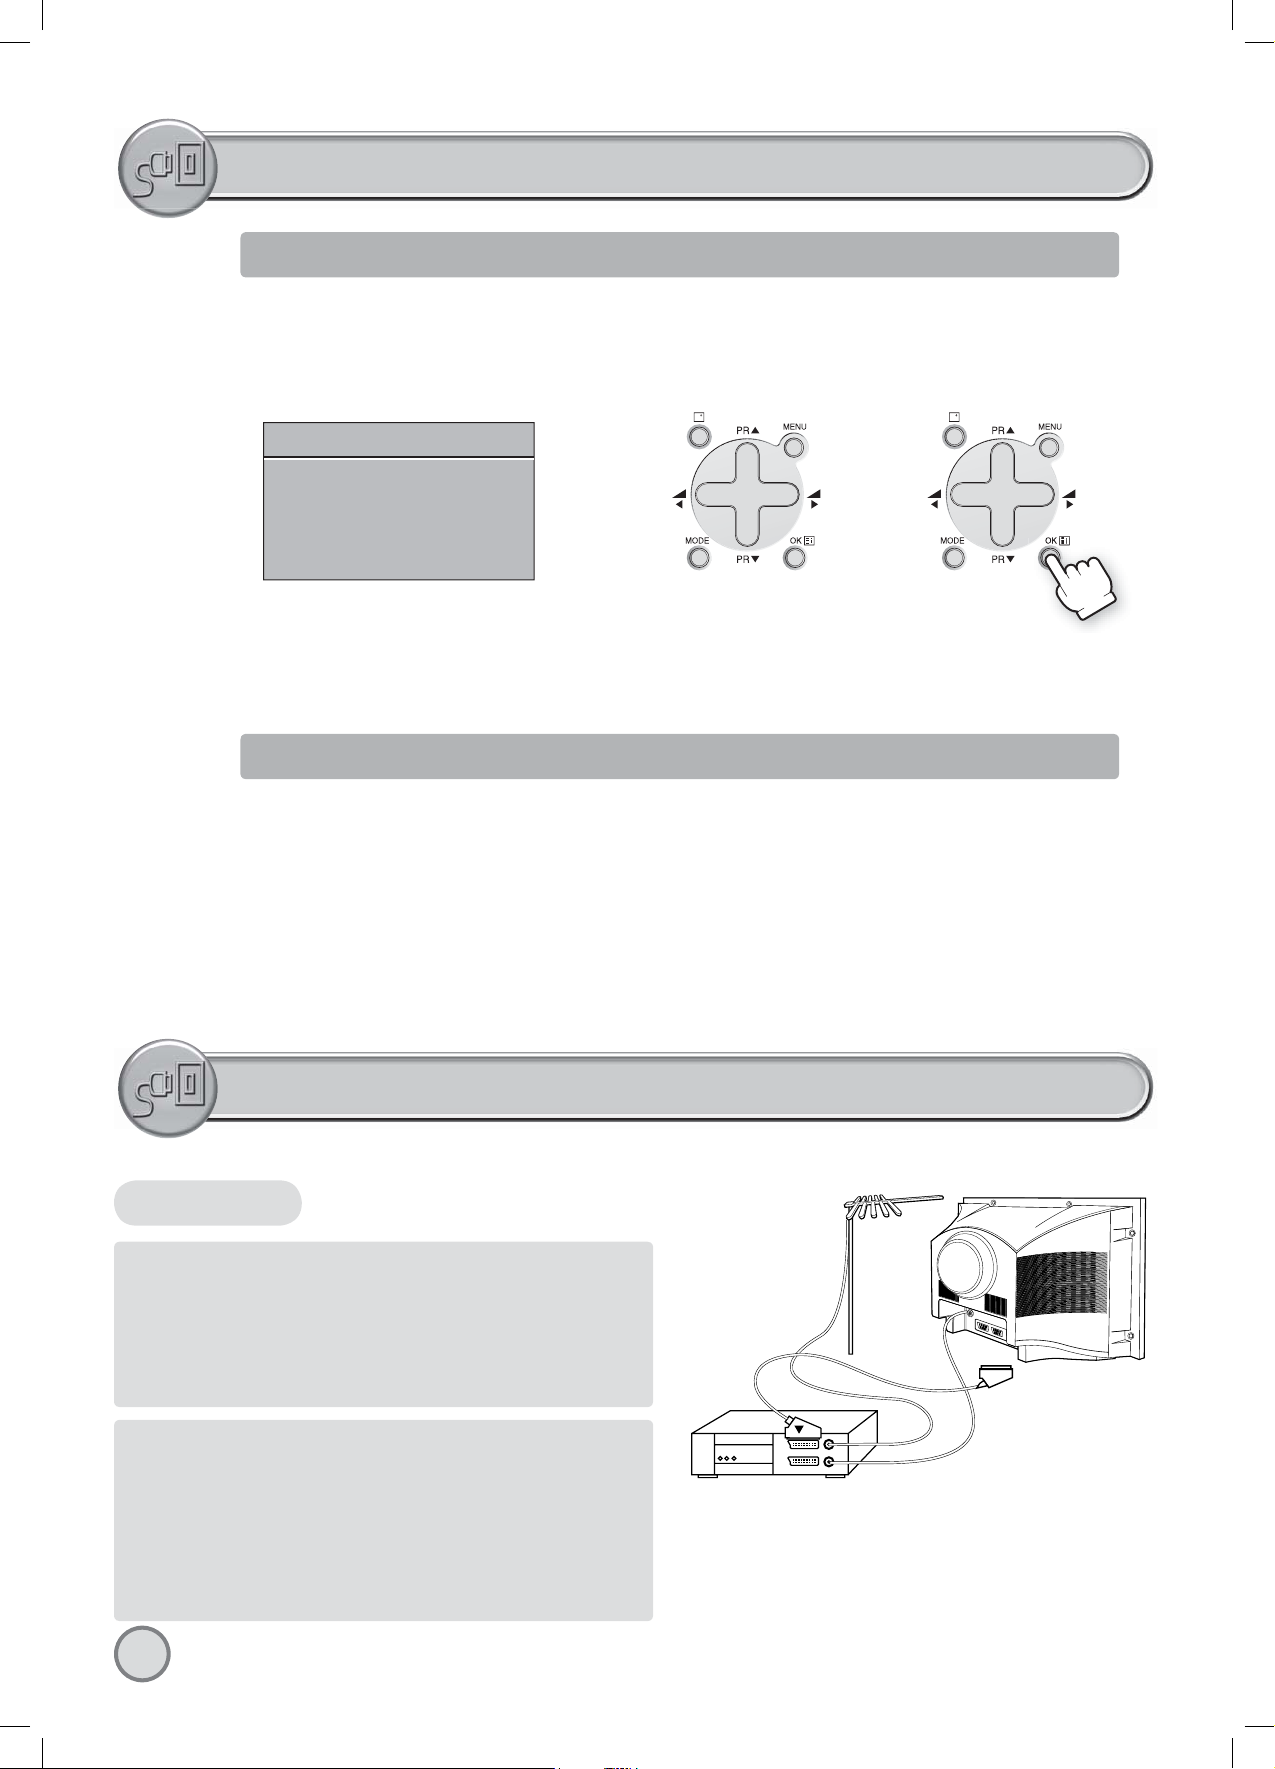
LANGUAGE MENU
The very first time that you turn on the TV, the LANGUAGE menu will appear on the screen. Its purpose is to enable you to select the language that will be
used for all the OSD (On Screen Display) menus. The user must enter a choice of language before proceeding further.
The language entered at this stage can still be modified at any later time, by entering the LANGUAGE menu (accessed from the FEATURES menu: see later
section under MENU DESCRIPTION).
The descriptions used in the menu are those of the country code (e.g. GB = English, NL = Holland etc).
LANGUAGE
BG CZ D DK E
F FIN GB GR H
I N NL PL RO
RUS S SK
Selection is made by use of the remote control CURSOR UP (A6) / CURSOR DOWN (A21) keys and CURSOR RIGHT (A20) / LEFT (A7) keys.
Once you are satisfied with your selection, push the OK button (A18) to confirm your choice. The choice will briefly highlight in red, after which the menu
will disappear.
Note : The languages shown are subject to modification without prior notice.
AUTOMATIC TUNING
Automatic Tuning System
If you have a satellite decoder: If your decoder is connected to the TV set by the aerial jack (C3), you must power on the demodulator and tune
Sky News before starting ATSS .
ATSS = Automatic Tuning and Sorting System. To start the ATSS function:
- Select „ATSS „ function.
- Adjust to the required country.
- Press and hold the OK button (A18) to start the automatic tuning.
The ATSS function has started when the phrase „Please Wait !” appears (in red characters ) in the help instructions box, below the Install menu.
When the ATSS function is finished, the stored programs are displayed on screen using Edit menu presentation (to Exit tuning before automatic
tuning is finished, press the remote control MENU button (A19) ).
CONNECTING EXTERNAL EQUIPMENT
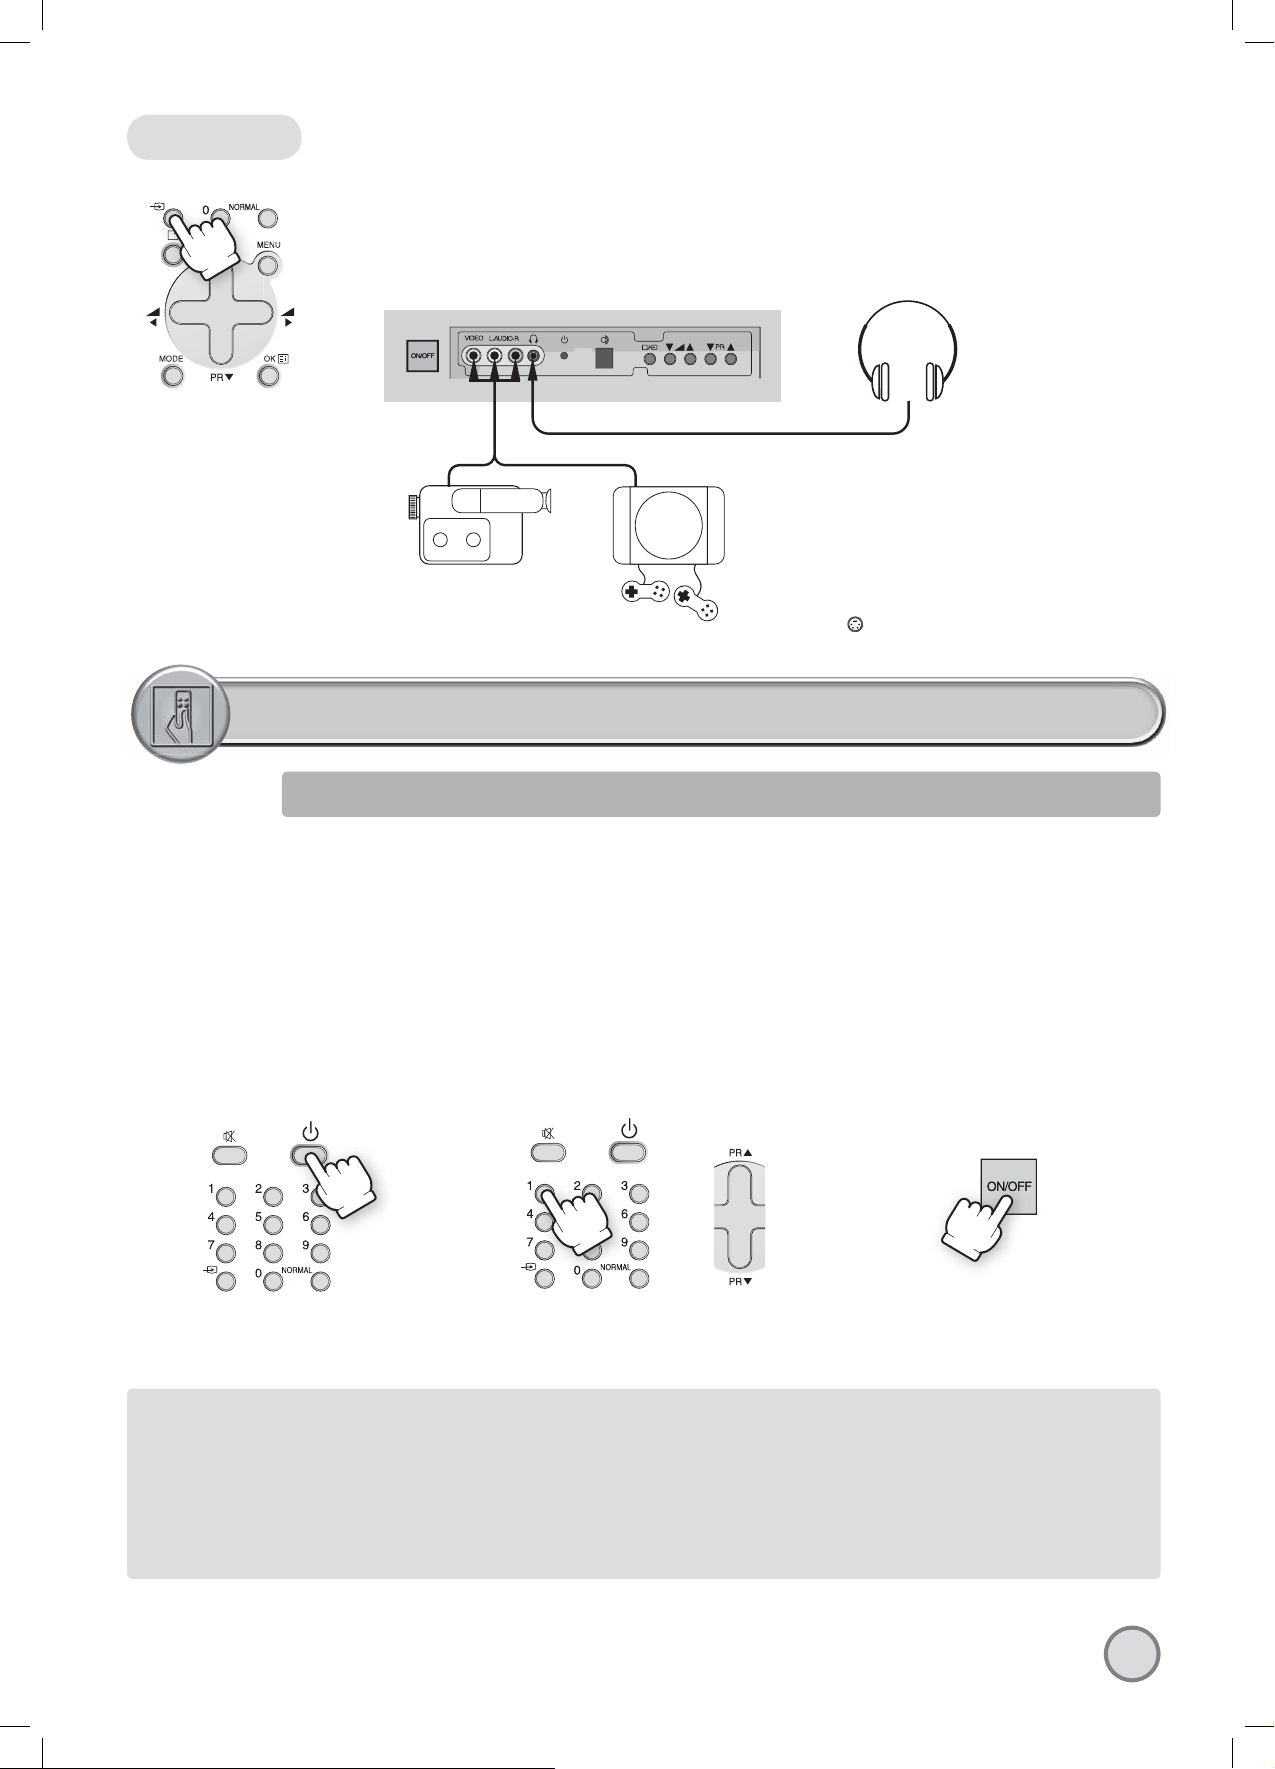
The rear Scart1 (C1), Scart2 (C2) sockets, the front AV socket (B2) (B3), and the S-VHS socket (B10, option: real flat TVs) are three dedicated
sockets to connect audio-video equipment.
Rear
REAR SCART 1 SOCKET (AV1)
This socket (C1) has video / audio inputs and outputs. It is recommended to
connect to this socket automatic AV switching equipment such as pay-TV
decoders, video games, DVD players and most VCR’s.
In most cases, when connecting powered equipment to this socket, the TV
set switches automatically to AV mode. If not, then use the TV/AV buttons
(A5) or (B7) to select AV1.
REAR SCART 2 SOCKET (AV2)
This socket (C2) has video / audio inputs and outputs. Automatic AV
switching equipment(for example most VCR’s) can be connected to this
socket.
In most cases, when connecting powered equipment to this socket, the TV
set switches automatically to AV mode. If not, then use the TV/AV buttons
(A5) or (B7) to select AV2.
You can also receive an S-VHS signal with REAR SCART2 socket, by
selecting SVHS2 with the TV / AV buttons (A5) or (B7).
5
VCR / DVD / Video Game / Pay-TV decoder Important:
If your video equipment does not have SCART socket(s), or
if you wish to use only the aerial (RF) connection (not
recommended), then you should make use of PR 00 on the
TV set for best performance.
Page 7
Front
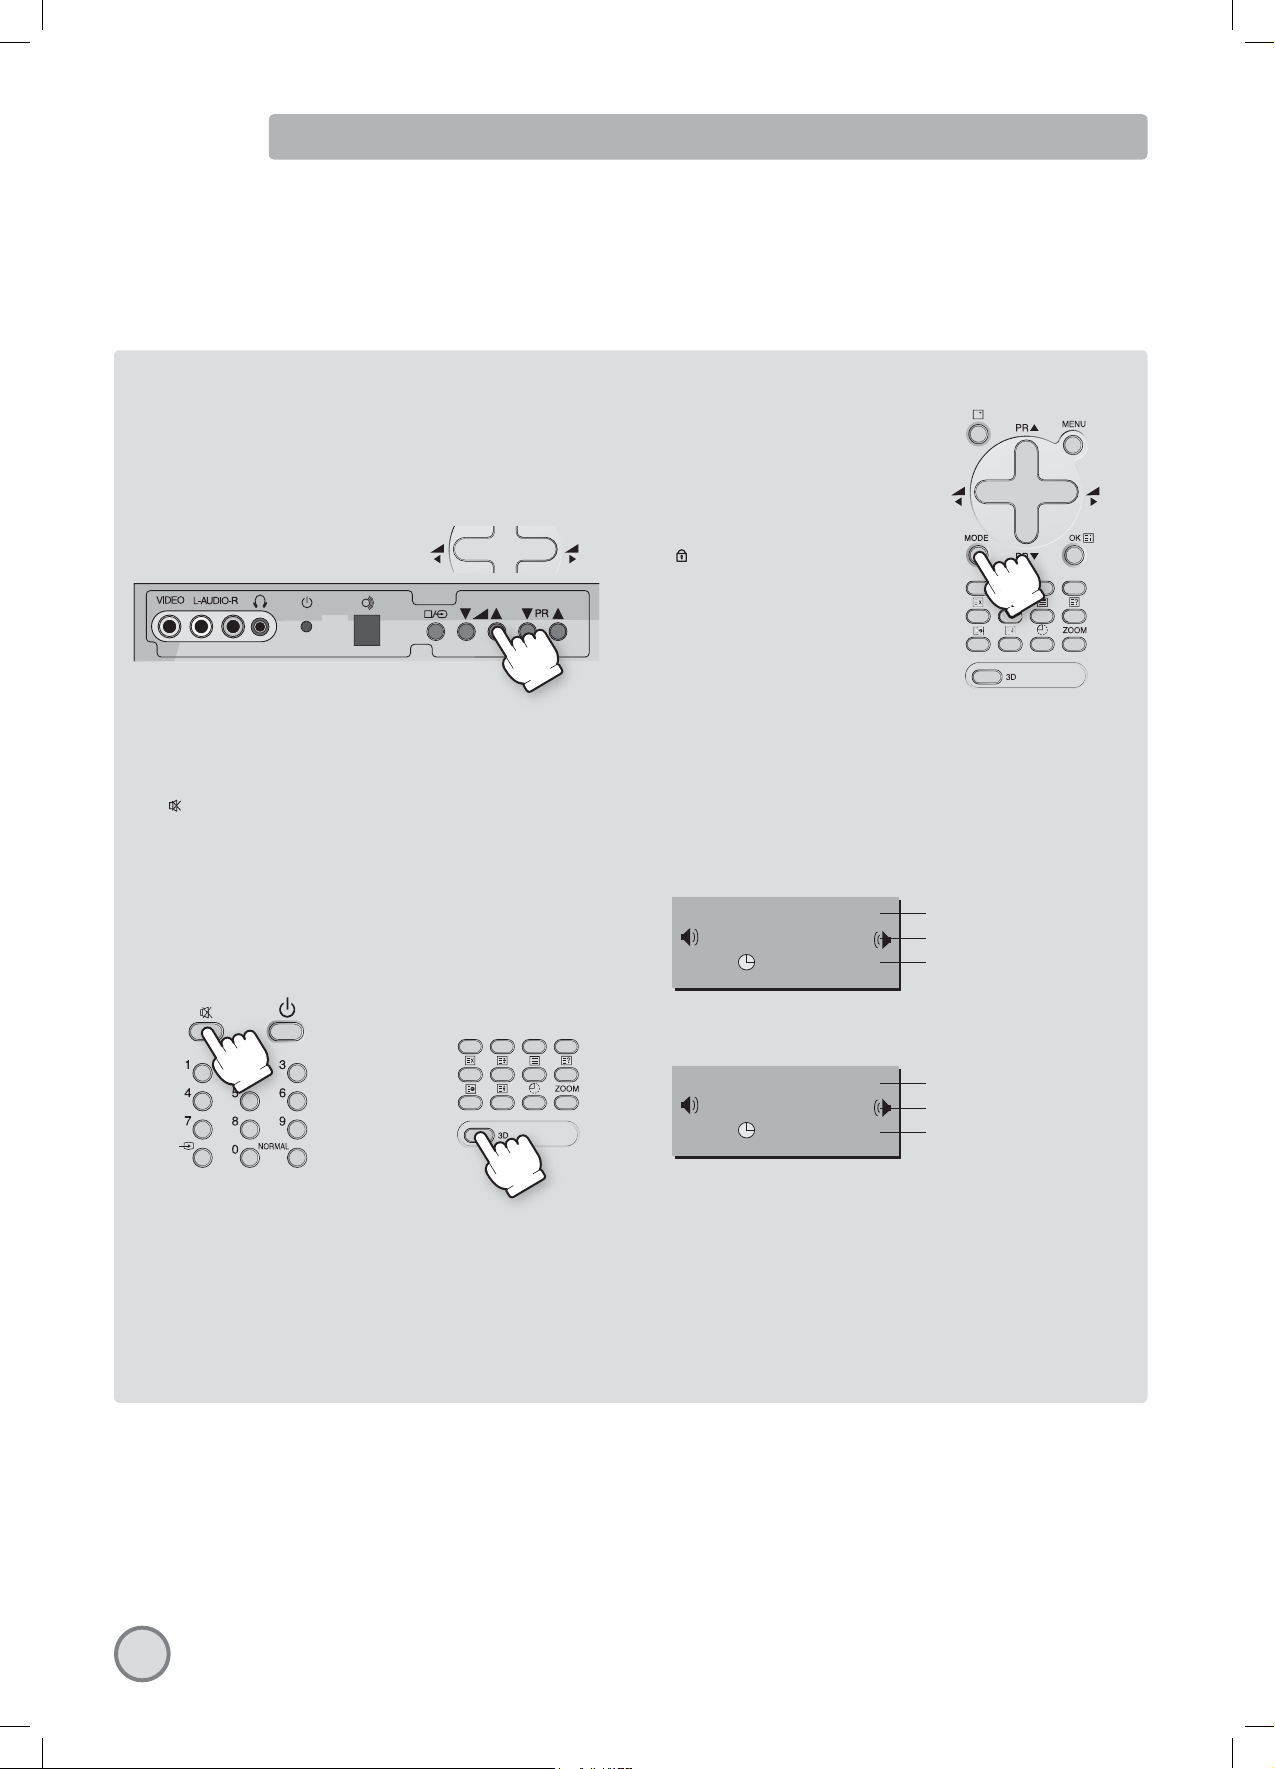
FRONT AV SOCKET (AV3)
The front AV socket (B2) - (B3)
has audio and video inputs. To
switch from TV to these inputs,
use the TV / AV buttons (A5) or
(B7) and select AV3.
TV/AV SELECTION
Allows to switch between TV and external modes.
By repeatedly pressing the remote control TV / AV (A5) or the TV front panel TV /
AV (B7) button, the on-screen display is changed as shown (SVHS3 is an option):
AV1 AV2 SVHS2 AV3 SVHS3 TV
Remark: If the signal source from the rear SCART1 socket (AV1) is RGB (e.g.
normally from a DVD player) then AV1 RGB will be displayed.
VIDEO GAME
OR
CAMCORDER
FRONT S-VIDEO JACK (Option for real flat TVs)
The front S-VIDEO jack (B10) has video inputs only.
It is necessary to connect the audio inputs to socket (B3)
in order to have audio and video. To switch from TV to
these inputs, use the TV / AV buttons (A5) or (B7) and
select SVHS3.
HEADPHONE SOCKET
To hear TV sound with
headphones, insert a 3.5mm
headphone plug into the
headphone socket (B4). The
speaker’s sound will be
automatically cut off.
DAILY USE
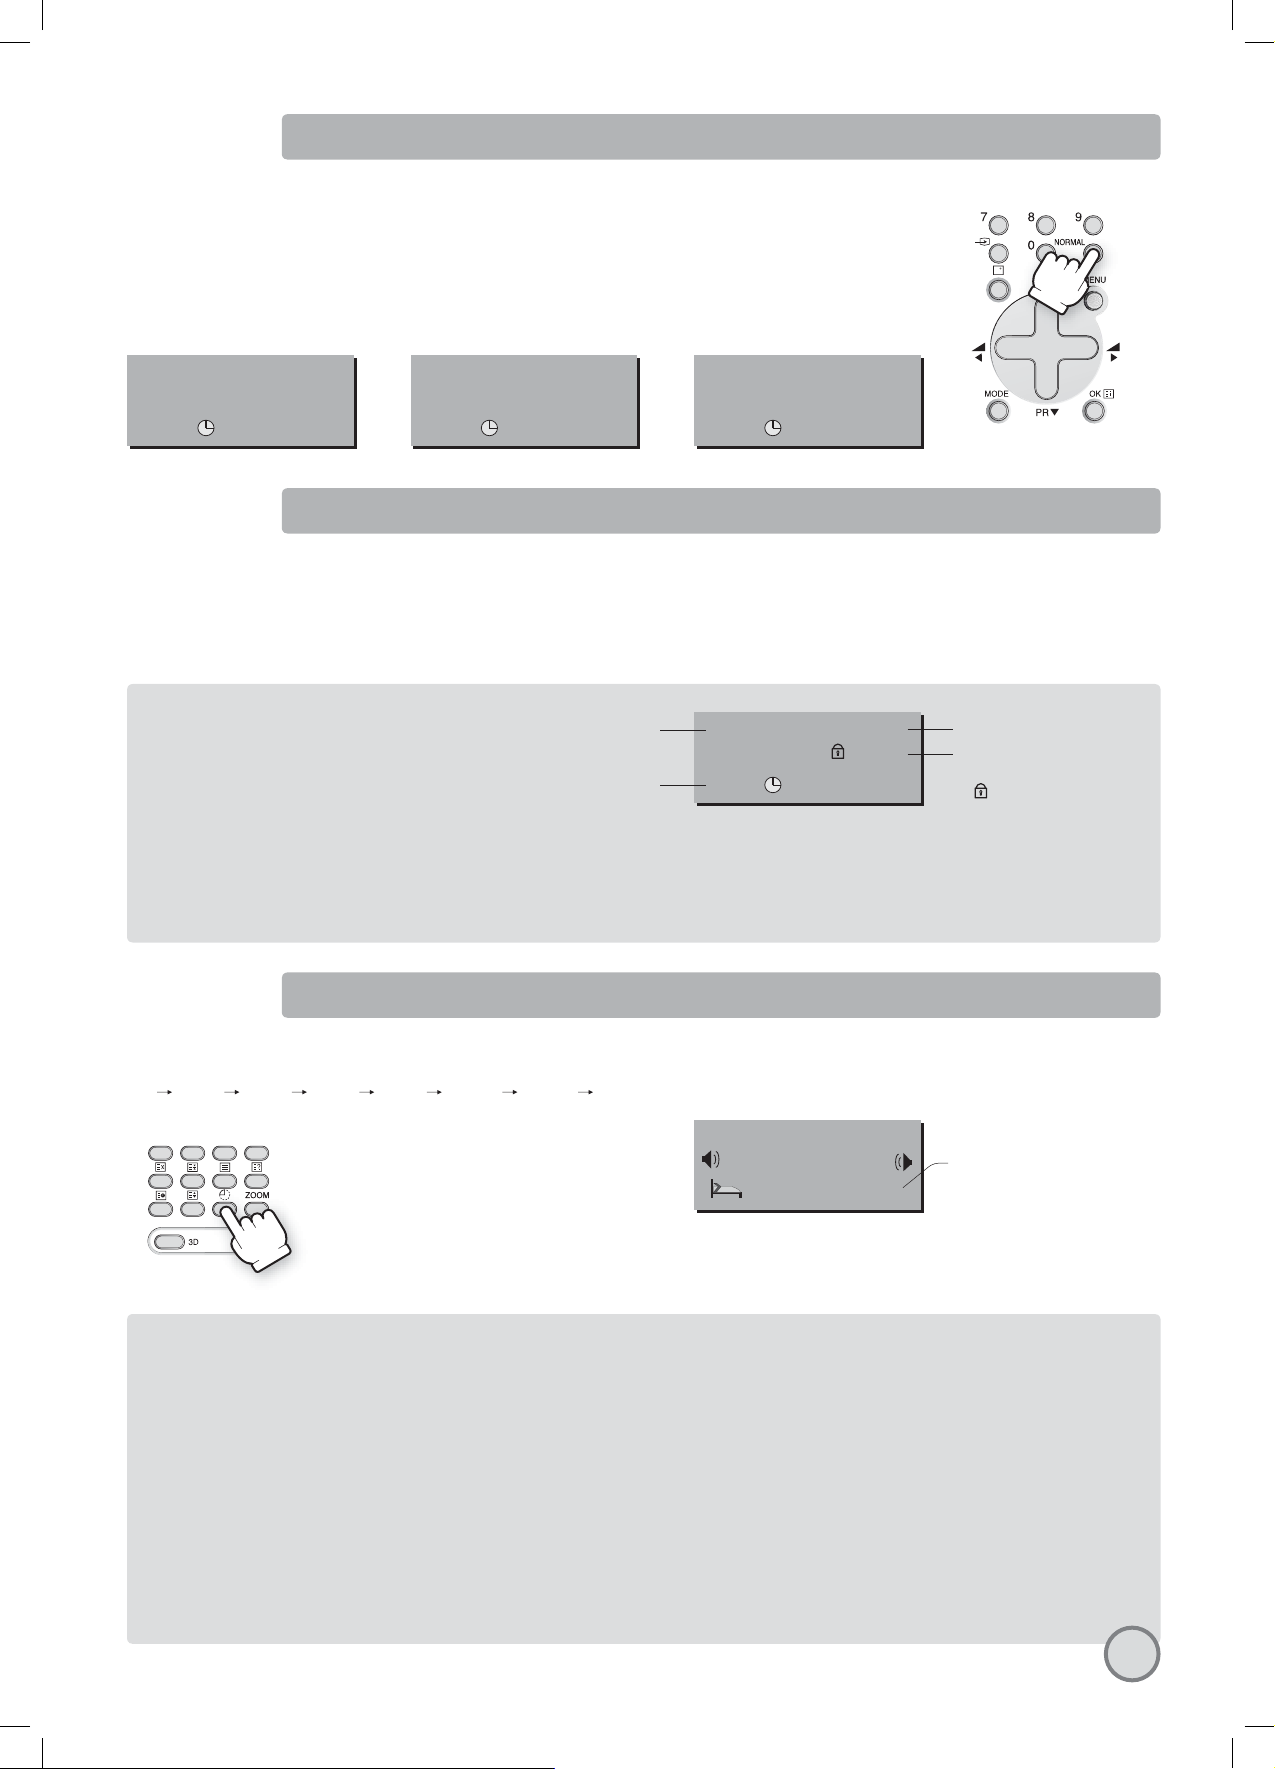
SWITCHING ON TV SET
1) If stand-by indicator (B5) is red, then the TV set is in
stand-by mode.
You can switch on using the remote control POWER
button (A1), the NUMBER 0….9 buttons (A3), or
PROGRAM UP (A6) / DOWN (A21) buttons.
The front panel PROGRAM UP/DOWN buttons (B9)
can also be used.
Once on, the stand-by indicator turns to green and
the picture appears on the screen.
2) If stand-by indicator (B5) is not lit, then the TV
set is powered off.
You must press the TV set front panel MAIN
POWER button (B1).
If a picture does not appear, then the stand-by
indicator will be lighted red.
In this case, use the remote control as
indicated in 1).
3) If stand-by indicator (B5) is flashing red, and
green then the TV set is in child-lock mode. It
is necessary to use the remote control POWER
button (A1), NUMBER 0….9 buttons (A3), or
PROGRAM UP (A6) / DOWN (A21) buttons.
The front panel PROGRAM UP/DOWN buttons
(B9) will not function.
Once on, the stand-by indicator turns to green
and the picture appears on the screen.
SWITCHING OFF TV SET
Remark: If a broadcast signal is not present after 30 minutes, the TV set will be automatically turned to stand-by mode.
1) Pressing the remote control POWER button
(A1), you can switch off to stand-by mode
(low power consumption mode) which also
allows quick restart by remote control
(see above: SWITCHING ON TV SET).
2) Pressing the TV set front panel MAIN POWER
button (B1), you can completely power off the
TV set.
In this case, you must use the same front
panel POWER button (B1) to switch on again
(see above: SWITCHING ON TV SET).
6
Page 8
PROGRAM SELECTION (FROM 0 TO 99)
Direct selection
Use the remote control NUMBER 0….9 buttons (A3).
For two digits program numbers, enter the second digit within 2 seconds.
SOUND CONTROL
Volume adjustment
Use the remote control VOLUME UP (A20) / DOWN (A7) buttons or
the TV set front panel VOLUME UP / DOWN buttons (B8).
Mute
Mute the sound by pressing the remote control
SOUND MUTE button (A2).
logo is displayed. The previous sound
Then,
setting is returned after pressing the same button
a second time.
If a sound related function is used (e.g. VOLUME, 3D)
then the MUTE will also be cancelled.
Up / Down selection
Use the remote control PROGRAM UP (A6) / DOWN (A21) buttons or the
TV set front panel PROGRAM UP / DOWN buttons (B9).
Mono forcing, dual language
- If you are unable to get good
sound quality for a program due
to poor reception, you can force
a change from stereo to mono
transmission by pressing the
remote control MODE button
(A14). Then the program status
display will indicate „MONO” with
icon.
a
- On the other hand, during a
program with dual language
transmission, the MODE button
(A14) allows you to toggle
between the first and second
language. The program status
display will indicate „DUAL 1” or
„DUAL 2” (plus NICAM according
to the received signal).
- To return to initial state, press again the MODE button (A14).
Sound effects
A SPATIAL sound effect is available, using the remote
control 3D (A13) button.
The following display appears:
SPATIAL
STEREO
11:11
Spatial sound effect
Sound transmission mode
Clock
Manufactured under license from Dolby Laboratories, „Dolby”
and the double-D symbol are trademarks of Dolby Laboratories.
To return to initial sound effect, press again the 3D (A13) button.
The following display appears:
OFF
STEREO
11:11
As an option, the sound effects PANORAMA and Dolby Virtual are
available with the same button. For other adjustments such as
BALANCE, EQUALIZER or AVL(option), use the SOUND menu
(page10).
No sound effect
Sound transmission mode
Clock
7
Page 9
PICTURE CONTROL
You can select three pictures settings, by using the remote control NORMAL button (A17) :
- Normal I (standard hard picture)
- Normal II (standard soft picture)
- Favourite
For other adjustments: BRIGHTNESS, CONTRAST, COLOUR, SHARPNESS, NOISE REDUCTION, use the PICTURE menu.
If an NTSC signal is received, then the TINT adjustment will also be available.
PR01 TF1
NORMAL I
11:11
PR01 TF1
NORMAL II
11:11
PR01 TF1
FAVOURITE
11:11
FREEZE PICTURE
This TV scans at 100Hz. It has an additional FREEZE picture function that holds the current image on the screen (similar in effect to the “pause” function of
a video player). To freeze the image at any time, just press on the yellow FREEZE button (A26). This function is available with any signal source (from aerial,
video player, DVD).
The display will indicate that the FREEZE function is activated. A second press on the same button (A26), entry to the MAIN menu (A19), or change of program will cancel the FREEZE function.
PROGRAM STATUS
DISPLAY (RECALL)
Use the remote control RECALL button (A16) to display (for 4 seconds only) program status information. This display appears also after a program selection
or after switching on the TV set.
Channel number
Clock
PR01 TF1
MONO
11:11
Channel name
Sound transmission Mode:
Displayed with forced icon
) only if forced to mono
(
by MODE button (A14)
SLEEP FUNCTION
The set will turn off (to stand-by mode) after a period of time that you can select. By repeated use of the remote control SLEEP
button (A4), you can enter one of the following settings :
OFF 20 min 40 min 60 min 80 min 100 min 120 min OFF
PR01 TF1
STEREO
SLEEP 18
The SLEEP time remaining (before TV turn-off) can be seen again at any time by one
touch on the remote control SLEEP button (A4).
A second touch (while the status display is active) will modify the SLEEP time remaining.
FORMAT SELECTION
AUTO setting :
If picture format signalling data is received,
then the most appropriate ZOOM format will be
automatically selected. In the absence of this
data, the default ZOOM format will be selected
(see page 13, ZOOM AUTO function under
FEATURES MENU).
Otherwise, the preferred mode of the user can
be forced by repeated pressing of the remote
control ZOOM button (A15):
Television Format 4:3
The following picture formats are
available:
AUTO 14:9 16:9 FULL SCREEN
FAVOURITE AUTO.
Television Format 16:9
The following picture formats are
available:
AUTO 4:3 14:9 ZOOM 14:9 ZOOM
16:9 FULL SCREEN FAVOURITE AUTO.
FAVOURITE Format
This contains the users preferred format setting. In order to
enter new settings, proceed as follows:
- Navigate the list of available formats with the ZOOM button
(A15) until FAVOURITE is selected.
- While the selection FAVOURITE is active on the screen, the
format can be manipulated by use of the CURSOR LEFT (A7),
RIGHT (A20) buttons (to change the horizontal size) and the
CURSOR UP (A6) or DOWN (A21) buttons (to change the
vertical size).
- The controls CURSOR RIGHT (A20) and CURSOR UP (A6)
increase the size.
- The controls CURSOR LEFT (A20) and CURSOR DOWN (A6)
decrease the size.
- The new settings are automatically memorized in the
FAVOURITE format.
If the OSD status display FAVOURITE is at any time lost (timeout
is 3-4 seconds after any previous use of the CURSOR keys), then
a single touch of the ZOOM button (A15) is necessary before
adjustment can be resumed.
Remaining time (minutes)
before TV set switches off
8
Page 10
MENUS LANGUAGE SELECTION, CHILD LOCK, CLOCK
SETTING, WAKE UP, NOISE REDUCTION
These functions are available in the Features menu (see description page 13).
CHILD LOCK
This function only allows the TV to be turned on using the remote control.
Once the user has set this CHILD LOCK to ON or OFF, it will remain in this
condition until the user changes it again.
WAKE UP
It is necessary to have set the clock (either manually or automatically) in
order to be able to use this function. If the clock is not set (--:-- is shown)
then the WAKE UP TIME and WAKE UP PROG. will not be selectable. The
default setting for WAKE TIME is in the “OFF” position. After each use (the
TV turns on according to the previous setting) the WAKE TIME will be
returned to the “OFF” position, conserving always the last time setting
entered ready for re-use.
CLOCK SETTING
The TV will automatically attempt to set the clock when powered on
(with the MAIN POWER button). It takes as reference information
embedded in the teletext signal of the channel defined by CLOCK
PROG. Therefore, automatic clock setting is only possible if teletext
is available on this channel.
If no time is captured automatically (the clock will show - - : - -), then
the TV will try again to set the clock whenever turning on from
standby mode.
Alternatively, the user can enter the time manually using the CLOCK
function. However, if this is done the clock will not be periodically updated
as would happen if the time is set automatically. We recommend that
the user choose (if available) a CLOCK PROG which allows the time to be
updated automatically.
PROGRAM INFORMATION
This information (if available) can be presented at the same time as the
RECALL window, in the lower part of the screen and in red characters
(transparent background), if the PROG. INFO is set to ON. This is a status
information available on most channels that have teletext. It is under the
editorial control of the transmitting station, and can contain, for example,
the programme title.
DEFAULT ZOOM CONTROL
If the ZOOM control is set to AUTO (A15, see page 8, FORMAT SELECTION),
then the picture format presented is controlled by the received picture
format signalling data embedded in the transmission. In the absence of
this signalling data (as can often be the case) a default format must be
used. This default format can be selected by the ZOOM AUTO function.
LANGUAGE
This can be changed at any time by the user in the LANGUAGE menu
(accessed via the FEATURES menu).
MENUS DESCRIPTION
MAIN MENU
All menus are removed within 25 seconds if you don’t press any button.
Press the remote control MENU button (A19) to display the main menu.
Then, you have the choice between several sub-menus:
If you want to Exit the main menu, press the MENU button (A19) a
second time.
- To select one of the sub-menus, use the remote control CURSOR UP
(A6), DOWN (A21) buttons.
- To enter the selected sub-menu, press the remote control OK button (A18).
Remark: In AV mode the INSTALL menu is not available, and will not be selectable.
HOW TO USE THE SUB-MENUS
The sub-menus referred to here are: PICTURE, SOUND, INSTALL, FEATURES.
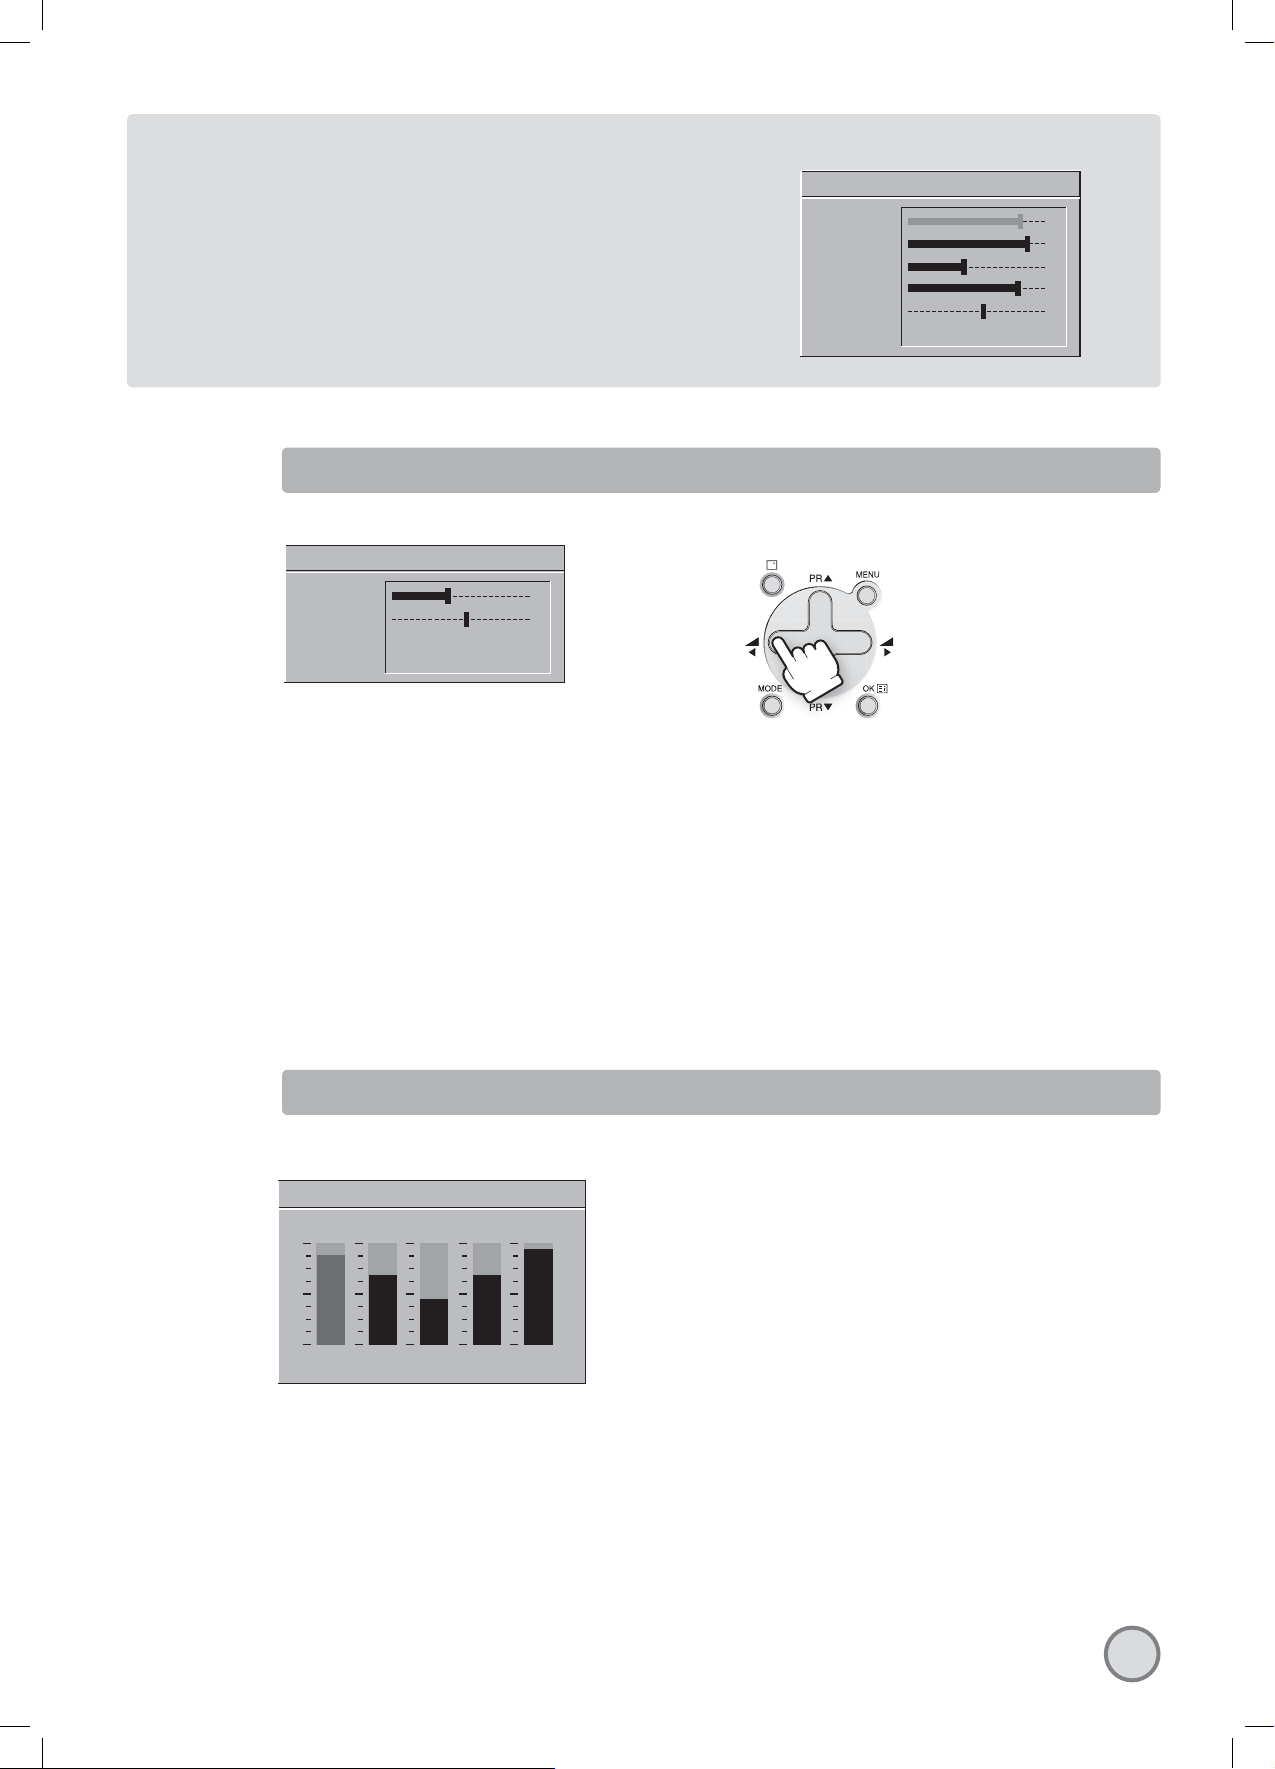
- Adjustthe function using :
PICTURE
SOUND
INSTALL
FEATURES
- Select the desired Position
by using the remote
control CURSOR UP (A6) or
DOWN (A21) buttons.
9
- The remote control
CURSOR LEFT (A7) or
RIGHT (A20) buttons if
you want to modify the
function value
- The remote control
NUMBER 0...9 buttons (A3)
to enter directly new data.
- Store (if needed) by
pressing the remote
control OK button (A18).
- Then Exit to main menu by
pressing the MENU button
(A19).
Page 11
PICTURE MENU
(For operating instructions, see page 9, HOW TO USE THE SUB-MENUS)
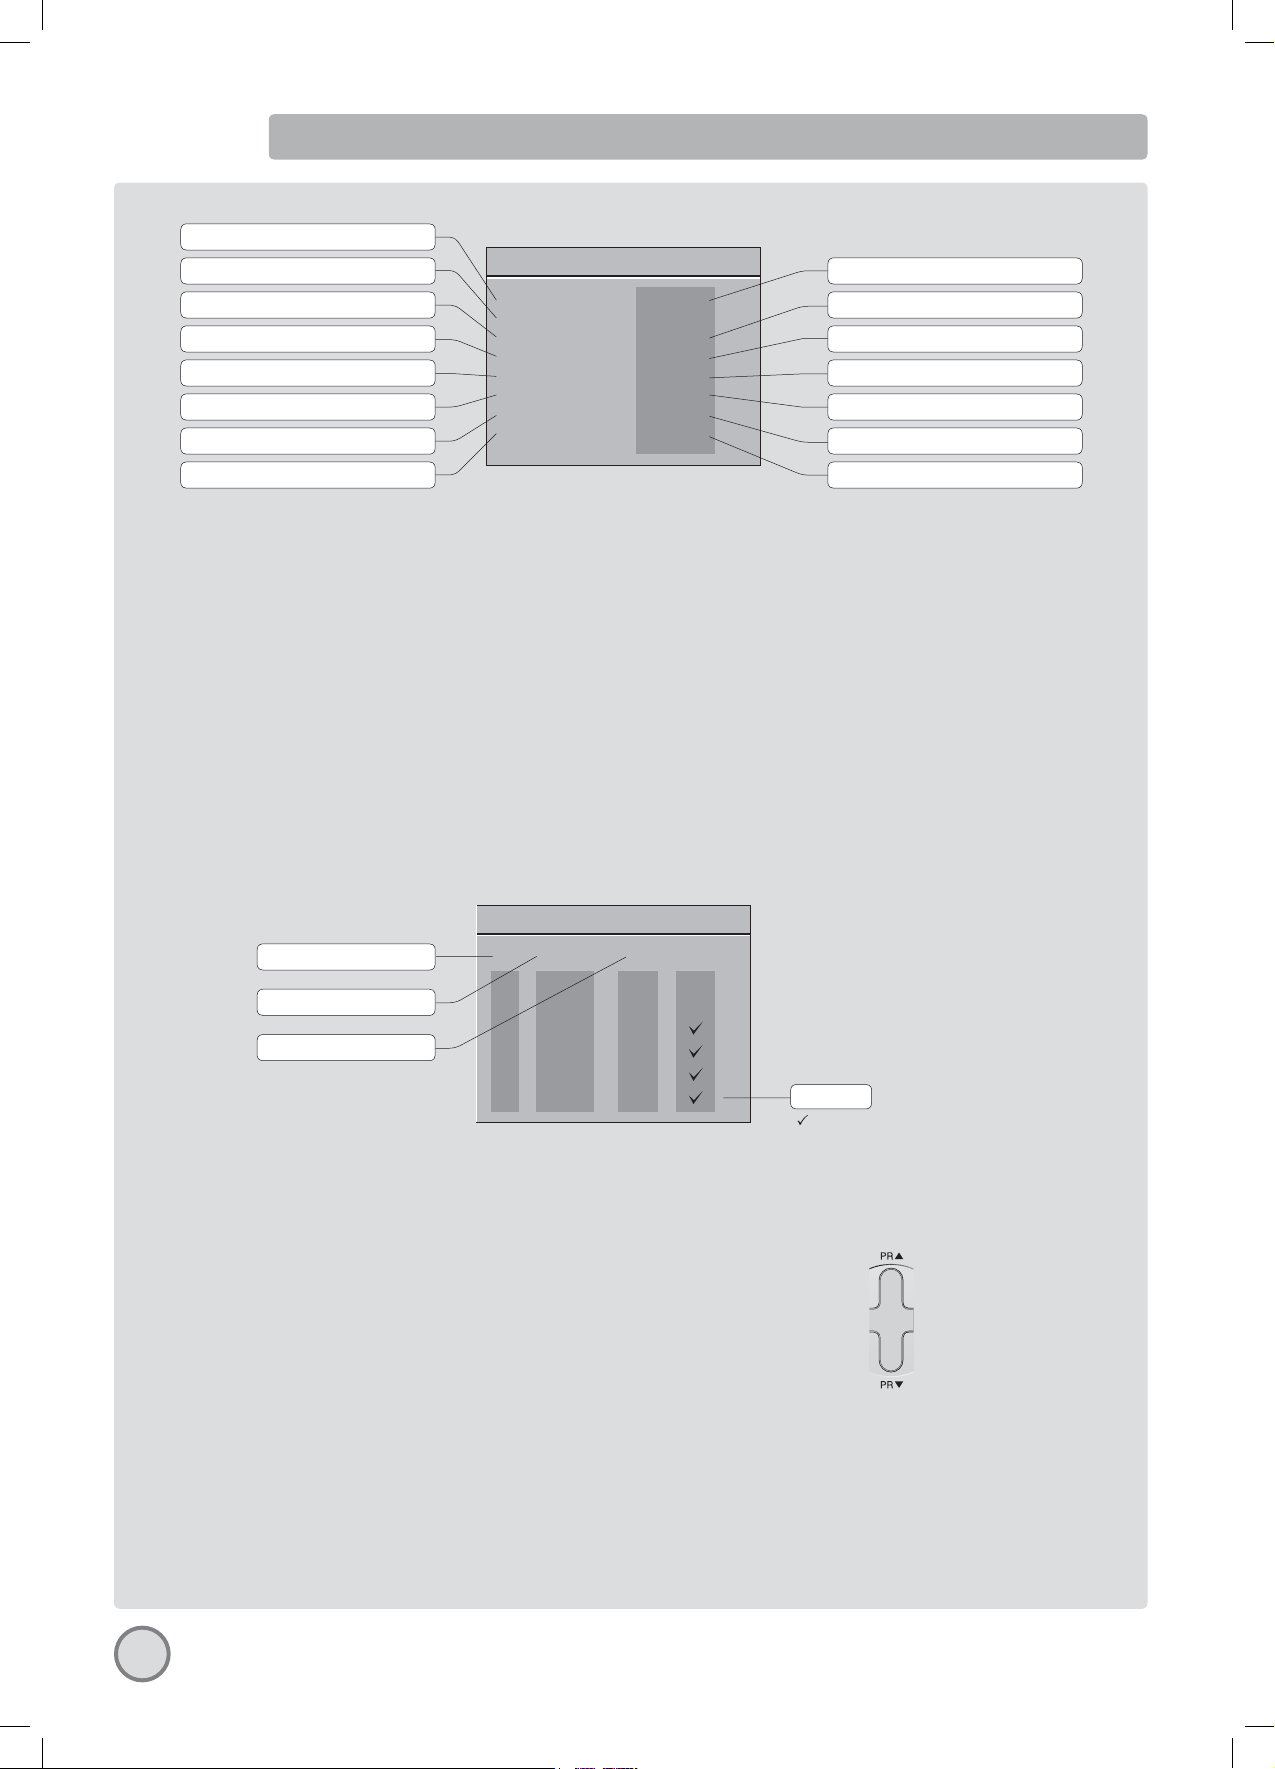
- Select and adjust the level of each function : BRIGHTNESS, CONTRAST, COLOUR,
SHARPNESS, TINT (if available).
- The above modified values are automatically stored in FAVOURITE mode.
- NOISE REDUCTION feature has 4 levels according to your preference.
- The OK (A18) or NORMAL button will select the picture presets FAVOURITE, NORMAL I,
NORMAL II. The currently selected preset is displayed in the menu header.
- The FAVOURITE preset contains the settings that you last entered.
If the NTSC standard is detected (eg from VHS player connected to AV1), then TINT will
available. Otherwise TINT will be displayed, but not selectable.
SOUND MENU
(For operating instructions, see page 9,HOW TO USE THE SUB-MENUS)
SOUND
VOLUME
BALANCE
EQUALIZER MUSIC
AVL MEDIUM
PICTURE
BRIGHTNESS
CONTRAST
COLOUR
SHARPNESS
TINT
NOISE RED STRONG
FAVOURITE
- Select VOLUME function to adjust the volume level.
- Select BALANCE function to adjust sound balance between the left and right speakers. If the indicator is highlighted in red, then the central balance
position has been found.
- Use the EQUALIZER function to select the sound presets MUSIC, SPEECH, NORMAL, FAVOURITE by use of the CURSOR LEFT (A7), RIGHT (A20) buttons. The
FAVOURITE preset contains the settings that you last entered into the EQUALIZER menu.
- The OK button (A18) will enter the EQUALIZER menu, and allow you to change the FAVOURITE settings.
- Automatic Volume Level (AVL, Option) feature has 4 levels according to your preference. This feature corrects for large volume level changes, such as
occur when passing from a movie to advertisements. The AVL solves this problem by equalizing the volume level, over a SHORT MEDIUM or LONG period
(referring to the time constant over which the equalizing effect lasts).
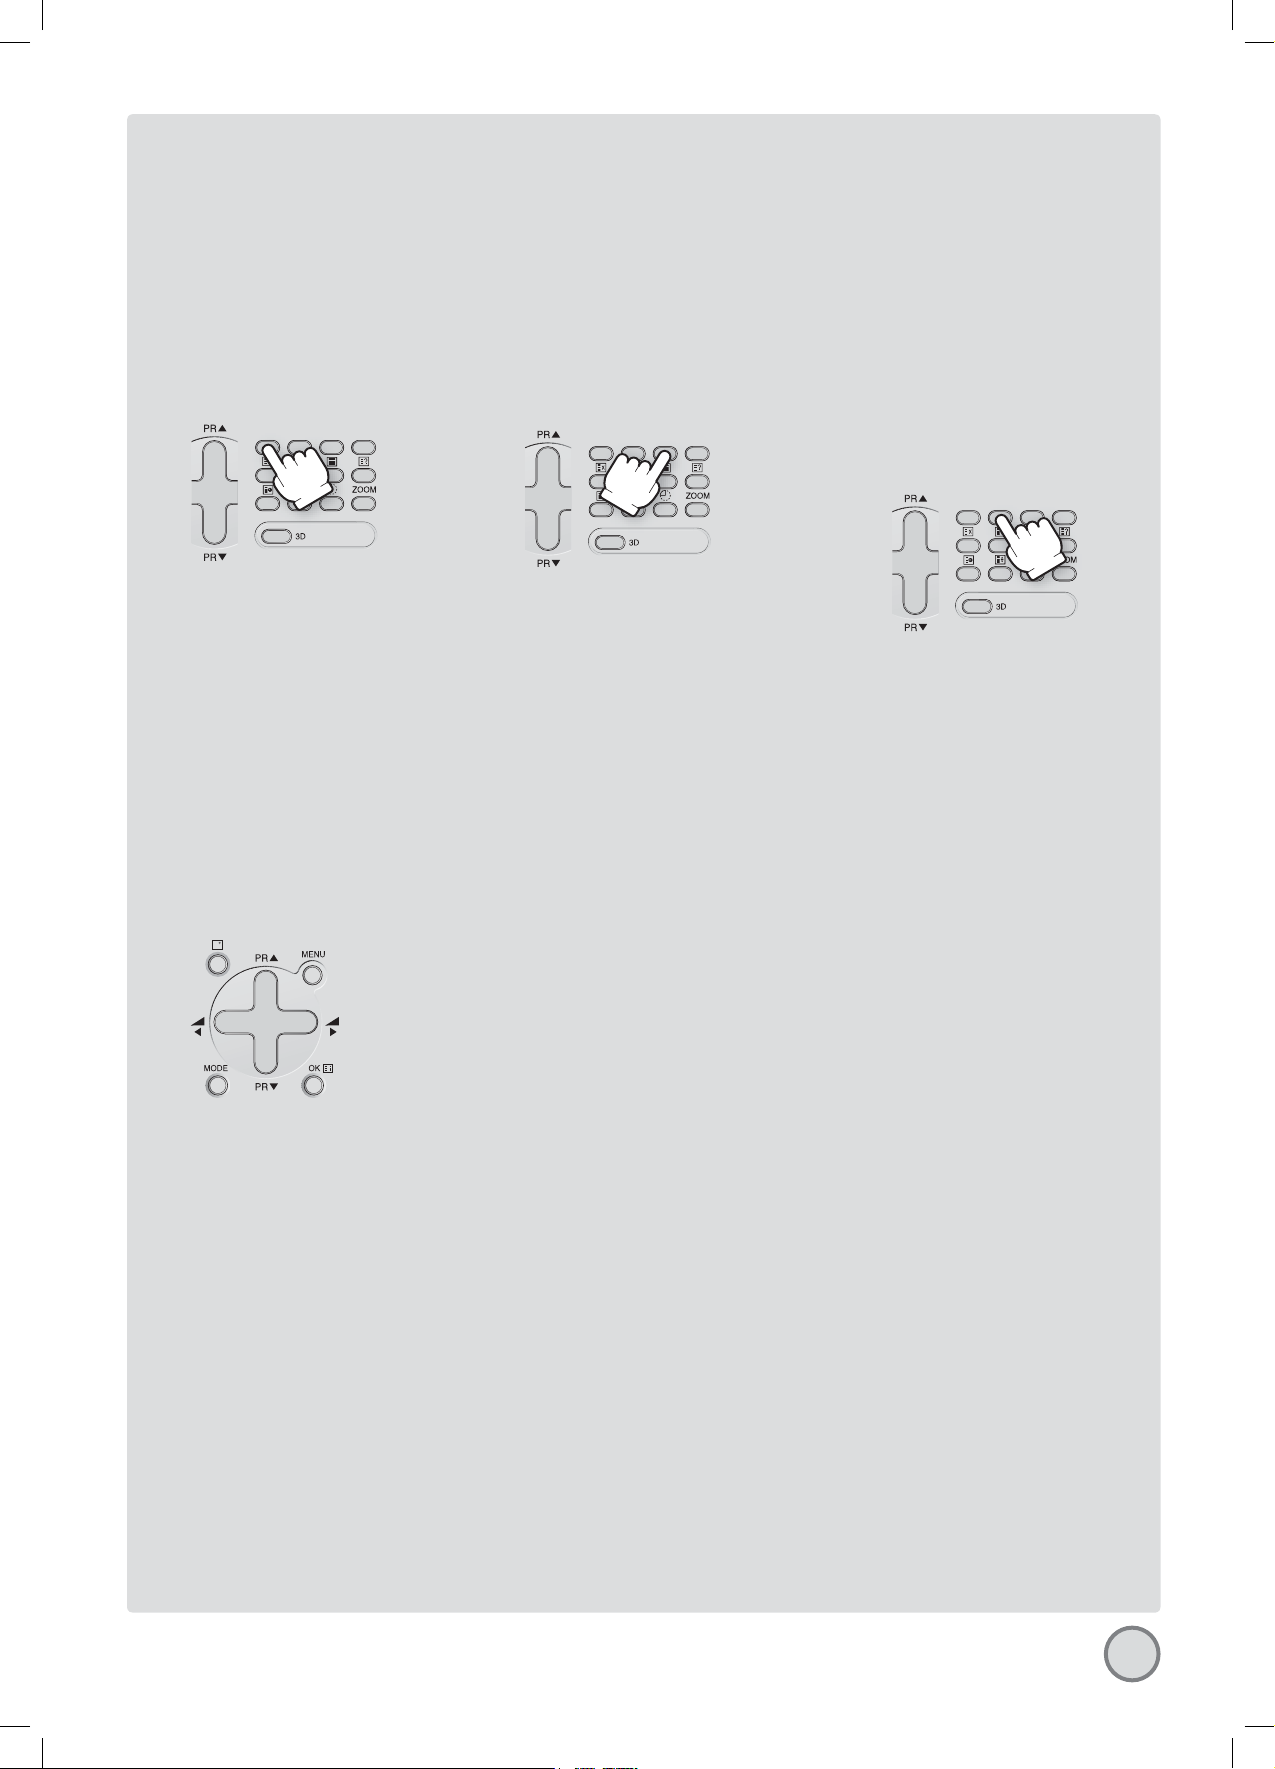
EQUALIZER MENU
EQUALIZER
120 500 1k5 5k 10k
MUSIC
- Select the equalizer band by use of the CURSOR LEFT (A7) or RIGHT (A20) buttons.
- Adjust the level of each of the 5 equalizer bands, 120Hz, 500Hz, 1500Hz, 5000Hz,
10000Hz, by use of the CURSOR UP (A6) and DOWN (A21) buttons.
- The above modified values are automatically stored in FAVOURITE mode.
- The OK button (A18) will select the picture presets MUSIC, SPEECH, NORMAL,
FAVOURITE. The currently selected preset is displayed in the menu header.
- The FAVOURITE preset always contains the settings that you last entered.
10
Page 12
INSTALL MENU
Automatic tuning system
Program list edition
TV system modification
Channel number
Channel Frequency
Channel name
Program number
(For operating instructions, see page 9,HOW TO USE THE SUB-MENUS)
INSTALL
ATSS GB
EDIT
SYSTEM GB
CHANNEL C47
FREQUENCY 679,25
NAME ABCDE
PROGRAM 00
STORE TO 00
Country
TV system
Channel number
Channel Frequency
Channel name
Program number
Program storage number
Automatic Tuning System
If you have a satellite decoder: If your decoder is connected to the TV set by the aerial jack (C3), you must power on the demodulator and
tune Sky News before starting ATSS.
ATSS = Automatic Tuning and Sorting System. To start the ATSS function:
- Select „ATSS” function.
- Adjust to the required country.
- Press and hold the OK button (A18) to start the automatic tuning.
The ATSS function has started when the phrase „Please Wait!” appears (in red characters) in the help instructions box, below the Install
menu.
When the ATSS function is finished, the stored programs are displayed on screen using Edit menu presentation (to Exit tuning before
automatic tuning finished, press the remote control MENU button (A19))
Program List Edition
This allows you to easily manipulate the existing program order allocation, by using Edit menu functions described below.
Program storage number
EDIT
Program number
Station name
Channel number
PR NAME CH SKIP
03 ITV C23
02 BBC2 C33
00 - - - - S41
99 - - - - S41
98 - - - - S41
97 - - - - S41
Skip code
: Program skipped
Nothing : Program not skipped
To enter the EDIT menu: From Install menu, select „Edit”, and press the OK button
(A18): the EDIT menu appears.
The current program being displayed is highlighted in blue (on the central line). In the
above case, the current program is PR00. The 3 previous, and 3 following programs,
are always displayed. Any program from 00 to 99 can be selected, by using the
remote control CURSOR UP (A6) / DOWN (A21) buttons.
The memorised programs can be modified as follows :
11
Page 13
Channel skipping
- You can select skip „YES” or
„NO” using the remote control
RED „Skip” button (A11).
A program with skip „YES”
doesn’t appear on screen
when changing channels with
the PROGRAM UP (A6) /
DOWN (A21) buttons.
Channel deleting
- Select the program to delete using
the remote control CURSOR UP
(A6) / DOWN (A21) buttons.
- Press the remote control YELLOW
„Delete” button (A26). The deleted
program is moved to program
number 99 with skip changed to
„YES”. The existing 99 program is
moved to program number 98 and
so on.
Channel order changing
- Select the program to move using the
remote control CURSOR UP (A6) / DOWN
(A21) buttons.
- Press the remote control GREEN „Move”
button (A12): the program line background
is highlighted in green, and can be moved
to another position using the remote control
CURSOR UP (A6)/ DOWN (A21) buttons.
- When the desired position is reached,
confirm the new position pressing the
remote control GREEN „Confirm” button
(A12). Then the program line background
will return again to grey.
Manual Channel Tuning
Choose a starting point
- Select with „Program” the
program from which you want
to start manual tuning. Then the
channel number, the frequency,
the name and the program
number of this program are
displayed in the Install menu.
Channel searching
- Select the „Frequency” function.
- Press, and hold for more than 1
second, the remote control
CURSOR RIGHT (A20) [LEFT
(A7)] buttons to start up [down]
manual tuning.
- Searching will stop automatically at
the next channel found (to stop
tuning, press the remote control
MENU button (A19)).
Note: You can directly locate a
program by entering the data
into the „channel” or the
„frequency” function.
Enter station name
It is possible to enter your own choice of name
for each program. You can change an existing
name, or enter a name where none exists. If
none exists „- - - - - - -” will be shown in the
Install menu, and program status display ( see
the section PROGRAM STATUS DISPLAY on
page 8).
- Select the „NAME” function.
- Select one of the 7 character positions by
using the remote control CURSOR RIGHT
(A20) / LEFT (A7) buttons to move the cursor.
- Then use the CURSOR UP (A6) /DOWN (A21)
buttons to select the desired character for
that position.
- Repeat the last two instructions for other
positions, as desired.
- Once the name has been entered, press the
OK button (A18) to store it. The name will be
memorised to the program number currently
shown on the „Store To” line. The „Store To”
program number will highlight in red briefly.
TV system modification
If necessary, you can modify the
TV system :
- Select „system” function.
- Adjust choosing between
FRANCE (L/L’), GB (I), EURO
(B/G), E/ EURO (D/K) systems.
Then, the program displayed on
the screen is changed to the
chosen system.
Perform fine tuning
- If you are unable to get a good
picture or reasonable quality sound
due to poor reception, it is possible
to perform fine tuning.
- Select the „frequency” function.
- Press, for less than 1 second, the
remote control CURSOR
RIGHT(A20) [LEFT(A7)] buttons to
perform up [down] fine tuning in
steps of 0.05MHz (50 kHz).
Store program in memory
- Select the „store to” function
- Enter the program number you want to
store to either by using the remote control
CURSOR RIGHT (A20) / LEFT (A7) buttons, or
directly by using the remote control NUMBER
0...9 buttons (A3).
- Press the OK button (A18) to confirm.
Remarks: this function can also be used if you
want to copy a program already
memorised to another program
number.
12
Page 14
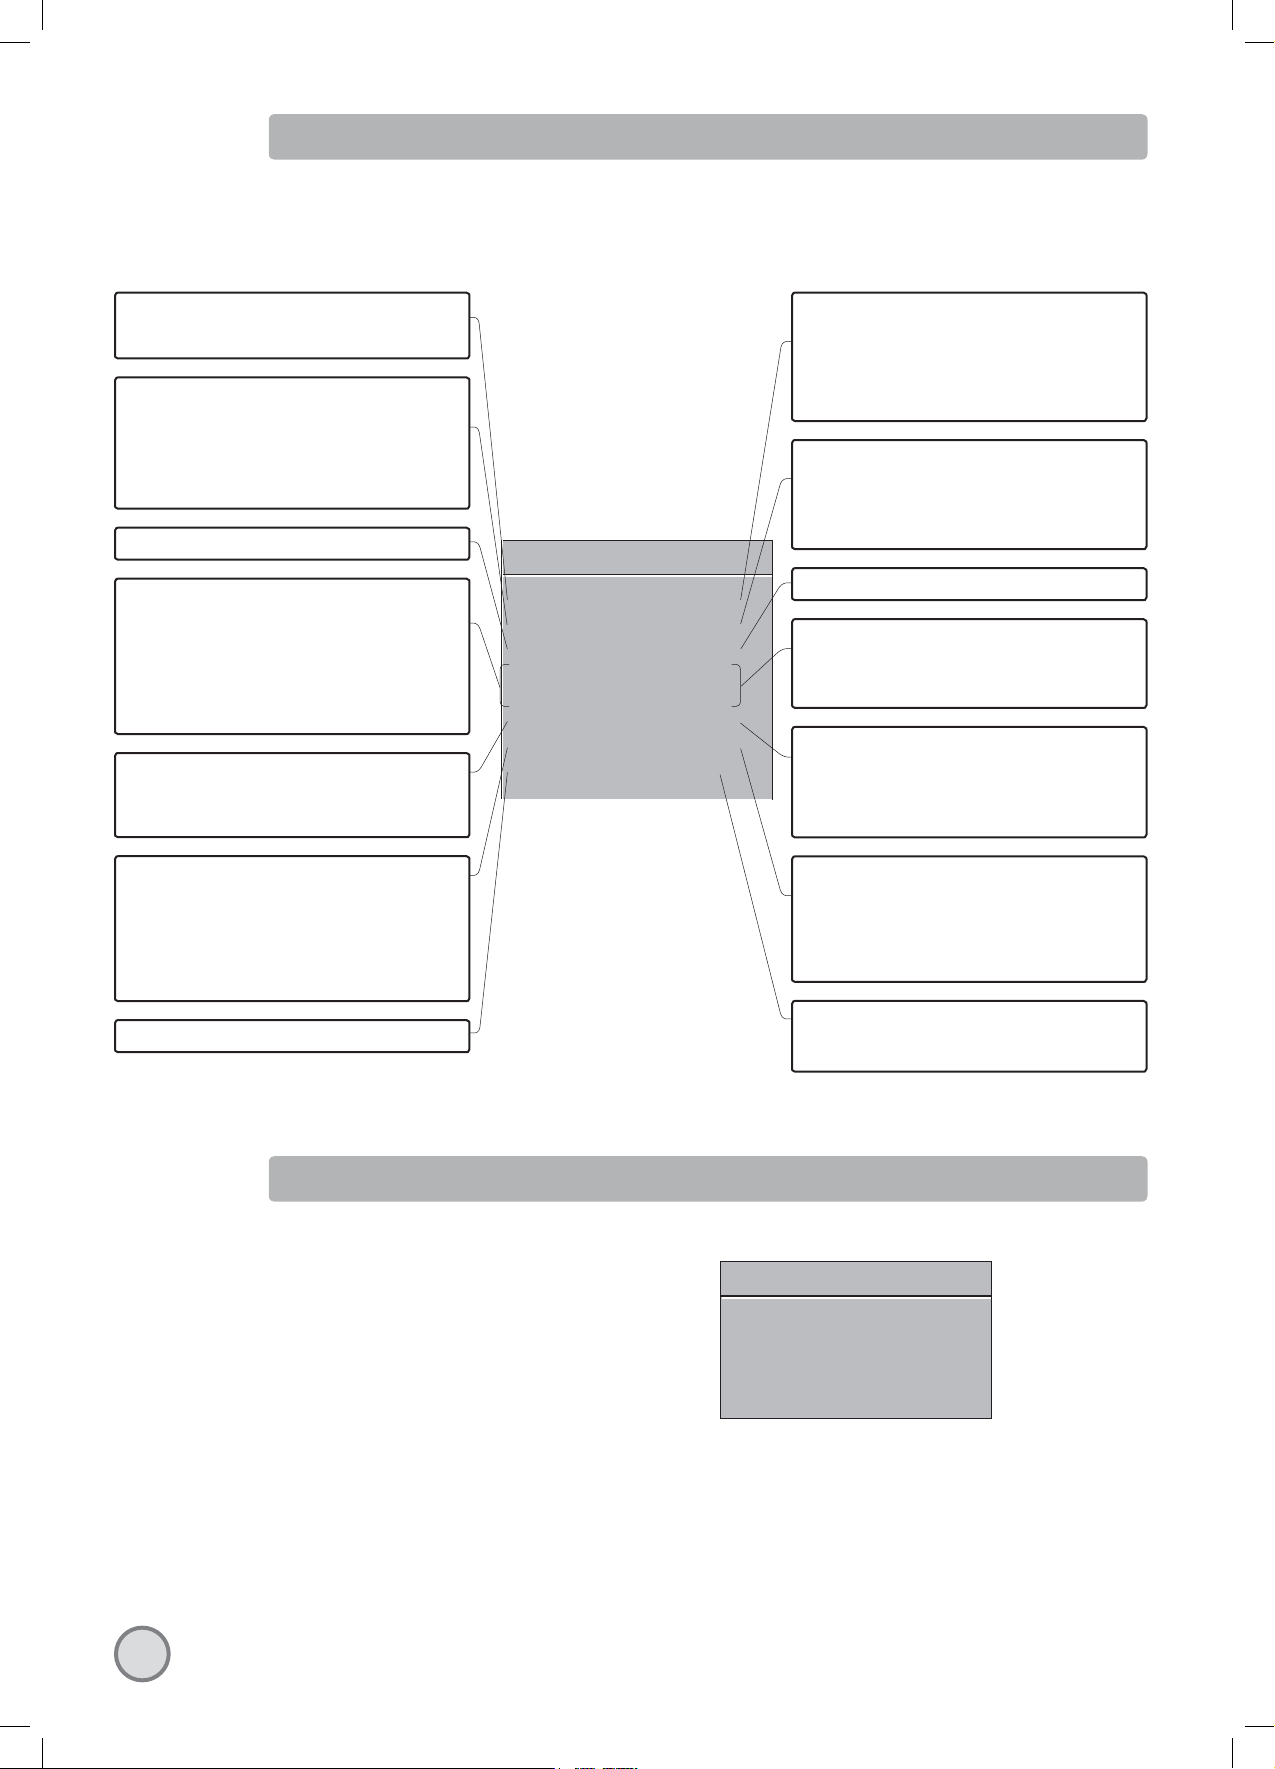
FEATURES MENU
See section near the end of section DAILY USE for a more detailed explanation of these functions.
(For operating instructions see page 9, HOW TO USE THE SUB-MENUS)
1. When switched to ON:
Prevents the use of the TV set without remote
control
2. Wake up function
This function is only selectable when the clock
is set. The TV set turns on from stand-by at the
WAKE TIME with the programme entered on the
WAKE PROG. line. Put the TV set on stand-by with
the remote control
3. Shared with WAKE TIME.
4. TV clock setting
This function allows user to enter the time
manually.
Note : If you turn off the set with the main power
button, the clock setting is lost. An automatic
attempt is made to set the clock again at power
on.
5. Programme Information function
This status information is under the editorial control of the transmitting station, and can contain the
programme title.
6. This function is only selectable when the default
picture format is currently active (see also
FORMAT SELECTION, AUTO setting, page 8). This
selects the default format to be used only when
the format selected with the ZOOM button (A15)
is AUTO, and no picture format signalling data
is received.
7. LANGUAGE menu entry.
FEATURES
CHILD LOCK OFF
WAKE TIME OFF
WAKE PROG 04
CLOCK - -:- -
CLOCK PROG 01
INFO PROG. ON
ZOOM AUTO ZOOM 16:9
LANGUAGE PL
1. Adjust this value ON or OFF.
- In stand-by mode, the stand-by indicator flashes
red and green to indicate the CHILD LOCK is set.
- The front panel TV buttons (B7, B8, B9) become
inactive and the TV will only respond to the
remote control.
2. Switch the WAKE UP function OFF or ’ON’ (the
time will be shown e.g. 07:15) with the remote
control CURSOR LEFT (A7) /RIGHT (A20) buttons
- Enter the wake up time with the remote control
0...9 NUMBER (A3) buttons.
3. Adjust TV turn-on program number
4. Adjust TV clock. Clock will start at 0 seconds
upon entry of the 4th figure.
The prog. no. which can be used to automatically
seize the time at turn on can be entered here.
5. Adjust this value ON or OFF.
- When ON, the information (if available) is
displayed upon change of channel, or with use
of the RECALL button.
- When OFF, no information is displayed.
6.
Choose your preferred default format with the
remote control CURSOR LEFT (A7) /RIGHT (A20)
buttons.
Note : For 4:3 TVs FULL SCREEN is represented
by 4:3. For 16:9 TVs FULL SCREEN is represented by 16:9.
7. The currently selected LANGUAGE is displayed.
Press the OK button (A18) to access the menu
and change the selection.
13
LANGUAGE MENU
- Select the preferred LANGUAGE by use of the CURSOR LEFT
(A7), RIGHT (A20) buttons, and the CURSOR UP (A6) or DOWN
(A21) buttons.
- Press the OK button (A18) to confirm the selection (the choice
will be highlighted in red).
Note : The languages shown are subject to modification without
prior notice.
LANGUAGE
BG CZ D DK E
F FIN GB GR H
I N NL PL RO
RUS S SK
Page 15
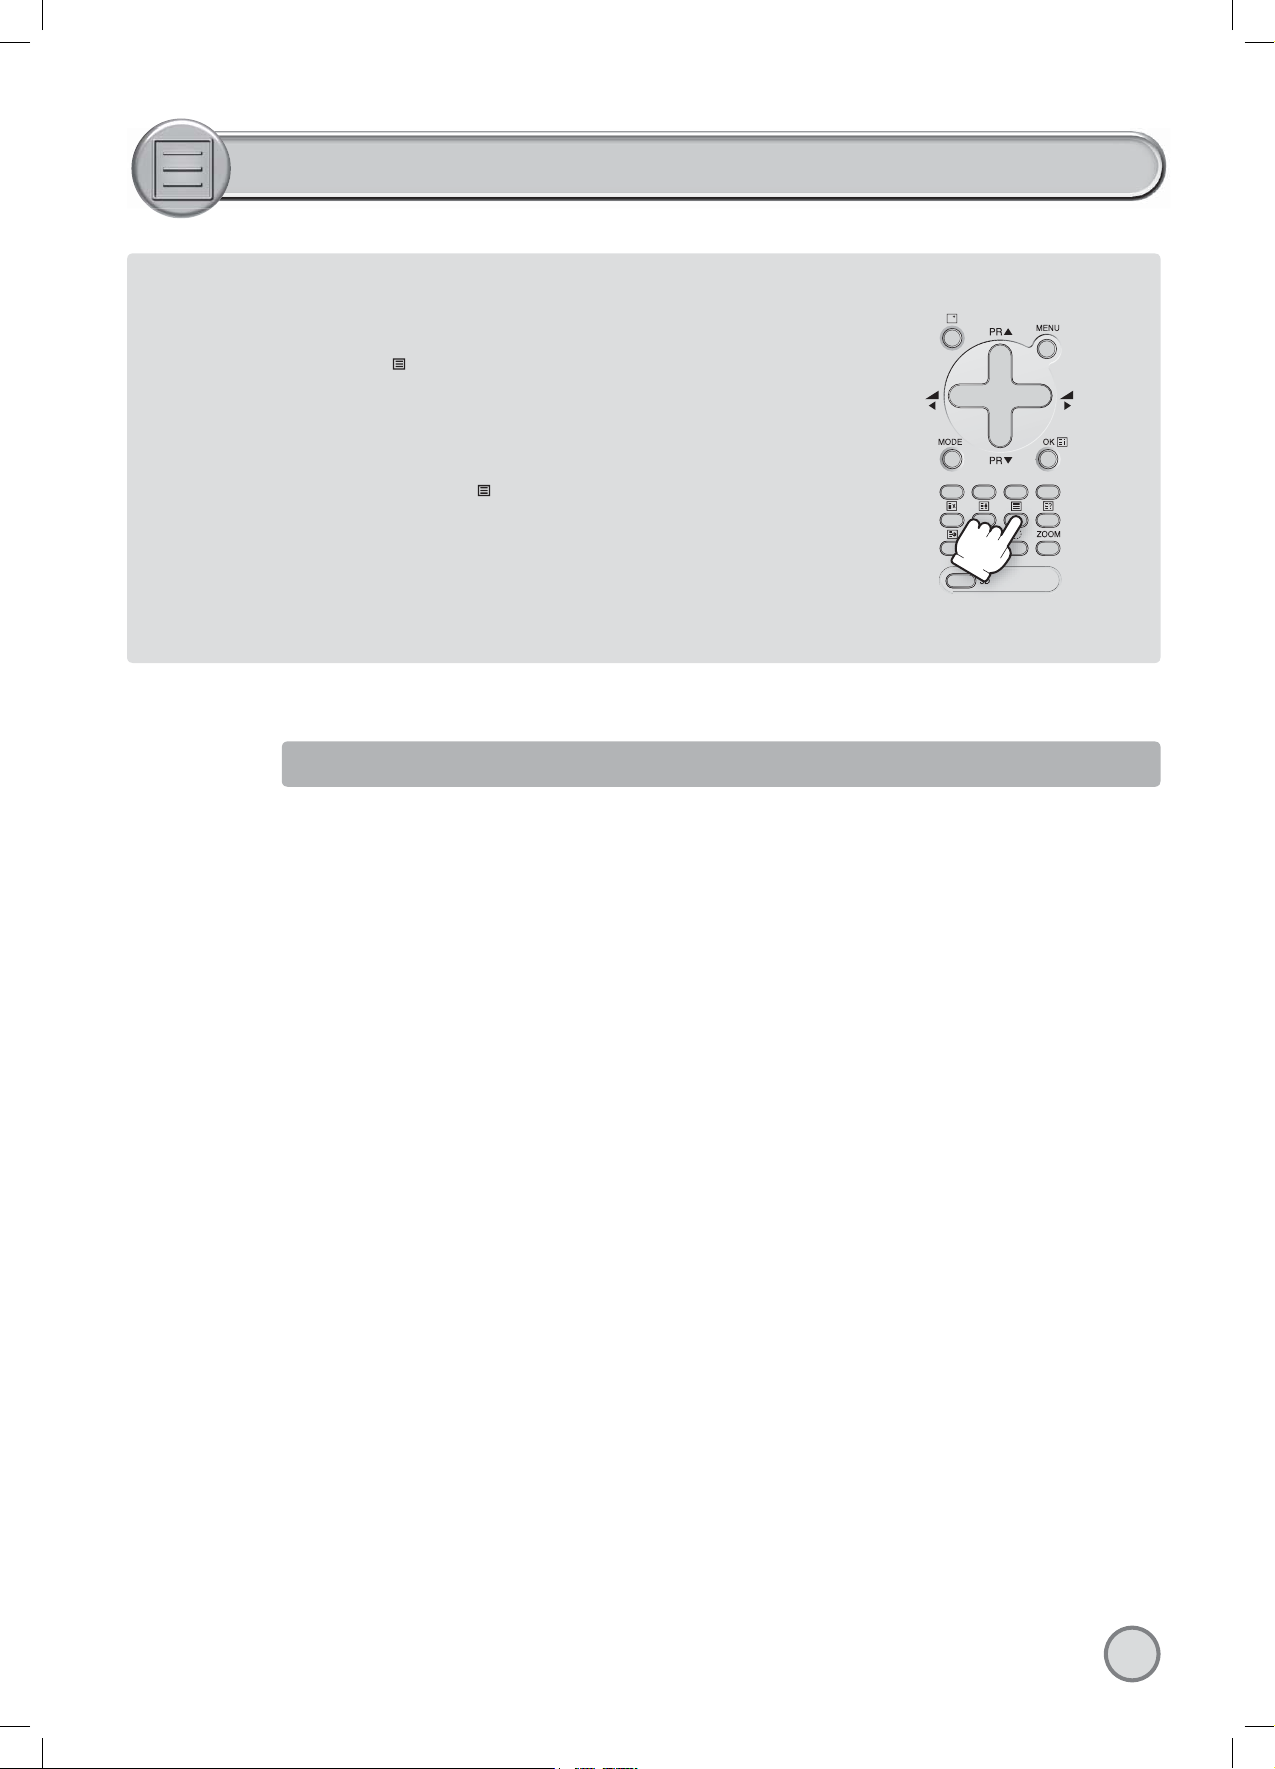
TELETEXT
ENTERING/LEAVING TELETEXT MODE
- Select the desired program with teletext.
- Press the remote control TELETEXT (
(or the last page viewed if you have already used teletext in the present channel) appears.
- Picture And Teletext (PAT) function : If you want to watch the TV program and use teletext at
the same time, press the TELETEXT button (A22) again. Teletext will be displayed on the left
hand part of the screen, and the whole TV picture will be compressed into right hand part of
the screen.
- To return to TV mode, press again the TELETEXT (
) button (A22) to select teletext mode. The initial page
) button (A22).
PAGE SELECTION
- You can directly enter the 3 figure page number by using the remote control NUMBER 0...9 buttons (A3).
- You can sequentially select teletext pages by pressing the remote control PAGE UP (A6) / DOWN (A21) buttons.
- At the base of the screen a menu of coloured page links is available, showing either page numbers or a title with headings (eg Sport, News)
in RED, GREEN, YELLOW or CYAN colour. These pages can be accessed by using the corresponding coloured buttons (A11, A12, A26, A25)
on the remote control.
Once a request is made, the page number is shown in the extreme top left corner of the screen. If the requested page is not
immediately available the rolling header will be active until the page arrives.
14
Page 16
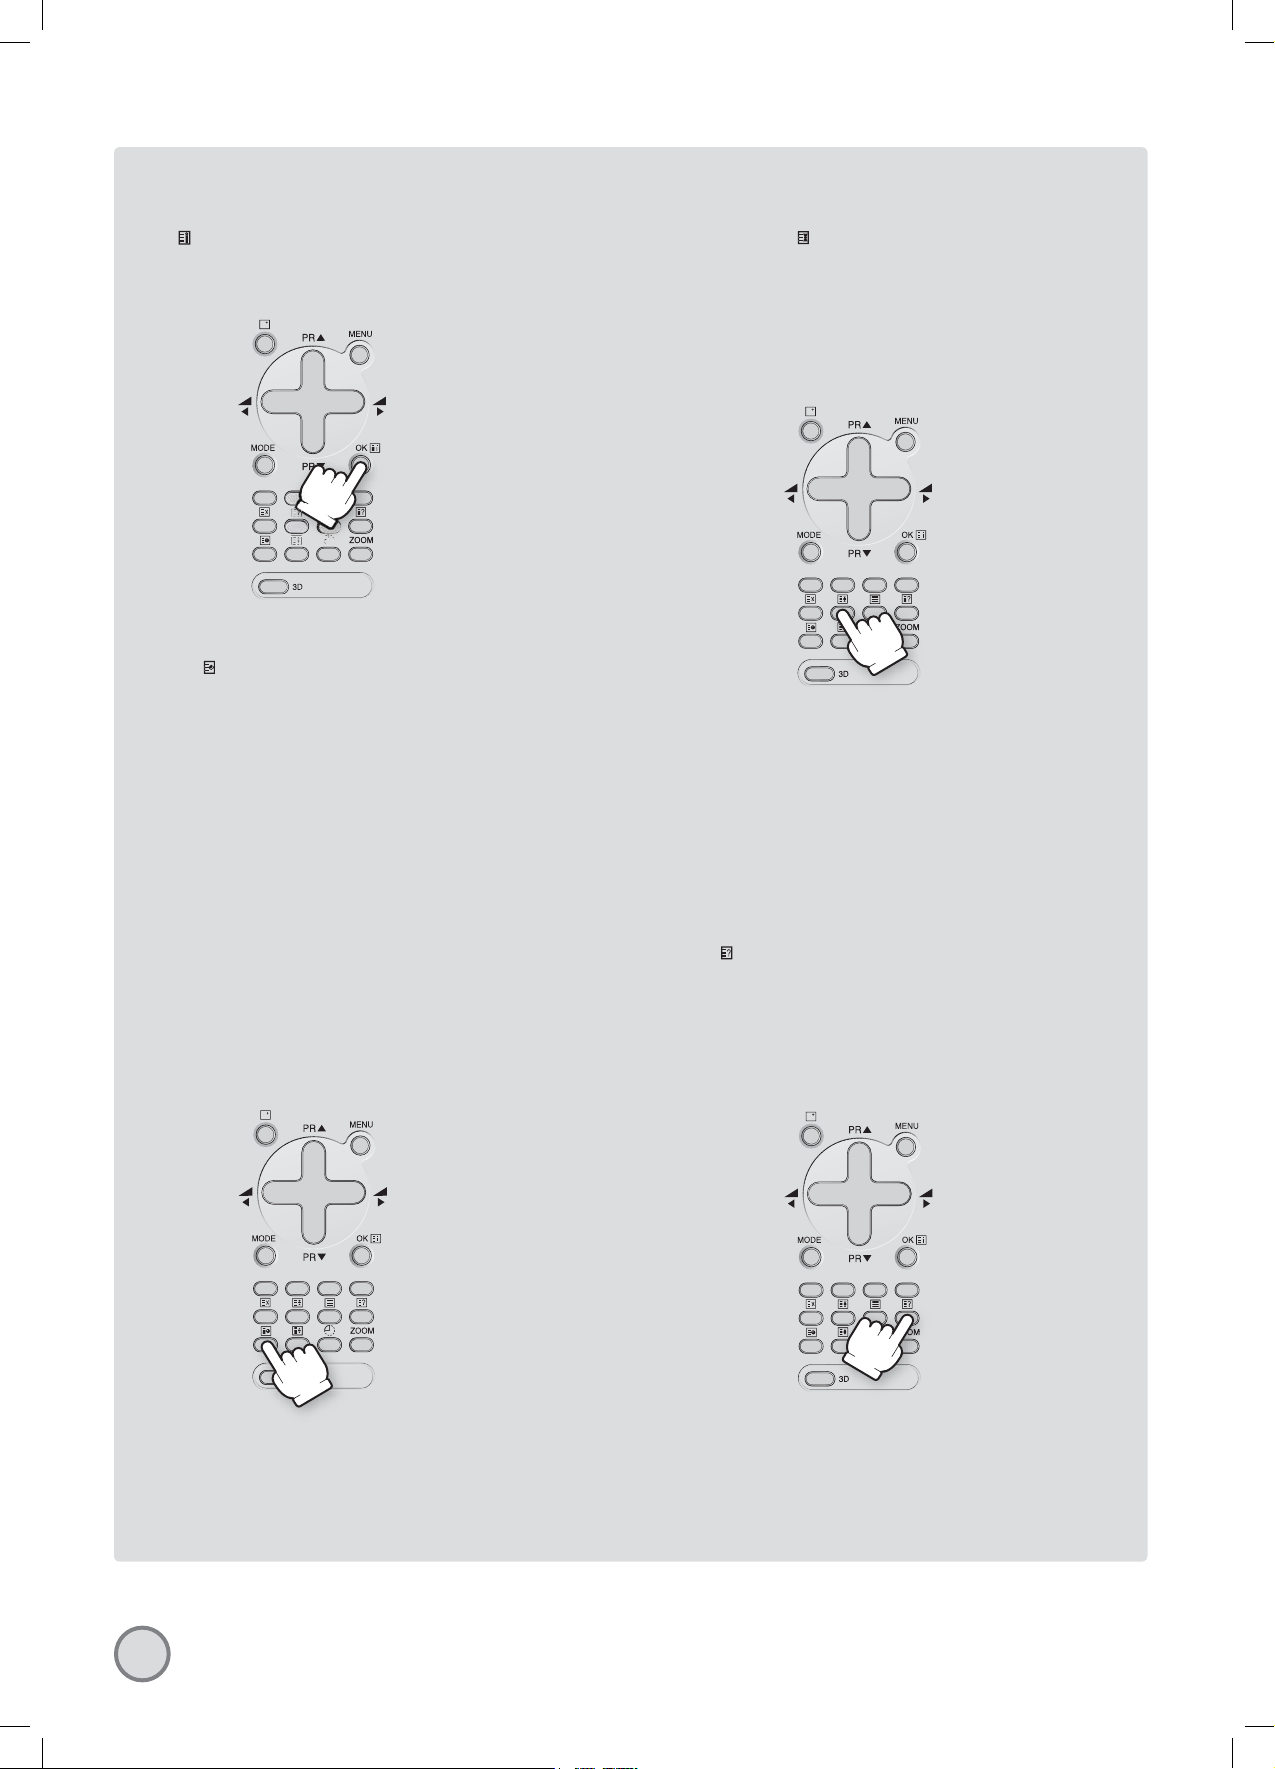
USEFUL TELETEXT FUNCTIONS
INDEX ( ) button (A18): Allows you to return directly to the
initial teletext page.
SUBPAGE (
subpage:
- Press the SUBPAGE button (A10). At the base of the screen a SUBPAGE
menu will appear. This has a red subpage minus link, a green subpage
plus link, plus a white background showing (e.g. for page 110), 110 /
0001. This is ready to accept the subpage number.
- Enter directly the subpage number you want with the remote control
NUMBER 0...9 buttons (A3): for example to request the 2nd subpage,
type 0002.
- Alternatively, use the red subpage minus link or the green subpage
plus link.
- The subpage number entered is shown at the base of the screen.
- If the requested page is not immediately available the rolling header
will be active until the page arrives. Warning: If the subpage is not
available (does not exist), then the header will roll continuously and
no new page will be found.
- To exit subpage mode, press the SUBPAGE button (A10) again.
Note : Teletext specification allows for subpage numbers 0000 to 3979
) button (A10): Allows you to request a specific
(the first figure is limited to the range 0..3, and the third figure
0..7).
PAGE HOLD button (
subpage can be held on the screen by pressing the
PAGE HOLD button.
- The page number shown in the extreme top left corner
instead of page number the HOLD icon is shown in green.
- Press the HOLD button again to cancel hold mode
(the page number will return to white).
REVEAL (
on certain pages, hidden information such as the
answer to a quiz.
- Press the button again to hide the information.
) button (A24): Press this button to reveal,
) (A9): Any teletext page or
15
Page 17
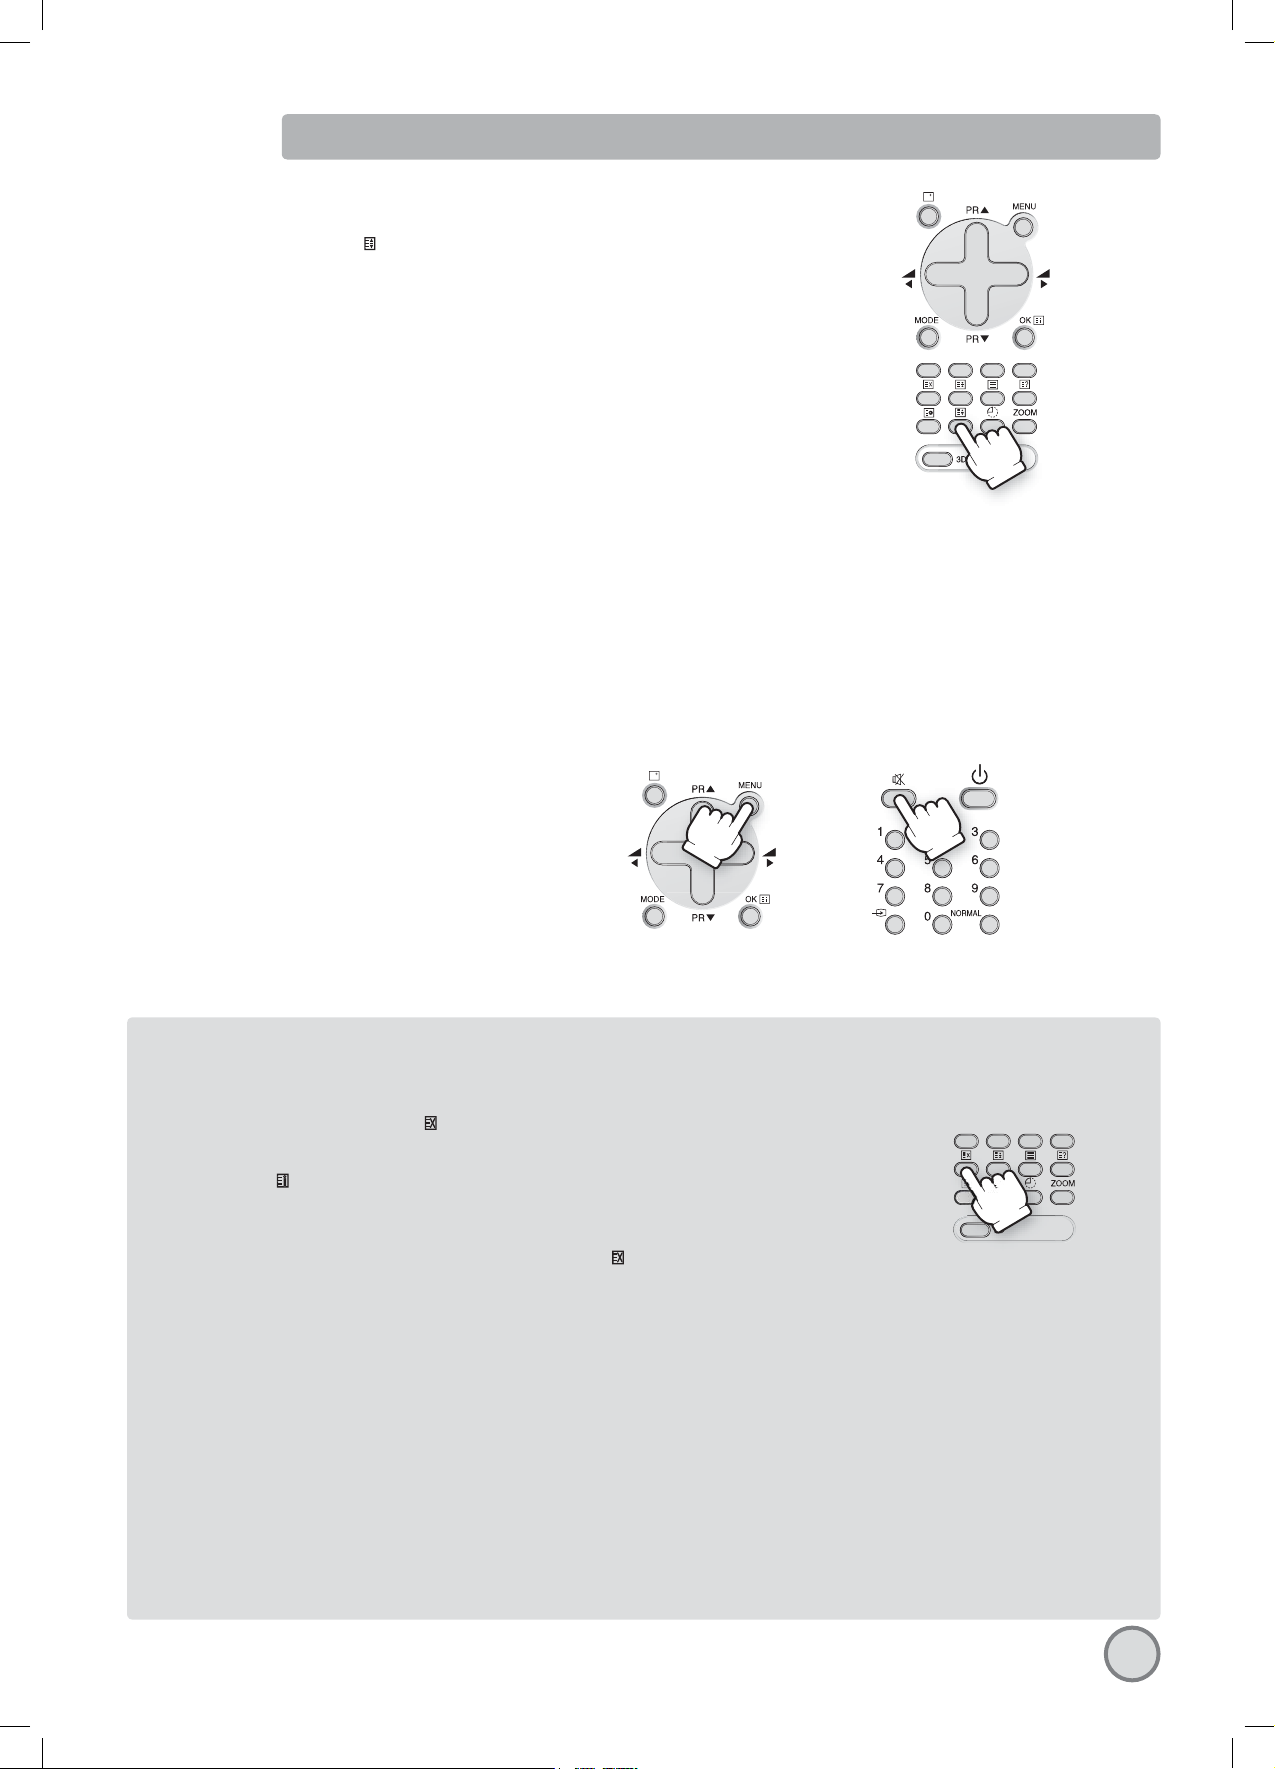
TELETEXT FORMAT PICTURE & SOUND CONTROL
Doubling character height
Repeatedly pressing the HEIGHT (
order:
Upper half of the page (UP) > Lower half of the page (DOWN) > Return to normal height.
If the page is in UP or DOWN mode, then normal size is automatically set if :
- A new page request is made (e.g. CYAN, INDEX or PAGE UP/DOWN).
- CANCEL mode (A8) function is used.
- VOLUME menu is activated the with the MENU button (A19).
Note : The menu at the base of the screen is always visible
Volume and brightness control in teletext mode
VOLUME ( and sound MUTE), BRIGHTNESS controls are all possible in teletext. The BRIGHTNESS
control are dedicated to the teletext display.
- Access the VOLUME control by pressing the MENU button (A19) in teletext mode. A barograph will appear in the lower part of the screen
(as in TV mode). If MUTE is active a mute icon is also shown.
- A second press on the MENU button (A19) will access the BRIGHTNESS control.
- The active bargraph will timeout after 3-4 seconds (as in TV mode VOLUME control) or by pressing on the MENU button (A19) a third
time after brightness control
- Each control can be adjusted by using the remote control CURSOR RIGHT (A20) / LEFT (A7) buttons.
- Mute can always be activated by pressing the SOUND MUTE button (A2).
- Any change to the VOLUME level will cancel the SOUND MUTE.
) button (A23) doubles the character height in the following
WATCHING TV WHILE PAGE SEARCHING
The CANCEL function can be used to make the teletext page transparent, thus revealing the TV picture:
- To enter cancel mode, press the CANCEL ( ) button (A8) while in teletext mode. The TV program will reappear on the screen, while only the teletext page number remains at the top and left corner of the screen.
- You can enter a new page number in this mode only by using the remote control NUMBER 0...9 buttons (A3),
or with the INDEX ( ) button (A18).
- If a page has been requested, but has not yet arrived, “???” flashing characters will be displayed until the page
arrives. Otherwise, the same characters will be displayed without flashing until the next arrival of the page in
the transmission cycle. Once arrived the page number will be displayed.
- The teletext page can be made visible again by pressing the CANCEL ( ) button (A8).
- It should be noted that the TV program cannot be changed while in cancel mode.
- The CANCEL function is not available in PAT mode.
WATCHING TV WITH TELETEXT SUBTITLES
If the actual teletext page is a news flash or subtitle page, then most of the TV picture becomes visible. In this situation the ZOOM format chosen in TV
mode is reactivated, where possible.
This is particularly useful while watching a program with the teletext subtitles. Only formats which do not allow the full height of the TV picture to be
seen are not possible in teletext mode, as these would not allow all teletext lines to be displayed.
Therefore only the formats ZOOM 14:9 AND ZOOM 16:9 (available with wide screen TV models) cannot be preserved with teletext subtitles. In this
situation the default format FULL SCREEN (equal to 16:9) will be used.
For FAVOURITE format, FULL SCREEN will also be used only if the vertical size chosen is greater than 100%.
Note : A 16:9 or 14:9 format can be realised by keeping a 100% vertical size, but reducing the horizontal size, thus allowing teletext subtitles to be used
over a picture that has no distortion.
16
 Loading...