

Daewoo DTC-14Q1TX User Manual
PR
STAND-BY
VIDEO AUDIO
MODEL NO.
DTC-14Q1TX
DTC-20Q1TX
DTC-21Q1TX
Instruction Manual
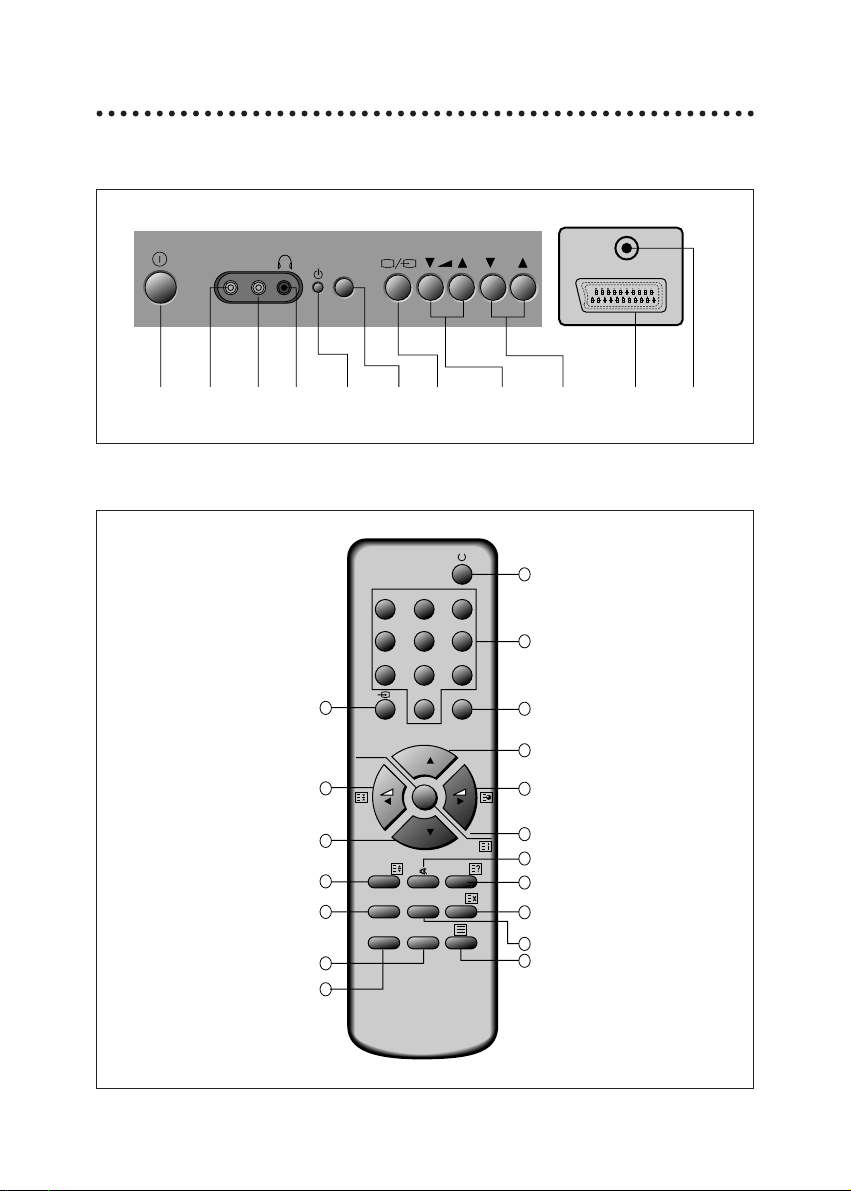
IDENTITY OF FEATURES ON LOCAL AND REMOTE CONTROL
1
LOCAL CONTROL
REMOTE CONTROL
PR
VIDEO AUDIO
Front
MAIN
POWER
BUTTON
VIDEO
INPUT
AUDIO
INPUT
HEAD
PHONE
STAND-BY
INDICATOR
REMOTE
SENSOR
AV
BUTTON
VOLUME
DOWN/UP
BUTTONS
PROGRAMME
DOWN/UP
BUTTONS
SCART
SOCKET
AERIAL
TERMINAL
Back
TELETEXT mode
1
POWER
2
NUMBER 0-9
3
MENU
4
NOT USED
5
PAGE UP
6
SUBPAGE
7
INDEX
8
PAGE DOWN
9
HOLD
A
MUTE
B
REVEAL
C
SIZE
D
CANCEL
E
G (VOLUME UP)
F
R (VOLUME DOWN)
G
TV
H
C (BRIGHT UP)
I
Y (BRIGHT DOWN)
TV mode
1
POWER
2
NUMBER 0-9
3
MENU
4
AV
5
PR (CURSOR)UP
6
VOLUME UP (CURSOR RIGHT)
7
OK(NORMAL)
8
PR(CURSOR) DOWN
9
VOLUME DOWN(CURSOR LEFT)
A
MUTE
B
RECALL
C
SLEEP
D
SKIP
E
MOVE
F
DELETE
G
TELETEXT
H
Not Used
I
TIME
1
4
9
8
12
15
17
18
123
456
7809
NORMAL
PR
OK
PR
SLEEP RECALL
TIME MODE
MENU
SKIPMOVEDEL
2
3
5
6
7
10
11
13
14
16
CONTENTS
* Identity of features on Local and Remote Control 1
* Important safeguards 2
* Installation 3
After moving the set 3
Inserting Batteries into the Remote Control Unit 3
Aerial connection 3
Mains connection 4
Switching the set on and off 4
Tuning the TV Channels 5
Edit 5
Manual Channel Setting 6
* Daily use 7
Selecting a Programme Number 7
Volume and Picture control 7
Timer 8
Sleep 8
Recall 8
Child Lock 8
Time 8
* Teletext 9
* Connecting the External Equipment 11
Water / Moisture : Never install the set in the following places:in the bathroom, in a wet base-
ment.
Do not place any containers with liquid (e.g. flower vases) on the set.
Heat : Never place the set near heat sources (e.g. radiator).
Ventilation : Do not cover the ventilation openings in the cabinet.
Never place the set in a confined space such as a bookcase or built-in-cabinet, unless proper ventilation is provided.
Object Entry : Do not insert foreign objects, such as needles and coins, into the ventilation
openings.
Lightning Striking: You should disconnect your set from the mains and the aerial system during
thunderstorms.
Cleaning : Unplug the set from the mains before cleaning.
2
IMPORTANT SAFEGUARDS
- The appliance is not intended for use by young children or infirm persons without supervision;
- Young children should be supervised to ensure that they do not play with the appliance.

INSTALLATION
If the used set is moved or placed in a different direction, the
MAIN POWER button must be switched off for at least 15 minutes in order to take out a colour strain on the screen.
3
AFTER MOVING THE SET
Press down the battery compartment grip and slide the cover,
Insert the batteries supplied(two 1.5v, type AA).
Make sure that the polarity matches with the (+) and (-) marks
inside of the battery compartment.
Used batteries should be disposed of properly.
INSERTING BATTERIES INTO THE REMOTE CONTROL UNIT
For better picture and sound quality, an effective aerial installation is the most important.
If you are located in a relatively strong area, you will be able to
use the indoor aerial.
When using an outdoor aerial, it is ususlly connected to the set
by means of 75 ohm coaxial cable.
AERIAL CONNECTION
Plug the mains cable into the power socket with 240V/50Hz AC.
4
MAINS CONNECTION
Switching On
Switch the set on with the MAIN POWER button, ( ). The set will turn on.
If not, press either : - PR UP or DOWN button on the front of set - or POWER button or the
UP/DOWN button or one of the NUMBER button 0..9 on the remote controller.
The STAND-BY INDICATOR will turn off and a picture will appear on the screen.
Switching off
Press POWER button ( ) on the remote controller to return the set to its stand-by mode.
The STAND-BY INDICATOR will illuminate.
If you don't use the set for extended period of time, turn it off with MAIN POWER button
SWITCHING THE SET ON AND OFF
 Loading...