

Page 1
D I G I T A L
PR
PR
PR
OK/LIST
MENU
TV/RADIO
EXIT
PAUSE
TXT TV/AV
L
R
INFO EPG
UHF
ALT-AUDIO
D I G I T A L
Broadcasting
Digital VVideo
D I G I T A L
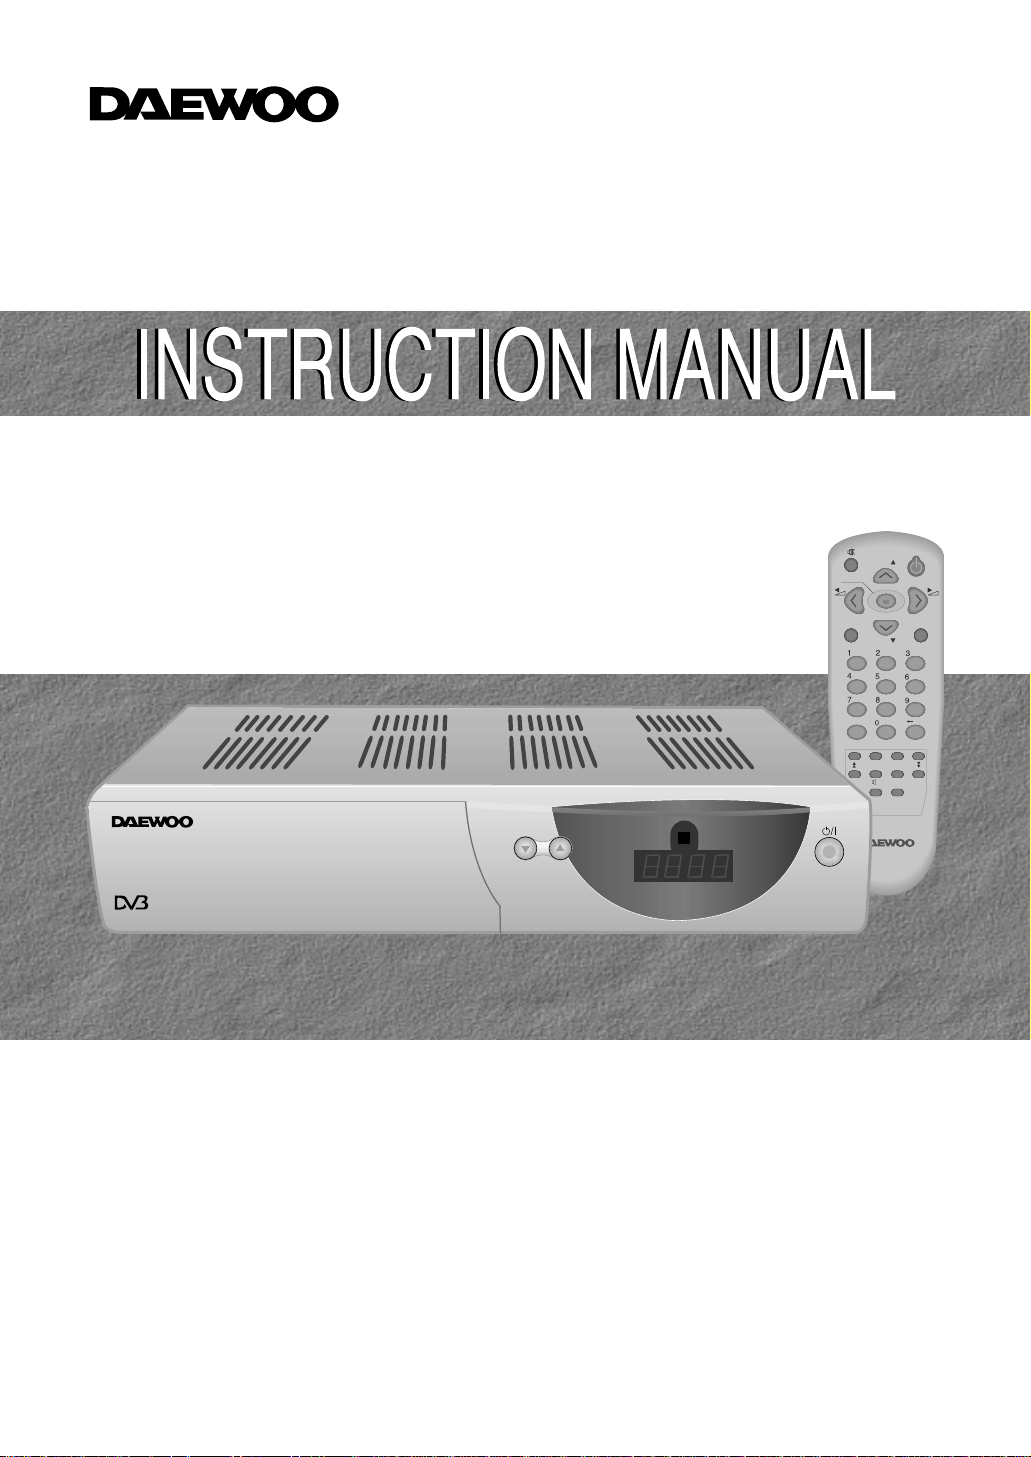
DSD-9230E
Page 2
CONTENTS
D I G I T A L
GENERAL INFORMATION 3
Main Features of DSD-9230E 3
For your Safety 4
Unpacking 4
General Operation of DSD-9230E 4
Remote Control 5
Front Panel 6
Rear Panel 6
INSTALLATION of DSD-9230E 7
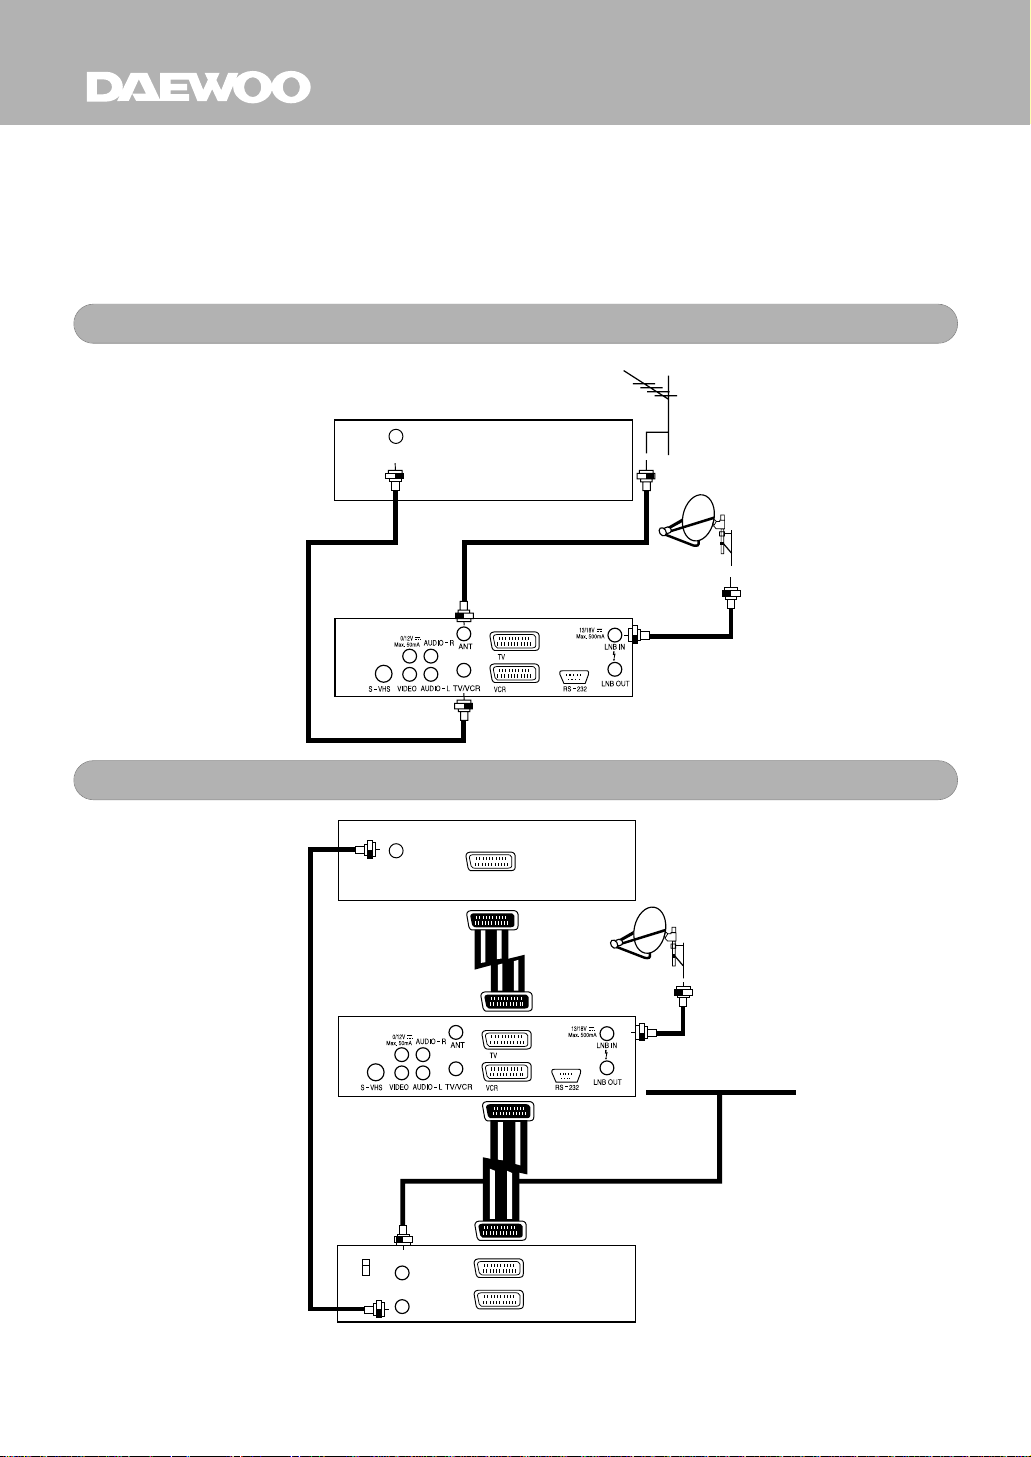
Connecting to Antenna & TV 7
Connecting to TV & VCR using SCART support
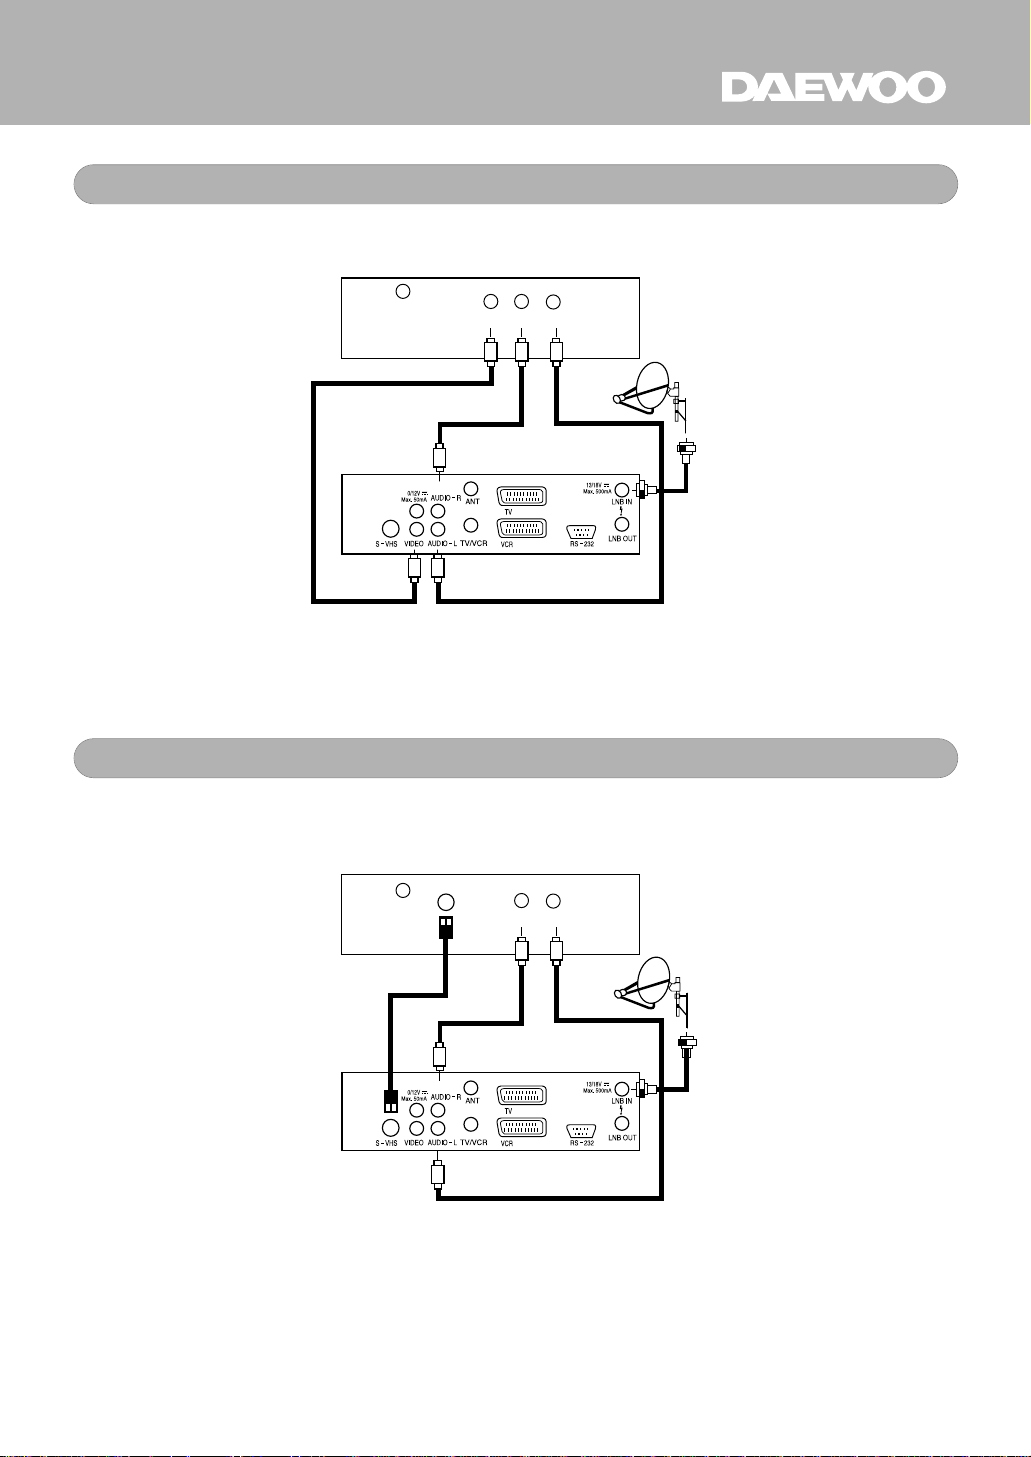
Connecting to TV using RCA support 8
Connecting to TV using S-VHS support 8
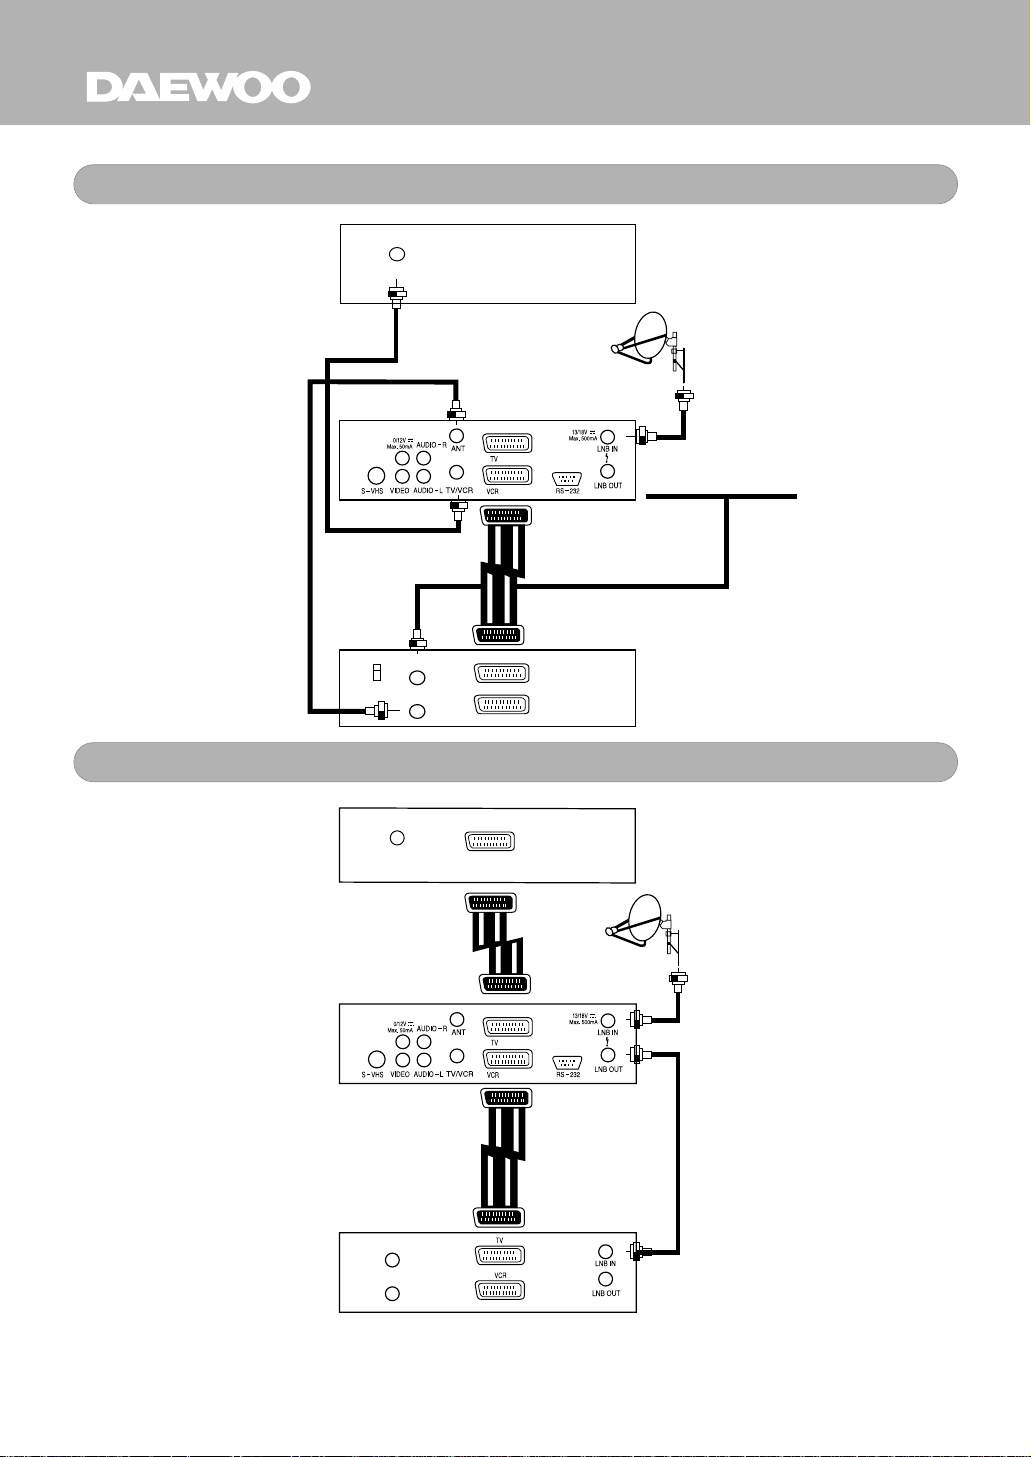
Connecting to TV using RF support 9
Connecting to another SVR 9
INITIAL INSTALLATON 10
Select Language 10
Time Setting 11
Select Switch 11
Select Satellite 11
Select LNB 12
Enter the LNB frequency 12
Test Signal Level 12
Setup Confirmation 13
Channel Searching 13
Installation Complete 13
7
CHANNEL MANAGER 17
Main Menu 17
Channel Manager 17
TV Channel Manager 18
Favorite Channel 18
Move Channel 19
Lock Channel 19
Rename Channel 19
Delete Channel 20
Sort Channel 20
Fast Edit Mode 21
GO TO FUNCTION 21
EPG (Electronic Program Guide) 22
TIMER 23
Easy Timer 23
Advanced Timer 23
USER INSTALLATION 24
Installation Guide 24
Antenna Setup 24
Antenna Direction Help 25
Channel Search 26
System Setting 29
GENERAL VIEWING FUNCTION 14
Select Channel 14
Frame Pause 15
Previous Channel Recall 15
TV & Radio mode 15
TV & VCR mode 15
Channel Information 16
Volume & Audio Control
16
Parental Lock 30
Factory Default 31
RECEIVER INFORMATION 32
FRONT PANEL DISPLAY 32
TROUBLE SHOOTING 33
Page 3

D I G I T A L
GENERAL INFORAMTION
D I G I T A L
DSD-9230E Digital Satellite Receiver is easy to use and a Free-to-Air receiver
that allows you to watch digital programs broadcasted via satellite. This
instruction manual will guide you through the initial installation of your receiver. It
also describes how to take full advantage of a wide range of features that are
easily accessible. Read this instruction manual carefully before installing your
receiver.
Main Features of DSD-9230E
.
High quality Digital Video & Audio.
.
Fully DVB compliant.
.
Install Wizard system.
.
One Step Direct move menu system. (Go To function)
.
Friendly and easy-to-use menu system.
.
Various channel editing functions. (favorite, move, lock, rename, delete and
sort)
.
User programmable Satellite & Transponder information.
.
Automatic search for newly added transponder. (NIT search)
.
Stores up to 2000 channels.
.
Easy and speedy software upgrade through RS-232 port.
.
Plug-and-play data transfer system. (DSR to DSR)
.
Individual channel volume saving function.
.
Timer function.
.
Automatic reserved channel moving system.
.
Electronic Program Guide. (EPG)
.
Teletext function support.
.
Antenna Positioning Help feature.
.
Support various video output - CBVS, RGB, S-VHS.
.
Provide various switch types, LNB types and NTSC/PAL monitor type.
.
SCPC/MCPC receivable from C/Ku Band.
.
Multi LNB control by DiSEqC 1.0 and 22 KHz switching.
.
256 color On-Screen-Display.
3
Page 4

D I G I T A L
GENERAL INFORAMTION
For Your Safety
.
Allow clear space of more than 10cm from the top, back and both sides of DSD-9230E
for sufficient ventilation.
.
Do not cover the DSD-9230E nor place it on a unit that emits heat.
.
Use a soft cloth and a mild solution of washing liquid to clean the casing.
.
Do not connect or modify cables when DSD-9230E is plugged in.
.
Do not remove the cover.
.
Do not allow the unit to be exposed to
.
Never allow liquid, spray or other
DSD-9230E.
.
This unit is designed for continuous operation. Switching it off does not disconnect it
from the mains(Stand-by). To disconnect it from the mains, you have to unplug the
mains.
extreme heat, cold or humidity.
materials
to come into contact with the inside of the
Unpacking
When unpacking check to make sure that all of the following items are included in the
packaging.
.
1 x Remote Control Unit(RCU)
.
1 x Instruction Manual
.
2 x AA battery
.
1 x DSR
General Operation of DSD-9230E
Throughout this manual you will notice that the daily operation of your DSD-9230E is
based on a series of user friendly On Screen Display and menus. These menus will
help you get the most from your DSD-9230E, and guide you through installation.
All function can be carried
functions can also be carried out by using the buttons on the front panel.
The DSD-9230E is easy to use and adaptable for future upgrades.
out by using the keys on the remote control, and some of the
Note that new software may change the functionality of DSD-9230E.
If you have
relevant section of this manual or call your dealer or customer service center.
difficulties with the operation of your DSD-9230E, please refer to the
4
Page 5
GENERAL INFORAMTION
D I G I T A L
PR
PR
PR
OK/LIST
MENU
TV/RADIO
EXIT
PAUSE
TXT TV/AV
L
R
INFO EPG
UHF
ALT-AUDIO
D I G I T A L
L
R
PR
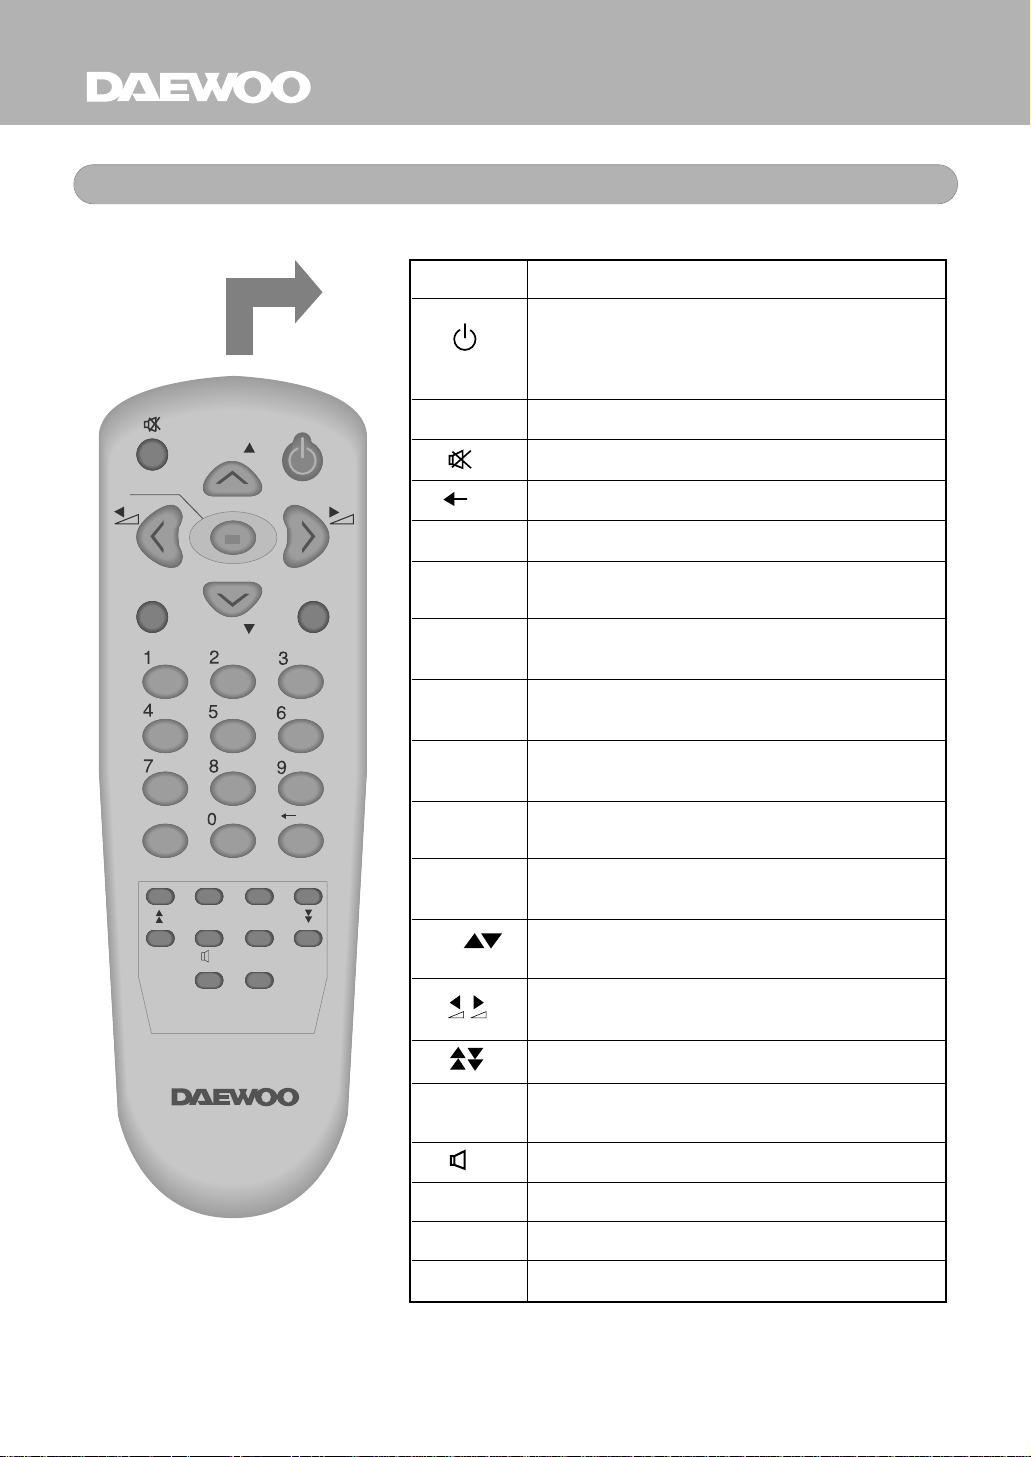
Remote Control
Key Function
Switches between the operational mode
and stand-by mode of the receiver (Green
lamp lights up during the operation, Red
lamp lights up in stand-by mode)
TV/ RADIO Switches between TV and Radio mode.
Mutes the sound.
Switches back to previous channel.
INFO Shows information of the current channel.
MENU
EXIT
ALT-AUDIO
EPG
LIST
OK/
0 - 9
Displays menu on screen, and calls command
box.
Returns to the previous menu on the menu
screen.
When watching a channel, switches the audio
languages.
Calls up the EPG
(Electronic Program Guide)
Executes the selected item in the menu screen,
or enters the desired value in any input mode.
Enter the number in the required menu item or
select a channel number to watch.
PR When watching, changes channels, or moves to
the next higher or lower item in the menu.
When watching, adjusts the volume, or moves to
the left or right item in menu.
Moves up / down a page in the channel list.
PAUSE
Press once to freeze the screen picture.
Press once again to go to the normal mode.
Selects the different audio model.
TXT Switches to the Teletext mode.
UHF Switches to the UHF Tuning Mode.
TV/AV Switches between TV and AV mode.
5
Page 6
GENERAL INFORAMTION
D I G I T A L
CAUTION
90-250V~
50/60Hz, 30W
S_VHS
VIDEO
ANT
TV/VCR
R
_
AUDIO
L
_
AUDIO
VCR
LNB IN
LNB OUT
_
RS 232
TV
0/12V
Max. 50mA
13/18V
Max. 500mA
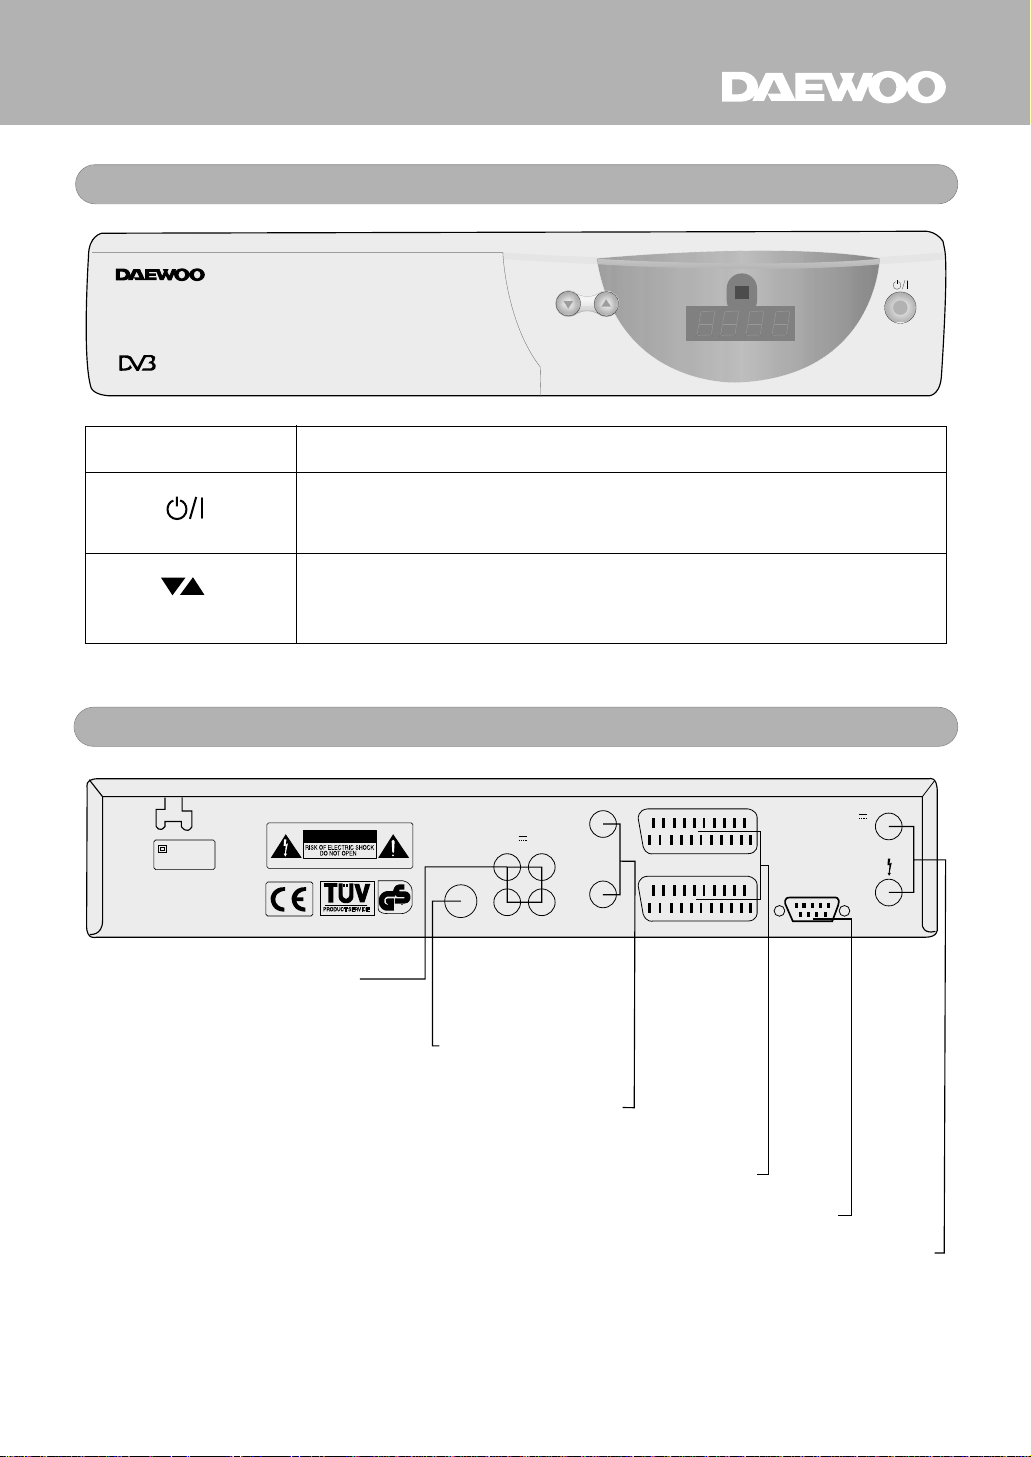
CONNECT TO THE S-VHS JACK
OF TV OR VCR
CONNECT TO TV AND VCR USING A SCART CABLE
RS232 : CONNECT TO A PC FOR S/W UPGRADE
LNB IN : CONNECT TO SATELLITE ANTENNA
LNB OUT : CONNECT TO ANOTHER RECEIVER
CONNECT TO A TV OR VCR
CONNECT TO TV ANT INPUT
CONNECT VIDEO TO A TV USING RCA JACK
CONNECT AUDIO L/R TO TV OR AUDIO TUNER
CONNECT 12V TO AN EXTERNAL 0/12V SWITCH
geprufte
Sicherheit
D I G I T A L
Broadcasting
Digital VVideo
Front Panel
KEY FUNCTION
Switches between the operational mode and stand-by
mode.
When watching, changes the channel, or in the menu,
moves to the previous and next item.
Rear Panel
6
Page 7
INSTALLATION OF DSD-9230E
D I G I T A L
IN
TV
DSR
TERRESTRIAL ANTENNA
SATELLITE
DISH
SCART
IN
TV
DSR
VCR
IN FROM ANT
VIDEO
IN
VIDEO
OUT
CH3
CH4
OUT TO ANT
CABLE
OR
TERRESTRIAL ANTENNA
SATELLITE
DISH
This section explains the installation of DSD-9230E. Refer to the manuals
supplied with the equipment for the installation of outdoor equipment such as the
dish antenna. When adding a new equipment, be sure to refer to the related
parts of the manual for the installation.
Connecting to ANTENNA & TV
Connecting to TV & VCR using SCART support
7
Page 8
INSTALLATION OF DSD-9230E
D I G I T A L
IN
RL
VIDEO AUDIO
TV
DSR
SATELLITE
DISH
IN
RL
S-VHS
AUDIO
TV
DSR
SATELLITE
DISH
Connecting to TV using RCA support
Connecting to TV using S-VHS support
8
Page 9
INSTALLATION OF DSD-9230E
D I G I T A L
IN
TV
DSR
VCR
IN FROM ANT
VIDEO
IN
VIDEO
OUT
CH3
CH4
OUT TO ANT
CABLE
OR
TERRESTRIAL ANTENNA
SATELLITE
DISH
IN
TV
DSR
Another
SVR
TV/VCR
ANT
SCART
SATELLITE
DISH
Connecting to TV using RF support
Connecting to another SVR
9
Page 10
INITIAL INSTALLATION
D I G I T A L
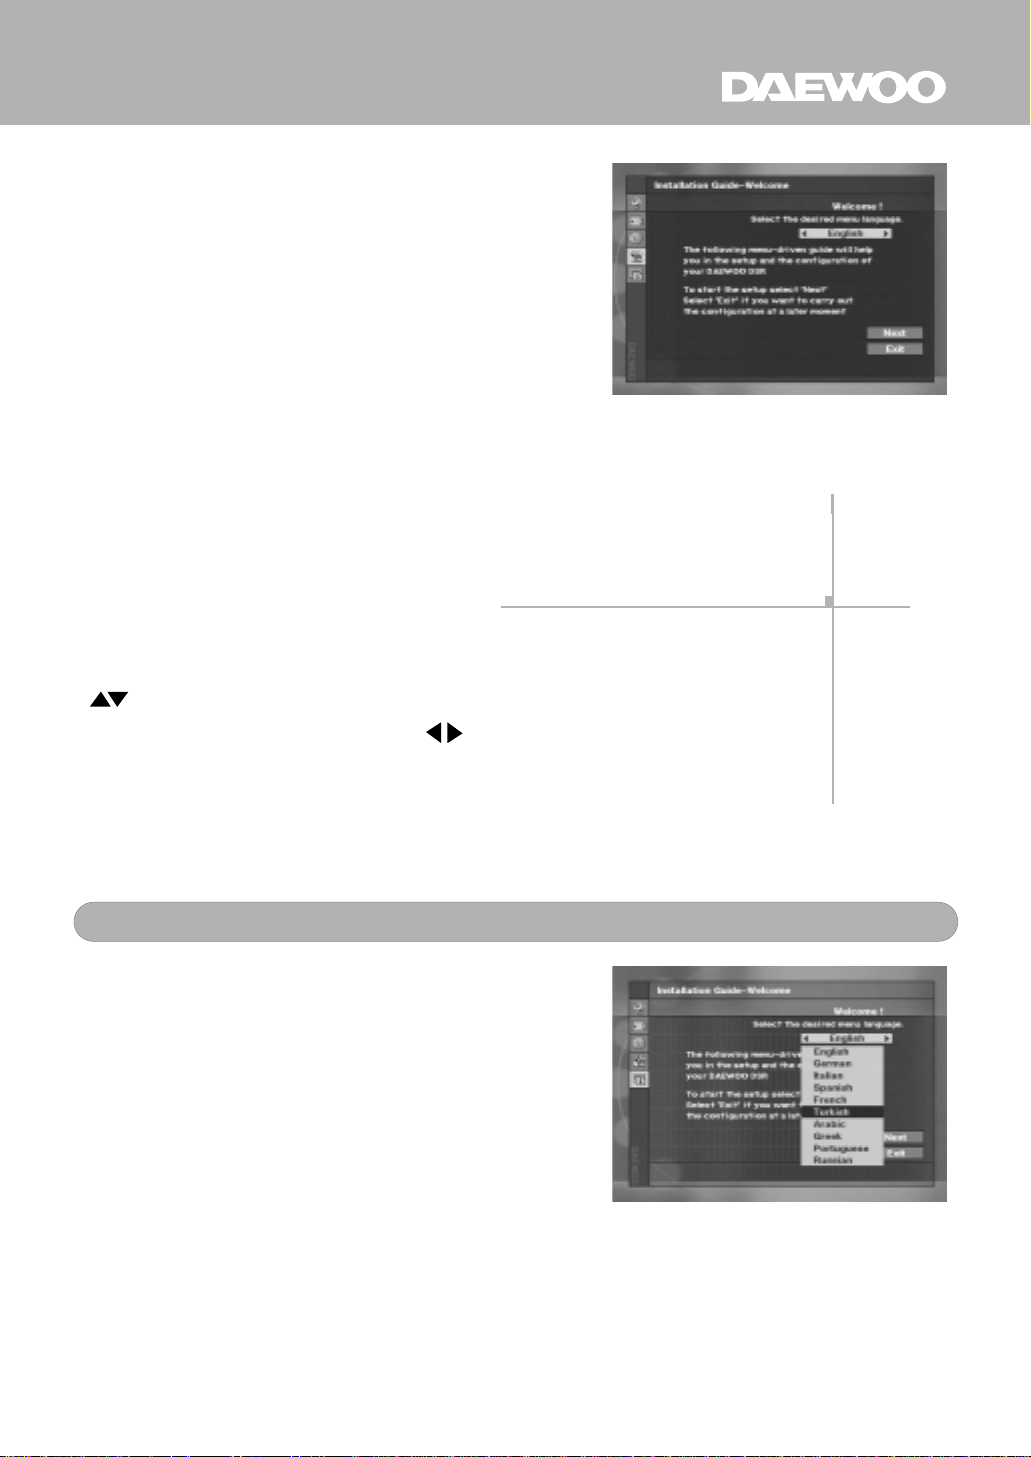
Once you have correctly connected the DSD9230E, "INSTALL WIZARD" will guide you
through the installation process.
When you turn on the DSD-9230E, this picture
will be displayed and this picture indicates that
you have started the installation procedure.
This "INSTALL WIZARD" menu is designed
for quick and easy installation.
During the installation process, OK key always
confirms a selection within these menus.
Selecting NEXT and pressing OK key will take
you to the next step in the installation process.
Selected box is highlighted for easy identification.
You can always go back to the previous menu
by selecting BACK and pressing OK key. Use
keys to move up and down from one line
to another. On Select Box, use to change
settings and press OK key to display the List
Box. You can also use the numeric keys on
the remote control to enter numeric value
directly.
Select the desired language.
To go to the next procedure after selecting
your language, select NEXT and press OK
key.
To quit, select EXIT and press OK key.
Select Language
10
Page 11
INITIAL INSTALLATION
D I G I T A L
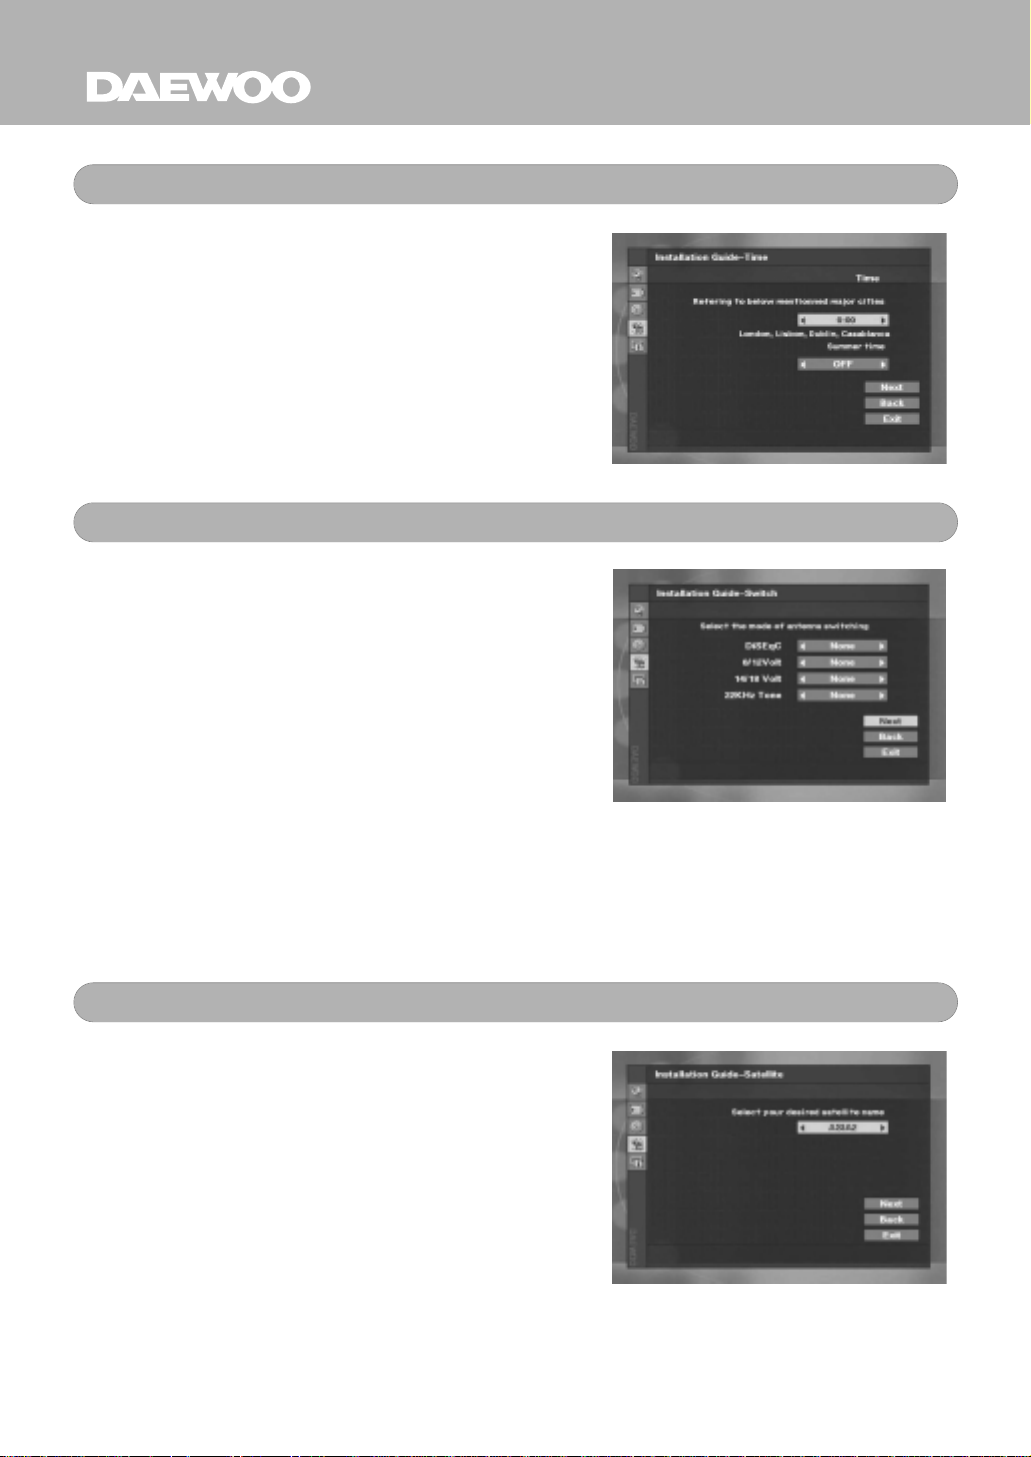
Time Setting
Select your local time referring to the city
name displayed on the screen. Local time can
be adjusted
For example, if you are in London, local time
shall be 0:00.
And if summer time is in effect, select ON from
the menu.
Local time will automatically set. To continue,
select NEXT and press OK key.
Select the switches with which you want to
configure the antenna.
These switches are related to the antenna
selection and you can select up to 16
antennas with the combination of these
switches.
+/- 12 hours in reference to UTC.
Select Switch
For example, if you have 4 antennas, you can
assign Antenna 1 for 0 volt and 14 volt,
Antenna 2 for 0 volt and 18 volt, Antenna 3 for
12 volt and 14 volt and Antenna 4 for 12 volt
and 18 volt.
If you have only one antenna, select all of the
switches as None.
Select Satellite
Select a satellite from the pre-programmed
list. You have to select a proper satellite
considering the installed antenna direction and
switch selection.
Note :
DSD-9230E can store up to 64 satellites.
11
Page 12
INITIAL INSTALLATION
D I G I T A L
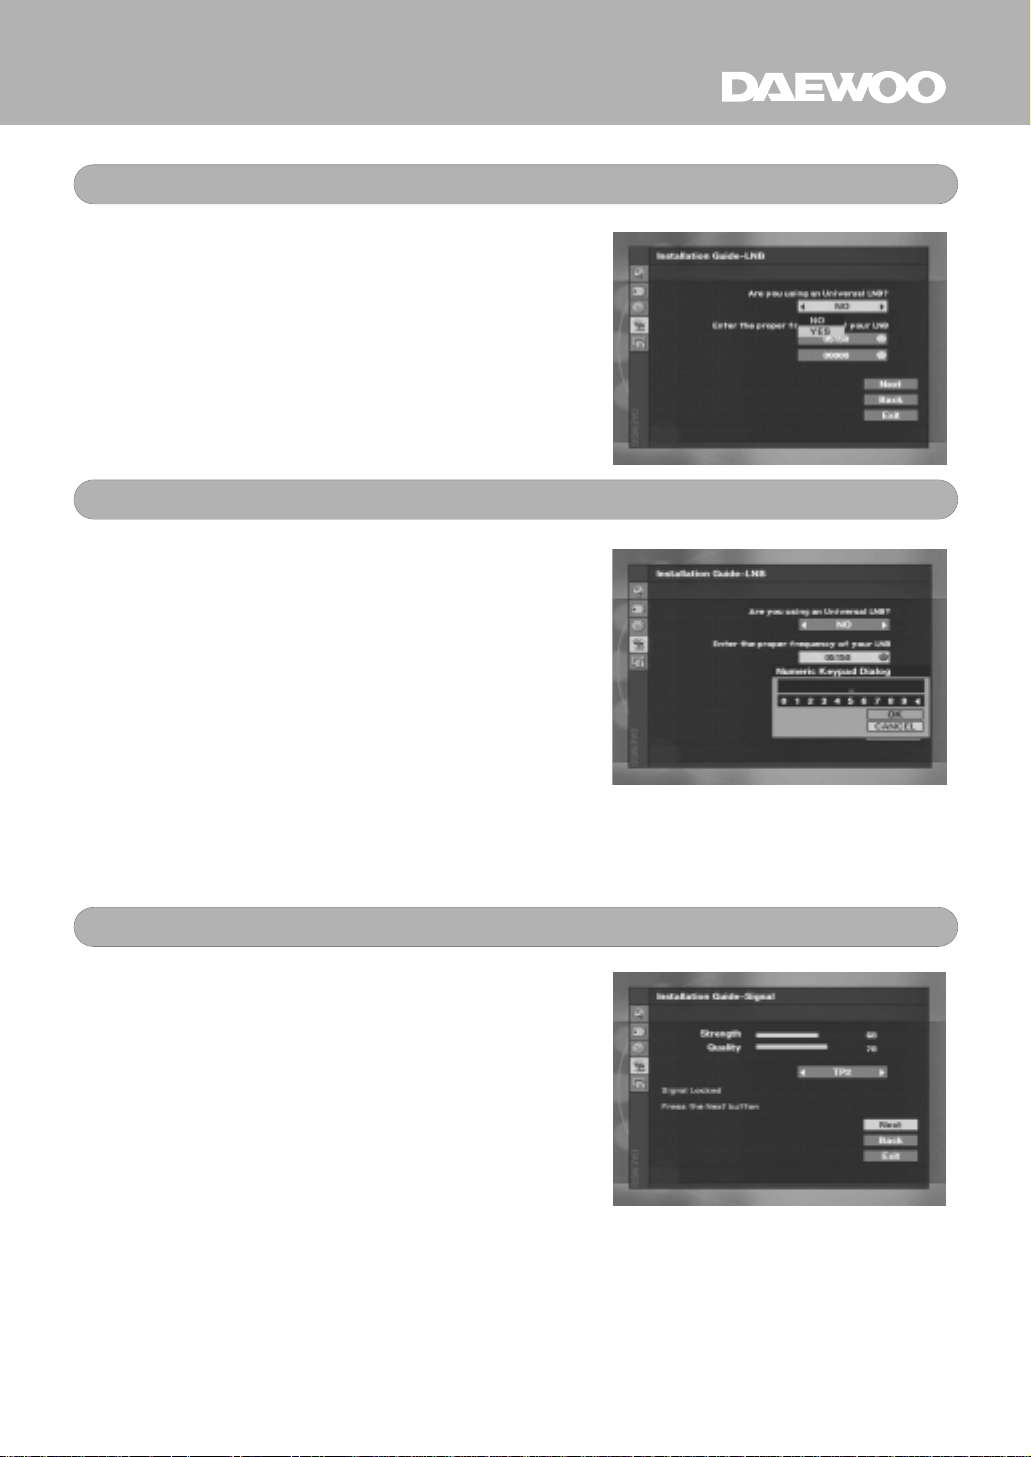
Select LNB
Select the type of your LNB. If you have
Universal LNB, select YES. Otherwise select
NO.
Enter the LNB frequency
Enter the proper LNB frequency referring to
your LNB using numeric key on the remote
control. Or use the on screen keypad
displayed by pressing OK key.
If you have a dual LNB, enter the proper value
in both boxes. Otherwise ignore the second
box.
To continue, select NEXT and press OK key.
Test Signal Level
In this menu you can check the signal level for
all TPs in your selected Satellite.
If you have entered correct values, “Signal
Locked” message will be displayed.
If “Signal unlocked” message continues,
please adjust your antenna direction and
check whether all of the values entered in
previous menus are correct.
To continue, select NEXT and press OK key.
12
Page 13
INITIAL INSTALLATION
D I G I T A L
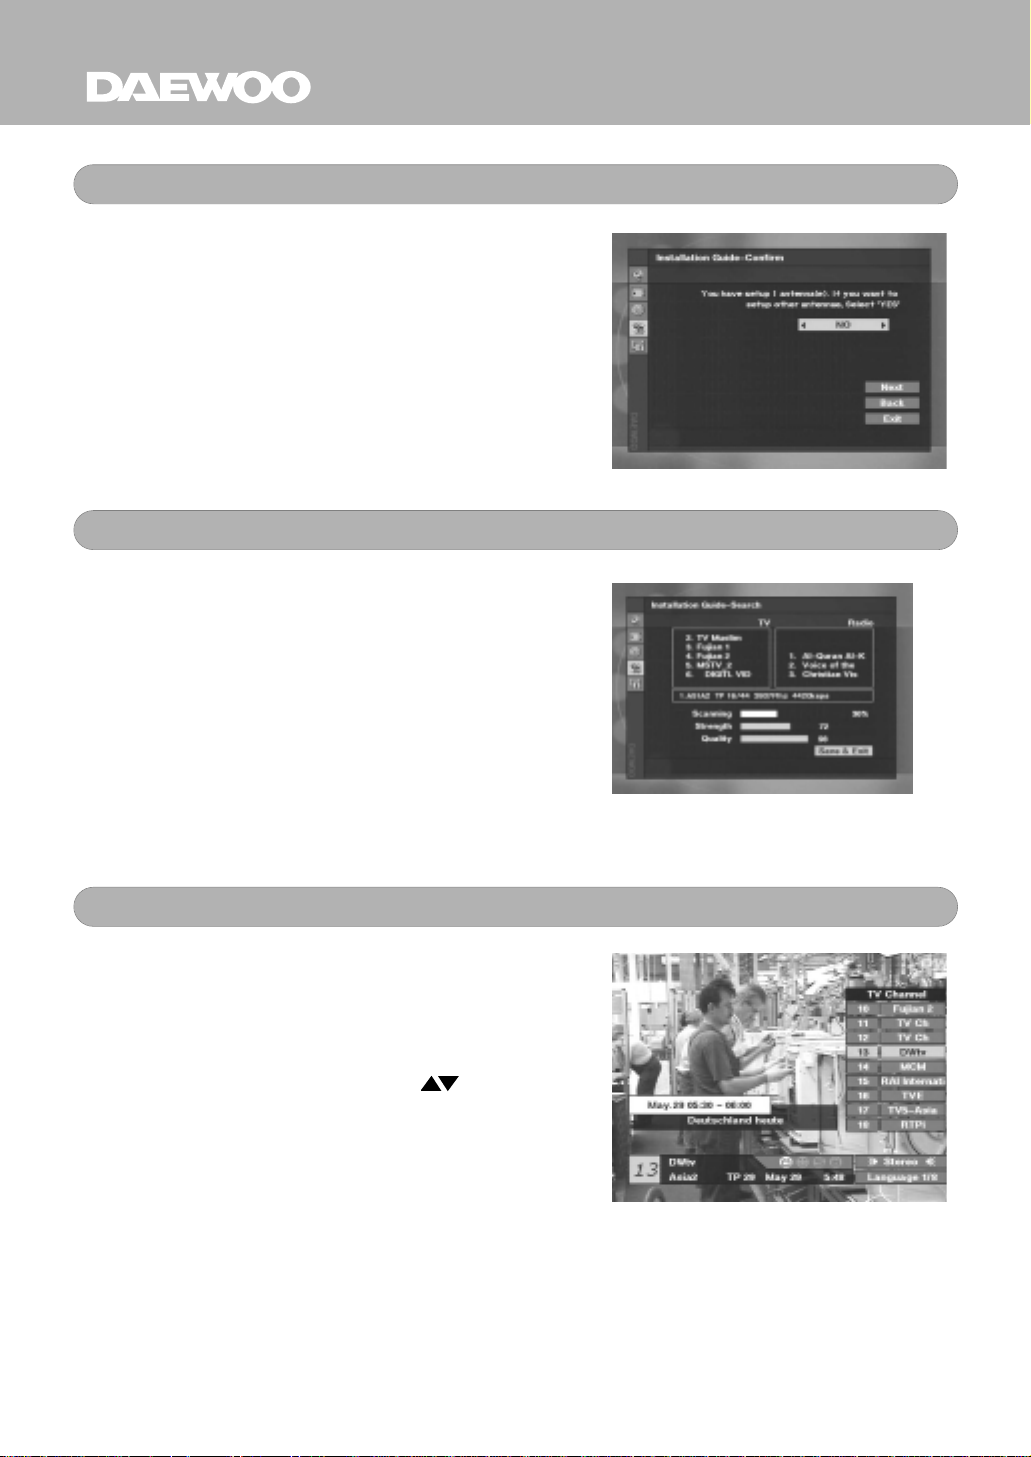
Setup Confirmation
This message shows that you have completed
the setting of only one antenna. To confirm,
select NO. To continue, select NEXT, and
press OK key.
If you have other antennas to configure, select
YES. To continue, select YES. To continue,
select NEXT and press OK key. Then it will
take you to the Select Switch menu.
Channel Searching
DSD-9230E will automatically search the
channels for all TV and RADIO programs
available on the satellite you have selected.
The programs are displayed in the Searched
List box as they are found.
When channel search is finished, COMPLETE
box is higlighted, then press OK key to
continue
Installation Complete
Installation is now complete. The channel list
can be displayed on the right side of the
screen by pressing OK key.
Choose your channel using PR key on the
remote control and press OK key to view the
channel.
13
Page 14
GENERAL VIEWING FUNCTION
D I G I T A L
The following describes the basic functions of your DSD-9230E while watching
satellite TV or listening to satellite radio.
If you select a channel to which you do not have access, you will get a message
on the screen. This message may vary, depending on type of program and
Service Provider. In the case of scrambled channel message, you can not watch
the program with DSD-9230E.
While viewing, the current channel information is shown on the bottom of the
screen when you press INFO key on the remote control.
There are many useful features in DSD-9230E for your convenience.
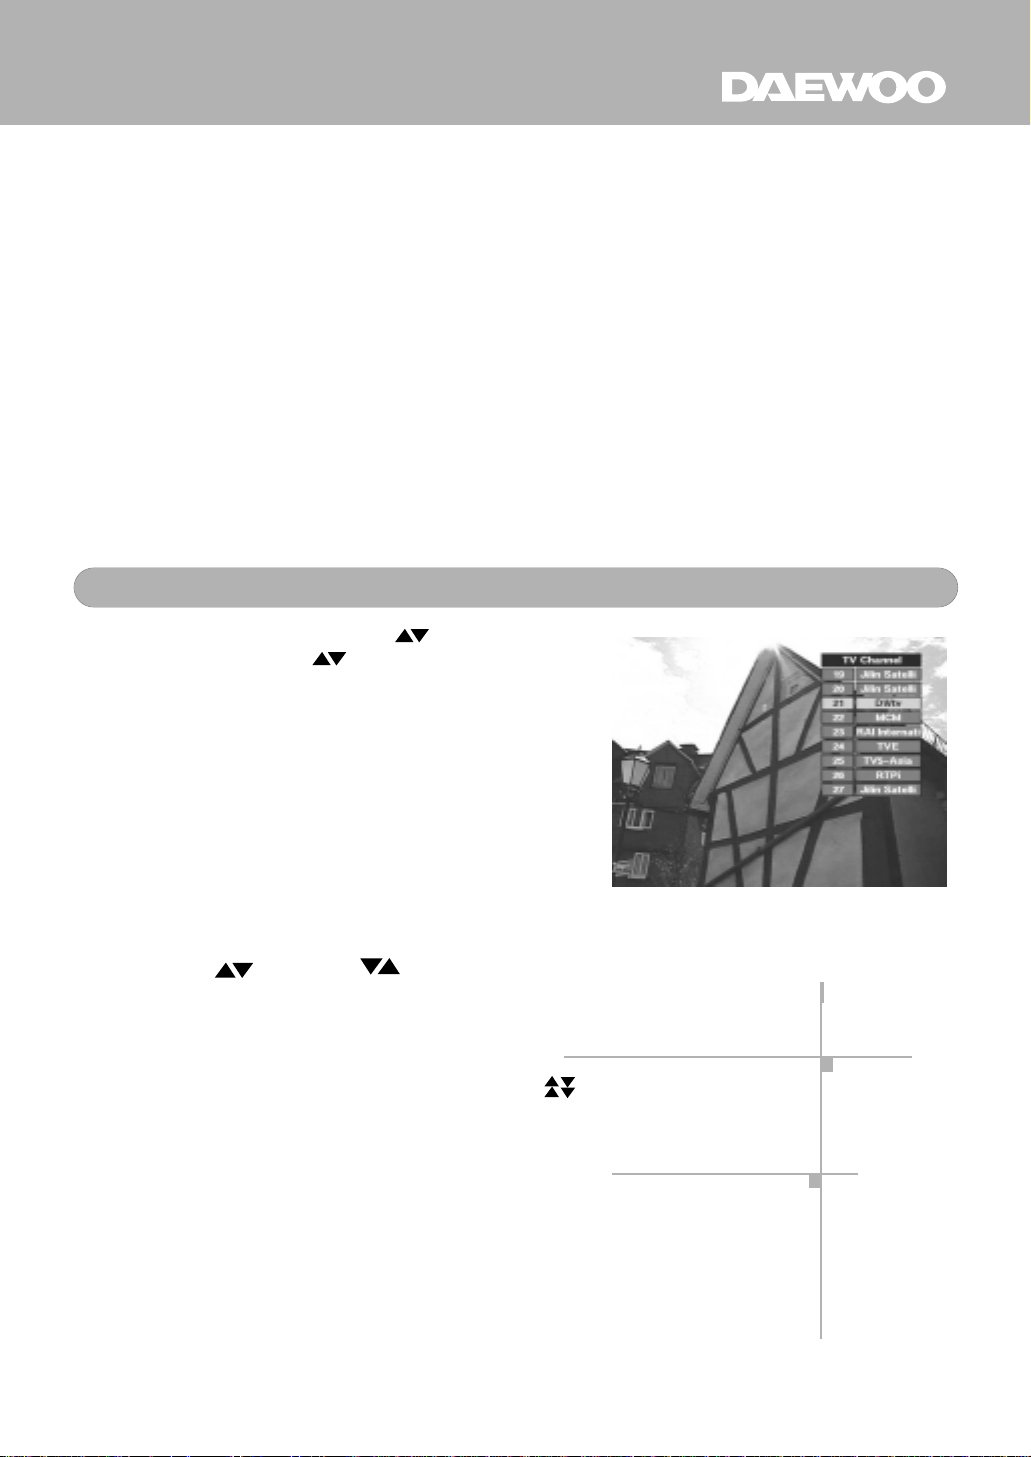
Select Channel
To change channel, use CH button on the
front panel or PR key on the remote
control. You can also directly enter the
channel number by using the numeric key on
the remote control.
In addition, DSD-9230E provides more
convenient channel change function.
While viewing, press OK key on the remote
control. Then channel list will be displayed on
the right side of the screen. When you press
EXIT key, the channel list will disappear.
Using PR or CH choose your
channel, which is highlighted in orange color.
Then press OK key to go to the selected
channel.
If there are a lot of channels listed, use
key on the remote control, then you can move
from page to page.
Note : DSD-9230E is designed to search all
of free channels in the selected
satellite. So if you have installed DSD9230E for the first time, it shows only
free channel list.
14
Page 15
GENERAL VIEWING FUNCTION
D I G I T A L
PR
Frame Pause
Press PAUSE key on the remote control to pause the screen. To bring it back to
the normal mode, press PAUSE key once again.
Previous channel recall
Press key on the remote control to move to the previous channel you were
watching.
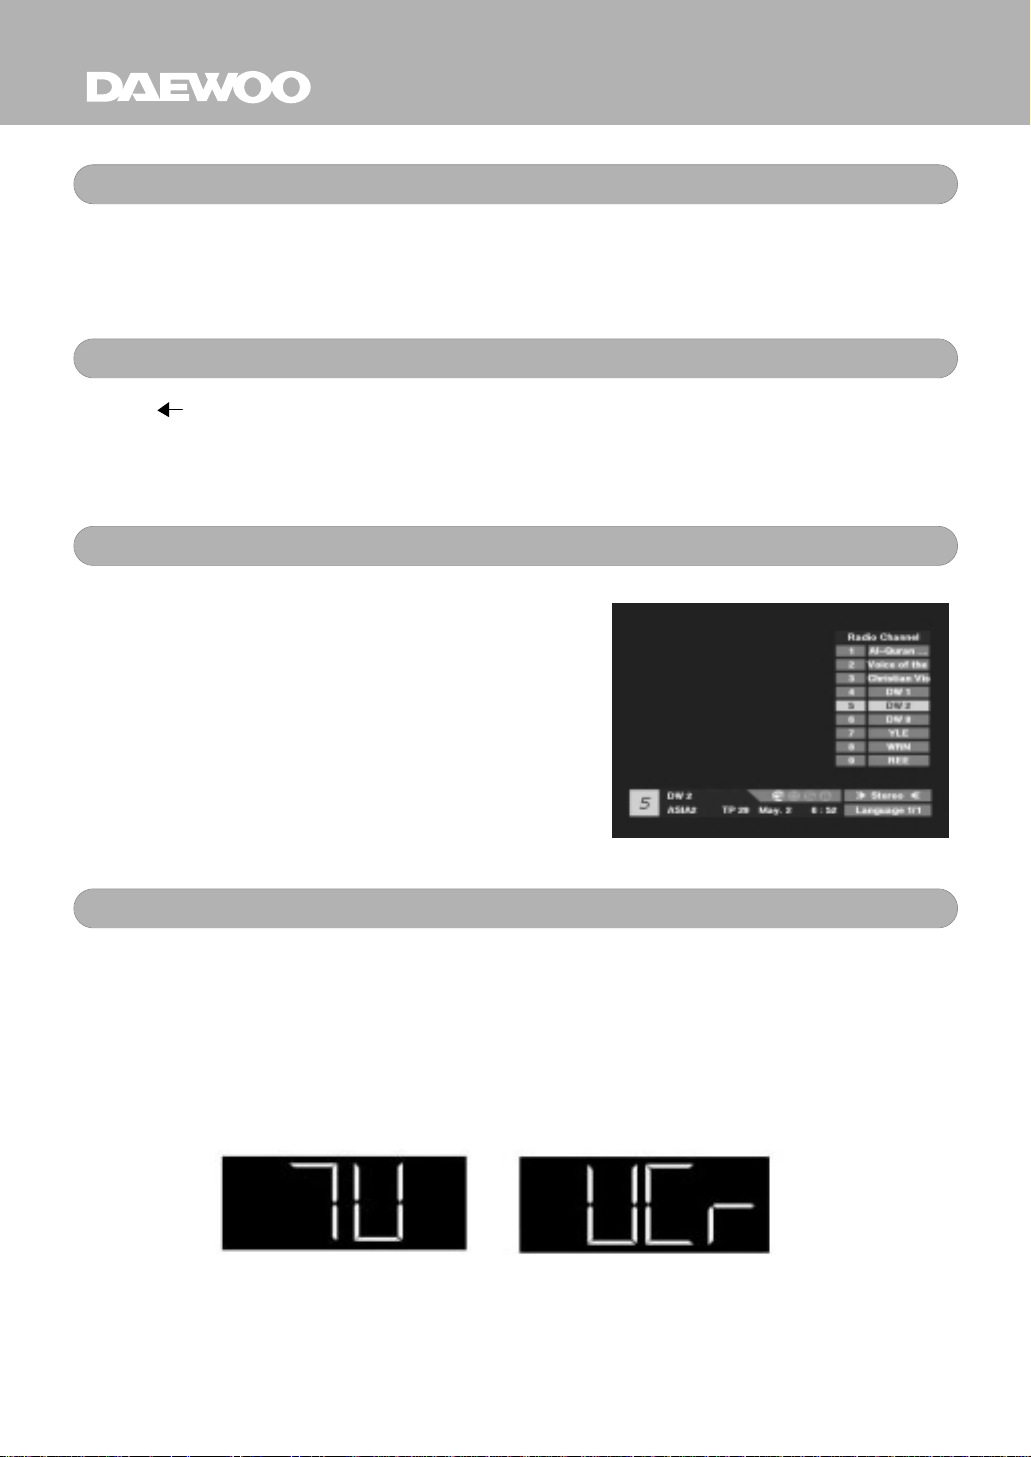
TV & Radio mode
While viewing TV channel, press TV/RADIO
key on the remote control to switch to radio
mode. Press this key once again to bring you
back to the TV mode.
While viewing satellite channel, press TV/AV key on the remote control to switch
to TV mode. Press this key once again, it will take you to the VCR mode. To see
satellite channel, press this key once again.
Note :
The current mode is displayed by LED display on the front panel.
TV & VCR mode
TV MODE VCR MODE
15
Page 16
GENERAL VIEWING FUNCTION
D I G I T A L
L
R
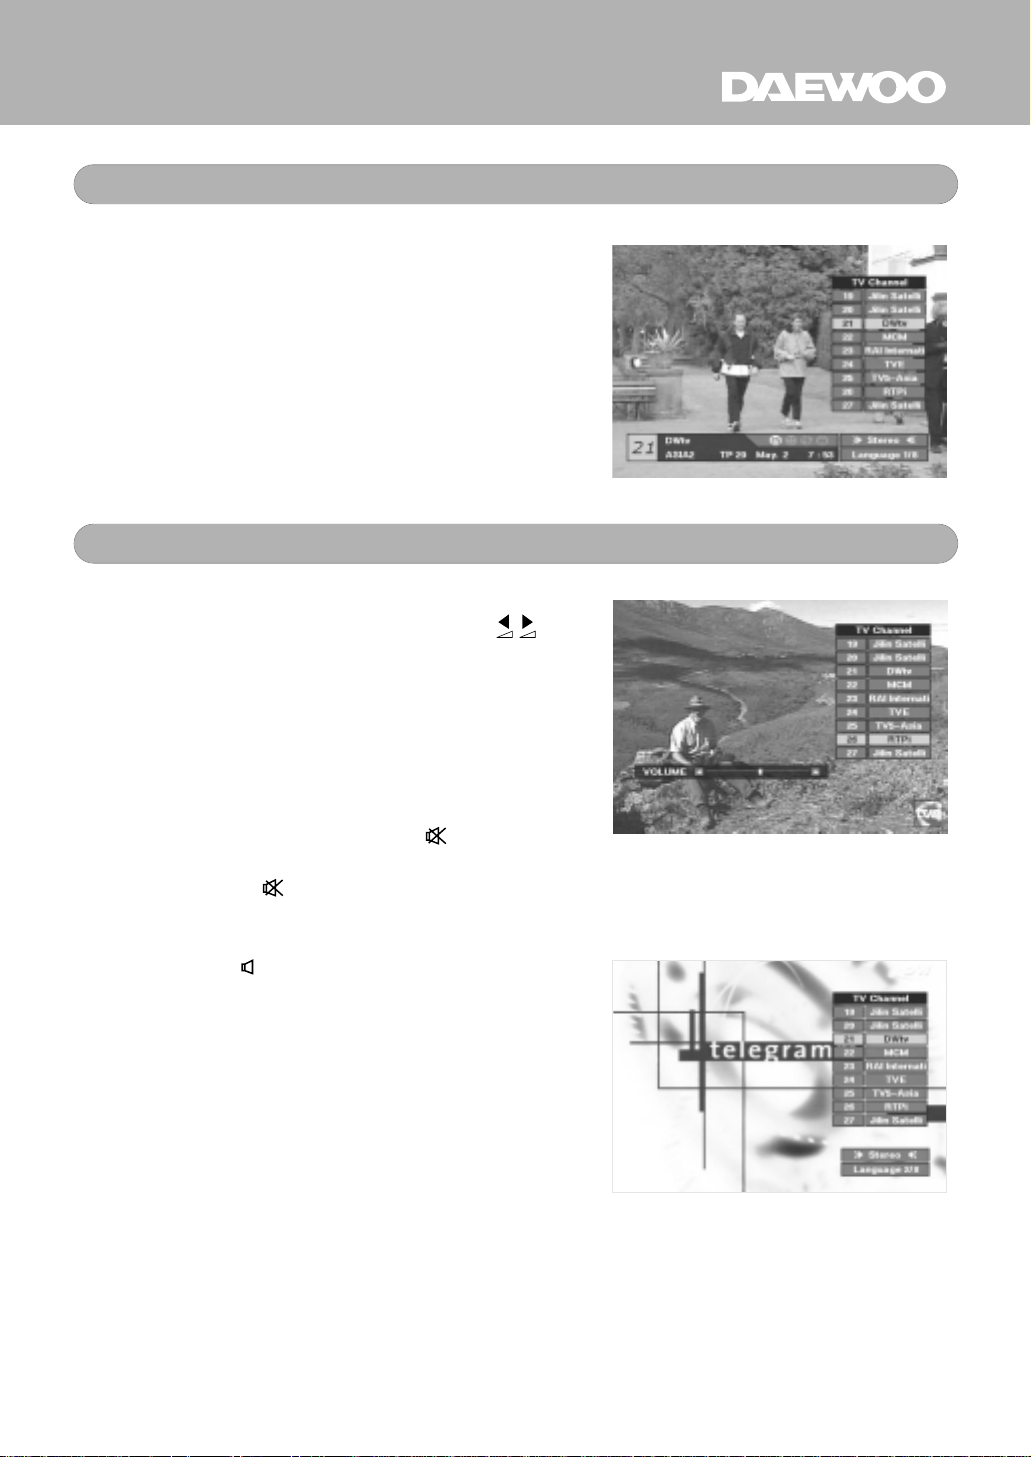
Channel Information
Whenever you change channels, program
information is displayed for a few seconds.
While viewing channel, you can see the
current channel information anytime by
pressing INFO key on the remote control.
Note : Channel information is displayed for 5
seconds.
Volume & Audio Control
1) Volume Control
To increase or decrease volume, use key
on the remote control.
Note : DSD-9230E has 18 volume levels and
this is controlled by the adjusted volume
level of your TV.
2) Mute
To mute the sound, press key on the
remote control. To bring back to the normal
sound, press key once again.
3) Audio Control
Press the key to select one of three
possible audio settings (Left, Right and Stereo)
The current audio setting is displayed in the
channel information.
4) Language Selection
Press the ALT-AUDIO key on the remote
control to select audio-language. This is
dependent on the transmission of audio signal
which supports Multi-language.
16
Page 17
CHANNEL MANAGER
D I G I T A L
DSD-9230E provides powerful channel managing functions to allow various
operations.
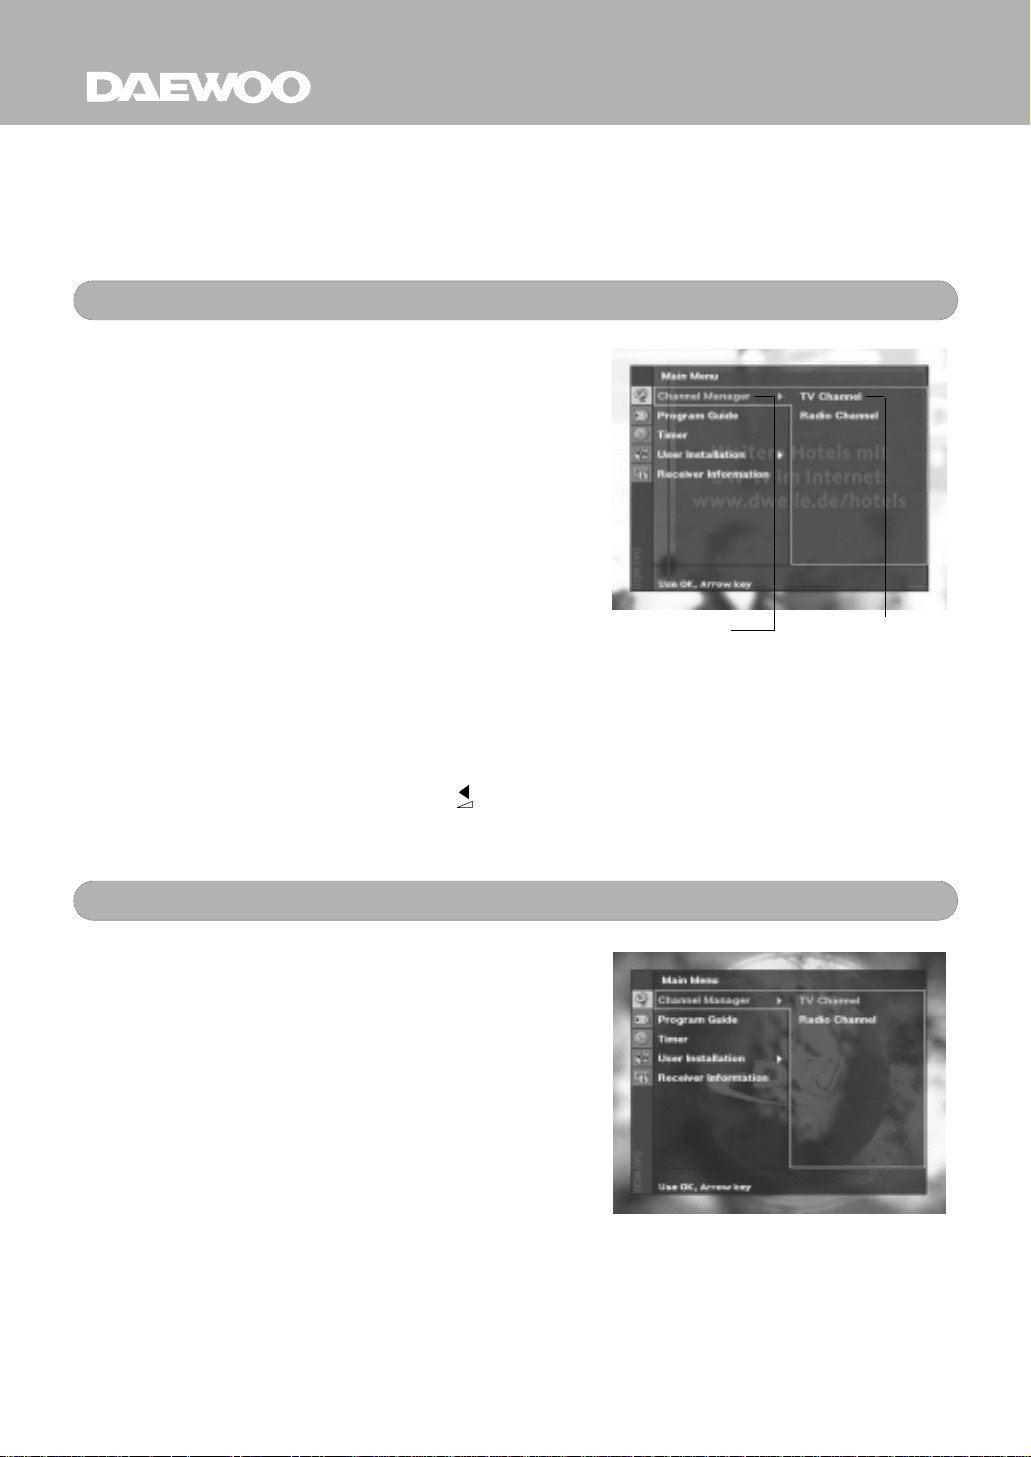
Main Menu
Press MENU key on the remote control to
display Main Menu on the screen.
To quit, press EXIT key.
There are five items in the Main Menu ;
- Channel Manager
- Program Guide
- Timer
- User Installation
- Receiver Information
Sub-menus are displayed on the right side of
(Menu)
the screen when you select Channel Manager
or User Installation. To activate sub-menu you
must select the main menu item first by
pressing OK key. You can go back to the main
menu by pressing the EXIT key or key.
(Sub-Menu)
Channel manager consists of TV channel
manager and Radio channel manager.
Channel Manager is activated by selecting TV
Channel and pressing OK key.
Note : The usage of Radio channel manager is
the same as that of TV channel manager.
Channel Manager
TV
17
Page 18
CHANNEL MANAGER
D I G I T A L
S
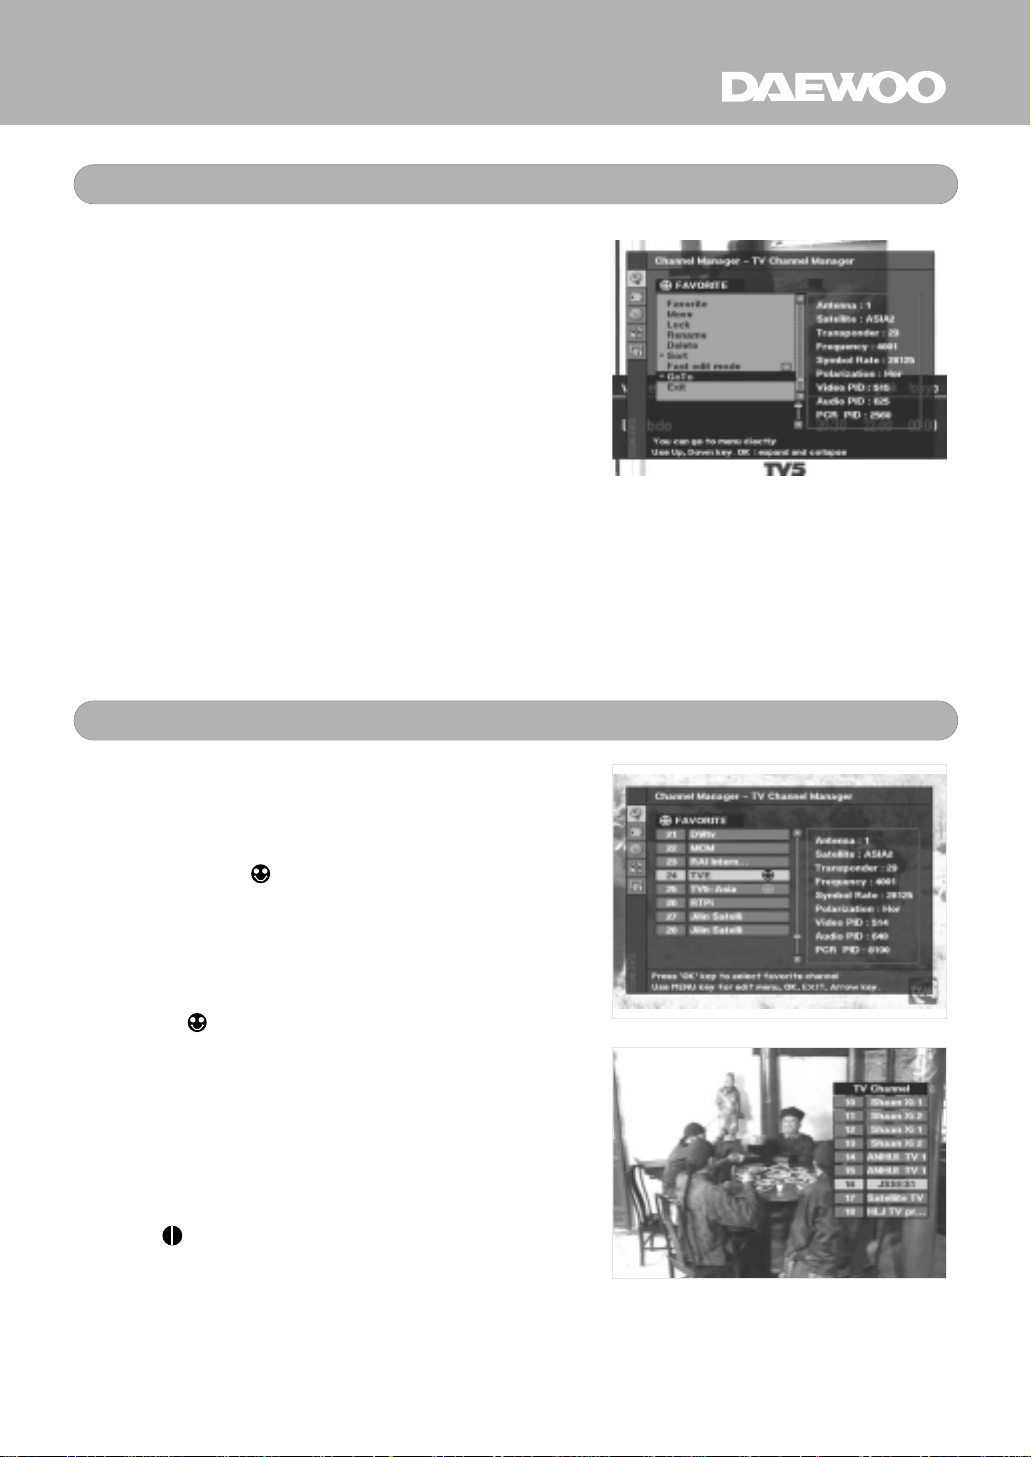
TV Channel Manager
In this menu you can see the channel list
searched by DSD-9230E on the left side. And
on the right side, the current channel
information is displayed.
Press MENU key on the remote control, then
command menu is displayed.
There are six functions available from the TV
Channel Manager;
1. Favorite channel
2. Move channel
3. Lock channel
4. Delete channel
5. Sort channel
6. Fast edit mode
They can be activated by highlighting the
appropriate function and pressing OK key .
Note : + means Sub-menus are hidden,
- means Sub-menus are displayed.
Favorite Channel
You can have easy access to your favorite
channels by marking them as Favorite
Channel. Select a favorite channel and press
OK key. Then symbol will appear on the
right end of your selected channel name.
If you want to delete the channel from the
favorite channel list, press OK key once again,
then the symbol will disappear.
When you have selected all of your favorite
channels, you can sort the channel list ordered by
favorite channels. Refer to the
Channel.
Note : symbolizes a scrambled channel.
page20
Sort
18
Page 19
CHANNEL MANAGER
D I G I T A L
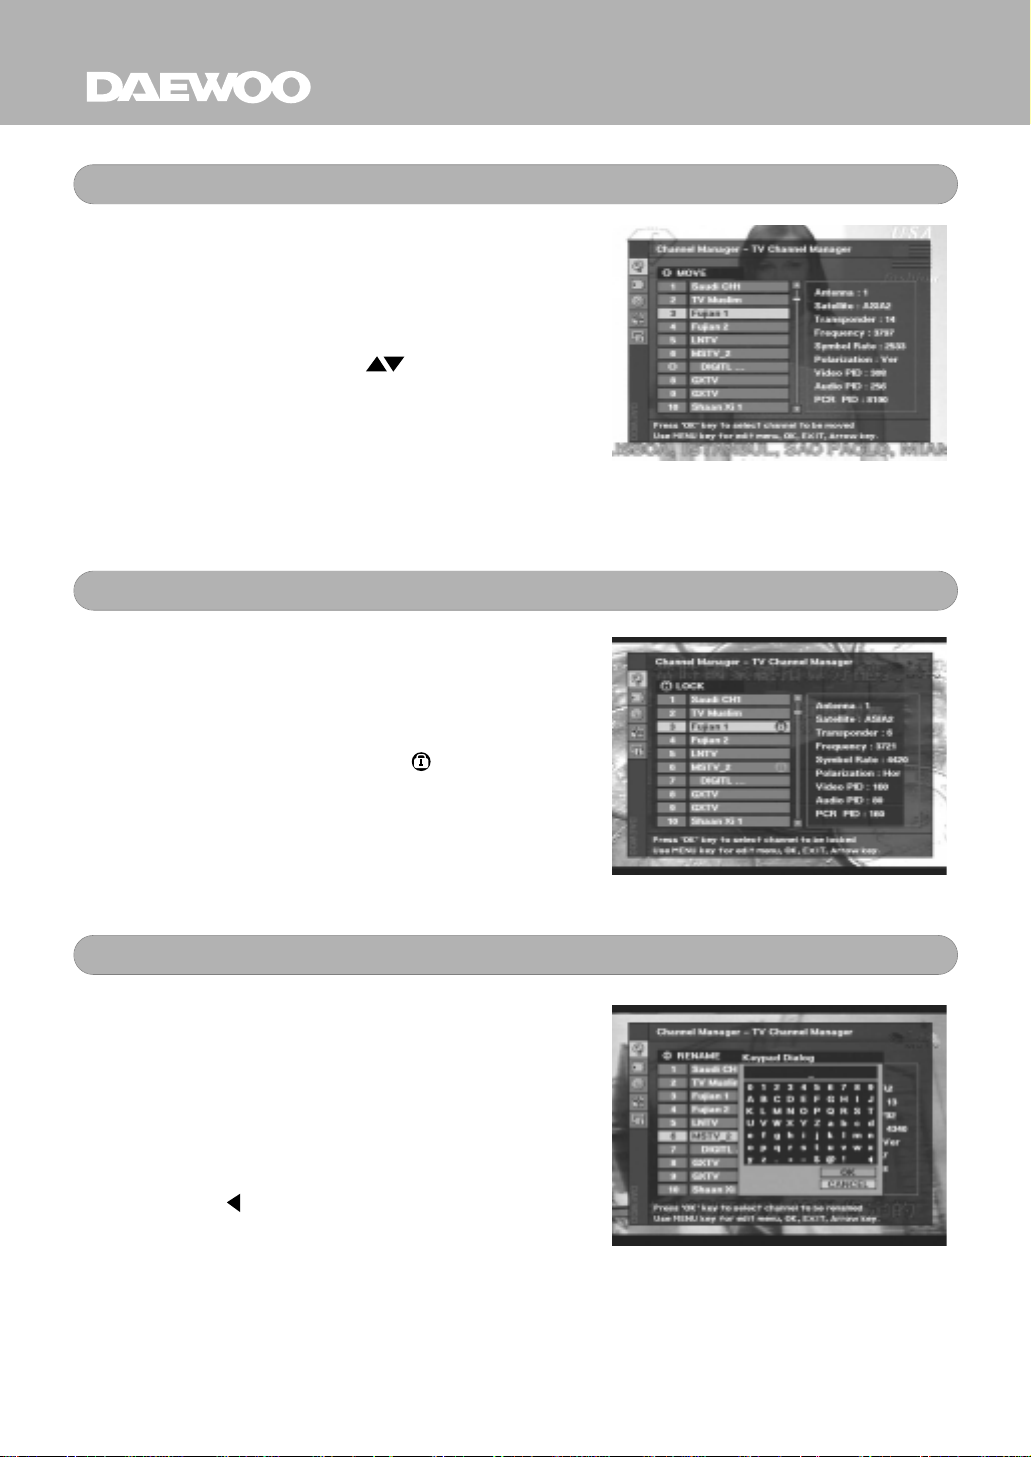
Move Channel
The Move
channel number.
Select MOVE from the TV Channel Manager.
Select the channel you want to move by pressing
OK key. Then using PR key, move the
channel to the desired location. Press OK key to
confirm your change.
Check whether the new channel number is
correct from the channel list.
feature allows you to change the
Lock Channel
Select Lock from the TV Channel Manager.
The Lock Feature allows you to lock out a
channel you do not want others (e.g. your
children) to watch
to lock, and press OK key. Then symbol will be
displayed on the right end of the selected channel
name.
. Select the channel you want
Note : To use this feature, you must set up the
Parental Lock explained later.
Rename Channel
The Rename feature allows you to rename a
channel. Select Rename from the
Manager.
Select the channel you want to rename, and press
OK key. Then Keypad Dialog box will be
displayed.
this keypad.
(If you select , it deletes the previous character)
Check whether the new channel name is correct
from the channel list.
Enter a new channel name using
TV Channel
19
Page 20
CHANNEL MANAGER
D I G I T A L
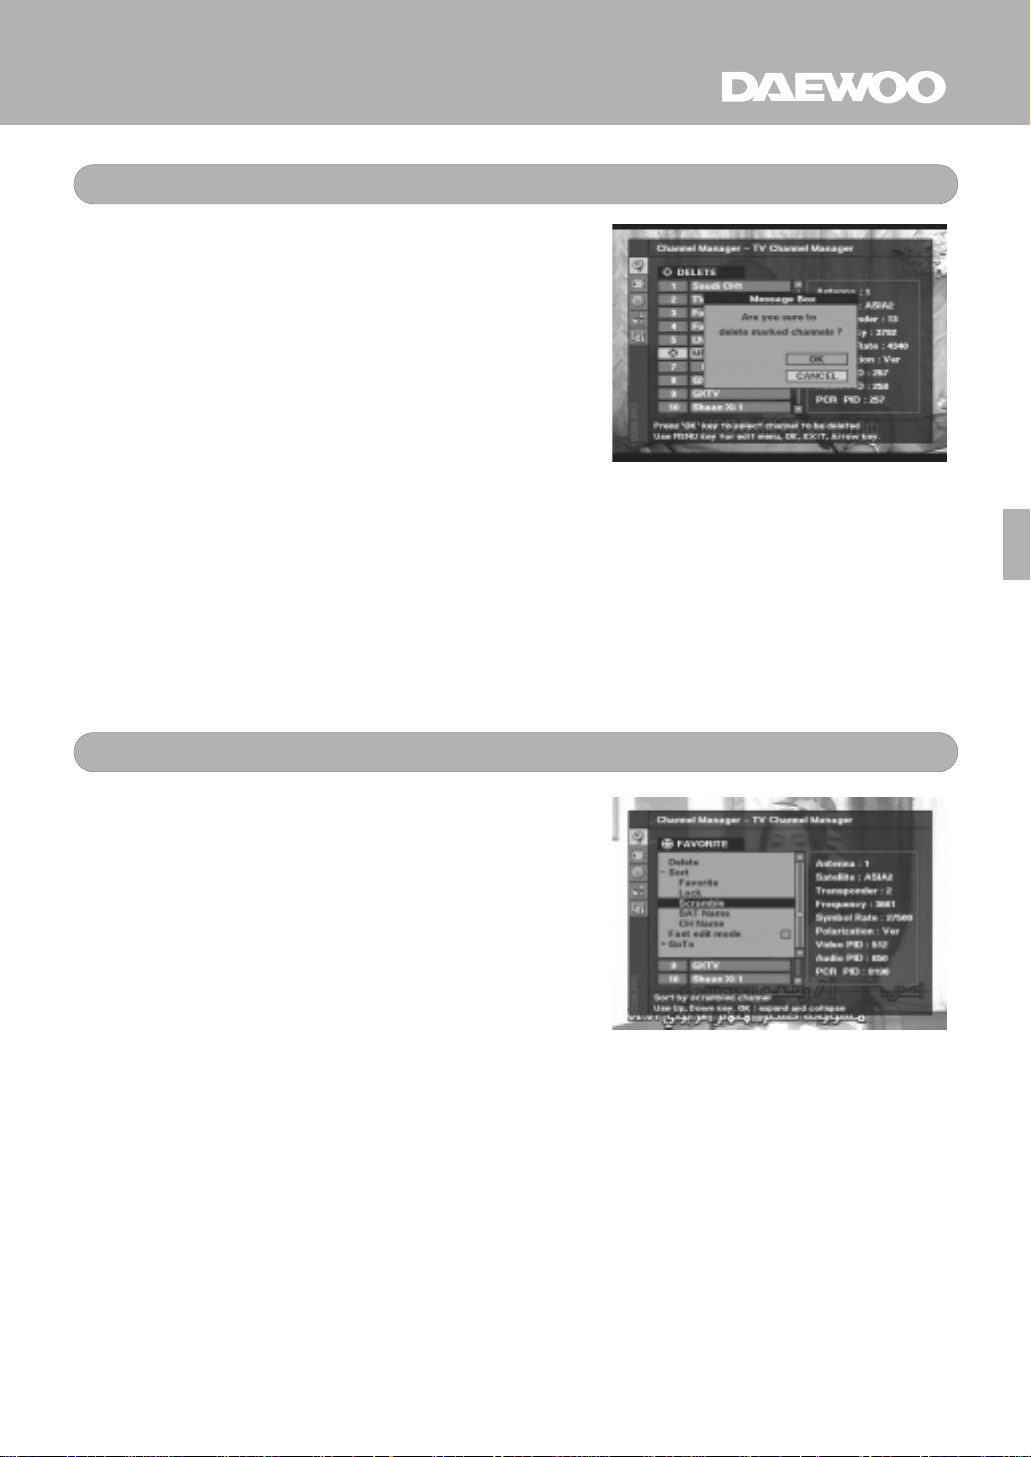
Delete Channel
The Delete feature allows you to delete a channel.
Select Delete from the TV channel Manager.
Select the channel you want to delete and press
OK key. Then the selected channel will be
highlighted with a ‘X’ mark. If you want to cancel
the selection, press OK key again. You can select
more than one channel at a time to delete.
If you decide to delete all the channels you have
selected, press EXIT key and a Message box will
be displayed. Press OK to delete.
Check whether the selected channels are deleted
from the channel list.
Warning : The deleted channels can not be
recovered unless you run a search
again. Be careful when you decide to
delete a channel.
Sort Channel
You can sort the channels by Favorite, Lock,
Scramble, SAT name and CH name.
Select Sort from the
Sub-menus will be displayed showing you the
different options. Select the desired option and
press OK key.
Check whether the channels are sorted correctly
from the channel list.
Note : Radio channel manager provides the same
features as the TV channel manager.
TV Channel Manager.
20
Page 21
CHANNEL MANAGER
D I G I T A L
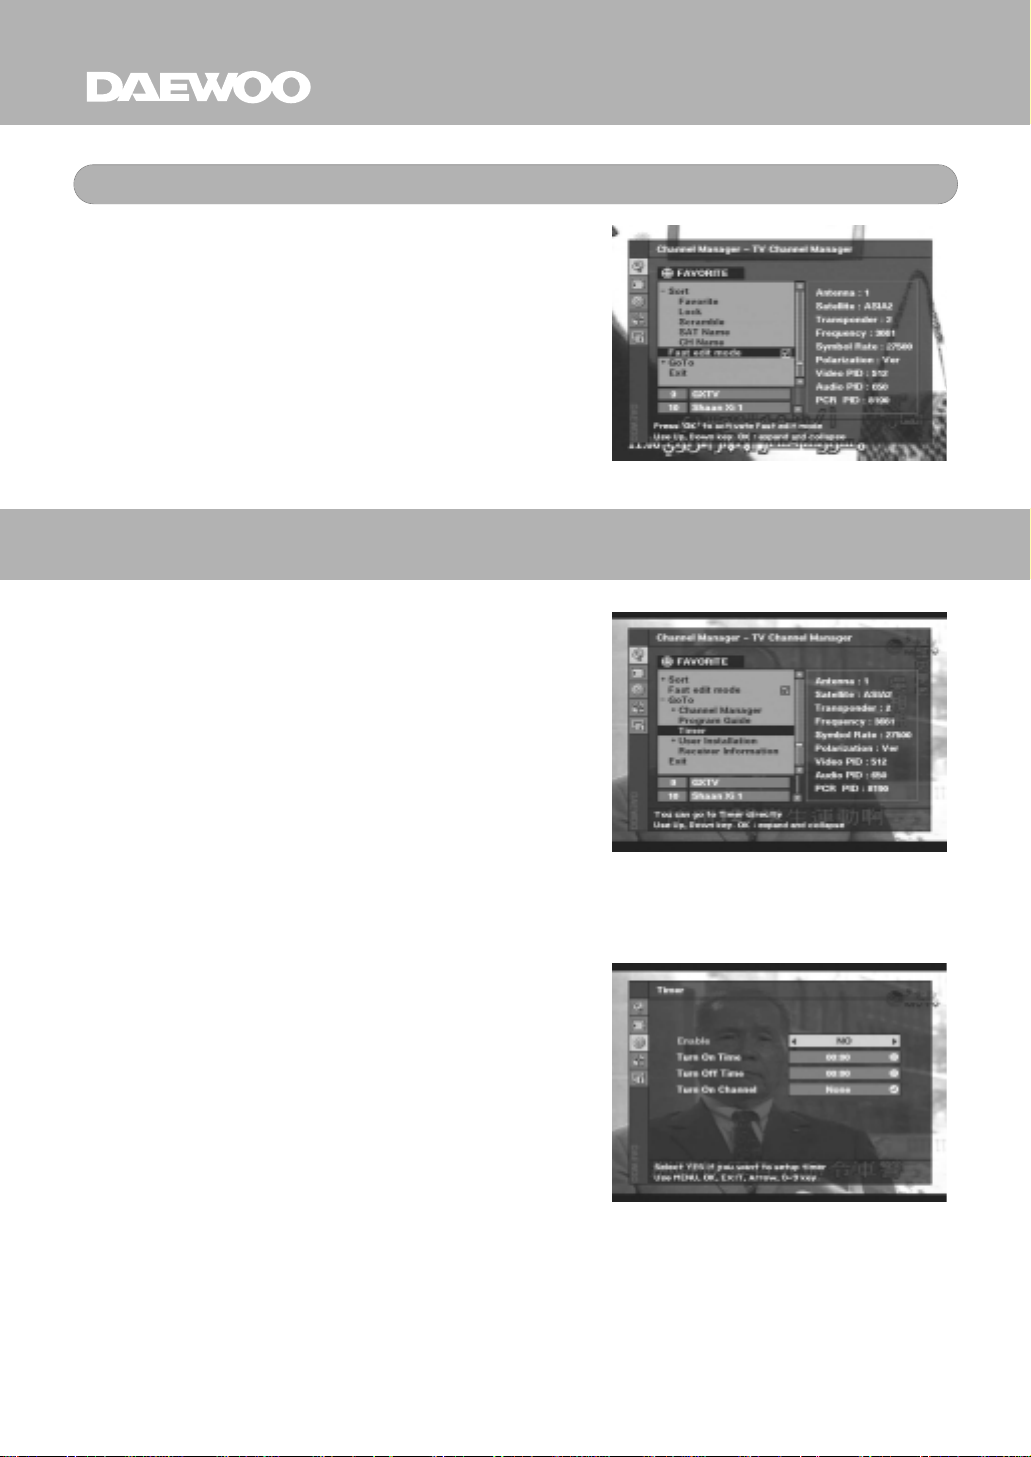
Fast Edit Mode
Fast Edit Mode allows you to edit channel fast
without switching to a selected channel.
If you disable the Fast Edit Mode, DSD-9230E
will show programs in the TV channel
manager each time a channels is selected.
Note : Fast Edit Mode is enabled in the factory
default setting.
DSD-9230E menu system is based on Open
Architecture Concept, which allows users to
move from one menu to another in a single
step using the GO TO function. This is the one
of the most powerful functions of DSD-9230E
and allows users to set up the system very
easily.
GO TO FUNCTION
How to use GO TO function.
*
1. Press MENU key.
2. Select the TV Channel in the Channel
Manager.
3. While at the TV channel manager,
press MENU key .
Then Menu box will appear.
4. Select Go To menu and press OK key.
Sub-menu list will appear.
5. Select the desired item and press OK key.
21
Page 22
D I G I T A L
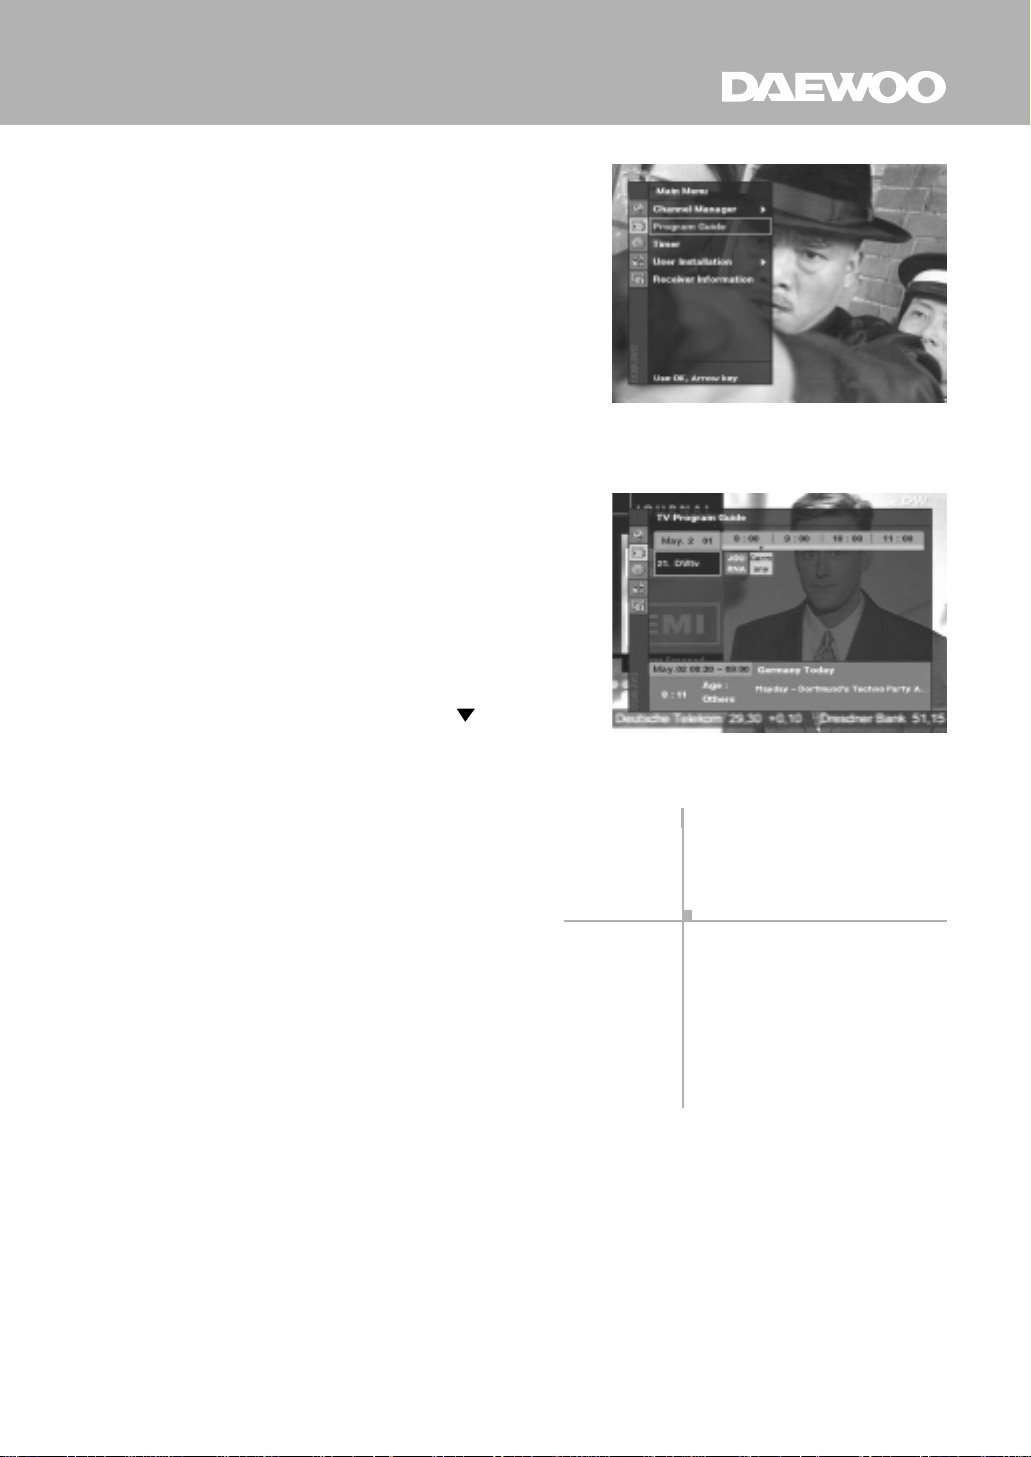
EPG (Electronic Program Guide)
DSD-9230E provides EPG function for you to
get access to the TV Guide(or Radio Guide if
you are listening to radio channels) which
provides information on the current and next
programs on different channels.
To access EPG, press EPG key on your
remote control or select Program Guide from
the Main Menu, and EPG box will appear.
You can see the channel list on the left and
Program schedule displayed on the right side.
The time will be displayed in relation to the
program schedule.
Select one channel and
the name of program you want to know in
detail and press OK key. A box with detailed
program information will be displayed.
place the
mark on
Note : A “No data available” message means
that the selected channel does not
provide EPG data.
22
Page 23
D I G I T A L
D I G I T A L
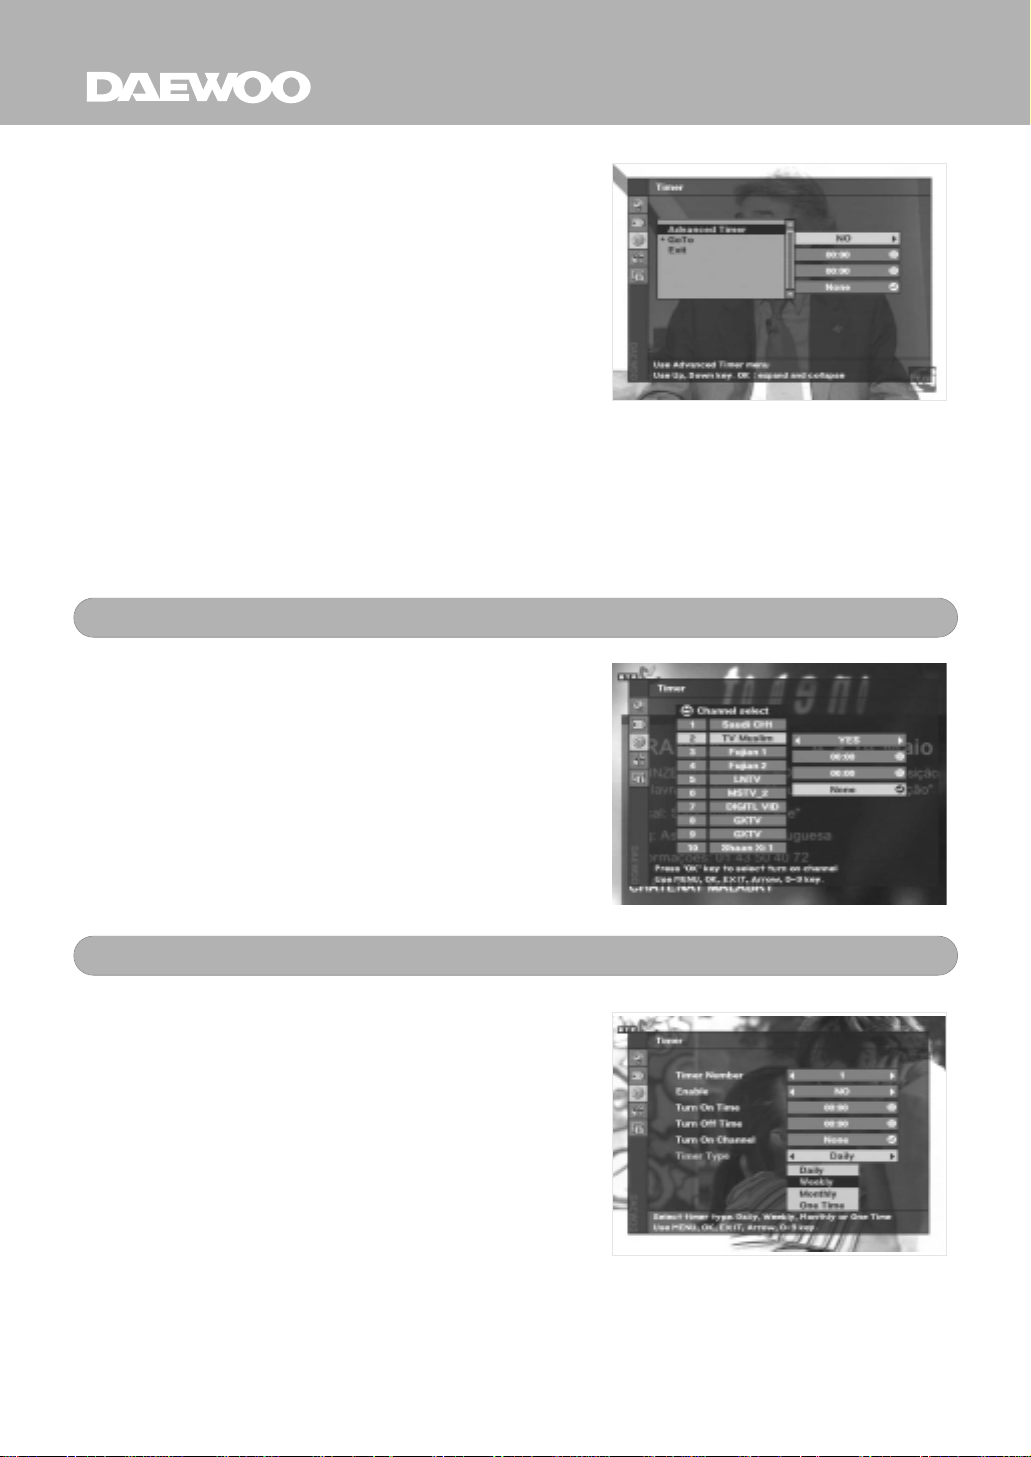
The “TIMER” feature allows you to program
the timer in various ways.
Note : DSD-9230E displays the time
information given by the satellite. So
there may be slight difference between
actual the standard time and DSD9230E’s time.
Easy Timer
To activate the Timer, set the “Enable” select
box to YES and enter the desired time.
TIMER
Select Turn On Time and Turn Off Time, and
select the channel you want to view from the
Turn On Channel.
Advanced Timer
Advanced Timer allows you to program the
various timer functions.
You can select the type of timer from Daily,
Weekly, Monthly and One Time.
Note : Easy Timer is default for the first time.
23
Page 24
D I G I T A L
USER INSTALLATION
DSD-9230E features Install Wizard system which allows you to set up the
receiver with minimum effort.
This User Installation is for advanced users or installers to set up in detail or upgrade the DSD-9230E with advanced functions.
There are six sub-menus;
- Installation Guide
- Antenna Setup
- Channel Search
- System Setting
- Parental Lock
- Factory Default
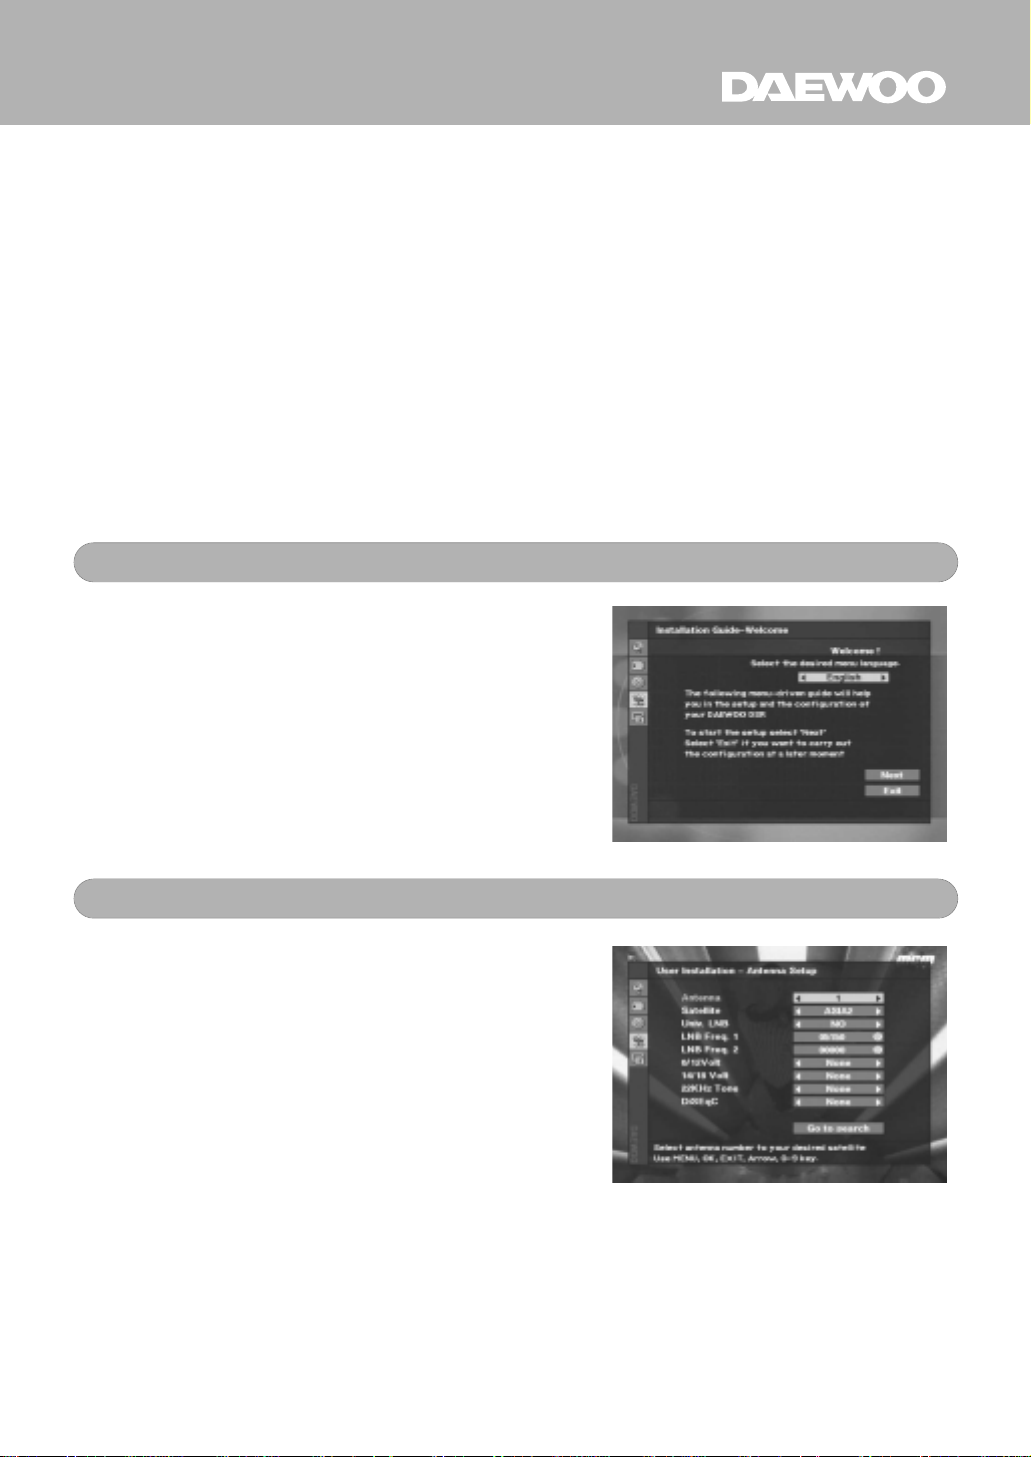
Installation Guide
You can use this Easy Installation Guide menu
to search a new satellite or new TP after you
had performed Install Wizard.
The installation procedure is the same as that
of Install Wizard.
Antenna Setup menu allows you to set up the
antenna in more detail. Installation Guide and
Install Wizard. This menu is for advanced
users.
Select an item you want to set up, and enter a
new value.
For your reference, Help messages are
displayed at the bottom of the screen.
Antenna Setup
24
Page 25
D I G I T A L
USER INSTALLATION
D I G I T A L
Antenna Setup
You can also use the GO TO function and use
the Antenna Direction Help function.
On how to use the GO TO menu, refer to page
21, GO TO function.
In this section Antenna Direction Help function
is described.
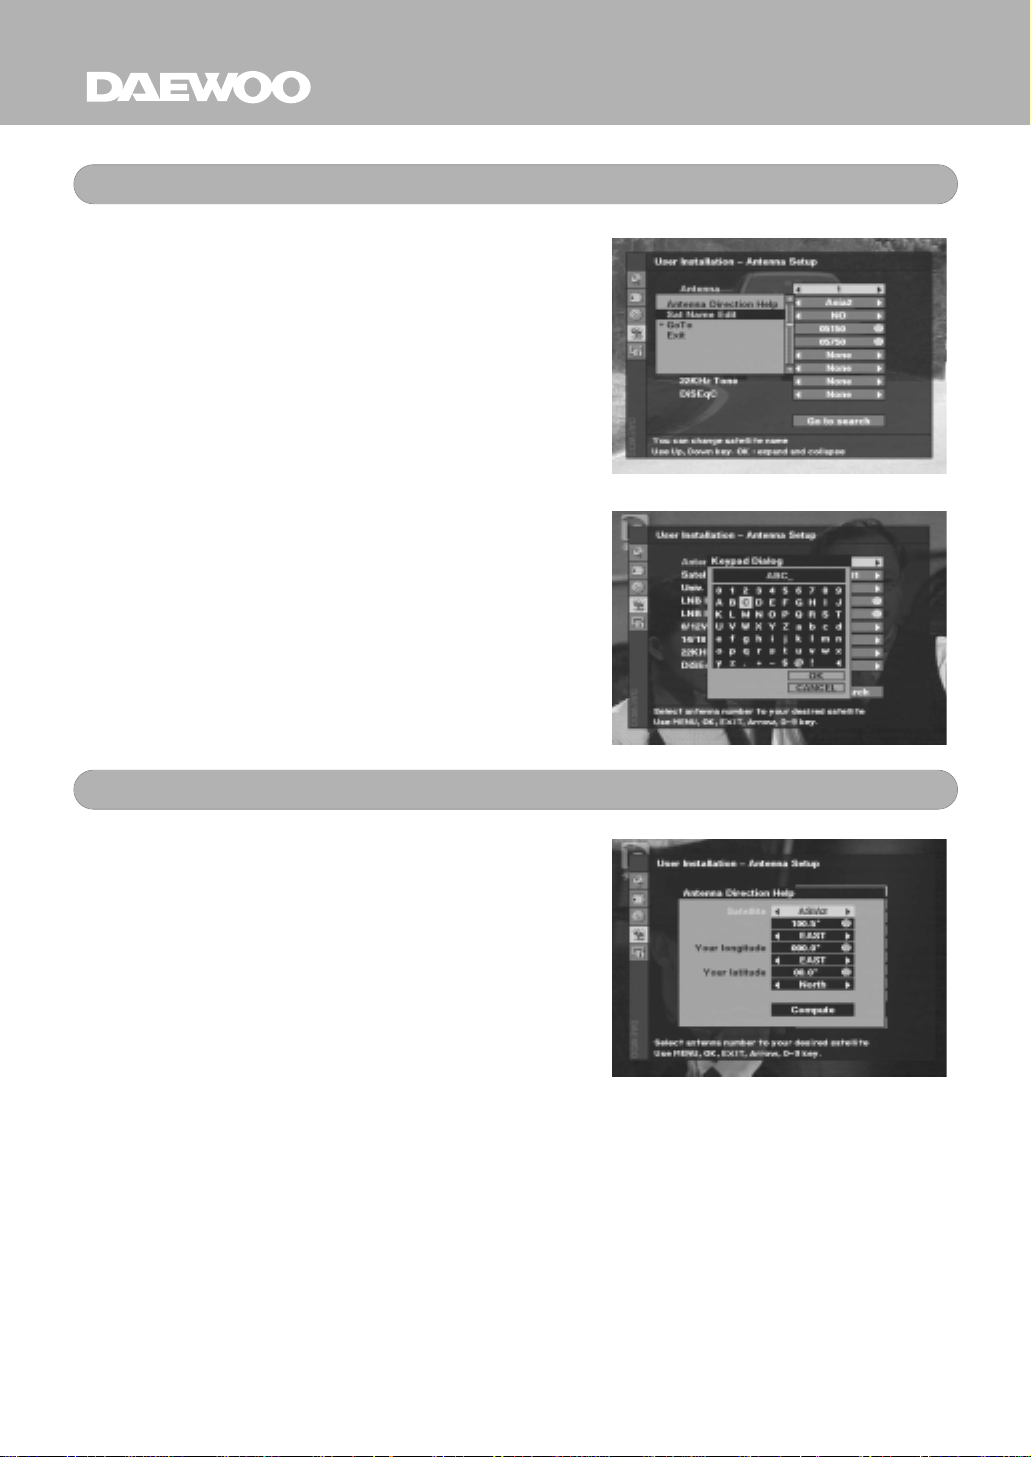
To change the satellite name, press MENU
key and select Sat Name Edit.
Keypad Dialog box will appear. Use arrow
keys on the remote control to enter the
satellite name.
Antenna Direction Help
If your antenna is positioned incorrectly, you
can not receive signal from the satellite, even
if you have entered correct values in Antenna
Setup menu.
DSD-9230E provides Antenna Direction Help
in order for you to have more exact
information on the pointing direction of your
antenna.
First, select a satellite name then the location
of the select satellite will be displayed. In case
the location of the satellite has changed, you
can re-set it with the new location.
Second, enter the Longitude and Latitude
value of your location.
25
Page 26
D I G I T A L
USER INSTALLATION
Antenna Direction Help
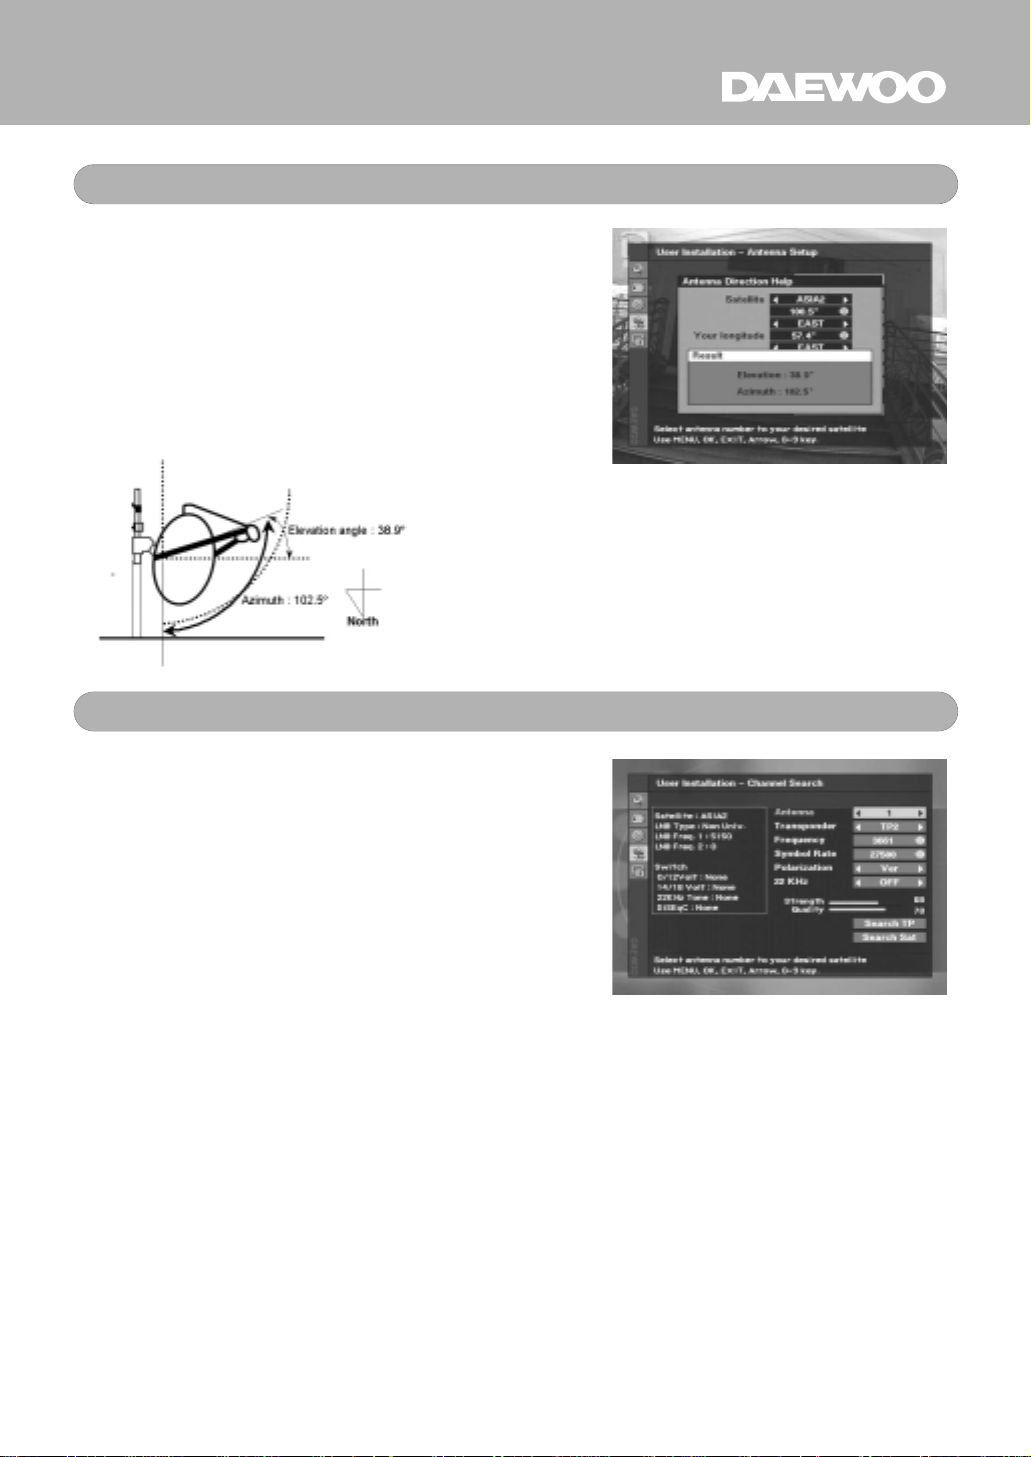
Once you have entered your coordinates,
select Compute and press OK key.
Then the exact information of antenna pointing
direction will be displayed.
Note :
Channel Search
Channel search menu allows you to search for
channels in a new TP or Satellite.
DSD-9230E allows you to search for channels
in TP and Satellite in one menu screen. This is
also our strong point for user’s convenience.
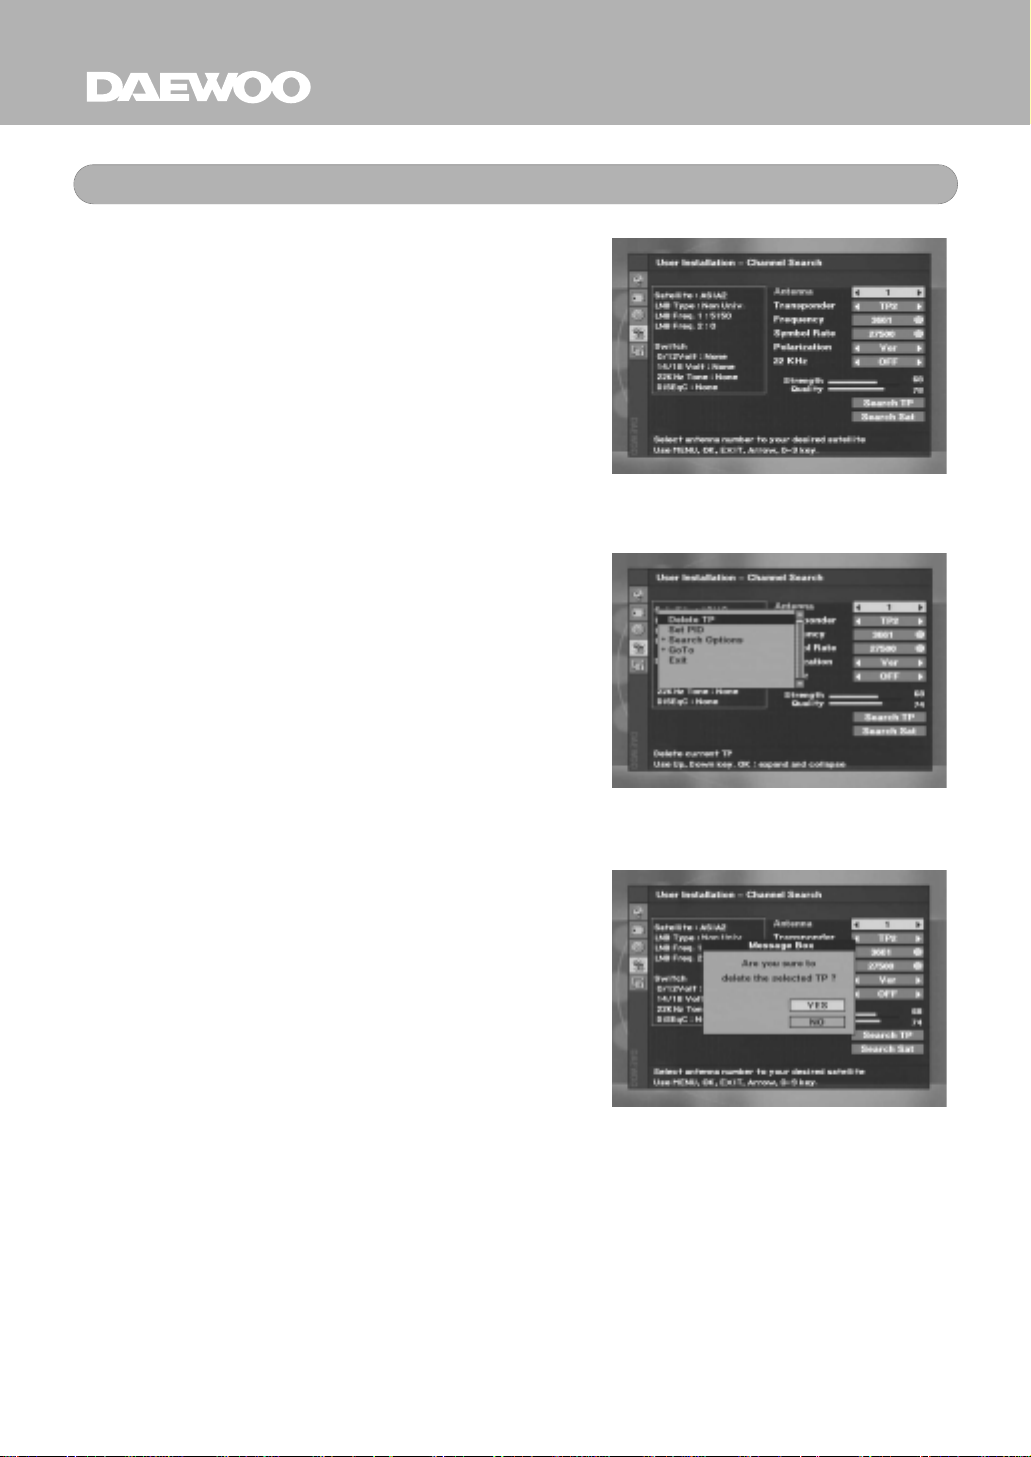
1. Select a satellite number, then you can
see the information of the selected
satellite on the left side of the screen.
2. Select the TP number you want to
search.
3. Enter the frequency of the selected TP.
4. Enter the symbol rate of the selected TP.
5. Select Vertical or Horizontal according to
the polarization of the selected TP.
6. Select ON/OFF according to your usage
of 22KHz switch.
26
Page 27
D I G I T A L
USER INSTALLATION
D I G I T A L
Channel Search
Once you have entered new values, check
whether you correctly entered the values and
positioned the antenna by referring to signal
level bars.
If the level bar is highlighted to orange color,
then you can run a TP search or satellite
search.
If you want to delete a TP, select the TP to be
deleted and press MENU key to display the
command box. Then select Delete TP option.
Confirmation message box will appear.
If you are sure to delete the TP, select Yes and
press OK key.
Warning : If you delete a TP, you will lose all
the channels in the TP.
27
Page 28
USER INSTALLATION
D I G I T A L
Channel Search
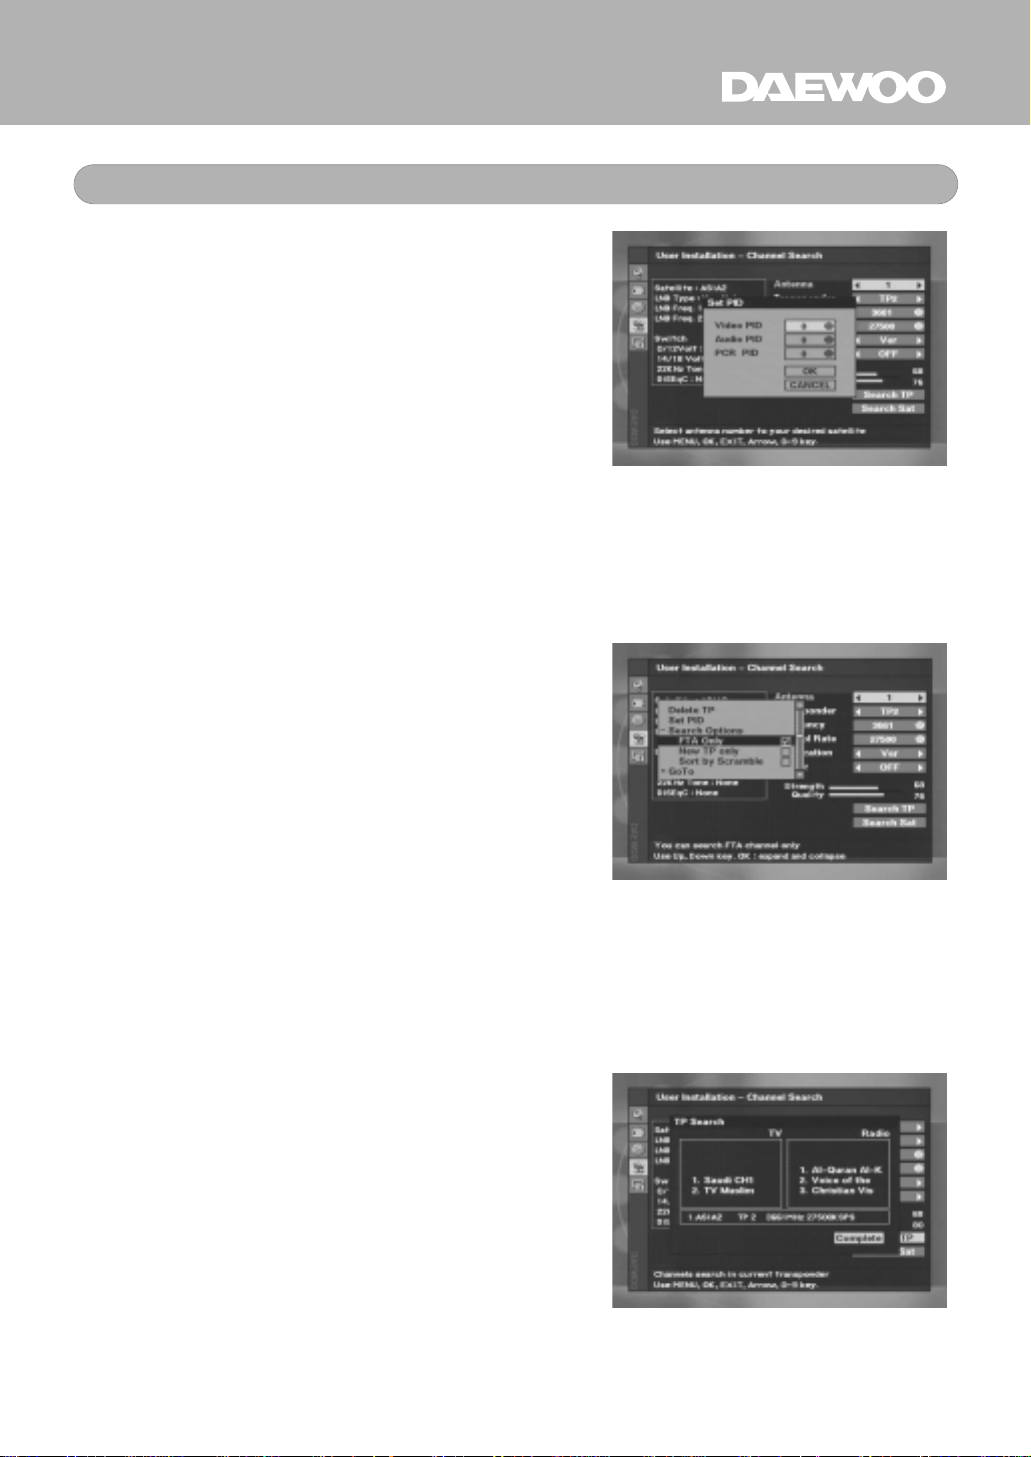
If you want to set up a specific PID (Packet
Identification), select the TP and press MENU
key to display command box for Channel
Search.
Select SET PID option and press OK, then Set
PID menu will be displayed. Enter the
appropriate value and select OK.
Note : You can acquire the correct PID value
through the installer or dealer.
DSD-9230E allows you to search channels
with various options.
- FTA only
- New TP only
- Sort by Scramble
If you select Sort by Scramble, DSD-9230E
sorts the scrambled channels automatically.
DSD-9230E also allows you to search the
channels by TP or by satellite.
If you select New TP only, DSD-9230E
searches the channel in the TP, which was
skipped during the Install Wizard procedure.
If there is no new TP or searched TP, DSD9230E search engine will not update the
channel list.
28
Page 29
D I G I T A L
USER INSTALLATION
D I G I T A L
System Setting
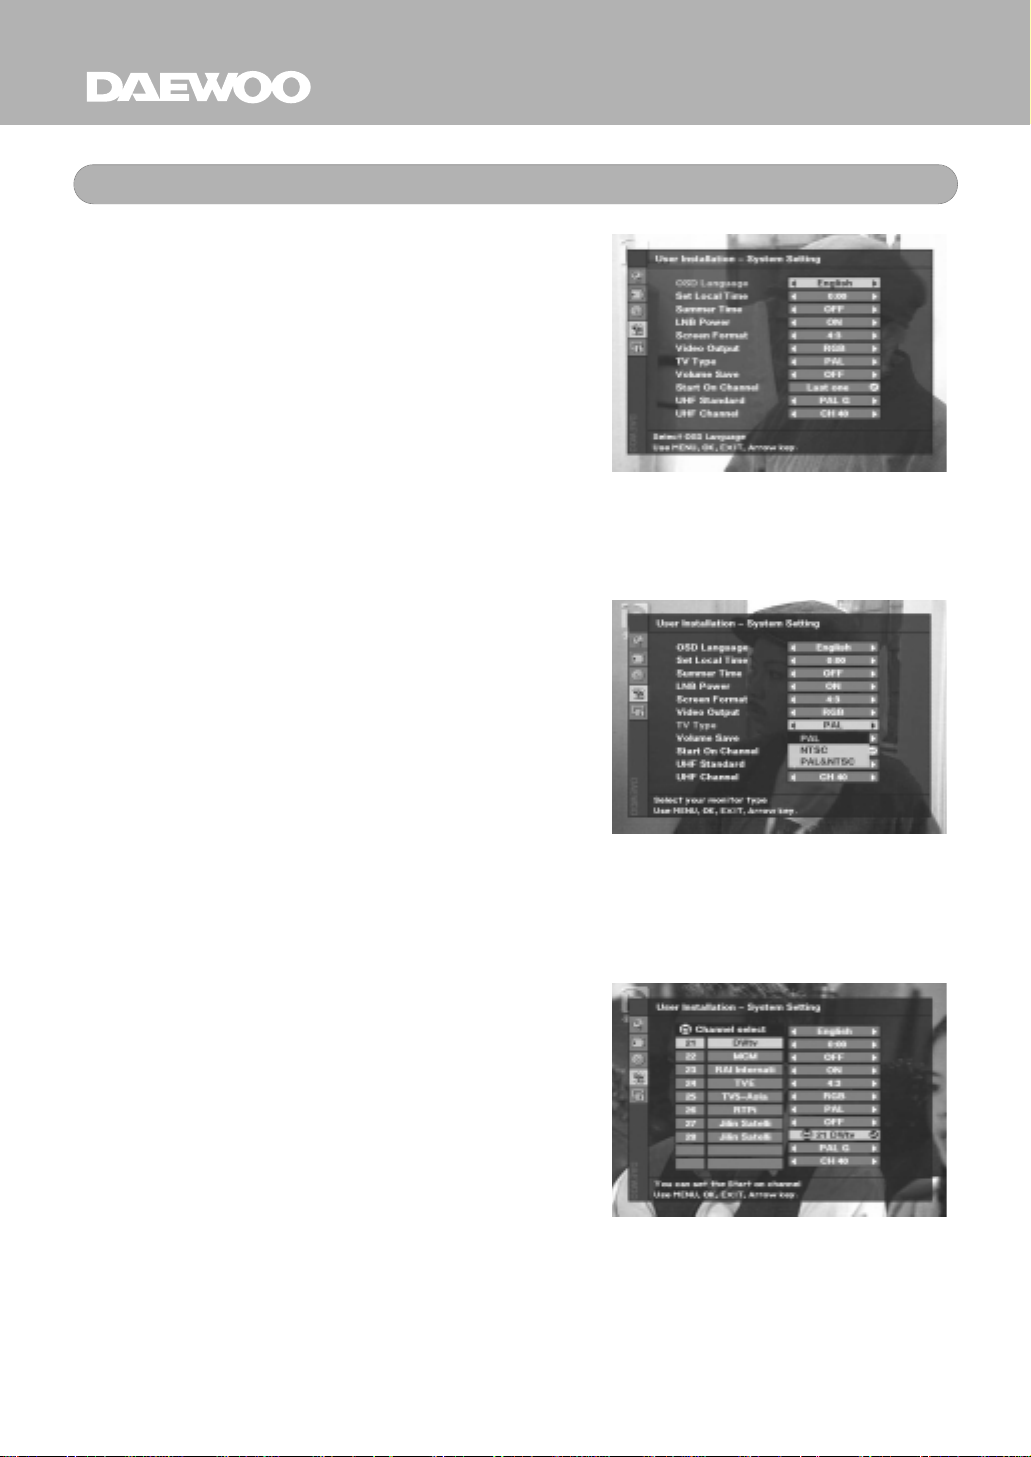
System Setting menu allows you to change the
key options set by Install Wizard and other
settings.
1) OSD Language : Select your language.
2) Set Local Time : Select your local time.
3) Summer Time : Select YES if summer time
is in effect.
4) LNB Power : If your DSD-9230E is
connected to an LNB, select YES. But if it is
connected to another receiver through Loop
Through support, check whether the receiver
is connected directly to an LNB. In case that
the other receiver is directly connected to an
LNB, select OFF.
5) Screen Format : If your TV supports 16:9
screen format, select 16:9.
6) Video Output : If your SCART supports
RGB control, select RGB. Otherwise select CVBS.
7)
TV Type : Select the type according to your TV
type.
8) Volume Save : If you select ON, DSD-9230E
will automatically save the last volume level
for each channel.
9) Start On Channel : If you activate this
function, you can assign the channel which
will be shown whenever you turn on the
DSD-9230E.
10) UHF Standard : Select UHF type (Optional).
1 1) UHF Channel : Select your desired UHF
channel for the satellite mode.(Optional)
Note : For some countries, where the UHF is not
used, 10) and 1 1) option will be deleted.
29
Page 30
USER INSTALLATION
D I G I T A L
Parental Lock
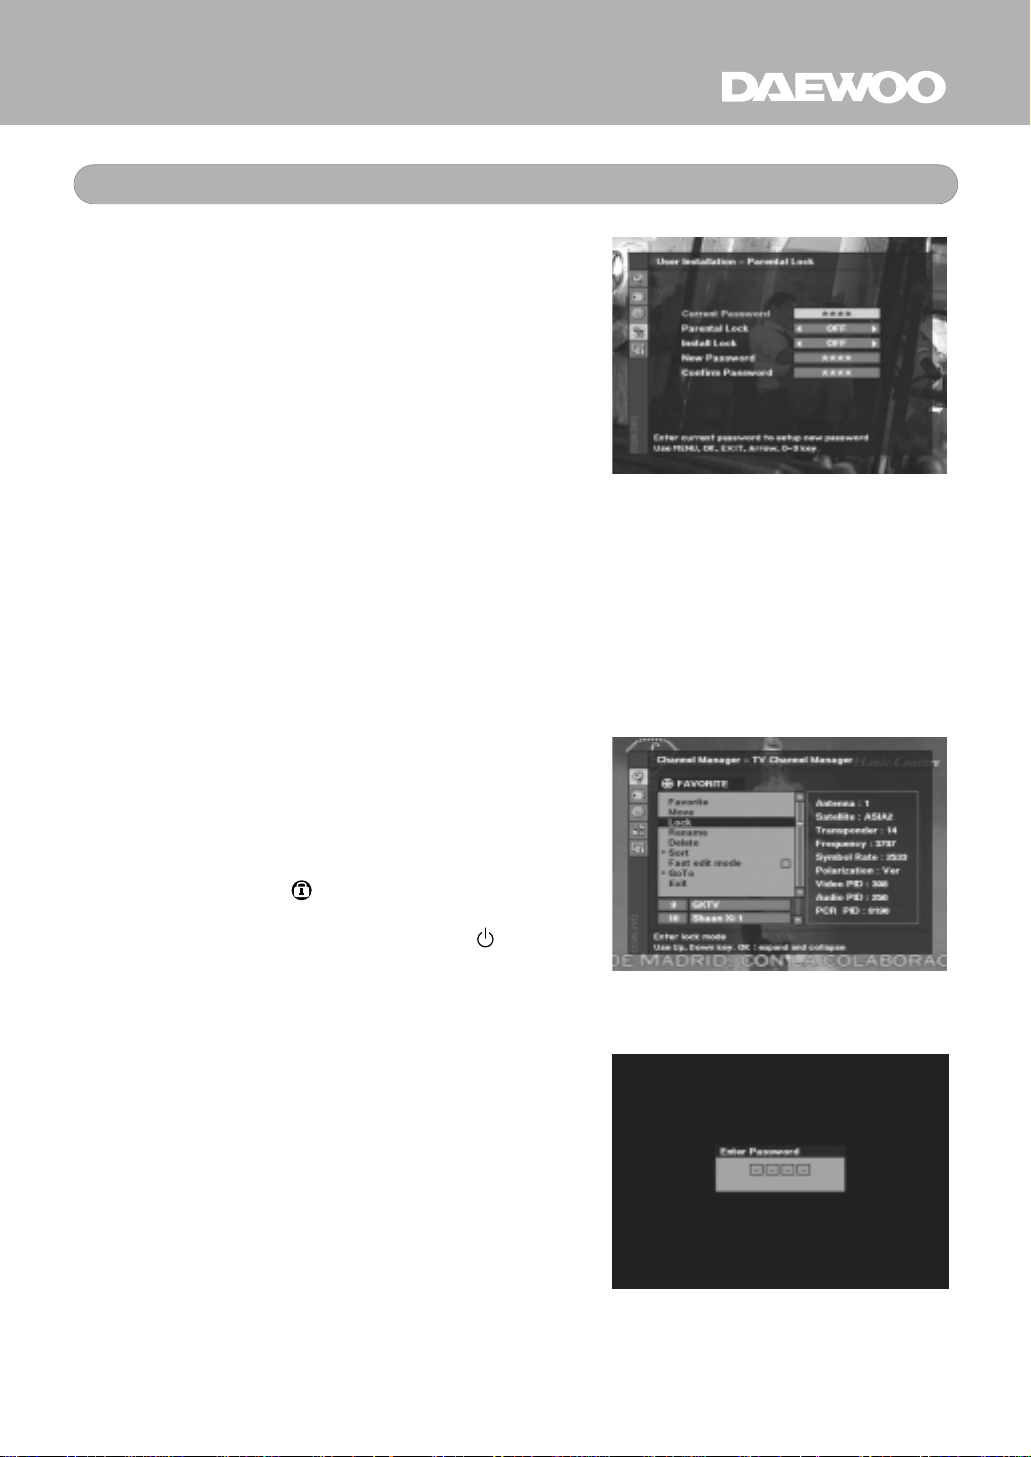
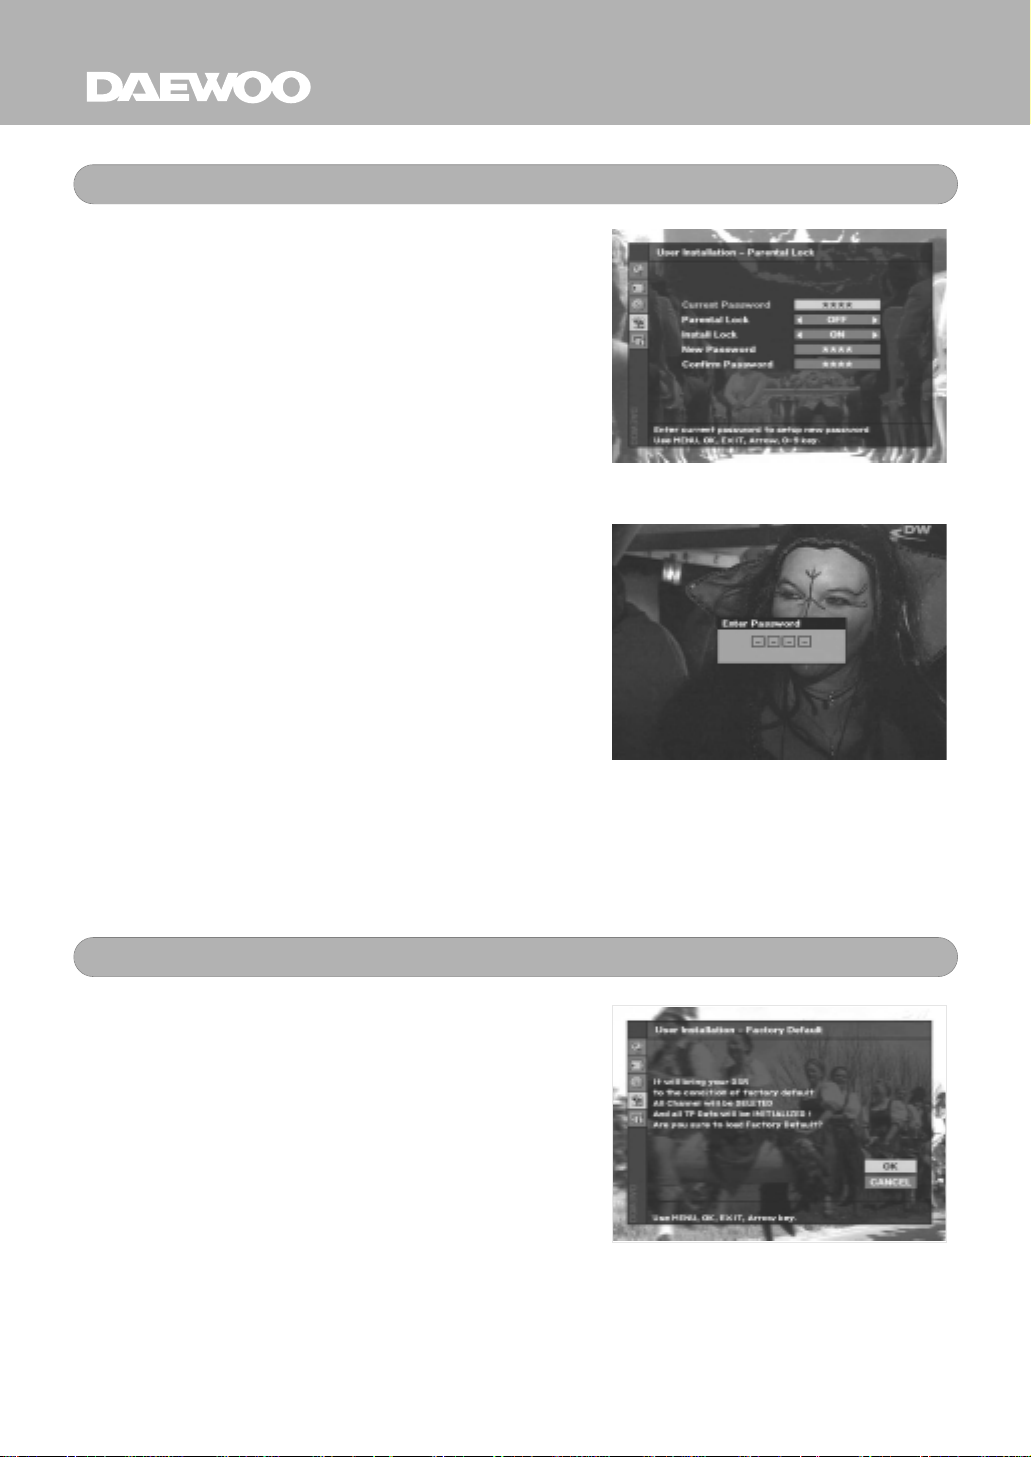
This function allows you to lock a channel with
your password in order to prevent your
children or any other person from accessing
the channels.
You can also protect your installed data and
information using Install Lock.
How to change the Password
*
1) Enter the current password.
2) Select Parental Lock to ON to activate the
function.
3) Enter a new password.
4) Confirm your new password by entering
the new password again.
Note : Default password is 0000.
Warning : Do not forget your password.
How to use Parental Lock
*
1) If you have activated parental lock
function, go to the TV channel manager
menu.
2) Open the command box and select Lock.
3) Select a channel you want to Lock.
4) Press OK then symbol will appear.
5) Exit from this menu and press key on
the remote control or the front panel.
Note : To activate Parental Lock function, you
must swicth DSD-9230E to stand-by
mode at least once.
Turn on DSD-9230E and select a channel
which is locked. To view the channel enter
your password.
30
Page 31
D I G I T A L
D I G I T A L
USER INSTALLATION
Parental Lock
How to use Install Lock
*
1) Enter the current password.
2) Select Install Lock to ON.
3) Enter a new password.
4) Confirm your new password by entering
the new password again.
5) Exit from this menu and press the stand-
by key.
6) Turn on DSD-9230E and press MENU
key.
7) Select any menu and press OK.
8) Enter Password box will appear .
9) Enter the password to access the menu.
Note : Default password is 0000
Warning : Do not forget your password.
Factory Default
If you want to re-set DSD-9230E back to the
factory default condition, select Factory
Default and press OK key.
Warning messages will appear.
To confirm, select OK and press OK key.
Warning : You will lose all of data and
information you have entered.
31
Page 32
RECEIVER INFORMATION
D I G I T A L
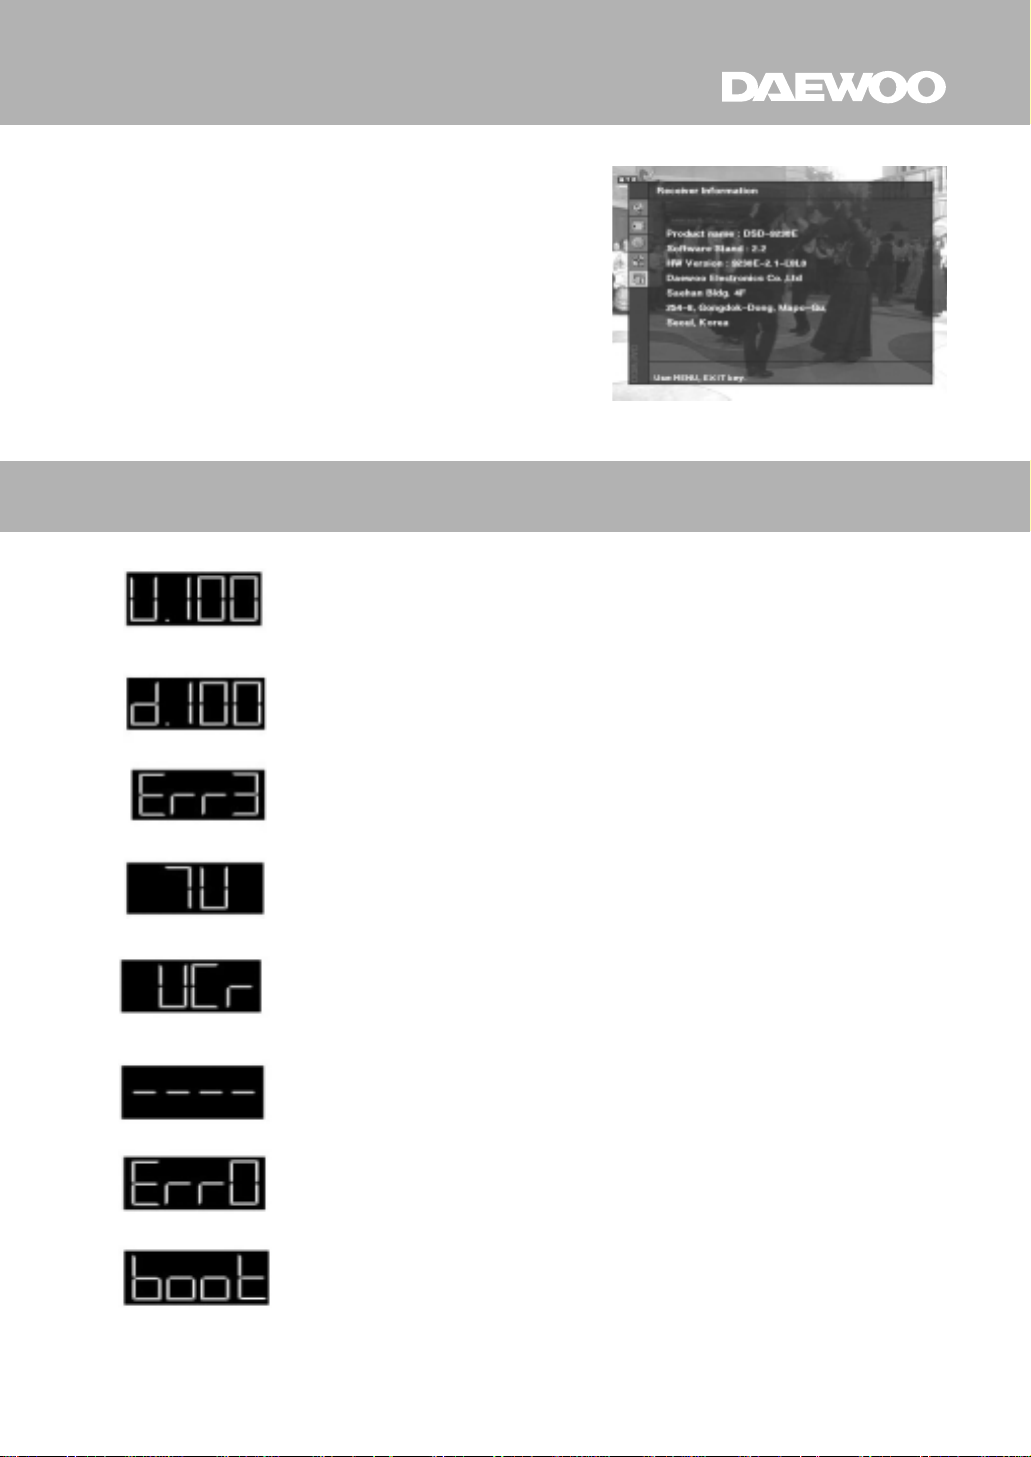
In the Receiver Information, you can see the
information of the product, its version and
contact point of the supplier.
FRONT PANEL DISPLAY
: UPLOAD IN PROCESS
: DOWNLOAD IN PROCESS
: ERROR IN DATA TRANSMISSION
: TV MODE
: VCR MODE
: SYSTEM WAITING
: FLASH ROM ERROR
: SYSTEM BOOTING
32
Page 33
D I G I T A L
D I G I T A L
TROUBLE SHOOTING
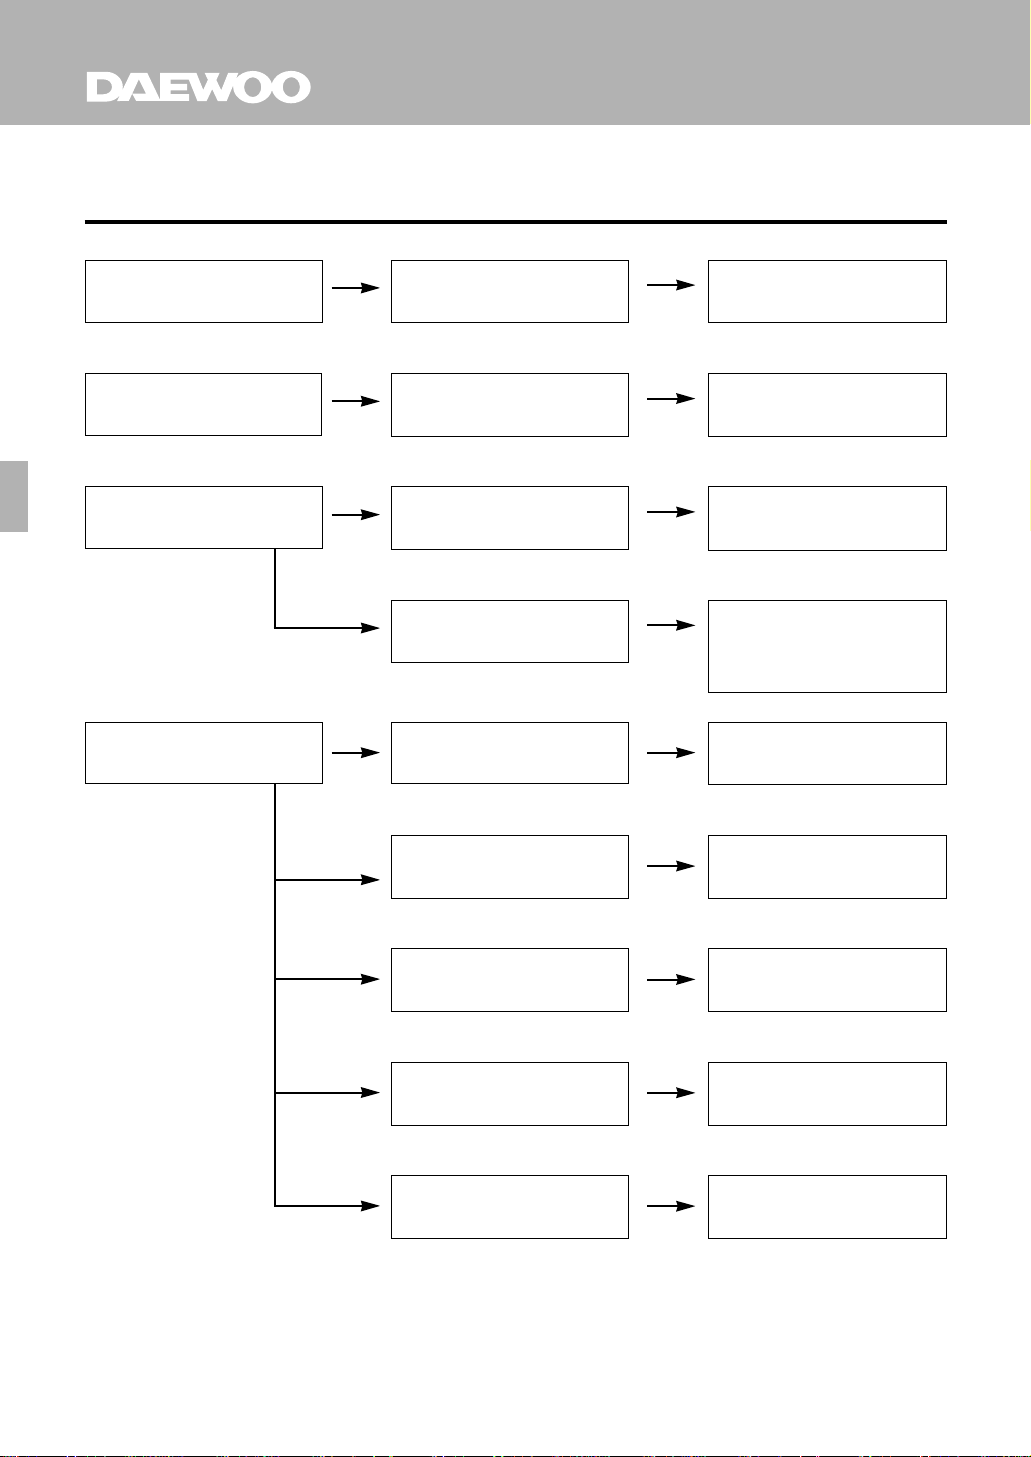
Problem Possible causes What to do
The display on the front
panel does not light up.
No sound or picture, and the
front panel shows red light.
No sound or picture.
Bad picture / blocking error
Main cable is not connected.
The DSD-9230E is in
stand-by mode.
The satellite dish is not
pointing at the satellite.
No signal or weak signal.
The satellite dish is not
pointing at the satellite.
Signal is too strong.
Check that the main cable is
plugged into the power socket.
Press the stand-by button.
Adjust the dish. Check the signal
level in the Channel Search menu.
Check the cable connections,
LNB and other equipment
connected between the LNB and
the receiver , or adjust the dish.
Adjust the dish.
Connect a signal attenuator
to the LNB input.
Satellite dish is too small.
LNB noise factor is too high.
The LNB is faulty.
33
Change to a larger dish.
Change to an LNB with
lower noise factor.
Change the LNB.
Page 34
D I G I T A L
TROUBLE SHOOTING
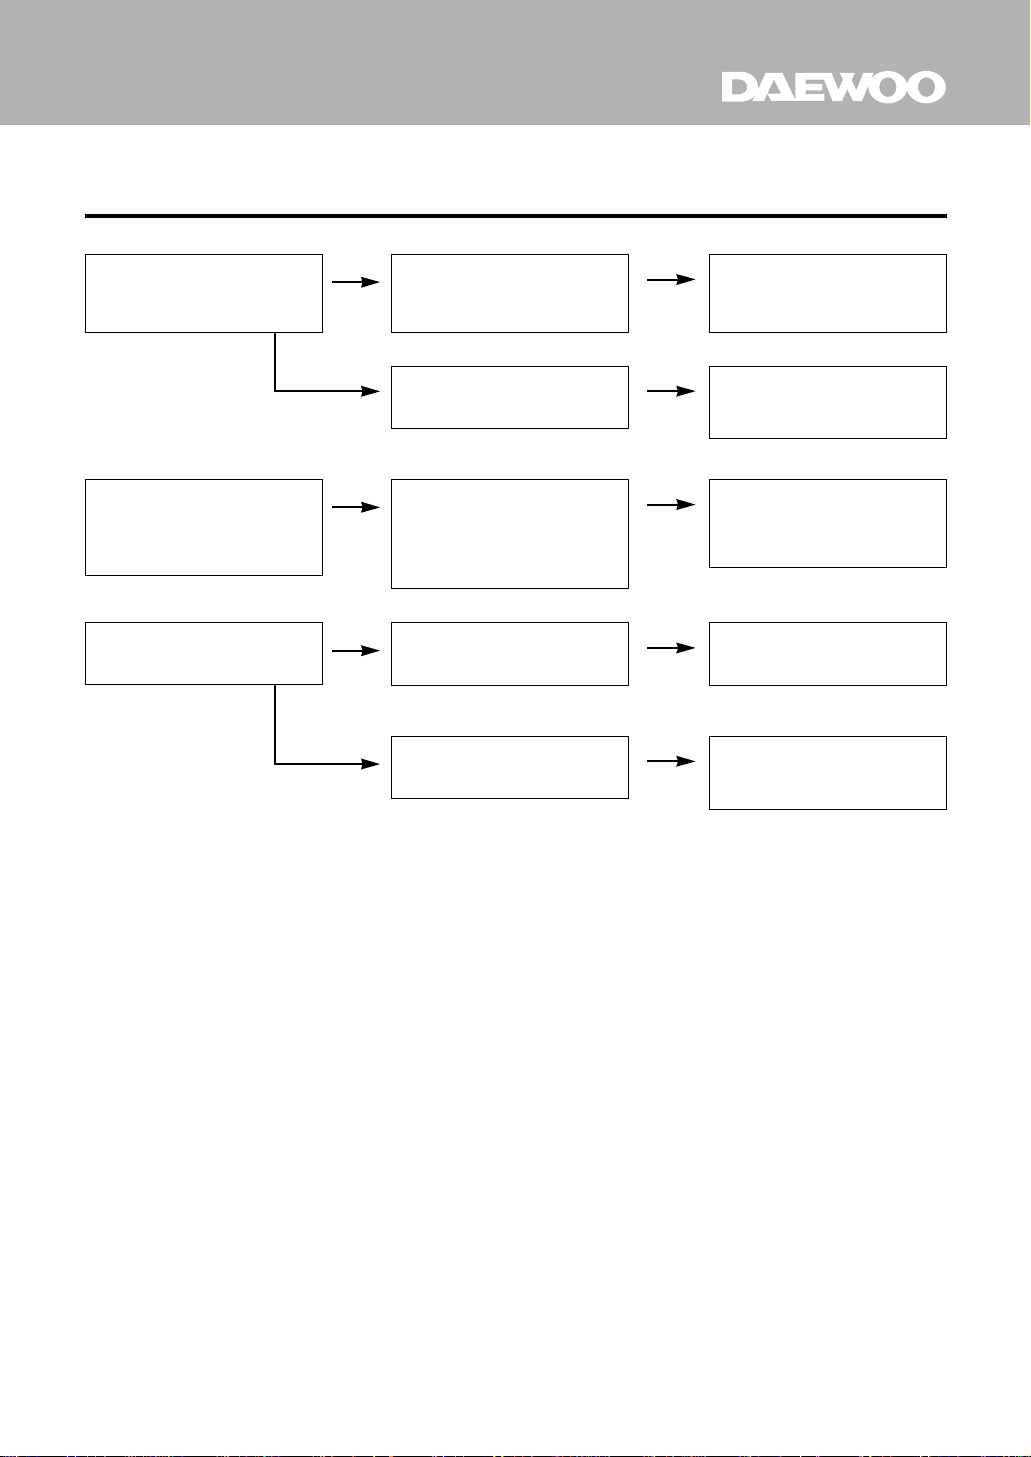
Problem Possible causes What to do
No Welcome Menu on the
screen after you switched on the
DSD-9230E for the first time.
There are interferences on your
digital satellite channels, caused
by an existing terrestrial channel
or video signal.
The remote control is not
working.
The system is connected by
SCART leads and TV is not in
A V mode.
The system is connected
by RF leads.
The system is connected by RF
leads and the output channel of
the DSD-9230E is interfered with
an existing terrestrial channels or
video signal.
Battery is exhausted.
Remote control is
incorrectly aimed.
If the system is connected by
SCART leads, switch the TV
to the appropriate A V input.
Check the UHF channel fixed
in your system and tune the
UHF channel properly .
Change the DSD-9230E
output channel to a more
suitable channel, or connect
the system by SCART leads.
Change the batteries.
Aim the remote control at
DSD-9230E, or check that
nothing blocks the front panel.
Note : If the problem persists, please contact your dealer or service provider.
34
Page 35

P/N:48586200E101-R0
 Loading...