

Page 1
Contents
CONTENTS
1. Specifications..........................................................................................................2
2. Outline and Dimensions.........................................................................................6
3. Operation ..............................................................................................................12
4. Wiring Diagram.....................................................................................................28
5. Refrigerant Cycle..................................................................................................32
6. Control Block Diagram.........................................................................................33
7. Electric Circuit Diagram........................................................................................34
8. Trouble Shooting...................................................................................................36
9. Key Components of Electronic Circuit.................................................................62
10. Disassembly Instructions .....................................................................................65
1) Indoor Unit........................................................................................................65
2) Outdoor Unit.....................................................................................................68
3) Exploded Diagram (Indoor Unit)......................................................................71
4) Exploded Diagram (Outdoor Unit)...................................................................79
5) Control Box Assembly......................................................................................87
Page 2
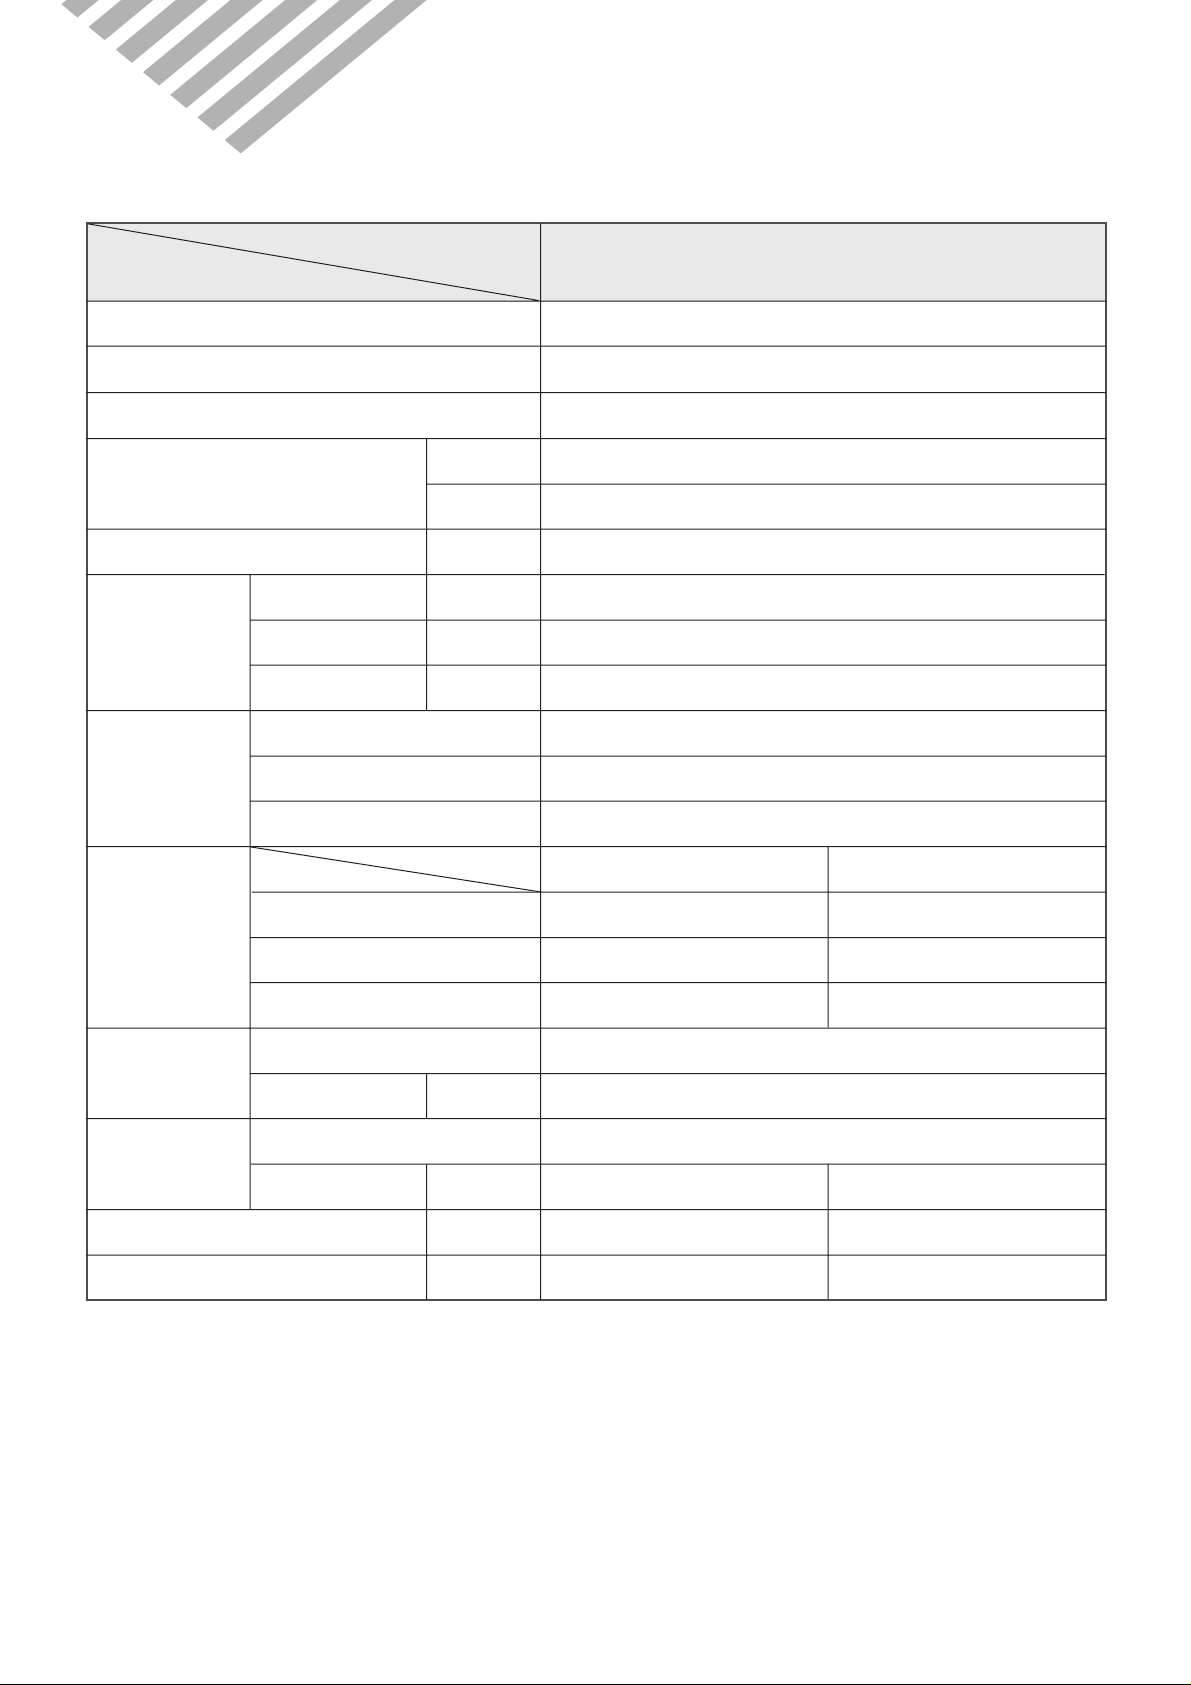
1. SPECIFICATIONS
¡ DSB-070L
MODEL
ITEM
Function Cooling
Class T
Power AC 220~ 240V/ 50Hz
Capacity W 2,051
Btu/h 7,000
Dehumidification l/h 0.89
Running Current A 2.9
Electrical
Data
Compressor
Power Input W 680
Starting Current A 18
Type Rotary
Model QB 125PL 12B
Capacitor 25µF/370VAC
DSB-070L
Indoor Unit Outdoor Unit
Fan
Motor
Refrigerant
(R-22)
Connection
Dimensions (W x H x D) mm 750 x 245 x 174 654 x 549 x 256
Net Weight kg 7.0 34
Type Cross flow fan Propeller fan
Capacitor 1.0µF 400VAC 1.8µF 400V
Motor Model Number IC-8417DWKF5A IC-9625DWLF5A
Control Capillary
Charge Q'ty g 800
Type Flare
OD
(Liquid/Suction)
in(mm) 1/4 (6.35) 1/2 (12.7)
2
Page 3
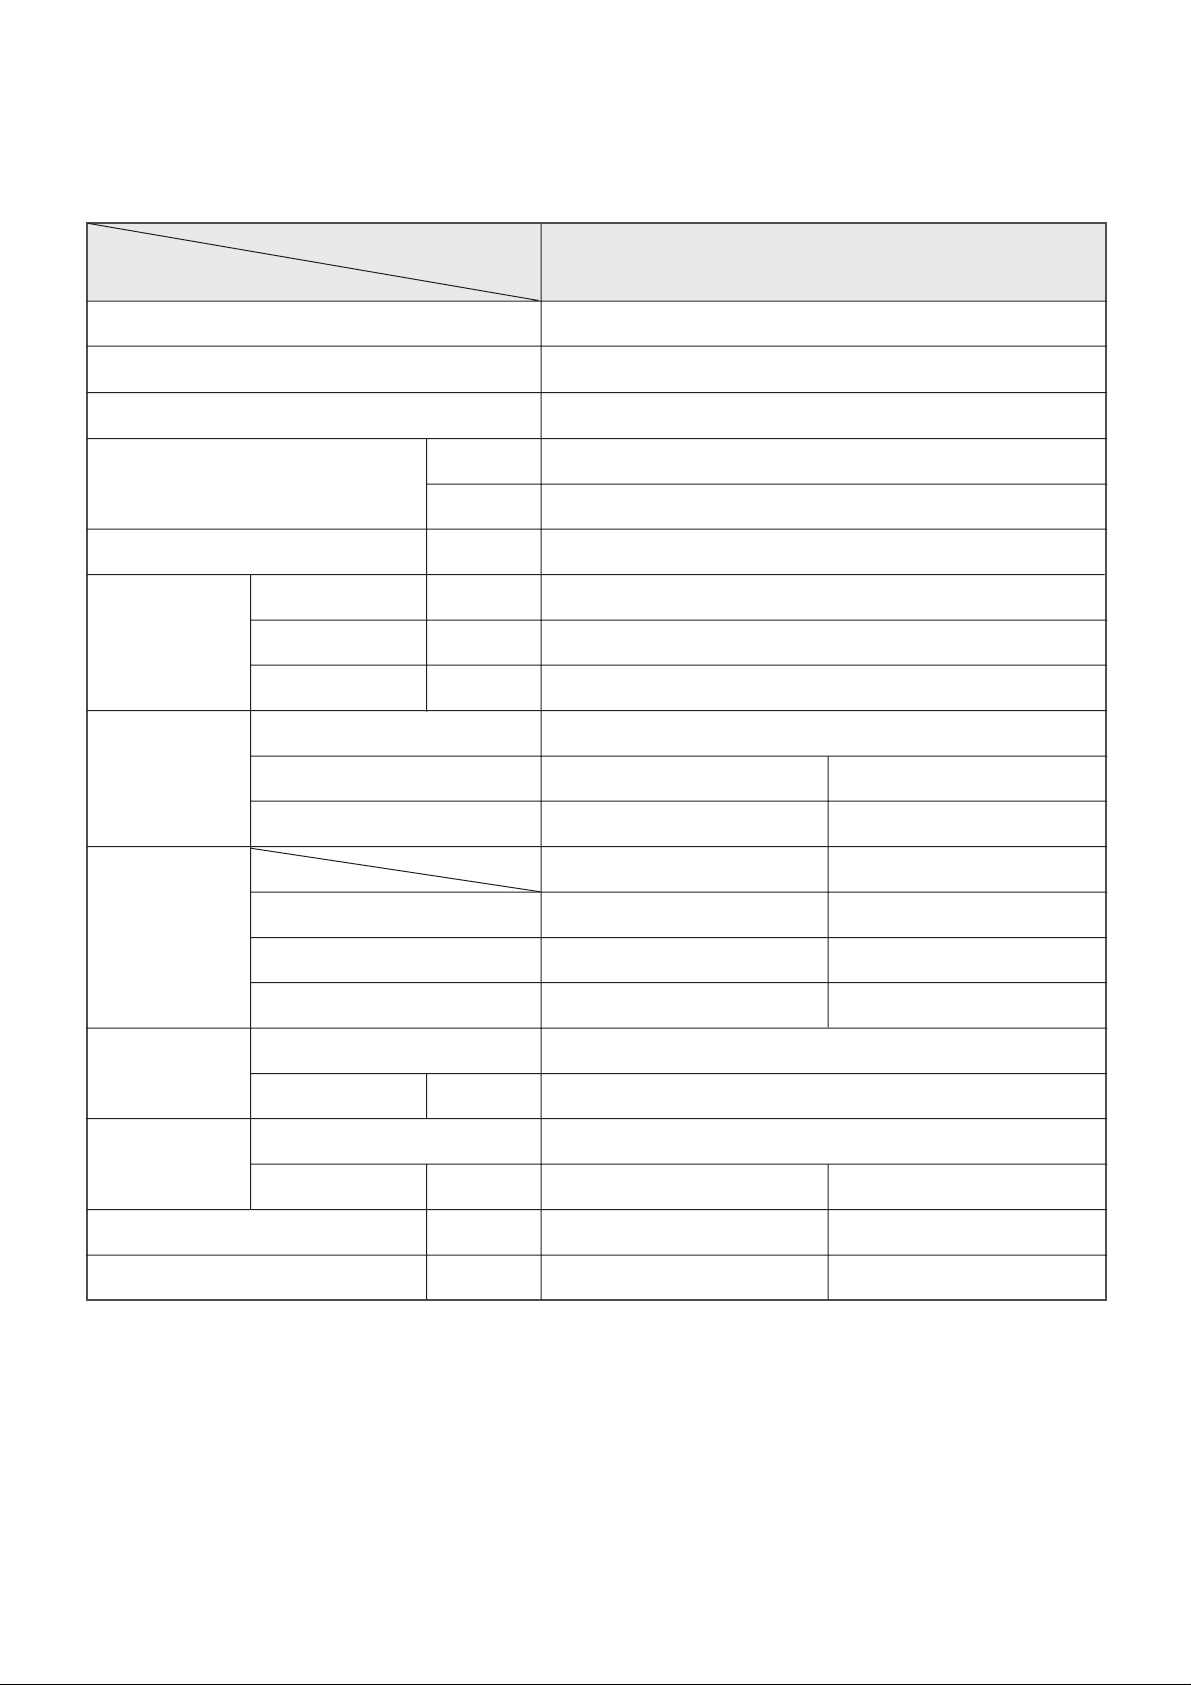
¡ DSB-091L
MODEL
ITEM
Function Cooling
Class T
Power AC 220~240V/ 50Hz
Capacity W 2,637
Btu/h 9,000
Dehumidification l/h 1.15
Running Current A 4.2
Electrical
Data
Compressor
Power Input W 920
Starting Current A 21
Type Rotary
Model RBB090A001 QK 164PN12F
Capacitor 25µF / 370VAC 30µF / 370VAC
DSB-091L
Indoor Unit Outdoor Unit
Fan
Motor
Refrigerant
(R-22)
Connection
Dimensions (W x H x D) mm 750 x 245 x 174 654 x 549 x 256
Net Weight kg 7.0 34
Type Cross flow fan Propeller fan
Capacitor 1.0µF 400VAC 1.8µF 400V
Motor Model Number IC-8417DWKF5A IC-9630DWLF5A
Control Capillary
Charge Q'ty g 1,000
Type Flare
OD
(Liquid/Suction)
in(mm) 1/4 (6.35) 1/2 (12.7)
3
Page 4
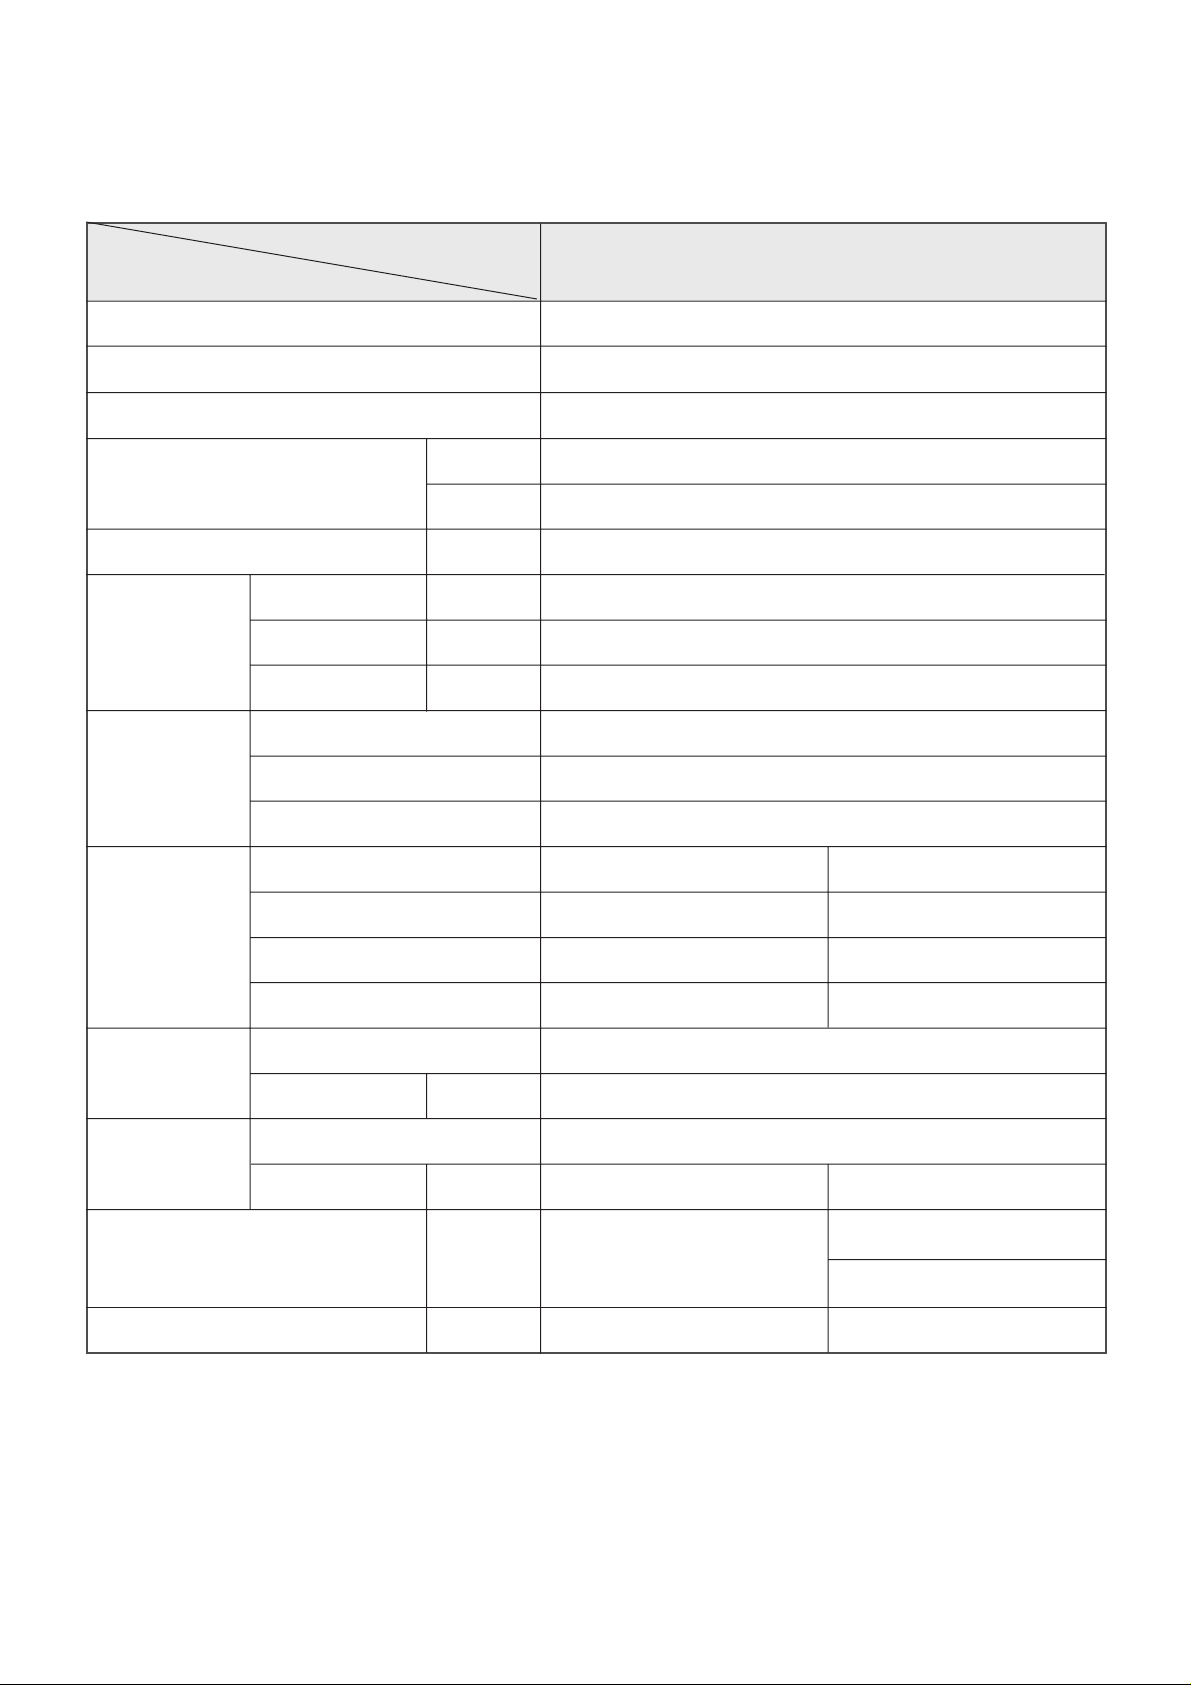
¡ DSB-121L/122L
MODEL
ITEM
Function Cooling
Class T
Power AC 220~240V/ 50Hz
Capacity W 3,507
Btu/h 12,000
Dehumidification l/h 1.53
Running Current A 5.7
Electrical
Data
Compressor
Power Input W 1,250
Starting Current A 34
Type Rotary
Model RCB 120A001
Capacitor 25µF/ 400VAC
DSB-121L/122L
Division Indoor Unit Outdoor Unit
Fan
Motor
Refrigerant
(R-22)
Connection
Dimensions (W x H x D) mm 925 x 285 x 194
Net Weight kg 9.7 34
Type Cross flow fan Propeller fan
Capacitor 1.0µF 400VAC 3.5µF 400VAC
Motor Model Number IC-8428DWKG7C IC-9430DWLC5B
Control Capillary
Charge Q'ty g 1,300
Type Flare
OD
(Liquid/Suction)
in(mm) 1/4 (6.35) 1/2 (12.7)
666 x 552 x 264(Before)
654 x 549 x 256(After)
4
Page 5
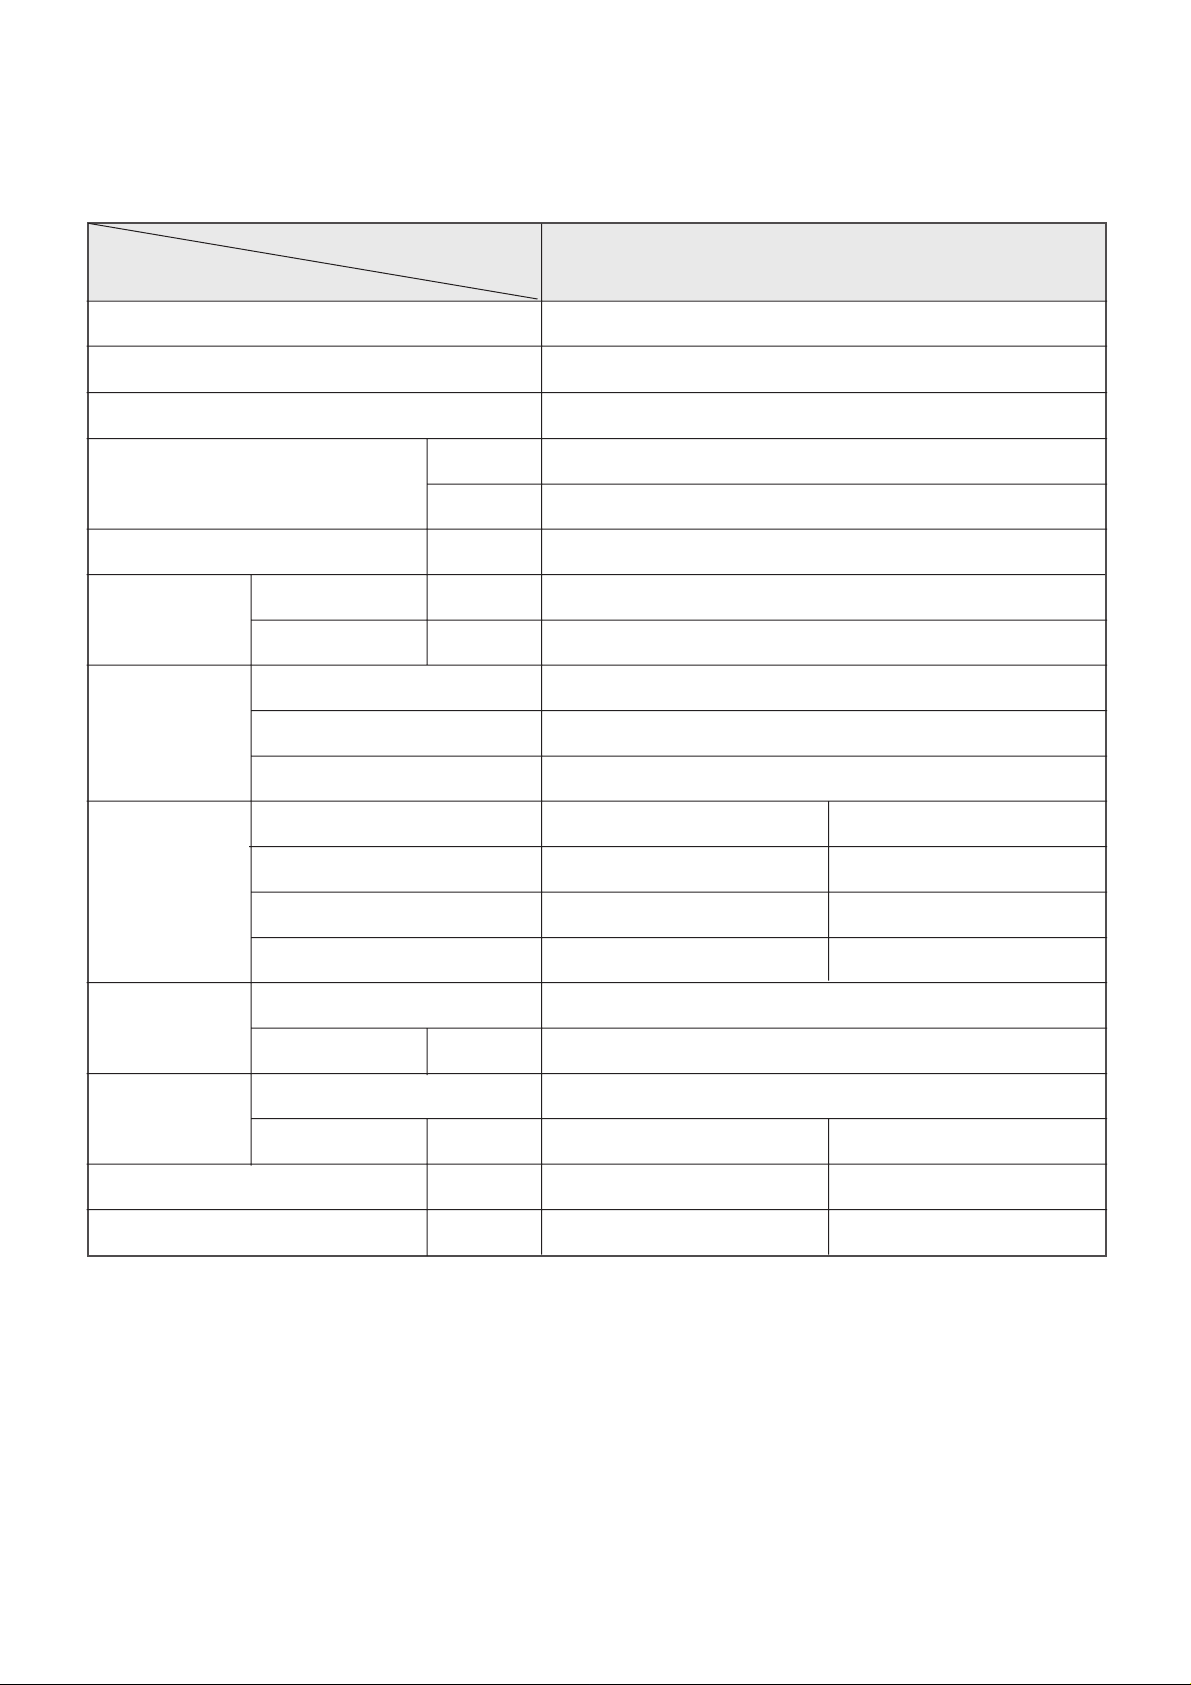
¡ DSB-240L
MODEL
ITEM
Function Cooling
Class T
Power AC 220~240V/ 50Hz
Capacity W 7,030
Btu/h 24,000
Dehumidification l/h 3.2
Electrical
Data
Compressor
Running Current A 13.4
Power Input W 2,400
Type Recipro
Model AWG5530EXC
Capacitor 45µF/ 400VAC
Division Indoor Unit Outdoor Unit
DSB-240L
Fan
Motor
Refrigerant
(R-22)
Connection
Dimensions (W x H x D) mm 1080 x 298 x 200 872 x 675 x 325
Net Weight kg 14.7 64
Type Cross flow fan Propeller fan
Capacitor 2µF 400VAC 5µF 400VAC
Motor Model Number IC9430DWKG7A 05ME986DERC
Control Capillary
Charge Q'ty g 2,050
Type Flare
OD
(Liquid/Suction)
in(mm) 3/8 (9.52) 5/8 (15.9)
5
Page 6
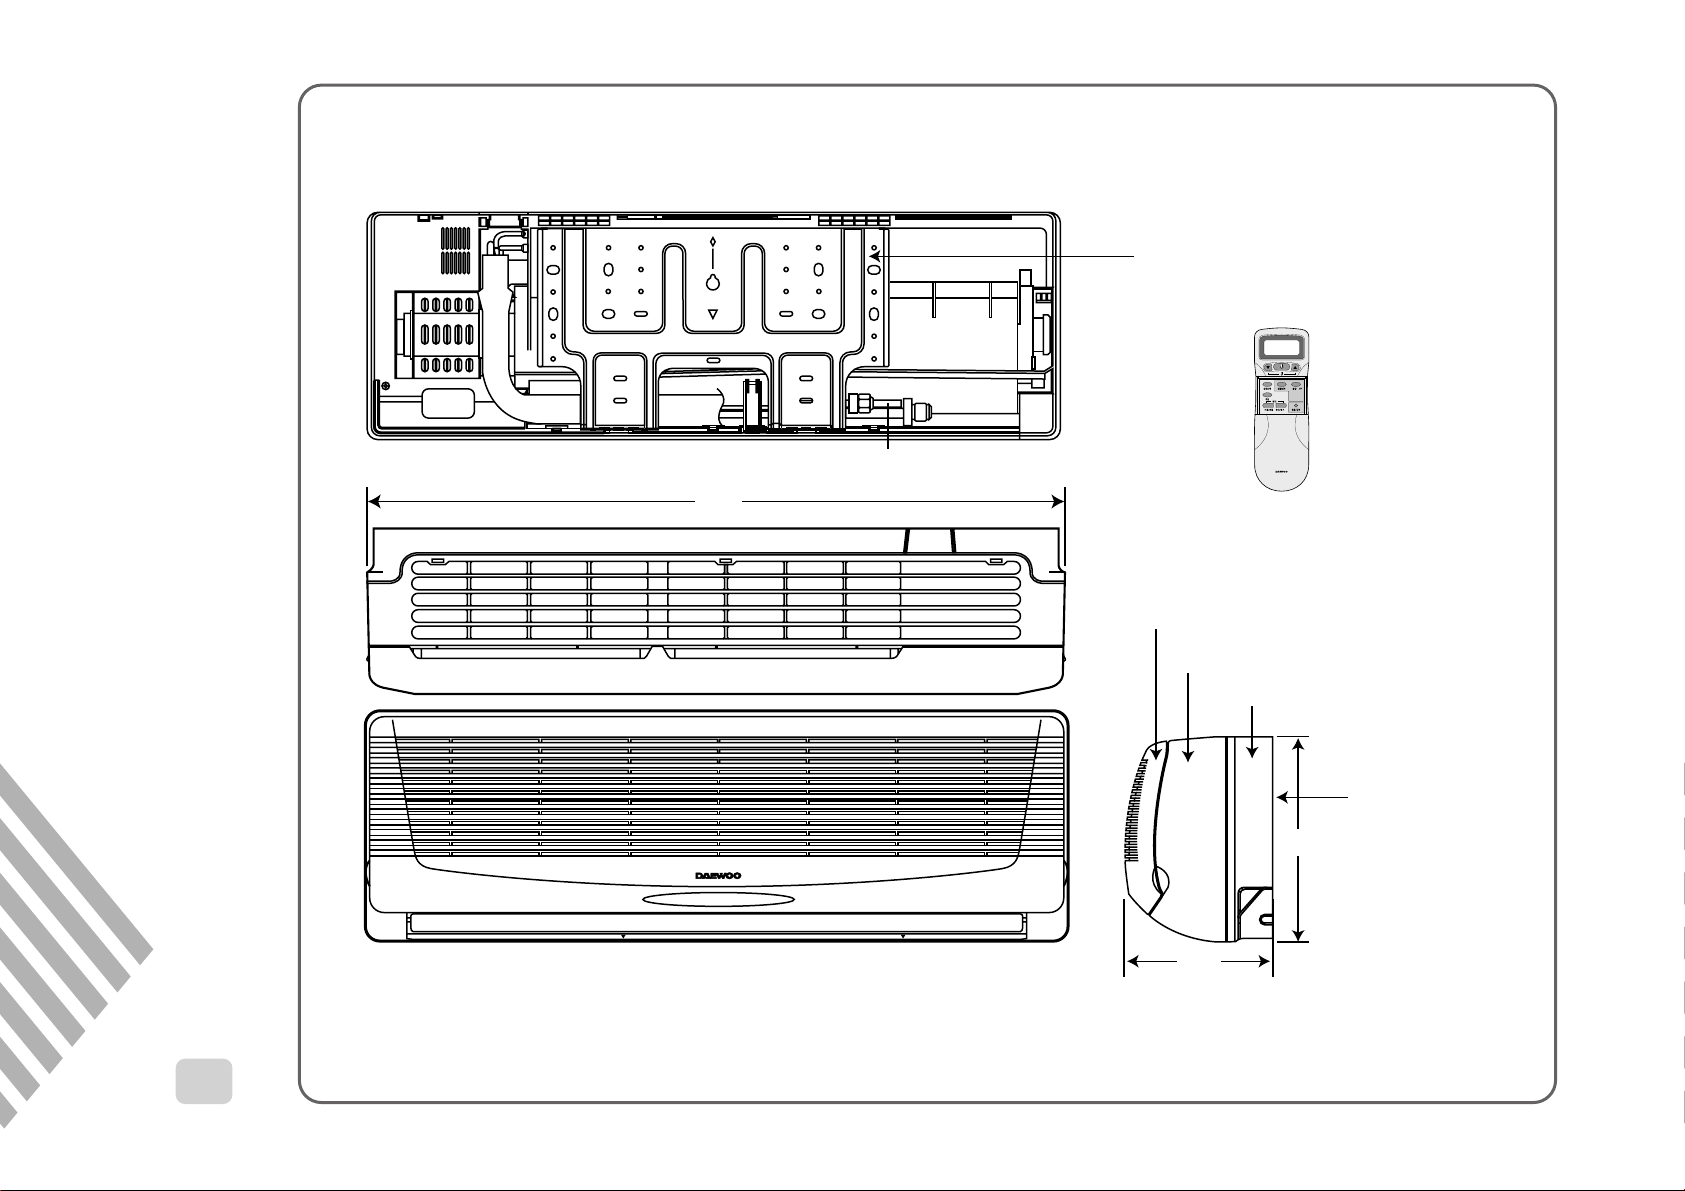
750
Plate Mounting
REMOCON
Connecting Pipe
Grille Insert
174
245
REMOTE CONTROLLER
Frame Grille
Body
Plate Mounting
INDOOR UNIT
2. OUTLINE AND DIMENSIONS
1
¡ DSB-070L/DSB-091L
6
Page 7
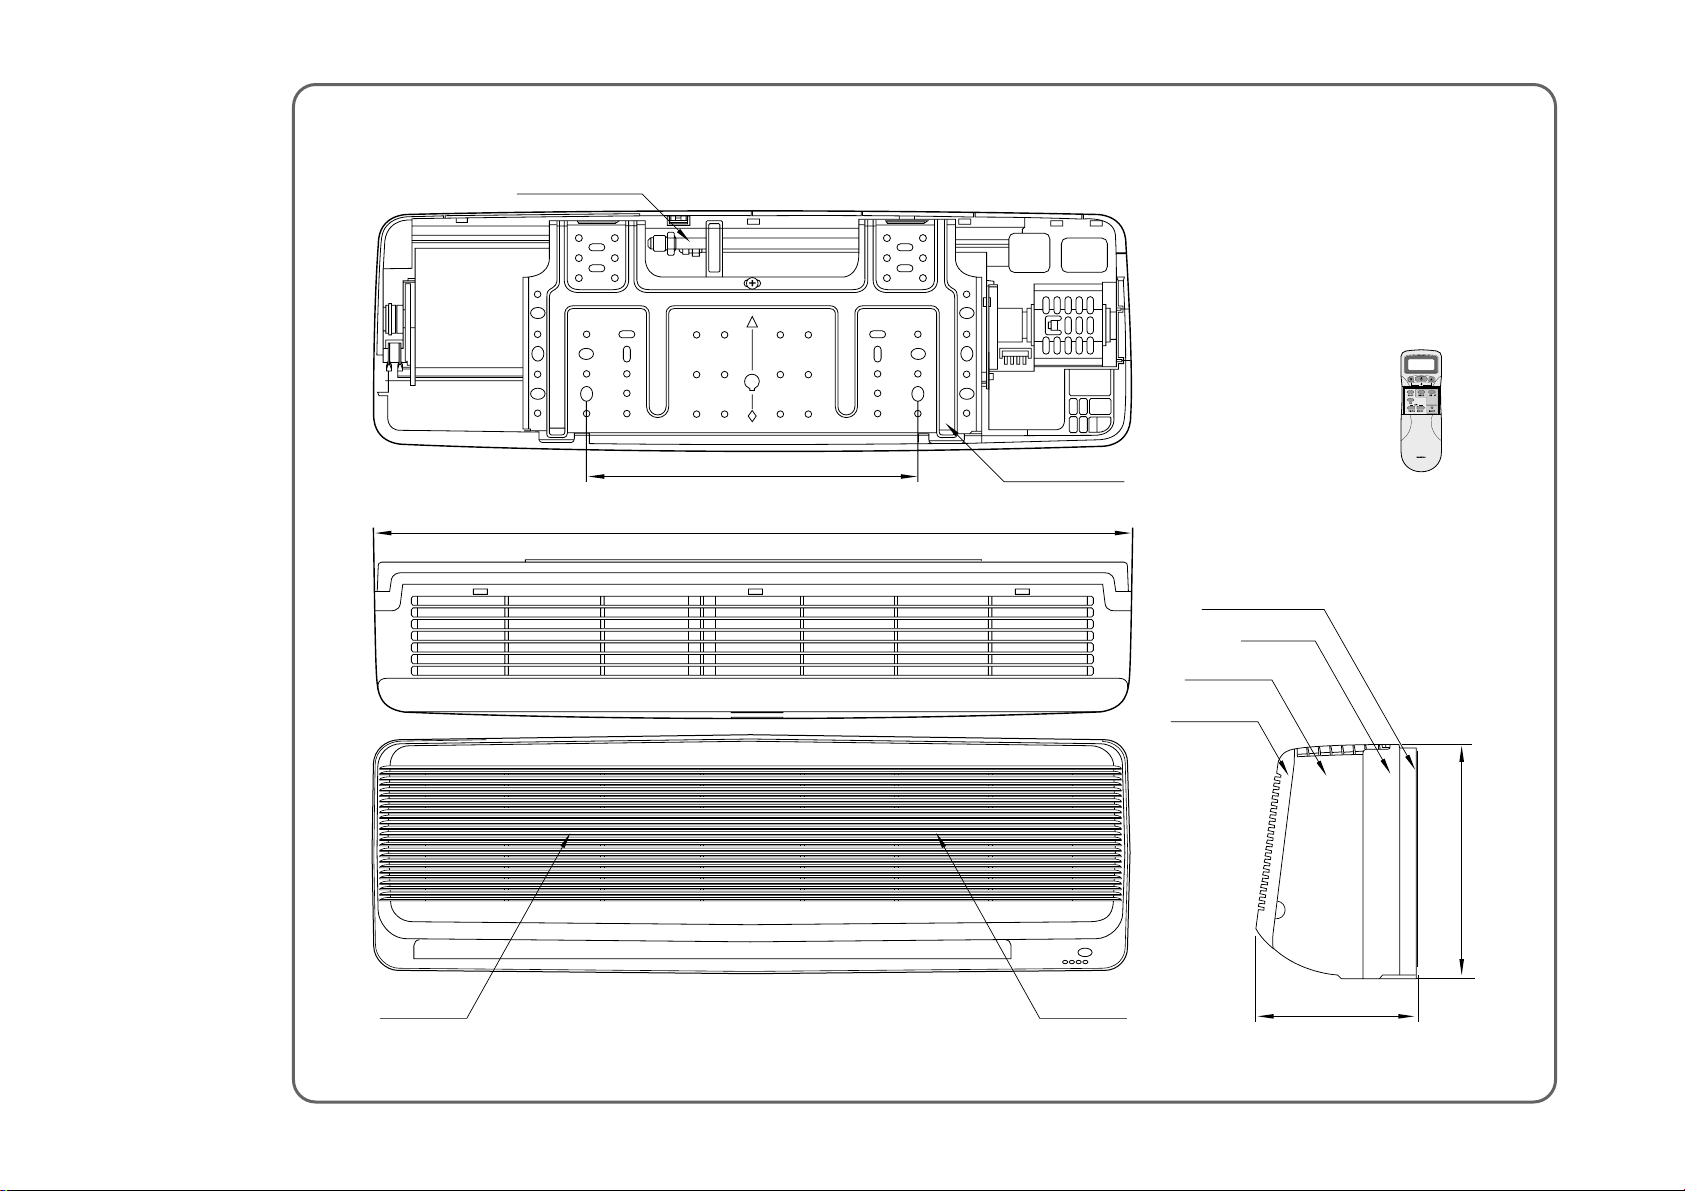
REMOCON
Filter - L Filter - R
Grille Insert
Frame Grille
Body
Plate Mounting
Connecting Pipe
Plate Mounting
406
194
285
925
REMOTE CONTROLLER
¡ DSB-121L/122L
7
Page 8
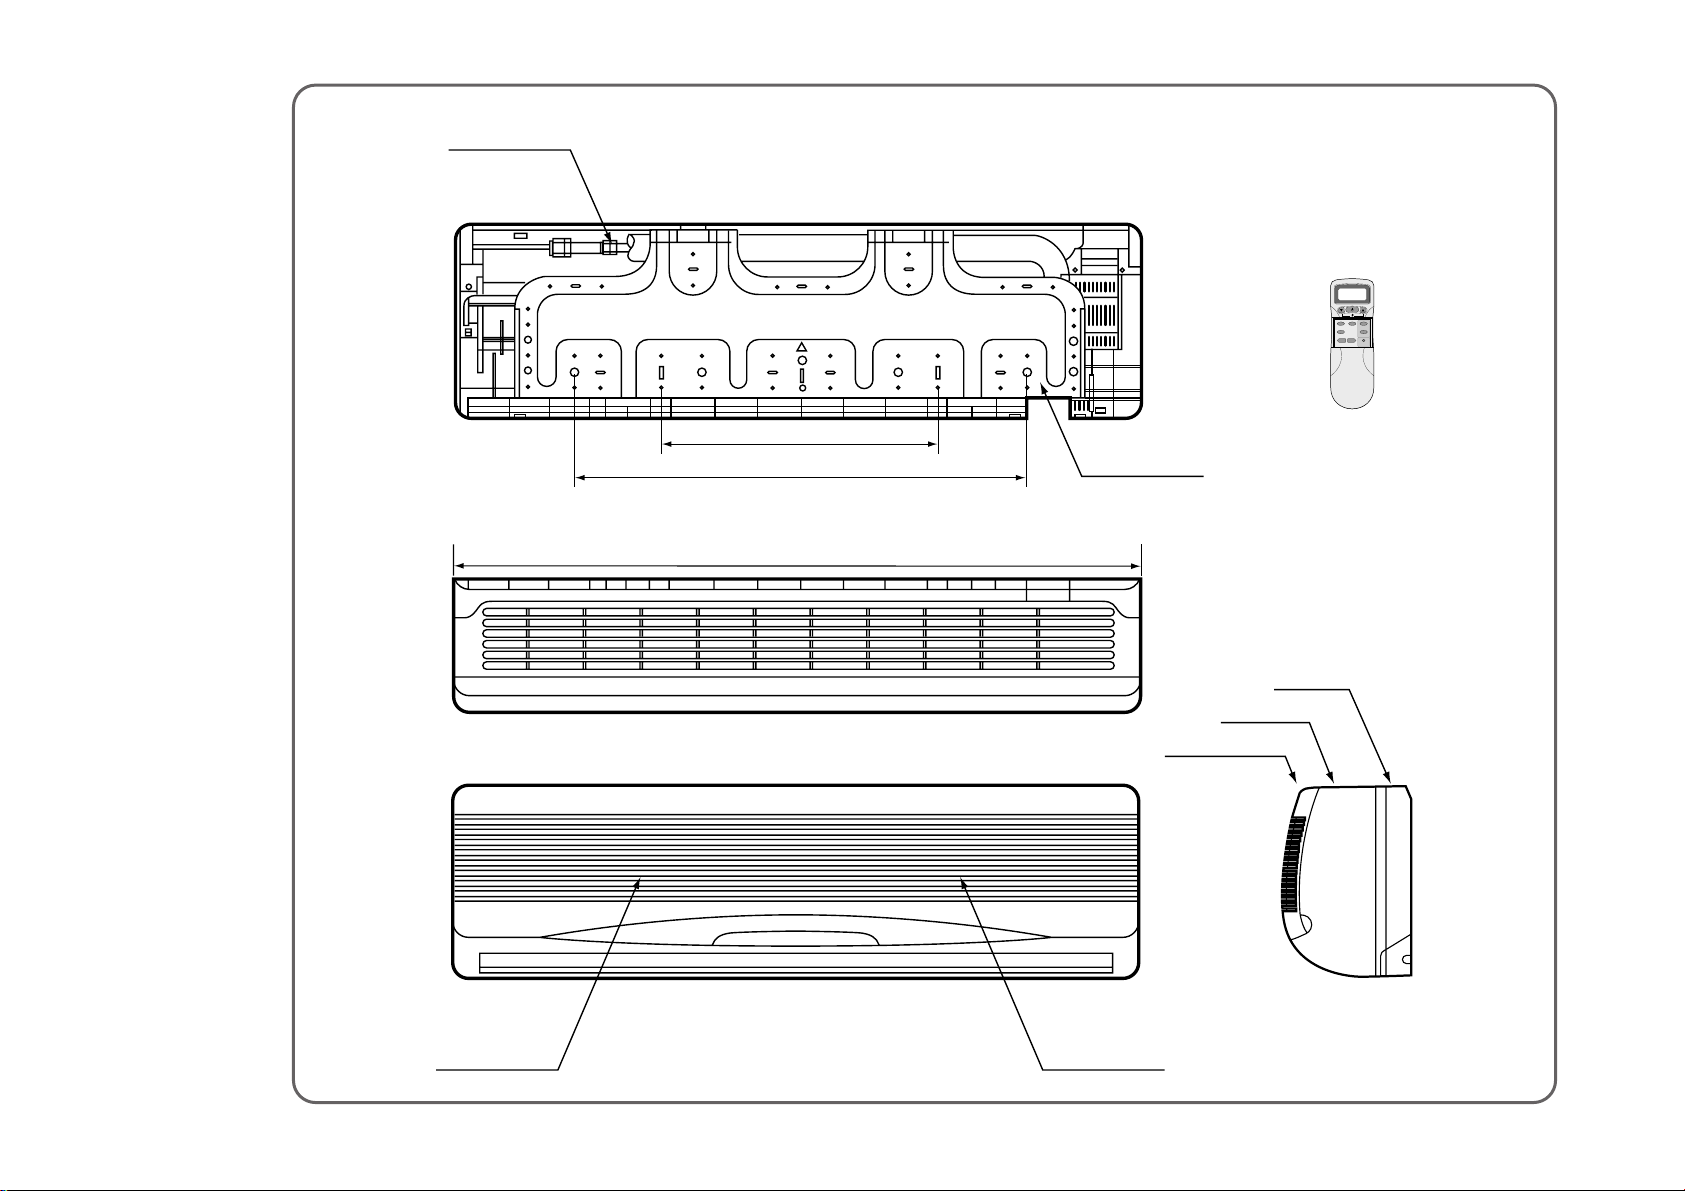
Connecting Pipe
Body
Frame Grille
Grille Insert
Plate Mounting
430
710
1080
Filter-L Filter-R
REMOCON
8
¡ DSB-240L
Page 9
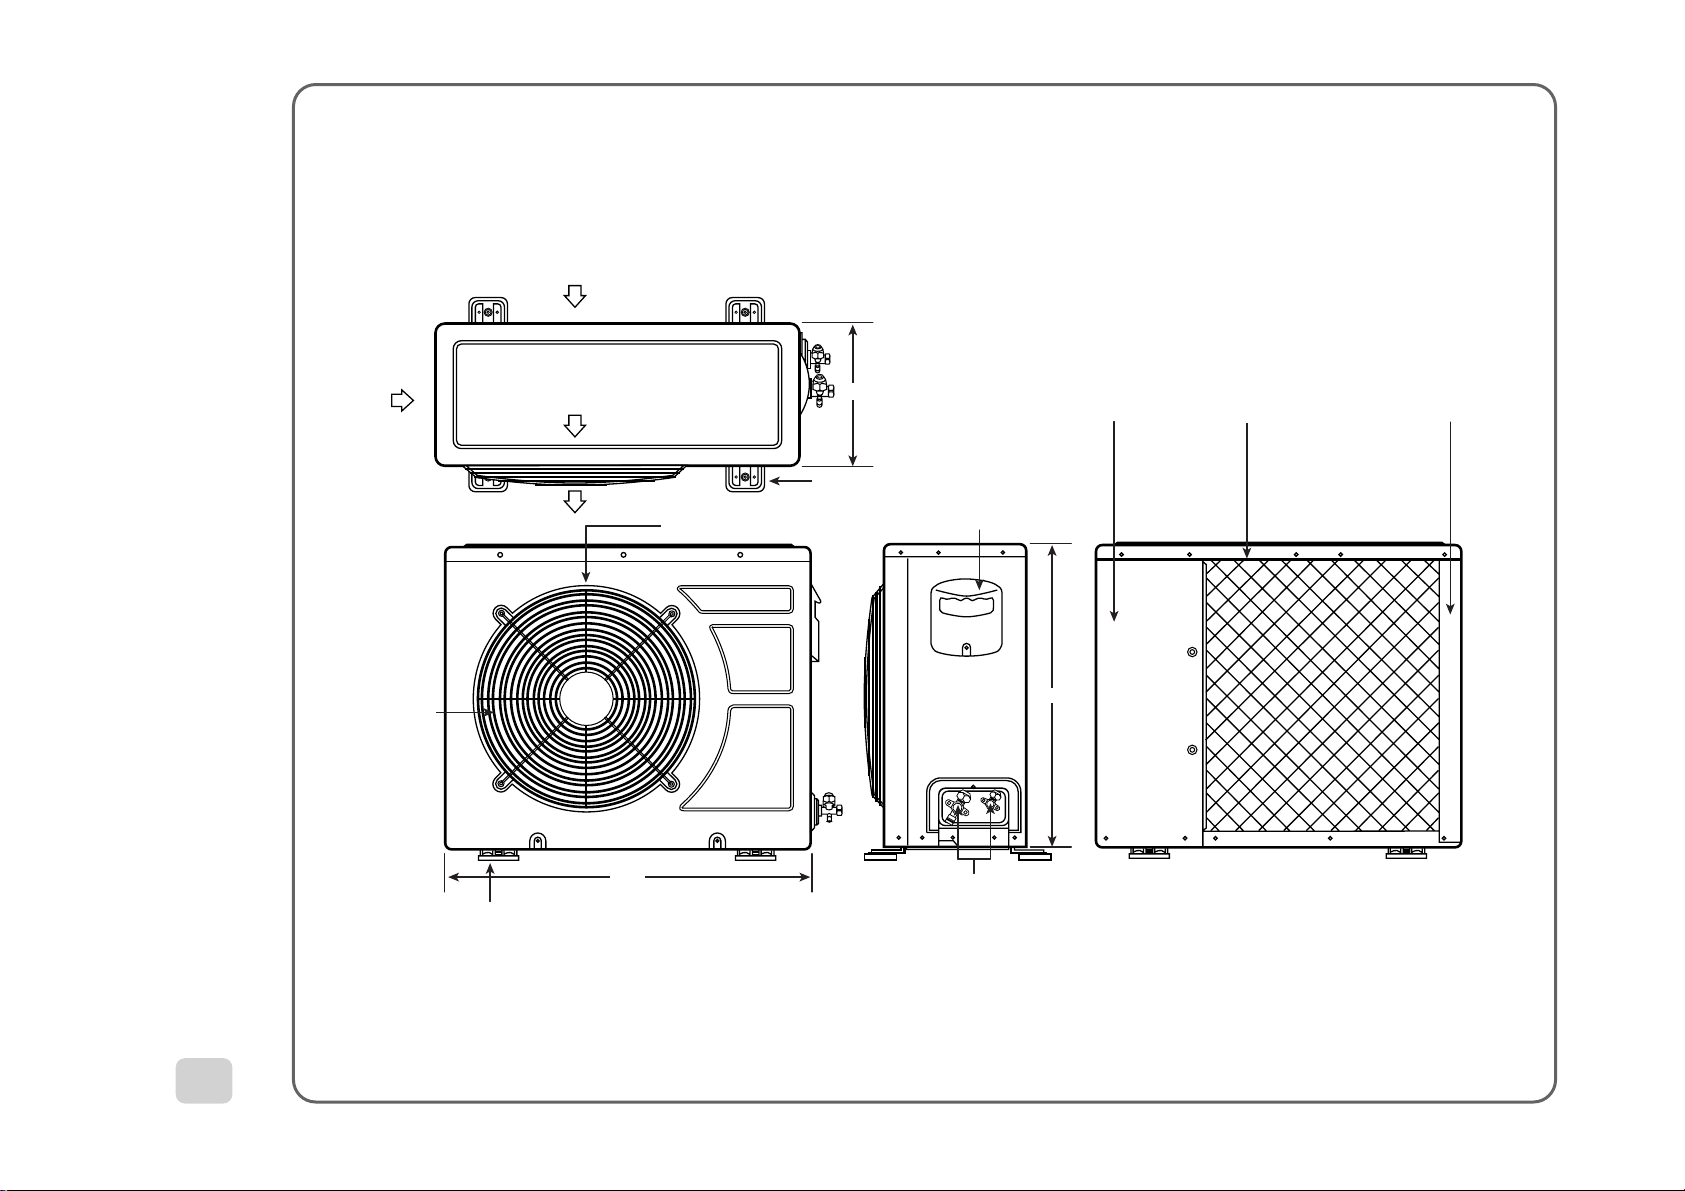
256
549
654
Inlet
Inlet
Cabinet Side
Panel Top
Guide Support
Outlet
Foot Cushion
OUTDOOR UNIT
Outlet
Cabinet Front
Foot
Handle
9
Service Valve
2
¡ DSB-070L/DSB-091L/DSB-121L/DSB-122L(After)
Page 10
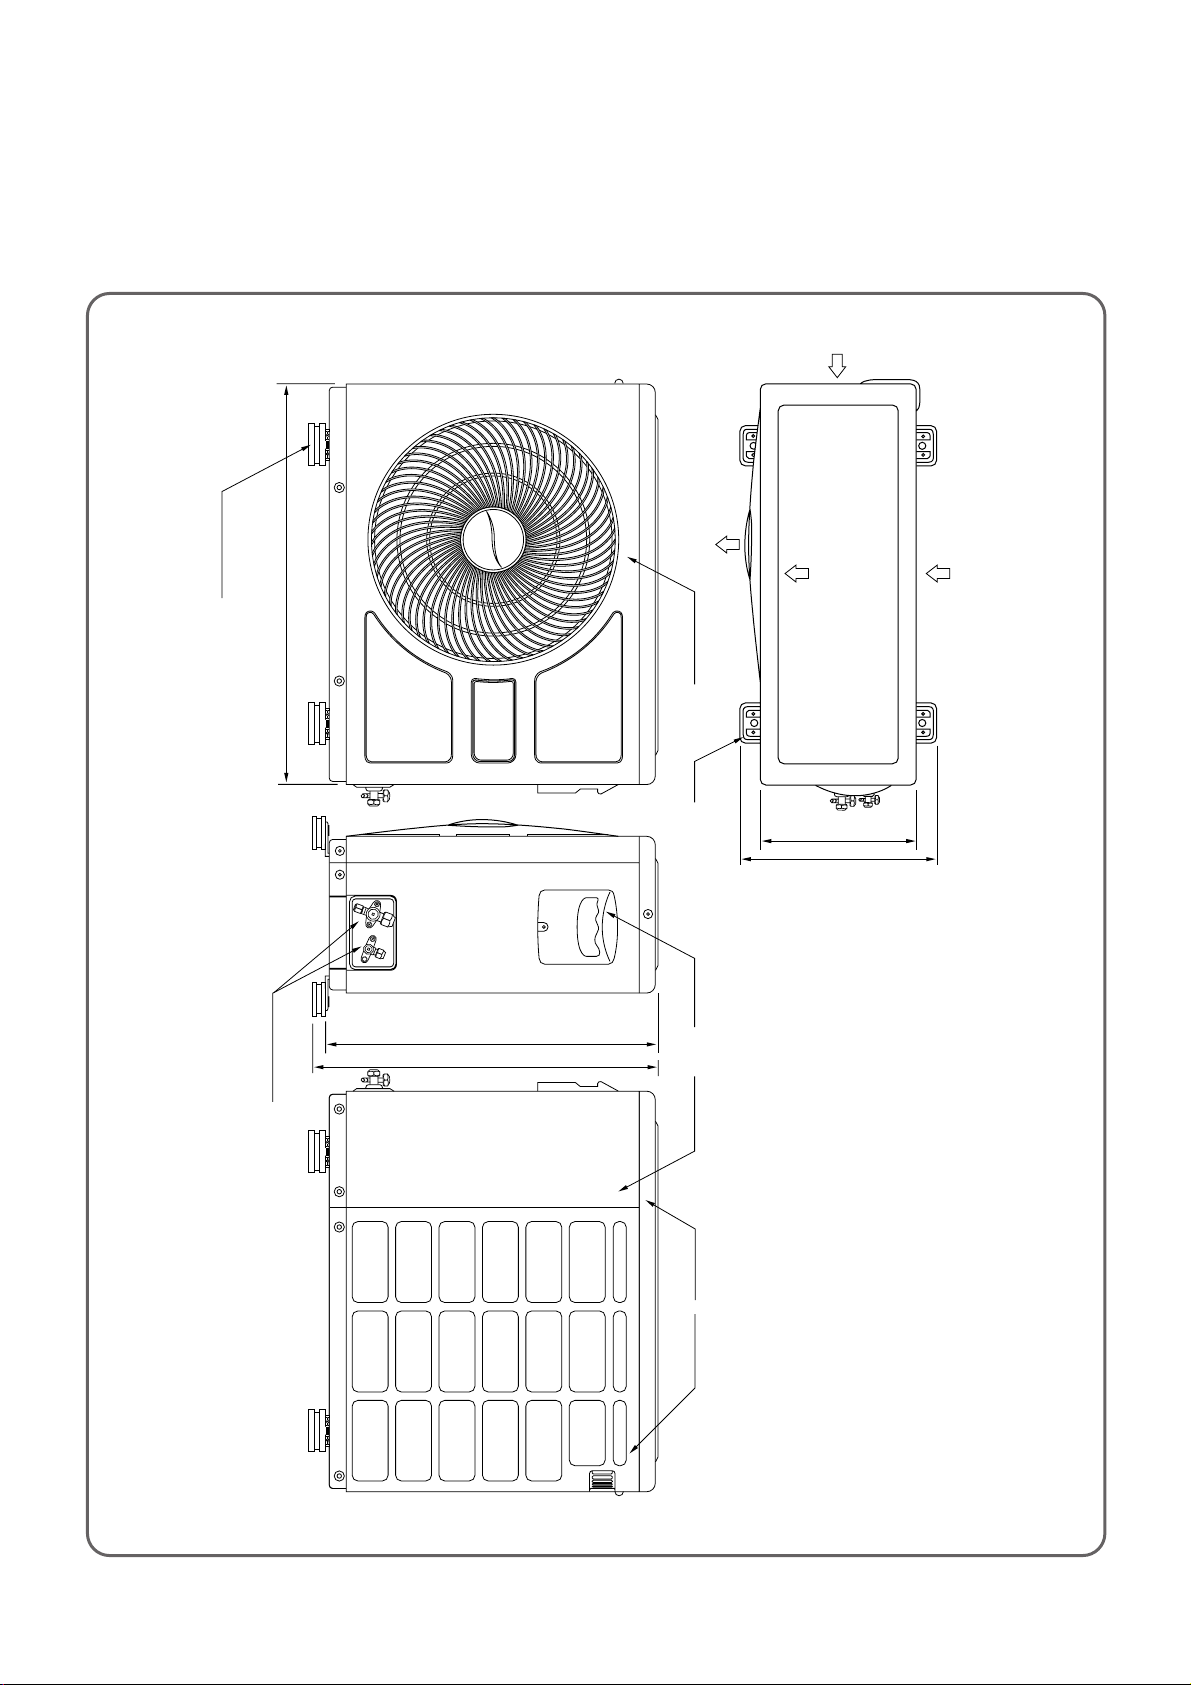
Cabinet SideHandleCabinet Front Foot
264
334
Panel Top
Cabinet Back
552
572
Inlet
AIR
Inlet
Outlet
Foot Cushion
Service Valve
666
¡ DSB-121L/122L(Before)
10
Page 11
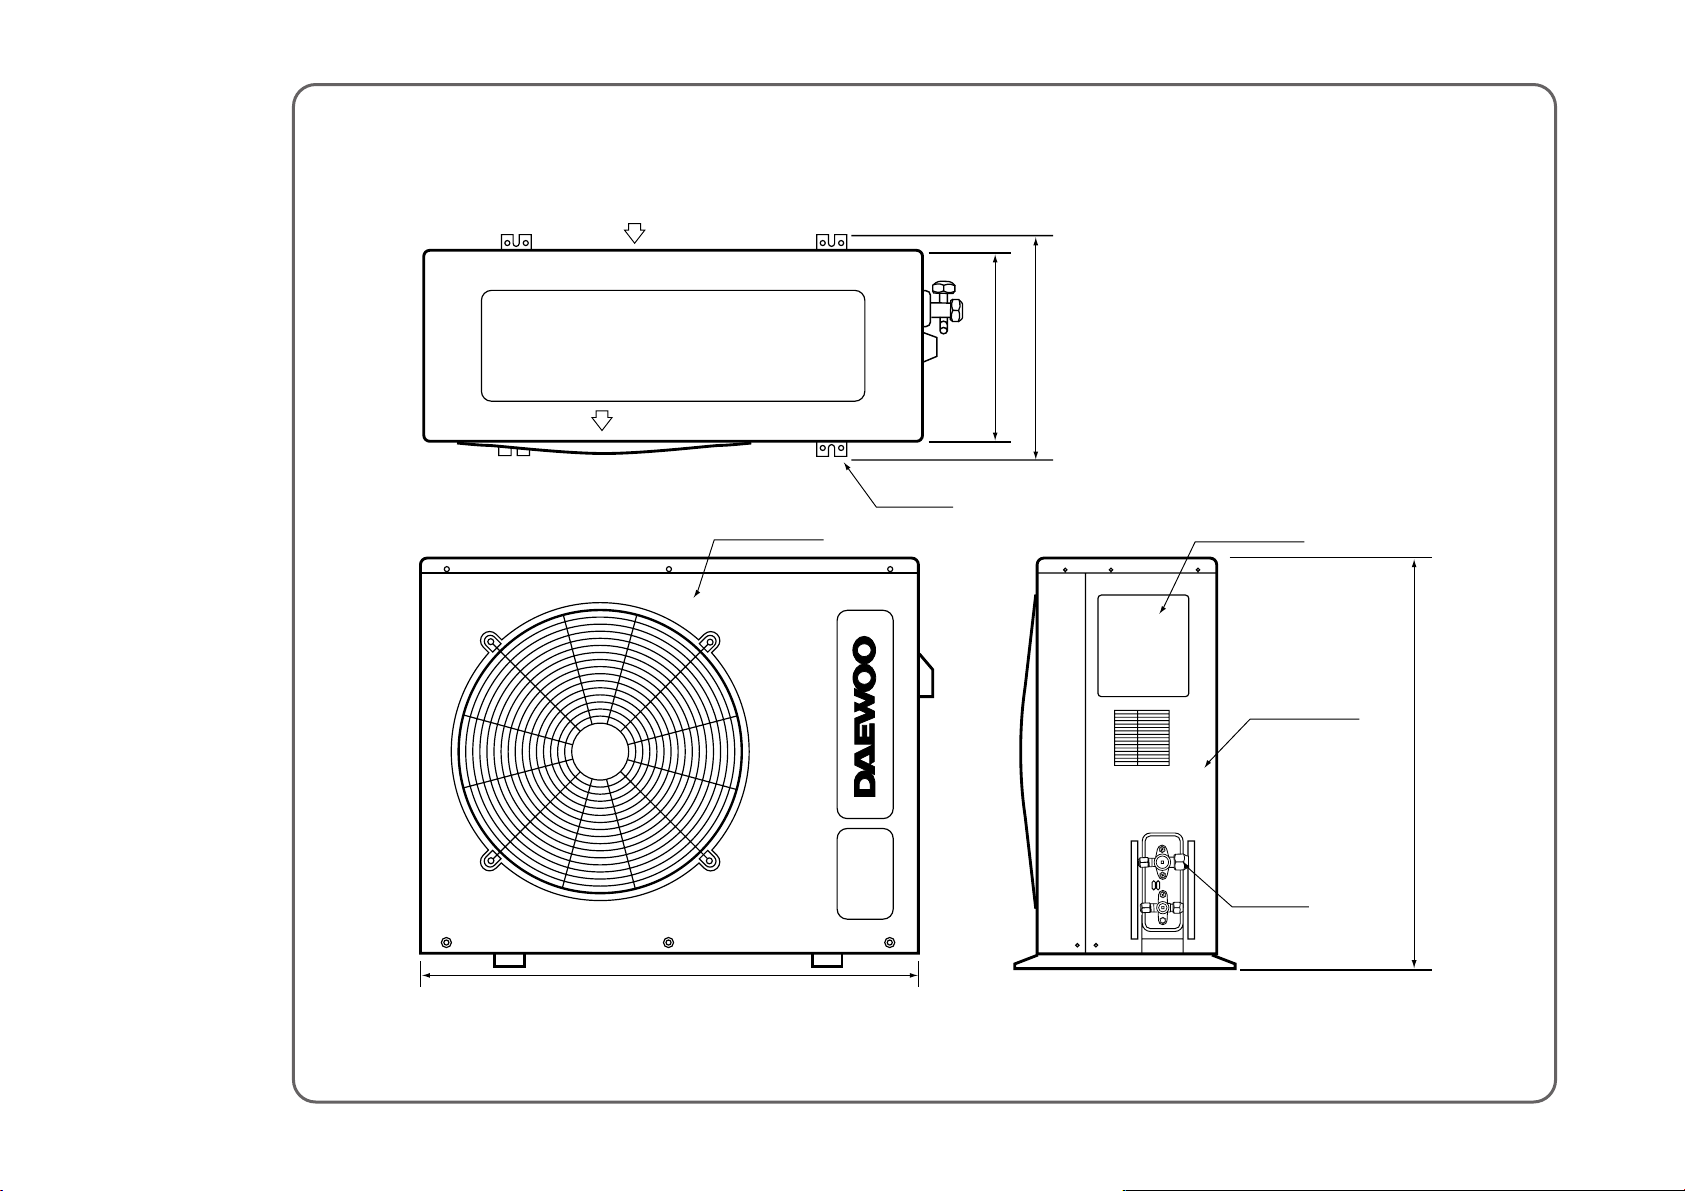
Inlet
380
699
323
foot
Service valve
873
Cabinet front
Service Cover
Cabinet Side
¡ DSB-240L
11
Page 12
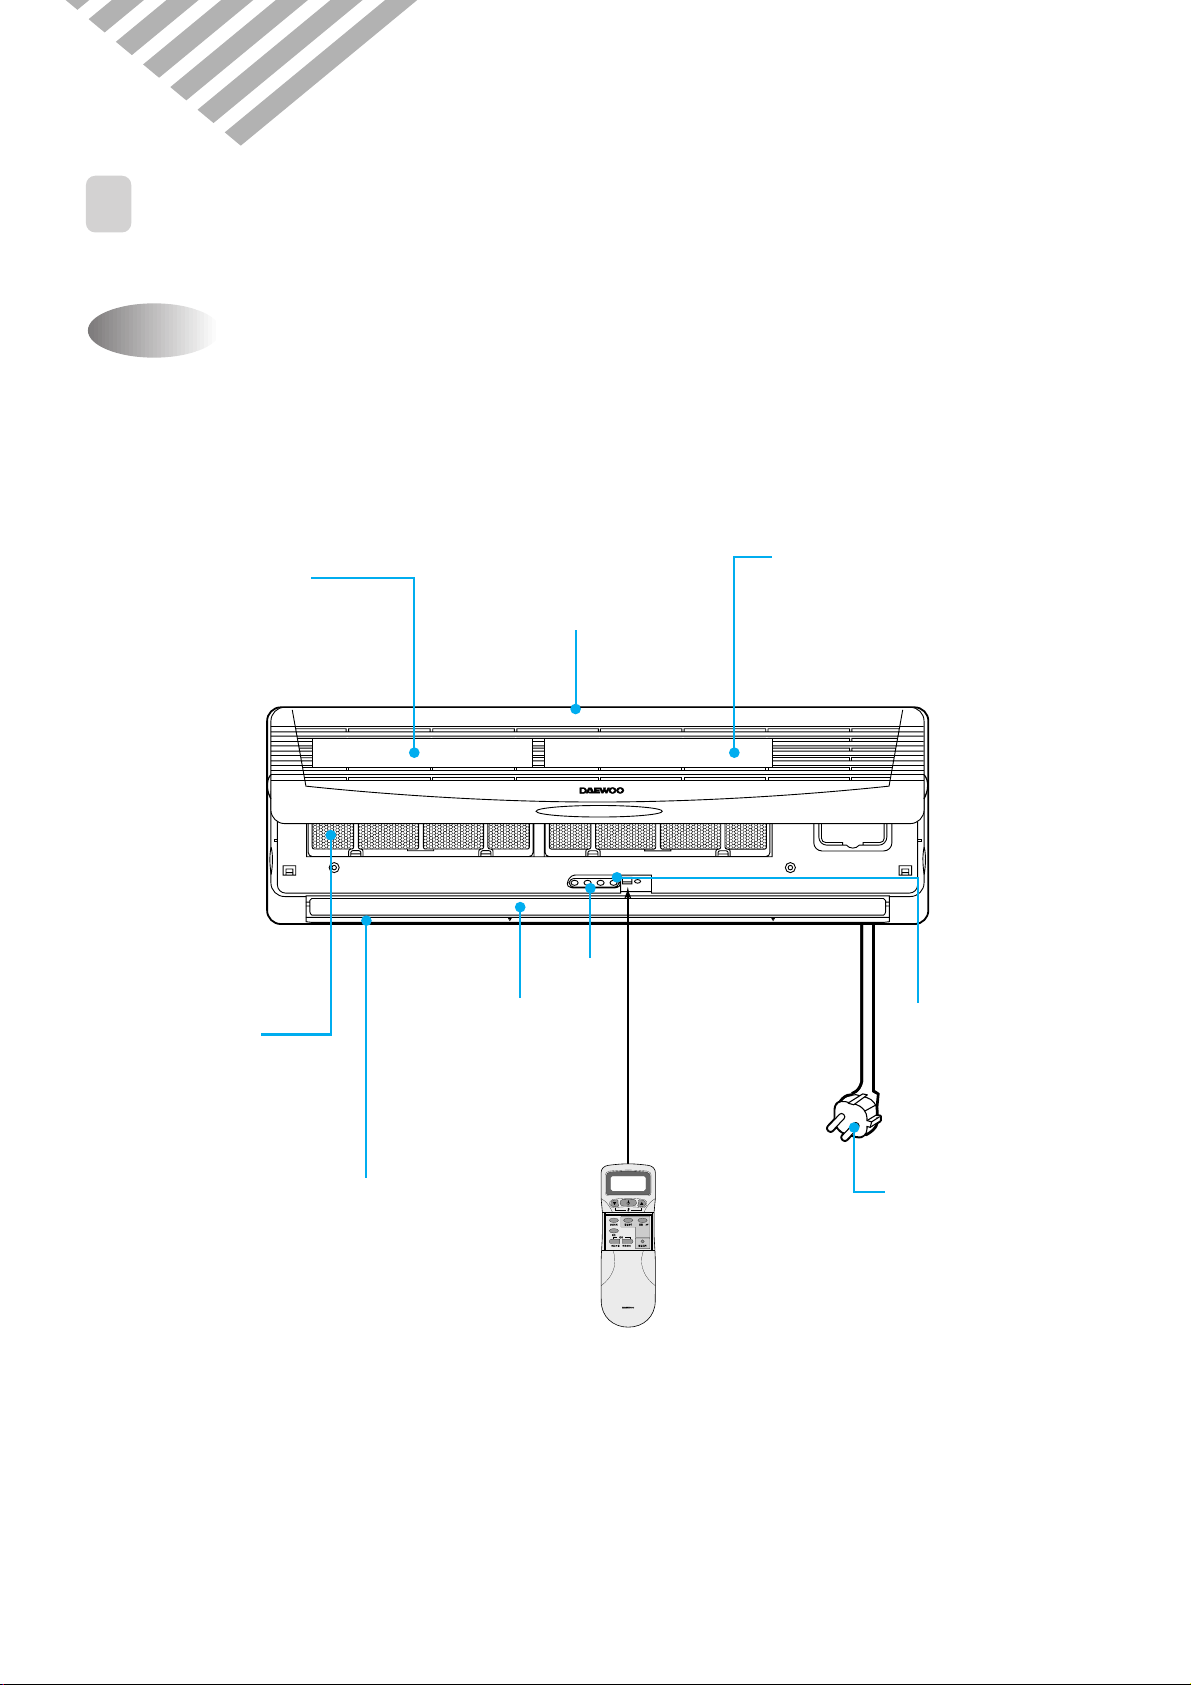
3. OPERATION
REMOTE CONTROLLER
PARTS OF NAME AND FUNCTION
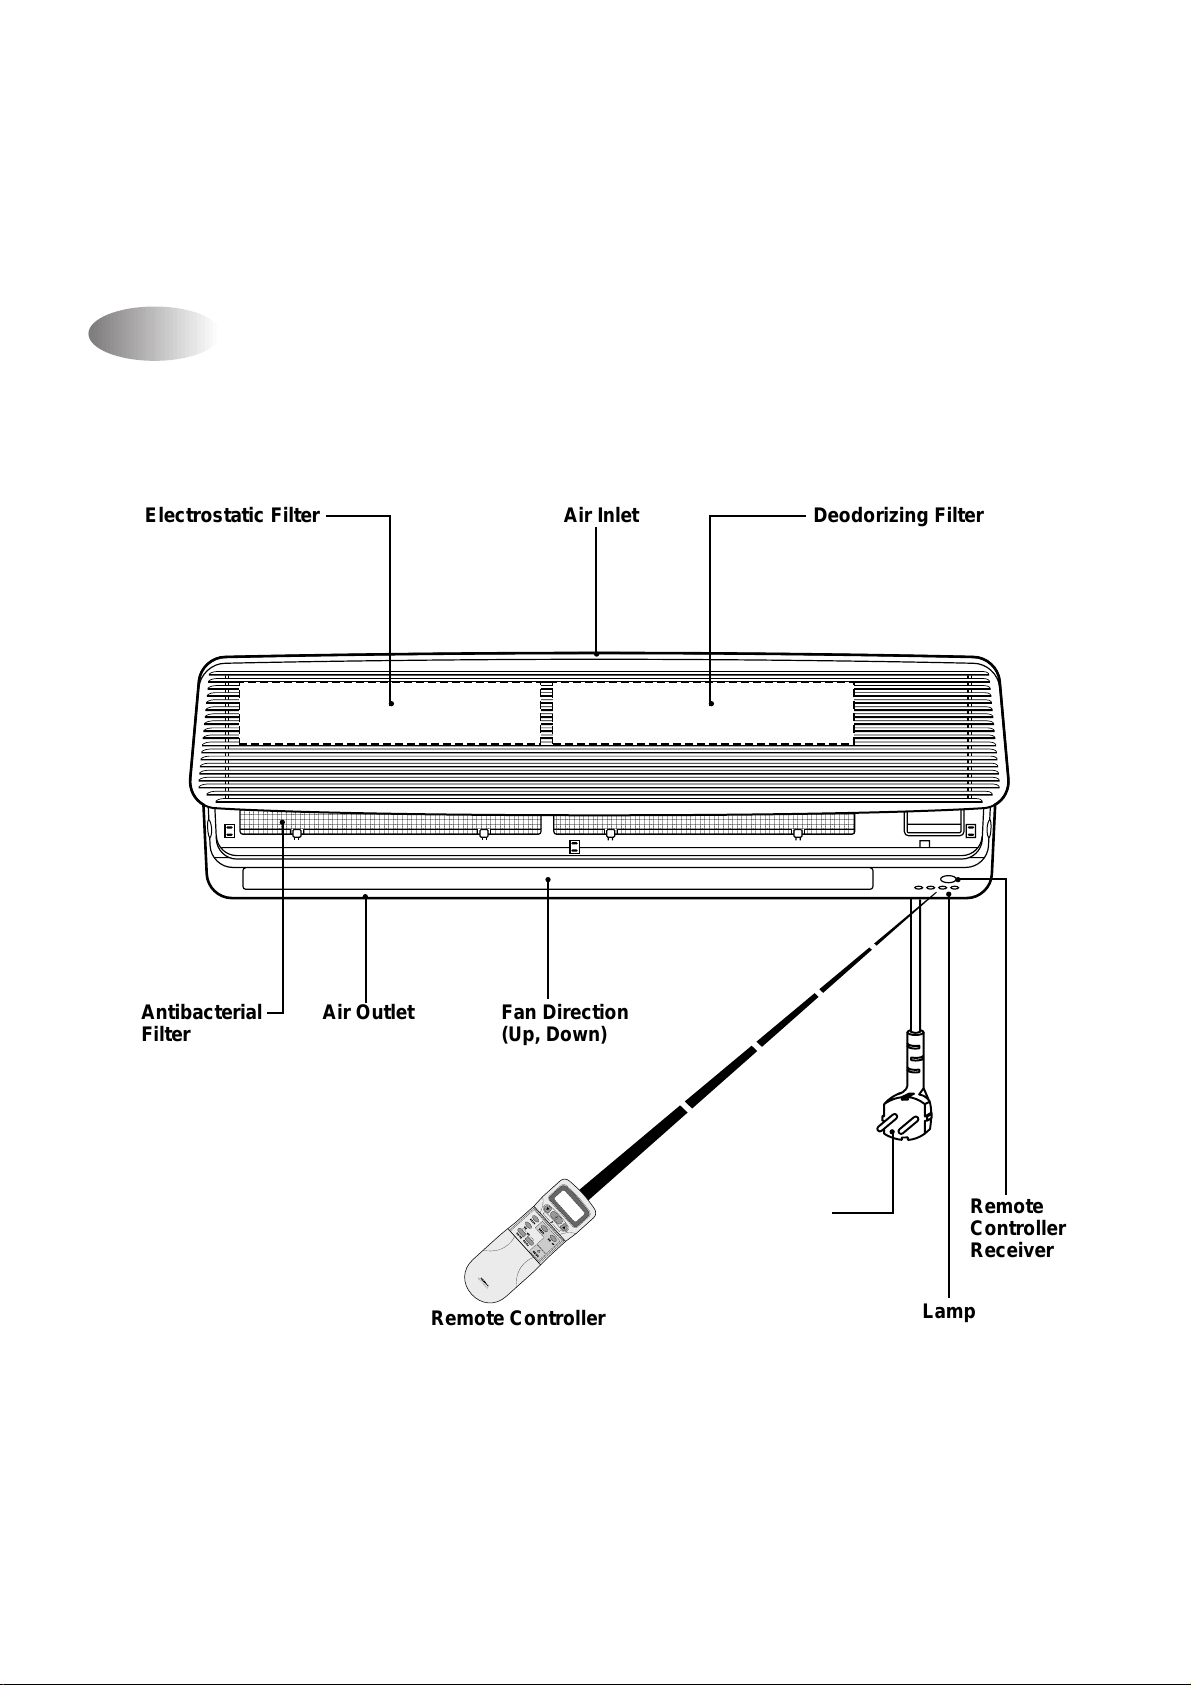
1
¡ DSB-070L/DSB-091L
Indoor Unit
Electrostatic Filter
(option)
Deodorizing Filter
(option)
Air Inlet
Antibacterial
Filter
Fan Direction
(Up, Down)
Air Outlet
Lamp
Remote
Controller
Receiver
Power Plug
Remote Controller
12
Page 13
¡ DSB-121L/122L
Power Plug
Electrostatic Filter Deodorizing FilterAir Inlet
Antibacterial
Filter
Air Outlet Fan Direction
(Up, Down)
Remote Controller
Remote
Controller
Receiver
Lamp
REMOTE CONTROLLER
Indoor Unit
13
Page 14
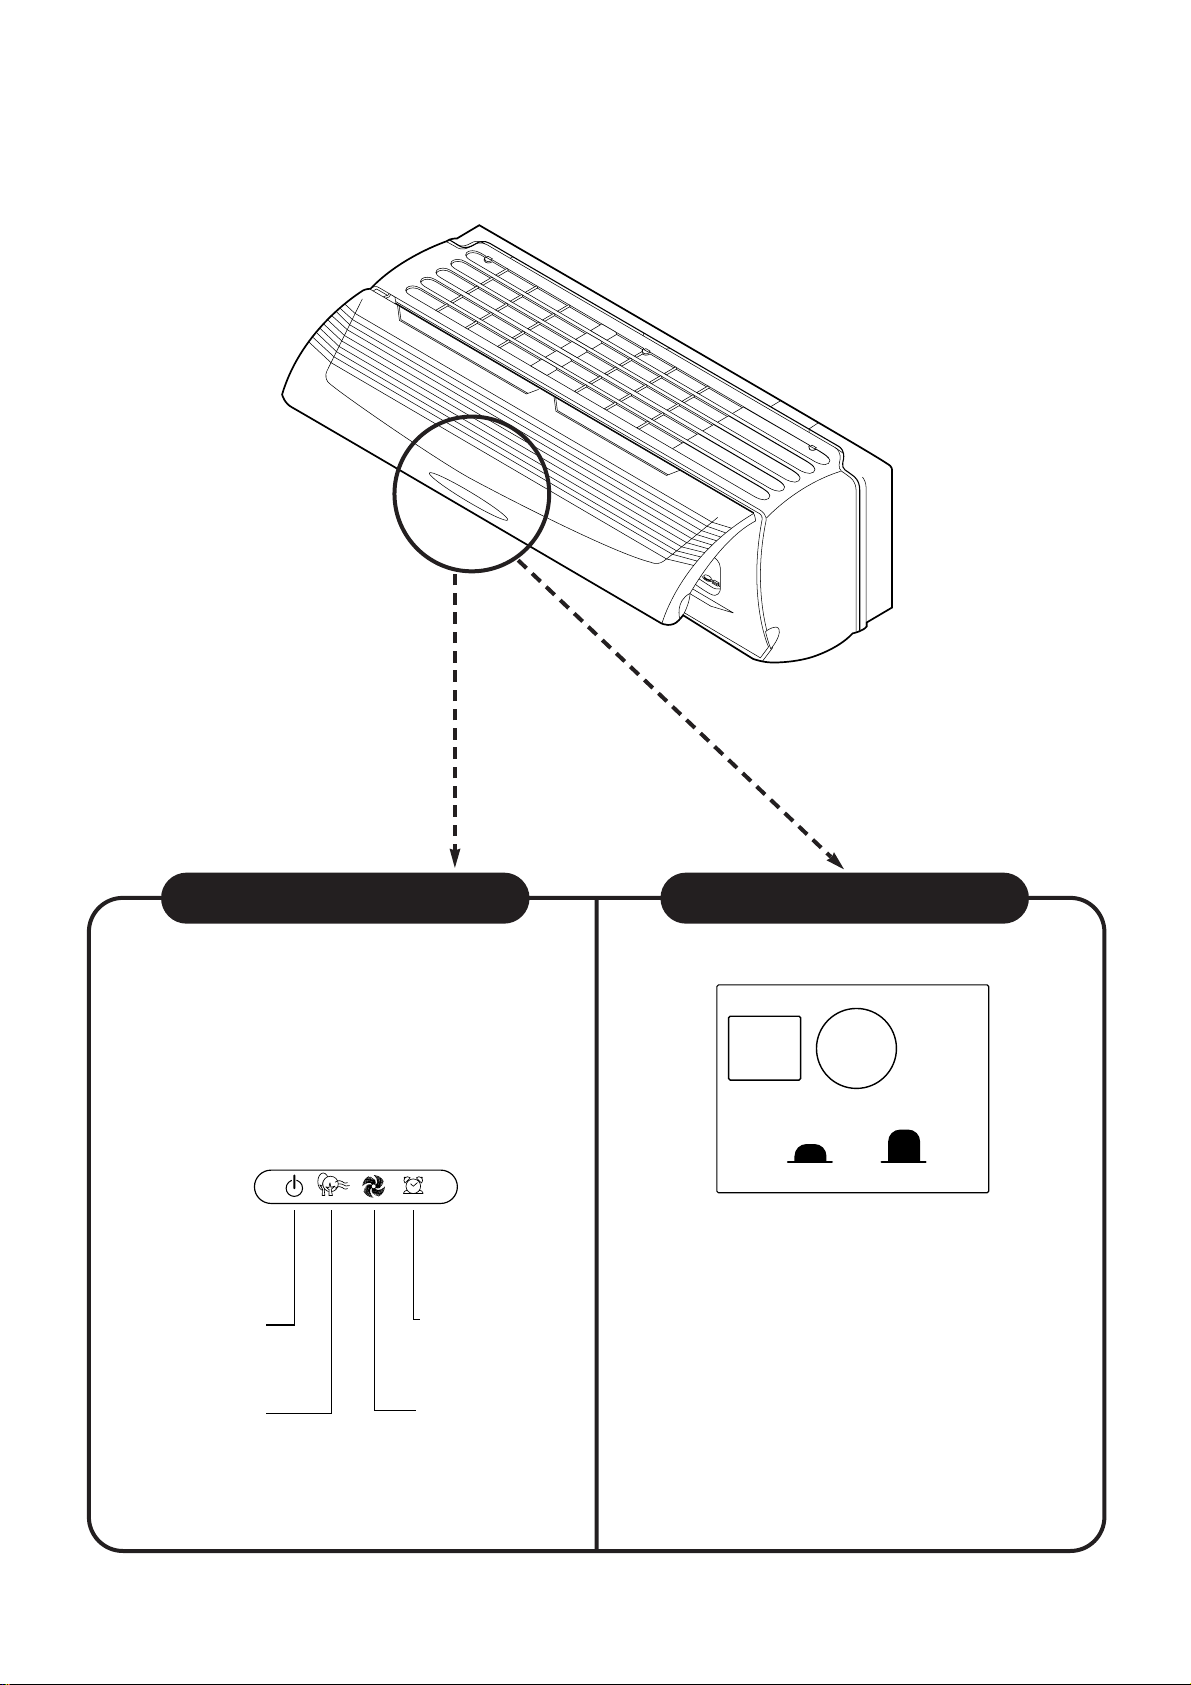
¡ DSB-070L/DSB-091L
Timer (Yellow)
Lights during the time
reservation mode.
Quick (Red)
ON (Red)
Lights when the
operation is going on.
Air clean (Green)
EMR. REMOCON
Indoor Unit Display Switch Panel
■
Remote Control Signal Receiver
This place is the part to receive the signal if it
receive the signal, you can hear the signal “beep.
“beep. beep .”
■
There is a switch panel at inside of Front
Panel. At the time of operating, open the
Front Panel.
Emergency switch can be used when the remote
controller is lost or Testing.
Remote switch is usually used by remote
controller.
14
Page 15
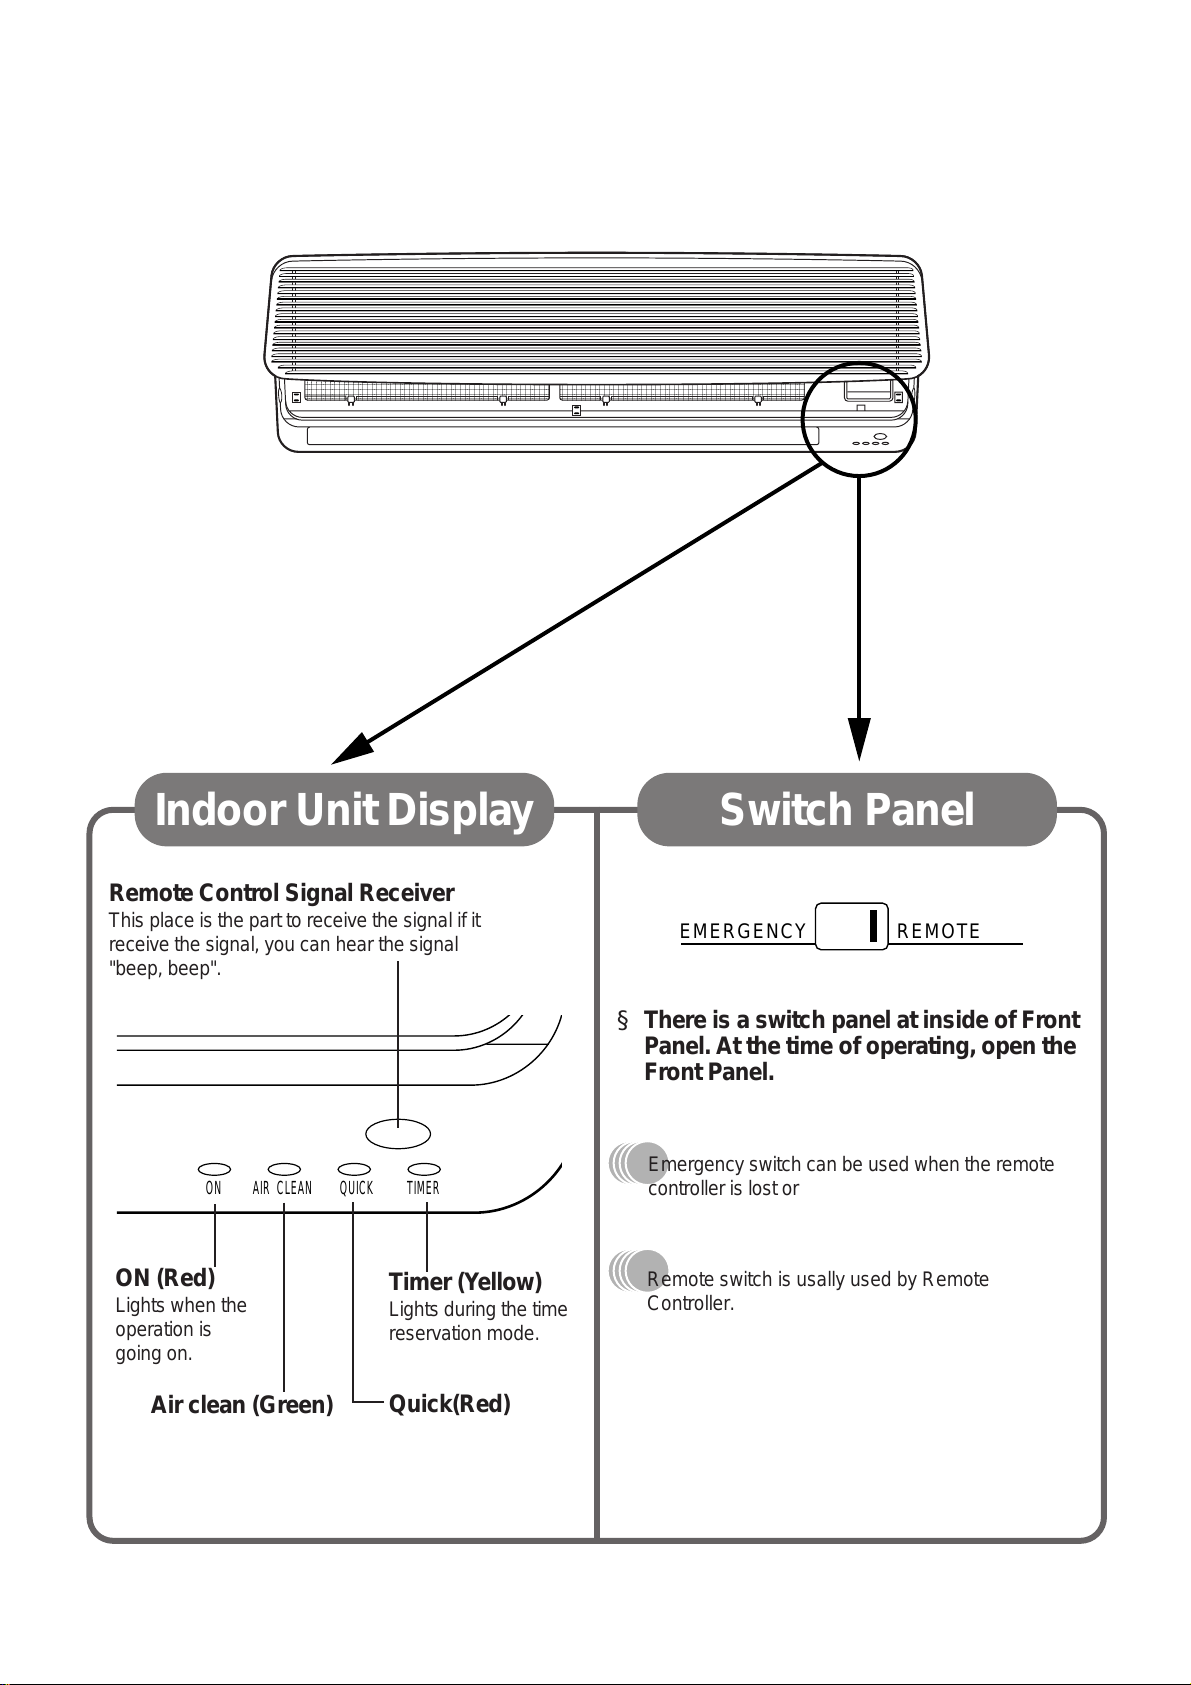
EMERGENCY REMOTE
ON AIR CLEAN QUICK TIMER
¡ DSB-121L/122L
Indoor Unit Display Switch P anel
Remote Control Signal Receiver
This place is the part to receive the signal if it
receive the signal, you can hear the signal
"beep, beep".
§ There is a switch panel at inside of Front
Panel. At the time of operating, open the
Front Panel.
Emergency switch can be used when the remote
controller is lost or testing.
ON (Red)
Lights when the
operation is
going on.
Timer (Y ello w)
Lights during the time
reservation mode.
Remote switch is usally used by Remote
Controller.
Air clean (Green)
Quick(Red)
15
Page 16
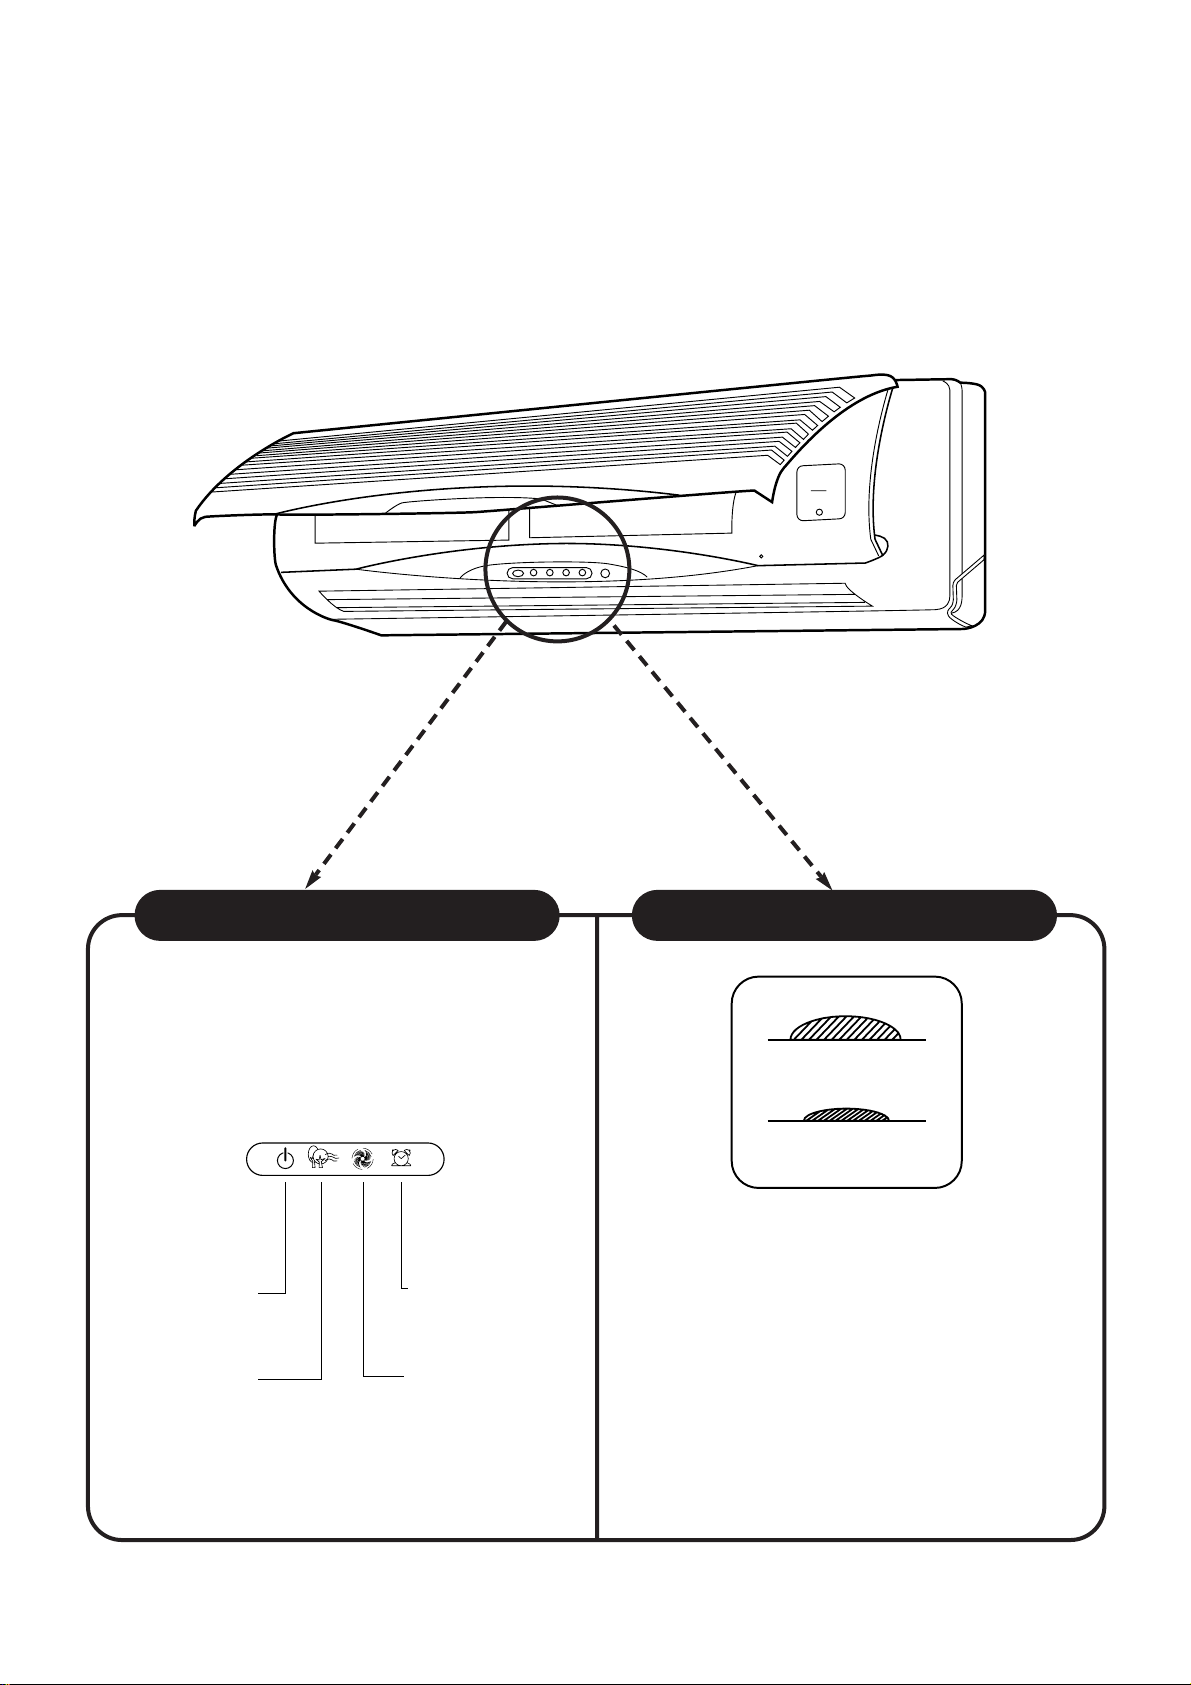
¡ DSB-240L
Timer (Yellow)
Lights-on during the time
of reservation mode.
Quick (Red)
Lights-on during the time
of Quick Mode.
ON (Red)
Lights-on
during the operation
Air clean (Green)
Lights-on
during the operation
EMERGENCY
REMOCON
Indoor Unit Display Switch Panel
■
Remote Control Signal Receiver
This place is the part to receive the signal if it
receive the signal, you can hear the signal “beep.
“beep, beep .”
REMOCON
EMERGENCY
■
There is a switch panel at inside of
Front Panel. At the time of operating,
open the Front Panel.
Emergency switch can be used when the remote
controller is lost or Testing.
Remote switch is usually used by remote
controller.
16
Page 17
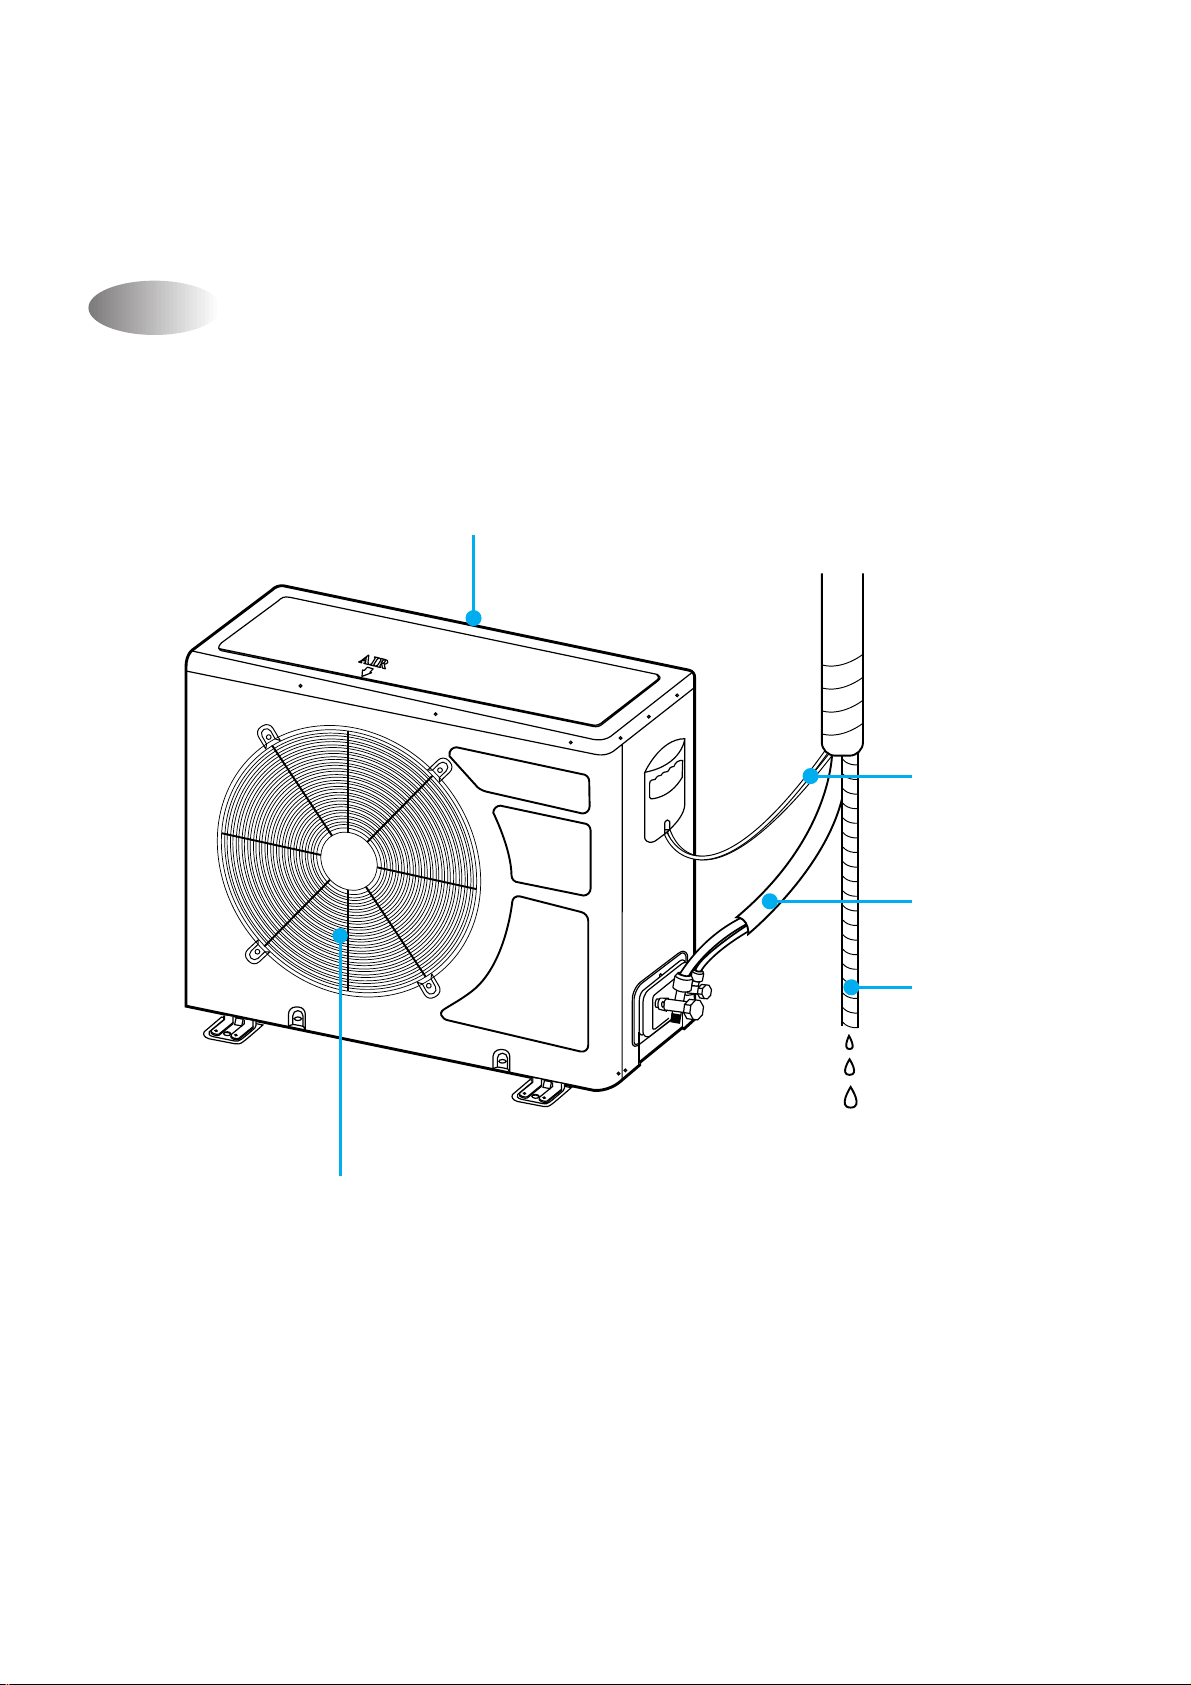
¡ DSB-070L/DSB-091L/DSB-121L/DSB-122L(After)
Outdoor Unit
Air Inlet (Side Back)
Connection Wire
Air Outlet
Connecting Pipe
Drain Hose
17
Page 18
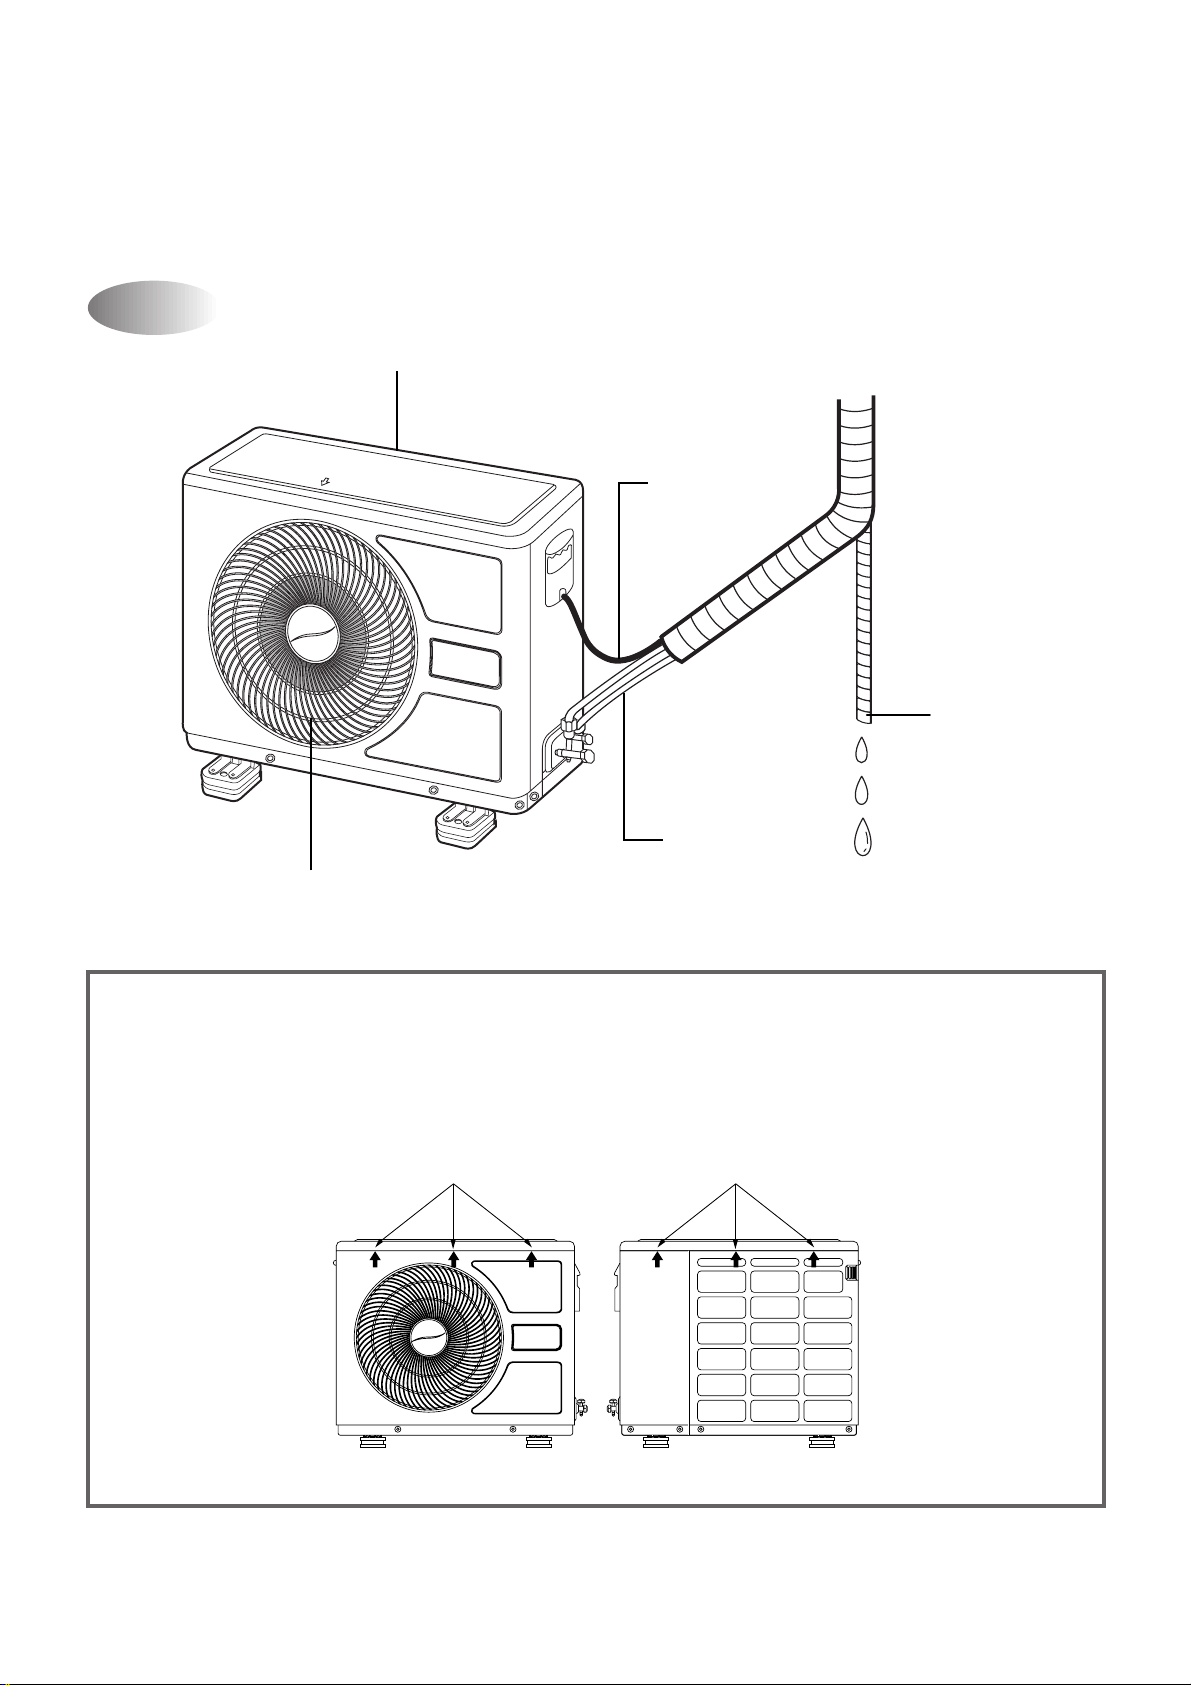
AIR
Air Inlet (side Back)
Air Outlet
Connection
Wire
Connecting
Pipe
Drain Hose
¡ DSB-121L/DSB-122L(Before)
Outdoor Unit
NOTE:
How to remove Top Panel
1. Loosen the screw at left and right side.
2. Push the three parts op Front and Back sides like figure orderly.
3. Unhook the locking parts of T op Panel.
The front locking parts
FRONT SIDE BACK SIDE
The back locking parts
18
Page 19
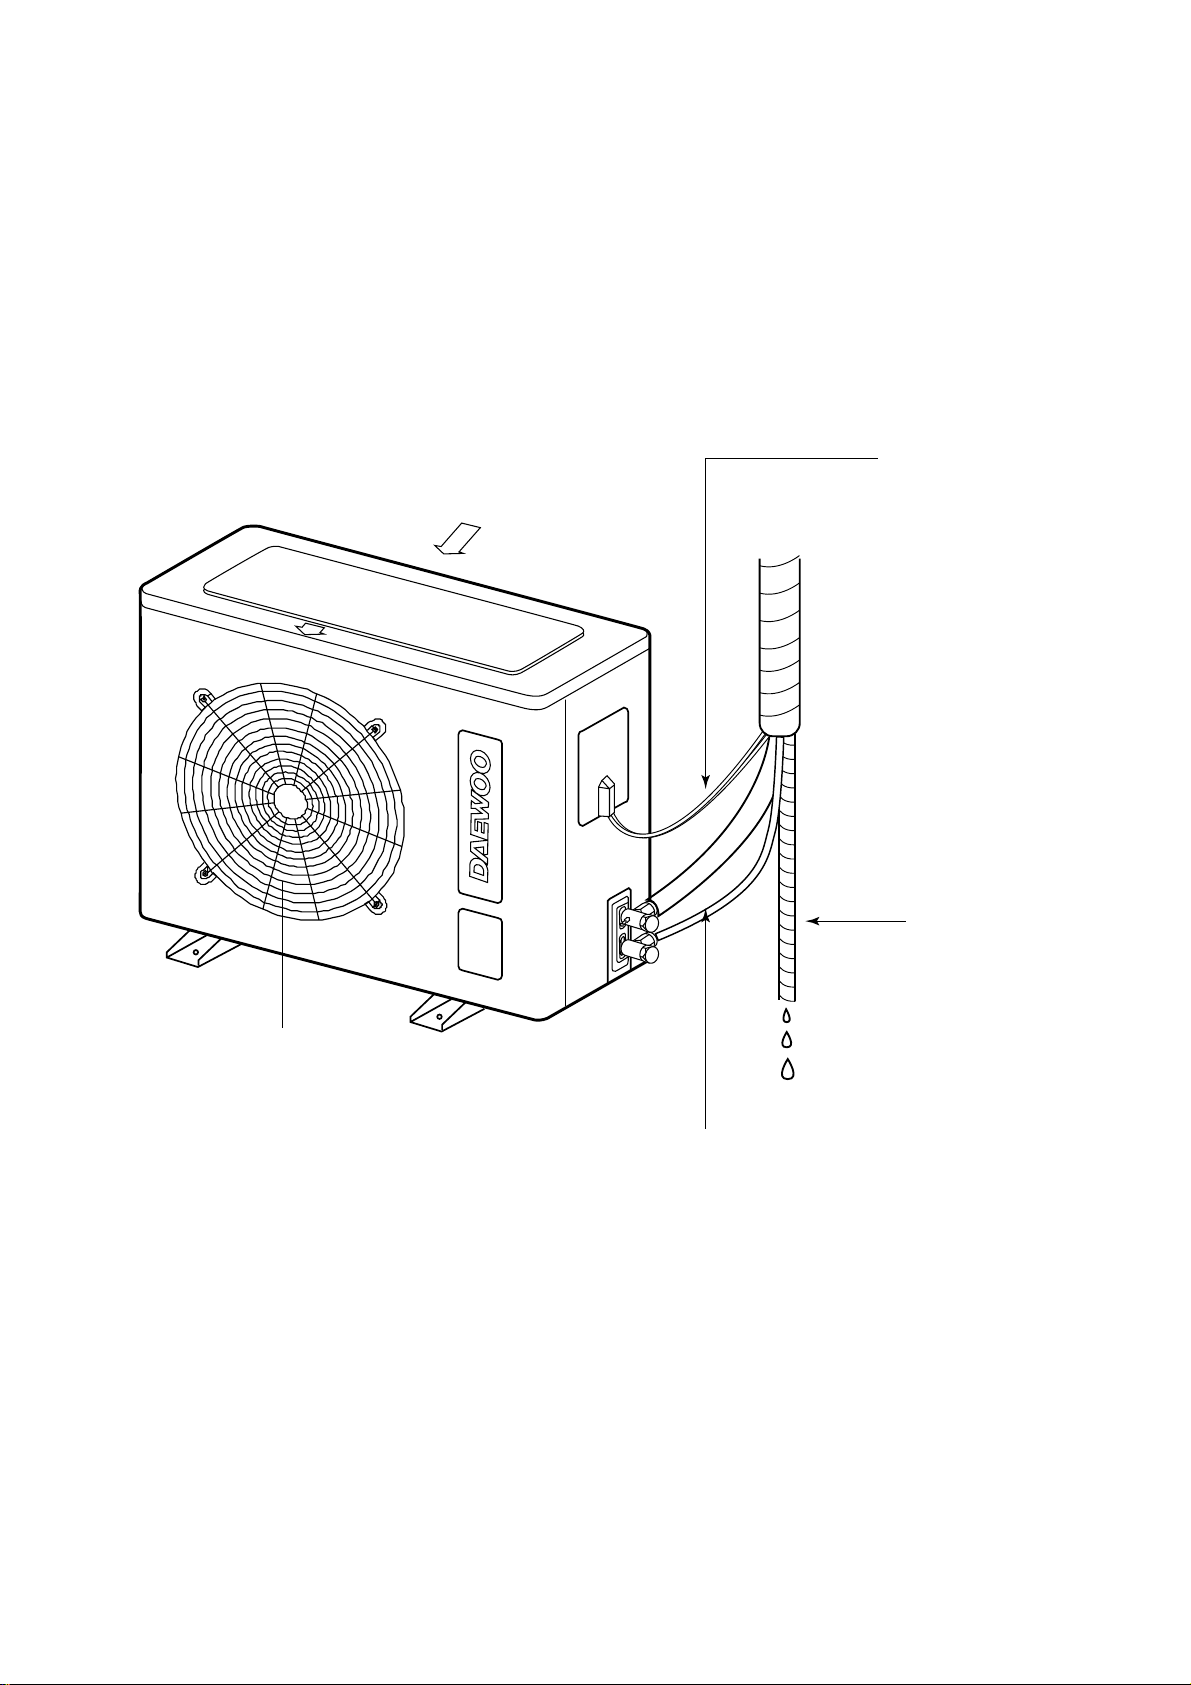
¡ DSB-240L
Air Inlet
Air Outlet
Connection Pipe
Connection wire
Drain Hose
19
Page 20
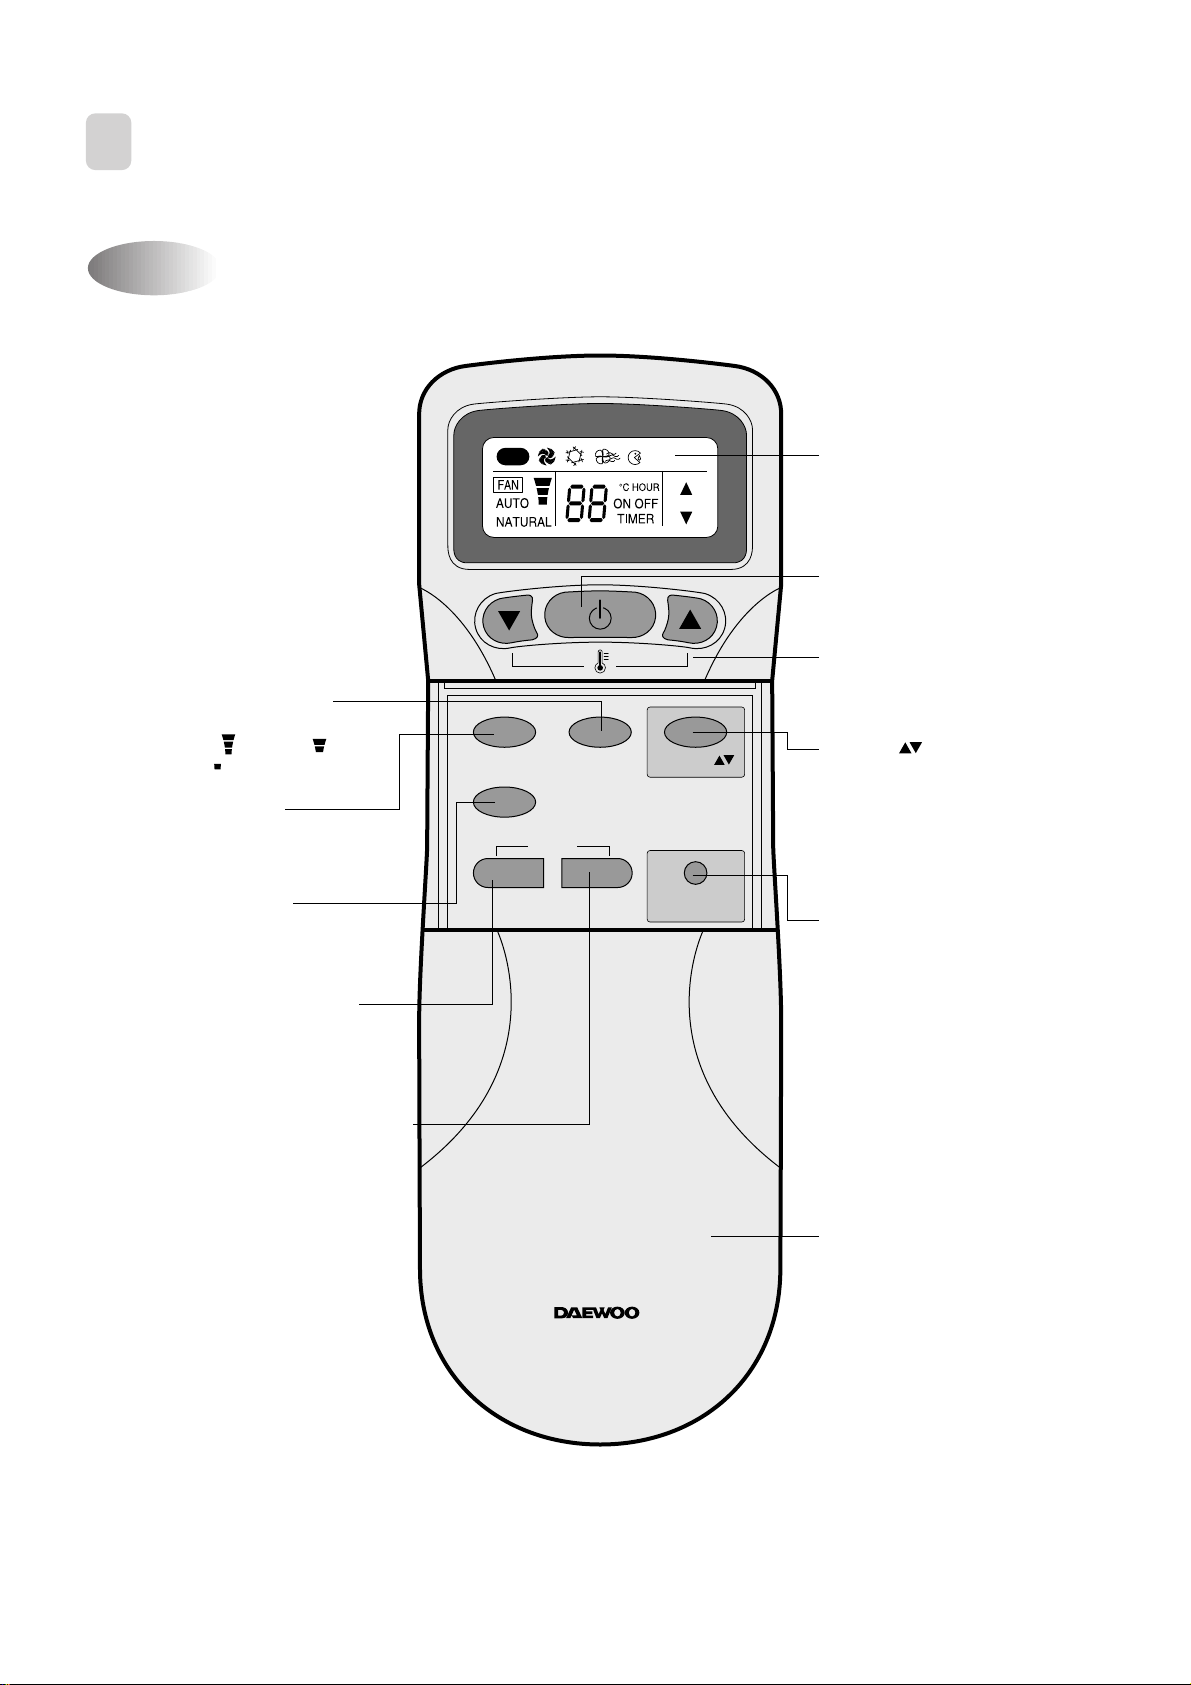
REMOTE CONTROLLER
MODE
SLEEP
ON/OFF
TIMER
ENTER/
CANCEL
FAN SPEED
TURBO/MILD
Display
Displays information
pertaining to unit.
TURBO/MILD
Press to be colder the unit.
TIMER ENTER/CANCEL Button
Press to enter a timer setting or
to cancel timer setting
TIMER ON/OFF Button
Press to set the unit of or on time.
(0.5, 1, 1.5, 2, 2.5, 3, 4, 5, 6, 8,
10, 12, 16, 20, 24hr)
MODE Button
Press to cycle through the modes
(Auto/Quick/Cooling/Fan/Dry)
SLEEP Button
Press to set the unit for
the sleep mode.
FAN DIR.
FAN DIR. Button
Press to select up/down
direction for fan.
ON/OFF Button
Press to turn the unit
on or off.
TEMPERATURE Buttons
Press to raise or lower
the desired temperature.
FAN SPEED Button
Press to select the fan speed
(High " ", Middle " ",
Low " ").
COVER
Slide down to access most
of the remote buttons.
Slide down further to
access the battery
compartment.
AUTO
REMOTE CONTROLLER
2
¡ DSB-070L/DSB-091L/DSB-121L/DSB-122L/DSB-240L
Name of Each Button
20
Page 21
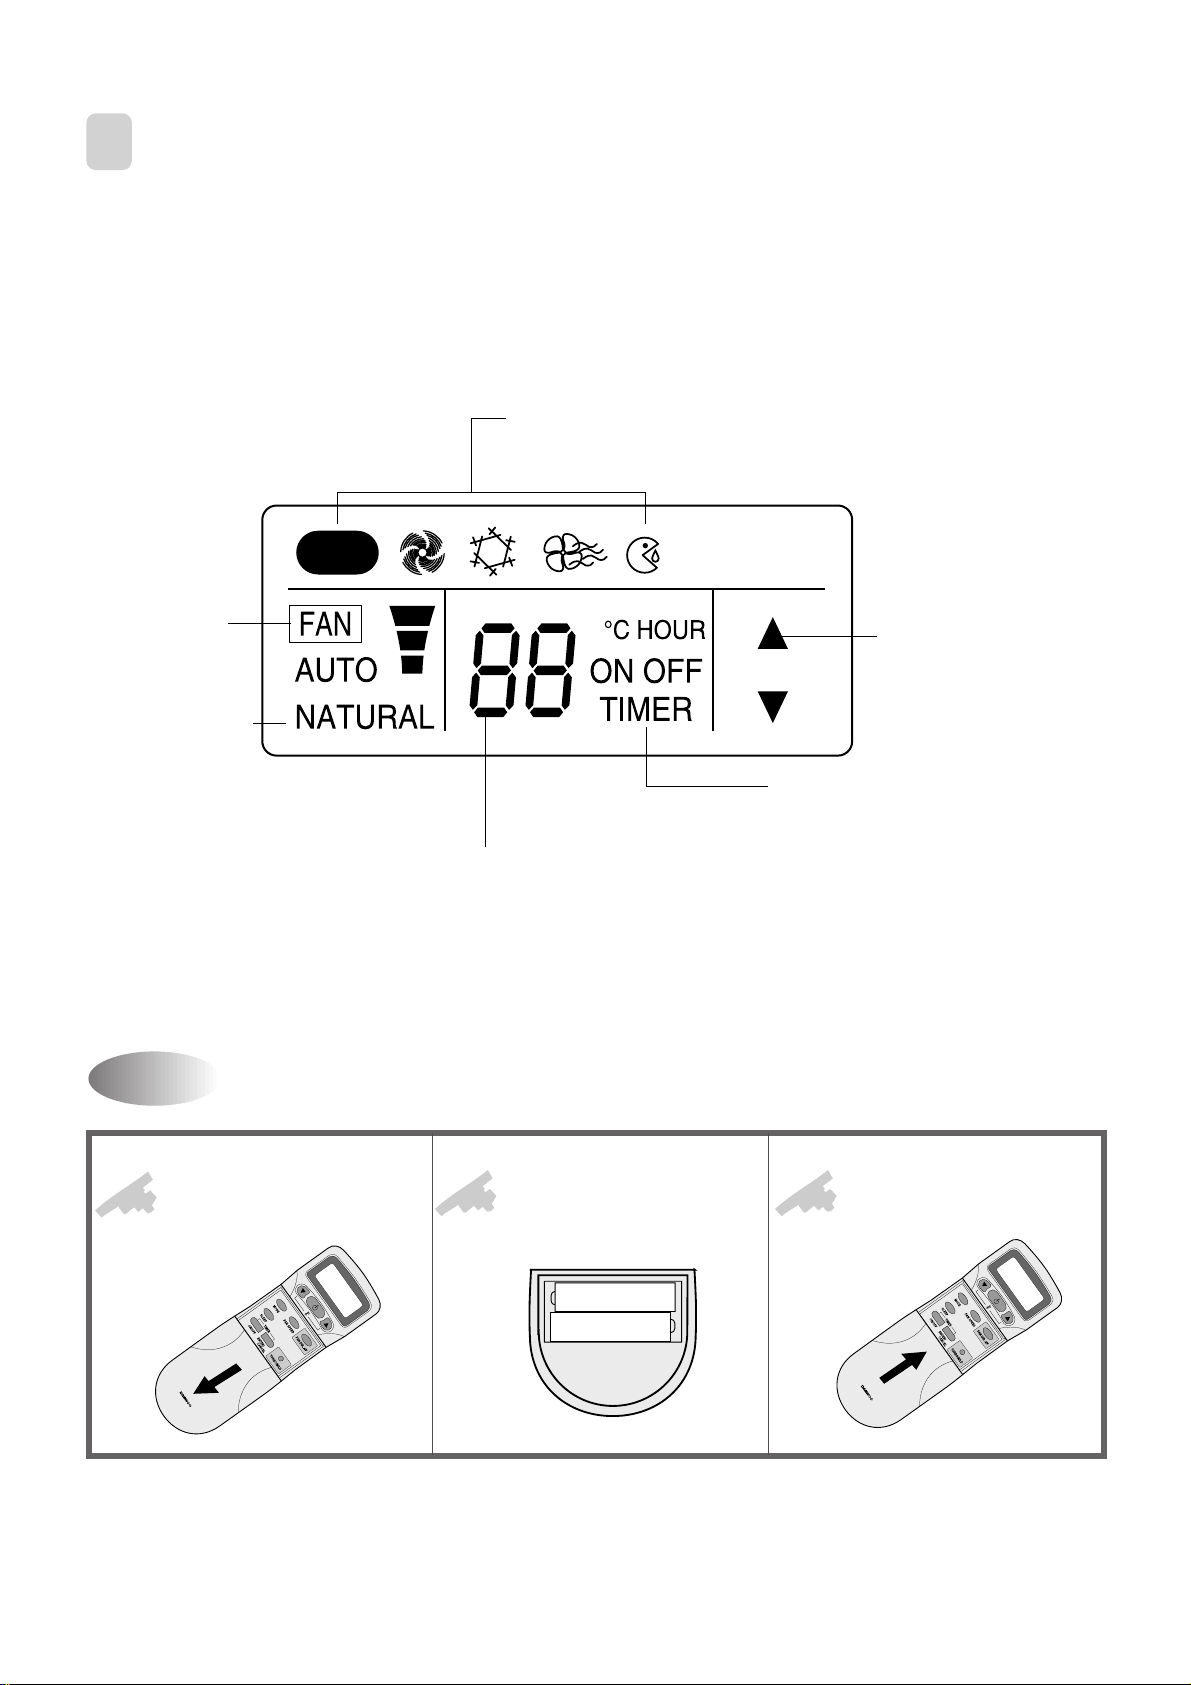
REMOTE CONTROLLER DISPLAY
REMOTE CONTROLLER
+–
+–
REMOTE CONTROLLER
MODE Indicators (Auto/Quick/Cool/Fan/Dehumidifier)
Lights to indicate the mode selected.
TIMER Indicators (Include sleep)
Lights to indicate the timer function mode.
TEMPERATURE & RESERVATION TIME lndicator
Lights to indicate the temperature or time.
FAN DIRECTION Indicators
Lights to indicate the
fan direction.
NATURAL Indicator
Lights to indicate the
speeds simulating a loreeze.
FAN Indicators
Lights to indicate
the fan speed.
AUTO
3
¡ DSB-070L/DSB-091L/DSB-121L/DSB-122L/DSB-240L
Replacing Batteries
Open the cover after
pressing the arrow
1
direction and pulling out.
Put the drycell by §]§^
2
direction.
21
3
Close the cover after
pushing into arrow
direction.
Page 22
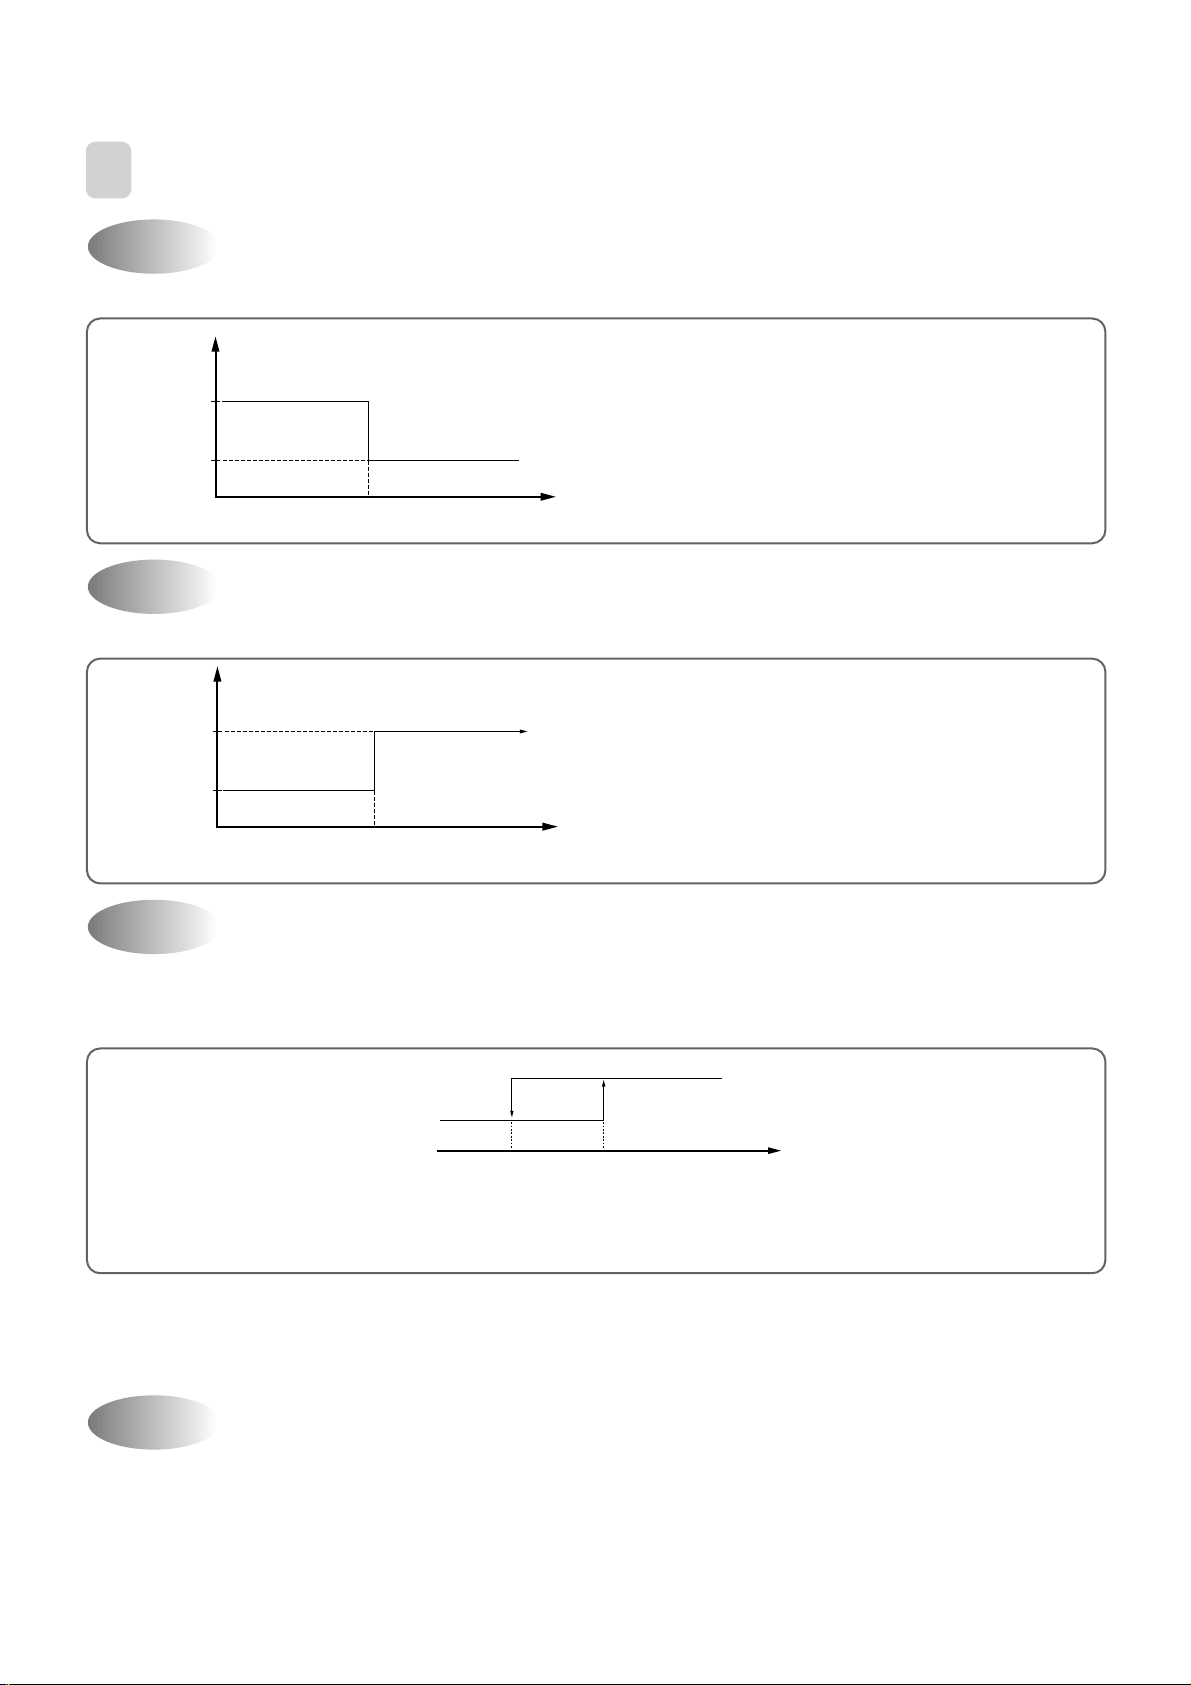
DESCRIPTION OF FUNCTIONS
Unit ON
Unit OFF
SET Time
HOUR
ON
OFF
Unit ON
Unit OFF
SET Time
HOUR
ON
OFF
COMP (ON)
*RT: ROOM TEMPERATURE
DT: DESIRED TEMPERATURE
COMP (OFF)
-1°C0°C
(COOLING)
(RT-DT)
4
OFF-Timer
If you set time in OFF-Timer Mode, the unit will stop at the set time.
ON-Timer
If you set time in ON-Timer Mode, the unit will run at the set time.
Control of Room Temperature
(1) Range of setting temperature: 18~32°C
(2) Setting temperature: Operating temperature of compressor
+1°C
(3) During the time of test operating, Fan (Indoor , Outdoor) and Compressor is running regardless of room
temperature.
Buzzer
If the Indoor Unit Display receive the signal of Remote Controller , y ou can hear the signal "beep –" or "beep ,
beep".
(1) In the case of receiving ON/OFF signal-"beep" "beep"
(2) And so on-"beep"
22
Page 23
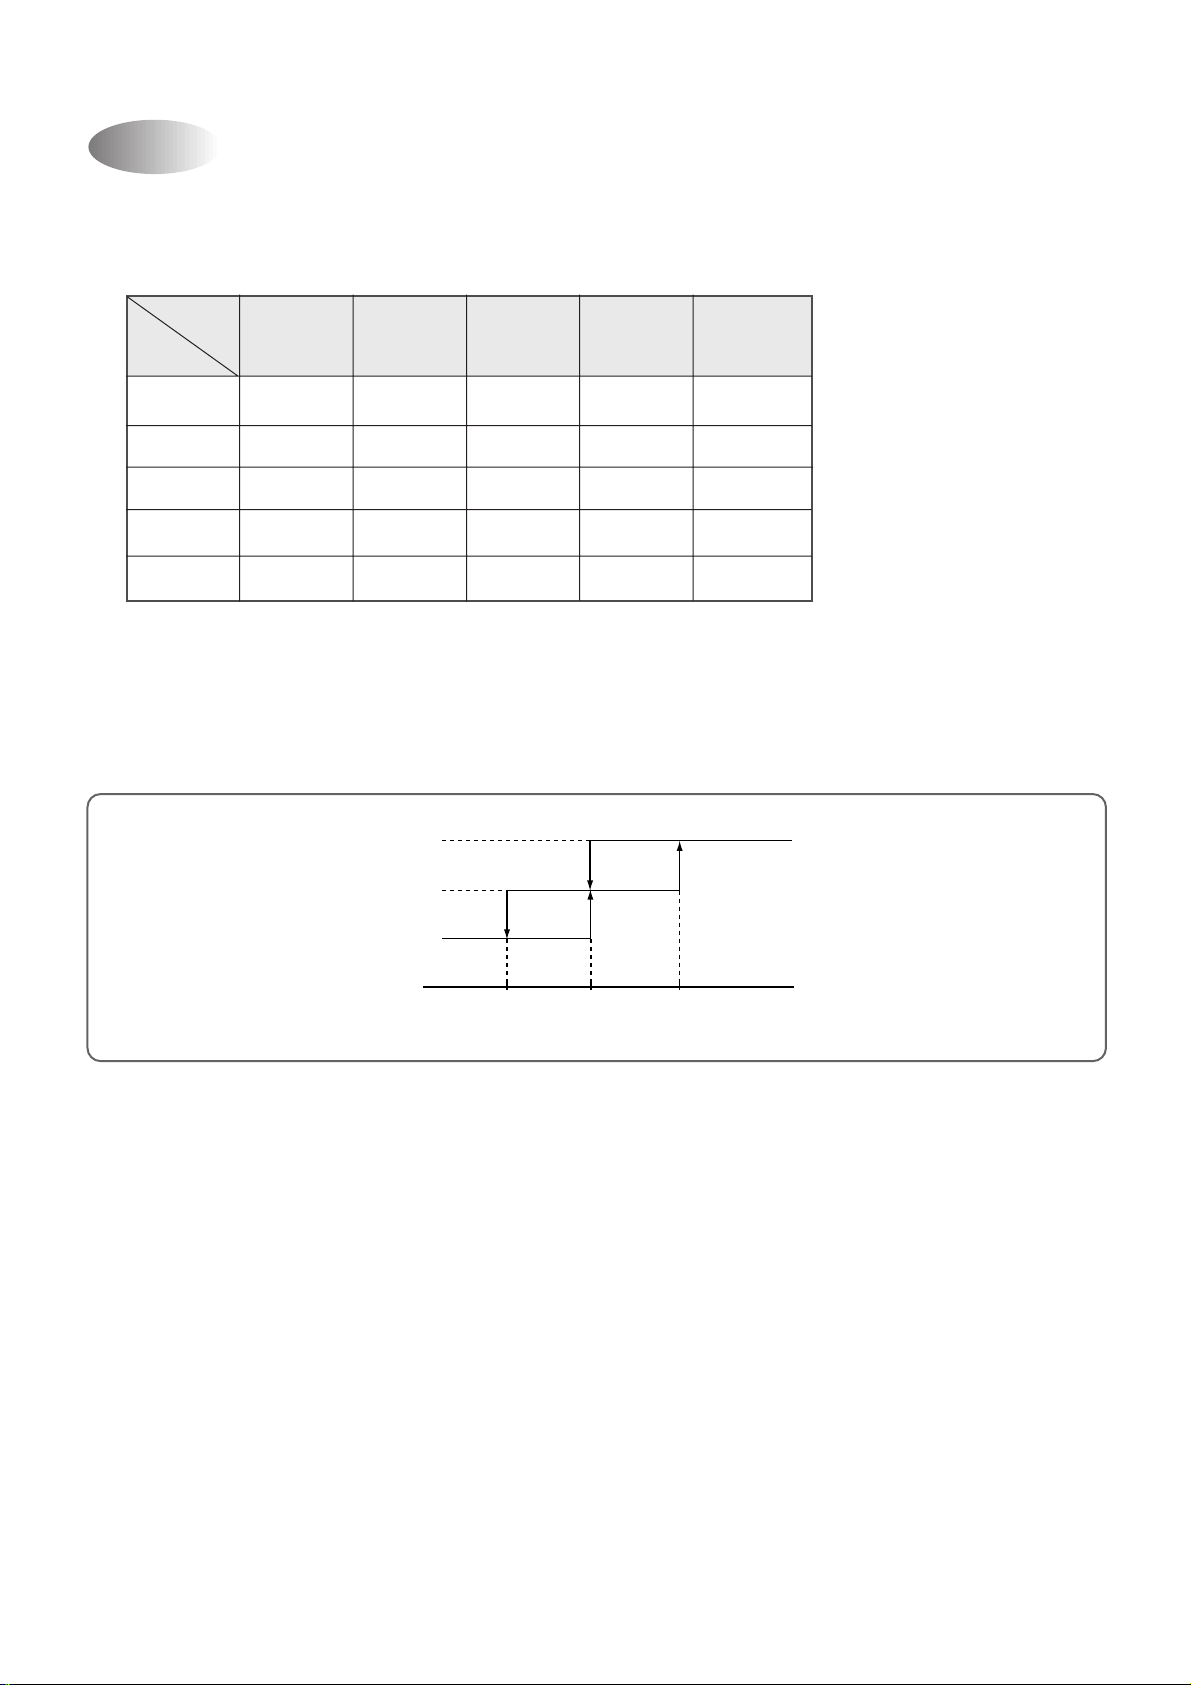
Fan Speed (Indoor Unit)
0°C
L
M
H
1°C2°C
(R.T-D.T)
(D.T)
(1) Motor speed (Super high speed, high speed, normal speed, low speed, ultra low speed).
(2) Remote controller setting fan speed. (Auto , L, M, H, Natural)
(3) Relation of operating mode between fan speed. (legned: X-no relation)
FAN ONLY COOL
H HHLHH
MMMLMH
LLLLLH
Auto Auto L Auto H
Natural Natural Natural L Natural H
DEHUMI-
DIFICATION
AUTO QUICK
(4) Automatic Operation
If the unit is set in 'AUT O' mode , the unit operates automatically according to the room temperature to keep the
room temperature comfortable.
(COOLING)
23
Page 24
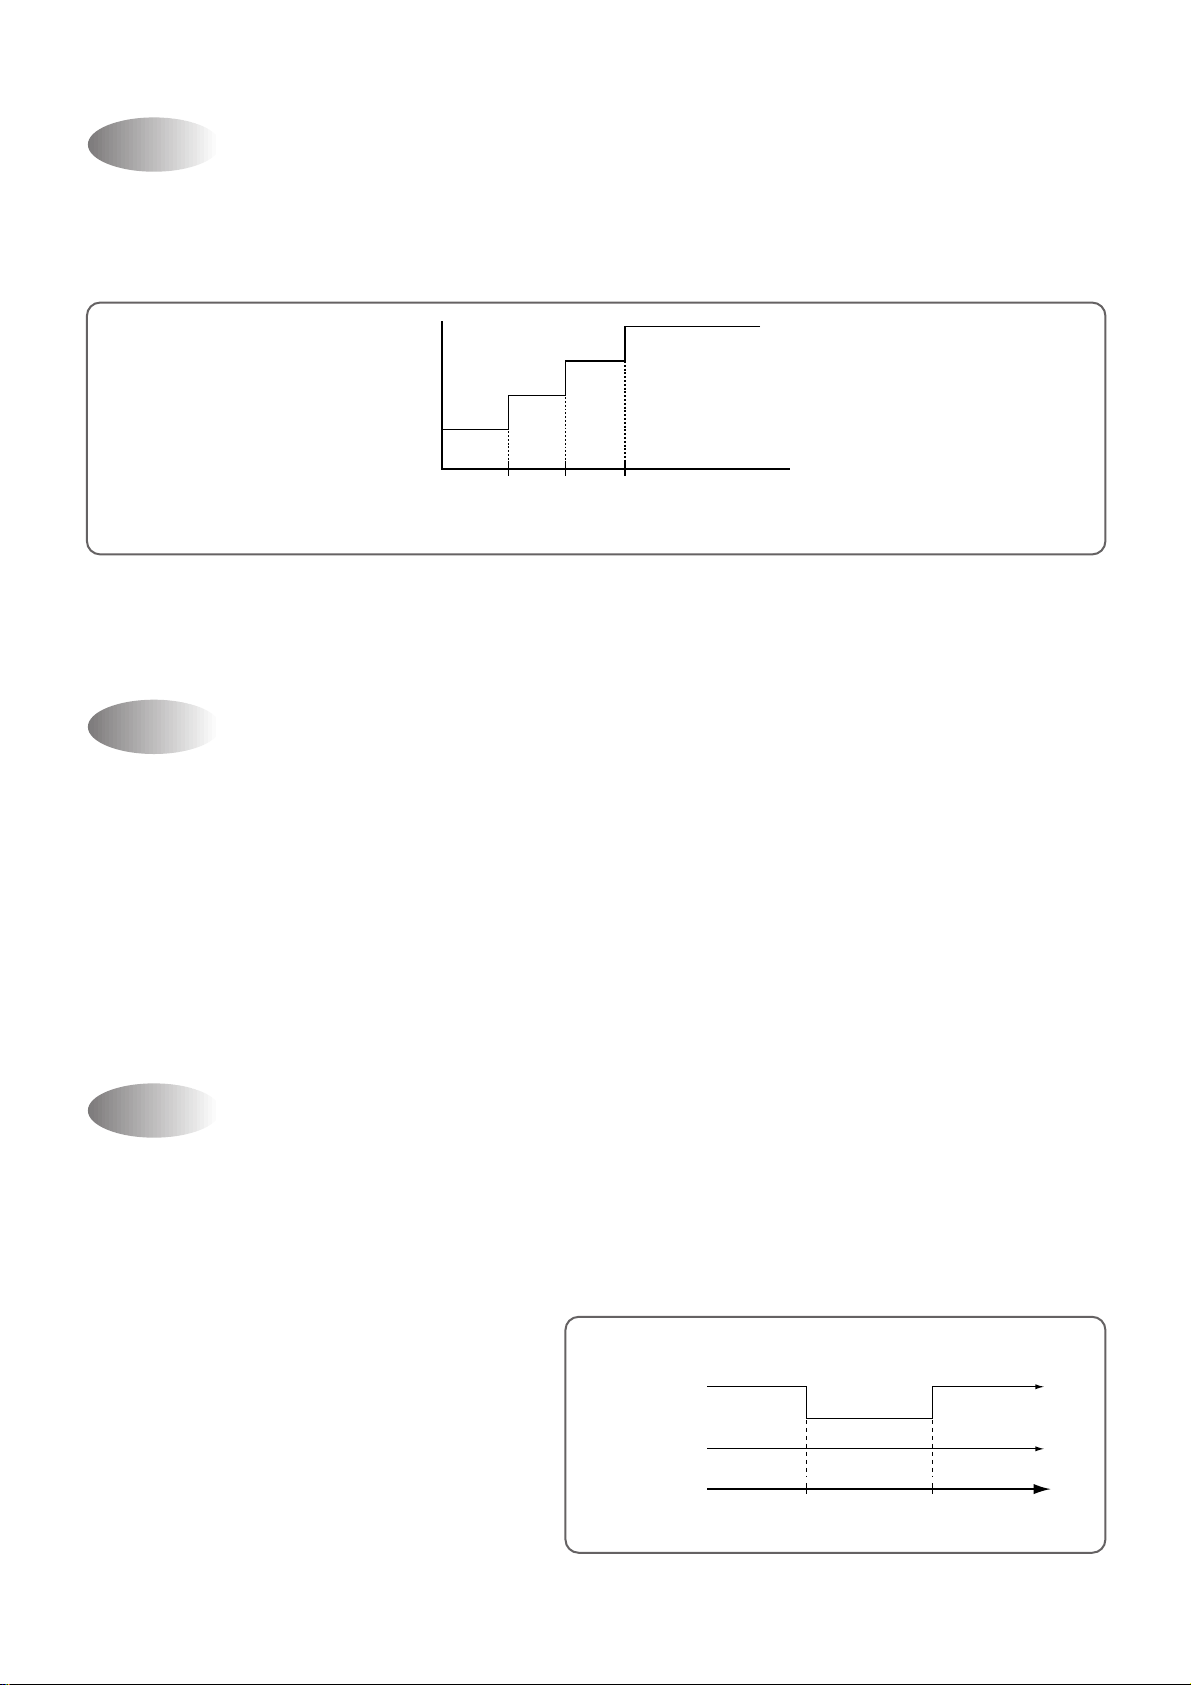
Sleep Mode
0 0.5 1.0 HOUR
(COOLING CYCLE)
DT
+0.5°C
+0.5°C
+0.5°C
-1°C+7°C
Compressor and
Outdoor Fan
ON ON
OFF
Indoor Fan
Set speed
(1) When you are going to sleep , select sleep s witch and the unit controls the room to the desired temper ature.
(The unit will not operate after 4 hour)
(2) For changing the temperature.
(3) To cancel sleep mode, press the SLEEP button again or press the MODE button once.: the SLEEP
indicator will disappear in the display.
Emergency Operation
(1) When the remote controller is lost, damaged or the battery is discharged, the Emergency operation can be
used to run the unit.
(2) The setting conditions of Emergency operation are as follows.
• Operation mode: Quick
• Preset temperature:18°C: Cooling
• Fan speed: High
¡You cannot operate with remote controller.
Frost Prevention of Indoor Unit
When the unit operates at low ambient temperature, frost may appear on the Ev aporator. When the indoor coil
temperature is lower than 0°C at the end of 10 minutes of continuous compressor operation from the start, the
microcomputer of the unit stops the compressor to protect the unit from the frost. The control procedure for
indoor coil freeze protection.
1) The compressor and outdoor fan turn off.
2) Indoor fan operates according to user set speed.
3) The normal operation returns when the indoor coil
temperature is higher than 7°C or equal to 7°C.
(Indoor coil temperature)
24
Page 25
3 min. Time Delay of Compressor
In normal operation, there is a time delay of three minutes between turn off and turning back on including initial
power up.
Auto Mode
(1) In Auto Mode
After the indoor fan is operated f or 20 seconds in the Auto Mode the unit will operate automatically b y selecting
operating Mode according to the room temperature
(RT: Room temperature)
ROOM TEMPERATURE
DT-2°C RT
DT-2°C
DT+3°C RT
(2) Selecting Operating Mode Again
Room temperature meets desired temperature and the compressor stops running over 30 minutes, then the unit
selects operating Mode again.
>
RT ≤DT+3°C
≤
<
OPERA TING MODE
Cooling
Dehumidifier
Cooling
FLAP POSITION
Cooling Position
Cooling Position
Cooling Position
25
Page 26
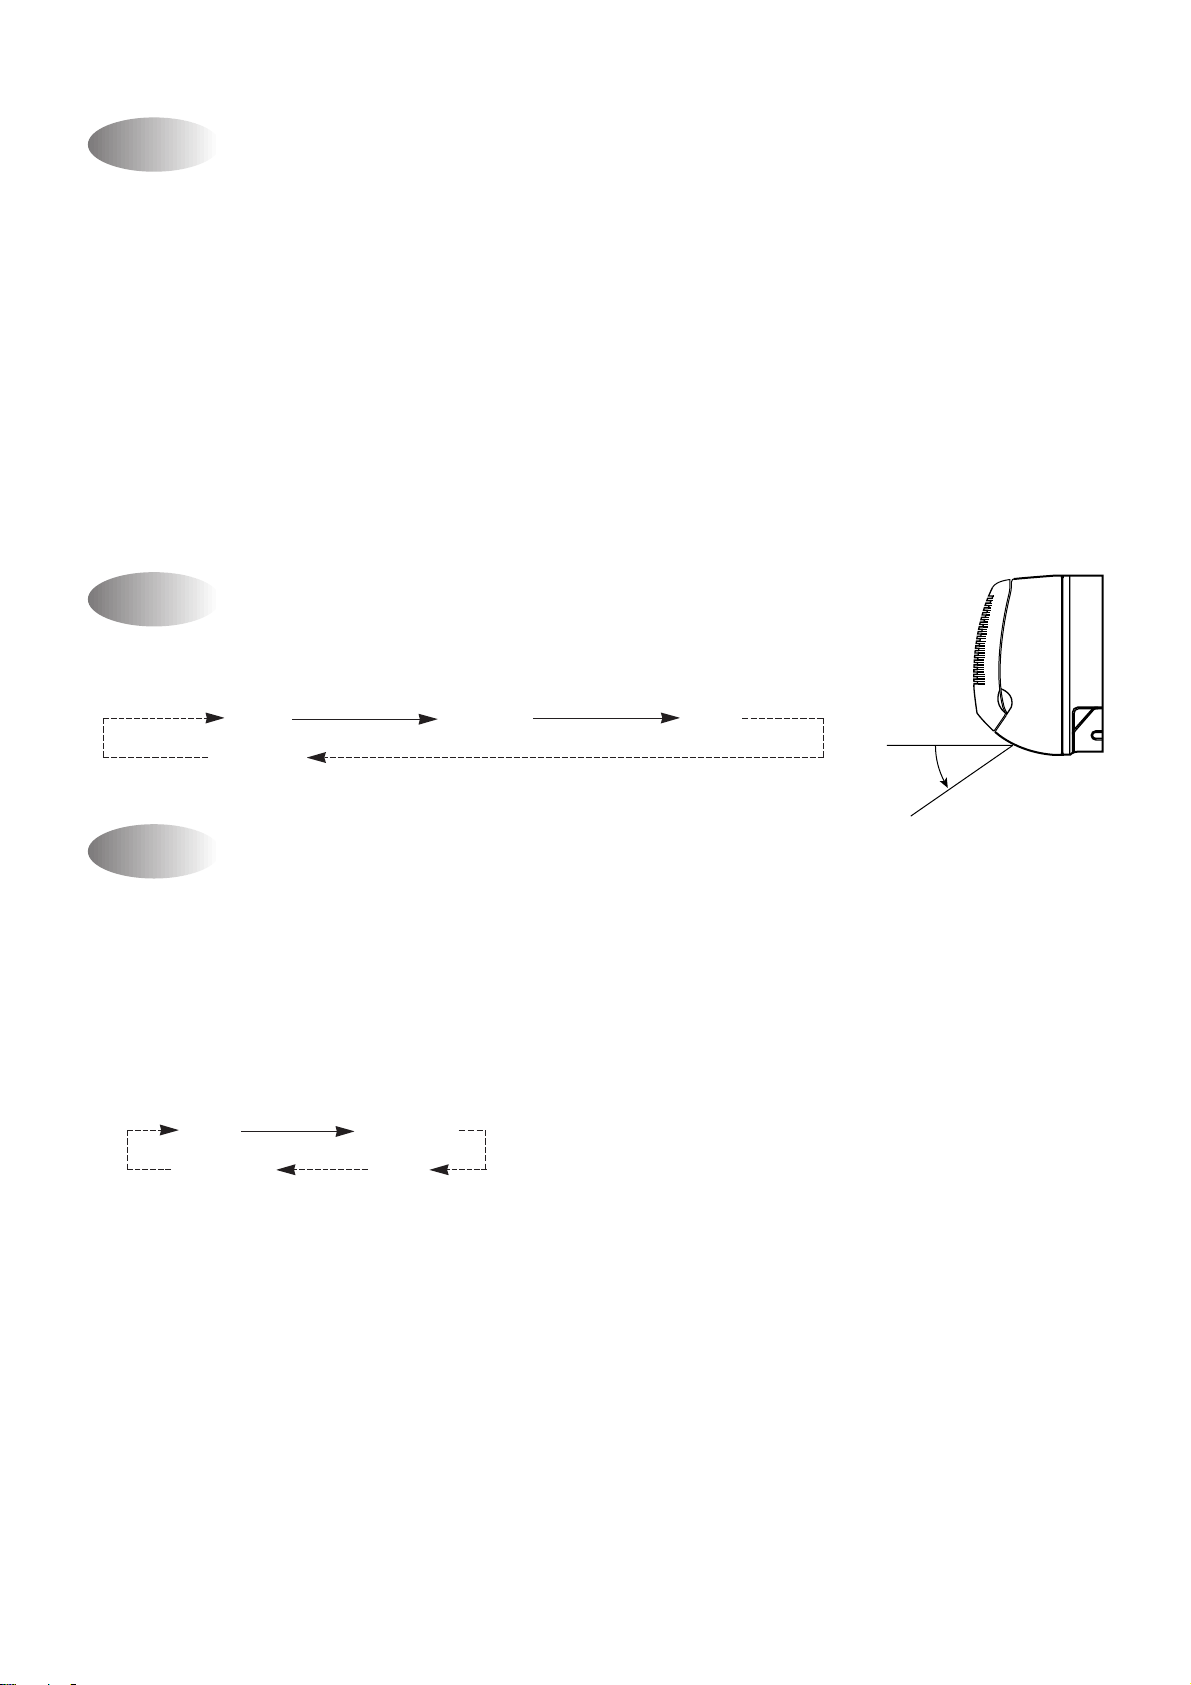
Dehumidification Mode
1Desired temperature < Room temperature
Outdoor Fan, Compressor : ON
Indoor Fan : Low speed
2Desired temperature ¡ˆRoom temperature
Compressor : 3 min/ON, 5 min/OFF
Fan Speed : low speed
3Room temperature ¡´18°C
Compressor : OFF
Fan speed : Low speed
Air Discharge Direction(only remocon operation)
The air discharge direction procedure is below.
Fixed Up/Down Fixed
Up/Down
Quick Mode(Powerful Cooling)
1) Cooling Mode
* When the room temperature is higher than 22°C
1Fan Speed: Super high speed
2Air discharge direction: Fixed
3Set temperature: 18°C (Fixed)
4Compressor and Outdoor Fan
The air discharge direction procedure is below
Fixed Up/Down
Up/Down Fixed
* The option is LEFT/RIGHT direction.
COOLING POSITION
26
Page 27
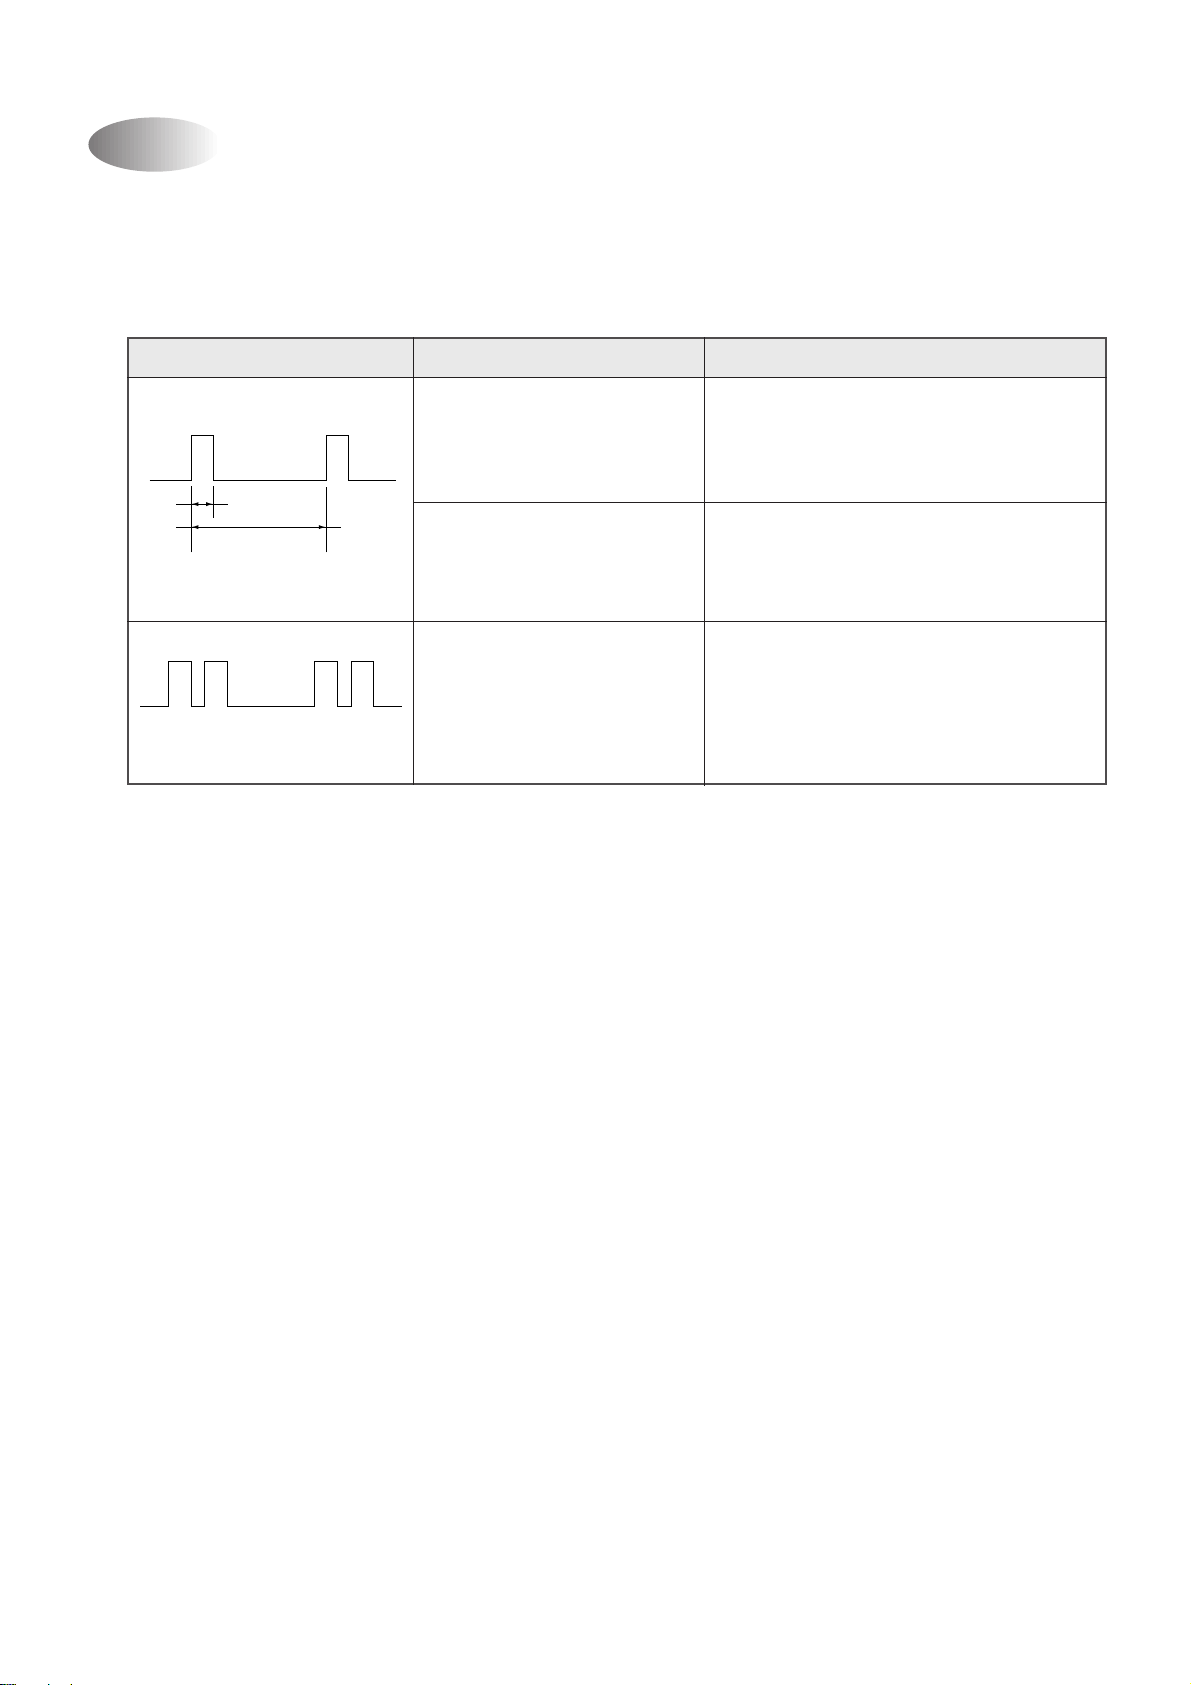
Self-Diagnostic Function
The control will contain diagnostic test to verify the integrity of the system.
(1)Error Code Display P attern
1 ON LAMP: Blink
LED BLINK PATTERN CASE NOTE
Room Sensor open or Short • Continuously woorking to fix room
0.5s
temperature 32°C in cooling mode
8s
1 times blink • O/D coil sensor open or short
2 times blink • Gas leak
• I/D coil sensor open or short Do not woorking
• Compressor or electrical parts Continuously workiug
of compressor error.
27
Page 28
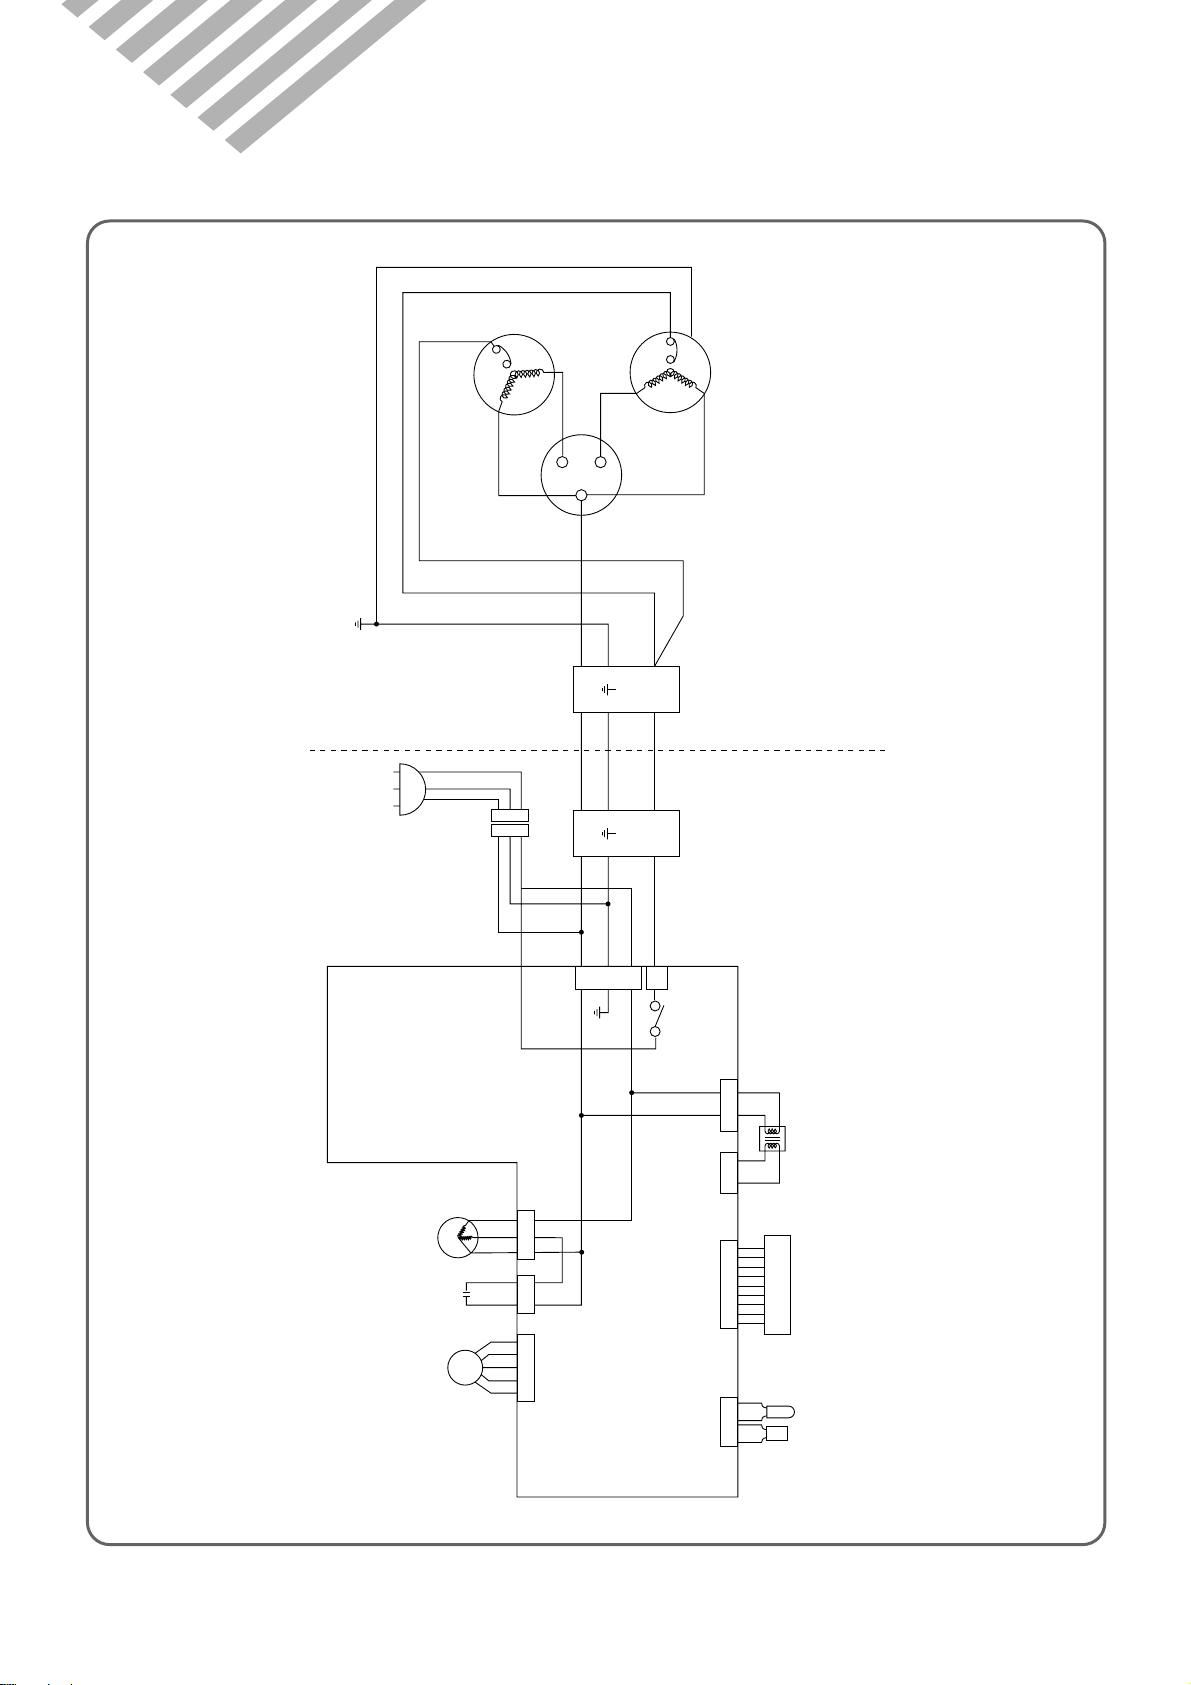
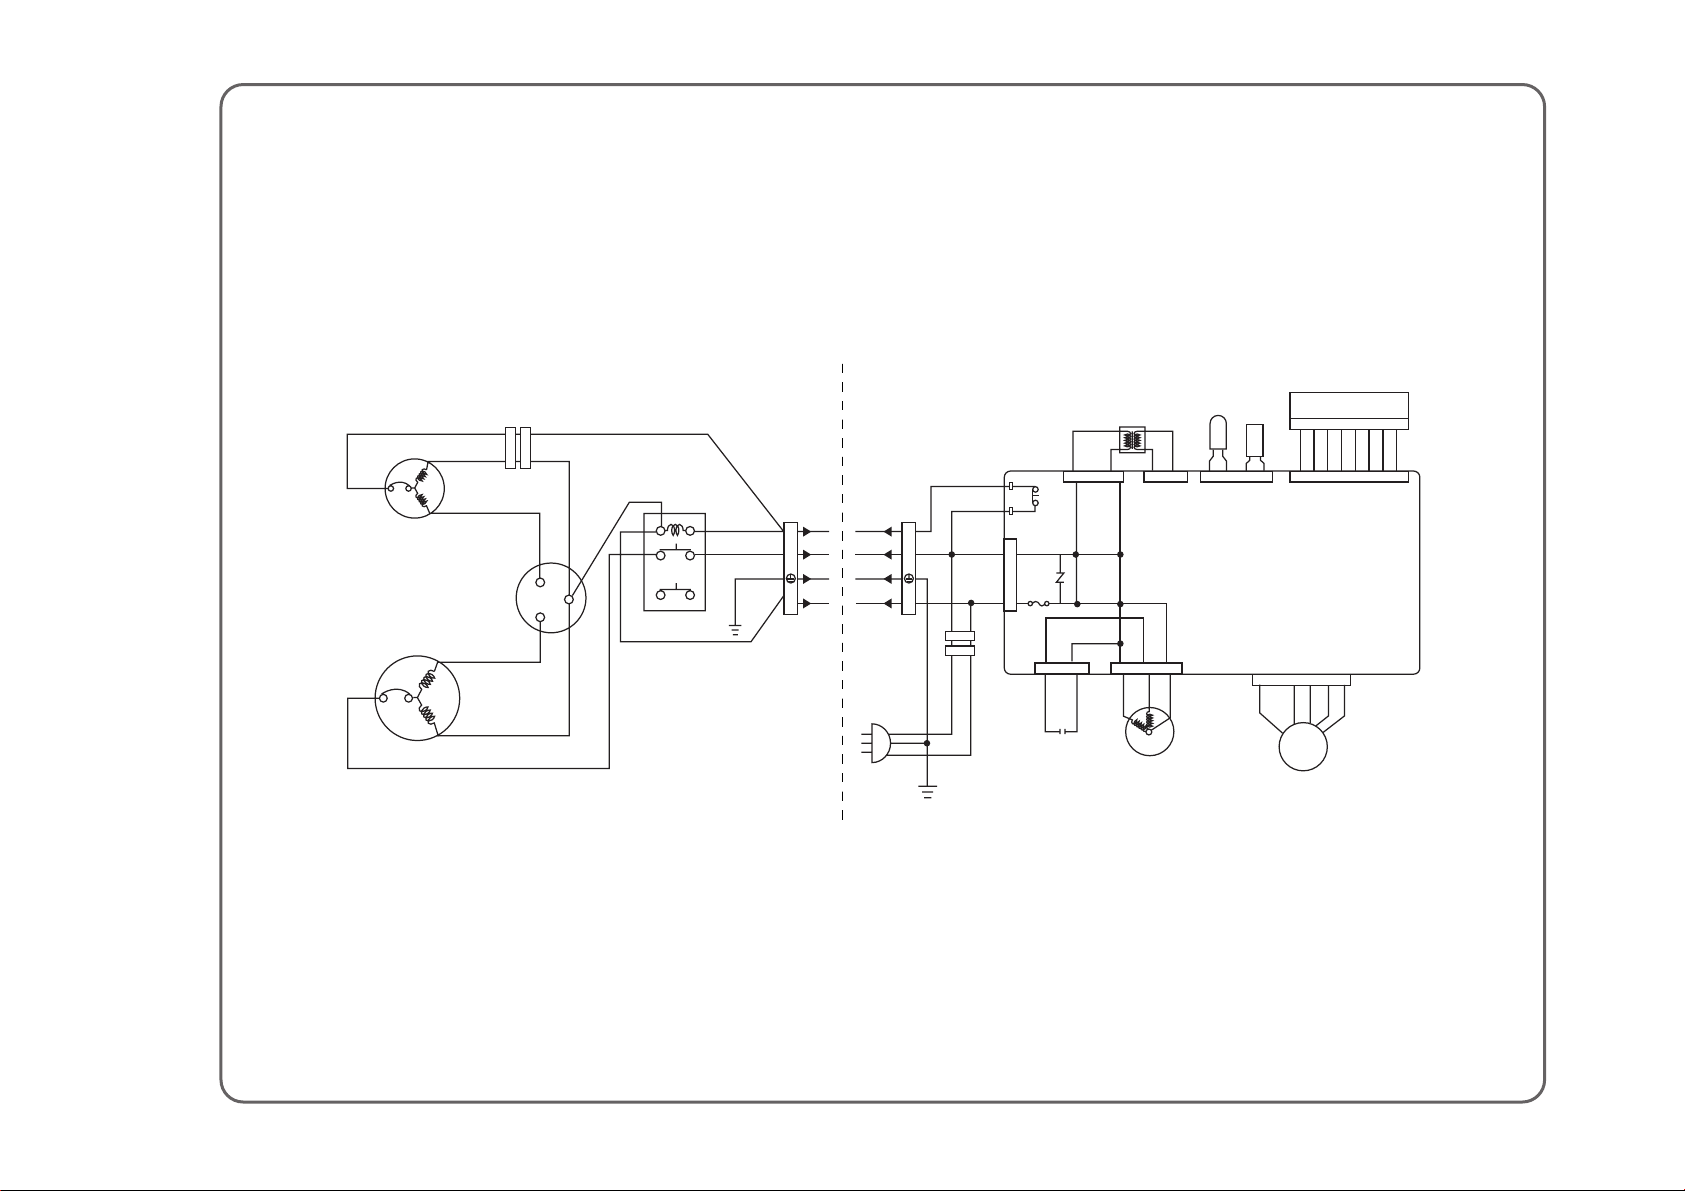
4. WIRING DIAGRAM
OUTDOOR UNIT INDOOR UNIT
FAN MOTOR
BRN
BLUE
BLU
BLU
COMP
BLU
BRN
BRN
YEL/GRN
YEL/GRN
BROWN
YELLOW/GREEN
BRN
BRN
BLU
POWER CORD
BLK
YEL/GRN
CAPACITOR
OUTDOOR
TERMINAL
BLOCK
YEL
RED
S
C
R
COMPRESSOR
FAN
HERM
C
1
1
BLK
BLK
RED
RED
BLU
ORG
RED
BLK
RED
PINK
BLU
ORG
YEL
YEL
WHT
BLU
RED
GRN
YEL
GRY
BRN
BLK
BLK
BLK
BLK
BLK
2
TRANS
1 12345678 1 23 4
I/D SENSOR
LED PCB
2
123
S
C
R
INDOOR
FAN MOTOR
FAN MOTOR
CAPACITOR
SWING
MOTOR
12
12345
Y
L
Y
L
1
2
3
¡ DSB-070L/DSB-091L/DSB-121L/DSB-122L
28
Page 29
Y
N
L
Y
N
L
FAN MO T OR
BLK
RED
ORG
H
S
S
R
C
C
CAP A CIT OR DUAL
FAN
HERM
RED
BRN
BRN
OUTDOOR INDOOR
RED
POWER RELA Y
RA TH. : R OOM AIR THERMISTOR
IDC TH. : INDOOR COIL THERMISTOR
RA TH. : R OOM AIR THERMISTOR
IDC TH. : INDOOR COIL THERMISTOR
FAN MO T OR
CAP A CIT OR
INDOOR
FAN MO T OR
SWING MOTOR
BLU
WHT
YEL/GRN
RED
BLU
YEL/GRN
BRN
RED
BLU
BLU
YEL/GRN
YEL
RED
WHT
RED
RED
RA
TH.
IDC
LED PCB
11234567
TH.
BLK
PCB TRANS
BLU
RL1
CN1
BLU
BRN
FUSE
BLK
RED
CN4 CN3
CN2 CN6 CN9 CN1
CN13
R
C
S
ORG BLU
RED
ORG
YEL
PNK
BLU
BRN
BRN
YEL/GRN
CONTROL PCB
POWER
CORD
1
8
4
0
6
2
BLU
COMPRESSOR
29
¡ DSB-240L
Page 30
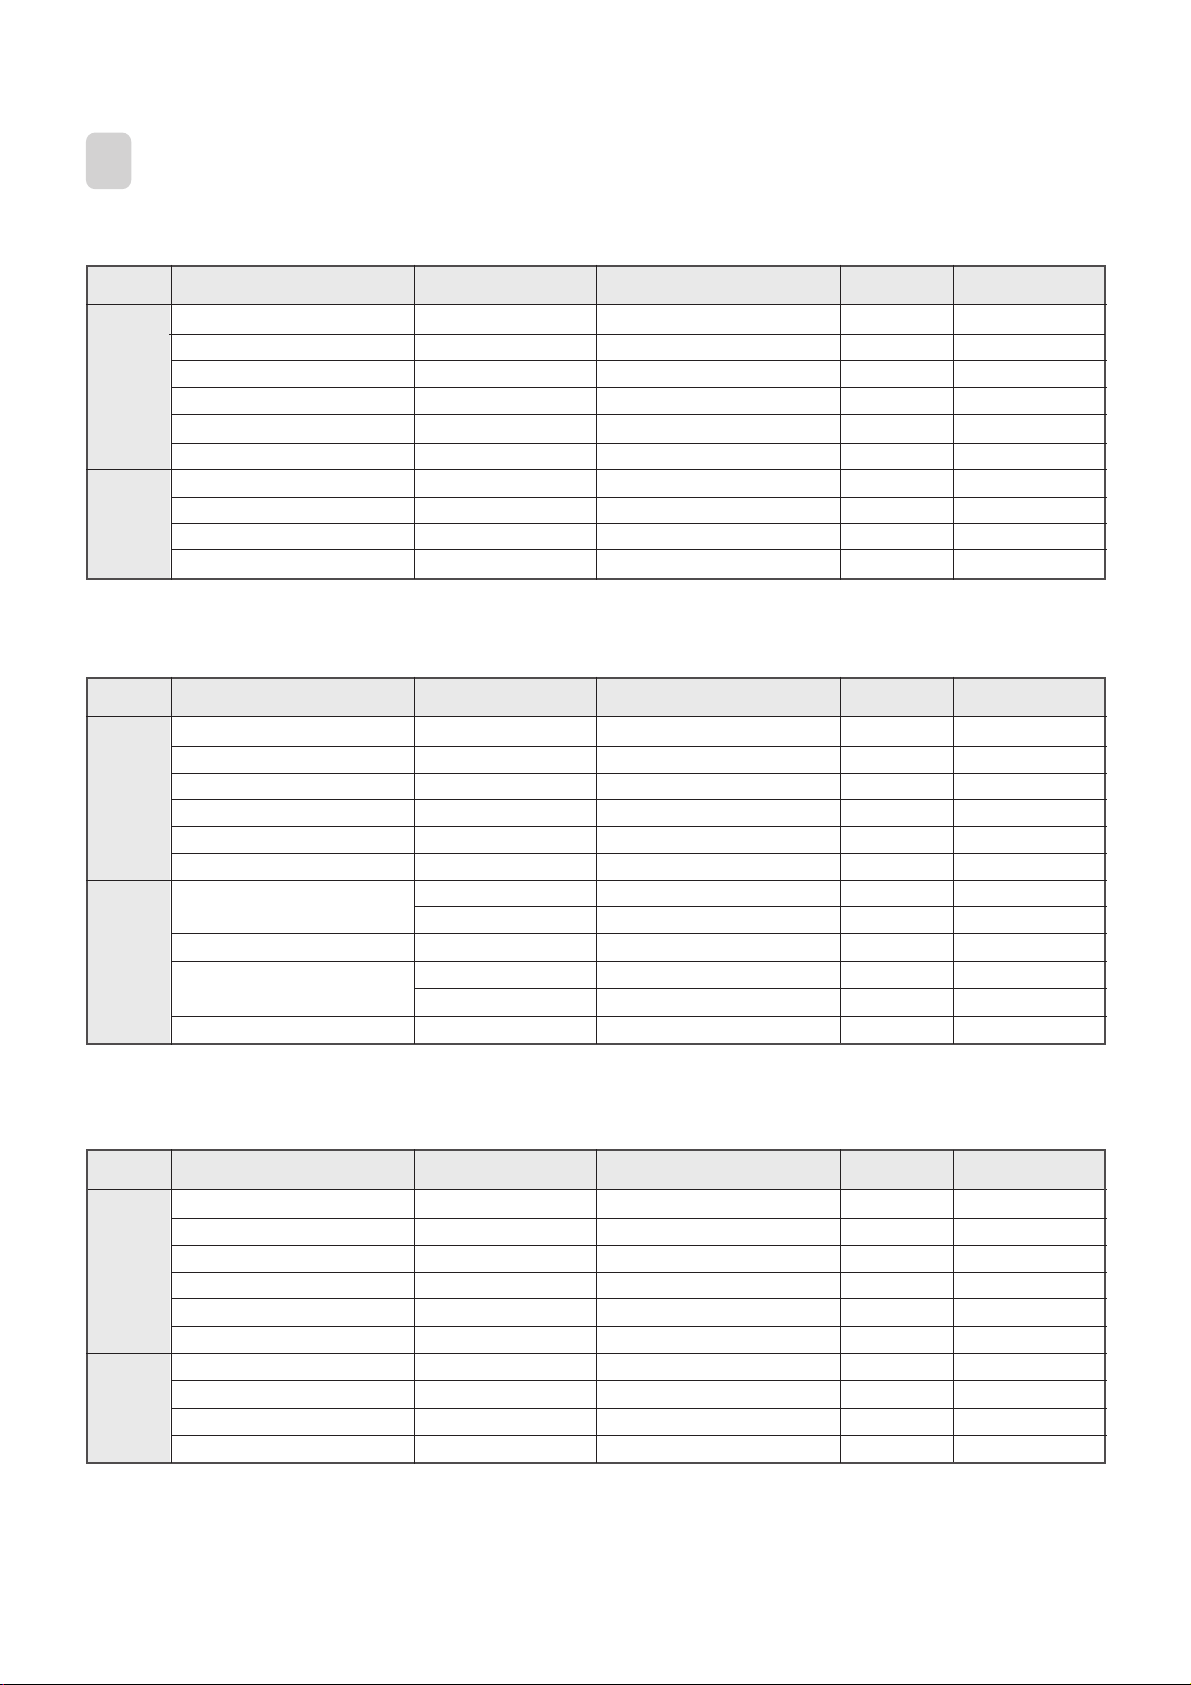
MAIN ELECTRIC PARTS
1
¡ DSB-070L
Fan Motor 3108003800 IC-8417DWKF5A 1
Indoor
Unit
Outdoor
Unit
Fan Motor Capacitor 3106900300 1.0µF 400VAC 1
Fuse 5FVLB3152L 250V 3.15A 1
Transformer 5EPV050120 230V 50Hz 1
Stepping Motor 3108003900 GSP-24SW-061 1
Terminal Block 3108912301 SN-DBW-05P 1
Compressor 3107101200 QB134PL12B 1
Fan Motor 3108004000 IC-9625DWLF5A 1
Dual Capacitor 3109501201 1.8+25µF 400VAC 1
Terminal Block 3108912301 SN-DBW-05P 1
¡ DSB-091L
Fan Motor 3108003800 IC-8417DWKF5A 1
Indoor
Unit
Outdoor
Unit
Fan Motor Capacitor 3106900300 1.0uF 400VAC 1
Fuse 5FVLB3152L 250V 3.15A 1
Transformer 5EPV050120 230V 50Hz 1
Stepping Motor 3108003900 GSP-24SW-061 1
Terminal Block 3108912301 SN-DBW-05P 1
Compressor
Fan Motor 3108004100 IC-9630DWLF5A 1
Dual Capacitor
Terminal Block 3108912301 SN-DBW-05P 1
PART NAME PART CODE SPEC. QUANTITY REMARK
PART NAME PART CODE SPEC. QUANTITY REMARK
3RC0020KE0 RBB100A001 1
3107101900 QK185PN13F 1
3109502010 1.8+30µF 400VAC 1
3109502030 1.8+35µF 400VAC 1
¡ DSB-121L/122L
PART NAME PART CODE SPEC. QUANTITY REMARK
Fan Motor 3108001220 IC-8428DWKG7C 1
Indoor
Unit
Outdoor
Unit
Fan Motor Capacitor 3106900300 1.0uF 400VAC 1
Fuse 5FVLB3152L 250V 3.15A 1
Transformer 5EPV050100 220V/18V 1
Stepping Motor 3108000100 MP28GA (L=400mm) 1
Terminal Block 3108912301 SN-DBW-05P 1
Compressor 3100030CE0 RCB150A001 1
Fan Motor 3108000800 IC-9430DWLC5A 1
Dual Capacitor 3109500700 3.5+25µF 400VAC 1
Terminal Block 3108912301 SN-DBW-05P 1
30
Page 31
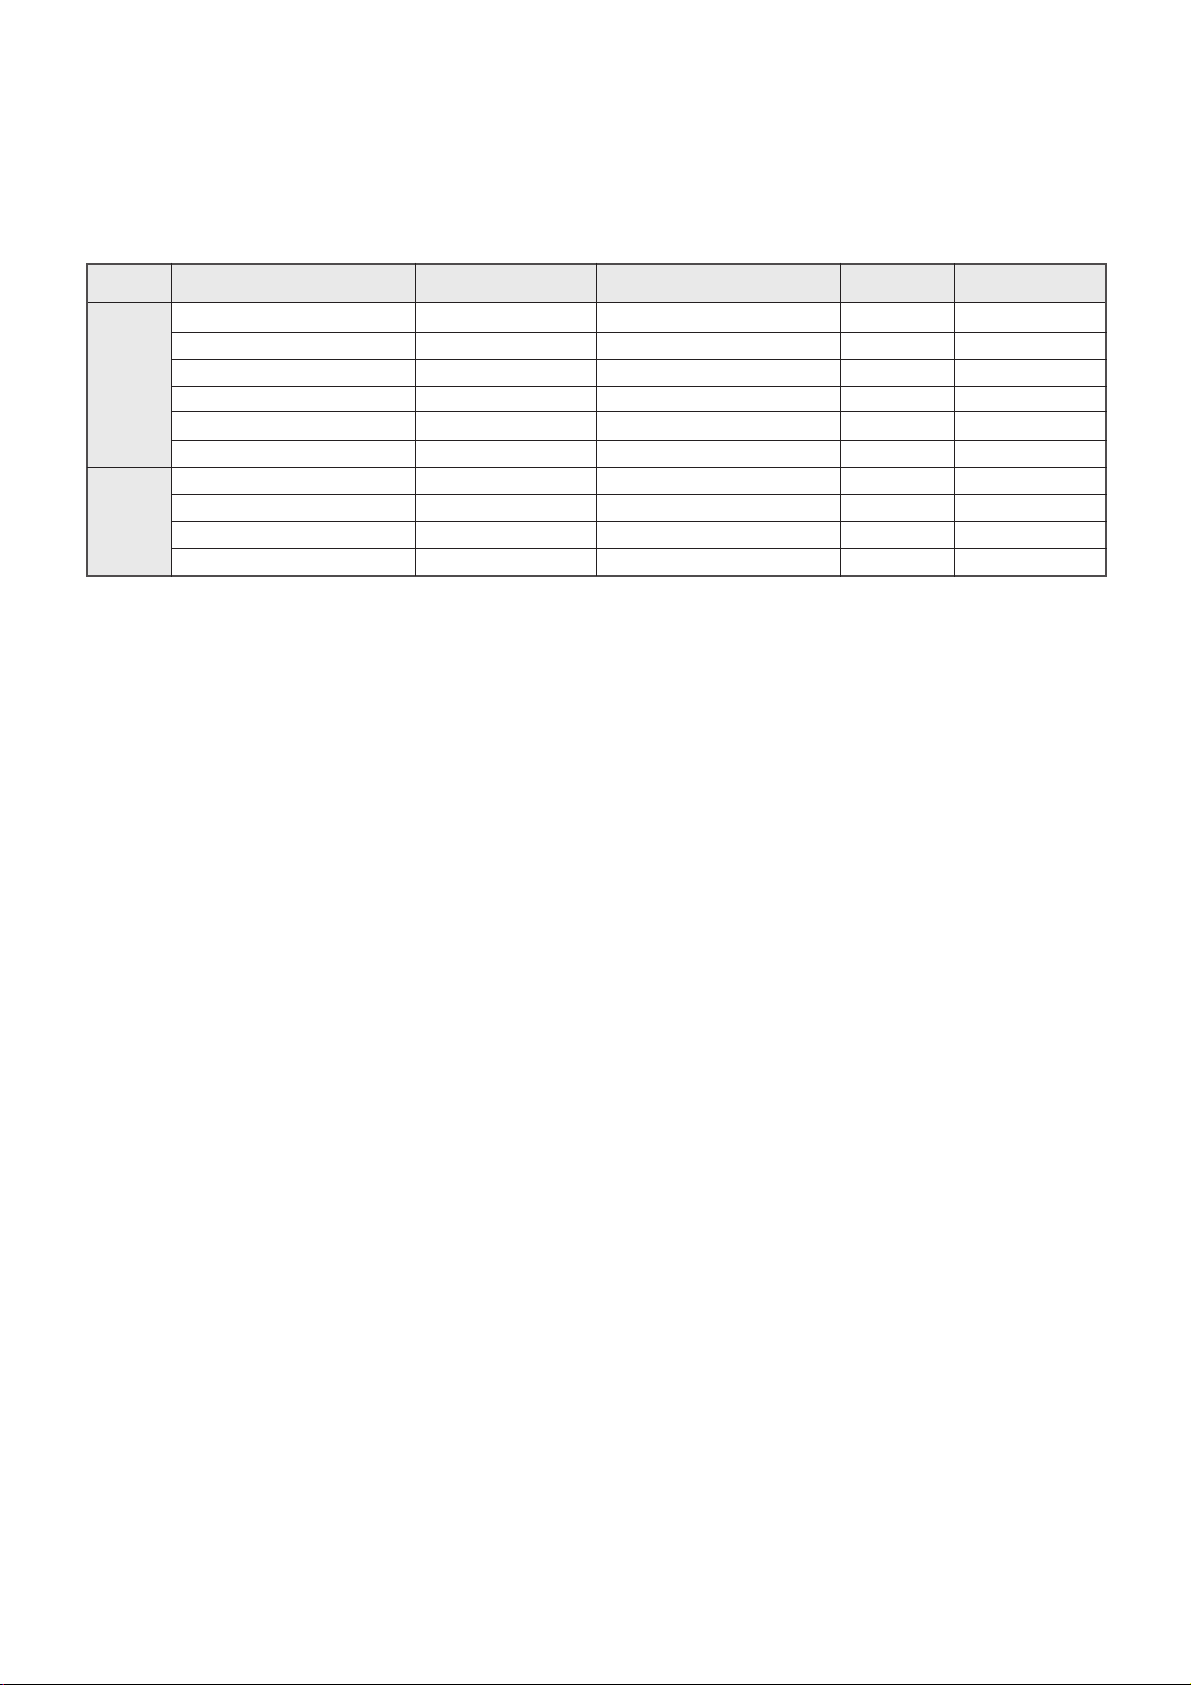
¡ DSB-240L
Fan Motor 3108007500 IC-9430DWKG7A 1
Indoor
Unit
Outdoor
Unit
Fan Motor Capacitor 3106902400 2.0uF 400VAC 1
Fuse 5FVLB3152L 250V 3.15A 1
Transformer 5EPV050120 230V/50Hz 1
Stepping Motor 3108007600 GSP-24RW-062 1
Terminal Block 3108912320 SN-DBW-062 1
Compressor 3100068201 AWG-5530EXC 1
Fan Motor 3108007400 OSME986DERC 230/50 1
Dual Capacitor 3109508100 5/45µF 400VAC 1
Terminal Block 3108912320 SN-DBW-4P 1
PART NAME PART CODE SPEC. QUANTITY REMARK
31
Page 32
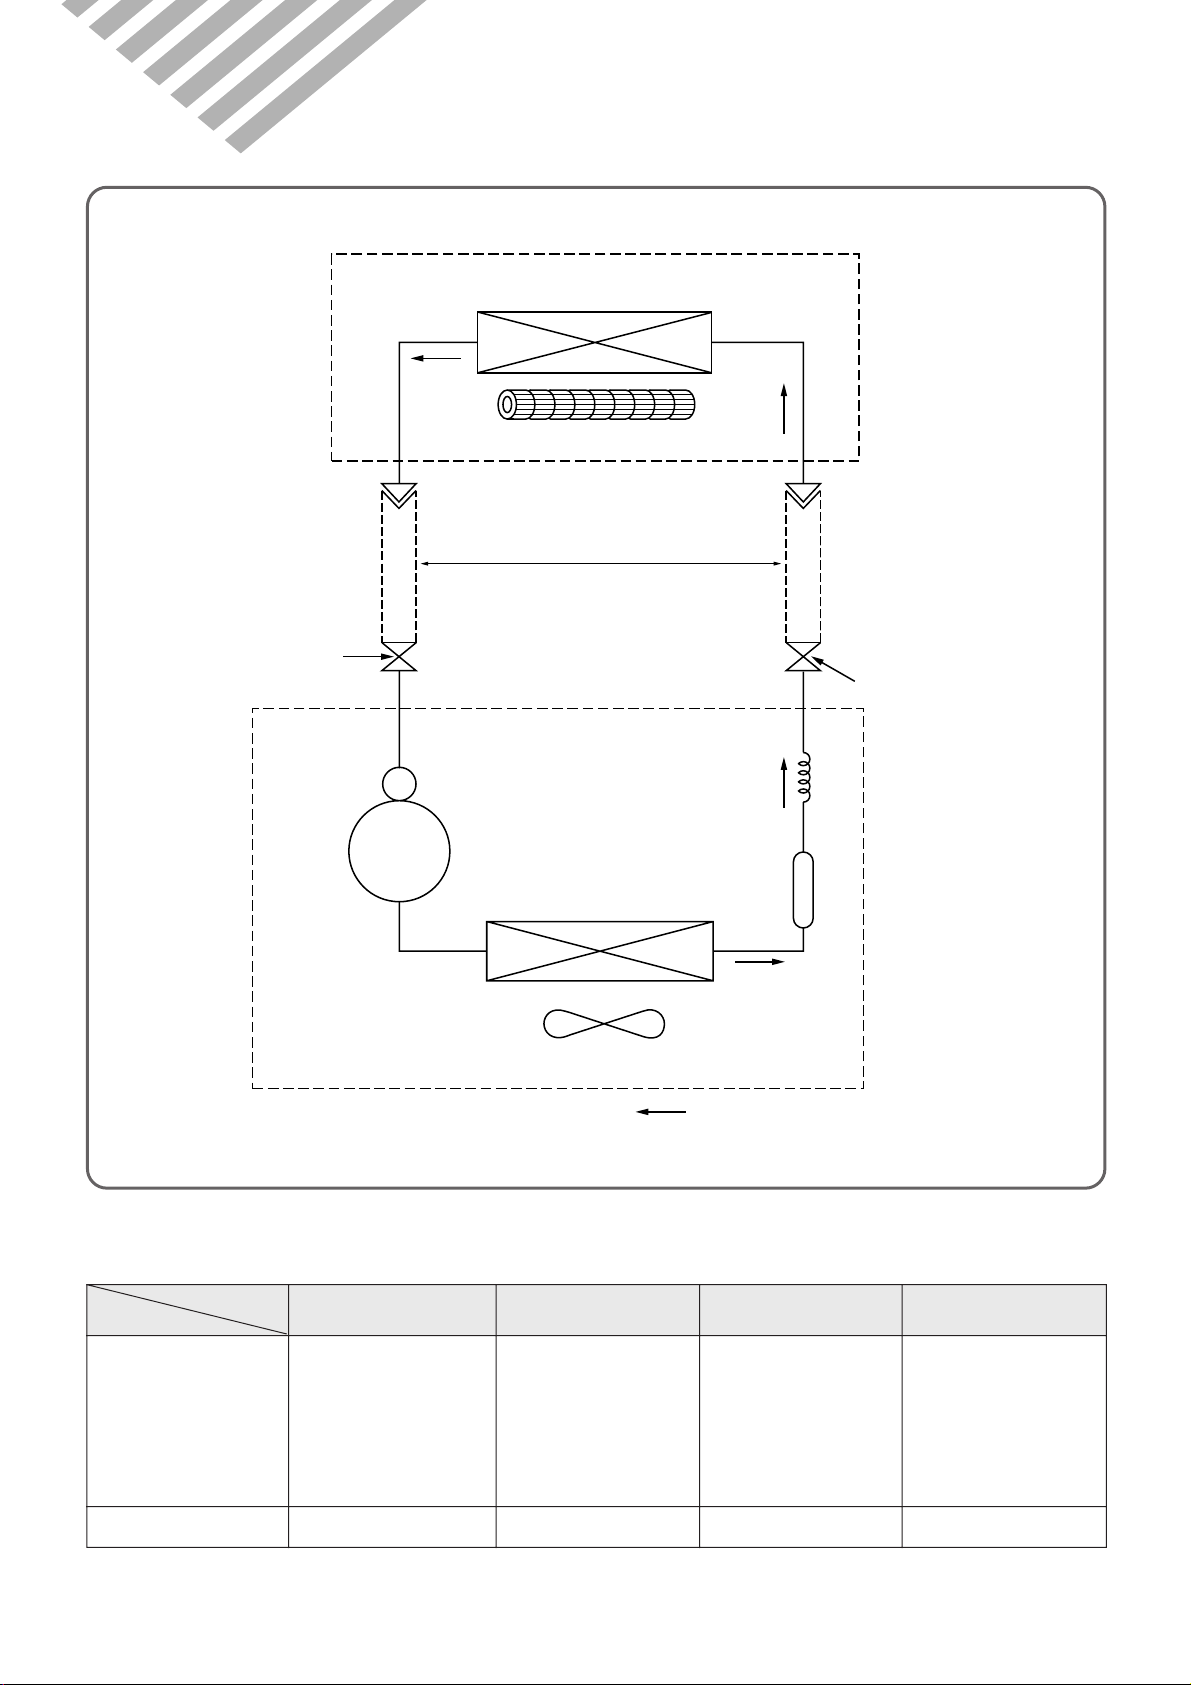
5. REFRIGERANT CYCLE
INDOOR UNIT
Evaporator
Cross flow fan
Connecting pipe
Capillary tube
Dryer
Condenser
Propeller fan
OUTDOOR UNIT
Refrigerant flow
Service valve
Service valve
Accumulator
Compressor
Note) If the pipe length exceeds the standard length, add 30g of refrigerant per extra meter.
DSB-091L
• IDØ1.78 x ODØ3.2 x 1200L
-QK164PN12F(LG COMP)
• IDØ1.6 x ODØ3.2 x 600L
IDØ1.6 x ODØ3.2 x 600L
DSB-121L
Contents
Capillary Tube
Model Name
DSB-070L
IDØ1.6 x ODØ3.2 x 600L
DSB-240L
IDØ2.0 x ODØ3.2 x 600L
IDØ2.0 x ODØ3.2 x 300L
Charge Quantity
800 g
-RBB090A001(DAEWOO COMP)
1,000 g
32
1,300 g
2,050g
Page 33
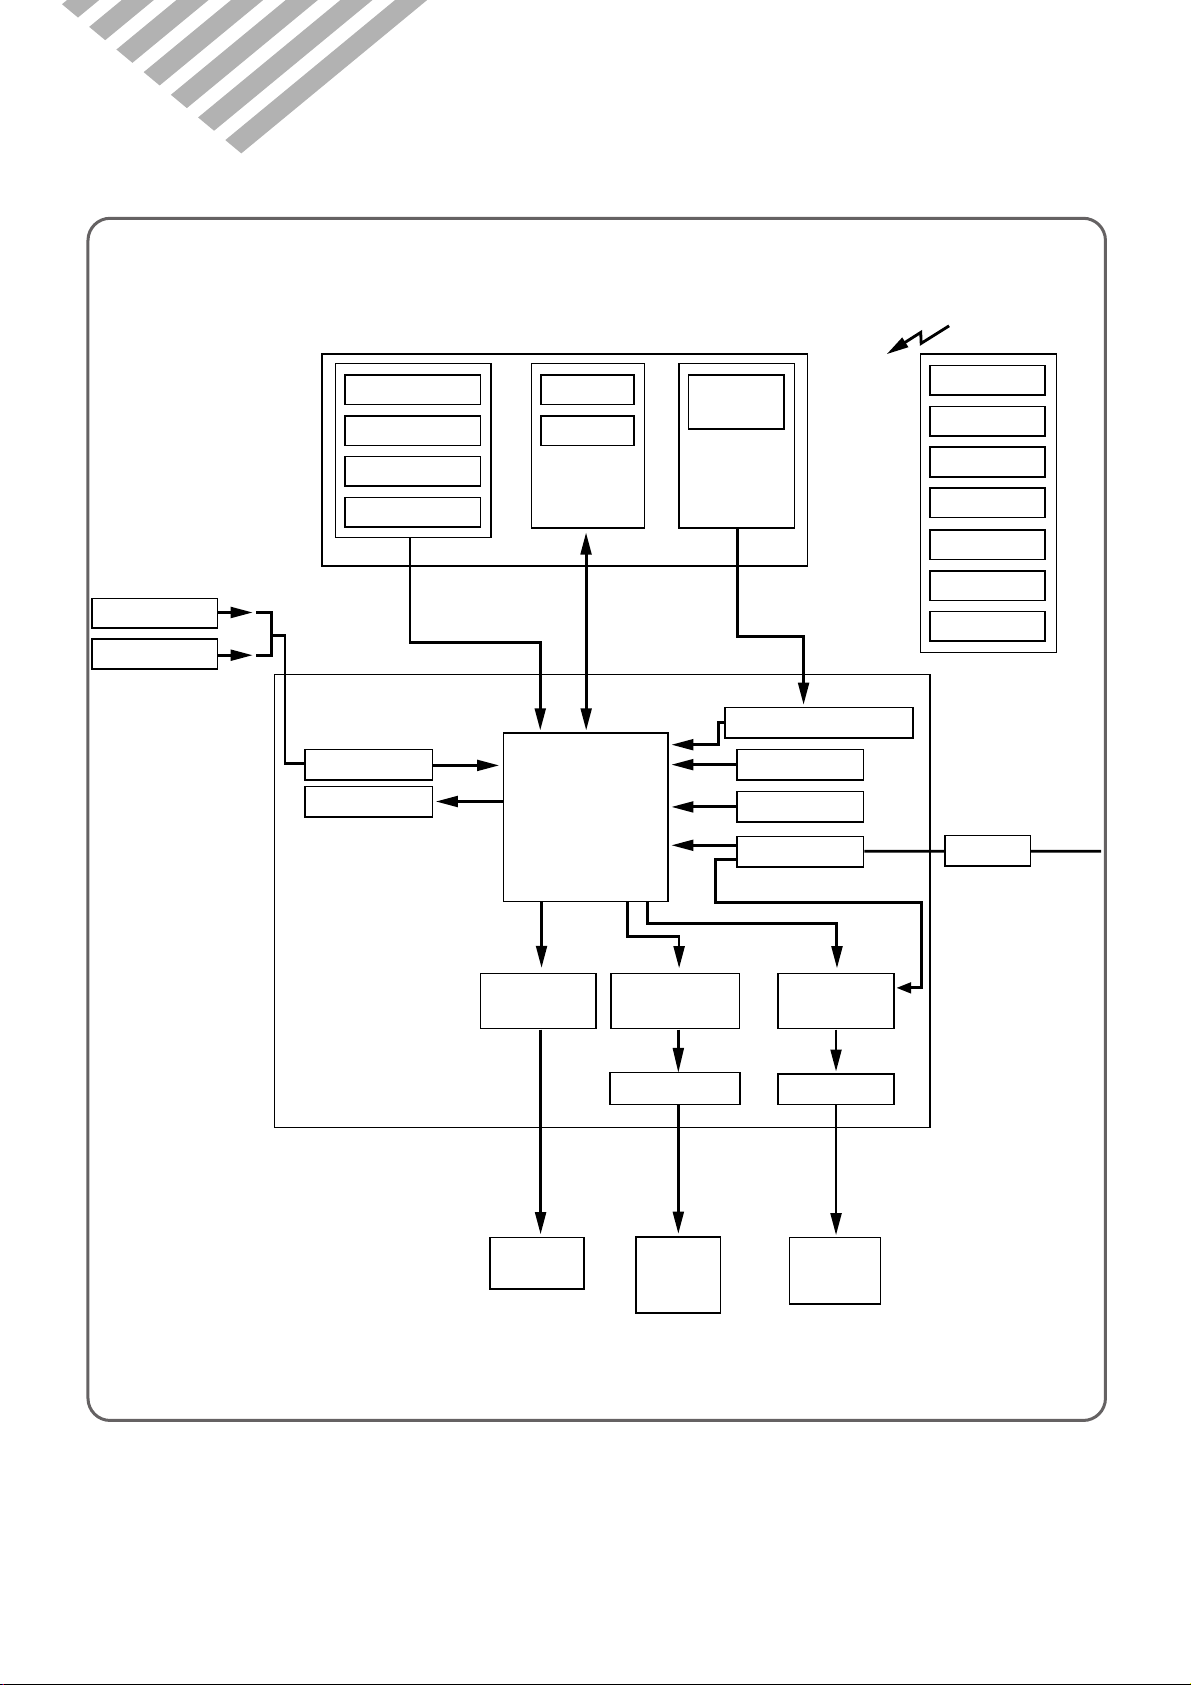
6. CONTROL BLOCK DIAGRAM
Relay RL1
Stepping
Motor
Indoor fan
motor
Compressor
outdoor fan
motor
TRIAC
DC12V
Operating Mode
Fan Speed
Timer Selection
Flap Position
Unit on lamp
Room air temp.
Indoor coil temp.
Air clean lamp
Quick lamp
Remote
Emergency
Operation
Signal
receiver
Timer lamp
A/D converter lnitialization
Clock generation
DC power supply
Circuit for
motor driving
Circuit for
relay driving
Circuit for
TRIAC control
Transformer
Circuit for signal receiver
MICRO
CONTROLLER
Beeper
Temp. Setting
ON/OFF
SLEEP
REMOCON
AC220V
50Hz
STEPPING MOTOR
ON/OFF
COMPRESSOR
ON/OFF
DC5V
¡ DSB-070L/DSB-091L/DSB-121L/DSB-122L/DSB-240L
33
Page 34
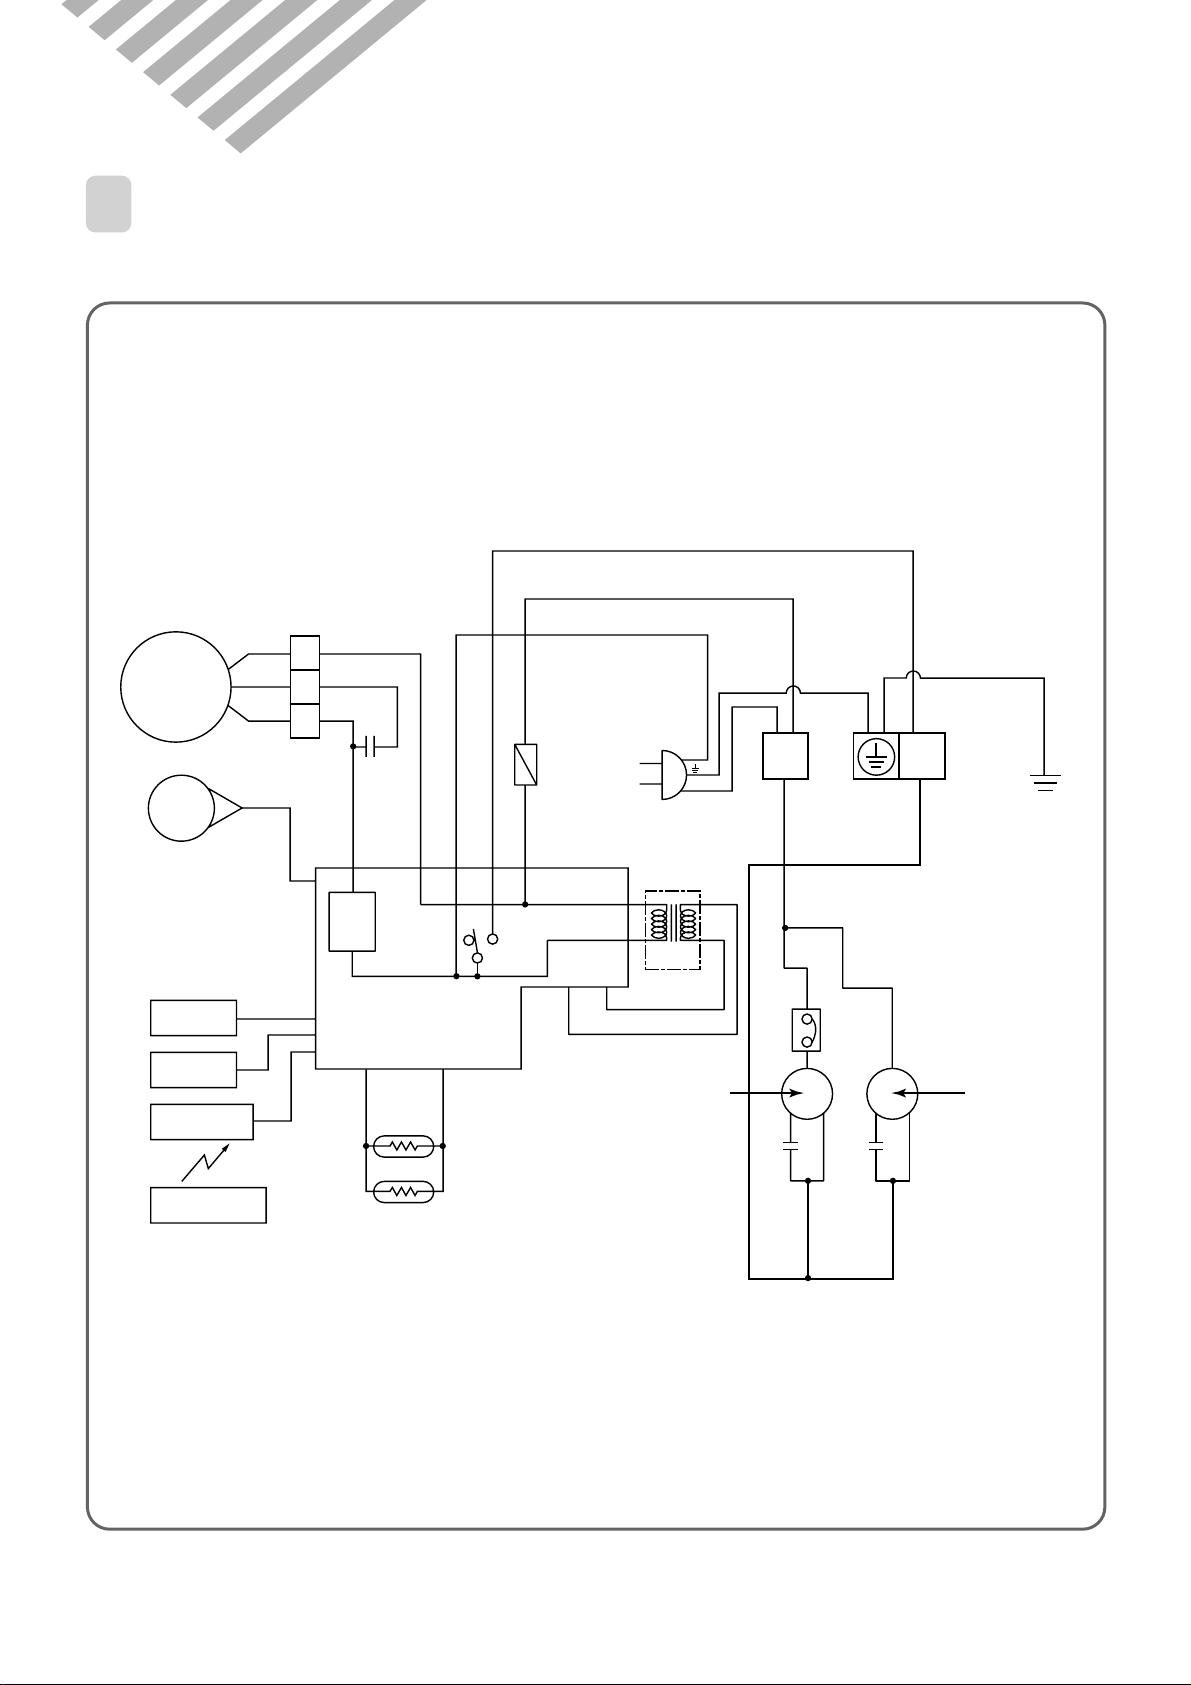
2
1
3
I.D.C
SR
SWING
MOTOR
ROOM AIR
SENSOR
Remote Controller
TRANS-
FORMER
RL1
COMP.
RELAY
TRIAC
OVERLOAD
PROTECTOR
COMPRESSOR
OUTDOOR UNIT
FAN MOTOR
TERMINAL
BLOCK
N
L
INDOOR COIL
SENSOR
Display Part
Control Part
Signal Receiver
FMCCMC
YL
Indoor Unit
Fan Motor
7. ELECTRIC CIRCUIT DIAGRAM
1
ELECTRIC CIRCUIT DIAGRAM
¡ DSB-070L/DSB-091L/DSB-121L/DSB-122L/DSB-240L
34
Page 35

Description
1. After the power ON/OFF button is pressed once, the rela y and triac are turned ON or OFF per the remote
control setpoint.
– TRIAC is controlled per the fan speed selection.
– RELAY is controlled per the operation mode selection.
2. If the power ON/OFF button is pressed once more, the rela y and triac are turn off and the unit stops
operation.
3. The unit turns on or off according to the temperature set point by sensing the room air temperature through
thermistor.
4. If the fan speed selection is set to the auto position, the fan speed is automatically controlled according to the
temperature differance between room temperature and temperature set point.
5. If you press the ON/OFF button during operating the unit, Relay and LED is OFF and the unit is OFF.
35
Page 36
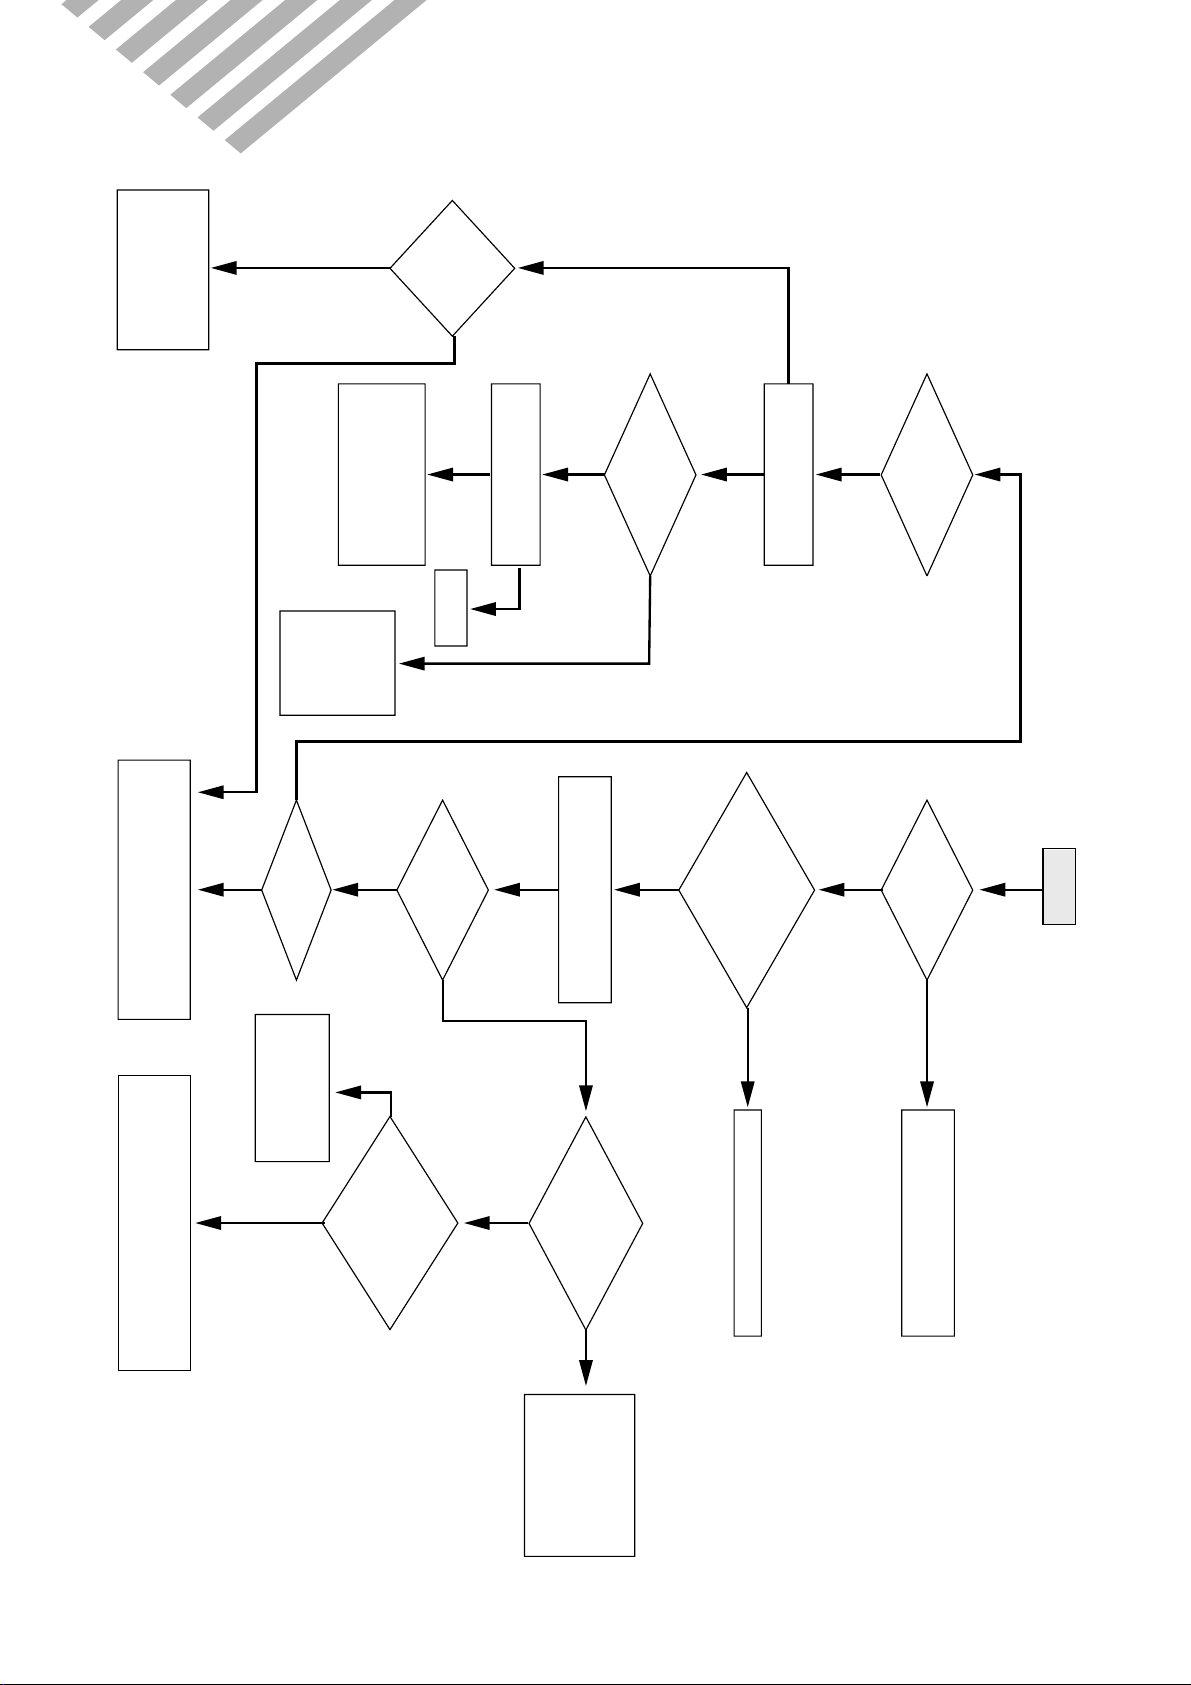
8. TROUBLE SHOOTING
Outdoor unit does
not run?(note. 1)
Does
the compressor run
normally?
Indoor unit does
not run(note 1)
Check the failure
code according to
the self diagnostic
(note 2)
Is the unit
display
mormal?
check the failure
code according to
the self-diagonostic
(note 2)
Normal
check the
connecting
point of
magnetic
contactor
YES
YES
YES
YES
NO
NO
YES
Trouble
Is the power
applied to the
unit
Is the
power normal?
check the voltage between
L & N of terminal
block
press the power ON/OFF
button on remote controller
Does the
beeper beep two
times?
Is the display
all off?
• Check the connector on display
PCB connected to control PCB
• Check the display PCB itself
Check power supply mains
or interconnection wires
Check the wiring of indoor
Is the
switch position
on switch pannel at
"Remote"
Does
control PCB
status LED repeat one
second "on and
off"?
• control PCB fault
• Micom or reset
IC fault
• Check the remote signal receiver
• Check the connection between signal
receiver and control PCB
Place the switch
position to the
"Remote" and then
Check it once
more
YES
NO
YES
NO
NO
NO
NO
YES
YES
YES
YES
YES
NO
NO
NO
Is the
unit display
normal?
36
Page 37

Note 1)
1 Neither indoor unit nor outdoor unit runs.
Check the following points first. (There are f ollo wing case in normal operation)
a. Is the timer mode set the "timer ON".
b. Is the timer mode set the "timer-OFF" and the time had passed?
2 Neither outdoor fan nor compressor runs while indoor fan runs.
Check following points first. (There are f ollo wing cases in normal operation)
a. Is the temperature set point suitable?
b. Has the 3 minutes time guard f or compressor operated?
Self-Diagnostic Function
• Error Code •
1 When the compressor do not run.
i) Check the voltage between and of terminal b lock.
L
(Indoor Unit, Outdoor Unit)
ii) Check connecting wire of indoor unit and outdoor unit.
iii)Check relay RL1 on power P.C.B
2 Check fixing of indoor coil thermistor.
3 Check the GAS LEAKA GE of the pipe.
Y
37
Page 38
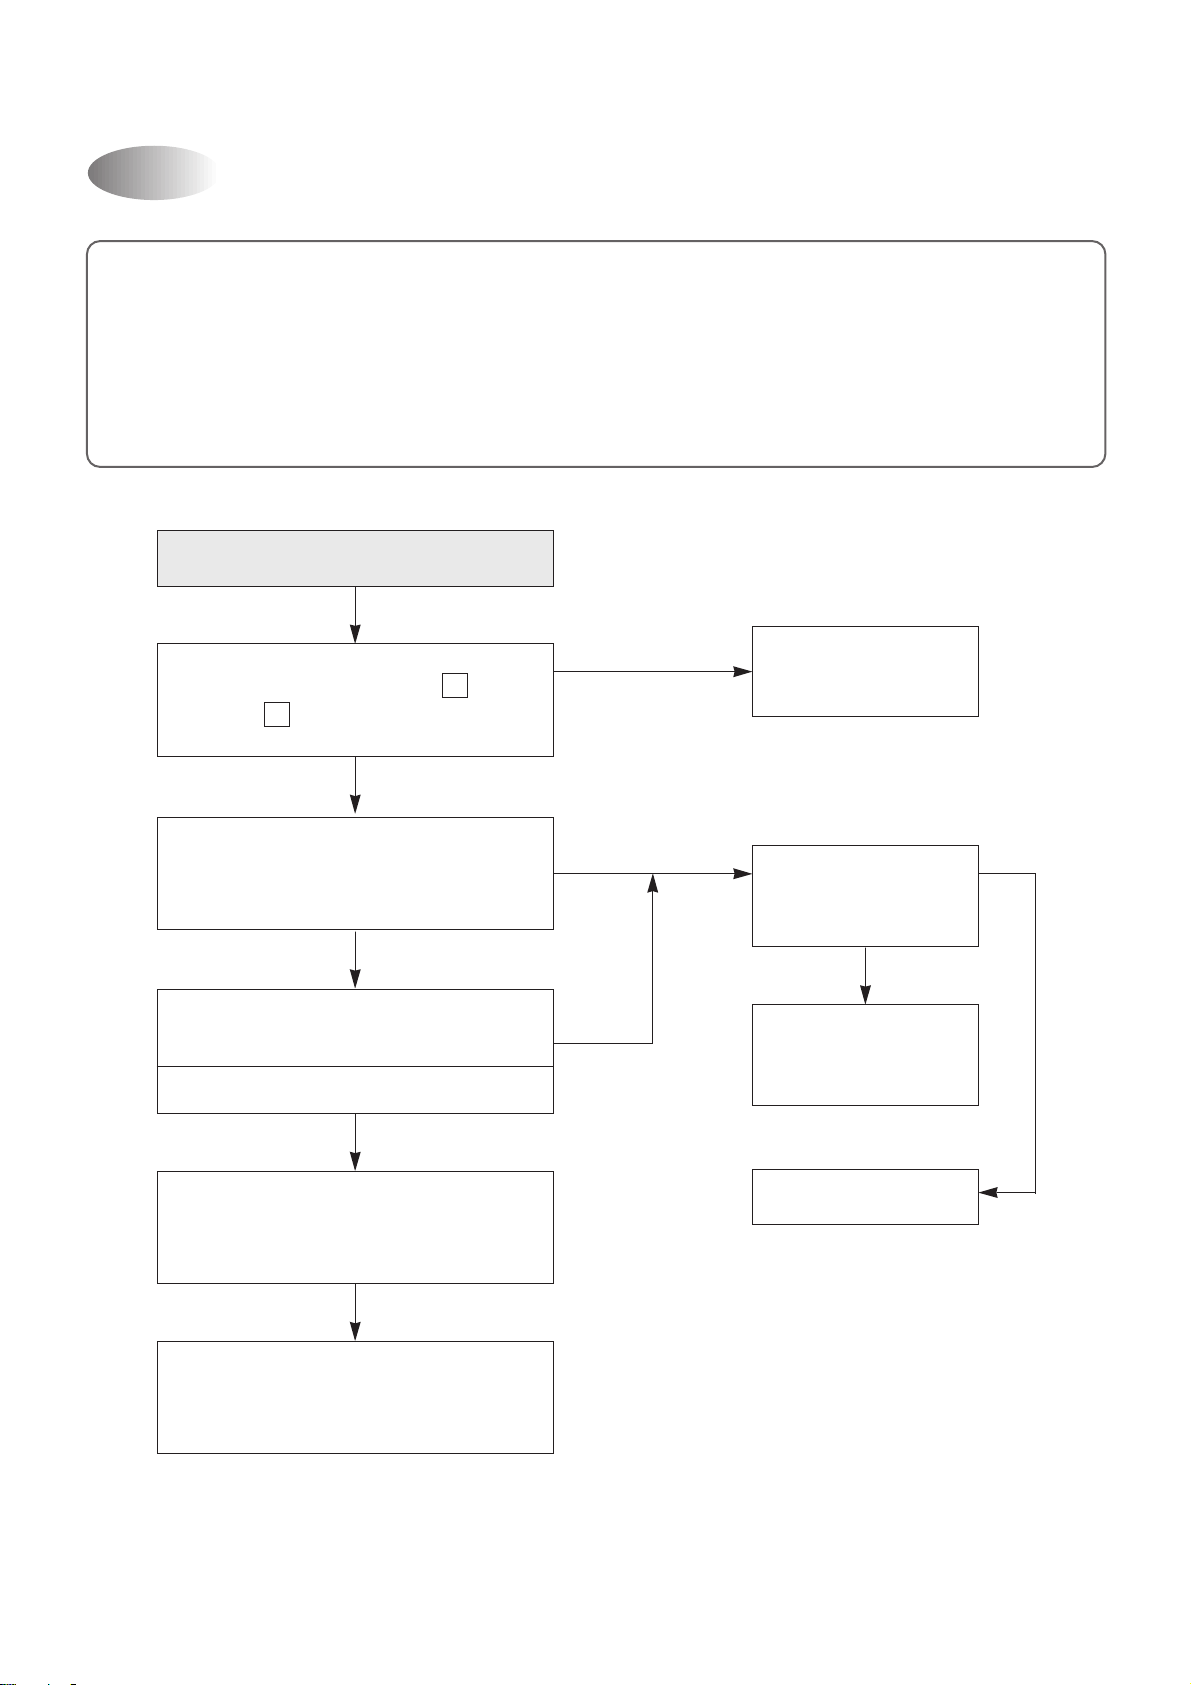
Neither Indoor Unit nor Outdoor Unit Runs
Confirm following statement.
When the unit operate normally , Sometimes the outdoor unit and indoor unit cannot operate.
1 Check the function select switch. Is it timer mode?
2 The function select switch locate the sleep mode and is the setting time ov er?
3 Is the setting mode DEHUMIDIFIER mode?
4 When the unit is DEHUMIDIFIER mode while in the auto mode, the outdoor unit and indoor unit does
not run.
The power is applied to the unit
Check the voltge between and
Y
of terminal block
Rating voltage more than 90%
Check the indoor unit display
is the display all off?
Yes
Press the ON/OFF switch of
Remote Control
Is the indoor unit display all off?
Pull out the power plug
and then insert the power plug
after 5 second
L
Rating voltage
under 90%
No No
No
Check the
Breaker or Fuse
Self Diagnostic
function is ON
Yes
Check according to
self Diagnostic function
Control P.C.B defect
Control P.C.B is normal
Recheck from the beginning
38
Page 39
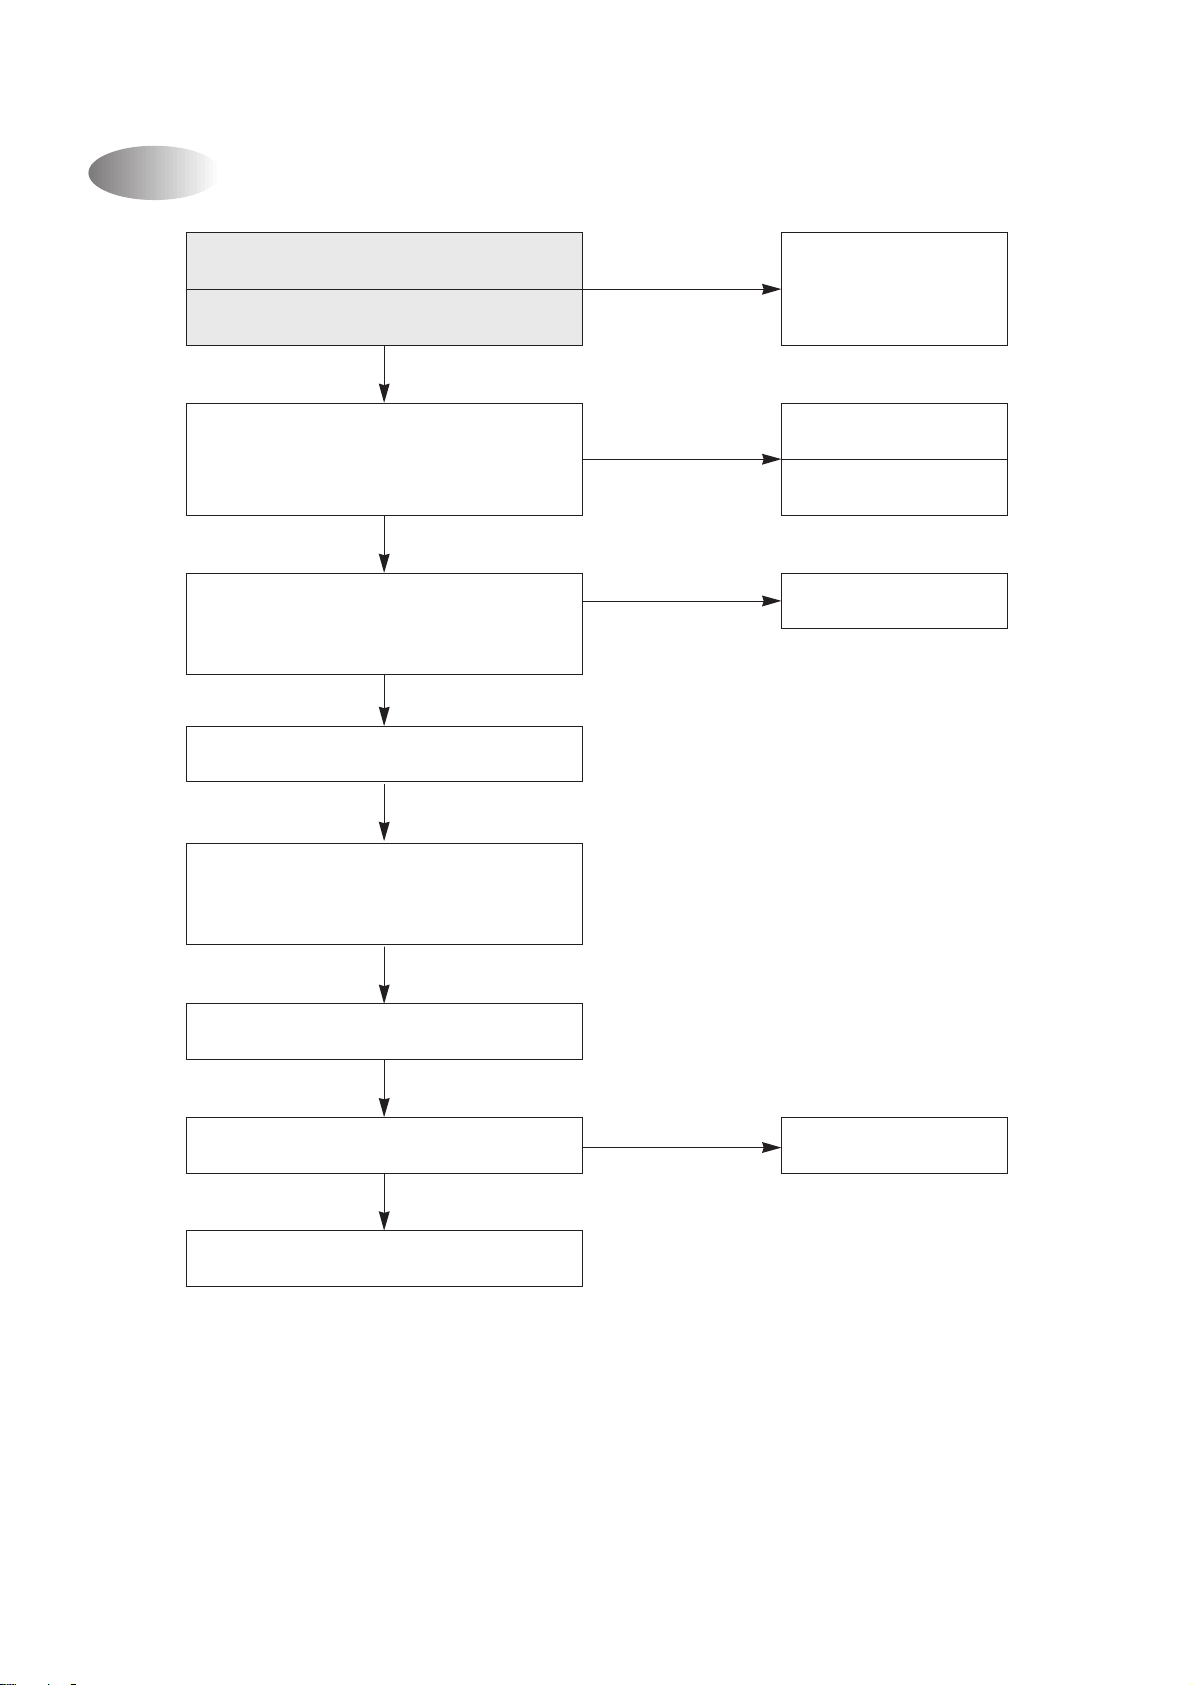
Outdoor Unit Runs but Indoor Fan Do Not Run
Check rotation of indoor fan
Rotate indoor fan by hand
YES
Check input Voltage of Fan
Motor connector at power P.C.B
Rating V oltage more than 90%
Check the winding resistance of
Indoor unit fan motor
Normal
Check the fan motor capacitor
NO
Rating voltage
under 90%
Open or short
Check the F an Motor
bearing and fan
Check the power P.C.B.
The circuit for triac control
Change of fan motor
Check the connecting wire of
indoor fan motor
Run again
Check the starting of indoor fan motor
Run again
No
Normal
39
Page 40
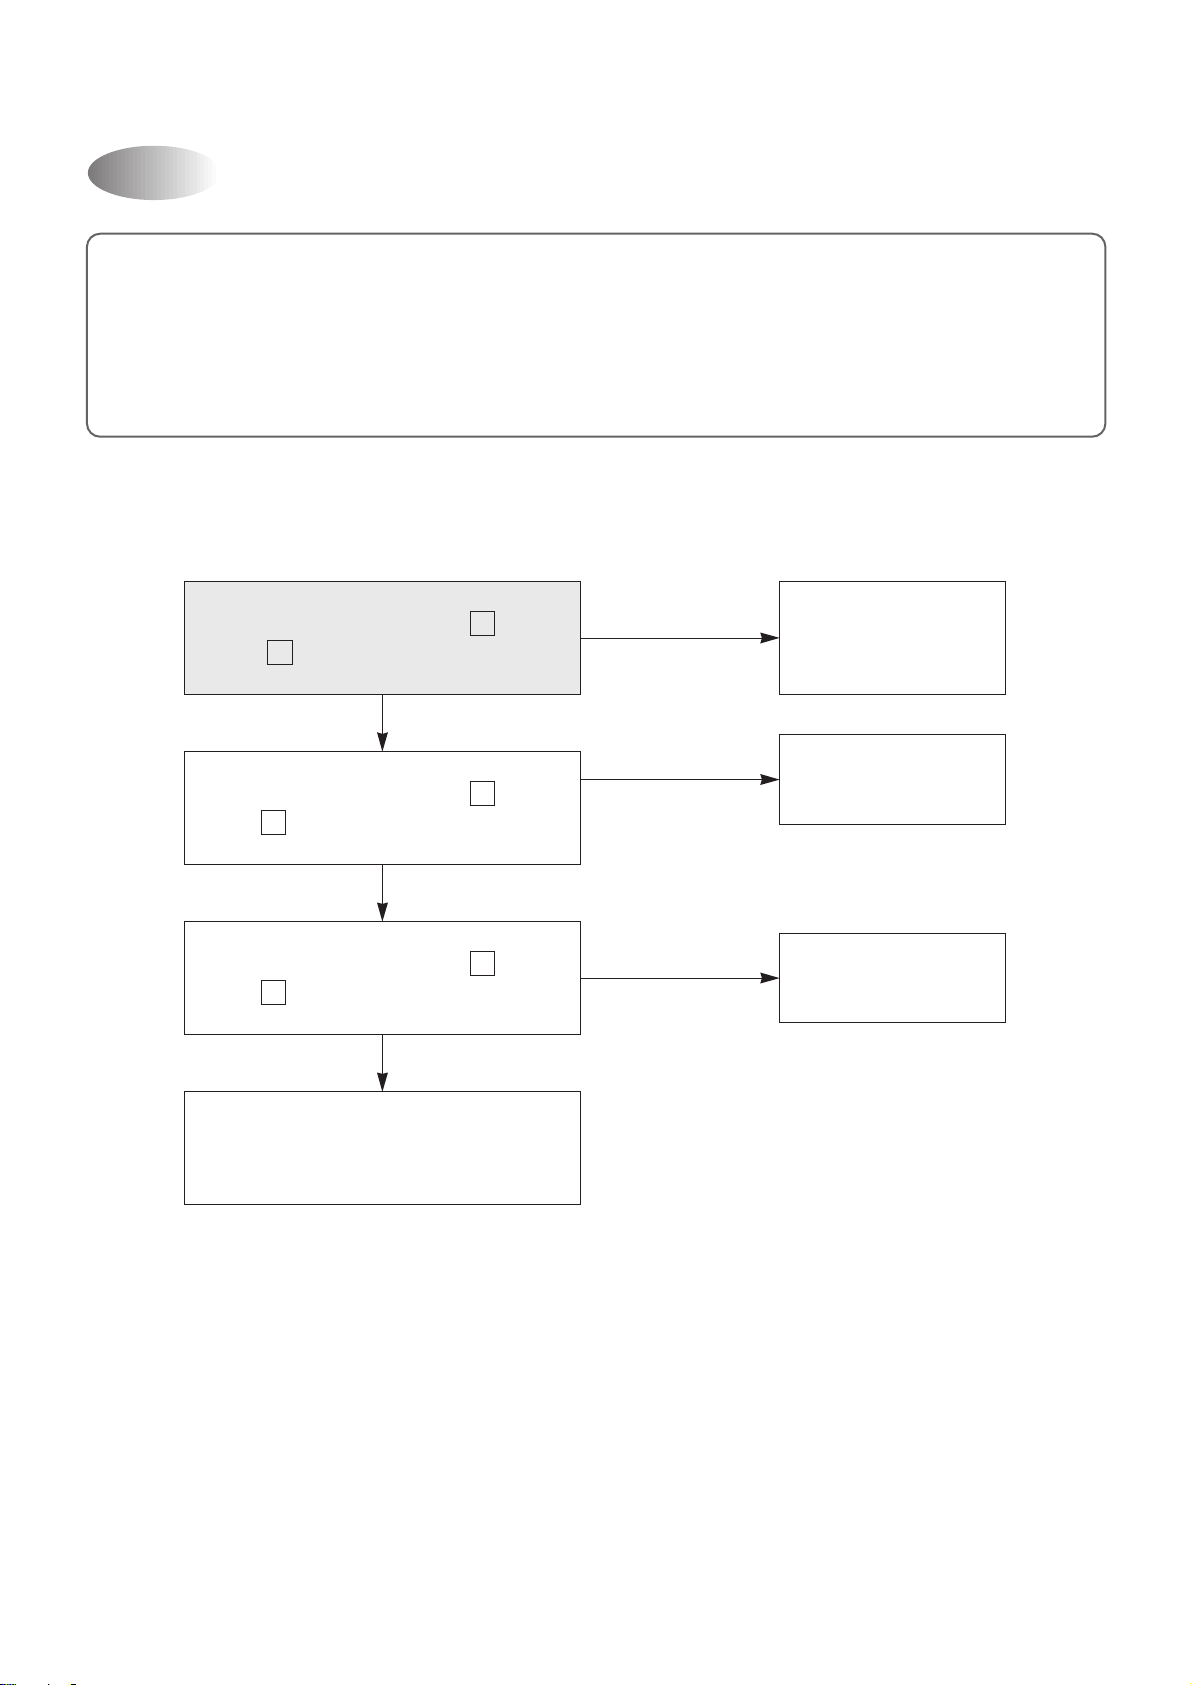
Outdoor Fan and Compressor Do Not
Confirm following statement.
When the unit operate normally , Sometimes the outdoor unit and indoor unit cannot operate.
1 Is the setting temperature proper?
2 Is the unit during 3min. Time delay of compressor .
3 During frost prevention of lndoor unit.
4 During dehumidifier mode.
Check the voltge between and
Y
of indoor unit terminal
Check the voltge between and
Y
of outdoor unit terminal
Check the voltge between and
Y
of outdoor unit terminal
Check compressor ,
outdoor fan motor individually
L
L
L
Rating voltage
under 90%
Rating voltage
under 90%
Rating voltage
under 90%
Check the wiring
and voltage
within doors
Check the
connecting wire
Check the
connecting wire
40
Page 41
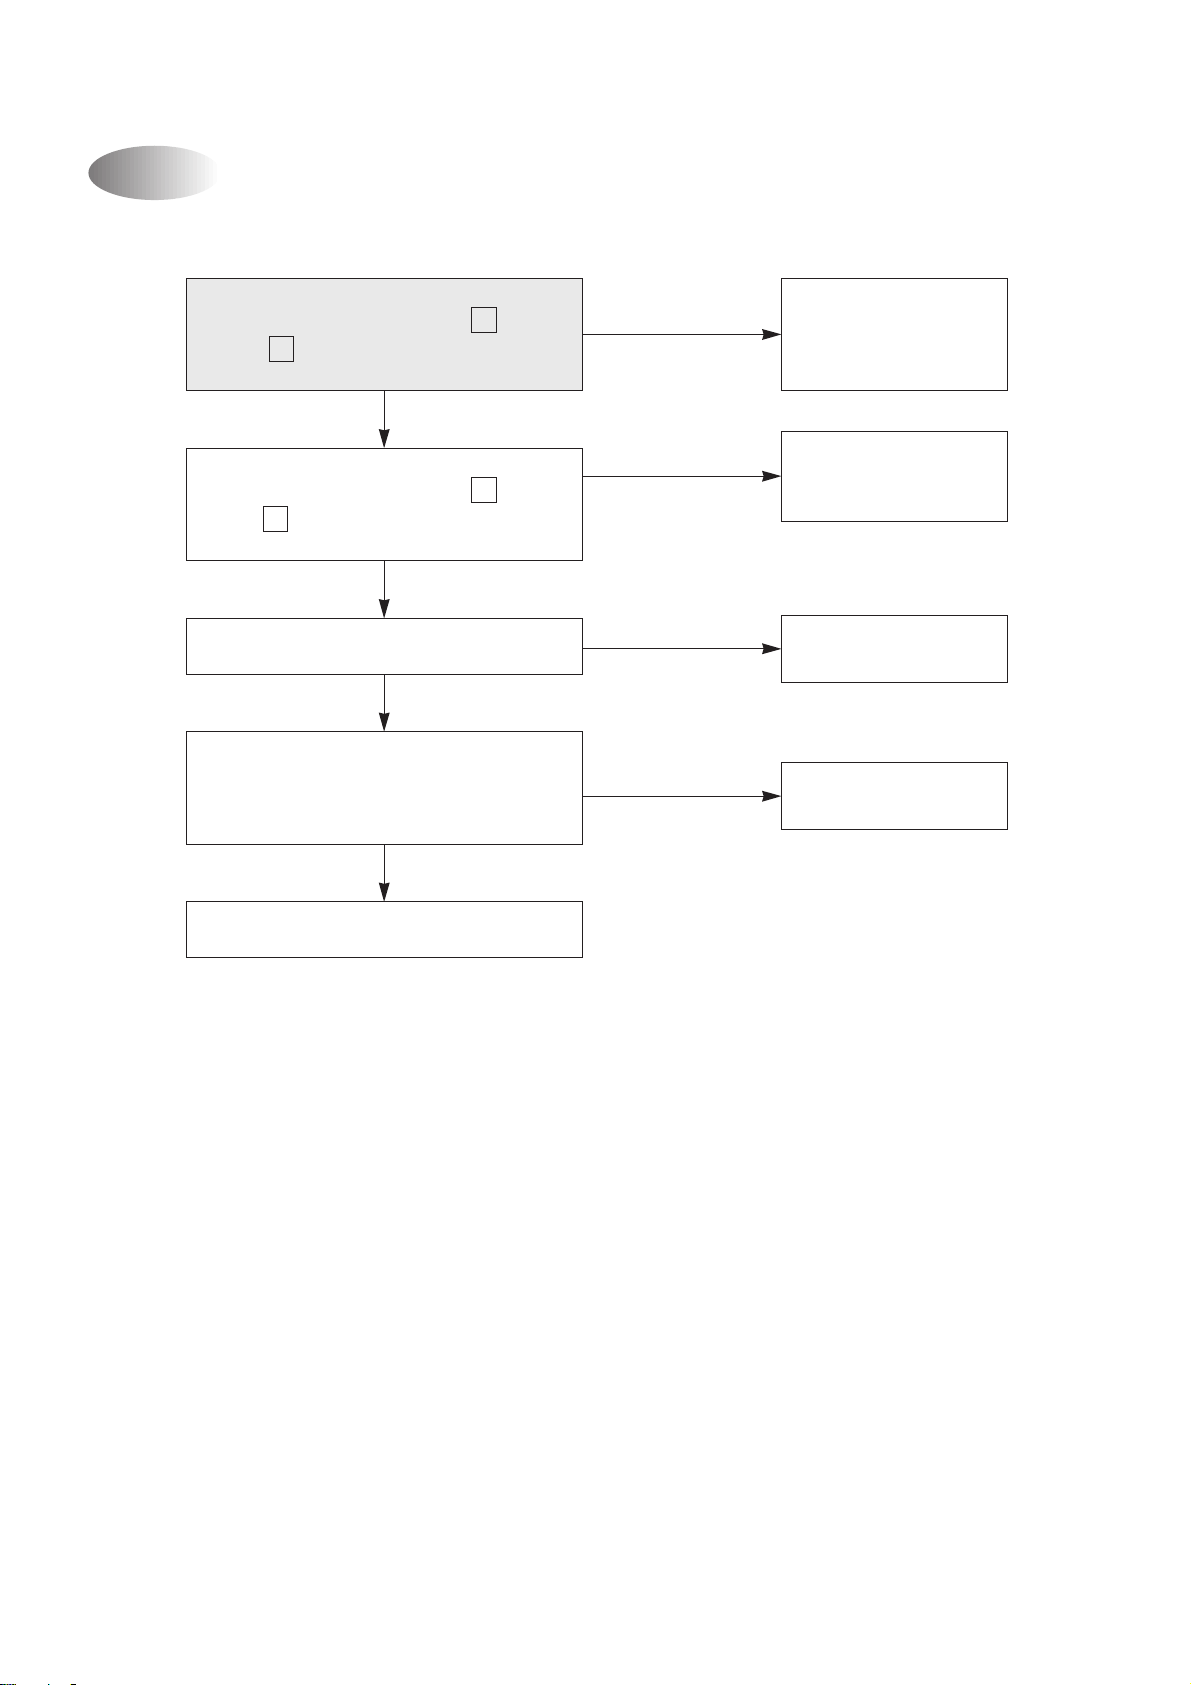
Only Compressor Do not Run
- Check the following at cooling mode
Check the voltge between and
Y
of indoor unit terminal
Rating voltage more than 90%
Check the voltge between and
Y
of outdoor unit terminal
Rating voltage more than 90%
Check the wiring of outdoor unit
Check the compressor
(Check the winding resistance)
OK
L
L
Rating voltage
less than 90%
Rating voltage
less than 90%
NG
Open or Short
Check the control P.C.B
the circuit for relay
driving.
Check the connecting
wire between indoor
and outdoor.
Change the control
P.C.B
Change the
compressor.
Check the compressor capacitor
41
Page 42

PCB DRIVING DESCRIPTION
Page 43
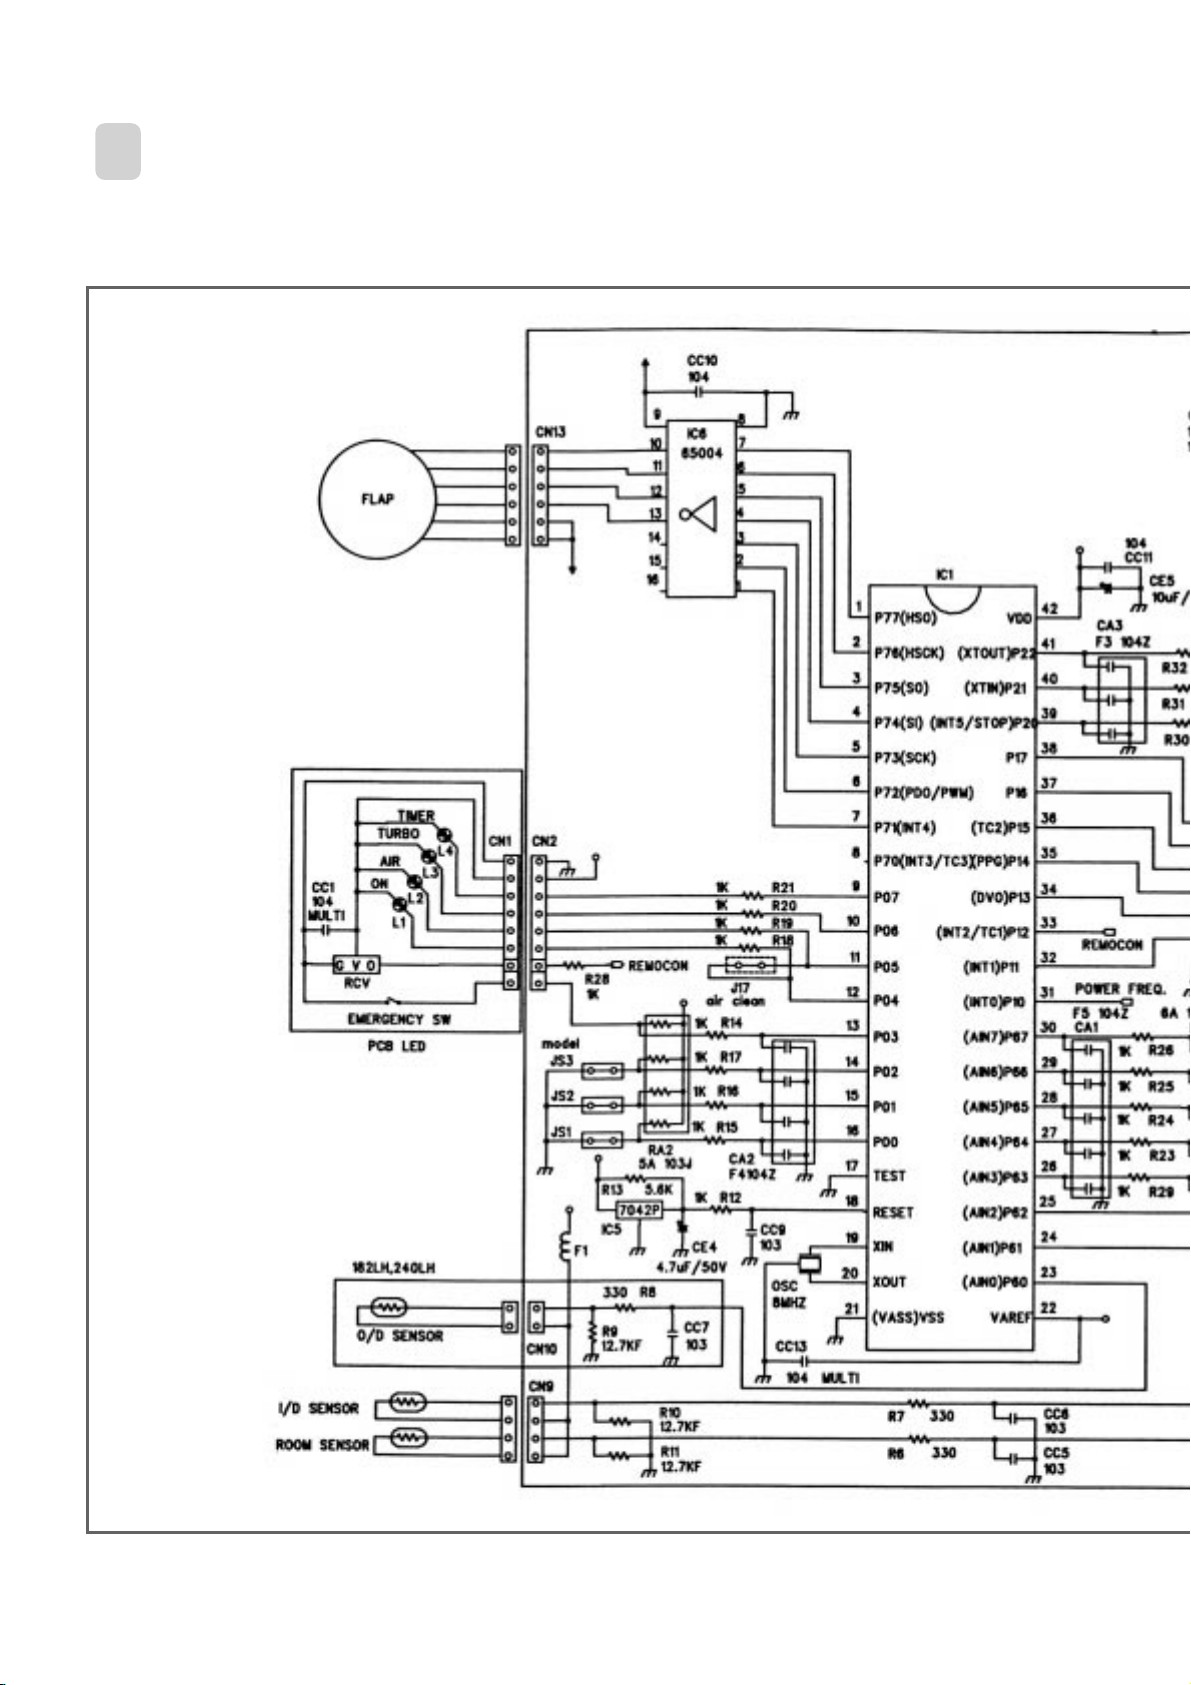
4
PCB CIRCUIT DIAGRAM
1
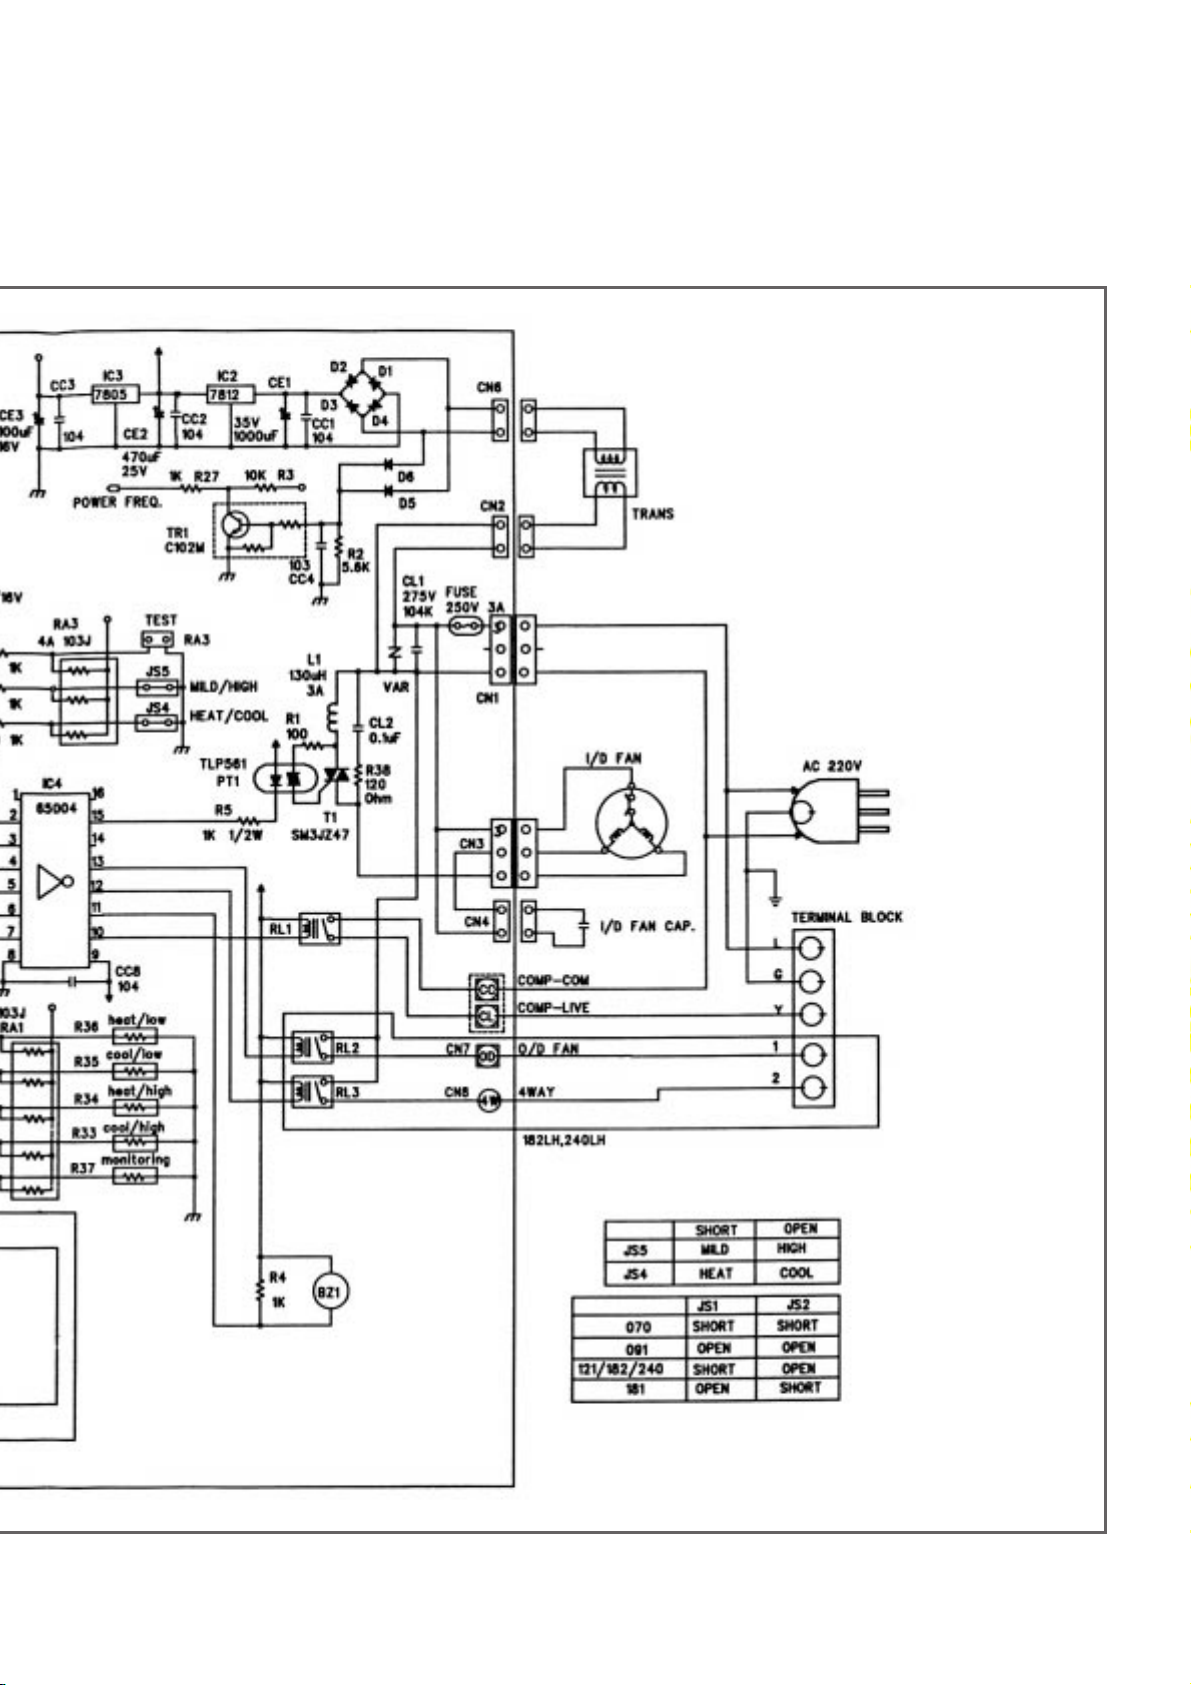
¡ DSB-070L/DSB-091L/DSB-240L
Page 44
3
Page 45
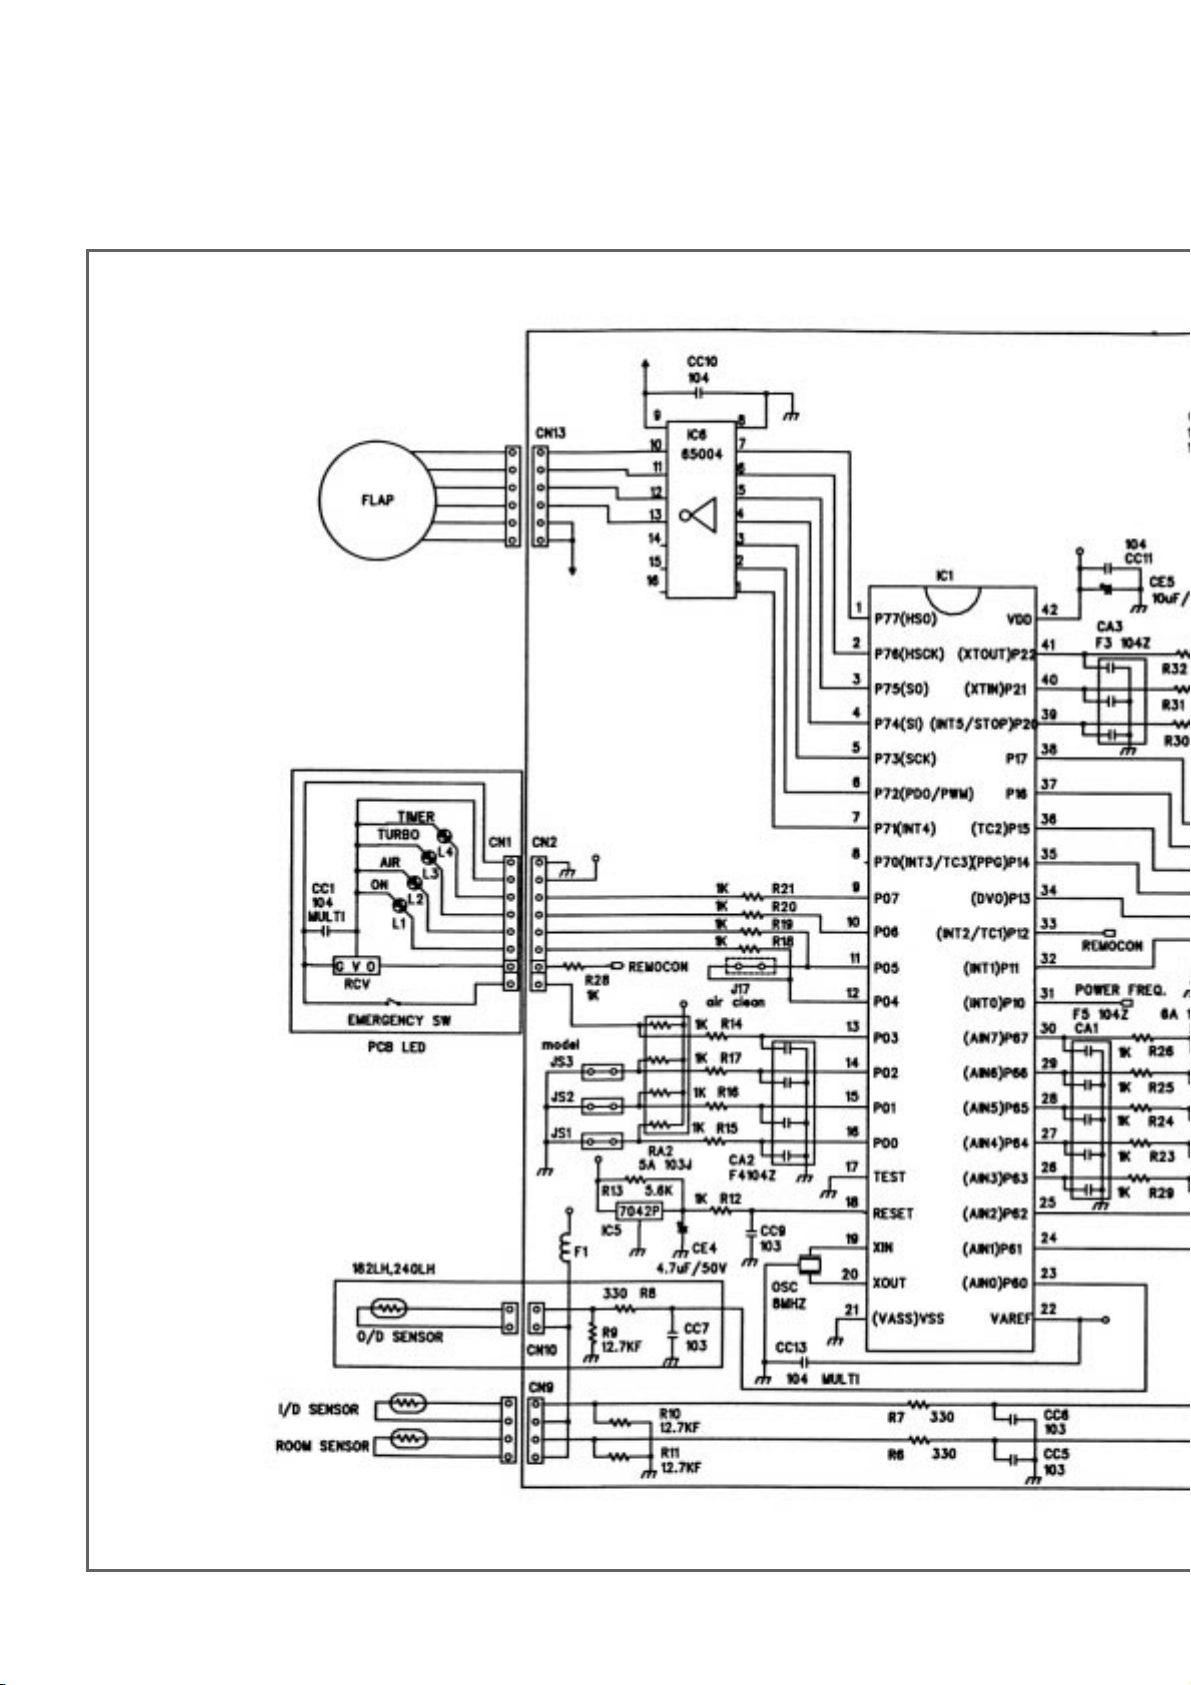
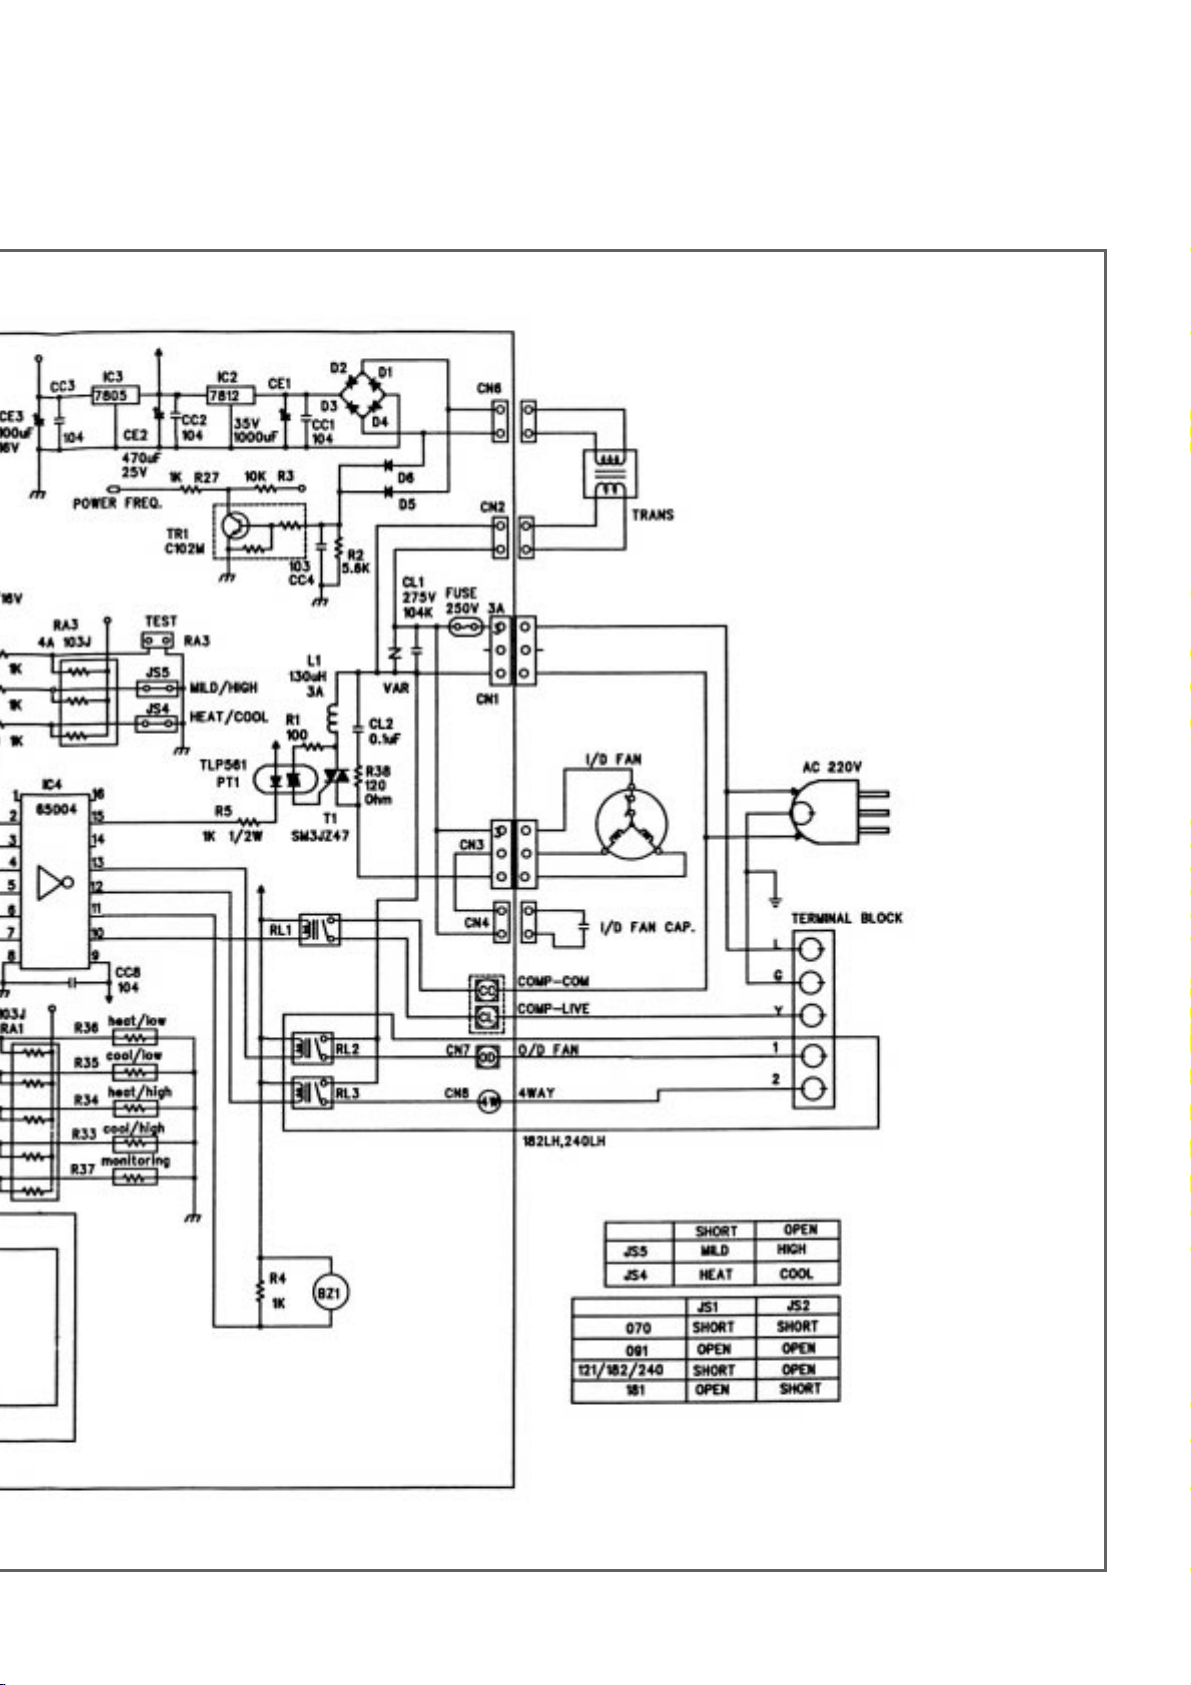
¡ DSB-121L/DSB-122L
4
Page 46
4
Page 47
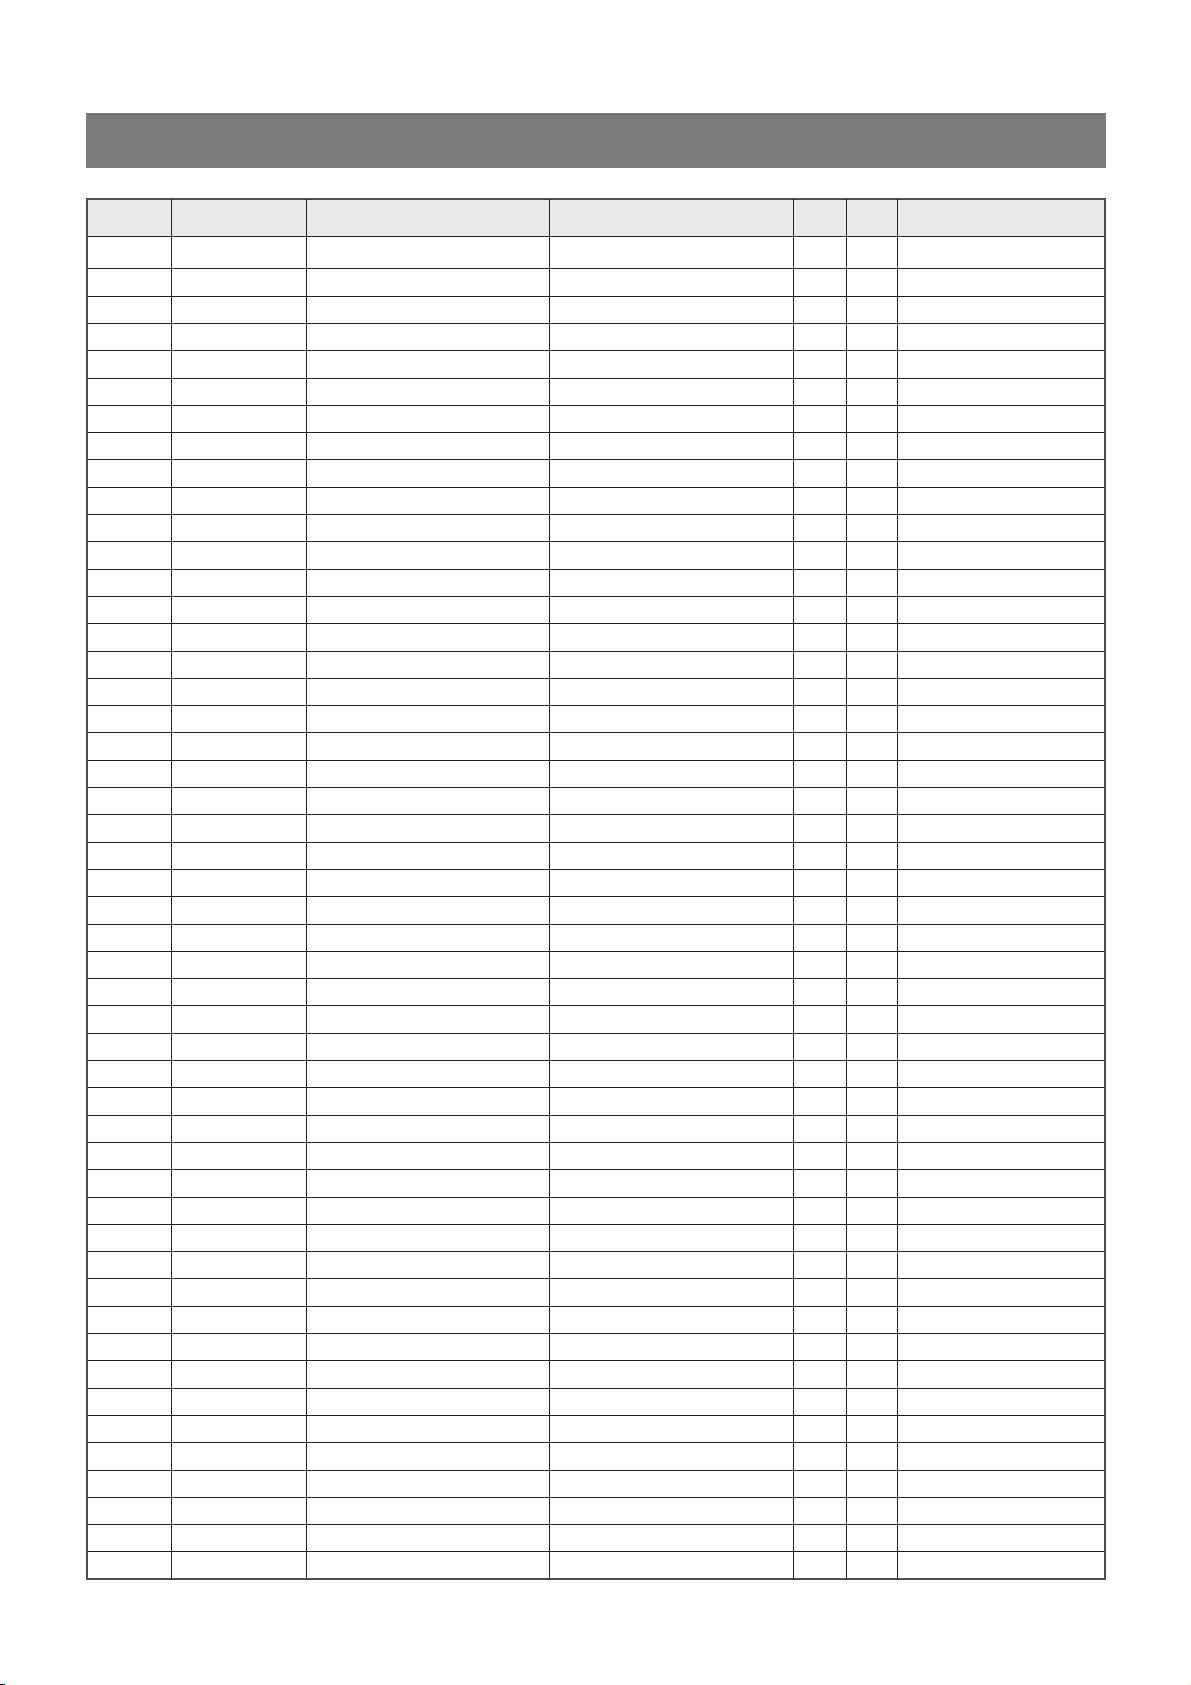
¡ DSB-070L/DSB-091L/DSB-240L PART LIST(INDOOR UNIT)
No PART CODE PART NAME SPEC Q'TY UNIT REMARK
BZ1 3105698200 BUZZER DP-2520BA 1 EA
CA1 CN5XD104M- C-ARRAY F5 104Z 1 EA
CA2 CN4XD104M- C-ARRAY F4 104Z 1 EA
CA3 CN3XD104M- C-ARRAY F3 104Z 1 EA
CC 3108803500 PIN GP881206-2(250) 1 EA
CC1 CCXE1E104M C-CERA 104Z 25VDC 1 EA
CC10 CCXE1E104M C-CERA 104Z 25VDC 1 EA
CC11 CCXE1E104M C-CERA 104Z 25VDC 1 EA
CC13 CDXE1H104M C-MULTI CR501B-Z5U,104Z,50V 1 EA
CC2 CCXE1E104M C-CERA 104Z 25VDC 1 EA
CC3 CCXE1E104M C-CERA 104Z 25VDC 1 EA
CC4 CCXE1H103M C-CERA 103Z 50VDC 1 EA
CC5 CCXE1H103M C-CERA 103Z 50VDC 1 EA
CC6 CCXE1H103M C-CERA 103Z 50VDC 1 EA
CC7 CCXE1H103M C-CERA 103Z 50VDC 1 EA 070LH,091LH,240LH
CC8 CCXE1E104M C-CERA 104Z 25VDC 1 EA
CC9 CCXE1H103M C-CERA 103Z 50VDC 1 EA
CE1 CEXE1V108C C-ELEC 1000MF 35V SD 1 EA
CE2 CEXE1E477C C-ELEC 470MF 25V SD 1 EA
CE3 CEXE1C107C C-ELEC 100MF 16V SD 1 EA 070LH,091LH,240LH
CE4 CEXE1C475A C-ELEC 4.7MF 50V SS 1 EA
CE5 CEXE1C106A C-ELEC 10MF 16V SS 1 EA
CL 3108803500 PIN GP881206-2(250) 1 EA
CL1 CLV-B3104M C-LINE ACROSS 275V 104K(PILKOR) 1 EA
CL2 CLV-B3104M C-LINE ACROSS 275V 104K(PILKOR) 1 EA
CLIP 3107000600 FUSE CLIP AFC-520 2 EA
CN1 3108803900 WAFER YW396-05AV(RED) 1 EA
CN10 3108801100 WAFER 5267-02A 1 EA 070LH,091LH,240LH
CN11 3108804000 WAFER SMAW250-08 1 EA
CN13 3108802000 WAFER SMW250-06(WHITE) 1 EA
CN2 3108803800 WAFER YFW800-02 1 EA
CN3 3108802900 WAFER YW396-05AV 1 EA
CN4 3108802500 WAFER YW396-03AV 1 EA
CN6 3108800320 WAFER 5281-02A 1 EA
CN7 3108803400 PIN GP881205-2(187) 1 EA
CN8 3108803600 WAFER YFW800-01 1 EA
CN9 3108804500 WAFER 5267-04A 1 EA
D1 DZN4004A-- DIODE KN4004A AUTO 52MM 1 EA
D2 DZN4004A-- DIODE KN4004A AUTO 52MM 1 EA
D3 DZN4004A-- DIODE KN4004A AUTO 52MM 1 EA
D4 DZN4004A-- DIODE KN4004A AUTO 52MM 1 EA
D5 DZN4004A-- DIODE KN4004A AUTO 52MM 1 EA
D6 DZN4004A-- DIODE KN4004A AUTO 52MM 1 EA
FUSE 5FVLB3152L FUSE GLASS TUBE 250V/50T 3.15A 1 EA
HS1 3105797200 HEAT SHINK 22(H)*23*17 1 EA
IC1 13GS1H13-- IC MICOM TMP87C846-1H13 1 EA
IC2 1KA7812AP- IC REGULATOR KIA 7812AP 1 EA
IC3 1KA7805AP- IC REGULATOR KIA 7805AP TO-220IS 1 EA
IC4 1KD65004AP IC DRIVER KID65004AP 1 EA
45
Page 48
No PART CODE PART NAME SPEC Q'TY UNIT REMARK
IC5 1KA7042P-- IC RESET KIA7042P 5L 1 EA
IC6 1KD65004AP IC DRIVER KID65004AP 1 EA
L1 52C1374001 COIL 130UH 3A 1 EA
OSC 4850103610 RESONATOR CST8.00MTW,8MHZ 1 EA
PCB 3104398102 PCB CONTROL 160.5*140*1.6T.1(42) 1 EA
PT1 1TLP560J-- IC PHOTO COUPLER TLP 560J 1 EA
R-OPT 3104810000 RESISTOR OPTION NOTE OPTION TABLE 1 ST
R1 RD-4K101J- R CARBON FILM 1/4 100 OHM J 1 EA
R10 RN-4K1272F R METAL FILM 1/4 12.7K OHM F 1 EA
R11 RN-4K1272F R METAL FILM 1/4 12.7K OHM F 1 EA
R12 RD-4K102J- R CARBON FILM 1/4 1K OHM J 1 EA
R13 RD-4K562J- R CARBON FILM 1/4 5.6K OHM J 1 EA
R14 RD-4K102J- R CARBON FILM 1/4 1K OHM J 1 EA
R15 RD-4K102J- R CARBON FILM 1/4 1K OHM J 1 EA
R16 RD-4K102J- R CARBON FILM 1/4 1K OHM J 1 EA
R17 RD-4K102J- R CARBON FILM 1/4 1K OHM J 1 EA
R18 RD-4K102J- R CARBON FILM 1/4 1K OHM J 1 EA
R19 RD-4K102J- R CARBON FILM 1/4 1K OHM J 1 EA
R2 RD-4K562J- R CARBON FILM 1/4 5.6K OHM J 1 EA
R20 RD-4K102J- R CARBON FILM 1/4 1K OHM J 1 EA
R21 RD-4K102J- R CARBON FILM 1/4 1K OHM J 1 EA
R23 RD-4K102J- R CARBON FILM 1/4 1K OHM J 1 EA
R24 RD-4K102J- R CARBON FILM 1/4 1K OHM J 1 EA
R25 RD-4K102J- R CARBON FILM 1/4 1K OHM J 1 EA
R26 RD-4K102J- R CARBON FILM 1/4 1K OHM J 1 EA
R27 RD-4K102J- R CARBON FILM 1/4 1K OHM J 1 EA
R28 RD-4K102J- R CARBON FILM 1/4 1K OHM J 1 EA
R29 RD-4K102J- R CARBON FILM 1/4 1K OHM J 1 EA
R3 RD-4K103J- R CARBON FILM 1/4 10K OHM J 1 EA
R30 RD-4K102J- R CARBON FILM 1/4 1K OHM J 1 EA
R31 RD-4K102J- R CARBON FILM 1/4 1K OHM J 1 EA
R32 RD-4K102J- R CARBON FILM 1/4 1K OHM J 1 EA
R38 RS01F121J- R M-OXIDE FILM 1W 120 OHM J 1 EA
R4 RD-4K102J- R CARBON FILM 1/4 1K OHM J 1 EA
R5 RD-2K102J- RESISTOR 1/2W - 1K 1 EA
R6 RD-4K331J- R CARBON FILM 1/4 330 OHM J 1 EA
R7 RD-4K331J- R CARBON FILM 1/4 330 OHM J 1 EA
R8 RD-4K331J- R CARBON FILM 1/4 330 OHM J 1 EA 070LH,091LH,240LH
R9 RN-4K1272F R METAL FILM 1/4 12.7K OHM F 1 EA 070LH,091LH,240LH
RA1 RA8K5103J- RESISTOR ARRAY 6A 103J 1 EA
RA2 RA8K4103J- RESISTOR ARRAY 5A 103J 1 EA
RA3 RA8K3103J- RESISTOR ARRAY 4A 103J 1 EA
RL1 5SC0101220 RELAY UKH-12SP 1 EA
RL1 5SC0101128 RELAY CS11-12SH 1C 1P 1 EA 240L/LH
RL2 5SC0101128 SW RELAY CS11-12SH 1C 1P 1 EA
RL3 5SC0101128 SW RELAY CS11-12SH 1C 1P 1 EA
SCRW 7122401211 SCREW TAPPING T2S TRS 4*12 MFZN 1 EA
T1 TSM3JZ47-- TRIAC SM3JZ47 1 EA
TEST 3108804300 WAFER YF254S-02 1 EA
TR1 TKRC102M-- TR KRC 102-M (TAPPING) 1 EA
VAR D15G561K-- VARISTOR 15G561K/350V 1 EA
WSHR 3106002900 WASHER 3*6 1 EA
46
Page 49
¡ CONTROL PCB ASS`Y (MODEL : 082M/H,102M/H,122M/H,151L,122L/LH,181L/LH)
No PART CODE PART NAME SPEC Q'TY UNIT REMARK
CA1 CN4XD104M- C-ARRAY F4 104Z 1 EA
CA2 CN3XD104M- C-ARRAY F3 104Z 1 EA
CC1 CCXE1E104M C-CERA 104Z 25VDC 1 EA
CC10 CCXE1H103M C-CERA 103Z 50VDC 1 EA 122LH,181LH
CC13 CDXE1H104M C-MULTI CR501B-Z5U,104Z,50V 1 EA
CC2 CCXE1E104M C-CERA 104Z 25VDC 1 EA
CC3 CCXE1H103M C-CERA 103Z 50VDC 1 EA
CC4 CCXE1H103M C-CERA 103Z 50VDC 1 EA
CC5 CCXE1H103M C-CERA 103Z 50VDC 1 EA
CC6 CCXE1H103M C-CERA 103Z 50VDC 1 EA
CC7 CCXE1E104M C-CERA 104Z 25VDC 1 EA
CC8 CCXE1H103M C-CERA 103Z 50VDC 1 EA
CC9 CCXE1H103M C-CERA 103Z 50VDC 1 EA
CE1 CEXE1C475A C-ELEC 4.7MF 50V SS 1 EA
CE2 CEXE1C106A C-ELEC 10MF 16V SS 1 EA
CN1 3108802400 WAFER SMAW250-10 1 EA
CN2 3108804100 WAFER SMW250-07 1 EA
CN3 3108804200 WAFER SMW250-02 1 EA
CN4 3108802010 WAFER SMW250-06(RED) 1 EA 181L/LH
CN5 3108802000 WAFER SMW250-06(WHITE) 1 EA
CN6 3108802000 WAFER SMW250-06(WHITE) 1 EA 181L/LH
CN7 3108801100 WAFER 5267-02A 1 EA 122LH,181LH
CN8 3108804500 WAFER 5267-04A 1 EA
D1 DZN4148FTB DIODE 1N4148 AUTO 26MM 1 EA 181L/LH
F1 52F6010100 FILTER EMI 0.6*10*3TUTN 1 EA 181LH
IC1 13GS1H13-- IC MICOM TMP87C846-1H13 1 EA
IC2 1KA7042P-- IC RESET KIA7042P 5L 1 EA
IC3 1KD65004AP IC DRIVER KID65004AP 1 EA
IC4 1KD65004AP IC DRIVER KID65004AP 1 EA
OSC1 4850103610 RESONATOR CST8.00MTW,8MHZ 1 EA
PCB 3104397162 PCB CONTROL 110*90.5*1.6T(99) 1 EA
R-OPT 3104810000 RESISTOR OPTION NOTE OPTION TABLE 1 ST
R1 RD-4K103J- R CARBON FILM 1/4 10K OHM J 1 EA
R10 RD-4K562J- R CARBON FILM 1/4 5.6K OHM J 1 EA
R11 RD-4K102J- R CARBON FILM 1/4 1K OHM J 1 EA
R12 RD-4K102J- R CARBON FILM 1/4 1K OHM J 1 EA
R13 RD-4K102J- R CARBON FILM 1/4 1K OHM J 1 EA
R14 RD-4K102J- R CARBON FILM 1/4 1K OHM J 1 EA
R16 RD-4K103J- R CARBON FILM 1/4 10K OHM J 1 EA
R17 RD-4K103J- R CARBON FILM 1/4 10K OHM J 1 EA 181L/LH
R18 RN-4K1272F R METAL FILM 1/4 12.7K OHM F 1 EA
R19 RD-4K331J- R CARBON FILM 1/4 330 OHM J 1 EA
47
Page 50
No PART CODE PART NAME SPEC Q'TY UNIT REMARK
R2 RD-4K103J- R CARBON FILM 1/4 10K OHM J 1 EA
R20 RN-4K1272F R METAL FILM 1/4 12.7K OHM F 1 EA
R21 RD-4K331J- R CARBON FILM 1/4 330 OHM J 1 EA
R22 RN-4K1272F R METAL FILM 1/4 12.7K OHM F 1 EA 122LH,181LH
R23 RD-4K331J- R CARBON FILM 1/4 330 OHM J 1 EA 122LH,181LH
R26 RD-4K102J- R CARBON FILM 1/4 1K OHM J 1 EA
R3 RD-4K102J- R CARBON FILM 1/4 1K OHM J 1 EA
R32 RD-4K102J- R CARBON FILM 1/4 1K OHM J 1 EA
R33 RD-4K102J- R CARBON FILM 1/4 1K OHM J 1 EA
R34 RD-4K102J- R CARBON FILM 1/4 1K OHM J 1 EA
R4 RD-4K102J- R CARBON FILM 1/4 1K OHM J 1 EA
R5 RD-4K102J- R CARBON FILM 1/4 1K OHM J 1 EA
R6 RD-4K102J- R CARBON FILM 1/4 1K OHM J 1 EA
R7 RD-4K102J- R CARBON FILM 1/4 1K OHM J 1 EA
R8 RD-4K102J- R CARBON FILM 1/4 1K OHM J 1 EA
R9 RD-4K102J- R CARBON FILM 1/4 1K OHM J 1 EA
RA1 RA8K5103J- RESISTOR ARRAY 6A 103J 1 EA
RA2 RA8K3103J- RESISTOR ARRAY 4A 103J 1 EA
TEST 3108804300 WAFER YF254S-02 1 EA
TR1 TZTC3198Y- TRANSISTOR KTC3198Y-(1815Y) 1 EA 181L/LH
TR2 TKRC102M-- TR KRC 102-M (TAPPING) 1 EA 181L/LH
¡ R-OPT. DETAIL LIST
MODEL
LOCATION
DSB-121L
DSB-122LH
DSB-181L, (151L)
DSB-181LH
LOCATION
DSB-070L, 091L
DSB-070LH
DSB-091LH
DSB-240L
DSA-240L
DSB-240LH
DSA-240LH
Cool
R28
2.87K
2.87K
3.65K
3.65K
R33
3.24K
3.24K
3.24K
3.76K
6.34K
5.76K
(6.34K)
High Low
Heat
R29
X
2.87K
X
3.65K
R34
X
49.9K
12.4K
X
X
5.76K
(6.34K)
Cool
R30
28.0K
28.0K
22.6K
22.6K
R35
24.9K
24.9K
24.9K
36.5K
7.68K
36.5K
(7.68K)
Heat
R31
X
28.0K
X
22.6K
R36
X
32.4K
15.0K
X
X
36.5K
(7.68K)
Monitoring
R27
X
24.3K
X
22.1K
R37
X
24.3K
24.3K
X
X
22.1K
(6.19K)
48
Page 51
¡ POWER PCB ASS`Y (MODEL : 122L/LH,151L,181L/LH,082M/H,102M/H,122M/H)
No PART CODE PART NAME SPEC Q'TY UNIT REMARK
BZ1 3105698200 BUZZER DP-2520BA 1 EA
C1 CLV-B3104M C-LINE ACROSS 275V 104K(PILKOR) 1 EA
C2 CLV-B3104M C-LINE ACROSS 275V 104K(PILKOR) 1 EA
CC 3108803500 PIN GP881206-2(250) 1 EA
CC1 CCXE1E104M C-CERA 104Z 25VDC 1 EA
CC2 CCXE1E104M C-CERA 104Z 25VDC 1 EA
CC3 CCXE1E104M C-CERA 104Z 25VDC 1 EA
CC4 CCXE1H103M C-CERA 103Z 50VDC 1 EA
CE1 CEXE1V108C C-ELEC 1000MF 35V SD 1 EA
CE2 CEXE1E477C C-ELEC 470MF 25V SD 1 EA
CE3 CEXE1C107C C-ELEC 100MF 16V SD 1 EA
CL 3108803500 PIN GP881206-2(250) 1 EA
CLIP 3107000600 FUSE CLIP AFC-520 2 EA
CN1 3108803900 WAFER YW396-05AV(RED) 1 EA
CN2 3108803800 WAFER YFW800-02 1 EA
CN3 3108802900 WAFER YW396-05AV 1 EA
CN4 3108802500 WAFER YW396-03AV 1 EA
CN5 3108802800 WAFER YW396-04AV(BLUE) 1 EA 082H,102H,122H
CN6 3108802100 WAFER SMW250-10 1 EA
CN7 3108800320 WAFER 5281-02A 1 EA
CN8 3108803400 PIN GP881205-2(187) 1 EA 122LH,181LH
CN9 3108803600 WAFER YFW800-01 1 EA 122LH,181LH
D1 DZN4004A-- DIODE KN4004A AUTO 52MM 1 EA
D2 DZN4004A-- DIODE KN4004A AUTO 52MM 1 EA
D3 DZN4004A-- DIODE KN4004A AUTO 52MM 1 EA
D4 DZN4004A-- DIODE KN4004A AUTO 52MM 1 EA
D5 DZN4004A-- DIODE KN4004A AUTO 52MM 1 EA
D6 DZN4004A-- DIODE KN4004A AUTO 52MM 1 EA
FUSE 5FVLB3152L FUSE GLASS TUBE 250V/50T 3.15A 1 EA
HS1 3105797200 HEAT SHINK 22(H)*23*17 1 EA
IC1 1KA7812AP- IC REGULATOR KIA 7812AP 1 EA
IC2 1KA7805AP- IC REGULATOR KIA 7805AP TO-220IS 1 EA
L1 52C1374001 COIL 130UH 3A 1 EA
PCB 3104396142 PCB POWER 130*81*1.6T(84) 1 EA
PT1 1TLP560J-- IC PHOTO COUPLER TLP 560J 1 EA
R1 RD-4K102J- R CARBON FILM 1/4 1K OHM J 1 EA
R2 RD-4K103J- R CARBON FILM 1/4 10K OHM J 1 EA
R3 RD-4K562J- R CARBON FILM 1/4 5.6K OHM J 1 EA
R4 RD-2K102J- RESISTOR 1/2W - 1K 1 EA
R5 RD-4K101J- R CARBON FILM 1/4 100 OHM J 1 EA
R6 RD-4K102J- R CARBON FILM 1/4 1K OHM J 1 EA
R7 RS01F121J- R M-OXIDE FILM 1W 120 OHM J 1 EA
RL1 5SC0101220 RELAY UKH-12SP 1 EA 122L/LH,082M/H
RL1 5SC0101220 SW RELAY CS11-12SH 1C 1P 1 EA
RL2 5SC0101128 SW RELAY CS11-12SH 1C 1P 1 EA 122LH,181LH
RL3 5SC0101128 SW RELAY CS11-12SH 1C 1P 1 EA 122LH,181LH
RL4 5SC0101128 SW RELAY CS11-12SH 1C 1P 1 EA 082H,102H,122H
SCRW 7122401211 SCREW TAPPING T2S TRS 4*12 MFZN 1 EA
T1 TSM3JZ47-- TRIAC SM3JZ47 1 EA
TR1 TKRC102M-- TR KRC 102-M (TAPPING) 1 EA
VAR D15G561K-- VARISTOR 15G561K/350V 1 EA
WSHR 3106002900 WASHER 3*6 1 EA
49
Page 52
¡ LED PCB ASS`Y (MODEL : 070L/LH,091L/LH,052M/H)
No PART CODE PART NAME SPEC Q'TY UNIT REMARK
CC1 CDXE1H104M C-MULTI CR501B-Z5U,104Z,50V 1 EA
CN1 3108804800 WAFER SMAW250-08 1 EA
HOLD 3103002700 HOLDER LED ABS 1 EA
L1 DDLS05031D LED DLSO-5031D(RED) 1 EA
L2 DDLG05031D LED DLG-5031D(GRN) 1 EA
L3 DDLS05031D LED DLSO-5031D(RED) 1 EA
L4 DDLY05031D LED DLY-5031D(YLW) 1 EA
PCB 3104398201 PCB LED 110*31*1.6T.10(288) 1 EA
RCV 1TSP1838YA RECEIVER MODULE TSOP-1838YA1(HOLDER) 1 EA
SW1 5S40202000 S/W PUSH JPS2281 1 EA
¡ LED PCB ASS`Y (MODEL : 240L/LH)
No PART CODE PART NAME SPEC Q'TY UNIT REMARK
CC1 CDXE1H104M C-MULTI CR501B-Z5U,104Z,50V 1 EA
CN1 3108804800 WAFER SMAW250-08 1 EA
HOLD 3103004100 HOLDER LED DSB-240L/LH 1 EA
L1 DDLS05031D LED DLSO-5031D(RED) 1 EA
L2 DDLG05031D LED DLG-5031D(GRN) 1 EA
L3 DDLS05031D LED DLSO-5031D(RED) 1 EA
L4 DDLY05031D LED DLY-5031D(YLW) 1 EA
PCB 3104398202 PCB LED 150*24.5*1.6T(240) 1 EA
RCV 1TSP1838YA RECEIVER MODULE TSOP-1838YA1(HOLDER) 1 EA
SW1 5S40202000 S/W PUSH JPS2281 1 EA
¡ LED PCB ASS`Y (MODEL : 122L/LH,080M/H)
No PART CODE PART NAME SPEC Q'TY UNIT REMARK
CC1 CXCH1H103M C CERA 103J/50 20% 1 EA
CN1 3108804600 WAFER SMAW250-07 1 EA
HOLD 3103001900 LED HOLDER ABS(VO) T2.0 1 EA
L1 DDSR302D-- LED DLSR-302D(RED) 1 EA
L2 DDLG302D-- LED DLG-302D 1 EA
L3 DDSR302D-- LED DLSR-302D(RED) 1 EA
L4 DDLY302D-- LED DLY-302D 1 EA
PCB 3104397402 LED PCB 72*50*1.6T(247) 1 EA
RCV 1TSP1838YA RECEIVER MODULE TSOP-1838YA1(HOLDER) 1 EA
¡ LED PCB ASS`Y (MODEL : 181L/LH,151L/LH,102M/H,122M/H)
No PART CODE PART NAME SPEC Q'TY UNIT REMARK
CC1 CXCH1H103M C CERA 103J/50 20% 1 EA
CN1 3108804600 WAFER SMAW250-07 1 EA
HOLD 3103001100 LED HOLDER ABS (BLK) 1 EA
L1 DDSR302D-- LED DLSR-302D(RED) 1 EA
L2 DDLG302D-- LED DLG-302D 1 EA
L3 DDSR302D-- LED DLSR-302D(RED) 1 EA
L4 DDLY302D-- LED DLY-302D 1 EA
PCB 3104395412 LED PCB 67.5*40*1.6T(350) 1 EA
RCV 1TSP1838YA RECEIVER MODULE TSOP-1838YA1(HOLDER) 1 EA
¡ SWITCH PCB ASS`Y (MODEL : 181L/LH, 151L,102M/H,122M/H)
No PART CODE PART NAME SPEC Q'TY UNIT REMARK
CN1 3108804700 WAFER SMAW250-02 1 EA
PCB 3104395311 S/W PCB 36*29.5*1.6T(891) 1 EA
SW1 5S30101330 SWITCH SLIDE KSA-2340B 1 EA
50
Page 53
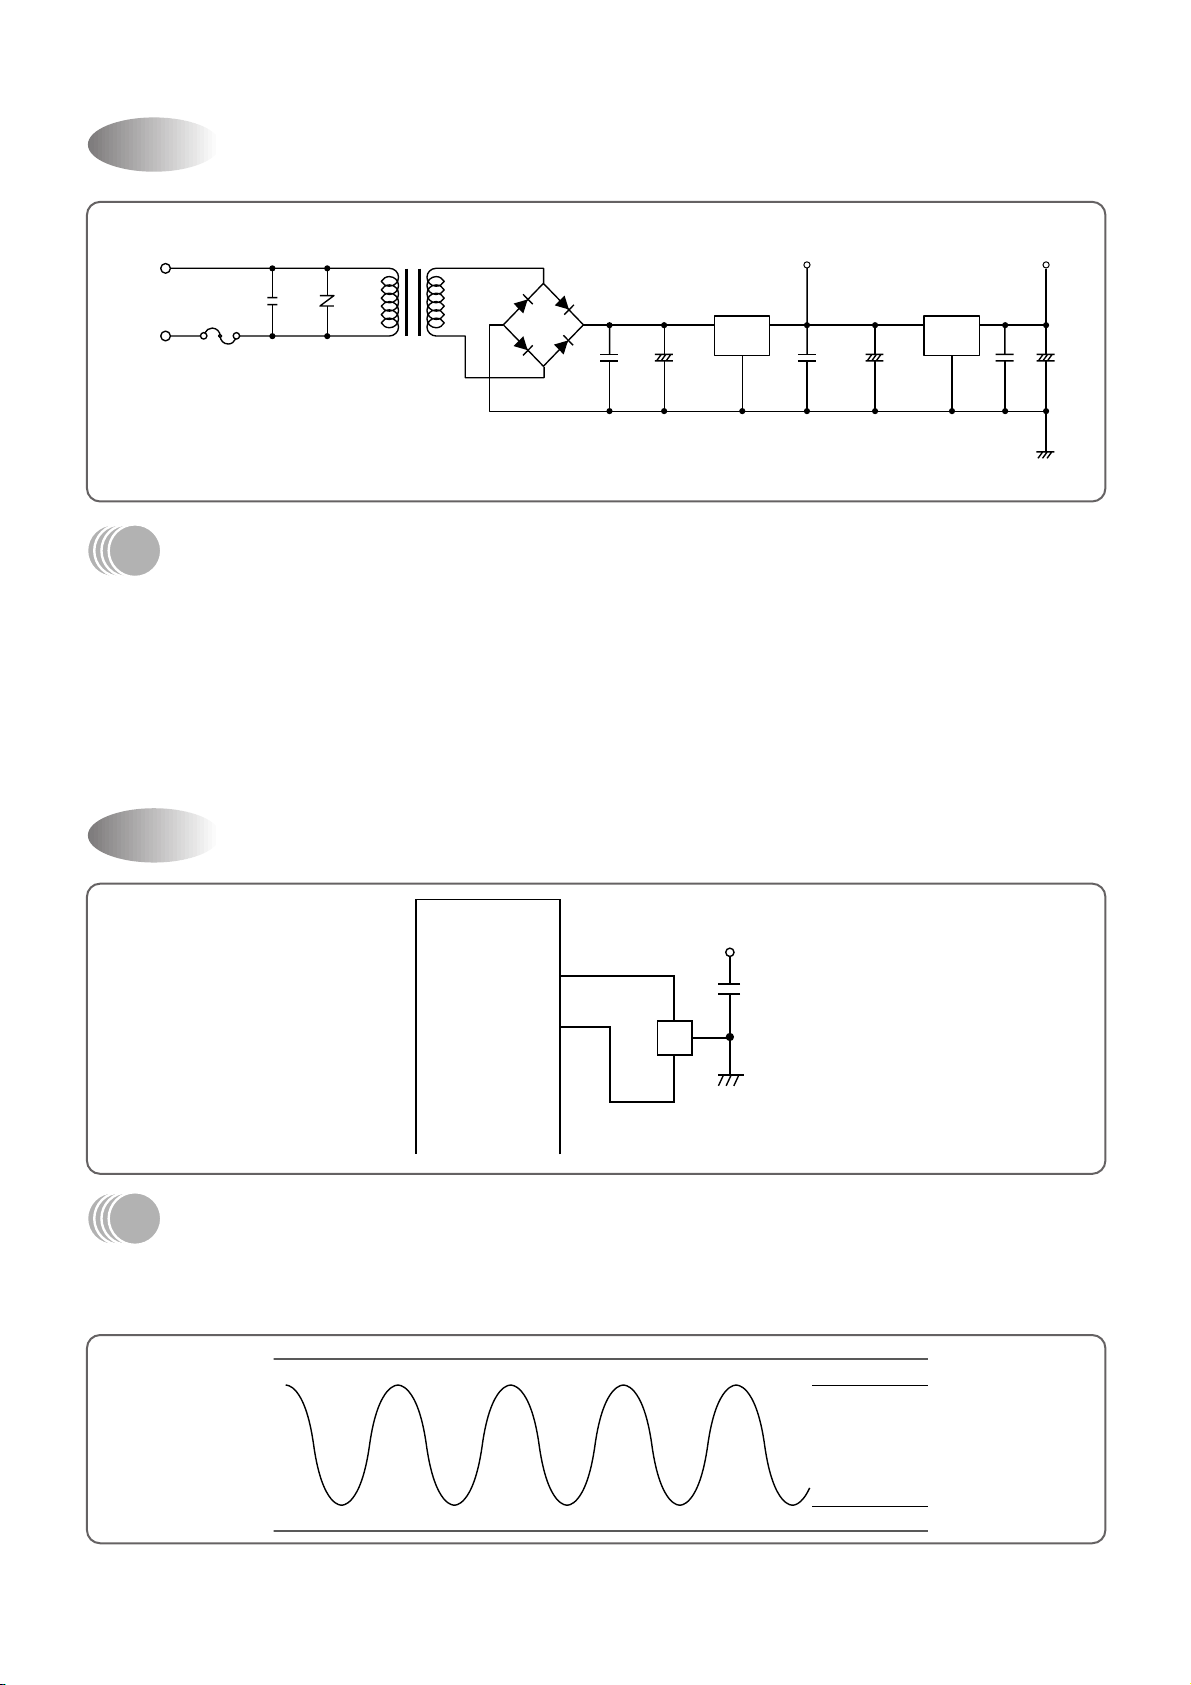
Power Supply(1)
AC 220V
CL1
275V
104K
VAR
FUSE1
3.15A
POWER TRANS
D2
CC1 CE1
D3
D1
D4
104
+
35V
1000µF
IC2
7812
VI VO
G
IC3
7805
VI VO
G
+
25V
470µF
CC2 CC3 CE3CE2
104
+
16V
100µF
104
12V 5V
19
OSC
CC13
104
5V
8M
20
VDD-10%
VSS+10%
DESCRIPTION
DC Po wer Supply in circuit needs +12V and +5V. +12V is used for Compressor Driving Rela y, Triac Driving
Photo Triac, Buzzer Driving Swing, Sweep Motor. A C v oltage of secondary Po wer Transformer is rectified by
Bridge Diode, and it is filtering by Main Condensor CE1.
Filtered DC voltage is about +18V, is regulated +12V DC by Regulator IC7812.
And it is regulated +5V DC by Regulator IC7805.
V AR is serge filter and CC1, CC2, CC3 is Noise filter .
Oscillator(2)
DESCRIPTION
Oscillatory Frequency drive Micom, it is made up 8MHz resonator oscillatory Freqency.
Ocillatory wave is as follo wing Fig 2-1.
51
Fig 2-1
Page 54
Sensor(3)
070LH,091LH
182LH, 240LH
O/C SENSOR
I/C SENSOR
ROOM SENSOR
CN10
330 R8
R7R6330
330
CC5
103
R9
12.7kF
CC7
103
103
CC6
23
24
25
MICOM
CN9
R10
12.7KF
R11
12.7KF
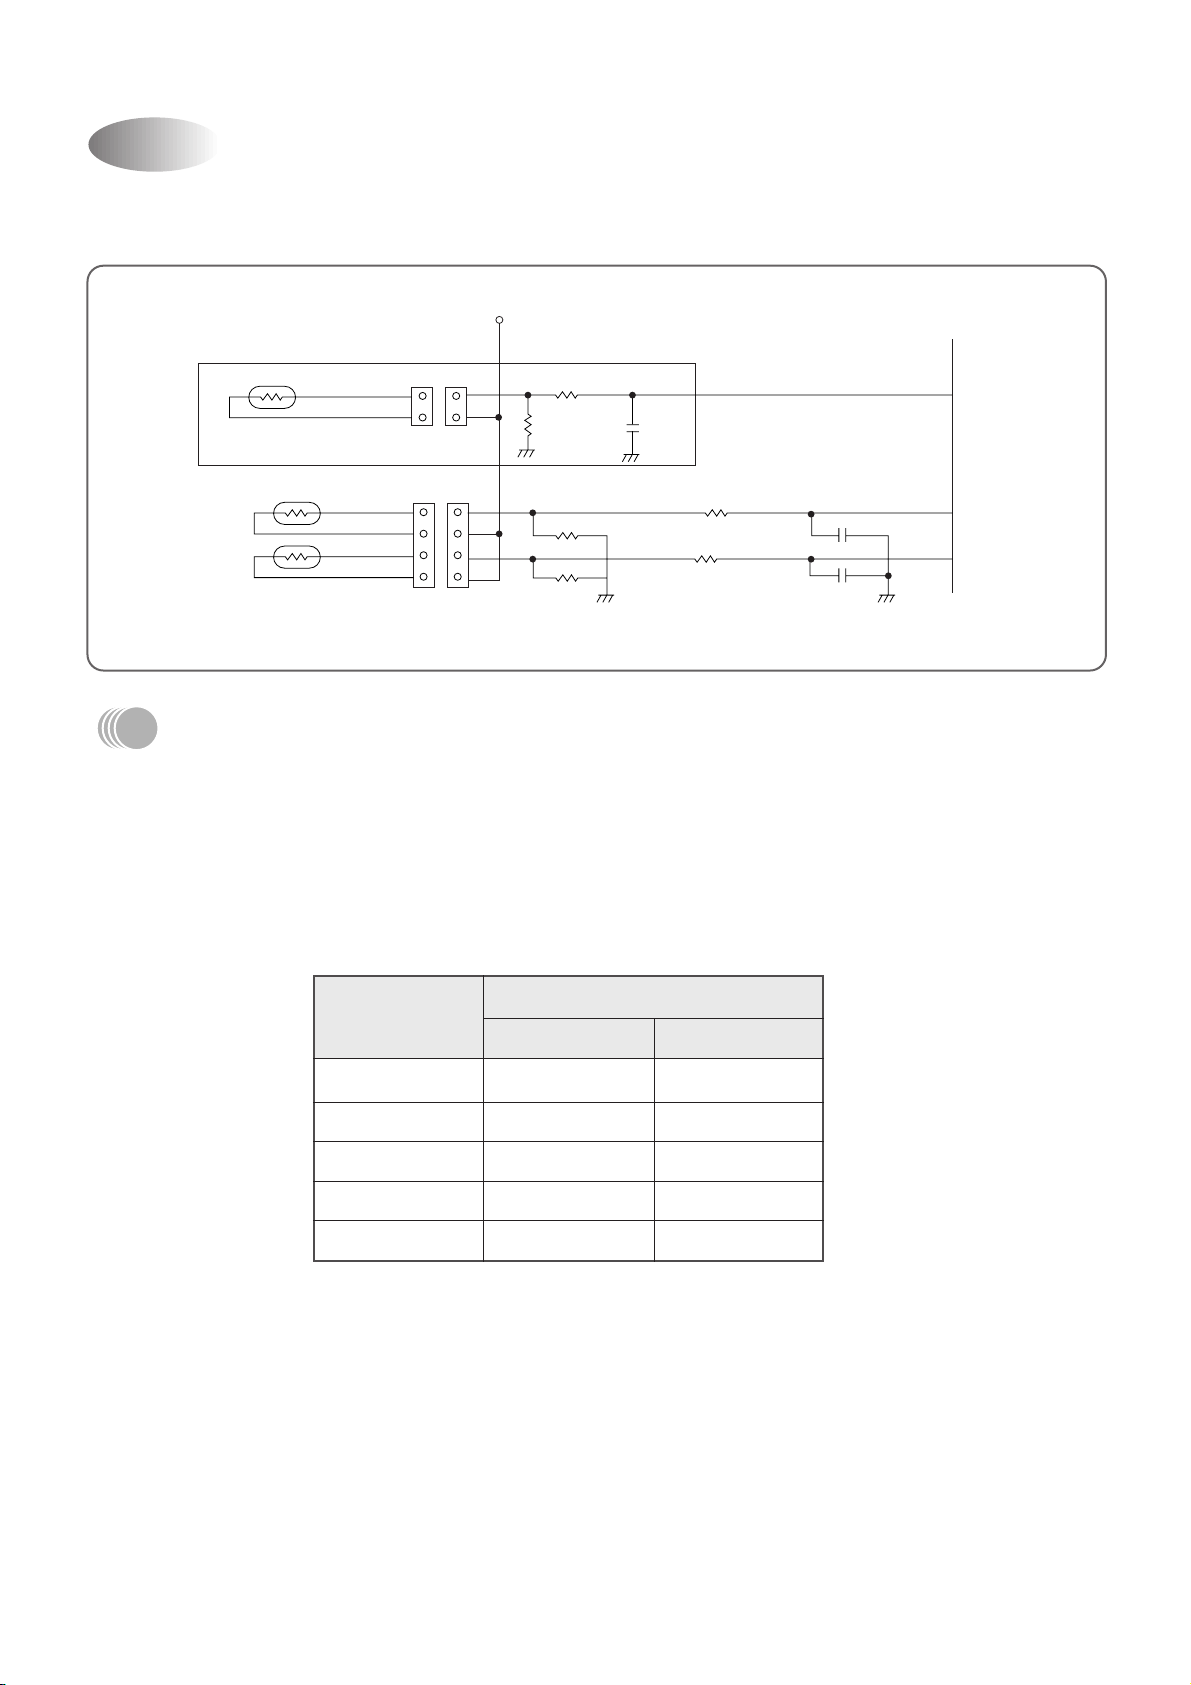
Room temperature and Evaporator temperature Sensor Input
DESCRIPTION
Number 24, 25 of Micom is Terminal of A/D convertor Input.
Room temperature and Evaporator temperature is sensing by change of Thermister Resistance, Micom is put
in 5V by ratio between R10 (12.7KΩ) and R11 (12.7KΩ).
Relation between temperature and voltage is follo wing Table 3-1.
CC5, 6 is Noise filter.
Temperature
(°C)
-5 1.127 1.127
0 1.378 1.378
5 1.650 1.650
10 1.936 1.936
15 2.228 2.228
Table 3-1
Voltage (V)
No. 1 No. 3
52
Page 55
T riac Driving(4)
N
L
AC 220V
TO MOTOR
T1
SM3JZ47
L1
12
130µH
3A
SN1
0.1µF
120Ohm
TLP561
PT1
12V
R5
1K
1/2W
IC4
KID 65004
MICOM
38
215
AC220V
TRIGGER
MOTOR
INPUT
LOW SPEED MEDIUM SPEED HIGH SPEED
DESCRIPTION
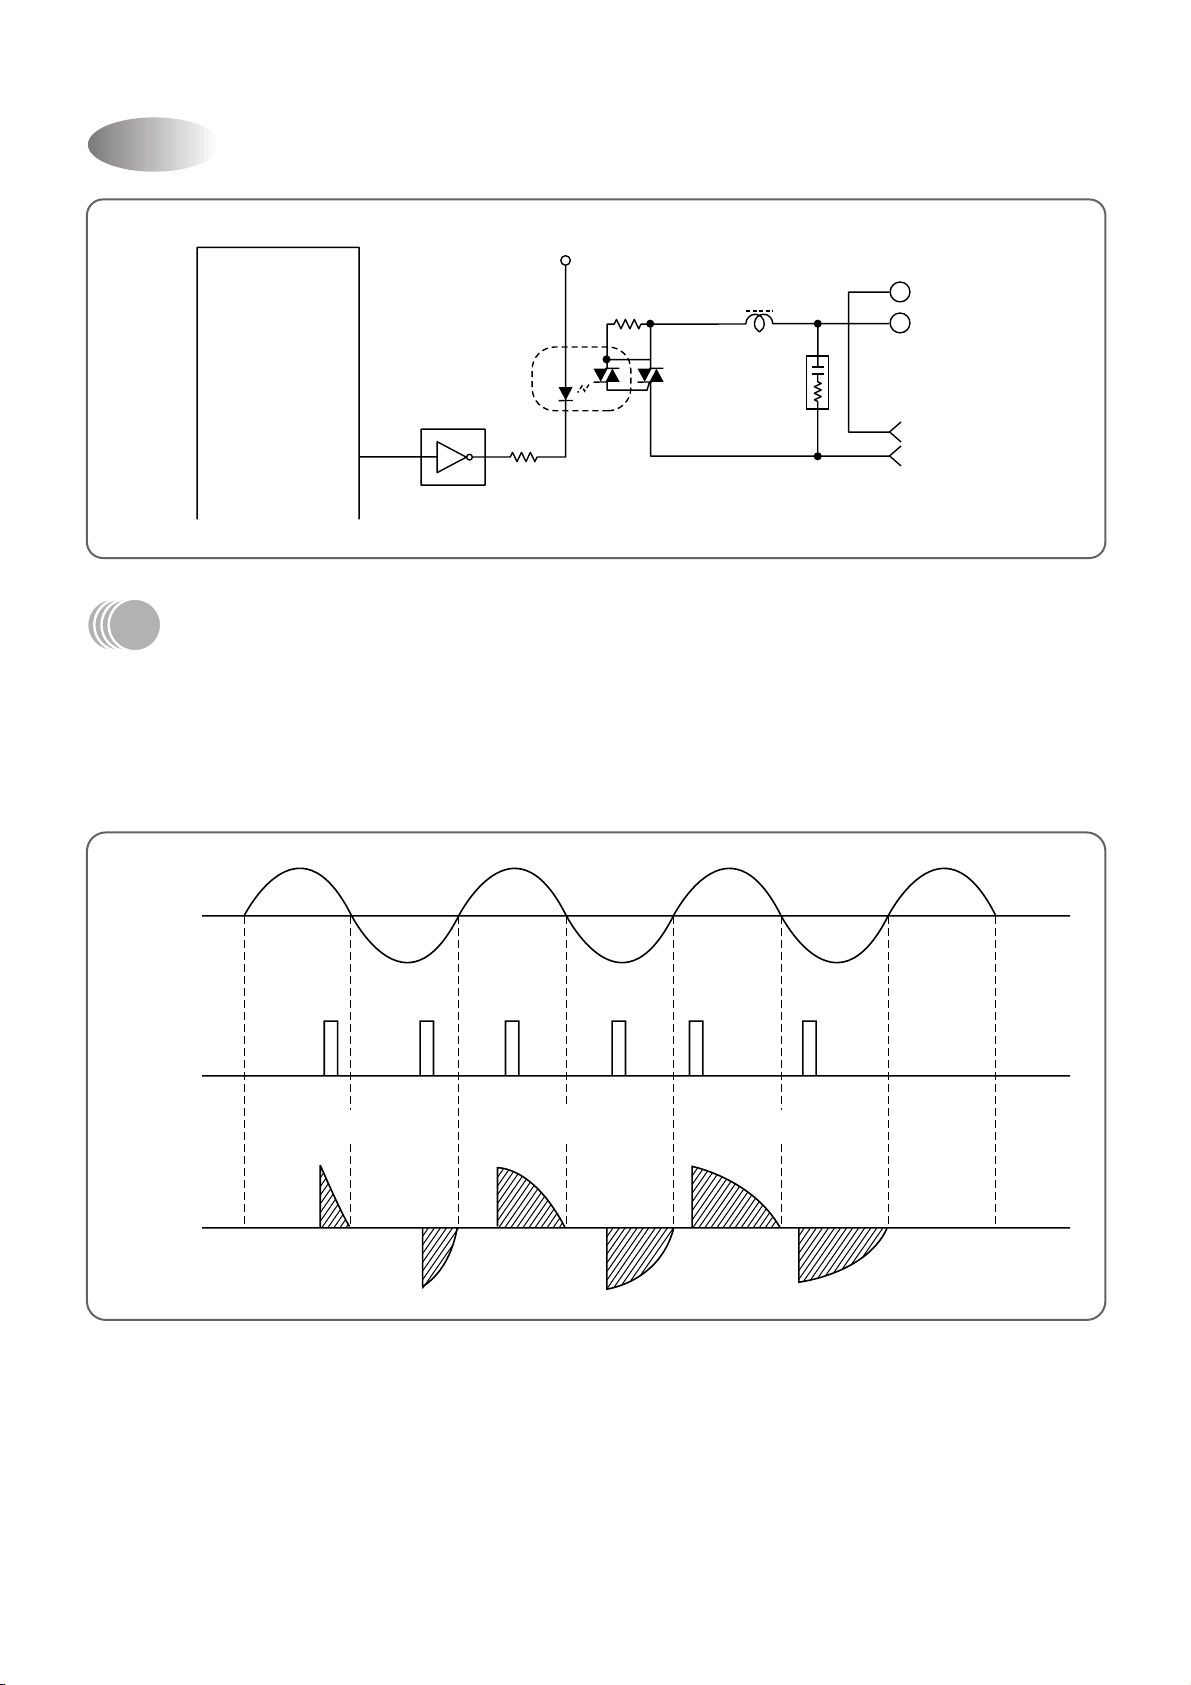
Number 38 Terminal of Micom is put out Pulse Output, by way of Buffer it is driving Photo Triac is supplied
Trigger Signal.
Trigger Test of Triac is detected Zero Cross Part of AC input and it is triggered from Zero Cross part to Time
delay part according to Fan Speed. (Ref. Fig 4-1) SN1 is Snub ber .
LOW SPEED
MEDIUM SPEED
Fig 4-1
53
HIGH SPEED
Page 56
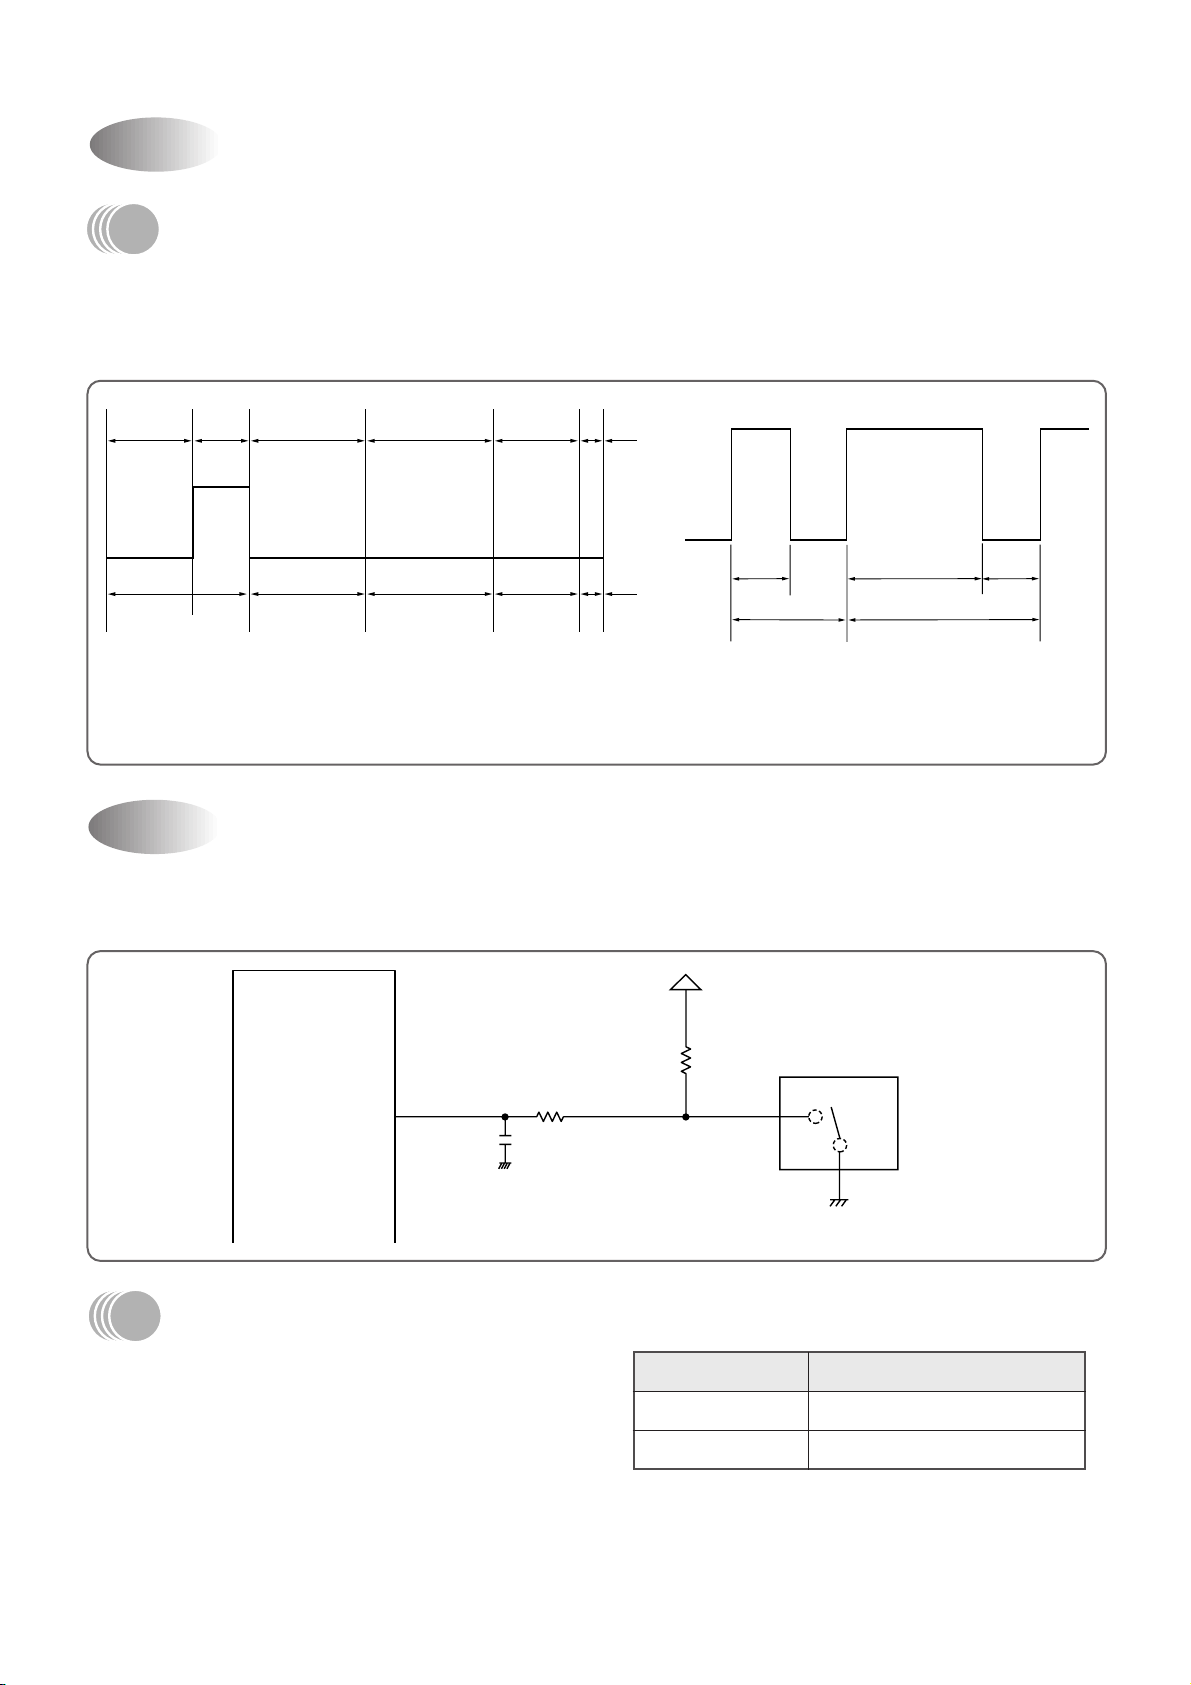
LEADER CODE
CUSTOM
CODE
DATA
CODE
CHECK
SUM
TAILER
9ms 4.5ms 16bit 16bit24bit 8bit
Remote Controller(5)
0.56ms 0.56ms1.69ms
1.12ms 2.25ms
bit 0 bit 1
MICOM
13
R14
1K
RA1
5V
CA1
F4104Z
P2
MODE
SELECT
PUSH S/W
DESCRIPTION
Signal from Remote Controller put in only Control Data Signal at Micom Terminal of Number 33, which is gotten
fid of Carrier (38KHz) from Receive Module. Signal Wa v e repeat third as follo wing Fig 5-1.
But in Secondary Wave Custom Code is Re v ersed F ace .
Fig 5-1
Selecting Mode(6)
(SELECT S/W INPUT, OUTPUT)
Fig 5-2
BIT STRUCTURE
DESCRIPTION
There are Mode according to SW position as
following Table 6-1.
According as port of fixed Micom is Low, the unit is
operating as following Table 6-1.
54
POSITION MODE
OPEN REMOCON
GN D EMERGENCY
Table 6-1
Page 57
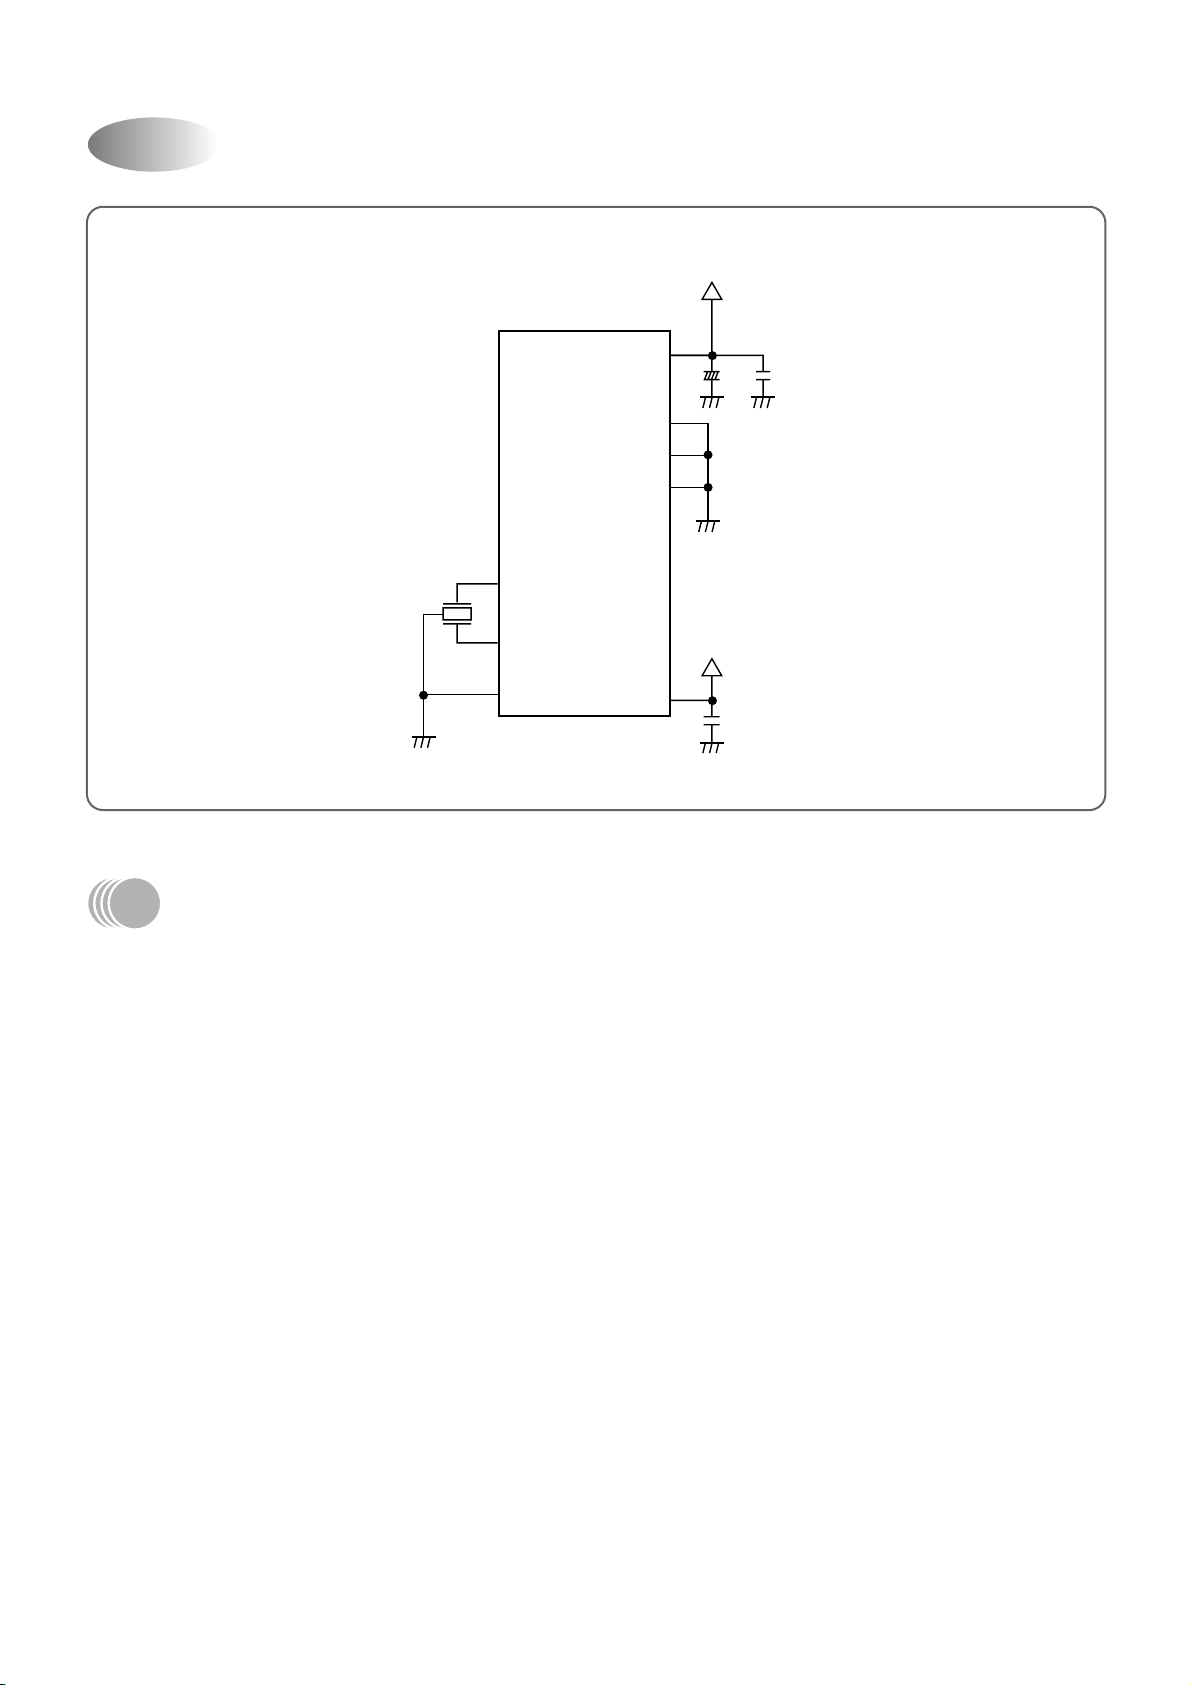
Micom Power Supply(7)
VDD 42
CE5
10µF
16V
CC11
104
CC13
104
+
5V
41
40
39
22
21
19
OSC
8MHz
20
VSS
MICOM
DESCRIPTION
MICOM Po wer is supplied 5V at Number 42 using VDD, Number 19, 20 Vsing Oscillator, CC13 is noise filter.
55
Page 58
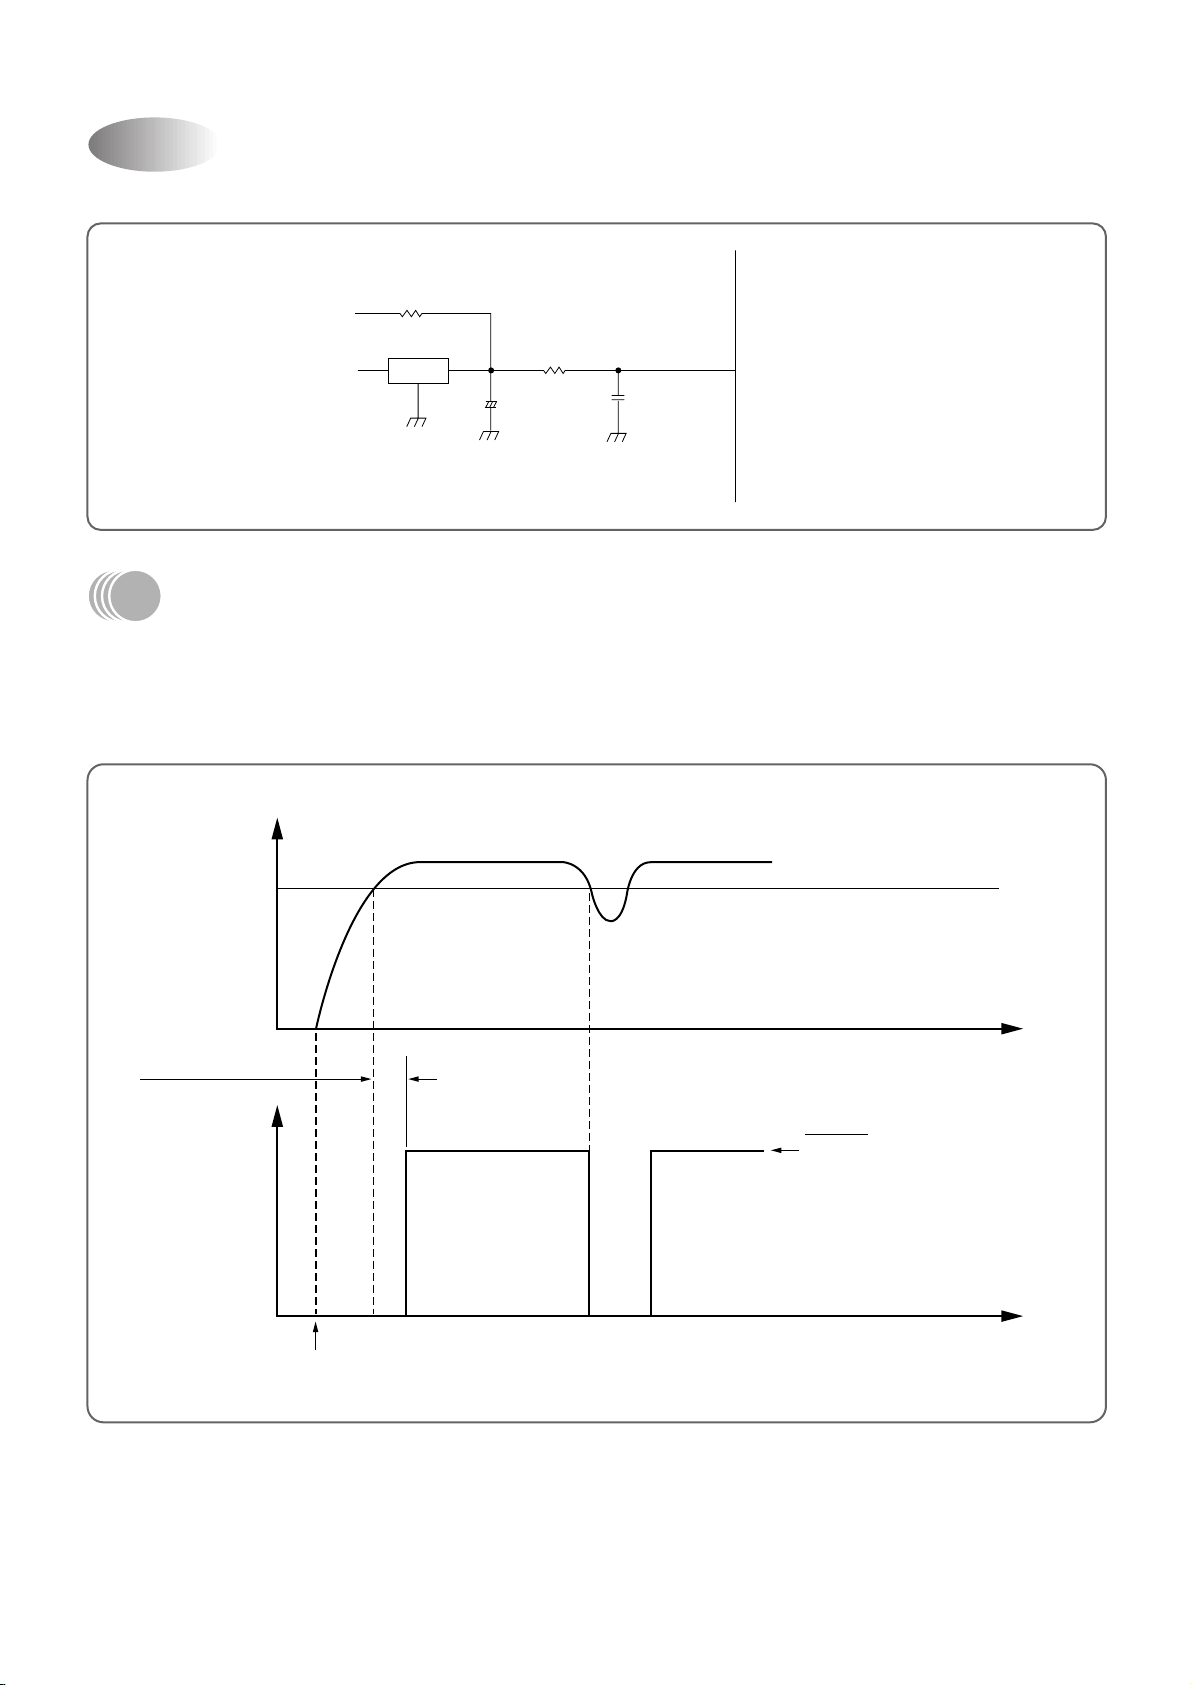
Reset(8)
R13 5.6K
1K R12
18
CC9
CE4
4.7uF/50V
IC5
7042P
10.3
MICOM
4.25V
H
L
t
t
POWER
ON
Vcc (+5V)
DELAY TIME
FOR POWER ON
RESET
DESCRIPTION
V oltage less than about 0.8V put in Micom Terminal of Number 18 and then Micom reset. Reset IC detect
Po wer ON and Voltage less than 4.25V, and then send Reset Signal.
56
Page 59
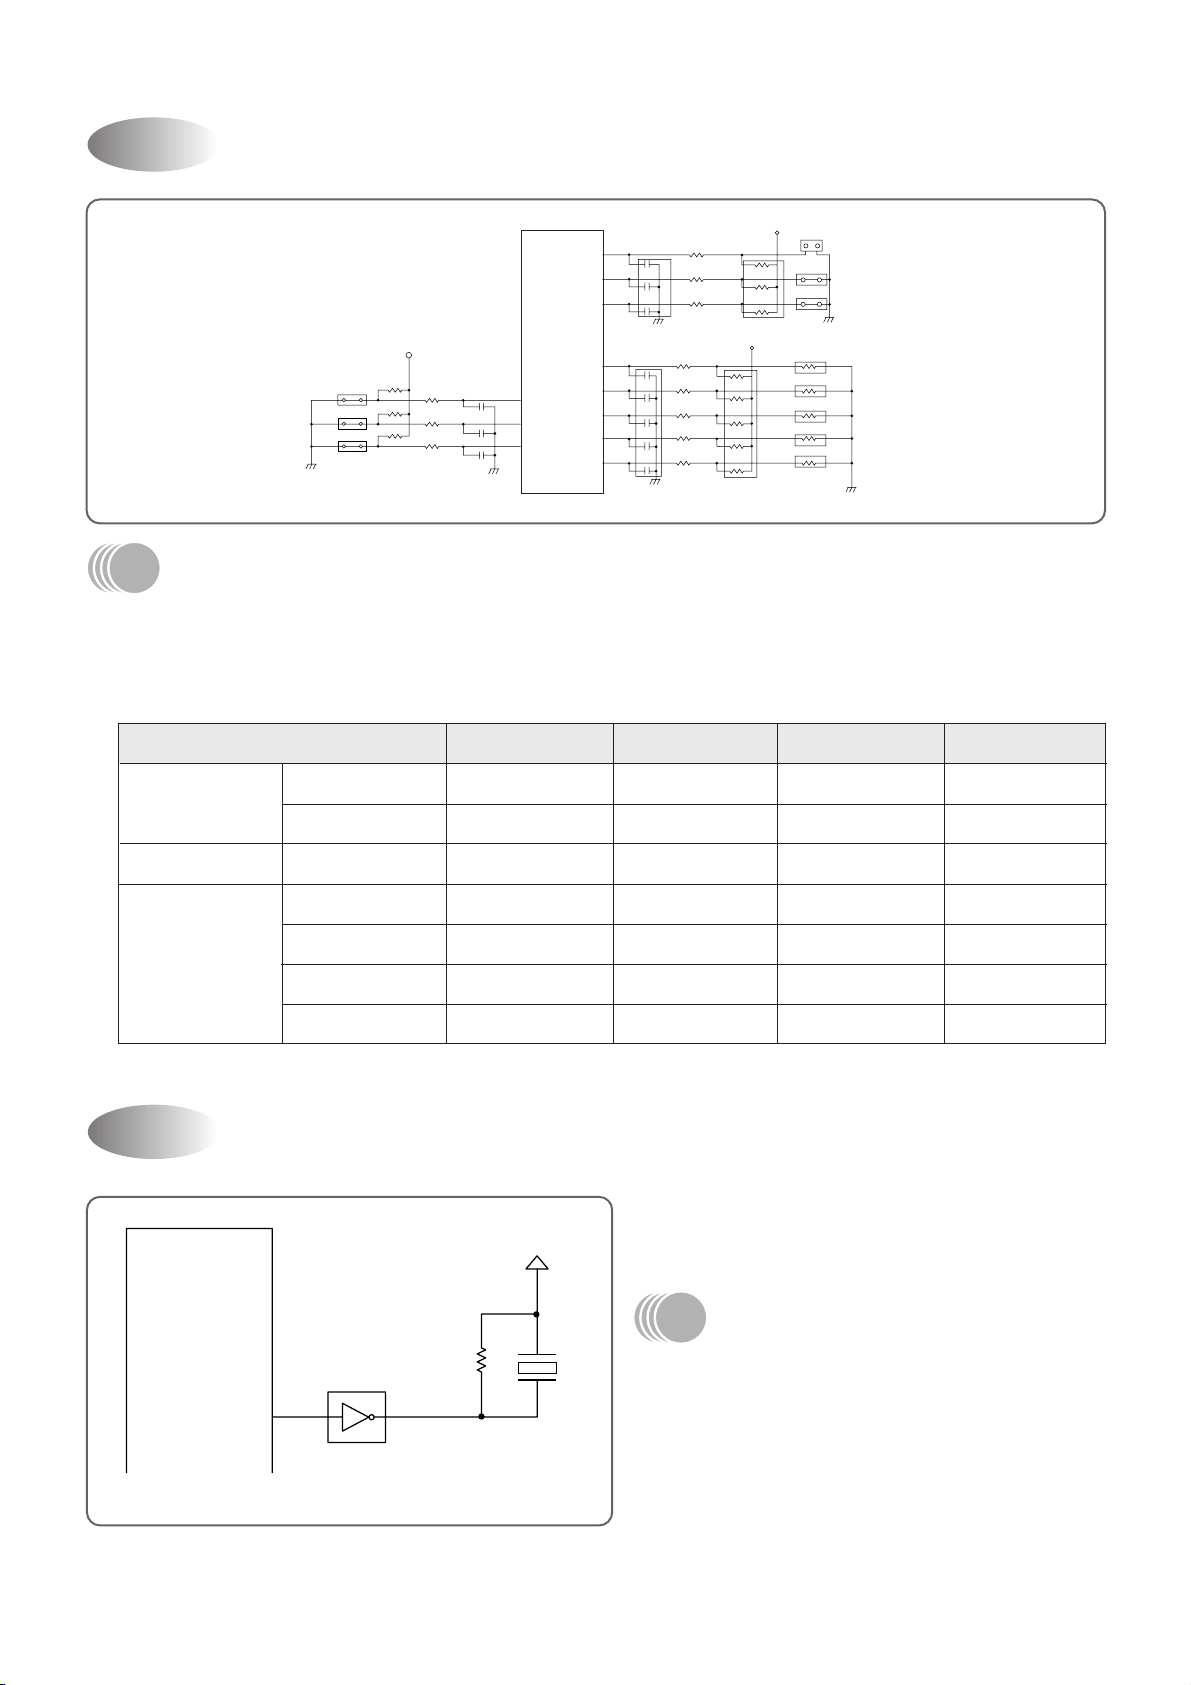
VCC
12V
KID 65004
MICOM
34
611
R4
1K
BZ1
model
JS3
JS2
JS1
1K
14
15
16
30
29
28
41
40
39
27
26
1K
1K
1K
1K
JS5
JS4
1K
1K
1K
1K
1K
R28
R32
R31
R30
R25
R24
R23
R35
R34
R33
R37
R29
1K
R17
MICOM
R16
R15
CA2
CA1
F5 104Z
RA1 R36
heat/low
heat/high
cool/low
MILD/HIGH
HEAT/COOL
cool/high
monitoring
6A
RA3
RA3
4A 103J
CA3
F3 104Z
103J
RA2
Function Selecting(9)
DESCRIPTION
Selecting function is as following table 9-1.
ƒRWhen power source is put at fist, Funtion selection input is recognized.
And when the unit is running the microcomputer ignore variation of funtion selection input.
MILD
FAN
HIGH
FUNCTION
COOL
070
091
MODEL
122/240
181
Buzzer Driving(10)
JS1
–
–
–
SHORT
OPEN
SHORT
OPEN
JS2
–
–
–
SHORT
OPEN
OPEN
SHORT
JS4
–
–
OPEN
–
–
–
–
JS5
SHORT
OPEN
–
–
–
–
–
DESCRIPTION
Micom 34 Terminal put out Buzzer Driving Pulse,
its output is driving Buzzer through Buffer .
Ocillatory Frequency of buzzer is selected by
internal Micom.
This unit is setting at 4KHz.
57
Page 60
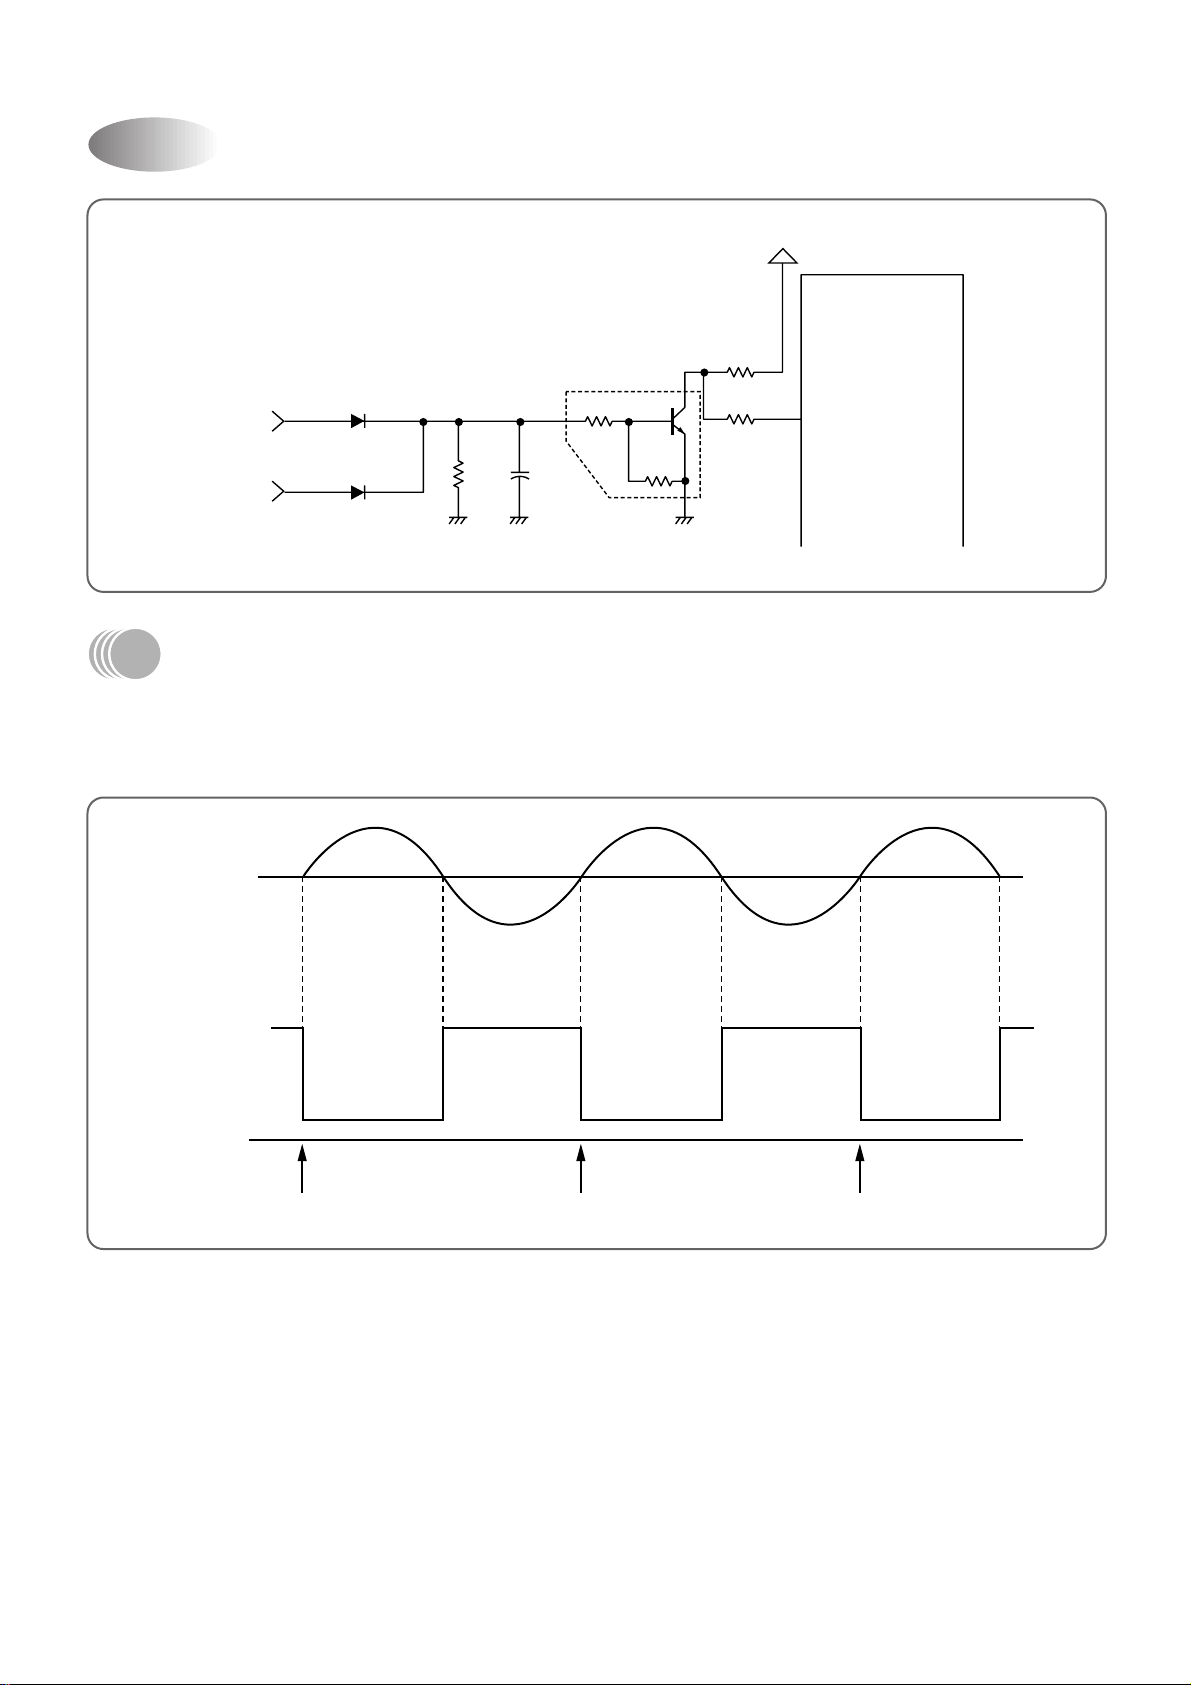
MICOM
TRANS
OUTPUT
D5
D6
R2
5.6K
12
CC4
103
TR1
KRC120M
12 1
23
21
R3
10K
R27
1K
VCC
31
DETECT POINT
H
The
Number
31 of
Micom
terminal
AC18V
L
Zero Crossing Detect(11)
DESCRIPTION
It defect Zero Cross part of Trans output voltage, Transistor TR1 is used to put in the Micom.
Detail Driving is as following Fig 11-1.
R19 is Resistance to limit current.
Fig 11-1
58
Page 61
Ø 4
Ø 3
Ø 2
Ø 1
B
+
6
5
4
3
2
1
12V
IC6
KID65004
CN13
1
MICOM
2
3
4
M1
FOR SWING
Stepping Motor Driving(12)
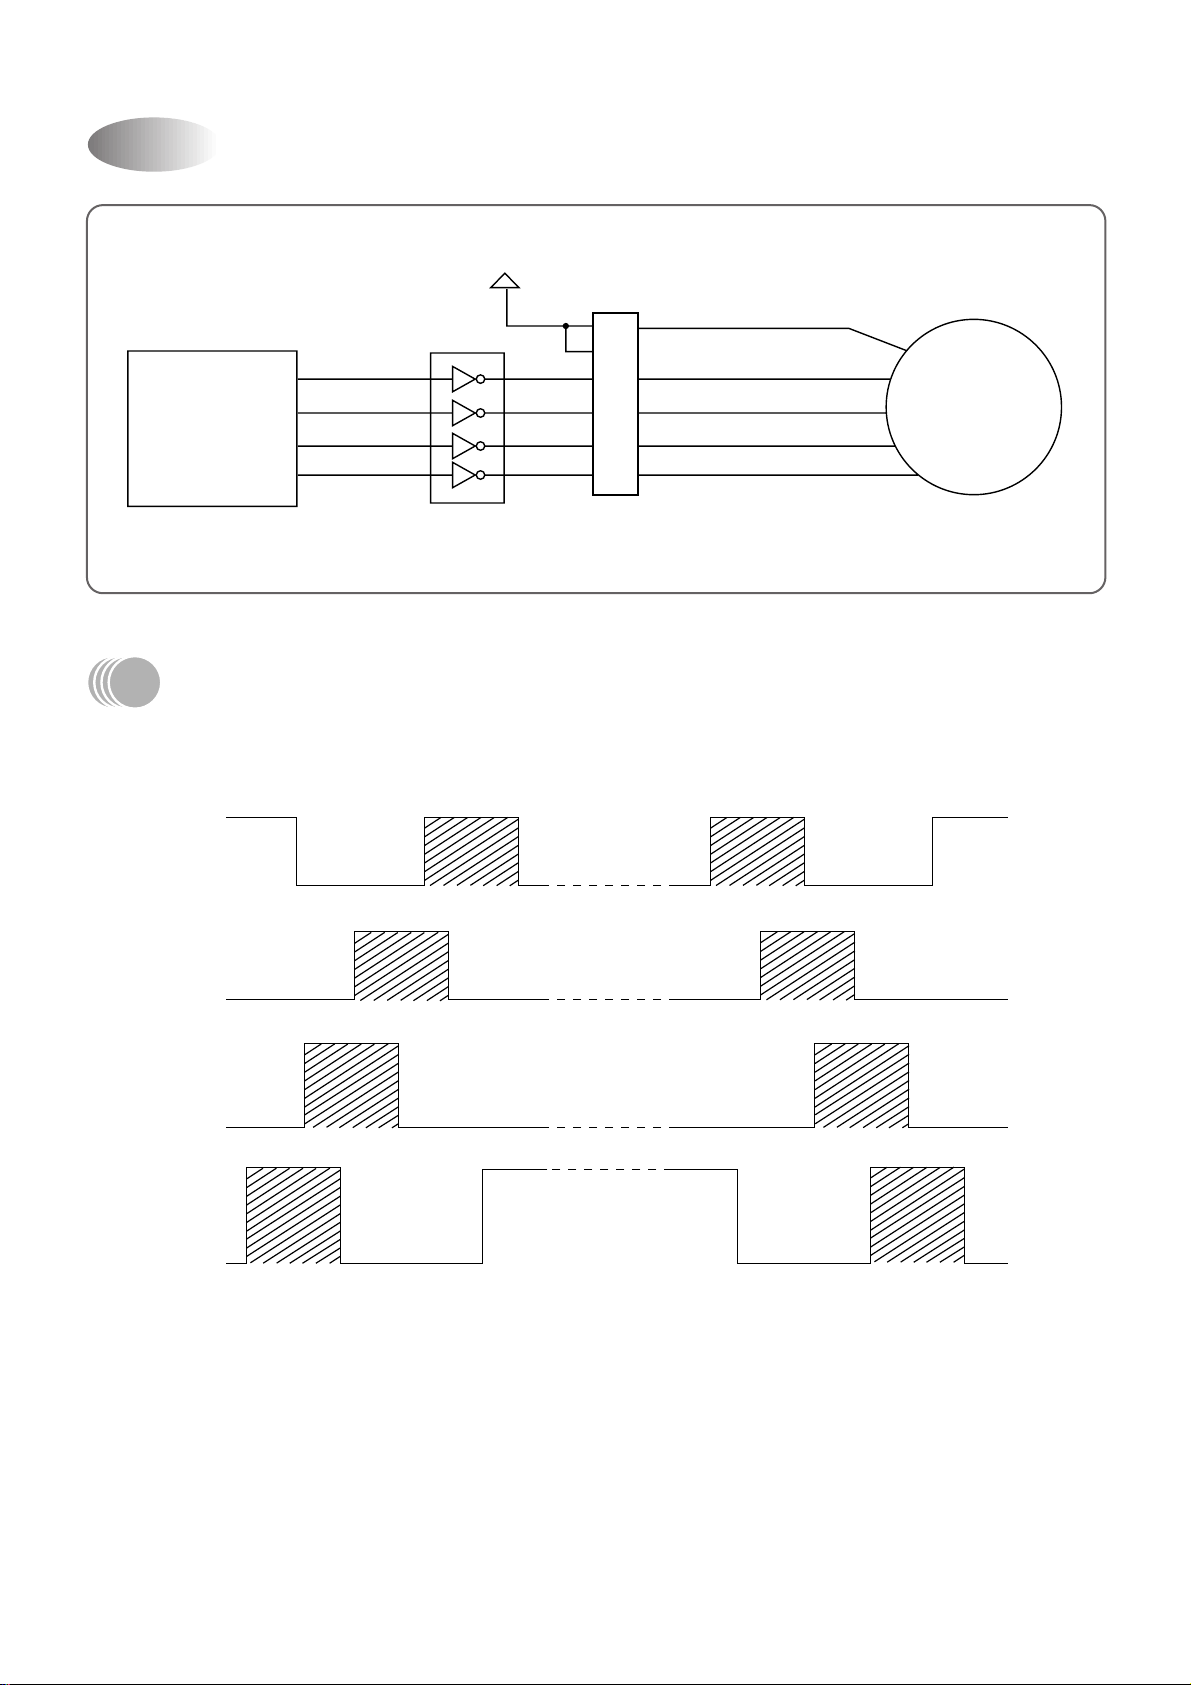
DESCRIPTION
There are one Stepping Motor for Flap (up and down) and it is used 4 face Drive Method.
It is driving as following Fig 12-1. (Ring Count Method of 8 Status)
Ø 4
Ø 3
Ø 2
Ø 1
(Normal Rotating) (Reversed Rotating)
Fig 12-1
59
Page 62
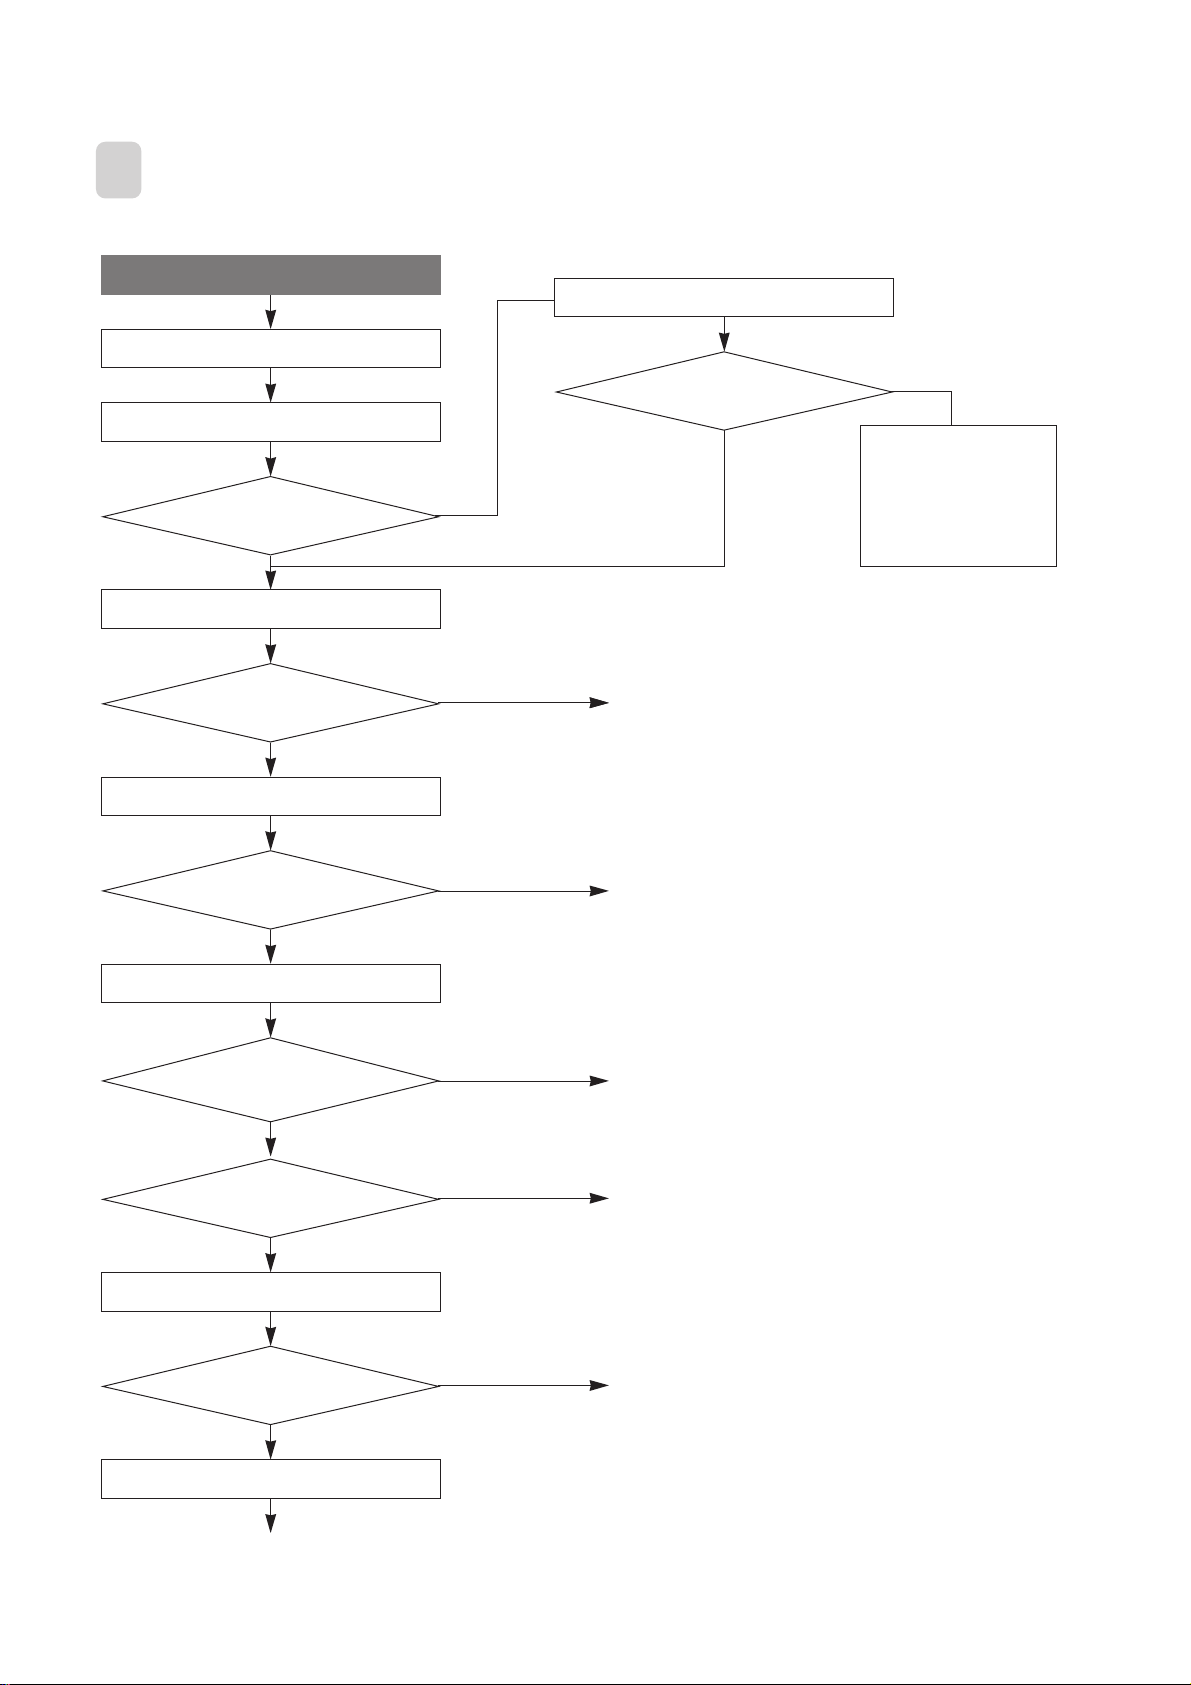
REMOTE CONTROLLER ASSMBLY FUNCTIONAL TEST METHOD
2
TEST START
Po wer Supply
Select ON/OFF button
Is Display at the
beginning ON?
Select Mode button
Is it normal?
Select F AN SPEEDbutton
No
No
No
Po wer supply again
Is Display at the
beginning ON?
Yes
ERROR
No
Check the Follo wing
BATTERY SPRING
MICOM
PCB
LCD
Is it normal?
Select F AN DIR. b utton
Is it normal?
Is display at the
begining ON?
Select TEMP. Button (¡ª,¡ )
Is it normal?
No
▲
( ▼ )
No
No
(Whenever y ou selectted Temp .
Button, it is changed by 1°C (18~32°C)
No
ERROR
ERROR
ERROR
ERROR
Select ON/OFF button
60
Page 63
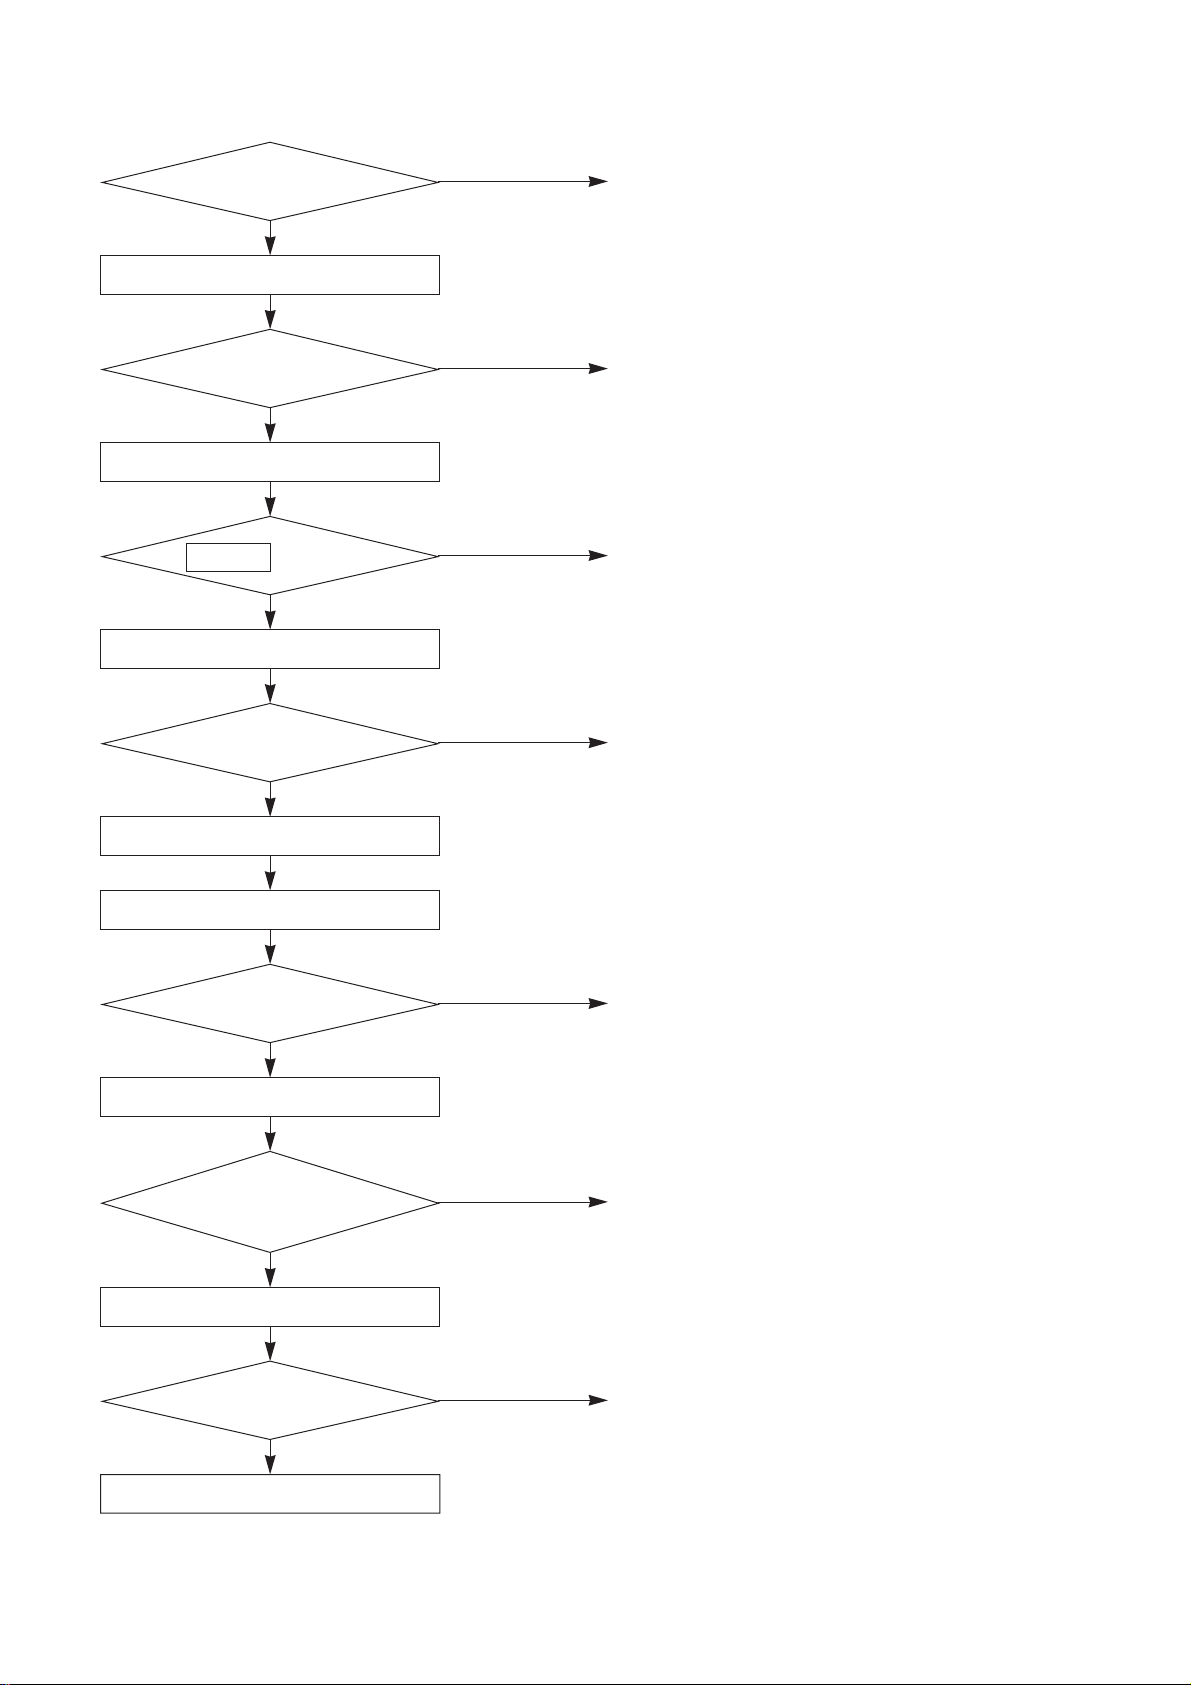
Is LCD display OFF?
Select TIMER ON Button
No
ERROR
Is it normal
Select Timer Enter Button
TIMER
display?
Select CANCEL Button
Is all display OFF?
Select ON/OFF Button
Select OFF (Timer) Button
No
ERROR
No
ERROR
No
ERROR
(0.5~24 HOUR)
Is it normal?
Select SLEEP Button
SLEEP MODE
Display ON?
Select SLEEP Button
Is display at the
beginning ON?
TEST OK!
No
ERROR
No
ERROR
No
ERROR
61
Page 64
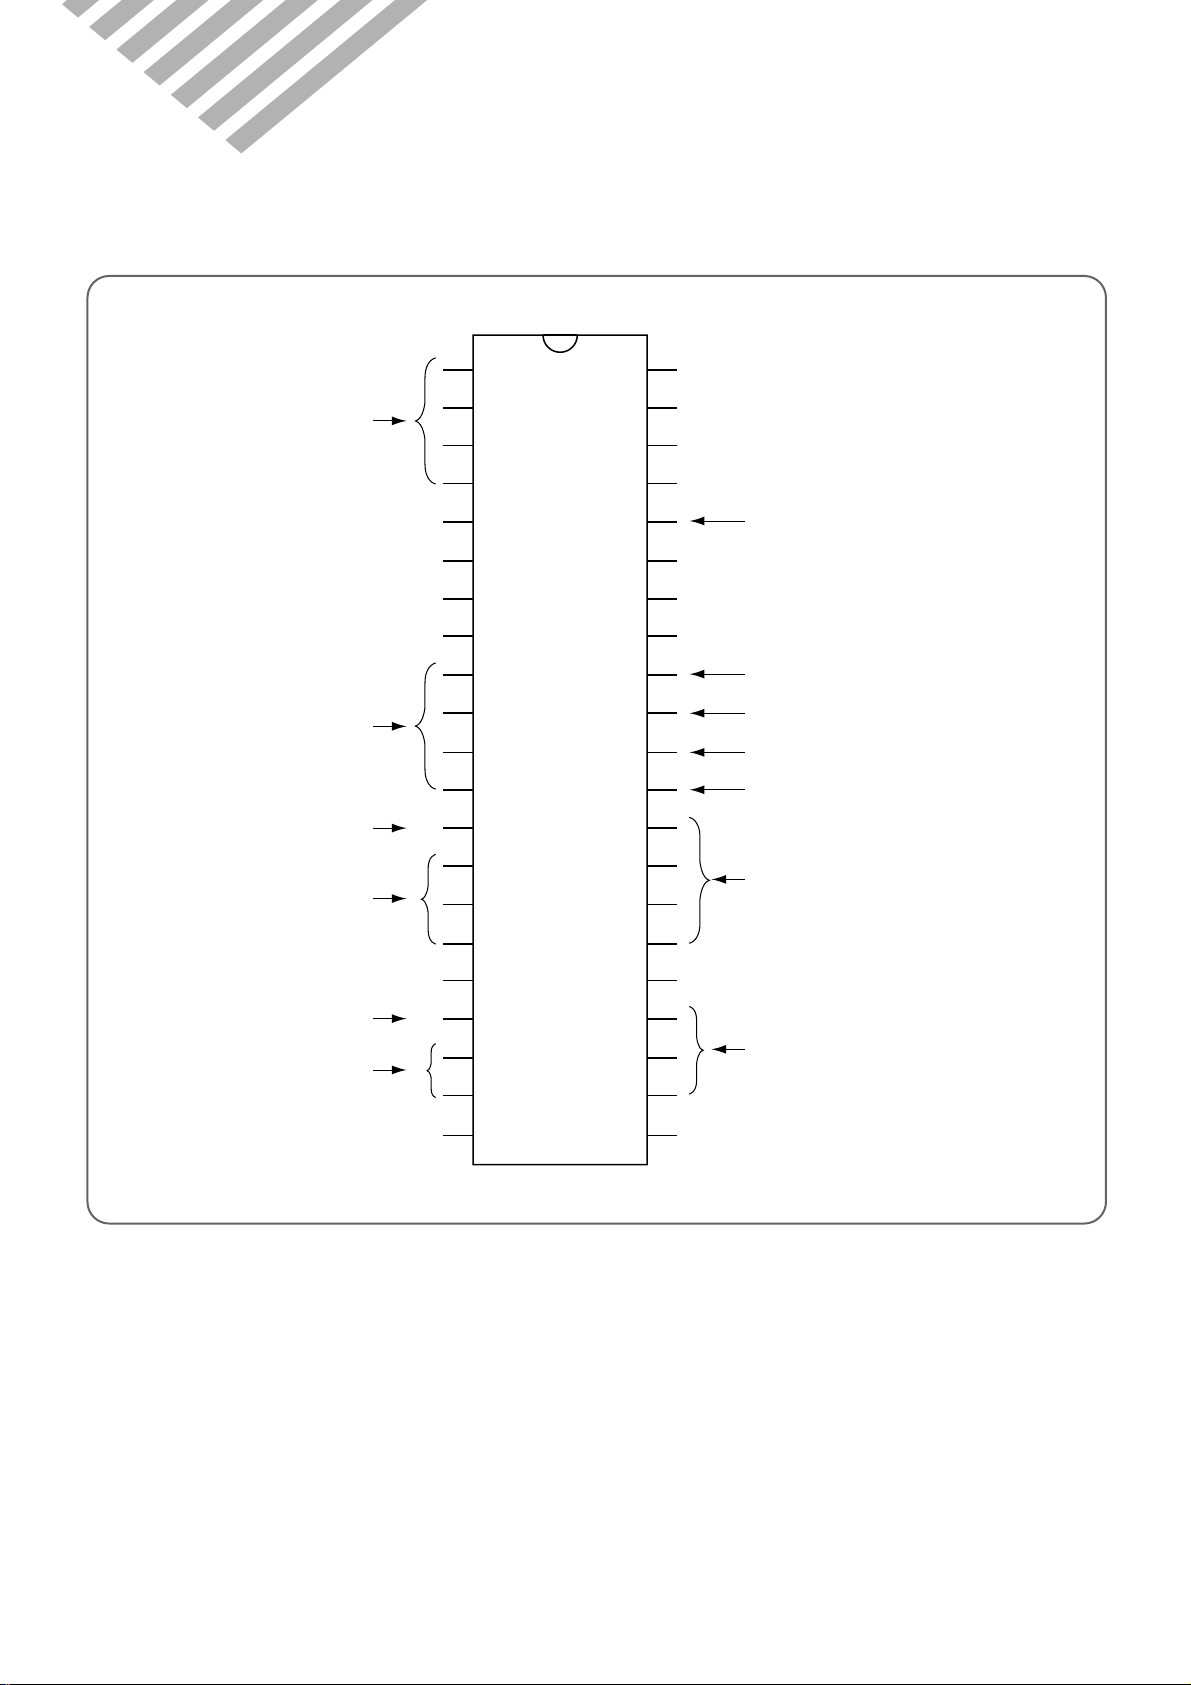
1
2
3
4
5
6
7
8
9
10
11
12
13
14
15
16
17
18
19
20
21
VDD
(XTOUT)P22
(XTIN)P21
(INT5/STOP)P20
P17
P16
(TC2)P15
(PPG)P14
(DVO)P13
(INT2/TC1)P12
(INT1)P11
(INTO)P10
(AIN7)P67
(AIN6)P66
(AIN5)P65
(AIN4)P64
(AIN3)P63
(AIN2)P62
(AIN1)P61
(AIN0)P60
VAREF
P77(HSO)
P76(HSCK)
P75(SO)
P74(SI)
P73(SCK)
P72(PDO/PWM)
P71(INT4)
P70(INT3/TC3)
P07
P06
P05
P04
P03
P02
P01
P00
TEST
RESET
XIN
XOUT
(VASS)VSS
42
41
40
39
38
37
36
35
34
33
32
31
30
29
28
27
26
25
24
23
22
Steppping Motor
Driving
Indoor Unit Motor Driving
Buzzer Driving
Remocon Input
Comp Relay Driving
Zero Crosing Detect
Function S/W
Temperature
Sensor Input
LED Driving
Emergency
Mode
Function
S/W
Reset Curcuit
Oscillation
9. KEY COMPONENTS OF ELECTRONIC CIRCUIT
(1) U1 (MICOM)
62
Page 65
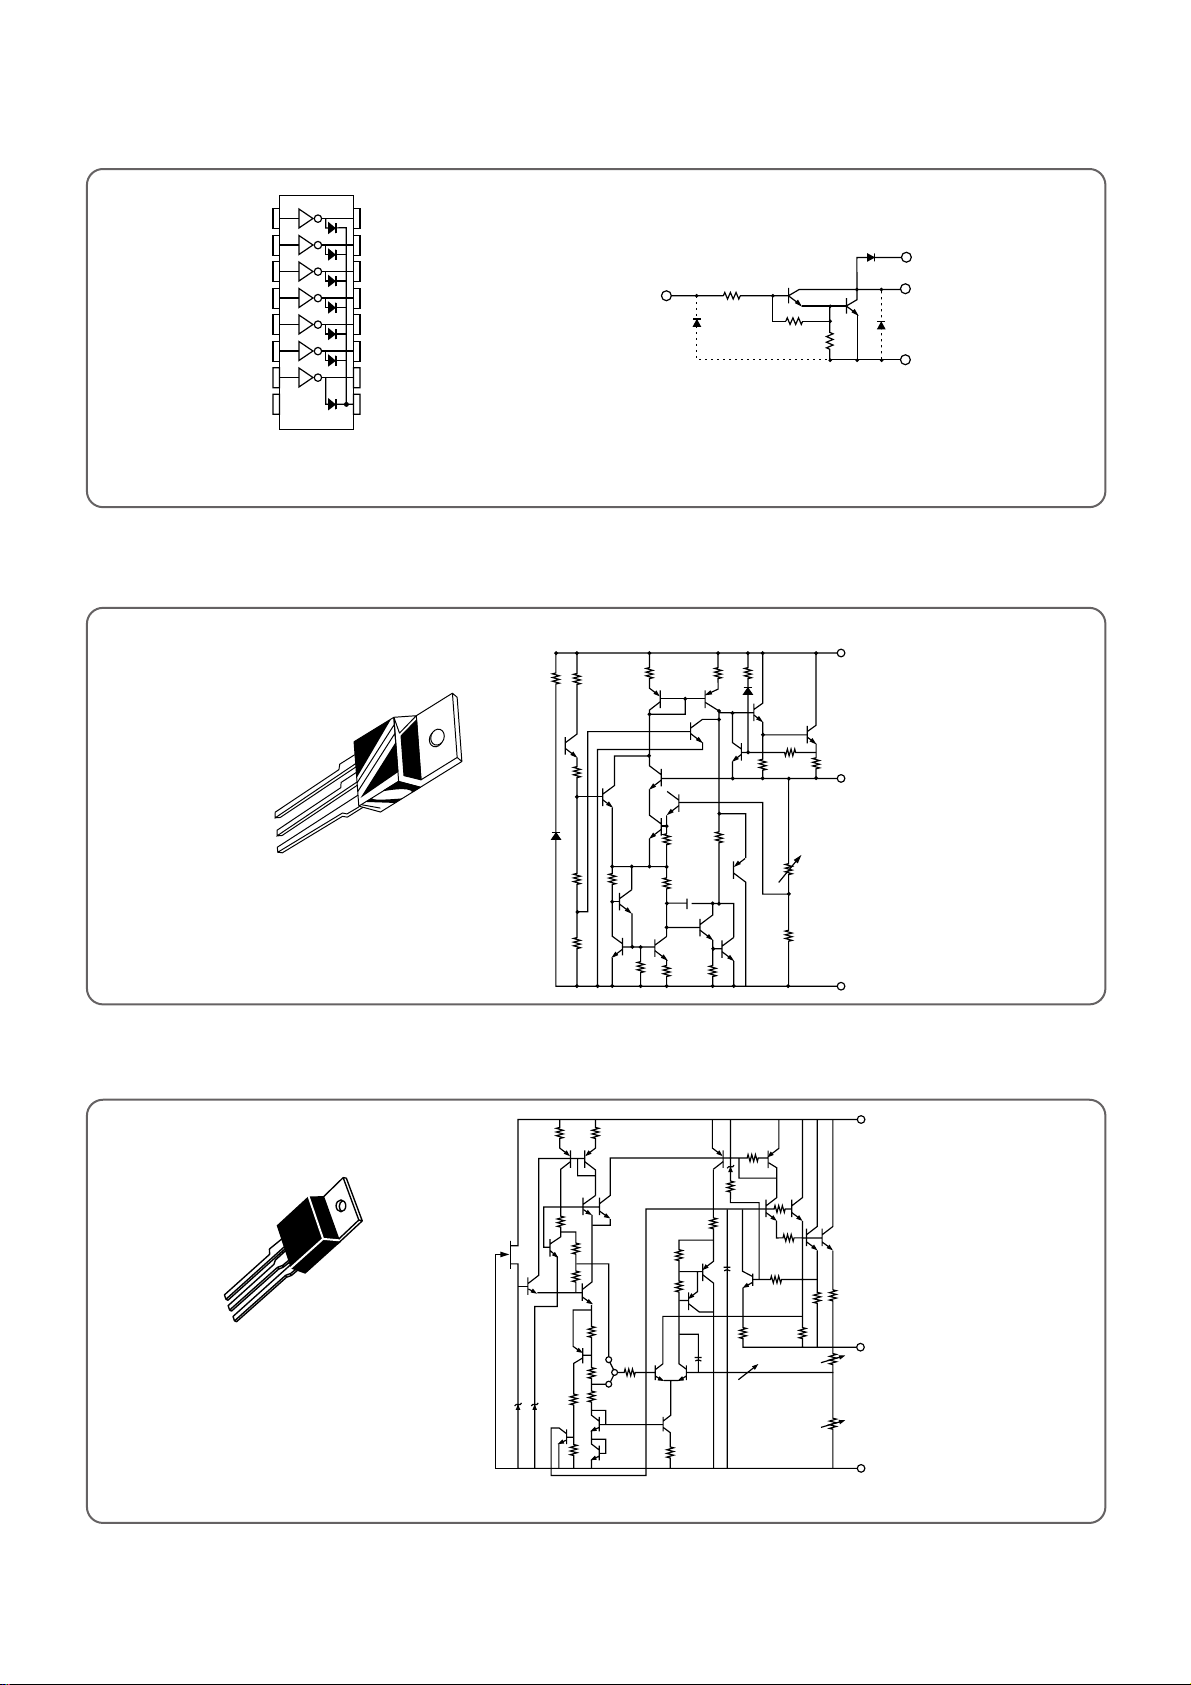
(2) U2, 4 (KID65004) DARLINGTON ARRAYS
IN1 1 16 OUT 1
IN2 2 15 OUT 2
IN 3 3 14 OUT 3
IN 4 4 13 OUT 4
IN5 5 12 OUT 5
IN6 6 11 OUT 6
IN7 7 10 OUT 7
GND 8 9 COMMON FREE
WHEELING DIODES
COMMON
10.5K‰
7.2K‰
3K‰
OUTPUT
GND
INPUT
100K 500
100
100
0.3
10K
6K
500
1K
5K
28K
6K
30pF
2K
5K
200
240
1.4
K
2.7
K
3.3
K
0.19K
INPUT
OUTPUT
GND
SCHEMATIC DIAGRAM
1
2
3
Fin 2 is ground
for Cose 221A.
Case is ground
for Case 1.
10K
INPUT
GND
10K
300
36K
64K
520
26K
60K
29K
20K
20K
40
pF
50K
50 200
300
200
100
16K
210
012
OUTPUT
KID65004AP
(Equivalent Circuit)
(Top View)
(3) U8 (KIA7805P) : VOLTAGE REGULATOR (5VDC)
Pin 1. INPUT
2. GROUND
3. OUTPUT
(4) U7 (KIA7812P) : VOLTAGE REGULATOR (12VDC)
Pin 1. INPUT
2. GROUND
3. OUTPUT
63
(Equivalent Ciircuit)
Page 66
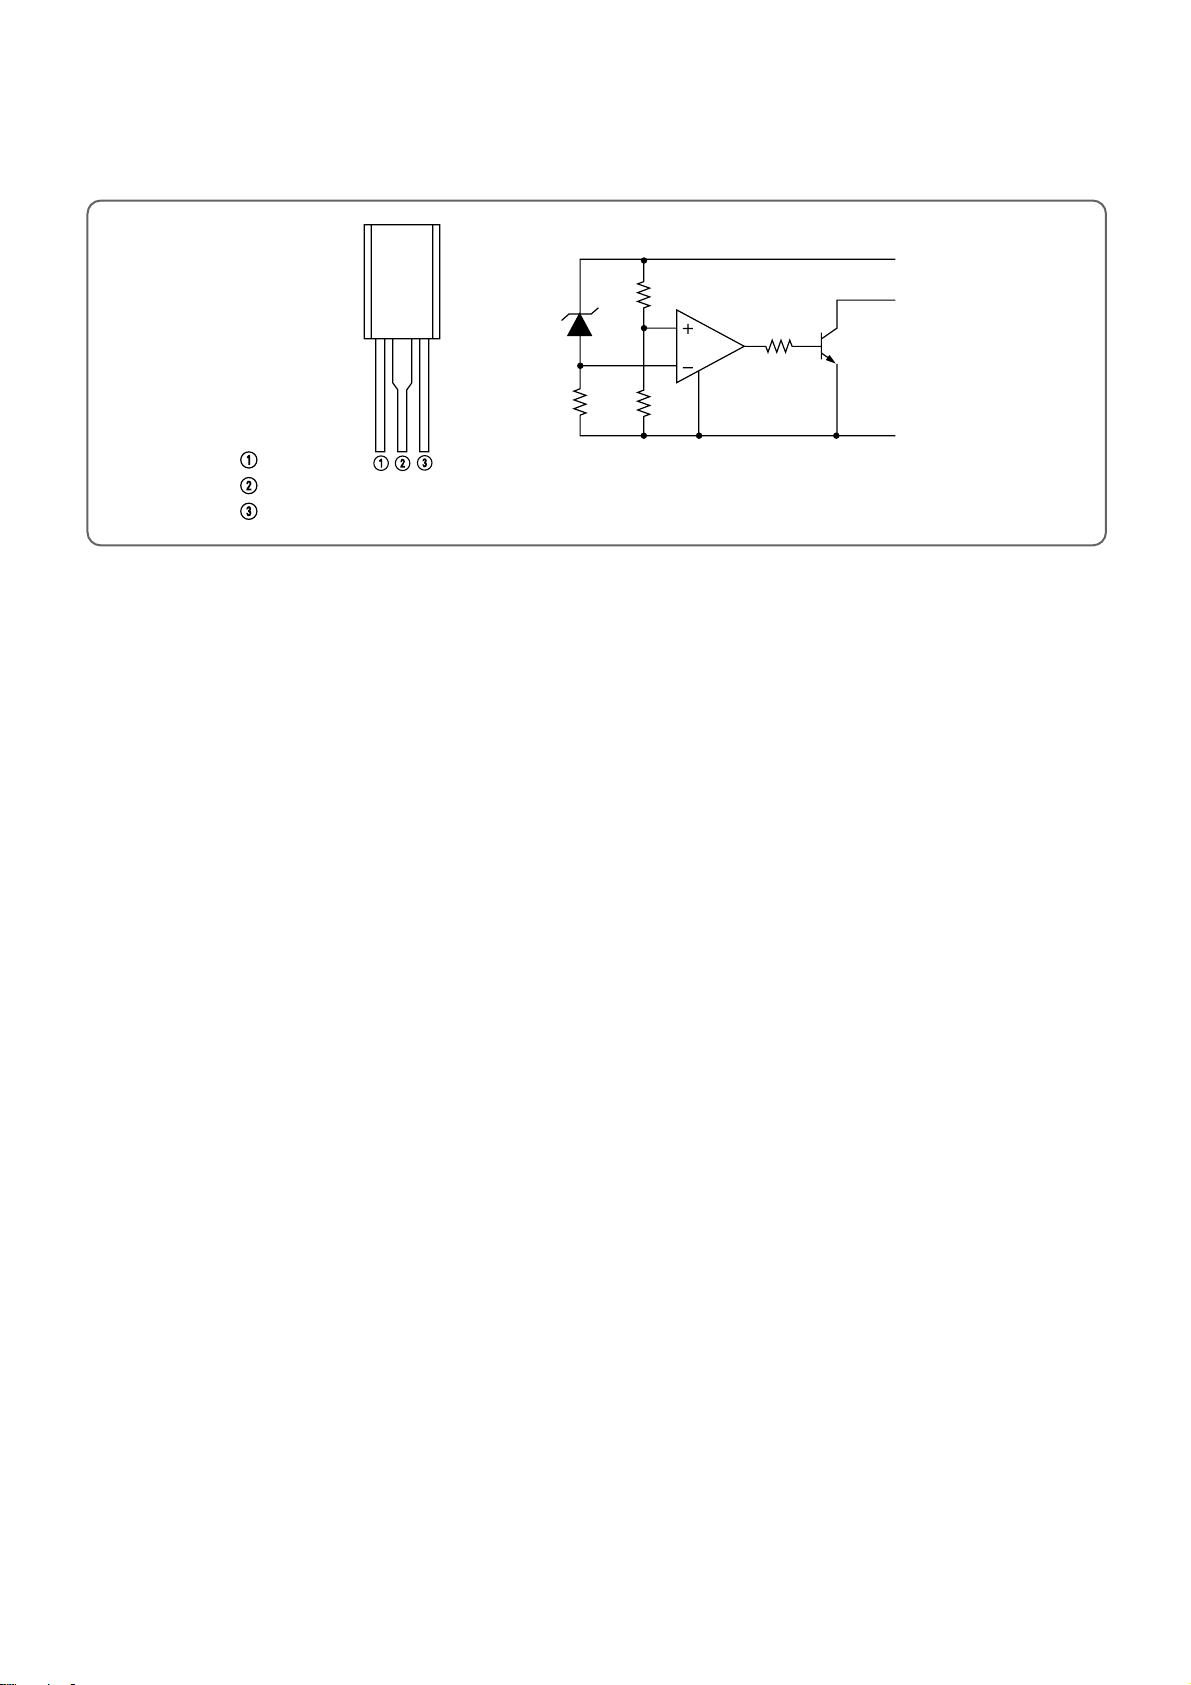
(5) U9 (KIA7042P) : RESET IC
KIA70
42P
OUTLINE
INPUT
GROUND
OUTPUT
VCC
1
3
2
OUT
GND
64
Page 67
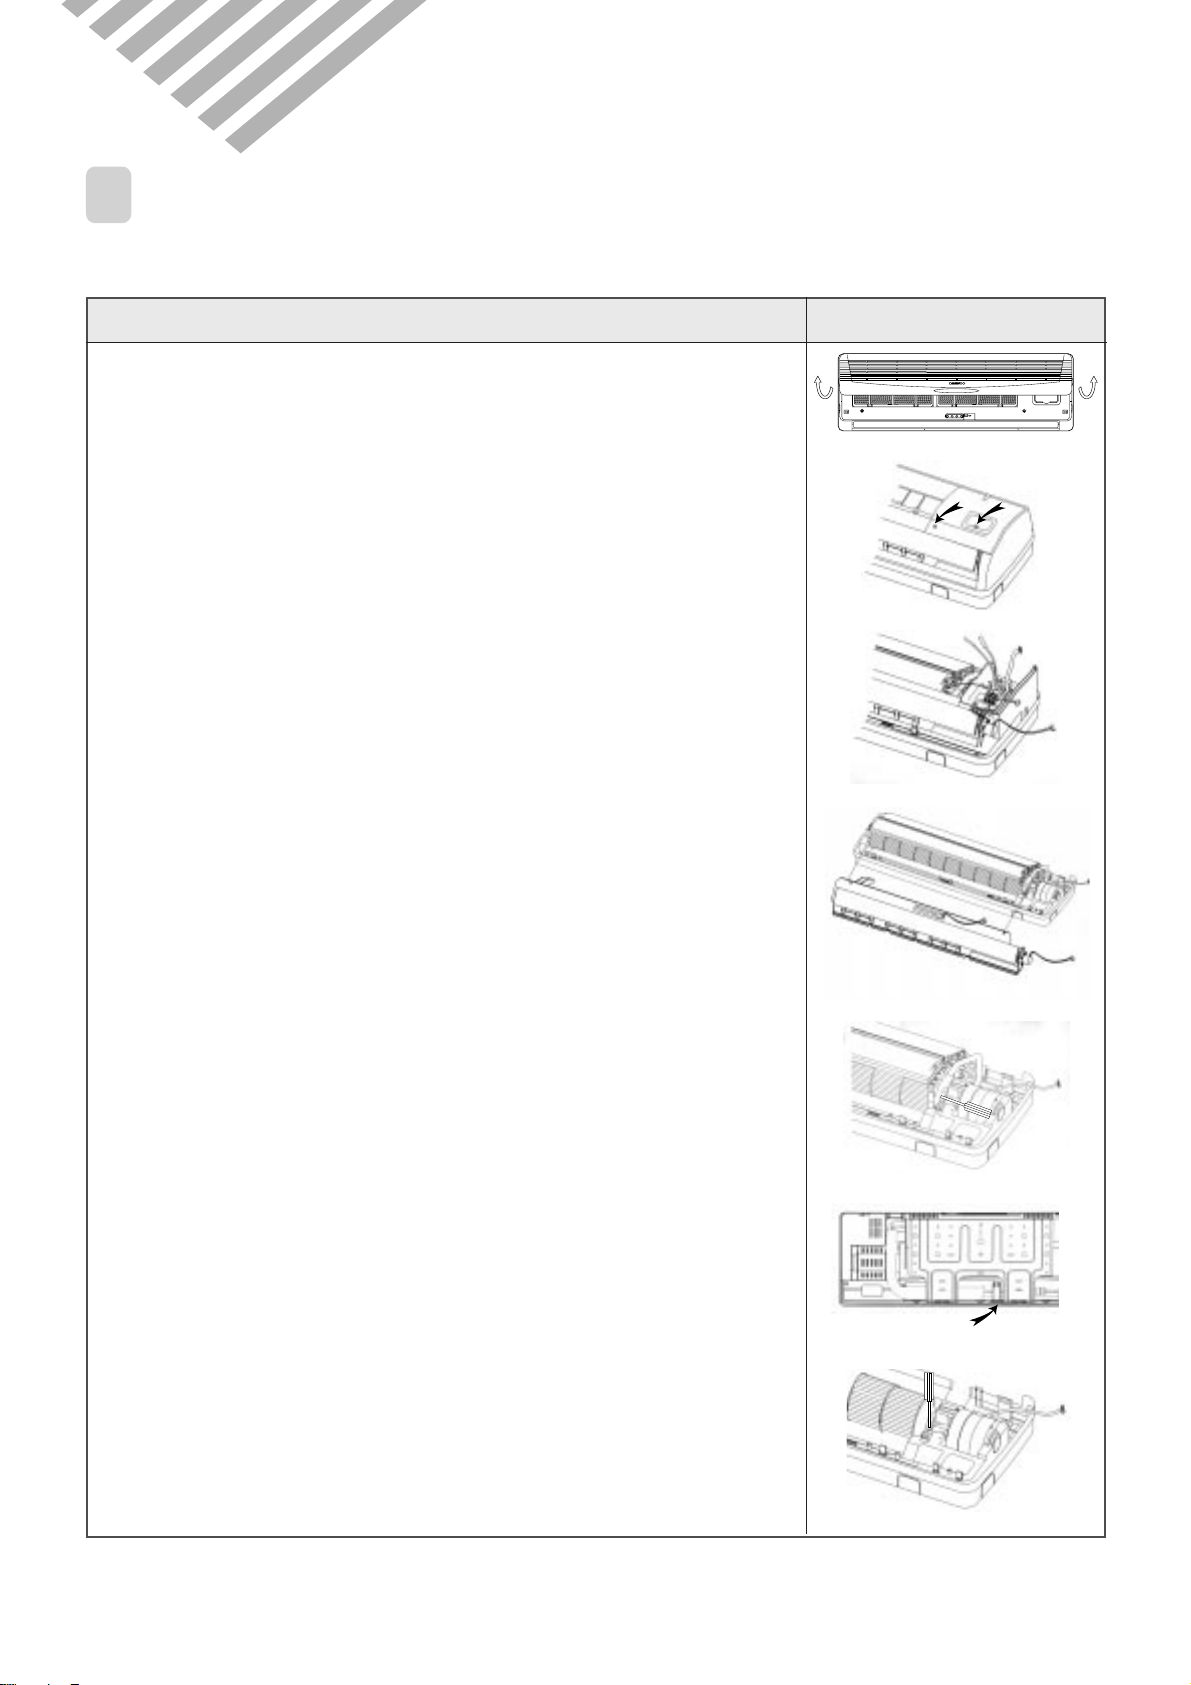
10. DISASSEMBLY INSTRUCTIONS
INDOOR UNIT
1
¡ DSB-070L/DSB-091L
PROCEDURES PHOTOS
1. Stop the Air conditioner and disconnect the power cord from the wall
outlet.
2. Removing the Insert Grille and F rame Grille. (Fig 1~2)
1 Draw up the Insert Grille and remov e it.
2 Loosen one screw for fixing the Cover Ter-Block.
3 Loosen two screw at the Frame Grille.
4 Remove the Frame Grille.
Fig 1
Fig 2
3. Removing the Control Box. (Fig 3)
1 Remove room and coil thermistors.
2 Disconnect the fan motor lead wire from connection at the
Control PCB.
3 Disconnect the stepping motor lead wire from connection at the
Control PCB.
4 Remove the select switch from connection at the Control PCB.
5 Loosen a screw for fixing ground wire.
6 Remove the Control Box
4. Removing the Drain Pan. (Fig 4)
1 Disconnect the Body drain hole. (left and right Body)
2 Disconnect three hook and remove the Drain Pan.
5. Removing the Indoor Evaporator . (Fig 5~6)
1 Remove one screw for fixing indoor Evaporator at the Body.
2 Remove the hook for fixing Bracket Pipe at the back of Body.
3 Remove Indoor Evaporator.
Fig 3
Fig 4
Fig 5
6. Removing the Cross Flow F an. (Fig 7)
1 Remove set screw for fixing Motor shaft.
2 Remove Cross Flow Fan.
7. Remove Motor IDU and Bearing Plastic.
Fig 6
Fig 7
65
Page 68
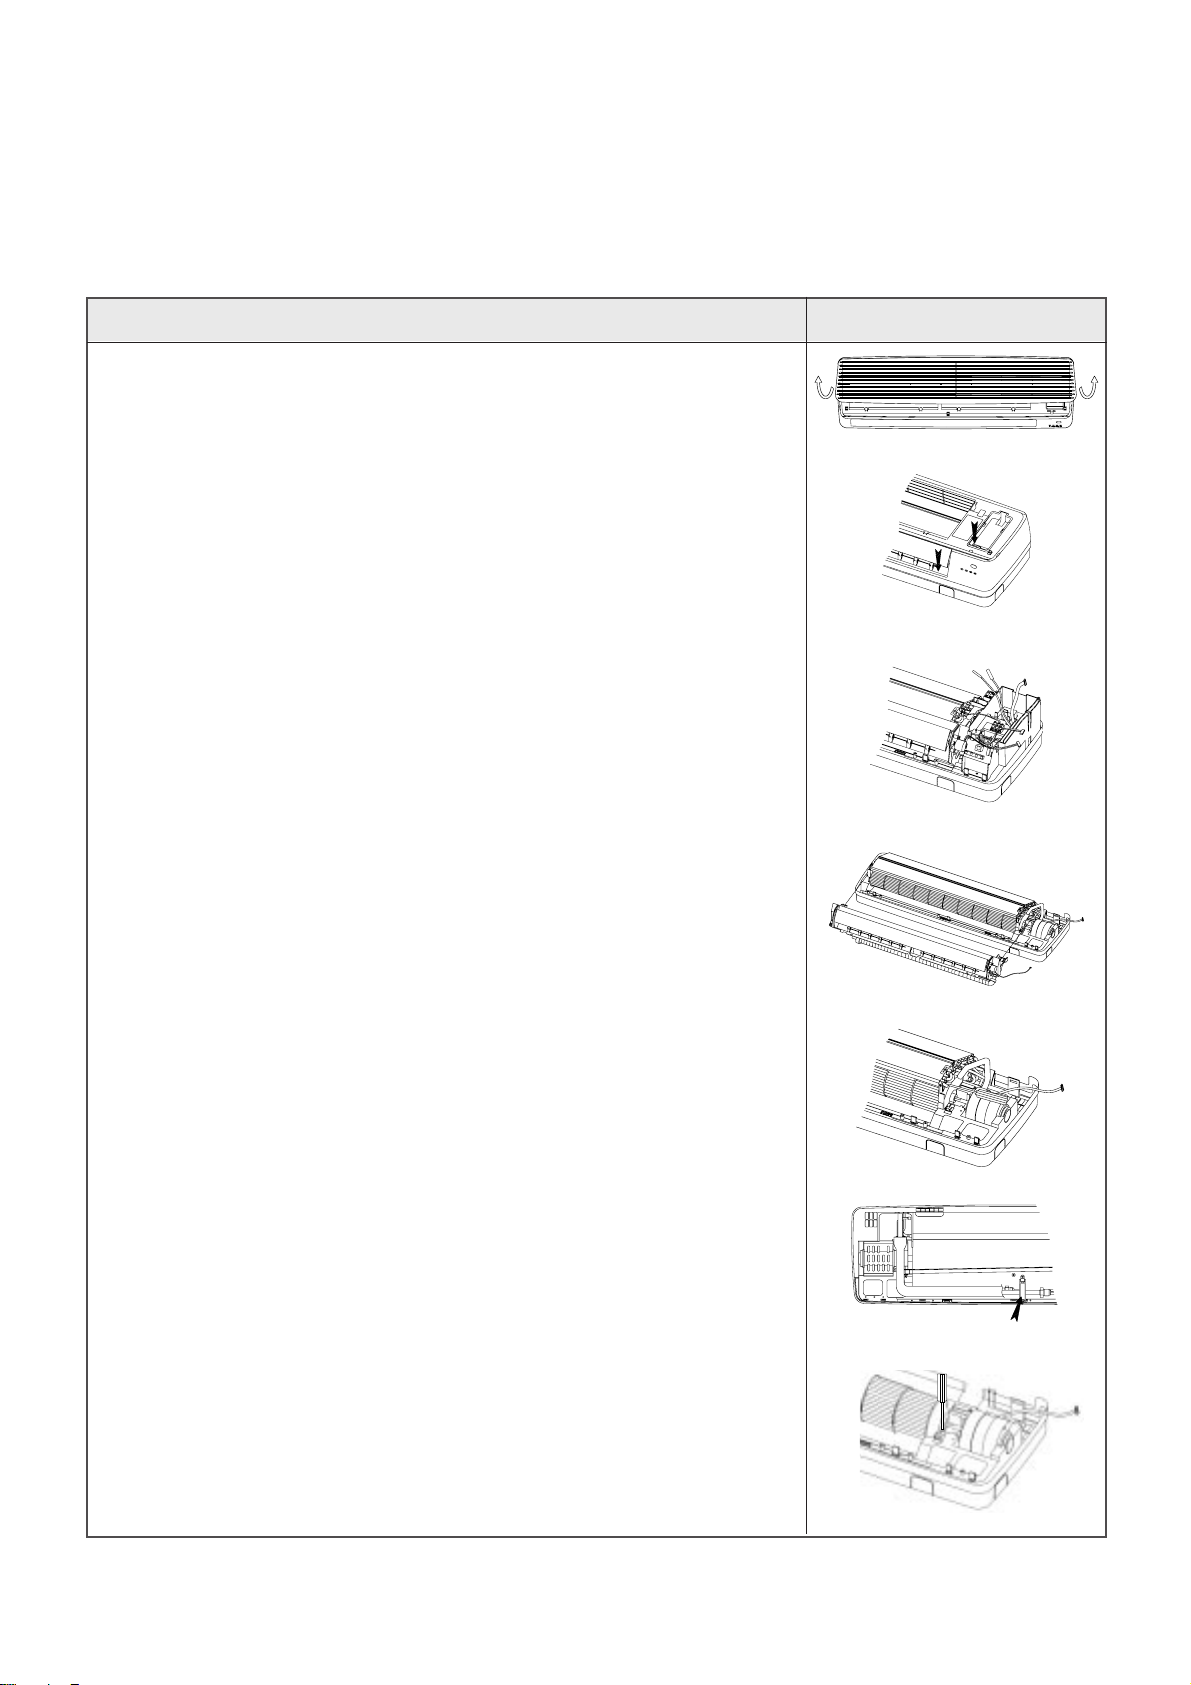
¡ DSB-121L/DSB-122L
PROCEDURES PHOTOS
1. Stop the Air conditioner and disconnect the power cord from the wall
outlet.
2. Removing the Insert Grille and F rame Grille. (Fig 1~2)
1 Draw up the Insert Grille and remov e it.
2 Loosen two special screw for fixing the Cover Ter-Block.
3 Loosen three screw at the Body.
4 Remove the Frame Gille.
3. Removing the Control Box. (Fig 3)
1 Remove room and coil thermistors.
2 Disconnect the fan motor lead wire from connection at the
Control PCB.
3 Disconnect the stepping motor lead wire from connection at the
Control PCB.
4 Remove the select switch from connection at the Control PCB.
5 Loosen a screw for fixing ground wire.
6 Remove the Control Box
Fig 1
Fig 2
Fig 3
4. Removing the Drain Pan. (Fig 4)
1 Disconnect the Body drain hole. (left and right Body)
2 Disconnect three hook and remove the Drain Pan.
5. Removing the Indoor Evaporator . (Fig 5~6)
1 Remove three screw for fixing indoor Evaporator at the Body.
2 Remove the hook for fixing Bracket Pipe at the back of Body.
3 Remove Indoor Evaporator.
6. Removing the Cross Flow F an. (Fig 7)
1 Remove set screw for fixing Motor shaft.
2 Remove Cross Flow Fan.
7. Remove Motor IDU and Bearing Plastic.
Fig 4
Fig 5
Fig 6
Fig 7
66
Page 69
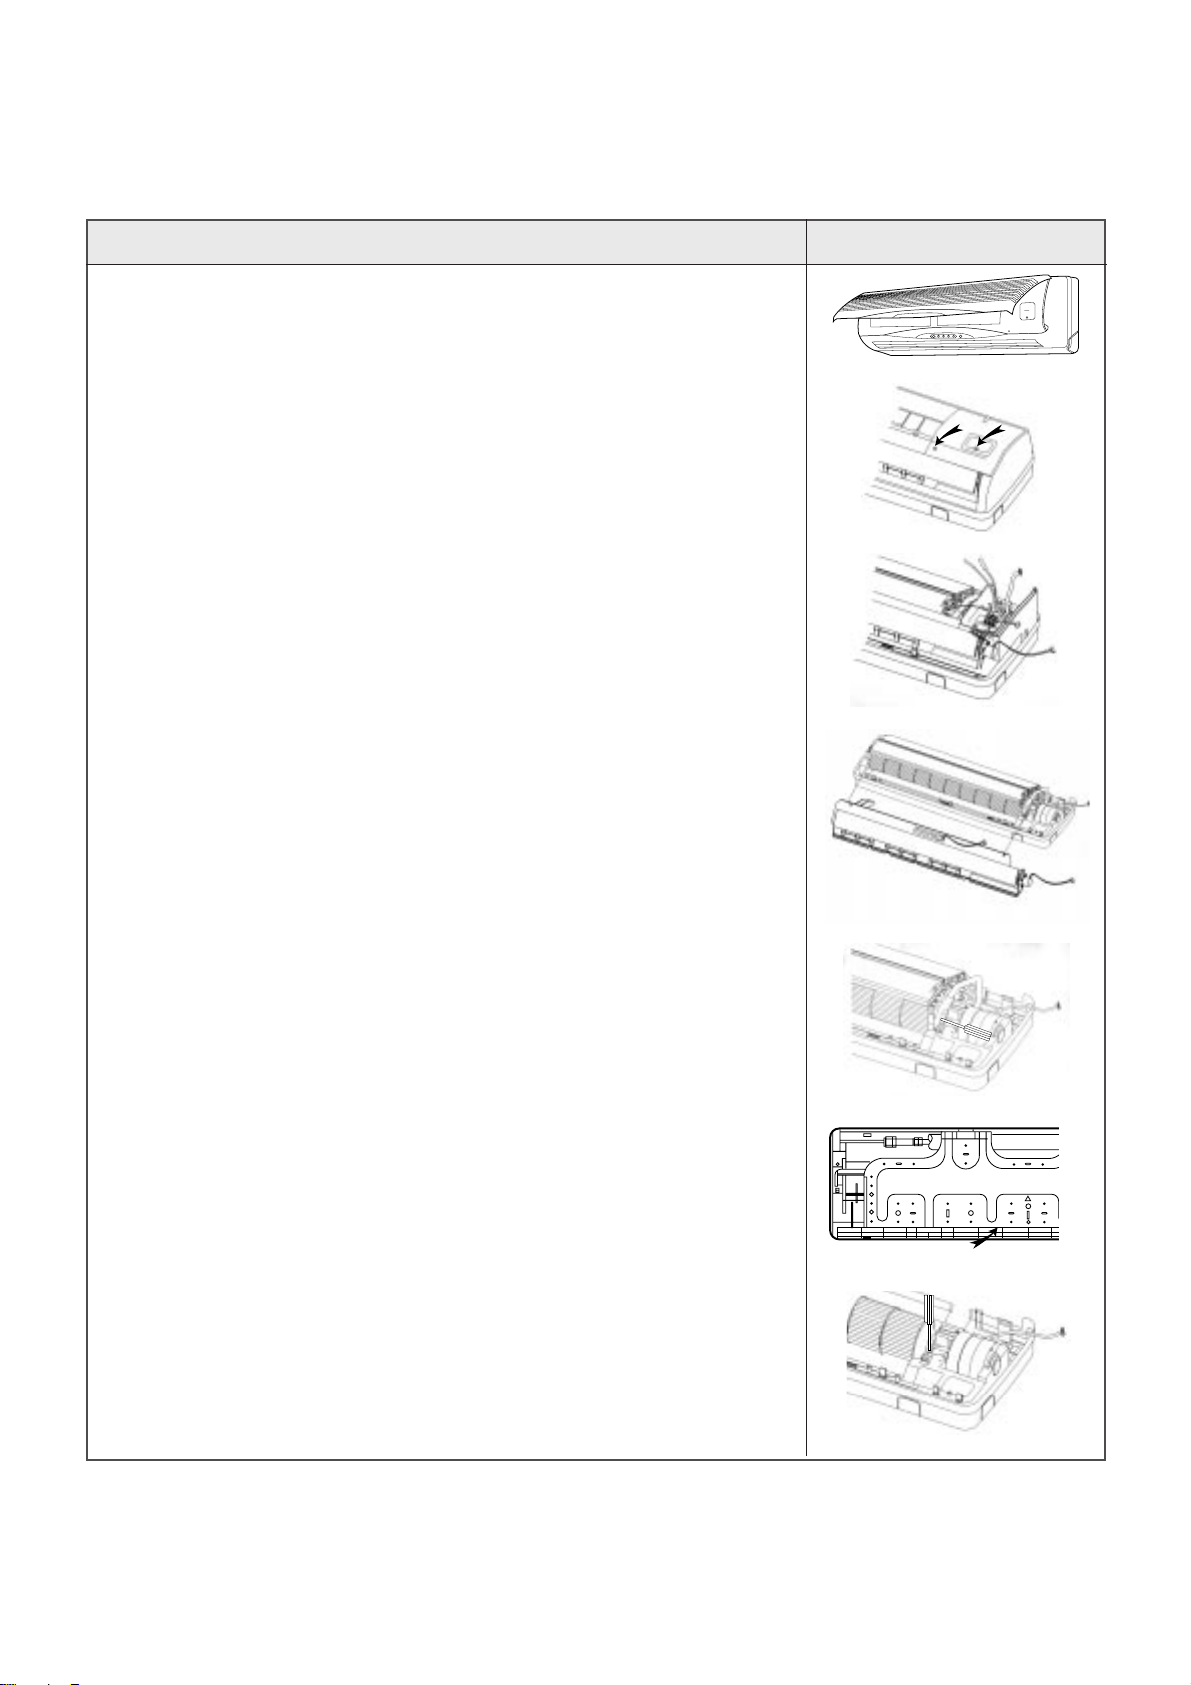
¡ DSB240L
PROCEDURES PHOTOS
1. Stop the Air conditioner and disconnect the power cord from the wall
outlet.
2. Removing the Insert Grille and F rame Grille. (Fig 1~2)
1 Draw up the Insert Grille and remov e it.
2 Loosen one screw for fixing the Cover Ter-Block.
3 Loosen two screw at the Frame Grille.
4 Remove the Frame Grille.
3. Removing the Control Box. (Fig 3)
1 Remove room and coil thermistors.
2 Disconnect the fan motor lead wire from connection at the
Control PCB.
3 Disconnect the stepping motor lead wire from connection at the
Control PCB.
4 Remove the select switch from connection at the Control PCB.
5 Loosen a screw for fixing ground wire.
6 Remove the Control Box
Fig 1
Fig 2
Fig 3
4. Removing the Drain Pan. (Fig 4)
1 Disconnect the Body drain hole. (left and right Body)
2 Disconnect three hook and remove the Drain Pan.
5. Removing the Indoor Evaporator . (Fig 5~6)
1 Remove the hook for fixing Plate mounting at the back of Body.
2 Remove Indoor Evaporator.
6. Removing the Cross Flow F an. (Fig 7)
1 Remove set screw for fixing Motor shaft.
2 Remove Cross Flow Fan.
7. Remove Motor IDU and Bearing Plastic.
Fig 4
Fig 5
Fig 6
Fig 7
67
Page 70
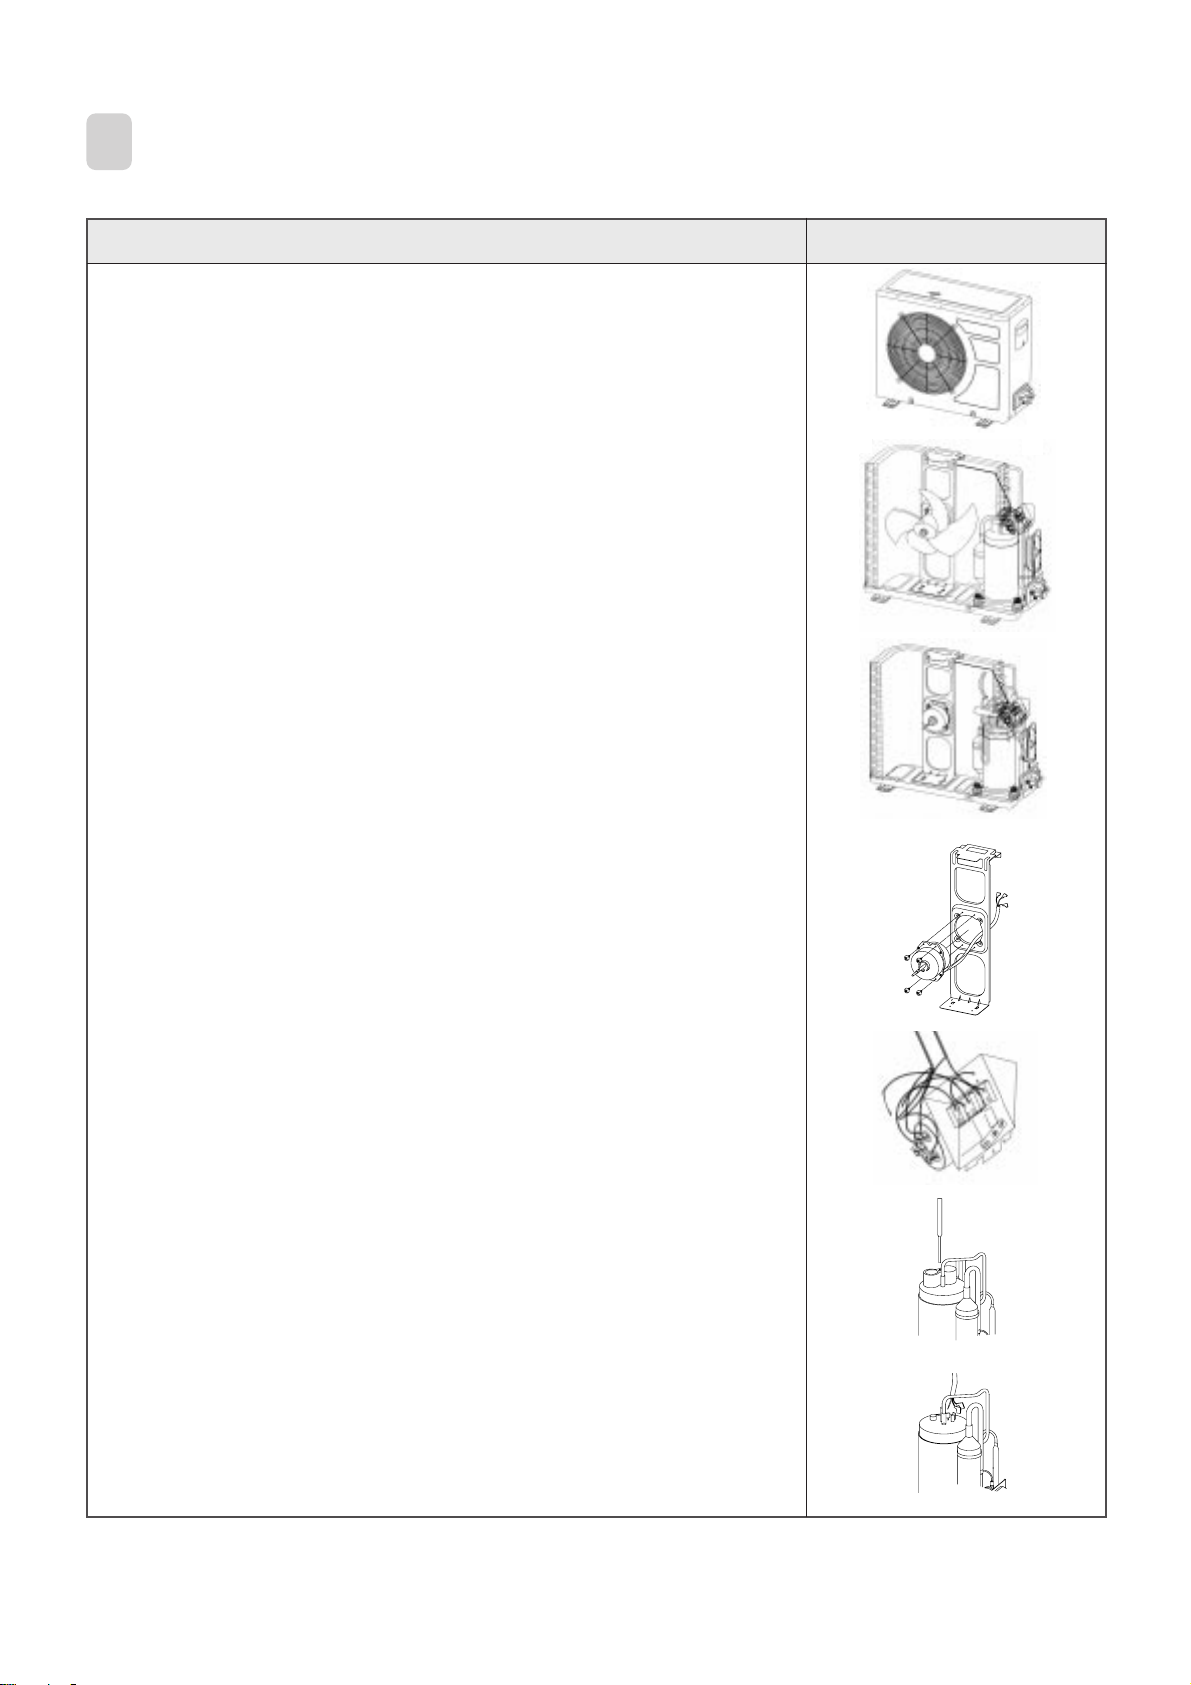
OUTDOOR UNIT
2
¡ DSB-070L/DSB-091L/DSB-121L(After)
PROCEDURES PHOTOS
1.Stop the air conditioner and disconnect the wire from Indoor Unit to
Outdoor Unit.
2. Disassemble the case. (Fig 1~2)
1 Remove the Top Panel. (Loosen thirteen screw)
2 Remove the Front Cabinet. (Loosen six screw)
3 Remove the Side Cabinet. (Loosen seven screw)
4 Remove the Guide Support. (Loosen tw o screw)
Fig 1
3. Removing the Propeller Fan. (Fig 3)
1 Loosen the Nut for fixing the Propeller Fan.
2 Remove the Plain Washer .
3 Remove the Propeller Fan.
4. Removing the Motor ODU. (Fig 4)
1 Loosen four screw at Bracket Motor .
2 Disconnect the wire at Control Panel and remove Motor ODU.
5. Removing the Dual Capacitor. (Fig 5)
1 Disconnect the wire at Control Panel.
2 Loosen a screw at Clamp Capacitor.
3 Remove the Dual Capacitor.
6. Removing the Over load Protector . (Fig 6~7)
1 Loosen a Hex Nut at T erminal Cov er .
2 Remove the Terminal Cover.
3 Remove the wire at Over load Protector.
4 Remove the Over load Protector.
Fig 2
Fig 3
Fig 4
Fig 5
68
Fig 6
Fig 7
Page 71
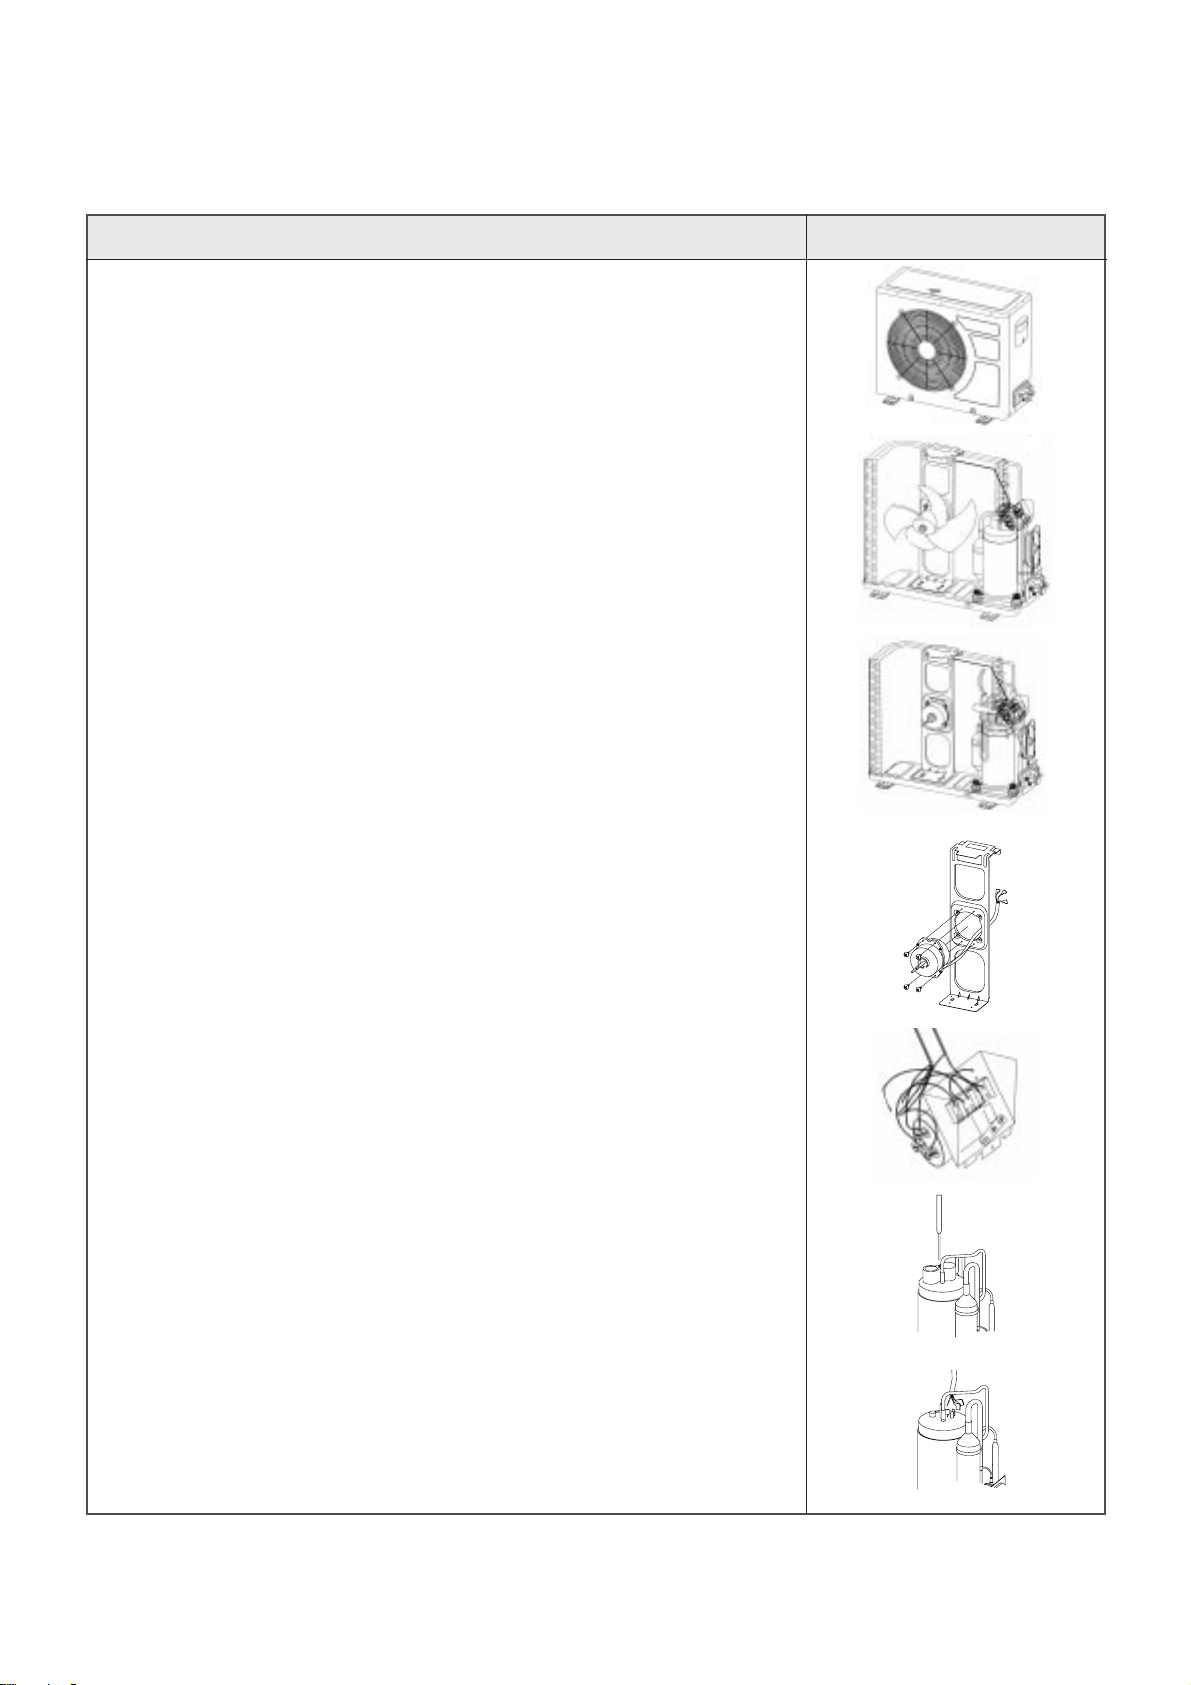
¡ DSB-121L (Before)
PROCEDURES PHOTOS
1.Stop the air conditioner and disconnect the wire from Indoor Unit to
Outdoor Unit.
2. Disassemble the case. (Fig 1~2)
1 Remove the Top Panel. (Loosen thirteen screw)
2 Remove the Front Cabinet. (Loosen six screw)
3 Remove the Side Cabinet. (Loosen seven screw)
4 Remove the Guide Support. (Loosen two scre w)
Fig 1
3. Removing the Propeller Fan. (Fig 3)
1 Loosen the Nut for fixing the Propeller Fan.
2 Remove the Plain Washer .
3 Remove the Propeller Fan.
4. Removing the Motor ODU. (Fig 4)
1 Loosen four screw at Bracket Motor .
2 Disconnect the wire at Control Panel and remove Motor ODU.
5. Removing the Dual Capacitor. (Fig 5)
1 Disconnect the wire at Control Panel.
2 Loosen a screw at Clamp Capacitor.
3 Remove the Dual Capacitor.
6. Removing the Over load Protector . (Fig 6~7)
1 Loosen a Hex Nut at T erminal Cov er .
2 Remove the Terminal Cover.
3 Remove the wire at Over load Protector.
4 Remove the Over load Protector.
Fig 2
Fig 3
Fig 4
Fig 5
69
Fig 6
Fig 7
Page 72
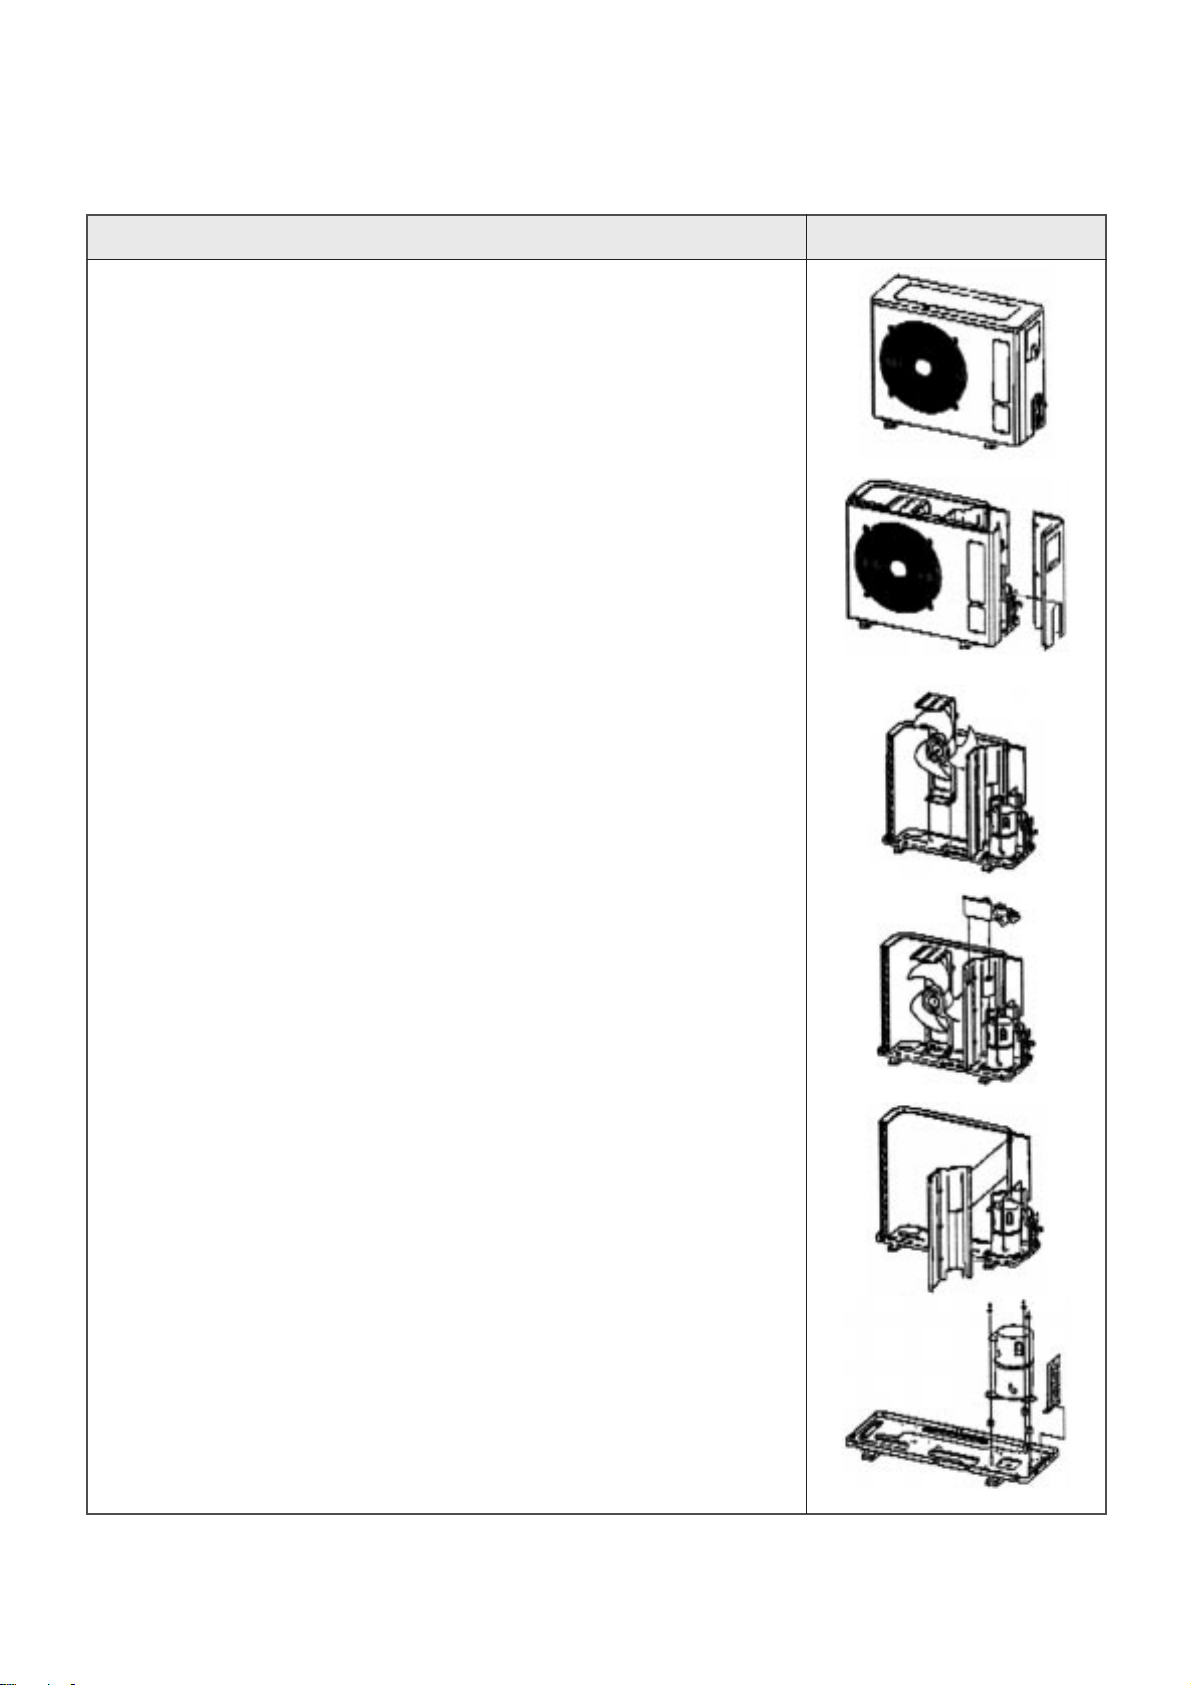
¡ DSB-240L
PROCEDURES PHOTOS
1.Stop the air conditioner and dis connect the wire from in door unit to out
door unit.
2. Disassemble the case. (Fig 1~2)
1 Remove the Top Panel. (Loosen two screw and remov e six hook)
2 Remove the Front Cabinet. (Loosen f our screw and f our hook)
3 Remove the Side Cabinet and Back Cabinet. (Loosen eight screw)
3. Removing the Propeller Fan. (Fig 3)
1 Loosen the screw for fixing the motor brack et.
2 Remove the Plain W asher.
3 Remove the Propeller F an.
4. Temove the panel control. (Fig 4)
1 Disconnect the wire at control panel.
2 Loosen a screw at panel control.
3 Remove the parts on panel control.
Fig 1
Fig 2
Fig 3
5. Remove the partition panel. (Fig 5)
1 Loosen four screws at brac ket motor.
2 Disconnect the wire at control panel.
6. Removing the Over load Protector . (Fig 6)
1 Remove the cocondenser
2 Loosen three volts at compressor.
3 Remove the compressor .
Fig 4
Fig 5
Fig 6
70
Page 73
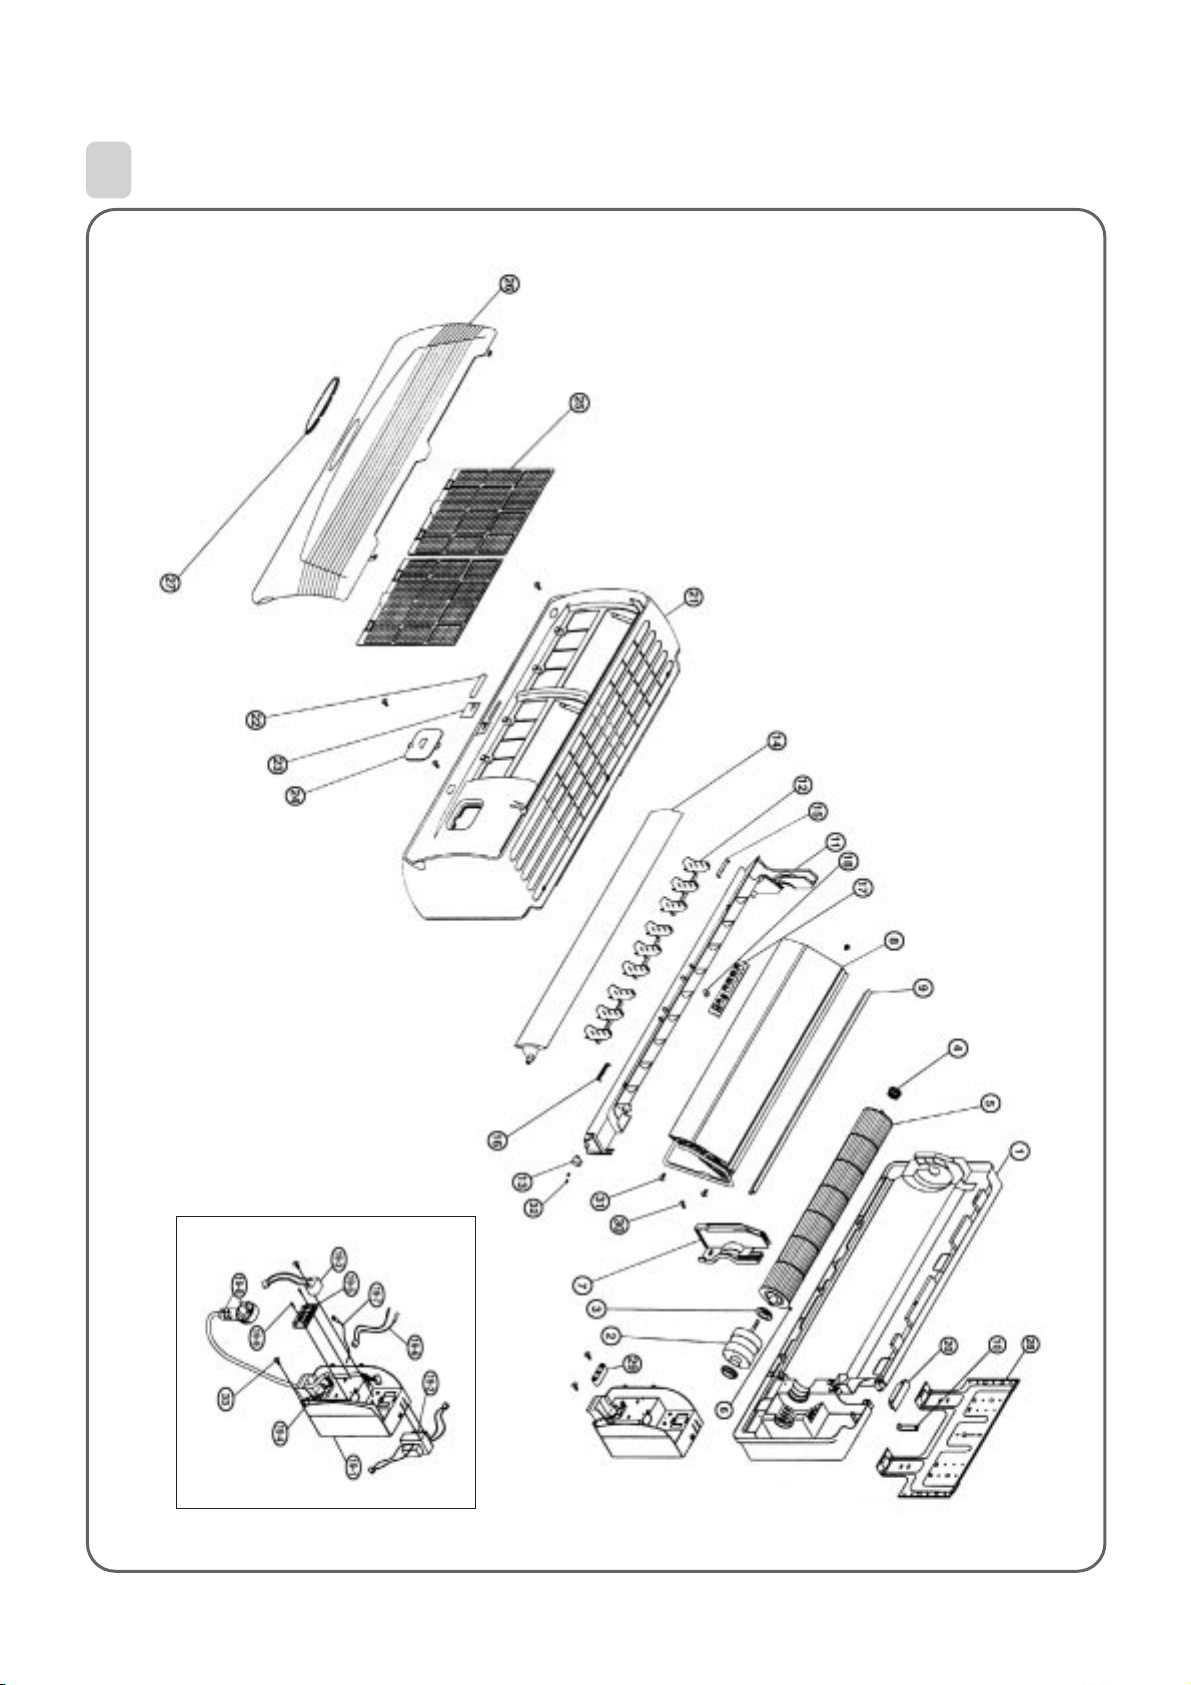
EXPLODED DIAGRAM (Indoor Unit)
3
¡ DSB-070L/DSB-091L
71
Page 74
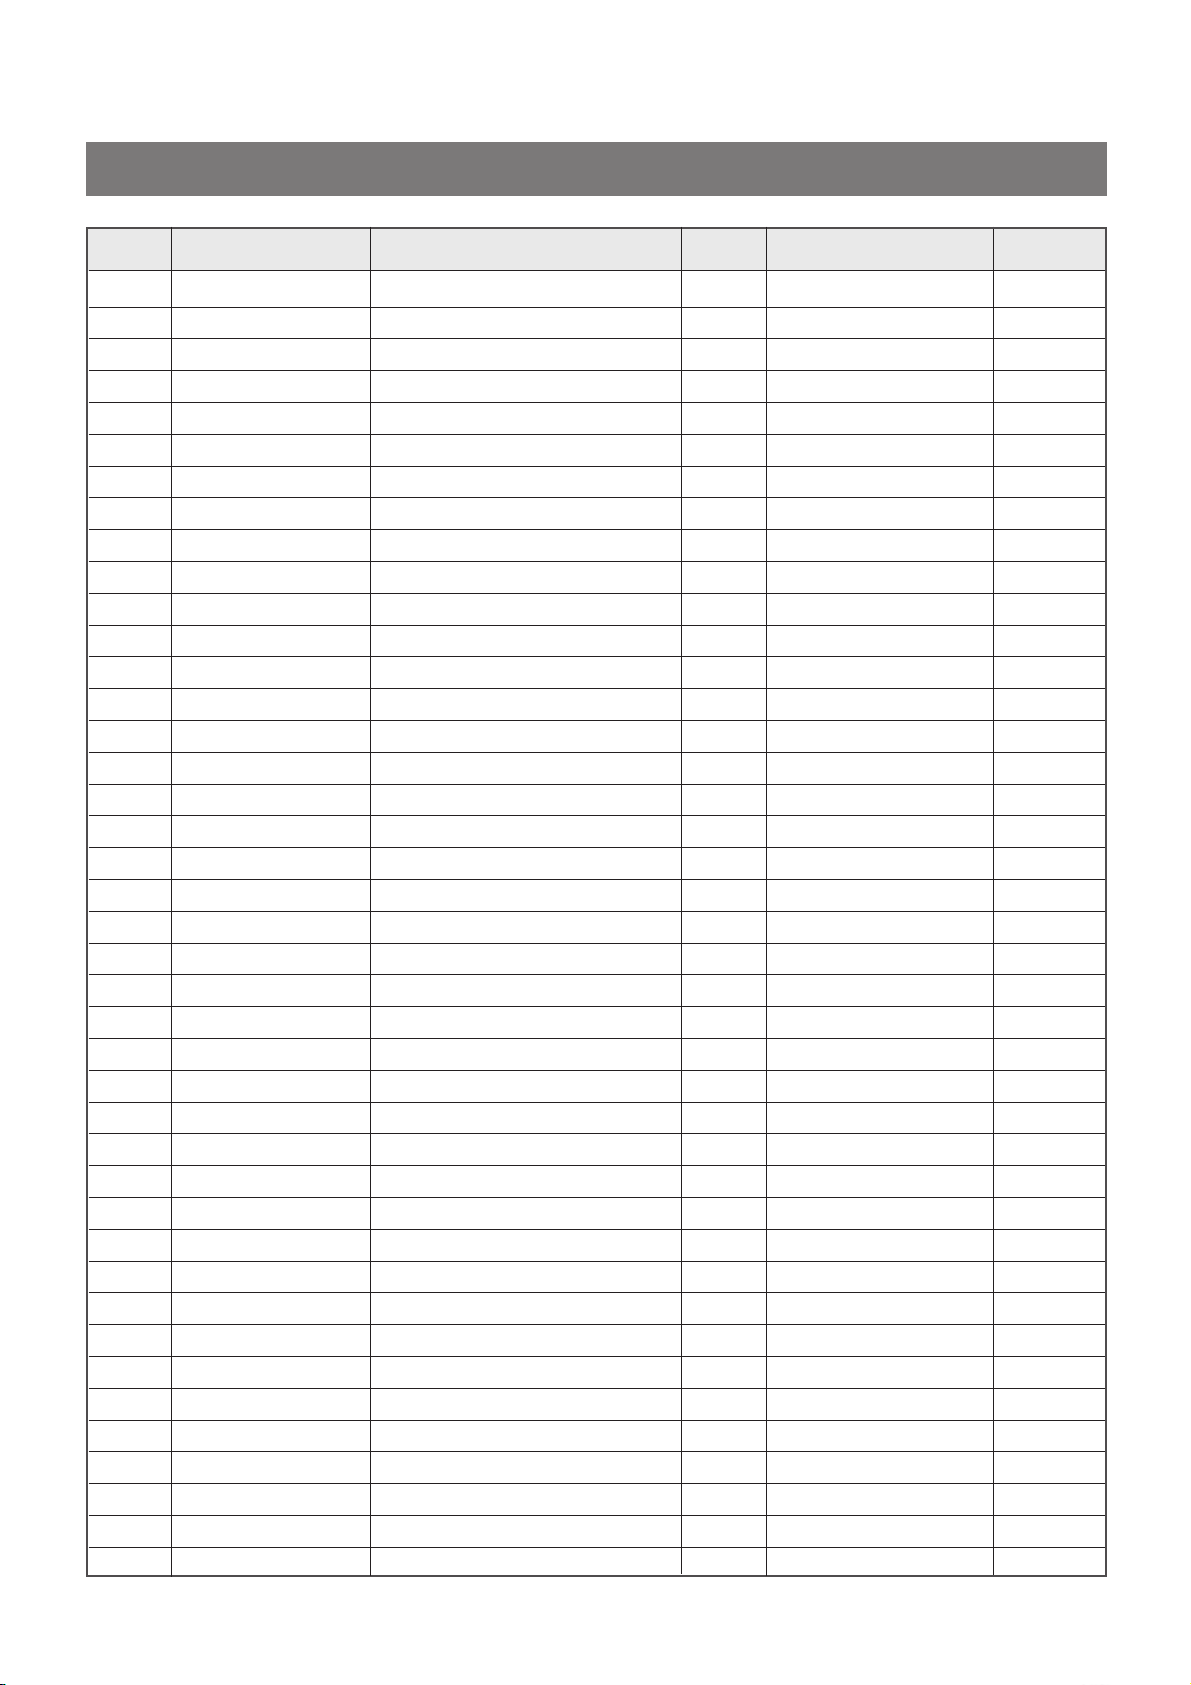
¡ DSB-070L/DSB-091L P ART LIST(INDOOR UNIT)
No PART CODE PART NAME Q'TY SPEC REMARK
1 3100400300 BODY 1 HIPS T2.0
2 3108004700 MOTOR IDU 1 IC-8417DWKF5A
3 3101500400 CUSHION MOTOR 2 CR Ø30
4 3106400400 BEARING PLASTIC ASS’Y 1
5 3100053700 FAN CROSS FLOW ASS’Y 1 Ø90.0xL540
6 7485401012 SET SCREW 1 6S-4x10-E MFZN
7 3103002600 HOLDER MOTOR 1 HIPS T2.0
8 3100053800 EVAPORATOR ASS’Y 1
9 3102501200 EVAP. GUIDE 1 PVC T1.0 L536
10 3100603800 BRACKET PIPE 1 HIPS T2.0
11 3108100800 PAN DRAIN 1 HIPS T2.0
12 3106501600 BLADE VERTICAL 3 P.P. T1.5
13 3108003900 MOTOR STEPPING 1
14 3107600400 FLAP 1 HIPS T2.5
15 3101404800 COVER WIRE L 1 HIPS
16 3101404900 COVER WIRE R 1 HIPS
17 3100054200 LED PCB ASS’Y 1
18 3100901600 CAP RUBBER 1 SILICON
19-1 3100508400 CONTROL BOX 1 P.P.+G.F.20%
19-2 5EPV050120 TRANSFORMER 1 DWA-220B
19-3 3106900300 CAPACITOR SH. M. B 1 1.0µF 400VAC
19-4 3100054400 CONTROL PCB ASS’Y 1
19-5 3108912310 TERMINAL BLOCK 1 SN-DBW-05P
19-6 3104896300 SENSOR ID ASS’Y 1 PTM-KD-43C-D2
19-7 3102797910 HARNESS 1 I.D EARTH
19-8 31013A24B1 POWER CORD ASS’Y 1 16A 250V
19-9 7111301611 SCREW TAPPING 2 T1S PAN 3x16 MFZN
20 3100400400 BODY-TOP 1 HIPS T2.0
21 3102200800 FRAME GRILLE 1 HIPS T2.5
22 3104508700 PLATE LED 1 PC SHEET T0.2
23 3104510200 PLATE SWITCH 1 PC SHEET T0.2
24 3101404600 COVER TERMINAL BLOCK 1 HIPS T2.0
25 3102200900 FILTER FRAME 2 P.P. T2.0
26 3102402200 INSERT GRILLE 1 HIPS T2.5
27 3101403900 COVER LED 1
28 3104507200 PLATE MOUNTING 1 SBHG 1 T0.7
29 3101203000 CLAMP WIRE 1 P.P.+G.F.20%
30 7S422X40B1 SPECIAL SCREW 8
31 7112400611 SCREW TAPPING 2 T1S TRS 4x6 MFZN
32 7141400811 SCREW TAPPING 2 T2 PAN 4x8 MFZN
33 7122401211 SCREW TAPPING 1 T2S TRS 4x12 MFZN
MP24GA or GSP-24SW-061
ABS(TRANSPARENCY) T2.0
TT2 TRS SE 4x12 MFZN
72
Page 75
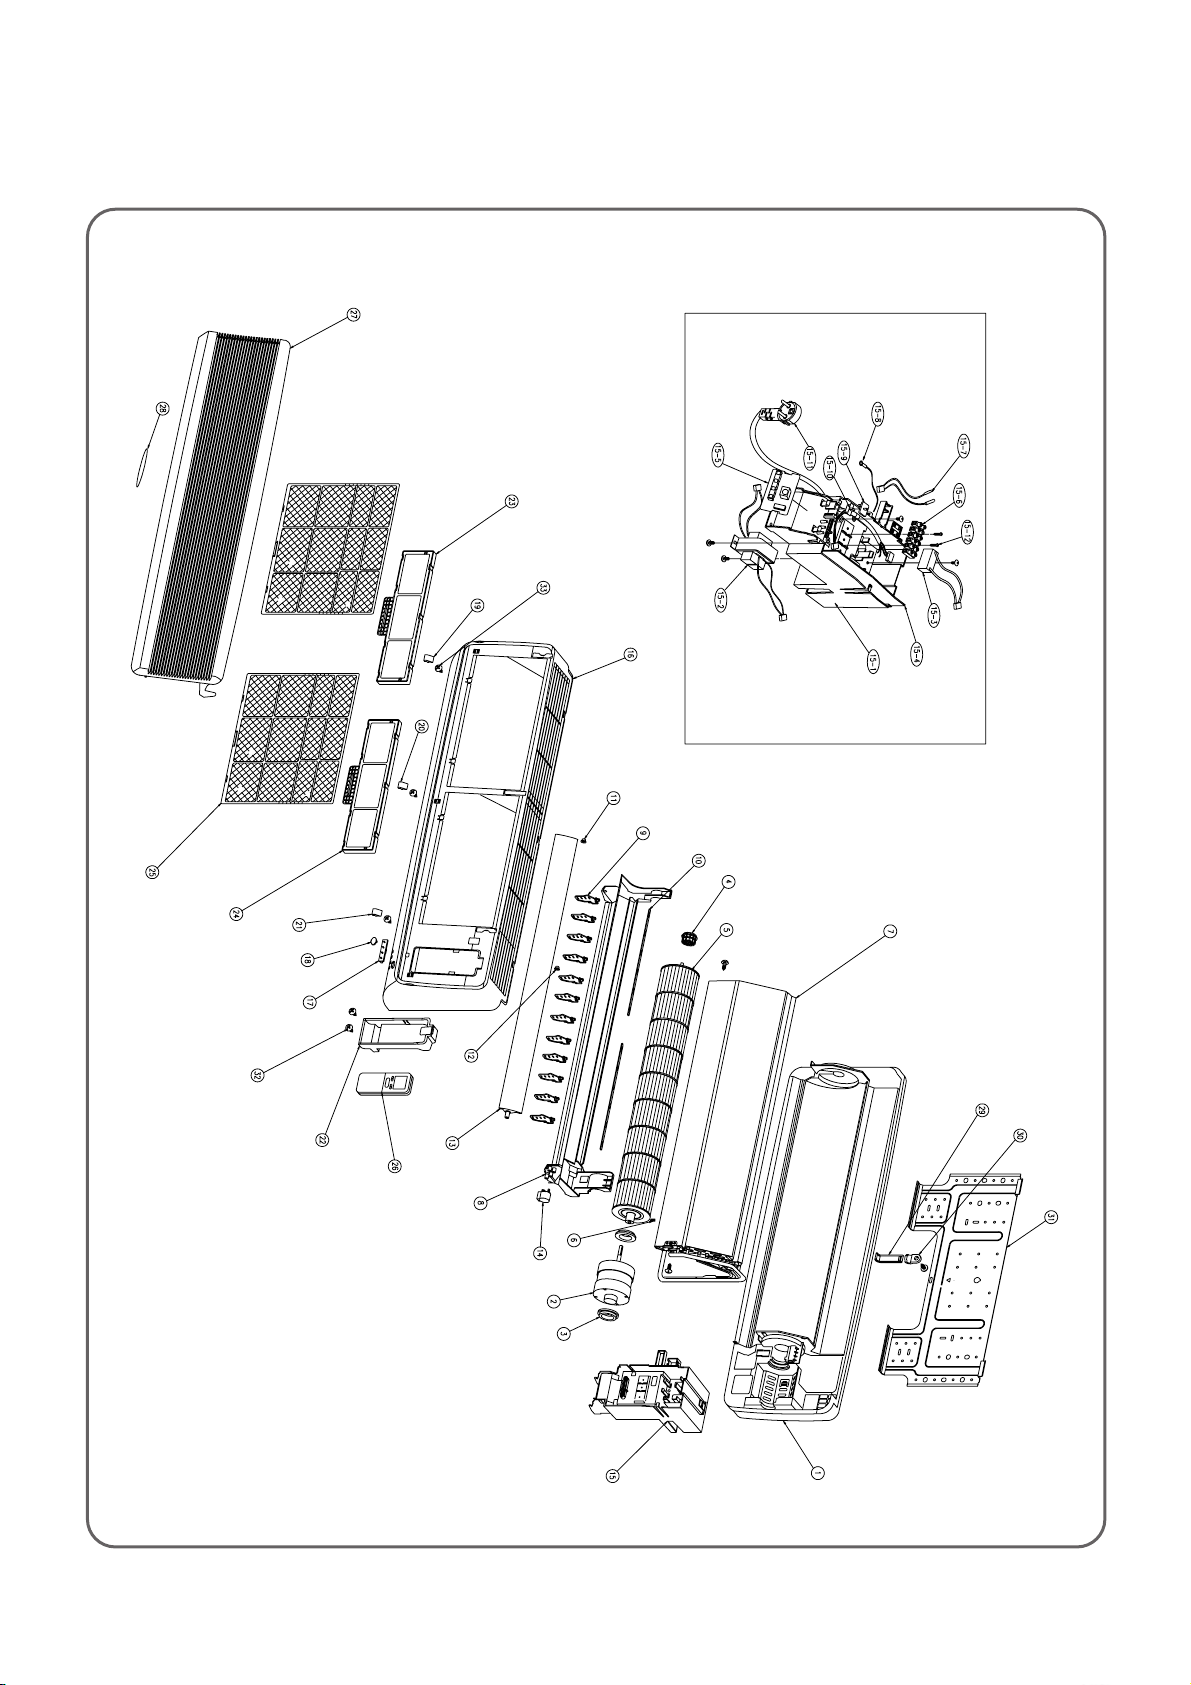
¡ DSB-121L/DSB-122L
73
Page 76
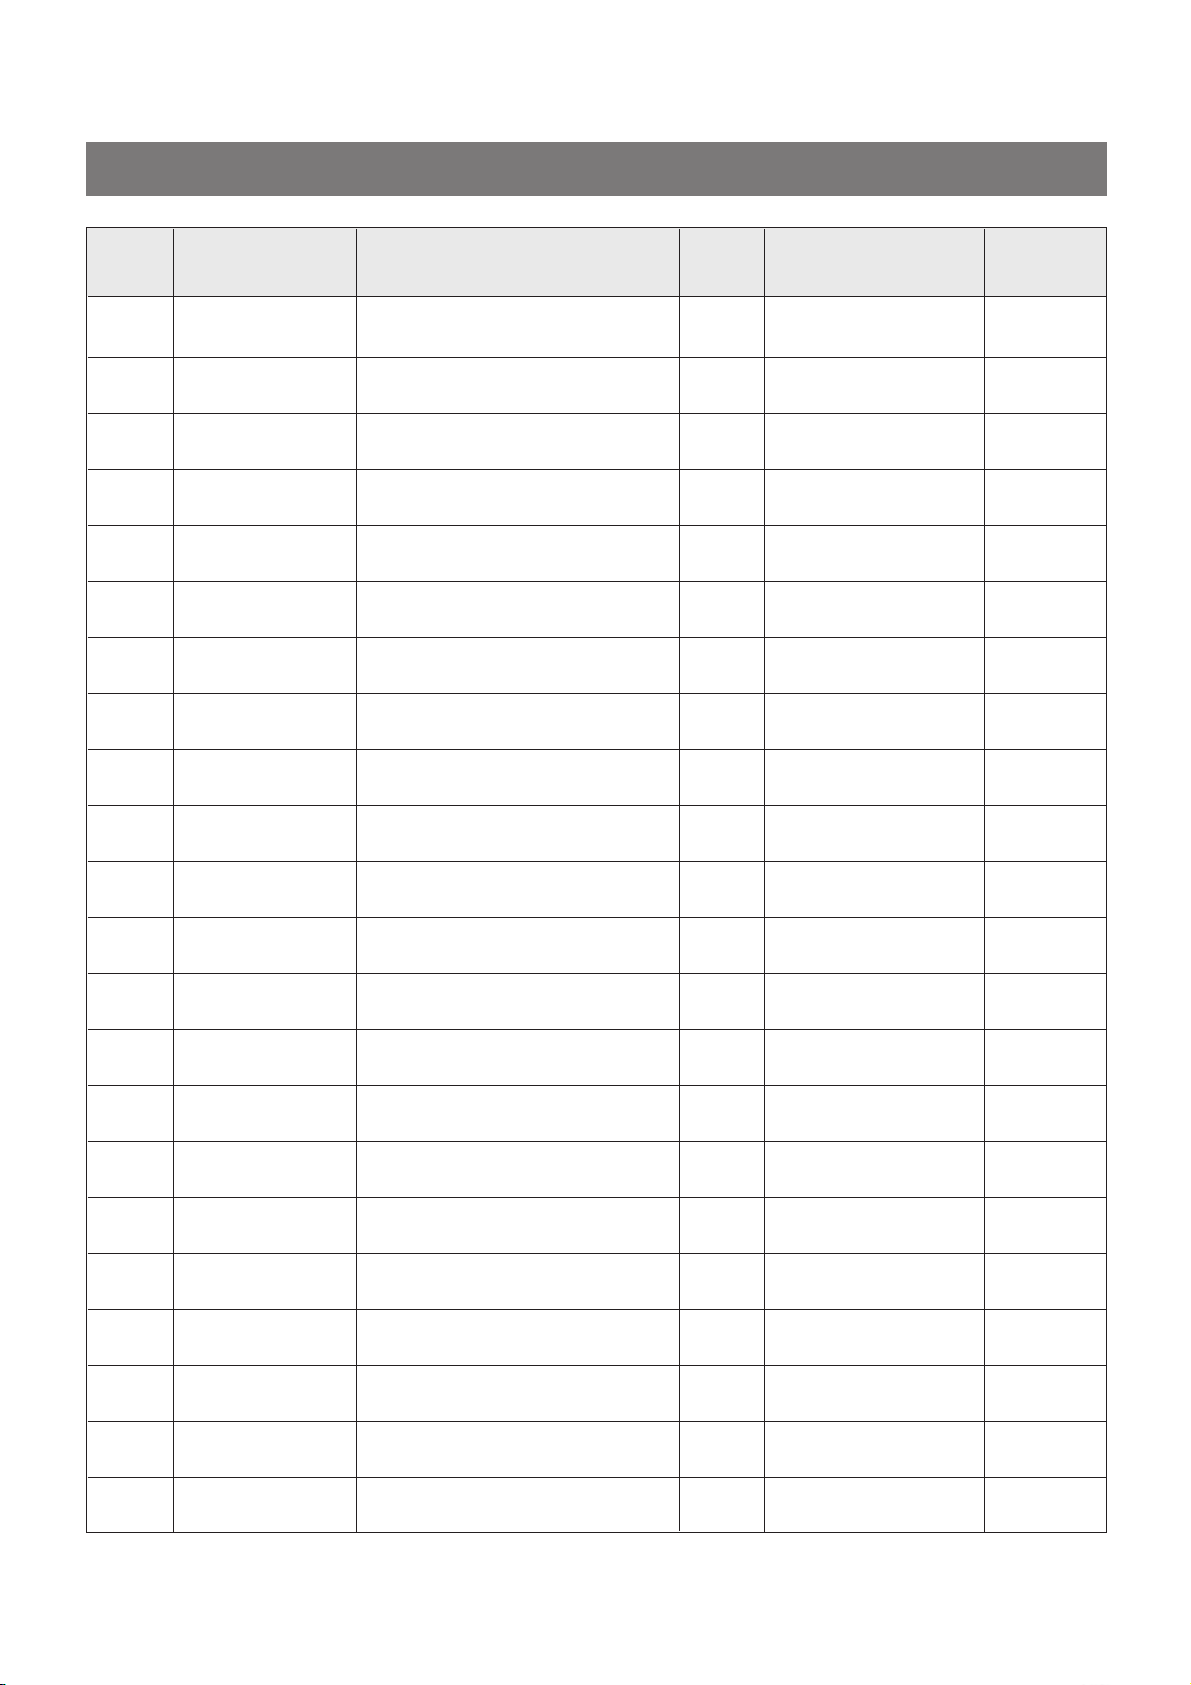
¡ DSB-121L/122L PART LIST(INDOOR UNIT)
No PART CODE PART NAME Q'TY SPEC REMARK
1 3100400201 BODY 1 ABS or HIPS
2 3108001220 MOTOR IDU 1 220V 50/60Hz
3 3101500400 CUSHION MOTOR 2 CR
4 3106400200 BEARING PLASTIC ASS’Y 1
5 3100014400 FAN CROSS FLOW ASS'Y 1 SAN+G. F20%
6 7485401012 SET SCREW 1 6S-4 X 10-E
7 3100014300 EVAPORATOR ASS'Y 1
8 3108100401 PAN DRAIN 1 ABS
9 3106500800 BLADE VERTICAL MN 12 ABS
10 3106300800 BAR BLADE 2 ABS
11 3100700800 BUSHING L 1 POM
12 3100700700 BUSHING R 1 POM
13 3107600300 FLAP 1 ABS
14 3108000100 MOTOR STEPPING 1 MG28GA
15 3100038210 CONTROL BOX ASS'Y 1 BUYER
15-1 3100503101 BOX CONTROL 1 P.P+G.F30%
15-2 5EPV050100 TRANS FORMER 1 DWA220A-50/60Hz
15-3 3106900300 CAPACITOR SH.M.B 1 1.0µF 400VAC
15-4 3100054400 CONTROL PCB ASS'Y 1
15-5 3100054200 LED PCB ASS'Y 1
15-6 3108912301 TERMINAL BLOCK 1 SN-DBW-05P
15-7 3104896300 SENSOR I.D ASS'Y 1 PTM-KD43C-D2
74
Page 77
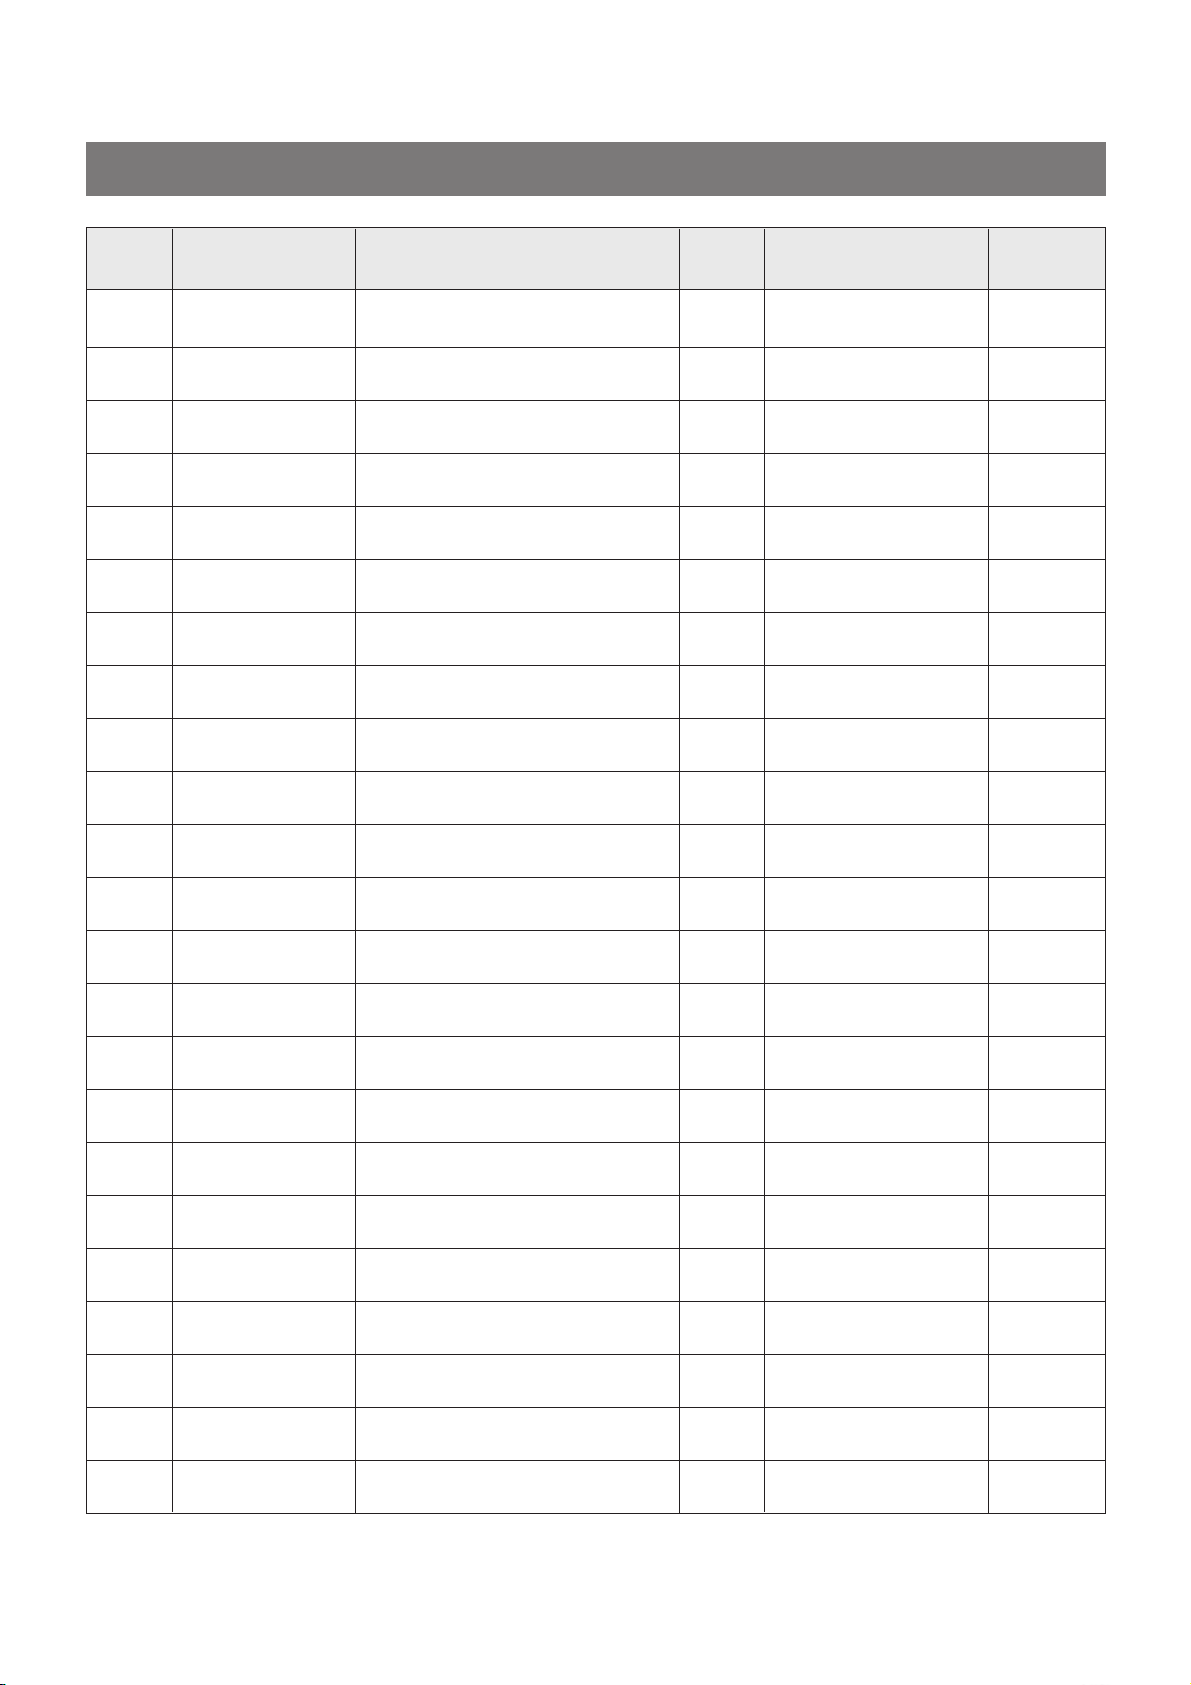
¡ DSB-121L/122L P ART LIST(INDOOR UNIT)
No PART CODE PART NAME Q'TY SPEC REMARK
15-8 3102797910 HARNESS 1 I.D EARTH
15-9 3103400300 KNOB RESET SWITCH 1 ABS
15-10 3100024000 MODE SELECT ASS'Y 1 TS-11 & HARNESS
15-11 3101395060 POWER CORD ASS'Y 1 BUYER
15-12 7111301611 TAPPING SCREW 2 T1S PAN 3 X 16 MFZN
16 3102200401 FRAME 1 ABS BUYER
17 3103600300 LAMP INDICATE 1 MIPS
18 3105500500 WINDOW SENSOR 1 ACRIL
19 3100901000 CAP FRAME L 1 ABS
20 3100900900 CAP FRAME C 1 ABS
21 3100900800 CAP FRAME R 1 ABS
22 3101401701 COVER TER-BLOCK 1 ABS
23 3100017800 FILTER ELECTRO ASS'Y 1
24 3100017900 FILTER CARBON ASS'Y 1
25 3100017700 FILTER PRE ASS'Y 2
26 REMOCON ASS'Y 1 BUYER
27 3102401500 INSERT GRILLE 1 ABS
28 3107500200 EMBLEM 1 URETANE BUYER
29 3100602400 BRACKET PIPE 1 HIPS
30 3101201200 CLAMP BRACKET PIPE 1 HIPS
31 3104503900 PLATE MOUNTING 1 SBHG1
32 3106001600 SPECIAL SCREW 1
33 7S422X40B1 SPECIAL SCREW 13
T2 4 X 16 MFNI LOCKING
TT2 TRS SE 4x12 MFZN
ƒINO 15, 15-11, 16, 26, 28 Will be changed depend on export destination & buyer requirements.
75
Page 78
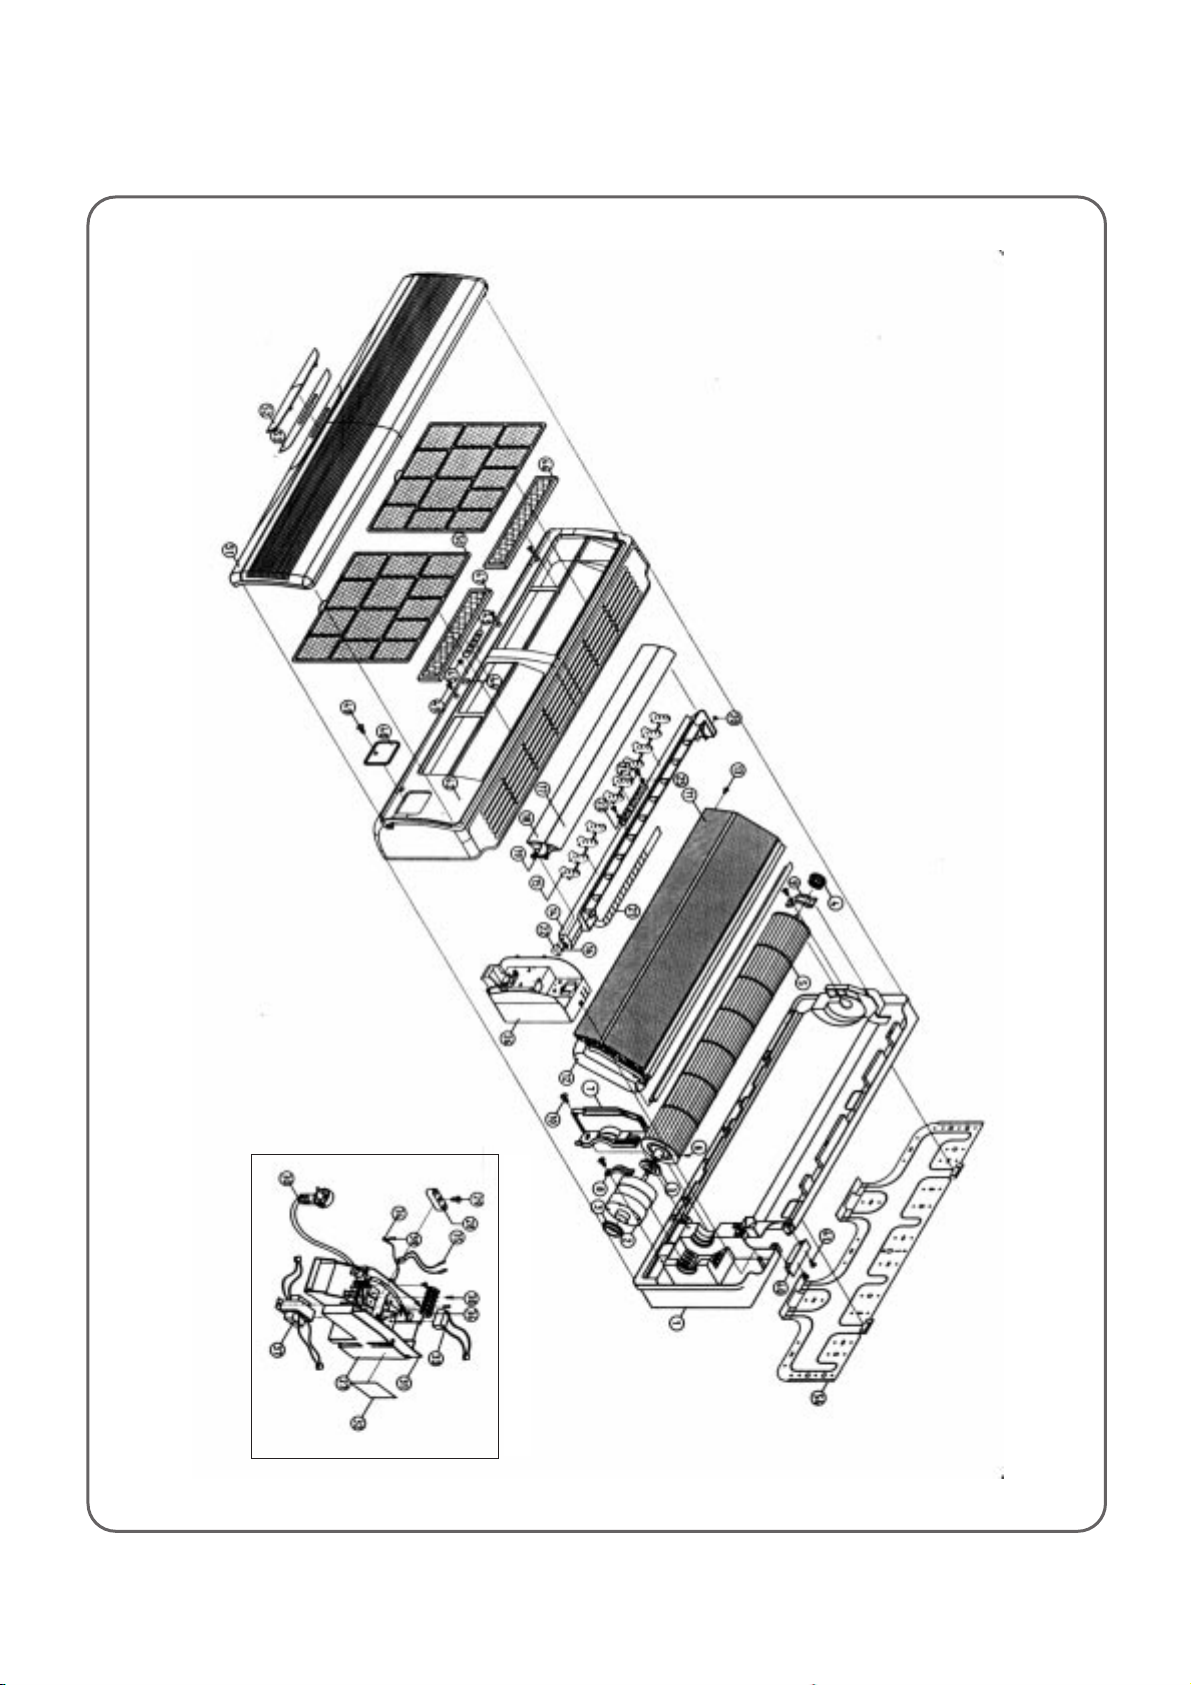
EXPLODED DIAGRAM (INDOOR UNIT)
¡ DSB-240L
CONTROL BOX ASSY
76
Page 79
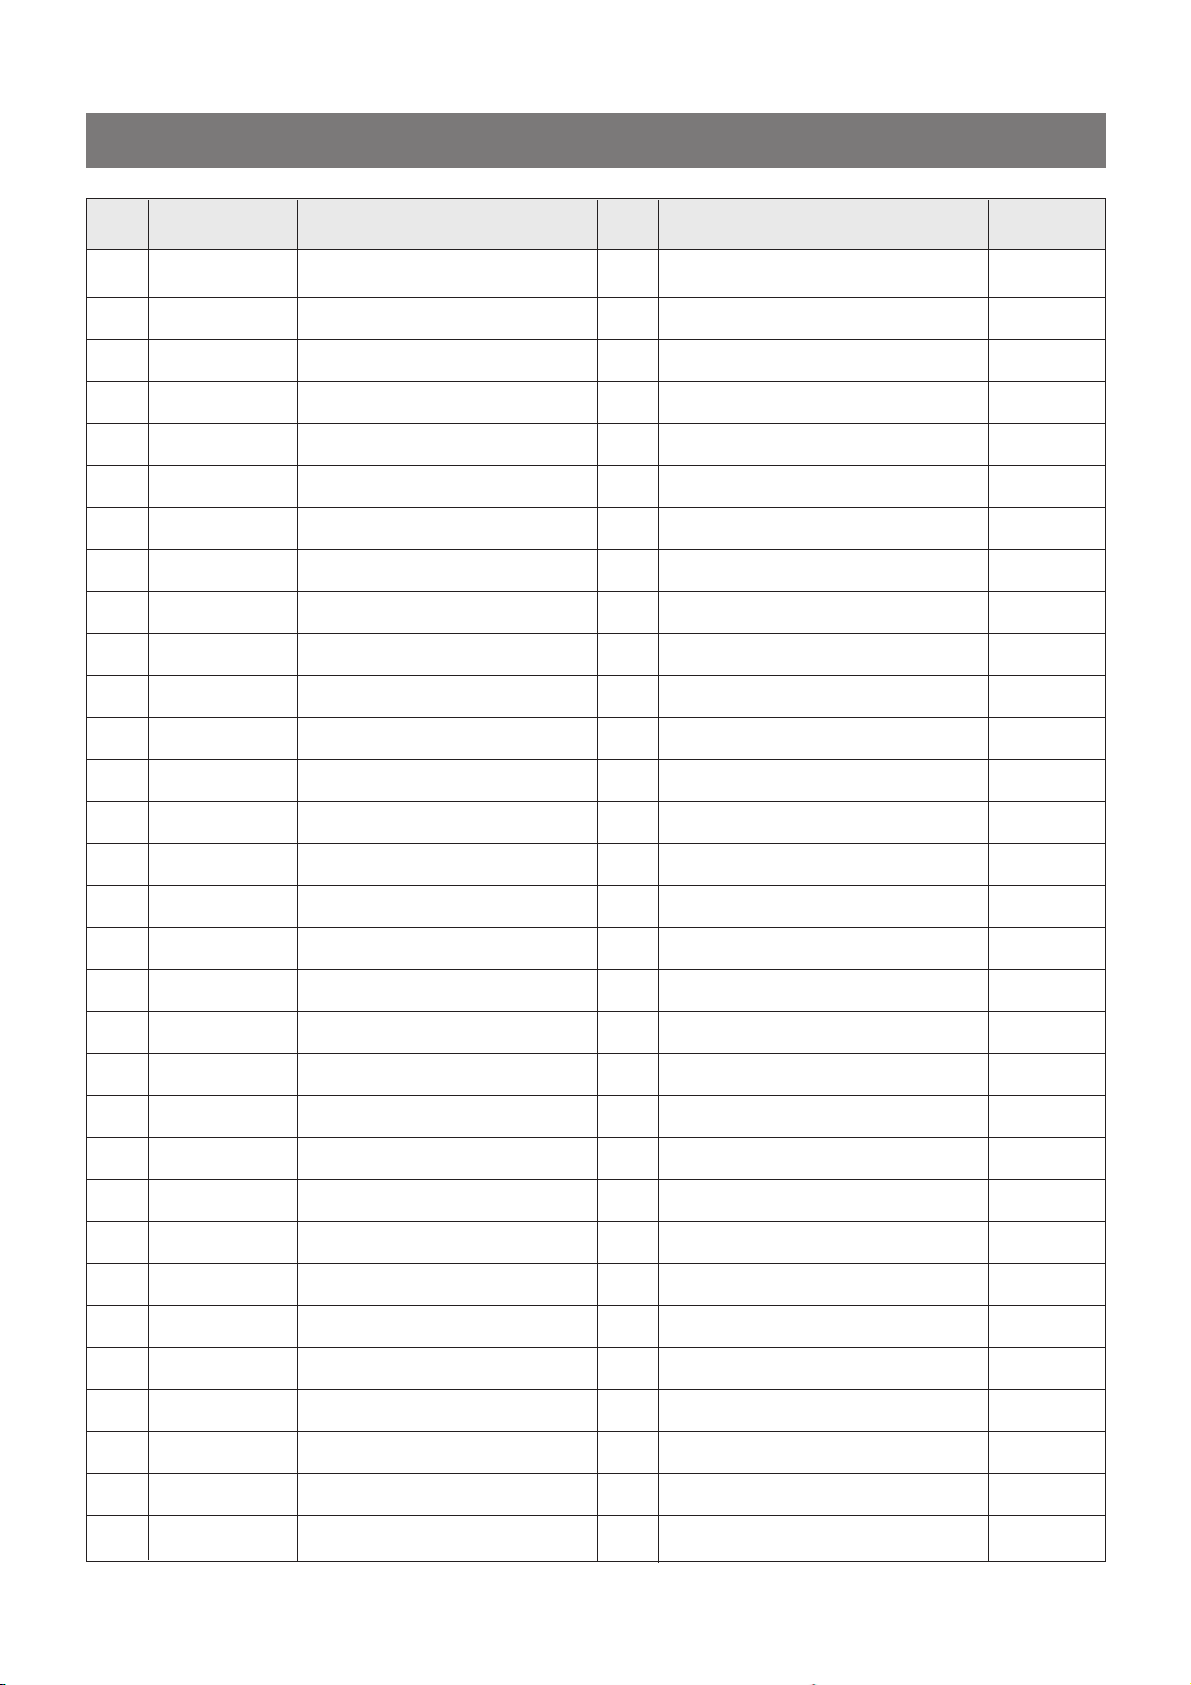
¡ DSB-240L PART LIST (INDOOR UNIT)
No PART CODE PART NAME Q'TY SPEC REMARK
1 3100400600 BODY 1 DSB-240L/LH
2 3108007500 MOTOR FCU 1 IC-9430DWKG7A
3 3101500400 CUSHION MOTOR 2 CR I.D30 (R/W45)
4 3106400200 BEARING PLASTIC ASSY 2 O.D37 .0*I.D6.0
5 3100076400 FAN CROSS FLOW ASSY 1 Ø100XL864
6 7485401012 SET SCREW 1 6S-4*10-E MFZN(BLACK)
7 3103003800 HOLDER MOTOR L/B 1 DSB-240L/LH
8 3103003900 HOLDER MOTOR R 1 DSB-240L/LH
9 3103004000 HOLDER BEARING 1 ABS T2.5
10 7172401211 SCREW TAPPING 3 TT2 TRS 4*12 MFZN
11 3100089100 EVAPORATOR 1 ASSY
12 3104440100 PIPE ARTRON HOSE 1 O.D:42 I.D:26 T=7, F-PE
13 7172401211 SCREW TAPPING 1 TT2 TRS 4*12 MFZN
14 3108101400 PAN DRAIN 1 DSB-240L/LH
15 3106502700 BLADE VERTICAL (M) 2.5 DSB-240L/LH J360A
16 7141400811 SCREW TAPPING 1 T2 PAN 4X8 MFZN
17 3107600500 FLAP UP 2 DSB-240L/LH
18 3107600600 FLAP DOWN 1 DSB-240L/LH
19 3107801700 LINK FLAP 1 DSB-240L/LH
20 3100702000 BUSHING 2 DSB-240L/LH
21 3103200800 HOSE DRAIN ASSY 1 ASSY
22 3108007600 MOTOR STEPPING 1 GSP-24RW-062
23 3104301700 LED PCB ASSY 1 18/24K (150X24.5X1.6T)
24 7112300611 SCREW TAPPING 2 T1, TRS M3*6
25 3106002900 WASHER PLASTIC 2 IS Ø3
26 3100077000 CONTROL BOX ASSY 1 ASSY
27 3100510700 BOX CONTROL 1 DSB-240L/LH
28 3101200400 CLAMP POWER CORD 1 DA-5N
29 7172401211 SCREW TAPPING 2 TT2 TRS 4*12 MFZN
30 3101300440 POWER CORD ASSY 1 SJT 3X14 AWG105
31 3104300830 CONTROL PCB ASSY 1 240LH(A), 240LH(B)
77
Page 80
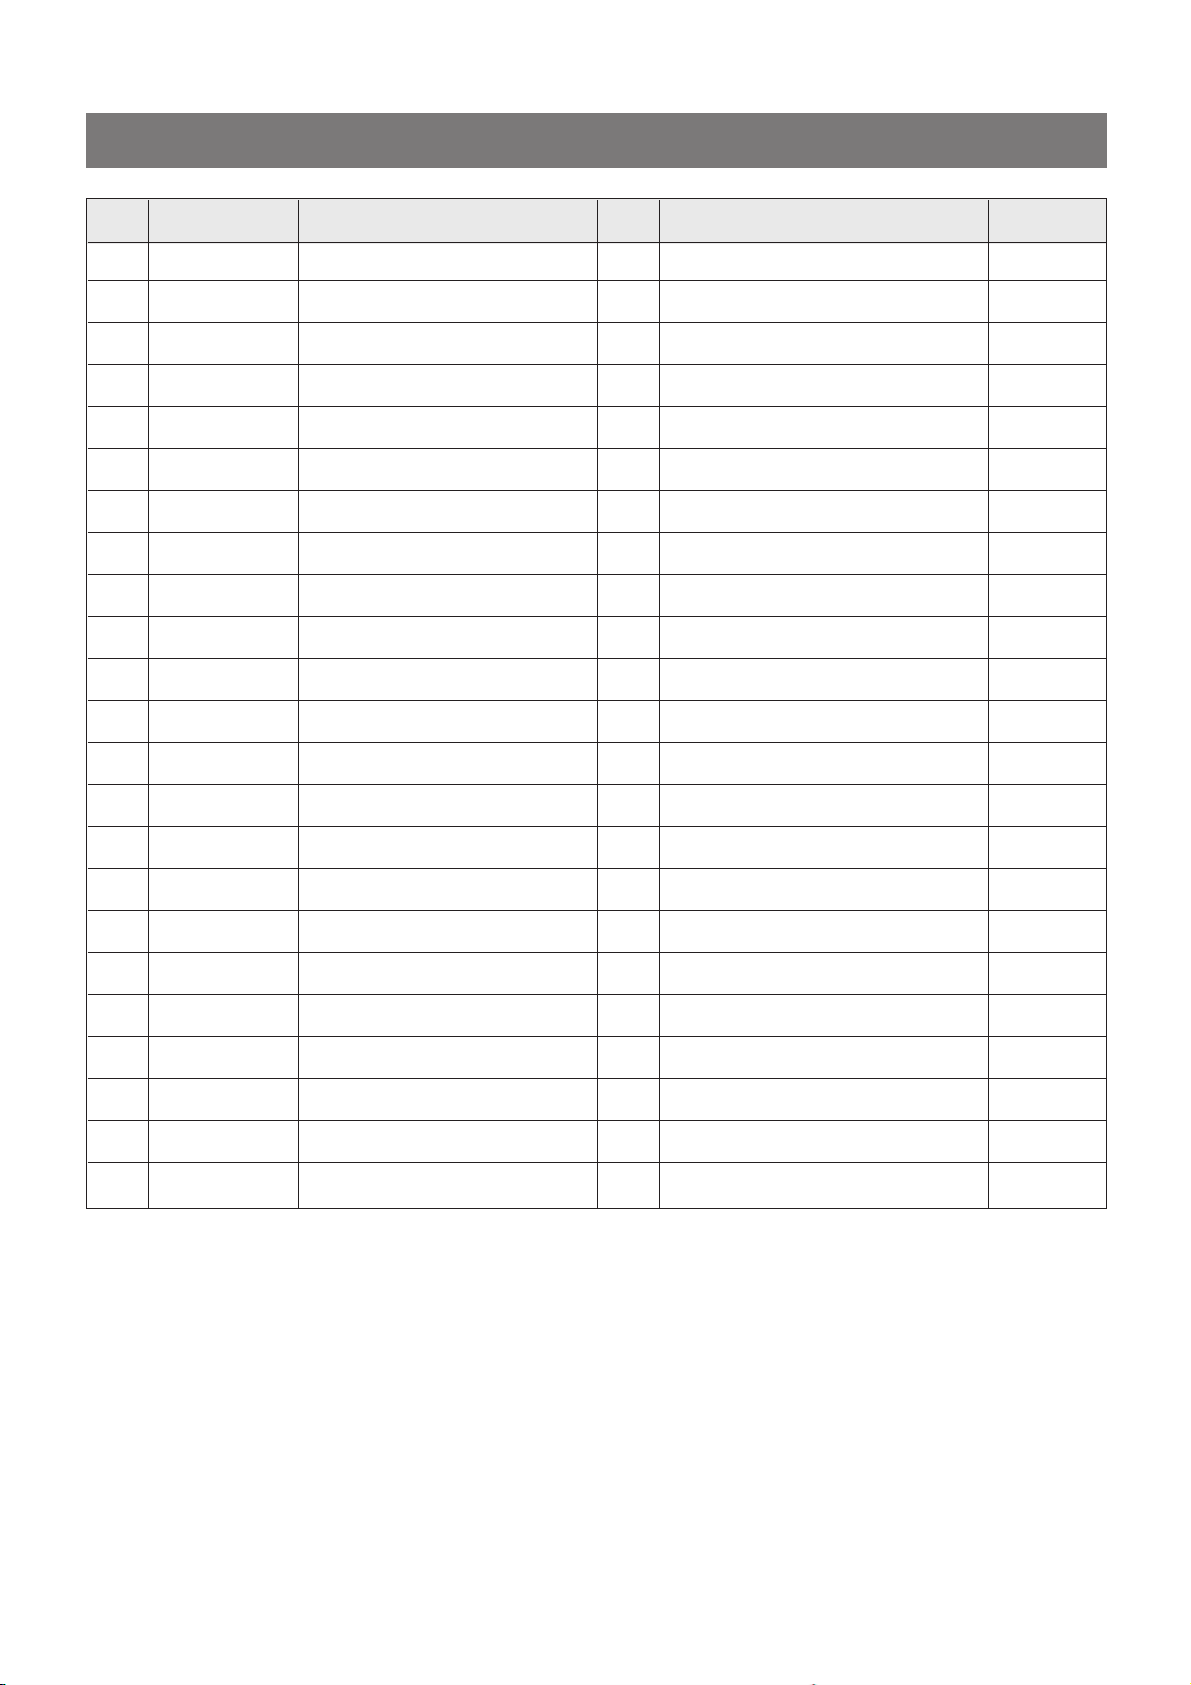
¡ DSB-240L PART LIST (INDOOR UNIT)
No PART CODE PART NAME Q'TY SPEC REMARK
32 2150013200 AL FOIL EMI 0.1 AL100P (W100XL100)
33 3106902400 CAPACITOR SH.M.B 1 2.0MF 400V
34 3102797910 HARNESS EARTH 1 GREEN/YELLOW L170mm
35 3104896300 SENSOR ID ASSY 1 NTM-KD43C-D1D2 L450, L330
36 3108912320 TERMINAL BLOCK 1 SN-DBW-4P
37 5EPV050120 TRANSFORMER 1 DWA-220B
38 7172401211 SCREW TAPPING 2 TT2 TRS 4*12 MFZN
39 7S422X40B1 SPECIAL SCREW 2 TTS TRS SE 4*12 MFZN
40 3100400700 BODY TOP 1 DSB-240L/LH
41 7172401211 SCREW TAPPING 2 TT2 TRS 4*12 MFZN
42 3102201400 FRAME GRILLE 1 DSB-240L/LH
43 3104512400 PLATE LED 1 PC SHEET T0.2
44 3104510200 PLATE SWITCH 1 PC SHEET T0.2
45 3103401400 KNOB SWITCH 1 DSB-240L/LH
46 3100017810 FILTER ELECTRO ASSY 1 070MG/HG
47 3100017910 FILTER CARBON ASSY 1 070MG/HG
48 3101406820 COVER T/BLOCK 1 ABS (DSB-240L/LH)
49 7112401211 SCREW TAPPING 4 T1 TRS 4*12 MFZN
50 3102201500 FILTER FRAME 2 DSB-240L/LH J360A
51 3102403500 GRILLE INSERT 1 DSB-240L/LH
52 3101406900 COVER LED 1 DSB-240L/LH
53 3104512600 PLATE INSERT GRILLE 1 PET T=0.1
54 3104511800 PLATE MOUNTING 1 DSB-240L/LH
78
Page 81
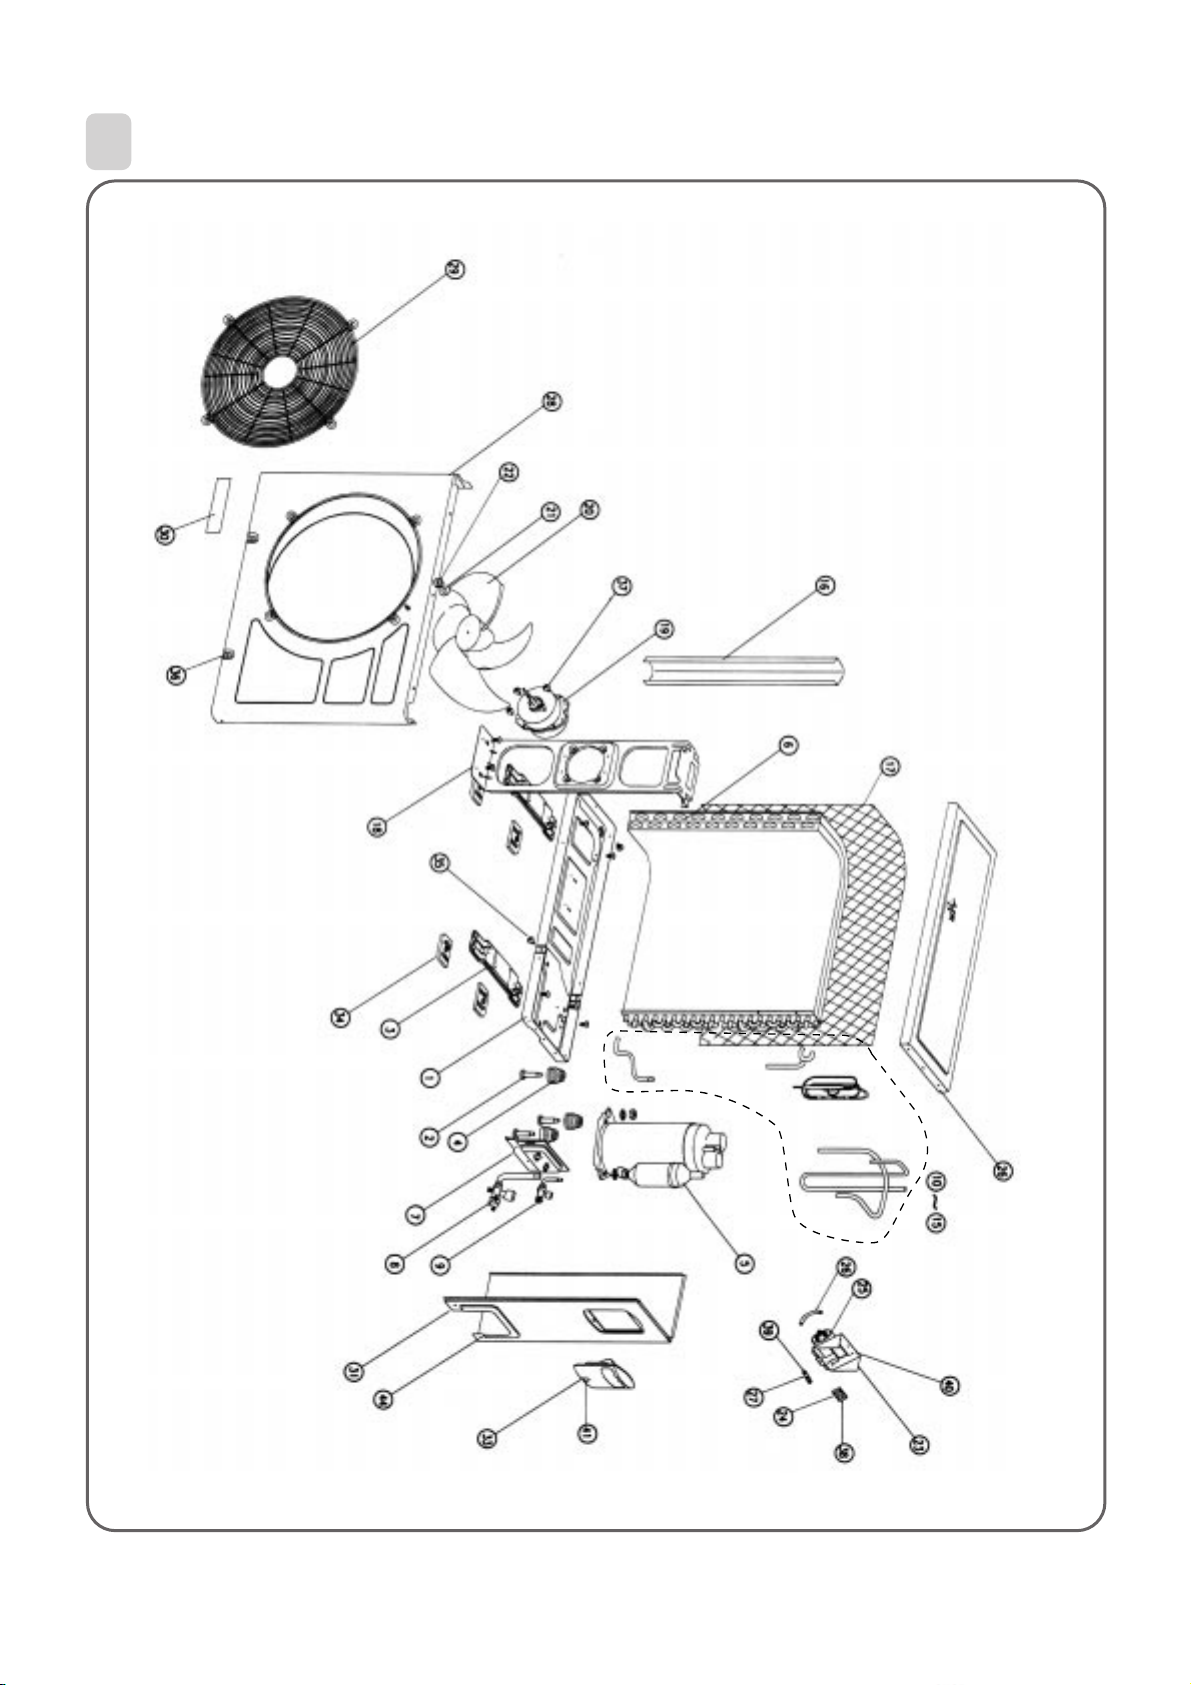
4
EXPLODED DIAGRAM(Outdoor Unit)
¡ DSB-070L/DSB-091L/DSB-121L/DSB-122L (After)
79
Page 82
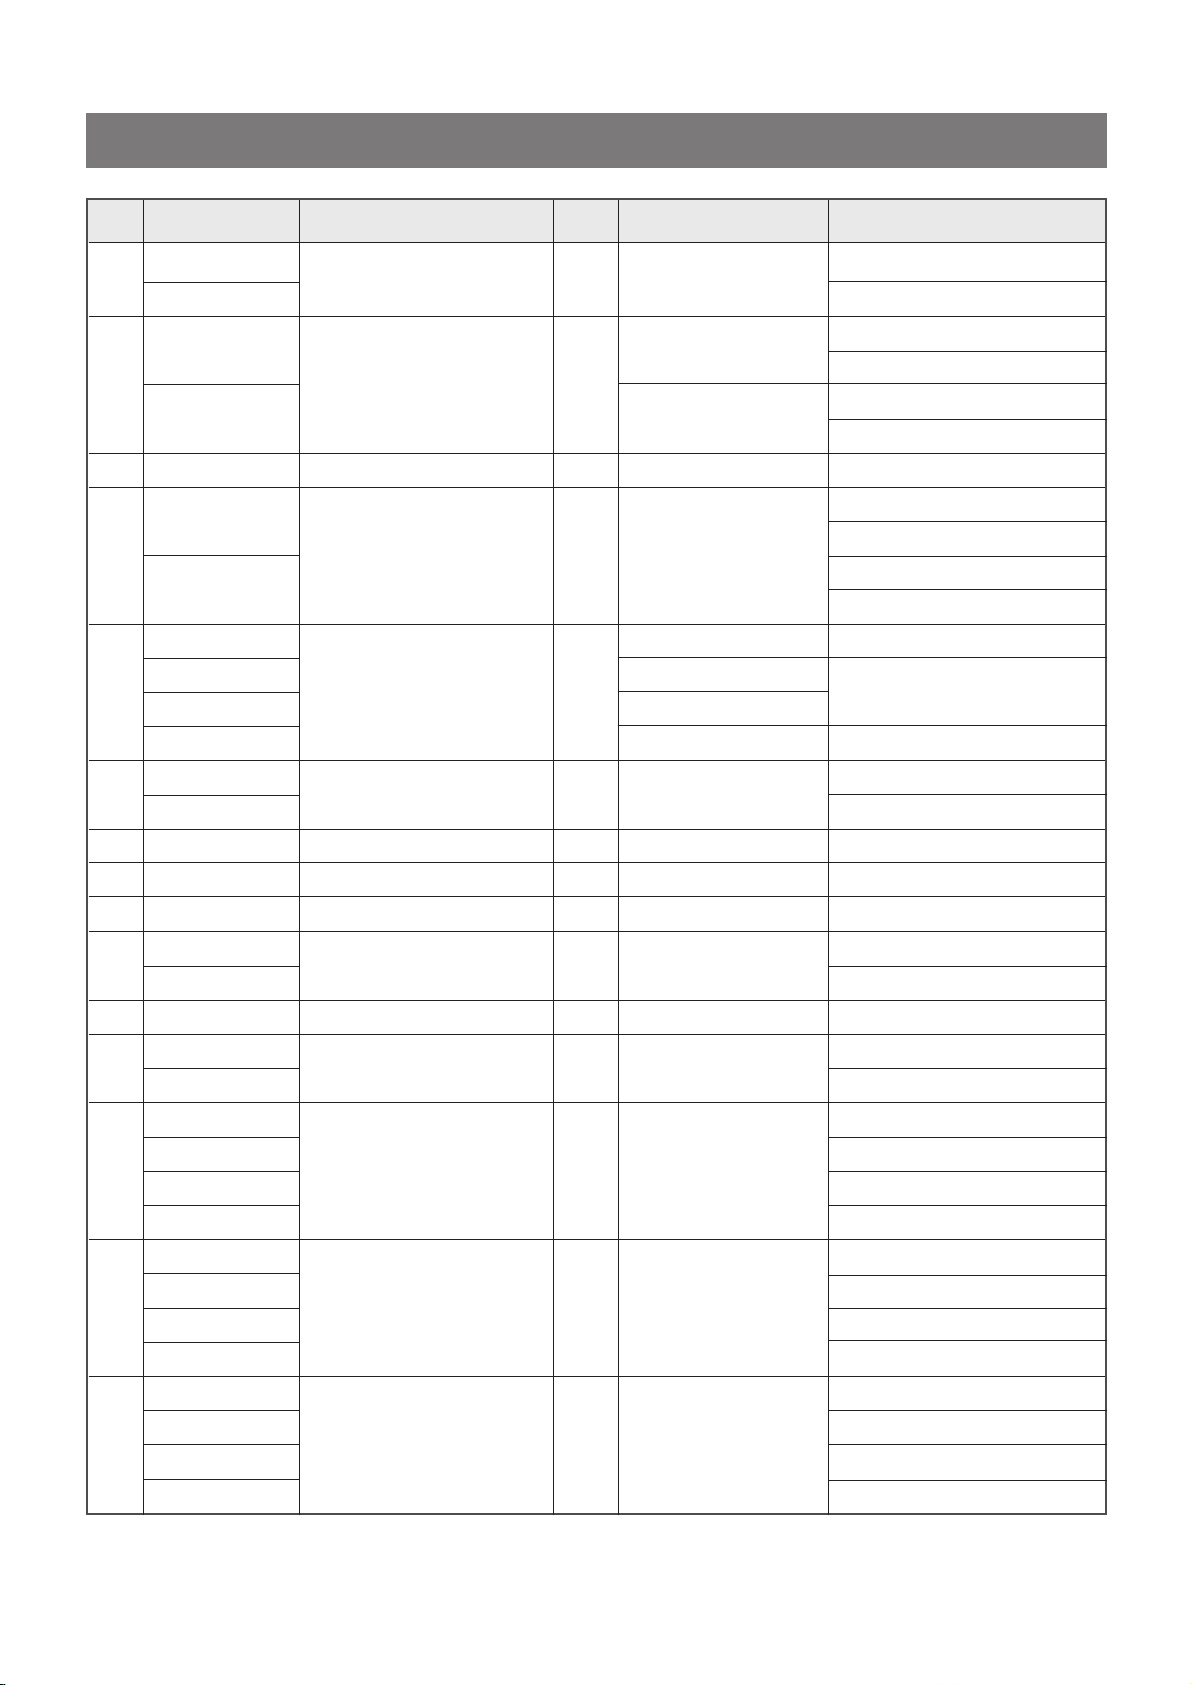
¡ DSB-070L/DSB-091L /DSB-121L/DSB-122L(After) P ART LIST(OUTDOOR UNIT)
No PART CODE PART NAME Q'TY SPEC REMARK
3100300511
1
3100300531 SECC T1.2 121L
3107101180 M8 x L47.5
2 COMP. BOLT 3
3106000900 M8XL46.5
3 3102100800 FOOT 2 SECC T1.2 070L/091L/121L
3107101110
4 COMP. GROMMET 3 EPDM
3108134AEO
3107101100 QB125PL12B 070L
3107101800
5
3RC0020JE0 RBB090A001
3100030CE0 RCB120A001 121L
3100054800
6
3100014110 121L
PAN BASE 1
COMPRESSOR ASS’Y 1
CONDENSER ASS’Y 1 L465xW208.5xH508
SECC T1.2 070L/091L
070L(LG COMP. QB125PL12B)
091L(LG COMP. QK164PN12F)
091L(DW COMP. RBB090A001)
121L(DW COMP. RCB120A001)
070L(LG COMP. QB125PL12B)
091L(LG COMP. QK164PN12F)
091L(DW COMP. RBB090A001)
121L(DW COMP. RCB120A001)
QK164PN12F
091L
070L/091L
7 3100602200 BRACKET SERVICE 1 SECC T1.2
8 3105400700 SERVICE VALVE 1 1/2¡¨
9 3105400800 SERVICE VALVE 1 1/4¡¨
10
11 3104412800 PIPE COND OUT ASS’Y 1 C1220T 121L
12
13
14
3100006400
PIPE COND IN ASS’Y 1 C1220T
3104410710 121L
3104411411
PIPE OUTLET 1 C1220T
3104411420 121L
3100055100
3100055110
PIPE SUCTION ASS’Y 1 C1220T
3100055300
3100020710
3100055200
3100055210
PIPE DISCHARGE ASS’Y 1 C1220T
3100055200
3100020610
3100014200
070L/091L
070L/091L
070L(LG COMP. QB125PL12B)
091L(LG COMP. QK164PN12F)
091L(DW COMP. RBB090A001)
121L(DW COMP. RCB120A001)
070L(LG COMP. QB125PL12B)
091L(LG COMP. QK164PN12F)
091L(DW COMP. RBB090A001)
121L(DW COMP. RCB120A001)
070L(LG COMP. QB125PL12B)
15
3100061820
3100061810
3100014200
PIPE FILTER ASS’Y 1
C1220T
091L(LG COMP. QK164PN12F)
091L(DW COMP. RBB090A001)
121L(DW COMP. RCB120A001)
8080
Page 83
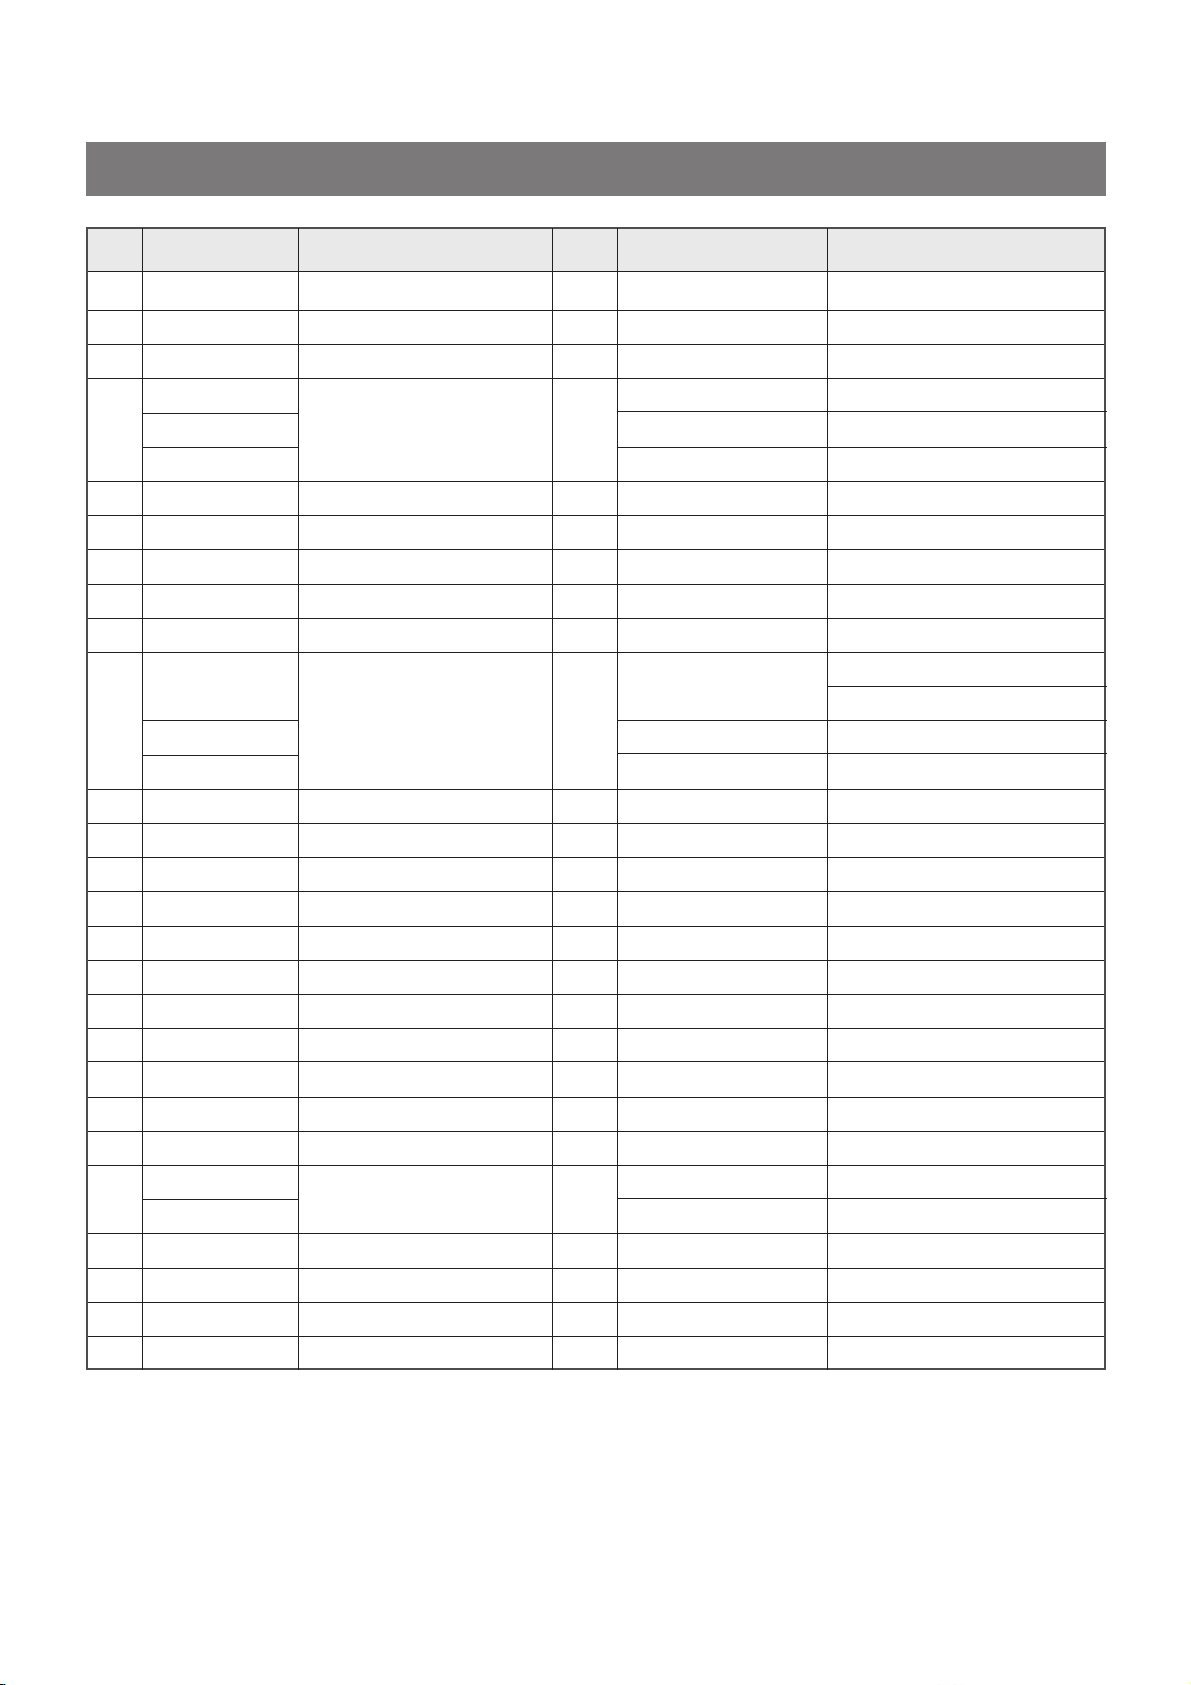
¡ DSB-070L/DSB-091L /DSB-121L/DSB-122L(After) PART LIST(OUTDOOR UNIT)
No PART CODE PART NAME Q'TY SPEC REMARK
16 3102501100 GUIDE SUPPORT 1 SECC T1.2
17 3102402600 GRILLE CONDENSER 1 P.E. 660x525.5xT3.5
18 3100601901 BRACKET MOTOR 1 SBHG1 T1.2
3108004000 IC-9625DWLF5A 070L
19 3108004100 MOTOR ODU 1 IC-9630DWLF5A 091L
3108000800 IC-9430DWLC5B 121L
20 3101801000 FAN PROPELLER 1
21 7400208411 WASHER PLAIN 1 PW-2-8 MFZN
22 7392800011 NUT LOCK 1 M8 x P1.25 MFZN
23 3104201900 PANEL CONTROL 1 SBHG1 T0.8
24 3108912300 TERMINAL BLOCK 1 SN-DBW-03P
3109501201 1.8+25µF 400VAC
25 CAPACITOR DUAL 1
3109502010 1.8+30µF 400VAC
3109500700 3.5+25µF 400VAC
26 3101201100 CLAMP CAPACITOR 1 SBHG1 T1.0
27 3101202000 CLAMP CORD 1 NYLON
28 3100801200 CABINET FRONT 1 SECC T0.8
29 3102402500 GRILLE DISCHAGE 1 Ø425.5
30 3103502210 LABEL BRAND 1 P.C.FILM T0.4
31 3100801300 CABINET SIDE 1 SECC T0.8
32 3104201800 PANEL TOP 1 SECC T0.8
33 3102600300 HANDLE 1 A.E.S. T2.5 (WH104A)
ABS+G.F20% (BLACK)
070L(LG COMP. QB125PL12B)
091L(LG COMP. QK164PN12F)
091L(DW COMP. RBB090A001)
121L(DW COMP. RCB120A001)
34 3102101000 FOOT CUSHION 4
35 7112401211 TAPPING SCREW 11 T1S TRS 4X12 MFZN
36 7112401214
7112401211
37
7112402011 T1S TRS 4X20 MFZN 121L
38 7111301611 TAPPING SCREW 2 T1S PAN 3X16 MFZN
39 7112403011 TAPPING SCREW 3 T1S TRS 4X30 MFZN
40 7S432X40A1 SPECIAL SCREW 1
41 7112401614
TAPPING SCREW+PVC WASHER
TAPPING SCREW 4
TAPPING SCREW+PVC WASHER
NBR (HARDNESS 45°¡ 5°)
29 T1S TRS 4X12 MFZN
T1S TRS 4X12MFZN 070L/091L
TT3 TRS SE 4X8 MFZN
5 T1S TRS 4X16 MFZN
81
Page 84
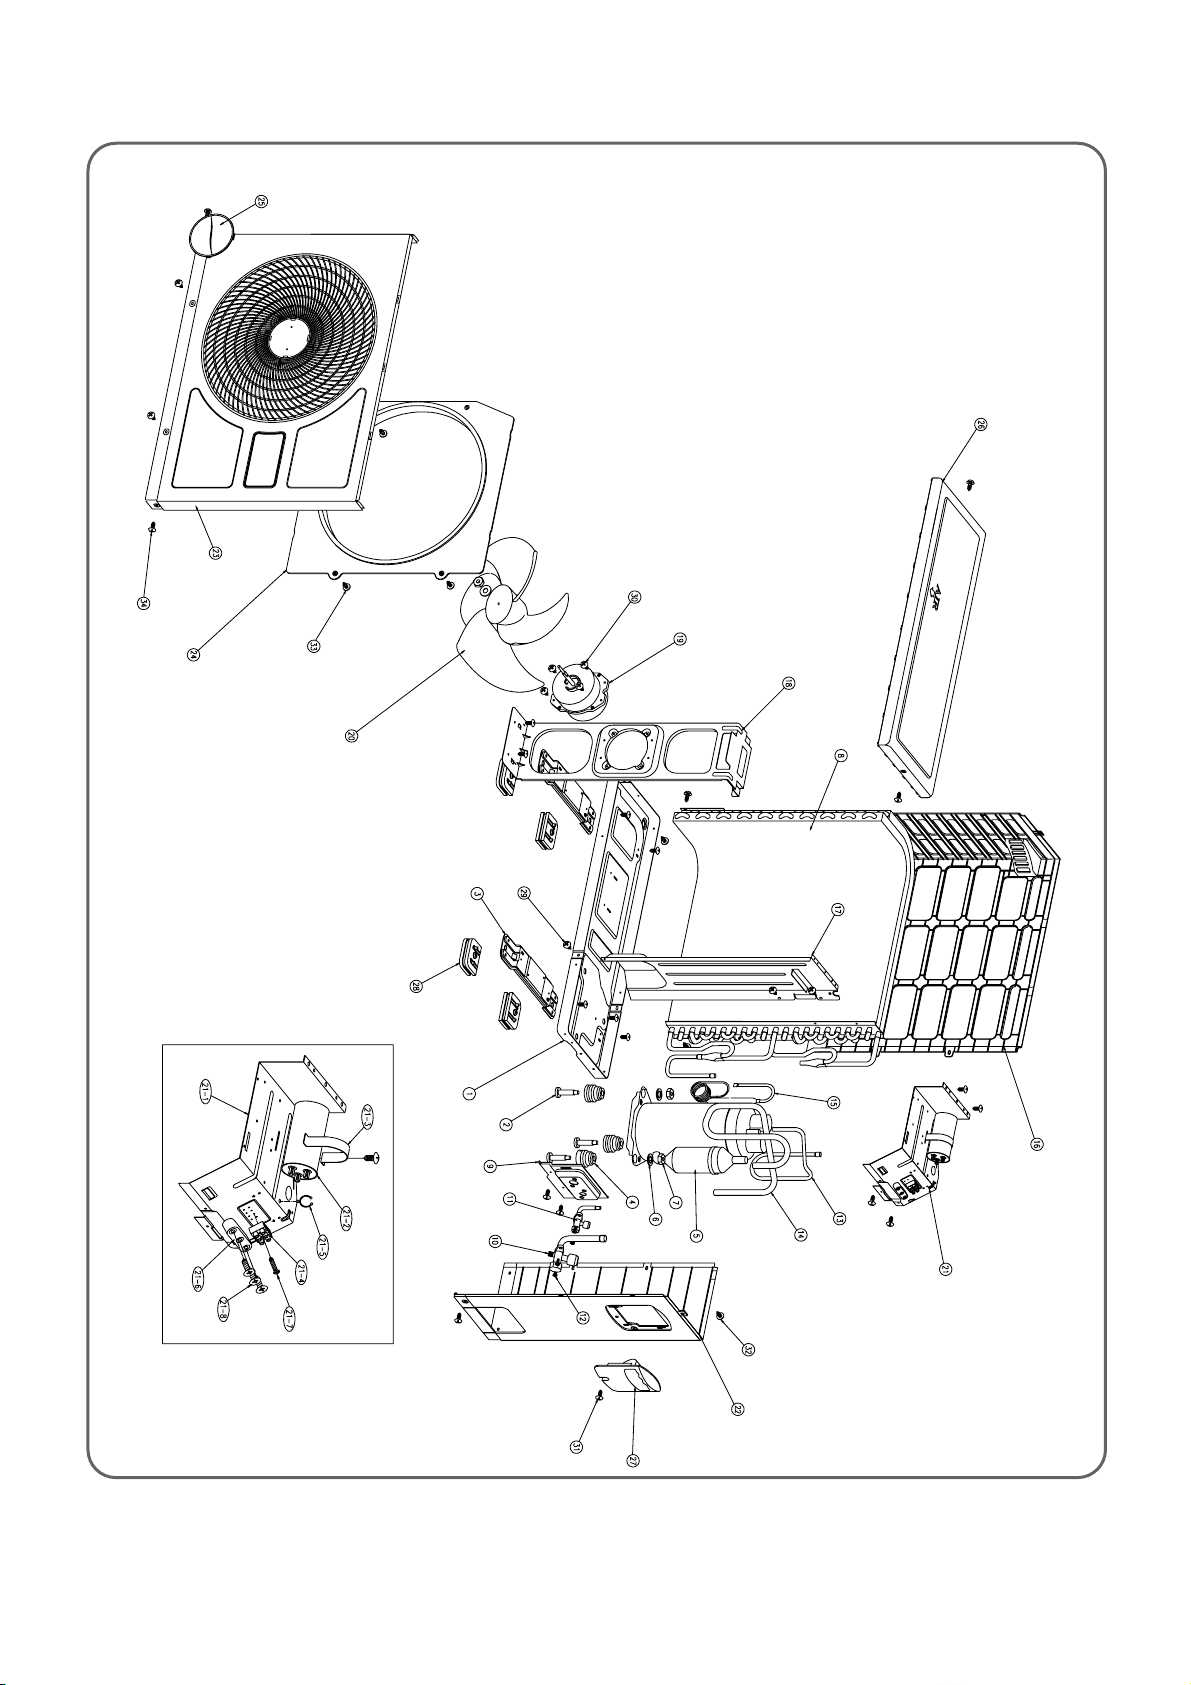
¡ DSB-121L(Before)
82
Page 85
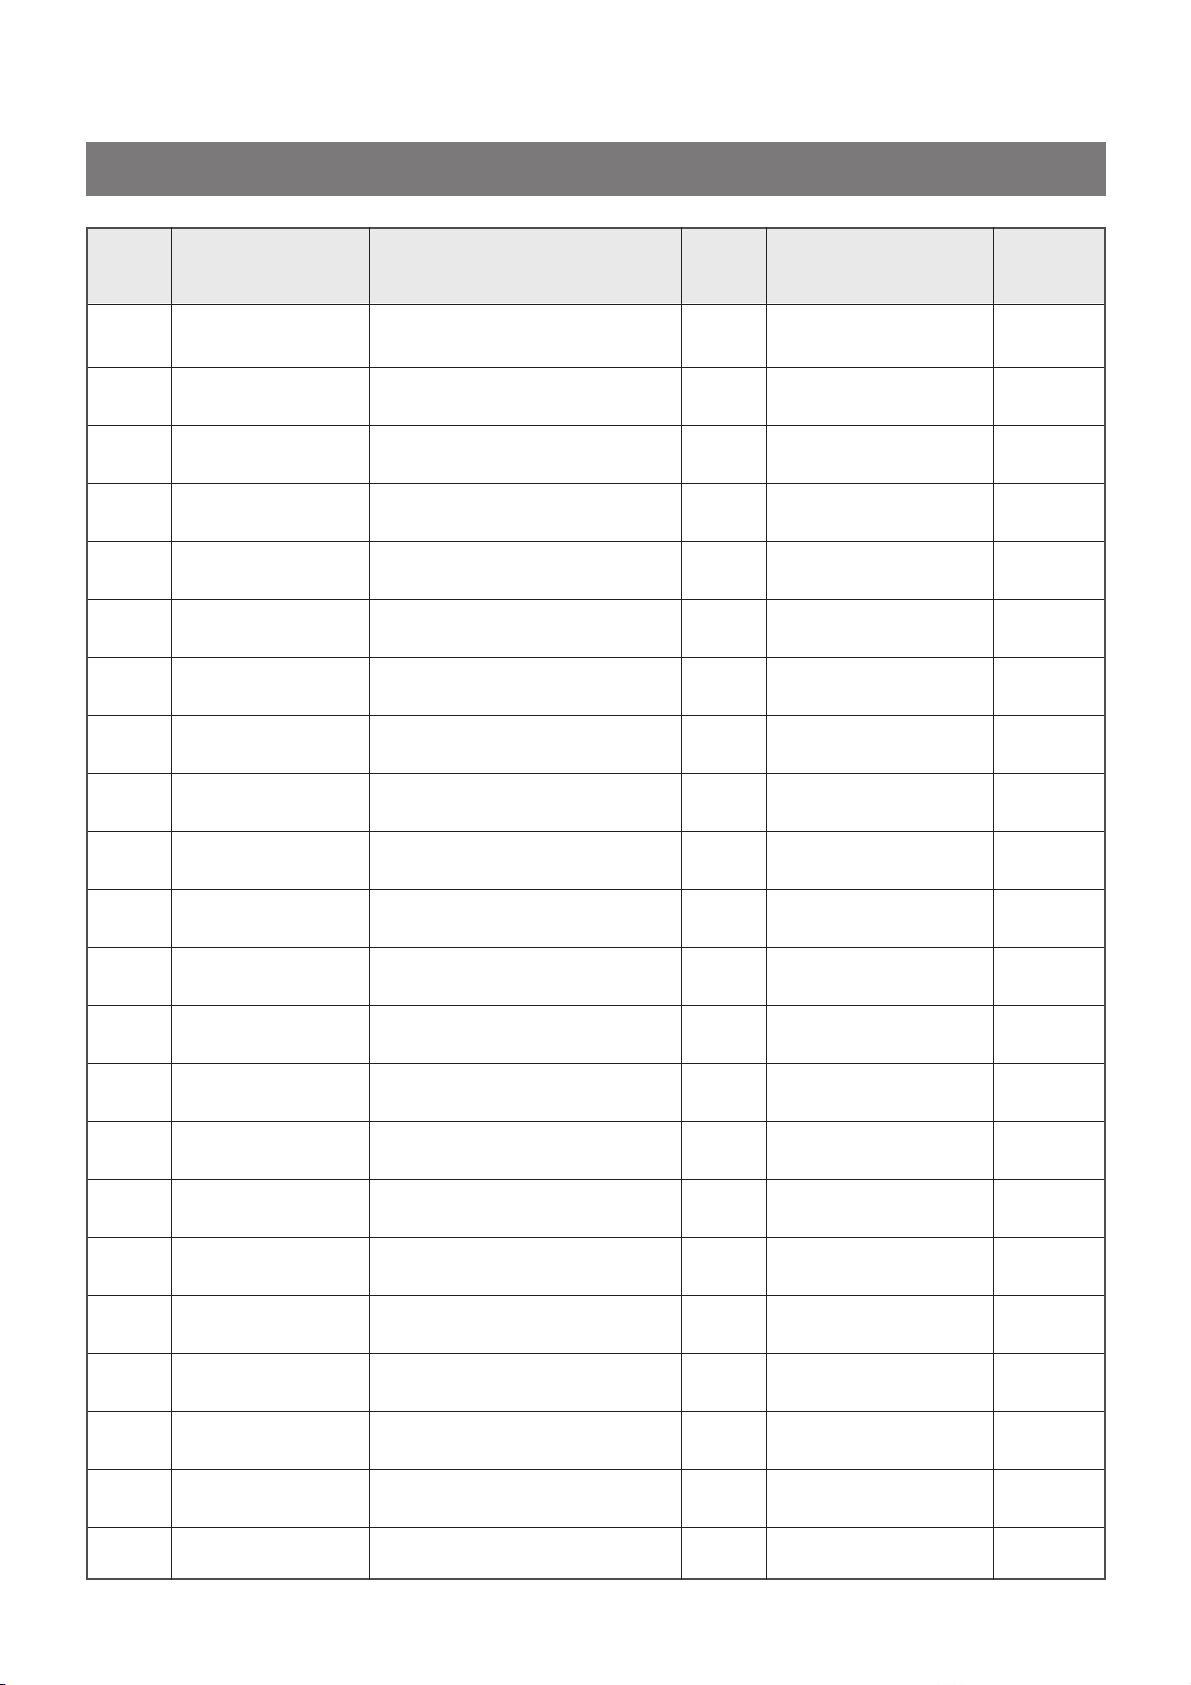
¡ DSB-121L(Before) PART LIST(OUTDOOR UNIT)
No PART CODE PART NAME Q'TY SPEC REMARK
1 3100300501 PAN BASE 1 SECC
2 3106000900 COMP BOLT 3 M8 X L46.5 MFZN
3 3102100800 FOOT 2 SECC
4 3108134AE0 GROMMET 3 EPDM
5 3100030CE0 COMPRESSOR ASS'Y 1 RCB120A001
6 7400208411 WASHER PLANE 4 M8.4 X 0.D22 X T1.6
7 7392800011 NUT LOCK 4 M8 X P1.25 MFZN
8 3100014100 CONDENSER ASS'Y 1
9 3100015100 BRACKET SERVICE ASS'Y 1
10 3105400700 SERVICE VALVE 1 1/2"
11 3105400800 SERVICE VALVE 1 1/4"
12 7347602011 BOLT HEX 4 M6 X L20 MFZN
13 3100020600 PIPE DISCHARGE ASS'Y 1 C1220T
14 3100020700 PIPE SUCTION ASS'Y 1 C1220T
15 3100014200 FILTER ASS'Y 1 C1220T
16 3100800600 CABINET BACK 1 ABS or AES
17 3104503800 PLATE PARTITION 1 SBHG1
18 3100601901 BRACKET MOTOR 1 SBHG1
19 3108000800 MOTOR ODU 1 IC-9430DWLC5A
20 3101801000 FAN PROPELLER 1 ABS+G.F20%
21 3100015400 PANEL CONTROL ASS'Y 1
21-1 3104201301 PANEL CONTROL 1 SBHG1
83
Page 86
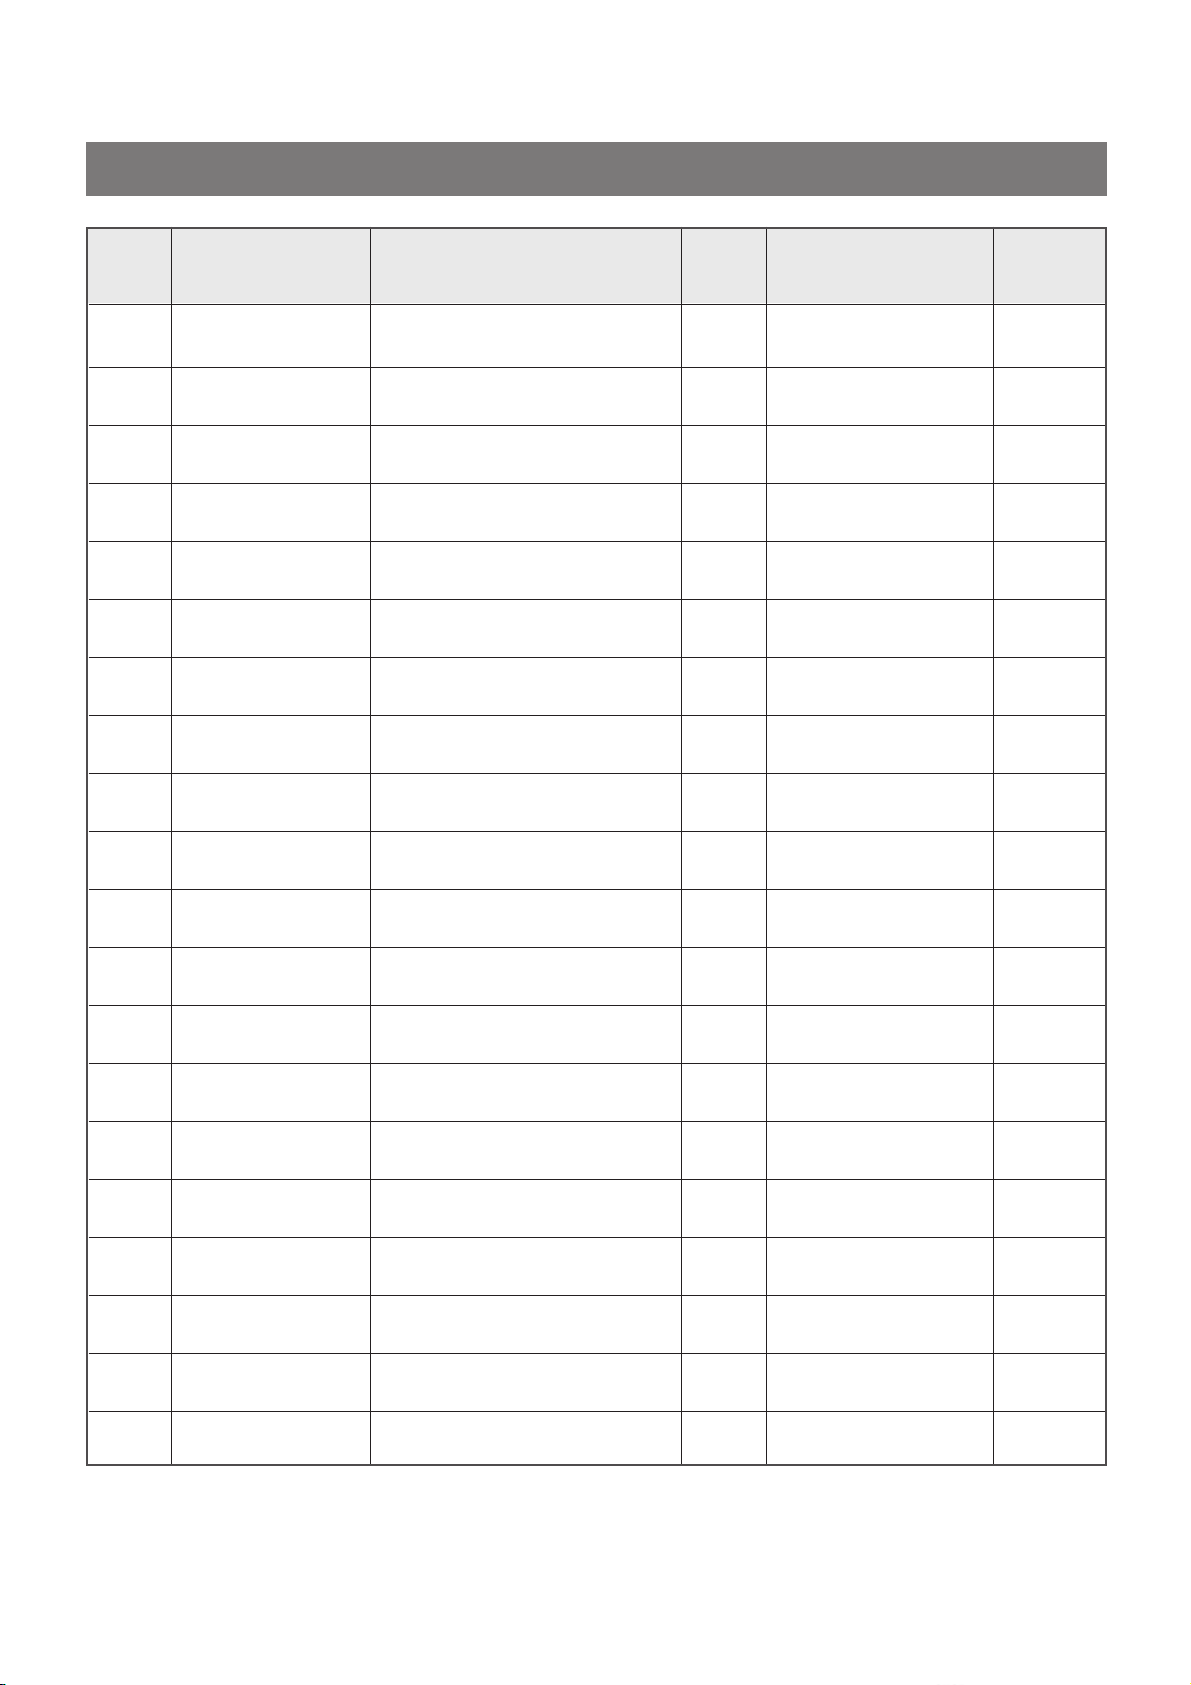
¡ DSB-121L(Before) P ART LIST(OUTDOOR UNIT)
No PART CODE PART NAME Q'TY SPEC REMARK
21-2 3109500700 CAPACITOR DUAL 1 3.5+25µF 400VAC
21-3 3101201100 CLAMP CAPACITOR 1 SBHG1
21-4 3108900900 TERMINAL BLOCK 1 323-HDS103
21-5 3103800300 LOCK TWIST 1 DATL-250
21-6 3101202000 CLAMP CORD 1 NYLON
21-7 7111301611 TAPPING SCREW 1 TIS PAN 3 X 16 MFZN
21-8 7112403011 TAPPING SCREW 3 TIS TRS 4 X 30 MFZN
22 3100800701 CABINET SIDE 1 ABS or AES
23 3100800501 CABINET FRONT 1 ABS or AES
24 3104201201 PANEL ORIFICE 1 P.P
25 3101401900 COVER GRILLE 1 ABS or AES
26 3104201100 PANEL TOP 1 ABS or AES
27 3102600300 HANDLE 1 ABS or AES
28 3102100700 FOOT CUSHTON 4 NBR
29 7112401211 TAPPING SCREW 19
30 7112402011 TAPPING SCREW 4
31 3106001600 SPECIAL SCREW 1
32 7112401614 TAPPING SCREW 4
33 7S422X40B1 SPECIAL SCREW 4
T1S TRS 4 X 12 MFZN
T1S TRS 4 X 20 MFZN
T2 4 X 16 MFNI LOCKING
T1S TRS 4 X 16 MFNI+PVC/W
TT2 TRS SE 4 X 12 MFZN
34 7112401214 TAPPING SCREW 12
84
TIS TRS 4 X 12 MFZN+PVC/W
Page 87
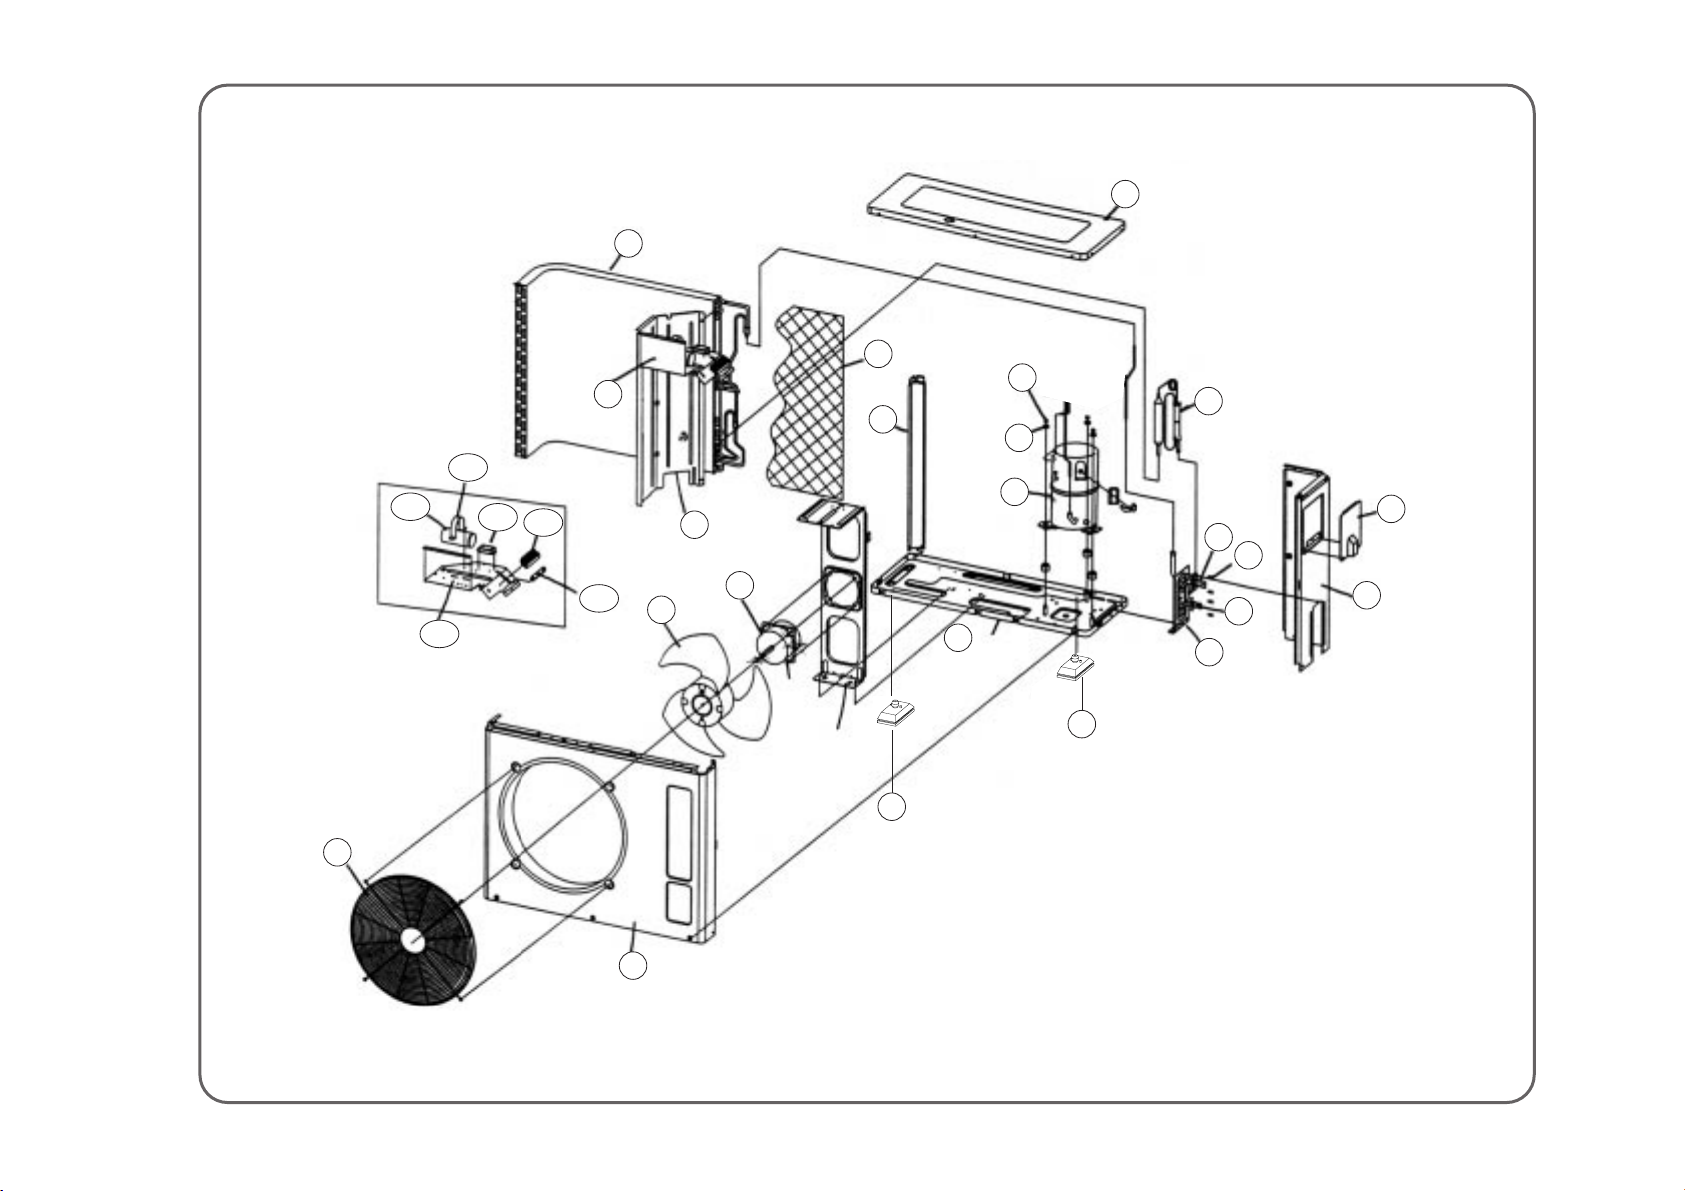
16-4
16-1
16-5
16-6
16-2
16
16-3
23
6
9
5
10
4
3
15
18
20
1
2
7
11
12
13
14
24
25
85
24
¡ DSB-240L
2
21
Page 88
¡ DSB-240L PART LIST (OUT DOOR UNIT)
No PART CODE PART NAME Q'TY SPEC REMARK
1 3100041750 BASE PAN PAINT ASSY 1 PAINTING
2 310P30281A FOOT CUSHION 4 NBR (54*63.5)
3 3100068201 COMPRESSOR ASSY 1 AWG5530EXC
4 7400208411 WASHER PLAIN 3 ID8.4*OD22*T1.6
5 7392801211 NUT LOCK 3 M8*1.25P
6 3100078000 CONDENSER ASSY 1 AL+CU DSB-240LH
7 3100082900 PIPE CAPILLARY ASSY 1 C1220T H/P
8 3102402100 GRILLE COND 1 PE
9 3100041100 GUIDE POST P/T ASSY 1 PAINTING
10 3100041201 BRK SERVICE P/T AS 1 PAINTING
11 3105401800 SERVICE VALVE (G) 1 Ø15.88 (5/8”)
12 3105401200 SERVICE VALVE (L) 1 Ø9.52 (3/8”)
13 3106002300 BOLT HEX 4 M6*L20 MFZN
14 3100031702 PLT PARTITION ASSY 1 SGCC-M-Z22
15 3100088500 ASSY PANEL CONTROL 1 SGCC-M-Z22 T0.8 H/P
16 3104201601 PANEL CONTROL 1 SGCC-M-Z22 T0.8
16-1 3108912330 TERMINAL BOLCK 1 SN-DBW-6P
16-2 3101202000 CLAMP CORD 1 NYLON66, (VDE)
16-3 3109508100 CAPACITOR DUAL 1 5/45MF 400VAC
16-4 3101203300 CLAMP CAPACITOR 1 SGCC Ø63 T0.8
16-5 5SC0202700 POWER RELAY 1 G7L-2A-TUB, 220/240V 50/60H
16-6 3105300400 SUPPORT MOTOR 1 SGCC-M-Z22 T1.6
17 3108007400 MOTOR ODU 1 OSME986DERC 230/50
18 7348602011 BOLT HEX 4 WAS M6*L20 MFZN
19 3101802000 FAN PROPELLER 1 ABS+G/F(20%)
20 3100031400 CABINET FRONT P/T AS 1 PAINTING
21 3100031500 CABINET SIDE P/T AS 1 PAINTING
22 3100041500 PANEL TOP P/T ASSY 1 PAINTING
23 3102102000 GRILLE DISCHARGE 1 (BE-002D)
24 3100044250 SERVICE COVER ASSY 1 ASA
86
Page 89
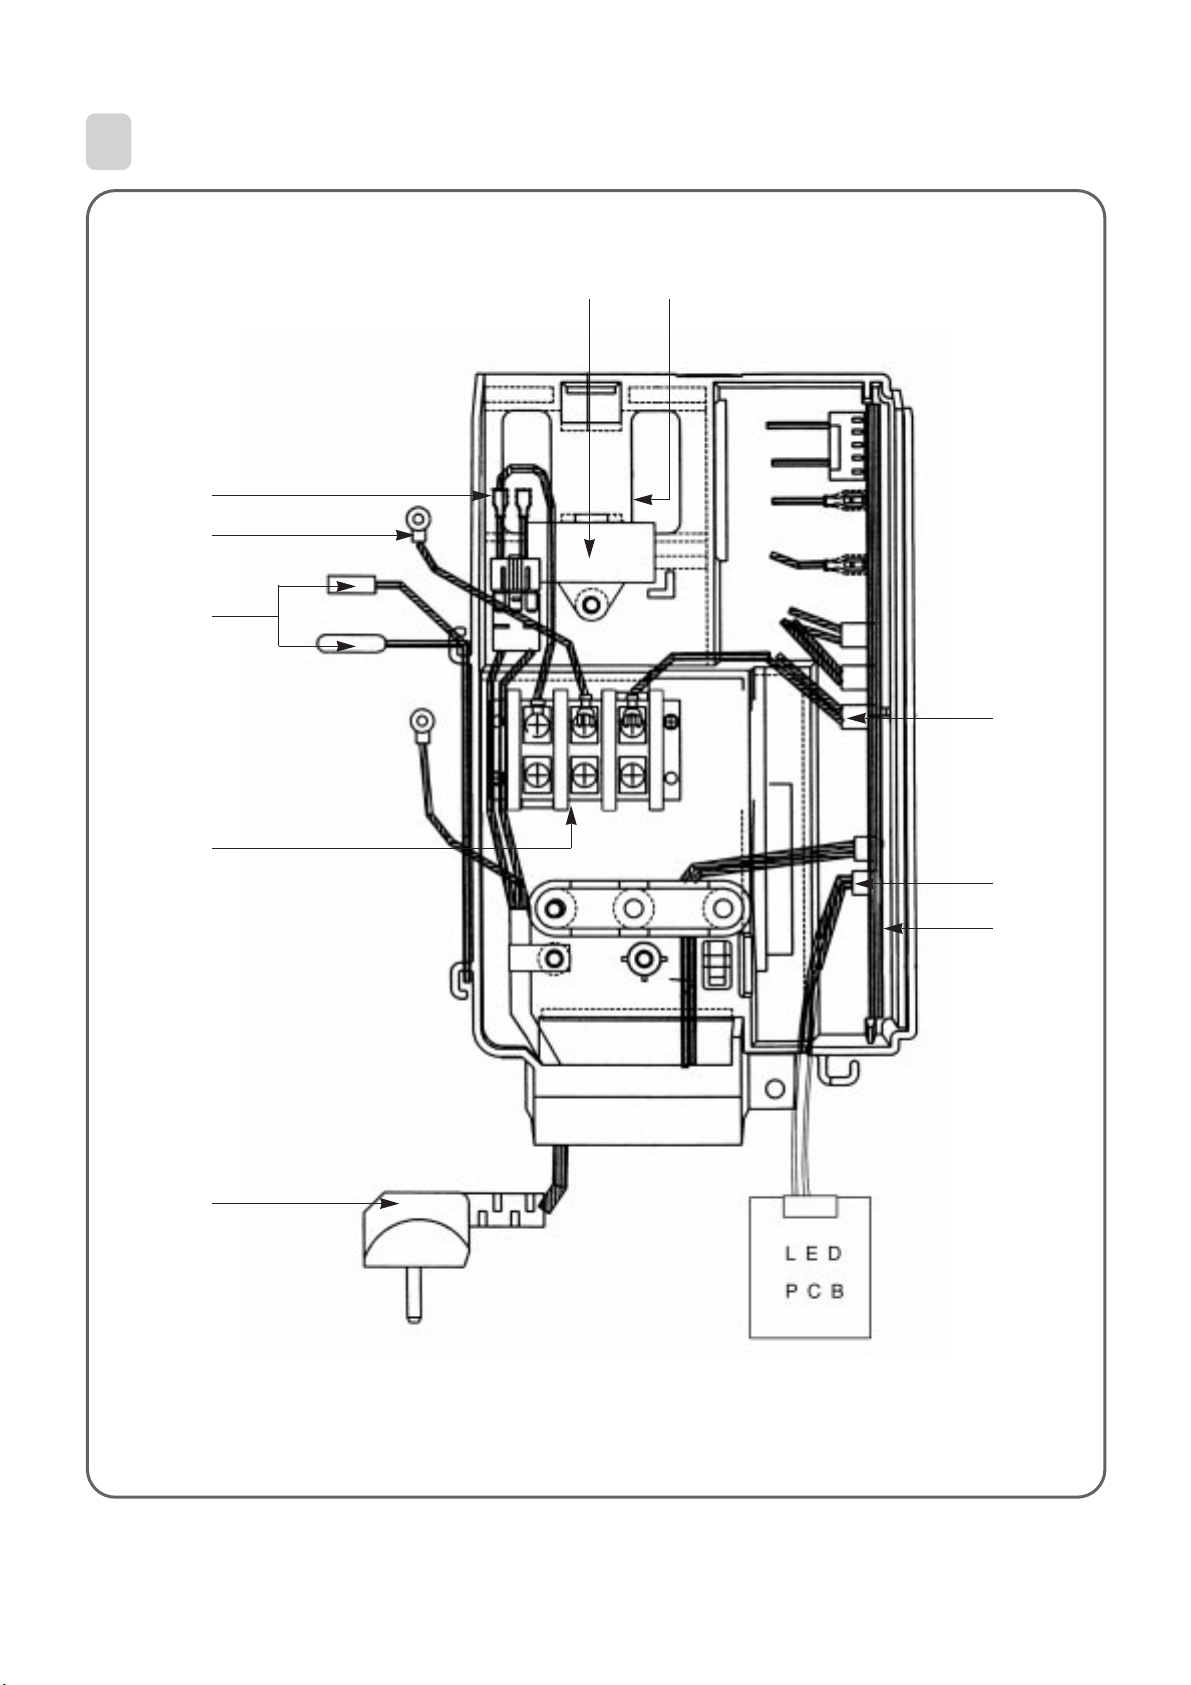
5
CONTROL BOX ASSEMBLY
¡ DSB-070L/DSB-091L
4 3
9
8
5
7
2
6
0
1
87
Page 90
¡ DSB-070L/DSB-091L
No PART CODE PAR T NAME Q'TY SPEC REMARK
1 3100054400 CONTROL PCB ASS’Y 1
2 3108912300 TERMINAL BLOCK 1 SN-DBW-03P
3 5EPV050120 TRANSFORMER 1
4 3106900300 CAPA CITOR SH.M.B 1 1.0µF 400VAC
5 3104896300 SENSOR ID ASS’Y 1 PTM-KD43C-D2
6 3101300100 POWER CORD ASS’Y 1 16A 250V
7 3102797610 HARNESS 1 I/D COMP
8 3102797910 HARNESS 1 I/D EARTH
9 3102704000 HARNESS 1 POWER
10 3102704500 HARNESS 1 LED PCB
DWA-220B 220V 50/60Hz
88
Page 91
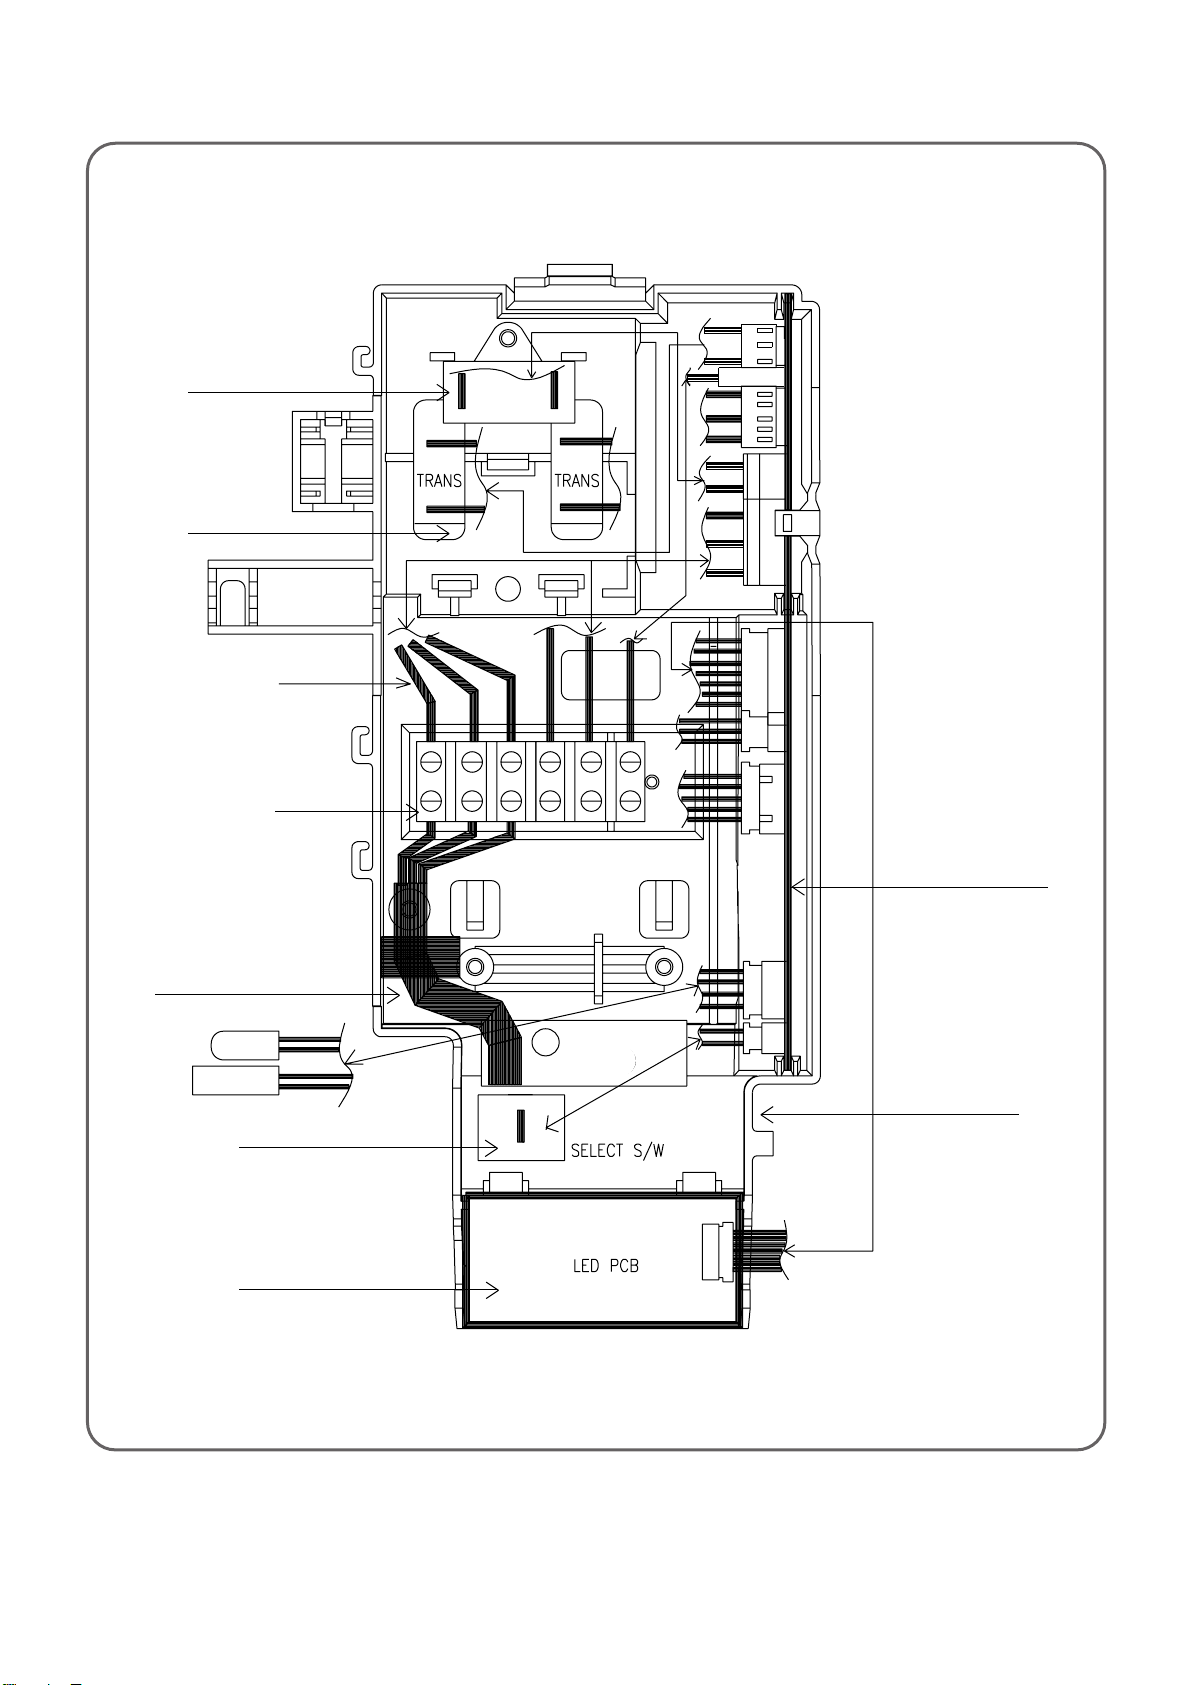
6
5
4
3
1
2
7
8
H1
H3
H2
S
H3
¡ DSB-121L/DSB-122L
89
Page 92
¡ DSB-121L/DSB-122L
No PART CODE PAR T NAME Q'TY SPEC REMARK
1 3100503101 CONTROL BOX 1 P.P+G.F 20%
2 3100054400 CONTROL PCB ASS'Y 1 FR-1
3 3108054200 LED PCB ASS'Y 1 FR-1
4 3103400300 KNOB RESET SWITCH 1 ABS
5 3101395060 POWER CORD ASS'Y 1 BUYER
6 3108901230 TERMINAL BLOCK 1 SN-DBW-03P
7 5EPV050100 TRANS FORMER 1 DW A220A-50/60Hz
8 3106900300 CAPA CITOR SH.M.B 1 1.0µF 400VAC
H1 3102797610 HARNESS I/D COMP 1
H2 3102797500 HARNESS LED PCB 1
S 3104896300 SENSOR ID ASS'Y 1 PTM-KD-43C-D2
H3 3102794000 HARHESS POWER 1
90
Page 93
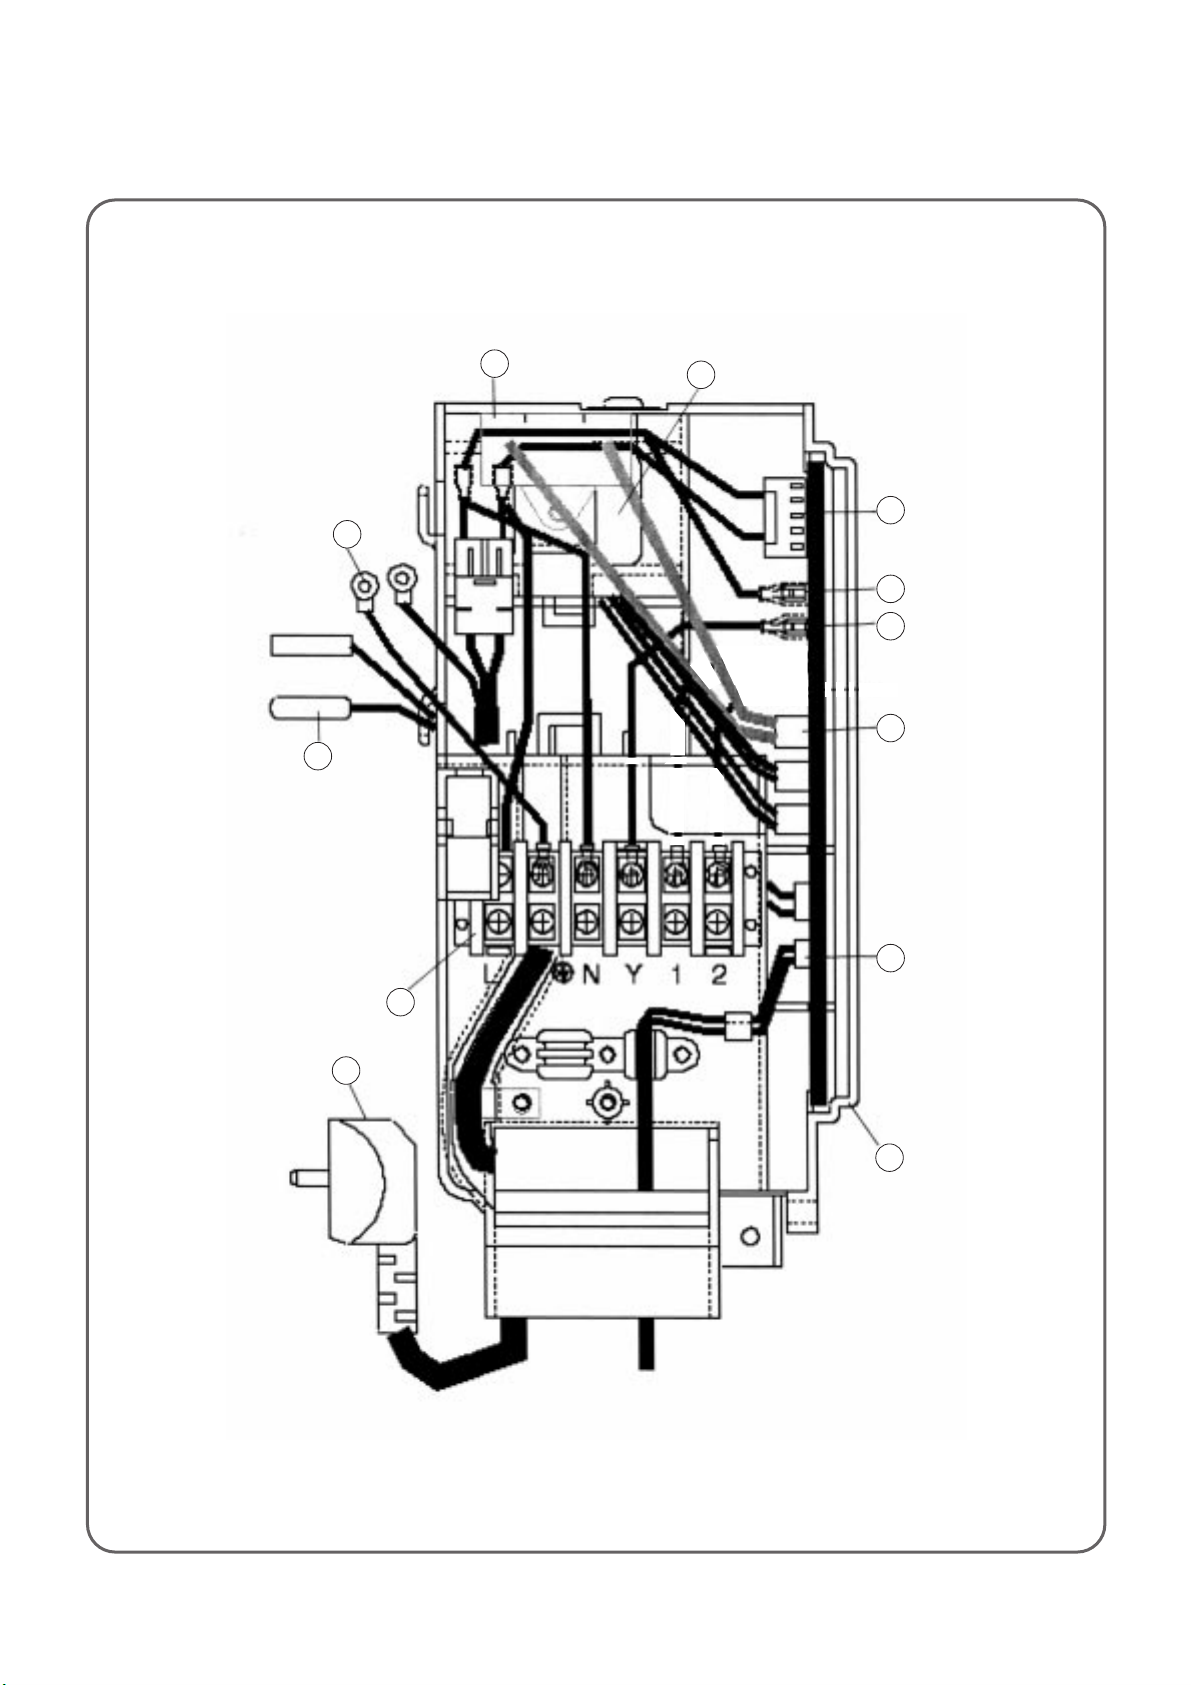
¡ DSB-240L
10
3
4
12
7
6
9
5
8
11
2
1
91
Page 94
¡ DSB-240L
No PART CODE PART NAME Q'TY SPEC REMARK
1 3104300830 CONTROL PCB ASS’Y 1 240LH(A), 240LH(B)
2 3101200400 CLAMP POWER CORD 1 DA-5N
3 3106902400 CAPACITOR SH.M.B 1 2.0MF 400V
4 3102797910 HARNESS EARTH 1 GREEN/YELLOW L170mm
5 3102714400 HARNESS CAPACITOR 1 DSB-240L, LH CAPACITOR
6 3102704410 HARNESS COMP SIGNAL 1 UL1015#18
7 3102704010 HARNESS POWER 1 UL1015#16
8 3102702200 HARNESS TH3 1 TH-3-1
9 3102704430 HARNESS OD SIGNAL 1 UL1015#18
10 3104896300 SENSOR ID ASSY 1 NTM-KD43C-D1D2 L450, L330
11 3108912320 TERMINAL BLOCK 1 SB-DBW-4P
12 5EPV050120 TRANSFORMER 1 DWA-220B
92
Page 95

DEAWOO ELECTRONICS CO., LTD
686, AHYEON-DONG MAPOGU,
SEOUL, KOREA.
C.P.O. BOX 8003 SEOUL KOREA
TELEX: DWELEC K28177-8
CABLE:"DAEWOOELEC"
FAX: +82-2-364-5588
TEL: +82-2-360-7114, 8114
http://www.dwe.daewoo.co.kr
S/M NO. : DSB070LH10 PRINTED DATE: APR. 1999
Page 96
 Loading...