

Page 1
Page 2

Copyright information
All rights reserved. No part of this publication may be reproduced, transmitted,
stored in a retrieval system, or translated into any language in any form by any
means, optical, electronic, recording, or otherwise, without the written consent
of our company.
We reserve the right to revise this manual and to make changes to any or
all parts at any time, without obligation to notify any person or entity of such
revisions and changes.
2 USER GUIDE
Page 3

Reminders
Disposal of Used Electrical & Electronic Equipment
The meaning of the symbol on the product, its accessory or packaging indicates that
this product shall not be treated as household waste. Please, dispose of this equipment
at your applicable collection point for the recycling of electrical & electronic equipments
waste. In the European Union and Other European countries there are separate
collection systems for used electrical and electronic product. By ensuring the correct
disposal of this product, you will help prevent potential hazard to the environment and
to human health, which could otherwise be caused by unsuitable waste handling of this
product. The recycling of materials will help conserve natural resources. Please do not
therefore dispose of your old electrical and electronic equipment with your household
waste. For more detailed information about recycling of this product, please contact
your local city offi ce, your household waste disposal service or the shop where you
purchased the product.
CAUTION
Keep the product out of direct sunlight. Exposure to direct sunlight or extreme heat
may cause damage or malfunction. To prevent fi re or shock hazard, do not expose to
rain or moisture.
IMPORTANT BATTERY INFORMATION
The battery used in this device may present a risk of fi re or chemical burn if
mistreated. Do not separately recharge, disassemble, heat above 60°C
(140°F), or incinerate.
Do not attempt to open the unit. No user serviceable parts inside.
Keep the unit away from children. Do not disassemble or dispose the product in a fi re.
USER GUIDE 3
Page 4

4 USER GUIDE
USER GUIDE 5
Copyright information
Table of contents
Page 5

USER GUIDE 5
Table of contents
Page 6

6 USER GUIDE
USER GUIDE 7
Table of contents
Page 7

USER GUIDE 7
Table of contents
Page 8
Getting started
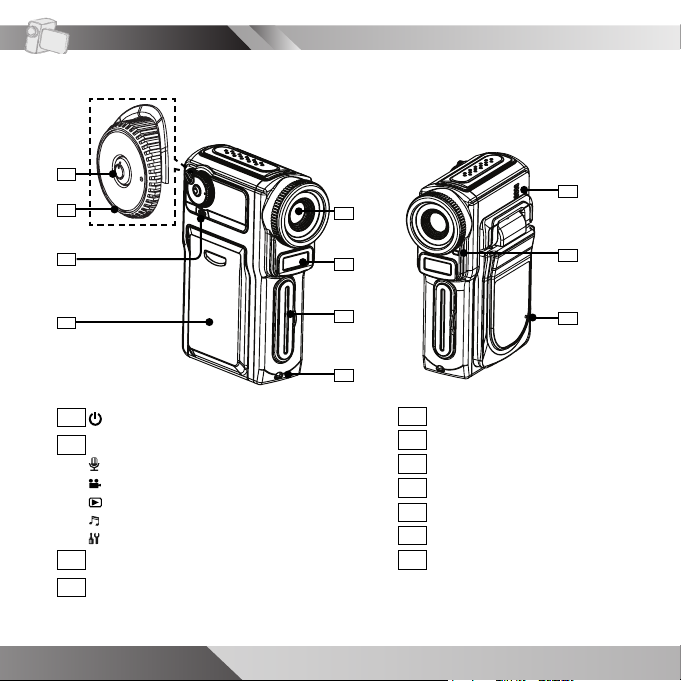
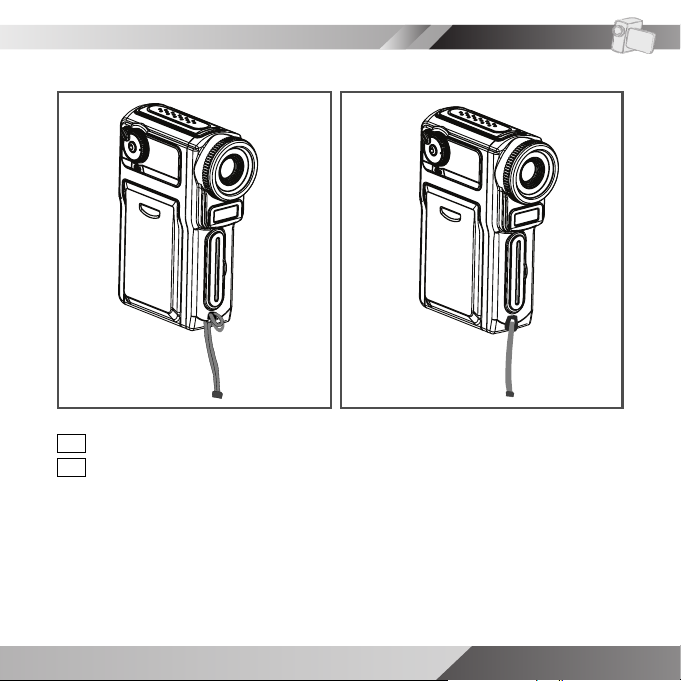
Getting to know your device
1
2
3
4
1
Power button
Mode dial
2
Record Voice
Record Video / Take Photo
Playback
Music
Setup
Power/charge indicator
3
Battery compartment cover
4
8 USER GUIDE
9
5
6
7
8
Lens
5
Flash
6
7
MMC/SD slot cover
Hook for strap
8
Built-in speaker
9
Status indicator
10
Microphone
11
10
11
Page 9
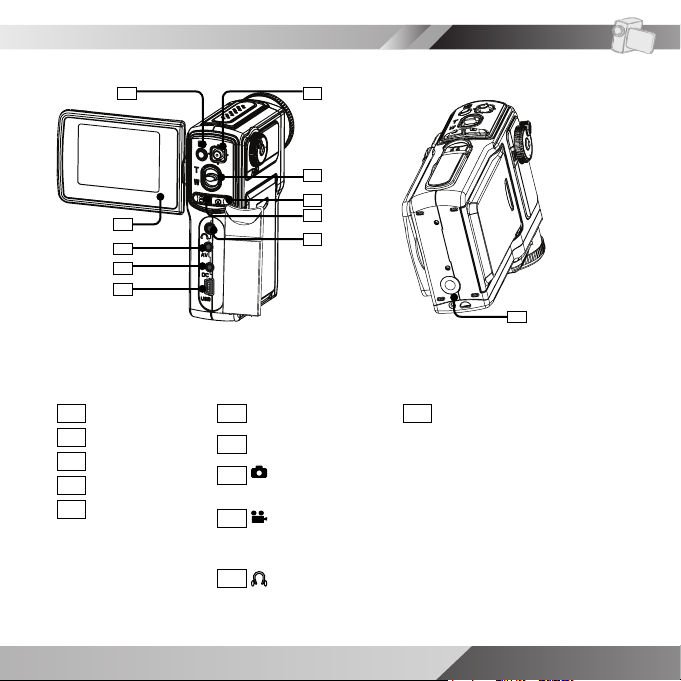
Getting started
Menu button
12
13
LCD screen
14
AV OUT jack
15
DC IN jack
16
USB port
12
13
14
15
16
17
18
19
20
17
18
19
20
21
Control button
Zoom lever
Shutter button
For photo taking.
Record button
22
Tripod receptacle
22
For video and
audio recording.
21
Earphone jack
USER GUIDE 9
Page 10
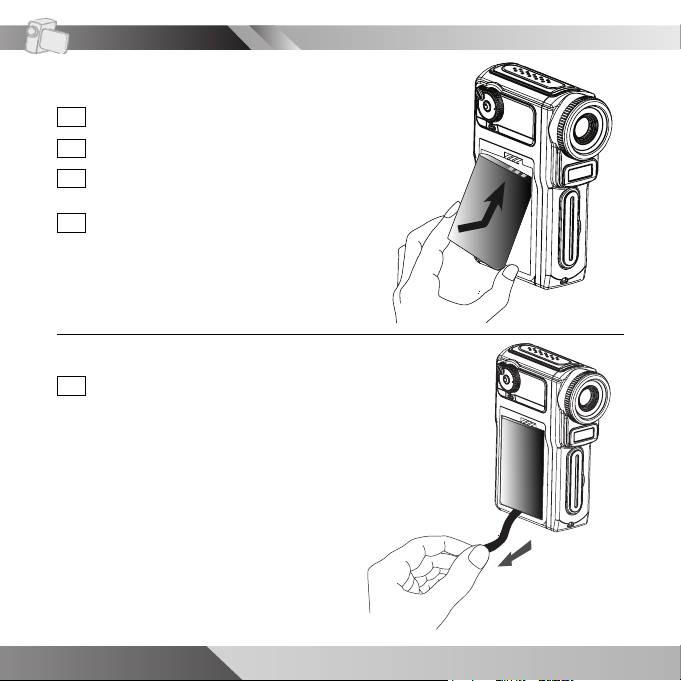
Getting started
Loading/removing battery
Slide down the battery cover.
A
Remove the battery cover.
B
Insert the battery into the battery
C
compartment.
Close the battery cover
D
To remove battery:
Pull the string to release the battery
A
from the battery compartment.
10 USER GUIDE
Page 11
Getting started
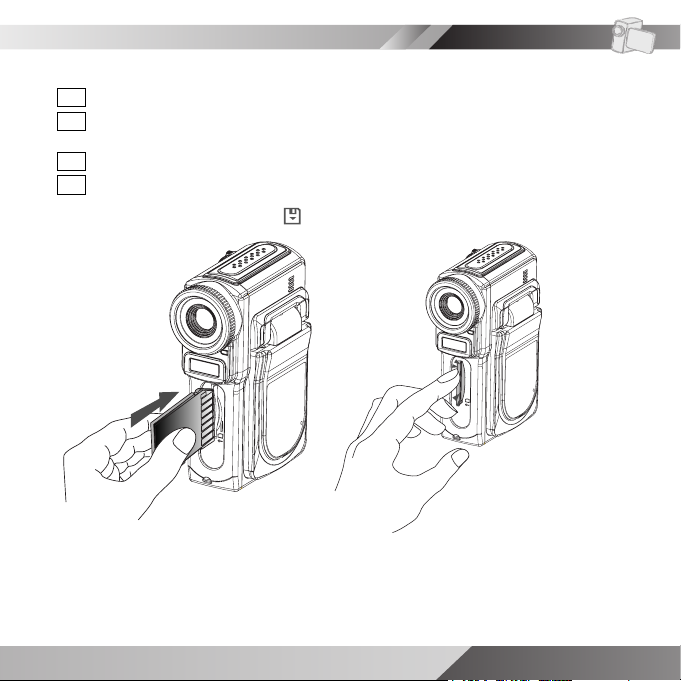
Inserting/removing memory card
A
Flip open the memory card slot cover.
Insert and press the MMC/SD card into the memory slot.
B
Tilted-edge side up and towards the memory slot.
Press down to secure the card into the slot.
C
Close the memory card slot cover.
D
Important: Make sure to select
setup menu.
Notes
• When the MMC/SD card is correctly inserted a “click” sound will be heard.
• This device has a 32 MB built-in memory, inserting an external memory card is
not mandatory for basic operations. However, we strongly recommend users to
use a higher capacity memory card when making extensive recordings.
Memory Card as the saving location from the
USER GUIDE 11
Page 12
Getting started
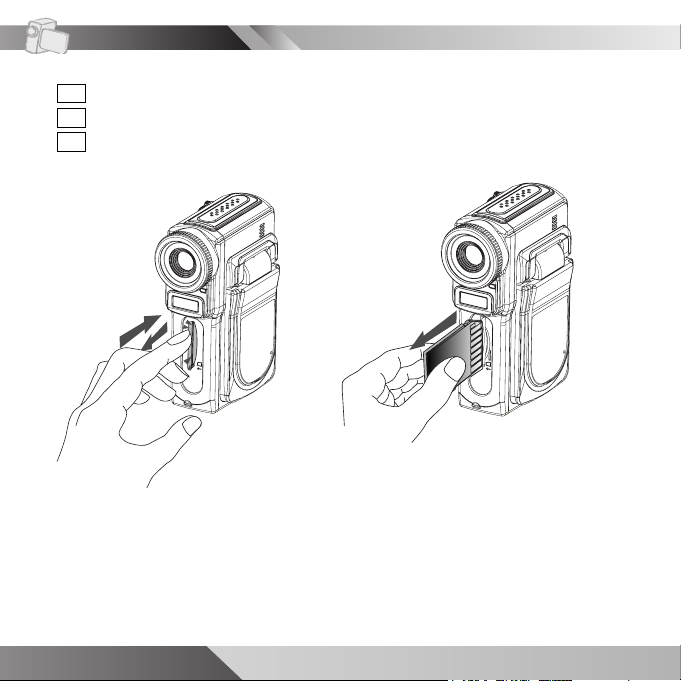
To remove memory card:
Flip open the memory card slot cover.
A
Press and release the MMC/SD card.
B
Withdraw the MMC/SD card from the slot.
C
12 USER GUIDE
Page 13
Getting started
U
S
B
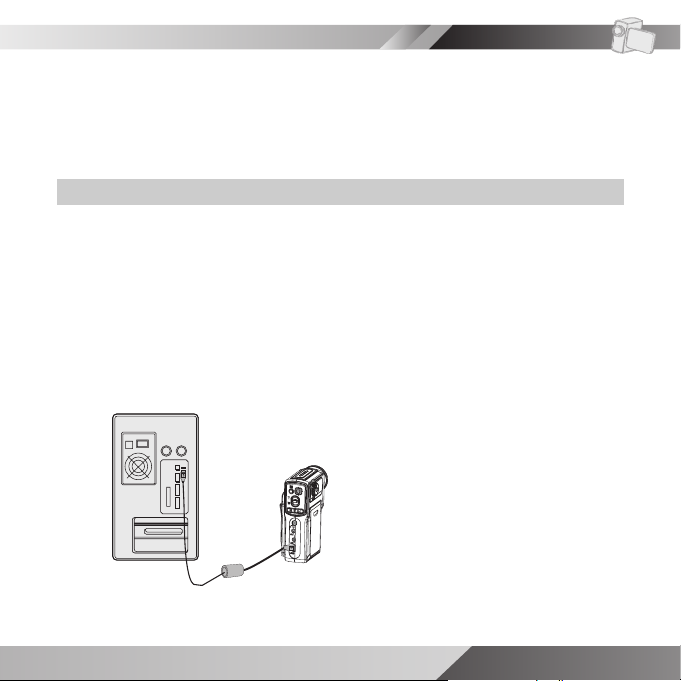
Charging the device
There are two ways to charge this device. Via the USB cable or an AC adapter.
For fi rst time users, be sure to charge the device for about 3 to 4 hours to fully
charge the battery.
Charging the device via USB cable
1. Connect the device to a computer with the USB cable.
2. The charge indicator blinks in red and starts charging. When the battery is
fully charged, the charge indicator will turn off automatically.
Note: To shorten charging time, charge the DV via an AC adapter. Charging
via an USB cable will require more time.
B
S
U
USER GUIDE 13
Page 14
Getting started
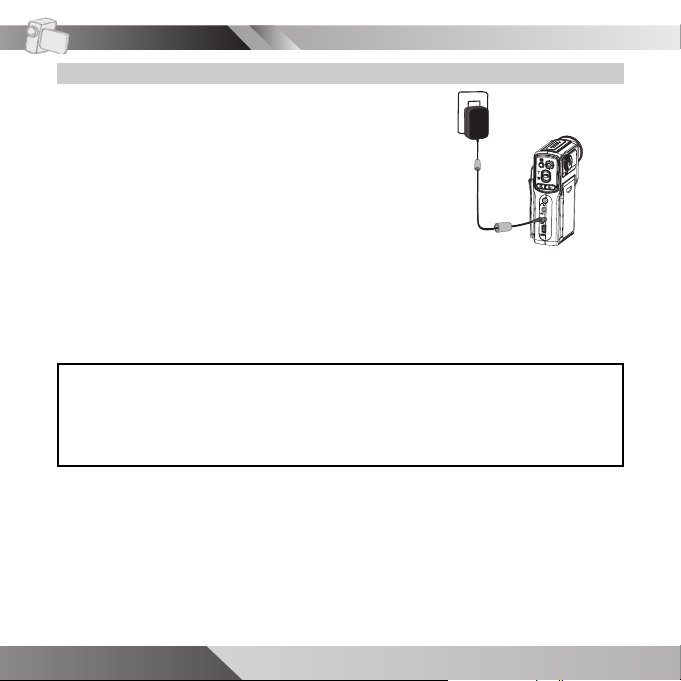
Charging the device via AC adapter
1. Connect the AC adapter to the DC IN jack on the
device and connect the power adapter to a power
outlet.
2. The charge indicator blinks in red and starts
charging. Turning on the device during the
charging stage will increase the charge time.
Attention: Use only the power adapter that came with this device. Adapters for
other electronic devices may affect its performance or damage it
For your reference:
When the battery is charging, the charge indicator is RED. Turning ON the
device while charging, the charge indicator will change to ORANGE.
When the battery is fully charged, the RED LED will turn OFF.
When the device is ON, the charge indicator is GREEN.
14 USER GUIDE
Page 15
Getting started
Attaching the strap
Insert the thin end of the strap into the strap hook.
A
B
Pass the other end of the strap through the loop of thin cord and pull tight.
USER GUIDE 15
Page 16
Getting started
Basic operations
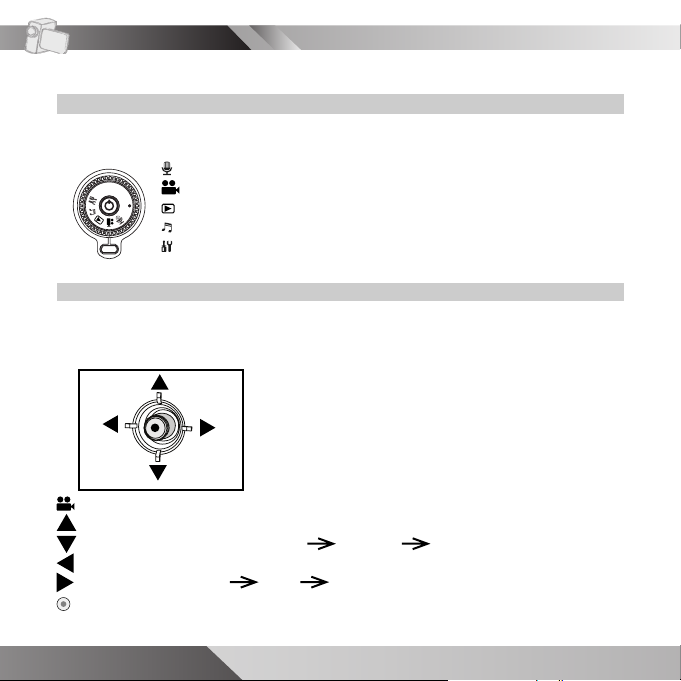
How to use the mode dial
The mode dial is a switch between fi ve different modes: Photo taking/video
recording, audio recording, playback/editing, music playing, and system setup.
: For audio recording.
: For photo taking and video recording.
: For fi le playback and fi le editing.
: For music playing.
: For system and various setup.
How to use the control button
The control button has different functions for each mode. Refer to the
corresponding chapters for more details.
mode (photo taking & video recording)
: AE Lock (photo only) or backlight compensation (video & photo)
: Display options (Guideline on OSD off OSD/LCD on)
: Self-timer
: Flash options ( Off Auto Red eye reduction) (photo only)
: Not applicable
16 USER GUIDE
Page 17
Getting started
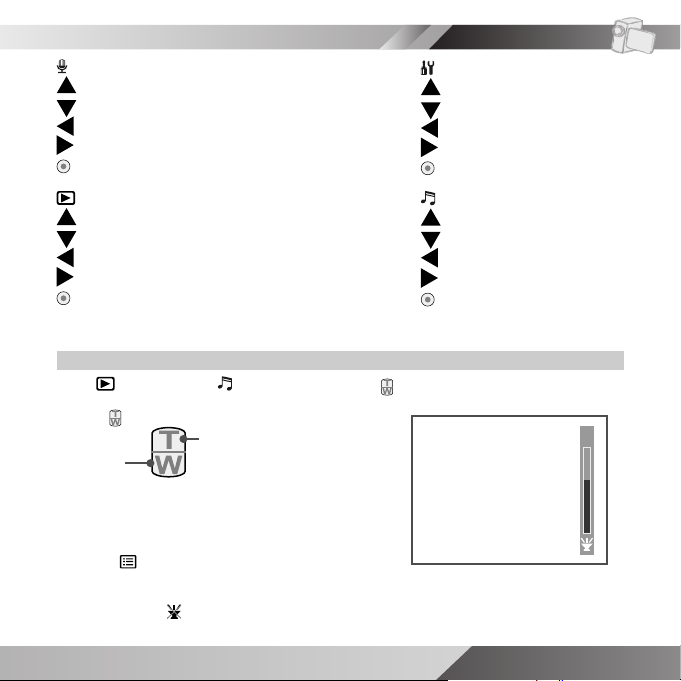
mode (audio recording):
: Not applicable
: Not applicable
: Not applicable
: Not applicable
: Pause/resume
mode (playback):
: Up
: Down
: Left
: Right
: Play fi le (photo, video, audio)/
pause/resume (video, audio)
mode (setup menu):
: Up
: Down
: Left
: Right
: Enter
mode (music player):
: Up
: Down
: F.Bwd
: F.Fwd
: Pause/resume
How to adjust volume
1. At (Playback) or (Music) mode press (Zoom lever).
2. Use
3. A volume bar will appear on the right side of
4. Press (Menu button) to exit.
Note: To turn off the speaker, press W repeatedly
(Zoom lever) to adjust volume.
Decrease
volume
Increase
volume
the screen.
until the icon appears.
5
USER GUIDE 17
Page 18
Getting started
ENTERSELECT
'05Y/01M /01D
CLOCK SET DATE
SETUP
NTSC
60Hz
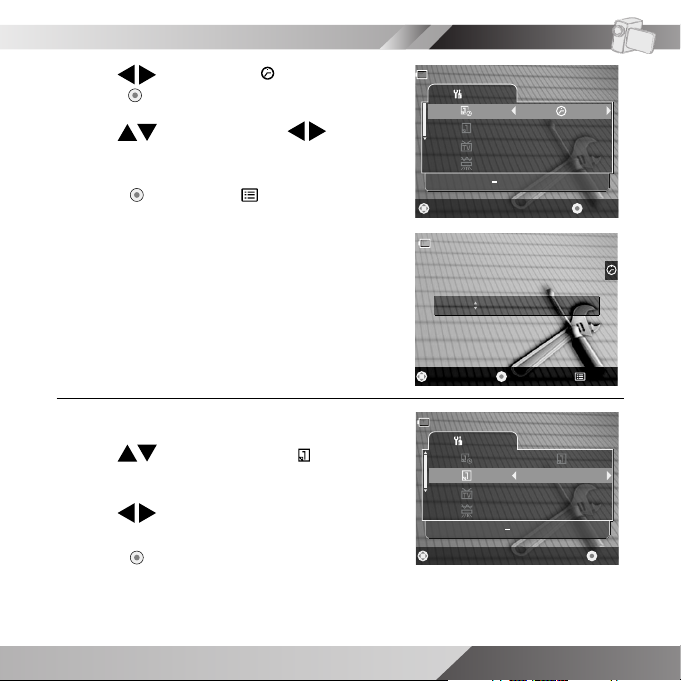
Setting the date and time
Be sure to set the date and time on the initial use of this DV. This information
affects the time display on your LCD screen and on photos with superimpose
date/time.
1. Turn on the device.
2. Set the mode dial to (setup menu).
3. Select (clock set).
4. Use
to navigate to (set date) then
press to enter.
5. Use to adjust value or to go to
next/previous item.
6. Press to confi rm or (Menu button) to
exit.
18 USER GUIDE
ADJUST
'05Y/01M 01D
EXITOK
Page 19
EXITOK
13H: 10M: 15S
ADJUST
7. Use to navigate to (set time) then
ENTERSELECT
CLOCK SET TIMER
SETUP
'05Y/01M/01D
NTSC
60Hz
OKSELECT
DATE FOR MAT MM/ DD /YY
01M/01D/'05Y
SETUP
NTSC
60Hz
press to enter.
Getting started
8. Use
to adjust value or to go to
next/previous item.
9. Press to confi rm or (Menu button) to
exit.
To change the display format of date:
1. Use to scroll and select (date
format).
2. Use to select a format.
3. Press to confi rm.
USER GUIDE 19
Page 20
Getting started
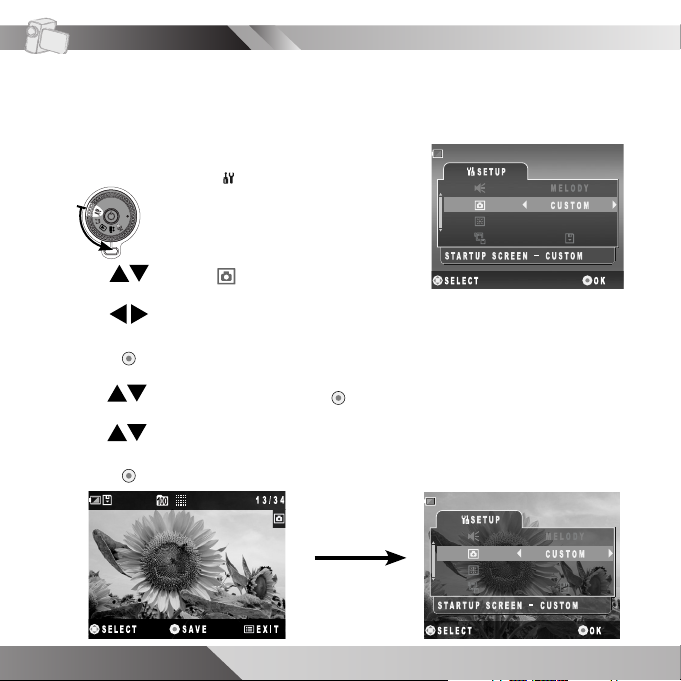
Customizing startup screen
You may use default startup screen or customize your own startup screen. To
customize, follow the procedures below.
1. Turn on the device.
2. Set the mode dial to
3. Use to select (startup screen).
4. Use to select CUSTOM.
5. Press to confi rm.
6. Use to select NEW and press .
7. Use to select a photo you want for startup screen.
8. Press to confi rm.
20 USER GUIDE
(setup menu).
Page 21
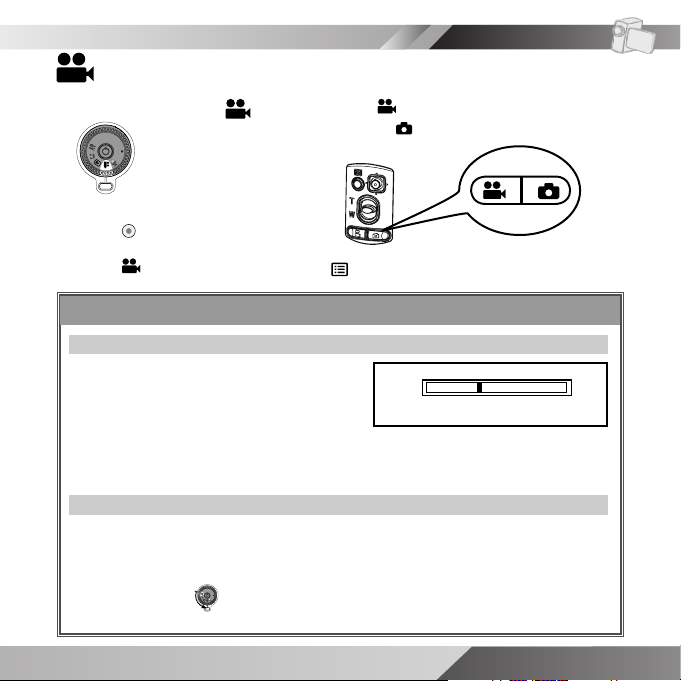
Recording video/taking picture
Recording video/taking picture
1. Set the Mode dial to .
3. Press to pause recording.
4. Press (Record button) again or (menu button) to stop recording.
2. Press (Record button) to record
video or (Shutter button) to take
a picture.
Convenient features
Zoom feature
Adjust the ZOOM lever to move your
object closer or farther away.
W side: wide-angle (subject appears
farther away)
T side: telephoto (subject appears closer)
Power save
The device provides a power saving mechanism that will turn off your LCD
screen automatically after the device has been idle for 60 seconds. The
device will also power off automatically according to your setting in Auto
Power Off under (setup). The default is 2 minutes, you may also set the
timer to 5 minutes or off.
Wide-angle
Telephoto
USER GUIDE 21
Page 22
Recording video
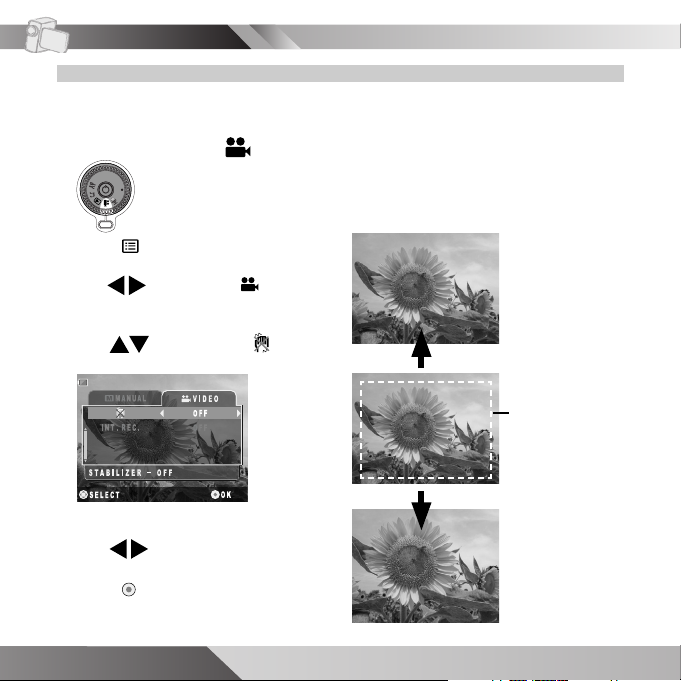
Using stabilizer
This feature will reduce shaking during video recording.
1. Set the Mode dial to .
2. Press (Menu button).
3. Use to select the VIDEO
tab.
4. Use
(Stabilizer).
5. Use to toggle to ON.
6. Press to confi rm.
22 USER GUIDE
to navigate to
NOTE:
This feature may magnify your
frame depending on your current
magnifi cation level.
Original frame
with zoom off
Preview area
with stabilizer
feature on
Actual frame
during video
recording
Page 23

Taking photo
1234
00:02:34
A
AEL
1
Using self-timer
Self-timer allows the device to capture photos 10 seconds after the (Shutter
button) is pressed.
1. Use
to set self-timer.
2. Self-timer icon
3. Press (Shutter button), camera will capture a photo after 10
seconds count-down.
4. To turn off self-timer, press
10 seconds count-down Photo captured
A
00:02:34
1234
again.
A
00:02:34
1234
10
AEL
AEL
displays on screen.
USER GUIDE 23
Page 24

Taking photo
1234
00:02:34
A
Using fl ash
Flash is effective when taking photos under poor lighting conditions. The default
setting is OFF, however you may manually switch the Flash to AUTO or to
Red-Eye Reduction.
How to set Flash
1. Press
repeatedly to select the Flash
2. Flash icon displays on screen.
option.
Flash modes
(Off)
(Default)
(Auto)
(Red-eye)
(Off): Flash does not strobe regardless of surroundings brightness.
(Auto): Detects surrounding brightness and determines whether Flash is
required.
(Red-eye): Strobes once prior to shooting to reduce red-eye phenomenon.
Note: Flash requires to be charged after each time used, a green LED and
a flash icon will blink while it is charging. Both indicators will return to steady
mode when the flash is ready to use again.
24 USER GUIDE
Page 25

Recording audio
Recording audio
1. Set the Mode dial to .
2. Press
recording.
3. Press to pause recording.
4. Press (Record button) again or (Menu button) to stop audio
recording.
Changing audio recording quality
There are two quality selections for audio recording: SP and LP. SP is set as
default. To change the audio quality:
1. Press (Menu button) at (audio recording)
mode.
2. Select the audio quality and press .
(Standard Play): Higher audio quality, but larger fi le size.
(Long Play): Longer recording time, but lower audio quality.
(Record button) to start audio
USER GUIDE 25
Page 26

Playback
Playing back recorded fi les
1. Set the Mode dial to
Recorded fi les display in thumbnail on the LCD screen.
2. Use to navigate through
the index.
.
3. Press once to enter and
twice to play video or audio
fi le.
4. Press
audio play.
(Menu button) to stop video or
Viewing on a computer
Installing CD
The installation CD contains software and information needed for operation.
Please follow the instructions below to complete the software installation.
1. Insert the Software CD to your CD-ROM drive or
DVD-ROM drive. The Select Language dialogue
box appears.
2. Select your preferred language and press OK to
continue.
3. A Welcome dialogue box appears, press Next.
26 USER GUIDE
Page 27

4. The Select Components dialogue box appears.
Select the software you wish to install and press
Next.
5. The Select Program Folder dialogue box
appears telling you that setup program is about
to add a program icon to your system, you can
change the folder name listed in the text box, or
simply press Next to continue.
6. The Start Copying Files dialogue box appears
confi rming that the listed software will be installed.
Press Next to continue.
7. Follow the on-screen instructions to continue and
complete the installation.
8. Restart your computer.
Playback
USER GUIDE 27
Page 28

Playback
Mass storage
Through mass storage mode, the device becomes a storing device that allows
to store, access, and delete data similar to your local hard disk. To setup MASS
STORAGE follow the instructions below.
1. Connect the device to a computer
with the USB cable provided in the
package.
2. Power ON the device.
3. Select MASS STORAGE from
the OSD menu press to
enter.
MASS STORAGE
DIRECT PRINT
OKSELECT
4. The following screen will appear
for 2 seconds before entering
MASS STORAGE.
IMPORTANT!
Please do not copy any fi les into the DCIM folder of your camera. Otherwise it
may cause the camera to become unstable or crash. We strongly recommend
you to move your images to your hard disk before applying any change.
5. Launch MAX Console, from the left
panel select DCIM/100MEDIA folder
for audio clips, videos and pictures
and select the MUSIC folder for
music fi les.
6. Use Drag and Drop method to copy
fi les to your computer or vice versa.
28 USER GUIDE
Page 29

Playback
File storage destination
Folder File Description
100MEDIA IMAG0001.JPG ~ IMAG9999.JPG Photo fi le
IMAG0001.WAV ~ IMAG9999.WAV
V0001.WAV ~ V9999.WAV
IMAG0001.ASF ~ IMAG9999.ASF
MISC AUTPRINT.MRK System marker for
AUTXFER.MRK
MUSIC *.MP3 Music fi le
*.WMA
: User defi ned
*
Audio fi le (recorded in
audio recording mode)
Audio fi le (recorded in
audio attaching mode)
Video fi le
DPOF fi le
USER GUIDE 29
Page 30

Music
Playing music
1. Set the Mode dial to (music).
Music list displays on the LCD screen.
2. Use to toggle through the
music list.
3. Press twice to play the music
fi le.
While playing
4. Use
to fast backward or fast
forward.
F.Bwd F.Fwd
During pause
7. Use
8. Press to resume play.
30 USER GUIDE
to fast backward or fast
forward.
F.Bwd
F.Fwd
5. Use to skip to next fi le or
return to previous fi le
6. Press to pause or (Menu
button) to stop.
9. Use to skip to next fi le or
return to previous fi le
10. Press (Menu button) to stop.
Page 31

Setup menu
Setup menu
The setup menu allows users to set up various settings such as time, TV system, frequency, speaker tone and etc.
1. Set the Mode dial to (Setup)
mode.
3. Press (Menu button) to exit.
Option Item Description
Clock set
Date
Timer
2. Use to navigate through the
menu and to confi rm.
Up
Left
Down
Right
OK
Sets the date and time.
(Please refer to page
18)
USER GUIDE 31
Page 32

Setup menu
Date format
DD/MM/YY
YY/MM/DD
Sets the date display
format. (Please refer to
page 19)
MM/DD/YY
TV system
Frequency
Beeper
NTSC
PAL
50Hz
60Hz
Melody
Off
Sets the output signal
to TV.
- NTSC for USA, Japan,
Taiwan, etc.*
- PAL for Australia,
China, Europe, etc.**
Sets the displaying
frequency.
Sets startup and
warning tones.
Normal
*NTSC system
Canada, Central America, Japan, Korea, Mexico, Panama, Taiwan, U.S.A., etc.
**PAL system
Australia, Austria, Belgium, China, Denmark, Finland, Germany, Greece,
Netherlands, Hong Kong, Malaysia, Norway, Portugal, Singapore, Spain,
Sweden, Switzerland, Thailand, Turkey, United Kingdom, Yugoslavia, etc.
32 USER GUIDE
Page 33

Setup menu
Startup screen
LCD brightness
Storage
Auto power off
Silence
Reset
Format
Default
OFF
Custom
Memory Card
Internal Memory
Never
5 Min
2 Min
Off
On
Memory Card
Internal Memory
Changes the startup
screen.
Adjusts the brightness
on the LCD screen.
Changes the storage
and playback path of
recording fi les.
Sets the time for the
device to auto shutdown
for power conservation
Sets system sound and
LED indicators
- Off will turn off all
sound and LED indicators
Restores device back to
factory default settings
Formats MMC/SD card
or internal memory
- All data including
protected fi les will be
erased
USER GUIDE 33
Page 34

Advanced operations
Advanced options
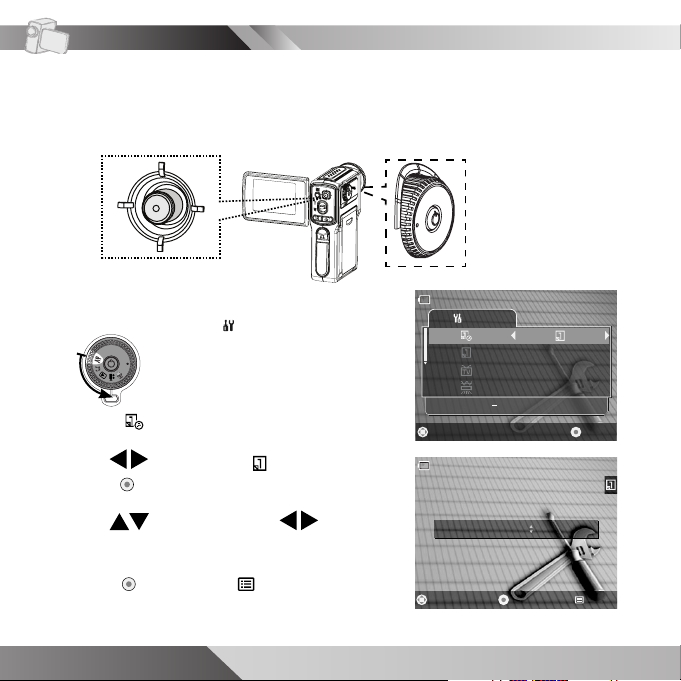
Adjusting the white balance
The level depending on surrounding lighting condition, however for optimal results, the user can manually set the white balance level according to the lighting
conditions.
1. Set the Mode dial to
2. Press the (Menu button).
3. Use the to navigate to MANUAL.
4. Use to navigate to (white balance adjustment).
5. Choose the proper white balance level for your surrounding lighting
condition.
Auto
Determines
the best white
balance level
automatically.
Fluorescent
Recording under
fl uorescent lighting
or neon signs.
6. Press
to confi rm.
.
Daylight
Recording under
sunlight conditions.
Tungsten
Recording under
yellowish lighting
conditions.
Cloudy
Recording under
cloudy conditions.
7. Press (Menu button) to exit.
34 USER GUIDE
Page 35

Adding effect
This option enriches your images by adding digital effects.
Advanced operations
1. Set the Mode dial to
2. Press the (Menu button).
3. Use the
4. Use to navigate to (Effect).
5. Choose your preferred effect.
NEGATIVE
Reverses the color and
brightness of the photo
like the negative.
SOLARIZE
Increases the
light contrast.
6. Press to confi rm.
7. Press (Menu button) to exit.
to navigate to MANUAL.
.
SEPIA
Takes the sepia-toned
photo like an old photo.
PASTEL
(photo only)
Sharpens the outline of
an object like the handdrawn photo.
B&W
Takes the photo
in black and white
color.
SKETCH
(photo only)
Takes sketcheffect photo.
USER GUIDE 35
Page 36

Advanced operations
Backlight compensation
Backlight compensation is effective when capturing or recording a backlighted
subject or when the background exposure is too strong.
1. Press twice to activate Backlight compensation.
2. Backlight compensation icon displays on screen.
A
00:02:34
1234
OFF
36 USER GUIDE
Page 37

Advanced operations
Various video options
Setting video resolution
The image resolution directly correlates to the fi le size, therefore higher resolu-
tion will have larger fi le size.
1. Set the Mode dial to
2. Press the
3. Use to navigate to
VIDEO tab.
4. Use to navigate to
(video resolution).
(Menu button).
.
5. Use
: Fine video resolution (640x480 30fps)
: High video resolution (352x288 30fps)
: Normal video resolution (320x240 30fps)
6. Press to confi rm.
7. Press (Menu button) to exit.
Setting video quality
The video quality directly correlates to the size of the fi le. High quality requires
larger fi le size.
1. Set the Mode dial to
2. Press the (Menu button).
3. Use to navigate to
VIDEO tab.
4. Use
quality).
to navigate to (video
.
to choose a video resolution.
5. Use to choose video
quality.
:Fine video quality
:Normal video quality
6. Press to confi rm.
7. Press (Menu button) to exit.
USER GUIDE 37
Page 38

Advanced operations
F
MANUAL
VIDEO
SELECT
OFF
Q
ON
OK
MOTION DETECT ON
Applying fader to video
This feature allows user to add fader to video.
1. Set the Mode dial to
.
2. Press the (Menu button).
3. Use
to navigate to
VIDEO tab.
5. Use
6. Press
7. Press (Menu button) to exit.
to choose a fader. A
preview will appear on the LCD
screen.
to confi rm.
4. Use to navigate to (fader).
Motion detect recording
This feature allows user to set the camera at one location and records when it
detects motion and stops when no motion is detected.
1. Set the Mode dial to .
2. Press the (Menu button).
3. Use to navigate to VIDEO tab.
4. Use to navigate to (motion detect).
38 USER GUIDE
Page 39

Advanced operations
1
234
00:01:15
AEL
1234
00:02:34
AEL
5. Use
to turn on or off motion
detect function.
6. Press to confi rm.
7. Press (Menu button) to exit.
Motion detected, 3
seconds count-down
AEL
00:02:34
1234
Recording
initiated
STOP
00:00:34
Motion exited, switches
back to standby mode
Interval recording
This feature sets a time interval on the device to record video with a set length
on every other interval.
1. Set the Mode dial to .
2. Press the (Menu button).
3. Use to navigate to
VIDEO tab.
4. Use to navigate to INT. REC.
5. Use
6. With the function on, use
7. Use to choose time
8. Press to confi rm.
to turn on or off the
interval record feature.
to navigate to INTERVAL.
between each interval.
USER GUIDE 39
Page 40

Advanced operations
9. Use to navigate to REC.
TIME.
10. Use to choose a record
time.
13. Use to choose elapse time.
14. Press to confi rm.
15. Press (Menu button) twice to exit.
11. Press
to confi rm.
12. Use to navigate to
ELAPSE.
1 Min
5 Min
Interval
10 Min
30 Min
Interval recording set
to record every 30
minutes for duration of
5 seconds with elapse
time of 12 hours
40 USER GUIDE
Rec.
Time
A frame from
the video clip
recorded 2
hours later
Note: To avoid power shortage, make
sure to plug in your power adapter for
extensive recordings.
Elapse
1 Hour
2 Hour
6 Hour
12 Hour
24 Hour
Full
A frame from
the video clip
recorded 12
hours later
5 Sec
10 Sec
15 Sec
30 Sec
A frame from
the video clip
recorded 6
hours later
Page 41

Advanced operations
Various photo options
Setting photo resolution
The image resolution directly correlates to the fi le size, therefore higher
resolution will have larger fi le size.
1. Set the Mode dial to .
2. Press the
3. Use the to navigate to
PHOTO tab.
4. Use to navigate to
(photo resolution).
(Menu button).
5. Use
: 6M (High, 2832x2128)
: 9M (Fine, 3504x2632)
6. Press to confi rm.
7. Press (Menu button) to exit.
Setting photo quality
The quality of the photo or video is directly correlated to the size of the fi le.
Hence higher quality will have larger fi le size.
1. Set the Mode dial to
2. Press the (Menu button).
3. Use the to navigate to
PHOTO tab.
4. Use to navigate to Q (photo
quality).
.
to choose a photo resolution.
: XGA (Economic, 1024x768))
: 3M (Normal, 2048x1536)
5. Use
Fine
High
Normal
6. Press to confi rm.
7. Press (Menu button) to exit.
to select a photo
quality.
USER GUIDE 41
Page 42

Advanced operations
Applying scene to photo
By default this device automatically detects and adjusts the photo scenario,
however for optimal results, you may select a scene manually that best fi t your
condition.
1. Set the Mode dial to
.
5. Use
to select a scenario.
2. Press the
3. Use to navigate to
PHOTO tab.
4. Use to navigate to SCENE.
Auto
Adjusts scene
automatically.
Night Shutter
Sharpens the portrait
with dark background in
dark places.
42 USER GUIDE
(Menu button).
Landscape
Enhances the contrast
of image color for the
vivid landscape photo.
Beach & Ski
Captures objects under
bright sunlight.
6. Press to confi rm.
7. Press (Menu button) to exit.
Sports
Captures fast-moving
subject.
Sunset & Moon
Captures objects under
sunset or moon lighting
environments
Page 43

Advanced operations
Attaching audio to photo
This feature allows you to add audio recording to a photo.
1. Set the Mode dial to
2. Press the (Menu button).
3. Use the
PHOTO tab.
4. Use to navigate to
(attach audio)
Note: You may also add audio to existing photos, for more detail refer to the
Edit section. (See page 53)
to navigate to
.
5. Use
6. Press
7. Press
to toggle the feature on or
off.
to confi rm.
(Menu button) to exit.
Superimposing date on photo
This option allows you to superimpose date on photos.
1. Set the Mode dial to .
2. Press the (Menu button).
3. Use the to navigate to
PHOTO tab.
4. Use to navigate to
(superimpose date).
5. Use
6. Press to confi rm.
7. Press (Menu button) to exit.
to toggle the feature on
or off.
USER GUIDE 43
Page 44

Advanced operations
Quick review
This option allows you to review the last photo you captured.
1. Set the Mode dial to
2. Press the (Menu button).
3. Use the
PHOTO tab.
4. Use to navigate to
(quick review).
to navigate to
.
5. Use
6. Press to confi rm.
7. Press (Menu button) to exit.
to toggle the feature on
or off.
Interval shutter
This feature sets a time interval on the device to take number of photos on
every other interval.
1. Set the Mode dial to .
2. Press the (Menu button).
3. Use the to navigate to PHOTO tab.
4. Use to navigate to INT. SHUT.
5. Use to turn on or off the interval shutter feature.
6. With the function turned on, use to navigate to INTERVAL.
44 USER GUIDE
Page 45

Advanced operations
7. Use to choose time between
each interval.
8. Press to confi rm.
9. Use to navigate to ELAPSE.
10. Use to choose an elapse time.
1 Min
5 Min
Interval
10 Min
30 Min
Interval shutter sets
to capture picture
every 30 minutes
with elapse time of
24 hours
Elapse
1 Hour
2 Hour
6 Hour
12 Hour
24 Hour
Full
Photo taken 6
hours later
11. Press to confi rm.
12. Press (Menu button) twice
to exit.
Photo taken
12 hours later
Photo taken 24
hours later
USER GUIDE 45
Page 46

Advanced operations
Using automatic exposure lock
AEL (Automatic Exposure Lock) allows the device to lock the exposure while
taking a photo.
How to set AEL
Focus on the object which you wish to lock the exposure, then select AEL to
lock the exposure.
1. Use
to activate AEL.
2. AEL icon displays on screen.
A
00:02:34
46 USER GUIDE
1234
AEL
Page 47

Various playback options
Displaying single or multiple images
1. Set the Mode dial to .
Recorded fi les display an index of six on the LCD screen.
T
SELECT VOL
W
2. Press to display image .
SELECT EXIT
3. Press (Menu button) to return to index.
13/34
13/34
Advanced operations
USER GUIDE 47
Page 48

Advanced operations
Enlarging or reducing photo viewing size
1. Set the Mode dial to .
2. Use to navigate to the
photo you wish to view.
3. Press to switch to single photo
viewing.
4. Press ZOOM lever to zoom in/out
of the photo. T zooms into the
photo, W zooms out of the photo.
5. Use to move to portion of
the photo.
6. Press (Menu button) to return to
original size.
MOVE
48 USER GUIDE
13/34
EXIT
MOVE
13/34
EXIT
Page 49

Advanced operations
Turning off information icons
This feature allows the device to turn off the information icons automatically
while playing back fi les.
1. Set the Mode dial to
.
3. Use
to navigate to
(Information).
to switch it auto off or
on.
2. Press the (Menu button) to bring
up the menu.
4. Use
5. Press confi rm.
Searching video or audio fi les
This feature allows users to play the fi rst 10 seconds of all playable (video &
audio) fi les.
1. Set the Mode dial to .
2. Press the (Menu button) to bring
up the menu.
PLAYBACK
AUTO OFF
A
SEARCH
ENTERSELECT
T
SELECT VOL
W
3. Use
to navigate to
(search).
4. Press to start to search.
5. Use to skip to next or return
to previous fi le.
6. Press (Menu button) to stop.
00:00:02
STOP
USER GUIDE 49
Page 50

Advanced operations
Playing back photos (slide show)
1. Set the Mode dial to .
2. Press the (Menu button) to
bring up the menu.
3. Use to navigate to (slide show).
4. Press to start the slide show.
5. Use
previous fi le.
6. Press (Menu button) to stop.
to skip to next or return to
Playing back all fi les
This feature allows users to play all recorded fi les (photo, video, audio). Photo
will display for 5 seconds and video & audio will be played at their full lengths.
1. Set the Mode dial to .
2. Press the (Menu button) to
bring up the menu.
3. Use to navigate to (play
all).
50 USER GUIDE
4. Press
5. Use to skip to next or return to
6. Press (Menu button) to stop.
to start to play.
previous fi le.
Page 51

Advanced operations
Playing back fi les on TV screen
Users have the option to playback photos or videos on the LCD screen for
convenient reviewing or on your TV screen for broad audience viewing. To
playback fi les on TV, follow the procedures below.
A/V Cable
1. Connect the device to a TV set with the AV cable.
2. Connect yellow end of the cable to the Video input (yellow) jack on your TV
set.
3. Connect the red and white ends of the cable to the Audio input (red, white)
jacks on your TV set.
A/V jack
USER GUIDE 51
Page 52

Advanced operations
Editing
Applying a theme to photo (memory mix)
This option digitally applies decoration effects to photos.
1. Set the Mode dial to .
5. Use
and to change theme.
to choose a photo
2. Press the (Menu button) to bring
up the menu.
3. Use to navigate to (memory
mix).
4. Press to enter.
PLAYBACK
MEMORY MIX
T
SELECT VOL
W
ENTERSELECT
13/35
52 USER GUIDE
6. Press
to save the photo as a
new fi le.
7. Press the (Menu button) to
return to index.
13/34
SAVE AS?
OKSELECT EXIT
Page 53

Rotating photo
OKSELECT EXIT
13/34
SAVE ?
1. Set the Mode dial to .
Advanced operations
5. Use
and to rotate it 90
degree each time.
to choose a photo
2. Press the (Menu button) to bring
up the menu.
3. Use to navigate to (rotate).
4. Press to enter.
PLAYBACK
ROTATE
SELECT VOL
T
W
ENTERSELECT
13/34
6. Press confi rm and save.
7. Press the
exit.
SAVE ?
OKSELECT EXIT
(Menu button) to
13/34
USER GUIDE 53
Page 54

Advanced operations
Attaching audio to photo
1. Set the Mode dial to .
2. Press the (Menu button) to bring
up the menu.
3. Use to navigate to (attach
audio).
4. Press to enter.
PLAYBACK
ATTACH AUDI O?
5. Use
to choose a photo you
wish to attach audio.
6. Press (Record button) or
to start audio recording.
7. Press
to pause or resume
recording.
8. Press (Record button) or
(Menu button) to stop and save
audio to photo.
13/34
ATTACH AUDIO
T
SELECT VOL
W
54 USER GUIDE
ENTERSELECT
13/34
00:01:30
SELECT
STOP
OK
EXIT
00:00:05
Page 55

Marking photo for print
1. Set the Mode dial to .
5. Use
mark or unmark.
Advanced operations
to choose a photo to
2. Press the (Menu button) to
bring up the menu.
3. Use to navigate to DPOF
then select (print mark).
4. Press to enter.
Marking photo for E-mail
1. Set the Mode dial to .
2. Press the (Menu button) to
bring up the menu.
3. Use to navigate to DPOF
then select (E-mail mark).
4. Press to enter.
6. Press to confi rm.
7. Press
5. Use
unmark.
6. Press to confi rm.
7. Press (Menu button) to exit.
(Menu button) to exit.
to choose a fi le to mark or
USER GUIDE 55
Page 56

Advanced operations
Protecting fi le from accidental delete
This allows you to protect a fi le from being accidentally deleted.
1. Set the Mode dial to
.
2. Press the (Menu button) to bring
up the menu.
3. Use
PLAYBACK
DPOF
LOCK
to navigate to (lock).
ENTERSELECT
56 USER GUIDE
4. Press
5. Use
to enter.
to choose a fi le to lock or
unlock.
6. Press
to confi rm.
Note: Press (Menu button) at anytime to abort.
13/34
T
SELECT VOL
W
UNLOCK?
OKSELECT EXIT
LOCK?
OKSELECT EXIT
or
14/34
14/34
Page 57

Deleting fi le
OK
DELETE ALL?
EXIT
1/1
SELECT VOL
W
T
1. Set the Mode dial to .
2. Press the (Menu button) to
bring up the menu.
Advanced operations
5. Press
6. To delete a single fi le, use
7. Press
to enter.
to choose the fi le you wish to
delete.
to confi rm.
3. Use
to navigate to
(delete fi le).
4. Use to choose to delete
a
(single fi le) or (all fi les)
within the folder.
PLAYBACK
DPOF
DELETE ONE
Note: You cannot delete the file if it
is
locked.
Note: Press (Menu button) at
anytime to abort.
13/34
DELETE ONE?
ENTERSELECT
OKSELECT EXIT
Exit
T
SELECT VOL
W
13/33
or
Protected
USER GUIDE 57
Page 58

Advanced operations
Direct print
Direct Print provides a direct connect solution for the device to communicate
with printers. If you connect the device to a PictBridge™ compliant printer,
the photos stored in the device can be printed directly without connecting to any
computers or third party devices.
Step 1. Connecting to a printer
Connect the device to a printer via
a USB cable.
Step 3. Selecting DIRECT PRINT
Select DIRECT PRINT from the OSD menu of the device. Make sure the
device is connected to a PictBridge™ compliant printer then press
MASS STORAGE
DIRECT PRINT
Step 2. Turning ON the device
Power ON the device.
to enter.
SELECT
58 USER GUIDE
OK
Page 59

SELECT
1/5
EXITOK
Photo Set
Step 4. Selecting Photos
Marking Particular Photo for Print
Use to select the tab then use
to highlight (select photo) from the menu. Use
to change to BROWSE then press to enter. An
index will appear displaying
all fi les. Press
a photo, a printer icon will
appear on the selected
photo. When the selection
is done, press (Menu
button) to exit.
Marking All Photos for Print
Use
to select the tab then use to
highlight (select photo) from the menu. Use to
change to ALL then press to confi rm.
Step 5. Enhancing Photo Quality
Scroll down to (optimal). The default setting
is OFF. To change the setting, Use to set
optimal option ON or OFF. Press to confi rm.
to select
Advanced operations
USER GUIDE 59
Page 60

Advanced operations
Step 6. Setting Number of Copies
Scroll down to (copies). The default setting is
1. To change the value, use to increase or
decrease number of copies. Press to confi rm.
Paper Set
Step 7-1. Setting Paper Size
Select tab on the top, then use to highlight (size) from the
menu. Use to change the paper size. Press to confi rm.
60 USER GUIDE
Page 61

Advanced operations
Step 7-2. Setting Paper Type
Scroll down to (paper). Use to select a paper
type then press to confi rm. Please be aware that some
paper types are not available in certain paper sizes.
Step 7-3. Setting Border
Scroll down to (border). Use to set border ON or
OFF then press to confi rm.
Step 8. Printing
Scroll down to . Press to print.
Note: When the device is connected to a computer under Direct Print mode,
Windows OS will ask for a device driver. We do not provide such driver.
USER GUIDE 61
Page 62

Advanced operations
Various music options
Repeating music
1. Set the Mode dial to (music).
2. Use to select a music.
3. Press (Menu button) to bring
up the menu.
4. Use to navigate to
(Repeat).
MUSIC
5. Use to choose a repeat
mode.
: Normal playback, repeat is off.
: Repeat current playing music.
: Repeat all of the music within
the folder.
: Play music within the folder in
random order.
6. Press to confi rm.
Note: Press (Menu button) at
anytime to abort.
MUSIC
REPEAT OFF
MUSIC
REPEAT RANDOM
SELECT
62 USER GUIDE
OKSELECT
OK
REPEAT ONE
MUSIC
REPEAT ALL
SELECT
OKSELECT
OK
Page 63

Advanced operations
VOLSELECT
W
T
ARTIST :
ALBUM:
LENGTH:
TYPE :WMA
02:23
STOP
SONG001
00:03
Searching music
This feature allows you to play the fi rst 10 seconds of music fi les so that you
can easily search a music fi le that you do not recognize by name.
1. Set the Mode dial to
(music).
2. Press (Menu button) to bring up the menu.
3. Use to navigate to (search).
4. Press to confi rm.
5. Press (Menu button) to stop.
MUSIC
SEARCH
SELECT
ENTER
USER GUIDE 63
Page 64

Advanced operations
Protecting music from accidental delete
This feature protects music fi le from accidental delete.
1. Set the Mode dial to
(music).
4. Press to enter.
5. Use to select a music.
2. Press (Menu button) to bring
up the menu.
3. Use
to navigate to (lock).
MUSIC
LOCK
SELECT
SONG001
SONG002
SONG005
TRACK001
TRACK006
TRACK012345678912345~
SELECT EXITUNLOCK
ENTER
Locked Unlocked
12/34
64 USER GUIDE
6. Press
to lock or unlock music fi le.
Note: Press (Menu button) at anytime
to abort.
SONG001
SONG002
SONG005
TRACK001
TRACK006
TRACK012345678912345~
SELECT EXITLOCK
12/34
Page 65

Deleting music
SONG001
SONG002
SONG005
TRACK001
TRACK006
TRACK012345678912345~
DELETE ALL?
EXITOK
NO MP3 OR WMA FILE!
SONG001
SONG005
TRACK001
TRACK006
TRACK012345678912345~
SONG002
12/34
SELECT EXITOK
SONG001
TRACK001
TRACK006
TRACK0090090 09009009~
TRACK100
SONG005
12/34
SELECT EXITOK
1. Set the Mode dial to (music).
Advanced operations
5. Press display music list.
6. Use to select a music.
2. Press (Menu button) to bring
up the menu.
3. Use
fi le).
4. Use
to navigate to (delete
to choose to delete
(single fi le) or
the folder.
MUSIC
DELETE ONE
MUSIC
DELETE ALL
(all fi les) within
ENTERSELECT
ENTERSELECT
7. Press again to delete fi le.
Notes:
• You cannot delete the file that is
locked.
• Press (Menu button) at anytime
to abort.
USER GUIDE 65
Page 66

Additional information
PM
02:36
'05 /0 1/01
AEL
NEGATIVE
X1 . 5
1234
00:02:34
Understanding screen indicators
Indicators for video recording and photo taking
2 3 4
Battery indicator
1
2
Memory locator
3
Self-timer indicator (photo)
4
Flash indicator (photo)
5
Current saving folder indicator
6
Photo resolution indicator (photo)
7
Video resolution indicator (video)
8
Time remaining for video recording
9
Picture remaining
10
White balance indicator
11
Scene indicator (photo)
12
Effect indicator
13
AE-lock (photo)/backlight
compensation indicator
66 USER GUIDE
1
15
16
17
18
19
20
21
22
23
5 76
8
14
Attach audio indicator (photo)
15
Zoom
Motion detect (video)
16
17
Stabilizer indicator (video)
18
Zoom ratio
19
Date
20
Superimposing date on photo
21
Time
22
Quick review indicator (photo)
23
Menu
9
10
11
12
13
14
Page 67

Indicators for playback
Additional information
1
11
SELECT VOL
Battery indicator
1
Memory locator
2
E-mail mark indicator
3
Print mark indicator
4
Current folder indicator
5
6
Photo resolution
Attach audio indicator
7
File protection indicator
8
Current selected fi le index
9
10
Total recorded fi les
00
T
W
3 465117
2
Menu
8 9 10
13/34
12
SELECT VOL
Playing progress bar
12
13
Played time
14
Video resolution
14
00
T
W
00:00:32
13/34
13
STOP
/
USER GUIDE 67
Page 68

Additional information
Indicators for audio recording
Before recording While recording
1
4
32
S
P
5
00:02:34
P
S
00:00:01
7
6
REC
1
Battery indicator
2
Memory locator
3
Current folder indicator
4
Record quality indicator
5
Recordable time
6
Menu
68 USER GUIDE
RECORDING
STOP
7
Recording indicator
8
Recorded time
8
Page 69

VOLSE LECT
W
T
/
ARTI ST :
ALBUM:
LENGTH:
TYPE :WMA
02:23
STOP
SONG001
00:03
13/34
Indicators for music playing
2 3 4 5 6
1
Additional information
1
2
3
4
5
6
7
8
9
SONG001
SONG002
SONG005
9
TRACK001
TRACK006
TRACK012345678912345~
T
8
VOLSELECT
W
Battery indicator
Memory locator
Repeat mode indicator
File protection indicator
Current track counter
Total tracks counter
Current track length
Menu
File name
12/34
02:23
12
7
11
10
Playing time
11
Playing bar
12
Song information
10
USER GUIDE 69
Page 70

Additional information
Function
Image Sensor
Lens
Digital Zoom
Display
Startup screen setting
Storage option
MMC/SD card hot swap
Shutter speed
Auto focus
Flash
Exposure control
White balance
Digital effect
Memory card slot
Internal memory
Microphone
Interface
LCD panel rotation
Motion detect
Television System
Battery Type
Power Source
Operating Temperature
Humidity
70 USER GUIDE
Focal Length
Aperture Ratio
Specifi cations
Digital Camcorder, Digital Still Camera, Digital
Voice Recorder, Music Player, Video Camera,
MMC/SD Card Reader
3 Mega CMOS
f = 8.6 mm
F3.0
8X
2.0” TFT LCD
Default, Custom, Off
Internal/External
Yes
1/15 sec. ~ 1/2500 sec.
Fixed
Built-in
Auto
Auto, Daylight, Cloudy, Fluorescent, Tungsten
Negative Art, Sepia, B&W, Solarize, Pastel, Sketch
MMC/SD slot
32 MB
Built-in
USB 2.0, A/V Out, Earphone, DC-IN
-90 to 270 degrees
Yes
NTSC/PAL
Rechargeable Li-ion battery (1650mAh)
DC-in (Charger inside/power adapter)
0°C ~ 40°C
80% RH non-condensing
Page 71

Resolution
Fine
High
Normal
Additional information
Digital Camcorder
640 x 480 (30 fps)
352 X 288 (30 fps)
320 X 240 (30 fps)
Quality
File Format (Video)
Resolution
Quality
Self-Timer
File Format (Image)
Scene Mode
Fine
Normal
Fine
High
Normal
Economic
Normal
High
Fine
Low compression rate
High compression rate
ASF fi le (MPEG-4 compatible)
Digital Still Camera
3504 x 2632 [9M] (H/W enhanced)
2832 x 2128 [6M] (H/W enhanced)
2048 x 1536 [3M]
1024 x 768 [XGA]
High compression rate
Normal compression rate
Low compression rate
10 seconds delay
JPEG compatible
Auto, Landscape, Sport, Night Shutter,
Beach & Ski, Sunset & Moon
USER GUIDE 71
Page 72

Additional information
File Format
Digital Voice Recorder
File Format MP3 and WMA compatible
System Requirements Pentium 800 MHz processor or higher
Mass Storage Support Win 98SE (Driver included), Me,
WAV compatible
Music Player
Mass Storage
Microsoft Windows 98SE, Me, 2000, XP
Available USB port
Super VGA card and colour monitor
CD-ROM or DVD-ROM drive
At least 128 MB of RAM
200 MB of available HD space
2000 SP3 or above, XP
MAC OS 9.X and OS 10.1 or above
72 USER GUIDE
 Loading...