

Page 1
1 2
■
Ice tray
Fill tray 3/4 full to allow expansion of water during freezing. Place tray in freezer
chest. To release cubes, twist lid slightly.
■
Removable shelf
Shelves can be removed by pulling forward. The shelf can be placed at your
desirable position.
■
Freezer Shelf
To remove the freezer shelf!
1. Remove the screw on the left of inside freezer shelf with screw driver.
2. Push the shelf hooks to the back slightly and remove it by lifting off the slots of
bottom side.
3. Reverse procedure to install.
■
Defrost Drain Vessel
To remove defrost drain vessel.
1. Lift the defrost drain vessel slightly, then rotate bottom out and pull it down.
2. Reverse procedure to install.
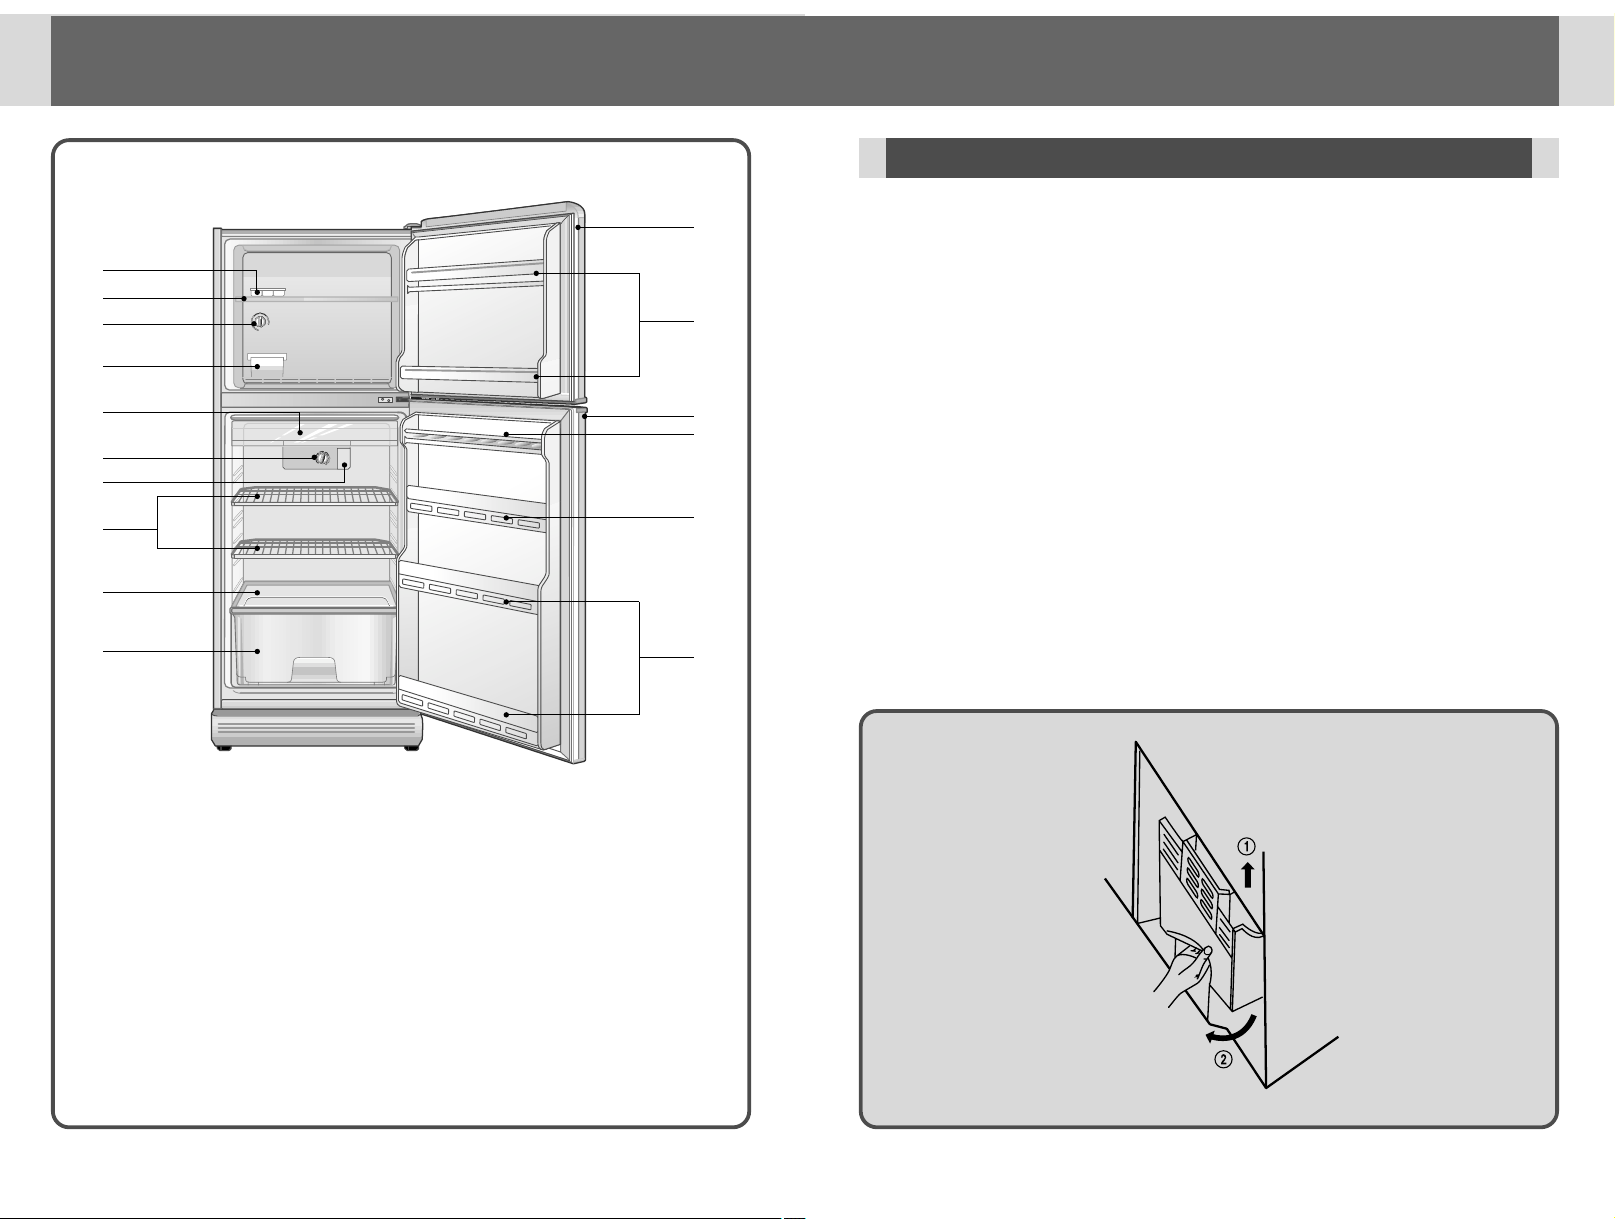
Take a moment to know all the features and convenience it was designed to provide.
Numbers match those in the illustration on page 1.
Here are the features of your new refrigerator.
!
@
&
)
*
(
%
#
$
^
2
1
3
4
5
6
!
FREEZER DOOR GASKET
@
FREEZER POCKET
#
FREEZER REMOVABLE SHELF
$
FREEZER TEMPERATURE
CONTROL KNOB
%
ICE TRAY
^
ICE BOX
&
REFRIGING-ROOM DOOR GASKET
*
EGG POCKET
(
REFRIGING-ROOM POCKET(SMALL
)
)
REFRIGING-ROOM POCKET(LARGE
)
1
LAMP COVER
2
REFRIGERATOR TEMPERATURE
CONTROL KNOB
3
REMOVABLE SHELF (LARGE)
4
GLASS SHELF
5
VEGETABLE BOX
6
CHILLED TRAY
FE ATURE CHART
Page 2
4
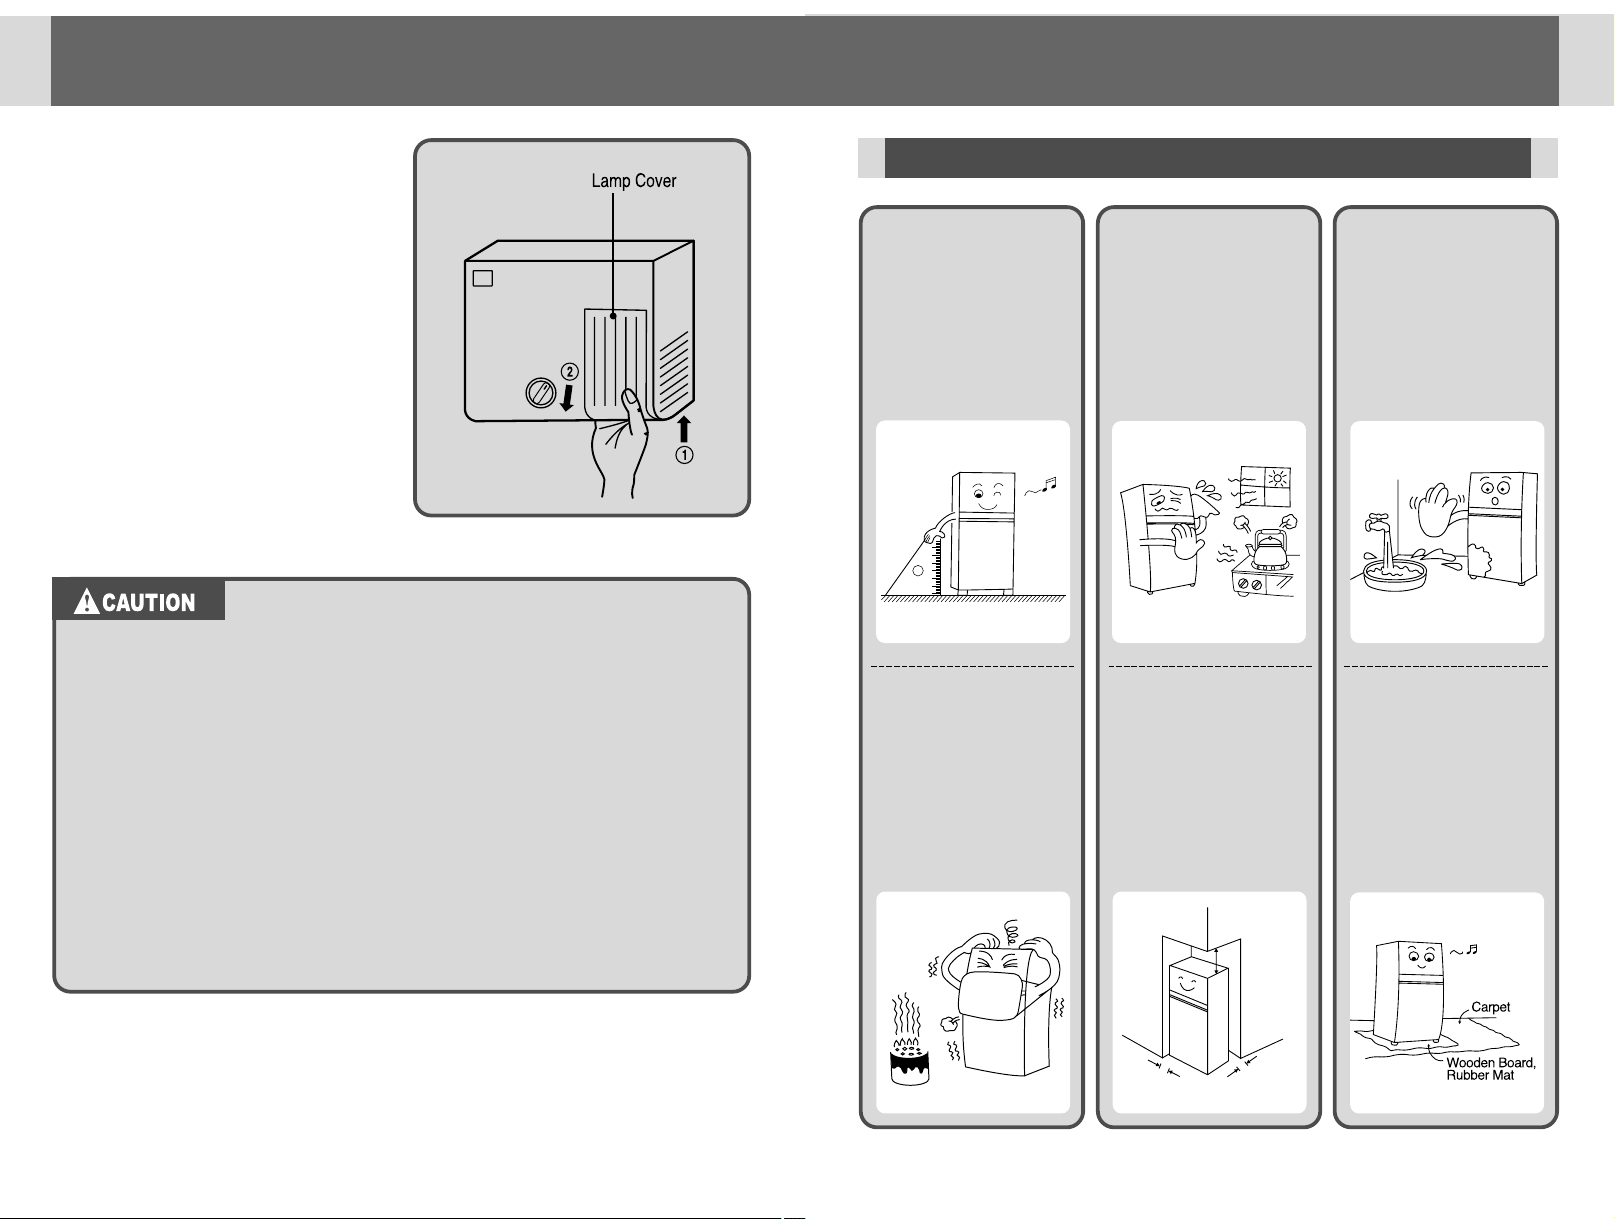
■
Lamp Cover
To remove lamp cover
1. Push up the bottom ends of lamp
cover gently, then pull out.
2. Reverse procedure to install.
■
Vegetable Crisper
May be used for fruit and vegetable
storage. Both the crisper and its cover
shelf are removable for easy cleaning.
Simply slide forward to remove.
■
Egg Pocket
Egg supporter in this pocket can be
turned upside down.
May be used for small size goods.
3
1. SAFE INSTALLATION PLACE FOR YOUR REFRIGERATOR
1. Check your voltage before inserting the power supply cord into the
socket.
2. Contact the earthing conductor to this unit with an attachment
earthing screw.
3. Don t make it spill to this unit.
4. Don t work with flammable spray, such as painting, near this unit.
5. Don t put ignitable materials, such as benzine, L.P. Gas, alcohol,
etc., into this unit.
6. Precaution to the leakage of any gas equipment near this unit.
7. Precaution not to hold on to the door of this unit by children.
8. Precaution not to reinsert the power supply cord within 5 minutes
after release it from socket. If not, a trouble may be occured to
compressor.
NO
NO
•Place your refrigerator
where there is no heat
source nearby.
High surrounding
temperature will lower
cooling efficiency and
increases your
electricity bill.
•Place the refrigerator
in an area with low
moisture.
Splashing water or a
high moisture area
may cause a short
circuit and make
rusting easier.
•Avoid places that are
exposed to smoke.
The discoloring can
occur to the
refrigerator.
At least 6cm
At least 6cm
At least 30cm
•For good ventilation
place refrigerator with
the spaced specified
on the figure.
This helps cooling
efficiency and lowers
the electricity bill.
•Placing the refrigerator
on the carpet may
cause heat to develop
and discolor the
appliance. In such a
case put a hard
wooden board or a
rubber mat between
the refrigerator and the
carpet.
•Place the refrigerator
on hard and level
floor.
METHODS OF SAFE INSTAL LATION
Page 3

65
Check
•Check if the doors are
completely shut.
•Unplug the power
cord.
Adhesive
Tape
•Fasten the interior
components with tape.
•Take food out of the
refrigerator
compartments.
•For relocating indoors
use the wheels.
R
elocating
Indoors
Adhesive Tape
•When moving have
two people carry the
refrigerator for safety
•Fasten the doors with
tape while moving to
prevent them from
opening.
Safe installation
place
Maintain ~
Level
Components to their
original places
Check
Plug in after
about hour
Put food after
2~3 hours
•Level the refrigerator
by using the
adjustable foot.
•Install the parts to their
own place.
•Select a safe place to
install your refrigerator.
•After running the
refrigerator for 2 ~ 3
Hours put food in the
refrigerator.
•Check the voltage and
wait about an hour
before plugging the
power cord into an
outlet.
2. INSTALLATION STEPS
3. THINGS TO KNOW BEFORE MOVING OR RELOCATING THE REFRIGERATOR!
Page 4

87
•When cleaning your
refrigerator, unplug the
power cord and use a
soft cloth and
dishwashing liquid to
clean.
Soft cloth
Soft cloth
•Use a soft cloth for
cleaning the interior
and exterior of the
refrigerator.
•The refrigerator can
smell on its initial
operation, but the
odour will be away
when the refrigerator
is cooled sufficiently.
•Do not splash water
directly on the
refrigerator itself.
W
a
te
r
C
om
ponents to their
original places
•Put the parts back to
their original position.
4. CLEANING YOUR REFRIGERATOR
■
If you want, the refrigerator door to close when not held open, adjust glides
so that the front of the refrigerator is raised. However, front corners must be level
with each other, and rear corners with each other.
■
If you want the refrigerator door to remain motionless when open, adjust the
leveling glides so that all four corners are level with each other.
■
Select a place with strong level floor.
■
Allow 6cm of space between the
refrigerator s side and the wall.
Make sure all packing material is removed. If the shipping tape has left a
residue on the door, touch the residue lightly with the adhesive side of tape
or with isopropyl alcohol (most rubbing alcohol is this type).
Install refrigerator in a convenient location away from extreme heat and
cold. Allow sufficient clearance about 6 cm between the refrigerator and
rear wall so it is easy for refrigerator to radiate heat.
Location
Level refrigerator so it rests solidly on the floor , without rocking. There
are two leveling glides, one at each front corner . T urn to the left to raise
a corner, to the right to lower it. Use shims under rear corners, if
necessary.
Leveling
HOW TO INSTAL L
Page 5

10
HOW TO OPERATE
9
■
Turn TEMPERATURE CONTROL toward MAX for colder temperature in
refrigerator and freezer sections, and toward MIN for warmer temperature in
refrigerator and freezer sections
■
Allow approximately 12 hours or overnight for the temperature to stabilize,
Then check to see if further adjustments are necessary.
Disconnect the power supply cord. Remove ice tray and food. Leave doors
ajar for air circulation and dehumidification of both sections.
To Avoid The Risk of Electrical Shock or Death unplug the power cord
before replacing a burned out light bulb or cleaning.
Interior and Exterior
1. DO NOT USE abrasive, heavy-duty Powders, etc.
These can scratch and dull the surface, depending on their abrasiveness
and the cleaning pressure applied.
Avoid metal pads and abrasive impregnated plastic, nylon and cloth pads,
etc.
2. DO NOT USE concentrated liquid dishwashing detergent (disslove in warm
water before using.), abrasive cleaners, solvents or polishing agents on
plastic parts. These cleaners may cause cracking or discoloring.
Remove all food and special compartments from the freezer and
refrigerator sections.
Exterior :
Wash with warm, soapy water, rinse and dry.
Use appliance polish or wax periodically to keep the exterior looking
like new.
Door gasket :
Clean at least twice a year with mild soap and water. Rinse and dry.
Apply a light film of petroleum jelly to the gaskets to keep them soft.
Interior :
Wash the liner with warm, soapy water, rinse and dry.
To turn off refrigerator
DEFROSTING THE REFRIGERATOR
Temperature is controlled automatically. The TEMPERATURE CONTROL at the inside
of the refrigerator and freezer section control the degree of cooling of each compartment.
1. Clean the refrigerator thoroughly. Wipe the outside with a soft dry cloth, the
inside with a damp cloth.
2. Set TEMPERATURE CONTROL at MED.
3. Connect the power supply cord.
Many factors influence the internal temperature of the refrigerator section
and freezer section
■
The temperature and humidity of the home.
■
The frequency of door openings and the amount of warm food placed in the
refrigerator.
■
The combination of foods and containers stored in the refrigerator.
For these reasons, you may want to adjust the control to suit the season
and your needs. When adjusting the temperature:
MED.
MAX.
OFF
MIN.
MED.
MAX.
MIN.
To change temperature
Starting your new refrigerator
Freezer temperature control
The control has three settings from MIN to MAX.
Refrigerator temperature control
TEMPERATURE CONTROL
It is defrosted automatically in the refrigerator. You don t need to defrost the
refrigerator.
Page 6

■
Thank you for selecting this refrigerator.
■
Before using this refrigerator, please read this manual carefully.
REFRIGERATO R
INSTRUCTION MANUAL
WHAT TO DO ...
11
When out of operating for a long time.
■
Remove the power supply cord.
■
Dry your refrigerator, opening the door for 2-3 days.
When you get ready to move.
■
Securely fasten removable interior parts (or move and package them
separately).
■
Do not lay your refrigerator horizontally, otherwise compressor may be get
damaged.
If the refrigerator is not operating:
■
Is the power supply cord unplugged?
■
Is home fuse blown or circuit breaker off?
If refrigerator is warmer than usual:
■
Has the door been open frequently or for a long period?
■
Is refrigerator overcrowded preventing good air circulation?
■
Is the clearance between side and rear plate of the refrigerator and the wall
allowed sufficiently?
If there are unusual sounds:
■
Is refrigerator placed on the level?
■
Are foreign objects behind the refrigerator?
■
Are dishes on refrigerator shelves vibrating?
If so, re-arrange the dishes.
When you need service; Before calling for service check
a few things noted below for yourself first.
Improper use of the grounding plug can result in a risk of electric
Shock. If a grounding adapter is used, make sure the receptacle box is
fully grounded.
If the supply cord is damaged, it must be replaced by the manufacturer or its
service agent or a simmilary qualified person in order to avoid a hazard.
Model No.: A ON-B51
 Loading...